本指南介绍了如何使用 virsh、xm、vmm 和 xend 来配置、创建和监控红帽企业 Linux 5 上的虚拟客户机操作系统。
如果你在《红帽企业版 Linux 虚拟化指南》发现了错误,或者想完善本指南,我们乐意接受你的建议!你可以在 Bugzilla(http://bugzilla.redhat.com/bugzilla/)里提交关于红帽企业版 Linux 和虚拟化指南的报告。
红帽虚拟化系统是多层的,它由专用的红帽虚拟化组件驱动。红帽虚拟化系统可以支持多个客户机操作系统。每个客户机操作系统都运行在自己的域里。红帽虚拟化系统在虚拟机内调度虚拟 CPU 来最好地利用可用的物理 CPU。每个客户机操作系统都处理自己的应用程序。这些客户机操作系统也相应地调度每个应用程序。
The hypervisor (Red Hat's Virtual Machine Monitor) is a virtualization platform that allows multiple operating systems to run on a single host simultaneously within a full virtualization environment. A guest is an operating system (OS) that runs on a virtual machine in addition to the host or main OS.
With Red Hat Virtualization, each guests memory comes from a slice of the host's physical memory. For paravirtual guests, you can set both the initial memory and the maximum size of the virtual machine. You can add (or remove) physical memory to the virtual machine at runtime without exceeding the maximum size you specify. This process is called ballooning.
你可以用许多虚拟 cpu(称为 vcpu)来配置每个客户机。虚拟机管理程序按照物理 CPU 的负载来调度这些 vcpu。
虚拟网络接口(Virtual networking interface)运行在客户机上。象虚拟以太网卡(VNIC)一样,其他接口可以运行在客户机上。这些网络接口用永久的虚拟 MAC 地址配置。新安装的客户机会缺省安装 VNIC,它的 MAC 地址从一个有着一千六百万地址的储备池里随机选取,所以两个客户机接受相同 MAC 地址是不太可能的。有着大量客户机的复杂站点可以手工分配 MAC 地址来确保在网络里的唯一性。
你可以配置任何客户机来使用虚拟图形控制台(graphical console),这对应于物理主机上的普通的显示控制台。对于完全和半虚拟化客户机你都可以使用它。它具有标准的图形适配器的特征,如引导信息、图形化引导、多个虚拟终端以及 X 窗口系统。你也可以使用图形化键盘来配置虚拟键盘和鼠标。
Guests can be identified in any of three identities: domain name (domain-name), identity (domain-id), or UUID. The domain-name is a text string that corresponds to a guest configuration file. The domain-name is used to launch the guests, and when the guest runs the same name is used to identify and control it. The domain-id is a unique, non-persistent number that gets assigned to an active domain and is used to identify and control it. The UUID is a persistent, unique identifier that is controlled from the guest's configuration file and ensures that the guest is identified over time by system management tools. It is visible to the guest when it runs. A new UUID is automatically assigned to each guest by the system tools when the guest first installs.
Red Hat Virtualization's paravirtualization mode allows you to utilize high performance virtualization on architectures that are potentially difficult to virtualize such as x86 based systems. To deploy para-virtualization across your operating system(s), you need access to the paravirtual guest kernels that are available from a respective Red Hat distro (for example, RHEL 4.0, RHEL 5.0, etc.). Whilst your operating system kernels must support Red Hat Virtualization, it is not necessary to modify user applications or libraries.
要检查是否用于 Intel 支持的 CPU flags,键入下面的命令:
grep vmx /proc/cpuinfo
grep vmx /proc/cpuinfo
Copy to ClipboardCopied!Toggle word wrapToggle overflow
Copy to ClipboardCopied!Toggle word wrapToggle overflow
如果出现了 vmx flag,那么你的 CPU 带有 Intel 支持。
要检查你是否有 AMD 支持的 CPU flag,键入下面的命令:
Copy to ClipboardCopied!Toggle word wrapToggle overflow
如果出现了 svm flag,则表示你的 CPU 带有 AMD 支持。
注意
除了检查 CPU flag,你应该在系统的 BIOS 启用完全虚拟化。
Red Hat虚拟化系统支持多处理器系统并允许你在 x86 体系结构的系统上用 P6(或更早)处理器运行Red Hat虚拟化系统:
title Red Hat Enterprise Linux Server  (2.6.18-4.elxen)
root  (hd0, 0)
kernel   /xen.gz-2.6.18-4-el5 mem=32G
module   /vmlinuz -2.6.18-4.el5xen ro root=LABEL=/
module   /initrd-2.6.18-4.el5xen.img
title Red Hat Enterprise Linux Server  (2.6.18-4.elxen)
root  (hd0, 0)
kernel   /xen.gz-2.6.18-4-el5 mem=32G
module   /vmlinuz -2.6.18-4.el5xen ro root=LABEL=/
module   /initrd-2.6.18-4.el5xen.img
Copy to ClipboardCopied!Toggle word wrapToggle overflow
Copy to ClipboardCopied!Toggle word wrapToggle overflow
如果你的输出和上面的相同(或近似),那么你的 CPU 支持 PAE。如果命令提示不显示任何输出,说明你的 CPU 不支持 PAE。
If your system CPU architecture is ia64, you need to manually install the xen-ia64-guest-firmware package to run a fully virtualized guest. This package is provided in the Supplementary CD and is not installed by default.
GNU Grand Unified Boot Loader (or GRUB) is a program which enables the user to select which installed operating system or kernel to load at system boot time. It also allows the user to pass arguments to the kernel. The GRUB configuration file (located in /boot/grub/grub.conf) is used to create a list of operating systems to boot in GRUB's menu interface. When you install the kernel-xen RPM, a post script adds kernel-xen entries to the GRUB configuration file. You can edit the grub.conf file and enable the following GRUB parameter:
title Red Hat Enterprise Linux Server (2.6.18-3.el5xen)
root   (hd0; 0)
kernel  /xen.gz.-2.6.18-3.el5
module  /vmlinuz-2.6..18-3.el5xen ro root=/dev/VolGroup00/LogVol00  rhgb quiet
module  /initrd-2.6.18-3. el5xenxen.img
title Red Hat Enterprise Linux Server (2.6.18-3.el5xen)
root   (hd0; 0)
kernel  /xen.gz.-2.6.18-3.el5
module  /vmlinuz-2.6..18-3.el5xen ro root=/dev/VolGroup00/LogVol00  rhgb quiet
module  /initrd-2.6.18-3. el5xenxen.img
Copy to ClipboardCopied!Toggle word wrapToggle overflow
如果你设置与示例相同的 Linux grub 条目,引导装载程序会载入 hypervisor、initrd 映像和 Linux 内核。既然关于内核的条目是在所有其他条目之上,内核会先被载入内存。引导装载程序向 hypervisor 和 Linux 内核发送(和接受)命令行参数。下面的示例条目展示了怎样把 Domain0 linux 内核内存限制在 800MB 之内:
title Red Hat Enterprise Linux Server (2.6.18-3.el5xen)
root   (hd0; 0)
kernel  /xen.gz.-2.6.18-3.el5 dom0_mem=800M
module  /vmlinuz-2.6..18-3.el5xen ro root=/dev/VolGroup00/LogVol00  rhgb quiet
module  /initrd-2.6.18-3. el5xenxen.img
title Red Hat Enterprise Linux Server (2.6.18-3.el5xen)
root   (hd0; 0)
kernel  /xen.gz.-2.6.18-3.el5 dom0_mem=800M
module  /vmlinuz-2.6..18-3.el5xen ro root=/dev/VolGroup00/LogVol00  rhgb quiet
module  /initrd-2.6.18-3. el5xenxen.img
Copy to ClipboardCopied!Toggle word wrapToggle overflow
Copy to ClipboardCopied!Toggle word wrapToggle overflow
chkconfig xendomains on 命令不会自动地启动域,它将在下次引导时启动域。
chkconfig xendomains off
chkconfig xendomains off
Copy to ClipboardCopied!Toggle word wrapToggle overflow
终止所有运行的Red Hat虚拟化域。chkconfig xendomains off 命令在下次引导时关闭所有的域。
Red Hat Virtualization configuration files contain the following standard variables. Configuration items within these files must be enclosed in quotes ("). These configuration files reside in the /etc/xen directory.
Red Hat Virtualization allows a domain's virtual CPUs to associate with one or more host CPUs. This can be used to allocate real resources among one or more guests. This approach allows Red Hat Virtualization to make optimal use of processor resources when employing dual-core, hyperthreading, or other advanced CPU technologies. If you are running I/O intensive tasks, its typically better to dedicate either a hyperthread or entire core to run domain0. The Red Hat Virtualization credit scheduler automatically rebalances virtual cpus between physical ones, to maximize system use. The Red Hat Virtualization system allows the credit scheduler to move CPUs around as necessary, as long as the virtual CPU is pinned to a physical CPU.
移植是把运行的虚拟域从一台物理主机搬迁到另外一台主机。红帽虚拟化系统支持两种移植方式 — offline 和 live。Offline 移植通过暂停虚拟机、转移内存然后在目的主机上恢复执行的方式把虚拟机从一台主机移到另外一台主机。Live 移植做相同的事情,但不直接影响域。当执行 live 移植时,域继续它平常的活动,从用户的角度来看它并没有值得注意的地方。要初始化一个 live 移植,两台主机都必须运行红帽虚拟化系统以及 xend 守护进程。目的主机必须有足够的资源(如内存)来容纳移植后的域带宽(bandwidth)。源主机和目的主机都必须有相同的体系结构和虚拟化扩展(如 i386-VT、x86-64-VT、x86-64-SVM 等)且必须都位于相同的 L2 子网。
When a domain migrates its MAC and IP addresses move with it. Only virtual machines with the same layer-2 network and subnets will successfully migrate. If the destination node is on a different subnet, the administrator must manually configure a suitable EtherIP or IP tunnel in the remote node of domain0. The xend daemon stops the domain and copies the job over to the new node and restarts it. The Red Hat Virtualization RPM does not enable migration from any other host except the localhost (see the /etc/xend-config.sxp file for information). To allow the migration target to accept incoming migration requests from remote hosts, you must modify the target's xen-relocation-hosts-allow parameter. Be sure to carefully restrict which hosts are allowed to migrate, since there is no authentication.
Each domain network interface is connected to a virtual network interface in dom0 by a point to point link. These devices are vif<domid> and <vifid>. vif1.0 for the first interface in domain 1; vif3.1 for the second interface in domain 3.
Domain0 处理这些虚拟接口上的通信,对于网桥、路由、速率限制等,它采用标准的 Linux 传统。xend 守护进程使用两个 shell 脚本来执行网络和新的虚拟接口的初始配置。这些脚本为所有的虚拟接口配置单一的网桥。你可以自定义这些脚本来配置其他的路由和网桥。
Red Hat Virtualization's virtual networking is controlled by the two shell scripts, network-bridge and vif-bridge. xend calls these scripts when certain events occur. Arguments can be passed to the scripts to provide additional contextual information. These scripts are located in the /etc/xen/scripts directory. You can change script properties by modifying the xend-config.sxp configuration file located in the /etc/xen directory.
When deploying Red Hat Virtualization on your corporate infrastructure, you must ensure that domain0 cannot be compromised. Domain0 is the privileged domain that handles system management. If domain0 is insecure, all other domains in the system are vulnerable. There are several ways to implement security you should know about when integrating Red Hat Virtualization into your systems. Together with other people in your organization,you should create a 'deployment plan' that contains the operating specifications and services that will run on Red Hat Virtualization, and what is needed to support these services. Here are some security issues to consider when putting together a deployment plan:
你可以从 XML 机器定义里创建一个新的虚拟机会话。如果你有一个现存的用xm 创建的客户机,你也可以为它创建一个虚拟机:
virsh create <path to XML configuration file>
virsh create <path to XML configuration file>
Copy to ClipboardCopied!Toggle word wrapToggle overflow
Copy to ClipboardCopied!Toggle word wrapToggle overflow
This command outputs the domain information (in XML) to stdout . If you save the data to a file, you can use the create option to recreate the virtual machine.
Copy to ClipboardCopied!Toggle word wrapToggle overflow
When a domain is in a suspended state, it still consumes system RAM. There will also be no disk or network I/O when suspended. This operation is immediate and the virtual machine must be restarted with the resume option.
virsh save [domain-name][domain-id | domain-uuid][filename]
virsh save [domain-name][domain-id | domain-uuid][filename]
Copy to ClipboardCopied!Toggle word wrapToggle overflow
This stops the virtual machine you specify and saves the data to a file, which may take some time given the amount of memory in use by your virtual machine. You can restore the state of the virtual machine with the restore option.
Copy to ClipboardCopied!Toggle word wrapToggle overflow
This command does an immediate ungraceful shutdown and stops any guest domain sessions (which could potentially lead to file corruptted filesystems still in use by the virtual machine). You should use the destroy option only when the virtual machine's operating system is non-responsive. For a paravirtualized virtual machine, you should use the shutdown option.
running  lists domains currently active on the CPU

blocked  lists domains that are blocked

paused   lists domains that are suspended

shutdown lists domains that are in process of shutting down

shutoff  lists domains that are completely down.

crashed  lists domains that are crashed
running  lists domains currently active on the CPU

blocked  lists domains that are blocked

paused   lists domains that are suspended

shutdown lists domains that are in process of shutting down

shutoff  lists domains that are completely down.

crashed  lists domains that are crashed
Copy to ClipboardCopied!Toggle word wrapToggle overflow
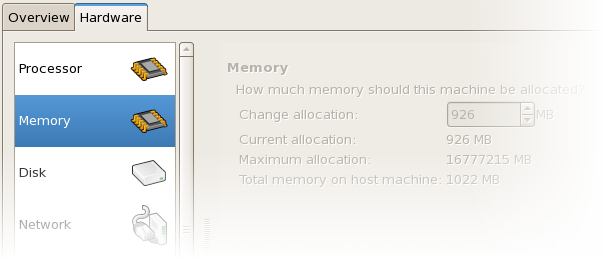
You can use virsh to modify a domain's memory allocation:
virsh setmem [domain-id | domain-name] [count]
virsh setmem [domain-id | domain-name] [count]
Copy to ClipboardCopied!Toggle word wrapToggle overflow
You must specify the [count] in kilobytes. Note that the new count cannot exceed the amount you specified when you created the Virtual Machine. Values lower than 64 MB probably won't work. You can adjust the Virtual Machine memory as necessary.
Copy to ClipboardCopied!Toggle word wrapToggle overflow
You must specify the [count] in kilobytes. Note that the new count cannot exceed the amount you specified when you created the Virtual Machine. Values lower than 64 MB probably won't work. The maximum memory doesn't affect the current use of the Virtual Machine (unless the new value is lower which should shrink memory usage).
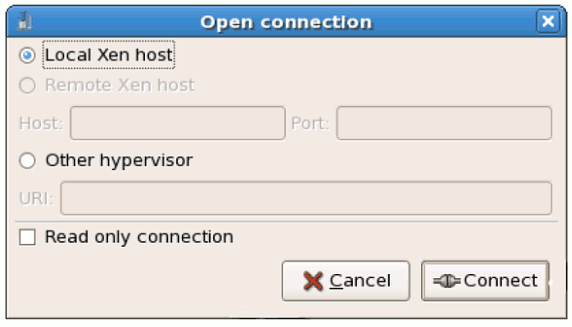
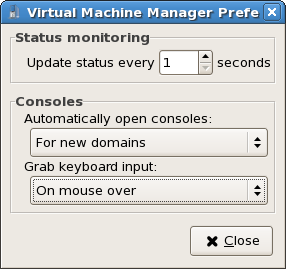
This window appears first and prompts the user to choose a hypervisor session. Non-privileged users can initiate a read-only session. Root users can start a session with full blown read-write status. For normal use, select the Local Xen host option. You start the Virtual Machine Manager test mode by selecting the Other hypervisor and then type test:///default in the URL field beneath. Once in test mode, you can connect to a libvirt dummy hypervisor. Note that although the Remote Xen host screen is visible, the functionality to connect to such a host is not implemented into Red Hat Enterprise Linux 5.1.
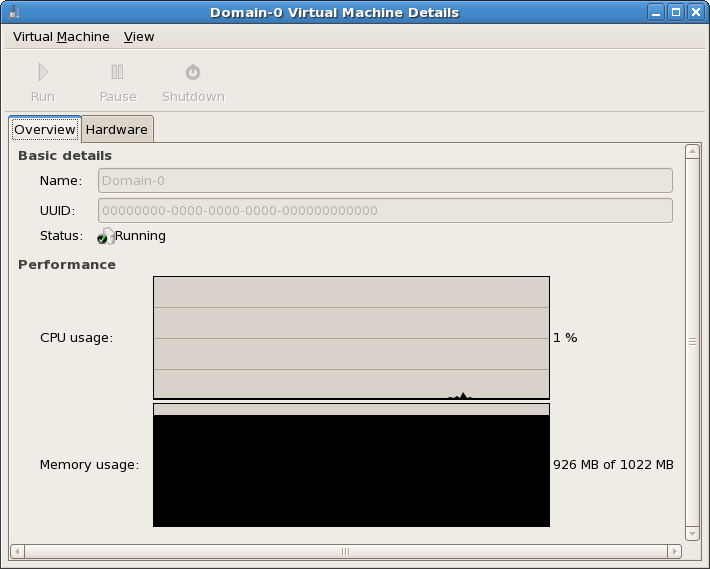
This window displays graphs and statistics of a guest's live resource utilization data available from the Red Hat Virtualization Virtual Machine Manager. The UUID field displays the globally unique identifier for the virtual machines(s).
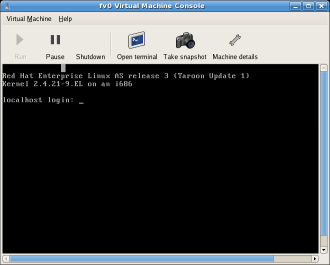
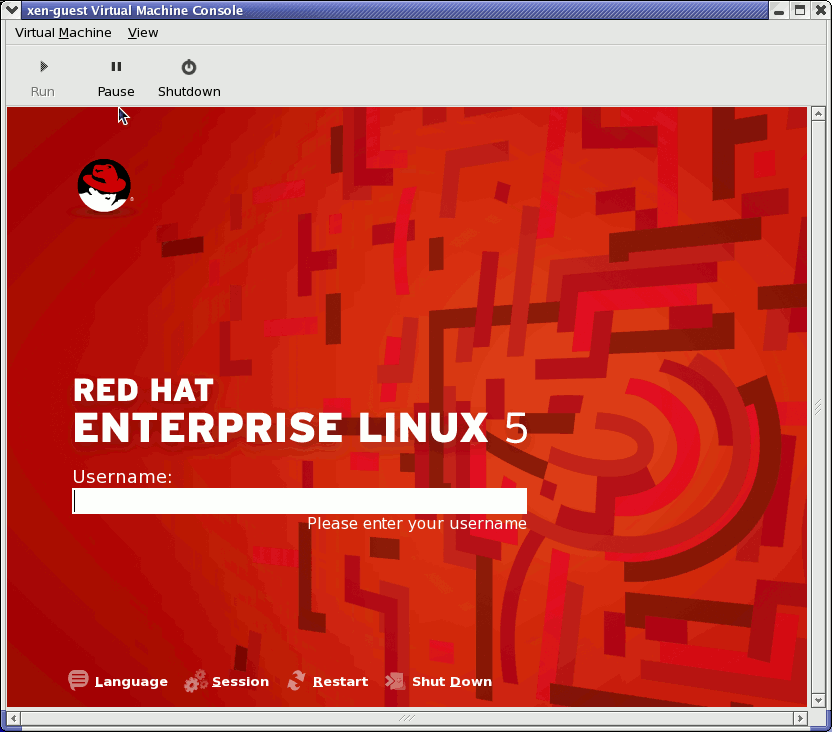
This window displays a virtual machine's graphical console. Paravirtual and full virtual machines use different techniques to export their local virtual framebuffers, but both technologies use VNC to make them available to the Virtual Machine Manager's console window. If your virtual machine is set to require authentication, the Virtual Machine Graphical console prompts you for a password before the display appears.
Your local desktop can intercept key combinations (for example, Ctrl+Alt+F11) to prevent them from being sent to the guest machine. You can use the Virtual Machine Manager's 'sticky key' capability to send these sequences. You must press any modifier key (like Ctrl or Alt) 3 times and the key you specify gets treated as active until the next non-modifier key is pressed. Then you can send Ctrl-Alt-F11 to the guest by entering the key sequence 'Ctrl Ctrl Ctrl Alt+F1'.
You must install Red Hat Enterprise Linux 5.1, virt-manager, and the kernel packages on all systems that require virtualization. All systems then must be booted and running the Red Hat Virtualization kernel.
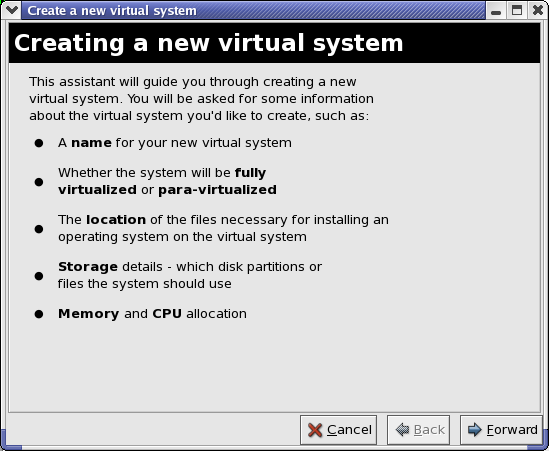
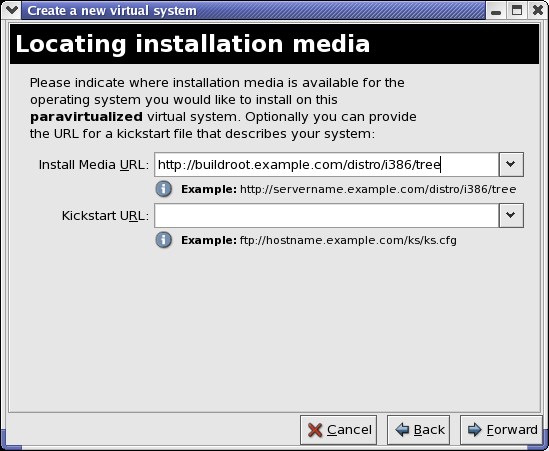
下面是使用虚拟机监控程序在红帽企业 Linux 5 上安装客户机操作系统所需要的步骤:
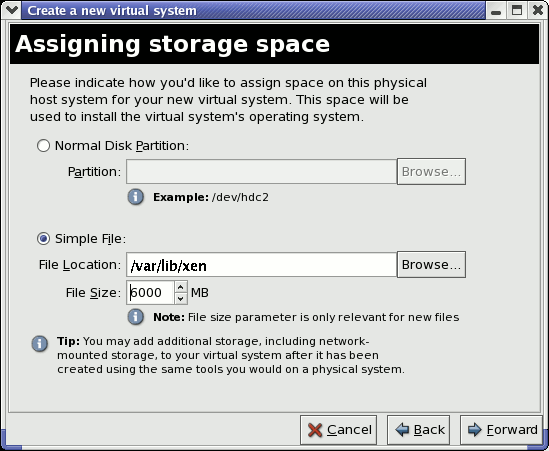
SELinux policy only allows xen disk images to reside in /var/lib/xen/images.
Open a terminal and create the /xen directory and set the SELinux policy with the command restorecon -v /xen. Specify your location and the size of the virtual disk, then click Forward.
When installing Red Hat Enterprise Linux 5.1 on a fully virtualized guest, do not use the kernel-xen kernel. Using this kernel on fully virtualized guests can cause your system to hang.
If you are using an Installation Number when installing Red Hat Enterprise Linux 5.1 on a fully virtualized guest, be sure to deselect the Virtualization package group during the installation. The Virtualization package group option installs the kernel-xen kernel.
Note that paravirtualized guests are not affected by this issue. Paravirtualized guests always use the kernel-xen kernel.
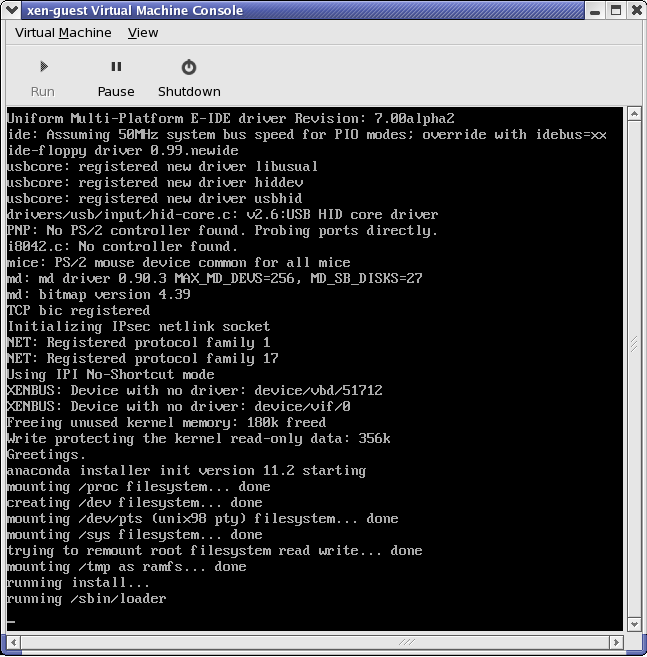
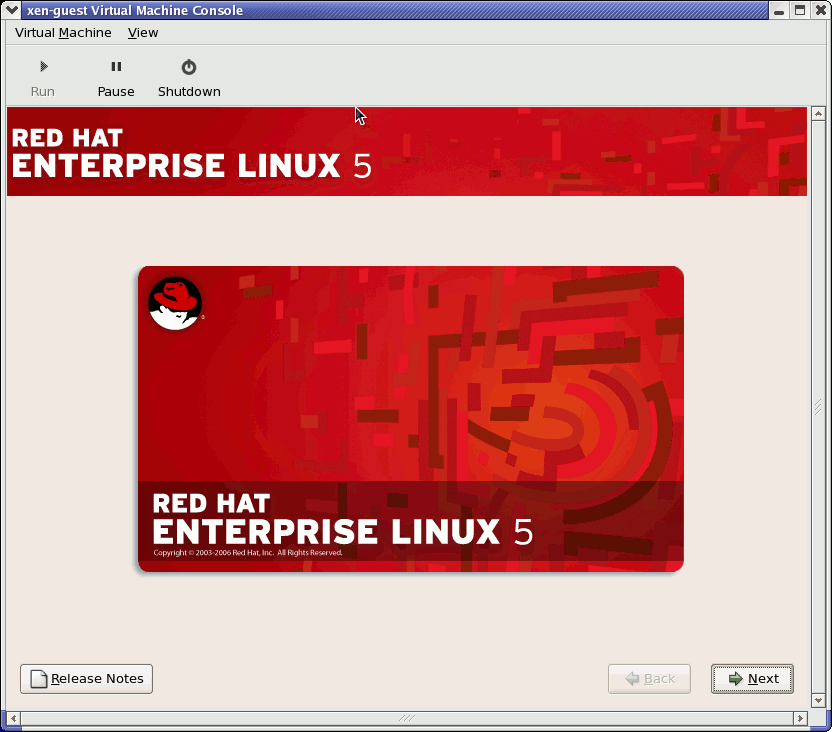
Type xm create -c xen-guest to start the Red Hat Enterprise Linux 5.1 guest. Right click on the guest in the Virtual Machine Manager and choose Open to open a virtual console.
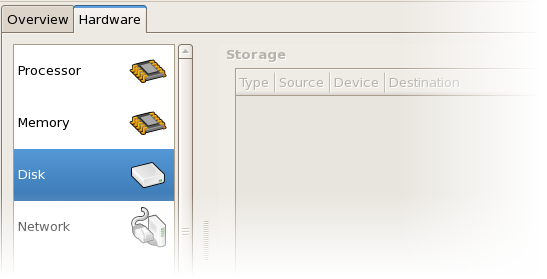
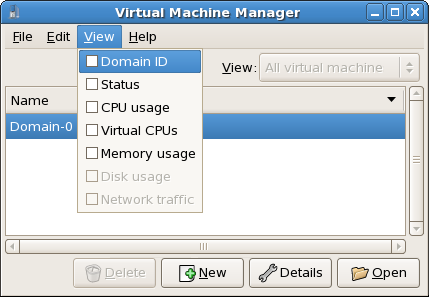
在 Hardware 页,点击 Disk 可以查看或修改当前的硬盘配置。
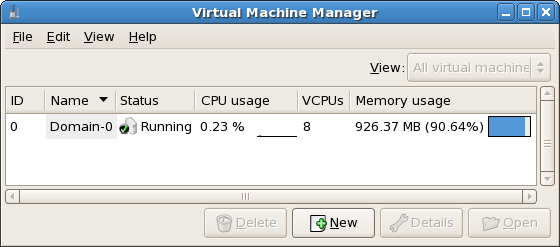
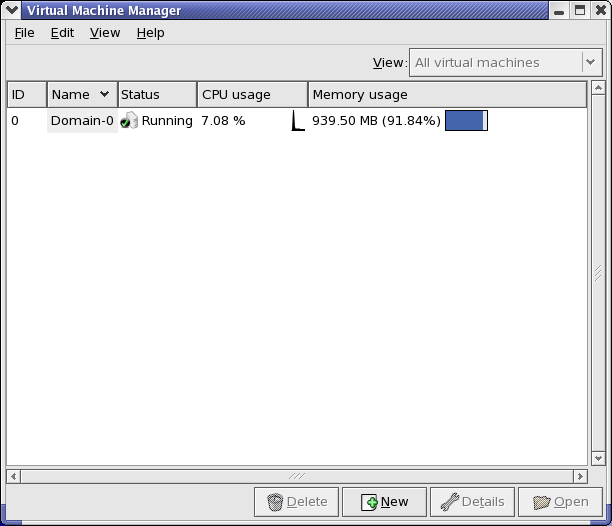
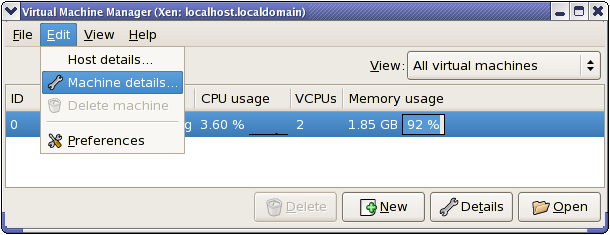
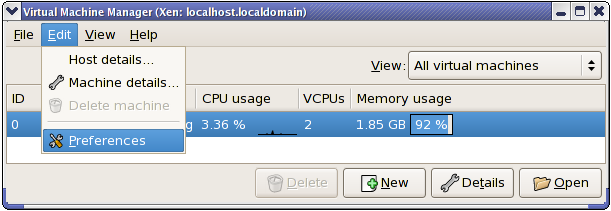
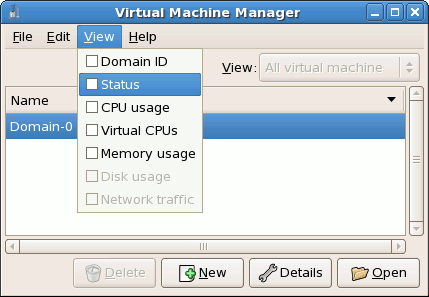
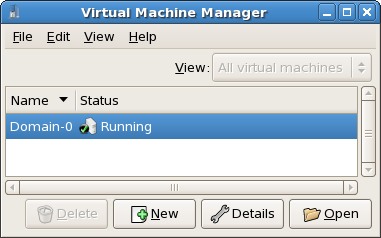
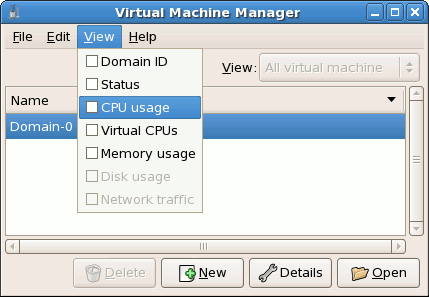
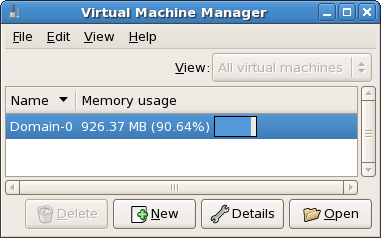
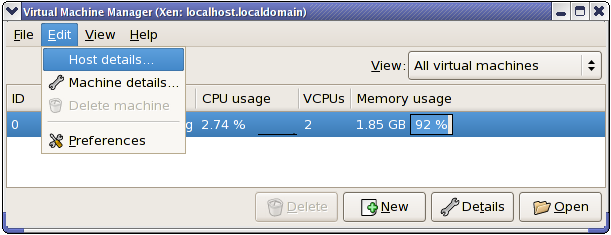
图 17.35. 显示 CPU 的使用情况
虚拟机管理者将列出系统里所有虚拟机的 CPU 使用百分比。
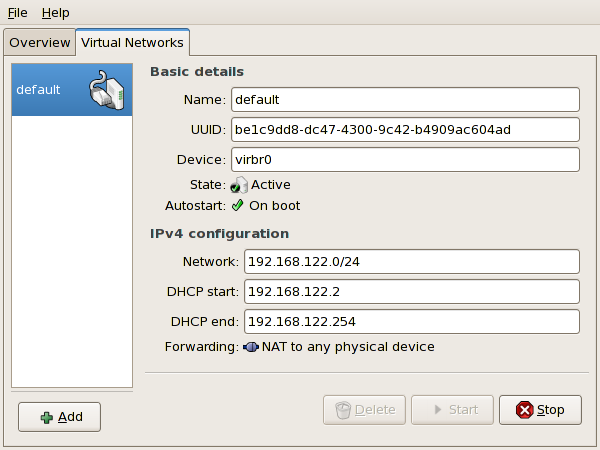
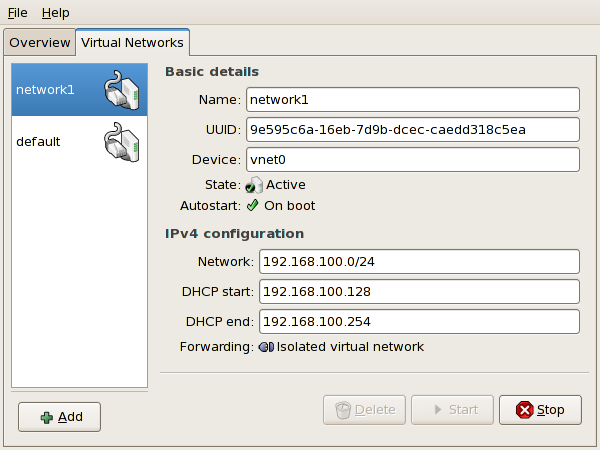
All available virtual networks are listed on the left-hand box of the menu. You can edit the configuration of a virtual network by selecting it from this box and editing as you see fit.
When deploying Red Hat Enterprise Linux 5.1 with Virtualization into your network infrastructure, the host's Virtualization software uses many specific directories for important configuration, log files, and other utilities. All the Red Hat Virtualization logs files are standard ASCII files, and easily accessable with any ASCII based editor:
brctl 是一个在虚拟化 Linux 内核里检查和配置以太网桥配置的网络工具。在执行这些示例命令时,你必须拥有根用户权限:
When encountering issues with installing Red Hat Virtualization, you can refer to the host system's two logs to assist with troubleshooting. The xend.log file contains the same basic information as when you run the xm log command. It resides in the /var/log/ directory. Here is an example log entry for when you create a domain running a kernel:
ERROR: Will only load images built for Xen v3.0
ERROR: Actually saw: GUEST_OS=netbsd, GUEST_VER=2.0, XEN_VER=2.0; LOADER=generic, BSD_SYMTAB'
ERROR: Error constructing guest OS
ERROR: Will only load images built for Xen v3.0
ERROR: Actually saw: GUEST_OS=netbsd, GUEST_VER=2.0, XEN_VER=2.0; LOADER=generic, BSD_SYMTAB'
ERROR: Error constructing guest OS
Copy to ClipboardCopied!Toggle word wrapToggle overflow
title Red Hat Enterprise Linix (2.6.18-8.2080_RHEL5xen0)
		root (hd0,2)
		kernel /xen.gz-2.6.18-8.el5 com1=38400,8n1
		module /vmlinuz-2.618-8.el5xen ro root=LABEL=/rhgb quiet console=xvc console=tty xencons=xvc
        	module /initrd-2.6.18-8.el5xen.img
title Red Hat Enterprise Linix (2.6.18-8.2080_RHEL5xen0)
		root (hd0,2)
		kernel /xen.gz-2.6.18-8.el5 com1=38400,8n1
		module /vmlinuz-2.618-8.el5xen ro root=LABEL=/rhgb quiet console=xvc console=tty xencons=xvc
        	module /initrd-2.6.18-8.el5xen.img
Copy to ClipboardCopied!Toggle word wrapToggle overflow
The sync_console can help determine a problem that causes hangs with asynchronous hypervisor console output, and the "pnpacpi=off" works around a problem that breaks input on the serial console. The parameters "console=ttyS0" and "console=tty" means that kernel errors get logged with on both the normal VGA console and on the serial console. Then you can install and set up ttywatch to capture the data on a remote host connected by a standard null-modem cable. For example, on the remote host you could type:
ttywatch --name myhost --port /dev/ttyS0
ttywatch --name myhost --port /dev/ttyS0
Copy to ClipboardCopied!Toggle word wrapToggle overflow
Full Virtualized guest operating systems automatically has a text console configured for use, but the difference is the kernel guest is not configured. To enable the guest virtual serial console to work with the Full Virtualized guest, you must modify the guest's grub.conf file, and include the 'console =ttyS0 console=tty0' parameter. This ensures that the kernel messages are sent to the virtual serial console (and the normal graphical console). If you plan to use the virtual serial console in a full virtualized guest, you must edit the configuration file in the /etc/xen/ directory. On the host domain, you can then access the text console by typing:
xm console
xm console
Copy to ClipboardCopied!Toggle word wrapToggle overflow
你也可以使用虚拟机管理者来显示串行控制台。在 Virtual Machine Details 窗口中的 View 菜单里,选择 Serial Console。
kpartx -a /dev/xen/guest1
#vgscan
Reading all physical volumes . This may take a while...
Found volume group "VolGroup00" using metadata type 1vm2
vgchange -ay VolGroup00
2 logical volume(s) in volume group VolGroup00 now active.
lvs
LV VG Attr Lsize Origin Snap% Move Log Copy%
LogVol00 VolGroup00 -wi-a- 5.06G
LogVol01 VolGroup00 -wi-a- 800.00M
mount /dev/VolGroup00/LogVol00 /mnt/
....
#umount /mnt/
#vgchange -an VolGroup00
#kpartx -d /dev/xen/guest1
# kpartx -a /dev/xen/guest1
#vgscan
Reading all physical volumes . This may take a while...
Found volume group "VolGroup00" using metadata type 1vm2
# vgchange -ay VolGroup00
2 logical volume(s) in volume group VolGroup00 now active.
# lvs
LV VG Attr Lsize Origin Snap% Move Log Copy%
LogVol00 VolGroup00 -wi-a- 5.06G
LogVol01 VolGroup00 -wi-a- 800.00M
# mount /dev/VolGroup00/LogVol00 /mnt/
....
#umount /mnt/
#vgchange -an VolGroup00
#kpartx -d /dev/xen/guest1
Copy to ClipboardCopied!Toggle word wrapToggle overflow
Error: Could not obtain handle on privileged command interfaces (2 = No such file or directory)
Traceback (most recent call last:)

File "/usr/sbin/xend/", line 33 in ?

from xen.xend.server. import SrvDaemon

File "/usr/lib/python2.4/site-packages/xen/xend/server/SrvDaemon.py" , line 26 in ?

from xen.xend import XendDomain

File "/usr//lib/python2.4/site-packages/xen/xend/XendDomain.py" , line 33, in ?

from xen.xend import XendDomainInfo

File "/usr/lib/python2.4/site-packages/xen/xend/image.py" , line37, in ?

import images

File "/usr/lib/python2.4/site-packages/xen/xend/image.py" , line30, in ?

xc = xen.lowlevel.xc.xc ()

RuntimeError: (2, 'No such file or directory' )
Copy to ClipboardCopied!Toggle word wrapToggle overflow
When you attempt to create a guest, you receive an "Invalid argument" error message. This usually means that the kernel image you are trying to boot is incompatible with the hypervisor. An example of this would be if you were attempting to run a non-PAE FC5 kernel on a PAE only FC6 hypervisor.
Red Hat Virtualization can configure multiple Virtualization network bridges to use with multiple ethernet cards. To successfully configure multiple network bridges for ethernet cards, you must configure the second network interface by either using the system-config-network TUI/GUI, or by creating a new configuration file in /etc/sysconfig/network-scripts . You should use a process to setup multiple Xen bridges. This is an example config file for a second NIC called 'eth1' :
The task of configuring your RHEL 5.1 loaded laptop for use on a network environment, presents a number of potential challenges. Most WiFi and wired connections switch constantly during any given day, and Red Hat Virtualization assumes it has access to the same interface consistently. This results in the system performing ifup/ifdown calls to the network interface in use by Red Hat Virtualization. WiFi cards are not the ideal network connection method since Red Hat Virtualization uses the default network interface.
The idea here is to create a 'dummy' network interface for Red Hat Virtualization to use.
This technique allows you to use a hidden IP address space for your guests and Virtual Machines. To do this operation successfully, you must use static IP addresses as DHCP does not listen for IP addresses on the dummy network. You also must configure NAT/IP masquerading to enable network access for your guests and Virtual Machines. You should attach a static IP when you create the 'dummy' network interface.
You will need to make additional modifications to the xend-config.sxp file. You must locate the ( network-script 'network-bridge' bridge=xenbr0 ) section and add include this in the end of the line:
netdev=dummy0
netdev=dummy0
Copy to ClipboardCopied!Toggle word wrapToggle overflow
You must also make some modifications to your guest's domU networking configuration to enable the default gateway to point to dummy0. You must edit the DomU 'network' file that resides in the /etc/sysconfig/ directory to reflect the example below:
To use Red Hat Virtualization to manage domain0, you will constantly making changes to the grub.conf configuration file, that resides in the /etc directory. Because of the large number of domains to manage, many system administrators prefer to use the 'cut and paste' method when editing grub.conf . If you do this, make sure that you include all five lines in the Virtualization entry (or this will create system errors). If you require Xen hypervisor specific values, you must add them to the 'xen' line. This example represents a correct grub.conf Virtualization entry:
boot=/dev/sda/
default=0
timeout=15
#splashimage=(hd0, 0)/grub/splash.xpm.gz
hiddenmenu
serial --unit=0 --speed=115200 --word=8 --parity=no --stop=1
terminal --timeout=10 serial console
title Red Hat Enterprise Linux Server (2.6.17-1.2519.4.21. el5xen)
        root (hd0, 0)
	kernel /xen.gz-2.6.17-1.2519.4.21.el5 com1=115200,8n1
	module /vmlinuz-2.6.17-1.2519.4.21el5xen ro root=/dev/VolGroup00/LogVol00
	module /initrd-2.6.17-1.2519.4.21.el5xen.img
# boot=/dev/sda/
default=0
timeout=15
#splashimage=(hd0, 0)/grub/splash.xpm.gz
hiddenmenu
serial --unit=0 --speed=115200 --word=8 --parity=no --stop=1
terminal --timeout=10 serial console
title Red Hat Enterprise Linux Server (2.6.17-1.2519.4.21. el5xen)
        root (hd0, 0)
	kernel /xen.gz-2.6.17-1.2519.4.21.el5 com1=115200,8n1
	module /vmlinuz-2.6.17-1.2519.4.21el5xen ro root=/dev/VolGroup00/LogVol00
	module /initrd-2.6.17-1.2519.4.21.el5xen.img
Copy to ClipboardCopied!Toggle word wrapToggle overflow
For example, if you need to change your dom0 hypervisor's memory to 256MB at boot time, you must edit the 'xen' line and append it with the correct entry, 'dom0_mem=256M' . This example represents the respective grub.conf xen entry:
boot=/dev/sda
default=0
timeout=15
#splashimage=(hd0,0)/grubs/splash.xpm.gz
hiddenmenu
serial --unit=0 --speed =115200 --word=8 --parity=no --stop=1
terminal --timeout=10 serial console
title Red Hat Enterprise Linux Server (2.6.17-1.2519.4.21. el5xen)
        root (hd0,0)
	kernel /xen.gz-2.6.17-1.2519.4.21.el5 com1=115200,8n1 dom0_mem=256MB
	module /vmlinuz-2.6.17-1.2519.4.21.el5xen ro
	root=/dev/VolGroup00/LogVol00
	module /initrd-2.6.17-1.2519.4.21.el5xen.img
# boot=/dev/sda
default=0
timeout=15
#splashimage=(hd0,0)/grubs/splash.xpm.gz
hiddenmenu
serial --unit=0 --speed =115200 --word=8 --parity=no --stop=1
terminal --timeout=10 serial console
title Red Hat Enterprise Linux Server (2.6.17-1.2519.4.21. el5xen)
        root (hd0,0)
	kernel /xen.gz-2.6.17-1.2519.4.21.el5 com1=115200,8n1 dom0_mem=256MB
	module /vmlinuz-2.6.17-1.2519.4.21.el5xen ro
	root=/dev/VolGroup00/LogVol00
	module /initrd-2.6.17-1.2519.4.21.el5xen.img
Copy to ClipboardCopied!Toggle word wrapToggle overflow
When you install new guests using virt-manager (or virt-install) tool(s) from Red Hat Enterprise Linux 5.1 with Virtualization, the guests configuration files (located in the /etc/xen directory) get modified and setup automatically. This configuration file example is for a para-virtualized guest:
You can copy (or clone) an existing configuration file to create an all new guest. You must modify the name parameter of the guests' configuration file. The new, unique name then appears in the hypervisor and is viewable by the management utilities. You must generate an all new UUID as well (using the uuidgen(1) command). Then for the vif entries you must define a unique MAC address for each guest (if you are copying a guest configuration from an existing guest, you can create a script to handle it). For the xen bridge information, if you move an existing guest configuration file to a new host, you must update the xenbr entry to match your local networking configuration. For the Device entries, you must modify the entries in the 'disk=' section to point to the correct guest image.
You must also modify these system configuration settings on your guest. You must modify the HOSTNAME entry of the /etc/sysconfig/network file to match the new guest's hostname.
红帽虚拟化系统可以在创建时为每个虚拟机生成一个 MAC 地址。虽然在同一子网里几乎可以有无限个可用选择,你仍有可能获得相同的 MAC 地址。要绕过这个问题,你可以编写一个脚本来生成 MAC 地址。下面是一个生成 MAC 地址的包含参数的脚本示例:
#! /usr/bin/python
macgen.py script generates a MAC address for Xen guests
#
import random
mac = [ 0x00, 0x16, 0x3e,
random.randint(0x00, 0x7f),
random.randint(0x00, 0xff),
random.randint(0x00, 0xff) ]
print ':'.join(map(lambda x: "%02x" % x, mac))

Generates e.g.:
00:16:3e:66:f5:77
to stdout
#! /usr/bin/python
# macgen.py script generates a MAC address for Xen guests
#
import random
mac = [ 0x00, 0x16, 0x3e,
random.randint(0x00, 0x7f),
random.randint(0x00, 0xff),
random.randint(0x00, 0xff) ]
print ':'.join(map(lambda x: "%02x" % x, mac))

Generates e.g.:
00:16:3e:66:f5:77
to stdout
Copy to ClipboardCopied!Toggle word wrapToggle overflow
Red Hat Virtualization can migrate virtual machines between other servers running Red Hat Enterprise Linux 5.1 with Virtualization. Further, migration is performed in an offline method (using the xm migrate command). Live migration can be done from the same command. However there are some additional modifications that you must do to the xend-config configuration file. This example identifies the entries that you must modify to ensure a successful migration:
(xend-relocation-server yes)
The default for this parameter is 'no', which keeps the relocation/migration server deactivated (unless on a trusted network) and the domain virtual memory is exchanged in raw form without encryption.
This parameter controls the host that communicates with the relocation port. If the value is empty, then all incoming connections are allowed. You must change this to a space-separated sequences of regular expressions (such as xend-relocation-hosts-allow- '^localhost\\.localdomain$' ). A host with a fully qualified domain name or IP address that matches these expressions are accepted.
[2006-12-21] 20:33:31 xend 3198] DEBUG (balloon:133) Balloon: 558432 Kib free; 0 to scrub; need 1048576; retries: 20
[2006-12-21] 20:33:31 xend. XendDomainInfo 3198] ERROR (XendDomainInfo: 202
Domain construction failed
[2006-12-21] 20:33:31 xend 3198] DEBUG (balloon:133) Balloon: 558432 Kib free; 0 to scrub; need 1048576; retries: 20
[2006-12-21] 20:33:31 xend. XendDomainInfo 3198] ERROR (XendDomainInfo: 202
Domain construction failed
Copy to ClipboardCopied!Toggle word wrapToggle overflow
You can check the amount of memory in use by domain0 by using the xm list Domain0 command. If domain0 is not ballooned down, you can use the command "xm mem-set Domain-0 NewMemSize" to check memory.
Copy to ClipboardCopied!Toggle word wrapToggle overflow
This message indicates that you are trying to run an unsupported guest kernel image on your Hypervisor. This happens when you try to boot a non-PAE paravirtual guest kernel on a RHEL 5.1 hypervisor. Red Hat Virtualization only supports guest kernels with PAE and 64bit architectures.
键入这个命令:
xm create -c va base

Using config file "va-base"
Error: (22, 'invalid argument')
[2006-12-14 14:55:46 xend.XendDomainInfo 3874] ERRORs
(XendDomainInfo:202) Domain construction failed

Traceback (most recent call last)
File "/usr/lib/python2.4/site-packages/xen/xend/XendDomainInfo.py", line 195 in create vm.initDomain()
File " /usr/lib/python2.4/site-packages/xen/xend/XendDomainInfo.py", line 1363 in initDomain raise VmError(str(exn))
VmError: (22, 'Invalid argument')
[2006-12-14 14:55:46 xend.XendDomainInfo 3874] DEBUG (XenDomainInfo: 1449]
XendDlomainInfo.destroy: domin=1
[2006-12-14 14:55:46 xend.XendDomainInfo 3874] DEBUG (XenDomainInfo: 1457]
XendDlomainInfo.destroy:Domain(1)
[root@smith]# xm create -c va base

Using config file "va-base"
Error: (22, 'invalid argument')
[2006-12-14 14:55:46 xend.XendDomainInfo 3874] ERRORs
(XendDomainInfo:202) Domain construction failed

Traceback (most recent call last)
File "/usr/lib/python2.4/site-packages/xen/xend/XendDomainInfo.py", line 195 in create vm.initDomain()
File " /usr/lib/python2.4/site-packages/xen/xend/XendDomainInfo.py", line 1363 in initDomain raise VmError(str(exn))
VmError: (22, 'Invalid argument')
[2006-12-14 14:55:46 xend.XendDomainInfo 3874] DEBUG (XenDomainInfo: 1449]
XendDlomainInfo.destroy: domin=1
[2006-12-14 14:55:46 xend.XendDomainInfo 3874] DEBUG (XenDomainInfo: 1457]
XendDlomainInfo.destroy:Domain(1)
Copy to ClipboardCopied!Toggle word wrapToggle overflow
This happens when you move the full virtualized HVM guest onto a RHEL 5.1 system. Your guest may fail to boot and you will see an error in the console screen. Check the PAE entry in your configuration file and ensure that pae=1.You should use a 32bit distibution.
# Do not remove the following line, or various programs
# that require network functionality will fail.
127.0.0.1 localhost.localdomain localhost
localhost.localdomain. localhost
# Do not remove the following line, or various programs
# that require network functionality will fail.
127.0.0.1 localhost.localdomain localhost
localhost.localdomain. localhost
Copy to ClipboardCopied!Toggle word wrapToggle overflow
Copy to ClipboardCopied!Toggle word wrapToggle overflow
This happens when the guest's bridge is incorrectly configured and this forces the Xen hotplug scipts to timeout. If you move configuration files between hosts, you must ensure that you update the guest configuration files to reflect network topology and configuration modifications. When you attempt to start a guest that has an incorrect or non-existent Xen bridge configuration, you will receive the following errors:
xm create r5b2-mySQL01

Using config file " r5b2-mySQL01"
Going to boot Red Hat Enterprise Linux Server (2.6.18.-1.2747 .el5xen)
kernel: /vmlinuz-2.6.18-12747.el5xen
initrd: /initrd-2.6.18-1.2747.el5xen.img
Error: Device 0 (vif) could not be connected. Hotplug scripts not working.
[root@trumble virt]# xm create r5b2-mySQL01

Using config file " r5b2-mySQL01"
Going to boot Red Hat Enterprise Linux Server (2.6.18.-1.2747 .el5xen)
kernel: /vmlinuz-2.6.18-12747.el5xen
initrd: /initrd-2.6.18-1.2747.el5xen.img
Error: Device 0 (vif) could not be connected. Hotplug scripts not working.
Copy to ClipboardCopied!Toggle word wrapToggle overflow
xm shutdown win2k3xen12
xm create win2k3xen12

Using config file "win2k3xen12".

/usr/lib64/python2.4/site-packages/xenxm/opts.py:520: Deprecation Warning:
Non ASCII character '\xc0' in file win2k3xen12 on line 1, but no encoding
declared; see http://www.python.org/peps/pep-0263.html for details

execfile (defconfig, globs, locs,)
Error: invalid syntax 9win2k3xen12, line1)
[root@python xen]# xm shutdown win2k3xen12
[root@python xen]# xm create win2k3xen12

Using config file "win2k3xen12".

/usr/lib64/python2.4/site-packages/xenxm/opts.py:520: Deprecation Warning:
Non ASCII character '\xc0' in file win2k3xen12 on line 1, but no encoding
declared; see http://www.python.org/peps/pep-0263.html for details

execfile (defconfig, globs, locs,)
Error: invalid syntax 9win2k3xen12, line1)
Copy to ClipboardCopied!Toggle word wrapToggle overflow
要学习更多关于Red Hat Virtualization的知识,请参考下面的资源。
http://www.cl.cam.ac.uk/research/srg/netos/xen/ — Xen™ 半虚拟化机器管理者的项目网站,Red Hat Virtualization源于这个项目。这个站点维护了最新的 Xen 项目的二进制文件和源码,它也包含其他信息,如架构概述、文档和关于 Xen 及其相关技术的链接。
http://www.libvirt.org/ — 和主机 OS 的虚拟化框架进行交互的 libvirt 虚拟化 API 的官方网站。
/usr/share/doc/xen-<version-number>/ —. This directory contains a wealth of information about the Xen para-virtualization hypervisor and associated management tools, including a look at various example configurations, hardware-specific information, and the current Xen upstream user documentation.
man virsh and /usr/share/doc/libvirt-<version-number> — Contains subcommands and options for the virsh virtual machine management utility as well as comprehensive information about the libvirt virtualization library API.
/usr/share/doc/gnome-applet-vm-<version-number> — Documentation for the GNOME graphical panel applet that monitors and manages locally-running virtual machines.
/usr/share/doc/libvirt-python-<version-number> — Provides details on the Python bindings for the libvirt library. The libvirt-python package allows python developers to create programs that interface with the libvirt virtualization management library.
/usr/share/doc/python-virtinst-<version-number> — Provides documentation on the virt-install command that helps in starting installations of Fedora and Red Hat Enterprise Linux related distributions inside of virtual machines.
/usr/share/doc/virt-manager-<version-number> — Provides documentation on the Virtual Machine Manager, which provides a graphical tool for administering virtual machines.
目标:安装 RHEL 3、4 或 5 和 Windows XP Xen 客户机。
先决条件:带有虚拟化组件的红帽企业 Linux 5.0 工作站。
在这个实验里,你将使用不同的虚拟化工具来配置并安装 RHEL 3、4 或 5 和 Windows XP Xen 客户机。
你必须检查你的系统是否支持 PAE。红帽虚拟化系统支持用基于 x86_64 或 ia64 CPU 的系统结构运行半虚拟化(para-virtualized)客户机。要运行 i386 客户机,系统需要带有 PAE 支持的 CPU。许多老式的笔记本(尤其是基于 Pentium Mobile 或 Centrino 的笔记本)不支持 PAE。
要检查你的 CPU 是否支持 PAE,键入:
grep pae /proc/cpuinfo
grep pae /proc/cpuinfo
Copy to ClipboardCopied!Toggle word wrapToggle overflow
下面的输出显示了这个 CPU 支持 PAE。如果这个命令没有返回任何输出,说明这个 CPU 不支持 PAE。这个实验里所有的练习都要求带有 PAE 扩展的 i386 CPU 或者是 x86_64 和 ia64。
    flags :
    fpu vme de pse tsc msr pae mce cx8 apic mtrr pge mca cmov pat clflush dts acpi
    mmx fxsr sse sse2 ss tm pbe nx up est tm2
    flags :
    fpu vme de pse tsc msr pae mce cx8 apic mtrr pge mca cmov pat clflush dts acpi
    mmx fxsr sse sse2 ss tm pbe nx up est tm2
Copy to ClipboardCopied!Toggle word wrapToggle overflow
Copy to ClipboardCopied!Toggle word wrapToggle overflow
如果这个命令没有任何输出,则表示 CPU 不支持 Intel-VT 或 AMD-V。
要知道你的 CPU 是否支持 Intel-VT 或 AMD-V,键入下面的命令:
cat /sys/hypervisor/properties/capabilities
cat /sys/hypervisor/properties/capabilities
Copy to ClipboardCopied!Toggle word wrapToggle overflow
The following output shows that Intel-VT support has been enabled in the BIOS. If the command returns nothing, then go into the BIOS Setup Utlility and look for a setting related to 'Virtualization', i.e. 'Intel(R) Virtualization Technology' under 'CPU' section on a IBM T60p. Enable and save the setting and do a power off to take effect.
xen-3.0-x86_32p hvm-3.0-x86_32 hvm-3.0-x86_32p
xen-3.0-x86_32p hvm-3.0-x86_32 hvm-3.0-x86_32p
Copy to ClipboardCopied!Toggle word wrapToggle overflow
键入 /dev/cdrom 作为虚拟 CD 映像。
The VNC viewer appears within the installation window. If there is an error message that says “main: Unable to connect to host: Connection refused (111)”, then type the following command to proceed: vncviewer localhost:5900. VNC port 5900 refers to the first Xen guest that is running on VNC. If it doesn't work, you might need to use 5901, 5902, etc.
指定 CD-ROM 或 DVD,并输入安装介质的路径。如果你将从 ISO 映像安装的话,指定 ISO 映像的位置。点击 Forward。
实验步骤 9:使用 virt-manager 安装 Windows XP Xen 完全虚拟化客户机。
在这个实验里,你将用 virt-manager 安装一个完全虚拟化的 Windows XP Xen 客户机。
要在 Windows XP 主机上安装红帽企业 Linux 5,在命令行下输入:virt-manager。
在 Open Connection 窗口里,选择 Local Xen host,然后点击 Connect。
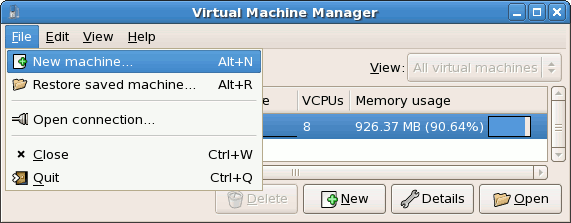
Start Red Hat's Virtual Machine Manager application, and from the File menu click on New.
指定 CD-ROM 或 DVD,然后输入安装介质的路径。如果你将从 ISO 映像进行安装,指定 ISO 映像的位置。点击 Forward。
Whenever a 'Files Needed' dialog box appears, change the path GLOBALROOT\DEVICE\CDROM0\I386 to C:\I386. Depending on your installation, you may or may not see this problem. You may be prompted for missing files during the installation. Changing the path to C:\I386 should compensate for this problem.
Create a /home/mp3 directory and copy TruthHappens.ogg from Red Hat's Truth Happens page to mkdir /home/mp3wget -c http://www.redhat.com/v/ogg/TruthHappens.ogg
Copy to ClipboardCopied!Toggle word wrapToggle overflow
在两台 Xen 主机的任何一台上,运行 Movie Player。如果没有安装,在运行 Movie Player 之前安装 totem 和 iso-codecs 软件包。点击 Applications,然后是 Sound & Video,最后选择 Movie Player。
点击 Movie,然后 Open Location,输入 http://guest:8888/TruthHappens.ogg。
步骤 4:执行 live 移植
Copy to ClipboardCopied!Toggle word wrapToggle overflow
观察 live 移植。注意完成这个移植需要多少时间。
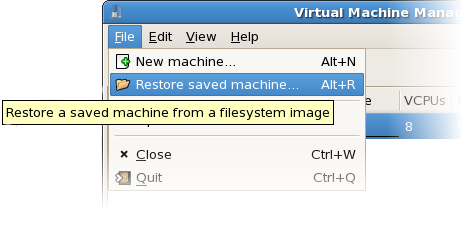
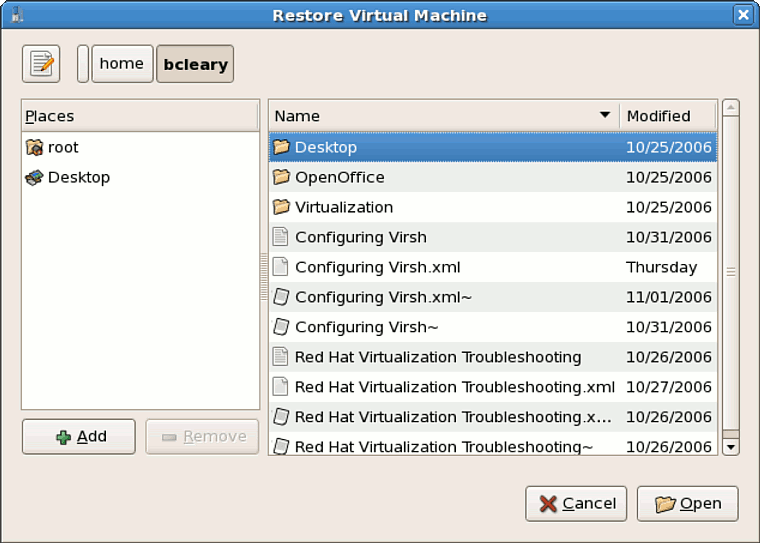
If time permits, from within the Xen guest, configure the VNC server to initiate when gdm starts up. Run VNC viewer and connect to the Xen guest. Play with the Xen guest when the live migration occurs. Attempt to pause/resume, and save/restore the Xen guest and observe what happens to the VNC viewer. If you connect to the VNC viewer via localhost:590x, and do a live migration, you won't be able to connect to the VNC viewer again when it dies. This is a known bug.
This document is licensed by Red Hat under the Creative Commons Attribution-ShareAlike 3.0 Unported License. If you distribute this document, or a modified version of it, you must provide attribution to Red Hat, Inc. and provide a link to the original. If the document is modified, all Red Hat trademarks must be removed.
Red Hat, as the licensor of this document, waives the right to enforce, and agrees not to assert, Section 4d of CC-BY-SA to the fullest extent permitted by applicable law.
Red Hat, Red Hat Enterprise Linux, the Shadowman logo, JBoss, OpenShift, Fedora, the Infinity logo, and RHCE are trademarks of Red Hat, Inc., registered in the United States and other countries.
Linux® is the registered trademark of Linus Torvalds in the United States and other countries.
Java® is a registered trademark of Oracle and/or its affiliates.
XFS® is a trademark of Silicon Graphics International Corp. or its subsidiaries in the United States and/or other countries.
MySQL® is a registered trademark of MySQL AB in the United States, the European Union and other countries.
Node.js® is an official trademark of Joyent. Red Hat Software Collections is not formally related to or endorsed by the official Joyent Node.js open source or commercial project.
The OpenStack® Word Mark and OpenStack logo are either registered trademarks/service marks or trademarks/service marks of the OpenStack Foundation, in the United States and other countries and are used with the OpenStack Foundation's permission. We are not affiliated with, endorsed or sponsored by the OpenStack Foundation, or the OpenStack community.
All other trademarks are the property of their respective owners.