此内容没有您所选择的语言版本。
Deploying Camel K integrations on OpenShift
TECHNOLOGY PREVIEW - Getting started with Red Hat Integration - Camel K
Abstract
Chapter 1. Introduction to Camel K
This chapter introduces the concepts, features, and cloud-native architecture provided by Red Hat Integration - Camel K:
Red Hat Integration - Camel K is a Technology Preview feature only. Technology Preview features are not supported with Red Hat production service level agreements (SLAs) and might not be functionally complete. Red Hat does not recommend using them in production.
These features provide early access to upcoming product features, enabling customers to test functionality and provide feedback during the development process. For more information about the support scope of Red Hat Technology Preview features, see https://access.redhat.com/support/offerings/techpreview.
1.1. Camel K overview
Red Hat Integration - Camel K is a lightweight integration framework built from Apache Camel K that runs natively in the cloud on OpenShift. Camel K is specifically designed for serverless and microservice architectures. You can use Camel K to instantly run your integration code written in Camel Domain Specific Language (DSL) directly on OpenShift. Camel K is a subproject of the Apache Camel open source community: https://github.com/apache/camel-k.
Camel K is implemented in the Go programming language and uses the Kubernetes Operator SDK to automatically deploy integrations in the cloud. For example, this includes automatically creating services and routes on OpenShift. This provides much faster turnaround times when deploying and redeploying integrations in the cloud, such as a few seconds or less instead of minutes.
The Camel K runtime provides significant performance optimizations. When running Camel K in developer mode, you can make live updates to your integration DSL and view results instantly in the cloud on OpenShift, without waiting for your integration to redeploy. When the Quarkus cloud-native Java framework is enabled, this provides faster start up times, and lower memory and CPU footprints.
Using Camel K with OpenShift Serverless and Knative Serving, containers are created only as needed and are autoscaled under load up and down to zero. This reduces cost by removing the overhead of server provisioning and maintenance and enables you to focus on application development instead.
Using Camel K with OpenShift Serverless and Knative Eventing, you can manage how components in your system communicate in an event-driven architecture for serverless applications. This provides flexibility and creates efficiencies through decoupled relationships between event producers and consumers using a publish-subscribe or event-streaming model.
Additional resources
1.2. Camel K Technology Preview features
The Camel K Technology Preview includes the following main features:
- OpenShift Container Platform 4.3
- OpenShift Serverless 1.7
- Knative Serving for autoscaling and scale-to-zero
- Knative Eventing for event-driven architectures
- Camel integrations written in Java, XML, or YAML DSL
- Java 11
- Quarkus 1.3 in HotSpot JVM mode
- OpenAPI 3.0 or 2.0
- Development tooling with Visual Studio Code
- Command line tools for Linux, Windows, and Mac
The Technology Preview includes building Camel K integration images with OpenShift only. Installing Camel K with the Buildah or Kaniko image builder is not included in the Technology Preview and has community-only support.
1.3. Camel K cloud-native architecture
The following diagram shows a simplified view of the Camel K cloud-native architecture:
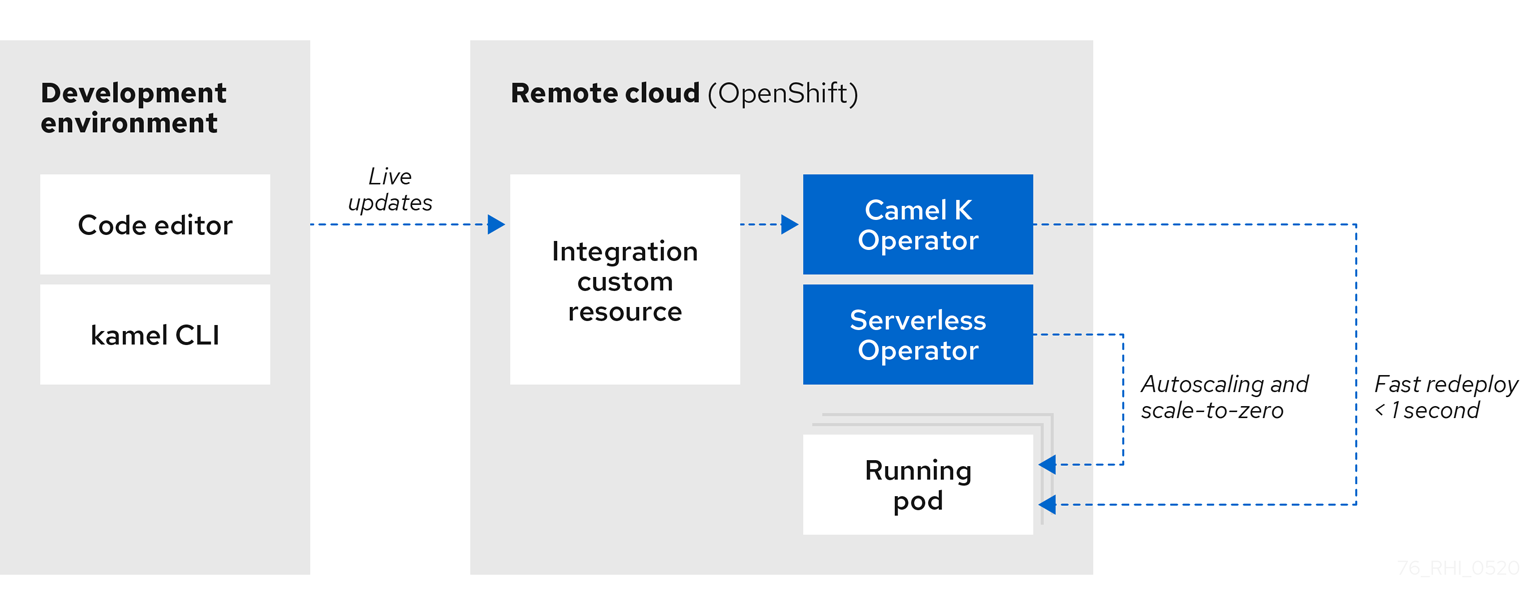
Camel K automatically wraps the Camel integration in a Kubernetes custom resource and uploads it to the cloud. This architecture provides the following benefits:
- Cloud-native integration and developer experience on OpenShift for faster development cycles
- Live updates without needing to redeploy using Camel K developer mode
- Automatic installation of Camel K and deployment of integrations using the Camel K Operator
- Autoscaling up and down to zero with Knative using the OpenShift Serverless Operator
Performance optimizations and cost savings using the Quarkus Java runtime:
- Pre-compilation and pre-initialization of code at build time
- Fast start up, deploy, and redeploy times
- Low memory and CPU footprint
- Automatic dependency resolution of Camel integration code
- Configuring advanced features on the command line using Camel K traits
Additional resources
1.4. Camel K development tooling
The Camel K Technology Preview provides development tooling extensions for Visual Studio (VS) Code, Red Hat CodeReady WorkSpaces, and Eclipse Che. These extensions include features such as automatic completion of Camel DSL code and Camel K traits, and automatic execution of Camel K quick start tutorial commands.
The following VS Code development tooling extensions are available:
VS Code Extension Pack for Apache Camel by Red Hat , which includes:
- Tooling for Apache Camel K extension
- Language Support for Apache Camel extension
- Additional extensions for OpenShift, Java, XML, and more
- Didact Tutorial Tools for VS Code extension
For details on how to set up these VS Code extensions for Camel K, see Section 2.4, “Setting up your Camel K development environment”.
Red Hat CodeReady Workspaces and Eclipse Che also provide these features using the vscode-camelk plug-in.
1.5. Camel K distributions
| Distribution | Description | Location |
|---|---|---|
| Operator image |
Container image for the Red Hat Integration - Camel K Operator: |
|
| Maven repository | Maven artifacts for Red Hat Integration - Camel K | |
| Source code | Source code for Red Hat Integration - Camel K | |
| Quickstarts | Quick start tutorials:
|
You must have a subscription for Red Hat Integration and be logged into the Red Hat Customer Portal to access the Red Hat Integration - Camel K distributions.
Chapter 2. Getting started with Camel K
This chapter explains how to install Red Hat Integration - Camel K on OpenShift and how to set up your development environment. This chapter also explains how to develop and deploy simple Camel K integrations written in Java, XML, and YAML.
- Section 2.1, “Installing Camel K from the OpenShift OperatorHub”
- Section 2.2, “Installing OpenShift Serverless from the OperatorHub”
- Section 2.3, “Installing the Camel K and OpenShift command line tools”
- Section 2.4, “Setting up your Camel K development environment”
- Section 2.5, “Developing Camel K integrations in Java”
- Section 2.6, “Developing Camel K integrations in XML”
- Section 2.7, “Developing Camel K integrations in YAML”
- Section 2.8, “Running Camel K integrations”
- Section 2.9, “Running Camel K integrations in development mode”
2.1. Installing Camel K from the OpenShift OperatorHub
You can install the Red Hat Integration - Camel K Operator on your OpenShift cluster from the OperatorHub. The OperatorHub is available from the OpenShift Container Platform web console and provides an interface for cluster administrators to discover and install Operators. For more details on the OperatorHub, see the OpenShift documentation.
Prerequisites
- You must have cluster administrator access to an OpenShift 4.3 cluster
You do not need to create a pull secret when installing Camel K from the OpenShift OperatorHub. The Camel K Operator automatically reuses the OpenShift cluster-level authentication to pull the Camel K image from registry.redhat.io.
Procedure
- In the OpenShift Container Platform web console, log in using an account with cluster administrator privileges.
Create a new OpenShift project:
- In the left navigation menu, click Home > Project > Create Project.
-
Enter a project name, for example,
my-camel-k-project, and click Create.
- In the left navigation menu, click Catalog > OperatorHub.
-
In the Filter by keyword text box, enter
Camel Kto find the Red Hat Integration - Camel K Operator. - Read the information about the Operator, and click Install. This displays the Create Operator Subscription page.
Select the following subscription settings:
- Installation Mode > A specific namespace on the cluster > my-camel-k-project
- Update Channel > techpreview
Approval Strategy > Automatic
NoteThe Installation mode > All namespaces on the cluster and Approval Strategy > Manual settings are also available if required by your environment.
- Click Subscribe. This displays the Operators > Installed Operators page.
- Wait a few moments until the Status for the Camel K Operator displays Succeeded and the subscription is Up to Date.
Additional resources
You can install the OpenShift Serverless Operator on your OpenShift cluster from the OperatorHub. The OperatorHub is available from the OpenShift Container Platform web console and provides an interface for cluster administrators to discover and install Operators. For more details on the OperatorHub, see the OpenShift documentation.
The OpenShift Serverless Operator supports both Knative Serving and Knative Eventing features. For more details, see Getting started with OpenShift Serverless.
Prerequisites
- You must have cluster administrator access to an OpenShift 4.3 cluster
- See Installing OpenShift Serverless in the OpenShift documentation
Procedure
- In the OpenShift Container Platform web console, log in using an account with cluster administrator privileges.
- In the left navigation menu, click Catalog > OperatorHub.
-
In the Filter by keyword text box, enter
Serverlessto find the OpenShift Serverless Operator. - Read the information about the Operator, and click Install. This displays the Create Operator Subscription page.
Select the default subscription settings:
- Installation Mode > All namespaces on the cluster
- Update Channel > Select the channel that matches your OpenShift version, for example, 4.3
Approval Strategy > Automatic
NoteThe Approval Strategy > Manual setting is also available if required by your environment.
- Click Subscribe. This displays the Operators > Installed Operators page.
- Wait a few moments until the Status for the Serverless displays Succeeded and the subscription is Up to Date.
For more details, see Installing OpenShift Serverless in the OpenShift documentation.
Next steps
You must install the following Knative components using the steps in the OpenShift documentation:
Camel K and OpenShift provide command line tools to deploy and manage your integrations in the cloud. This section explains how to install the following Command Line Interface (CLI) tools:
-
kamel- Camel K CLI -
oc- OpenShift Container Platform CLI -
kn- OpenShift Serverless CLI
These command line tools are all available on Linux, Windows, and Mac.
Prerequisites
You must have access to an OpenShift cluster on which the Camel K Operator and OpenShift Serverless Operator are installed:
Procedure
- In the OpenShift Container Platform web console, log in using an account with developer or administrator privileges.
-
Click the
 help icon in the toolbar, and select Command Line Tools.
-
Download and extract the
oc- OpenShift CLI archive if this tool is not already installed. For more details, see the OpenShift CLI documentation. -
Download and extract the
kn- OpenShift Serverless CLI archive if this tool is not already installed. For more details, see the OpenShift Serverless CLI documentation. -
Download and extract the
kamel- Camel K CLI archive to install. -
Add the
kamelbinary file to your system path. For example, on Linux, you can putkamelin/usr/bin. Log into your OpenShift cluster using the
occlient tool, for example:oc login --token=my-token --server=https://my-cluster.example.com:6443
$ oc login --token=my-token --server=https://my-cluster.example.com:6443Copy to Clipboard Copied! Toggle word wrap Toggle overflow Enter the following command to verify the installation of the
kamelclient tool:kamel --help
$ kamel --helpCopy to Clipboard Copied! Toggle word wrap Toggle overflow
Additional resources
2.4. Setting up your Camel K development environment
You must set up your environment with the recommended development tooling before you can automatically deploy the Camel K quick start tutorials. This section explains how to install the recommended Visual Studio (VS) Code IDE and the extensions that it provides for Camel K.
VS Code is recommended for ease of use and the best developer experience of Camel K. This includes automatic completion of Camel DSL code and Camel K traits, and automatic execution of tutorial commands. However, you can manually enter your code and tutorial commands using your chosen IDE instead of VS Code.
Prerequisites
You must have access to an OpenShift cluster on which the Camel K Operator and OpenShift Serverless Operator are installed:
- Section 2.3, “Installing the Camel K and OpenShift command line tools”
Procedure
Install VS Code on your development platform. For example, on Red Hat Enterprise Linux:
Install the required key and repository:
sudo rpm --import https://packages.microsoft.com/keys/microsoft.asc
sudo sh -c 'echo -e "[code]\nname=Visual Studio Code\nbaseurl=https://packages.microsoft.com/yumrepos/vscode\nenabled=1\ngpgcheck=1\ngpgkey=https://packages.microsoft.com/keys/microsoft.asc" > /etc/yum.repos.d/vscode.repo'
$ sudo rpm --import https://packages.microsoft.com/keys/microsoft.asc
$ sudo sh -c 'echo -e "[code]\nname=Visual Studio Code\nbaseurl=https://packages.microsoft.com/yumrepos/vscode\nenabled=1\ngpgcheck=1\ngpgkey=https://packages.microsoft.com/keys/microsoft.asc" > /etc/yum.repos.d/vscode.repo'
Copy to Clipboard Copied! Toggle word wrap Toggle overflow Update the cache and install the VS Code package:
yum check-update
sudo yum install code
$ yum check-update
$ sudo yum install code
Copy to Clipboard Copied! Toggle word wrap Toggle overflow For details on installing on other platforms, see the VS Code installation documentation.
-
Enter the
codecommand to launch the VS Code editor. For more details, see the VS Code command line documentation. Install the VS Code Camel Extension Pack, which includes the extensions required for Camel K. For example, in VS Code:
- In the left navigation bar, click Extensions.
- In the search box, enter Apache Camel.
Select the Extension Pack for Apache Camel by Red Hat, and click Install.
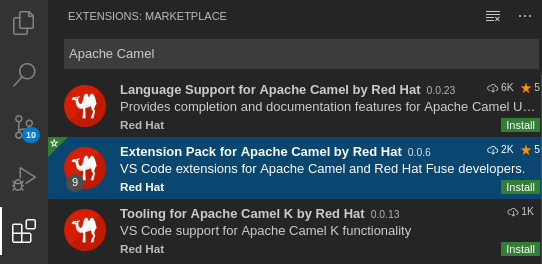
For more details, see the instructions for the Extension Pack for Apache Camel by Red Hat.
Install the VS Code Didact extension, which you can use to automatically run quick start tutorial commands by clicking links in the tutorial. For example, in VS Code:
- In the left navigation bar, click Extensions.
- In the search box, enter Didact.
Select the extension, and click Install.
For more details, see the instructions for the Didact extension.
2.5. Developing Camel K integrations in Java
This section shows how to develop a simple Camel K integration in Java DSL. Writing an integration in Java to be deployed using Camel K is the same as defining your routing rules in Camel. However, you do not need to build and package the integration as a JAR when using Camel K.
You can use any Camel component directly in your integration routes. Camel K automatically handles the dependency management and imports all the required libraries from the Camel catalog using code inspection.
Procedure
Enter the
kamel initcommand to generate a simple Java integration file. For example:kamel init HelloCamelK.java
$ kamel init HelloCamelK.javaCopy to Clipboard Copied! Toggle word wrap Toggle overflow Open the generated integration file in your IDE and edit as appropriate. For example, the
HelloCamelK.javaintegration automatically includes the Cameltimerandlogcomponents to help you get started:Copy to Clipboard Copied! Toggle word wrap Toggle overflow
Next steps
2.6. Developing Camel K integrations in XML
This section explains how to develop a simple Camel K integration in classic XML DSL. Writing an integration in XML to be deployed using Camel K is the same as defining your routing rules in Camel.
You can use any Camel component directly in your integration routes. Camel K automatically handles the dependency management and imports all the required libraries from the Camel catalog using code inspection.
Procedure
Enter the
kamel initcommand to generate a simple XML integration file. For example:kamel init hello-camel-k.xml
$ kamel init hello-camel-k.xmlCopy to Clipboard Copied! Toggle word wrap Toggle overflow Open the generated integration file in your IDE and edit as appropriate. For example, the
hello-camel-k.xmlintegration automatically includes the Cameltimerandlogcomponents to help you get started:Copy to Clipboard Copied! Toggle word wrap Toggle overflow
Next steps
2.7. Developing Camel K integrations in YAML
This section explains how to develop a simple Camel K integration in YAML DSL. Writing an integration in YAML to be deployed using Camel K is the same as defining your routing rules in Camel.
You can use any Camel component directly in your integration routes. Camel K automatically handles the dependency management and imports all the required libraries from the Camel catalog using code inspection.
Procedure
Enter the
kamel initcommand to generate a simple XML integration file. For example:kamel init hello.camelk.yaml
$ kamel init hello.camelk.yamlCopy to Clipboard Copied! Toggle word wrap Toggle overflow Open the generated integration file in your IDE and edit as appropriate. For example, the
hello.camelk.yamlintegration automatically includes the Cameltimerandlogcomponents to help you get started:Copy to Clipboard Copied! Toggle word wrap Toggle overflow ImportantIntegrations written in YAML must have a file name with the pattern
*.camelk.yamlor a first line of# camel-k: language=yaml.
Additional resources
2.8. Running Camel K integrations
You can run Camel K integrations in the cloud on your OpenShift cluster from the command line using the kamel run command.
Prerequisites
- You must have access to an OpenShift cluster on which the Camel K Operator is installed. For more details, see Section 2.1, “Installing Camel K from the OpenShift OperatorHub”.
- Section 2.3, “Installing the Camel K and OpenShift command line tools”.
- Section 2.4, “Setting up your Camel K development environment”.
- You must already have a Camel integration written in Java, XML, or YAML DSL.
Procedure
Log into your OpenShift cluster using the
occlient tool, for example:oc login --token=my-token --server=https://my-cluster.example.com:6443
$ oc login --token=my-token --server=https://my-cluster.example.com:6443Copy to Clipboard Copied! Toggle word wrap Toggle overflow Ensure that the Camel K Operator is running, for example:
oc get pod
NAME                               READY   STATUS    RESTARTS   AGE
camel-k-operator-86b8d94b4-pk7d6   1/1     Running   0          6m28s
$ oc get pod
NAME                               READY   STATUS    RESTARTS   AGE
camel-k-operator-86b8d94b4-pk7d6   1/1     Running   0          6m28s
Copy to Clipboard Copied! Toggle word wrap Toggle overflow Enter the
kamel runcommand to run your integration in the cloud on OpenShift. For example:Java example
kamel run HelloCamelK.java
integration "hello-camel-k" created
$ kamel run HelloCamelK.java
integration "hello-camel-k" created
Copy to Clipboard Copied! Toggle word wrap Toggle overflow XML example
kamel run hello-camel-k.xml
integration "hello-camel-k" created
$ kamel run hello-camel-k.xml
integration "hello-camel-k" created
Copy to Clipboard Copied! Toggle word wrap Toggle overflow YAML example
kamel run hello.camelk.yaml
integration "hello" created
$ kamel run hello.camelk.yaml
integration "hello" created
Copy to Clipboard Copied! Toggle word wrap Toggle overflow Enter the
kamel getcommand to check the status of the integration:kamel get NAME PHASE KIT hello Building Kit kit-bq666mjej725sk8sn12g
$ kamel get
NAME       PHASE           KIT
hello      Building Kit    kit-bq666mjej725sk8sn12g
Copy to Clipboard Copied! Toggle word wrap Toggle overflow When the integration runs for the first time, Camel K builds the integration kit for the container image, which downloads all the required Camel modules and adds them to the image classpath.
Enter
kamel getagain to verify that the integration is running:kamel get NAME PHASE KIT hello Running kit-bq666mjej725sk8sn12g
$ kamel get
NAME       PHASE   KIT
hello      Running kit-bq666mjej725sk8sn12g
Copy to Clipboard Copied! Toggle word wrap Toggle overflow Enter the
kamel logcommand to print the log tostdout:Copy to Clipboard Copied! Toggle word wrap Toggle overflow -
Press
Ctrl-Cto terminate logging in the terminal.
Additional resources
-
For more details on the
kamel runcommand, enterkamel run --help - For faster deployment turnaround times, see Section 2.9, “Running Camel K integrations in development mode”
- For examples of using development tooling to run integrations, see VS Code Tooling for Apache Camel K by Red Hat
- See also Section 5.1, “Managing Camel K integrations”
2.9. Running Camel K integrations in development mode
You can run Camel K integrations in development mode on your OpenShift cluster from the command line. Using development mode, you can iterate quickly on integrations in development and get fast feedback on your code.
When you specify the kamel run command with the --dev option, this deploys the integration in the cloud immediately and shows the integration logs in the terminal. You can then change the code and see the changes automatically applied instantly to the remote integration Pod on OpenShift. The terminal automatically displays all redeployments of the remote integration in the cloud.
The artifacts generated by Camel K in development mode are identical to those that you run in production. The purpose of development mode is faster development.
Prerequisites
- You must have access to an OpenShift cluster on which the Camel K Operator is installed. For more details, see Section 2.1, “Installing Camel K from the OpenShift OperatorHub”.
- Section 2.3, “Installing the Camel K and OpenShift command line tools”.
- Section 2.4, “Setting up your Camel K development environment”.
- You must already have a Camel integration written in Java, XML, or YAML DSL.
Procedure
Log into your OpenShift cluster using the
occlient tool, for example:oc login --token=my-token --server=https://my-cluster.example.com:6443
$ oc login --token=my-token --server=https://my-cluster.example.com:6443Copy to Clipboard Copied! Toggle word wrap Toggle overflow Ensure that the Camel K Operator is running, for example:
oc get pod
NAME                               READY   STATUS    RESTARTS   AGE
camel-k-operator-86b8d94b4-pk7d6   1/1     Running   0          6m28s
$ oc get pod
NAME                               READY   STATUS    RESTARTS   AGE
camel-k-operator-86b8d94b4-pk7d6   1/1     Running   0          6m28s
Copy to Clipboard Copied! Toggle word wrap Toggle overflow Enter the
kamel runcommand with--devto run your integration in development mode on OpenShift in the cloud. The following shows a simple Java example:Copy to Clipboard Copied! Toggle word wrap Toggle overflow Edit the content of your integration DSL file, save your changes, and see the changes displayed instantly in the terminal. For example:
Copy to Clipboard Copied! Toggle word wrap Toggle overflow -
Press
Ctrl-Cto terminate logging in the terminal.
Additional resources
-
For more details on the
kamel runcommand, enterkamel run --help - For examples of using development tooling to run integrations, see VS Code Tooling for Apache Camel K by Red Hat
- Section 5.1, “Managing Camel K integrations”
- Section 4.6, “Configuring Camel K integration dependencies”
Chapter 3. Camel K quick start developer tutorials
Red Hat Integration - Camel K provides quick start developer tutorials based on integration use cases available from https://github.com/openshift-integration. This chapter provides details on how to set up and deploy the following tutorials:
3.1. Deploying a basic Camel K Java integration
This tutorial demonstrates how to run a simple Java integration in the cloud on OpenShift, apply configuration and routing to an integration, and run an integration as a Kubernetes CronJob.
Prerequisites
- See the tutorial readme in GitHub: https://github.com/openshift-integration/camel-k-example-basic.
- You must have cluster administrator access to an OpenShift 4.3 cluster to install Camel K. See Section 2.1, “Installing Camel K from the OpenShift OperatorHub”.
-
You must have the
kamelcommand installed. See Section 2.3, “Installing the Camel K and OpenShift command line tools”. - Visual Studio (VS) Code is optional but recommended for the best developer experience. See Section 2.4, “Setting up your Camel K development environment”.
Procedure
Clone the tutorial Git repository:
git clone git@github.com:openshift-integration/camel-k-example-basic.git
$ git clone git@github.com:openshift-integration/camel-k-example-basic.gitCopy to Clipboard Copied! Toggle word wrap Toggle overflow In the VS Code navigation tree, right-click the
readme.didact.mdfile and select Didact: Start Didact Tutorial from File. For example: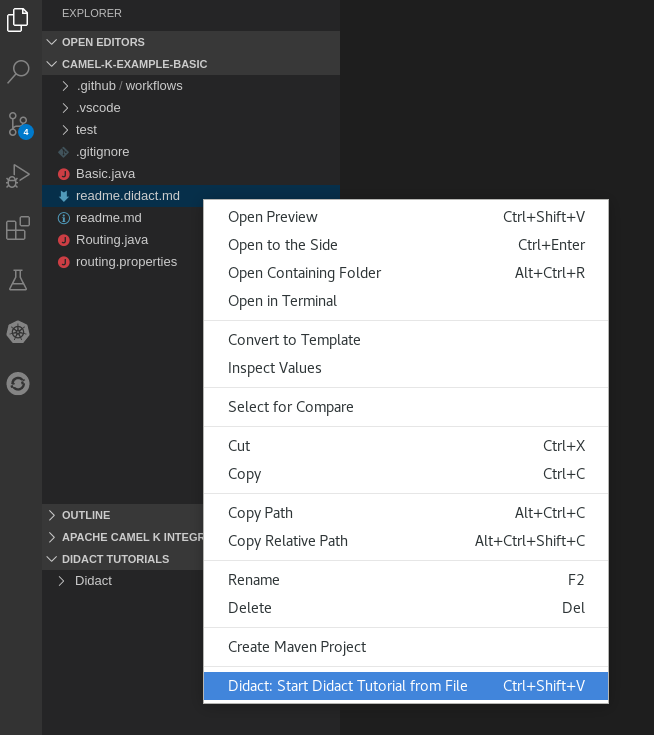
This opens a new Didact tab in VS Code to display the tutorial instructions.
Follow the tutorial instructions and click the provided links to run the commands automatically.
Alternatively, if you do not have VS Code installed with the Didact extension, you can manually enter the commands from https://github.com/openshift-integration/camel-k-example-basic.
Additional resources
This tutorial demonstrates how to deploy Camel K integrations with OpenShift Serverless in an event-driven architecture. This tutorial uses a Knative Eventing broker to communicate using an event publish-subscribe pattern in a Bitcoin trading demonstration.
This tutorial also shows how to use Camel K integrations to connect to a Knative event mesh with multiple external systems. The Camel K integrations also use Knative Serving to automatically scale up and down to zero as needed.
Prerequisites
- See the tutorial readme in GitHub: https://github.com/openshift-integration/camel-k-example-knative.
You must have cluster administrator access to an OpenShift 4.3 cluster to install Camel K and OpenShift Serverless:
-
You must have the
kamelcommand installed. See Section 2.3, “Installing the Camel K and OpenShift command line tools”. - Visual Studio (VS) Code is optional but recommended for the best developer experience. See Section 2.4, “Setting up your Camel K development environment”.
Procedure
Clone the tutorial Git repository:
git clone git@github.com:openshift-integration/camel-k-example-knative.git
$ git clone git@github.com:openshift-integration/camel-k-example-knative.gitCopy to Clipboard Copied! Toggle word wrap Toggle overflow -
In the VS Code navigation tree, right-click the
readme.didact.mdfile and select Didact: Start Didact Tutorial from File. This opens a new Didact tab in VS Code to display the tutorial instructions. Follow the tutorial instructions and click the provided links to run the commands automatically.
Alternatively, if you do not have VS Code installed with the Didact extension, you can manually enter the commands from https://github.com/openshift-integration/camel-k-example-knative.
Additional resources
This tutorial demonstrates using Camel K and OpenShift Serverless with Knative Eventing for an event-driven architecture.
The tutorial shows how to install Camel K and Serverless with Knative in an AMQ Streams cluster with an AMQ Broker cluster, and how to deploy an event streaming project to run a global hazard alert demonstration application.
Prerequisites
- See the tutorial readme in GitHub: https://github.com/openshift-integration/camel-k-example-event-streaming.
You must have cluster administrator access to an OpenShift 4.3 cluster to install Camel K and OpenShift Serverless:
-
You must have the
kamelcommand installed. See Section 2.3, “Installing the Camel K and OpenShift command line tools”. You must follow the instructions in the tutorial readme to install the additional required Operators on your OpenShift cluster:
- AMQ Streams Operator
- AMQ Broker Operator
- Visual Studio (VS) Code is optional but recommended for the best developer experience. See Section 2.4, “Setting up your Camel K development environment”.
Procedure
Clone the tutorial Git repository:
git clone git@github.com:openshift-integration/camel-k-example-event-streaming.git
$ git clone git@github.com:openshift-integration/camel-k-example-event-streaming.gitCopy to Clipboard Copied! Toggle word wrap Toggle overflow -
In the VS Code navigation tree, right-click the
readme.didact.mdfile and select Didact: Start Didact Tutorial from File. This opens a new Didact tab in VS Code to display the tutorial instructions. Follow the tutorial instructions and click the provided links to run the commands automatically.
Alternatively, if you do not have VS Code installed with the Didact extension, you can manually enter the commands from https://github.com/openshift-integration/camel-k-example-event-streaming.
Additional resources
This tutorial demonstrates using Camel K and OpenShift Serverless with Knative Serving for an API-based integration, and managing an API with 3scale API Management on OpenShift.
The tutorial shows how to configure Amazon S3-based storage, design an OpenAPI definition, and run an integration that calls the demonstration API endpoints.
Prerequisites
- See the tutorial readme in GitHub: https://github.com/openshift-integration/camel-k-example-api.
You must have cluster administrator access to an OpenShift 4.3 cluster to install Camel K and OpenShift Serverless:
-
You must have the
kamelcommand installed. See Section 2.3, “Installing the Camel K and OpenShift command line tools”. - You can also install the optional Red Hat Integration - 3scale Operator on your OpenShift system to manage the API. See Deploying 3scale using the Operator.
- Visual Studio (VS) Code is optional but recommended for the best developer experience. See Section 2.4, “Setting up your Camel K development environment”.
Procedure
Clone the tutorial Git repository:
git clone git@github.com:openshift-integration/camel-k-example-api.git
$ git clone git@github.com:openshift-integration/camel-k-example-api.gitCopy to Clipboard Copied! Toggle word wrap Toggle overflow -
In the VS Code navigation tree, right-click the
readme.didact.mdfile and select Didact: Start Didact Tutorial from File. This opens a new Didact tab in VS Code to display the tutorial instructions. Follow the tutorial instructions and click the provided links to run the commands automatically.
Alternatively, if you do not have VS Code installed with the Didact extension, you can manually enter the commands from https://github.com/openshift-integration/camel-k-example-api.
Additional resources
Chapter 4. Configuring Camel K integrations
This chapter explains available options for configuring Red Hat Integration - Camel K integrations using properties:
- Section 4.1, “Configuring Camel K integrations using properties”
- Section 4.2, “Configuring Camel K integrations using property files”
- Section 4.3, “Configuring Camel K properties using an OpenShift ConfigMap”
- Section 4.4, “Configuring Camel K properties using an OpenShift Secret”
- Section 4.5, “Configuring Camel integration components”
- Section 4.6, “Configuring Camel K integration dependencies”
4.1. Configuring Camel K integrations using properties
You can configure properties for Camel K integrations on the command line at runtime. When you define a property in an integration using a property placeholder, for example, {{my.message}}, you can specify the property value on the command line, for example --property my.message=Hello. You can specify multiple properties in a single command.
Procedure
Develop a Camel integration that uses a property. The following simple route includes a
{{my.message}}property placeholder:Copy to Clipboard Copied! Toggle word wrap Toggle overflow Enter the
kamel runcommand using the--propertyoption to set the property value at runtime. For example:kamel run --property my.message="Hola Mundo" HelloCamelK.java --dev ... [1] 2020-04-13 15:39:59.213 INFO [main] ApplicationRuntime - Listener org.apache.camel.k.listener.RoutesDumper@6e0dec4a executed in phase Started [1] 2020-04-13 15:40:00.237 INFO [Camel (camel-k) thread #1 - timer://java] info - Exchange[ExchangePattern: InOnly, BodyType: String, Body: Hola Mundo from java] ...
$ kamel run --property my.message="Hola Mundo" HelloCamelK.java --dev
...
[1] 2020-04-13 15:39:59.213 INFO  [main] ApplicationRuntime - Listener org.apache.camel.k.listener.RoutesDumper@6e0dec4a executed in phase Started
[1] 2020-04-13 15:40:00.237 INFO  [Camel (camel-k) thread #1 - timer://java] info - Exchange[ExchangePattern: InOnly, BodyType: String, Body: Hola Mundo from java]
...
Copy to Clipboard Copied! Toggle word wrap Toggle overflow
You can configure multiple properties for Camel K integrations by specifying a property file on the command line at runtime. When you define properties in an integration using property placeholders, for example, {{my.items}}, you can specify the property values on the command line using a properties file, for example --property-file my-integration.properties.
Procedure
Define your integration properties file. The following shows a simple example from a
routing.propertiesfile:# List of items for random generation items=*radiator *engine *door window # Marker to identify priority items priority-marker=*
# List of items for random generation items=*radiator *engine *door window # Marker to identify priority items priority-marker=*Copy to Clipboard Copied! Toggle word wrap Toggle overflow Develop a Camel integration that uses properties defined in the properties file. The following example from the
Routing.javaintegration uses the{{items}}and{{priority-marker}}property placeholders:Copy to Clipboard Copied! Toggle word wrap Toggle overflow Enter the
kamel runcommand with the--property-fileoption. For example:Copy to Clipboard Copied! Toggle word wrap Toggle overflow
You can configure multiple properties for Camel K integrations using an OpenShift ConfigMap. When you define properties in an integration using property placeholders, for example, {{my.message}}, you can specify the property values at runtime using a ConfigMap. You can also specify additional properties such as logging levels in the application.properties section of the ConfigMap.
Procedure
Develop a Camel integration that uses properties. The following simple route includes the
{{my.message}}property placeholder:Copy to Clipboard Copied! Toggle word wrap Toggle overflow Define a ConfigMap that contains your configuration properties. For example:
Copy to Clipboard Copied! Toggle word wrap Toggle overflow This example sets the value of the
my.messageproperty and sets the logging level for theorg.apache.camelpackage in theapplication.properties.Create the ConfigMap in the same OpenShift namespace as your integration:
oc apply -f my-configmap.yaml
configmap/my-configmap created
$ oc apply -f my-configmap.yaml
configmap/my-configmap created
Copy to Clipboard Copied! Toggle word wrap Toggle overflow Run the integration with the
--configmapoption to specify the configuration properties in the ConfigMap:Copy to Clipboard Copied! Toggle word wrap Toggle overflow
Additional resources
You can configure multiple properties for Camel K integrations using an OpenShift Secret. When you define properties in an integration using property placeholders, for example, {{my.message}}, you can specify the property values at runtime using a Secret. You can also specify additional properties such as logging levels in the application.properties section of the Secret.
Configuring integration properties using a Secret is similar to configuring using a ConfigMap. The main difference is that you may need to base64-encode the content of the application.properties in the Secret.
Procedure
Develop a Camel integration that uses properties. The following simple route includes the
{{my.message}}property placeholder:Copy to Clipboard Copied! Toggle word wrap Toggle overflow Define a Secret that contains your configuration properties. For example:
Copy to Clipboard Copied! Toggle word wrap Toggle overflow This example sets the value of the
my.messageproperty toHello Worldand sets the logging level for theorg.apache.camelpackage toDEBUG. These settings are specified in base64-encoded format in theapplication.properties.Create the Secret in the same OpenShift namespace as your integration:
oc apply -f my-secret.yaml
secret/my-secret created
$ oc apply -f my-secret.yaml
secret/my-secret created
Copy to Clipboard Copied! Toggle word wrap Toggle overflow Run the integration with the
--secretoption to specify the configuration properties in the Secret:kamel run --secret=my-secret HelloCamelK.java --dev [1] 2020-04-14 14:30:29.788 DEBUG [Camel (camel-k) thread #1 - timer://java] DefaultReactiveExecutor - Queuing reactive work: CamelInternalProcessor - UnitOfWork - afterProcess - DefaultErrorHandler[sendTo(log://info)] - ID-hello-camel-k-68f85d99b9-srd92-1586874486770-0-144 [1] 2020-04-14 14:30:29.789 DEBUG [Camel (camel-k) thread #1 - timer://java] SendProcessor - >>>> log://info Exchange[ID-hello-camel-k-68f85d99b9-srd92-1586874486770-0-144] [1] 2020-04-14 14:30:29.789 INFO [Camel (camel-k) thread #1 - timer://java] info - Exchange[ExchangePattern: InOnly, BodyType: String, Body: Hello World from java]
$ kamel run --secret=my-secret HelloCamelK.java --dev
[1] 2020-04-14 14:30:29.788 DEBUG [Camel (camel-k) thread #1 - timer://java] DefaultReactiveExecutor - Queuing reactive work: CamelInternalProcessor - UnitOfWork - afterProcess - DefaultErrorHandler[sendTo(log://info)] - ID-hello-camel-k-68f85d99b9-srd92-1586874486770-0-144
[1] 2020-04-14 14:30:29.789 DEBUG [Camel (camel-k) thread #1 - timer://java] SendProcessor - >>>> log://info Exchange[ID-hello-camel-k-68f85d99b9-srd92-1586874486770-0-144]
[1] 2020-04-14 14:30:29.789 INFO  [Camel (camel-k) thread #1 - timer://java] info - Exchange[ExchangePattern: InOnly, BodyType: String, Body: Hello World from java]
Copy to Clipboard Copied! Toggle word wrap Toggle overflow
Additional resources
4.5. Configuring Camel integration components
You can configure Camel components programmatically in your integration code or by using configuration properties on the command line at runtime. You can configure Camel components using the following syntax:
camel.component.${scheme}.${property}=${value}
camel.component.${scheme}.${property}=${value}
For example, to change the queue size of the Camel seda component for staged event-driven architecture, you can configure the following property on the command line:
camel.component.seda.queueSize=10
camel.component.seda.queueSize=10Procedure
Enter the
kamel runcommand and specify the Camel component configuration using the--propertyoption. For example:kamel run --property camel.component.seda.queueSize=10 examples/Integration.java
$ kamel run --property camel.component.seda.queueSize=10 examples/Integration.javaCopy to Clipboard Copied! Toggle word wrap Toggle overflow
4.6. Configuring Camel K integration dependencies
Camel K automatically resolves a wide range of dependencies that are required to run your integration code. However, you can explicitly add dependencies on the command line at runtime using the kamel run --dependency option.
The following example integration uses Camel K automatic dependency resolution:
...
  from("imap://admin@myserver.com")
    .to("seda:output")
...
...
  from("imap://admin@myserver.com")
    .to("seda:output")
...
Because this integration has an endpoint starting with the imap: prefix, Camel K can automatically add the camel-mail component to the list of required dependencies. The seda: endpoint belongs to camel-core, which is automatically added to all integrations, so Camel K does not add additional dependencies for this component.
Camel K automatic dependency resolution is transparent to the user at runtime. This is very useful in development mode because you can quickly add all the components that you need without exiting the development loop.
You can explicitly add a dependency using the kamel run --dependency or -d option. You might need to use this to specify dependencies that are not included in the Camel catalog. You can specify multiple dependencies on the command line.
Procedure
Enter the
kamel runcommand and specify dependencies using the-doption. For example:kamel run -d mvn:com.google.guava:guava:26.0-jre -d camel-mina2 Integration.java
$ kamel run -d mvn:com.google.guava:guava:26.0-jre -d camel-mina2 Integration.javaCopy to Clipboard Copied! Toggle word wrap Toggle overflow
You can disable automatic dependency resolution by disabling the dependencies trait: -trait dependencies.enabled=false. However, this is not recommended in most cases.
Chapter 5. Managing and monitoring Camel K integrations
This chapter explains available options for managing and monitoring Red Hat Integration - Camel K integrations at runtime:
5.1. Managing Camel K integrations
Camel K provides different options for managing Camel K integrations on your OpenShift cluster on the command line. This section shows examples of using the following commands:
-
kamel get -
kamel describe -
kamel log -
kamel delete
Prerequisites
- Section 2.4, “Setting up your Camel K development environment”
- You must already have a Camel integration written in Java, XML, or YAML DSL
Procedure
Ensure that the Camel K Operator is running on your OpenShift cluster, for example:
oc get pod
NAME                               READY   STATUS    RESTARTS   AGE
camel-k-operator-86b8d94b4-pk7d6   1/1     Running   0          6m28s
$ oc get pod
NAME                               READY   STATUS    RESTARTS   AGE
camel-k-operator-86b8d94b4-pk7d6   1/1     Running   0          6m28s
Copy to Clipboard Copied! Toggle word wrap Toggle overflow Enter the
kamel runcommand to run your integration in the cloud on OpenShift. For example:kamel run hello.camelk.yaml integration "hello" created
$ kamel run hello.camelk.yaml
integration "hello" created
Copy to Clipboard Copied! Toggle word wrap Toggle overflow Enter the
kamel getcommand to check the status of the integration:kamel get NAME PHASE KIT hello Building Kit kit-bqatqib5t4kse5vukt40
$ kamel get
NAME   PHASE        KIT
hello  Building Kit kit-bqatqib5t4kse5vukt40
Copy to Clipboard Copied! Toggle word wrap Toggle overflow Enter the
kamel describecommand print detailed information about the integration:Copy to Clipboard Copied! Toggle word wrap Toggle overflow Enter the
kamel logcommand to print the log tostdout:Copy to Clipboard Copied! Toggle word wrap Toggle overflow -
Press
Ctrl-Cto terminate logging in the terminal. Enter the
kamel deleteto delete the integration deployed on OpenShift:kamel delete hello Integration hello deleted
$ kamel delete hello
Integration hello deleted
Copy to Clipboard Copied! Toggle word wrap Toggle overflow
Additional resources
- For more details on logging, see Section 5.2, “Setting Camel K integration logging levels”
- For faster deployment turnaround times, see Section 2.9, “Running Camel K integrations in development mode”
- For examples of using development tooling to manage integrations, see VS Code Tooling for Apache Camel K by Red Hat
5.2. Setting Camel K integration logging levels
Camel K uses Apache Log4j 2 as the logging framework for integrations. You can configure the logging levels of various loggers on the command line at runtime by specifying the logging.level prefix as an integration property. For example:
--property logging.level.org.apache.camel=DEBUG
--property logging.level.org.apache.camel=DEBUGProcedure
Enter the
kamel runcommand and specify the logging level using the--propertyoption. For example:Copy to Clipboard Copied! Toggle word wrap Toggle overflow -
Press
Ctrl-Cto terminate logging in the terminal.
Additional resources
- For more details on the logging framework, see the Apache Log4j 2 documentation
- For examples of using development tooling to view logging, see VS Code Tooling for Apache Camel K by Red Hat
Chapter 6. Camel K developer reference
This chapter provides reference information about advanced features and core capabilities that you can configure on the command line at runtime. Red Hat Integration - Camel K provides feature traits to configure Camel K for specific features and technologies. Camel K also provides platform traits to configure internal Camel K core capabilities.
The Red Hat Integration - Camel K Technology Preview includes the OpenShift and Knative profiles. The Kubernetes profile has community-only support.
This Technology Preview includes Java, XML, and YAML DSL for integrations. Other languages such as Groovy, JavaScript, and Kotlin have community-only support.
This chapter includes the following sections:
Camel K feature traits
- Section 6.2.1, “3scale Trait”
- Section 6.2.2, “Affinity Trait”
- Section 6.2.3, “Cron Trait”
- Section 6.2.4, “Gc Trait”
- Section 6.2.5, “Istio Trait”
- Section 6.2.6, “Jolokia Trait”
- Section 6.2.7, “Knative Trait”
- Section 6.2.8, “Knative Service Trait”
- Section 6.2.9, “Master Trait”
- Section 6.2.10, “Prometheus Trait”
- Section 6.2.11, “Quarkus Trait”
- Section 6.2.12, “Route Trait”
- Section 6.2.13, “Service Trait”
Camel K core platform traits
- Section 6.3.1, “Builder Trait”
- Section 6.3.3, “Camel Trait”
- Section 6.3.2, “Container Trait”
- Section 6.3.4, “Dependencies Trait”
- Section 6.3.5, “Deployer Trait”
- Section 6.3.6, “Deployment Trait”
- Section 6.3.7, “Environment Trait”
- Section 6.3.8, “Jvm Trait”
- Section 6.3.9, “OpenAPI”
- Section 6.3.10, “Owner Trait”
- Section 6.3.11, “Platform Trait”
6.1. Camel K traits and profiles
Camel K traits are advanced features and core capabilities that you can configure on the command line to customize Camel K integrations. For example, this includes feature traits that configure interactions with technologies such as 3scale API Management, Quarkus, Knative, and Prometheus. Camel K also provides internal platform traits that configure important core platform capabilities such as Camel support, containers, dependency resolution, and JVM support.
Camel K profiles define the target cloud platforms on which Camel K integrations run. The Camel K Technology Preview supports the OpenShift and Knative profiles.
When you run an integration on OpenShift, Camel K uses the Knative profile when OpenShift Serverless is installed on the cluster. Camel K uses the OpenShift profile when OpenShift Serverless is not installed.
You can also specify the profile at runtime using the kamel run --profile option.
Camel K provides useful defaults for all traits, taking into account the target profile on which the integration runs. However, advanced users can configure Camel K traits for custom behavior. Some traits only apply to specific profiles such as OpenShift or Knative. For more details, see the available profiles in each trait description.
Camel K trait configuration
Each Camel trait has a unique ID that you can use to configure the trait on the command line. For example, the following command disables creating an OpenShift Service for an integration:
kamel run --trait service.enabled=false my-integration.yaml
$ kamel run --trait service.enabled=false my-integration.yaml
You can also use the -t option to specify traits.
Camel K trait properties
You can use the enabled property to enable or disable each trait. All traits have their own internal logic to determine if they need to be enabled when the user does not activate them explicitly.
Disabling a platform trait may compromise the platform functionality.
Some traits have an auto property, which you can use to enable or disable automatic configuration of the trait based on the environment. For example, this includes traits such as 3scale, Cron, and Knative. This automatic configuration can enable or disable the trait when the enabled property is not explicitly set, and can change the trait configuration.
Most traits have additional properties that you can configure on the command line. For more details, see the descriptions for each trait in the sections that follow.
6.2. Camel K feature traits
6.2.1. 3scale Trait
The 3scale trait can be used to automatically create annotations that allow 3scale to discover the generated service and make it available for API management.
The 3scale trait is disabled by default.
This trait is available in the following profiles: Kubernetes, Knative, OpenShift.
6.2.1.1. Configuration
Trait properties can be specified when running any integration with the CLI:
kamel run --trait 3scale.[key]=[value] --trait 3scale.[key2]=[value2] Integration.java
kamel run --trait 3scale.[key]=[value] --trait 3scale.[key2]=[value2] Integration.javaThe following configuration options are available:
| Property | Type | Description |
|---|---|---|
| 3scale.enabled | bool | Can be used to enable or disable a trait. All traits share this common property. |
| 3scale.auto | bool | Enables automatic configuration of the trait. |
| 3scale.scheme | string |
The scheme to use to contact the service (default |
| 3scale.path | string |
The path where the API is published (default |
| 3scale.port | int |
The port where the service is exposed (default |
| 3scale.description-path | string |
The path where the Open-API specification is published (default |
6.2.2. Affinity Trait
Allows to constrain which nodes the integration pod(s) are eligible to be scheduled on, based on labels on the node, or with inter-pod affinity and anti-affinity, based on labels on pods that are already running on the nodes.
It’s disabled by default.
This trait is available in the following profiles: Kubernetes, Knative, OpenShift.
6.2.2.1. Configuration
Trait properties can be specified when running any integration with the CLI:
kamel run --trait affinity.[key]=[value] --trait affinity.[key2]=[value2] Integration.java
kamel run --trait affinity.[key]=[value] --trait affinity.[key2]=[value2] Integration.javaThe following configuration options are available:
| Property | Type | Description |
|---|---|---|
| affinity.enabled | bool | Can be used to enable or disable a trait. All traits share this common property. |
| affinity.pod-affinity | bool | Always co-locates multiple replicas of the integration in the same node (default false). |
| affinity.pod-anti-affinity | bool | Never co-locates multiple replicas of the integration in the same node (default false). |
| affinity.node-affinity-labels | string | Defines a set of nodes the integration pod(s) are eligible to be scheduled on, based on labels on the node. |
| affinity.pod-affinity-labels | string | Defines a set of pods (namely those matching the label selector, relative to the given namespace) that the integration pod(s) should be co-located with. |
| affinity.pod-anti-affinity-labels | string | Defines a set of pods (namely those matching the label selector, relative to the given namespace) that the integration pod(s) should not be co-located with. |
6.2.2.2. Examples
To schedule the integration pod(s) on a specific node using the built-in node label
kubernetes.io/hostname:kamel run -t affinity.node-affinity-labels="kubernetes.io/hostname in(node-66-50.hosted.k8s.tld)" ...
$ kamel run -t affinity.node-affinity-labels="kubernetes.io/hostname in(node-66-50.hosted.k8s.tld)" ...Copy to Clipboard Copied! Toggle word wrap Toggle overflow To schedule a single integration pod per node (using the
Existsoperator):kamel run -t affinity.pod-anti-affinity-labels="camel.apache.org/integration" ...
$ kamel run -t affinity.pod-anti-affinity-labels="camel.apache.org/integration" ...Copy to Clipboard Copied! Toggle word wrap Toggle overflow To co-locate the integration pod(s) with other integration pod(s):
kamel run -t affinity.pod-affinity-labels="camel.apache.org/integration in(it1, it2)" ...
$ kamel run -t affinity.pod-affinity-labels="camel.apache.org/integration in(it1, it2)" ...Copy to Clipboard Copied! Toggle word wrap Toggle overflow
The labels options follow the requirements from Label selectors. They can be multi-valuated, then the requirements list is ANDed, e.g., to schedule a single integration pod per node AND not co-located with the Camel K operator pod(s):
kamel run -t affinity.pod-anti-affinity-labels="camel.apache.org/integration" -t affinity.pod-anti-affinity-labels="camel.apache.org/component=operator" ...
$ kamel run -t affinity.pod-anti-affinity-labels="camel.apache.org/integration" -t affinity.pod-anti-affinity-labels="camel.apache.org/component=operator" ...More information can be found in the official Kubernetes documentation about Assigning Pods to Nodes.
6.2.3. Cron Trait
The Cron trait can be used to customize the behaviour of periodic timer/cron based integrations.
While normally an integration requires a pod to be always up and running, some periodic tasks, such as batch jobs, require to be activated at specific hours of the day or with a periodic delay of minutes. For such tasks, the cron trait can materialize the integration as a Kubernetes CronJob instead of a standard deployment, in order to save resources when the integration does not need to be executed.
Integrations that start from the following components are evaluated by the cron trait: timer, cron, quartz.
The rules for using a Kubernetes CronJob are the following:
-
timer: when periods can be written as cron expressions. E.g.timer:tick?period=60000. -
cron,quartz: when the cron expression does not contain seconds (or the "seconds" part is set to 0). E.g.cron:tab?schedule=0/2+*+*+*+?orquartz:trigger?cron=0+0/2+*+*+*+?.
This trait is available in the following profiles: Kubernetes, Knative, OpenShift.
6.2.3.1. Examples
The following route is materialized into a Kubernetes CronJob by the cron trait:
CronJob.java
6.2.3.2. Configuration
Trait properties can be specified when running any integration with the CLI:
kamel run --trait cron.[key]=[value] --trait cron.[key2]=[value2] Integration.java
kamel run --trait cron.[key]=[value] --trait cron.[key2]=[value2] Integration.javaThe following configuration options are available:
| Property | Type | Description |
|---|---|---|
| cron.enabled | bool | Can be used to enable or disable a trait. All traits share this common property. |
| cron.schedule | string | The CronJob schedule for the whole integration. If multiple routes are declared, they must have the same schedule for this mechanism to work correctly. |
| cron.components | string |
A comma separated list of the Camel components that need to be customized in order for them to work when the schedule is triggered externally by Kubernetes. A specific customizer is activated for each specified component. E.g. for the
Supported components are currently: |
| cron.fallback | bool |
Use the default Camel implementation of the |
| cron.concurrency-policy | string | Specifies how to treat concurrent executions of a Job. Valid values are: - "Allow": allows CronJobs to run concurrently; - "Forbid" (default): forbids concurrent runs, skipping next run if previous run hasn’t finished yet; - "Replace": cancels currently running job and replaces it with a new one |
| cron.auto | bool |
Automatically deploy the integration as CronJob when all routes are either starting from a periodic consumer (only
It’s required that all periodic consumers have the same period and it can be expressed as cron schedule (e.g. |
6.2.4. Gc Trait
The GC Trait garbage-collects all resources that are no longer necessary upon integration updates.
This trait is available in the following profiles: Kubernetes, Knative, OpenShift.
6.2.4.1. Configuration
Trait properties can be specified when running any integration with the CLI:
kamel run --trait gc.[key]=[value] --trait gc.[key2]=[value2] Integration.java
kamel run --trait gc.[key]=[value] --trait gc.[key2]=[value2] Integration.javaThe following configuration options are available:
| Property | Type | Description |
|---|---|---|
| gc.enabled | bool | Can be used to enable or disable a trait. All traits share this common property. |
| gc.discovery-cache | string |
Discovery client cache to be used, either |
6.2.5. Istio Trait
The Istio trait allows to configure properties related to the Istio service mesh, such as sidecar injection and outbound IP ranges.
This trait is available in the following profiles: Kubernetes, Knative, OpenShift.
6.2.5.1. Configuration
Trait properties can be specified when running any integration with the CLI:
kamel run --trait istio.[key]=[value] --trait istio.[key2]=[value2] Integration.java
kamel run --trait istio.[key]=[value] --trait istio.[key2]=[value2] Integration.javaThe following configuration options are available:
| Property | Type | Description |
|---|---|---|
| istio.enabled | bool | Can be used to enable or disable a trait. All traits share this common property. |
| istio.allow | string |
Configures a (comma-separated) list of CIDR subnets that should not be intercepted by the Istio proxy ( |
| istio.inject | bool |
Forces the value for labels |
6.2.6. Jolokia Trait
The Jolokia trait activates and configures the Jolokia Java agent.
See https://jolokia.org/reference/html/agents.html
This trait is available in the following profiles: Kubernetes, Knative, OpenShift.
6.2.6.1. Configuration
Trait properties can be specified when running any integration with the CLI:
kamel run --trait jolokia.[key]=[value] --trait jolokia.[key2]=[value2] Integration.java
kamel run --trait jolokia.[key]=[value] --trait jolokia.[key2]=[value2] Integration.javaThe following configuration options are available:
| Property | Type | Description |
|---|---|---|
| jolokia.enabled | bool | Can be used to enable or disable a trait. All traits share this common property. |
| jolokia.ca-cert | string |
The PEM encoded CA certification file path, used to verify client certificates, applicable when |
| jolokia.client-principal | []string |
The principal(s) which must be given in a client certificate to allow access to the Jolokia endpoint, applicable when |
| jolokia.discovery-enabled | bool |
Listen for multicast requests (default |
| jolokia.extended-client-check | bool |
Mandate the client certificate contains a client flag in the extended key usage section, applicable when |
| jolokia.host | string |
The Host address to which the Jolokia agent should bind to. If |
| jolokia.password | string |
The password used for authentication, applicable when the |
| jolokia.port | int |
The Jolokia endpoint port (default |
| jolokia.protocol | string |
The protocol to use, either |
| jolokia.user | string | The user to be used for authentication |
| jolokia.use-ssl-client-authentication | bool |
Whether client certificates should be used for authentication (default |
| jolokia.options | string |
A comma-separated list of additional Jolokia options as defined in JVM agent configuration options, e.g.: |
6.2.7. Knative Trait
The Knative trait automatically discovers addresses of Knative resources and inject them into the running integration.
The full Knative configuration is injected in the CAMEL_KNATIVE_CONFIGURATION in JSON format. The Camel Knative component will then use the full configuration to configure the routes.
The trait is enabled by default when the Knative profile is active.
This trait is available in the following profiles: Knative.
6.2.7.1. Configuration
Trait properties can be specified when running any integration with the CLI:
kamel run --trait knative.[key]=[value] --trait knative.[key2]=[value2] Integration.java
kamel run --trait knative.[key]=[value] --trait knative.[key2]=[value2] Integration.javaThe following configuration options are available:
| Property | Type | Description |
|---|---|---|
| knative.enabled | bool | Can be used to enable or disable a trait. All traits share this common property. |
| knative.configuration | string | Can be used to inject a Knative complete configuration in JSON format. |
| knative.channel-sources | string | Comma-separated list of channels used as source of integration routes. Can contain simple channel names or full Camel URIs. |
| knative.channel-sinks | string | Comma-separated list of channels used as destination of integration routes. Can contain simple channel names or full Camel URIs. |
| knative.endpoint-sources | string | Comma-separated list of channels used as source of integration routes. |
| knative.endpoint-sinks | string | Comma-separated list of endpoints used as destination of integration routes. Can contain simple endpoint names or full Camel URIs. |
| knative.event-sources | string | Comma-separated list of event types that the integration will be subscribed to. Can contain simple event types or full Camel URIs (to use a specific broker different from "default"). |
| knative.event-sinks | string | Comma-separated list of event types that the integration will produce. Can contain simple event types or full Camel URIs (to use a specific broker). |
| knative.filter-source-channels | bool | Enables filtering on events based on the header "ce-knativehistory". Since this is an experimental header that can be removed in a future version of Knative, filtering is enabled only when the integration is listening from more than 1 channel. |
| knative.auto | bool | Enable automatic discovery of all trait properties. |
6.2.8. Knative Service Trait
The Knative Service trait allows to configure options when running the integration as Knative service instead of a standard Kubernetes Deployment.
Running integrations as Knative Services adds auto-scaling (and scaling-to-zero) features, but those features are only meaningful when the routes use a HTTP endpoint consumer.
This trait is available in the following profiles: Knative.
6.2.8.1. Configuration
Trait properties can be specified when running any integration with the CLI:
kamel run --trait knative-service.[key]=[value] --trait knative-service.[key2]=[value2] Integration.java
kamel run --trait knative-service.[key]=[value] --trait knative-service.[key2]=[value2] Integration.javaThe following configuration options are available:
| Property | Type | Description |
|---|---|---|
| knative-service.enabled | bool | Can be used to enable or disable a trait. All traits share this common property. |
| knative-service.autoscaling-class | string |
Configures the Knative autoscaling class property (e.g. to set Refer to the Knative documentation for more information. |
| knative-service.autoscaling-metric | string |
Configures the Knative autoscaling metric property (e.g. to set Refer to the Knative documentation for more information. |
| knative-service.autoscaling-target | int | Sets the allowed concurrency level or CPU percentage (depending on the autoscaling metric) for each Pod. Refer to the Knative documentation for more information. |
| knative-service.min-scale | int | The minimum number of Pods that should be running at any time for the integration. It’s zero by default, meaning that the integration is scaled down to zero when not used for a configured amount of time. Refer to the Knative documentation for more information. |
| knative-service.max-scale | int | An upper bound for the number of Pods that can be running in parallel for the integration. Knative has its own cap value that depends on the installation. Refer to the Knative documentation for more information. |
| knative-service.auto | bool | Automatically deploy the integration as Knative service when all conditions hold:
|
6.2.9. Master Trait
The Master trait allows to configure the integration to automatically leverage Kubernetes resources for doing leader election and starting master routes only on certain instances.
It’s activated automatically when using the master endpoint in a route, e.g. from("master:lockname:telegram:bots")….
this trait adds special permissions to the integration service account in order to read/write configmaps and read pods. It’s recommended to use a different service account than "default" when running the integration.
This trait is available in the following profiles: Kubernetes, Knative, OpenShift.
6.2.9.1. Configuration
Trait properties can be specified when running any integration with the CLI:
kamel run --trait master.[key]=[value] --trait master.[key2]=[value2] Integration.java
kamel run --trait master.[key]=[value] --trait master.[key2]=[value2] Integration.javaThe following configuration options are available:
| Property | Type | Description |
|---|---|---|
| master.enabled | bool | Can be used to enable or disable a trait. All traits share this common property. |
| master.auto | bool | Enables automatic configuration of the trait. |
| master.include-delegate-dependencies | bool |
When this flag is active, the operator analyzes the source code to add dependencies required by delegate endpoints. E.g. when using |
| master.configmap | string | Name of the configmap that will be used to store the lock. Defaults to "<integration-name>-lock". |
| master.label-key | string | Label that will be used to identify all pods contending the lock. Defaults to "camel.apache.org/integration". |
| master.label-value | string | Label value that will be used to identify all pods contending the lock. Defaults to the integration name. |
6.2.10. Prometheus Trait
The Prometheus trait configures the Prometheus JMX exporter and exposes the integration with a Service and a ServiceMonitor resources so that the Prometheus endpoint can be scraped.
The creation of the ServiceMonitor resource requires the Prometheus Operator custom resource definition to be installed. You can set service-monitor to false for the Prometheus trait to work without the Prometheus operator.
It’s disabled by default.
This trait is available in the following profiles: Kubernetes, Knative, OpenShift.
6.2.10.1. Configuration
Trait properties can be specified when running any integration with the CLI:
kamel run --trait prometheus.[key]=[value] --trait prometheus.[key2]=[value2] Integration.java
kamel run --trait prometheus.[key]=[value] --trait prometheus.[key2]=[value2] Integration.javaThe following configuration options are available:
| Property | Type | Description |
|---|---|---|
| prometheus.enabled | bool | Can be used to enable or disable a trait. All traits share this common property. |
| prometheus.port | int |
The Prometheus endpoint port (default |
| prometheus.service-monitor | bool |
Whether a |
| prometheus.service-monitor-labels | string |
The |
| prometheus.configmap | string |
To use a custom ConfigMap containing the Prometheus exporter configuration (under the |
6.2.11. Quarkus Trait
The Quarkus trait activates the Quarkus runtime.
It’s disabled by default.
This trait is available in the following profiles: Kubernetes, Knative, OpenShift.
6.2.11.1. Configuration
Trait properties can be specified when running any integration with the CLI:
kamel run --trait quarkus.[key]=[value] --trait quarkus.[key2]=[value2] Integration.java
kamel run --trait quarkus.[key]=[value] --trait quarkus.[key2]=[value2] Integration.javaThe following configuration options are available:
| Property | Type | Description |
|---|---|---|
| quarkus.enabled | bool | Can be used to enable or disable a trait. All traits share this common property. |
| quarkus.native | bool | The Quarkus runtime type (reserved for future use) |
6.2.12. Route Trait
The Route trait can be used to configure the creation of OpenShift routes for the integration.
This trait is available in the following profiles: OpenShift.
6.2.12.1. Configuration
Trait properties can be specified when running any integration with the CLI:
kamel run --trait route.[key]=[value] --trait route.[key2]=[value2] Integration.java
kamel run --trait route.[key]=[value] --trait route.[key2]=[value2] Integration.javaThe following configuration options are available:
| Property | Type | Description |
|---|---|---|
| route.enabled | bool | Can be used to enable or disable a trait. All traits share this common property. |
| route.host | string | To configure the host exposed by the route. |
| route.tls-termination | string |
The TLS termination type, like Refer to the OpenShift documentation for additional information. |
| route.tls-certificate | string | The TLS certificate contents. Refer to the OpenShift documentation for additional information. |
| route.tls-key | string | The TLS certificate key contents. Refer to the OpenShift documentation for additional information. |
| route.tls-ca-certificate | string | The TLS cert authority certificate contents. Refer to the OpenShift documentation for additional information. |
| route.tls-destination-ca-certificate | string | The destination CA certificate provides the contents of the ca certificate of the final destination. When using reencrypt termination this file should be provided in order to have routers use it for health checks on the secure connection. If this field is not specified, the router may provide its own destination CA and perform hostname validation using the short service name (service.namespace.svc), which allows infrastructure generated certificates to automatically verify. Refer to the OpenShift documentation for additional information. |
| route.tls-insecure-edge-termination-policy | string |
To configure how to deal with insecure traffic, e.g. Refer to the OpenShift documentation for additional information. |
6.2.13. Service Trait
The Service trait exposes the integration with a Service resource so that it can be accessed by other applications (or integrations) in the same namespace.
It’s enabled by default if the integration depends on a Camel component that can expose a HTTP endpoint.
This trait is available in the following profiles: Kubernetes, OpenShift.
6.2.13.1. Configuration
Trait properties can be specified when running any integration with the CLI:
kamel run --trait service.[key]=[value] --trait service.[key2]=[value2] Integration.java
kamel run --trait service.[key]=[value] --trait service.[key2]=[value2] Integration.javaThe following configuration options are available:
| Property | Type | Description |
|---|---|---|
| service.enabled | bool | Can be used to enable or disable a trait. All traits share this common property. |
| service.auto | bool | To automatically detect from the code if a Service needs to be created. |
6.3. Camel K platform traits
6.3.1. Builder Trait
The builder trait is internally used to determine the best strategy to build and configure IntegrationKits.
This trait is available in the following profiles: Kubernetes, Knative, OpenShift.
The builder trait is a platform trait: disabling it may compromise the platform functionality.
6.3.1.1. Configuration
Trait properties can be specified when running any integration with the CLI:
kamel run --trait builder.[key]=[value] --trait builder.[key2]=[value2] Integration.java
kamel run --trait builder.[key]=[value] --trait builder.[key2]=[value2] Integration.javaThe following configuration options are available:
| Property | Type | Description |
|---|---|---|
| builder.enabled | bool | Can be used to enable or disable a trait. All traits share this common property. |
| builder.verbose | bool | Enable verbose logging on build components that support it (e.g., OpenShift build pod). Kaniko and Buildah are not supported. |
6.3.2. Container Trait
The Container trait can be used to configure properties of the container where the integration will run.
It also provides configuration for Services associated to the container.
This trait is available in the following profiles: Kubernetes, Knative, OpenShift.
The container trait is a platform trait: disabling it may compromise the platform functionality.
6.3.2.1. Configuration
Trait properties can be specified when running any integration with the CLI:
kamel run --trait container.[key]=[value] --trait container.[key2]=[value2] Integration.java
kamel run --trait container.[key]=[value] --trait container.[key2]=[value2] Integration.javaThe following configuration options are available:
| Property | Type | Description |
|---|---|---|
| container.enabled | bool | Can be used to enable or disable a trait. All traits share this common property. |
| container.auto | bool | |
| container.request-cpu | string | The minimum amount of CPU required. |
| container.request-memory | string | The minimum amount of memory required. |
| container.limit-cpu | string | The maximum amount of CPU required. |
| container.limit-memory | string | The maximum amount of memory required. |
| container.expose | bool | Can be used to enable/disable exposure via kubernetes Service. |
| container.port | int |
To configure a different port exposed by the container (default |
| container.port-name | string |
To configure a different port name for the port exposed by the container (default |
| container.service-port | int |
To configure under which service port the container port is to be exposed (default |
| container.service-port-name | string |
To configure under which service port name the container port is to be exposed (default |
| container.name | string |
The main container name. It’s named |
| container.probes-enabled | bool |
ProbesEnabled enable/disable probes on the container (default |
| container.probe-path | string |
Path to access on the probe ( default |
| container.liveness-initial-delay | int32 | Number of seconds after the container has started before liveness probes are initiated. |
| container.liveness-timeout | int32 | Number of seconds after which the probe times out. Applies to the liveness probe. |
| container.liveness-period | int32 | How often to perform the probe. Applies to the liveness probe. |
| container.liveness-success-threshold | int32 | Minimum consecutive successes for the probe to be considered successful after having failed. Applies to the liveness probe. |
| container.liveness-failure-threshold | int32 | Minimum consecutive failures for the probe to be considered failed after having succeeded. Applies to the liveness probe. |
| container.readiness-initial-delay | int32 | Number of seconds after the container has started before readiness probes are initiated. |
| container.readiness-timeout | int32 | Number of seconds after which the probe times out. Applies to the readiness probe. |
| container.readiness-period | int32 | How often to perform the probe. Applies to the readiness probe. |
| container.readiness-success-threshold | int32 | Minimum consecutive successes for the probe to be considered successful after having failed. Applies to the readiness probe. |
| container.readiness-failure-threshold | int32 | Minimum consecutive failures for the probe to be considered failed after having succeeded. Applies to the readiness probe. |
6.3.3. Camel Trait
The Camel trait can be used to configure versions of Apache Camel K runtime and related libraries, it cannot be disabled.
This trait is available in the following profiles: Kubernetes, Knative, OpenShift.
The camel trait is a platform trait: disabling it may compromise the platform functionality.
6.3.3.1. Configuration
Trait properties can be specified when running any integration with the CLI:
kamel run --trait camel.[key]=[value] --trait camel.[key2]=[value2] Integration.java
kamel run --trait camel.[key]=[value] --trait camel.[key2]=[value2] Integration.javaThe following configuration options are available:
| Property | Type | Description |
|---|---|---|
| camel.enabled | bool | Can be used to enable or disable a trait. All traits share this common property. |
| camel.runtime-version | string | The camel-k-runtime version to use for the integration. It overrides the default version set in the Integration Platform. |
6.3.4. Dependencies Trait
The Dependencies trait is internally used to automatically add runtime dependencies based on the integration that the user wants to run.
This trait is available in the following profiles: Kubernetes, Knative, OpenShift.
The dependencies trait is a platform trait: disabling it may compromise the platform functionality.
6.3.4.1. Configuration
Trait properties can be specified when running any integration with the CLI:
kamel run --trait dependencies.[key]=[value] Integration.java
kamel run --trait dependencies.[key]=[value] Integration.javaThe following configuration options are available:
| Property | Type | Description |
|---|---|---|
| dependencies.enabled | bool | Can be used to enable or disable a trait. All traits share this common property. |
6.3.5. Deployer Trait
The deployer trait can be used to explicitly select the kind of high level resource that will deploy the integration.
This trait is available in the following profiles: Kubernetes, Knative, OpenShift.
The deployer trait is a platform trait: disabling it may compromise the platform functionality.
6.3.5.1. Configuration
Trait properties can be specified when running any integration with the CLI:
kamel run --trait deployer.[key]=[value] --trait deployer.[key2]=[value2] Integration.java
kamel run --trait deployer.[key]=[value] --trait deployer.[key2]=[value2] Integration.javaThe following configuration options are available:
| Property | Type | Description |
|---|---|---|
| deployer.enabled | bool | Can be used to enable or disable a trait. All traits share this common property. |
| deployer.kind | string |
Allows to explicitly select the desired deployment kind between |
6.3.6. Deployment Trait
The Deployment trait is responsible for generating the Kubernetes deployment that will make sure the integration will run in the cluster.
This trait is available in the following profiles: Kubernetes, Knative, OpenShift.
The deployment trait is a platform trait: disabling it may compromise the platform functionality.
6.3.6.1. Configuration
Trait properties can be specified when running any integration with the CLI:
kamel run --trait deployment.[key]=[value] --trait deployment.[key2]=[value2] Integration.java
kamel run --trait deployment.[key]=[value] --trait deployment.[key2]=[value2] Integration.javaThe following configuration options are available:
| Property | Type | Description |
|---|---|---|
| deployment.enabled | bool | Can be used to enable or disable a trait. All traits share this common property. |
6.3.7. Environment Trait
The environment trait is used internally to inject standard environment variables in the integration container, such as NAMESPACE, POD_NAME and others.
This trait is available in the following profiles: Kubernetes, Knative, OpenShift.
The environment trait is a platform trait: disabling it may compromise the platform functionality.
6.3.7.1. Configuration
Trait properties can be specified when running any integration with the CLI:
kamel run --trait environment.[key]=[value] --trait environment.[key2]=[value2] Integration.java
kamel run --trait environment.[key]=[value] --trait environment.[key2]=[value2] Integration.javaThe following configuration options are available:
| Property | Type | Description |
|---|---|---|
| environment.enabled | bool | Can be used to enable or disable a trait. All traits share this common property. |
| environment.container-meta | bool |
6.3.8. Jvm Trait
The JVM trait is used to configure the JVM that runs the integration.
This trait is available in the following profiles: Kubernetes, Knative, OpenShift.
The jvm trait is a platform trait: disabling it may compromise the platform functionality.
6.3.8.1. Configuration
Trait properties can be specified when running any integration with the CLI:
kamel run --trait jvm.[key]=[value] --trait jvm.[key2]=[value2] Integration.java
kamel run --trait jvm.[key]=[value] --trait jvm.[key2]=[value2] Integration.javaThe following configuration options are available:
| Property | Type | Description |
|---|---|---|
| jvm.enabled | bool | Can be used to enable or disable a trait. All traits share this common property. |
| jvm.debug | bool | Activates remote debugging, so that a debugger can be attached to the JVM, e.g., using port-forwarding |
| jvm.debug-suspend | bool | Suspends the target JVM immediately before the main class is loaded |
| jvm.debug-address | string | Transport address at which to listen for the newly launched JVM |
| jvm.options | string | A comma-separated list of JVM options |
6.3.9. OpenAPI
The OpenAPI DSL trait is internally used to allow creating integrations from a OpenAPI specs.
This trait is available in the following profiles: Kubernetes, Knative, OpenShift.
The openapi trait is a platform trait: disabling it may compromise the platform functionality.
6.3.9.1. Configuration
Trait properties can be specified when running any integration with the CLI:
kamel run --trait openapi.[key]=[value] Integration.java
kamel run --trait openapi.[key]=[value] Integration.javaThe following configuration options are available:
| Property | Type | Description |
|---|---|---|
| openapi.enabled | bool | Can be used to enable or disable a trait. All traits share this common property. |
6.3.10. Owner Trait
The Owner trait ensures that all created resources belong to the integration being created and transfers annotations and labels on the integration onto these owned resources.
This trait is available in the following profiles: Kubernetes, Knative, OpenShift.
The owner trait is a platform trait: disabling it may compromise the platform functionality.
6.3.10.1. Configuration
Trait properties can be specified when running any integration with the CLI:
kamel run --trait owner.[key]=[value] --trait owner.[key2]=[value2] Integration.java
kamel run --trait owner.[key]=[value] --trait owner.[key2]=[value2] Integration.javaThe following configuration options are available:
| Property | Type | Description |
|---|---|---|
| owner.enabled | bool | Can be used to enable or disable a trait. All traits share this common property. |
| owner.target-annotations | string | The annotations to be transferred (A comma-separated list of label keys) |
| owner.target-labels | string | The labels to be transferred (A comma-separated list of label keys) |
6.3.11. Platform Trait
The platform trait is a base trait that is used to assign an integration platform to an integration.
In case the platform is missing, the trait is allowed to create a default platform. This feature is especially useful in contexts where there’s no need to provide a custom configuration for the platform (e.g. on OpenShift the default settings work, since there’s an embedded container image registry).
This trait is available in the following profiles: Kubernetes, Knative, OpenShift.
The platform trait is a platform trait: disabling it may compromise the platform functionality.
6.3.11.1. Configuration
Trait properties can be specified when running any integration with the CLI:
kamel run --trait platform.[key]=[value] --trait platform.[key2]=[value2] Integration.java
kamel run --trait platform.[key]=[value] --trait platform.[key2]=[value2] Integration.javaThe following configuration options are available:
| Property | Type | Description |
|---|---|---|
| platform.enabled | bool | Can be used to enable or disable a trait. All traits share this common property. |
| platform.create-default | bool | To create a default (empty) platform when the platform is missing. |
| platform.auto | bool | To automatically detect from the environment if a default platform can be created (it will be created on OpenShift only). |