Camel K 入门
前言
使开源包含更多
红帽承诺替换我们的代码、文档和网页属性中存在问题的语言。我们从这四个术语开始: master、slave、blacklist 和 whitelist。这些更改将在即将发行的几个发行本中逐渐实施。有关更多详情,请参阅我们的首席技术官 Chris Wright 提供的消息。
第 1 章 Camel K 简介
本章介绍了 Red Hat Integration - Camel K 提供的概念、功能和云原生架构:
1.1. Camel K 概述
Red Hat Integration - Camel K 是一个从 Apache Camel K 构建的轻量级集成框架,它在 OpenShift 的云中原生运行。Camel K 是专为无服务器和微服务架构而设计的。您可以使用 Camel K 立即在 OpenShift 上运行使用 Camel 域特定语言(DSL)编写的集成代码。Camel K 是 Apache Camel 开源社区的子项目 :https://github.com/apache/camel-k。
Camel K 采用 Go 编程语言实施,并使用 Kubernetes Operator SDK 在云中自动部署集成。例如,这包括在 OpenShift 上自动创建服务和路由。这在在云中部署和重新部署集成时(如几秒钟或更短的时间),这可以更快地进行解决。
Camel K 运行时提供了显著的性能优化。Quarkus 云原生 Java 框架默认启用,以更快地启动时间,并降低内存和 CPU 占用。在开发人员模式下运行 Camel K 时,您可以对集成 DSL 进行实时更新,并在 OpenShift 的云中立即查看结果,而无需等待您的集成重新部署。
将 Camel K 与 OpenShift Serverless 和 Knative Serving 搭配使用,仅根据需要创建容器,并在负载下自动缩放为零。这通过删除服务器配置和维护开销来降低成本,并可让您专注于应用程序开发。
将 Camel K 与 OpenShift Serverless 和 Knative Eventing 一起使用,您可以管理系统中的组件如何在无服务器应用程序的事件驱动的架构中进行通信。这通过使用发布订阅或事件流模型在事件制作者和消费者间分离的关系提供了灵活性。
1.2. Camel K 功能
Camel K 包括以下主要平台和特性:
1.2.1. 平台和组件版本
- OpenShift Container Platform 4.6, 4.9, 4.10, 4.11
- OpenShift Serverless 1.27.0
- Red Hat build of Quarkus 2.7.6
- Red Hat Camel Extensions for Quarkus 2.7.1
- Apache Camel K 1.8.0
- Apache Camel 3.14.2
- OpenJDK 11
1.2.2. Camel K 功能
- 用于自动扩展和缩减至零的 Knative Serving
- 用于事件驱动的架构的 Knative Eventing
- 默认使用 Quarkus 运行时进行性能优化
- Camel 集成使用 Java 或 YAML DSL 编写
- 使用 Visual Studio Code 的开发工具
- 使用 OpenShift 中的 Prometheus 监控集成
- Quickstart 教程
- 对外部系统的kamelet 目录,如 AWS、JIRA 和 Salesforce
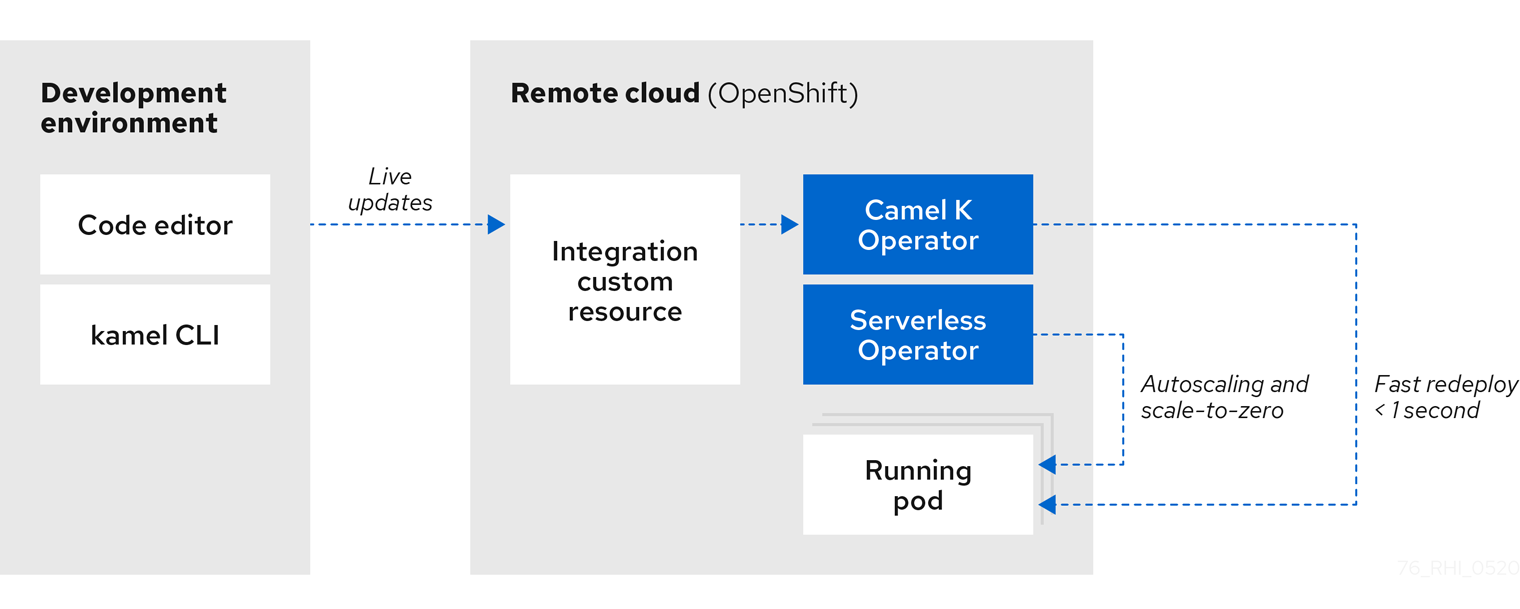
下图显示了 Camel K 云原生架构的简化视图:
其他资源
1.2.3. Kamelets
kamelets 隐藏了连接到简单界面后面的外部系统的复杂性,其中包含实例化它们所需的所有信息,即使用户没有熟悉 Camel。
kamelet 作为自定义资源实施,您可以在 OpenShift 集群上安装并在 Camel K 集成中使用。kamelets 是路由模板,它使用 Camel 组件来连接外部系统,而无需深入了解组件。Kamelets 对连接到外部系统的详细信息进行了抽象。您还可以组合 Kamelets 来创建复杂的 Camel 集成,就像使用标准 Camel 组件一样。
其他资源
1.3. Camel K 开发工具
Camel K 为 Visual Studio (VS)代码、Red Hat CodeReady WorkSpaces 和 Eclipse Che 提供开发工具扩展。基于 Camel 的工具扩展包括自动完成 Camel DSL 代码、Camel K 模式配置和 Camel K traits 等功能。虽然 Didact 教程工具扩展提供了 Camel K 快速启动指南命令的自动执行。
可用的 VS Code 开发工具扩展如下:
- Apache Camel K 扩展的工具
- Apache Camel 扩展的语言支持
- Apache Camel K 的调试适配器
- OpenShift、Java 等的额外扩展
- VS Code 扩展的 Didact 教程工具
有关如何为 Camel K 设置这些 VS Code 扩展的详情,请参考 设置 Camel K 开发环境。
-
以下插件 VS Code Language support for Camel(Camel extension pack 的一部分)提供了在编辑 Camel 路由和
application.properties时提供内容协助。 - 要安装 VS 代码支持的 Camel K 工具扩展,以便在 OpenShift 上创建、运行和操作 Camel K 集成,请参阅 VS Code Tooling for Apache Camel K by Red Hat extension
- 要安装 VS 代码支持的 Camel debug 工具扩展,以在本地调试使用 Java、YAML 或 XML 编写的 Camel 集成,请参阅红帽 对 Apache Camel 的 Debug Adapter
- 有关在特定产品版本中使用开发人员工具的配置和组件的详情,请参阅 Camel K 支持的配置 和 Camel K 组件详情
注意: Camel K VS Code 扩展是社区功能。
Eclipse Che 还使用 vscode-camelk 插件提供这些功能。
1.4. Camel K 发行版
| 分发 | 描述 | 位置 |
|---|---|---|
| Operator 镜像 |
Red Hat Integration 的容器镜像 - Camel K Operator: |
|
| Maven 存储库 | Red Hat Integration 的 Maven 工件 - Camel K 红帽提供了 Maven 存储库,用于托管我们随我们的产品附带的内容。这些软件仓库可从软件下载页面下载。 对于 Red Hat Integration - Camel K 需要以下软件仓库:
红帽集成安装 - 本发行版本中不支持以离线模式的 Camel K。 | |
| 源代码 | Red Hat Integration 的源代码 - Camel K | |
| Quickstarts | 快速入门指南:
|
您必须有一个 Red Hat Integration 订阅,并登录到红帽客户门户网站来访问 Red Hat Integration - Camel K 发行版本。
第 2 章 准备 OpenShift 集群
本章解释了如何在 OpenShift 上安装 Red Hat Integration - Camel K 和 OpenShift Serverless,以及如何在开发环境中安装所需的 Camel K 和 OpenShift Serverless 命令行工具。
2.1. 安装 Camel K
您可以从 OperatorHub 在 OpenShift 集群上安装 Red Hat Integration - Camel K Operator。OperatorHub 可从 OpenShift Container Platform Web 控制台获得,集群管理员提供了一个界面来发现和安装 Operator。
安装 Camel K Operator 后,您可以安装 Camel K CLI 工具以便命令行访问所有 Camel K 功能。
先决条件
您可以使用正确的访问级别访问 OpenShift 4.6 (或更新版本)集群、创建项目并安装 Operator 的功能,以及在本地系统上安装 CLI 工具。
注意从 OpenShift OperatorHub 安装 Camel K 时,您不需要创建 pull secret。Camel K Operator 会自动重复使用 OpenShift 集群级别的身份验证,以从
registry.redhat.io中拉取 Camel K 镜像。-
已安装 OpenShift CLI 工具(
oc),以便您可以在命令行中与 OpenShift 集群交互。有关如何安装 OpenShift CLI 的详细信息,请参阅安装 OpenShift CLI。
流程
- 在 OpenShift Container Platform Web 控制台中,使用具有集群管理员权限的账户登录。
创建新 OpenShift 项目:
- 在左侧导航菜单中,点击 Home > Project > Create Project。
-
输入项目名称,如
my-camel-k-project,然后单击 Create。
- 在左侧导航菜单中,点 Operators > OperatorHub。
-
在 Filter by keyword 文本框中,输入
Camel K,然后点 Red Hat Integration - Camel K Operator 卡。 - 阅读 Operator 的信息,然后单击 Install。此时会打开 Operator 安装页面。
选择以下订阅设置:
- 更新频道 & gt; latest
- Installation Mode > A specific namespace on the cluster > my-camel-k-project
Approval Strategy > Automatic
注意如果您的环境需要,也可以使用 Installation mode > All namespaces on the cluster 和 Approval Strategy > Manual 设置。
- 点 Install,然后等待几分钟,直到 Camel K Operator 准备就绪。
下载并安装 Camel K CLI 工具:
- 在 OpenShift Web 控制台顶部的 Help 菜单(?)中选择 Command line tools。
- 向下滚动到 kamel - Red Hat Integration - Camel K - 命令行界面 部分。
- 单击链接,以下载本地操作系统的二进制文件(Linux、Mac、Windows)。
- 在您的系统路径中解压并安装 CLI。
要验证您可以访问 Kamel K CLI,请打开命令窗口,然后键入以下内容:
kamel --help此命令显示有关 Camel K CLI 命令的信息。
后续步骤
(可选) 指定 Camel K 资源限值
2.1.1. 指定 Camel K 资源限值
安装 Camel K 时,Camel K 的 OpenShift pod 没有为 CPU 和内存(RAM)资源设置任何限制。如果要为 Camel K 定义资源限值,您必须编辑在安装过程中创建的 Camel K 订阅资源。
前提条件
- 您对安装 Camel K Operator 的 OpenShift 项目具有集群管理员访问权限,如 安装 Camel K 所述。
您知道您要应用到 Camel K 订阅的资源限值。有关资源限值的更多信息,请参阅以下文档:
流程
- 登录 OpenShift Web 控制台。
- 选择 Operators > Installed Operators > Operator Details > Subscription。
选择 Actions > Edit Subscription。
订阅的文件会在 YAML 编辑器中打开。
在
spec部分下,添加一个config.resources部分,并为 memory 和 cpu 提供值,如下例所示:spec: channel: default config: resources: limits: memory: 512Mi cpu: 500m requests: cpu: 200m memory: 128Mi- 保存您的更改。
OpenShift 更新订阅并应用您指定的资源限值。
2.2. 安装 OpenShift Serverless
您可以从 OperatorHub 在 OpenShift 集群上安装 OpenShift Serverless Operator。OperatorHub 可从 OpenShift Container Platform Web 控制台获得,集群管理员提供了一个界面来发现和安装 Operator。
OpenShift Serverless Operator 支持 Knative Serving 和 Knative Eventing 功能。如需了解更多详细信息,请参阅安装 OpenShift Serverless Operator。
先决条件
- 具有安装 Camel K Operator 的 OpenShift 项目的集群管理员访问权限。
-
已安装 OpenShift CLI 工具(
oc),以便您可以在命令行中与 OpenShift 集群交互。有关如何安装 OpenShift CLI 的详细信息,请参阅安装 OpenShift CLI。
流程
- 在 OpenShift Container Platform Web 控制台中,使用具有集群管理员权限的账户登录。
- 在左侧导航菜单中,点 Operators > OperatorHub。
-
在 Filter by keyword 文本框中,输入
Serverless来查找 OpenShift Serverless Operator。 - 阅读 Operator 的信息,然后点 Install 以显示 Operator 订阅页面。
选择默认订阅设置:
- 更新频道 > 选择与您的 OpenShift 版本匹配的频道,如 4.12
- Installation Mode > All namespaces on the cluster
Approval Strategy > Automatic
注意如果您的环境需要,也可以使用 Approval Strategy > Manual 设置。
- 点 Install,然后等待几分钟,直到 Operator 准备就绪。
按照 OpenShift 文档中的步骤安装所需的 Knative 组件:
(可选)下载并安装 OpenShift Serverless CLI 工具:
- 在 OpenShift Web 控制台顶部的 Help 菜单(?)中选择 Command line tools。
- 向下滚动到 kn - OpenShift Serverless - 命令行界面 部分。
- 单击链接,以下载本地操作系统的二进制文件(Linux、Mac、Windows)
- 在您的系统路径中解压并安装 CLI。
要验证您可以访问
knCLI,请打开命令窗口,然后键入以下内容:kn --help此命令显示有关 OpenShift Serverless CLI 命令的信息。
如需了解更多详细信息,请参阅 OpenShift Serverless CLI 文档。
2.3. 为 Camel K 配置 Maven 存储库
对于 Camel K operator,您可以在 ConfigMap 或 secret 中提供 Maven 设置。
流程
要从文件创建
ConfigMap,请运行以下命令:oc create configmap maven-settings --from-file=settings.xml然后,在
IntegrationPlatform资源中可以从spec.build.maven.settings字段引用创建的ConfigMap。示例
apiVersion: camel.apache.org/v1
kind: IntegrationPlatform
metadata:
  name: camel-k
spec:
  build:
     maven:
        settings:
           configMapKeyRef:
                key: settings.xml
                name: maven-settings
或者,您可以直接编辑
IntegrationPlatform资源来引用包含 Maven 设置的 ConfigMap:oc edit ip camel-k
为远程 Maven 存储库配置 CA 证书
您可以在 Secret 中提供 Maven 命令用来连接到远程 Maven 存储库的 CA 证书。
流程
使用以下命令,从文件创建 Secret:
oc create secret generic maven-ca-certs --from-file=ca.crt从
spec.build.maven.caSecret字段引用IntegrationPlatform资源中创建的 Secret,如下所示。apiVersion: camel.apache.org/v1 kind: IntegrationPlatform metadata: name: camel-k spec: build: maven: caSecret: key: tls.crt name: tls-secret
第 3 章 开发并运行 Camel K 集成
本章介绍了如何设置开发环境以及如何开发和部署使用 Java 和 YAML 编写的简单 Camel K 集成。它还介绍了如何在运行时使用 kamel 命令行来管理 Camel K 集成。例如,这包括运行、描述、日志记录和删除集成。
3.1. 设置 Camel K 开发环境
在自动部署 Camel K 快速启动指南前,您必须使用推荐的开发工具设置您的环境。本节介绍如何安装推荐的 Visual Studio (VS)代码 IDE 及其为 Camel K 提供的扩展。
- Camel K VS Code 扩展是社区功能。
- 建议使用 VS Code,以及 Camel K 的最佳开发人员体验。这包括自动完成 Camel DSL 代码和 Camel K traits,以及自动执行教程命令。但是,您可以使用您选择的 IDE 手动输入代码和教程命令,而不是 VS Code。
先决条件
您必须有权访问安装 Camel K Operator 和 OpenShift Serverless Operator 的 OpenShift 集群:
流程
在您的开发平台上安装 VS Code。例如,在 Red Hat Enterprise Linux 中:
安装所需的密钥和存储库:
$ sudo rpm --import https://packages.microsoft.com/keys/microsoft.asc
$ sudo sh -c 'echo -e "[code]\nname=Visual Studio Code\nbaseurl=https://packages.microsoft.com/yumrepos/vscode\nenabled=1\ngpgcheck=1\ngpgkey=https://packages.microsoft.com/keys/microsoft.asc" > /etc/yum.repos.d/vscode.repo'
更新缓存并安装 VS Code 软件包:
$ yum check-update
$ sudo yum install code
有关在其他平台上安装的详情,请查看 VS Code 安装文档。
-
输入
代码命令以启动 VS Code 编辑器。如需了解更多详细信息,请参阅 VS Code 命令行文档。 安装 VS Code Camel 扩展包,其中包括 Camel K 所需的扩展。例如,在 VS Code 中:
- 在左侧导航栏中,单击 Extensions。
- 在搜索框中,输入 Apache Camel。
选择 由红帽为 Apache Camel 的扩展 包,然后单击 Install。
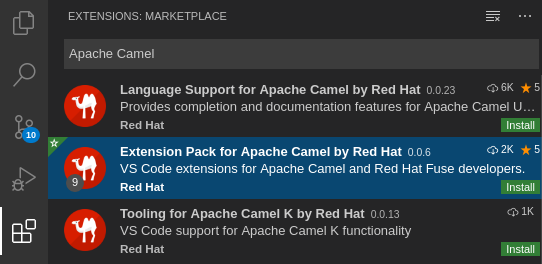
如需了解更多详细信息,请参阅红帽 Apache Camel 的扩展包 的说明。
安装 VS Code Didact 扩展,您可以通过单击教程中的链接来自动运行快速启动指南命令。例如,在 VS Code 中:
- 在左侧导航栏中,单击 Extensions。
- 在搜索框中,输入 Didact。
选择扩展,然后单击 Install。
如需了解更多详细信息,请参阅 Did act 扩展 的说明。
3.2. 在 Java 中开发 Camel K 集成
本节介绍如何在 Java DSL 中开发简单的 Camel K 集成。在 Java 中编写集成以使用 Camel K 部署,与在 Camel 中定义路由规则相同。但是,在使用 Camel K 时,您不需要构建并将集成打包为 JAR。
您可以在集成路由中直接使用任何 Camel 组件。Camel K 会自动处理依赖项管理,并使用代码检查从 Camel 目录中导入所有必需的库。
先决条件
流程
输入
kamel init命令来生成简单的 Java 集成文件。例如:$ kamel init HelloCamelK.java在 IDE 中打开生成的集成文件,并根据需要编辑。例如,
HelloCamelK.java集成自动包含 Camel计时器和日志组件,以帮助您开始:// camel-k: language=java import org.apache.camel.builder.RouteBuilder; public class HelloCamelK extends RouteBuilder { @Override public void configure() throws Exception { // Write your routes here, for example: from("timer:java?period=1s") .routeId("java") .setBody() .simple("Hello Camel K from ${routeId}") .to("log:info"); } }
后续步骤
3.3. 在 YAML 中开发 Camel K 集成
本节介绍如何在 YAML DSL 中开发简单的 Camel K 集成。在 YAML 中编写集成以使用 Camel K 部署,与在 Camel 中定义路由规则相同。
您可以在集成路由中直接使用任何 Camel 组件。Camel K 会自动处理依赖项管理,并使用代码检查从 Camel 目录中导入所有必需的库。
先决条件
流程
输入
kamel init命令来生成简单的 YAML 集成文件。例如:$ kamel init hello.camelk.yaml在 IDE 中打开生成的集成文件,并根据需要编辑。例如,
hello.camelk.yaml集成会自动包含 Camel计时器和日志组件,以帮助您开始:# Write your routes here, for example: - from: uri: "timer:yaml" parameters: period: "1s" steps: - set-body: constant: "Hello Camel K from yaml" - to: "log:info"
3.4. 运行 Camel K 集成
您可以使用 kamel run 命令从命令行运行 OpenShift 集群的云中 Camel K 集成。
先决条件
- 设置您的 Camel K 开发环境。
- 您必须已经使用 Java 或 YAML DSL 编写 Camel 集成。
流程
使用
oc客户端工具登录到 OpenShift 集群,例如:$ oc login --token=my-token --server=https://my-cluster.example.com:6443确保 Camel K Operator 正在运行,例如:
$ oc get pod
NAME                               READY   STATUS    RESTARTS   AGE
camel-k-operator-86b8d94b4-pk7d6   1/1     Running   0          6m28s
输入
kamel run命令,以在 OpenShift 的云中运行您的集成。例如:Java 示例
$ kamel run HelloCamelK.java
integration "hello-camel-k" created
YAML 示例
$ kamel run hello.camelk.yaml
integration "hello" created
输入
kamel get命令检查集成的状态:$ kamel get NAME PHASE KIT hello Building Kit myproject/kit-bq666mjej725sk8sn12g当集成第一次运行时,Camel K 会为容器镜像构建集成工具包,它会下载所有所需的 Camel 模块并将其添加到镜像 classpath 中。
再次输入
kamel get来验证集成是否正在运行:$ kamel get NAME PHASE KIT hello Running myproject/kit-bq666mjej725sk8sn12g输入
kamel log命令将日志输出到stdout:$ kamel log hello [1] 2021-08-11 17:58:40,573 INFO [org.apa.cam.k.Runtime] (main) Apache Camel K Runtime 1.7.1.fuse-800025-redhat-00001 [1] 2021-08-11 17:58:40,653 INFO [org.apa.cam.qua.cor.CamelBootstrapRecorder] (main) bootstrap runtime: org.apache.camel.quarkus.main.CamelMainRuntime [1] 2021-08-11 17:58:40,844 INFO [org.apa.cam.k.lis.SourcesConfigurer] (main) Loading routes from: SourceDefinition{name='camel-k-embedded-flow', language='yaml', location='file:/etc/camel/sources/camel-k-embedded-flow.yaml', } [1] 2021-08-11 17:58:41,216 INFO [org.apa.cam.imp.eng.AbstractCamelContext] (main) Routes startup summary (total:1 started:1) [1] 2021-08-11 17:58:41,217 INFO [org.apa.cam.imp.eng.AbstractCamelContext] (main) Started route1 (timer://yaml) [1] 2021-08-11 17:58:41,217 INFO [org.apa.cam.imp.eng.AbstractCamelContext] (main) Apache Camel 3.10.0.fuse-800010-redhat-00001 (camel-1) started in 136ms (build:0ms init:100ms start:36ms) [1] 2021-08-11 17:58:41,268 INFO [io.quarkus] (main) camel-k-integration 1.6.6 on JVM (powered by Quarkus 1.11.7.Final-redhat-00009) started in 2.064s. [1] 2021-08-11 17:58:41,269 INFO [io.quarkus] (main) Profile prod activated. [1] 2021-08-11 17:58:41,269 INFO [io.quarkus] (main) Installed features: [camel-bean, camel-core, camel-k-core, camel-k-runtime, camel-log, camel-support-common, camel-timer, camel-yaml-dsl, cdi] [1] 2021-08-11 17:58:42,423 INFO [info] (Camel (camel-1) thread #0 - timer://yaml) Exchange[ExchangePattern: InOnly, BodyType: String, Body: Hello Camel K from yaml] ...-
按
Ctrl-C终止终端中的日志记录。
其他资源
-
有关
kamel run命令的更多详细信息,请输入kamel run --help - 有关更快地部署时间,请参阅在 开发模式下运行 Camel K 集成
- 有关运行集成的开发工具的详情,请参阅 VS Code Tooling for Apache Camel K by Red Hat
- 另请参阅 管理 Camel K 集成
在不使用 CLI 的情况下运行集成
您可以在没有 CLI (Command Line Interface)的情况下运行 集成自定义资源,并使用配置创建一个集成自定义资源 来运行应用程序。
例如,执行以下示例路由。
kamel run Sample.java -o yaml它返回预期的 Integration 自定义资源。
apiVersion: camel.apache.org/v1
kind: Integration
metadata:
  creationTimestamp: null
  name: my-integration
  namespace: default
spec:
  sources:
  - content: "
    import org.apache.camel.builder.RouteBuilder;
    public class Sample extends RouteBuilder {
      @Override
      public void configure()
      throws Exception {
        from(\"timer:tick\")
        .log(\"Hello Integration!\");
       }
      }"
    name: Sample.java
status: {}
将此自定义资源保存到 yaml 文件 my-integration.yaml 中。现在,使用 oc 命令行、UI 或 API 来调用 OpenShift 集群,运行包含 Integration 自定义资源的集成。在以下示例中,从命令行使用 oc CLI。
oc apply -f my-integration.yaml
...
integration.camel.apache.org/my-integration created
Operator 运行集成。
- Kubernetes 支持 CustomResourceDefinitions 的 Structural Schema。
- 有关 Camel K traits 的详情,请参阅 Camel K trait 配置参考。
自定义资源的 schema 更改
强大的 Trait API 会对以下 CustomResourceDefinitions 实施更改: 集成、集成工具包'和"集成平台"。
spec.traits.<trait-id>.configuration 下的特征属性现在直接在 spec.traits.<trait-id> 下定义。
traits:
  container:
    configuration:
      enabled: true
      name: my-integration
↓↓↓
traits:
  container:
    enabled: true
    name: my-integration
这种实现中有可能向后兼容。为实现向后兼容,请为每个特征类型提供带有 RawMessage 类型的 Configuration 字段,以便从现有集成和资源从新的 Camel K 版本读取。
当读取旧的集成和资源时,每个特征(若有)中的旧配置将迁移到新的 Trait API 字段。如果在新的 API 字段中预定义了值,它们会在旧的 API 字段前面。
type Trait struct {
    // Can be used to enable or disable a trait. All traits share this common property.
    Enabled *bool `property:"enabled" json:"enabled,omitempty"`

    // Legacy trait configuration parameters.
    // Deprecated: for backward compatibility.
    Configuration *Configuration `json:"configuration,omitempty"`
}

// Deprecated: for backward compatibility.
type Configuration struct {
    RawMessage `json:",inline"`
}
3.5. 在开发模式下运行 Camel K 集成
您可以从命令行在 OpenShift 集群上以开发模式运行 Camel K 集成。使用开发模式,您可以快速迭代开发中的集成,并快速获得代码反馈。
当您使用 --dev 选项指定 kamel run 命令时,这将立即在云中部署集成,并在终端中显示集成日志。然后,您可以更改代码,并查看立即对 OpenShift 上的远程集成 Pod 应用的更改。终端会自动显示云中远程集成的所有重新部署。
Camel K 在开发模式中生成的工件与您生产环境中运行的工件相同。开发模式的目的是加快开发速度。
先决条件
- 设置您的 Camel K 开发环境。
- 您必须已经使用 Java 或 YAML DSL 编写 Camel 集成。
流程
使用
oc客户端工具登录到 OpenShift 集群,例如:$ oc login --token=my-token --server=https://my-cluster.example.com:6443确保 Camel K Operator 正在运行,例如:
$ oc get pod
NAME                               READY   STATUS    RESTARTS   AGE
camel-k-operator-86b8d94b4-pk7d6   1/1     Running   0          6m28s
使用
--dev进入kamel run命令,以便在云的 OpenShift 上以开发模式运行集成。下面显示了一个简单的 Java 示例:$ kamel run HelloCamelK.java --dev Condition "IntegrationPlatformAvailable" is "True" for Integration hello-camel-k: test/camel-k Integration hello-camel-k in phase "Initialization" Integration hello-camel-k in phase "Building Kit" Condition "IntegrationKitAvailable" is "True" for Integration hello-camel-k: kit-c49sqn4apkb4qgn55ak0 Integration hello-camel-k in phase "Deploying" Progress: integration "hello-camel-k" in phase Initialization Progress: integration "hello-camel-k" in phase Building Kit Progress: integration "hello-camel-k" in phase Deploying Integration hello-camel-k in phase "Running" Condition "DeploymentAvailable" is "True" for Integration hello-camel-k: deployment name is hello-camel-k Progress: integration "hello-camel-k" in phase Running Condition "CronJobAvailable" is "False" for Integration hello-camel-k: different controller strategy used (deployment) Condition "KnativeServiceAvailable" is "False" for Integration hello-camel-k: different controller strategy used (deployment) Condition "Ready" is "False" for Integration hello-camel-k Condition "Ready" is "True" for Integration hello-camel-k [1] Monitoring pod hello-camel-k-7f85df47b8-js7cb ... ... [1] 2021-08-11 18:34:44,069 INFO [org.apa.cam.k.Runtime] (main) Apache Camel K Runtime 1.7.1.fuse-800025-redhat-00001 [1] 2021-08-11 18:34:44,167 INFO [org.apa.cam.qua.cor.CamelBootstrapRecorder] (main) bootstrap runtime: org.apache.camel.quarkus.main.CamelMainRuntime [1] 2021-08-11 18:34:44,362 INFO [org.apa.cam.k.lis.SourcesConfigurer] (main) Loading routes from: SourceDefinition{name='HelloCamelK', language='java', location='file:/etc/camel/sources/HelloCamelK.java', } [1] 2021-08-11 18:34:46,180 INFO [org.apa.cam.imp.eng.AbstractCamelContext] (main) Routes startup summary (total:1 started:1) [1] 2021-08-11 18:34:46,180 INFO [org.apa.cam.imp.eng.AbstractCamelContext] (main) Started java (timer://java) [1] 2021-08-11 18:34:46,180 INFO [org.apa.cam.imp.eng.AbstractCamelContext] (main) Apache Camel 3.10.0.fuse-800010-redhat-00001 (camel-1) started in 243ms (build:0ms init:213ms start:30ms) [1] 2021-08-11 18:34:46,190 INFO [io.quarkus] (main) camel-k-integration 1.6.6 on JVM (powered by Quarkus 1.11.7.Final-redhat-00009) started in 3.457s. [1] 2021-08-11 18:34:46,190 INFO [io.quarkus] (main) Profile prod activated. [1] 2021-08-11 18:34:46,191 INFO [io.quarkus] (main) Installed features: [camel-bean, camel-core, camel-java-joor-dsl, camel-k-core, camel-k-runtime, camel-log, camel-support-common, camel-timer, cdi] [1] 2021-08-11 18:34:47,200 INFO [info] (Camel (camel-1) thread #0 - timer://java) Exchange[ExchangePattern: InOnly, BodyType: String, Body: Hello Camel K from java] [1] 2021-08-11 18:34:48,180 INFO [info] (Camel (camel-1) thread #0 - timer://java) Exchange[ExchangePattern: InOnly, BodyType: String, Body: Hello Camel K from java] [1] 2021-08-11 18:34:49,180 INFO [info] (Camel (camel-1) thread #0 - timer://java) Exchange[ExchangePattern: InOnly, BodyType: String, Body: Hello Camel K from java] ...编辑集成 DSL 文件的内容,保存您的更改,并立即查看在终端中显示的更改。例如:
... integration "hello-camel-k" updated ... [2] 2021-08-11 18:40:54,173 INFO [org.apa.cam.k.Runtime] (main) Apache Camel K Runtime 1.7.1.fuse-800025-redhat-00001 [2] 2021-08-11 18:40:54,209 INFO [org.apa.cam.qua.cor.CamelBootstrapRecorder] (main) bootstrap runtime: org.apache.camel.quarkus.main.CamelMainRuntime [2] 2021-08-11 18:40:54,301 INFO [org.apa.cam.k.lis.SourcesConfigurer] (main) Loading routes from: SourceDefinition{name='HelloCamelK', language='java', location='file:/etc/camel/sources/HelloCamelK.java', } [2] 2021-08-11 18:40:55,796 INFO [org.apa.cam.imp.eng.AbstractCamelContext] (main) Routes startup summary (total:1 started:1) [2] 2021-08-11 18:40:55,796 INFO [org.apa.cam.imp.eng.AbstractCamelContext] (main) Started java (timer://java) [2] 2021-08-11 18:40:55,797 INFO [org.apa.cam.imp.eng.AbstractCamelContext] (main) Apache Camel 3.10.0.fuse-800010-redhat-00001 (camel-1) started in 174ms (build:0ms init:147ms start:27ms) [2] 2021-08-11 18:40:55,803 INFO [io.quarkus] (main) camel-k-integration 1.6.6 on JVM (powered by Quarkus 1.11.7.Final-redhat-00009) started in 3.025s. [2] 2021-08-11 18:40:55,808 INFO [io.quarkus] (main) Profile prod activated. [2] 2021-08-11 18:40:55,809 INFO [io.quarkus] (main) Installed features: [camel-bean, camel-core, camel-java-joor-dsl, camel-k-core, camel-k-runtime, camel-log, camel-support-common, camel-timer, cdi] [2] 2021-08-11 18:40:56,810 INFO [info] (Camel (camel-1) thread #0 - timer://java) Exchange[ExchangePattern: InOnly, BodyType: String, Body: Hello Camel K from java] [2] 2021-08-11 18:40:57,793 INFO [info] (Camel (camel-1) thread #0 - timer://java) Exchange[ExchangePattern: InOnly, BodyType: String, Body: Hello Camel K from java] ...-
按
Ctrl-C终止终端中的日志记录。
其他资源
-
有关
kamel run命令的更多详细信息,请输入kamel run --help - 有关运行集成的开发工具的详情,请参阅 VS Code Tooling for Apache Camel K by Red Hat
- 管理 Camel K 集成
- 配置 Camel K 集成依赖项
3.6. 使用 modeline 运行 Camel K 集成
您可以使用 Camel K 模式在 Camel K 集成源文件中指定多个配置选项,这些文件在运行时执行。这通过保存重新输入多个命令行选项的时间来创建时间,并有助于防止输入错误。
以下示例显示了 Java 集成文件的 modeline 条目,它启用了 3scale 并限制集成容器内存。
先决条件
- 设置 Camel K 开发环境
- 您必须已经使用 Java 或 YAML DSL 编写 Camel 集成。
流程
在您的集成文件中添加 Camel K modeline 条目。例如:
ThreeScaleRest.java
// camel-k: trait=3scale.enabled=true trait=container.limit-memory=256Mi1 import org.apache.camel.builder.RouteBuilder; public class ThreeScaleRest extends RouteBuilder { @Override public void configure() throws Exception { rest().get("/") .route() .setBody().constant("Hello"); } }- 1
- 启用容器和 3scale 特征,以通过 3scale 公开路由,并限制容器内存。
运行集成,例如:
kamel run ThreeScaleRest.javakamel run命令输出集成中指定的任何 mode 命令行选项,例如:Modeline options have been loaded from source files Full command: kamel run ThreeScaleRest.java --trait=3scale.enabled=true --trait=container.limit-memory=256Mi
其他资源
- Camel K 模式命令行选项
- 有关运行模式集成的开发工具的详情,请参考对 Apache Camel K Modeline 的 IDE 支持。
第 4 章 升级 Camel K
您可以自动升级已安装的 Camel K operator,但不自动升级 Camel K 集成。您必须手动为 Camel K 集成触发升级。本章解释了如何升级 Camel K operator 和 Camel K 集成。
4.1. 升级 Camel K operator
安装的 Camel K operator 订阅指定一个更新频道,如 1.6.0 频道,用于跟踪和接收 Operator 的更新。要升级 Operator 以开始跟踪并从更新频道接受更新,您可以更改订阅中的更新频道。如需有关更改 已安装 Operator 的更新频道的更多信息,请参阅升级已安装的 Operator。
- 安装的 Operator 无法变为比当前频道旧的频道。
如果订阅中的批准策略被设置为 Automatic,升级过程会在所选频道中提供新的 Operator 版本时立即启动。如果批准策略被设置为 Manual,则必须手动批准待处理的升级。
先决条件
- Camel K operator 使用 Operator Lifecycle Manager (OLM)安装。
流程
- 在 OpenShift Container Platform web 控制台的 Administrator 视角中,进入 Operators → Installed Operators。
- 点 Camel K Operator。
- 点 Subscription 标签页。
- 点 Channel 中的更新频道的名称。
-
点击您要更改为的更新频道。例如,
latest。点击 Save。这将开始升级到最新的 Camel K 版本。
对于带有自动批准策略的订阅,升级会自动开始。返回到 Operators → Installed Operators 页面,以监控升级的进度。完成后,状态将变为 Succeeded 和 Up to date。
对于采用手动批准策略的订阅,您可以从 Subscription 选项卡中手动批准升级。
4.2. 升级 Camel K 集成
当您触发 Camel K operator 的升级时,Operator 会准备要升级的集成,但不会为每个 Operator 触发升级,以避免服务中断。在升级 Operator 时,集成自定义资源不会自动升级到较新的版本,例如,Operator 可能处于 1.6.0 版本,而集成会报告自定义资源的 status.version 字段。
先决条件
Camel K operator 使用 Operator Lifecycle Manager (OLM)安装和升级。
流程
- 打开终端,并运行以下命令来升级 Camel K 间的操作。
kamel rebuild myintegration
这将清除集成资源的状态,Operator 将使用升级版本的工件(如 1.6.0 )启动集成部署。
4.3. 降级 Camel K
您可以通过安装以前的 Operator 版本来降级到 Camel K operator 的旧版本。这需要使用 OC CLI 手动触发。有关使用 CLI 安装 Operator 特定版本的更多信息 ,请参阅安装 Operator 的特定版本。
您必须删除现有 Camel K operator,然后安装 Operator 的 specifc 版本,因为 OLM 不支持降级。
安装旧版本的 Operator 后,请使用 kamel rebuild 命令降级与 Operator 版本的集成。例如,
kamel rebuild myintegration第 5 章 Camel K 快速启动开发人员指南
Red Hat Integration - Camel K 提供基于 https://github.com/openshift-integration 提供的集成用例的快速入门开发人员教程。本章详细介绍了如何设置和部署以下教程:
5.1. 部署基本 Camel K Java 集成
本教程介绍了如何在 OpenShift 的云中运行简单的 Java 集成,应用配置和路由到集成,并以 Kubernetes CronJob 的形式运行集成。
先决条件
- 请参阅 GitHub 中的教程: https://github.com/openshift-integration/camel-k-example-basic/tree/1.6.x。
-
您必须已安装了 Camel K 操作器和
kamelCLI。请参阅 安装 Camel K。 - Visual Studio (VS)代码是可选的,但推荐获得最佳开发人员体验。请参阅链接:设置 Camel K 开发环境。
流程
克隆教程 Git 存储库:
$ git clone git@github.com:openshift-integration/camel-k-example-basic.git- 在 VS Code 中,选择 File → Open Folder → camel-k-example-basic。
在 VS Code 导航树中,右键单击
readme.didact.md文件,然后从文件中选择 Didact: Start Didact 教程。例如: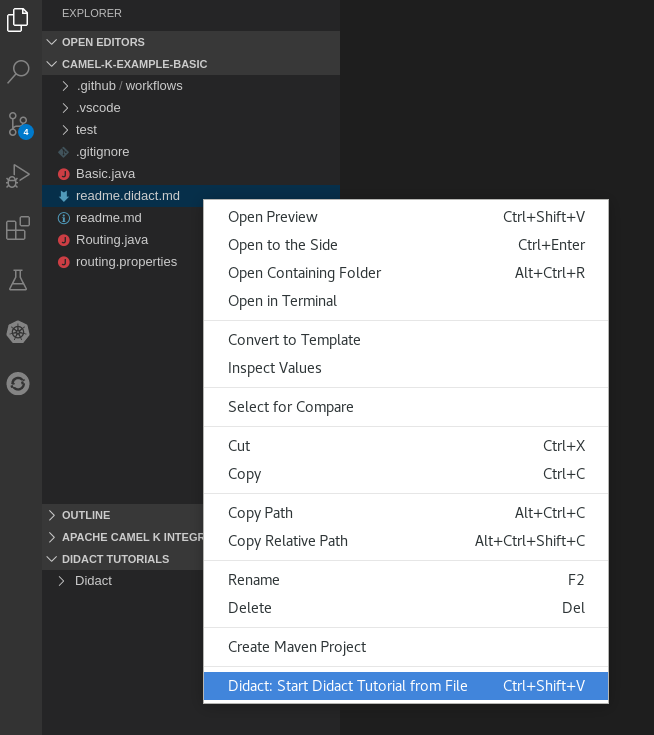
这会在 VS Code 中打开一个新的 Didact 选项卡,以显示教程说明。
按照教程说明,点提供的链接自动运行命令。
或者,如果您没有安装带有 Didact 扩展名的 VS Code,您可以手动输入 https://github.com/openshift-integration/camel-k-example-basic 中的命令。
5.2. 部署 Camel K Serverless 与 Knative 集成
本教程演示了如何在事件驱动的架构中部署 Camel K 与 OpenShift Serverless 集成。本教程使用 Knative Eventing 代理在 Bitcoin 演示中使用事件发布订阅模式进行通信。
本教程还介绍了如何使用 Camel K 集成来与多个外部系统连接到 Knative 事件网格。Camel K 集成也使用 Knative Serving 来根据需要自动缩放和缩减为零。
先决条件
- 请参阅 GitHub 中的教程: https://github.com/openshift-integration/camel-k-example-knative/tree/1.6.x。
您必须具有集群管理员访问 OpenShift 集群才能安装 Camel K 和 OpenShift Serverless:
- Visual Studio (VS)代码是可选的,但推荐获得最佳开发人员体验。请参阅设置您的 Camel K 开发环境。
流程
克隆教程 Git 存储库:
$ git clone git@github.com:openshift-integration/camel-k-example-knative.git- 在 VS Code 中,选择 File → Open Folder → camel-k-example-knative。
-
在 VS Code 导航树中,右键单击
readme.didact.md文件,然后从文件中选择 Didact: Start Didact 教程。这会在 VS Code 中打开一个新的 Didact 选项卡,以显示教程说明。 按照教程说明,点提供的链接自动运行命令。
或者,如果您没有安装带有 Didact 扩展名的 VS Code,您可以手动输入 https://github.com/openshift-integration/camel-k-example-knative 中的命令。
5.3. 部署 Camel K 转换集成
本教程介绍了如何在 OpenShift 上运行 Camel K Java 集成,该集成将数据转换为 JSON,并将其存储在 PostgreSQL 等数据库中。
教程示例使用 CSV 文件查询 XML API,并使用收集的数据来构建有效的 GeoJSON 文件,该文件存储在 PostgreSQL 数据库中。
先决条件
- 请参阅 GitHub 中的教程: https://github.com/openshift-integration/camel-k-example-transformations/tree/1.6.x。
- 您必须具有集群管理员访问 OpenShift 集群才能安装 Camel K。请参阅安装 Camel K。
- 您必须遵循教程 readme 中的说明,通过 Dev4Ddevs.com 安装 PostgreSQL Operator,这是 OpenShift 集群上所需的。
- Visual Studio (VS)代码是可选的,但推荐获得最佳开发人员体验。请参阅设置您的 Camel K 开发环境。
流程
克隆教程 Git 存储库:
$ git clone git@github.com:openshift-integration/camel-k-example-transformations.git- 在 VS Code 中,选择 File → Open Folder → camel-k-example-transformations。
-
在 VS Code 导航树中,右键单击
readme.didact.md文件,然后从文件中选择 Didact: Start Didact 教程。这会在 VS Code 中打开一个新的 Didact 选项卡,以显示教程说明。 按照教程说明,点提供的链接自动运行命令。
或者,如果您没有安装带有 Didact 扩展名的 VS Code,您可以手动输入 https://github.com/openshift-integration/camel-k-example-transformations 中的命令。
5.4. 部署 Camel K Serverless 事件流集成
本教程演示了在 Knative Eventing 中使用 Camel K 和 OpenShift Serverless 进行事件驱动的架构。
本教程演示了如何在带有 AMQ Broker 集群的 AMQ Streams 集群中安装带有 Knative 的 Camel K 和 Serverless,以及如何部署事件流项目来运行全局 hazard 警报演示应用程序。
先决条件
- 请参阅 GitHub 中的教程: https://github.com/openshift-integration/camel-k-example-event-streaming/tree/1.6.x。
您必须具有集群管理员访问 OpenShift 集群才能安装 Camel K 和 OpenShift Serverless:
您必须按照教程 readme 中的说明在 OpenShift 集群上安装额外的所需 Operator:
- AMQ Streams Operator
- AMQ Broker Operator
- Visual Studio (VS)代码是可选的,但推荐获得最佳开发人员体验。请参阅设置您的 Camel K 开发环境。
流程
克隆教程 Git 存储库:
$ git clone git@github.com:openshift-integration/camel-k-example-event-streaming.git- 在 VS Code 中,选择 File → Open Folder → camel-k-example-event-streaming。
-
在 VS Code 导航树中,右键单击
readme.didact.md文件,然后从文件中选择 Didact: Start Didact 教程。这会在 VS Code 中打开一个新的 Didact 选项卡,以显示教程说明。 按照教程说明,点提供的链接自动运行命令。
或者,如果您没有安装带有 Didact 扩展名的 VS Code,您可以手动输入 https://github.com/openshift-integration/camel-k-example-event-streaming 中的命令。
5.5. 部署基于 Camel K Serverless API 的集成
本教程演示了将 Camel K 和 OpenShift Serverless 与 Knative Serving 用于基于 API 的集成,并管理在 OpenShift 上使用 3scale API 管理的 API。
教程演示了如何配置基于 Amazon S3 的存储、设计 OpenAPI 定义,并运行调用演示 API 端点的集成。
先决条件
- 请参阅 GitHub 中的教程: https://github.com/openshift-integration/camel-k-example-api/tree/1.6.x。
您必须具有集群管理员访问 OpenShift 集群才能安装 Camel K 和 OpenShift Serverless:
- 您还可以在 OpenShift 系统上安装可选的 Red Hat Integration - 3scale Operator,以管理 API。请参阅使用 Operator 部署 3scale。
- Visual Studio (VS)代码是可选的,但推荐获得最佳开发人员体验。请参阅设置您的 Camel K 开发环境。
流程
克隆教程 Git 存储库:
$ git clone git@github.com:openshift-integration/camel-k-example-api.git- 在 VS Code 中,选择 File → Open Folder → camel-k-example-api。
-
在 VS Code 导航树中,右键单击
readme.didact.md文件,然后从文件中选择 Didact: Start Didact 教程。这会在 VS Code 中打开一个新的 Didact 选项卡,以显示教程说明。 按照教程说明,点提供的链接自动运行命令。
或者,如果您没有安装带有 Didact 扩展名的 VS Code,您可以手动输入 https://github.com/openshift-integration/camel-k-example-api 中的命令。
5.6. 部署 Camel K SaaS 集成
本教程介绍了如何在 OpenShift 上运行 Camel K Java 集成,该集成连接了两个广泛使用的软件作为服务(SaaS)供应商。
教程示例演示了如何使用基于 REST 的 Camel 组件集成 Salesforce 和 ServiceNow SaaS 供应商。在这个简单示例中,每个新的 Salesforce 问题单都会被复制到包括 Salesforce 问题单号的对应 ServiceNow Incident 中。
先决条件
- 请参阅 GitHub 中的教程: https://github.com/openshift-integration/camel-k-example-saas/tree/1.6.x。
- 您必须具有集群管理员访问 OpenShift 集群才能安装 Camel K。请参阅安装 Camel K。
- 您必须具有 Salesforce 登录凭证和服务否登录凭证。
- Visual Studio (VS)代码是可选的,但推荐获得最佳开发人员体验。请参阅设置您的 Camel K 开发环境。
流程
克隆教程 Git 存储库:
$ git clone git@github.com:openshift-integration/camel-k-example-saas.git- 在 VS Code 中,选择 File → Open Folder → camel-k-example-saas。
-
在 VS Code 导航树中,右键单击
readme.didact.md文件,然后从文件中选择 Didact: Start Didact 教程。这会在 VS Code 中打开一个新的 Didact 选项卡,以显示教程说明。 按照教程说明,点提供的链接自动运行命令。
或者,如果您没有安装带有 Didact 扩展名的 VS Code,您可以手动输入 https://github.com/openshift-integration/camel-k-example-saas 中的命令。
5.7. 部署 Camel K JDBC 集成
本教程介绍了如何通过 JDBC 驱动程序使用 Camel K 和 SQL 数据库。本教程介绍了如何将生成数据的集成设置为 Postgres 数据库(您可以使用您选择的任何相关数据库)以及如何从同一数据库读取数据。
先决条件
- 请参阅 GitHub 中的教程: https://github.com/openshift-integration/camel-k-example-jdbc/tree/1.6.x。
您必须具有集群管理员访问 OpenShift 集群才能安装 Camel K。
- Visual Studio (VS)代码是可选的,但推荐获得最佳开发人员体验。请参阅设置您的 Camel K 开发环境。
流程
克隆教程 Git 存储库:
$ git clone git@github.com:openshift-integration/camel-k-example-jdbc.git- 在 VS Code 中,选择 File → Open Folder → camel-k-example-jdbc。
-
在 VS Code 导航树中,右键单击
readme.didact.md文件,然后从文件中选择 Didact: Start Didact 教程。这会在 VS Code 中打开一个新的 Didact 选项卡,以显示教程说明。 按照教程说明,点提供的链接自动运行命令。
或者,如果您没有安装带有 Didact 扩展名的 VS Code,您可以手动输入 https://github.com/openshift-integration/camel-k-example-jdbc 中的命令。
其他资源
5.8. 部署 Camel K JMS 集成
本教程介绍了如何使用 JMS 连接到消息代理,以便使用和生成消息。有两个示例:
- JMS Sink:本教程演示了如何向 JMS 代理生成消息。
- JMS Source:本教程演示了如何使用来自 JMS 代理的消息。
先决条件
- 请参阅 GitHub 中的教程: https://github.com/openshift-integration/camel-k-example-jms/tree/1.6.x。
您必须具有集群管理员访问 OpenShift 集群才能安装 Camel K。
- Visual Studio (VS)代码是可选的,但推荐获得最佳开发人员体验。请参阅设置您的 Camel K 开发环境。
流程
克隆教程 Git 存储库:
$ git clone git@github.com:openshift-integration/camel-k-example-jms.git- 在 VS Code 中,选择 File → Open Folder → camel-k-example-jms。
-
在 VS Code 导航树中,右键单击
readme.didact.md文件,然后从文件中选择 Didact: Start Didact 教程。这会在 VS Code 中打开一个新的 Didact 选项卡,以显示教程说明。 按照教程说明,点提供的链接自动运行命令。
或者,如果您没有安装带有 Didact 扩展名的 VS Code,您可以手动输入 https://github.com/openshift-integration/camel-k-example-jms 中的命令。
其他资源
5.9. 部署 Camel K Kafka 集成
本教程介绍了如何在 Apache Kafka 中使用 Camel K。本教程介绍了如何通过 Red Hat OpenShift Streams for Apache Kafka 设置 Kafka 主题,并将其与 Camel K 一起使用。
先决条件
- 请参阅 GitHub 中的教程: https://github.com/openshift-integration/camel-k-example-kafka/tree/1.6.x。
您必须具有集群管理员访问 OpenShift 集群才能安装 Camel K。
- Visual Studio (VS)代码是可选的,但推荐获得最佳开发人员体验。请参阅设置您的 Camel K 开发环境。
流程
克隆教程 Git 存储库:
$ git clone git@github.com:openshift-integration/camel-k-example-kafka.git- 在 VS Code 中,选择 File → Open Folder → camel-k-example-kafka。
-
在 VS Code 导航树中,右键单击
readme.didact.md文件,然后从文件中选择 Didact: Start Didact 教程。这会在 VS Code 中打开一个新的 Didact 选项卡,以显示教程说明。 按照教程说明,点提供的链接自动运行命令。
或者,如果您没有安装带有 Didact 扩展名的 VS Code,您可以手动输入 https://github.com/openshift-integration/camel-k-example-kafka 中的命令。