创建 CI/CD 管道
在 OpenShift Pipelines 中创建并运行任务和管道入门
摘要
第 1 章 为使用 OpenShift Pipelines 的应用程序创建 CI/CD 解决方案
使用 Red Hat OpenShift Pipelines,您可以创建一个自定义的 CI/CD 解决方案来构建、测试和部署应用程序。
要为应用程序创建一个完整的自助 CI/CD 管道,请执行以下任务:
- 创建自定义任务,或安装现有的可重复使用的任务。
- 为应用程序创建并定义交付管道。
使用以下方法之一提供附加到管道执行的工作区中的存储卷或文件系统:
- 指定创建持久性卷声明的卷声明模板
- 指定一个持久性卷声明
-
创建一个
PipelineRun对象来实例化并调用管道。 - 添加触发器以捕获源仓库中的事件。
本节使用 pipelines-tutorial 示例来演示前面的任务。这个示例使用一个简单的应用程序,它由以下部分组成:
-
一个前端接口,
pipelines-vote-ui,它的源代码在pipelines-vote-uiGit 存储库中。 -
一个后端接口
pipelines-vote-api,它的源代码在pipelines-vote-apiGit 存储库中。 -
apply-manifests和update-deployment任务在pipelines-tutorialGit 存储库中。
1.1. 先决条件
- 有访问 OpenShift Container Platform 集群的权限。
- 已使用在 OpenShift OperatorHub 中列出的 Red Hat OpenShift Pipelines Operator 安装了 OpenShift Pipelines。在安装后,它可用于整个集群。
- 已安装 OpenShift Pipelines CLI。
-
使用您的 GitHub ID fork 前端
pipelines-vote-ui和后端pipelines-vote-apiGit 存储库,并具有对这些存储库的管理员访问权限。 -
可选:已克隆了
pipelines-tutorialGit 存储库。
1.2. 创建项目并检查管道服务帐户
流程
登录您的 OpenShift Container Platform 集群:
oc login -u <login> -p <password> https://openshift.example.com:6443
$ oc login -u <login> -p <password> https://openshift.example.com:6443Copy to Clipboard Copied! Toggle word wrap Toggle overflow 为示例应用程序创建一个项目。在本例中,创建
pipelines-tutorial项目:oc new-project pipelines-tutorial
$ oc new-project pipelines-tutorialCopy to Clipboard Copied! Toggle word wrap Toggle overflow 注意如果您使用其他名称创建项目,请确定使用您的项目名称更新示例中使用的资源 URL。
查看
pipeline服务帐户:Red Hat OpenShift Pipelines Operator 添加并配置一个名为
pipeline的服务帐户,该帐户有足够的权限来构建和推送镜像。PipelineRun对象使用此服务帐户。oc get serviceaccount pipeline
$ oc get serviceaccount pipelineCopy to Clipboard Copied! Toggle word wrap Toggle overflow
1.3. 创建管道任务
流程
从
pipelines-tutorial存储库安装apply-manifests和update-deployment任务资源,其中包含可为管道重复使用的任务列表:oc create -f https://raw.githubusercontent.com/openshift/pipelines-tutorial/pipelines-1.12/01_pipeline/01_apply_manifest_task.yaml oc create -f https://raw.githubusercontent.com/openshift/pipelines-tutorial/pipelines-1.12/01_pipeline/02_update_deployment_task.yaml
$ oc create -f https://raw.githubusercontent.com/openshift/pipelines-tutorial/pipelines-1.12/01_pipeline/01_apply_manifest_task.yaml
$ oc create -f https://raw.githubusercontent.com/openshift/pipelines-tutorial/pipelines-1.12/01_pipeline/02_update_deployment_task.yaml
Copy to Clipboard Copied! Toggle word wrap Toggle overflow 使用
tkn task list命令列出您创建的任务:tkn task list
$ tkn task listCopy to Clipboard Copied! Toggle word wrap Toggle overflow 输出会确认创建了
apply-manifests和update-deployment任务:NAME DESCRIPTION AGE apply-manifests 1 minute ago update-deployment 48 seconds ago
NAME DESCRIPTION AGE apply-manifests 1 minute ago update-deployment 48 seconds agoCopy to Clipboard Copied! Toggle word wrap Toggle overflow 使用
tkn clustertasks list命令列出由 Operator 安装的额外集群任务,如buildah和s2i-python:注意要在受限环境中使用
buildah集群任务,您必须确保 Dockerfile 使用内部镜像流作为基础镜像。tkn clustertasks list
$ tkn clustertasks listCopy to Clipboard Copied! Toggle word wrap Toggle overflow 输出列出了 Operator 安装的
ClusterTask资源:NAME DESCRIPTION AGE buildah 1 day ago git-clone 1 day ago s2i-python 1 day ago tkn 1 day ago
NAME DESCRIPTION AGE buildah 1 day ago git-clone 1 day ago s2i-python 1 day ago tkn 1 day agoCopy to Clipboard Copied! Toggle word wrap Toggle overflow
在 Red Hat OpenShift Pipelines 1.10 中,集群任务功能已弃用,计划在以后的发行版本中删除。
1.4. 组装管道
管道(pipeline)代表一个 CI/CD 流,由要执行的任务定义。它被设计为在多个应用程序和环境中通用且可重复使用。
管道指定任务如何使用 from 和 runAfter 参数相互交互以及它们执行的顺序。它使用 workspaces 字段指定管道中每个任务在执行过程中所需的一个或多个卷。
在本小节中,您将创建一个管道,从 GitHub 获取应用程序的源代码,然后在 OpenShift Container Platform 上构建和部署应用程序。
管道为后端应用程序 pipelines-vote-api 和前端应用程序 pipelines-vote-ui 执行以下任务:
-
通过引用
git-url和git-revision参数,从 Git 存储库中克隆应用程序的源代码。 -
使用
buildah集群任务构建容器镜像。 -
通过引用
image参数将镜像推送到 OpenShift 镜像 registry。 -
通过使用
apply-manifests和update-deployment任务在 OpenShift Container Platform 上部署新镜像。
流程
复制以下管道 YAML 文件示例内容并保存:
Copy to Clipboard Copied! Toggle word wrap Toggle overflow Pipeline 定义提取 Git 源存储库和镜像 registry 的特定内容。当一个管道被触发并执行时,这些详细信息会作为
params添加。创建管道:
oc create -f <pipeline-yaml-file-name.yaml>
$ oc create -f <pipeline-yaml-file-name.yaml>Copy to Clipboard Copied! Toggle word wrap Toggle overflow 或者,还可以从 Git 存储库直接执行 YAML 文件:
oc create -f https://raw.githubusercontent.com/openshift/pipelines-tutorial/pipelines-1.12/01_pipeline/04_pipeline.yaml
$ oc create -f https://raw.githubusercontent.com/openshift/pipelines-tutorial/pipelines-1.12/01_pipeline/04_pipeline.yamlCopy to Clipboard Copied! Toggle word wrap Toggle overflow 使用
tkn pipeline list命令来验证管道是否已添加到应用程序中:tkn pipeline list
$ tkn pipeline listCopy to Clipboard Copied! Toggle word wrap Toggle overflow 检查输出来验证创建了
build-and-deploypipeline:NAME AGE LAST RUN STARTED DURATION STATUS build-and-deploy 1 minute ago --- --- --- ---
NAME AGE LAST RUN STARTED DURATION STATUS build-and-deploy 1 minute ago --- --- --- ---Copy to Clipboard Copied! Toggle word wrap Toggle overflow
1.5. 镜像以在受限环境中运行管道
要在断开连接的集群或受限环境中置备的集群中运行 OpenShift Pipelines,请确保为受限网络配置了 Samples Operator,或者集群管理员创建了带有镜像 registry 的集群。
以下流程使用 pipelines-tutorial 示例,使用带有镜像 registry 的集群在受限环境中为应用程序创建管道。为确保 pipelines-tutorial 示例在受限环境中工作,您必须为前端接口(pipelines-vote-ui)后端接口(pipelines-vote-api)和 cli 从 mirror registry 中镜像相应的构建器镜像。
流程
为前端接口
pipelines-vote-ui从 mirror registry 中镜像构建器镜像。验证所需镜像标签没有导入:
oc describe imagestream python -n openshift
$ oc describe imagestream python -n openshiftCopy to Clipboard Copied! Toggle word wrap Toggle overflow 输出示例
Copy to Clipboard Copied! Toggle word wrap Toggle overflow 将支持的镜像标签镜像到私有 registry:
oc image mirror registry.redhat.io/ubi9/python-39:latest <mirror-registry>:<port>/ubi9/python-39
$ oc image mirror registry.redhat.io/ubi9/python-39:latest <mirror-registry>:<port>/ubi9/python-39Copy to Clipboard Copied! Toggle word wrap Toggle overflow 导入镜像:
oc tag <mirror-registry>:<port>/ubi9/python-39 python:latest --scheduled -n openshift
$ oc tag <mirror-registry>:<port>/ubi9/python-39 python:latest --scheduled -n openshiftCopy to Clipboard Copied! Toggle word wrap Toggle overflow 您必须定期重新导入镜像。
--scheduled标志启用镜像自动重新导入。验证带有指定标签的镜像已被导入:
oc describe imagestream python -n openshift
$ oc describe imagestream python -n openshiftCopy to Clipboard Copied! Toggle word wrap Toggle overflow 输出示例
Copy to Clipboard Copied! Toggle word wrap Toggle overflow
为后端接口
pipelines-vote-api从 mirror registry 中镜像构建器镜像。验证所需镜像标签没有导入:
oc describe imagestream golang -n openshift
$ oc describe imagestream golang -n openshiftCopy to Clipboard Copied! Toggle word wrap Toggle overflow 输出示例
Copy to Clipboard Copied! Toggle word wrap Toggle overflow 将支持的镜像标签镜像到私有 registry:
oc image mirror registry.redhat.io/ubi9/go-toolset:latest <mirror-registry>:<port>/ubi9/go-toolset
$ oc image mirror registry.redhat.io/ubi9/go-toolset:latest <mirror-registry>:<port>/ubi9/go-toolsetCopy to Clipboard Copied! Toggle word wrap Toggle overflow 导入镜像:
oc tag <mirror-registry>:<port>/ubi9/go-toolset golang:latest --scheduled -n openshift
$ oc tag <mirror-registry>:<port>/ubi9/go-toolset golang:latest --scheduled -n openshiftCopy to Clipboard Copied! Toggle word wrap Toggle overflow 您必须定期重新导入镜像。
--scheduled标志启用镜像自动重新导入。验证带有指定标签的镜像已被导入:
oc describe imagestream golang -n openshift
$ oc describe imagestream golang -n openshiftCopy to Clipboard Copied! Toggle word wrap Toggle overflow 输出示例
Copy to Clipboard Copied! Toggle word wrap Toggle overflow
从
cli的镜像 registry 中镜像构建器镜像。验证所需镜像标签没有导入:
oc describe imagestream cli -n openshift
$ oc describe imagestream cli -n openshiftCopy to Clipboard Copied! Toggle word wrap Toggle overflow 输出示例
Copy to Clipboard Copied! Toggle word wrap Toggle overflow 将支持的镜像标签镜像到私有 registry:
oc image mirror quay.io/openshift-release-dev/ocp-v4.0-art-dev@sha256:65c68e8c22487375c4c6ce6f18ed5485915f2bf612e41fef6d41cbfcdb143551 <mirror-registry>:<port>/openshift-release-dev/ocp-v4.0-art-dev:latest
$ oc image mirror quay.io/openshift-release-dev/ocp-v4.0-art-dev@sha256:65c68e8c22487375c4c6ce6f18ed5485915f2bf612e41fef6d41cbfcdb143551 <mirror-registry>:<port>/openshift-release-dev/ocp-v4.0-art-dev:latestCopy to Clipboard Copied! Toggle word wrap Toggle overflow 导入镜像:
oc tag <mirror-registry>:<port>/openshift-release-dev/ocp-v4.0-art-dev cli:latest --scheduled -n openshift
$ oc tag <mirror-registry>:<port>/openshift-release-dev/ocp-v4.0-art-dev cli:latest --scheduled -n openshiftCopy to Clipboard Copied! Toggle word wrap Toggle overflow 您必须定期重新导入镜像。
--scheduled标志启用镜像自动重新导入。验证带有指定标签的镜像已被导入:
oc describe imagestream cli -n openshift
$ oc describe imagestream cli -n openshiftCopy to Clipboard Copied! Toggle word wrap Toggle overflow 输出示例
Copy to Clipboard Copied! Toggle word wrap Toggle overflow
1.6. 运行管道
PipelineRun 资源启动管道,并将其与 Git 和用于特定调用的镜像资源相关联。它为管道中的每个任务自动创建并启动 TaskRun 资源。
流程
启动后端应用程序的管道:
Copy to Clipboard Copied! Toggle word wrap Toggle overflow 上一命令使用卷声明模板,该模板为管道执行创建持久性卷声明。
要跟踪管道运行的进度,请输入以下命令:
$ tkn pipelinerun logs <pipelinerun_id> -f
$ tkn pipelinerun logs <pipelinerun_id> -fCopy to Clipboard Copied! Toggle word wrap Toggle overflow 上述命令中的 <pipelinerun_id> 是上一命令输出返回的
PipelineRun的 ID。启动前端应用程序的管道:
Copy to Clipboard Copied! Toggle word wrap Toggle overflow 要跟踪管道运行的进度,请输入以下命令:
$ tkn pipelinerun logs <pipelinerun_id> -f
$ tkn pipelinerun logs <pipelinerun_id> -fCopy to Clipboard Copied! Toggle word wrap Toggle overflow 上述命令中的 <pipelinerun_id> 是上一命令输出返回的
PipelineRun的 ID。几分钟后,使用
tkn pipelinerun list命令列出所有管道运行来验证管道是否成功运行:$ tkn pipelinerun list
$ tkn pipelinerun listCopy to Clipboard Copied! Toggle word wrap Toggle overflow 输出列出了管道运行:
 NAME                         STARTED      DURATION     STATUS
 build-and-deploy-run-xy7rw   1 hour ago   2 minutes    Succeeded
 build-and-deploy-run-z2rz8   1 hour ago   19 minutes   Succeeded
 NAME                         STARTED      DURATION     STATUS
 build-and-deploy-run-xy7rw   1 hour ago   2 minutes    Succeeded
 build-and-deploy-run-z2rz8   1 hour ago   19 minutes   Succeeded
Copy to Clipboard Copied! Toggle word wrap Toggle overflow 获取应用程序路由:
$ oc get route pipelines-vote-ui --template='http://{{.spec.host}}'$ oc get route pipelines-vote-ui --template='http://{{.spec.host}}'Copy to Clipboard Copied! Toggle word wrap Toggle overflow 记录上一个命令的输出。您可以使用此路由来访问应用程序。
要重新运行最后的管道运行,请使用上一管道的管道资源和服务帐户运行:
$ tkn pipeline start build-and-deploy --last
$ tkn pipeline start build-and-deploy --lastCopy to Clipboard Copied! Toggle word wrap Toggle overflow
1.7. 在管道中添加触发器
触发器(Trigger)使 Pipelines 可以响应外部 GitHub 事件,如推送事件和拉取请求。在为应用程序组装并启动管道后,添加 TriggerBinding、TriggerTemplate、Trigger 和 EventListener 资源来捕获 GitHub 事件。
流程
复制以下
TriggerBindingYAML 示例文件的内容并保存:Copy to Clipboard Copied! Toggle word wrap Toggle overflow 创建
TriggerBinding资源:oc create -f <triggerbinding-yaml-file-name.yaml>
$ oc create -f <triggerbinding-yaml-file-name.yaml>Copy to Clipboard Copied! Toggle word wrap Toggle overflow 或者,您可以直接从
pipelines-tutorialGit 仓库创建TriggerBinding资源:oc create -f https://raw.githubusercontent.com/openshift/pipelines-tutorial/pipelines-1.12/03_triggers/01_binding.yaml
$ oc create -f https://raw.githubusercontent.com/openshift/pipelines-tutorial/pipelines-1.12/03_triggers/01_binding.yamlCopy to Clipboard Copied! Toggle word wrap Toggle overflow 复制以下
TriggerTemplateYAML 示例文件的内容并保存:Copy to Clipboard Copied! Toggle word wrap Toggle overflow 模板指定一个卷声明模板,用于创建用于为工作空间定义存储卷的持久性卷声明。因此,您不需要创建持久性卷声明来提供数据存储。
创建
TriggerTemplate资源:oc create -f <triggertemplate-yaml-file-name.yaml>
$ oc create -f <triggertemplate-yaml-file-name.yaml>Copy to Clipboard Copied! Toggle word wrap Toggle overflow 另外,您还可以从
pipelines-tutorialGit 仓库直接创建TriggerTemplate资源:oc create -f https://raw.githubusercontent.com/openshift/pipelines-tutorial/pipelines-1.12/03_triggers/02_template.yaml
$ oc create -f https://raw.githubusercontent.com/openshift/pipelines-tutorial/pipelines-1.12/03_triggers/02_template.yamlCopy to Clipboard Copied! Toggle word wrap Toggle overflow 复制以下
TriggerYAML 示例文件的内容并保存:Copy to Clipboard Copied! Toggle word wrap Toggle overflow 创建
Trigger资源:oc create -f <trigger-yaml-file-name.yaml>
$ oc create -f <trigger-yaml-file-name.yaml>Copy to Clipboard Copied! Toggle word wrap Toggle overflow 另外,您还可以直接从
pipelines-tutorialGit 仓库创建Trigger资源:oc create -f https://raw.githubusercontent.com/openshift/pipelines-tutorial/pipelines-1.12/03_triggers/03_trigger.yaml
$ oc create -f https://raw.githubusercontent.com/openshift/pipelines-tutorial/pipelines-1.12/03_triggers/03_trigger.yamlCopy to Clipboard Copied! Toggle word wrap Toggle overflow 复制以下
EventListenerYAML 示例文件的内容并保存:Copy to Clipboard Copied! Toggle word wrap Toggle overflow 或者,如果您还没有定义触发器自定义资源,将绑定和模板规格添加到
EventListenerYAML 文件中,而不是引用触发器的名称:Copy to Clipboard Copied! Toggle word wrap Toggle overflow 通过执行以下步骤来创建
EventListener资源:使用安全 HTTPS 连接创建
EventListener资源:添加一个标签,在 Eventlistener 资源中启用安全
HTTPS连接:oc label namespace <ns-name> operator.tekton.dev/enable-annotation=enabled
$ oc label namespace <ns-name> operator.tekton.dev/enable-annotation=enabledCopy to Clipboard Copied! Toggle word wrap Toggle overflow 创建
EventListener资源:oc create -f <eventlistener-yaml-file-name.yaml>
$ oc create -f <eventlistener-yaml-file-name.yaml>Copy to Clipboard Copied! Toggle word wrap Toggle overflow 或者,您可以直接从
pipelines-tutorialGit 仓库创建EvenListener资源:oc create -f https://raw.githubusercontent.com/openshift/pipelines-tutorial/pipelines-1.12/03_triggers/04_event_listener.yaml
$ oc create -f https://raw.githubusercontent.com/openshift/pipelines-tutorial/pipelines-1.12/03_triggers/04_event_listener.yamlCopy to Clipboard Copied! Toggle word wrap Toggle overflow 使用重新加密 TLS 终止创建路由:
oc create route reencrypt --service=<svc-name> --cert=tls.crt --key=tls.key --ca-cert=ca.crt --hostname=<hostname>
$ oc create route reencrypt --service=<svc-name> --cert=tls.crt --key=tls.key --ca-cert=ca.crt --hostname=<hostname>Copy to Clipboard Copied! Toggle word wrap Toggle overflow 另外,您可以创建一个重新加密 TLS 终止 YAML 文件,以创建安全路由。
安全路由重新加密 TLS 终止 YAML 示例
Copy to Clipboard Copied! Toggle word wrap Toggle overflow 如需了解更多选项,请参阅
oc create route reencrypt --help。
使用不安全的 HTTP 连接创建
EventListener资源:-
创建
EventListener资源。 将
EventListener服务公开为 OpenShift Container Platform 路由,使其可以被公开访问:oc expose svc el-vote-app
$ oc expose svc el-vote-appCopy to Clipboard Copied! Toggle word wrap Toggle overflow
-
创建
1.8. 配置事件监听程序为多个命名空间提供服务
如果要创建一个基本的 CI/CD 管道,您可以跳过此部分。但是,如果您的部署策略涉及多个命名空间,您可以将事件监听程序配置为为多个命名空间提供服务。
为了提高 EvenListener 对象的可重用性,集群管理员可将它们配置为为多个命名空间的多租户事件监听程序进行配置和部署。
流程
为事件监听程序配置集群范围的获取权限。
设置在
ClusterRoleBinding和EventListener对象中使用的服务帐户名称。例如,el-sa。ServiceAccount.yaml示例apiVersion: v1 kind: ServiceAccount metadata: name: el-sa ---
apiVersion: v1 kind: ServiceAccount metadata: name: el-sa ---Copy to Clipboard Copied! Toggle word wrap Toggle overflow 在
ClusterRole.yaml文件的rules部分,为每个事件监听器部署设置适当的权限,以便正常工作集群范围的。ClusterRole.yaml示例Copy to Clipboard Copied! Toggle word wrap Toggle overflow 使用适当的服务帐户名称和集群角色名称配置集群角色绑定。
ClusterRoleBinding.yaml示例Copy to Clipboard Copied! Toggle word wrap Toggle overflow
在事件监听器的
spec参数中,添加服务帐户名称,如el-sa。使用事件监听程序要服务的命名空间名称填充namespaceSelector参数。EventListener.yaml示例Copy to Clipboard Copied! Toggle word wrap Toggle overflow 创建具有必要权限的服务帐户,如
foo-trigger-sa。使用它来绑定触发器。ServiceAccount.yaml示例Copy to Clipboard Copied! Toggle word wrap Toggle overflow RoleBinding.yaml示例Copy to Clipboard Copied! Toggle word wrap Toggle overflow 使用适当的触发器模板、触发器绑定和服务帐户名称创建触发器。
Trigger.yaml示例Copy to Clipboard Copied! Toggle word wrap Toggle overflow
1.9. 创建 Webhook
Webhook 是事件监听程序在存储库中配置事件时接收到的 HTTP POST 信息。然后,事件有效负载映射到触发器绑定,并由触发器模板处理。触发器模板最终启动一个或多个管道运行,从而创建并部署 Kubernetes 资源。
在本小节中,您将在 Git 存储库 pipelines-vote-ui 和 pipelines-vote-api 的副本中配置 webhook URL。这个 URL 指向公开访问的 EventListener 服务路由。
添加 Webhook 需要对该存储库有管理特权。如果您没有对库的管理权限,请联络您的系统管理员来添加 webhook。
流程
获取 Webhook URL:
对于安全 HTTPS 连接:
echo "URL: $(oc get route el-vote-app --template='https://{{.spec.host}}')"$ echo "URL: $(oc get route el-vote-app --template='https://{{.spec.host}}')"Copy to Clipboard Copied! Toggle word wrap Toggle overflow 对于 HTTP(不安全)连接:
echo "URL: $(oc get route el-vote-app --template='http://{{.spec.host}}')"$ echo "URL: $(oc get route el-vote-app --template='http://{{.spec.host}}')"Copy to Clipboard Copied! Toggle word wrap Toggle overflow 记录下输出中的 URL。
在前端存储库中手动配置 Webhook:
-
在浏览器中打开前端 Git 存储库
pipelines-vote-ui。 - 点 Settings → Webhooks → Add Webhook
在 Webhooks/Add Webhook 页面中:
- 在 Payload URL 字段中输入第 1 步中的 webhook URL
- 为 Content type 选择 application/json
- 在 Secret 字段中指定 secret
- 确定选择了 Just the push event
- 选择 Active
- 点击 Add webhook。
-
在浏览器中打开前端 Git 存储库
-
重复步骤 2 来使用后端存储库
pipelines-vote-api。
1.10. 触发一个管道运行
每当 Git 仓库中发生 push 事件时,配置的 Webhook 会将事件有效负载发送到公开的 EventListener 服务路由。应用程序的 EventListener 服务处理有效负载,并将其传递给相关的 TriggerBinding 和 TriggerTemplate 资源对。TriggerBinding 资源提取参数,TriggerTemplate 资源使用这些参数并指定必须创建资源的方式。这可能会重建并重新部署应用程序。
在本小节中,您将把一个空的提交推送到前端 pipelines-vote-ui 存储库,该存储库将触发管道运行。
流程
在终端中,克隆 fork 的 Git 存储库
pipelines-vote-ui:git clone git@github.com:<your GitHub ID>/pipelines-vote-ui.git -b pipelines-1.12
$ git clone git@github.com:<your GitHub ID>/pipelines-vote-ui.git -b pipelines-1.12Copy to Clipboard Copied! Toggle word wrap Toggle overflow 推送空提交:
git commit -m "empty-commit" --allow-empty && git push origin pipelines-1.12
$ git commit -m "empty-commit" --allow-empty && git push origin pipelines-1.12Copy to Clipboard Copied! Toggle word wrap Toggle overflow 检查管道运行是否已触发:
tkn pipelinerun list
$ tkn pipelinerun listCopy to Clipboard Copied! Toggle word wrap Toggle overflow 请注意,一个新的管道运行被启动。
1.11. 为用户定义的项目启用触发器监控事件监听程序
作为集群管理员,在用户定义的项目中收集 Triggers 服务的事件监听程序指标,并在 OpenShift Container Platform Web 控制台中显示它们,您可以为每个事件监听程序创建服务监控器。在收到 HTTP 请求时,Triggers 服务的事件监听程序返回三个指标数据 - eventlistener_http_duration_seconds, eventlistener_event_count, 和 eventlistener_triggered_resources。
前提条件
- 已登陆到 OpenShift Container Platform Web 控制台。
- 已安装 Red Hat OpenShift Pipelines Operator。
- 您已为用户定义的项目启用了监控。
流程
对于每个事件侦听器,创建一个服务监控器。例如,要查看
test命名空间中的github-listener事件监听程序的指标,请创建以下服务监控器:Copy to Clipboard Copied! Toggle word wrap Toggle overflow 通过将请求发送到事件监听程序来测试服务监控器。例如,推送空提交:
git commit -m "empty-commit" --allow-empty && git push origin main
$ git commit -m "empty-commit" --allow-empty && git push origin mainCopy to Clipboard Copied! Toggle word wrap Toggle overflow - 在 OpenShift Container Platform web 控制台中进入 Administrator → Observe → Metrics。
-
要查看指标,请按名称搜索。例如,若要查看
github-listener事件监听器的eventlistener_http_resources指标的详细信息,请使用eventlistener_http_resources关键字搜索。
1.12. 在 GitHub 拦截器中配置拉取请求功能
使用 GitHub Interceptor,您可以创建验证和过滤 GitHub Webhook 的逻辑。例如,您可以验证 webhook 的源并根据指定条件过滤传入的事件。当使用 GitHub Interceptor 过滤事件数据时,您可以在字段中指定拦截器可以接受的事件类型。在 Red Hat OpenShift Pipelines 中,您可以使用 GitHub Interceptor 的以下功能:
- 根据已更改的文件过滤拉取请求事件
- 根据配置的 GitHub 所有者验证拉取请求
1.12.1. 使用 GitHub Interceptor 过滤拉取请求
您可以根据为推送和拉取事件更改的文件过滤 GitHub 事件。这有助于您只对 Git 仓库中的相关更改执行管道。GitHub Interceptor 添加以逗号分隔的所有更改的文件列表,并使用 CEL Interceptor 根据更改的文件过滤传入的事件。更改的文件列表添加到顶层 extensions 字段中事件有效负载的 changed_files 属性中。
前提条件
- 已安装 Red Hat OpenShift Pipelines Operator。
流程
执行以下步骤之一:
对于公共 GitHub 存储库,在 YAML 配置文件中将
addChangedFiles参数的值设置为true,如下所示:Copy to Clipboard Copied! Toggle word wrap Toggle overflow 对于私有 GitHub 存储库,将
addChangedFiles参数的值设置为true,并在以下所示的 YAML 配置文件中提供访问令牌详情、secretName和secretKey:Copy to Clipboard Copied! Toggle word wrap Toggle overflow
- 保存配置文件。
1.12.2. 使用 GitHub Interceptors 验证拉取请求
您可以使用 GitHub Interceptor 根据为存储库配置的 GitHub 所有者验证拉取请求处理。此验证可帮助您防止对 PipelineRun 或 TaskRun 对象进行不必要的执行。只有在用户名列为拥有者或者由存储库的所有者发出可配置注释时,GitHub Interceptor 才会处理拉取请求。例如,当您以所有者身份在拉取请求上注释掉 /ok-to-test 时,会触发 PipelineRun 或 TaskRun。
所有者在存储库根目录的 OWNERS 文件中配置。
前提条件
- 已安装 Red Hat OpenShift Pipelines Operator。
流程
- 创建 secret 字符串值。
- 使用该值配置 GitHub Webhook。
-
创建名为
secretRef的 Kubernetes secret,其中包含您的 secret 值。 - 将 Kubernetes secret 作为对 GitHub Interceptor 的引用。
-
创建一个
owners文件,并将批准者列表添加到approvers部分。 执行以下步骤之一:
对于公共 GitHub 存储库,在 YAML 配置文件中将
githubOwners参数的值设置为true,如下所示:Copy to Clipboard Copied! Toggle word wrap Toggle overflow 对于私有 GitHub 存储库,将
githubOwners参数的值设置为true,并在以下所示的 YAML 配置文件中提供访问令牌详情、secretName和secretKey:Copy to Clipboard Copied! Toggle word wrap Toggle overflow 注意checkType参数用于指定需要身份验证的 GitHub 所有者。您可以将其值设为orgMembers、repoMembers或all。
- 保存配置文件。
第 2 章 在 web 控制台中使用 Red Hat OpenShift Pipelines
您可以使用 Administrator 或 Developer 视角从 OpenShift Container Platform Web 控制台中的 Pipelines 页面创建和修改 Pipeline、PipelineRun 和 Repository 对象。您还可以使用 web 控制台的 Developer 视角中的 +Add 页面为软件交付过程创建 CI/CD 管道。
在 OpenShift Container Platform 版本 4.12 和 4.13 中,在使用 Web 控制台为 输入 YAML 清单时,不支持 tekton.dev/v1 API 版本。例如,当在 web 控制台中使用 YAML 视图创建管道和任务时,数据中的 API 版本与预期的 API 版本错误消息不匹配。使用 apiVersion: tekton.dev/v1beta1 设置。OpenShift Container Platform 版本 4.14 及之后的版本在使用 Web 控制台输入 YAML 清单时支持 tekton.dev/v1 API 版本。
2.1. 在 Developer 视角中使用 Red Hat OpenShift Pipelines
在 Developer 视角中,您可以从 +Add 页面访问以下选项来创建管道:
- 使用 +Add → Pipelines → Pipeline builder 选项为您的应用程序创建自定义管道。
- 使用 +Add → From Git 选项,在创建应用程序时使用管道模板和资源创建管道。
在为应用程序创建管道后,可以在 Pipelines 视图中查看并以视觉化的形式与部署进行交互。您还可以使用 Topology 视图与使用 From Git 选项创建的管道交互。您需要将自定义标识应用到使用 Pipeline builder 创建的管道,以便在 Topology 视图中查看它。
前提条件
- 您可以访问 OpenShift Container Platform 集群并切换到 Developer 视角。
- 已在集群中安装了 OpenShift Pipelines Operator。
- 您是集群管理员,或是有创建和编辑权限的用户。
- 您已创建了一个项目。
2.1.1. 使用 Pipeline 构建器构建管道
在控制台的 Developer 视角中,您可以使用 +Add → Pipeline → Pipeline Builder 选项:
- 使用 Pipeline 构建器 或 YAML 视图 配置管道。
- 使用现有任务和集群任务构建管道流。安装 OpenShift Pipelines Operator 时,它会在集群中添加可重复使用的管道集群任务。
在 Red Hat OpenShift Pipelines 1.10 中,集群任务功能已弃用,计划在以后的发行版本中删除。
- 指定管道运行所需的资源类型,如有必要,将额外参数添加到管道。
- 引用管道中的每个任务中的这些管道资源作为输入和输出资源。
- 如果需要,引用任务中添加至管道的任何额外参数。任务的参数会根据任务的规格预先填充。
- 使用 Operator 安装的、可重复使用的片断和示例来创建详细的管道。
- 搜索并添加您配置的本地 Tekton Hub 实例的任务。
在 Developer 视角中,您可以使用自己的一组策展的任务创建自定义管道。要从开发人员控制台直接搜索、安装和升级任务,集群管理员需要安装和部署本地 Tekton Hub 实例,并将 hub 链接到 OpenShift Container Platform 集群。如需了解更多详细信息,请参阅附加资源部分中的将 Tekton Hub 与 OpenShift Pipelines 搭配使用。如果您没有部署任何本地 Tekton Hub 实例,则默认只能访问集群任务、命名空间任务和公共 Tekton Hub 任务。
流程
- 在 Developer 视角的 Add 视图中,点 Pipeline 标题查看 Pipeline Builder 页面。
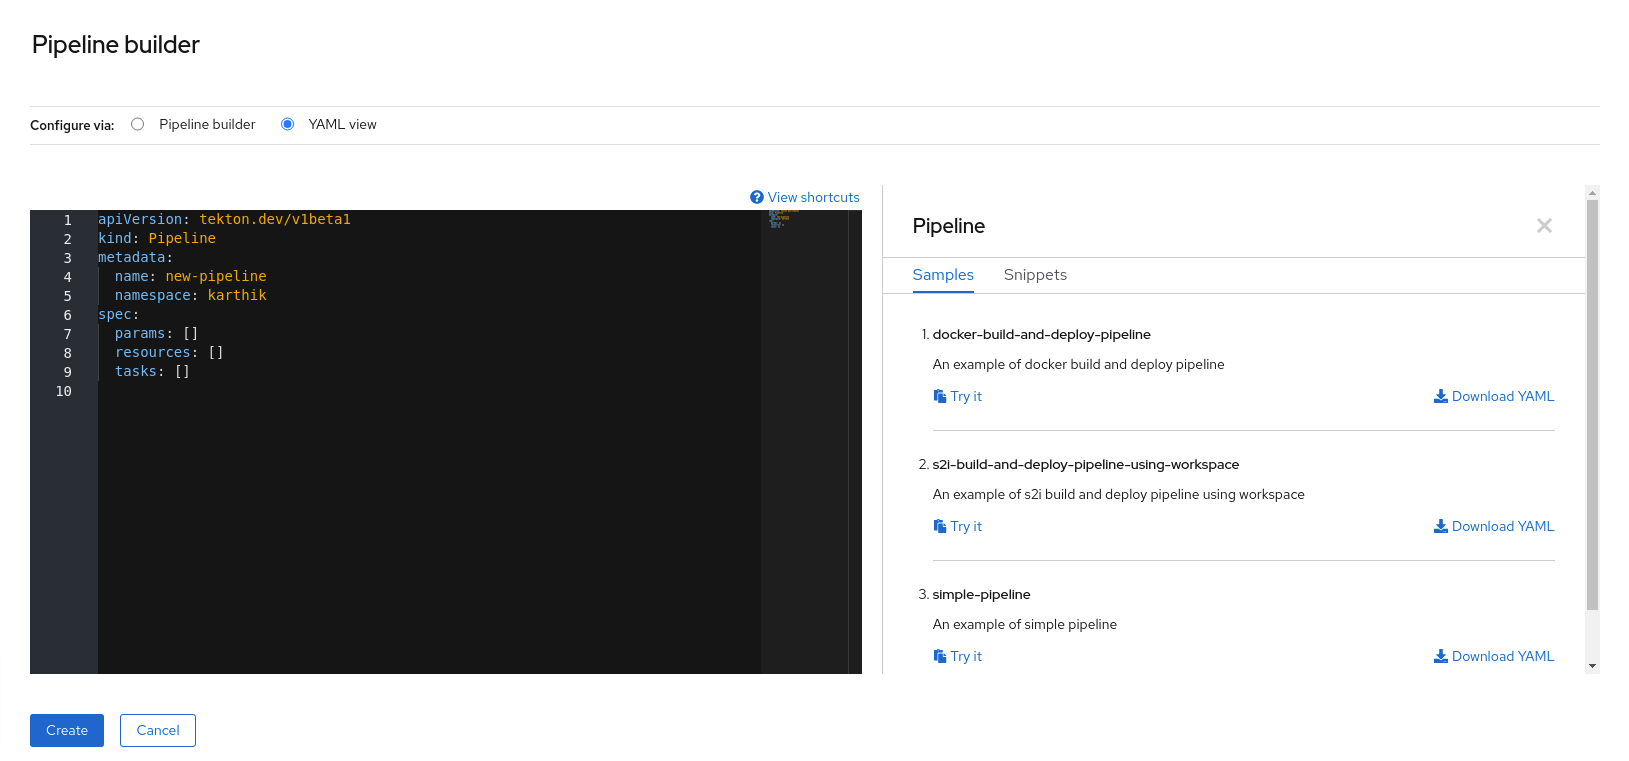
使用 Pipeline 构建器 视图或 YAML 视图配置管道。
注意Pipeline 构建器 视图支持有限的字段,而 YAML 视图支持所有可用字段。另外,您还可以使用 Operator 安装的、可重复使用的片断和样本来创建详细的管道。
图 2.1. YAML 视图
使用 Pipeline 构建器配置管道:
- 在 Name 字段中输入管道的唯一名称。
在 Tasks 部分:
- 单击 Add task。
- 使用快速搜索字段搜索任务,然后从显示的列表中选择所需的任务。
点击 Add 或 Install and add。在本例中,使用 s2i-nodejs 任务。
注意搜索列表包含集群中可用的所有 Tekton Hub 任务和任务。此外,如果某一任务已经安装,它将显示 Add 添加该任务,而它将显示 Install and add 以安装和添加该任务。当使用更新的版本添加相同的任务时,它将显示 Update and add。
在管道中添加后续任务:
- 点击任务右侧或左侧的加号图标 → 点 Add task。
- 使用快速搜索字段搜索任务,然后从显示的列表中选择所需的任务。
点击 Add 或 Install and add。
图 2.2. Pipeline 构建器
添加最后一项任务:
- 点 Add finally task → Click Add task。
- 使用快速搜索字段搜索任务,然后从显示的列表中选择所需的任务。
- 点击 Add 或 Install and add。
在 Resources 部分,点 Add Resources 指定管道运行的资源的名称和类型。这些资源然后会被管道中的任务使用作为输入和输出。在此例中:
-
添加一个输入资源。在 Name 字段中输入
Source,从 Resource Type 下拉列表中选择 Git。 添加一个输出资源。在 Name 字段中输入
img,从 Resource Type 下拉列表中选择 Image。注意如果缺少资源,任务旁边会出现一个红色图标。
-
添加一个输入资源。在 Name 字段中输入
- 可选:任务的 Parameters 部分会根据任务的规格预先填充。如果需要,使用 Parameters 部分中的 Add Parameters 链接来添加额外的参数。
- 在 Workspaces 部分,点 Add workspace,并在 Name 字段中输入唯一工作区名称。您可以在管道中添加多个工作区。
在 Tasks 部分中,点 s2i-nodejs 任务,以查看带任务详情的侧面板。在任务侧面板中,为 s2i-nodejs 任务指定资源和参数:
- 如果需要,在 Parameters 部分,使用 $(params.<param-name>)语法为默认参数添加更多参数。
-
在 Image 部分中,按在 Resources 部分中的指定输入
Img。 - 从 Workspaces 部分下的 source 下拉菜单中选择一个工作区。
- 将资源、参数和工作空间添加到 openshift-client 任务。
- 点 Create 在 Pipeline Details 页面中创建并查看管道。
- 点 Actions 下拉菜单,然后点 Start,查看 Start Pipeline 页面。
- Workspaces 部分列出了您之前创建的工作区。使用对应的下拉菜单为您的工作区指定卷源。您有以下选项: mpty Directory、Config Map、Secret、PersistentVolumeClaim 或 VolumeClaimTemplate。

2.1.2. 创建 OpenShift Pipelines 和应用程序
要与应用程序一同创建管道,使用 Developer 视角的 Add+ 视图中的 From Git 选项。您可以查看所有可用的管道,并在导入代码或部署镜像时选择用来创建应用程序的管道。
Tekton Hub 集成默认是启用的,您可以看到集群支持的 Tekton Hub 中的任务。管理员可以选择不使用 Tekton Hub 集成,将不会显示 Tekton Hub 任务。您还可以检查是否为生成的管道存在 webhook URL。为使用 +Add 流创建的管道添加默认 Webhook,URL 在 Topology 视图中所选资源侧面面板中可见。
2.1.3. 添加包含管道的 GitHub 仓库
在 Developer 视角中,您可以将包含管道的 GitHub 存储库添加到 OpenShift Container Platform 集群中。当相关 Git 事件(如推送或拉取请求)被触发时,可以在集群中的 GitHub 存储库中运行管道和任务。
您可以同时添加公共和私有 GitHub 仓库。
前提条件
- 确保集群管理员已在管理员视角中配置了所需的 GitHub 应用程序。
流程
- 在 Developer 视角中,选择要在其中添加 GitHub 仓库的命名空间或项目。
- 使用左侧导航窗格进入到 Pipelines。
- 在 Pipelines 页面右侧点 Create → Repository。
- 输入 Git Repo URL,控制台会自动获取仓库名称。
点 Show configuration options。默认情况下,您只看到一个选项 Setup a webhook。如果您配置了 GitHub 应用程序,您会看到两个选项:
- Use GitHub App: 选择这个选项在仓库中安装 GitHub 应用程序。
- Setup a webhook :选择此选项,将 webhook 添加到您的 GitHub 应用程序。
使用 Secret 部分中的以下选项之一设置 webhook:
使用 Git 访问令牌 设置 webhook:
- 输入您的个人访问令牌。
点与 Webhook secret 字段对应的 Generate 以生成新的 webhook secret。
注意如果您没有个人访问令牌并且想要创建新令牌,可以点 Git access token 字段下的链接。
使用 Git 访问令牌 secret 设置 webhook:
从下拉列表中选择命名空间中的 secret。根据您选择的 secret,会自动生成 Webhook secret。
在您的 GitHub 仓库中添加 webhook secret 详情:
- 复制 Webhook URL 并前往 GitHub 仓库设置。
- 点 Webhooks → Add webhook。
- 从开发人员控制台复制 Webhook URL,并将它粘贴到 GitHub 仓库设置的 Payload URL 字段中。
- 选择内容类型。
- 从开发人员控制台复制 Webhook secret,并将它粘贴到 GitHub 仓库设置的 Secret 字段中。
- 选择 SSL 验证选项之一。
- 选择要触发此 webhook 的事件。
- 点击 Add webhook。
- 返回到开发人员控制台,然后点 Add。
- 阅读执行步骤的详情,并点 Close。
- 查看您刚才创建的仓库的详细信息。


当使用 Import from Git 导入应用程序时,Git 存储库有一个 .tekton 目录,您可以为应用程序配置 pipelines-as-code。
2.1.4. 使用 Developer 视角与管道交互
开发者视角中的 Pipelines 视图列出了项目中的所有管道,以及以下详细信息:
- 创建管道的命名空间
- 最后一次管道运行
- 管道运行中的任务状态
- 管道运行的状态
- 最后一次管道运行的创建时间
流程
- 在 Developer 视角的 Pipelines 视图中,从 Project 下拉列表中选择一个项目,以查看该项目中的管道。
点击所需管道查看 Pipeline 详情页面。
默认情况下,Details 选项卡显示所有
serial任务,parallel任务、finally任务以及管道中的when表达式的可视化表示。这些任务和finally的任务列在页面的右下角。要查看任务详情,请点列出的 Tasks 和 Finally 任务。另外,您可以执行以下操作:
- 使用 Pipeline 详情 视觉化左下角显示的标准图标,使用 zoom in、zoom out 和 reset view 功能。
- 使用鼠标轮改管道视觉化的缩放因素。
将鼠标悬停在任务上,再查看任务详情。
图 2.3. Pipeline 详情
可选: 在 Pipeline 详情页面中,点 Metrics 选项卡查看有关管道的以下信息:
- Pipeline 成功率
- Pipeline 运行数量
- 管道运行持续时间
任务运行持续时间
您可以使用这些信息来改进管道工作流,并在管道生命周期的早期解决问题。
- 可选:点 YAML 选项卡编辑管道的 YAML 文件。
可选:点 Pipeline Runs 选项卡查看已完成、正在运行或运行失败的管道。
Pipeline Runs 选项卡提供有关管道运行、任务状态以及调试失败管道运行的链接。您可以使用 Options 菜单
 来停止正在运行的管道,使用与之前的管道执行相同的参数和资源重新运行管道,或删除管道运行。
点所需的管道运行查看 Pipeline Run details 页面。默认情况下,Details 选项卡显示所有串行任务、并行任务、
finally任务以及管道中运行的 when 表达式的可视化表示。成功运行的结果会显示在页面底部的 Pipeline Run 结果窗格下。另外,您只能查看由集群支持的 Tekton Hub 中的任务。在查看某个任务时,您可以点击相关链接来跳至任务文档。注意Pipeline Run Details 页面的 Details 部分显示失败管道运行的日志片段。日志片断 提供一般错误信息和日志片断。Logs 部分的链接可让您快速访问失败运行的详细信息。
在 Pipeline Run details 页面中,点 Task Runs 选项卡查看已完成、正在运行和运行失败的任务。
Task Runs 选项卡提供有关任务运行的信息,以及任务和 pod 的链接,以及任务运行的状态和持续时间。使用 Options 菜单
来删除任务运行。
注意TaskRuns 列表页面带有一个 Manage column 按钮,您还可以使用它来添加 Duration 列。
点所需的任务运行查看 Task Run details 页面。成功运行的结果显示在页面底部的 Task Run 结果窗格下。
注意Task Run details 页面的 Details 部分显示失败任务运行的日志片段。日志片断 提供一般错误信息和日志片断。Logs 部分的链接可让您快速访问失败的任务运行的详细信息。
- 点 Parameters 标签,查看管道中定义的参数。您还可以根据需要添加或者编辑附加参数。
- 点 Resources 标签页,查看管道中定义的资源。您还可以根据需要添加或编辑附加资源。

2.1.5. 从 Pipelines 视图启动管道
创建管道后,您需要启动它以在定义的顺序中执行包含的任务。您可从 Pipelines 视图、Pipeline Details 页面或 Topology 视图启动管道。
流程
使用 Pipelines 视图启动管道:
-
在 Developer 视角 的 Pipelines 视图中,点附加到 Pipeline 的 Options
菜单,然后选择 Start。
Start Pipeline 对话框显示 Git Resources 以及基于管道定义的 Image Resources。
注意对于使用 From Git 选项创建的管道,Start Pipeline 对话框也会在 Parameters 部分显示
APP_NAME字段,对话框中的所有字段都由管道模板预先填充。- 如果您在命名空间中有资源,Git Resources 和 Image Resources 字段会预先填充这些资源。如果需要,使用下拉菜单选择或创建所需资源并自定义管道运行实例。
可选:修改 Advanced Options 以添加验证指定私有 Git 服务器或镜像 registry 的凭证。
- 在 Advanced Options 下,点 Show Credentials Options 并选择 Add Secret。
在 Create Source Secret 部分,指定以下内容:
- secret 的唯一 Secret Name。
- 在 要被验证的指定供应商 部分,在 Access to 字段中指定要验证的供应商,以及基本 服务器 URL。
选择 Authentication Type 并提供凭证:
对于 Authentication Type
Image Registry Credentials,请指定您要进行身份验证的 Registry 服务器地址,并通过Username、Password 和 Email 项中提供您的凭证。如果要指定额外的 Registry 服务器地址,选择 Add Credentials 。
-
如果 Authentication Type 为
Basic Authentication,在 UserName 和 Password or Token 项中指定相关的值。 如果 Authentication Type 为
SSH Keys时,在 SSH Private Key 字段中指定相关的值。注意对于基本身份验证和 SSH 身份验证,您可以使用注解,例如:
-
tekton.dev/git-0: https://github.com -
tekton.dev/git-1: https://gitlab.com.
-
- 选择要添加 secret 的检查标记。
您可以根据频道中的资源数量添加多个 secret。
- 点 Start 启动管道。
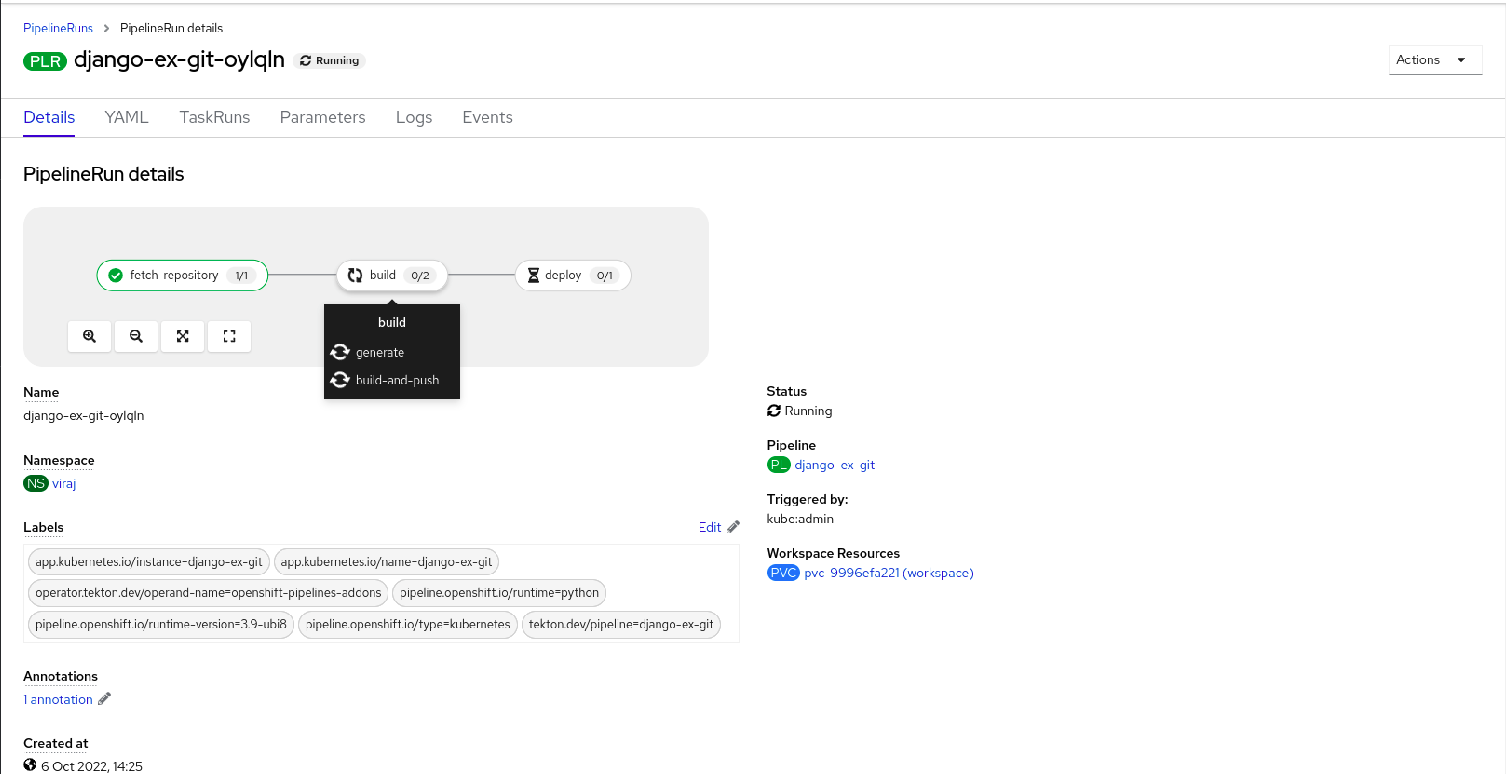
PipelineRun 详情页面显示正在执行的管道。管道启动后,每个任务中的任务和步骤都会被执行。您可以:
- 使用 PipelineRun 详情页面的左下角,使用 zoom in、zoom out、适用于屏幕和重置视图功能,它们位于 PipelineRun 详情页面的左下角。
- 使用鼠标轮改管道运行视觉化的缩放因素。在特定的缩放条件中,任务更改的背景颜色表示错误或警告状态。
- 将鼠标悬停在任务上,以查看详细信息,例如执行每个步骤、任务名称和任务状态所需的时间。
- 将鼠标悬停在任务徽标上,以查看已完成的任务和任务总数。
- 点一个任务来查看任务中每一步骤的日志。
- 点 Logs 选项卡查看与任务执行顺序相关的日志。您还可以使用相关按钮扩展窗格,单独或批量下载日志。
点 Events 选项卡查看管道运行生成的事件流。
您可以使用 Task Runs、Logs 和 Events 选项卡来帮助调试失败的管道运行或失败的任务运行。
图 2.4. Pipeline 运行详情
2.1.6. 从 Topology 视图启动管道
对于使用 From Git 选项创建的管道,您可以在启动后使用 Topology 视图来与管道进行交互:
要使用 Pipeline Builder 在 Topology 视图中查看创建的管道,自定义管道标识来把 Pipeline 与应用程序负载相连接。
流程
- 单击左侧导航面板中的 Topology。
- 点应用程序在侧面面板中显示 Pipeline Runs。
在 Pipeline Runs 中,点 Start Last Run 来启动一个新的管道运行,使用与前一个相同的参数和资源。如果没有启动管道运行,这个选项会被禁用。您还可以在创建管道时启动管道运行。
图 2.5. Topology 视图中的管道

在 Topology 页面中,把鼠标移到应用程序的左侧,以查看其管道运行的状态。添加管道后,底部左图标表示存在关联的管道。
2.1.7. 从 Topology 视图与管道交互
Topology 页面中的应用程序节点的侧面板显示管道运行的状态,并可与之交互。
- 如果管道运行没有自动启动,则侧面板会显示管道无法自动启动的消息,因此需要手动启动。
- 如果创建一个管道,但用户没有启动管道,则其状态不会启动。当用户点击 Not started status 图标时,Topology 视图中会打开启动对话框。
- 如果管道没有构建或构建配置,则无法看到 Builds 部分。如果存在管道和构建配置,则 Builds 部分 可见。
- 当管道运行在特定任务运行时,侧边面板会显示一个 日志片段。您可以在 Pipeline Runs 部分的 Resources 选项卡中查看日志片断。它提供常规错误消息和日志片断。Logs 部分的链接可让您快速访问失败运行的详细信息。
2.1.8. 编辑管道
您可以使用 web 控制台的 Developer 视角编辑集群中的管道:
流程
- 在 Developer 视角的 Pipelines 视图中,选择您要编辑的管道来查看管道的详情。在 Pipeline Details 页中,点 Actions 并选择 Edit Pipeline。
在 Pipeline builder 页面中,您可以执行以下任务:
- 在管道中添加其他任务、参数或资源。
- 点要修改的任务来查看侧面面板中的任务详情,并修改所需的任务详情,如显示名称、参数和资源。
- 或者,要删除任务,点任务,在侧面面板中点 Actions 并选择 Remove Task。
- 点 Save 保存修改后的管道。
2.1.9. 删除管道
您可以使用 web 控制台的 Developer 视角删除集群中的管道。
流程
-
在 Developer 视角 的 Pipelines 视图中,点 Pipeline 旁的 Options
菜单,然后选择 Delete Pipeline。
- 在 Delete Pipeline 确认提示下,点 Delete 以确认删除。
2.3. 在 Administrator 视角中创建管道模板
作为集群管理员,您可以创建管道模板,开发人员可在集群上创建管道时重复使用该模板。
前提条件
- 您可以使用集群管理员权限访问 OpenShift Container Platform 集群,并切换到 Administrator 视角。
- 已在集群中安装了 OpenShift Pipelines Operator。
流程
- 进入到 Pipelines 页面来查看现有的管道模板。
-
点
 图标进入 Import YAML 页面。
为管道模板添加 YAML。模板必须包含以下信息:
Copy to Clipboard Copied! Toggle word wrap Toggle overflow - 点 Create。创建管道后,会进入 Pipeline 详情页面,您可以在其中查看或编辑管道的信息。
第 3 章 使用解析器指定远程管道和任务
管道和任务是 CI/CD 进程的可重复使用的块。您可以重复使用之前开发的管道或任务,或者由其他人开发的任务,而无需复制并粘贴其定义。这些管道或任务可从集群中的其他命名空间中的几种源到公共目录提供。
在管道运行资源中,您可以从现有源指定管道。在管道资源或任务运行资源中,您可以从现有源指定任务。
在这些情况下,Red Hat OpenShift Pipelines 中的 解析器 在运行时从指定源中检索管道或任务定义。
以下解析器包括在 Red Hat OpenShift Pipelines 的默认 installaton 中:
- hub 解析器
- 从 Artifact Hub 或 Tekton Hub 上的 Pipelines Catalog 检索任务或管道。
- 捆绑包解析器
- 从 Tekton 捆绑包检索任务或管道,该捆绑包是可从任何 OCI 存储库(如 OpenShift 容器存储库)提供的 OCI 镜像。
- 集群解析器
- 检索已在特定命名空间中在同一 OpenShift Container Platform 集群中创建的任务或管道。
- Git 解析器
- 从 Git 存储库检索任务或管道绑定。您必须指定存储库、分支和路径。
3.1. 从 Tekton 目录指定远程管道或任务
您可以使用 hub 解析器指定在 Artifact Hub 的公共 Tekton 目录或 Tekton Hub 实例中定义的远程管道或任务。
Red Hat OpenShift Pipelines 不支持 Artifact Hub 项目。仅支持 Artifact Hub 的配置。
3.1.1. 配置 hub 解析器
您可以通过配置 hub 解析器来更改拉取资源的默认 hub 和默认目录设置。
流程
要编辑
TektonConfig自定义资源,请输入以下命令:oc edit TektonConfig config
$ oc edit TektonConfig configCopy to Clipboard Copied! Toggle word wrap Toggle overflow 在
TektonConfig自定义资源中,编辑pipeline.hub-resolver-configspec:Copy to Clipboard Copied! Toggle word wrap Toggle overflow 重要如果将
default-type选项设置为tekton,则必须通过设置tekton-hub-api值来配置您自己的 Tekton Hub 实例。如果将
default-type选项设置为artifact,则解析器默认使用位于 https://artifacthub.io/ 的公共 hub API。您可以通过设置artifact-hub-api值来配置您自己的 Artifact Hub API。
3.1.2. 使用 hub 解析器指定远程管道或任务
在创建管道运行时,您可以指定来自 Artifact Hub 或 Tekton Hub 的远程管道。在创建管道或任务运行时,您可以从 Artifact Hub 或 Tekton Hub 指定远程任务。
流程
要指定来自 Artifact Hub 或 Tekton Hub 的远程管道或任务,请在
pipelineRef或taskRefspec 中使用以下引用格式:Copy to Clipboard Copied! Toggle word wrap Toggle overflow Expand 表 3.1. hub 解析器支持的参数 参数 描述 示例值 catalog用于拉取资源的目录。
默认:
tekton-catalog-tasks(用于task类型);tekton-catalog-pipelines(用于pipeline类型)。type用于拉取资源的目录类型。
artifact(Artifact Hub)或tekton(Tekton Hub)。默认:
artifactkind输入
task或pipeline。默认:
taskname从 hub 获取的任务或管道的名称。
golang-buildversion要从 hub 获取的任务或管道版本。您必须使用引号(
")来括起数据。"0.5.0"如果管道或任务需要额外的参数,在管道、管道运行或任务运行规格的
params部分中指定这些参数的值。pipelineRef或taskRef规格的params部分必须包含解析器支持的参数。
以下示例管道运行引用目录中的远程管道:
以下示例管道从目录中引用远程任务:
以下示例任务运行来引用目录中的远程任务:
3.2. 从 Tekton 捆绑包指定远程管道或任务
您可以使用捆绑包解析器指定 Tekton 捆绑包中的远程管道或任务。Tekton 捆绑包是任何 OCI 存储库(如 OpenShift 容器存储库)提供的 OCI 镜像。
3.2.1. 配置捆绑包解析器
您可以通过配置捆绑包解析器来更改默认服务帐户名称和从 Tekton 捆绑包中拉取资源的默认 kind。
流程
要编辑
TektonConfig自定义资源,请输入以下命令:oc edit TektonConfig config
$ oc edit TektonConfig configCopy to Clipboard Copied! Toggle word wrap Toggle overflow 在
TektonConfig自定义资源中,编辑pipeline.bundles-resolver-configspec:Copy to Clipboard Copied! Toggle word wrap Toggle overflow
3.2.2. 使用捆绑包解析器指定远程管道或任务
在创建管道运行时,您可以从 Tekton 捆绑包中指定远程管道。在创建管道或任务运行时,您可以从 Tekton 捆绑包中指定远程任务。
流程
要从 Tekton 捆绑包中指定远程管道或任务,请在
pipelineRef或taskRefspec 中使用以下引用格式:Copy to Clipboard Copied! Toggle word wrap Toggle overflow Expand 表 3.2. 捆绑包解析器支持的参数 参数 描述 示例值 serviceAccount构建 registry 凭据时要使用的服务帐户名称。
defaultbundle指向镜像要获取的捆绑包 URL。
gcr.io/tekton-releases/catalog/upstream/golang-build:0.1name要从捆绑包中拉取的资源名称。
golang-buildkind从捆绑包中拉取的资源类型。
task如果管道或任务需要额外的参数,在管道、管道运行或任务运行规格的
params部分中指定这些参数的值。pipelineRef或taskRef规格的params部分必须包含解析器支持的参数。
以下示例管道运行引用 Tekton 捆绑包中的远程管道:
以下示例管道引用 Tekton 捆绑包中的远程任务:
以下示例任务运行引用 Tekton 捆绑包中的远程任务:
3.3. 从同一集群中指定远程管道或任务
您可以使用集群解析器指定在运行 Red Hat OpenShift Pipelines 的 OpenShift Container Platform 集群上的命名空间中定义的远程管道或任务。
3.3.1. 配置集群解析器
您可以更改集群解析器的默认类型和命名空间,或者限制集群解析器可以使用的命名空间。
流程
要编辑
TektonConfig自定义资源,请输入以下命令:oc edit TektonConfig config
$ oc edit TektonConfig configCopy to Clipboard Copied! Toggle word wrap Toggle overflow 在
TektonConfig自定义资源中,编辑pipeline.cluster-resolver-configspec:Copy to Clipboard Copied! Toggle word wrap Toggle overflow
3.3.2. 使用集群解析器指定远程管道或任务
在创建管道运行时,您可以从同一集群中指定远程管道。在创建管道或任务运行时,您可以从同一集群中指定远程任务。
流程
要指定同一集群中的远程管道或任务,请在
pipelineRef或taskRefspec 中使用以下引用格式:Copy to Clipboard Copied! Toggle word wrap Toggle overflow Expand 表 3.3. 集群解析器支持的参数 参数 描述 示例值 name要获取的资源的名称。
some-pipelinenamespace包含资源的集群中的命名空间。
other-namespacekind要获取的资源类型。
pipeline如果管道或任务需要额外的参数,请在
params中提供这些参数。
以下示例管道运行引用同一集群中的远程管道:
以下示例管道引用同一集群中的远程任务:
以下示例任务运行引用同一集群中的远程任务:
3.4. 从 Git 仓库指定远程管道或任务
您可以使用 Git 解析器指定 Git 仓库中的远程管道或任务。存储库必须包含定义管道或任务的 YAML 文件。Git 解析器可以通过匿名方式克隆存储库,也可以使用经过身份验证的 SCM API 访问存储库。
3.4.1. 为匿名 Git 克隆配置 Git 解析器
如果要使用匿名 Git 克隆,您可以配置默认的 Git 修订、获取超时和默认存储库 URL,以便从 Git 存储库拉取远程管道和任务。
流程
要编辑
TektonConfig自定义资源,请输入以下命令:oc edit TektonConfig config
$ oc edit TektonConfig configCopy to Clipboard Copied! Toggle word wrap Toggle overflow 在
TektonConfig自定义资源中,编辑pipeline.git-resolver-configspec:Copy to Clipboard Copied! Toggle word wrap Toggle overflow
3.4.2. 为经过身份验证的 SCM API 配置 Git 解析器
对于经过身份验证的 SCM API,您必须为经过身份验证的 Git 连接设置配置。
您可以使用 go-scm 库支持的 Git 存储库供应商。并非所有 go-scm 实现都已使用 Git 解析器测试,但以下供应商已知可以正常工作:
-
github.com和 GitHub Enterprise -
gitlab.com和自托管的 Gitlab - Gitea
- Bitbucket 服务器
- Bitbucket 云
- 您只能在集群中使用经过身份验证的 SCM API 配置一个 Git 连接。此连接可供集群的所有用户使用。集群的所有用户都可以使用您为连接配置的安全令牌访问存储库。
- 如果将 Git 解析器配置为使用经过身份验证的 SCM API,您还可以使用匿名 Git 克隆引用来检索管道和任务。
流程
要编辑
TektonConfig自定义资源,请输入以下命令:oc edit TektonConfig config
$ oc edit TektonConfig configCopy to Clipboard Copied! Toggle word wrap Toggle overflow 在
TektonConfig自定义资源中,编辑pipeline.git-resolver-configspec:Copy to Clipboard Copied! Toggle word wrap Toggle overflow - 1
- 如果未指定,使用默认 Git 修订。
- 2
- 单个 Git 克隆解析可能需要的最大时间,如
1m、2s、700ms。Red Hat OpenShift Pipelines 还在所有解析请求中强制实施全局最大超时时间为 1 分钟。 - 3
- SCM 提供程序类型。
- 4
- 用于经过身份验证的 SCM API 的基本 URL。如果您使用
github.com、gitlab.com或 BitBucket Cloud,则不需要此设置。 - 5
- 包含 SCM 提供程序 API 令牌的 secret 名称。
- 6
- 包含令牌的令牌 secret 中的密钥。
- 7
- 包含令牌 secret 的命名空间(如果不是
default)。 - 8
- 可选:使用经过身份验证的 API 时存储库的默认机构。如果您没有在解析器参数中指定机构,则使用此机构。
使用经过身份验证的 SCM API 需要 scm-type,api-token-secret-name, 和 api-token-secret-key 设置。
3.4.3. 使用 Git 解析器指定远程管道或任务
在创建管道运行时,您可以从 Git 仓库指定远程管道。在创建管道或任务运行时,您可以从 Git 仓库指定远程任务。
前提条件
- 如果要使用经过身份验证的 SCM API,您必须为 Git 解析器配置经过身份验证的 Git 连接。
流程
要从 Git 仓库指定远程管道或任务,请在
pipelineRef或taskRefspec 中使用以下引用格式:Copy to Clipboard Copied! Toggle word wrap Toggle overflow Expand 表 3.4. Git 解析器支持的参数 参数 描述 示例值 url使用匿名克隆时存储库的 URL。
https://github.com/tektoncd/catalog.gitrepo使用经过身份验证的 SCM API 时的存储库名称。
test-infraorg使用经过身份验证的 SCM API 时存储库的机构。
tektoncdrevision存储库中的 Git 修订。您可以指定分支名称、标签名称或提交 SHA 哈希。
aeb957601cf41c012be462827053a21a420befcamainv0.38.2pathInRepo存储库中的 YAML 文件的路径名称。
task/golang-build/0.3/golang-build.yaml注意要匿名克隆和获取存储库,请使用
url参数。要使用经过身份验证的 SCM API,请使用repo参数。不要同时指定url参数和repo参数。如果管道或任务需要额外的参数,在管道、管道运行或任务运行规格的
params部分中指定这些参数的值。pipelineRef或taskRef规格的params部分必须包含解析器支持的参数。
以下示例管道运行引用 Git 存储库中的远程管道:
以下示例管道引用 Git 存储库中的远程任务:
以下示例任务运行引用 Git 存储库中的远程任务:
第 4 章 管理未指定版本的和版本化的集群任务
作为集群管理员,安装 Red Hat OpenShift Pipelines Operator 会为每个默认集群任务创建变体,称为 版本化的集群任务 (VCT) 和非版本的集群任务 (NVCT)。例如,安装 Red Hat OpenShift Pipelines Operator v1.7 创建一个 buildah-1-7-0 VCT 和 buildah NVCT。
NVCT 和 VCT 具有相同的元数据、行为和规格,包括 params、workspaces 和 steps。但是,当禁用 Operator 或升级 Operator 时,它们的行为会有所不同。
在 Red Hat OpenShift Pipelines 1.10 中,集群任务功能已弃用,计划在以后的发行版本中删除。
4.1. 非版本和版本的集群任务之间的区别
非版本的和版本化的集群任务有不同的命名约定。另外,Red Hat OpenShift Pipelines Operator 会不同地升级它们。
| 非版本的集群任务 | 版本的集群任务 | |
|---|---|---|
| Nomenclature |
NVCT 仅包含集群任务的名称。例如,随 Operator v1.7 安装的 Buildah NVCT 的名称是 |
VCT 包含集群任务的名称,后接为后缀的版本。例如,由 Operator v1.7 安装的 Buildah 的 VCT 的名称是 |
| Upgrade(升级) | 升级 Operator 时,它会使用最新的更改更新非版本的集群任务。NVCT 的名称保持不变。 |
升级 Operator 会安装 VCT 的最新版本并保留更早的版本。VCT 的最新版本对应于升级的 Operator。例如,安装 Operator 1.7 安装 |
4.2. 非版本和版本的集群任务的优点和缺陷
在将未指定版本或版本化的集群任务用作生产环境中的标准之前,集群管理员可能会考虑它们的优点和缺点。
| 集群任务 | 优点 | 缺点 |
|---|---|---|
| 非版本的集群任务 (NVCT) |
| 如果您部署使用 NVCT 的管道,如果自动升级的集群任务不向后兼容,则它们可能会在 Operator 升级后中断。 |
| 版本化的集群任务 (VCT) |
|
|
4.3. 禁用未指定版本和版本的集群任务
作为集群管理员,您可以禁用安装 OpenShift Pipelines Operator 的集群任务。
流程
要删除所有非版本的集群任务和最新版本的集群任务,请编辑
TektonConfig自定义资源定义(CRD)并将spec.addon.params中的clusterTasks参数设置为false。TektonConfigCR 示例Copy to Clipboard Copied! Toggle word wrap Toggle overflow 当您禁用集群任务时,Operator 会删除所有非版本的集群任务,且只从集群中删除最新版本的集群任务。
注意重新启用集群任务将安装非版本的集群任务。
可选: 要删除早期版本的集群任务,请使用以下方法之一:
要删除个别较早版本的集群任务,请使用
oc delete clustertask命令,后面是版本化的集群任务名称。例如:oc delete clustertask buildah-1-6-0
$ oc delete clustertask buildah-1-6-0Copy to Clipboard Copied! Toggle word wrap Toggle overflow 要删除由旧版本 Operator 创建的所有版本集群任务,您可以删除对应的安装程序设置。例如:
oc delete tektoninstallerset versioned-clustertask-1-6-k98as
$ oc delete tektoninstallerset versioned-clustertask-1-6-k98asCopy to Clipboard Copied! Toggle word wrap Toggle overflow Important如果您删除旧版本的集群任务,则无法恢复它。您只能恢复当前创建的 Operator 版本和未版本的集群任务。