此内容没有您所选择的语言版本。
Google Cloud Backup Guide
Abstract
1. Introduction
The Red Hat OpenStack Platform Director is a toolset for installing and managing a complete OpenStack environment. It is based primarily on the OpenStack project TripleO (OpenStack-on-OpenStack). The Director’s primary objective is to fully orchestrate a functional, Enterprise-grade OpenStack deployment with minimal manual configuration. It helps address many of the issues inherent in manually configuring individual OpenStack components.
The end-result OpenStack deployment provided by the Director is called the Overcloud. The Overcloud houses all the components that provide services to end users, including Block Storage. This document provides guidance on how to deploy custom back ends to the Overcloud’s Block Storage service.
Red Hat OpenStack Platform supports several third-party services, devices, and applications for functions ranging from block storage back ends to data processing. This release allows you to configure the Block Storage service to use Google Cloud as a backup storage service. This Google Cloud integration is available in this release as a technology preview feature.
Technology Preview features are not fully supported by Red Hat. The deployment scenario described in this document should only be used for testing, and should not be deployed in a production environment.
For more information about Technology Preview features, see Scope of Coverage Details.
This document presents a test scenario where the Block Storage service on an overcloud deployment is configured to back up volumes to Google Cloud storage. This test scenario requires that:
- The overcloud has already been deployed through director, per instructions in the Red Hat OpenStack Platform 10 Director Installation and Usage guide.
-
You have the username and password of an account with elevated privileges. You can use the same account that was created to deploy the overcloud; in the Red Hat OpenStack Platform 10 Director Installation and Usage guide, a user named
stackis created for this purpose. - The Block Storage service is installed on the Controller node; or, as is the case in an HA deployment, on every Controller node.
- You have a Google account with access to Google Cloud Platform. This account will be used by the Block Storage service to access and use Google Cloud for storing backups.
2. Process Description
Configuring the Block Storage service to use Google Cloud as a backup service involves the following steps:
- Creating and downloading the service account credentials of your Google account (Section 3, “Create and Download the GCS Credentials File”).
- Creating an environment file to map out the Block Storage settings required (Section 4, “Create the Environment File”). This environment file will also use the service account credentials created in the previous step.
- Re-deploying the overcloud using the environment file you created (Section 5, “Re-Deploy the Overcloud”).
The following sections describe each step in greater detail.
3. Create and Download the GCS Credentials File
The Block Storage service needs your Google credentials in order to access and use Google Cloud for backups. You can provide these credentials to Block Storage by creating a service account key:
- Log in to the Google developer console (http://console.developers.google.com) using your Google account.
Click the
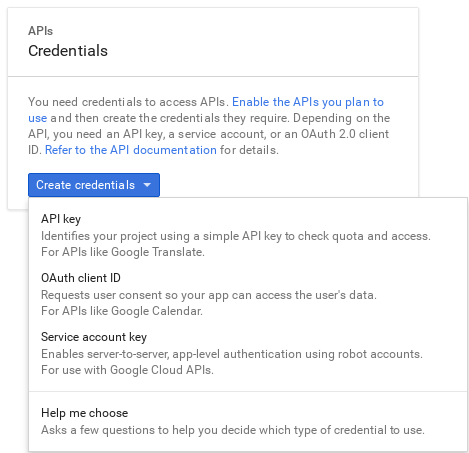
Credentialstab. From there, selectService account keyfrom theCreate credentialsdropdown.
In the next screen (
Create service account key), select the service account that the Block Storage service should use from theService accountdropdown:
In the same screen, select
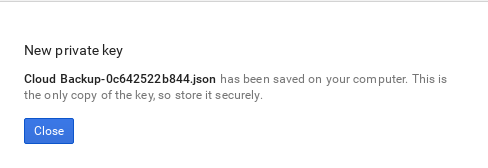
JSONfrom theKey typesection and clickCreate.The browser will then download the key to its default download location:

Open the file, and note the value of the
project_idparameter:{ "type": "service_account", "project_id": "cloud-backup-1370", ...{ "type": "service_account", "project_id": "cloud-backup-1370", ...Copy to Clipboard Copied! Toggle word wrap Toggle overflow The /etc/cinder/Cloud-Backup.json key will be used later in Section 4, “Create the Environment File” (in particular, the value of
project_idand the absolute path to the file).Copy the key file to /etc/cinder/ on any Controller node. From there, change the user, group, and permissions of the key file to match that of /etc/cinder/cinder.conf. This will ensure that the Block Storage service can use it:
cp Cloud-Backup.json /etc/cinder/
chown cinder:cinder /etc/cinder/Cloud-Backup.json
chmod 0600 /etc/cinder/Cloud-Backup.json
# cp Cloud-Backup.json /etc/cinder/
# chown cinder:cinder /etc/cinder/Cloud-Backup.json
# chmod 0600 /etc/cinder/Cloud-Backup.json
Copy to Clipboard Copied! Toggle word wrap Toggle overflow Copy the key file to the same location on each Controller node (namely, to /etc/cinder/Cloud-Backup.json). Use
rsync -ato ensure that the permissions and ownership settings are preserved:rsync -a /etc/cinder/Cloud-Backup.json root@CONTROLLERHOST:/etc/cinder/
# rsync -a /etc/cinder/Cloud-Backup.json root@CONTROLLERHOST:/etc/cinder/Copy to Clipboard Copied! Toggle word wrap Toggle overflow Replace CONTROLLERHOST with the hostname of a target Controller.
4. Create the Environment File
The environment file contains the settings you want to apply to the Block Storage service. In this case, the Block Storage service will be configured to store volume backups to Google Cloud. For more information about environment files, see the Red Hat OpenStack Platform 10 Director Installation and Usage guide.
Each setting is defined in the environment file as follows:
Entry format
SECT/PARAM: #
    value: CONFIG #
SECT/PARAM: #
value: CONFIG # - 1
- All Block Storage settings are configured in the /etc/cinder/cinder.conf file of the node hosting the Block Storage service. This file is divided into different sections, making it easier to manage different settings. PARAM is the setting you want to apply, and SECT is the section to which it belongs.
- 2
- CONFIG is the value you want to set to PARAM.
In this document, all parameters are declared in the DEFAULT section. The following table describes each setting required to configure Google Cloud Storage (GCS) as your backup service:
- Google Cloud backup settings
| PARAM | Default | CONFIG Description |
| backup_driver | cinder.backup.drivers.swift |
The backup driver that the Block Storage server should use. For Google Cloud Storage, use |
| backup_gcs_credential_file | The absolute path to the service account key file you created earlier in Section 3, “Create and Download the GCS Credentials File”. | |
| backup_gcs_bucket | The GCS bucket (or object storage repository) to use, which may or may not exist. If you specify a non-existent bucket, the Google Cloud Storage backup driver creates one using the name you specify here. See Buckets and Bucket name requirements for more information. | |
| backup_gcs_bucket_location | US |
The location of the GCS bucket. This value is only used if you specify a non-existent bucket in See Bucket Locations for more information. |
| backup_gcs_project_id |
The project ID of the service account you are using, as noted in the | |
| backup_gcs_object_size | 52428800 | The size (in bytes) of GCS backup objects. |
| backup_gcs_block_size | 32768 |
The size (in bytes) that changes are tracked for incremental backups. This value must be a multiple of the |
| backup_gcs_user_agent | gcscinder | The HTTP user-agent string for the GCS API. |
| backup_gcs_reader_chunk_size | 2097152 | GCS objects will be downloaded in chunks of this size (in bytes). |
| backup_gcs_writer_chunk_size | 2097152 |
GCS objects will be uploaded in chunks of this size (in bytes). To upload files as a single chunk instead, use the value |
| backup_gcs_num_retries | 3 | Number of retries to attempt. |
| backup_gcs_storage_class | NEARLINE |
Storage class of the GCS bucket. This value is only used if you specify a non-existent bucket in |
| backup_gcs_retry_error_codes | 429 | List of GCS error codes. |
| backup_gcs_enable_progress_timer | True |
Boolean to enable or disable the timer for sending periodic progress notifications to the Telemetry service ( |
When creating new buckets, Google Cloud Storage charges based on your chosen storage class (backup_gcs_storage_class). The default NEARLINE class is appropriate for backup services.
In addition, you cannot edit the location or class of a bucket once it is created. For more information, see Managing a bucket’s storage class or location.
The following sample shows the typical contents of an environment file for configuring GCS as a backup service:
/home/stack/templates/gcs-backup.yaml
- 1
ControllerExtraConfigdefines custom settings that will be applied to all Controller nodes. Thecinder::config::cinder_configclass means the settings should be applied to the Block Storage (cinder) service. This, in turn, means that the back end settings will ultimately end in the/etc/cinder/cinder.conffile of each Controller node.
After creating the environment file, see Section 5, “Re-Deploy the Overcloud” for instructions on deploying its settings to the overcloud.
5. Re-Deploy the Overcloud
Once you have created the environment file file in /home/stack/templates/, log in as the stack user. Then, deploy the configuration by running:
openstack overcloud deploy --templates -e /home/stack/templates/gcs-backup.yaml
$ openstack overcloud deploy --templates -e /home/stack/templates/gcs-backup.yamlIf you passed any extra environment files when you created the Overcloud, pass them again here using the -e option to avoid making undesired changes to the Overcloud.
For more information, see Scaling the Overcloud and Updating the Overcloud Packages.