配置和管理虚拟化
设置您的主机、创建和管理虚拟机并了解 Red Hat Enterprise Linux 8 中的虚拟化功能
摘要
- 虚拟化的功能和用例
- 如何使用命令行工具以及 web 控制台管理您的主机和虚拟机
- 在各种系统构架上虚拟化的支持限制,如 Intel 64、AMD64、IBM POWER 和 IBM Z
对红帽文档提供反馈
我们感谢您对我们文档的反馈。让我们了解如何改进它。
通过 Jira 提交反馈(需要帐户)
- 登录到 Jira 网站。
- 单击顶部导航栏中的 Create。
- 在 Summary 字段中输入描述性标题。
- 在 Description 字段中输入您对改进的建议。包括文档相关部分的链接。
- 点对话框底部的 Create。
第 1 章 介绍 RHEL 中的虚拟化
如果您对虚拟化概念或其在 Linux 中的实施不熟悉,以下小节提供了 RHEL 8 虚拟化的一般概述:红帽提供的基本知识、优势、组件和其他可能的虚拟化解决方案。
1.1. 什么是虚拟化?
RHEL 8 提供虚拟化功能,它让运行 RHEL 8 的机器能够托管(host) 多个虚拟机(VM),也称为客户机(guest)。VM 使用主机的物理硬件和计算资源,在主机操作系统中作为用户空间进程运行一个独立的虚拟操作系统(客户机操作系统)。
换句话说,虚拟化功能使在一个操作系统中执行其他操作系统成为可能。
VM 可让您安全地测试软件配置和功能,运行旧的软件或优化硬件的工作负载效率。有关优点的更多信息,请参阅 虚拟化的优势。
有关什么是虚拟化的更多信息,请参阅 虚拟化主题页面。
后续步骤
- 要在 Red Hat Enterprise Linux 8 中尝试虚拟化,请参阅 开始使用虚拟化。
- 除了 Red Hat Enterprise Linux 8 虚拟化外,红帽还提供了多种专用的虚拟化解决方案,每种解决方案都有不同的用户重点和特性。如需更多信息,请参阅 Red Hat Virtualization 解决方案。
1.2. 虚拟化的优点
与使用物理机器相比,使用虚拟机(VM)有以下优点:
灵活精细的资源分配
一个虚拟机在主机机器(通常是物理机器)上运行,主机的硬件也可以分配给客户机操作系统使用。但是,物理资源分配是在软件级别上完成的,因此非常灵活。虚拟机使用的主机内存、CPU 或存储空间的比例是可以配置的,可以指定非常精细的资源请求。
例如:客户机操作系统的磁盘可以在主机的文件系统中以一个文件代表,且该磁盘的大小限制比物理磁盘的限制要小。
软件控制的配置
虚拟机的整个配置都作为数据保存在主机上,并由软件控制。因此,虚拟机可轻松创建、删除、克隆、迁移、远程操作或连接到远程存储。
与主机分离
在虚拟内核中运行的客户机操作系统与主机操作系统分开。这意味着可在虚拟机中安装任何操作系统,即使虚拟机操作系统不稳定或受损,主机也不会受到任何影响。
空间及成本效率
单个物理机器可以托管大量虚拟机。因此,无需多个物理机器执行同样的任务,因此降低了与物理硬件关联的空间、电源和维护的要求。
软件兼容性
因为虚拟机可以使用不同于其主机的操作系统,所以通过虚拟化,可以运行最初没有为主机操作系统发布的应用程序。例如,使用 RHEL 7 客户机操作系统,您可以在 RHEL 8 主机系统上运行为 RHEL 7 发布的应用程序。
注意不是所有操作系统都可以作为 RHEL 8 主机中的客户机操作系统被支持。详情请查看 RHEL 8 虚拟化中推荐的功能。
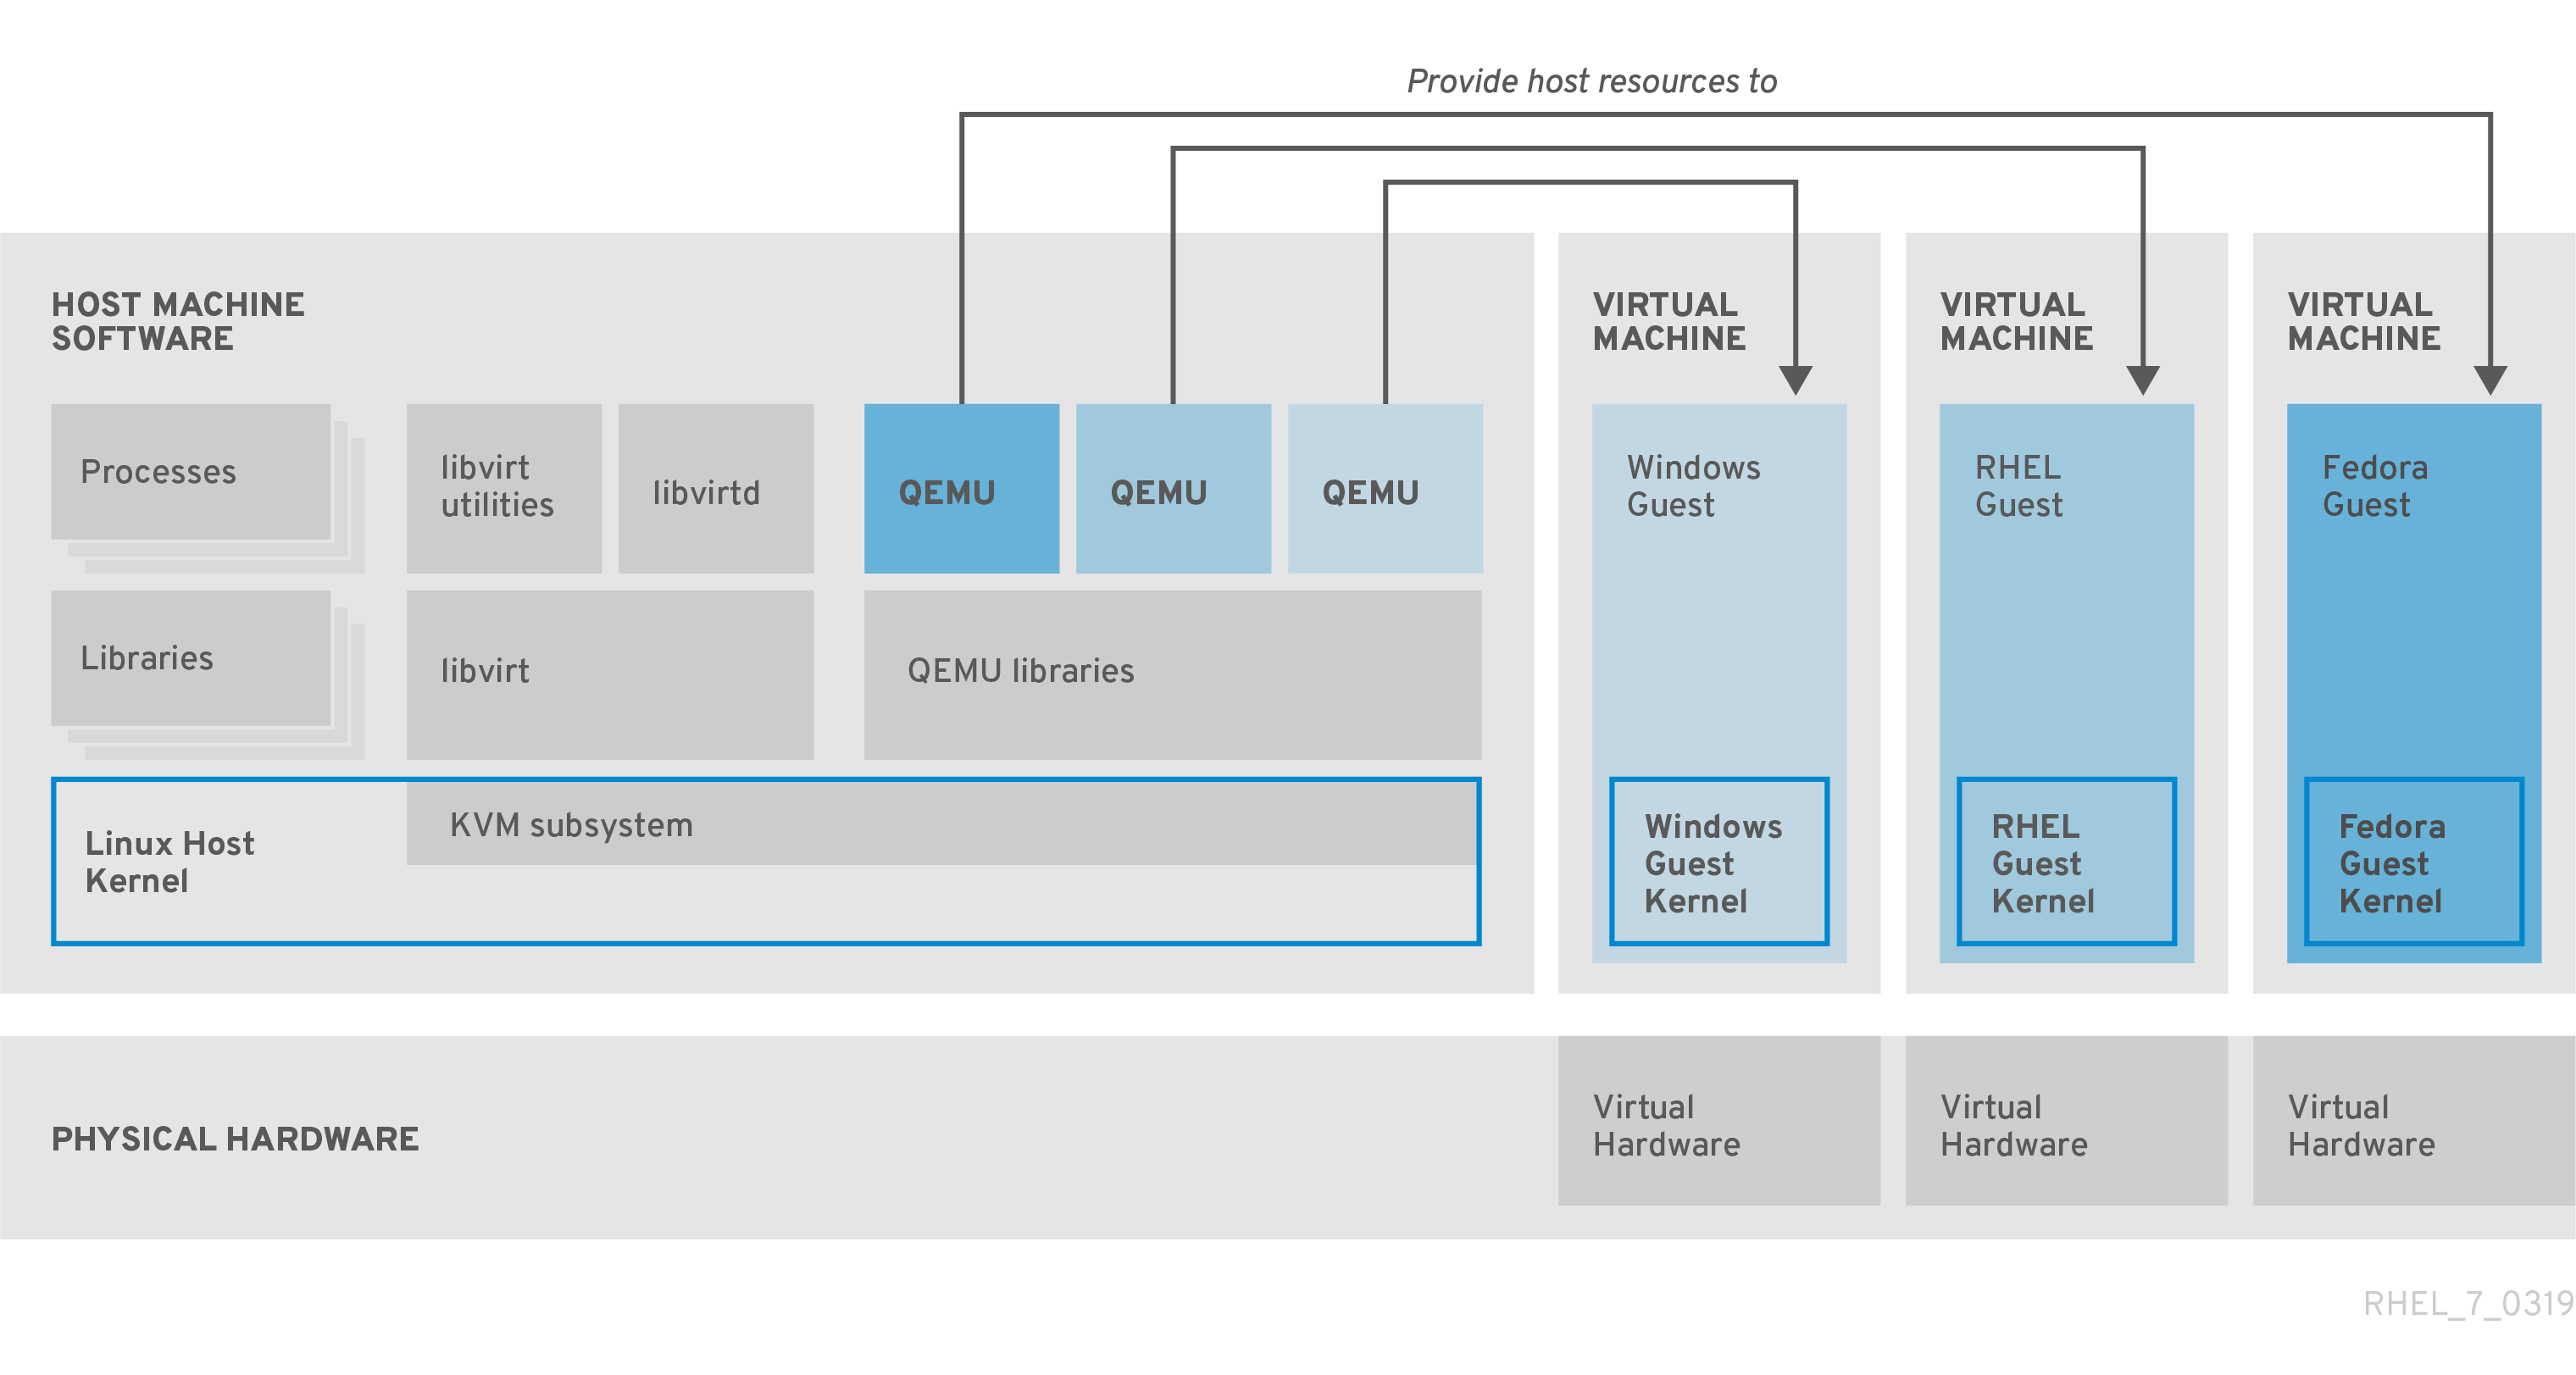
1.3. 虚拟机组件及其交互
RHEL 8 中的虚拟化由以下主要软件组件组成:
虚拟机监控程序(Hypervisor)
在 RHEL 8 中创建虚拟机(VM)的基础是(hypervisor(虚拟机监控程序) ),它是一个软件层用来控制硬件并在主机中运行多个操作系统。
虚拟机监控程序包括 基于内核的虚拟机(KVM) 模块和虚拟化内核驱动程序。这些组件可确保主机中的 Linux 内核为用户空间软件提供虚拟化资源。
在用户空间级别,QEMU 模拟器会模拟一个客户机操作系统可以在上面运行的完整虚拟硬件平台,并管理如何在主机中分配资源并提供给客户机。
此外,libvirt 软件套件充当管理和通信层,使 与 QEMU 更容易交互、实施安全规则,并提供用于配置和运行 VM 的许多其他工具。
XML 配置
基于主机的 XML 配置文件(也称域 XML 文件)决定了特定虚拟机中的所有设置和设备。配置包括:
- 元数据,如虚拟机名称、时区和其他有关虚拟机的信息。
- 对虚拟机中的设备的描述,包括虚拟 CPU(vCPUS)、存储设备、输入/输出设备、网络接口卡及其他真实和虚拟硬件。
- 虚拟机设置,如它可以使用的最大内存量、重启设置和其他有关虚拟机行为的设置。
有关 XML 配置内容的更多信息,请参阅 虚拟机 XML 配置示例。
组件交互
当虚拟机启动时,虚拟机监控程序使用 XML 配置在主机上以用户空间进程的形式创建虚拟机实例。hypervisor 还使虚拟机进程能被基于主机的接口访问,如 virsh、virt-install 和 guestfish 工具,或者 Web 控制台 GUI。
当使用这些虚拟化工具时,libvirt 会将它们的输入转换成 QEMU 的指令。QEMU 将指令信息发送到 KVM,这样可确保内核正确分配执行该指令所需的资源。因此,QEMU 可以执行相应的用户空间更改,如创建或修改虚拟机或在虚拟机的客户机操作系统中执行操作。
尽管 QEMU 是构架中的基本组件,但出于安全考虑,它并没有被设计为直接在 RHEL 8 系统中使用。因此,红帽不支持 qemu-* 命令,强烈建议您使用 libvirt 与 QEMU 进行交互。
有关基于主机的接口的更多信息,请参阅 虚拟化管理的工具和接口。
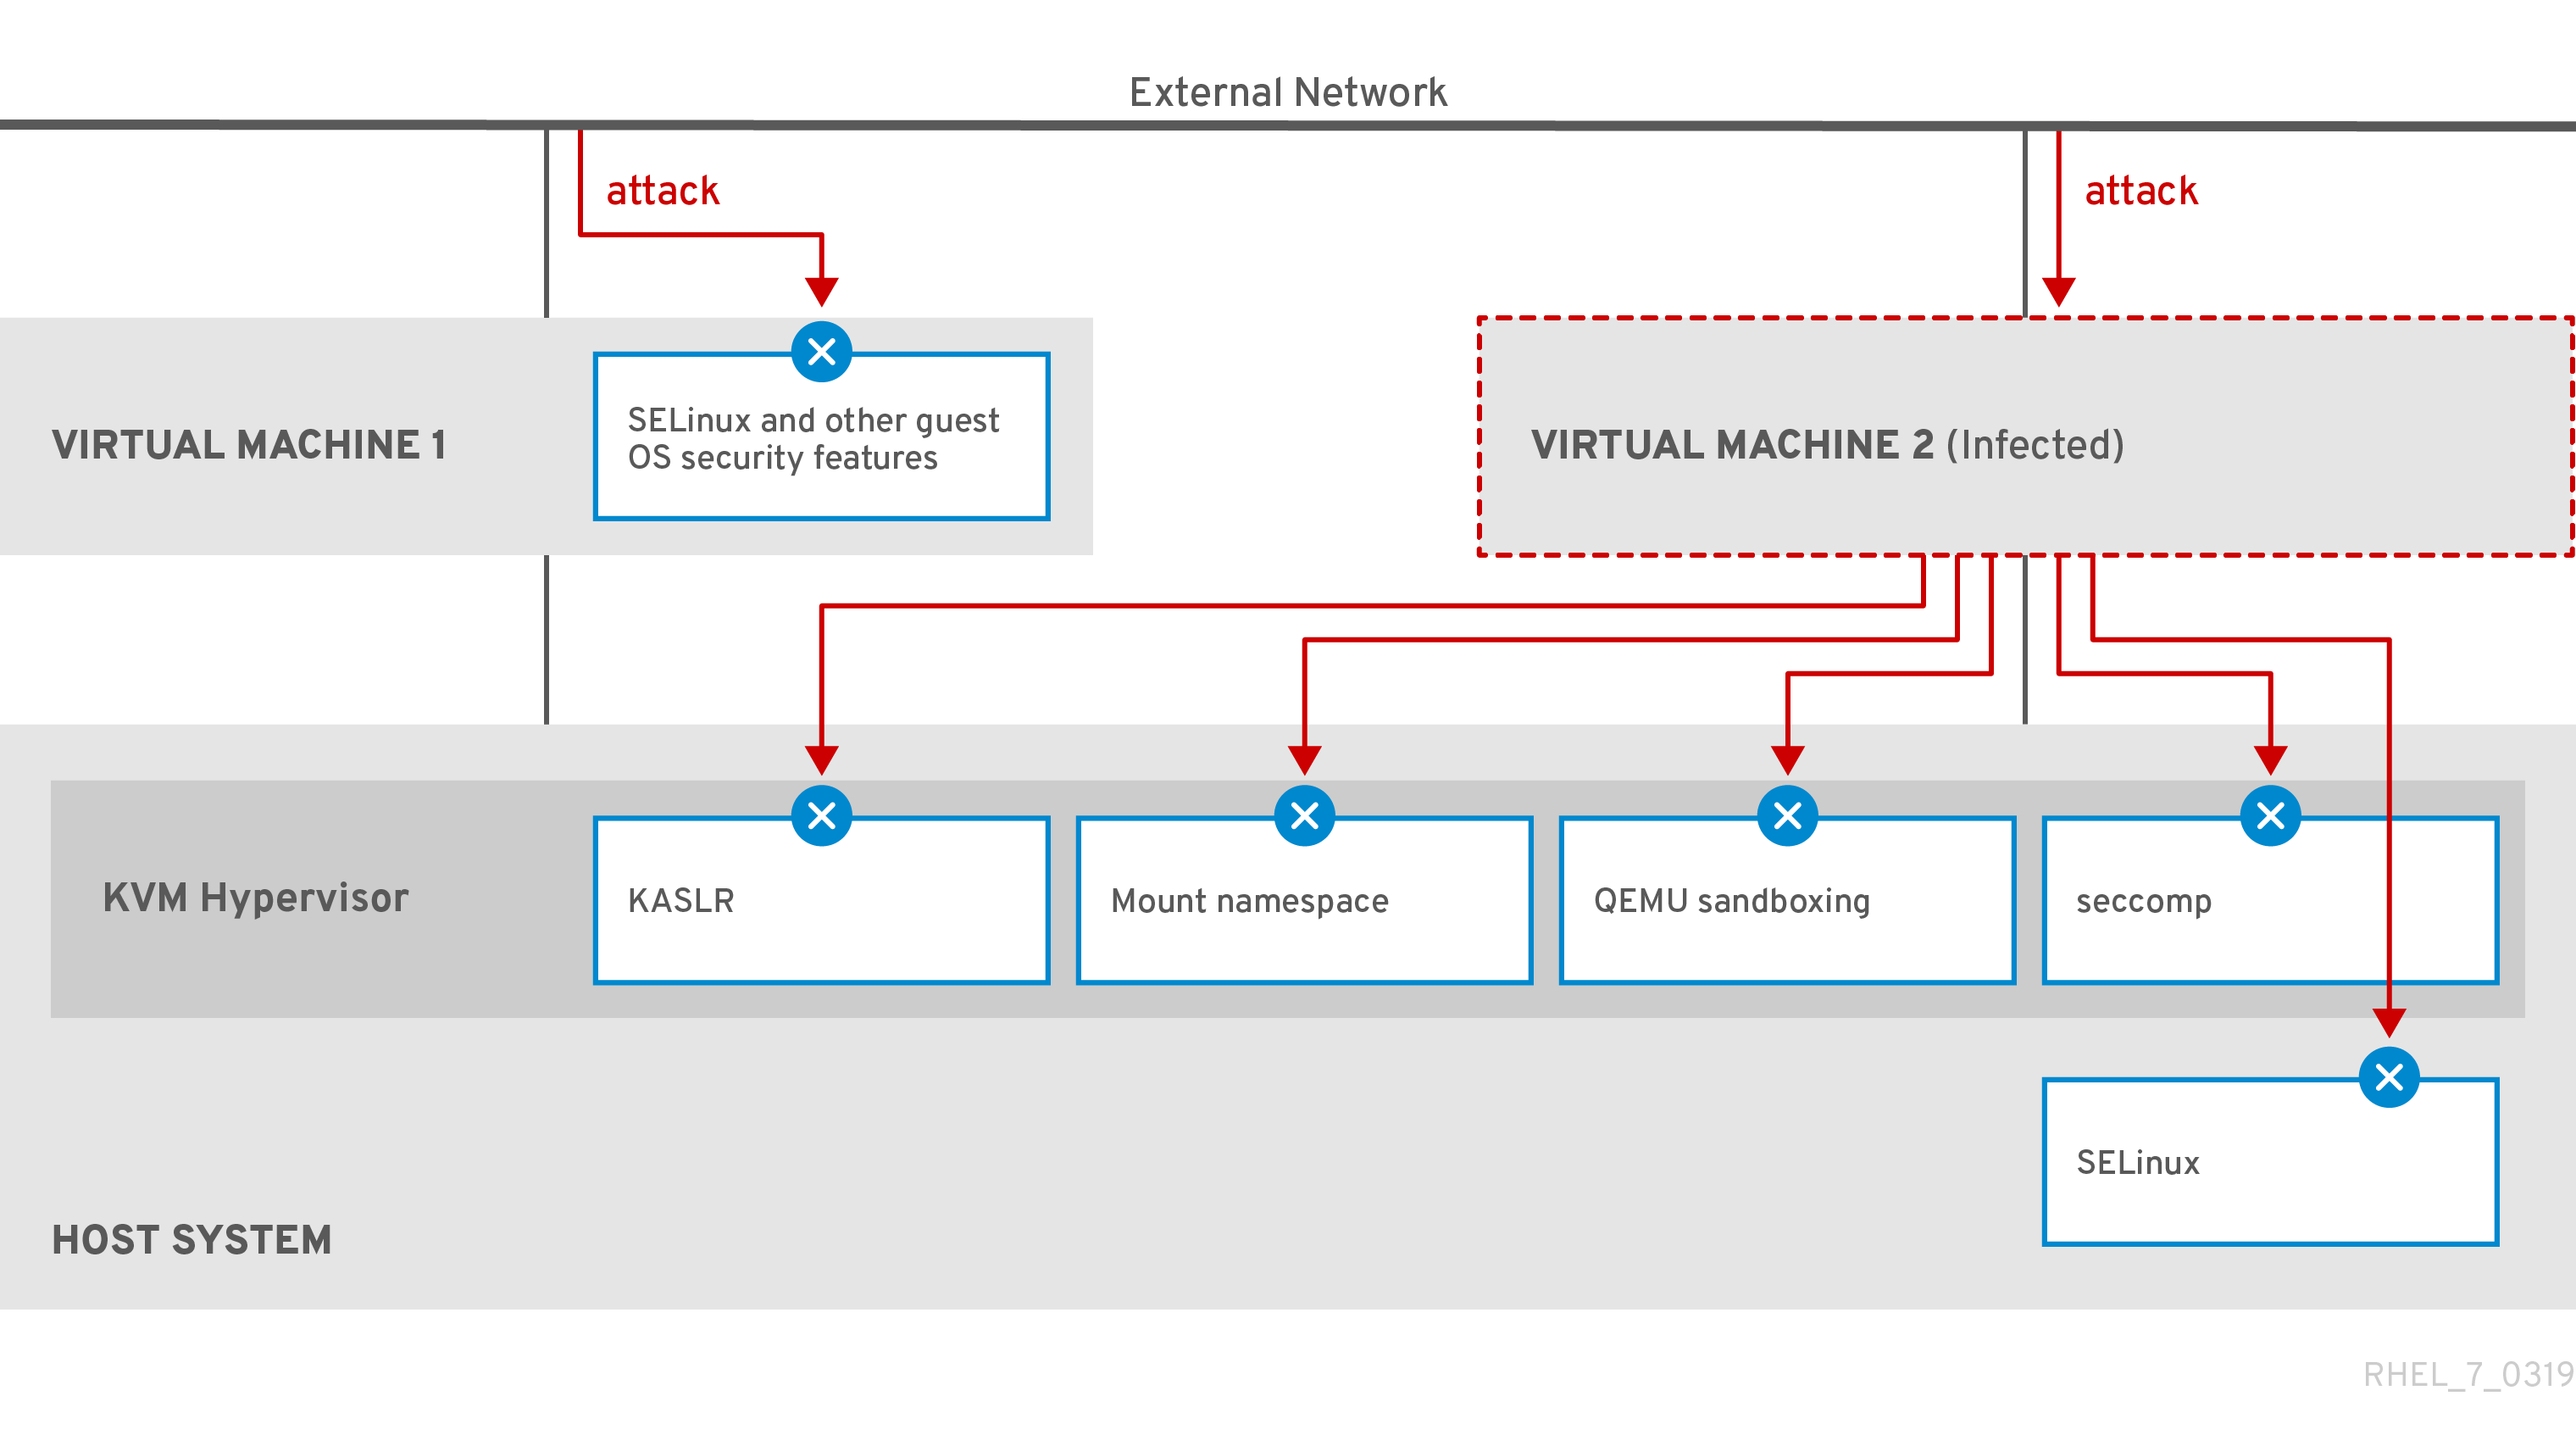
图 1.1. RHEL 8 虚拟化架构
1.4. 用于虚拟化管理的工具和界面
您可以使用命令行(CLI)或几个图形用户界面(GUI)在 RHEL 8 中管理虚拟化。
命令行界面
CLI 是在 RHEL 8 中管理虚拟化的最强大的方法。虚拟机(VM)管理的 CLI 命令包括:
virsh - 一个多用途的虚拟化命令行工具程序和 shell,根据提供的参数,可以实现不同功能。例如:
-
启动和关闭虚拟机 -
virsh start和virsh shutdown -
列出可用的虚拟机 -
virsh list -
从配置文件创建虚拟机 -
virsh create -
进入虚拟化 shell -
virsh
如需更多信息,请参阅您系统上的
virsh (1)手册页。-
启动和关闭虚拟机 -
-
virt-install- 用于创建新虚拟机的 CLI 工具。如需更多信息,请参阅您系统上的virt-install (1)手册页。 -
virt-xml- 用于编辑虚拟机配置的工具。 -
guestfish- 用于检查和修改虚拟机磁盘镜像的工具。如需更多信息,请参阅您系统上的guestfish (1)手册页。
图形界面
您可以使用以下 GUI 在 RHEL 8 中管理虚拟化:
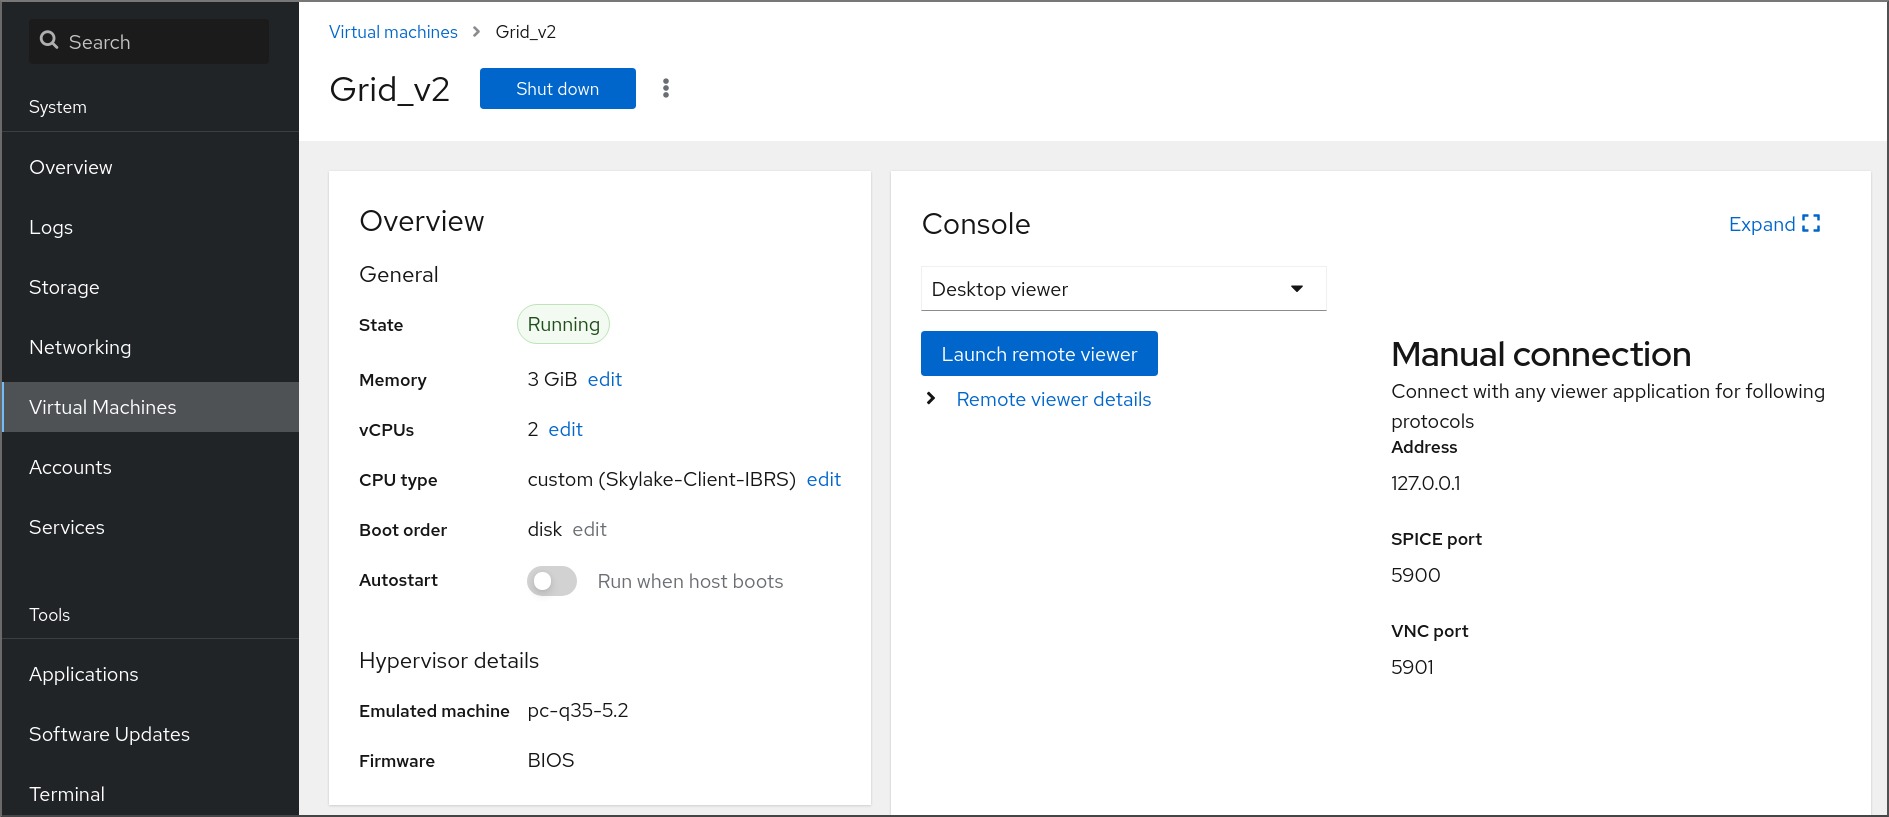
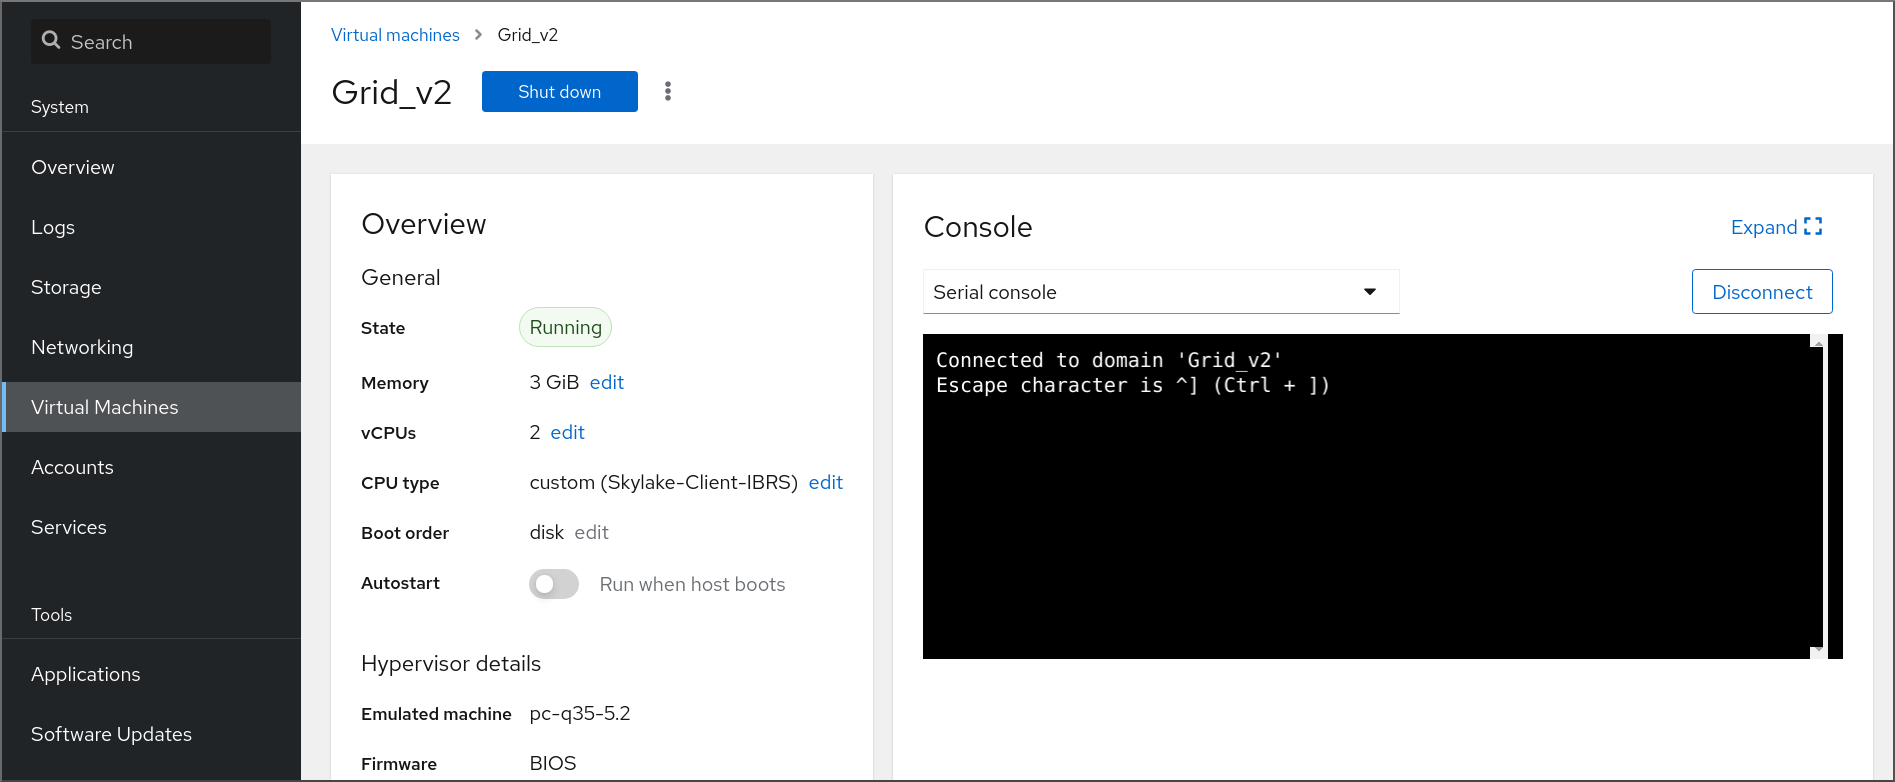
RHEL 8 web 控制台 (也称为 Cockpit )提供了一个远程的、易于使用的图形用户界面管理虚拟机和虚拟化主机。
有关使用 web 控制台进行基本虚拟化管理的步骤,请参阅 web 控制台中管理虚拟机。
虚拟机管理器(virt-manager)应用程序提供管理虚拟机和虚拟化主机的专用 GUI。
重要虽然 RHEL 8 中仍在支持,但 virt-manager 已被弃用。在以后的版本中计划使用 Web 控制台替换它。因此,建议您熟悉通过 web 控制台使用 GUI 管理虚拟化。
但是,在 RHEL 8 中,某些功能只能从 virt-manager 或命令行访问。详情请参阅 虚拟机管理器和 web 控制台中虚拟化功能之间的区别。
Gnome Boxes 应用程序是一个轻量级图形界面,可用来查看和访问虚拟机和远程系统。GNOME Boxes 主要用于桌面系统。
重要GNOME Boxes 作为 GNOME 桌面环境的一部分提供,在 RHEL 8 中被支持,但红帽建议您通过 web 控制台使用 GUI 管理虚拟化。
1.5. 红帽虚拟化解决方案
以下红帽产品是在 RHEL 8 虚拟化功能之上构建的,并扩展了 RHEL 8 中提供的 KVM 虚拟化功能。另外,许多 RHEL 8 虚拟化的限制 不适用于这些产品:
- OpenShift Virtualization
OpenShift Virtualization 基于 KubeVirt 技术,作为 Red Hat OpenShift Container Platform 的一部分,并可在容器中运行虚拟机。
有关 OpenShift Virtualization 的更多信息,请参阅红帽混合云页面。
- Red Hat OpenStack Platform(RHOSP)
Red Hat OpenStack Platform 为创建、部署并扩展一个安全可靠的公共或私有 OpenStack 云环境提供了一个集成的基础。
如需有关 Red Hat OpenStack Platform 的更多信息,请参阅红帽客户门户网站或 Red Hat OpenStack Platform 文档套件。
有关 RHEL 中不支持,但在其他 Red Hat 虚拟化解决方案中支持的虚拟化功能,请参阅:RHEL 8 虚拟化中不支持的功能
第 2 章 虚拟化入门
要开始使用RHEL 8 中的虚拟化,请按照以下步骤操作。默认方法是使用命令行(CLI),但为了方便用户,一些步骤可以在 web 控制台 GUI 中完成。
- 启用虚拟化模块,并安装虚拟化软件包 - 请参阅 启用虚拟化。
创建虚拟机:
- 对于 CLI,请参阅 使用命令行创建虚拟机。
- 对于 GUI,请参阅使用 web 控制台创建虚拟机并安装客户机操作系统。
启动虚拟机:
- 对于 CLI ,请参阅 使用命令行启动虚拟机。
- 对于 GUI,请参阅使用 web 控制台启动虚拟机。
连接到虚拟机:
- 对于 CLI ,请参阅使用 SSH 连接到虚拟机,或使用 Virt Viewer 打开虚拟机图形控制台。
- 对于 GUI,请参阅使用 web 控制台与虚拟机交互。
Web 控制台目前仅提供一部分虚拟机管理功能,因此对于 RHEL 8 中虚拟化的高级使用,建议使用命令行。
2.1. 启用虚拟化
要在 RHEL 8 中使用虚拟化,您必须启用虚拟化模块,安装虚拟化软件包,并确保您的系统被配置为可托管虚拟机(VM)。
先决条件
- RHEL 8 已安装并在主机上注册。
您的系统满足以下硬件要求以作为虚拟主机工作:
有以下最小系统资源可用:
- 主机有 6 GB 可用磁盘空间,以及每个预期的虚拟机需要额外 6 GB 空间。
- 主机需要 2 GB RAM,以及每个预期的虚拟机需要额外 2 GB。
- 主机上有 4 个 CPU。虚拟机通常可以使用单个分配的 vCPU 运行,但红帽建议为每个虚拟机分配 2 个或更多 vCPU,以避免虚拟机在高负载期间变得无响应。
主机的构架 支持 KVM 虚拟化。
- 值得注意的是,RHEL 8 不支持 64 位 ARM 架构(ARM 64)上的虚拟化。
以下流程适用于 AMD64 和 Intel 64 架构(x86_64)。要在具有不同的受支持构架的主机上启用虚拟化,请参阅以下部分之一:
流程
在 RHEL 8 虚拟化模块中安装软件包:
# yum module install virt安装
virt-install和virt-viewer软件包:# yum install virt-install virt-viewer启动
libvirtd服务:# systemctl start libvirtd
验证
确认您的系统已准备好成为虚拟化主机:
# virt-host-validate
[...]
QEMU: Checking for device assignment IOMMU support       : PASS
QEMU: Checking if IOMMU is enabled by kernel             : WARN (IOMMU appears to be disabled in kernel. Add intel_iommu=on to kernel cmdline arguments)
LXC: Checking for Linux >= 2.6.26                        : PASS
[...]
LXC: Checking for cgroup 'blkio' controller mount-point  : PASS
LXC: Checking if device /sys/fs/fuse/connections exists  : FAIL (Load the 'fuse' module to enable /proc/ overrides)
查看
virt-host-validate检查的返回值,并采取适当的措施:-
如果所有
virt-host-validate检查都返回PASS值,则代表您的系统已准备好 创建虚拟机。 -
如果有任何检查返回
FAIL值,请按照显示的说明来修复问题。 -
如果任何检查都返回
WARN值,请考虑按照显示的说明改进虚拟化功能
-
如果所有
故障排除
如果您的主机 CPU 不支持 KVM 虚拟化,
virt-host-validate会生成以下输出:QEMU: Checking for hardware virtualization: FAIL (Only emulated CPUs are available, performance will be significantly limited)但是,在这样的主机系统上的虚拟机将无法引导,而不存在性能问题。
要临时解决这个问题,您可以将虚拟机的 XML 配置中的
<domain type>的值改为qemu。但请注意,红帽不支持使用qemu域类型的虚拟机,在生产环境中不建议这样做。
2.2. 创建虚拟机
要在 RHEL 8 中创建虚拟机(VM),使用命令行 或 RHEL 8 web 控制台。
2.2.1. 使用命令行创建虚拟机
要使用命令行在 RHEL 8 上创建虚拟机(VM),请使用 virt-install 工具。
先决条件
- 虚拟化已在您的主机系统上 启用。
- 您有足够的系统资源来分配给虚拟机,如磁盘空间、RAM 或 CPU。根据虚拟机的预期任务和工作负载,推荐的值可能会有很大不同。
操作系统(OS)安装源可存在于本地或者网络中。可以是以下之一:
- 安装介质的 ISO 镜像
现有虚拟机安装的磁盘镜像
警告在 RHEL 8 中无法从主机 CD-ROM 或者 DVD-ROM 设备安装。当使用 RHEL 8 中的任何虚拟机安装方法时,如果选择了 CD-ROM 或者 DVD-ROM 作为安装源,则安装将失败。如需更多信息,请参阅红帽知识库解决方案 RHEL 7 或更高版本无法从 CD/DVD-ROM 安装客户机操作系统。
另请注意,红帽只对 一组有限的客户机操作系统 提供支持。
- 可选:对于快速、简单的配置安装,可以使用 Kickstart 文件。
流程
要创建虚拟机并启动其操作系统安装,请使用 virt-install 命令以及以下强制参数:
-
--name: 新机器的名称 -
--memory:分配的内存量 -
--vCPUs :分配的虚拟 CPU 数量 -
--disk:分配的存储的类型和大小 -
--cdrom或--location:操作系统安装源的类型和位置
根据所选安装方法,所需选项和值可能会有所不同。请参阅以下命令的示例:
列出的命令使用 VNC 远程显示协议而不是默认的 SPICE 协议。VNC 目前没有 SPICE 的功能,但在 RHEL 9 中被完全支持。因此,如果您将主机迁移到 RHEL 9,则使用 VNC 的虚拟机将无法停止工作。如需更多信息,请参阅使用 RHEL 9 的注意事项。
以下命令创建一个名为 demo-guest1 的虚拟机,它从本地存储在 /home/username/Downloads/Win10install.iso 文件中的 ISO 镜像安装 Windows 10 OS。此虚拟机还可分配 2048 MiB RAM 和 2 个 vCPU,为虚拟机自动配置 80 GiB qcow2 虚拟磁盘。
# virt-install \
    --graphics vnc \
    --name demo-guest1 --memory 2048 \
    --vcpus 2 --disk size=80 --os-variant win10 \
    --cdrom /home/username/Downloads/Win10install.iso
以下命令创建一个名为 demo-guest2 的虚拟机,它使用 /home/username/Downloads/rhel8.iso 镜像从 live CD 运行 RHEL 8 操作系统。没有为这个虚拟机分配磁盘空间,因此在此会话中所做的更改不会被保留。另外,虚拟机被分配 4096 MiB RAM 和 4 个 vCPU。
# virt-install \
    --graphics vnc \
    --name demo-guest2 --memory 4096 --vcpus 4 \
    --disk none --livecd --os-variant rhel8.0 \
    --cdrom /home/username/Downloads/rhel8.iso
以下命令创建一个名为 demo-guest3 的 RHEL 8 虚拟机,它连接到现有磁盘镜像 /home/username/backup/disk.qcow2。这和在不同的机器间物理地移动硬盘驱动器类似,因此 demo-guest3 可用的操作系统和数据由之前处理镜像的方式决定。另外,这个虚拟机还会分配 2048 MiB RAM 和 2 个 vCPU。
# virt-install \
    --graphics vnc \
    --name demo-guest3 --memory 2048 --vcpus 2 \
    --os-variant rhel8.0 --import \
    --disk /home/username/backup/disk.qcow2
请注意,在导入磁盘镜像时,强烈建议使用
--os-variant选项。如果没有提供,创建虚拟机的性能将会受到负面影响。以下命令创建一个名为 demo-guest4 的虚拟机,它从
http://example.com/OS-installURL 安装。要使安装成功启动,URL 必须包含可正常工作的操作系统安装树。另外,操作系统使用 /home/username/ks.cfg kickstart 文件自动进行配置。此虚拟机还可分配 2048 MiB RAM、2 个 vCPU 和 160 GiB qcow2 虚拟磁盘。# virt-install \ --graphics vnc \ --name demo-guest4 --memory 2048 --vcpus 2 --disk size=160 \ --os-variant rhel8.0 --location http://example.com/OS-install \ --initrd-inject /home/username/ks.cfg --extra-args="inst.ks=file:/ks.cfg console=tty0 console=ttyS0,115200n8"以下命令创建一个名为 demo-guest5 的虚拟机,它使用文本模式从
RHEL8.iso镜像文件进行安装,而无需图形。它将客户端控制台连接到串行控制台。虚拟机有 16384 MiB 内存、16 个 vCPU 和 280 GiB 磁盘。当通过慢速网络连接连接到主机时这种安装很有用。# virt-install \ --name demo-guest5 --memory 16384 --vcpus 16 --disk size=280 \ --os-variant rhel8.0 --location RHEL8.iso \ --graphics none --extra-args='console=ttyS0'以下命令创建一个名为 demo-guest6 的虚拟机,其与 demo-guest5 有相同的配置,但位于 192.0.2.1 远程主机上。
# virt-install \
    --connect qemu+ssh://root@192.0.2.1/system --name demo-guest6 --memory 16384 \
    --vcpus 16 --disk size=280 --os-variant rhel8.0 --location RHEL8.iso \
    --graphics none --extra-args='console=ttyS0'
验证
- 如果成功创建虚拟机,则使用虚拟机的图形控制台打开 virt-viewer 窗口并启动客户端操作系统安装。
故障排除
如果
virt-install失败,且出现cannot find default network错误:确定
libvirt-daemon-config-network软件包已安装:# {PackageManagerCommand} info libvirt-daemon-config-network Installed Packages Name : libvirt-daemon-config-network [...]验证
libvirt默认网络是否处于活动状态,并且已配置为自动启动:# virsh net-list --all Name State Autostart Persistent -------------------------------------------- default active yes yes如果没有,激活默认网络并将其设置为 auto-start:
# virsh net-autostart default
Network default marked as autostarted

# virsh net-start default
Network default started
如果激活默认网络失败并显示以下错误,则代表还没有正确安装
libvirt-daemon-config-network软件包。error: failed to get network 'default' error: Network not found: no network with matching name 'default'要解决这个问题,请重新安装
libvirt-daemon-config-network:# {PackageManagerCommand} reinstall libvirt-daemon-config-network如果激活默认网络失败并显示类似如下的错误,则默认网络子网和主机上现有接口之间出现了冲突。
error: Failed to start network default
error: internal error: Network is already in use by interface ens2
要解决这个问题,请使用
virsh net-edit default命令,并将配置中的192.0.2.*值改为主机上未被使用的子网。
2.2.2. 使用 web 控制台创建虚拟机并安装客户机操作系统
要在 RHEL 8 主机上的 GUI 中管理虚拟机(VM),请使用 web 控制台。以下小节介绍了如何使用 RHEL 8 web 控制台创建虚拟机,并在其上安装客户机操作系统。
使用 Web 控制台创建的虚拟机当前默认使用 SPICE 远程桌面协议。但是,RHEL 9 不支持 SPICE,因此如果您将主机升级到 RHEL 9,虚拟机将停止工作。如需更多信息,请参阅使用 RHEL 9 的注意事项。
要创建使用 VNC 协议的虚拟机,该协议将在 RHEL 9 上正常工作,请使用 命令行。
2.2.2.1. 使用 web 控制台创建虚拟机
要在 RHEL 8 web 控制台连接的主机机器上创建一个虚拟机(VM),请使用以下说明。
先决条件
- 您已安装了 RHEL 8 web 控制台。
- 您已启用了 cockpit 服务。
您的用户帐户被允许登录到 web 控制台。
具体步骤请参阅安装并启用 Web 控制台。
- 虚拟化已在您的主机系统上启用。
- Web 控制台 VM 插件已安装在主机系统上。
- 您有足够的系统资源来分配给虚拟机,如磁盘空间、RAM 或 CPU。根据虚拟机的预期任务和工作负载,推荐的值可能会有很大不同。
流程
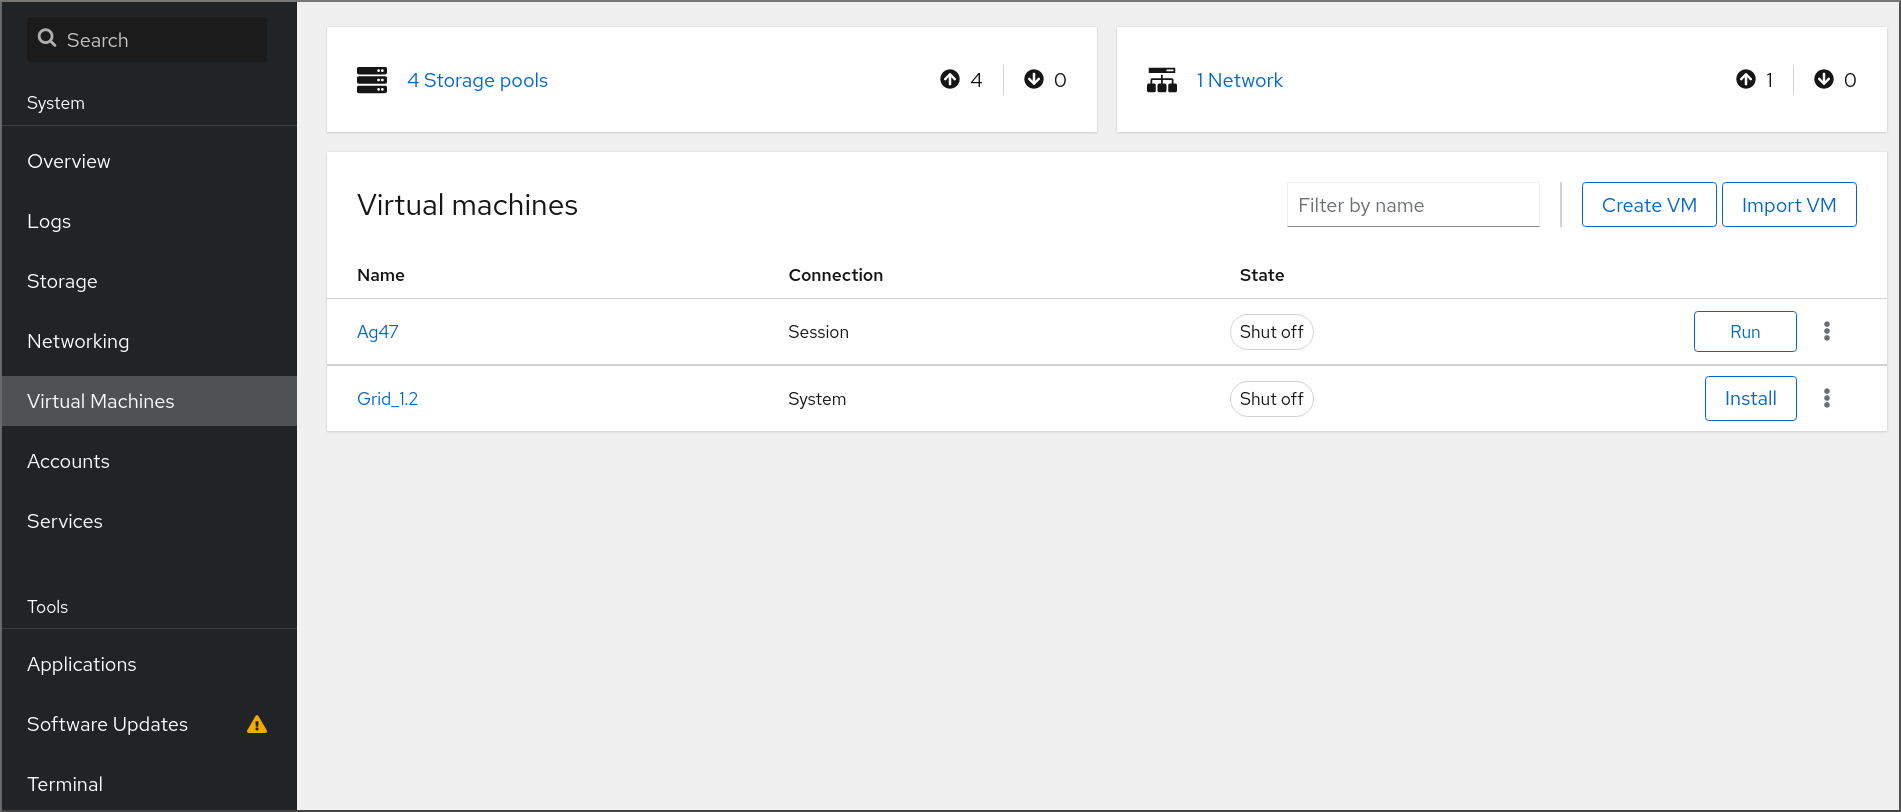
在 web 控制台的 Virtual Machines 界面中,点 。
此时会出现 Create new virtual machine 对话框。
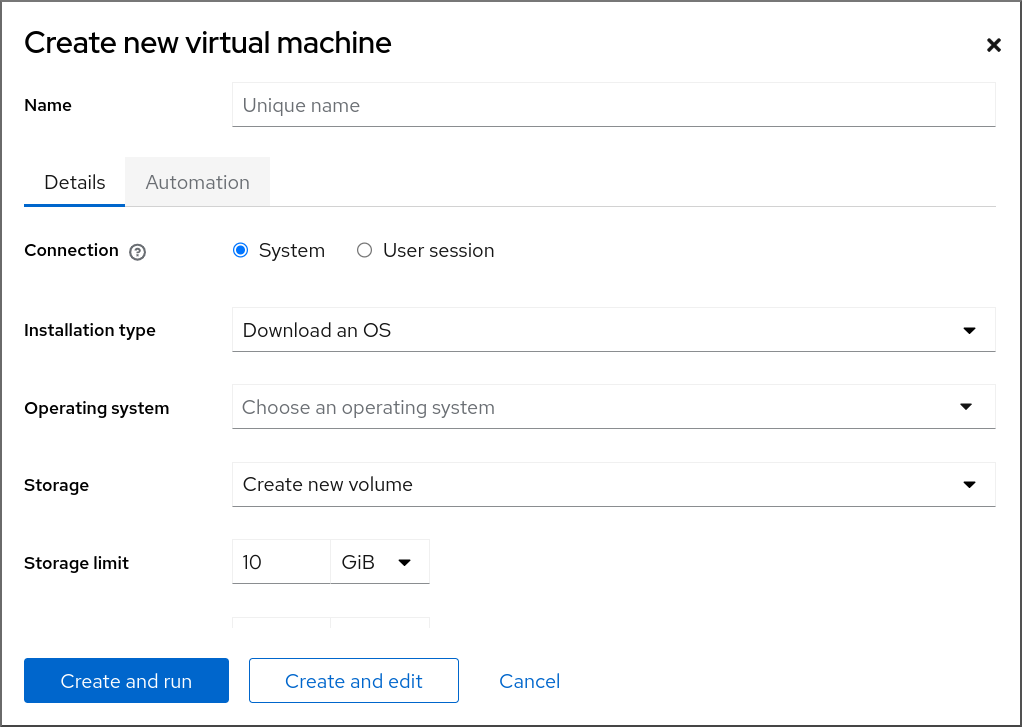
输入您要创建的虚拟机的基本配置。
- Name - 虚拟机的名称。
- Connection - 授予会话的权限级别。如需了解更多详细信息,请在 web 控制台中展开相关的对话框。
- Installation type - 安装可以使用本地安装介质、URL、PXE 网络引导、云基础镜像,或者从有限的操作系统集中下载操作系统。
Operating system - 在虚拟机上运行的客户机操作系统。请注意,红帽只对一组有限的客户机操作系统提供支持。
注意要从 web 控制台直接下载并安装 Red Hat Enterprise Linux,您必须在 Offline token 字段中添加一个离线令牌。
- Storage - 存储的类型。
- Storage Limit - 存储空间量。
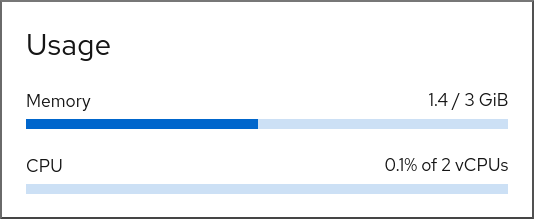
- Memory - 内存量。
创建虚拟机:
- 如果您希望虚拟机自动安装操作系统,请点 。
- 如果要在安装操作系统前编辑虚拟机,点。
2.2.2.2. 使用 web 控制台,通过导入磁盘镜像来创建虚拟机
您可以通过在 RHEL 8 web 控制台中导入现有虚拟机安装的磁盘镜像来创建一个虚拟机(VM)。
先决条件
- 您已安装了 RHEL 8 web 控制台。
- 您已启用了 cockpit 服务。
您的用户帐户被允许登录到 web 控制台。
具体步骤请参阅安装并启用 Web 控制台。
- Web 控制台 VM 插件已安装在您的系统上。
- 您有足够的系统资源来分配给虚拟机,如磁盘空间、RAM 或 CPU。根据虚拟机的预期任务和工作负载,推荐的值可能会有很大不同。
- 您已下载了现有虚拟机安装的磁盘镜像。
流程
在 web 控制台的 Virtual Machines 界面中,单击 。
此时会出现 Import a virtual machine 对话框。
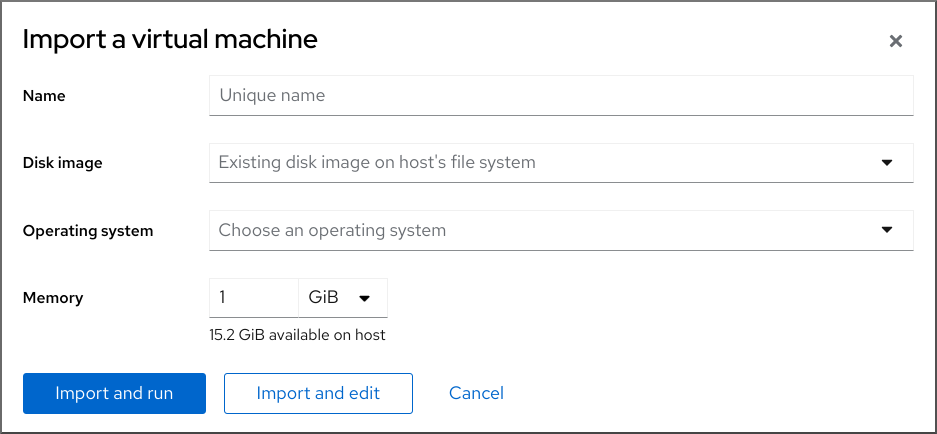
输入您要创建的虚拟机的基本配置:
- Name - 虚拟机的名称。
- Disk image - 主机系统上虚拟机现有磁盘映像的路径。
- Operating system - 在 VM 磁盘上运行的操作系统。请注意,红帽只对一组有限的客户机操作系统提供支持。
- Memory - 分配给虚拟机使用的内存量。
导入虚拟机:
- 要在虚拟机上安装操作系统,而无需对虚拟机设置进行额外的编辑,请点 。
- 要在安装操作系统前编辑虚拟机设置,请点 。
2.2.2.3. 使用 Web 控制台安装客户机操作系统
当虚拟机(VM)第一次引导时,您必须在虚拟机上安装操作系统。
如果您在创建新虚拟机时点了 或 ,则操作系统的安装例程会在创建虚拟机时自动启动。
先决条件
- 您已安装了 RHEL 8 web 控制台。
- 您已启用了 cockpit 服务。
您的用户帐户被允许登录到 web 控制台。
具体步骤请参阅安装并启用 Web 控制台。
- Web 控制台 VM 插件已安装在主机系统上。
流程
登录到 RHEL 8 web 控制台。
详情请参阅 登录到 web 控制台。
在 Virtual Machines 界面中,单击要在其上安装客户机操作系统的虚拟机。
此时将打开一个新页面,其中包含有关所选虚拟机的基本信息,以及管理虚拟机各方面的控制。

可选:更改固件。
注意只有在创建新虚拟机时选择了 或 ,且还没有在虚拟机上安装操作系统,您才能更改固件。

- 点击固件。
- 在 Change Firmware 窗口中,选择所需的固件。
- 点击 。
点 。
在 VM 控制台中运行的操作系统的安装过程。
故障排除
- 如果安装例程失败,请在再次开始安装前删除并重新创建虚拟机。
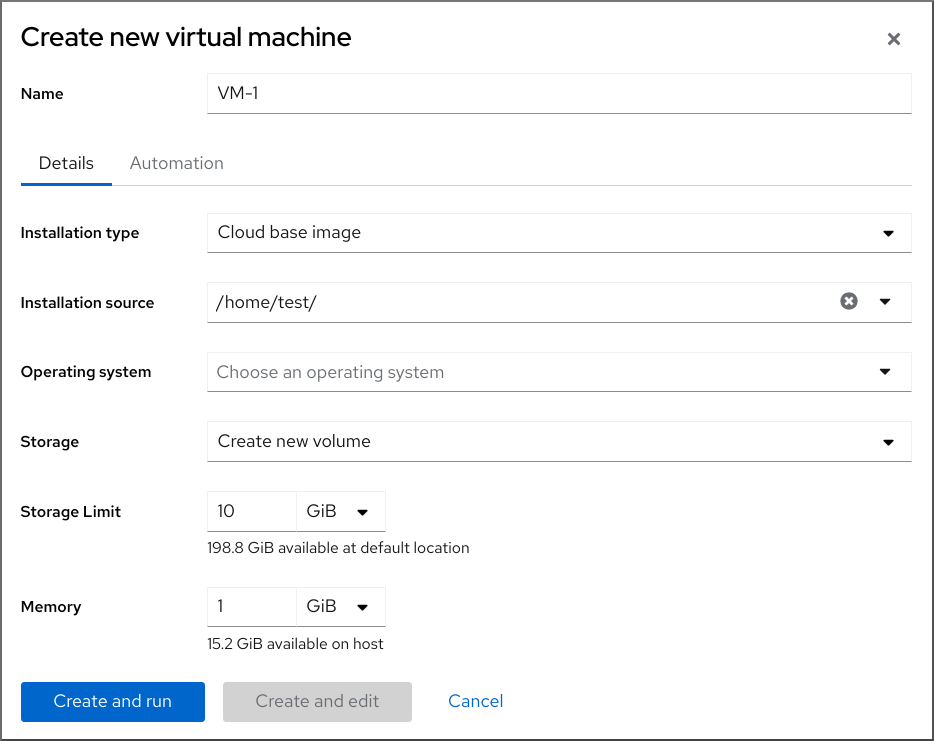
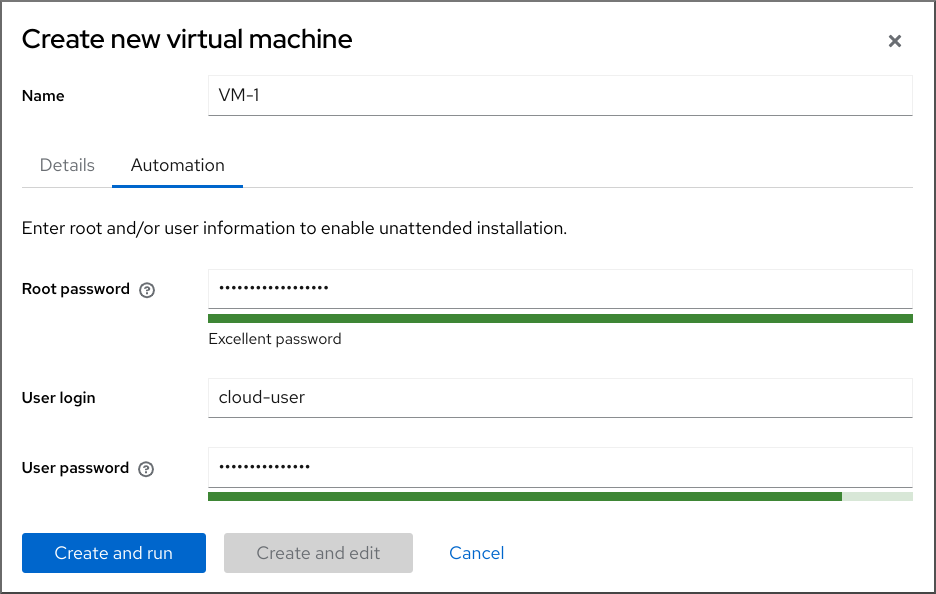
2.2.3. 使用 web 控制台,使用云镜像身份验证创建虚拟机
默认情况下,发行版云镜像没有登录帐户。但是,通过使用 RHEL web 控制台,您现在可以创建虚拟机(VM),并指定 root 和用户帐户登录凭证,然后传给 cloud-init。
先决条件
- 您已安装了 RHEL 8 web 控制台。
- 您已启用了 cockpit 服务。
您的用户帐户被允许登录到 web 控制台。
具体步骤请参阅安装并启用 Web 控制台。
- Web 控制台 VM 插件 已安装在您的系统上。
- 虚拟化已在您的主机系统上 启用。
2.3.
2.3.1.
# virsh start demo-guest1
Domain 'demo-guest1' started
# virsh -c qemu+ssh://root@192.0.2.1/system start demo-guest1 root@192.0.2.1's password: Domain 'demo-guest1' started
2.3.2.
2.3.3.
# virsh autostart demo-guest1 Domain 'demo-guest1' marked as autostarted- 注意
# mkdir -p /etc/systemd/system/libvirtd.service.d/# touch /etc/systemd/system/libvirtd.service.d/10-network-online.conf[Unit] After=network-online.target
# virsh dominfo demo-guest1
Id:             2
Name:           demo-guest1
UUID:           e46bc81c-74e2-406e-bd7a-67042bae80d1
OS Type:        hvm
State:          running
CPU(s):         2
CPU time:       385.9s
Max memory:     4194304 KiB
Used memory:    4194304 KiB
Persistent:     yes
Autostart:      enable
Managed save:   no
Security model: selinux
Security DOI:   0
Security label: system_u:system_r:svirt_t:s0:c873,c919 (enforcing)
$ cat /etc/systemd/system/libvirtd.service.d/10-network-online.conf [Unit] After=network-online.target
2.4.
2.4.1.
2.4.1.1.
2.4.1.2.
[D]
2.4.1.3.
[D]
2.4.1.4.
- 注意
2.4.2.
# virt-viewer guest-name# virt-viewer --direct --connect qemu+ssh://root@192.0.2.1/system guest-name root@192.0.2.1's password:
2.4.3.
# yum install libvirt-nss... passwd: compat shadow: compat group: compat hosts: files libvirt_guest dns ...
# ssh root@192.0.2.1
root@192.0.2.1's password:
Last login: Mon Sep 24 12:05:36 2021
root~#
# ssh root@testguest1 root@testguest1's password: Last login: Wed Sep 12 12:05:36 2018 root~]#
# virsh list --all
Id    Name                           State
----------------------------------------------------
2     testguest1                    running
-     testguest2                    shut off
2.4.4.
$ sudo grep GRUB_TERMINAL /etc/default/grub
GRUB_TERMINAL=serial
# virsh dumpxml vm-name | grep console <console type='pty' tty='/dev/pts/2'> </console>- 注意
# cat /proc/cmdline
BOOT_IMAGE=/vmlinuz-3.10.0-948.el7.x86_64 root=/dev/mapper/rhel-root ro console=tty0 console=ttyS0,9600n8 rd.lvm.lv=rhel/root rd.lvm.lv=rhel/swap rhgb
# grubby --update-kernel=ALL --args="console=ttyS0"# grub2-editenv - unset kernelopts
# systemctl status serial-getty@ttyS0.service

○ serial-getty@ttyS0.service - Serial Getty on ttyS0
     Loaded: loaded (/usr/lib/systemd/system/serial-getty@.service; enabled; preset: enabled)
# virsh console guest1 --safe
Connected to domain 'guest1'
Escape character is ^]

Subscription-name
Kernel 3.10.0-948.el7.x86_64 on an x86_64

localhost login:
2.4.5.
# virsh -c qemu+ssh://root@192.0.2.1/system list
root@192.0.2.1's password:

Id   Name              State
---------------------------------
1    remote-guest      running
# virsh -c remote-host list
root@192.0.2.1's password:

Id   Name              State
---------------------------------
1    remote-guest      running
# vi ~/.ssh/config
Host example-host-alias
  User                    root
  Hostname                192.0.2.1
# vi /etc/libvirt/libvirt.conf uri_aliases = [ "example-qemu-host-alias=qemu+ssh://example-host-alias/system", ]
# virsh -c example-qemu-host-alias list

root@192.0.2.1's password:

Id   Name                       State
----------------------------------------
1    example-remote-guest      running
注意
# These can be used in cases when no URI is supplied by the application
# (@uri_default also prevents probing of the hypervisor driver).
#
uri_default = "example-qemu-host-alias"
$ virsh list root@192.0.2.1's password: Id Name State --------------------------------- 1 example-remote-guest running
2.4.6.
# virsh dumpxml <vm-name> | grep graphics

 <graphics type='vnc' ports='-1' autoport=yes listen=127.0.0.1>
 </graphics>
# virsh edit <vm-name><graphics type='vnc' ports='-1' autoport=yes listen=127.0.0.1 passwd='<password>'><graphics type='vnc' ports='-1' autoport=yes listen=127.0.0.1 passwd='<password>' passwdValidTo='2025-02-01T15:30:00'>
# virsh start <vm-name># virt-viewer <vm-name>
2.5.
2.5.1.
- 注意
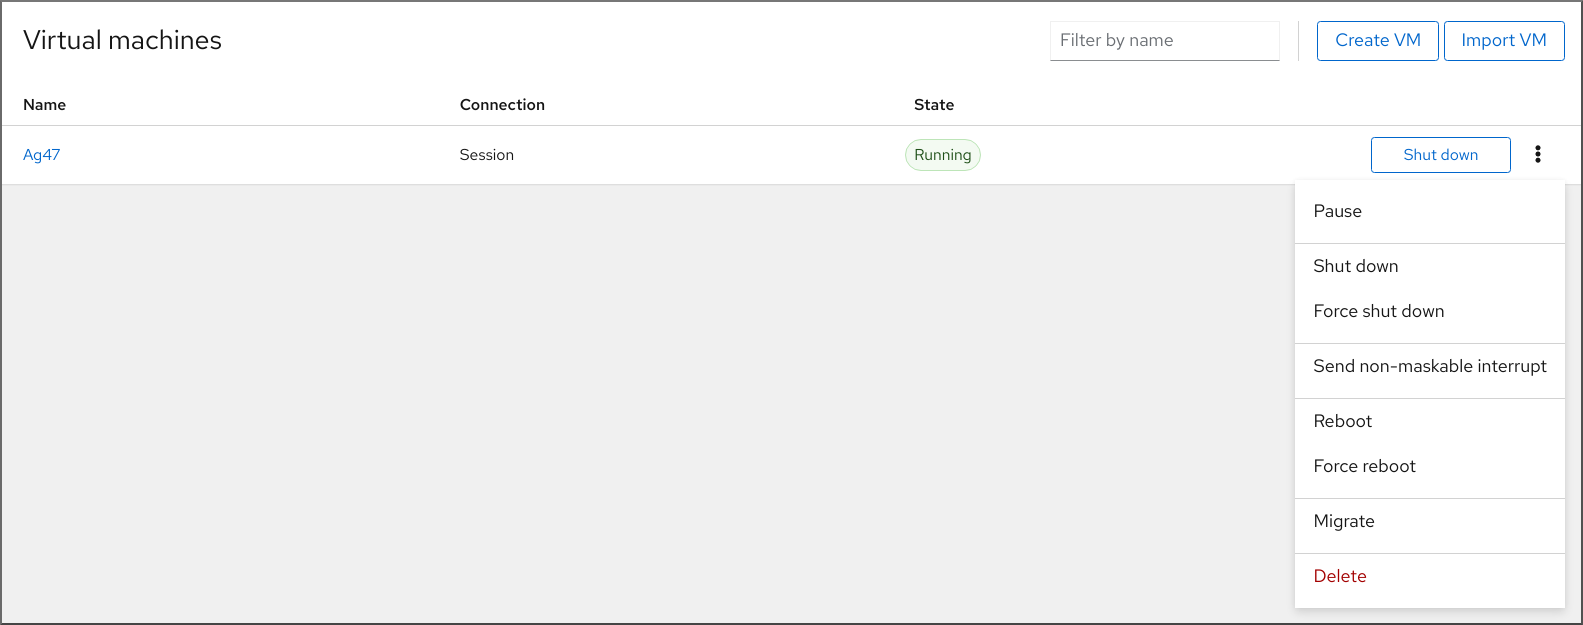
# virsh shutdown demo-guest1
Domain 'demo-guest1' is being shutdown
# virsh -c qemu+ssh://root@192.0.2.1/system shutdown demo-guest1 root@192.0.2.1's password: Domain 'demo-guest1' is being shutdown
# virsh destroy demo-guest1
Domain 'demo-guest1' destroyed
# virsh list --all

 Id    Name                 State
------------------------------------------
 1     demo-guest1          shut off
2.5.2.
2.5.2.1.
2.5.2.2.
2.5.2.3.
2.6.
2.6.1.
# virsh undefine guest1 --remove-all-storage --nvram
Domain 'guest1' has been undefined
Volume 'vda'(/home/images/guest1.qcow2) removed.
2.6.2.

[D]
第 3 章
3.1.
# grep ^platform /proc/cpuinfo/
platform        : PowerNV
# modprobe kvm_hv# lsmod | grep kvm# yum module install virt# yum install virt-install# systemctl start libvirtd
# virt-host-validate
[...]
QEMU: Checking if device /dev/vhost-net exists                : PASS
QEMU: Checking if device /dev/net/tun exists                  : PASS
QEMU: Checking for cgroup 'memory' controller support         : PASS
QEMU: Checking for cgroup 'memory' controller mount-point     : PASS
[...]
QEMU: Checking for cgroup 'blkio' controller support          : PASS
QEMU: Checking for cgroup 'blkio' controller mount-point      : PASS
QEMU: Checking if IOMMU is enabled by kernel                  : PASS
QEMU: Checking for hardware virtualization: FAIL (Only emulated CPUs are available, performance will be significantly limited)
3.2.
qemu-kvm: Failed to allocate KVM HPT of order 33 (try smaller maxmem?): Cannot allocate memory
第 4 章
4.1.
- 重要
# grep sie /proc/cpuinfo
features        : esan3 zarch stfle msa ldisp eimm dfp edat etf3eh highgprs te sie
# modprobe kvm# lsmod | grep kvm# yum module install virt:rhel/common# for drv in qemu network nodedev nwfilter secret storage interface; do systemctl start virt${drv}d{,-ro,-admin}.socket; done
# virt-host-validate
[...]
QEMU: Checking if device /dev/kvm is accessible             : PASS
QEMU: Checking if device /dev/vhost-net exists              : PASS
QEMU: Checking if device /dev/net/tun exists                : PASS
QEMU: Checking for cgroup 'memory' controller support       : PASS
QEMU: Checking for cgroup 'memory' controller mount-point   : PASS
[...]
QEMU: Checking for hardware virtualization: FAIL (Only emulated CPUs are available, performance will be significantly limited)
4.2.
# hostnamectl | grep "Operating System"
Operating System: Red Hat Enterprise Linux 8.5 (Ootpa)
# yum module list --installed
[...]
Advanced Virtualization for RHEL 8 IBM Z Systems (RPMs)
Name                Stream                  Profiles                  Summary
virt                av [e]                common [i]                Virtualization module
# yum disable virt:av# yum module reset virt -y# yum update
# yum module info virt

Name             : virt
Stream           : rhel [d][e][a]
Version          : 8050020211203195115
[...]
4.3.
- 注意
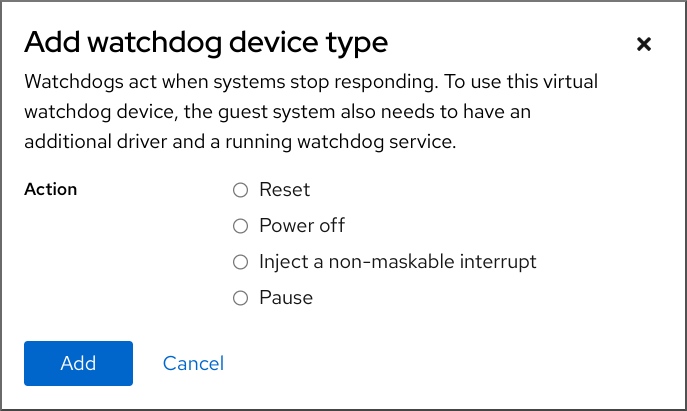
<disk type='file' device='disk'>
  <driver name='qemu' type='qcow2'/>
  <source file='/path/to/qcow2'/>
  <target dev='vda' bus='virtio'/>
  <address type='ccw' cssid='0xfe' ssid='0x0' devno='0x0000'/>
  <boot order='1' loadparm='2'/>
</disk>
<devices> <watchdog model='diag288' action='poweroff'/> </devices>
# pxelinux
default linux
label linux
kernel kernel.img
initrd initrd.img
append ip=dhcp inst.repo=example.com/redhat/BaseOS/s390x/os/
4.4.
<cpu mode='host-model' check='partial'>
  <model fallback='allow'/>
</cpu>
<cpu mode='custom' match='exact' check='partial'> <model fallback='allow'>zEC12</model> <feature policy='force' name='ppa15'/> <feature policy='force' name='bpb'/> </cpu>
第 5 章
5.1.
# touch qemuga.xml<channel type='unix'> <source mode='bind' path='/var/lib/libvirt/qemu/f16x86_64.agent'/> <target type='virtio' name='org.qemu.guest_agent.0'/> </channel># virsh attach-device <vm-name> qemuga.xml --live --config# virsh attach-device <vm-name> qemuga.xml --config
# yum install qemu-guest-agent# systemctl start qemu-guest-agent
5.2.
5.3.
- 重要
# setsebool virt_qemu_ga_read_nonsecurity_files on - 重要
# setsebool virt_qemu_ga_manage_ssh on
第 6 章
[D]
6.1.
6.2.
# yum install cockpit-machines
-
[D]
6.3.

[D]
6.4.
|
|
|
|
|
|
|
|
|
|
|
|
|
|
|
|
|
|
|
|
|
|
|
|
|
|
|
|
|
|
|
|
|
|
|
|
|
|
|
6.5.
|
|
|
|
|
|
|
|
|
|
|
|
|
|
|
|
|
|
|
|
|
|
|
|
|
|
|
|
|
|
|
|
|
|
|
|
|
|
|
|
|
|
|
|
|
|
|
|
|
|
|
|
|
|
|
|
|
|
|
|
|
|
|
|
|
|
|
|
|
|
|
|
|
|
|
|
|
|
|
|
|
|
|
|
|
|
|
|
|
|
|
|
第 7 章
7.1.
# virsh list --all
Id   Name              State
----------------------------------
1    testguest1             running
-    testguest2             shut off
-    testguest3             shut off
-    testguest4             shut off
# virsh dominfo testguest1 Id: 1 Name: testguest1 UUID: a973666f-2f6e-415a-8949-75a7a98569e1 OS Type: hvm State: running CPU(s): 2 CPU time: 188.3s Max memory: 4194304 KiB Used memory: 4194304 KiB Persistent: yes Autostart: disable Managed save: no Security model: selinux Security DOI: 0 Security label: system_u:system_r:svirt_t:s0:c486,c538 (enforcing)# virsh dumpxml testguest2 <domain type='kvm' id='1'> <name>testguest2</name> <uuid>a973434f-2f6e-4ěša-8949-76a7a98569e1</uuid> <metadata> [...]# virsh domblklist testguest3 Target Source --------------------------------------------------------------- vda /var/lib/libvirt/images/testguest3.qcow2 sda - sdb /home/username/Downloads/virt-p2v-1.36.10-1.el7.iso# virsh domfsinfo testguest3 Mountpoint Name Type Target ------------------------------------ / dm-0 xfs /boot vda1 xfs
# virsh vcpuinfo testguest4
VCPU:           0
CPU:            3
State:          running
CPU time:       103.1s
CPU Affinity:   yyyy

VCPU:           1
CPU:            0
State:          running
CPU time:       88.6s
CPU Affinity:   yyyy
# virsh net-list --all Name State Autostart Persistent --------------------------------------------- default active yes yes labnet active yes yes# virsh net-info default Name: default UUID: c699f9f6-9202-4ca8-91d0-6b8cb9024116 Active: yes Persistent: yes Autostart: yes Bridge: virbr0
7.2.
7.2.1.
-
[D]
7.2.2.


7.2.3.
7.2.4.
[D]
7.2.5.

[D]
7.2.6.
7.3.
# virsh dumpxml testguest1
|
|
|
|
|
|
|
|
|
|
|
|
|
|
|
|
|
|
|
|
|
|
|
|
|
|
|
|
|
|
|
|
第 8 章
8.1.
8.2.
# virsh managedsave demo-guest1
Domain 'demo-guest1' saved by libvirt
# virsh list --managed-save --all
Id    Name                           State
----------------------------------------------------
-     demo-guest1                    saved
-     demo-guest2                    shut off
# virsh list --with-managed-save --all Id Name State ---------------------------------------------------- - demo-guest1 shut off
8.3.
# virsh start demo-guest1
Domain 'demo-guest1' started
# virsh -c qemu+ssh://root@192.0.2.1/system start demo-guest1 root@192.0.2.1's password: Domain 'demo-guest1' started
8.4.
第 9 章
9.1.
9.2.
9.2.1.
# yum install libguestfs-tools-c# ls -la /var/lib/libvirt/images -rw-------. 1 root root 9665380352 Jul 23 14:50 a-really-important-vm.qcow2 -rw-------. 1 root root 8591507456 Jul 26 2017 an-actual-vm-that-i-use.qcow2 -rw-------. 1 root root 8591507456 Jul 26 2017 totally-not-a-fake-vm.qcow2 -rw-------. 1 root root 10739318784 Sep 20 17:57 another-vm-example.qcow2
# whoami root# cp /var/lib/libvirt/images/a-really-important-vm.qcow2 /var/lib/libvirt/images/a-really-important-vm-original.qcow2# virt-sysprep -a /var/lib/libvirt/images/a-really-important-vm.qcow2 [ 0.0] Examining the guest ... [ 7.3] Performing "abrt-data" ... [ 7.3] Performing "backup-files" ... [ 9.6] Performing "bash-history" ... [ 9.6] Performing "blkid-tab" ... [...]
# virt-diff -a /var/lib/libvirt/images/a-really-important-vm-orig.qcow2 -A /var/lib/libvirt/images/a-really-important-vm.qcow2 - - 0644 1001 /etc/group- - - 0000 797 /etc/gshadow- = - 0444 33 /etc/machine-id [...] - - 0600 409 /home/username/.bash_history - d 0700 6 /home/username/.ssh - - 0600 868 /root/.bash_history [...]
9.2.2.
# ls -la /var/lib/libvirt/images
-rw-------.  1 root root  9665380352 Jul 23 14:50 a-really-important-vm.qcow2
-rw-------.  1 root root  8591507456 Jul 26  2017 an-actual-vm-that-i-use.qcow2
-rw-------.  1 root root  8591507456 Jul 26  2017 totally-not-a-fake-vm.qcow2
-rw-------.  1 root root 10739318784 Sep 20 17:57 another-vm-example.qcow2
# rm -f /etc/udev/rules.d/70-persistent-net.rules注意- 注意
DEVICE=eth[x] BOOTPROTO=none ONBOOT=yes #NETWORK=192.0.2.0 <- REMOVE #NETMASK=255.255.255.0 <- REMOVE #IPADDR=192.0.2.1 <- REMOVE #HWADDR=xx:xx:xx:xx:xx <- REMOVE #USERCTL=no <- REMOVE # Remove any other *unique or non-desired settings, such as UUID.* DEVICE=eth[x] BOOTPROTO=dhcp ONBOOT=yes
- 注意
# rm /etc/sysconfig/rhn/systemid# subscription-manager unsubscribe --all # subscription-manager unregister # subscription-manager clean# subscription-manager clean注意# subscription-manager register --consumerid=71rd64fx-6216-4409-bf3a-e4b7c7bd8ac9
# rm -rf /etc/ssh/ssh_host_example# rm /etc/lvm/devices/system.devices
# rm ~/.config/gnome-initial-setup-done注意
9.3.
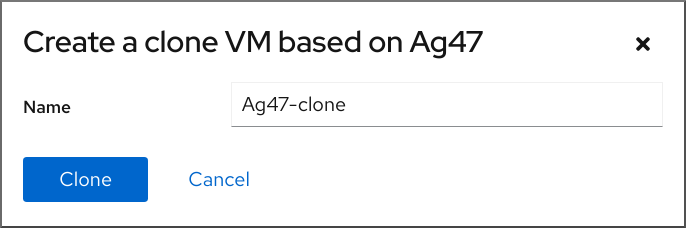
# virt-clone --original example-VM-1 --auto-clone
Allocating 'example-VM-1-clone.qcow2'                            | 50.0 GB  00:05:37

Clone 'example-VM-1-clone' created successfully.
# virt-clone --original example-VM-2 --name example-VM-3 --file /var/lib/libvirt/images/disk-1-example-VM-2.qcow2 --file /var/lib/libvirt/images/disk-2-example-VM-2.qcow2 Allocating 'disk-1-example-VM-2-clone.qcow2' | 78.0 GB 00:05:37 Allocating 'disk-2-example-VM-2-clone.qcow2' | 80.0 GB 00:05:37 Clone 'example-VM-3' created successfully.# virsh migrate --offline --persistent example-VM-3 qemu+ssh://root@192.0.2.1/system root@192.0.2.1's password: # scp /var/lib/libvirt/images/<disk-1-example-VM-2-clone>.qcow2 root@192.0.2.1/<user@remote_host.com>://var/lib/libvirt/images/ # scp /var/lib/libvirt/images/<disk-2-example-VM-2-clone>.qcow2 root@192.0.2.1/<user@remote_host.com>://var/lib/libvirt/images/
# virsh list --all
Id   Name                  State
---------------------------------------
-    example-VM-1          shut off
-    example-VM-1-clone    shut off
# virsh start example-VM-1-clone Domain 'example-VM-1-clone' started
9.4.
[D]
第 10 章
10.1.
|
|
|
|
|
|
|
|
|
|
10.2.
10.3.
10.4.
# virsh domdirtyrate-calc <example_VM> 30# virsh domstats <example_VM> --dirtyrate Domain: 'example-VM' dirtyrate.calc_status=2 dirtyrate.calc_start_time=200942 dirtyrate.calc_period=30 dirtyrate.megabytes_per_second=2注意
# systemctl enable --now libvirtd.service
# virsh migrate --offline --persistent <example_VM> qemu+ssh://example-destination/system
# virsh migrate --live --persistent <example_VM> qemu+ssh://example-destination/system
# virsh migrate --live --persistent --parallel --parallel-connections 4 <example_VM> qemu+ssh://<example-destination>/system
# virsh migrate-setmaxdowntime <example_VM> <time_interval_in_milliseconds>
# virsh migrate --live --persistent --postcopy --timeout <time_interval_in_seconds> --timeout-postcopy <example_VM> qemu+ssh://<example-destination>/system
# virsh migrate --live --persistent --auto-converge <example_VM> qemu+ssh://<example-destination>/system
# virsh list --all
Id      Name             State
----------------------------------
10    example-VM-1      shut off
# virsh list --all
Id      Name             State
----------------------------------
10    example-VM-1      running
# virsh list --all
Id      Name             State
----------------------------------
10    example-VM-1      shut off
# virsh list --all Id Name State ---------------------------------- 10 example-VM-1 running
10.5.
# virsh domdirtyrate-calc vm-name 30# virsh domstats vm-name --dirtyrate Domain: 'vm-name' dirtyrate.calc_status=2 dirtyrate.calc_start_time=200942 dirtyrate.calc_period=30 dirtyrate.megabytes_per_second=2注意

10.6.
# setsebool virt_use_nfs 1
# ssh root@example-shared-storage
root@example-shared-storage's password:
Last login: Mon Sep 24 12:05:36 2019
root~#
# mkdir /var/lib/libvirt/shared-images# scp /var/lib/libvirt/images/example-disk-1.qcow2 root@example-shared-storage:/var/lib/libvirt/shared-images/example-disk-1.qcow2# /var/lib/libvirt/shared-images example-source-machine(rw,no_root_squash) example-destination-machine(rw,no\_root_squash)# exportfs -a# mount example-shared-storage:/var/lib/libvirt/shared-images /var/lib/libvirt/images
10.7.
# virsh domcapabilities | xmllint --xpath "//cpu/mode[@name='host-model']" - > domCaps-CPUs.xml# cat domCaps-CPUs.xml <cpu> <model fallback="forbid">Skylake-Client-IBRS</model> <vendor>Intel</vendor> <feature policy="require" name="ss"/> <feature policy="require" name="vmx"/> <feature policy="require" name="pdcm"/> <feature policy="require" name="hypervisor"/> <feature policy="require" name="tsc_adjust"/> <feature policy="require" name="clflushopt"/> <feature policy="require" name="umip"/> <feature policy="require" name="md-clear"/> <feature policy="require" name="stibp"/> <feature policy="require" name="arch-capabilities"/> <feature policy="require" name="ssbd"/> <feature policy="require" name="xsaves"/> <feature policy="require" name="pdpe1gb"/> <feature policy="require" name="invtsc"/> <feature policy="require" name="ibpb"/> <feature policy="require" name="ibrs"/> <feature policy="require" name="amd-stibp"/> <feature policy="require" name="amd-ssbd"/> <feature policy="require" name="rsba"/> <feature policy="require" name="skip-l1dfl-vmentry"/> <feature policy="require" name="pschange-mc-no"/> <feature policy="disable" name="hle"/> <feature policy="disable" name="rtm"/> </cpu># virsh domcapabilities | xmllint --xpath "//cpu/mode[@name='host-model']" - <mode name="host-model" supported="yes"> <model fallback="forbid">IvyBridge-IBRS</model> <vendor>Intel</vendor> <feature policy="require" name="ss"/> <feature policy="require" name="vmx"/> <feature policy="require" name="pdcm"/> <feature policy="require" name="pcid"/> <feature policy="require" name="hypervisor"/> <feature policy="require" name="arat"/> <feature policy="require" name="tsc_adjust"/> <feature policy="require" name="umip"/> <feature policy="require" name="md-clear"/> <feature policy="require" name="stibp"/> <feature policy="require" name="arch-capabilities"/> <feature policy="require" name="ssbd"/> <feature policy="require" name="xsaveopt"/> <feature policy="require" name="pdpe1gb"/> <feature policy="require" name="invtsc"/> <feature policy="require" name="ibpb"/> <feature policy="require" name="amd-ssbd"/> <feature policy="require" name="skip-l1dfl-vmentry"/> <feature policy="require" name="pschange-mc-no"/> </mode># cat domCaps-CPUs.xml <cpu> <model fallback="forbid">Skylake-Client-IBRS</model> <vendor>Intel</vendor> <feature policy="require" name="ss"/> <feature policy="require" name="vmx"/> <feature policy="require" name="pdcm"/> <feature policy="require" name="hypervisor"/> <feature policy="require" name="tsc_adjust"/> <feature policy="require" name="clflushopt"/> <feature policy="require" name="umip"/> <feature policy="require" name="md-clear"/> <feature policy="require" name="stibp"/> <feature policy="require" name="arch-capabilities"/> <feature policy="require" name="ssbd"/> <feature policy="require" name="xsaves"/> <feature policy="require" name="pdpe1gb"/> <feature policy="require" name="invtsc"/> <feature policy="require" name="ibpb"/> <feature policy="require" name="ibrs"/> <feature policy="require" name="amd-stibp"/> <feature policy="require" name="amd-ssbd"/> <feature policy="require" name="rsba"/> <feature policy="require" name="skip-l1dfl-vmentry"/> <feature policy="require" name="pschange-mc-no"/> <feature policy="disable" name="hle"/> <feature policy="disable" name="rtm"/> </cpu> <cpu> <model fallback="forbid">IvyBridge-IBRS</model> <vendor>Intel</vendor> <feature policy="require" name="ss"/> <feature policy="require" name="vmx"/> <feature policy="require" name="pdcm"/> <feature policy="require" name="pcid"/> <feature policy="require" name="hypervisor"/> <feature policy="require" name="arat"/> <feature policy="require" name="tsc_adjust"/> <feature policy="require" name="umip"/> <feature policy="require" name="md-clear"/> <feature policy="require" name="stibp"/> <feature policy="require" name="arch-capabilities"/> <feature policy="require" name="ssbd"/> <feature policy="require" name="xsaveopt"/> <feature policy="require" name="pdpe1gb"/> <feature policy="require" name="invtsc"/> <feature policy="require" name="ibpb"/> <feature policy="require" name="amd-ssbd"/> <feature policy="require" name="skip-l1dfl-vmentry"/> <feature policy="require" name="pschange-mc-no"/> </cpu># virsh hypervisor-cpu-baseline domCaps-CPUs.xml <cpu mode='custom' match='exact'> <model fallback='forbid'>IvyBridge-IBRS</model> <vendor>Intel</vendor> <feature policy='require' name='ss'/> <feature policy='require' name='vmx'/> <feature policy='require' name='pdcm'/> <feature policy='require' name='pcid'/> <feature policy='require' name='hypervisor'/> <feature policy='require' name='arat'/> <feature policy='require' name='tsc_adjust'/> <feature policy='require' name='umip'/> <feature policy='require' name='md-clear'/> <feature policy='require' name='stibp'/> <feature policy='require' name='arch-capabilities'/> <feature policy='require' name='ssbd'/> <feature policy='require' name='xsaveopt'/> <feature policy='require' name='pdpe1gb'/> <feature policy='require' name='invtsc'/> <feature policy='require' name='ibpb'/> <feature policy='require' name='amd-ssbd'/> <feature policy='require' name='skip-l1dfl-vmentry'/> <feature policy='require' name='pschange-mc-no'/> </cpu># virsh edit <vm_name># virsh shutdown <vm_name> # virsh start <vm_name>
10.8.
|
|
|
|
|
|
|
|
|
|
|
|
|
|
|
|
|
|
|
|
第 11 章
11.1.
11.2.
11.3.
11.3.1.
# virt-xml --network=?
--network options:
[...]
address.unit
boot_order
clearxml
driver_name
[...]
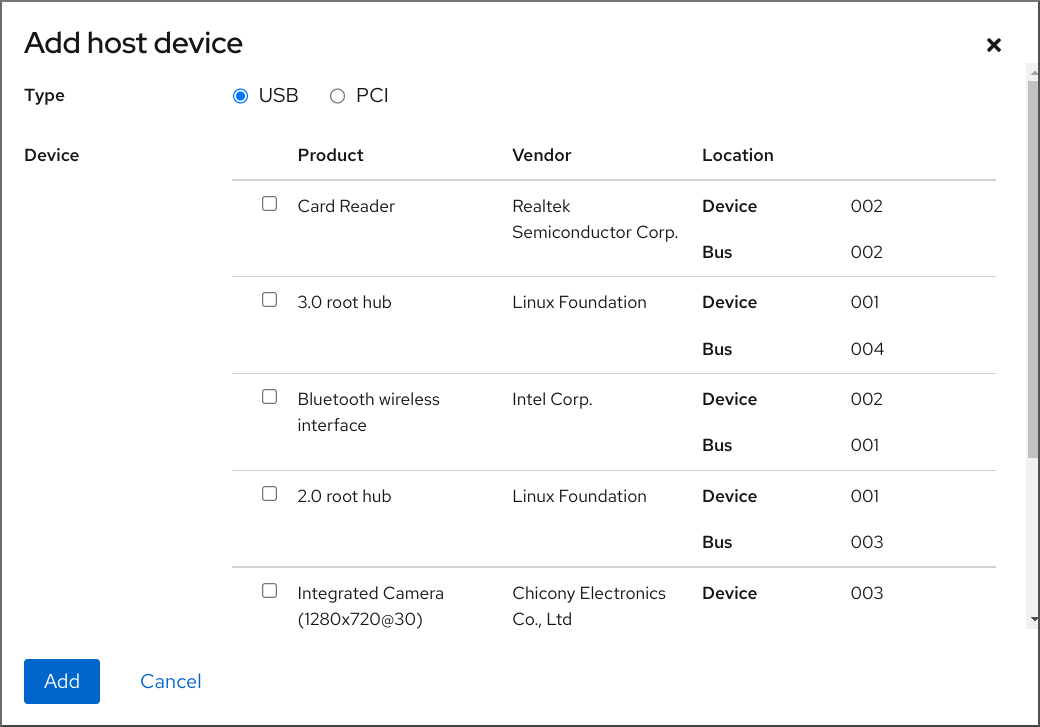
# virt-xml testguest --add-device --disk /var/lib/libvirt/images/newdisk.qcow2,format=qcow2,size=20
Domain 'testguest' defined successfully.
Changes will take effect after the domain is fully powered off.
# virt-xml testguest2 --add-device --update --hostdev 002.004 Device hotplug successful. Domain 'testguest2' defined successfully.
# virsh dumpxml testguest
[...]
<hostdev mode='subsystem' type='usb' managed='yes'>
  <source>
    <vendor id='0x4146'/>
    <product id='0x902e'/>
    <address bus='2' device='4'/>
  </source>
  <alias name='hostdev0'/>
  <address type='usb' bus='0' port='3'/>
</hostdev>
[...]
11.3.2.
# virt-xml --network=?
--network options:
[...]
address.unit
boot_order
clearxml
driver_name
[...]
# virsh dumpxml testguest1 > testguest1.xml
# cat testguest1.xml
<domain type='kvm' xmlns:qemu='http://libvirt.org/schemas/domain/qemu/1.0'>
<name>testguest1</name>
<uuid>ede29304-fe0c-4ca4-abcd-d246481acd18</uuid>
[...]
</domain># virt-xml testguest --edit --cpu host-model,clearxml=yes Domain 'testguest' defined successfully.
# virsh dumpxml testguest [...] <cpu mode='host-model' check='partial'> <model fallback='allow'/> </cpu> [...]
# virsh define testguest.xml
11.3.3.
# virsh dumpxml testguest1 > testguest1.xml
# cat testguest1.xml
<domain type='kvm' xmlns:qemu='http://libvirt.org/schemas/domain/qemu/1.0'>
  <name>testguest1</name>
  <uuid>ede29304-fe0c-4ca4-abcd-d246481acd18</uuid>
  [...]
</domain>
# virt-xml testguest --remove-device --disk target=vdb Domain 'testguest' defined successfully. Changes will take effect after the domain is fully powered off.# virt-xml testguest2 --remove-device --update --hostdev type=usb Device hotunplug successful. Domain 'testguest2' defined successfully.
# virsh define testguest.xml
11.4.
11.4.1.

[D]
11.4.2.
- 注意
# virsh edit example-VM-1 # virsh dumpxml example-VM-1 > example-VM-1.xml
11.4.3.
# virsh edit <example-VM-1># virsh dumpxml testguest1 > testguest1.xml # cat testguest1.xml <domain type='kvm' xmlns:qemu='http://libvirt.org/schemas/domain/qemu/1.0'> <name>testguest1</name> <uuid>ede29304-fe0c-4ca4-abcd-d246481acd18</uuid> [...] </domain>
# virsh define testguest1.xml
11.5.
11.5.1.
# lsusb
[...]
Bus 001 Device 003: ID 2567:0a2b Intel Corp.
Bus 001 Device 005: ID 0407:6252 Kingston River 2.0
[...]
# virt-xml example-VM-1 --add-device --hostdev 001.005 Domain 'example-VM-1' defined successfully.
# virsh dumpxml example-VM-1
[...]
<hostdev mode='subsystem' type='usb' managed='yes'>
  <source>
    <vendor id='0x0407'/>
    <product id='0x6252'/>
    <address bus='1' device='5'/>
  </source>
  <alias name='hostdev0'/>
  <address type='usb' bus='0' port='3'/>
</hostdev>
[...]
11.5.2.
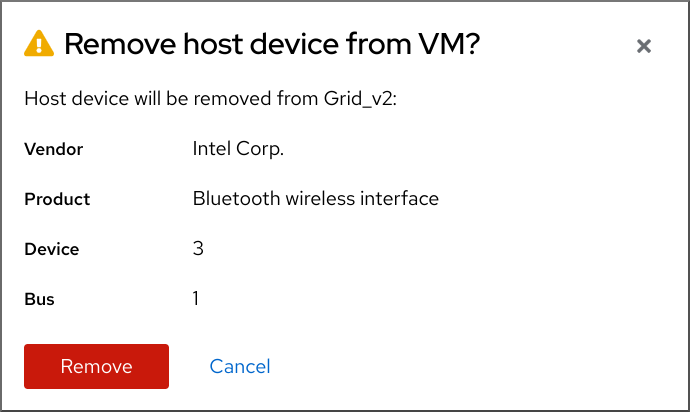
# lsusb
[...]
Bus 001 Device 003: ID 2567:0a2b Intel Corp.
Bus 001 Device 005: ID 0407:6252 Kingston River 2.0
[...]
# virt-xml example-VM-1 --remove-device --hostdev 001.005 Domain 'example-VM-1' defined successfully.
11.5.3.
# virt-xml testguest --add-device --smartcard mode=passthrough,type=spicevmc
Domain 'testguest' defined successfully.
Changes will take effect after the domain is fully powered off.
注意
# virsh dumpxml testguest<smartcard mode='passthrough' type='spicevmc'/>
11.6.
11.6.1.
# virt-xml example-VM-name --add-device --disk /home/username/Downloads/example-ISO-name.iso,device=cdrom
Domain 'example-VM-name' defined successfully.
11.6.2.
# virt-xml vmname --add-device --disk target.dev=sda,device=cdrom
[D]
11.6.3.
# virsh dumpxml example-VM-name
...
<disk>
  ...
  <source file='$(/home/username/Downloads/example-ISO-name.iso)'/>
  <target dev='sda' bus='sata'/>
  ...
</disk>
...
# virt-xml example-VM-name --edit target=sda --disk /dev/cdrom/example-ISO-name-2.iso Domain 'example-VM-name' defined successfully.
11.6.4.
# virsh dumpxml example-VM-name
...
<disk>
  ...
  <source file='$(/home/username/Downloads/example-ISO-name.iso)'/>
  <target dev='sda' bus='sata'/>
  ...
</disk>
...
# virt-xml example-VM-name --edit target=sda --disk path= Domain 'example-VM-name' defined successfully.
11.6.5.
# virsh dumpxml example-VM-name
...
<disk type='file' device='cdrom'>
  <driver name='qemu' type='raw'/>
  <target dev='sda' bus='sata'/>
  ...
</disk>
...
# virt-xml example-VM-name --remove-device --disk target=sda Domain 'example-VM-name' defined successfully.
11.6.6.

[D]
11.7.
11.7.1.
# lsmod | grep vfio
# lspci -nkD

0000:00:00.0 0600: 8086:a708 (rev 01)
	Subsystem: 17aa:230e
	Kernel driver in use: igen6_edac
	Kernel modules: igen6_edac
0000:00:02.0 0300: 8086:a7a1 (rev 04)
	Subsystem: 17aa:230e
	Kernel driver in use: i915
	Kernel modules: i915, xe
0000:00:04.0 1180: 8086:a71d (rev 01)
	Subsystem: 17aa:230e
	Kernel driver in use: proc_thermal_pci
	Kernel modules: processor_thermal_device_pci
0000:00:05.0 0604: 8086:a74d (rev 01)
	Subsystem: 17aa:230e
	Kernel driver in use: pcieport
0000:00:07.0 0604: 8086:a76e (rev 01)
	Subsystem: 17aa:230e
	Kernel driver in use: pcieport
0000:65:00.0 0108: 144d:a822 (rev 01)
    DeviceName: PCIe SSD in Slot 0 Bay 2
    Subsystem: 1028:1fd9
    Kernel driver in use: nvme
    Kernel modules: nvme
0000:6a:00.0 0108: 1179:0110 (rev 01)
    DeviceName: PCIe SSD in Slot 11 Bay 2
    Subsystem: 1028:1ffb
    Kernel driver in use: nvme
    Kernel modules: nvme
# virsh edit vm-name<hostdev mode="subsystem" type="pci" managed="yes"> <driver name="vfio"/> <source> <address domain="0x0000" bus="0x65" slot="0x00" function="0x0"/> </source> <address type="pci" domain='0x0000' bus='0x02' slot='0x00' function='0x0'/> </hostdev><hostdev mode="subsystem" type="pci" managed="yes"> <driver name="vfio"/> <source> <address domain="0x0000" bus="0x65" slot="0x00" function="0x0"/> </source> <address type="pci" domain='0x0000' bus='0x02' slot='0x00' function='0x0'> <zpci uid="0x0008" fid="0x001807"/> </address> </hostdev># virsh shutdown vm-name
# lspci -nkD | grep 0000:02:00.0

0000:02:00.0 8086:9a09 (rev 01)
11.7.2.
- 注意
# virsh edit example-VM-1 # virsh dumpxml example-VM-1 > example-VM-1.xml
11.7.3.
# virsh dumpxml <VM-name>

[...]
<hostdev mode='subsystem' type='pci' managed='yes'>
  <source>
    <address domain='0x0000' bus='0x65' slot='0x00' function='0x0'/>
  </source>
  <address type='pci' domain='0x0000' bus='0x02' slot='0x00' function='0x0'/>
</hostdev>
[...]
# virt detach-device <VM-name> --hostdev 0000:65:00.0 --config Domain 'VM-name' defined successfully.注意# virsh nodedev-reattach pci_0000_65_00_0 Device pci_0000_65_00_0 re-attached
# virsh dumpxml <VM-name>
11.7.4.
# virsh edit <example-VM-1># virsh dumpxml testguest1 > testguest1.xml # cat testguest1.xml <domain type='kvm' xmlns:qemu='http://libvirt.org/schemas/domain/qemu/1.0'> <name>testguest1</name> <uuid>ede29304-fe0c-4ca4-abcd-d246481acd18</uuid> [...] </domain>
# virsh define testguest1.xml
11.8.
11.8.1.
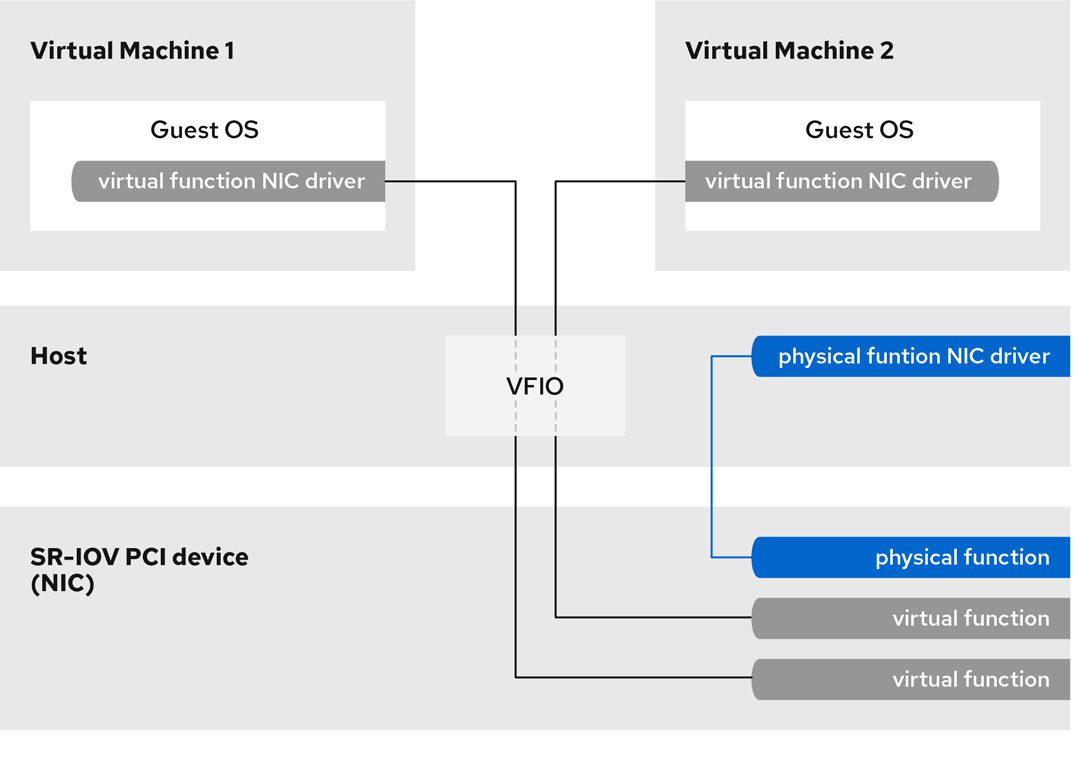
图 11.1.
[D]
11.8.2.
# lspci -v
[...]
02:00.0 Ethernet controller: Intel Corporation 82576 Gigabit Network Connection (rev 01)
	Subsystem: Intel Corporation Gigabit ET Dual Port Server Adapter
	Flags: bus master, fast devsel, latency 0, IRQ 16, NUMA node 0
	Memory at fcba0000 (32-bit, non-prefetchable) [size=128K]
[...]
	Capabilities: [150] Alternative Routing-ID Interpretation (ARI)
	Capabilities: [160] Single Root I/O Virtualization (SR-IOV)
	Kernel driver in use: igb
	Kernel modules: igb
[...]
# ip link set eth1 up # ip link show eth1 8: eth1: <BROADCAST,MULTICAST,UP,LOWER_UP> mtu 1500 qdisc mq state UP mode DEFAULT qlen 1000 link/ether a0:36:9f:8f:3f:b8 brd ff:ff:ff:ff:ff:ff vf 0 MAC 00:00:00:00:00:00, spoof checking on, link-state auto vf 1 MAC 00:00:00:00:00:00, spoof checking on, link-state auto vf 2 MAC 00:00:00:00:00:00, spoof checking on, link-state auto vf 3 MAC 00:00:00:00:00:00, spoof checking on, link-state auto# grubby --args="intel_iommu=on iommu=pt" --update-kernel=ALL
# grubby --args="iommu=pt" --update-kernel=ALL
# cat /sys/class/net/eth1/device/sriov_totalvfs
7
# echo VF-number > /sys/class/net/network-interface/device/sriov_numvfs# echo 2 > /sys/class/net/eth1/device/sriov_numvfs# lspci | grep Ethernet 82:00.0 Ethernet controller: Intel Corporation 82599ES 10-Gigabit SFI/SFP+ Network Connection (rev 01) 82:00.1 Ethernet controller: Intel Corporation 82599ES 10-Gigabit SFI/SFP+ Network Connection (rev 01) 82:10.0 Ethernet controller: Intel Corporation 82599 Ethernet Controller Virtual Function (rev 01) 82:10.2 Ethernet controller: Intel Corporation 82599 Ethernet Controller Virtual Function (rev 01)ACTION=="add", SUBSYSTEM=="net", ENV{ID_NET_DRIVER}=="ixgbe", ATTR{device/sriov_numvfs}="2"警告# virsh attach-interface testguest1 hostdev 0000:82:10.0 --managed --live --config
11.8.3.
11.9.
# yum install driverctl# lsmod | grep vfio
# lscss -d 0.0.002c
Device   Subchan.  DevType CU Type Use  PIM PAM POM  CHPIDs
----------------------------------------------------------------------
0.0.002c 0.0.29a8  3390/0c 3990/e9 yes  f0  f0  ff   02111221 00000000
# cio_ignore -r 0.0.002ccio_ignore=all,!condev,!0.0.002c
# driverctl -b css set-override 0.0.29a8 vfio_ccw注意# cat nodedev.xml <device> <parent>css_0_0_29a8</parent> <capability type="mdev"> <type id="vfio_ccw-io"/> </capability> </device> # virsh nodedev-define nodedev.xml Node device 'mdev_30820a6f_b1a5_4503_91ca_0c10ba12345a_0_0_29a8' defined from 'nodedev.xml' # virsh nodedev-start mdev_30820a6f_b1a5_4503_91ca_0c10ba12345a_0_0_29a8 Device mdev_30820a6f_b1a5_4503_91ca_0c10ba12345a_0_0_29a8 started# virsh nodedev-dumpxml mdev_30820a6f_b1a5_4503_91ca_0c10ba12345a_0_0_29a8 <device> <name>mdev_30820a6f_b1a5_4503_91ca_0c10ba12345a_0_0_29a8</name> <parent>css_0_0_29a8</parent> <capability type='mdev'> <type id='vfio_ccw-io'/> <uuid>30820a6f-b1a5-4503-91ca-0c10ba12345a</uuid> <iommuGroup number='0'/> <attr name='assign_adapter' value='0x02'/> <attr name='assign_domain' value='0x002b'/> </capability> </device><hostdev mode='subsystem' type='mdev' model='vfio-ccw'> <source> <address uuid="30820a6f-b1a5-4503-91ca-0c10ba12345a"/> </source> </hostdev># virsh nodedev-autostart mdev_30820a6f_b1a5_4503_91ca_0c10ba12345a_0_0_29a8
# virsh nodedev-info mdev_30820a6f_b1a5_4503_91ca_0c10ba12345a_0_0_29a8
Name:           mdev_30820a6f_b1a5_4503_91ca_0c10ba12345a_0_0_29a8
Parent:         css_0_0_0121
Active:         yes
Persistent:     yes
Autostart:      yes
# virsh dumpxml vm-name <domain> [...] <hostdev mode='subsystem' type='mdev' managed='no' model='vfio-ccw'> <source> <address uuid='10620d2f-ed4d-437b-8aff-beda461541f9'/> </source> <alias name='hostdev0'/> <address type='ccw' cssid='0xfe' ssid='0x0' devno='0x0009'/> </hostdev> [...] </domain># lscss | grep 0.0.0009 0.0.0009 0.0.0007 3390/0c 3990/e9 f0 f0 ff 12212231 00000000# chccwdev -e 0.0009 Setting device 0.0.0009 online Done
11.10.
[D]
第 12 章
12.1.
12.1.1.
12.1.2.
# virsh vol-info --pool guest_images firstimage
  Name:             firstimage
  Type:             block
  Capacity:         20.00 GB
  Allocation:       20.00 GB
12.1.3.
12.1.4.
12.1.5.
12.2.
12.2.1.
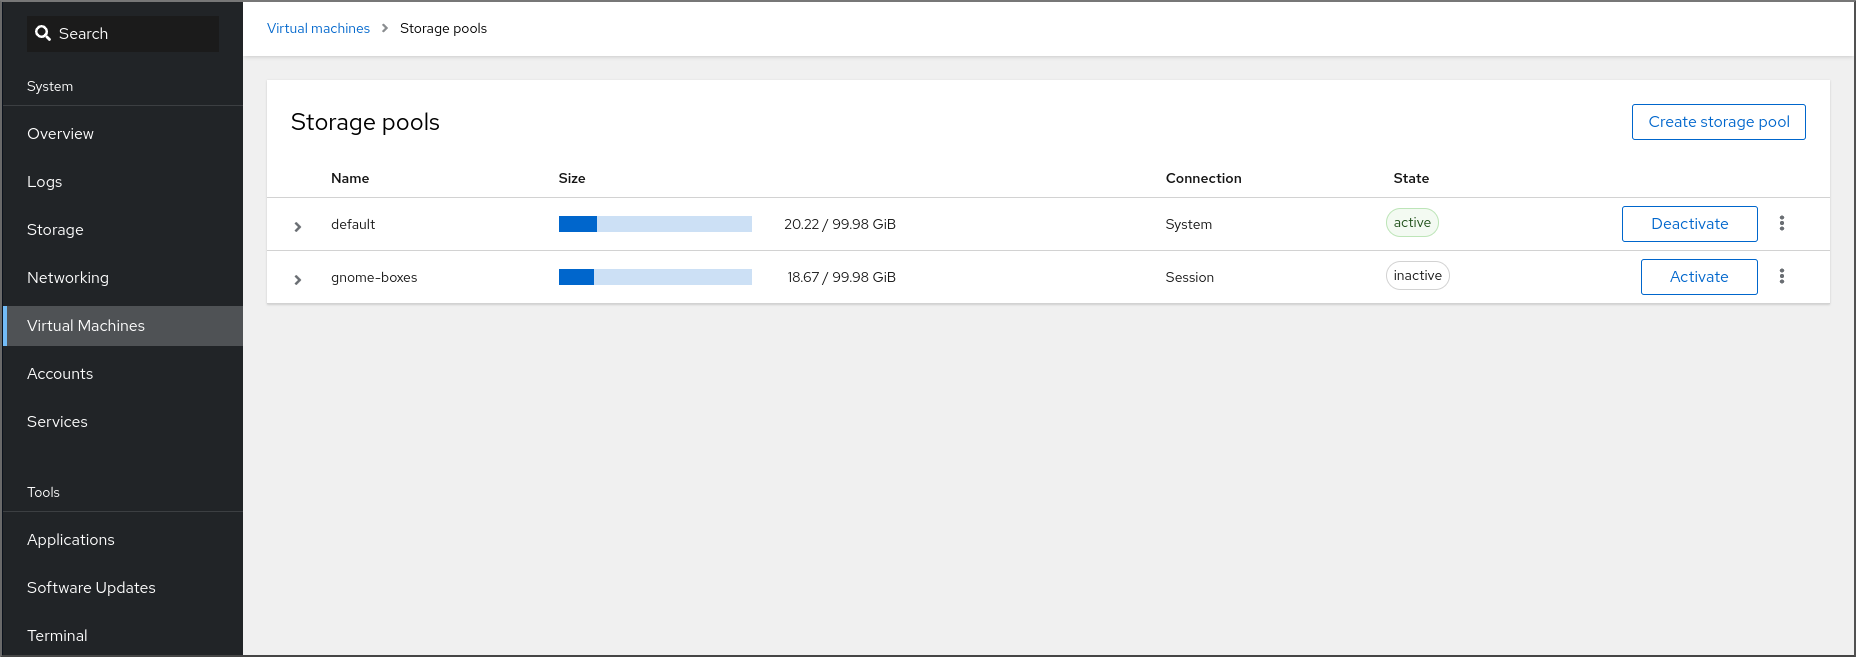
# virsh pool-list --all --details
 Name                State    Autostart  Persistent    Capacity  Allocation   Available
 default             running  yes        yes          48.97 GiB   23.93 GiB   25.03 GiB
 Downloads           running  yes        yes         175.62 GiB   62.02 GiB  113.60 GiB
 RHEL-Storage-Pool   running  yes        yes         214.62 GiB   93.02 GiB  168.60 GiB
12.2.2.
# virsh pool-capabilities | grep "'dir' supported='yes'"
# virsh pool-define-as guest_images_dir dir --target "/guest_images"
Pool guest_images_dir defined
# virsh pool-build guest_images_dir Pool guest_images_dir built # ls -la /guest_images total 8 drwx------. 2 root root 4096 May 31 19:38 . dr-xr-xr-x. 25 root root 4096 May 31 19:38 ..# virsh pool-list --all Name State Autostart ----------------------------------------- default active yes guest_images_dir inactive no# virsh pool-start guest_images_dir Pool guest_images_dir started注意# virsh pool-autostart guest_images_dir Pool guest_images_dir marked as autostarted
# virsh pool-info guest_images_dir
  Name:           guest_images_dir
  UUID:           c7466869-e82a-a66c-2187-dc9d6f0877d0
  State:          running
  Persistent:     yes
  Autostart:      yes
  Capacity:       458.39 GB
  Allocation:     197.91 MB
  Available:      458.20 GB
12.2.3.
# virsh pool-capabilities | grep "'disk' supported='yes'"GRUB_DISABLE_OS_PROBER=trueGRUB_OS_PROBER_SKIP_LIST="5ef6313a-257c-4d43@/dev/sdb1"
# virsh pool-define-as guest_images_disk disk --source-format=gpt --source-dev=/dev/sdb --target /dev
Pool guest_images_disk defined
# virsh pool-build guest_images_disk Pool guest_images_disk built注意# virsh pool-list --all Name State Autostart ----------------------------------------- default active yes guest_images_disk inactive no# virsh pool-start guest_images_disk Pool guest_images_disk started注意# virsh pool-autostart guest_images_disk Pool guest_images_disk marked as autostarted
# virsh pool-info guest_images_disk
  Name:           guest_images_disk
  UUID:           c7466869-e82a-a66c-2187-dc9d6f0877d0
  State:          running
  Persistent:     yes
  Autostart:      yes
  Capacity:       458.39 GB
  Allocation:     197.91 MB
  Available:      458.20 GB
12.2.4.
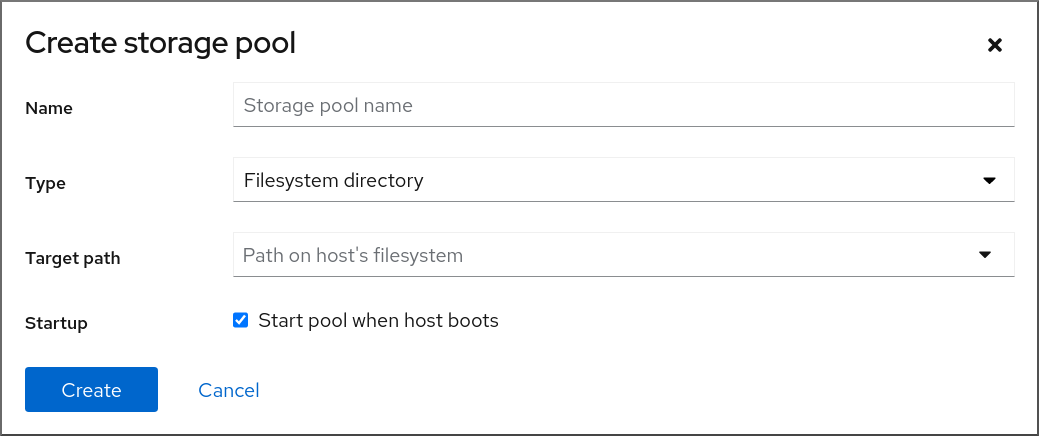
# virsh pool-capabilities | grep "'fs' supported='yes'"GRUB_DISABLE_OS_PROBER=trueGRUB_OS_PROBER_SKIP_LIST="5ef6313a-257c-4d43@/dev/sdb1"
# virsh pool-define-as guest_images_fs fs --source-dev /dev/sdc1 --target /guest_images
Pool guest_images_fs defined
# virsh pool-build guest_images_fs Pool guest_images_fs built # ls -la /guest_images total 8 drwx------. 2 root root 4096 May 31 19:38 . dr-xr-xr-x. 25 root root 4096 May 31 19:38 ..# virsh pool-list --all Name State Autostart ----------------------------------------- default active yes guest_images_fs inactive no# virsh pool-start guest_images_fs Pool guest_images_fs started注意# virsh pool-autostart guest_images_fs Pool guest_images_fs marked as autostarted
# virsh pool-info guest_images_fs
  Name:           guest_images_fs
  UUID:           c7466869-e82a-a66c-2187-dc9d6f0877d0
  State:          running
  Persistent:     yes
  Autostart:      yes
  Capacity:       458.39 GB
  Allocation:     197.91 MB
  Available:      458.20 GB
# mount | grep /guest_images /dev/sdc1 on /guest_images type ext4 (rw) # ls -la /guest_images total 24 drwxr-xr-x. 3 root root 4096 May 31 19:47 . dr-xr-xr-x. 25 root root 4096 May 31 19:38 .. drwx------. 2 root root 16384 May 31 14:18 lost+found
12.2.5.
# gluster volume status
Status of volume: gluster-vol1
Gluster process                           Port	Online	Pid
------------------------------------------------------------
Brick 222.111.222.111:/gluster-vol1       49155	  Y    18634

Task Status of Volume gluster-vol1
------------------------------------------------------------
There are no active volume tasks
# setsebool virt_use_fusefs on # getsebool virt_use_fusefs virt_use_fusefs --> on
# virsh pool-capabilities | grep "'gluster' supported='yes'"
# virsh pool-define-as --name guest_images_glusterfs --type gluster --source-host 111.222.111.222 --source-name gluster-vol1 --source-path /
Pool guest_images_glusterfs defined
# virsh pool-list --all Name State Autostart -------------------------------------------- default active yes guest_images_glusterfs inactive no# virsh pool-start guest_images_glusterfs Pool guest_images_glusterfs started注意# virsh pool-autostart guest_images_glusterfs Pool guest_images_glusterfs marked as autostarted
# virsh pool-info guest_images_glusterfs
  Name:           guest_images_glusterfs
  UUID:           c7466869-e82a-a66c-2187-dc9d6f0877d0
  State:          running
  Persistent:     yes
  Autostart:      yes
  Capacity:       458.39 GB
  Allocation:     197.91 MB
  Available:      458.20 GB
12.2.6.
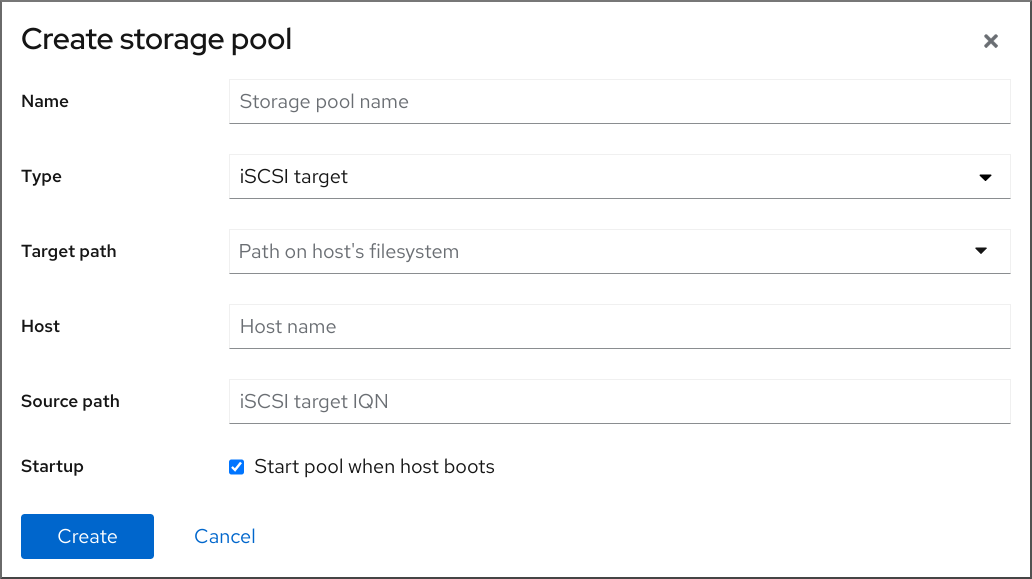
# virsh pool-capabilities | grep "'iscsi' supported='yes'"
# virsh pool-define-as --name guest_images_iscsi --type iscsi --source-host server1.example.com --source-dev iqn.2010-05.com.example.server1:iscsirhel7guest --target /dev/disk/by-path
Pool guest_images_iscsi defined
# virsh pool-list --all Name State Autostart ----------------------------------------- default active yes guest_images_iscsi inactive no# virsh pool-start guest_images_iscsi Pool guest_images_iscsi started注意# virsh pool-autostart guest_images_iscsi Pool guest_images_iscsi marked as autostarted
# virsh pool-info guest_images_iscsi
  Name:           guest_images_iscsi
  UUID:           c7466869-e82a-a66c-2187-dc9d6f0877d0
  State:          running
  Persistent:     yes
  Autostart:      yes
  Capacity:       458.39 GB
  Allocation:     197.91 MB
  Available:      458.20 GB
12.2.7.
# virsh pool-capabilities | grep "'logical' supported='yes'"
# virsh pool-define-as guest_images_lvm logical --source-name lvm_vg --target /dev/lvm_vg
Pool guest_images_lvm defined
# virsh pool-list --all Name State Autostart ------------------------------------------- default active yes guest_images_lvm inactive no# virsh pool-start guest_images_lvm Pool guest_images_lvm started注意# virsh pool-autostart guest_images_lvm Pool guest_images_lvm marked as autostarted
# virsh pool-info guest_images_lvm
  Name:           guest_images_lvm
  UUID:           c7466869-e82a-a66c-2187-dc9d6f0877d0
  State:          running
  Persistent:     yes
  Autostart:      yes
  Capacity:       458.39 GB
  Allocation:     197.91 MB
  Available:      458.20 GB
12.2.8.
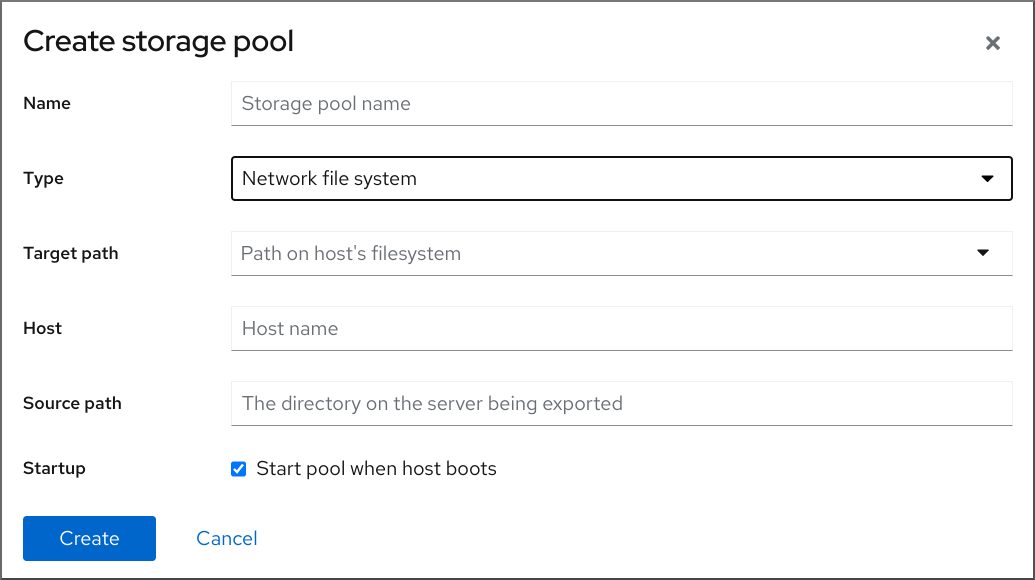
# virsh pool-capabilities | grep "<value>nfs</value>"
# virsh pool-define-as --name guest_images_netfs --type netfs --source-host='111.222.111.222' --source-path='/home/net_mount' --source-format='nfs' --target='/var/lib/libvirt/images/nfspool'# virsh pool-list --all Name State Autostart ----------------------------------------- default active yes guest_images_netfs inactive no# virsh pool-start guest_images_netfs Pool guest_images_netfs started注意# virsh pool-autostart guest_images_netfs Pool guest_images_netfs marked as autostarted
# virsh pool-info guest_images_netfs
  Name:           guest_images_netfs
  UUID:           c7466869-e82a-a66c-2187-dc9d6f0877d0
  State:          running
  Persistent:     yes
  Autostart:      yes
  Capacity:       458.39 GB
  Allocation:     197.91 MB
  Available:      458.20 GB
12.2.9.
# virsh pool-capabilities | grep "'scsi' supported='yes'"
# virsh pool-define-as guest_images_vhba scsi --adapter-parent scsi_host3 --adapter-wwnn 5001a4a93526d0a1 --adapter-wwpn 5001a4ace3ee047d --target /dev/disk/
Pool guest_images_vhba defined
# virsh pool-list --all Name State Autostart ----------------------------------------- default active yes guest_images_vhba inactive no# virsh pool-start guest_images_vhba Pool guest_images_vhba started注意# virsh pool-autostart guest_images_vhba Pool guest_images_vhba marked as autostarted
# virsh pool-info guest_images_vhba
  Name:           guest_images_vhba
  UUID:           c7466869-e82a-a66c-2187-dc9d6f0877d0
  State:          running
  Persistent:     yes
  Autostart:      yes
  Capacity:       458.39 GB
  Allocation:     197.91 MB
  Available:      458.20 GB
12.2.10.
# virsh pool-list --all
Name                 State      Autostart
-------------------------------------------
default              active     yes
Downloads            active     yes
RHEL-Storage-Pool   active     yes
# virsh pool-destroy Downloads Pool Downloads destroyed# virsh pool-delete Downloads Pool Downloads deleted# virsh pool-undefine Downloads Pool Downloads has been undefined
# virsh pool-list --all
Name                 State      Autostart
-------------------------------------------
default              active     yes
rhel-Storage-Pool   active     yes
12.3.
12.3.1.
12.3.2.
12.3.3.
12.3.4.
12.3.5.

12.3.6.

12.3.7.
12.3.8.

12.3.9.
[D]
12.4.
12.4.1.
# virsh pool-define ~/guest_images.xml
  Pool defined from guest_images_dir
|
|
|
|
|
|
|
|
|
<pool type='dir'>
<name>dirpool</name>
<target>
<path>/guest_images</path>
</target>
</pool>12.4.2.
# virsh pool-define ~/guest_images.xml
Pool defined from guest_images_disk
|
|
|
|
|
|
|
|
|
|
|
|
<pool type='disk'>
<name>phy_disk</name>
<source>
<device path='/dev/sdb'/>
<format type='gpt'/>
</source>
<target>
<path>/dev</path>
</target>
</pool>12.4.3.
# virsh pool-define ~/guest_images.xml
Pool defined from guest_images_fs
|
|
|
|
|
|
|
|
|
|
|
|
|
|
|
<pool type='fs'>
<name>guest_images_fs</name>
<source>
<device path='/dev/sdc1'/>
<format type='auto'/>
</source>
<target>
<path>/guest_images</path>
</target>
</pool>12.4.4.
# virsh pool-define ~/guest_images.xml
Pool defined from guest_images_glusterfs
|
|
|
|
|
|
|
|
|
|
|
|
<pool type='gluster'>
<name>Gluster_pool</name>
<source>
<host name='111.222.111.222'/>
<dir path='/'/>
<name>gluster-vol1</name>
</source>
</pool>12.4.5.
# virsh pool-define ~/guest_images.xml
Pool defined from guest_images_iscsi
|
|
|
|
|
|
|
|
|
|
|
|
|
|
|
|
|
|
<pool type='iscsi'>
<name>iSCSI_pool</name>
<source>
<host name='server1.example.com'/>
<device path='iqn.2010-05.com.example.server1:iscsirhel7guest'/>
</source>
<target>
<path>/dev/disk/by-path</path>
</target>
</pool>12.4.6.
# virsh pool-define ~/guest_images.xml
Pool defined from guest_images_logical
|
|
|
|
|
|
|
|
|
|
|
|
|
|
|
|
|
|
<source>
<device path='/dev/sda1'/>
<device path='/dev/sdb3'/>
<device path='/dev/sdc2'/>
...
</source>
<pool type='logical'>
<name>guest_images_lvm</name>
<source>
<device path='/dev/sdc'/>
<name>libvirt_lvm</name>
<format type='lvm2'/>
</source>
<target>
<path>/dev/libvirt_lvm</path>
</target>
</pool>12.4.7.
# virsh pool-define ~/guest_images.xml
Pool defined from guest_images_netfs
|
|
|
|
|
|
|
|
|
|
|
|
|
|
|
|
|
|
<pool type='netfs'>
<name>nfspool</name>
<source>
<host name='file_server'/>
<format type='nfs'/>
<dir path='/home/net_mount'/>
</source>
<target>
<path>/var/lib/libvirt/images/nfspool</path>
</target>
</pool>12.4.8.
# virsh pool-define ~/guest_images.xml
Pool defined from guest_images_vhba
|
|
|
|
|
|
|
|
|
|
|
|
<pool type='scsi'> <name>vhbapool_host3</name> <source> <adapter type='fc_host' wwnn='5001a4a93526d0a1' wwpn='5001a4ace3ee047d'/> </source> <target> <path>/dev/disk/by-path</path> </target> </pool><pool type='scsi'> <name>vhbapool_host3</name> <source> <adapter type='fc_host' parent='scsi_host3' wwnn='5001a4a93526d0a1' wwpn='5001a4ace3ee047d'/> </source> <target> <path>/dev/disk/by-path</path> </target> </pool>
12.5.
12.5.1.
# virsh vol-list --pool RHEL-Storage-Pool --details Name Path Type Capacity Allocation --------------------------------------------------------------------------------------------- .bash_history /home/VirtualMachines/.bash_history file 18.70 KiB 20.00 KiB .bash_logout /home/VirtualMachines/.bash_logout file 18.00 B 4.00 KiB .bash_profile /home/VirtualMachines/.bash_profile file 193.00 B 4.00 KiB .bashrc /home/VirtualMachines/.bashrc file 1.29 KiB 4.00 KiB .git-prompt.sh /home/VirtualMachines/.git-prompt.sh file 15.84 KiB 16.00 KiB .gitconfig /home/VirtualMachines/.gitconfig file 167.00 B 4.00 KiB RHEL_Volume.qcow2 /home/VirtualMachines/RHEL8_Volume.qcow2 file 60.00 GiB 13.93 GiB# virsh vol-info --pool RHEL-Storage-Pool --vol RHEL_Volume.qcow2 Name: RHEL_Volume.qcow2 Type: file Capacity: 60.00 GiB Allocation: 13.93 GiB
12.5.2.
# virsh pool-list --details Name State Autostart Persistent Capacity Allocation Available -------------------------------------------------------------------------------------------- default running yes yes 48.97 GiB 36.34 GiB 12.63 GiB Downloads running yes yes 175.92 GiB 121.20 GiB 54.72 GiB VM-disks running yes yes 175.92 GiB 121.20 GiB 54.72 GiB
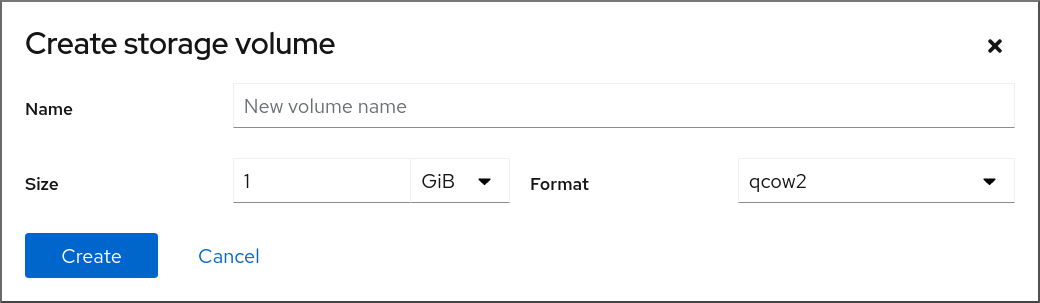
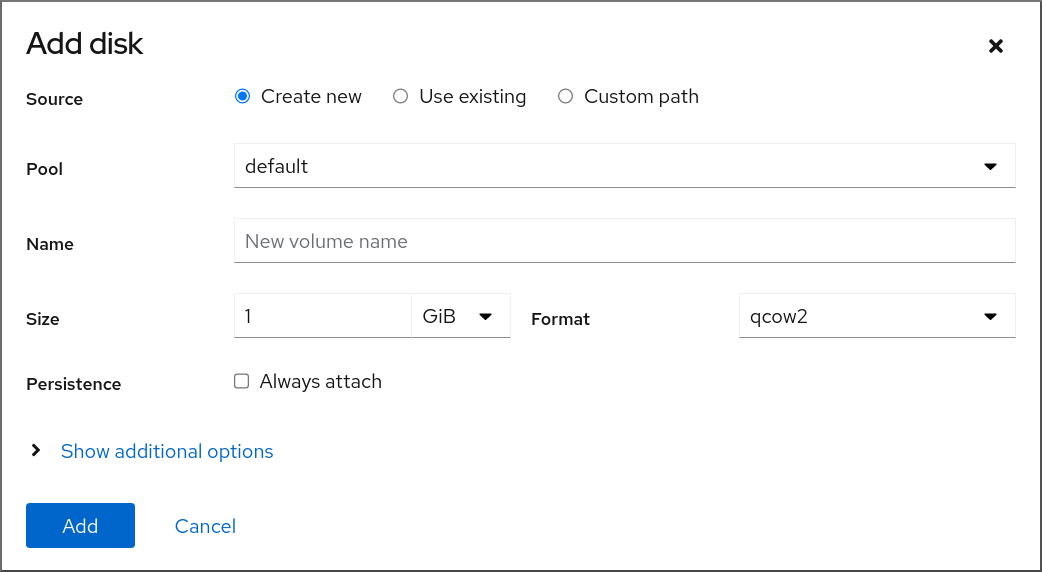
# virsh vol-create-as --pool guest-images-fs --name vm-disk1 --capacity 20 --format qcow2<disk type='volume' device='disk'> <driver name='qemu' type='qcow2'/> <source pool='guest-images-fs' volume='vm-disk1'/> <target dev='hdk' bus='ide'/> </disk><disk type='network' device='disk'> <driver name='qemu' type='raw'/> <source protocol='gluster' name='Volume1/Image'> <host name='example.org' port='6000'/> </source> <target dev='vda' bus='virtio'/> <address type='pci' domain='0x0000' bus='0x00' slot='0x03' function='0x0'/> </disk><disk type='block' device='disk'> <driver name='qemu' type='raw'/> <source dev='/dev/mapper/mpatha' /> <target dev='sda' bus='scsi'/> </disk><disk type='network' device='disk'> <driver name='qemu' type='raw'/> <source protocol='rbd' name='pool/image'> <host name='mon1.example.org' port='6321'/> </source> <target dev='vdc' bus='virtio'/> </disk>
# virsh attach-device --config testguest1 ~/vm-disk1.xml
12.5.3.
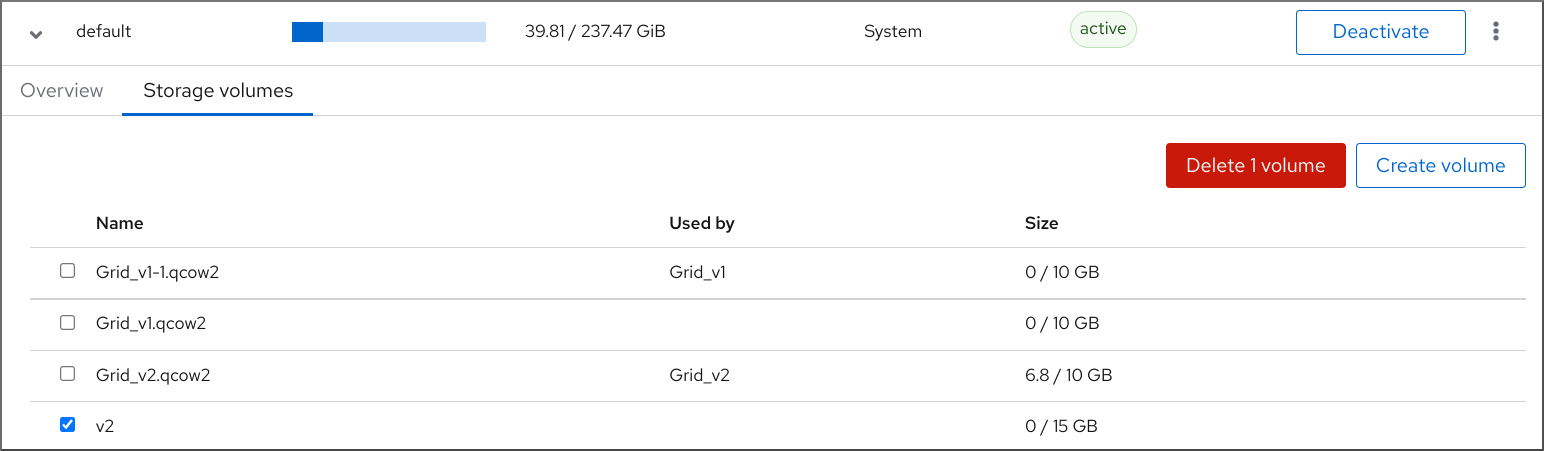
# virsh vol-list --pool RHEL-SP Name Path --------------------------------------------------------------- .bash_history /home/VirtualMachines/.bash_history .bash_logout /home/VirtualMachines/.bash_logout .bash_profile /home/VirtualMachines/.bash_profile .bashrc /home/VirtualMachines/.bashrc .git-prompt.sh /home/VirtualMachines/.git-prompt.sh .gitconfig /home/VirtualMachines/.gitconfig vm-disk1 /home/VirtualMachines/vm-disk1# virsh vol-wipe --pool RHEL-SP vm-disk1 Vol vm-disk1 wiped# virsh vol-delete --pool RHEL-SP vm-disk1 Vol vm-disk1 deleted
# virsh vol-list --pool RHEL-SP Name Path --------------------------------------------------------------- .bash_history /home/VirtualMachines/.bash_history .bash_logout /home/VirtualMachines/.bash_logout .bash_profile /home/VirtualMachines/.bash_profile .bashrc /home/VirtualMachines/.bashrc .git-prompt.sh /home/VirtualMachines/.git-prompt.sh .gitconfig /home/VirtualMachines/.gitconfig
12.6.
12.6.1.
# qemu-img create -f <format> <image-name> <size># qemu-img create -f qcow2 test-image 30G Formatting 'test-img', fmt=qcow2 cluster_size=65536 extended_l2=off compression_type=zlib size=32212254720 lazy_refcounts=off refcount_bits=16
# qemu-img info <test-img> image: test-img file format: qcow2 virtual size: 30 GiB (32212254720 bytes) disk size: 196 KiB cluster_size: 65536 Format specific information: compat: 1.1 compression type: zlib lazy refcounts: false refcount bits: 16 corrupt: false extended l2: false
12.6.2.
# qemu-img check <test-name.qcow2> No errors were found on the image. 327434/327680 = 99.92% allocated, 0.00% fragmented, 0.00% compressed clusters Image end offset: 21478375424167 errors were found on the image. Data may be corrupted, or further writes to the image may corrupt it. 453368 leaked clusters were found on the image. This means waste of disk space, but no harm to data. 259 internal errors have occurred during the check. Image end offset: 21478375424- 警告
# qemu-img check -r all <test-name.qcow2> [...] 122 errors were found on the image. Data may be corrupted, or further writes to the image may corrupt it. 250 internal errors have occurred during the check. Image end offset: 27071414272
12.6.3.
- 警告
# virsh domblklist <vm-name> Target Source ---------------------------------------------------------- vda /home/username/disk-images/example-image.qcow2# cp <example-image.qcow2> <example-image-backup.qcow2># qemu-img resize <example-image.qcow2> +10G
# qemu-img info <converted-image.qcow2> image: converted-image.qcow2 file format: qcow2 virtual size: 30 GiB (32212254720 bytes) disk size: 196 KiB cluster_size: 65536 Format specific information: compat: 1.1 compression type: zlib lazy refcounts: false refcount bits: 16 corrupt: false extended l2: false
12.6.4.
# qemu-img convert -f raw <original-image.img> -O qcow2 <converted-image.qcow2>
# qemu-img info <converted-image.qcow2> image: converted-image.qcow2 file format: qcow2 virtual size: 30 GiB (32212254720 bytes) disk size: 196 KiB cluster_size: 65536 Format specific information: compat: 1.1 compression type: zlib lazy refcounts: false refcount bits: 16 corrupt: false extended l2: false
12.6.5.
12.7.
12.7.1.

12.7.2.
12.8.
12.8.1.
-
[D]
12.8.2.
-
[D] - 注意
12.8.3.
12.8.4.
-
[D]
12.9.
<secret ephemeral='no' private='yes'> <description>Passphrase for the iSCSI example.com server</description> <usage type='iscsi'> <target>iscsirhel7secret</target> </usage> </secret># virsh secret-define secret.xml# virsh secret-list UUID Usage -------------------------------------------------------------- 2d7891af-20be-4e5e-af83-190e8a922360 iscsi iscsirhel7secret# virsh secret-set-value --interactive 2d7891af-20be-4e5e-af83-190e8a922360 Enter new value for secret: Secret value set<pool type='iscsi'> <name>iscsirhel7pool</name> <source> <host name='192.0.2.1'/> <device path='iqn.2010-05.com.example.server1:iscsirhel7guest'/> <auth type='chap' username='_example-user_'> <secret usage='iscsirhel7secret'/> </auth> </source> <target> <path>/dev/disk/by-path</path> </target> </pool>注意<auth username='redhat'> <secret type='iscsi' usage='iscsirhel7secret'/> </auth># virsh pool-destroy iscsirhel7pool # virsh pool-start iscsirhel7pool
12.10.
# virsh nodedev-list --cap vports scsi_host3 scsi_host4# virsh nodedev-dumpxml scsi_host3<device> <name>scsi_host3</name> <path>/sys/devices/pci0000:00/0000:00:04.0/0000:10:00.0/host3</path> <parent>pci_0000_10_00_0</parent> <capability type='scsi_host'> <host>3</host> <unique_id>0</unique_id> <capability type='fc_host'> <wwnn>20000000c9848140</wwnn> <wwpn>10000000c9848140</wwpn> <fabric_wwn>2002000573de9a81</fabric_wwn> </capability> <capability type='vport_ops'> <max_vports>127</max_vports> <vports>0</vports> </capability> </capability> </device><device> <parent>scsi_host3</parent> <capability type='scsi_host'> <capability type='fc_host'> </capability> </capability> </device><device> <name>vhba</name> <parent wwnn='20000000c9848140' wwpn='10000000c9848140'/> <capability type='scsi_host'> <capability type='fc_host'> </capability> </capability> </device>注意注意# virsh nodedev-create vhba_host3 Node device scsi_host5 created from vhba_host3.xml
# virsh nodedev-dumpxml scsi_host5 <device> <name>scsi_host5</name> <path>/sys/devices/pci0000:00/0000:00:04.0/0000:10:00.0/host3/vport-3:0-0/host5</path> <parent>scsi_host3</parent> <capability type='scsi_host'> <host>5</host> <unique_id>2</unique_id> <capability type='fc_host'> <wwnn>5001a4a93526d0a1</wwnn> <wwpn>5001a4ace3ee047d</wwpn> <fabric_wwn>2002000573de9a81</fabric_wwn> </capability> </capability> </device>
第 13 章
13.1.
# grubby --args="intel_iommu=on iommu_pt" --update-kernel DEFAULT
# grubby --args="iommu=pt" --update-kernel DEFAULT注意
# lspci -Dnn | grep VGA 0000:02:00.0 VGA compatible controller [0300]: NVIDIA Corporation GK106GL [Quadro K4000] [10de:11fa] (rev a1)# grubby --args="pci-stub.ids=10de:11fa" --update-kernel DEFAULT
# virsh nodedev-dumpxml pci_0000_02_00_0<device> <name>pci_0000_02_00_0</name> <path>/sys/devices/pci0000:00/0000:00:03.0/0000:02:00.0</path> <parent>pci_0000_00_03_0</parent> <driver> <name>pci-stub</name> </driver> <capability type='pci'> <domain>0</domain> <bus>2</bus> <slot>0</slot> <function>0</function> <product id='0x11fa'>GK106GL [Quadro K4000]</product> <vendor id='0x10de'>NVIDIA Corporation</vendor> <iommuGroup number='13'> <address domain='0x0000' bus='0x02' slot='0x00' function='0x0'/> <address domain='0x0000' bus='0x02' slot='0x00' function='0x1'/> </iommuGroup> <pci-express> <link validity='cap' port='0' speed='8' width='16'/> <link validity='sta' speed='2.5' width='16'/> </pci-express> </capability> </device># driverctl set-override 0000:02:00.1 vfio-pci
<hostdev mode='subsystem' type='pci' managed='yes'> <driver name='vfio'/> <source> <address domain='0x0000' bus='0x02' slot='0x00' function='0x0'/> </source> </hostdev># virsh attach-device System1 --file /home/GPU-Assign.xml --persistent Device attached successfully.注意
13.2.
13.2.1.
# lshw -C display *-display description: 3D controller product: GP104GL [Tesla P4] vendor: NVIDIA Corporation physical id: 0 bus info: pci@0000:01:00.0 version: a1 width: 64 bits clock: 33MHz capabilities: pm msi pciexpress cap_list configuration: driver=vfio-pci latency=0 resources: irq:16 memory:f6000000-f6ffffff memory:e0000000-efffffff memory:f0000000-f1ffffff
blacklist nouveau options nouveau modeset=0# dracut --force # reboot# lsmod | grep nvidia_vgpu_vfio nvidia_vgpu_vfio 45011 0 nvidia 14333621 10 nvidia_vgpu_vfio mdev 20414 2 vfio_mdev,nvidia_vgpu_vfio vfio 32695 3 vfio_mdev,nvidia_vgpu_vfio,vfio_iommu_type1 # systemctl status nvidia-vgpu-mgr.service nvidia-vgpu-mgr.service - NVIDIA vGPU Manager Daemon Loaded: loaded (/usr/lib/systemd/system/nvidia-vgpu-mgr.service; enabled; vendor preset: disabled) Active: active (running) since Fri 2018-03-16 10:17:36 CET; 5h 8min ago Main PID: 1553 (nvidia-vgpu-mgr) [...]# uuidgen 30820a6f-b1a5-4503-91ca-0c10ba58692a<device> <parent>pci_0000_01_00_0</parent> <capability type="mdev"> <type id="nvidia-63"/> <uuid>30820a6f-b1a5-4503-91ca-0c10ba58692a</uuid> </capability> </device># virsh nodedev-define vgpu-test.xml Node device mdev_30820a6f_b1a5_4503_91ca_0c10ba58692a_0000_01_00_0 created from vgpu-test.xml# virsh nodedev-list --cap mdev --inactive mdev_30820a6f_b1a5_4503_91ca_0c10ba58692a_0000_01_00_0# virsh nodedev-start mdev_30820a6f_b1a5_4503_91ca_0c10ba58692a_0000_01_00_0 Device mdev_30820a6f_b1a5_4503_91ca_0c10ba58692a_0000_01_00_0 started# virsh nodedev-list --cap mdev mdev_30820a6f_b1a5_4503_91ca_0c10ba58692a_0000_01_00_0# virsh nodedev-autostart mdev_30820a6f_b1a5_4503_91ca_0c10ba58692a_0000_01_00_0 Device mdev_d196754e_d8ed_4f43_bf22_684ed698b08b_0000_9b_00_0 marked as autostarted<hostdev mode='subsystem' type='mdev' managed='no' model='vfio-pci' display='on'> <source> <address uuid='30820a6f-b1a5-4503-91ca-0c10ba58692a'/> </source> </hostdev>
# virsh nodedev-info mdev_30820a6f_b1a5_4503_91ca_0c10ba58692a_0000_01_00_0 Name: virsh nodedev-autostart mdev_30820a6f_b1a5_4503_91ca_0c10ba58692a_0000_01_00_0 Parent: pci_0000_01_00_0 Active: yes Persistent: yes Autostart: yes# lspci -d 10de: -k 07:00.0 VGA compatible controller: NVIDIA Corporation GV100GL [Tesla V100 SXM2 32GB] (rev a1) Subsystem: NVIDIA Corporation Device 12ce Kernel driver in use: nvidia Kernel modules: nouveau, nvidia_drm, nvidia
13.2.2.
# virsh nodedev-list --cap mdev mdev_30820a6f_b1a5_4503_91ca_0c10ba58692a_0000_01_00_0# virsh nodedev-destroy mdev_30820a6f_b1a5_4503_91ca_0c10ba58692a_0000_01_00_0 Destroyed node device 'mdev_30820a6f_b1a5_4503_91ca_0c10ba58692a_0000_01_00_0'# virsh nodedev-info mdev_30820a6f_b1a5_4503_91ca_0c10ba58692a_0000_01_00_0 Name: virsh nodedev-autostart mdev_30820a6f_b1a5_4503_91ca_0c10ba58692a_0000_01_00_0 Parent: pci_0000_01_00_0 Active: no Persistent: yes Autostart: yes<hostdev mode='subsystem' type='mdev' managed='no' model='vfio-pci'> <source> <address uuid='30820a6f-b1a5-4503-91ca-0c10ba58692a'/> </source> </hostdev># virsh nodedev-undefine mdev_30820a6f_b1a5_4503_91ca_0c10ba58692a_0000_01_00_0 Undefined node device 'mdev_30820a6f_b1a5_4503_91ca_0c10ba58692a_0000_01_00_0'
# virsh nodedev-list --cap mdev --inactive mdev_30820a6f_b1a5_4503_91ca_0c10ba58692a_0000_01_00_0# virsh nodedev-list --cap mdev
13.2.3.
# virsh nodedev-list --cap mdev_types pci_0000_5b_00_0 pci_0000_9b_00_0# virsh nodedev-dumpxml pci_0000_9b_00_0 <device> <name>pci_0000_9b_00_0</name> <path>/sys/devices/pci0000:9a/0000:9a:00.0/0000:9b:00.0</path> <parent>pci_0000_9a_00_0</parent> <driver> <name>nvidia</name> </driver> <capability type='pci'> <class>0x030000</class> <domain>0</domain> <bus>155</bus> <slot>0</slot> <function>0</function> <product id='0x1e30'>TU102GL [Quadro RTX 6000/8000]</product> <vendor id='0x10de'>NVIDIA Corporation</vendor> <capability type='mdev_types'> <type id='nvidia-346'> <name>GRID RTX6000-12C</name> <deviceAPI>vfio-pci</deviceAPI> <availableInstances>2</availableInstances> </type> <type id='nvidia-439'> <name>GRID RTX6000-3A</name> <deviceAPI>vfio-pci</deviceAPI> <availableInstances>8</availableInstances> </type> [...] <type id='nvidia-440'> <name>GRID RTX6000-4A</name> <deviceAPI>vfio-pci</deviceAPI> <availableInstances>6</availableInstances> </type> <type id='nvidia-261'> <name>GRID RTX6000-8Q</name> <deviceAPI>vfio-pci</deviceAPI> <availableInstances>3</availableInstances> </type> </capability> <iommuGroup number='216'> <address domain='0x0000' bus='0x9b' slot='0x00' function='0x3'/> <address domain='0x0000' bus='0x9b' slot='0x00' function='0x1'/> <address domain='0x0000' bus='0x9b' slot='0x00' function='0x2'/> <address domain='0x0000' bus='0x9b' slot='0x00' function='0x0'/> </iommuGroup> <numa node='2'/> <pci-express> <link validity='cap' port='0' speed='8' width='16'/> <link validity='sta' speed='2.5' width='8'/> </pci-express> </capability> </device>
13.2.4.
第 14 章
14.1.
14.1.1.

[D]
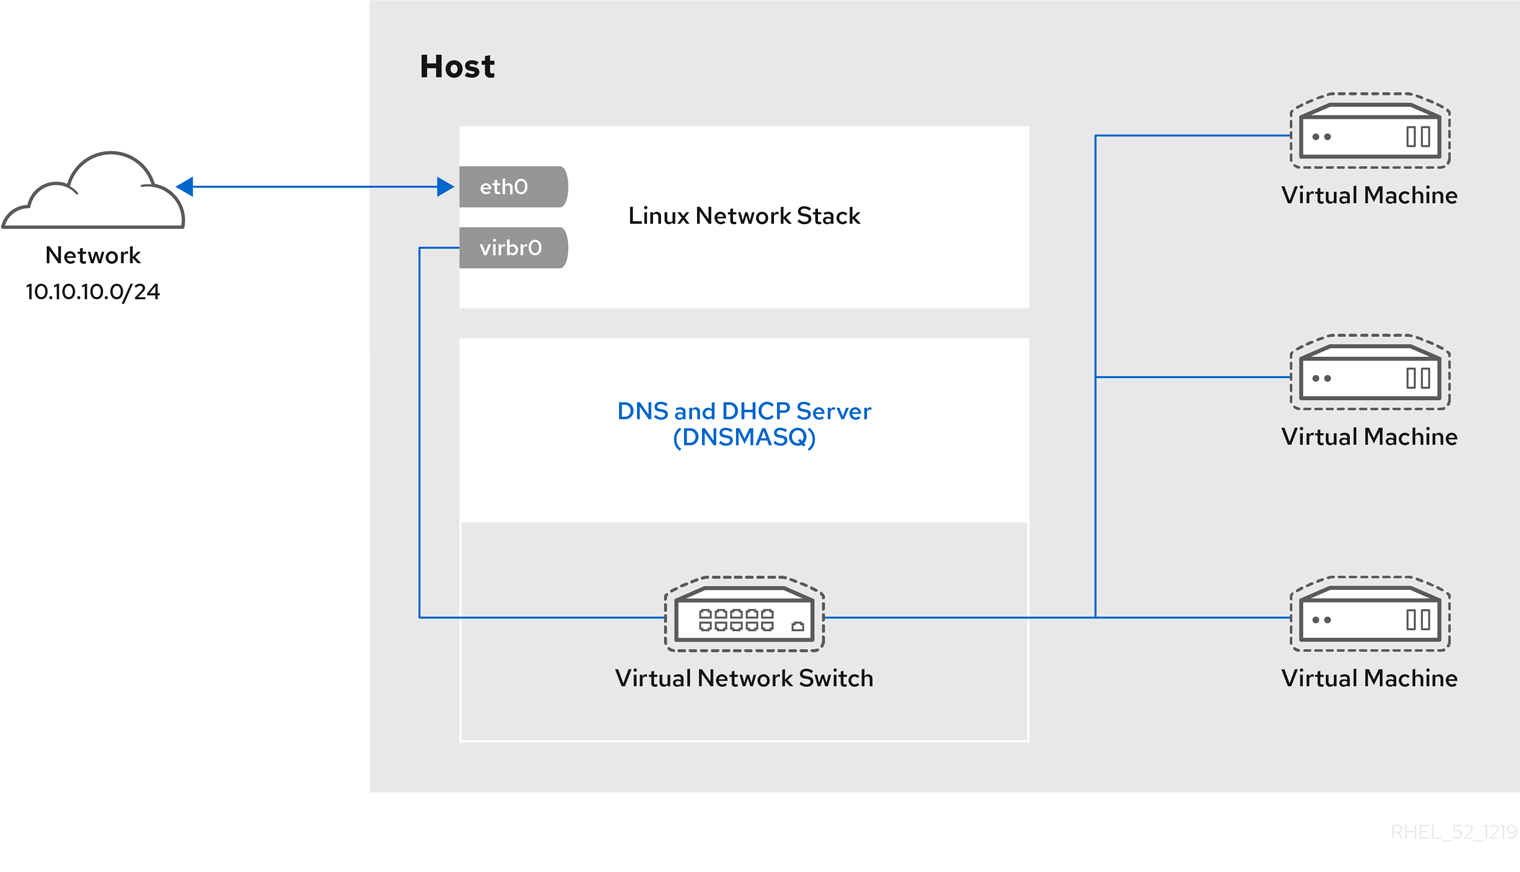
$ ip addr show virbr0
3: virbr0: <BROADCAST,MULTICAST,UP,LOWER_UP> mtu 1500 qdisc noqueue state
UNKNOWN link/ether 1b:c4:94:cf:fd:17 brd ff:ff:ff:ff:ff:ff
inet 192.0.2.1/24 brd 192.0.2.255 scope global virbr0
14.1.2.
[D]
14.2.
14.2.1.
14.2.2.
14.2.3.

[D]
14.3.
14.3.1.
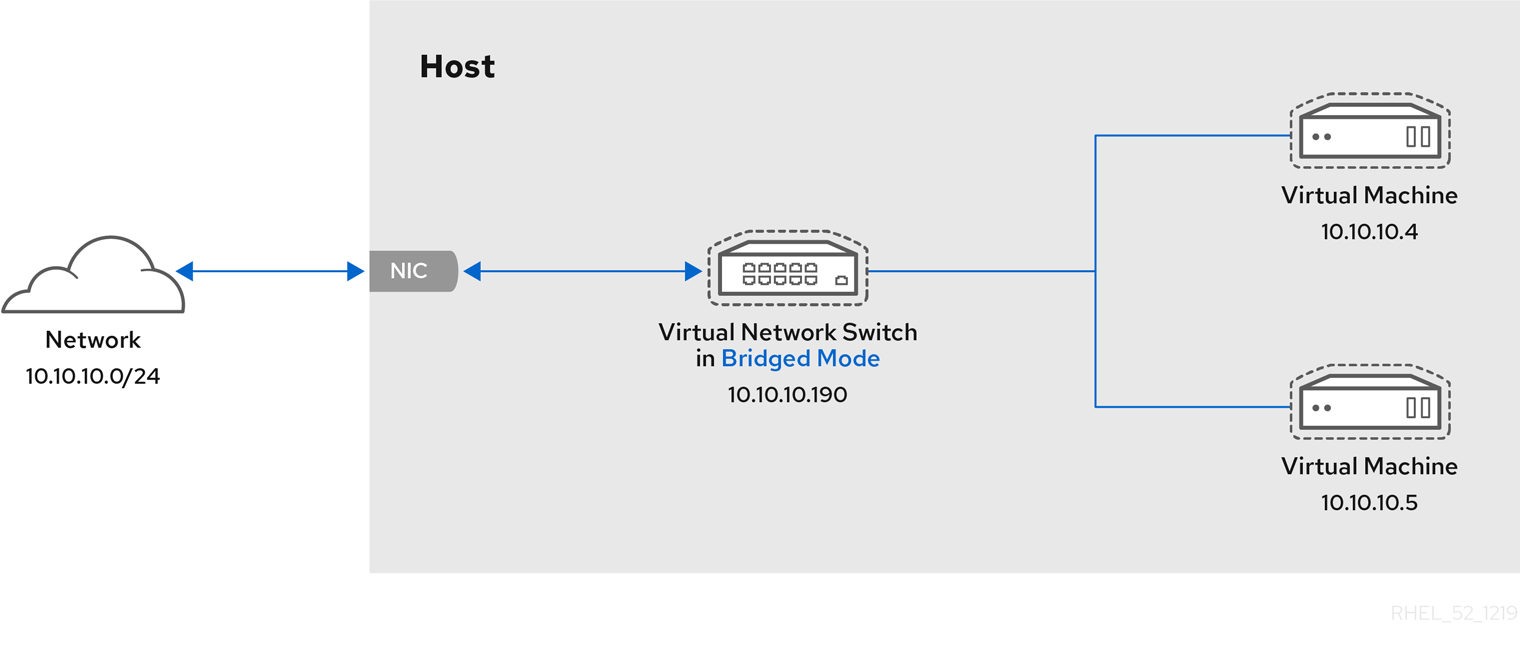
# ip addr [...] enp0s25: <BROADCAST,MULTICAST,UP,LOWER_UP> mtu 1500 qdisc fq_codel state UP group default qlen 1000 link/ether 54:ee:75:49:dc:46 brd ff:ff:ff:ff:ff:ff inet 192.0.2.1/24 brd 192.0.2.255 scope global dynamic noprefixroute enp0s25
# virt-xml testguest --edit --network bridge=bridge0 Domain 'testguest' defined successfully.# virsh start testguest
# ip link show master bridge0 2: enp0s25: <BROADCAST,MULTICAST,UP,LOWER_UP> mtu 1500 qdisc fq_codel master bridge0 state UP mode DEFAULT group default qlen 1000 link/ether 54:ee:75:49:dc:46 brd ff:ff:ff:ff:ff:ff 10: vnet0: <BROADCAST,MULTICAST,UP,LOWER_UP> mtu 1500 qdisc fq_codel master bridge0 state UNKNOWN mode DEFAULT group default qlen 1000 link/ether fe:54:00:89:15:40 brd ff:ff:ff:ff:ff:ff# ip addr [...] enp0s0: <BROADCAST,MULTICAST,UP,LOWER_UP> mtu 1500 qdisc fq_codel state UP group default qlen 1000 link/ether 52:54:00:09:15:46 brd ff:ff:ff:ff:ff:ff inet 192.0.2.1/24 brd 192.0.2.255 scope global dynamic noprefixroute enp0s0# ssh root@192.0.2.1 root@192.0.2.1's password: Last login: Mon Sep 24 12:05:36 2019 root~#*
14.3.2.

[D]

[D]# ip addr [...] enp0s0: <BROADCAST,MULTICAST,UP,LOWER_UP> mtu 1500 qdisc fq_codel state UP group default qlen 1000 link/ether 52:54:00:09:15:46 brd ff:ff:ff:ff:ff:ff inet 192.0.2.1/24 brd 192.0.2.255 scope global dynamic noprefixroute enp0s0# ssh root@192.0.2.1 root@192.0.2.1's password: Last login: Mon Sep 24 12:05:36 2019 root~#*
14.3.3.
14.4.
14.4.1.

[D]
14.4.2.

[D]

[D]
14.4.3.
[D]
14.4.4.
[D]
14.4.5.
14.4.6.
|
|
|
|
|
|
|
|
|
|
|
|
|
|
|
|
|
|
|
|
|
|
|
|
|
|
| |||
14.5.
14.5.1.
# chmod -R a+r /var/lib/tftpboot# chown -R nobody: /var/lib/tftpboot# chcon -R --reference /usr/sbin/dnsmasq /var/lib/tftpboot # chcon -R --reference /usr/libexec/libvirt_leaseshelper /var/lib/tftpboot# virsh net-destroy default# virsh net-edit default<ip address='192.0.2.1' netmask='255.255.255.0'> <tftp root='/var/lib/tftpboot'/> <dhcp> <range start='192.0.2.2' end='192.0.2.254' /> <bootp file='example-pxelinux'/> </dhcp> </ip># virsh net-start default
# virsh net-list Name State Autostart Persistent --------------------------------------------------- default active no no
14.5.2.
# virt-install --pxe --network network=default --memory 2048 --vcpus 2 --disk size=10<interface type='network'> <mac address='52:54:00:66:79:14'/> <source network='default'/> <target dev='vnet0'/> <alias name='net0'/> <address type='pci' domain='0x0000' bus='0x00' slot='0x03' function='0x0'/> <boot order='1'/> </interface>
14.5.3.
# virt-install --pxe --network bridge=breth0 --memory 2048 --vcpus 2 --disk size=10<interface type='bridge'> <mac address='52:54:00:5a:ad:cb'/> <source bridge='breth0'/> <target dev='vnet0'/> <alias name='net0'/> <address type='pci' domain='0x0000' bus='0x00' slot='0x03' function='0x0'/> <boot order='1'/> </interface>
第 15 章
15.1.
# yum install nfs-utils -y
# mkdir shared-files# virsh domifaddr testguest1 Name MAC address Protocol Address ---------------------------------------------------------------- vnet0 52:53:00:84:57:90 ipv4 192.0.2.2/24 # virsh domifaddr testguest2 Name MAC address Protocol Address ---------------------------------------------------------------- vnet1 52:53:00:65:29:21 ipv4 192.0.2.3/24/home/<username>/Downloads/<shared_directory>/ <VM1-IP(options)> <VM2-IP(options)> .../usr/local/shared-files/ 192.0.2.2(rw,sync) 192.0.2.3(rw,sync)注意# exportfs -a# systemctl start nfs-server# ip addr ... 5: virbr0: [BROADCAST,MULTICAST,UP,LOWER_UP] mtu 1500 qdisc noqueue state UP group default qlen 1000 link/ether 52:54:00:32:ff:a5 brd ff:ff:ff:ff:ff:ff inet 192.0.2.1/24 brd 192.0.2.255 scope global virbr0 valid_lft forever preferred_lft forever ...
# mount 192.0.2.1:/usr/local/shared-files /mnt/host-share- 注意
# Install-WindowsFeature NFS-Client# Enable-WindowsOptionalFeature -FeatureName ServicesForNFS-ClientOnly, ClientForNFS-Infrastructure -Online -NoRestart
# C:\Windows\system32\mount.exe -o anon \\192.0.2.1\usr\local\shared-files Z:- 注意
$ ls <mount_point> shared-file1 shared-file2 shared-file3
第 16 章
16.1.
图 16.1.
[D]
图 16.2.
[D]
16.2.
# getenforce Enforcing注意
16.3.
- 注意
16.4.
# yum install edk2-ovmf- 警告
# virt-install --name rhel8sb --memory 4096 --vcpus 4 --os-variant rhel8.0 --boot uefi,nvram_template=/usr/share/OVMF/OVMF_VARS.secboot.fd --disk boot_order=2,size=10 --disk boot_order=1,device=cdrom,bus=scsi,path=/images/RHEL-8.0-installation.iso
# mokutil --sb-state SecureBoot enabled
16.5.
# ls /usr/share/polkit-1/actions | grep libvirt # ls /usr/share/polkit-1/rules.d | grep libvirt
# sed -i 's/#access_drivers = \[ "polkit" \]/access_drivers = \[ "polkit" \]/' /etc/libvirt/libvirtd.conf# systemctl restart libvirtd
$ virsh -c qemu:///system list --all Id Name State -------------------------------
16.6.
$ getsebool -a | grep virt
[...]
virt_sandbox_use_netlink --> off
virt_sandbox_use_sys_admin --> off
virt_transition_userdomain --> off
virt_use_comm --> off
virt_use_execmem --> off
virt_use_fusefs --> off
[...]
|
|
|
|
|
|
|
|
|
|
|
|
|
|
|
|
|
|
|
|
|
|
|
|
|
|
|
|
|
|
|
|
|
|
|
|
|
|
|
|
|
|
|
|
|
16.7.
# grep facilities /proc/cpuinfo | grep 158# ls /sys/firmware | grep uv# virsh domcapabilities | grep unpack <feature policy='require' name='unpack'/># virsh dumpxml <vm_name> | grep "<cpu mode='host-model'/>"# yum install guestfs-tools
# grubby --update-kernel=ALL --args="prot_virt=1"[...] </memballoon> </devices> <launchSecurity type="s390-pv"/> </domain>
# touch ~/secure-parameters# ls /boot/loader/entries -l [...] -rw-r--r--. 1 root root 281 Oct 9 15:51 3ab27a195c2849429927b00679db15c1-4.18.0-240.el8.s390x.conf# cat /boot/loader/entries/3ab27a195c2849429927b00679db15c1-4.18.0-240.el8.s390x.conf | grep options options root=/dev/mapper/rhel-root crashkernel=auto rd.lvm.lv=rhel/root rd.lvm.lv=rhel/swap# echo "root=/dev/mapper/rhel-root crashkernel=auto rd.lvm.lv=rhel/root rd.lvm.lv=rhel/swap swiotlb=262144" > ~/secure-parameters# genprotimg -i /boot/vmlinuz-4.18.0-240.el8.s390x -r /boot/initramfs-4.18.0-240.el8.s390x.img -p ~/secure-parameters -k HKD-8651-00020089A8.crt -o /boot/secure-image# cat /boot/loader/entries/3ab27a195c2849429927b00679db15c1-4.18.0-240.el8.s390x.conf title Red Hat Enterprise Linux 8.3 version 4.18.0-240.el8.s390x linux /boot/secure-image [...]# zipl -V# shred /boot/vmlinuz-4.18.0-240.el8.s390x # shred /boot/initramfs-4.18.0-240.el8.s390x.img # shred secure-parameters
#!/usr/bin/bash echo "$(cat /proc/cmdline) swiotlb=262144" > parmfile cat > ./HKD.crt << EOF -----BEGIN CERTIFICATE----- 1234569901234569901234569901234569901234569901234569901234569900 1234569901234569901234569901234569901234569901234569901234569900 1234569901234569901234569901234569901234569901234569901234569900 1234569901234569901234569901234569901234569901234569901234569900 1234569901234569901234569901234569901234569901234569901234569900 1234569901234569901234569901234569901234569901234569901234569900 1234569901234569901234569901234569901234569901234569901234569900 1234569901234569901234569901234569901234569901234569901234569900 1234569901234569901234569901234569901234569901234569901234569900 1234569901234569901234569901234569901234569901234569901234569900 1234569901234569901234569901234569901234569901234569901234569900 1234569901234569901234569901234569901234569901234569901234569900 1234569901234569901234569901234569901234569901234569901234569900 1234569901234569901234569901234569901234569901234569901234569900 1234569901234569901234569901234569901234569901234569901234569900 1234569901234569901234569901234569901234569901234569901234569900 1234569901234569901234569901234569901234569901234569901234569900 1234569901234569901234569901234569901234569901234569901234569900 1234569901234569901234569901234569901234569901234569901234569900 1234569901234569901234569901234569901234569901234569901234569900 1234569901234569901234569901234569901234569901234569901234569900 1234569901234569901234569901234569901234569901234569901234569900 1234569901234569901234569901234569901234569901234569901234569900 1234569901234569901234569901234569901234569901234569901234569900 1234569901234569901234569901234569901234569901234569901234569900 xLPRGYwhmXzKDg== -----END CERTIFICATE----- EOF version=$(uname -r) kernel=/boot/vmlinuz-$version initrd=/boot/initramfs-$version.img genprotimg -k ./HKD.crt -p ./parmfile -i $kernel -r $initrd -o /boot/secure-linux --no-verify cat >> /etc/zipl.conf<< EOF [secure] target=/boot image=/boot/secure-linux EOF zipl -V shutdown -h now# virt-customize -a <vm_image_path> --selinux-relabel --firstboot <script_path>
# virsh dumpxml vm-name [...] <cpu mode='host-model'/> <devices> <disk type='file' device='disk'> <driver name='qemu' type='qcow2' cache='none' io='native'> <source file='/var/lib/libvirt/images/secure-guest.qcow2'/> <target dev='vda' bus='virtio'/> </disk> <interface type='network'> <source network='default'/> <model type='virtio'/> </interface> <console type='pty'/> <memballoon model='none'/> </devices> <launchSecurity type="s390-pv"/> </domain>
16.8.
# lszcrypt -V CARD.DOMAIN TYPE MODE STATUS REQUESTS PENDING HWTYPE QDEPTH FUNCTIONS DRIVER -------------------------------------------------------------------------------------------- 05 CEX5C CCA-Coproc online 1 0 11 08 S--D--N-- cex4card 05.0004 CEX5C CCA-Coproc online 1 0 11 08 S--D--N-- cex4queue 05.00ab CEX5C CCA-Coproc online 1 0 11 08 S--D--N-- cex4queue# lsmod | grep vfio_ap vfio_ap 24576 0 [...]# modprobe vfio_ap# lszdev --list-types ... ap Cryptographic Adjunct Processor (AP) device ...
# echo "obase=10; ibase=16; 04" | bc 4 # echo "obase=10; ibase=16; AB" | bc 171# chzdev -t ap apmask=-5 aqmask=-4,-171注意# lszcrypt -V CARD.DOMAIN TYPE MODE STATUS REQUESTS PENDING HWTYPE QDEPTH FUNCTIONS DRIVER -------------------------------------------------------------------------------------------- 05 CEX5C CCA-Coproc - 1 0 11 08 S--D--N-- cex4card 05.0004 CEX5C CCA-Coproc - 1 0 11 08 S--D--N-- vfio_ap 05.00ab CEX5C CCA-Coproc - 1 0 11 08 S--D--N-- vfio_ap# vim vfio_ap.xml <device> <parent>ap_matrix</parent> <capability type="mdev"> <type id="vfio_ap-passthrough"/> <attr name='assign_adapter' value='0x05'/> <attr name='assign_domain' value='0x0004'/> <attr name='assign_domain' value='0x00ab'/> <attr name='assign_control_domain' value='0x00ab'/> </capability> </device># virsh nodedev-define vfio_ap.xml Node device 'mdev_8f9c4a73_1411_48d2_895d_34db9ac18f85_matrix' defined from 'vfio_ap.xml'# virsh nodedev-start mdev_8f9c4a73_1411_48d2_895d_34db9ac18f85_matrix Device mdev_8f9c4a73_1411_48d2_895d_34db9ac18f85_matrix started# cat /sys/devices/vfio_ap/matrix/mdev_supported_types/vfio_ap-passthrough/devices/669d9b23-fe1b-4ecb-be08-a2fabca99b71/matrix 05.0004 05.00ab# virsh nodedev-dumpxml mdev_8f9c4a73_1411_48d2_895d_34db9ac18f85_matrix <device> <name>mdev_8f9c4a73_1411_48d2_895d_34db9ac18f85_matrix</name> <parent>ap_matrix</parent> <capability type='mdev'> <type id='vfio_ap-passthrough'/> <uuid>8f9c4a73-1411-48d2-895d-34db9ac18f85</uuid> <iommuGroup number='0'/> <attr name='assign_adapter' value='0x05'/> <attr name='assign_domain' value='0x0004'/> <attr name='assign_domain' value='0x00ab'/> <attr name='assign_control_domain' value='0x00ab'/> </capability> </device># vim crypto-dev.xml<hostdev mode='subsystem' type='mdev' managed='no' model='vfio-ap'> <source> <address uuid='8f9c4a73-1411-48d2-895d-34db9ac18f85'/> </source> </hostdev># virsh attach-device testguest1 crypto-dev.xml --live --config
# lszcrypt -V CARD.DOMAIN TYPE MODE STATUS REQUESTS PENDING HWTYPE QDEPTH FUNCTIONS DRIVER -------------------------------------------------------------------------------------------- 05 CEX5C CCA-Coproc online 1 0 11 08 S--D--N-- cex4card 05.0004 CEX5C CCA-Coproc online 1 0 11 08 S--D--N-- cex4queue 05.00ab CEX5C CCA-Coproc online 1 0 11 08 S--D--N-- cex4queue# lszcrypt -d C DOMAIN 00 01 02 03 04 05 06 07 08 09 0a 0b 0c 0d 0e 0f ------------------------------------------------------ 00 . . . . U . . . . . . . . . . . 10 . . . . . . . . . . . . . . . . 20 . . . . . . . . . . . . . . . . 30 . . . . . . . . . . . . . . . . 40 . . . . . . . . . . . . . . . . 50 . . . . . . . . . . . . . . . . 60 . . . . . . . . . . . . . . . . 70 . . . . . . . . . . . . . . . . 80 . . . . . . . . . . . . . . . . 90 . . . . . . . . . . . . . . . . a0 . . . . . . . . . . . B . . . . b0 . . . . . . . . . . . . . . . . c0 . . . . . . . . . . . . . . . . d0 . . . . . . . . . . . . . . . . e0 . . . . . . . . . . . . . . . . f0 . . . . . . . . . . . . . . . . ------------------------------------------------------ C: Control domain U: Usage domain B: Both (Control + Usage domain)
16.9.
# {PackageManagerCommand} install edk2-ovmf# {PackageManagerCommand} install swtpm libtpms
<devices> [...] <tpm model='tpm-crb'> <backend type='emulator' version='2.0'/> </tpm> [...] </devices>
Your device meets the requirements for standard hardware security.
第 17 章
17.1.
17.2.
# tuned-adm list Available profiles: - balanced - General non-specialized TuneD profile - desktop - Optimize for the desktop use-case [...] - virtual-guest - Optimize for running inside a virtual guest - virtual-host - Optimize for running KVM guests Current active profile: balanced# tuned-adm profile selected-profile# tuned-adm profile virtual-host# tuned-adm profile virtual-guest
# tuned-adm active Current active profile: virtual-host# tuned-adm verify Verification succeeded, current system settings match the preset profile. See tuned log file ('/var/log/tuned/tuned.log') for details.
17.3.
|
|
|
|
|
|
|
|
|
|
|
|
|
|
|
|
|
|
|
|
|
|
|
|
|
|
|
|
|
|
|
|
|
|
|
|
|
|
|
|
|
|
17.4.
17.4.1.
17.4.2.
# virsh dumpxml testguest | grep memballoon <memballoon model='virtio'> </memballoon>
# virsh dominfo testguest Max memory: 2097152 KiB Used memory: 2097152 KiB
[D]
17.4.3.
# virsh dumpxml testguest | grep memballoon <memballoon model='virtio'> </memballoon>
# virsh dominfo testguest Max memory: 2097152 KiB Used memory: 2097152 KiB# virt-xml testguest --edit --memory memory=4096,currentMemory=4096 Domain 'testguest' defined successfully. Changes will take effect after the domain is fully powered off.警告# virsh setmem testguest --current 2048
# virsh dominfo testguest Max memory: 4194304 KiB Used memory: 2097152 KiB# virsh domstats --balloon testguest Domain: 'testguest' balloon.current=365624 balloon.maximum=4194304 balloon.swap_in=0 balloon.swap_out=0 balloon.major_fault=306 balloon.minor_fault=156117 balloon.unused=3834448 balloon.available=4035008 balloon.usable=3746340 balloon.last-update=1587971682 balloon.disk_caches=75444 balloon.hugetlb_pgalloc=0 balloon.hugetlb_pgfail=0 balloon.rss=1005456
17.4.4.
# virsh edit testguest<memoryBacking> <hugepages> <page size='1' unit='GiB'/> </hugepages> </memoryBacking>
# cat /proc/meminfo | grep Huge HugePages_Total: 4 HugePages_Free: 2 HugePages_Rsvd: 1 Hugepagesize: 1024000 kB
17.5.
17.5.1.
<domain> [...] <blkiotune> <weight>800</weight> <device> <path>/dev/sda</path> <weight>1000</weight> </device> <device> <path>/dev/sdb</path> <weight>500</weight> </device> </blkiotune> [...] </domain># virsh blkiotune VM-name --device-weights device, I/O-weight# virsh blkiotune testguest1 --device-weights /dev/sda, 500
# virsh blkiotune testguest1 Block I/O tuning parameters for domain testguest1: weight : 800 device_weight : [ {"sda": 500}, ] ...重要
17.5.2.
# virsh domblklist rollin-coal Target Source ------------------------------------------------ vda /var/lib/libvirt/images/rollin-coal.qcow2 sda - sdb /home/horridly-demanding-processes.iso$ lsblk NAME MAJ:MIN RM SIZE RO TYPE MOUNTPOINT zram0 252:0 0 4G 0 disk [SWAP] nvme0n1 259:0 0 238.5G 0 disk ├─nvme0n1p1 259:1 0 600M 0 part /boot/efi ├─nvme0n1p2 259:2 0 1G 0 part /boot └─nvme0n1p3 259:3 0 236.9G 0 part └─luks-a1123911-6f37-463c-b4eb-fxzy1ac12fea 253:0 0 236.9G 0 crypt /home# virsh blkiotune VM-name --parameter device,limit# virsh blkiotune rollin-coal --device-read-iops-sec /dev/nvme0n1p3,1000 --device-write-iops-sec /dev/nvme0n1p3,1000 --device-write-bytes-sec /dev/nvme0n1p3,52428800 --device-read-bytes-sec /dev/nvme0n1p3,52428800
17.5.3.
# virsh edit <example_vm><disk type='block' device='disk'> <driver name='qemu' type='raw' queues='N'/> <source dev='/dev/sda'/> <target dev='vda' bus='virtio'/> <address type='pci' domain='0x0000' bus='0x00' slot='0x04' function='0x0'/> </disk><controller type='scsi' index='0' model='virtio-scsi'> <driver queues='N' /> </controller>
17.5.4.
# virsh edit <testguest1> <domain type='kvm'> <name>testguest1</name> ... <vcpu placement='static'>8</vcpu> <iothreads>1</iothreads> ... </domain>注意# virsh edit <testguest1> <domain type='kvm'> <name>testguest1</name> ... <devices> <disk type='file' device='disk'> <driver name='qemu' type='raw' cache='none' io='native' iothread='1'/> <source file='/var/lib/libvirt/images/test-disk.raw'/> <target dev='vda' bus='virtio'/> <address type='pci' domain='0x0000' bus='0x04' slot='0x00' function='0x0'/> </disk> ... </devices> ... </domain>注意# virsh edit <testguest1> <domain type='kvm'> <name>testguest1</name> ... <devices> <controller type='scsi' index='0' model='virtio-scsi'> <driver iothread='1'/> <address type='pci' domain='0x0000' bus='0x00' slot='0x0b' function='0x0'/> </controller> ... </devices> ... </domain>
17.5.5.
# virsh edit <vm_name><domain type='kvm'> <name>testguest1</name> ... <devices> <disk type='file' device='disk'> <driver name='qemu' type='raw' cache='none' io='native' iothread='1'/> <source file='/var/lib/libvirt/images/test-disk.raw'/> <target dev='vda' bus='virtio'/> <address type='pci' domain='0x0000' bus='0x04' slot='0x00' function='0x0'/> </disk> ... </devices> ... </domain>
17.6.
# virt-xml testguest1 --edit --cpu host-model
17.6.1.
17.6.2.
# virsh vcpucount testguest maximum config 4 maximum live 2 current config 2 current live 1
# virsh setvcpus testguest 8 --maximum --config# virsh setvcpus testguest 4 --live# virsh setvcpus testguest 1 --config
# virsh vcpucount testguest maximum config 8 maximum live 4 current config 1 current live 4
17.6.3.
[D]
- 注意
- 注意
17.6.4.
# virsh nodeinfo CPU model: x86_64 CPU(s): 48 CPU frequency: 1200 MHz CPU socket(s): 1 Core(s) per socket: 12 Thread(s) per core: 2 NUMA cell(s): 2 Memory size: 67012964 KiB# yum install numactl
# virt-xml testguest5 --edit --vcpus placement=auto # virt-xml testguest5 --edit --numatune mode=preferred# echo 1 > /proc/sys/kernel/numa_balancing# systemctl start numad
# numactl --hardware available: 2 nodes (0-1) node 0 size: 18156 MB node 0 free: 9053 MB node 1 size: 18180 MB node 1 free: 6853 MB node distances: node 0 1 0: 10 20 1: 20 10# virsh edit <testguest6> <domain type='kvm'> <name>testguest6</name> ... <vcpu placement='static'>16</vcpu> ... <cpu ...> <numa> <cell id='0' cpus='0-7' memory='16' unit='GiB'/> <cell id='1' cpus='8-15' memory='16' unit='GiB'/> </numa> ... </domain>
17.6.5.
# lscpu -p=node,cpu Node,CPU 0,0 0,1 0,2 0,3 0,4 0,5 0,6 0,7 1,0 1,1 1,2 1,3 1,4 1,5 1,6 1,7# lscpu -p=node,cpu Node,CPU 0,0 0,1 0,2 0,3# virsh vcpupin testguest6 0 1 # virsh vcpupin testguest6 1 3 # virsh vcpupin testguest6 2 5 # virsh vcpupin testguest6 3 7# virsh vcpupin testguest6 VCPU CPU Affinity ---------------------- 0 1 1 3 2 5 3 7# virsh emulatorpin testguest6 2,4 # virsh emulatorpin testguest6 emulator: CPU Affinity ---------------------------------- *: 2,4
17.6.6.
# virsh schedinfo <vm_name> Scheduler : posix cpu_shares : 0 vcpu_period : 0 vcpu_quota : 0 emulator_period: 0 emulator_quota : 0 global_period : 0 global_quota : 0 iothread_period: 0 iothread_quota : 0# virsh schedinfo <vm_name> --set vcpu_period=100000# virsh schedinfo <vm_name> --set vcpu_quota=50000
# virsh schedinfo <vm_name> Scheduler : posix cpu_shares : 2048 vcpu_period : 100000 vcpu_quota : 50000 ...
17.6.7.
# virsh schedinfo <vm_name> Scheduler : posix cpu_shares : 1024 vcpu_period : 0 vcpu_quota : 0 emulator_period: 0 emulator_quota : 0 global_period : 0 global_quota : 0 iothread_period: 0 iothread_quota : 0# virsh schedinfo <vm_name> --set cpu_shares=2048 Scheduler : posix cpu_shares : 2048 vcpu_period : 0 vcpu_quota : 0 emulator_period: 0 emulator_quota : 0 global_period : 0 global_quota : 0 iothread_period: 0 iothread_quota : 0
17.6.8.
# systemctl stop ksm # systemctl stop ksmtuned# systemctl disable ksm Removed /etc/systemd/system/multi-user.target.wants/ksm.service. # systemctl disable ksmtuned Removed /etc/systemd/system/multi-user.target.wants/ksmtuned.service.注意# echo 2 > /sys/kernel/mm/ksm/run
17.7.
# lsmod | grep vhost vhost_net 32768 1 vhost 53248 1 vhost_net tap 24576 1 vhost_net tun 57344 6 vhost_net# modprobe vhost_net
<interface type='network'> <source network='default'/> <model type='virtio'/> <driver name='vhost' queues='N'/> </interface># ethtool -C tap0 rx-frames 64
17.8.
# yum install perf# perf kvm stat report Analyze events for all VMs, all VCPUs: VM-EXIT Samples Samples% Time% Min Time Max Time Avg time EXTERNAL_INTERRUPT 365634 31.59% 18.04% 0.42us 58780.59us 204.08us ( +- 0.99% ) MSR_WRITE 293428 25.35% 0.13% 0.59us 17873.02us 1.80us ( +- 4.63% ) PREEMPTION_TIMER 276162 23.86% 0.23% 0.51us 21396.03us 3.38us ( +- 5.19% ) PAUSE_INSTRUCTION 189375 16.36% 11.75% 0.72us 29655.25us 256.77us ( +- 0.70% ) HLT 20440 1.77% 69.83% 0.62us 79319.41us 14134.56us ( +- 0.79% ) VMCALL 12426 1.07% 0.03% 1.02us 5416.25us 8.77us ( +- 7.36% ) EXCEPTION_NMI 27 0.00% 0.00% 0.69us 1.34us 0.98us ( +- 3.50% ) EPT_MISCONFIG 5 0.00% 0.00% 5.15us 10.85us 7.88us ( +- 11.67% ) Total Samples:1157497, Total events handled time:413728274.66us.
# numastat -c qemu-kvm
Per-node process memory usage (in MBs)
PID Node 0 Node 1 Node 2 Node 3 Node 4 Node 5 Node 6 Node 7 Total
--------------- ------ ------ ------ ------ ------ ------ ------ ------ -----
51722 (qemu-kvm) 68 16 357 6936 2 3 147 598 8128
51747 (qemu-kvm) 245 11 5 18 5172 2532 1 92 8076
53736 (qemu-kvm) 62 432 1661 506 4851 136 22 445 8116
53773 (qemu-kvm) 1393 3 1 2 12 0 0 6702 8114
--------------- ------ ------ ------ ------ ------ ------ ------ ------ -----
Total 1769 463 2024 7462 10037 2672 169 7837 32434
# numastat -c qemu-kvm
Per-node process memory usage (in MBs)
PID Node 0 Node 1 Node 2 Node 3 Node 4 Node 5 Node 6 Node 7 Total
--------------- ------ ------ ------ ------ ------ ------ ------ ------ -----
51747 (qemu-kvm) 0 0 7 0 8072 0 1 0 8080
53736 (qemu-kvm) 0 0 7 0 0 0 8113 0 8120
53773 (qemu-kvm) 0 0 7 0 0 0 1 8110 8118
59065 (qemu-kvm) 0 0 8050 0 0 0 0 0 8051
--------------- ------ ------ ------ ------ ------ ------ ------ ------ -----
Total 0 0 8072 0 8072 0 8114 8110 32368第 18 章
18.1.
--disk path=/usr/share/virtio-win/virtio-win.iso,device=cdrom--os-variant win10# osinfo-query os--boot uefi --tpm model=tpm-crb,backend.type=emulator,backend.version=2.0
# virsh edit windows-vm<os firmware='efi'> <type arch='x86_64' machine='pc-q35-6.2'>hvm</type> <boot dev='hd'/> </os><devices> <tpm model='tpm-crb'> <backend type='emulator' version='2.0'/> </tpm> </devices>
18.2.
18.2.1.
18.2.1.1.
18.2.1.2.
# subscription-manager refresh All local data refreshed# yum install -y virtio-win# yum upgrade -y virtio-win# ls /usr/share/virtio-win/ drivers/ guest-agent/ virtio-win-1.9.9.iso virtio-win.iso
# virt-xml WindowsVM --add-device --disk virtio-win.iso,device=cdrom Domain 'WindowsVM' defined successfully.
18.2.1.3.
[D]
18.2.1.4.
C:\WINDOWS\system32\netsh dump > backup.txtC:\WINDOWS\system32\msiexec.exe /i X:\virtio-win-gt-x86.msi /passive /norestart
C:\WINDOWS\system32\netsh -f backup.txt
18.2.1.5.
18.2.2.
18.2.2.1.
# virsh edit windows-vm<features> [...] <hyperv> <relaxed state='on'/> <vapic state='on'/> <spinlocks state='on' retries='8191'/> <vpindex state='on'/> <runtime state='on' /> <synic state='on'/> <stimer state='on'> <direct state='on'/> </stimer> <frequencies state='on'/> </hyperv> [...] </features><clock offset='localtime'> ... <timer name='hypervclock' present='yes'/> </clock>
<hyperv> <relaxed state='on'/> <vapic state='on'/> <spinlocks state='on' retries='8191'/> <vpindex state='on'/> <runtime state='on' /> <synic state='on'/> <stimer state='on'> <direct state='on'/> </stimer> <frequencies state='on'/> </hyperv> <clock offset='localtime'> ... <timer name='hypervclock' present='yes'/> </clock>
18.2.2.2.
|
|
注意
|
|
|
|
|
|
|
|
|
|
|
|
|
|
|
|
|
|
|
|
|
|
|
| |
|
|
|
|
|
|
|
|
|
|
|
|
|
|
|
|
|
|
|
|
|
|
|
|
|
|
|
|
|
18.2.3.
18.2.4.
|
|
|
|
|
注意
|
|
|
|
|
|
|
|
|
|
|
|
|
|
|
|
|
|
|
|
|
|
|
|
|
18.2.5.
# bcdedit /set useplatformclock No
18.3.
# {PackageManagerCommand} install edk2-ovmf# {PackageManagerCommand} install swtpm libtpms
<devices> [...] <tpm model='tpm-crb'> <backend type='emulator' version='2.0'/> </tpm> [...] </devices>
Your device meets the requirements for standard hardware security.
18.4.
第 19 章
19.1.
19.2.
|
|
|
|
|
|
| |
|
| ||
|
|
# *modprobe kvm hpage=1 nested=1*
modprobe: ERROR: could not insert 'kvm': Invalid argument
# *dmesg |tail -1*
[90226.508366] kvm-s390: A KVM host that supports nesting cannot back its KVM guests with huge pages19.3.
# cat /sys/module/kvm_intel/parameters/nested# modprobe -r kvm_intel# modprobe kvm_intel nested=1options kvm_intel nested=1
# virsh edit Intel-L1<cpu mode='host-passthrough'/><cpu mode ='custom' match ='exact' check='partial'> <model fallback='allow'>Haswell-noTSX</model> <feature policy='require' name='vmx'/> ... </cpu>
19.4.
# cat /sys/module/kvm_amd/parameters/nested# modprobe -r kvm_amd# modprobe kvm_amd nested=1options kvm_amd nested=1
# virsh edit AMD-L1<cpu mode='host-passthrough'/><cpu mode="custom" match="exact" check="none"> <model fallback="allow">EPYC-IBPB</model> <feature policy="require" name="svm"/> ... </cpu>
19.5.
# cat /sys/module/kvm/parameters/nested# modprobe -r kvm# modprobe kvm nested=1options kvm nested=1
19.6.
# cat /sys/module/kvm_hv/parameters/nested# modprobe -r kvm_hv# modprobe kvm_hv nested=1options kvm_hv nested=1
<nested-hv state='on'/>
第 20 章
20.1.
20.1.1.
20.1.2.
Expand 表 20.1. 例 20.1.
log_filters="3:remote 4:event 3:util.json 3:rpc" log_outputs="1:file:/var/log/libvirt/libvirt.log"$ systemctl restart libvirtd.service
20.1.3.
# virt-admin daemon-log-filters >> virt-filters-backup注意Expand 表 20.2. 例 20.2.
# virt-admin daemon-log-filters "3:remote 4:event 3:util.json 3:rpc"# virt-admin daemon-log-outputs "1:file:/var/log/libvirt/libvirt.log"# virt-admin daemon-log-filters Logging filters:
20.1.4.
20.2.
20.2.1.
20.2.2.
# virsh dump lander1 /core/file/gargantua.file --memory-only Domain 'lander1' dumped to /core/file/gargantua.file
crashkernel=1G-4G:192M,4G-64G:256M,64G-:512M20.3.
# pgrep libvirt 22014 22025
# gstack 22014 Thread 3 (Thread 0x7f33edaf7700 (LWP 22017)): #0 0x00007f33f81aef21 in poll () from /lib64/libc.so.6 #1 0x00007f33f89059b6 in g_main_context_iterate.isra () from /lib64/libglib-2.0.so.0 #2 0x00007f33f8905d72 in g_main_loop_run () from /lib64/libglib-2.0.so.0 ...
第 21 章
21.1.
21.2.
# virsh dumpxml VM-name | grep machine=
# /usr/libexec/qemu-kvm -M help21.3.
<domain type='qemu'><domain type='kvm'>
<disk type="block" device="lun"><hostdev mode='subsystem' type='scsi'>21.4.
21.5.
21.6.
|
|
|
|
|
|
|
|
|
|
|
|
|
|
|