How to Manage JBoss Servers with JBoss ON
managing JBoss applications
Edition 3.1.2
Abstract
Document Information
1. Document History
| Revision History | ||||||
|---|---|---|---|---|---|---|
| Revision 3.1.2-1.400 | 2013-10-31 | |||||
| ||||||
| Revision 3.1.2-1 | January 23, 2013 | |||||
| ||||||
| Revision 3.1.1-1 | September 19, 2012 | |||||
| ||||||
| Revision 3.1-1 | June 12, 2012 | |||||
| ||||||
Chapter 1. How JBoss ON Manages JBoss Resources
1.1. How JBoss ON Works with JBoss Software
- Monitoring, event logging, availability, and alerting ("Setting up Monitoring, Alerts, and Operations")
- Managing software updates and patches (Chapter 14, Applying JBoss Patches from the Patch RSS Feed)
- Deployed web applications (Chapter 13, Deploying Applications)
- Clusters and web contexts (Chapter 16, Managing mod_cluster Deployments for JBoss EAP 5 (Tech Preview))
1.2. What's Covered in This Guide
- Content management for EARs and WARs and other web applications
- Managing JBoss server clusters
- Managing JBoss server domains
- Monitoring JBoss instances
1.3. Installing JBoss Plug-in Packs
| Product | Versions | Plug-in Pack |
|---|---|---|
| JBoss AS or EAP |
| EAP |
| JBoss AS |
| Tech Preview |
| mod_cluster |
| Tech Preview |
| Hibernate | EAP | |
| JBoss Cache Service |
| EAP |
| JMX | EAP | |
| JMS Manager Service (HornetQ) | EAP | |
| Business Rules Management Service (BRMS/Drools) |
| BRMS |
| Data Services Platform (EDS-P/Teiid) |
| EDS |
| Developer Studio (ModeShape) |
| ModeShape |
| Tomcat (Web Services) |
| EWS |
| ESB Services (SOA-P) |
| SOA-P |
- Download the plug-in JAR files from the Customer Support Portal.In the Customer Support Portal, click Software, and then select the JBoss ON for Plug-in drop-down box.
- Download the plug-in packs.
- Unzip the additional plug-in packs. This creates a subdirectory with the name
jon-plugin-pack-plugin_name-3.1.2.GA1. - Copy the new plug-ins from the
jon-plugin-pack-plugin_name-3.1.2.GA1/directory to the JBoss ON server plug-in directory.[root@server rhq-agent]# cp myDirectory/jon-plugin-pack-plugin_name-3.1.2.GA1/* /opt/jon/jon-server-3.1.2.GA1/plugins
The server polls this directory every few minutes to look for updated plug-ins. - Once the plug-ins have been deployed to the server, reload the agent plug-ins on the agents themselves.This can be done from the command line using the agent's
pluginscommand:> plugins update
This can also be done in the JBoss ON GUI by scheduling an update plugins operation for an agent or a group or agents.
Part I. General Tasks
Chapter 2. Setting up a Custom JVM for Discovery
2.1. Required JVM Configuration for Discovery
- Sun JMX remoting is enabled, with a port system property specified in the command line.
-Dcom.sun.management.jmxremote.port=12345 com.xyz.MyAppMain
- A Sun/Oracle-compatible Java process is accessible through the
com.sun.tools.attachAPI, and the resource key is specified as a system property in the command line.-Dorg.rhq.resourceKey=KEY com.xyz.MyAppMain
2.2. Excluding Java Processes from Discovery
rhq.jmxplugin.process-filters, which lists strings to ignore specifically from the Generic JMX Plug-in discovery scan. If a Java process contains any of the strings in the filter, it is excluded from discovery as a JMX server[1].
RHQ_AGENT_ADDITIONAL_JAVA_OPTS="-Drhq.jmxplugin.process-filters=org.rhq.enterprise.agent.AgentMain,org.jboss.Main,catalina.startup.Bootstrap"
- Open the agent configuration file.
[jbosson-agent@server ~]$ vim agentRoot/rhq-agent/conf/agent-configuration.xml
- In the
RHQ_AGENT_ADDITIONAL_JAVA_OPTSlink, add the string to exclude to therhq.jmxplugin.process-filtersoption. This can be the classname or any other identifying string which is in the command line for the given process.For example:RHQ_AGENT_ADDITIONAL_JAVA_OPTS="-Drhq.jmxplugin.process-filters=org.rhq.enterprise.agent.AgentMain,org.jboss.Main,catalina.startup.Bootstrap
,com.abc.OtherAppMain"Therhq.jmxplugin.process-filtersvalue is a comma-separated list of strings. - Restart the agent with the
--configoption to load the new configuration.[jbosson-agent@server ~]$ agentRoot/rhq-agent/bin/rhq-agent.sh --config
2.3. Manually Importing a JVM Resource
Note
- Click the Inventory tab in the top menu.
- Select the platform resource.
- Click the Inventory tab of the platform.
- Click the Import button in the bottom of the Inventory tab, and select the JMX server resource type.
- Select the type of JVM, and set all of the connection properties correctly, depending on the type of JVM selected.

- Fill in the connection information for the JVM. This varies depending on the JVM type, but it includes options like a URL and port, directory paths for client libraries, directory paths for classes, and login credentials.

- Click the to import the instance.
Chapter 3. Enabling the Agent to Connect to Secured JMX Servers
-Dcom.sun.management.jmxremote
-Dcom.sun.management.jmxremote.port=5222
-Dcom.sun.management.jmxremote.ssl=false
-Dcom.sun.management.jmxremote.authenticate=true
-Dcom.sun.management.jmxremote.password.file=/jmxremote.password
-Dcom.sun.management.jmxremote.access.file=/jmxremote.access
Note
The agent generally reads the connection credentials from the jmx-console-*.properties file in the JbossASInstallDir/server/default/conf/props/ directory.
jmx-console-users.properties file, so there is no way for the agent to get the credentials.
- Open the
jmx-console-*.propertiesfile for editing. For example:[root@server ~]# vim JbossASInstallDir/server/default/conf/props/jmx-console-users.properties
- Uncomment or add a line for the admin user.
admin=admin
By default, the agent uses the jmx-console-*.properties file for a username, not the access files. It is possible to change the connection settings for the resource so that the agent uses the access files, going through the remote endpoint, which were specified in the JMX server's command line.
- Click the Inventory tab in the top menu.
- Search for the JMX server in the Servers area of the Inventory, or open the JBoss EAP instance and navigate through its children to find the JMX server instance.
- On the JMX server's entry page, open the Inventory tab, and select the Connection Settings subtab.
- Enter the user name and password to set in the JMX remote access files.
- Click the button.
JBoss ON can connect to the parent resource, and then use that to connect to the JMX server, rather than connecting through the remoting endpoint. This does not require using any user credentials, since the parent can connect to the child resource using internal authentication.
- Click the Inventory tab in the top menu.
- Search for the JMX server in the Servers area of the Inventory, or open the JBoss EAP instance and navigate through its children to find the JMX server instance.
- On the JMX server's entry page, open the Inventory tab, and select the Connection Settings subtab.
- Unset all of the connection properties except for the Type property.
- For the Type property, select the Parent value.
- Click the button.
Part II. Managing JBoss EAP 6 (AS 7)
Chapter 4. The Structure of JBoss EAP 6
Note
4.1. "Classic" Structure: Standalone Servers
standalone.xml file. Almost every entry in that file is identified as a child of the server. For example, these subsystem entries create the ee and jmx child resources for the server:
<subsystem xmlns="urn:jboss:domain:ee:1.1"/>
<subsystem xmlns="urn:jboss:domain:jmx:1.1">
    <show-model value="true"/>
    <remoting-connector/>
</subsystem>standalone.xml.
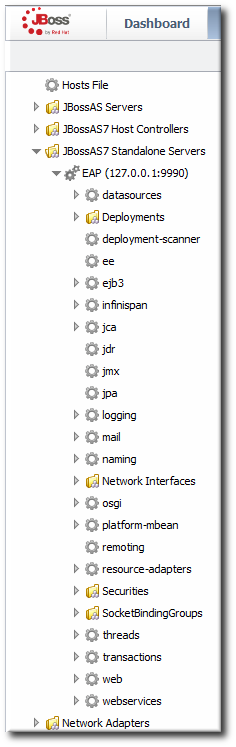
Figure 4.1. Standalone Server Configuration
4.2. Separating Configuration and Real-Time Operations: Domains
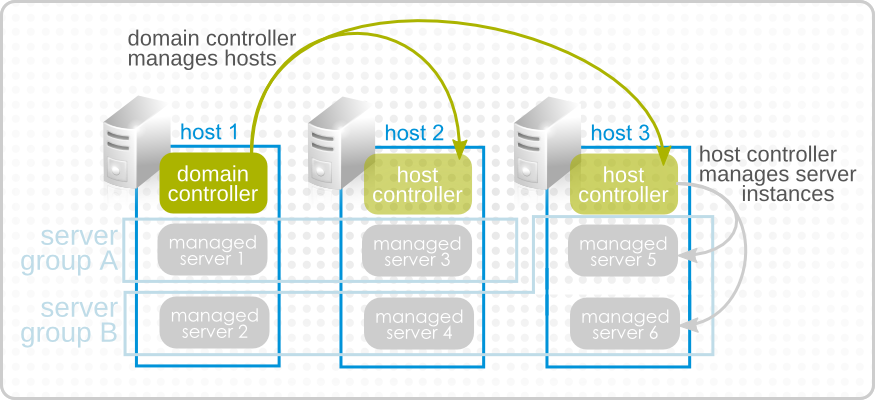
Figure 4.2. Simple Domain Structure
domain.xml file. This lists all of the configured profiles and subsystems, server groups, socket binding configuration, system properties, deployments, and other settings. As with the standalone server, almost every entry is discovered and added to the inventory as a resource. For example, this creates a server group resource, with a child deployment resource and a child JVM resource for the server group.
Example 4.1. Server Group domain.xml Entry
        <server-group name="main-server-group" profile="full">
            <jvm name="default">
                <heap size="1303m" max-size="1303m"/>
                <permgen max-size="256m"/>
            </jvm>
            <socket-binding-group ref="full-sockets"/>
            <deployments>
                <deployment name="sample2.war" runtime-name="sample2.war"/>
            </deployments>
</server-group> host.xml file. These managed servers have virtually no configuration of their own; they simply point back to the original server group configuration to use in the domain.
    <servers>
        <server name="server-one" group="main-server-group"/>
        <server name="server-two" group="other-server-group">
            <!-- server-two avoids port conflicts by incrementing the ports in
                 the default socket-group declared in the server-group -->
            <socket-bindings port-offset="150"/>
        </server>
    </servers>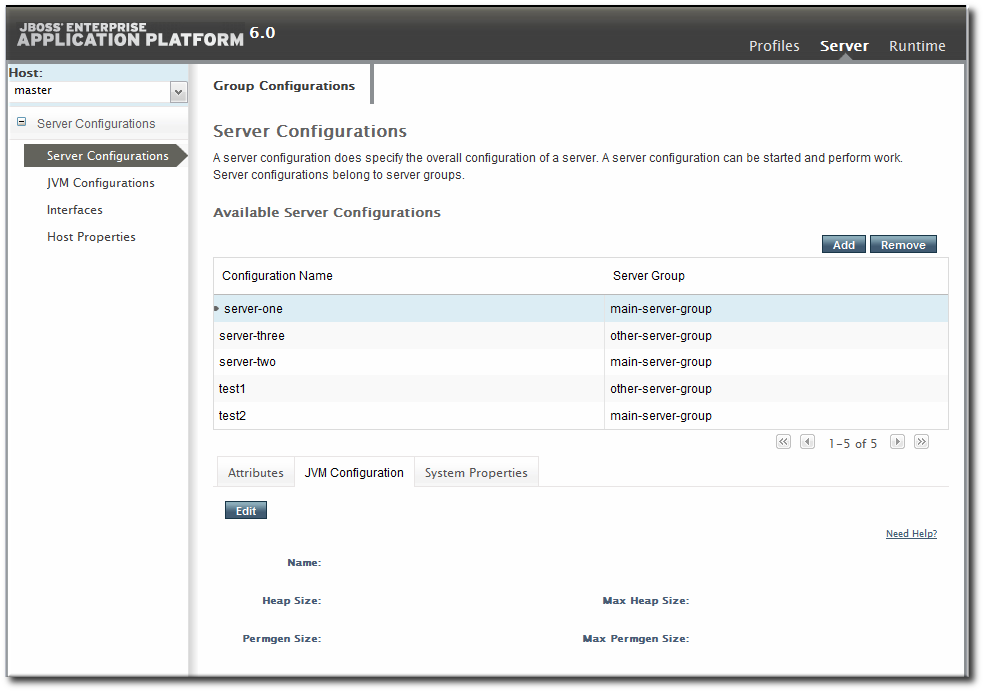
Figure 4.3. EAP 6 Console
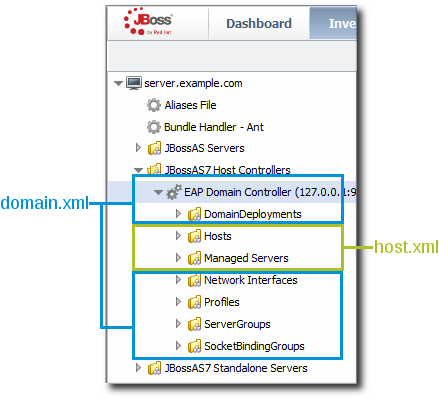
Figure 4.4. Domain Resources
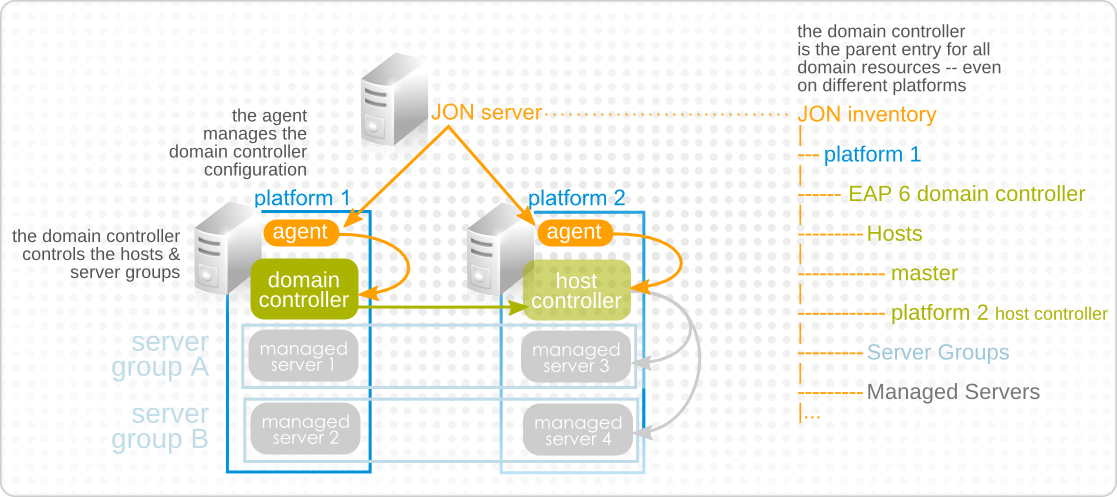
Figure 4.5. Domain Components in the JBoss ON Inventory
4.3. EAP 6 Resources in JBoss ON
domain.xml, host.xml, or standalone.xml is interpreted as a resource type. Because EAP 6 draws a distinction between configuration components and operational components, the EAP 6 resource types in JBoss ON do different things; some resources define configuration, while others are used for monitoring, alerting, and operations.
4.4. The Purpose of Managing EAP 6 Resources with JBoss ON
- Additional monitoring metrics for resources, with stored historical data, resource-specific operational baselines, and alternate display types
- Configuration and connection setting histories
- Inventory change histories when children are added or removed through JBoss ON
- Package versioning and repositories for controlled package updates
- Configuration, monitoring, and alerting for underlying and associated resources, like the platform, Apache and Tomcat web servers, and plug-ins like
mod_cluster
4.5. Topics Covered in This Guide
- "Initial Setup for the Resource Inventory, Groups, and Users" for creating dynagroups definitions, importing child resources, creating groups, and managing users and access control.
- "Deploying Applications and Content," particularly for bundles deployment.
- "Managing Resource Configuration" for managing drift and editing resource configuration.
- "Setting up Monitoring, Alerts, and Operations" for information about configuring alerts, particularly for launching script and resource operations; for setting up and changing monitoring configuration; and for running operations.
- "Writing JBoss ON Command-Line Scripts" for examples on writing server scripts and using the CLI.
Chapter 5. Upgrading the JBoss EAP 6 Resource Plug-in
Note
- Delete the original tech preview plug-in and purge it from the JBoss ON database. Purging the plug-in allows the server to deploy the new plug-in in its place.
- In the top menu, click the Administration tab.
- In the Configuration box on the left navigation bar, click the Agent Plugins link.

- Select the EAP 6 tech preview plug-in.
- Click the Delete button.

- Click the SHOW DELETED button at the bottom of the plug-ins list.
- Select the EAP 6 plug-in, and then click the PURGE button. This removes the entry in the JBoss ON database that tells the servers to ignore that original tech preview plug-in and any updates to it.

Important
Wait for the purge operation to complete before continuing with the upgrade process.
- If the server has not already been upgraded, upgrade the JBoss ON server, as described in the server upgrade section of the Installation Guide.
- Install the EAP 6 plug-in pack, as described in the installing plug-in packs section of the Installation Guide.
- Import the EAP 6 server and its children, and manage the resources as normal.
Chapter 6. Setting up JBoss EAP 6 Instances
6.1. Configuration for Servers and Profiles
6.1.1. Differences for Standalone Servers and Domains

Figure 6.1. Profiles Area in the EAP 6 Console
- Subsystem configuration is located in the profile resources within the Profiles autogroup for the domain controller.
- JVM definitions are configured under the domain controller (domain-wide defaults), server group (group-wide settings), or the managed server (local settings).
- Network interfaces are configured under the domain controller.
- Socket bindings themselves are configured as part of the domain controller configuration, in the entries under the SocketBindings autogroup for the domain controller. Each server group and managed server has an offset, a number that is added to the socket bindings value, which is used to give the managed servers unique port numbers in the domain; these offsets are set on the server group and managed server connection settings.
- System properties can be set on almost any server resource: the domain controller, host controller, server group, managed server.
6.1.2. Requried Management Interfaces on EAP 6
/host=instanceName/core-service=management/management-interface=http-interface:add(interface=http,port="\${jboss.management.http.port:9990}",security-realm=ManagementRealm6.1.3. Configuration Features in JBoss ON
- View the change history, including diffs between versions
- Rollback changes to any previous version, simply by clicking a button
- Track which users made changes, as part of an audit trail
- Use alerting to notify administrators of any configuration changes
- Define drift monitoring to track configuration changes against a defined baseline and to control unexpected configuration changes
6.2. Creating Management Users
6.2.1. Creating a Management User Through JBoss ON
rhqadmin user in the ManagementRealm for the EAP 6 server.
Note
- Click the Inventory tab in the top menu.
- Select Servers - Top Level Imports in the Resources menu table on the left. Select the JBoss EAP 6 server, either the standalone server or the domain controller.
- In the inventory tree, select the top resource entry for the server.
- Open the Operations tab.
- Click the New button at the bottom of the page.
- Select the Install RHQ User option from the drop-down menu.

- Click the Schedule button.
6.2.2. Creating a Management User in EAP 6
- Run the
add-userutility to create the user.[root@server ~]# cd /opt/jboss-eap-6.0 [root@server bin]# ./add-user.sh What type of user do you wish to add? a) Management User (mgmt-users.properties) b) Application User (application-users.properties) (a): a Enter the details of the new user to add. Realm (ManagementRealm) : Username : jonadmin Password : Re-enter Password : About to add user 'jonadmin' for realm 'ManagementRealm' Is this correct yes/no? yes
- Set that user in the connection settings for the EAP 6 server resource in JBoss ON.
- Click the Inventory tab in the top menu.
- Select Servers - Top Level Imports in the Resources menu table on the left. Select the JBoss EAP 6 server, either the standalone server or the domain controller.
- In the inventory tree, select the top resource entry for the server.
- Open the Inventory tab.
- Select the Connection Settings subtab.
- Fill in the username and password for the management user that was created in EAP 6.

- Click the button at the top of the page.
6.3. Creating a Dynamic Group for EAP 6 Resources
- Click the Inventory tab in the top menu.
- In the Groups area on the left, click the Dynagroup Definitions link.

- Enter the expression to create compatible groups for each EAP 6 server type.
resource.type.plugin = JBossAS7
resource.type.category = SERVER
resource.parent.type.category = PLATFORM
groupby resource.pluginConfiguration[productType]
groupby resource.type.name

- Click the button in the middle of the page.
6.4. Setting Start Script Arguments, Environment Variables, and JAVA_OPTS
6.4.1. Start Script Discovery and Settings
- The discovery process identifies, or attempts to identify, the start script used, including custom start scripts.
- Discovery detects a subset of environment variables set in the
run.conffile or parent process that are required for the start script to work.Note
Although the discovery process does detect some environment variables, the discovery scan does not detectJAVA_OPTSvalues.The connection properties for the start script intentionally defer to therun.conffile forJAVA_OPTSvalues. - Discovery attempts to detect any arguments passed with the start script itself.
- Discovery attempts to detect what user the script is running as and assign a prefix command to use with the start script. For example, if the start script is running as the
jbossuser and the JBoss ON agent is running asjonagent, then the discovery script automatically assigns asudocommand,sudo -u jboss -g jboss, to pass with the start script.
Note
-XX:PermSize=256M), the argument value will not be updated if the server is restarted later with a different setting value.
6.4.2. Start Script Arguments and Drift Monitoring
Example 6.1. System Properties Without Violating the Drift Definition
6.4.3. Changing Start Script Configuration
- Click the Inventory tab in the top menu.
- Select Servers - Top Level Imports in the Resources menu table on the left. Select the JBoss EAP 6 server.
- In the inventory tree, select the top resource entry for the server.
- Open the Inventory tab, and select the Connection Settings subtab.
- Expand the Operations area.
- Change or add start script settings. These are the scripts and settings that the JBoss ON agent uses when running a start or restart operation on the EAP 6 server.

- To use a custom start script, one other than
domain.shorstandalone.sh, enter the path and script name. - Optionally, enter a prefix to use with the script when running the start script.When the start script is discovered, the agent tries to determine the user the script is running as and assign a prefix command to use with the start script. For example, if the start script is running as the
jbossuser and the JBoss ON agent is running asjonagent, then the discovery script automatically assigns asudocommand,sudo -u jboss -g jboss, to pass with the start script.Additionally, JBoss ON assigns thenohupcommand as a prefix so that if the JBoss EAP/AS server is started by the agent and the agent process dies, the JBoss EAP/AS server process continues running. - Set any environment variables, one per line.
- Set any script arguments, one per line. For regular JAVA_OPTS, these arguments usually are
-X,-D, or-P. Some useful-XXarguments are listed in the JVM options documentation from Sun. Some useful system properties for EAP 6 are listed with the JBoss AS7 project documentation.The EAP 6 default start scripts use arun.sh-style script, so the arguments use that format. A custom script can use different arguments or options.
- Click the Save button at the top of the page.
6.5. Changing Port Numbers
6.5.1. Changing Socket Binding Ports
- Click the Inventory tab in the top menu.
- Select Servers - Top Level Imports in the Resources menu table on the left. Select the JBoss EAP 6 server.
- In the inventory tree, select the SocketBindingsGroup compatible group, and then select the socket binding to edit.
- Open the Configuration tab.
- Click the green pencil icon to edit an existing socket definition or click the green plus sign (+) to create a new one.
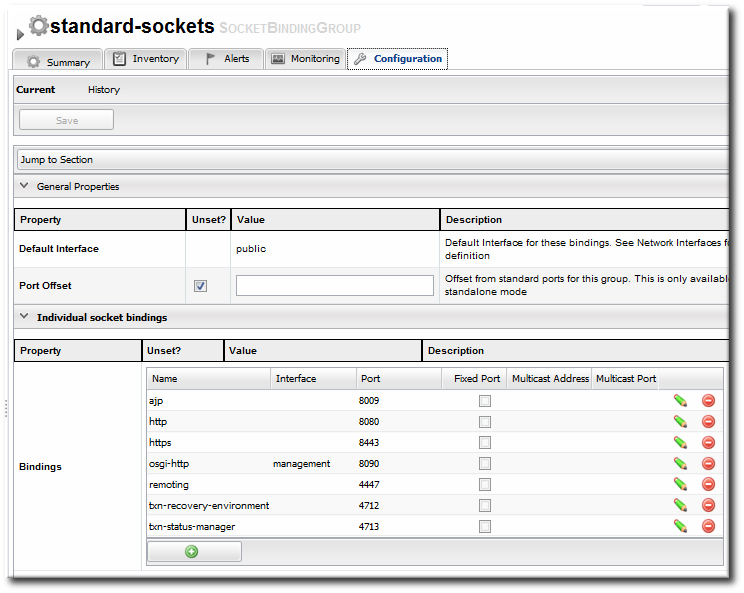
- Change the Port number to any available port between 1025 and 65535. On Linux, available port numbers can be determined using
iptables. Optionally, configure multicast settings for the socket. If there are multiple instances of JBoss servers on the same system or in the same cluster, then multicast may be configured for cluster communication.
 - Click the Save button at the top of the page.
6.5.2. Changing Port Offsets for Server Groups in a Domain
Note
host.xml file. This can be set when the managed server is created in JBoss ON, but it cannot be edited afterward.
- Click the Inventory tab in the top menu.
- Select Servers - Top Level Imports in the Resources menu table on the left. Select the JBoss EAP 6 server.
- In the inventory tree, expand the Server Groups node, and select the server group.
- Open the Configuration tab for the server group.
- In the Port Offset field, enter the new value for the offset.

- Click at the top of the page.
6.6. Editing Network Interfaces
- Click the Inventory tab in the top menu.
- Select Servers - Top Level Imports in the Resources menu table on the left. Select the JBoss EAP 6 server.
- In the inventory tree, select the Network Interfaces group under the main server entry, and select the interface (management, public, or unsecure).
- Open the Configuration tab.
- Set either the specific IP address for the interface to use or set which type of IP address to use (IPv4, IPv6, or either). Either the IP address or the IP address type must be set.
 Because either a specific IP address or an IP address type can be set, and which property is used is optional, the UI does not enforce that a selection is made. For the network interface to work properly, however, some kind of IP address configuration must be set.
 - Click the Save button at the top of the page.
6.7. Setting System Properties
domain.xml file. When editing a host controller or a managed server, the properties are added to the server's entry in the host.xml file.
Note
-D or -P arguments.
Note
- Click the Inventory tab in the top menu.
- Select Servers - Top Level Imports in the Resources menu table on the left. Select the JBoss EAP 6 server.
- In the inventory tree, select the top resource entry for the server.
- Open the Configuration tab.
- Expand the Properties section.

- Click the green plus (+) icon at the bottom of the Paths list.
- Fill in the new property information.

- The system property name.
- The value of the property.
- If the property should be loaded immediately to the running JVM or if it should be loaded when the JVM is started. The default is to load it immediately.
- Click .
6.8. Adding System Paths
Note
jboss.*, user.*, and java.*.
- Click the Inventory tab in the top menu.
- Select Servers - Top Level Imports in the Resources menu table on the left. Select the JBoss EAP 6 server.
- In the inventory tree, select the top resource entry for the server.
- Open the Configuration tab.
- Expand the Paths section.

- Click the green plus (+) icon at the bottom of the Paths list.
- Fill in the path information.

- The name of the path to create.
- The path (absolute or relative) to create.
- If a relative path was given as the Path value, then de-select the Unset? checkbox for the Relative field, and enter the name of the system path that it is relative to.For example, if the new path is
devel/, and this is relative to the EAP home directory, then the Relative value is java.home.dir. This results in a final path of/opt/jboss-eap-6.0/devel/. - If the property is read-only. A read-only property cannot be edited after it is created. Read-only paths (aside from the default paths) have to be deleted and recreated if they need to be changed.
- Click .
6.9. Editing Connection Settings
6.9.1. Changing the General Properties for an EAP 6 Server
- Click the Inventory tab in the top menu.
- Select Servers - Top Level Imports in the Resources menu table on the left. Select the JBoss EAP 6 server.
- In the inventory tree, select the top resource entry for the server.
- Open the Inventory tab, and select the Connection Settings subtab.
- The server connection properties are in the General Properties section. Only some of the properties can be edited. Information that is derived from the JBoss EAP 6 installation itself, like the home directory, base directory, and server type (EAP or AS) is displayed, but is inactive.

- Hostname gives IP address to use to connect to the server. This is usually 127.0.0.1, but if the management interface configuration has been changed, then the IP address may be a public IP instead of the localhost.
- Port is the port of the management interface.
- Username and Password are the credentials of the JBoss EAP 6 user for the agent to use to log in. If this user was created using the install RHQ user operation, then the user is
rhqadmin. - Domain Controllers Only. With the standalone server, all of the configuration and the server instance definition are in the same file,
standalone.xmlor any other configuration file passed to the start script. For domains, the server configuration is defined in one file (for the domain controller), while the server instances are defined in a separate file (for the host controller). The Domain Configuration and Host Configuration fields give the names of the files within thedomain/configuration/directory to reference for profile configuration and for managed server instances, respectively.
- Click the button at the top of the page.
Note
6.9.2. Viewing Installation Paths for EAP 6 Child Resources
main-server-group definition is in the domain controller's domain.xml file:
    <server-groups>
        <server-group name="main-server-group" profile="full">
		... 8< ...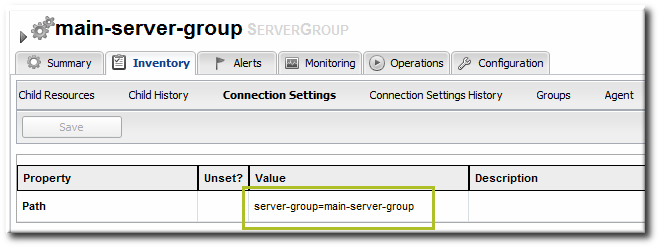
Figure 6.2. Child Resource Connection Settings
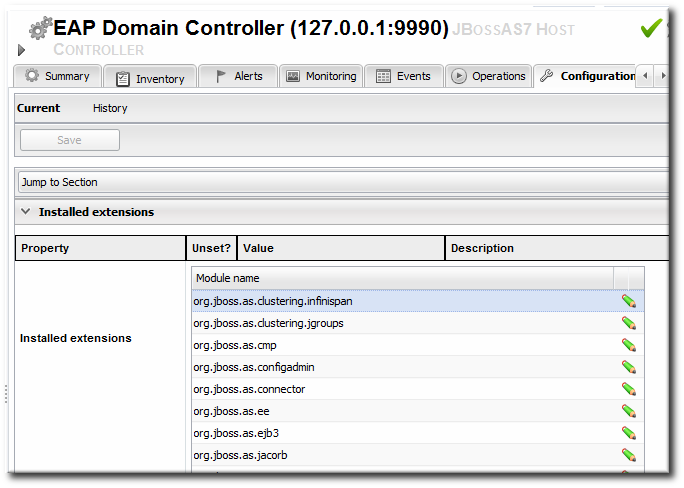
6.10. Viewing Installed Extensions
domain.xml or standalone.xml).
    <extensions>
        <extension module="org.jboss.as.clustering.infinispan"/>
        <extension module="org.jboss.as.clustering.jgroups"/>
        <extension module="org.jboss.as.cmp"/>
        <extension module="org.jboss.as.configadmin"/>
        <extension module="org.jboss.as.connector"/>
        <extension module="org.jboss.as.ee"/>
        <extension module="org.jboss.as.ejb3"/>
... 8< ...- Click the Inventory tab in the top menu.
- Select Servers - Top Level Imports in the Resources menu table on the left. Select the JBoss EAP 6 server.
- In the inventory tree, select the top resource entry for the server.
- Open the Configuration tab.
- Expand the Installed extensions section.
Note
6.11. Reloading the Server Configuration
Note

Figure 6.3. Reload Configuration Message
Note
Note
- Click the Inventory tab in the top menu.
- Select Servers - Top Level Imports in the Resources menu table on the left. Select the JBoss EAP 6 server.
- In the inventory tree, select the top resource entry for the server.
- Open the Operations tab.
- Click the New button at the bottom of the page.
- Select the Reload) option from the drop-down menu.
- Click the Schedule button.
6.12. Controlling Configuration Drift
- Set drift definitions that track the critical configuration directories, such as
domain/configuration/andstandalone/configuration/, but that exclude directories which will have constantly changing data, such as logging, library, and data directories. Even within the configuration directories, create exclude rules for thehost_xml_history/,domain_xml_history/, andstandalone_xml_history/directories, since those are not proper configuration files and should not be tracked. - Once the desired configuration is in place, pin that configuration to the drift definition. This sets the desired configuration as the baseline. All changes will be compared against that baseline.
- Create an archive of the blessed configuration.
- Create a bundle definition that can be automatically deployed to reset the EAP 6 configuration and remediate drift.When creating the he destination should be the platform of the EAP 6 resource. The destination could be the standalone server or the domain controller, but using the platform allows you to deploy the bundle to an expendable directory, like
/tmp/mybundles/holding, and then run a post-install task that copies the configuration files into the configuration directory.Deploying a bundle generally removes whatever existing files are in the target directory and replaces them with the bundle. There are ways to control that behavior, but, generally, it is safest to have the contents of the bundle match exactly what the final deployment will be.Since it may not be feasible to have the entire configuration directory in the bundle, deploying to a separate location on the filesystem preserves the configuration directory, and only the important configuration files are updated (when they are copied by the Ant task).For more on bundles and remedying drift, see the bundles chapter in "Deploying Applications and Content" and the drift-bundle CLI example script in "Writing JBoss ON Command-Line Scripts." - Set up alerts for configuration drift that do two things:
- Send a notification email to administrators.
- Run a CLI script on the platform that automatically deploys the bundle.
"Setting up Monitoring, Alerts, and Operations" has information on how to configure alert notifications that launch a JBoss ON server-side script or that run an operation on another resource.
Note
domain.xml and standalone.xml. That will trigger a drift alert, if alerting is configured.
6.13. Tracking and Reverting Configuration Changes
- Click the Inventory tab in the top menu.
- Select Servers - Top Level Imports in the Resources menu table on the left. Select the JBoss EAP 6 server.
- In the inventory tree, select the top resource entry for the server.
- Open the Configuration tab, and select the History subtab.
Note
Change history pages are kept for resource configuration (the Configuration tab) and the connection settings (the Inventory > Connection Settings tab). - Clicking the change ID number opens the configuration settings that were in effect for that version.

- Changes can be compared to one another, in a standard diff format, by selecting them from the list and clicking the button.
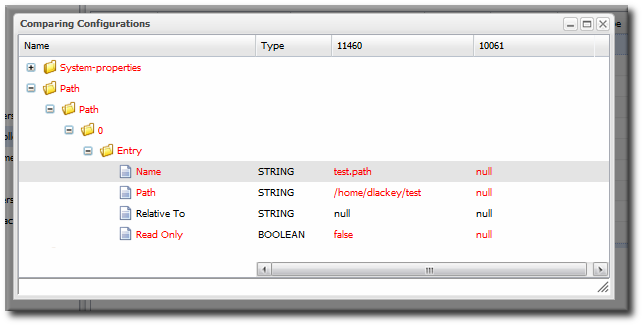
- The current, live version of the configuration can be reverted to any previous version by selecting the desired previous version in the list and clicking the button.

Chapter 7. Creating JBoss EAP 6 Resources
7.1. Tracking the Child History
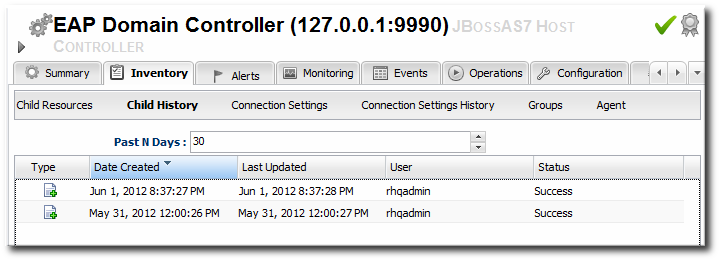
Figure 7.1. Child History
7.2. Creating Server Groups
- Click the Inventory tab in the top menu.
- Select Servers - Top Level Imports in the Resources menu table on the left.
- Right-click the domain controller entry.

- In the Create New menu, select the item for .
- Enter the name for the new server group.
- Enter the settings for the server group: the profile to use, the socket bindings group to use, and any system properties to set.

- Click .
7.3. Creating Managed Servers
Note
Note
- Click the Inventory tab in the top menu.
- Select Servers - Top Level Imports in the Resources menu table on the left.
- Right-click the domain controller entry.
- In the Create New menu, select the item for .
- Enter the name for the new server.
- Enter the settings for the server:
- The EAP 6 domain host to create the server on.
- The server group to add the server to.
- The socket binding group to use. This gives the base port numbers for the server instance to use.
- The port offset. This is the number to add to the socket bindings settings to determine the actual port numbers for the server instance. If the socket binding port is 1000, and the offset is 150, then the port number used for that interface on the managed server is 1150.
- Whether the server starts automatically when the EAP 6 host starts.
- Any system properties for the server.

- Click .
7.4. Changing JVM Definitions
7.4.1. JVM Definitions as Resources
Figure 7.2. JVM Definitions in the EAP 6 Console
7.4.2. Creating a JVM Definition
Important
- Click the Inventory tab in the top menu.
- Select Servers - Top Level Imports in the Resources menu table on the left.
- Right-click the entry to which to add the JVM definition.
- In the Create New menu, select the item for .
- Enter the name for the definition.

Note
The name of JVM definition can be anything for a host controller. For a managed server or server group, the name of the JVM definition must be the same as the host controller JVM definition which is the base of the definition. - Enter the settings for the JVM. Any settings which are left blank use the values defined in the parent JVM definition.
 Most of the configuration for the JVM relates to memory and resource usage, along with options to pass environment variables or other settings to the JVM. The values of these settings can have a positive impact on both the resource performance and the overall system performance.The configuration settings are listed in Table 7.1, “JVM Definition Properties”.
 - Click .
| Property | Description |
|---|---|
| JVM Options | Sets any other Java option. Many of these are documented with the Java provider, such as Sun's documentation at http://www.oracle.com/technetwork/java/javase/tech/vmoptions-jsp-140102.html. |
| Environment variables | Sets environments variables to use with the JVM. |
| Heap Size | Sets the initial heap size for the JVM. |
| Max Heap Size | Sets the maximum allowed heap size for the JVM. Setting this too low can cause out of memory errors. |
| Permgen Size | Sets the initial size of the permanent generation. |
| Max Permgen Size | Sets the maximum size of the permanent generation. |
| Type | The type of JVM. This can be Sun or IBM, the two supported Java types for JBoss ON. |
7.4.3. Editing a JVM Definition
- Click the Inventory tab in the top menu.
- Select Servers - Top Level Imports in the Resources menu table on the left.
- Select the EAP server and navigate to the appropriate JVM definition entry.
- Open the Configuration tab.

- Change any of the JVM settings. These are listed in Table 7.1, “JVM Definition Properties”.
- Click the button at the top of the page.
7.5. A Short List of Parent-Child Resources
Note
| Resource | Child Resource Types |
|---|---|
| Standalone server |
|
| Domain Controller |
|
| Host |
|
| Server Groups |
|
| Datasources (under Profiles) |
|
| Infinispan > Hibernate |
|
| Logging |
|
| Web |
|
Chapter 8. Deploying Web Applications
8.1. Runtime Information and Deployment Resources
8.1.1. Views of Deployments

Figure 8.1. Deployments in the Runtime Page
- A web application is treated as a separate entity, in and of itself. It has its own place in the inventory; its association with domains and server groups is reflected as it is a child of those resources.JBoss ON also records package details, like its file size and an identifying SHA256 hash.
- A web application has a history. Updates to packages are recorded in a changelog which makes it possible to track how the application has been maintained.
- Web applications can be monitored. Response time metrics specifically track the performance of web applications, apart from the performance or monitoring of the underlying server.
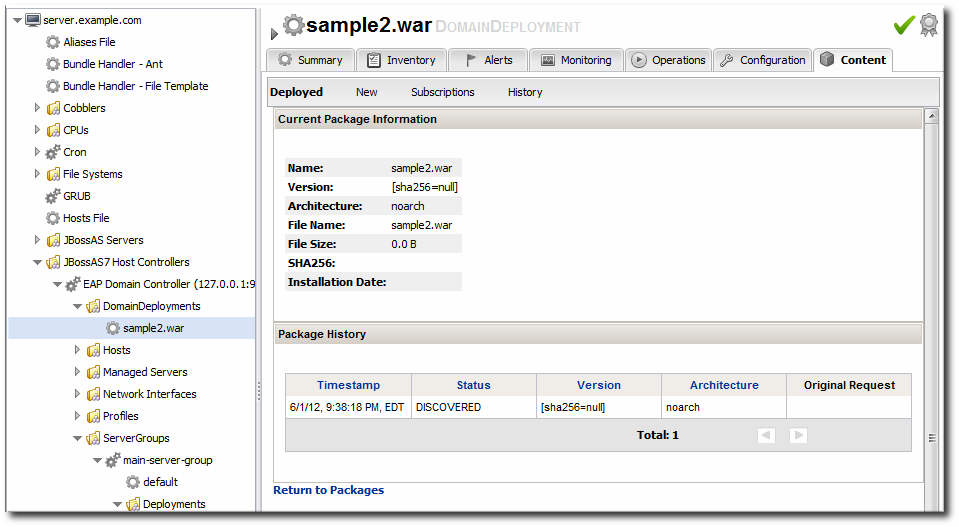
Figure 8.2. Deployment Resource Details in JBoss ON
- Creating content repositories to store patches and updates
- Tracking multiple versions of content
- Reverting software packages to a previous version (particularly for standalone servers)
- Using the same content repository for multiple EAP instances, including multiple domains and standalone server
- Tracking (and auditing) changes to content
8.1.2. Deployment Paths for Standalone Servers and Domains
- Create a deployment as a child resource
- Use a bundle to provision the application in the deployment directory
8.2. Deploying Web Applications to a Domain
Note
- Click the Inventory tab in the top menu.
- Select Servers - Top Level Imports in the Resources menu table on the left. Select the JBoss EAP 6 domain controller.
- Right-click the domain controller entry.
- In the Create New menu, select the item for .
- Enter the version number.

- Upload the EAR, WAR, or JAR file.

- Optionally, enter a runtime name for the deployment.
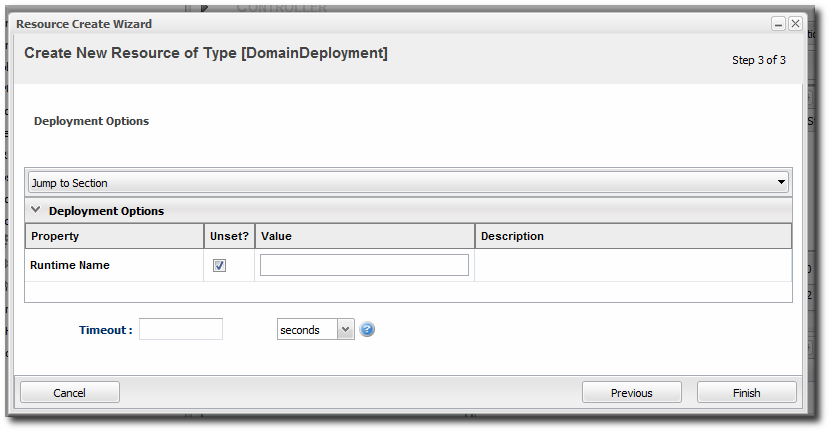
- At the bottom of the wizard, set an optional timeout period. This is how long the JBoss ON server will wait during the deployment process before determining that the deployment has failed.
Note
The timeout period only applies to the server's reporting a result. If the operation continues running, it can still complete successfully, and the web application is deployed.Particularly for large application files, do not set a low timeout period, or the server will mark the deployment as having failed. If the deployment completes later, the web application must be imported into the inventory manually; it will not be discovered by the agent. - Click .
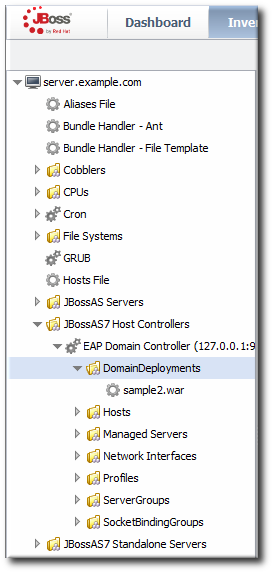
Figure 8.3. Domain Deployments Directory
8.3. Assigning Web Applications to a Server Group
Note
Important
Note
- Click the Inventory tab in the top menu.
- Select Servers - Top Level Imports in the Resources menu table on the left. Select the JBoss EAP 6 domain controller.
- Expand the DomainDeployments folder.To deploy all web applications in the deployments folder, select the deployments folder itself to run the operation.To deploy a single web application, select the specific web application.
- Open the Operations tab for the server.
- Click the New button at the bottom of the page.
- Select the Assign to Server-Group option from the drop-down menu.

- Select which group (or all groups) to deploy the application to.
- Enter the standard information for operations, like the schedule for when to run the operation and the timeout period.
Note
The timeout period sets how long the server waits before assuming that the operation has timed out and failed. This does not necessarily mean that the operation has failed or stopped running; it could complete successfully past the time out period. - If there are multiple web applications being deployed, then set the Execute radio button to the way set the order that the packages are deployed. All packages can be deployed at once, or they can be deployed in a specific order.
- Click the Schedule button.
- Optionally, run a discovery scan on the agent to discover the new content resource. By default, discovery scans for services are only made every 24 hours, so there could be a long delay in discovering new content.
- Open the agent entry in the UI.
- Open the Operations tab, and select the execute prompt command operation.
- Enter the
discoverycommand as an operation rgument. This runs a discovery scan. - Click the Schedule button.
8.4. Extended Example: Assigning Web Applications and Managing Updates
Tim the IT Guy wants to have a clear progression for web applications, from development through staging and production. The native structure in EAP 6 allows him to create different server groups and deploy content from his central domain controller to the appropriate server groups as it passes testing at each stage.
- Tim first outlines what server groups he needs to maintain. For a simple environment, he just wants three groups: testing, staging, and production.
- He creates two content repositories, one for patches and one for new versions of the web application.
- He creates the domain deployment and then promotes the web application to the testing server group.
- Tim configures response time monitoring for the web application. Once it meets the required performance parameters in the testing area, Tim promotes the deployment to the staging and then production server groups.
The package history for each deployment allows Tim to track when the web application was deployed, its version, and its content.
8.5. Enabling and Disabling Web Applications
- Click the Inventory tab in the top menu.
- Select Servers - Top Level Imports in the Resources menu table on the left. Select the JBoss EAP 6 domain controller.
- In the inventory tree, expand the ServerGroups folder, and select the server group from the list.
- Expand the Deployments folder, and select the web application to enable or disable.
- Open the Operations tab for the web app.
- Click the New button at the bottom of the page.
- Select the Enable (or Disable) option from the drop-down menu.

- Click the Schedule button.
8.6. Updating Deployment Content
- Click the Inventory tab in the top menu.
- Select Servers - Top Level Imports in the Resources menu table on the left. Select the JBoss EAP 6 server.
- Open the Deployments folder (for the domain, standalone server, or server group), and select the web application to update.
- On the web application details page, open the Content tab, and click the New subtab.
- Click the button.
- Click the button.
- In the pop-up window, click the Add button, and browse the local filesystem to the updated content file to be uploaded.
- Click the UPLOAD button.
- Select the repository where the web application package should be stored. While this is not required, it is beneficial to store the updated package in JBoss ON so that it is available to other JBoss EAP 6 deployments.

- Fill in the version information.
- Confirm the details for the new package, then click .
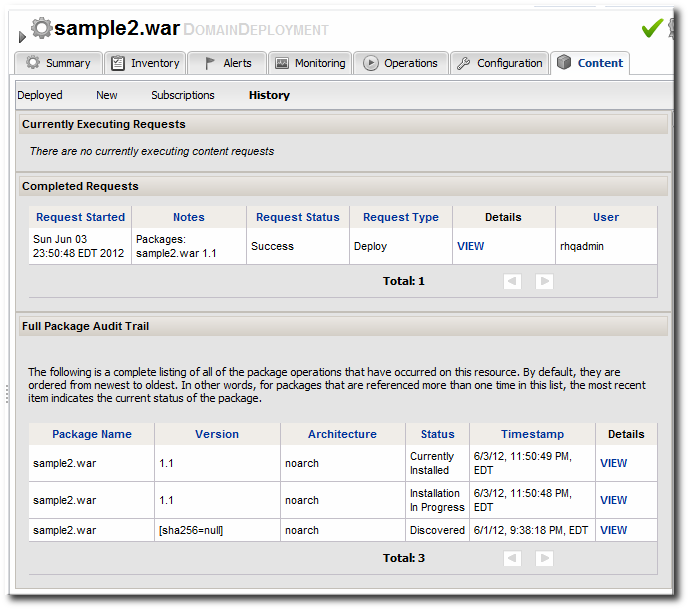
Figure 8.4. Deployment History for a Resource
8.7. Deploying Web Applications to a Standalone Server
8.7.1. Deploying a Web Application as a Child Resource
Important
discovery command. This runs a discovery scan.
- Click the Inventory tab in the top menu.
- Select Servers - Top Level Imports in the Resources menu table on the left. Select the JBoss EAP 6 standalone server.
- Right-click the standalone server entry in the navigation tree.
- In the Create New menu, select the item for .
- Enter the version number.
- Upload the EAR, WAR, or JAR file.
- Optionally, enter a runtime name for the deployment.
- At the bottom of the wizard, set an optional timeout period. This is how long the JBoss ON server will wait during the deployment process before determining that the deployment has failed.
Note
The timeout period only applies to the server's reporting a result. If the operation continues running, it can still complete successfully, and the web application is deployed.Particularly for large application files, do not set a low timeout period, or the server will mark the deployment as having failed. If the deployment completes later, the web application must be imported into the inventory manually; it will not be discovered by the agent. - Click .
8.7.2. Deploying Web Applications Through Bundles
- In the top menu, click the Bundles tab.

- Upload the distribution file, and go through the deployment wizard to create the bundle version.
- Scroll to the bottom of the window and click the button.
- Select the bundles to deploy.
- Define the destination information for the JBoss standalone server. A destination is a combination of a compatible group (containing the JBoss resource) and the directory to which to deploy the bundle.
- Complete the deployment wizard, setting any require properties.
8.8. Tracking Content History and Reverting Changes
Figure 8.5. Deployment History for a Resource
- If the domain deployment or server group deployment is associated with a content repository, then upload an updated package to the content repository and sync the change over to the associated resources.
- Upload an updated package to the domain deployment and use the deploy to group operation to send the updated package to the server groups.
8.9. Troubleshooting Deployments
- Q: My deployment says it failed, but when I tried to redeploy the package, it fails because it says the resource already exists.
- Q: I tried to deploy a package to a server group and it seemed to be successful, but I don't see the deployment listed.
- The agent discovery scan hasn't run. There can be several hours between discovery runs, so it can take awhile for the application to appear in the discovery queue. To work around this, run a discovery scan on the agent.
- The package has already been deployed to the domain. Creating a deployment child on a server group actually attempts to create the deployment on the domain (where the content is stored) and then deploys it to the server group. If the package already exists in the domain, then attempting to re-create the deployment on the server group fails as a duplicate.In this case, use the deploy to server group operation on the domain controller to deploy the application.
Chapter 9. Monitoring JBoss EAP 6 Resources
9.1. Runtime Information and JBoss ON Monitoring
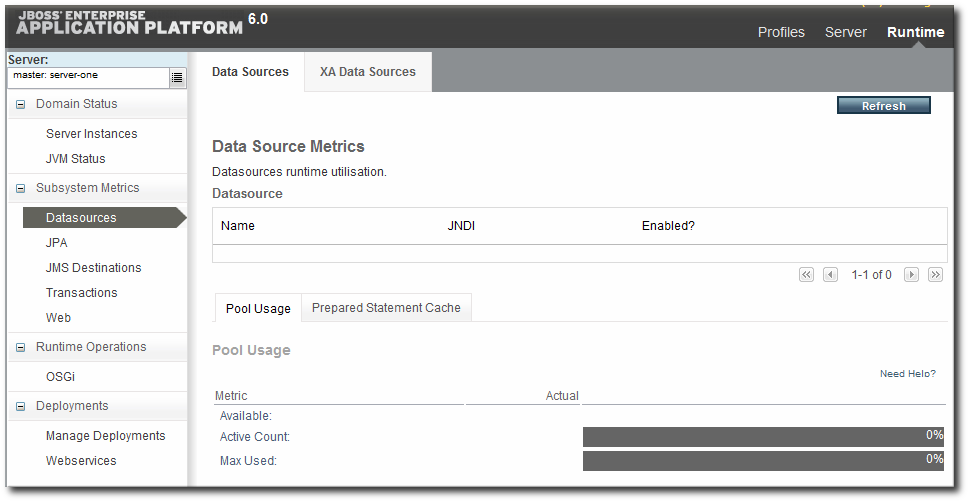
Figure 9.1. EAP 6 Runtime Metrics
- Time-based monitoring graphs for each metric
- Operating parameters, or baselines calculated on the real performance of the resource
- Availability uptime percentages, recovery times, and mean down time
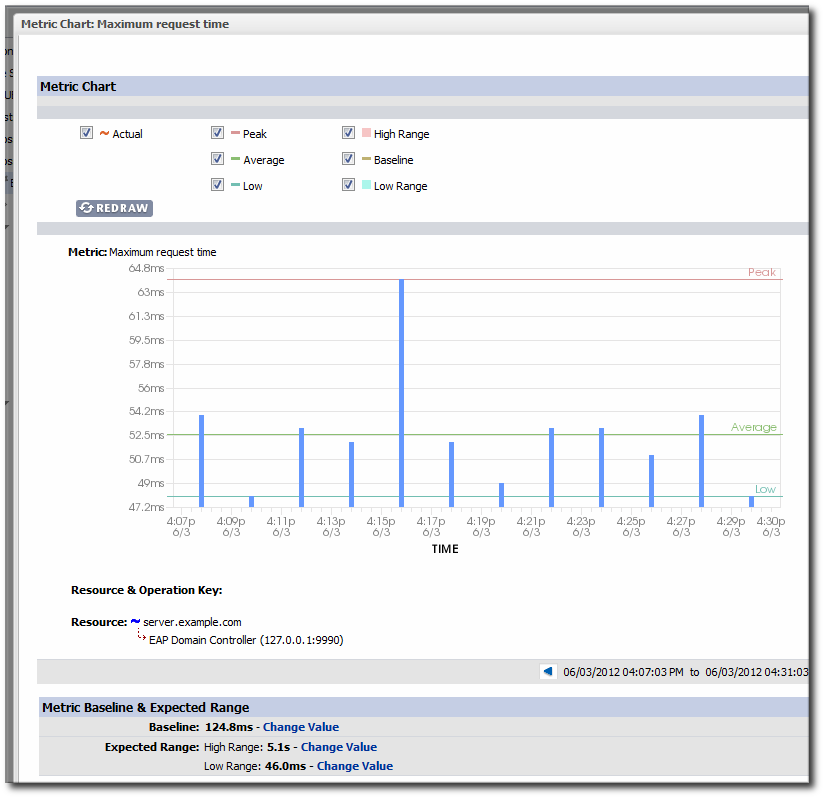
Figure 9.2. JBoss ON Baselines for a Single Metric
- More metrics are available for resources. At a minimum, every resource has availability monitoring. Some resources — like datasources and managed servers — have dozens more metrics that can be enabled for routine monitoring.
- Response time monitoring can be configured for specific URLs and pages for web applications. This allows administrators to track usability and customer experience for web applications along with internal metrics like connection counts.
- Event log monitoring can filter important messages from different error logs. This allows JBoss ON to respond (through alerts) to issues that may not have crossed a performance threshold yet, and it also makes it possible for administrators to correlate log events with observed performance metrics.
9.2. Configuring Response Time Metrics for JBoss EAP 6/AS 7
Note
9.2.1. Installing the Response Time Filters
- Make sure that you have created a management user to access the JBoss EAP 6 instance.For more information, see the JBoss AS 7.1 documentation.
- Download the response time packages for JBoss from the JBoss ON UI. The response time filters are packaged as AS 7 modules. There are two modules to obtain:
rhq-rtfilter-module.zip
rhq-rtfilter-subsystem-module.zip
Note
This can also be done from the command line usingwget:[root@server ~]# wget http://server.example.com:7080/downloads/connectors/rhq-rtfilter-module.zip [root@server ~]# wget http://server.example.com:7080/downloads/connectors/rhq-rtfilter-subsystem-module.zip
- Click the Administration tab in the top menu.
- In the Configuration menu box on the left, select the item.

- Click the rhq-rtfilter-module.zip and
rhq-rtfilter-subsystem-module.ziplinks, and save the files to an accessible directory, like the/tmpdirectory.
- Open the
modules/directory for the JBoss EAP 6 instance. For example:[root@server ~]# cd /opt/jboss-eap-6.0/modules/
- Unzip the
rhq-rtfilter-module.ziparchive to install the response time filter JAR and the associatedmodule.xmlfile.[root@server modules]# unzip /tmp/rhq-rtfilter-module.zip
- Open the configuration file for the server,
domain.xmlorstandalone.xml. - Deploy the response time module globally by adding the module to the list of global modules in the <subsystem> element.
<profile...
	<subsystem xmlns="urn:jboss:domain:ee:1.1">
		<global-modules>
		    <module name="org.rhq.helpers.rhq-rtfilter" slot="main"/>
		</global-modules>
	</subsystem>
</profile>
- Save the file.
- Unzip the
rhq-rtfilter-subsystem-module.ziparchive to install the subsystem response time filter JAR and the associatedmodule.xmlfile.[root@server modules]# unzip /tmp/rhq-rtfilter-subsystem-module.zip
This installs the filters as a subsystem for the application server or individual web apps. - After the filters have been installed, the JBoss EAP 6 server needs to be configured to use them.The response time filter can be deployed globally, for all web applications hosted by the EAP/AS instance, or it can be configured for a specific web application.To deploy the filter as a global subsystem:
- Open the configuration file for the server,
domain.xmlorstandalone.xml. - Add the an
<extensions>element for the response time filter.<extension module="org.rhq.helpers.rhq-rtfilter-subsystem"/>
- Add a
<subsystem>element beneath the<profileelement.All that is required for response time filtering to work is the default<subsystem>element, without any optional parameters. However, the parameters can be uncommented and set as necessary; the different ones are described in Table 9.1, “Parameters Available for User-Defined <filter> Settings”.The<subsystem>element should be added even if none of the optional parameters are set.<subsystem xmlns="urn:rhq:rtfilter:1.0"> <!-- Optional parameters. <init-param> <param-name>chopQueryString</param-name> <param-value>true</param-value> </init-param> <init-param> <param-name>logDirectory</param-name> <param-value>/tmp</param-value> </init-param> <init-param> <param-name>logFilePrefix</param-name> <param-value>localhost_7080_</param-value> </init-param> <init-param> <param-name>dontLogRegEx</param-name> <param-value></param-value> </init-param> <init-param> <param-name>matchOnUriOnly</param-name> <param-value>true</param-value> </init-param> <init-param> <param-name>timeBetweenFlushesInSec</param-name> <param-value>73</param-value> </init-param> <init-param> <param-name>flushAfterLines</param-name> <param-value>13</param-value> </init-param> <init-param> <param-name>maxLogFileSize</param-name> <param-value>5242880</param-value> </init-param> --> </subsystem>
To configure the response time filters for an individual web application:- Open the web application's
web.xmlfile.[root@server ~]# vim WARHomeDir/WEB-INF/web.xml
- Add the filter and, depending on the configuration, filter mapping elements to the file. This activates the response time filtering.All that is required for response time filtering to work is the default
<filter>element, without any optional parameters. However, the parameters can be uncommented and set as necessary; the different ones are described in Table 9.1, “Parameters Available for User-Defined <filter> Settings”.<filter> <filter-name>RhqRtFilter</filter-name> <filter-class>org.rhq.helpers.rtfilter.filter.RtFilter</filter-class> <!-- Optional parameters. <init-param> <param-name>chopQueryString</param-name> <param-value>true</param-value> </init-param> <init-param> <param-name>logDirectory</param-name> <param-value>/tmp</param-value> </init-param> <init-param> <param-name>logFilePrefix</param-name> <param-value>localhost_7080_</param-value> </init-param> <init-param> <param-name>dontLogRegEx</param-name> <param-value></param-value> </init-param> <init-param> <param-name>matchOnUriOnly</param-name> <param-value>true</param-value> </init-param> <init-param> <param-name>timeBetweenFlushesInSec</param-name> <param-value>73</param-value> </init-param> <init-param> <param-name>flushAfterLines</param-name> <param-value>13</param-value> </init-param> <init-param> <param-name>maxLogFileSize</param-name> <param-value>5242880</param-value> </init-param> --> </filter> <!-- Use this only when also enabling the RhqRtFilter in the filter <filter-mapping> <filter-name>RhqRtFilter</filter-name> <url-pattern>/*</url-pattern> </filter-mapping> -->
- Restart the JBoss EAP/AS server to load the new
web.xmlsettings.
|
Parameter
|
Description
|
|---|---|
|
chopQueryString
|
Only the URI part of a query will be logged if this parameter is set to true. Otherwise the whole query line will be logged. Default is true.
|
|
logDirectory
|
The directory where the log files will be written to. Default setting is {
jboss.server.log.dir}/rt/ (usually server/xxx/log/rt). If this property is not defined, the fallback is {java.io.tmpdir}/rt/ (/tmp/ on UNIX®, and ~/Application Data/Local Settings/Temp – check the TEMP environment variable) is used. If you specify this init parameter, no directory rt/ will be created, but the directory you have provided will be taken literally.
|
|
logFilePrefix
|
A prefix that is put in front of the log file names. Default is the empty string.
|
|
dontLogRegEx
|
A regular expression that is applied to query strings. See java.util.regex.Pattern. If the parameter is not given or an empty string, no pattern is applied.
|
|
matchOnUriOnly
|
Should the dontLogRegEx be applied to the URI part of the query (true) or to the whole query string (false). Default is true.
|
|
timeBetweenFlushesInSec
|
Log lines are buffered by default. When the given number of seconds have passed and a new request is received, the buffered lines will be flushed to disk even if the number of lines to flush after (see next point) is not yet reached.. Default value is 60 seconds (1 Minute).
|
|
flushAfterLines
|
Log lines are buffered by default. When the given number of lines have been buffered, they are flushed to disk. Default value is 10 lines.
|
|
maxLogFileSize
|
The maximum allowed size, in bytes, of the log files; if a log file exceeds this limit, the filter will truncate it; the default value is 5242880 (5 MB).
|
|
vHostMappingFile
|
This properties file must exist on the Tomcat process classpath. For example, in the ../conf/vhost-mappings.properties. The file contains mappings from the 'incoming' vhost (server name) to the vhost that should be used as the prefix in the response time log file name. If no mapping is present (no file or no entry response times are set), then the incoming vhost (server name) is used. For example:
pickeldi.users.acme.com=pickeldi
pickeldi=
%HOST%=
The first mapping states that if the incoming vhost is 'host1.users.acme.com', then the log file name should get a vhost of 'host1' as prefix, separated by a _ from the context root portion. The second mapping states that if the 'incoming' vhost is 'host1', then no prefix, and no _, should be used. The third mapping uses a special left-hand-side token, '%HOST%'. This mapping states that if the 'incoming' vhost is a representation of localhost then no prefix, and no _ , should be used.
%HOST% will match the host name, or canonical host name or IP address, as returned by the implementation of InetAddress.getLocalHost().
The second and third mappings are examples of empty right hand side, but could just as well have provided a vhost.
This is a one time replacement. There is no recursion in the form that the result of the first line would then be applied to the second one.
|
9.2.2. Enabling the Call-Time Metric
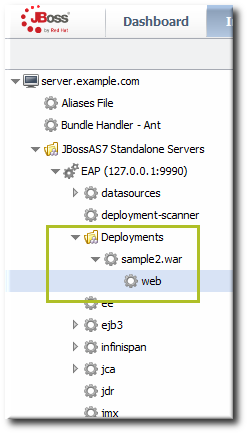
Figure 9.3. Web Runtime Resource
- Click the Inventory tab in the top menu.
- Click the Servers - Top Level Imports item, and select the JBoss EAP 6 resource.
- Navigate to the deployment resource, and expand the application to the web subsystem.
- Click the Monitoring tab on the web resource entry.
- Click the Schedules subtab.
- Select the Response Time metric. This metric is the calltime type.

- Click the at the bottom of the list.
- Click the Inventory tab on the web entry.
- Select the Connection Settings subtab.
- Unset the check boxes for the response time configuration and fill in the appropriate values for the web application.

- The response times log which is used by that specific web application. The log file is a required setting for call-time data collection to work..
- Any files, elements, or pages to exclude from response time measurements. The response times log records times for all resources the web server serves, including support files like CSS files and icons or background images.
- The same page can be accessed with different parameters passed along in the URL. The Response Time Url Transforms field provides a regular expression that can be used to strip or substitute the passed parameters.
9.3. Setting up Monitoring for EAP 6 Resources
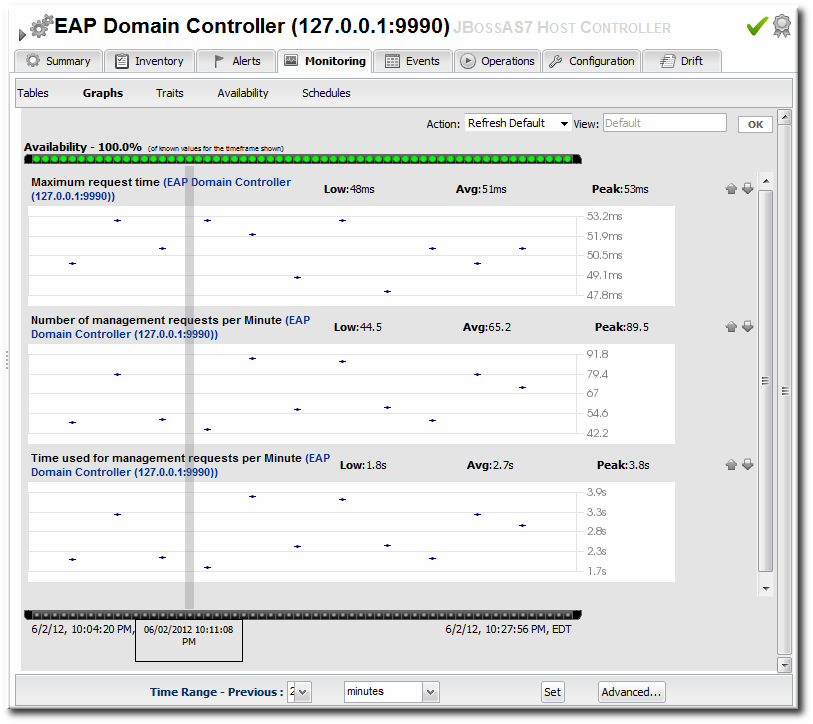
Figure 9.4. Monitoring Graph
Note
9.3.1. Enabling Additional Metrics
Note
Note
- Click the Inventory tab in the top menu.
- Select Servers - Top Level Imports in the Resources menu table on the left. Then select the JBoss EAP 6 server and navigate to the resource to edit.
- Click the Monitoring tab on the resource entry.
- Click the Schedules subtab.
- To enable a metric:
- Select the metric row. Multiple metrics can be selected using the Ctrl key.
- Click the button at the bottom of the page.
- To change a collection interval for a metric:
- Select the metric row. Multiple metrics can be selected using the Ctrl key, if they will all be changed to the same frequency.

- Enter the desired collection period in the Collection Interval field, with the appropriate time unit (seconds, minutes, or hours).
- Click Set.
Note
Changing the collection interval for a disabled metric automatically enables the metric.
9.3.2. Availability Monitoring
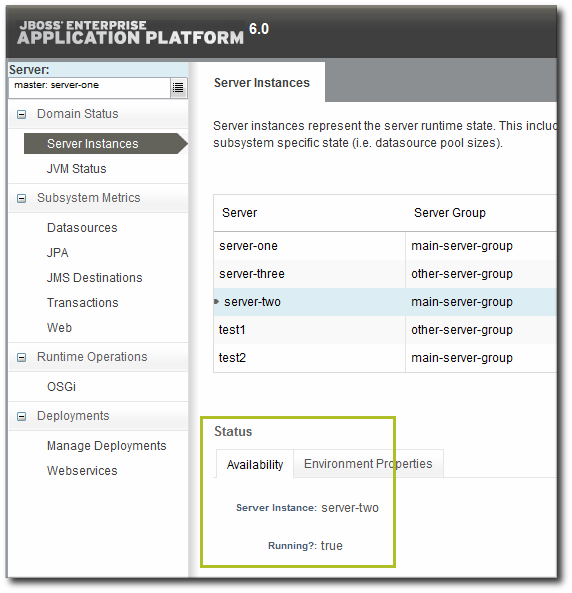
Figure 9.5. Availability in the EAP 6 Console
- Its overall uptime percentage
- Total time spent in different states (up, down, or disabled)
- The total number of failures (times it has gone down)
- The mean time between failures, which is essentially the mean time that a resource is up and available
- The mean time to recovery, which is the mean amount of time that it takes a resource to come back up after a failure
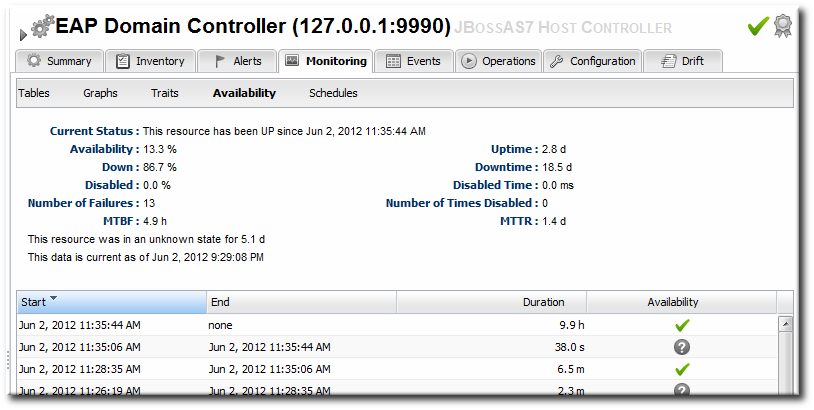
Figure 9.6. Availability in JBoss ON
Note
9.4. Configuring Events Monitoring
Note
- Host controllers, in
domain/log/host-controller.log - Managed servers, in
domain/servers/server-three/log/server.log - Standalone servers, in
standalone/log/server.log
- Click the Inventory tab in the top menu.
- Click the Servers - Top Level Imports item, and select the JBoss EAP 6 resource.
- Navigate to the appropriate EAP 6 resource.
- Click the Inventory tab on the resource entry.
- Select the Connection Settings subtab.
- Click green plus icon under the Events Log section.

- Enable the event entry.Optionally, set the date format, string filters to include messages, or the severity of the messages to include.

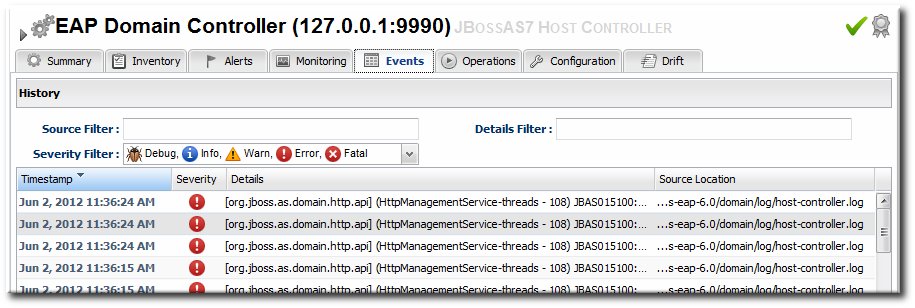
Figure 9.7. JBoss EAP 6 Event Logging
9.5. Alerting on JBoss EAP 6 Resources
- Email an administrator
- Run a restart operation on the alerting resource
- Run an operation on the parent of the alerting resource
- Run a shell script
- Run a JBoss ON server-side scriptServer-side scripts are extremely powerful. A script can perform almost any management task in JBoss ON: change resource configuration, deploy updated packages, create new resources, delete existing resources, run an operation, or all of the above. For more information on writing server-side scripts, see "Writing JBoss ON Command-Line Scripts".
Chapter 10. Using the mod_cluster Services in EAP 6
mod_cluster modules provides dynamic load balancing between web contexts on a JBoss application server and an Apache web server.
mod_cluster: configuring the module on JBoss to manage the web applications and configuring the module on Apache to manage sessions and routing.
mod_cluster subsystem for JBoss EAP 6 for both domain servers and standalone servers.
10.1. About mod_cluster and JBoss ON
mod_cluster module, a subsystem on EAP 6, communicates between the web applications on a JBoss EAP server and an Apache web server. Multiple JBoss EAP servers can be involved in a mod_cluster group, and those servers can be managed servers, standalone servers, or a mix of both.
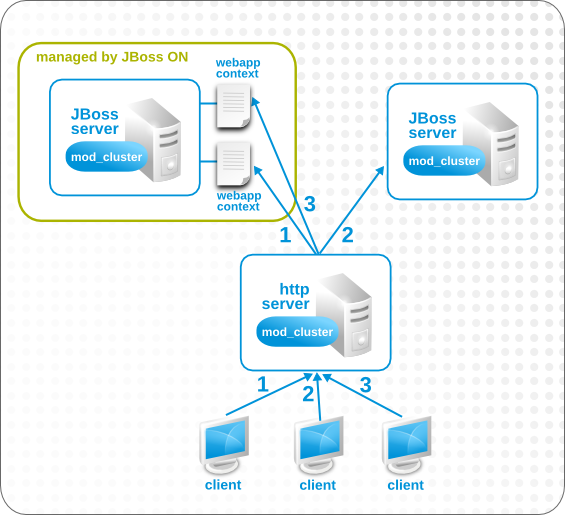
Figure 10.1. The mod_cluster Topology
mod_cluster module. For domains, the other-server-group server group is configured to use the full-ha profiles, though any profile which supports high availability can be used (such as the ha profile or a custom profile). For standalone servers, the server must be started with the standalone-ha.xml configuration.
mod_cluster server is the master node; that is the administering mod_cluster service. Every other member of the cluster is a worker node.
Note
mod_cluster in general is available with the mod_cluster project documentation.
mod_cluster domain depends on the profile that resource is associated with, which is largely outside of the control of JBoss ON. (Of course, a standalone server can be started with the high availability configuration with the JAVA_OPTS settings in JBoss ON for start scripts, or a new managed server can be created that uses a high availability profile. But the profile definitions themselves are created and maintained outside of JBoss ON.)
mod_cluster configuration itself. The cluster settings include multicast (advertising), load balancing, session handling, and network settings.
10.2. Configuring Multicast for Load Balancing
mod_cluster can use multicast signals to inform nodes which proxy servers are available. This allows nodes to register themselves automatically to the domain.
Note
- Click the Inventory tab in the top menu.
- Select Servers - Top Level Imports in the Resources menu table on the left. Then select the JBoss EAP 6 server which hosts the
mod_clusterservice (the master node). - Navigate to the
mod_clusterservice resource.
- Click the Configuration tab on the resource entry.
- Go to the Advertise Options section.

- Change the multicast settings.To use a specific load balancer for the
mod_clusternodes, set the Balancer field to the load balancer name and, optionally, the Domain field to the load balancer group, which is one of the groups configured on the balancer itself.Important
The Balancer and Domain values must match the configuration for the corresponding Apache server. - Click the button at the top of the page.
10.3. Excluding Web Contexts from Discovery
mod_cluster service. If a web context should not be included in the cluster, it can be excluded, by name.
- Click the Inventory tab in the top menu.
- Select Servers - Top Level Imports in the Resources menu table on the left. Then select the JBoss EAP 6 server which hosts the
mod_clusterservice (the master node). - Navigate to the
mod_clusterservice resource. - Click the Configuration tab on the resource entry.
- Go to the Web Context Options section.

- Unset the Excluded Contexts field, and add the names of any contexts to exclude.
Note
Some internal contexts for JBoss EAP are excluded by default. This should be kept in the excludes list; any new contexts to exclude should be added to the existing list. - Click the button at the top of the page.
10.4. Configuring Web Context Metrics
mod_cluster can use different types of metrics to determine how to balance traffic most efficiently. These metrics are described in the mod_cluster documentation. These metrics include things like active sessions, request counts, and traffic.
mod_cluster subsystem configuration for JBoss ON to monitor (and existing metrics can be removed).
- Click the Inventory tab in the top menu.
- Select Servers - Top Level Imports in the Resources menu table on the left. Then select the JBoss EAP 6 server which hosts the
mod_clusterservice (the master node). - Navigate to the
mod_clusterservice resource. - Click the Operations tab on the resource entry.
- Select the Add (Custom) Metrics operation from the drop-down menu.

- Fill in the metric information. The default metrics are listed in the mod_cluster documentation.
- Click the button at the bottom of the page.
Part III. Managing JBoss EAP 5
Chapter 11. Discovering JBoss EAP/AS 5 Servers
11.1. Discovering and Managing the JBoss AS/EAP 5 JVM
- Open the
run.conffile. For example, on Red Hat Enterprise Linux:[root@server ~]# vim jbossInstallDir/bin/run.conf
- Add the
JAVA_OPTSsettings to use the platform MBean server.On Red Hat Enterprise Linux:JAVA_OPTS="$JAVA_OPTS -Djboss.platform.mbeanserver"
On Windows:set JAVA_OPTS=%JAVA_OPTS% -Djboss.platform.mbeanserver
- Restart the JBoss EAP/AS server.
11.2. Enabling Remote Access to JMX and Profile Service
- Verify that the JBoss Naming Protocol server (JNP) is deployed. (It is deployed by default.)Open the
jboss-service.xmlfile:[root@server ~]# vim jbossInstallDir/server/config/conf/jboss-service.xml
Then, make sure that there is a line enabling the JNP connector.<mbean code="org.jboss.naming.NamingService"> ... </mbean>
- While not required, it is recommended that you enable authentication for the JNP service. (This is enabled by default.)
- Open the
jmx-invoker-service.xmlfile.[root@server ~]# vim jbossInstallDir/server/config/deploy/jmx-invoker-service.xml
- Add a line for the JMX connector authentication.
<interceptor code="org.jboss.jmx.connector.invoker.AuthenticationInterceptor" securityDomain="java:/jaas/jmx-console"/> - Make sure that the admin user is listed in the JMX users properties file. When a new JBoss EAP resource is discovered, the agent reads the JMX username and password from this file and stores them in the discovered JBoss EAP resource's connection settings. These settings are then used to connect to the EAP server's JNP service.
[root@server ~]# vim jbossInstallDir/server/config/conf/props/jmx-console-users.properties
- Uncomment or add the user information. This is a simple key/value pair, username=password. For example:
admin=admin
- Restart the JBoss EAP/AS server.
11.3. Setting Start Script Arguments, Environment Variables, and JAVA_OPTS
11.3.1. Start Script Discovery and Settings
- The discovery process identifies, or attempts to identify, the start script that was used to start the EAP server, whether it was
run.sh|bator a custom start script. - Discovery detects a subset of environment variables set in the
run.conffile or parent process that are required for the start script to work.Note
Although the discovery process does detect some environment variables, the discovery scan does notJAVA_OPTSvalues.The connection properties for the start script intentionally defer to therun.conffile forJAVA_OPTSvalues. - Discovery attempts to detect any arguments passed to the start script itself.
Note
-XX:PermSize=256M), the argument value will not be updated if the server is restarted later with a different setting value.
11.3.2. Start Script Arguments and Drift Monitoring
Example 11.1. System Properties Without Violating the Drift Definition
11.3.3. Changing Start Script Configuration
- Click the Inventory tab in the top menu.
- Select Servers - Top Level Imports in the Resources menu table on the left. Select the JBoss EAP 5 server.
- In the inventory tree, select the top resource entry for the server.
- Open the Inventory tab, and select the Connection Settings subtab.
- Expand the Operations section.
- Change or add start script settings. These are the scripts and settings that the JBoss ON agent uses when running a start or restart operation on the EAP 5 server.
- To use a custom start script, enter the path and script name.
- Optionally, enter a prefix to use with the script when running the start script.
- Set any environment variables, one per line.
- Set any script arguments, one per line. For regular JAVA_OPTS, these arguments usually are
-X,-D, or-P. Some useful-XXarguments are listed in the JVM options documentation from Sun.The EAP 5 default start scripts use arun.sh-style script, so the arguments use that format. A custom script can use different arguments or options.
- Click the Save button at the top of the page.
Chapter 12. Creating JBoss EAP 5 Child Resources
12.1. Creating Data Sources
Note
- Search for the JBoss server instance to which to deploy the data source.
- On the details page for the selected JBoss server instance, open the Inventory tab.
- In the Create New drop-down menu, select the item for .
- Select a template for the data source. There are three data sources templates to populate a data source with common information:
- The default template is used with SQL databases like PostgreSQL or MySQL.
- The Oracle Local TX is used for Oracle databases with local transactions.
- The Oracle XA template is used for Oracle databases with XA transactions.
- Along with the obvious settings, like the resource name, enter the information for the specific child resource to be deployed:
- The type of data source to create, either No TX Data Sources, Local TX Data Sources or XA Data Sources
- A unique JNDI name for the DataSource wrapper to use to bind under
- The fully qualified name of the JDBC driver or DataSource class, such as
org.postgresql.Driver - The JDBC driver connection URL string, such as
jdbc:postgresql://127.0.0.1:5432/foo - The username and password to use to connect to the data source
- The minimum and maximum connection pool sizes for this data source
Additional settings are available under the Advanced Settings area.
12.2. Creating Connection Factories
Note
- Search for the JBoss server instance to which to deploy the connection factory.
- On the details page for the selected JBoss server instance, open the Inventory tab.
- In the Create New drop-down menu, select the item for .
- Along with the obvious settings, like the resource name, enter the information for the specific child resource to be deployed:
- The type of connection factory to create, either tx-connection-factory (transaction) or no-tx-connection-factory (no transaction)
- A unique JNDI name for the DataSource wrapper to use to bind under
- The username and password to use to connect to the data source
- The minimum and maximum connection pool sizes for this data source
Additional settings are available under the Advanced Settings area.
12.3. Creating JMS Queues and Topics
Note
- Search for the JBoss messaging service to which to deploy the JMS queue or topic.
- On the details page for the selected JBoss messaging service, open the Inventory tab.
- In the Create New drop-down menu, select the or item.
- Aside from the obvious settings, like the resource name, the JMS Queue or JMS Topic entry requires two additional parameters:
- The name of the queue or topic to use as the JMX object name
- A unique JNDI name for the DataSource wrapper to use to bind under
Additional settings are available under the Advanced Settings area.
Chapter 13. Deploying Applications
13.1. Setting Permissions for Agent and Resource Users
MANIFEST.MF file, the agent creates one when it writes the SHA-256 value for the package. When the JBoss EAP/AS server server tries to remove the WAR application later (and the JBoss EAP/AS server user is different than the agent user), then the removal fails. The JBoss EAP/AS server server cannot delete the MANIFEST.MF file. The agent then rediscovers the application directory and re-initiates the deployment operation for the removed WAR.
Note
MANIFEST.MF file — meaning, a situation where the agent creates a file within the deployment directory. Even if the agent and JBoss EAP/AS server users are different, this situation does not occur if the application is not exploded or where the agent does not write any files.
- Add the agent user and the resource user to the same primary group.
- Set the
umaskvalue for the agent user to give read and write permissions to both user and group, such as660. For example:vim /home/rhqagent/.bashrc umask 660
13.2. Deploying EAR and WAR Files
Important
discovery command. This runs a discovery scan.
- Search for the JBoss server instance to which to deploy the EAR or WAR.
- On the details page for the selected JBoss server instance, open the Inventory tab.
- In the Create New menu at the bottom, select the item for or , as appropriate.

- Enter the version number.
 This is not used for the resource. The actual version number is calculated based on the spec version and implementation version in
MANIFEST.MF, if any are given, or the calculated SHA-256 value for the package itself:SPEC(IMPLEMENTATION)[sha256=abcd1234]
If no version numbers are defined inMANIFEST.MF, then the SHA value is used. The SHA value is always used to identify the package version internally.Note
When the EAR or WAR file is exploded after it is deployed, theMANIFEST.MFfile is updated to include the calculated SHA version number. For example:Manifest-Version: 1.0 Created-By: Apache Maven
RHQ-Sha256: 570f196c4a1025a717269d16d11d6f37...For more information on package versioning, see "Deploying Applications and Content". - Upload the EAR/WAR file.

- Enter the information for the application to be deployed.

- Whether the file should be exploded (unzipped) when it is deployed.
- The path to the directory to which to deploy the EAR or WAR package. The destination directory is relative to the JBoss server instance installation directory; this cannot contain an absolute path or go up a parent directory.
- Whether to back up any existing file with the same name in the target directory.
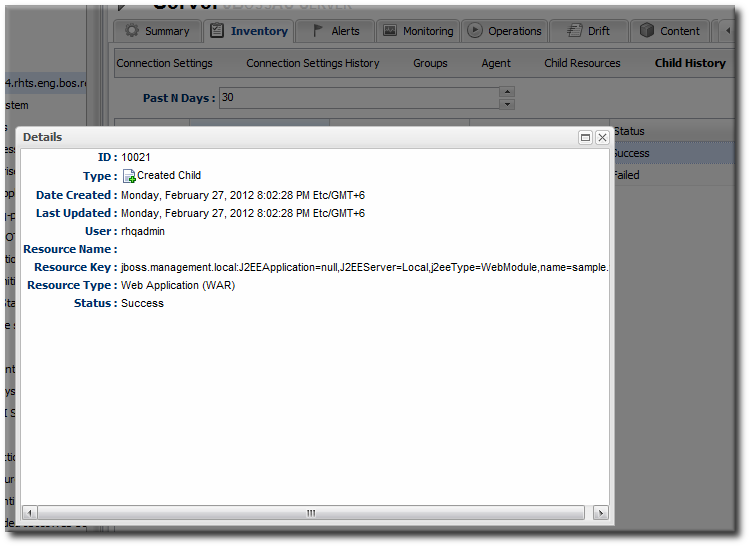
Figure 13.1. WAR Child Resource
13.3. Updating Applications
- Browse to the EAR or WAR resource in the JBoss ON UI.
- In the EAR or WAR resource details page, open the Content tab, and click the New subtab.

- Click the button.
- Click the button.

- In the pop-up window, click the Add button, and browse the local filesystem to the updated WAR or EAR file to be uploaded.

- Click the UPLOAD button to load the file and dismiss the window.
- In the main form, select the repository where the WAR or EAR file package should be stored. If one exists, select an existing repository or a subscribed repository for the resource. Otherwise, create a new repository.
- Optionally, set the version number for the EAR/WAR package.If this is set, then this value is displayed in the UI. If not, then a version number is calculated, based on the spec version and implementation version in
MANIFEST.MF, if any are given, or the calculated SHA-256 value for the package itself. Internally, the package is identified by the SHA value.SPEC(IMPLEMENTATION)[sha256=abcd1234]
For more information on package versioning, see "Deploying Applications and Content". - Confirm the details for the new package, then click .

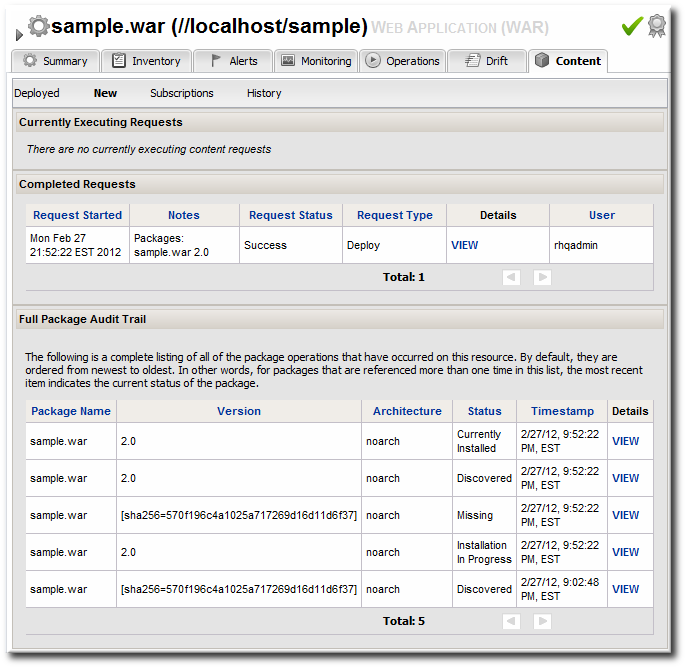
Figure 13.2. Deployment History for a Resource
13.4. Deleting an Application
- Browse to the EAR or WAR resource in the JBoss ON UI.
- In the EAR or WAR resource details page, open the Content tab, and click the Deployed subtab.
- Select the checkbox by the EAR/WAR package, and click the button.

Chapter 14. Applying JBoss Patches from the Patch RSS Feed
Note
14.1. Planning How to Patch JBoss Resources
- Identifying and configuring content sources
- Planning how to execute manual steps
14.1.1. Identifying Content Sources
Note
Note
14.1.2. Planning Manual Steps
- The file to be patched is not present in the configuration.
- There are files that need to be removed manually.
- Configuration files, such as XML or Java properties files, require patches that need to be applied manually.
- Seam is being used and must be patched manually.
14.2. Enabling the Default JBoss Patch Content Source
Note
- In the Administration tab in the top menu, open the menu and select the Content Sources item.
- Click the JBoss Customer Portal Patch Feed source.

- Click the Edit button at the bottom of the Customer Portal Feed Settings area to modify the content source.
- Fill in the required connection information.

- The Customer Portal username and password.
Note
The Customer Portal password is obfuscated when it is stored in the JBoss ON database. - The URL for the content source (https://access.redhat.com/jbossnetwork/restricted/feed/software.html?product=all&downloadType=all&flavor=rss&version=&jonVersion=2.0).
- The activation state. This should be Yes to enable automatic patching.
Most of the default settings, such as the schedule, can be kept.Important
Keep the Lazy Load checkbox activated, or all patches defined in the RSS feed, 1 GB of data, is preemptively downloaded by the JBoss ON server. - Click .
- Optionally, use button to force the content source to pull down the latest RSS Feed and synchronize it with the local data. The history of synchronization attempts is listed in the Synchronization Results section.
- Complete any manual steps (Section 14.1.2, “Planning Manual Steps”) to finish applying the patches.
14.3. Subscribing a Specific Resource to the Default JBoss Patch Repository
- In the Resources item in the top menu, go to the Servers item.
- Search for the JBoss instance to subscribe to the repository.
- On the JBoss server resource's entry page, open the Content tab and select the Subscriptions subtab. The JBoss patches repository is listed as available for subscription.

- Select the checkbox beside the JBoss patches repository, and click the button. When the assignment is complete, the repository is listed under the Current Resource Subscriptions area, rather than Available Repositories.

14.4. Subscribing Multiple JBoss Resources to the Default JBoss Patch Repository
- In the Administration tab in the top menu, open the menu and select the Repositories item.
- Click the JBoss Patch Channel.The JBoss patch repository is associated with the JBoss patch content source by default. To associate the repository to another content source, click the button and assign the content source.
- In the main page for the repository, click the button to subscribe JBoss resources to the patch repository.
- In the search area, select Server in the drop-down menu.
- Select all the JBoss server instance resources to subscribe to this repository.
14.5. Applying a Patch
- Stop the JBoss instance.
- In the Resources item in the top menu, go to the Servers item.
- Search for the JBoss instance to patch.
- On the JBoss server resource's entry page, open the Content tab and select the New subtab. This lists all of the packages and patches which are available for that specific resource type.
- Select the checkboxes beside the names of the patched to install, and click the button.

- Review the information on the page and verify everything is correct. Click the VIEW link in the Instructions column to review the steps that will be performed during the package installation process.

- Optionally, enter any notes to describe the patch deployment or environment.
- Click the button to install the updates. The patch process runs in the background; the progress can be viewed in the History subtab of the Content tab.
- When the installation process is complete, the patch job is listed in the Completed Requests area. Clicking the button displays the list of steps that performed in the process and whether they succeeded, failed, or were skipped.

- When the patch process is complete, start the JBoss instance.
Chapter 15. Configuring HTTP Response Time Metrics for JBoss EAP/AS 5
15.1. Installing the Response Time Filters
- Download the Response Time servlet filter connector from the JBoss ON UI.
Note
This can also be done from the command line usingwget:[root@server ~]# wget http://server.example.com:7080/downloads/connectors/connector-rtfilter.zip
- Click the Administration tab in the top menu.
- In the Configuration menu box on the left, select the item.
- Click the connector-rtfilter.zip link, and save the file.
- Unzip the connectors.
[root@server ~]# unzip connector-rtfilter.zip
- Copy the
rhq-rtfilter-version.jarfile into thelib/directory for the profile.[root@server ~]# cp connector-rtfilter/rhq-rtfilter-version.jar JbossHomeDir/lib/server/profileName/lib/
JBoss EAP/AS already includes thecommons-logging.jarfile, which is also required for response time filtering. - Then configure the
web.xmlfile for the EAP/AS instance.The response time filter can be deployed globally, for all web applications hosted by the EAP/AS instance or it can be configured for a specific web application.To configure it globally, edit the globalweb.xmlfile:[root@server ~]# vim JbossHomeDir/server/configName/default/deploy/jbossweb.sar/
To configure it for a single web app, edit that one web app'sweb.xmlfile:[root@server ~]# vim WARLocation/WEB-INF/web.xml
- Add the filter and, depending on the configuration, filter mapping elements to the file. This activates the response time filtering.All that is required for response time filtering to work is the default
<filter>element, without any optional parameters. However, the parameters can be uncommented and set as necessary; the different ones are described in Table 15.1, “Parameters Available for User-Defined <filter> Settings”.<filter> <filter-name>RhqRtFilter</filter-name> <filter-class>org.rhq.helpers.rtfilter.filter.RtFilter</filter-class> <!-- Optional parameters. <init-param> <param-name>chopQueryString</param-name> <param-value>true</param-value> </init-param> <init-param> <param-name>logDirectory</param-name> <param-value>/tmp</param-value> </init-param> <init-param> <param-name>logFilePrefix</param-name> <param-value>localhost_7080_</param-value> </init-param> <init-param> <param-name>dontLogRegEx</param-name> <param-value></param-value> </init-param> <init-param> <param-name>matchOnUriOnly</param-name> <param-value>true</param-value> </init-param> <init-param> <param-name>timeBetweenFlushesInSec</param-name> <param-value>73</param-value> </init-param> <init-param> <param-name>flushAfterLines</param-name> <param-value>13</param-value> </init-param> <init-param> <param-name>maxLogFileSize</param-name> <param-value>5242880</param-value> </init-param> --> </filter> <!-- Use this only when also enabling the RhqRtFilter in the filter <filter-mapping> <filter-name>RhqRtFilter</filter-name> <url-pattern>/*</url-pattern> </filter-mapping> --> - Restart the JBoss EAP/AS server to load the new
web.xmlsettings.
|
Parameter
|
Description
|
|---|---|
|
chopQueryString
|
Only the URI part of a query will be logged if this parameter is set to true. Otherwise the whole query line will be logged. Default is true.
|
|
logDirectory
|
The directory where the log files will be written to. Default setting is {
jboss.server.log.dir}/rt/ (usually server/xxx/log/rt). If this property is not defined, the fallback is {java.io.tmpdir}/rt/ (/tmp/ on UNIX®, and ~/Application Data/Local Settings/Temp – check the TEMP environment variable) is used. If you specify this init parameter, no directory rt/ will be created, but the directory you have provided will be taken literally.
|
|
logFilePrefix
|
A prefix that is put in front of the log file names. Default is the empty string.
|
|
dontLogRegEx
|
A regular expression that is applied to query strings. See java.util.regex.Pattern. If the parameter is not given or an empty string, no pattern is applied.
|
|
matchOnUriOnly
|
Should the dontLogRegEx be applied to the URI part of the query (true) or to the whole query string (false). Default is true.
|
|
timeBetweenFlushesInSec
|
Log lines are buffered by default. When the given number of seconds have passed and a new request is received, the buffered lines will be flushed to disk even if the number of lines to flush after (see next point) is not yet reached.. Default value is 60 seconds (1 Minute).
|
|
flushAfterLines
|
Log lines are buffered by default. When the given number of lines have been buffered, they are flushed to disk. Default value is 10 lines.
|
|
maxLogFileSize
|
The maximum allowed size, in bytes, of the log files; if a log file exceeds this limit, the filter will truncate it; the default value is 5242880 (5 MB).
|
|
vHostMappingFile
|
This properties file must exist on the Tomcat process classpath. For example, in the ../conf/vhost-mappings.properties. The file contains mappings from the 'incoming' vhost (server name) to the vhost that should be used as the prefix in the response time log file name. If no mapping is present (no file or no entry response times are set), then the incoming vhost (server name) is used. For example:
pickeldi.users.acme.com=pickeldi
pickeldi=
%HOST%=
The first mapping states that if the incoming vhost is 'host1.users.acme.com', then the log file name should get a vhost of 'host1' as prefix, separated by a _ from the context root portion. The second mapping states that if the 'incoming' vhost is 'host1', then no prefix, and no _, should be used. The third mapping uses a special left-hand-side token, '%HOST%'. This mapping states that if the 'incoming' vhost is a representation of localhost then no prefix, and no _ , should be used.
%HOST% will match the host name, or canonical host name or IP address, as returned by the implementation of InetAddress.getLocalHost().
The second and third mappings are examples of empty right hand side, but could just as well have provided a vhost.
This is a one time replacement. There is no recursion in the form that the result of the first line would then be applied to the second one.
|
15.2. Configuring HTTP Response Time Metrics
- Install the response time filter for the Apache or Tomcat server. For Apache, simply install the filters; for Tomcat, there is additional configuration required to set up the filter entry in the
web.xmlfile. - Click the Inventory tab in the top menu.
- Select the Servers menu table on the left, and then navigate to the web server

- Click the Connection Settings tab on the web server resource entry. and scroll to the Response Time configuration section.
- Configure the response time properties for the web server. The agent has to know what log file the web server uses to record response time data.Optionally, the server can perform certain transformations on the collected data.
- The response times log records times for all resources the web server serves, including support files like CSS files and icons or background images. These resources can be excluded from the response time calculations in the Response Time Url Excludes field.
- The same page can be accessed with different parameters passed along in the URL. The Response Time Url Transforms field provides a regular expression that can be used to strip or substitute the passed parameters.

- Click the button.
- Click the Monitoring tab on the web server resource entry.
- Click the Schedules subtab.
- Select the HTTP Response Time metric. This metric is the calltime type.

- Click the at the bottom of the list.
Chapter 16. Managing mod_cluster Deployments for JBoss EAP 5 (Tech Preview)
mod_cluster module provides intelligent, dynamic load balancing for web applications. There are two halves to mod_cluster: one in the JBoss application server (which manages the web application contexts) and one in the HTTP server (which manages sessions and routing). JBoss ON monitors and manages the mod_cluster module within the JBoss server.
16.1. About mod_cluster
mod_cluster is an HTTP load balancer that provides a level of intelligence and control over web applications that is not available with other HTTP load balancers. mod_cluster has lots of features that improve performance and management, but two are crucial:
- By using multicast (advertising),
mod_clustersignals workers what proxy servers are available, so workers can register themselves dynamically with the cluster domain. - Using a special communication layer between the JBoss server and the HTTP server,
mod_clustercan not only register when a web context is enabled but also when it is disabled and removed from load balancing. This allowsmod_clusterto handle full web application life cycles.
mod_cluster is in the product documentation at http://www.jboss.org/mod_cluster.
mod_cluster has two modules: one for the HTTP server which handles routing and load balancing and one for the JBoss server to manage the web application contexts. Both modules must be installed and configured for the cluster to function.
Figure 16.1. The mod_cluster Topology
mod_cluster domain is imported as a child resource for the JBoss server. The web application contexts are listed as children resources for the cluster, with contexts as children within the mod_cluster module.

Figure 16.2. The mod_cluster Resource Hierarchy
Important
mod_cluster module in the HTTP server is configured externally from JBoss ON and is not managed by JBoss ON.
mod_cluster module in the JBoss server can be managed by JBoss ON, and it is critical that the cluster is properly configured in order for JBoss ON to manage its resources. JBoss ON detects mod_cluster like any other JMX resource (such as Hibernate).
mod_cluster:
16.2. Managing mod_cluster
mod_cluster properties provide direct management over how the mod_cluster domain operates. Almost any part of the mod_cluster configuration can be managed through JBoss ON, but two elements are critical for domain behavior:
- How the
mod_clusterdomain handles sticky sessions. Sticky sessions are enabled inmod_clusterby default, but this can be disabled or its behavior can be changed through the configuration properties. - Enabling advertising (multicast).
mod_clustercan send the JBoss information to any VirtualHost configured in the HTTP server. This allows workers to find the cluster and register themselves with the JBoss server dynamically.
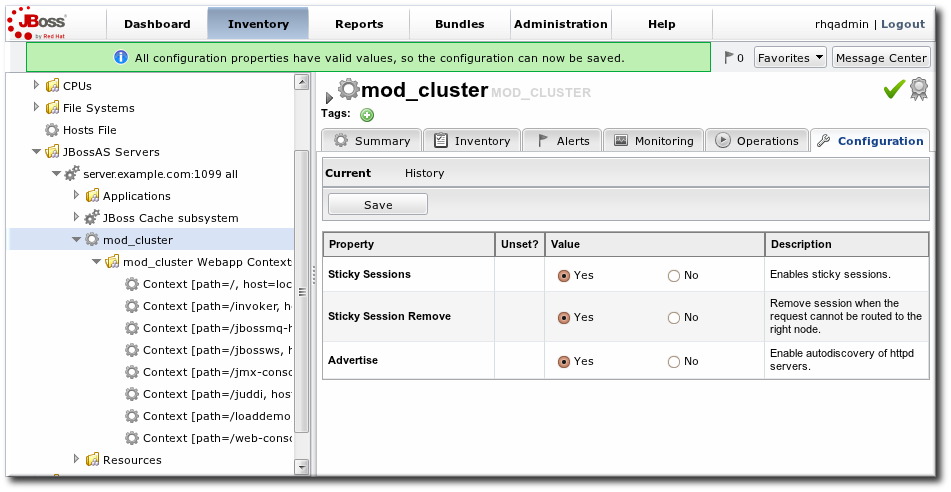
Figure 16.3. Setting Server-Level Properties
mod_cluster domain. The obvious ones that impact the web application contexts are enabling and disabling all contexts. The other options are used to reset the mod_cluster domain after an error (reset the node) or reload the cluster configuration after making changes to the cluster properties.
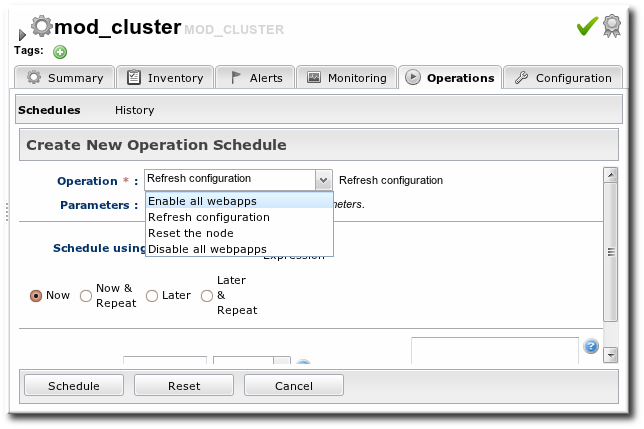
Figure 16.4. Running Server-Level Operations
16.3. Managing Web Applications Contexts
mod_cluster load-balancing cluster.
mod_cluster domain.
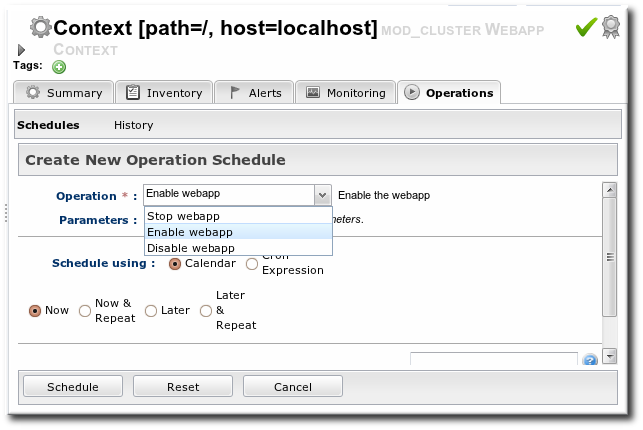
Figure 16.5. Running Web Application Context Operations
Appendix A. Interactions with System Users for Agents and Resources
- JBoss EAP servers
- PostgreSQL databases
- Tomcat servers
- Apache servers
- Generic JVMs
| Resource | User Information |
|---|---|
| PostgreSQL | No effect for monitoring and discovery.
The agent user must have read/write permissions to the PostgreSQL configuration file for configuration viewing and editing.
|
| Apache | No effect for monitoring and discovery.
The agent user must have read/write permissions to the Apache configuration file for configuration viewing and editing.
|
| Tomcat | Must use the same user or can't be discovered |
| JMX server or JVM | Different users are fine when using JMX remoting; cannot be discovered with different users and the attach API |
| JBoss AS/EAP | Different users are all right, but requires read permissions on run.jar and execute and search permission on all ancestor directories for run.jar |
A.1. The Agent User
A.2. Agent Users and Discovery
- For JBoss EAP resources, the agent must have read permissions to the
run.jarfile, plus execute and search permissions for every directory in the path to therun.jarfile. - If a JVM or JMX server is running with JMX remoting, then it can be discovered if the agent is running as a different user. However, if it is running with using the attach API, it has to be running as the same user as the agent for the resource to be discovered.
A.3. Users and Management Tasks
- Discovery
- Deploying applications (related to Section 13.1, “Setting Permissions for Agent and Resource Users”)
- Executing scripts
- Running start, stop, and restart operations
- Creating child resources through the JBoss ON UI
- Viewing and editing resource configuration
sudo.
A.4. Using sudo with JBoss ON Operations
sudo is for long-running operations, such as starting a service or a process, or for scripts which are owned by a resource user. The user which executes the script should be the same as the resource user because that user already has the proper authorization and permissions.
sudo rights to the given command.
- There can be no required interaction from the user, including no password prompts.
- It should be possible for the agent to pass variables to the script.
sudo for resource scripts:
- Grant the JBoss ON agent user
sudorights to the specific script or command. For example, to run a script as thejbossadminuser:[root@server ~]# visudo jbosson-agent hostname=(jbossadmin) NOPASSWD: /opt/jboss-eap/jboss-as/bin/*myScript*.sh
Using theNOPASSWDoption runs the command without prompting for a password.Important
JBoss ON passes command-line arguments with the start script when it starts an EAP instance. This can be done either by including the full command-line script (including arguments) in thesudoersentry or by using thesudo -uuser command in a wrapper script or a script prefix.The second option has a simplersudoersentry - Create or edit a wrapper script to use. Instead of invoking the resource's script directly, invoke the wrapper script which uses
sudoto run the script.Note
For the EAP start script, it is possible to set a script prefix in the connection settings, instead of creating a separate wrapper script:/usr/bin/sudo -u jbosson-agent
For example, for a start script wrapper,start-myScript.sh:#!/bin/sh # start-myScript.sh # Helper script to execute start-myConfig.sh as the user jbosson-agent # sudo -u jbosson-agent /opt/jboss-eap/jboss-as/bin/start-myConfig.sh
- Create the start script, with any arguments or settings to pass with the
run.shscript. For example, forstart-myConfig.sh:nohup ./run.sh -c MyConfig -b jonagent-host 2>&1> jboss-MyConfig.out &
Index
D
- deploying apps
- discovery
- secured JMX server, Enabling the Agent to Connect to Secured JMX Servers
J
- JBoss
- applying patches, Applying JBoss Patches from the Patch RSS Feed
- enabling the default patch content source, Enabling the Default JBoss Patch Content Source
- managing and configuring, How JBoss ON Manages JBoss Resources
- subscribing resources to the default patch, Subscribing Multiple JBoss Resources to the Default JBoss Patch Repository
- JBoss EAP
- discovering secure JMX servers, Enabling the Agent to Connect to Secured JMX Servers
- JBoss EAP 6/AS 7
- configuring response time metrics, Configuring Response Time Metrics for JBoss EAP 6/AS 7
- JBoss EAP/AS 5
- configuring response time metrics, Configuring HTTP Response Time Metrics for JBoss EAP/AS 5
- JMX server
- discovery, Setting up a Custom JVM for Discovery, Enabling the Agent to Connect to Secured JMX Servers
- excluding processes, Excluding Java Processes from Discovery
- required configuration, Required JVM Configuration for Discovery
- manually importing, Manually Importing a JVM Resource
- JVM
- discovery, Setting up a Custom JVM for Discovery
- excluding processes, Excluding Java Processes from Discovery
- required configuration, Required JVM Configuration for Discovery
- manually importing, Manually Importing a JVM Resource
M
- monitoring
- configuring response time filters for JBoss EAP 6/AS 7 servers, Configuring Response Time Metrics for JBoss EAP 6/AS 7
- configuring response time filters for JBoss EAP/AS 5 servers, Configuring HTTP Response Time Metrics for JBoss EAP/AS 5
P
- patches
- applying, Applying a Patch
R
- resources
- child
- connection factories, Creating Connection Factories
- data sources, Creating Data Sources
- EAR and WAR, Deploying EAR and WAR Files
- JMS queues and topics, Creating JMS Queues and Topics
- child types, Deploying Applications
- response time filters
- configuring JBoss EAP 6/AS 7, Configuring Response Time Metrics for JBoss EAP 6/AS 7
- configuring JBoss EAP/AS 5, Configuring HTTP Response Time Metrics for JBoss EAP/AS 5
T
- timeout
- manually discover app, Deploying Web Applications to a Domain, Deploying a Web Application as a Child Resource