Dieser Inhalt ist in der von Ihnen ausgewählten Sprache nicht verfügbar.
10.3.9. Configuring Connection Settings
10.3.9.1. Configuring 802.1X Security
Link kopierenLink in die Zwischenablage kopiert!
802.1X security is the name of the IEEE standard for port-based Network Access Control (PNAC). Simply put, 802.1X security is a way of defining a logical network out of a physical one. All clients who want to join the logical network must authenticate with the server (a router, for example) using the correct 802.1X authentication method.
802.1X security is most often associated with securing wireless networks (WLANs), but can also be used to prevent intruders with physical access to the network (LAN) from gaining entry. In the past, DHCP servers were configured not to lease IP addresses to unauthorized users, but for various reasons this practice is both impractical and insecure, and thus is no longer recommended. Instead, 802.1X security is used to ensure a logically-secure network through port-based authentication.
802.1X provides a framework for WLAN and LAN access control and serves as an envelope for carrying one of the Extensible Authentication Protocol (EAP) types. An EAP type is a protocol that defines how WLAN security is achieved on the network.
You can configure 802.1X security for a wired or wireless connection type by opening the Network Connections window (see Section 10.2.2, “Configuring New and Editing Existing Connections”) and following the applicable procedure:
Procedure 10.15. For a wired connection...
- Either click , select a new network connection for which you want to configure 802.1X security and then click , or select an existing connection and click .
- Then select the 802.1X Security tab and check the Use 802.1X security for this connection check box to enable settings configuration.
Procedure 10.16. For a wireless connection...
- Either click on , select a new network connection for which you want to configure 802.1X security and then click , or select an existing connection and click .
- Select the Wireless Security tab.
- Then click the Security dropdown and choose one of the following security methods: , , or .
- See Section 10.3.9.1.1, “Configuring TLS (Transport Layer Security) Settings” for descriptions of which EAP types correspond to your selection in the Security dropdown.
10.3.9.1.1. Configuring TLS (Transport Layer Security) Settings
Link kopierenLink in die Zwischenablage kopiert!
With Transport Layer Security, the client and server mutually authenticate using the TLS protocol. The server demonstrates that it holds a digital certificate, the client proves its own identity using its client-side certificate, and key information is exchanged. Once authentication is complete, the TLS tunnel is no longer used. Instead, the client and server use the exchanged keys to encrypt data using AES, TKIP or WEP.
The fact that certificates must be distributed to all clients who want to authenticate means that the EAP-TLS authentication method is very strong, but also more complicated to set up. Using TLS security requires the overhead of a public key infrastructure (PKI) to manage certificates. The benefit of using TLS security is that a compromised password does not allow access to the (W)LAN: an intruder must also have access to the authenticating client's private key.
NetworkManager does not determine the version of TLS supported. NetworkManager gathers the parameters entered by the user and passes them to the daemon, wpa_supplicant, that handles the procedure. It in turn uses OpenSSL to establish the TLS tunnel. OpenSSL itself negotiates the SSL/TLS protocol version. It uses the highest version both ends support.
- Identity
- Identity string for EAP authentication methods, such as a user name or login name.
- User certificate
- Click to browse for, and select, a user's certificate.
- CA certificate
- Click to browse for, and select, a Certificate Authority's certificate.
- Private key
- Click to browse for, and select, a user's private key file. Note that the key must be password protected.
- Private key password
- Enter the user password corresponding to the user's private key.
10.3.9.1.2. Configuring Tunneled TLS Settings
Link kopierenLink in die Zwischenablage kopiert!
- Anonymous identity
- This value is used as the unencrypted identity.
- CA certificate
- Click to browse for, and select, a Certificate Authority's certificate.
- Inner authentication
- — Password Authentication Protocol.— Challenge Handshake Authentication Protocol.— Microsoft Challenge Handshake Authentication Protocol version 2.— Challenge Handshake Authentication Protocol.
- Username
- Enter the user name to be used in the authentication process.
- Password
- Enter the password to be used in the authentication process.
10.3.9.1.3. Configuring Protected EAP (PEAP) Settings
Link kopierenLink in die Zwischenablage kopiert!
- Anonymous Identity
- This value is used as the unencrypted identity.
- CA certificate
- Click to browse for, and select, a Certificate Authority's certificate.
- PEAP version
- The version of Protected EAP to use. Automatic, 0 or 1.
- Inner authentication
- — Microsoft Challenge Handshake Authentication Protocol version 2.— Message Digest 5, a cryptographic hash function.— Generic Token Card.
- Username
- Enter the user name to be used in the authentication process.
- Password
- Enter the password to be used in the authentication process.
10.3.9.2. Configuring Wireless Security
Link kopierenLink in die Zwischenablage kopiert!
- Security
- — Do not encrypt the Wi-Fi connection.— Wired Equivalent Privacy (WEP), from the IEEE 802.11 standard. Uses a single pre-shared key (PSK).— An MD5 hash of the passphrase will be used to derive a WEP key.— Lightweight Extensible Authentication Protocol, from Cisco Systems.— WEP keys are changed dynamically.— Wi-Fi Protected Access (WPA), from the draft IEEE 802.11i standard. A replacement for WEP. Wi-Fi Protected Access II (WPA2), from the 802.11i-2004 standard. Personal mode uses a pre-shared key (WPA-PSK).— WPA for use with a RADIUS authentication server to provide IEEE 802.1X network access control.
- Password
- Enter the password to be used in the authentication process.
Note
In the case of WPA and WPA2 (Personal and Enterprise), an option to select between Auto, WPA and WPA2 has been added. This option is intended for use with an access point that is offering both WPA and WPA2. Select one of the protocols if you would like to prevent roaming between the two protocols. Roaming between WPA and WPA2 on the same access point can cause loss of service.

Figure 10.16. Editing the Wireless Security tab and selecting the WPA protocol
10.3.9.3. Configuring PPP (Point-to-Point) Settings
Link kopierenLink in die Zwischenablage kopiert!
- Configure Methods
- Use point-to-point encryption (MPPE)
- Microsoft Point-To-Point Encryption protocol (RFC 3078).
- Allow BSD data compression
- PPP BSD Compression Protocol (RFC 1977).
- Allow Deflate data compression
- PPP Deflate Protocol (RFC 1979).
- Use TCP header compression
- Compressing TCP/IP Headers for Low-Speed Serial Links (RFC 1144).
- Send PPP echo packets
- LCP Echo-Request and Echo-Reply Codes for loopback tests (RFC 1661).
10.3.9.4. Configuring IPv4 Settings
Link kopierenLink in die Zwischenablage kopiert!
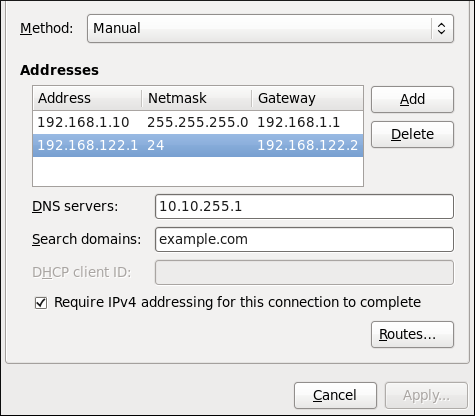
Figure 10.17. Editing the IPv4 Settings Tab
The IPv4 Settings tab allows you to configure the method by which you connect to the Internet and enter IP address, route, and DNS information as required. The IPv4 Settings tab is available when you create and modify one of the following connection types: wired, wireless, mobile broadband, VPN or DSL.
If you are using DHCP to obtain a dynamic IP address from a DHCP server, you can set Method to .
Setting the Method
Available IPv4 Methods by Connection Type
When you click the Method dropdown menu, depending on the type of connection you are configuring, you are able to select one of the following IPv4 connection methods. All of the methods are listed here according to which connection type or types they are associated with.
- Method
- — Choose this option if the network you are connecting to uses a DHCP server to assign IP addresses. You do not need to fill in the DHCP client ID field.— Choose this option if the network you are connecting to uses a DHCP server to assign IP addresses but you want to assign DNS servers manually.— Choose this option if the network you are connecting to does not have a DHCP server and you do not want to assign IP addresses manually. Random addresses will be selected as per RFC 3927.— Choose this option if the interface you are configuring is for sharing an Internet or WAN connection.
- Wired, Wireless and DSL Connection Methods
- — Choose this option if the network you are connecting to does not have a DHCP server and you want to assign IP addresses manually.
- Mobile Broadband Connection Methods
- — Choose this option if the network you are connecting to uses a DHCP server to assign IP addresses.— Choose this option if the network you are connecting to uses a DHCP server to assign IP addresses but you want to assign DNS servers manually.
- VPN Connection Methods
- — Choose this option if the network you are connecting to uses a DHCP server to assign IP addresses.— Choose this option if the network you are connecting to uses a DHCP server to assign IP addresses but you want to assign DNS servers manually.
- DSL Connection Methods
- — Choose this option if the network you are connecting to uses a DHCP server to assign IP addresses.— Choose this option if the network you are connecting to uses a DHCP server to assign IP addresses but you want to assign DNS servers manually.
PPPoE Specific Configuration Steps
If more than one NIC is installed, and PPPoE will only be run over one NIC but not the other, then for correct PPPoE operation it is also necessary to lock the connection to the specific Ethernet device PPPoE is supposed to be run over. To lock the connection to one specific NIC, do one of the following:
- Enter the MAC address in nm-connection-editor for that connection. Optionally select Connect automatically and Available to all users to make the connection come up without requiring user login after system start.
- Set the hardware-address in the [802-3-ethernet] section in the appropriate file for that connection in
/etc/NetworkManager/system-connections/as follows:Mere presence of the file in[802-3-ethernet] mac-address=00:11:22:33:44:55/etc/NetworkManager/system-connections/means that it is “available to all users”. Ensure thatautoconnect=trueappears in the [connection] section for the connection to be brought up without requiring user login after system start.
For information on configuring static routes for the network connection, go to Section 10.3.9.6, “Configuring Routes”.
10.3.9.5. Configuring IPv6 Settings
Link kopierenLink in die Zwischenablage kopiert!
- Method
- — Choose this option if you want to disable IPv6 settings.— Choose this option if the network you are connecting to uses a DHCP server to assign IP addresses.— Choose this option if the network you are connecting to uses a DHCP server to assign IP addresses but you want to assign DNS servers manually.— Choose this option if the network you are connecting to does not have a DHCP server and you want to assign IP addresses manually.— Choose this option if the network you are connecting to does not have a DHCP server and you do not want to assign IP addresses manually. Random addresses will be selected as per RFC 4862.— Choose this option if the interface you are configuring is for sharing an Internet or WAN connection.
- Addresses
- — Enter a comma separated list of DNS servers.— Enter a comma separated list of domain controllers.
For information on configuring static routes for the network connection, go to Section 10.3.9.6, “Configuring Routes”.
10.3.9.6. Configuring Routes
Link kopierenLink in die Zwischenablage kopiert!
A host's routing table will be automatically populated with routes to directly connected networks. The routes are learned by observing the network interfaces when they are “up”. This section is for entering static routes to networks or hosts which can be reached by traversing an intermediate network or connection, such as a VPN or leased line.
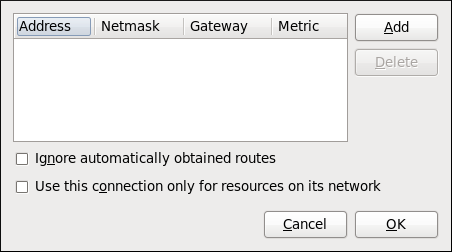
Figure 10.18. Configuring static network routes
- Addresses
- — The IP address of a network, sub-net or host.— The netmask or prefix length of the IP address just entered.— The IP address of the gateway leading to the network, sub-net or host.— A network cost, that is to say a preference value to give to this route. Lower values will be preferred over higher values.
- Ignore automatically obtained routes
- Select this check box to only use manually entered routes for this connection.
- Use this connection only for resources on its network
- Select this check box to prevent the connection from becoming the default route. Typical examples are where a connection is a VPN or a leased line to a head office and you do not want any Internet bound traffic to pass over the connection. Selecting this option means that only traffic specifically destined for routes learned automatically over the connection or entered here manually will be routed over the connection.