Red Hat AMQ 6
As of February 2025, Red Hat is no longer supporting Red Hat AMQ 6. If you are using AMQ 6, please upgrade: Migrating to AMQ 7.Dieser Inhalt ist in der von Ihnen ausgewählten Sprache nicht verfügbar.
9.5. Add Broker Authorization Entries
Overview
Link kopierenLink in die Zwischenablage kopiert!
Before enabling LDAP authorization in the broker, you need to create a suitable tree of entries in the directory server to represent permissions. You need to create the following kinds of entry:
- Queue entries
- Each queue entry has a Common Name (
cn), which can be the name of a specific queue or a wildcard pattern that matches multiple queues. Under each queue entry, you must create sub-entries for the admin, read, and write permissions. - Topic entries
- Each topic entry has a Common Name (
cn), which can be the name of a specific topic or a wildcard pattern that matches multiple topics. Under each topic entry, you must create sub-entries for the admin, read, and write permissions. - Advisory topics entry
- In particular, you must define one topic entry with the Common Name,
ActiveMQ.Advisory.$, which is a wildcard pattern that matches all advisory topics. - Temporary queues entry
- A single
Tempentry contains the admin, read, and write permissions that apply to all temporary queues.
Using wildcards in queue and topic entries
Link kopierenLink in die Zwischenablage kopiert!
When setting the common name of queue and topic entries in the directory server, you can use any of the wildcards shown in Table 9.1, “Destination Name Wildcards in LDAP” to match one or more segments of a destination name.
| Wildcard | Description |
|---|---|
. | Separates segments in a path name. |
* | Matches any single segment in a path name. |
$ | Matches any number of segments in a path name. |
For example, the pattern,
FOO.*, will match FOO.BAR, but not FOO.BAR.LONG; whereas the pattern, FOO.$, will match FOO.BAR and FOO.BAR.LONG.
Note
In the context of LDAP entries, the
$ character is used instead of the usual > character to match multiple destination name segments.
Steps to add authorization entries
Link kopierenLink in die Zwischenablage kopiert!
Perform the following steps to add authorization entries to the directory server:
- The next few steps describe how to create the
ou=ActiveMQnode.- Right-click the
YourDomainnode, and selectfrom the context menu. The Create New Organizational Unit dialog appears. - Select the tab in the left-hand pane of the Create New Organizational Unit dialog.
- Enter
ActiveMQin the Name field. - Click OK, to close the Create New Organizational Unit dialog.
- The next few steps describe how to create the
ou=Destinationnode.- Right-click on the
ActiveMQnode and selectfrom the context menu. The Create New Organizational Unit dialog appears. - Select the tab in the left-hand pane of the Create New Organizational Unit dialog.
- Enter
Destinationin the Name field. - Click OK, to close the Create New Organizational Unit dialog.
- In a similar manner to the preceding steps, by right-clicking on the
Destinationnode and invoking thecontext menu option, create the following organisationalUnitnodes as children of theou=Destinationnode:ou=Queue,ou=Destination,ou=ActiveMQ,dc=YourDomain ou=Topic,ou=Destination,ou=ActiveMQ,dc=YourDomain ou=Temp,ou=Destination,ou=ActiveMQ,dc=YourDomain
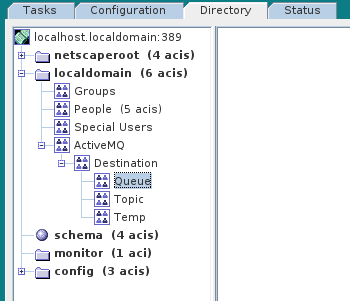
ou=Queue,ou=Destination,ou=ActiveMQ,dc=YourDomain ou=Topic,ou=Destination,ou=ActiveMQ,dc=YourDomain ou=Temp,ou=Destination,ou=ActiveMQ,dc=YourDomainCopy to Clipboard Copied! Toggle word wrap Toggle overflow - In the LDAP Browser window, you should now see the following tree:
Figure 9.1. DIT after Creating Destination, Queue, Topic and Temp Nodes
- The next few steps describe how to create the following nodes:
cn=$,ou=Queue,ou=Destination,ou=ActiveMQ,dc=YourDomain
cn=ActiveMQ.Advisory.$,ou=Topic,ou=Destination,ou=ActiveMQ,dc=YourDomain
cn=$,ou=Queue,ou=Destination,ou=ActiveMQ,dc=YourDomain
cn=ActiveMQ.Advisory.$,ou=Topic,ou=Destination,ou=ActiveMQ,dc=YourDomain
Copy to Clipboard Copied! Toggle word wrap Toggle overflow These nodes represent name patterns that match queue names and topic names, respectively. Thecn=$queue node defines an entry that matches all queue names, so it can be used to define access rights for all queues. Thecn=ActiveMQ.Advisory.$node defines a topic entry that matches all advisory topics.- Right-click on the
ou=Queuenode and select. The New Object dialog appears. - Select applicationprocess. Click OK.
- The Property Editor dialog now appears. In the Full name field, enter
$(where$represents the wildcard that matches any queue name). Click OK. - In a similar manner to the preceding steps, by right-clicking on the
ou=Topicnode and selecting thecontext menu option, create the following applicationProcessnode as a child of theou=Topicnode:cn=ActiveMQ.Advisory.$,ou=Topic,ou=Destination,ou=ActiveMQ,dc=YourDomain
cn=ActiveMQ.Advisory.$,ou=Topic,ou=Destination,ou=ActiveMQ,dc=YourDomainCopy to Clipboard Copied! Toggle word wrap Toggle overflow
- The next few steps describe how to create the permission group nodes, which represent
admin,read, andwritepermissions, for theou=Queuenode.- Right-click on the
cn=$node (initially depicted as a spherical icon in the console) and selectfrom the context menu. - The Create New Group dialog appears. Select the tab in the left-hand pane of the Create New Group dialog.
- Set the Group Name field to
admin. - Select the tab in the left-hand pane of the Create New Group dialog.
- Click Add to open the Search users and groups dialog.
- In the Search field, select
Groupsfrom the drop-down menu, and click the Search button. - From the list of groups that is now displayed, select
Administrator. - Click , to close the Search users and groups dialog.
- Click , to close the Create New Group dialog.
- In a similar manner to the preceding steps, by right-clicking on the
cn=$node and opening thedialog, create the following additional groupOfUniqueNamesnodes as children of thecn=$node:cn=read,cn=$,ou=Queue,ou=Destination,ou=ActiveMQ,dc=YourDomain cn=write,cn=$,ou=Queue,ou=Destination,ou=ActiveMQ,dc=YourDomain
cn=read,cn=$,ou=Queue,ou=Destination,ou=ActiveMQ,dc=YourDomain cn=write,cn=$,ou=Queue,ou=Destination,ou=ActiveMQ,dc=YourDomainCopy to Clipboard Copied! Toggle word wrap Toggle overflow
- Copy the
cn=admin,cn=read, andcn=writepermission nodes and paste them as children of thecn=ActiveMQ.Advisory.$node, as follows.Using a combination of mouse and keyboard, select the three nodes,cn=admin,cn=read, andcn=write, and typeCtrl-Cto copy them. Select thecn=ActiveMQ.Advisory.$node and typeCtrl-Vto paste the copied nodes as children. - Similarly, copy the
cn=admin,cn=read, andcn=writepermission nodes and paste them as children of theou=Tempnode. - In the LDAP Browser window, you should now see the following tree:
Figure 9.2. DIT after Creating Children of Queue, Topic and Temp Nodes