Dieser Inhalt ist in der von Ihnen ausgewählten Sprache nicht verfügbar.
Chapter 6. QEMU
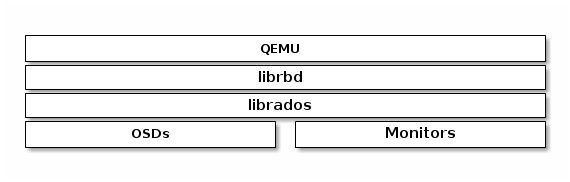
One of the use cases for Ceph Block Devices involves providing block device images to virtual machines. For example, a user may create a "golden" image with an operating system and any relevant software in an ideal configuration. Then, the user takes a snapshot of the image. Finally, the user clones the snapshot, typically many times. The ability to make copy-on-write clones of a snapshot means that Ceph can provision block device images to virtual machines quickly, because the client doesn’t have to download an entire image each time it spins up a new virtual machine. See Chapter 3, Snapshots for more details. Ceph Block Devices can integrate with the QEMU virtual machine.
To use Ceph Block Devices with QEMU, you must have access to a running Ceph storage cluster.
6.1. Quick Start
A storage pool, a RBD image and a client key will need to be created to host the virtual machines images. Perform the following commands from a Ceph Monitor or a Ceph client node.
Create a storage pool:
Syntax
ceph osd pool create <pool_name> <pg_num> [<pgp_num>]
# ceph osd pool create <pool_name> <pg_num> [<pgp_num>]Copy to Clipboard Copied! Toggle word wrap Toggle overflow Example
ceph osd pool create libvirt-pool 128 128
# ceph osd pool create libvirt-pool 128 128Copy to Clipboard Copied! Toggle word wrap Toggle overflow Create a RBD image for the virtual machine:
Syntax
rbd create <image_name> --size <megabytes> --pool <pool-name> --image-format 2
# rbd create <image_name> --size <megabytes> --pool <pool-name> --image-format 2Copy to Clipboard Copied! Toggle word wrap Toggle overflow Example
rbd create librbd --size 13240 --pool libvirt-pool --image-format 2
# rbd create librbd --size 13240 --pool libvirt-pool --image-format 2Copy to Clipboard Copied! Toggle word wrap Toggle overflow Create a Ceph user and add capabilities:
Syntax
ceph auth get-or-create client.<user_name> <daemon_type> 'allow <capability>' [<daemon_type> 'allow <capability> pool=<pool_name>']
# ceph auth get-or-create client.<user_name> <daemon_type> 'allow <capability>' [<daemon_type> 'allow <capability> pool=<pool_name>']Copy to Clipboard Copied! Toggle word wrap Toggle overflow Example
ceph auth get-or-create client.libvirt mon 'allow r' osd 'allow class-read object_prefix rbd_children, allow rwx pool=libvirt-pool'
# ceph auth get-or-create client.libvirt mon 'allow r' osd 'allow class-read object_prefix rbd_children, allow rwx pool=libvirt-pool'Copy to Clipboard Copied! Toggle word wrap Toggle overflow Verify the user’s authentication key and capabilities:
Exmaple
Copy to Clipboard Copied! Toggle word wrap Toggle overflow NoteMake note of the
client.libvirtkey.
On the client node, verify that KVM/QEMU packages are installed and the libvirtd service is running. See the Red Hat Enterprise Linux Virtualization Deployment and Administration Guide for more details. Also, verify that the latest ceph-common package is installed. See the Red Hat Ceph Storage Installation Guide for more details. Then create a virtual machine, but do not add any storage devices to the virtual machine. If the virtual machine powers on after creation, then power off the virtual machine before editing.
Edit the virtual machine configuration:
Syntax
virsh edit <VM_name>
# virsh edit <VM_name>Copy to Clipboard Copied! Toggle word wrap Toggle overflow Exmaple
virsh edit example-vm
# virsh edit example-vmCopy to Clipboard Copied! Toggle word wrap Toggle overflow Add the new RBD image to the virtual machine configuration. Append the following code block to the end of the virtual machine configuration. Substitute the Ceph Monitor for the
<monitor_host_name>variable:Example
Copy to Clipboard Copied! Toggle word wrap Toggle overflow Create a
secret.xmlfile using theclient.libvirtuser:Example
Copy to Clipboard Copied! Toggle word wrap Toggle overflow Define the secret:
Example
virsh secret-define --file secret.xml
# virsh secret-define --file secret.xmlCopy to Clipboard Copied! Toggle word wrap Toggle overflow NoteMake note of the generated UUID that is returned. This will be used to set the secret.
Set the UUID:
Syntax
virsh secret-set-value --secret <uuid_from_previous_step> --base64 <ceph_user_key>
# virsh secret-set-value --secret <uuid_from_previous_step> --base64 <ceph_user_key>Copy to Clipboard Copied! Toggle word wrap Toggle overflow Example
virsh secret-set-value --secret 727c2e12-a6ac-4f57-a553-8b6fd13a1da9 --base64 AQC/+EhVmQ+NOxAA0OZAEXBSR0pD3gDPwxrFDA==
# virsh secret-set-value --secret 727c2e12-a6ac-4f57-a553-8b6fd13a1da9 --base64 AQC/+EhVmQ+NOxAA0OZAEXBSR0pD3gDPwxrFDA==Copy to Clipboard Copied! Toggle word wrap Toggle overflow Edit the virtual machine configuration and add authentication block to the disk block:
Authentication Block Example
<auth username='libvirt'>
      <secret type='ceph' uuid='727c2e12-a6ac-4f57-a553-8b6fd13a1da9'/>
</auth>
<auth username='libvirt'> <secret type='ceph' uuid='727c2e12-a6ac-4f57-a553-8b6fd13a1da9'/> </auth>Copy to Clipboard Copied! Toggle word wrap Toggle overflow Full Disk Block Example
Copy to Clipboard Copied! Toggle word wrap Toggle overflow - Start the virtual machine and install an operating system.
Configuring the authentication is required for each KVM/QEMU client.