Dieser Inhalt ist in der von Ihnen ausgewählten Sprache nicht verfügbar.
Chapter 5. Using Red Hat Container Development Kit
Once your Vagrant box is added, and one or more VMs is running, there are things you can do to begin using and managing your CDK environment. Topics associated with using your CDK are described in this chapter.
Two different Vagrantfiles are available in the Red Hat Developer Tools ZIP file that you can use to start differently configured Red Hat Enterprise Linux virtual machines from Vagrant:
rhel-ose- preconfigured instance of OpenShift Enterprise
rhel-k8s-singlenode-setup- preconfigured instance of Kubernetes
5.1. Using CDK to Develop with OpenShift
The OpenShift (rhel-ose) Vagrantfile is the recommended one for container development with the Red Hat Enterprise Linux CDK. When you run vagrant up from the rhel-ose directory, the Vagrantfile starts up a Red Hat Enterprise Linux virtual machine from the vagrant box you installed. The characteristics of that box are as follows:
- Sets up a CDK development environment with OpenShift (see https://www.openshift.com/enterprise/whats-new.html).
- Creates private networking to expose services from the Red Hat Enterprise Linux VM to the host system.
If you haven’t started it already, to start the CDK Red Hat Enterprise Linux VM from the rhel-ose Vagrantfile and start using it, do the following:
Change to the rhel-ose directory and start the Red Hat Enterprise Linux VM (for Windows, use
%USERPROFILE%\cdk\components\rhel\rhel-ose):cd ~/cdk/components/rhel/rhel-ose/ vagrant up
$ cd ~/cdk/components/rhel/rhel-ose/
$ vagrant up
Copy to Clipboard Copied! Toggle word wrap Toggle overflow From the same directory, provision the box as follows:
NOTE: The
vagrant provisionisn’t stricktly required, but it can help overcome a timeout issue and gives you a way to see help messages for next steps you can take. You may have to run this several times.Copy to Clipboard Copied! Toggle word wrap Toggle overflow -
At the end of the provisioning, you see output describing how to access the OpenShift console or start using the
occommand line to begin developing OpenShift projects. For more information on how to use the Red Hat Enterprise Linux VM that was created from the rhel-ose Vagrantfile, see the README.rst file in the rhel-ose directory.
The next sections step you through using the different interfaces to OpenShift.
5.1.1. Using CDK from OpenShift Web Interface
Here’s one way to get started using the OpenShift Enterprise Web Console to develop containerized applications:
Point your Web browser to the URL shown for the OpenShift console. The default is: https://10.1.2.2:8443/console. Figure 5-1 shows an example of the OpenShift Enterprise login screen:

-
Login as either a basic user with the
openshift-devusername anddevelpassword or cluster admin user with theadminusername andadminpassword. To start using OpenShift, try one of the following:
- For a walk-through of the OpenShift Web Console, refer to the Getting Started for Developers: Web Console guide
- For help creating your first OpenShift application, refer to the OpenShift Creating New Applications guide.
NOTE: To stop the OpenShift (ose) service, you can run the
systemctl stop openshiftcommand.
5.2. Using CDK to Develop with Kubernetes
When you run vagrant up from the rhel-k8s-singlenode-setup directory, the Vagrantfile starts a Red Hat Enterprise Linux virtual machine from the vagrant box you installed. The characteristics of that box are as follows:
- Starts up the docker service
- Starts up all the services needed to run an all-in-one Kubernetes master and node on the Red Hat Enterprise Linux VM
The resulting virtual machine is ready to start using the kubectl command to build Kubernetes pods, services, replication controllers and other features.
Change to the rhel-docker-eclipse directory and start the Red Hat Enterprise Linux VM (for Windows, use
%USERPROFILE%\cdk\components\rhel\rhel\rhel-k8s-singlenode-setup):cd ~/cdk/components/rhel/misc/rhel-k8s-singlenode-setup/ vagrant up
$ cd ~/cdk/components/rhel/misc/rhel-k8s-singlenode-setup/
$ vagrant up
Copy to Clipboard Copied! Toggle word wrap Toggle overflow Use
vagrant sshto access the Red Hat Enterprise Linux VM and check the status of kubernetes:vagrant ssh
$ vagrant ssh
[vagrant@localhost ~]$ kubectl cluster-info
Kubernetes master is running at http://localhost:8080
Copy to Clipboard Copied! Toggle word wrap Toggle overflow - Begin using your Red Hat Enterprise Linux Kubernetes-enabled VM. For information on developing containerized applications to run in Kubernetes, refer to the Launching container pods with Kubernetes section of the "Get Started Orchestrating Containers with Kubernetes" guide.
5.3. Using docker and oc Command-Line Tools
The docker and oc commands, which can be used to control the Docker and OpenShift services respectively, are included in CDK, which allows you to run those commands directly when you are logged into the CDK virtual machine.
The docker and oc client commands can also be used on your host system to interact with the Docker and OpenShift services running inside the CDK virtual machine. For instructions on how to install and use these commands on Microsoft Windows, Mac OS X, and Linux, see the Using the Docker Service and Using OpenShift Enterprise chapters in the CDK Getting Started Guide.
5.4. Using CDK with Docker Tooling on Eclipse
You can access the Docker service runnning on the CDK Red Hat Enterprise Linux VM from an Eclipse IDE running on your local system. Here’s how:
Install Eclipse. Install the Eclipse software on the system in which you are running the CDK and start up Eclipse. For example, to install and start Eclipse, do the following:
On a Fedora system:
sudo dnf install -y eclipse eclipse-linuxtools-docker
eval "$(vagrant service-manager env docker)"
eclipse &
$ sudo dnf install -y eclipse eclipse-linuxtools-docker
$ eval "$(vagrant service-manager env docker)"
$ eclipse &
Copy to Clipboard Copied! Toggle word wrap Toggle overflow On a Red Hat Enterprise Linux system:
sudo yum install -y devtoolset-4-eclipse devtoolset-4-eclipse-linuxtools devtoolset-4-eclipse-linuxtools-docker.noarch
eval "$(vagrant service-manager env docker)"
scl enable devtoolset-4 'eclipse' &
$ sudo yum install -y devtoolset-4-eclipse devtoolset-4-eclipse-linuxtools devtoolset-4-eclipse-linuxtools-docker.noarch
$ eval "$(vagrant service-manager env docker)"
$ scl enable devtoolset-4 'eclipse' &
Copy to Clipboard Copied! Toggle word wrap Toggle overflow -
Select a workspace. Choose the folder that will store our Eclipse work on your local desktop (such as
/home/chris/workspace). The Eclipse Platform screen appears. -
Open the Docker perspective. Select Window
Perspective Open Perspective Other Docker Tooling OK. Then select the Workbench icon. The Docker Tooling - Eclipse Platform screen should appear as shown in Figure 5-2
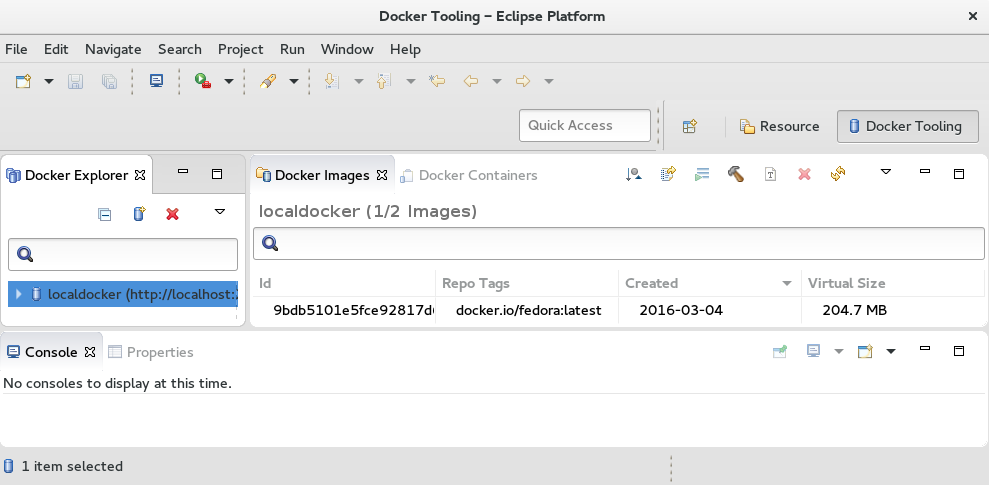
You can now begin using the Eclipse Docker Tooling screen to work with Docker images from inside the CDK’s virtual machine.
5.5. Working with CDK Vagrant Virtual Machine
There are several ways you can gain access to the virtual machines you start up with your CDK. There are Vagrant commands you can use to gain shell access to a VM. Likewise, there are ways of accessing a CDK VM from Web UIs, such as OpenShift and Eclipse. The following section documents how to access your CDK VM from Vagrant.
5.5.1. Interacting with a Running Vagrant Box
To use a Vagrant box that is up and running, first change to the directory from which you started that box. For example, cd %USERPROFILE%\cdk\components\rhel\rhel-ose (in Windows) or cd ~/cdk/components/rhel/rhel-ose (in Fedora, Red Hat Enterprise Linux, or Mac OS X). From that location, you can run different vagrant commands to use or manage the box in different ways.
List the subcommands available to use with your vagrant command:
vagrant list-commands
$ vagrant list-commandsLog into your Red Hat Enterprise Linux CDK Vagrant box using SSH:
vagrant ssh
$ vagrant ssh
This automatically logs you into the Red Hat Enterprise Linux virtual machine as the vagrant user. When you are done, exit the SSH session (type exit). To stop the Vagrant box, execute:
vagrant halt
$ vagrant halt
If, at some point you want to delete the created VM and free virtualization resources, use the vagrant destroy command. Your Vagrantfile and the box image in the .vagrant.d in your home directory will remain, allowing you to recreate a fresh version of the environment with a subsequent vagrant up command.
vagrant destroy
$ vagrant destroy
Do not delete the .vagrant subdirectory where Vagrant keeps its per-machine state without first using the vagrant destroy command to free virtualization (libvirt or Virtualbox) resources. If you no longer have the .vagrant subdirectory on a system using libvirt, you will need to use libvirt tools, such as virt-manager (GUI) or virsh (CLI), to manually delete the resources that were created by Vagrant before you can bring up a Vagrant box with the same name. Likewise, on a system using Virtualbox for virtualization, use the Virtualbox GUI to delete the resources you created with Vagrant.
After vagrant destroy, you will be able to bring the Vagrant box up again in its original, clean state.
5.5.2. Viewing all Vagrant Boxes and Directories
To view the status of all Vagrant boxes on your system and verify that your box was properly stopped, use:
vagrant global-status
$ vagrant global-status