Dieser Inhalt ist in der von Ihnen ausgewählten Sprache nicht verfügbar.
Console Administration Guide
System Administration of Red Hat Gluster Storage Environments using the Administration Portal
Abstract
Chapter 1. Introduction
- Support to quickly create and manage Red Hat Gluster Storage trusted storage pool and volumes.
- Multilevel administration to enable administration of physical infrastructure and virtual objects.
Note
1.1. System Components
1.1.1. Components
1.1.2. The Console
1.1.3. Hosts
1.2. Red Hat Gluster Storage Console Resources
- Hosts - A host is a physical host (a physical machine) running Red Hat Gluster Storage 3.4. Servers are grouped into storage clusters. Red Hat Gluster Storage volumes are created on these clusters. The system and all its components are managed through a centralized management system.
- Clusters - A cluster is a group of linked computers that work together closely, thus in many respects forming a single computer. Hosts in a cluster share the same network infrastructure and the same storage.
- User - Red Hat Gluster Storage supports multiple levels of administrators and users with distinct levels of permissions. System administrators can manage and administer objects of the physical infrastructure, such as clusters, hosts, and volume.
- Events and Monitors - Alerts, warnings, and other notices about activities within the system help the administrator to monitor the performance and operation of various resources.
1.3. Administration of the Red Hat Gluster Storage Console
- Configuring a new logical cluster is the most important task of the system administrator. Designing a new cluster requires an understanding of capacity planning and definition of requirements. This is typically determined by the solution architect, who provides the requirements to the system architect. Preparing to set up the storage environment is a significant part of the setup, and is usually part of the system administrator's role.
- Maintaining the cluster, including performing updates and monitoring usage and performance to keep the cluster responsive to changing needs and loads.
1.3.1. Maintaining the Red Hat Gluster Storage Console
- Managing hosts and other physical resources.
- Managing the storage environment. This includes creating, deleting, expanding and shrinking volumes and clusters.
- Monitoring overall system resources for potential problems such as an extreme load on one of the hosts, insufficient memory or disk space, and taking any necessary actions.
- Managing user setup and access, and setting user and administrator permission levels. This includes assigning or customizing roles to suit the needs of the enterprise.
- Troubleshooting for specific users or hosts or for overall system functionality.
Part I. The Red Hat Gluster Storage Console Interface
Chapter 2. Getting Started
2.1. Graphical User Interface
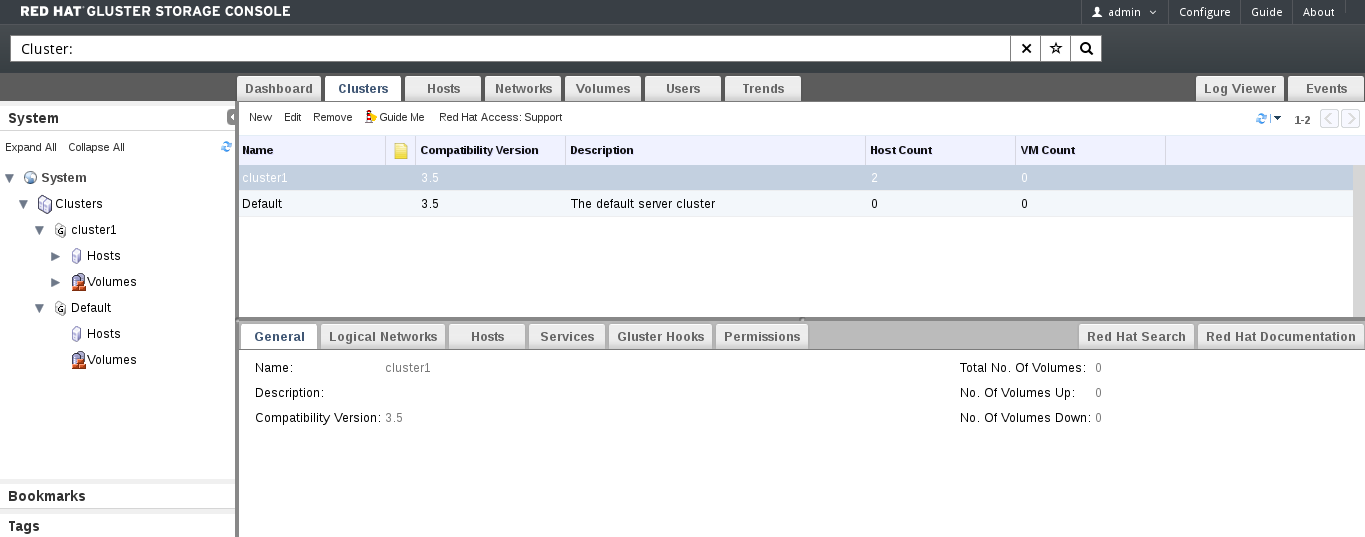
Figure 2.1. Graphical User Interface Elements of the Administration Portal
Graphical User Interface Elements
 Header
 The Header bar contains the name of the current logged-in user, the button, the button, and the button. The button provides access to version information. The button allows you to configure user roles.  Search Bar
 The Search bar allows you to quickly search for resources such as hosts and volumes. You can build queries to find the resources that you need. Queries can be as simple as a list of all the hosts in the system, or much more complex. As you type each part of the search query, you will be offered choices to assist you in building the search. The star icon can be used to save the search as a bookmark.  Resource Tabs
 All resources, such as hosts and clusters, can be managed using the appropriate tab. Additionally, the Events tab allows you to manage and view events across the entire system. Clicking a tab displays the results of the most recent search query on the selected object. For example, if you recently searched for all hosts starting with "M", clicking the Hosts tab displays a list of all hosts starting with "M". The Administration Portal provides the following tabs: Clusters, Hosts, Volumes, Users, and Events.  Results List
 Perform a task on an individual item, multiple items, or all the items in the results list, by selecting the items and then clicking the relevant action button. If multiple selection is not possible, the button is disabled. Details of a selected item display in the details pane.  Details Pane
 The Details pane displays detailed information about a selected item in the Results Grid. If multiple items are selected, the Details pane displays information on the first selected item only.  Bookmarks Pane
 Bookmarks are used to save frequently used or complicated searches for repeated use. Bookmarks can be added, edited, or removed.  Alerts/Events Pane
 The Alerts pane lists all events with a severity of Error or Warning. The system records all events, which are listed as audits in the Alerts section. Like events, alerts can also be viewed in the lowermost panel of the Events tab by resizing the panel and clicking the Alerts tab. This tabbed panel also appears in other tabs, such as the Hosts tab.
Important
2.1.1. Tree Mode and Flat Mode
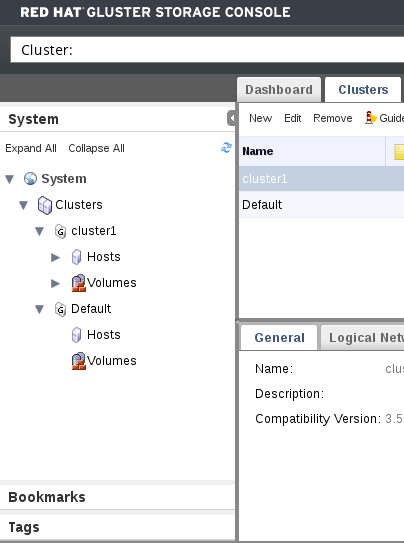
Figure 2.2. Tree Mode

Figure 2.3. Flat Mode
2.2. Search
2.2.1. Search Syntax
result-type: {criteria} [sortby sort_spec]
The following examples describe how search queries are used, and help you to understand how Red Hat Gluster Storage Console assists with building search queries.
| Example | Result |
|---|---|
| Volumes: status = up | Displays a list of all volumes that are up. |
| Volumes: cluster = data | Displays a list of all volumes of the cluster data. |
| Events: severity > normal sortby time | Displays the list of all events whose severity is higher than Normal, sorted by time. |
2.2.1.1. Auto-Completion
Volumes: status = down
| Input | List Items Displayed | Action |
|---|---|---|
v | Volumes (1 option only) |
Select
Volumes or;
Type
Volumes
|
Volumes: |
All volumes properties
| Type s |
Volumes: s | volume properties starting with s | Select status or type status |
Volumes: status | =
!=
| Select or type |
Volumes: status = | All status values | Select or type down |
2.2.1.2. Result-Type Options
- Host for a list of hosts
- Event for a list of events
- Users for a list of users
- Cluster for a list of clusters
- Volumes for a list of volumes
2.2.1.3. Search Criteria
{criteria} is as follows:
<prop> <operator> <value>
<obj-type>.<prop> <operator> <value>
The following table describes the parts of the syntax:
| Part | Description | Values | Example | Note |
|---|---|---|---|---|
| prop | The property of the searched-for resource. Can also be the property of a resource type (see obj-type), or tag (custom tag). | See the information for each of the search types in Section 2.2.1.3.1, “Wildcards and Multiple Criteria”. | Status | -- |
| obj-type | A resource type that can be associated with the searched-for resource. | See the explanation of each of the search types in Section 2.2.1.3.1, “Wildcards and Multiple Criteria”. | Users | -- |
| operator | Comparison operators. |
=
!= (not equal)
>
<
>=
<=
| -- | Value options depend on obj-type. |
| Value | What the expression is being compared to. |
String
Integer
Ranking
Date (formatted according to regional settings)
|
Jones
256
normal
|
|
2.2.1.3.1. Wildcards and Multiple Criteria
<value> part of the syntax for strings. For example, to find all users beginning with m, enter m*.
AND and OR. For example:
Volumes: name = m* AND status = Up
AND or OR, AND is implied. AND precedes OR, and OR precedes implied AND.
2.2.1.4. Determining Sort Order
sortby. Sort direction (asc for ascending, desc for descending) can be included.
events: severity > normal sortby time desc
2.2.2. Saving Queries as Bookmarks
2.3. Tags
Procedure 2.1. Creating a tag
- In tree mode or flat mode, click the resource tab for which you wish to create a tag. For example, Hosts.
- Click the Tags tab. Select the node under which you wish to create the tag. For example, click the root node to create it at the highest level. The New button is enabled.
- Click New at the top of the Tags pane. The New Tag dialog box displays.
- Enter the Name and Description of the new tag.
- Click . The new tag is created and displays on the Tags tab.
Procedure 2.2. Modifying a tag
- Click the Tags tab. Select the tag that you wish to modify. The buttons on the Tags tab are enabled.
- Click Edit on the Tags pane. The Edit Tag dialog box displays.
- You can change the Name and Description of the tag.
- Click . The changes in the tag display on the Tags tab.
Procedure 2.3. Deleting a tag
- Click the Tags tab. The list of tags will display.
- Select the tags to be deleted and click . The Remove Tag(s) dialog box displays.
- The tags are displayed in the dialog box. Check that you are sure about the removal. The message warns you that removing the tags will also remove all descendants of the tags.
- Click . The tags are removed and no longer display on the Tags tab. The tags are also removed from all the objects to which they were attached.
Procedure 2.4. Adding or removing a tag to or from one or more object instances
- Search for the objects that you wish to tag or untag so that they are among the objects displayed in the results list.
- Select one or more objects on the results list.
- Click the Assign Tags button on the tool bar or right-click menu option.
- A dialog box provides a list of tags. Select the check box to assign a tag to the object, or deselect the check box to detach the tag from the object.
- Click . The specified tag is now added or removed as a custom property of the selected objects.
- Follow the search instructions in Section 2.2, “Search” , and enter a search query using “tag” as the property and the desired value or set of values as criteria for the search.The objects tagged with the tag criteria that you specified are listed in the results list.
Chapter 3. Dashboard Overview
- Capacity: Displays the Total, Used and Available storage capacity in the system. Its calculated by aggregating data from all the hosts in the System.
- Utilization: Displays the average usage percentage of CPU, Memory. This is averaged across all the hosts in system.
- Alerts : Displays the number of alerts in the system. The Alerts tab will display a red exclamation icon if there is an alert ot alerts. Click on the alerts arrow icon to open the alerts dialog box. To delete the alert/alerts, click the cross icon at the right hand side of the dialogue box.
- Hosts: Displays the total number of Hosts in the system and the number of hosts in down state.
- Volumes:Displays the total number of volumes in the system across all cluster and number of them in UP, DOWN, Degraded, Partial, or Stopped status.
- NICs: Displays the number of network interfaces in the hosts.
- Network: Displays the transmission and receiving rate of the NICs.
Note
3.1. Viewing Cluster Summary
Procedure 3.1. Viewing Cluster Summary
- In Dashboard tab, select the cluster name from drop-down list to view cluster capacity details of a specific cluster.Select All Clusters to view cluster capacity details of all clusters.
Figure 3.1. Dashboard Overview
- View the cluster and volume details by hovering over each dashboard item.
- Click CAPACITY or VOLUMES to view the cluster and volume details respectively.
- Click UTILIZATION, HOST, NIC, or NETWORK to view the host and network details.
Note
Clicking each item takes you to corresponding tab in Red Hat Gluster Storage Console.
Part II. Managing System Components
Chapter 4. Managing Clusters
4.1. Cluster Properties
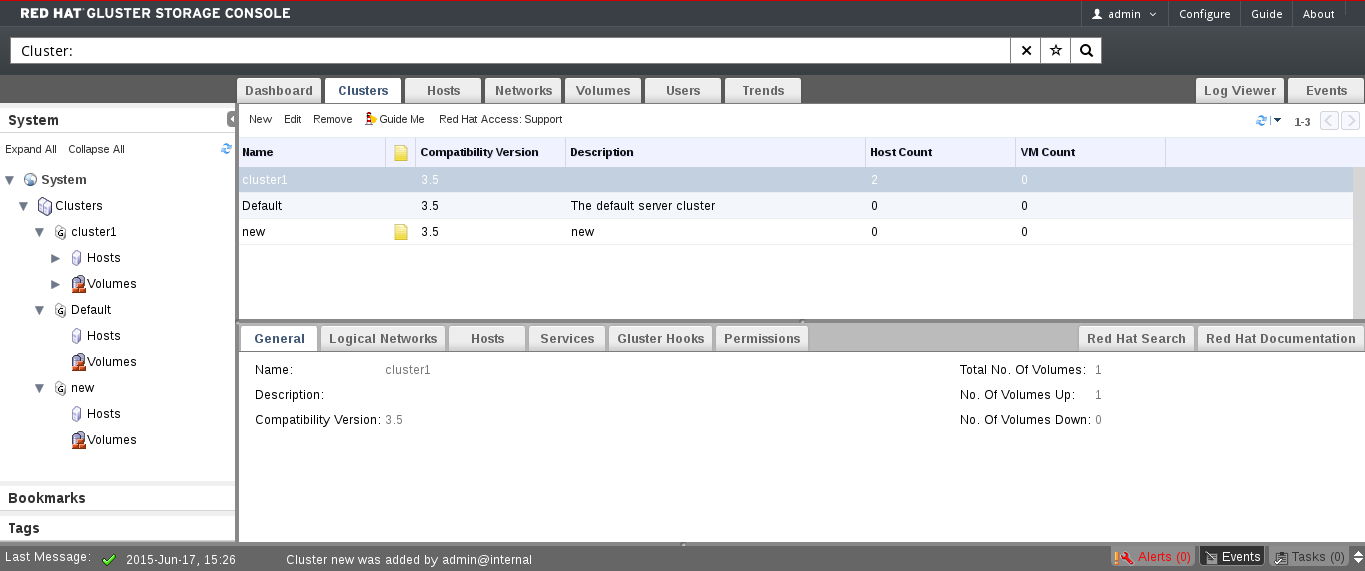
Figure 4.1. Clusters Tab
|
Field
|
Description
|
|---|---|
Name
|
The name of the cluster. This must be a unique name and may use any combination of uppercase or lowercase letters, numbers, hyphens and underscores. Maximum length is 40 characters. The name can start with a number and this field is mandatory.
|
Description
|
The description of the cluster. This field is optional, but recommended.
|
Compatibility Version
|
The version of Red Hat Gluster Storage Console with which the cluster is compatible. All hosts in the cluster must support the indicated version.
Note
The default compatibility version is 3.4.
|
| Feature | Compatibility Version 3.2 | Compatibility Version 3.3 | Compatibility Version 3.4 |
|---|---|---|---|
|
View advanced details of a particular brick of the volume through the Red Hat Gluster Storage Console.
|
Supported
|
Supported
|
Supported
|
|
Synchronize brick status with the engine database.
|
Supported
|
Supported
|
Supported
|
|
Manage glusterFS hooks through the Red Hat Gluster Storage Console. View the list of hooks available in the hosts, view the contents and status of hooks, enable or disable hooks, and resolve hook conflicts.
|
Supported
|
Supported
|
Supported
|
|
Display Services tab with NFS and SHD service status.
|
Supported
|
Supported
|
Supported
|
|
Manage volume rebalance through the Red Hat Gluster Storage Console. Rebalance volume, stop rebalance, and view rebalance status.
|
Not Supported
|
Supported
|
Supported
|
|
Manage remove-brick operations through the Red Hat Gluster Storage Console. Remove-brick, stop remove-brick, view remove-brick status, and retain the brick being removed.
|
Not Supported
|
Supported
|
Supported
|
|
Allow using system's root partition for bricks and and re-using the bricks by clearing the extended attributes.
|
Not Supported
|
Supported
|
Supported
|
|
Addition of RHS U2 nodes
|
Not Supported
|
Supported
|
Supported
|
|
Viewing Nagios Monitoring Trends
|
Not Supported
|
Not Supported
|
Supported
|
4.2. Cluster Operations
4.2.1. Creating a New Cluster
Procedure 4.1. To Create a New Cluster
- Open the Clusters view by expanding the System tab and selecting the Cluster tab in the Tree pane. Alternatively, select Clusters from the Details pane.
- Click to open the New Cluster dialog box.
Figure 4.2. New Cluster Dialog Box
- Enter the cluster Name, Description and Compatibility Version. The name cannot include spaces. When the user selects Import existing gluster configuration and enters the Address, fingerprint will be fetched automatically by the Red Hat Gluster Storage Console.
- Click to create the cluster. The new cluster displays in the Clusters tab.
- Click to configure the cluster. The Guide Me window lists the entities you need to configure for the cluster. Configure these entities or postpone configuration by clicking . You can resume the configuration process by selecting the cluster and clicking . To import an existing cluster, see Section 4.2.2, “Importing an Existing Cluster”.
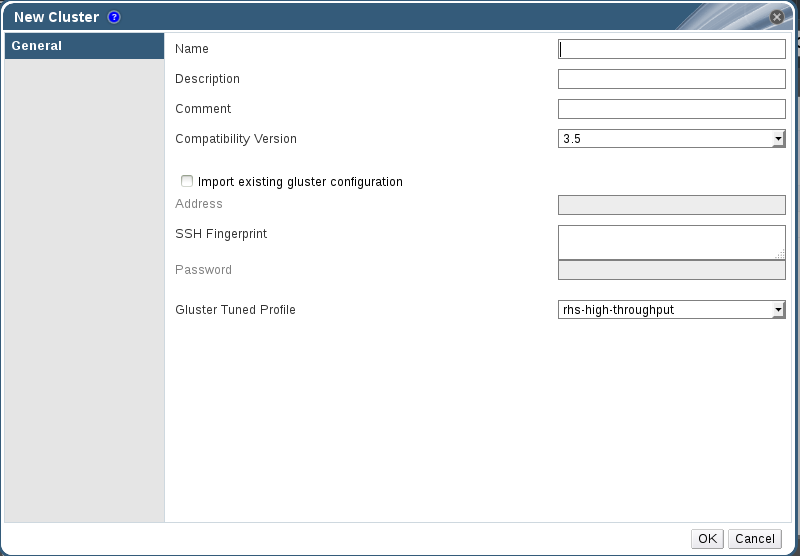
Tuned profiles helps to enhance the performance of the system by applying some predefined set of system parameters. We have two tuned profiles for Red Hat Gluster Storage:
rhs-high-throughput: It is a default profile which will be applied on the RHGS nodes. This helps to enhance the performance of RHGS Volume.rhs-virtualization: If the number of clients is greater than 100, you must switch to the rhs-virtualization tuned profile. For more information, see Number of Clients in Red Hat Gluster Storage Administration Guide.
4.2.2. Importing an Existing Cluster
peer status command executes on that host through SSH, then displays a list of hosts that are part of the cluster. You must manually verify the fingerprint of each host and provide passwords for them. If some hosts are not reachable, then import cluster will not add these hosts to the cluster during import.
Procedure 4.2. To Import an Existing Cluster
- In the Tree pane, click System tab, then click the Clusters tab.
- Click to open the New Cluster dialog box.
- Enter the cluster Name, Description and Compatibility Version. The name cannot include spaces.
- Select to import the cluster.
- In the Address field, enter the host name or IP address of a host in the cluster.The host Fingerprint displays to indicate the connection host. If a host in unreachable or if there is a network error, Error in fetching fingerprint displays in the Fingerprint field.
- Enter the Root Password for the host in the Password field and click .
- The Add Hosts window opens, and a list of hosts that are part of the cluster displays.
- For each host, enter the Name and Root Password. If you wish to use the same password for all hosts, check Use a common password and enter a password.
- Click to set the password for all hosts then click to submit the changes.
4.2.3. Editing a Cluster
Procedure 4.3. To Edit a Cluster
- Click the Clusters tab to display the list of host clusters. Select the cluster that you want to edit.
- Click to open the Edit Cluster dialog box.
- Enter a Name and Description for the cluster and select the compatibility version from the Compatibility Version drop down list.
- Click to confirm the changes and display the host cluster details.
4.2.4. Viewing Hosts in a Cluster
Procedure 4.4. To View Hosts in a Cluster
- Click the Clusters tab to display a list of host clusters. Select the desired cluster to display the Details pane.
- Click the tab to display a list of hosts.
Figure 4.3. The Hosts tab on the Cluster Details pane
4.2.5. Removing a Cluster
Warning
Procedure 4.5. To Remove a Cluster
- Click the Clusters tab to display a list of clusters. If the required cluster is not visible, perform a search.
- Select the cluster to be removed. Ensure that there are no running hosts or volumes.
- Click the button.
- A dialog box lists all the clusters selected for removal. Click to confirm the removal.
4.3. Cluster Entities
A cluster is a collection of hosts. The Hosts tab displays all information related to the hosts in a cluster.
|
Field
|
Description
|
|---|---|
Name
|
The name of the host.
|
Hostname/IP
|
The name of the host/IP address.
|
Status
|
The status of the host.
|
Logical networks enable hosts to communicate with other hosts, and for the Console to communicate with cluster entities. You must define logical networks for each cluster.
|
Field
|
Description
|
|---|---|
Name
| The name of the logical networks in a cluster. |
Status
| The status of the logical networks. |
Role
| The hierarchical permissions available to the logical network. |
Description
| The description of the logical networks. |
Cluster permissions define which users and roles can work in a cluster, and what operations the users and roles can perform.
|
Field
|
Description
|
|---|---|
User
| The user name of an existing user in the directory services. |
Role
| The role of the user. The role comprises of user, permission level and object. Roles can be default or customized roles. |
Inherited Permissions
| The hierarchical permissions available to the user. |
Gluster Hooks are volume lifecycle extensions. You can manage the Gluster Hooks from Red Hat Gluster Storage Console.
|
Field
|
Description
|
|---|---|
Name
| The name of the hook. |
Volume Event
| Events are instances in the execution of volume commands like create, start, stop, add-brick, remove-brick, set and so on. Each of the volume commands have two instances during their execution, namely Pre and Post.
Pre and Post refers to the time just before and after the corresponding volume command has taken effect on a peer respectively.
|
Stage
| When the event should be executed. For example, if the event is Start Volume and the Stage is Post, the hook will be executed after the start of the volume. |
Status
|
Status of the gluster hook.
|
Content Type
|
Content type of the gluster hook.
|
The service running on a host can be searched using the Services tab.
|
Field
|
Description
|
|---|---|
Host
| The ip of the host. |
Service
| The name of the service. |
Port
| The port number of the host. |
Status
|
The status of the host.
|
Process Id
|
The process id of the host.
|
4.4. Cluster Permissions
- Creation and removal of specific clusters.
- Addition and removal of hosts.
- Permission to attach users to hosts within a single cluster.
Note
Procedure 4.6. To Add a Cluster Administrator Role
- Click the Clusters tab to display the list of clusters. If the required cluster is not visible, perform a search.
- Select the cluster that you want to edit. Click the tab in the Details pane to display a list of existing users and their current roles and inherited permissions.
- Click to display the Add Permission to User dialog box. Enter all or part of a name or user name in the Search box, then click . A list of possible matches displays in the results list.
- Select the user you want to modify. Scroll through the Role to Assign list and select .
- Click to display the name of the user and their assigned role in the Permissions tab.
Procedure 4.7. To Remove a Cluster Administrator Role
- Click the Clusters tab to display a list of clusters. If the required cluster is not visible, perform a search.
- Select the cluster that you want to edit. Click the tab in the Details pane to display a list of existing users and their current roles and inherited permissions.
- Select the user you want to modify and click . This removes the user from the Permissions tab and from associated hosts and volumes.
Chapter 5. Logical Networks
5.1. Introduction to Logical Networks
ovirtmgmt. The ovirtmgmt network carries all traffic, until another logical network is created. It is meant especially for management communication between the Red Hat Gluster Storage Console and hosts.

Figure 5.1. Logical Network architecture
Warning
5.2. Required Networks, Optional Networks
5.3. Logical Network Tasks
5.3.1. Using the Networks Tab
- Attaching or detaching the networks to clusters and hosts
- Adding and removing permissions for users to access and manage networks
5.3.2. Creating a New Logical Network in Cluster
Create a logical network and define its use in a cluster.
Procedure 5.1. Creating a New Logical Network in a Cluster
- Click the Networks or Clusters tab in tree mode and select a network or cluster.
- Click the Logical Networks tab of the details pane to list the existing logical networks.
- From the Clusters tab, select Logical Networks sub-tab and click to open the New Logical Network window.
- From the Networks tab, click to open the New Logical Network window.
Figure 5.2. New Logical Network
- Enter a Name, Description, and Comment for the logical network.
- From the Cluster tab, select the clusters to which the network will be assigned. You can also specify whether the logical network will be a required network.
Figure 5.3. New Logical Network - Cluster
- Click OK.


You have defined a logical network as a resource required by a cluster or clusters in the Network. If you entered a label for the logical network, it will be automatically added to all host network interfaces with that label.
5.3.3. Editing a Logical Network
Edit the settings of a logical network.
Procedure 5.2. Editing a Logical Network
- Click Networks tab in tree mode and select a Network.
- Select a logical network and click to open the Edit Logical Network window.
Figure 5.4. New Logical Network - Cluster
- Edit the necessary settings.
- Click OK to save the changes.

You have updated the settings of your logical network.
Note
5.3.4. Explanation of Settings and Controls in the New Logical Network and Edit Logical Network Windows
5.3.4.1. Logical Network General Settings Explained
|
Field Name
|
Description
|
|---|---|
|
Name
|
The name of the logical network. This text field has a 15-character limit and must be a unique name with any combination of uppercase and lowercase letters, numbers, hyphens, and underscores.
|
|
Description
|
The description of the logical network. This text field has a 40-character limit.
|
|
Comment
|
A field for adding plain text, human-readable comments regarding the logical network.
|
|
Network Label
|
Allows you to specify a new label for the network or select from existing labels already attached to host network interfaces. If you select an existing label, the logical network will be automatically assigned to all host network interfaces with that label.
|
5.3.4.2. Logical Network Cluster Settings Explained
|
Field Name
|
Description
|
|---|---|
|
Attach/Detach Network to/from Cluster(s)
|
Allows you to attach or detach the logical network from clusters and specify whether the logical network will be a required network for individual clusters.
Name - the name of the cluster to which the settings will apply. This value cannot be edited.
Attach All - Allows you to attach or detach the logical network to or from all clusters. Alternatively, select or clear the Attach check box next to the name of each cluster to attach or detach the logical network to or from a given cluster.
Required All - Allows you to specify whether the logical network is a required network on all clusters. Alternatively, select or clear the Required check box next to the name of each cluster to specify whether the logical network is a required network for a given cluster.
|
5.3.5. Designate a Specific Traffic Type for a Logical Network with the Manage Networks Window
Specify the traffic type for the logical network to optimize the network traffic flow.
Procedure 5.3. Specifying Traffic Types for Logical Networks
- Click Clusters tab in tree mode and select the cluster in the results list.
- Select the Logical Networks tab in the details pane to list the logical networks assigned to the cluster.
- Click to open the Manage Networks window.
Figure 5.5. Manage Networks Window
- Select appropriate check boxes.
- Click to save the changes and close the window.

You have optimized the network traffic flow by assigning a specific type of traffic to be carried on a specific logical network.
5.3.6. Explanation of Settings in the Manage Networks Window
|
Field
|
Description/Action
|
|---|---|
|
Assign
|
Assigns the logical network to all hosts in the cluster.
|
|
Required
|
A Network marked "required" must remain operational in order for the hosts associated with it to function properly. If a required network ceases to function, any hosts associated with it become non-operational.
|
|
Gluster Network
| A logical network marked "Gluster Network" carries gluster network traffic. |
5.3.7. Network Labels
Network Label Associations
- When you attach a label to a logical network, that logical network will be automatically associated with any physical host network interfaces with the given label.
- When you attach a label to a physical host network interface, any logical networks with the given label will be automatically associated with that physical host network interface.
- Changing the label attached to a logical network or physical host network interface acts in the same way as removing a label and adding a new label. The association between related logical networks or physical host network interfaces is updated.
Network Labels and Clusters
- When a labeled logical network is added to a cluster and there is a physical host network interface in that cluster with the same label, the logical network is automatically added to that physical host network interface.
- When a labeled logical network is detached from a cluster and there is a physical host network interface in that cluster with the same label, the logical network is automatically detached from that physical host network interface.
Network Labels and Logical Networks With Roles
- When a labeled logical network is assigned to act as a display network or migration network, that logical network is then configured on the physical host network interface using DHCP so that the logical network can be assigned an IP address.
5.4. Logical Networks and Permissions
5.4.1. Managing System Permissions for a Network
- Create, edit and remove networks.
- Edit the configuration of the network, including configuring port mirroring.
- Attach and detach networks from resources including clusters and host.
5.4.2. Network Administrator and User Roles Explained
The table below describes the administrator and user roles and privileges applicable to network administration.
| Role | Privileges | Notes |
|---|---|---|
| NetworkAdmin | Network Administrator for cluster or host. The user who creates a network is automatically assigned NetworkAdmin permissions on the created network. | Can configure and manage the network of a particular cluster or host. A network administrator of a cluster inherits network permissions for storage devices within the cluster. To configure port mirroring on a storage device network, apply the NetworkAdmin role on the network. |
| NetworkUser | Logical network and network interface user for virtual machine and template. | Can attach or detach network interfaces from specific logical networks. |
Chapter 6. Managing Red Hat Gluster Storage Hosts
- Must belong to only one cluster in the system.
- Can have an assigned system administrator with system permissions.
Important
6.1. Hosts Properties
Figure 6.1. Hosts Details Pane
|
Field
|
Description
|
|---|---|
Cluster
| The selected cluster. |
Name
| The host name. |
Address
| The IP address or resolvable hostname of the host. |
6.2. Hosts Operations
6.2.1. Adding Hosts
Important
Before you can add a host to Red Hat Gluster Storage, ensure your environment meets the following criteria:
- The host hardware is Red Hat Enterprise Linux certified. See https://access.redhat.com/ecosystem/#certifiedHardware to confirm that the host has Red Hat certification.
- The host should have a resolvable hostname or static IP address.
- On Red Hat Enterprise Linux 7 nodes, register to the Red Hat Gluster Storage Server Channels if firewall needs to be configured automatically as iptables-service package is required.
Procedure 6.1. To Add a Host
- Click the Hosts tab to list available hosts.
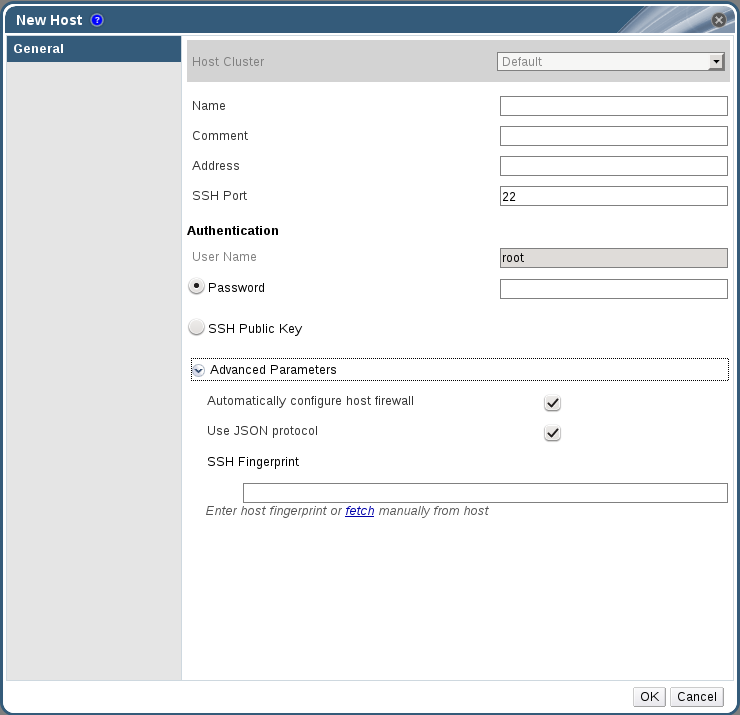
- Click to open the New Host window.
Figure 6.2. New Host Window
- Select the Host Cluster for the new host from the drop-down menu.
Expand Table 6.2. Add Hosts Properties FieldDescriptionHost ClusterThe cluster to which the host belongs. NameThe name of the host. This text field has a 40-character limit and must be a unique name with any combination of uppercase and lowercase letters, numbers, hyphens, and underscores.If Nagios is enabled, the host name given in Name field of Add Host window should match the host name given while configuring Nagios.AddressThe IP address or resolvable hostname of the host. Root PasswordThe password of the host's root user. This can only be given when you add the host, it cannot be edited afterwards. SSH Public KeyCopy the contents in the text box to the /root/.ssh/authorized_keys file on the host if you'd like to use the Manager's ssh key instead of using a password to authenticate with the host. Automatically configure host firewallWhen adding a new host, the Manager can open the required ports on the host's firewall. This is enabled by default. This is an Advanced Parameter.The required ports are opened if this option is selected.SSH FingerprintYou can fetch the host's ssh fingerprint, and compare it with the fingerprint you expect the host to return, ensuring that they match. This is an Advanced Parameter. Note
For Red Hat Enterprise Linux 7 hosts, iptables-service is used to manage firewall and existing firewalld configurations will not be enforced if "Automatically configure host firewall is chosen." - Enter the Name, and Address of the new host.
- Select an authentication method to use with the host:
- Enter the root user's password to use password authentication.
- Copy the key displayed in the SSH PublicKey field to
/root/.ssh/authorized_keyson the host to use public key authentication.
- The mandatory steps for adding a Red Hat Gluster Storage host are complete. Click to show the advanced host settings:
- Optionally disable automatic firewall configuration.
- Optionally disable use of JSON protocol.
Note
With Red Hat Gluster Storage Console, the communication model between the engine and VDSM now uses JSON protocol, which reduces parsing time. As a result, the communication message format has changed from XML format to JSON format. Web requests have changed from synchronous HTTP requests to asynchronous TCP requests. - Optionally add a host SSH fingerprint to increase security. You can add it manually, or fetch it automatically.
- Click to add the host and close the window.The new host displays in the list of hosts with a status of "Installing" and then it goes to "Initialization" state and the host comes up.
Note
The host will be in Up status after the status of "Installing" and "Initialization" state. The host will have Non-Operational status when the host is not compatible with the cluster compatibility version. The Non-Responsive status will be displayed if the host is down or is unreachable.You can view the progress of the host installation in the Details pane.
6.2.2. Activating Hosts
Procedure 6.2. To Activate a Host
- In the Hosts tab, select the host you want to activate.
- Click . The host status changes to Up.
6.2.3. Managing Host Network Interfaces
Note
6.2.3.1. Editing Host Network Interfaces
Procedure 6.3. To Edit a Host Network Interface
- Click the Hosts tab to display a list of hosts. Select the desired host to display the Details pane.
- Click to open the Setup Host Networks window.
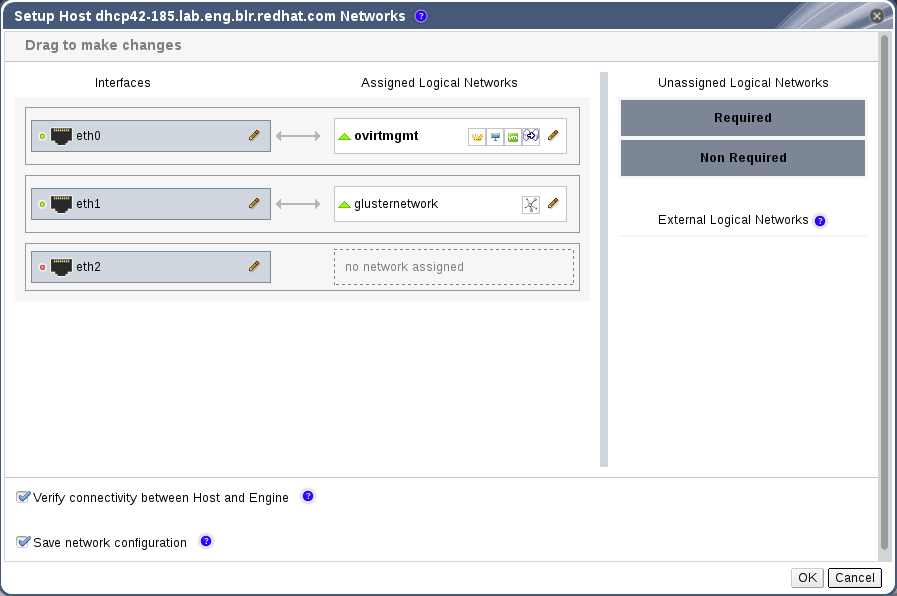
Figure 6.3. Setup Host Networks Window
- Attach a logical network to a physical host network interface by selecting and dragging the logical network into the Assigned Logical Networks area next to the physical host network interface.
- If your logical network definition is not synchronized with the network configuration on the host, select the Sync network check box. A logical network cannot be edited or moved to another interface until it is synchronized.Alternatively, right-click the logical network and select a network interface from the drop-down menu.
- Configure the logical network:
- Hover your cursor over an assigned logical network and click the pencil icon to open the Edit Network window.
- Select a Boot Protocol:
- None
- DHCP
- Static - provide the IP and Subnet Mask.
- Click .
- Select Verify connectivity between Host and Engine to run a network check.
- Select Save network configuration if you want the network changes to be persistent when you reboot the environment.
- Click to implement the changes and close the window.
6.2.3.2. Editing Management/Gluster Network Interfaces
Note
Important
Procedure 6.4. To Edit a Management Network Interface
- Click the Hosts tab to display a list of hosts. Select the desired host to display the Details pane.
- Edit the logical networks by hovering over an assigned logical network and clicking the pencil icon to open the Edit Management Network window.
Figure 6.4. Edit Management Network Dialog Box
- If your logical network definition is not synchronized with the network configuration on the host, select the Sync network check box.
- Select a Boot Protocol:
- None
- DHCP
- Static - provide the IP and Subnet Mask.
- Make the required changes to the management network interface:
- To attach the ovirtmgmt management network to a different network interface card, select a different interface from the drop-down list.
- Select the network setting from , or . For the setting, provide the IP, Subnet and Default Gateway information for the host.
- Click to confirm the changes.
- Select Verify connectivity between host and engine if required.
- Select Save network configuration to make the changes persistent when you reboot the environment.
- Click .
- Activate the host. See Section 6.2.2, “Activating Hosts”.

6.2.4. Managing Gluster Sync
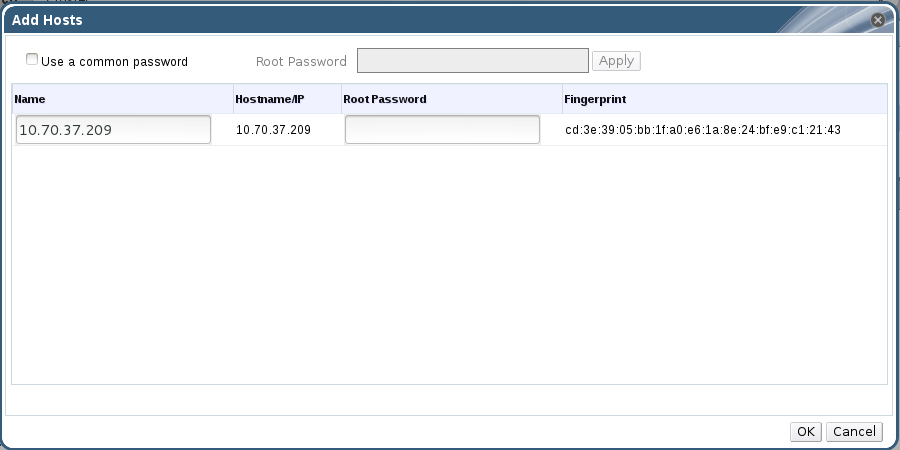
Procedure 6.5. To Import a Host to a Cluster
- Click the Cluster tab and select a cluster to display the General tab with details of the cluster.
- In , click Import to display the Add Hosts window.
Figure 6.5. Add Hosts Window
- Enter the Name and Root Password. Select Use a common password if you want to use the same password for all hosts.
- Click .
- Click to add the host to the cluster.
Procedure 6.6. To Detach a Host from a Cluster
- Click the Cluster tab and select a cluster to display the General tab with details of the cluster.
- In , click Detach to display the Detach Hosts window.
- Select the host you want to detach and click . Select Force Detach if you want to perform force removal of the host from the cluster.
6.2.5. Deleting Hosts
Note
Procedure 6.7. To Delete a Host
- Click the Hosts tab to display a list of hosts. Select the host you want to remove. If the required host is not visible, perform a search.
- Click to place the host into maintenance. Click to confirm the action. The Status field of the host changes to Preparing for Maintenance, followed by Maintenance. The icon changes to indicate that the host is in maintenance mode.
Important
If you move the Hosts under Maintenance mode, it stops all gluster process such as brick, self-heal, and geo-replication. If you wish to reuse this host, ensure to remove the gluster related information stored in/var/lib/glusterdmanually. - Click .
- Click to confirm.
6.2.6. Managing Storage Devices
Note
Important
Procedure 6.8. Creating Bricks
- Click the Hosts tab to display a list of hosts.
- Select a host and select the Storage Devices sub-tab. The list of storage devices is displayed.
- Select a storage device from the list and click Create Brick. The Create Brick page is displayed..
- Enter the Brick Name, Mount Point name, and the No. of Physical Disks in RAID Volume.The Mount Point is auto-suggested and can be edited.
- Confirm the Raid Type.
- Click OK. A new thinly provisioned logical volume is created with recommended Red Hat Gluster Storage configurations using the selected storage devices. This Logical Volume will be mounted at the specified mount point and this mount point can be used as brick in gluster volume.
Important
- semanage fcontext -a -t glusterd_brick_t '/rhgs/brick1(/.*)?'
- restorecon -Rv /rhgs/brick1
6.3. Maintaining Hosts
Warning
6.3.1. Moving Hosts into Maintenance Mode
Important
Procedure 6.9. To Move a Host into Maintenance Mode
- Click the Hosts tab to display a list of hosts.
- Click to place the host into maintenance. Click to confirm the action. The Status field of the host changes to Preparing for Maintenance, followed by Maintenance. The icon changes to indicate that the host is in maintenance mode.
- Perform required tasks. When you are ready to reactivate the host, click .
- After the host reactivates, the Status field of the host changes to Up. If the Red Hat Gluster Storage Console is unable to contact or control the host, the Status field displays Non-responsive.
6.3.2. Editing Host Details
Procedure 6.10. To Edit Host Details
- Click the Hosts tab to display a list of hosts.
- If you are moving the host to a different cluster, first place it in maintenance mode by clicking . Click to confirm the action. The Status field of the host changes to Preparing for Maintenance, followed by Maintenance. The icon changes to indicate that the host is in maintenance mode.
- Click to open the Edit Host dialog box.
- To move the host to a different cluster, select the cluster from the Host Cluster drop-down list.
- Make the required edits and click . Activate the host to start using it. See Section 6.2.2, “Activating Hosts”
6.3.3. Customizing Hosts
Note
Procedure 6.11. To Tag a Host
- Click the Hosts tab to display a list of hosts. Select the desired host to display the Details pane.
- Click to open the Assign Tags dialog box.
- Select the required tags and click .
6.4. Hosts Entities
6.4.1. Viewing General Host Information
Procedure 6.12. To View General Host Information
- Click the Hosts tab to display a list of hosts. If the required host is not visible, perform a search.
- Select the desired host to display general information, network interface information and host information in the Details pane.
- Click to display the following information:
- Version information for OS, Kernel, VDSM, and RHS.
- Status of memory page sharing (Active/Inactive) and automatic large pages (Always).
- CPU information: number of CPUs attached, CPU name and type, total physical memory allocated to the selected host, swap size, and shared memory.
- An alert if the host is in Non-Operational or Install-Failed state.
6.4.2. Viewing Network Interfaces on Hosts
Procedure 6.13. To View Network Interfaces on a Host
- Click the Hosts tab to display a list of hosts. If the required host is not visible, perform a search.
- Select the desired host to display the Details pane.
- Click the Network Interfaces tab.
6.4.3. Viewing Permissions on Hosts
Procedure 6.14. To View Permissions on a Host
- Click the Hosts tab to display a list of hosts. If the required host is not visible, perform a search.
- Select the desired host to display the Details pane.
- Click the Permissions tab.
6.4.4. Viewing Events from a Host
Procedure 6.15. To View Events from a Host
- Click the Hosts tab to display a list of hosts. If the required host is not visible, perform a search.
- Select the desired host to display the Details pane.
- Click the Events tab.
6.4.5. Viewing Bricks
Procedure 6.16. To View Bricks on a Host
- Click the Hosts tab to display a list of hosts. If the required host is not visible, perform a search.
- Select the desired host to display the Details pane.
- Click the Bricks tab.
6.5. Hosts Permissions
Note
Procedure 6.17. To Add a Host Administrator Role
- Click the Hosts tab to display a list of hosts. If the required host is not visible, perform a search.
- Select the desired host to display the Details pane.
- Click the Permissions tab to display a list of users and their current roles.
Figure 6.6. Host Permissions Window
- Click to display the Add Permission to User dialog box. Enter all or part of a name or user name in the Search box, then click . A list of possible matches displays in the results list.
- Select the user you want to modify. Scroll through the Role to Assign list and select .
- Click to display the name of the user and their assigned role in the Permissions tab.
Procedure 6.18. To Remove a Host Administrator Role
- Click the Hosts tab to display a list of hosts. If the required host is not visible, perform a search.
- Select the desired host to display the Details pane.
- Click the Permissions tab to display a list of users and their current roles.
- Select the desired user and click
Chapter 7. Managing Volumes
Note
Note
7.1. Creating a Volume
Procedure 7.1. Creating a Volume
- Click the Volumes tab. The Volumes tab lists all volumes in the system.
- Click the . The New Volume window is displayed.
Figure 7.1. New Volume
- Select the cluster from the Volume Cluster drop-down list.
- In the Name field, enter the name of the volume.
Note
You can not create a volume with the name volume. - Select the type of the volume from the Type drop-down list. You can set the volume type to Distribute, Replicate or Distributed Replicate.
Note
- Creating replicated volumes with replica count more than 3 is under technology preview.
- As necessary, click Add Bricks to add bricks to your volume.
Note
At least one brick is required to create a volume. The number of bricks required depends on the type of the volume.For more information on adding bricks to a volume, see Section 7.6.1, “Adding Bricks”. - Configure the Access Protocol for the new volume by selecting NFS, or CIFS, or both check boxes.
- In the Allow Access From field, specify the volume access control as a comma-separated list of IP addresses or hostnames.You can use wildcards to specify ranges of addresses. For example, an asterisk (*) specifies all IP addresses or hostnames. You need to use IP-based authentication for Gluster Filesystem and NFS exports.You can optimize volumes for virt-store by selecting .
- Click to create the volume. The new volume is added and displays on the Volume tab. The volume is configured, and group and storage-owner-gid options are set.
7.2. Starting Volumes
Procedure 7.2. Starting a Volume
- In the Volumes tab, select the volume to be started.You can select multiple volumes to start by using the
ShiftorCtrlkey. - Click the button.
7.3. Configuring Volume Options
Procedure 7.3. Configuring Volume Options
- Click the Volumes tab.A list of volumes displays.
- Select the volume to tune, and click the tab from the Details pane.The Volume Options tab lists the options set for the volume.
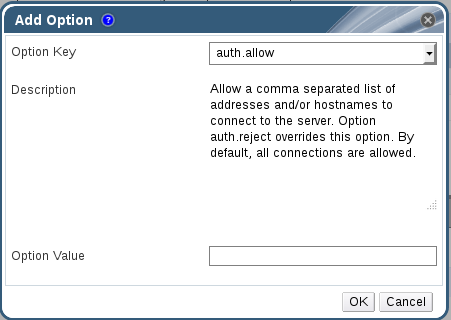
- Click to set an option. The Add Option window is displayed. Select the option key from the drop-down list and enter the option value.
Figure 7.2. Add Option
- Click .The option is set and displays in the Volume Options tab.
7.3.1. Edit Volume Options
Procedure 7.4. Editing Volume Options
- Click the Volumes tab.A list of volumes displays.
- Select the volume to edit, and click the Volume Options tab from the Details pane.The Volume Options tab lists the options set for the volume.
- Select the option to edit. Click . The Edit Option window is displayed. Enter a new value for the option in the Option Value field.
- Click .The edited option displays in the Volume Options tab.
7.3.2. Resetting Volume Options
Procedure 7.5. Resetting Volume Options
- Click the Volumes tab.A list of volumes is displayed.
- Select the volume and click the Volume Options tab from the Details pane.The Volume Options tab lists the options set for the volume.
- Select the option to reset. Click Reset. Reset Option window is displayed, prompting to confirm the reset.
- Click .The selected option is reset. The name of the volume option reset is displayed in the Events tab.
Note
7.4. Stopping Volumes
Note
Procedure 7.6. Stopping a Volume
- In the Volumes tab, select the volume to be stopped.You can select multiple volumes to stop by using the
ShiftorCtrlkey. - Click . A window is displayed, prompting to confirm the stop.
Note
Stopping volume will make its data inaccessible. - Click OK.
7.5. Deleting Volumes
Procedure 7.7. Deleting a Volume
- In the Volumes tab, select the volume to be deleted.
- Click Stop. The volume stops.
- Click . A window is displayed, prompting to confirm the deletion. Click . The volume is removed from the cluster.
7.6. Managing Bricks
Note
7.6.1. Adding Bricks
Procedure 7.8. Adding a Brick
- Click the Volumes tab.A list of volumes displays.
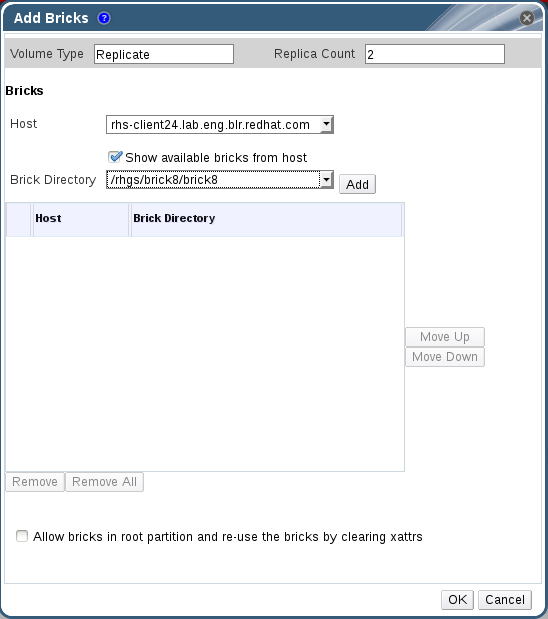
- Select the volume to which the new bricks are to be added. Click the tab from the Details pane.The Bricks tab lists the bricks of the selected volume.
- Click to add new bricks. The Add Bricks window is displayed.
Figure 7.3. Add Bricks
Expand Table 7.1. Add Bricks Tab Properties Field/TabDescription/ActionVolume TypeThe type of volume.Replica CountNumber of replicas to keep for each stored item.HostThe selected host from which new bricks are to be added.Brick DirectoryThe directory in the host. - Use the drop-down menu to select the host on which the brick resides.
- Select the brick directory from the drop-down menu.
Note
Uncheck Show available bricks from host to type the brick directory path since the brick is not shown in the brick directory drop-down. - Select the Allow bricks in root partition and re-use the bricks by clearing xattrs to use the system's root partition for storage and to re-use the existing bricks by clearing the extended attributes.
Note
It is not recommended to reuse bricks of restored volume as is. In case of reusing the brick, delete the logical volume and recreate it from the same or different pool (the data on the logical volume will be lost). Otherwise there would be some performance penalty on copy-on-write because the original brick and the restored brick shares the block.Note
Using the system's root partition for storage backend is not recommended. Original bricks of snapshot restored volume is not recommended to be used as a new brick - Click and click . The new bricks are added to the volume and is displayed in the Bricks tab.
7.6.2. Removing Bricks
Note
- When shrinking distributed replicated volumes, the number of bricks being removed must be a multiple of the replica count. For example, to shrink a distributed replicated volume with a replica count of 2, you need to remove bricks in multiples of 2 (such as 2, 4, 6, 8). In addition, the bricks you are removing must be from the same replica set. In a non-replicated volume, all bricks must be available in order to migrate data and perform the remove brick operation. In a replicated volume, at least one of the bricks in the replica must be available.
- You can monitor the status of Remove Bricks operation from the Tasks pane.
- You can perform Commit, Retain, view Status and Stop from remove-brick icon in the Activities column of Volumes and Bricks sub-tab.
Procedure 7.9. Removing Bricks from an Existing Volume
- Click the Volumes tab.A list of volumes is displayed.
- Select the volume from which bricks are to be removed. Click the Bricks tab from the Details pane.The Bricks tab lists the bricks for the volume.
- Select the brick to remove. Click . The Remove Bricks window is displayed, prompting to confirm the removal of the bricks.
Warning
If the brick is removed without selecting theMigrate Data from the brickscheck box, the data on the brick which is being removed will not be accessible on the glusterFS mount point. If theMigrate Data from the brickscheck box is selected, the data is migrated to other bricks and on a successful commit, the information of the removed bricks is deleted from the volume configuration. Data can still be accessed directly from the brick. - Click , remove brick starts.
Note
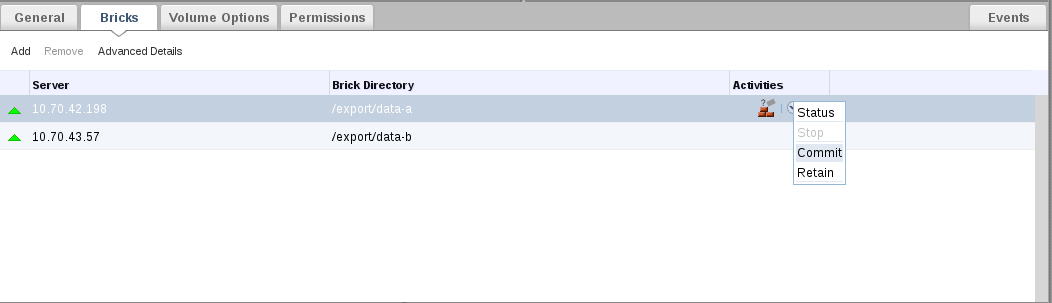
- Once remove-brick starts, remove-brick icon is displayed in Activities column of both Volumes and Bricks sub-tab.
- After completion of the remove brick operation, the remove brick icon disappears after 10 minutes.
- In the Activities column, ensure that data migration is completed and select the drop down of the remove-brick icon corresponding to the volume from which bricks are to be removed.
- Click Commit to perform the remove brick operation.
Figure 7.4. Remove Bricks Commit
Note
TheCommitoption is enabled only if the data migration is completed.The remove brick operation is completed and the status is displayed in the Activities column. You can check the status of the remove brick operation by selecting Status from the activities column.
7.6.2.1. Stopping a Remove Brick Operation
Note
- Stop remove-brick operation is a technology preview feature. Technology Preview features are not fully supported under Red Hat subscription level agreements (SLAs), may not be functionally complete, and are not intended for production use. However, these features provide early access to upcoming product innovations, enabling customers to test functionality and provide feedback during the development process. As Red Hat considers making future iterations of Technology Preview features generally available, we will provide commercially reasonable efforts to resolve any reported issues that customers experience when using these features.
- Files which were migrated during Remove Brick operation are not migrated to the same brick when the operation is stopped.
Procedure 7.10. Stopping a Remove Brick Operation
- Click the Volumes tab. A list of volumes displays.
- In the Activities column, select the drop down of the remove-brick icon corresponding to the volume to stop remove brick.
- Click Stop to stop remove brick operation. The remove brick operation is stopped and remove-brick icon in the activities column is updated. The remove brick status is displayed after stopping the remove brick.You can also view the status of the Remove Brick operation by selecting Status from the drop down of the remove-brick icon in the Activities column of Volumes and Bricks sub-tab..
7.6.2.2. Viewing Remove Brick Status
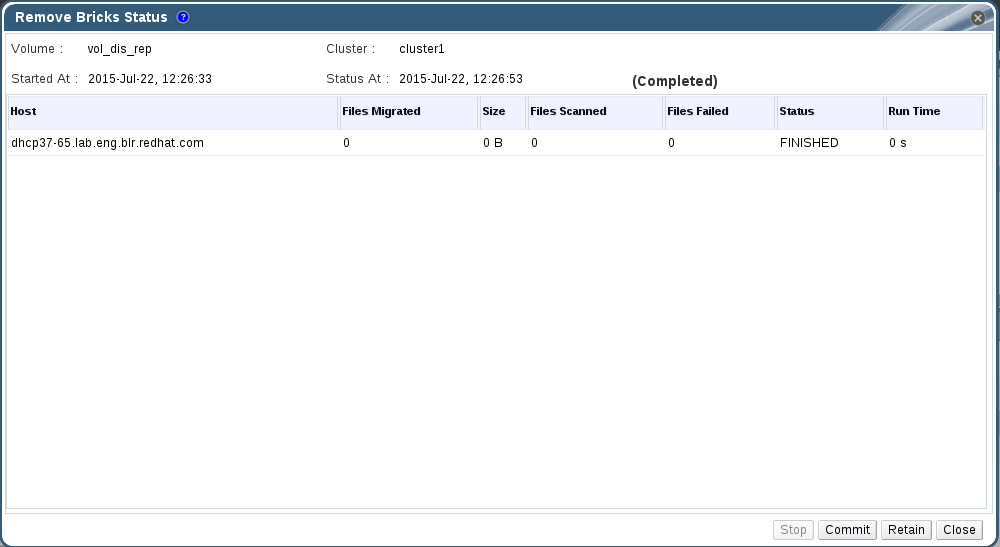
Procedure 7.11. Viewing Remove Brick Status
- Click the Volumes tab. A list of volumes displays.
- In the Activities column, click the arrow corresponding to the volume.
- Click Status to view the status of the remove brick operation. The Remove Bricks Status window displays.
Figure 7.5. Remove Brick Status
- Click one of the options below for the corresponding results
- Stop to stop the remove brick operation
- Commit to commit the remove brick operation
- Retain to retain the brick selected for removal
- Close to close the remove-brick status popup
7.6.2.3. Retaining a brick selected for Removal
Note
Procedure 7.12. Retaining a Brick selected for Removal
- Click the Volumes tab. A list of volumes displays.
- In the Activities column, click the arrow corresponding to the volume.
- Click Retain to retain the brick selected for removal. The brick is not removed and the status of the operation is displayed in the remove brick icon in the Activities column.You can also check the status by selecting the Status option from the drop down of remove-brick icon in the activities column.
7.6.3. Viewing Advanced Details
Procedure 7.13. Viewing Advanced Details
- Click the Volumes tab. A list of volumes displays.
- Select the required volume and click the tab from the Details pane.
- Select the brick and click . The Brick Advanced Details window displays.
Figure 7.6. Brick Advanced Details
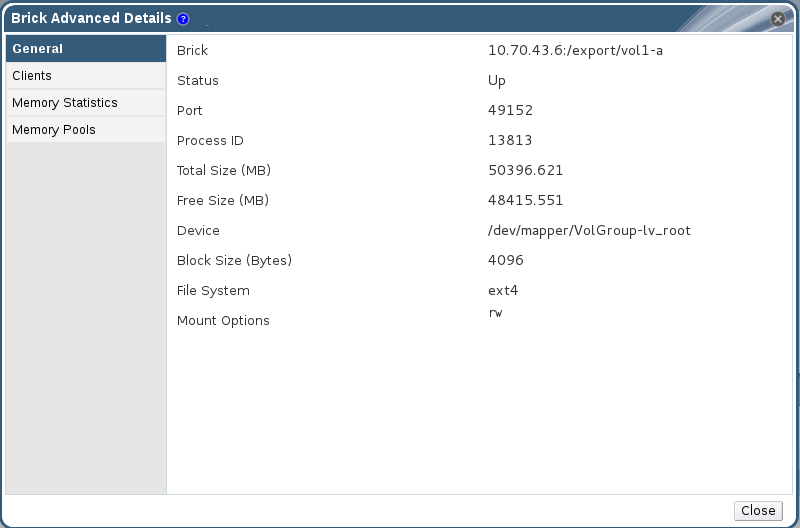
|
Field/Tab
|
Description/Action
|
|---|---|
General
|
Displays additional information about the bricks.
|
Clients
|
Displays a list of clients accessing the volumes.
|
Memory Statistics/Memory Pool
|
Displays the details of memory usage and memory pool for the bricks.
|
7.7. Volumes Permissions
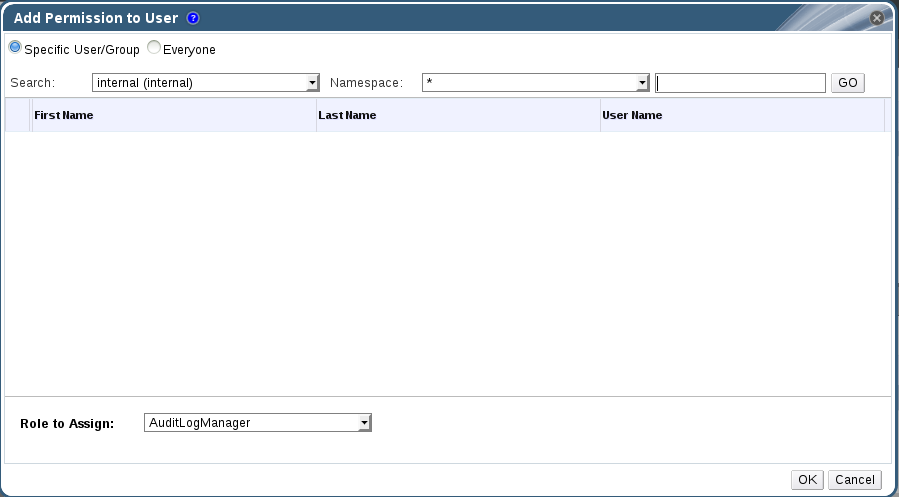
Procedure 7.14. Assigning a System Administrator Role for a Volume
- Click the Volumes tab. A list of volumes displays.
- Select the volume to edit, and click the tab from the Details pane.The Permissions tab lists users and their current roles and permissions, if any.
Figure 7.7. Volume Permissions
- Click to add an existing user. The Add Permission to User window is displayed. Enter a name, a user name, or part thereof in the Search text box, and click . A list of possible matches displays in the results list.
- Select the check box of the user to be assigned the permissions. Scroll through the Role to Assign list and select
GlusterAdmin.Figure 7.8. Assign GlusterAdmin Permission
- Click .The name of the user displays in the Permissions tab, with an icon and the assigned role.

Note
Procedure 7.15. Removing a System Administrator Role
- Click the Volumes tab. A list of volumes displays.
- Select the required volume and click the tab from the Details pane.The Permissions tab lists users and their current roles and permissions, if any. The Super User and Cluster Administrator, if any, will display in the Inherited Permissions tab. However, none of these higher level roles can be removed.
- Select the appropriate user.
- Click . A window is displayed, prompting to confirm removing the user. Click . The user is removed from the Permissions tab.
7.8. Rebalancing Volume
- Start Rebalance
- Stop Rebalance
- View Rebalance Status
Note
7.8.1. Start Rebalance
- Click the Volumes tab. The Volumes tab is displayed with the list of all volumes in the system.
- Select the volume that you want to Rebalance.
- Click the Rebalance. The Rebalance process starts and the rebalance icon is displayed in the Activities column of the volume. A mouseover script is displayed mentioning that the rebalance is in progress. You can view the rebalance status by selecting status from the rebalance drop-down list .
Note
After completion of the rebalance operation, the rebalance icon disappears after 10 minutes.
7.8.2. Stop Rebalance
- Click the Volumes tab. The Volumes tab is displayed with the list of all volumes in the system.
- Select a volume on which Rebalance need to be stopped.
Note
- You can not stop rebalance for multiple volumes.
- Rebalance can be stopped for volumes only if it is in progress
- In the Activities column, select the drop-down of the Rebalance icon corresponding to the volume.
- Click Stop. The Stop Rebalance window is displayed.
- Click OK to stop rebalance. The Rebalance is stopped and the status window is displayed.You can also check the status of the Rebalance operation by selecting Status option from the drop down of Rebalance icon in the activities column.
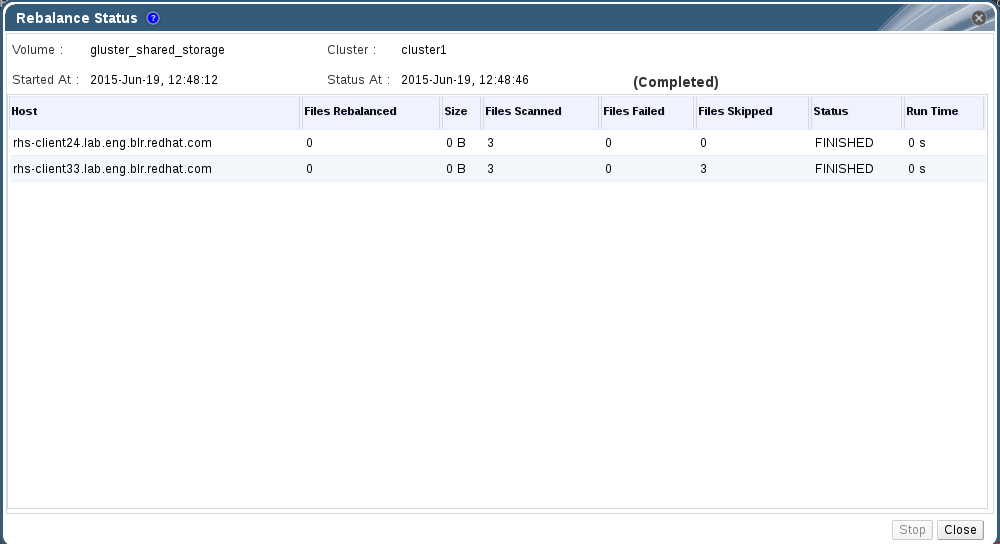
7.8.3. View Rebalance Status
- Click the Volumes tab. The Volumes tab is displayed with the list of all volumes in the system.
- Select the volume on which Rebalance is in progress, stopped, completed.
- Click Status option from the Rebalance icon drop down list. The Rebalance Status page is displayed.
Figure 7.9. Rebalance Status
Note
If the Rebalance Status window is open while Rebalance is stopped using the CLI, the status is displayed asStopped. If the Rebalance Status window is not open, the task status is displayed asUnknownas the status update depends on gluster CLI.You can also stop Rebalance operation by clicking Stop in the Rebalance Status window.
Chapter 8. Managing Gluster Hooks
- View a list of hooks available in the hosts.
- View the content and status of hooks.
- Enable or disable hooks.
- Resolve hook conflicts.
8.1. Viewing the list of Hooks
Figure 8.1. Gluster Hooks
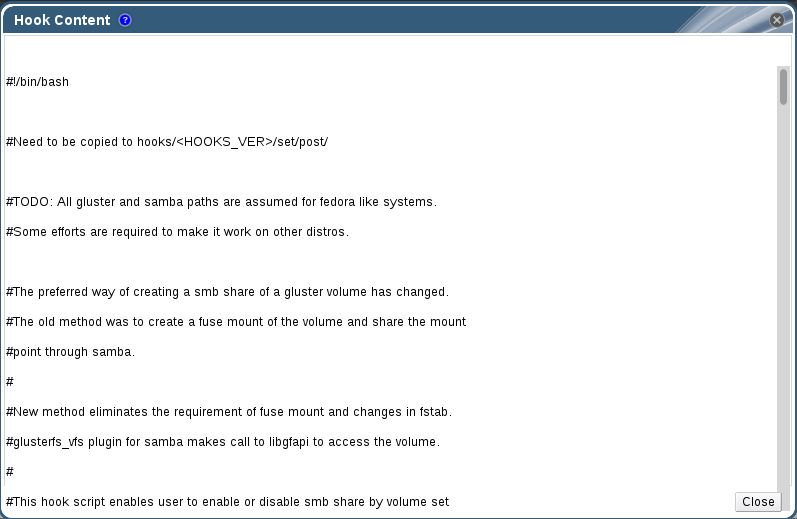
8.2. Viewing the Content of Hooks
Procedure 8.1. Viewing the Content of a Hook
- Click the Cluster tab and select a cluster. A Gluster Hooks sub-tab displays, listing the hooks in the cluster.
- Select a hook with content type Text and click . The Hook Content window displays with the content of the hook.
Figure 8.2. Hook Content
8.3. Enabling or Disabling Hooks
Procedure 8.2. Enabling or Disabling a Hook
- Click the Cluster tab and select a cluster. A Gluster Hooks sub-tab displays, listing the hooks in the cluster.
- Select the hook and click or .If Disable is selected, Disable Gluster Hooks dialog box displays, prompting you to confirm disabling hook. Click OK to confirm disabling.The hook is enabled or disabled on all nodes of the cluster.The enabled or disabled hooks status update displays in the Gluster Hooks sub-tab.
8.4. Refreshing Hooks
Procedure 8.3. Refreshing a Hook
- Click the Cluster tab and select a cluster. A Gluster Hooks sub-tab displays, listing the hooks in the cluster.
- Click . The hooks are synchronized and displayed.
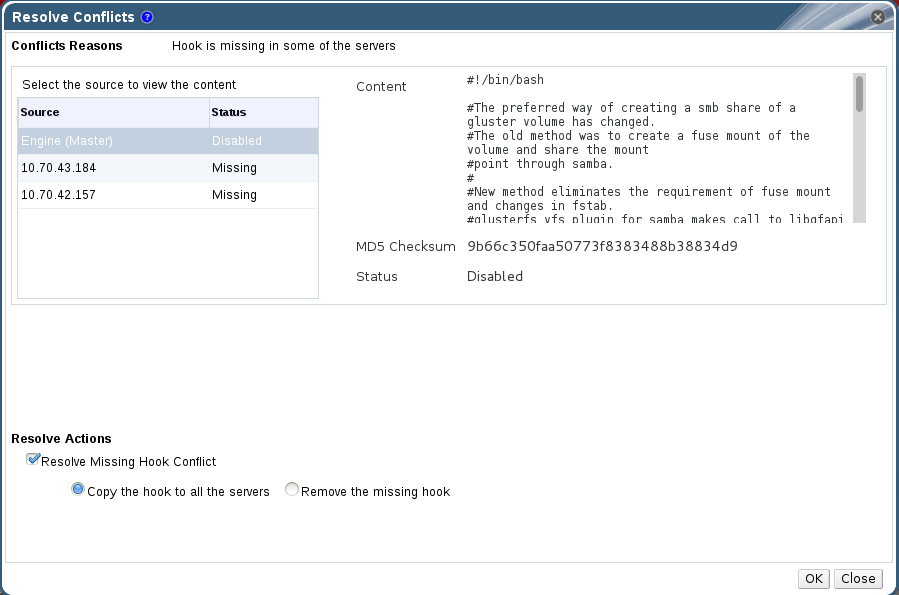
8.5. Resolving Conflicts
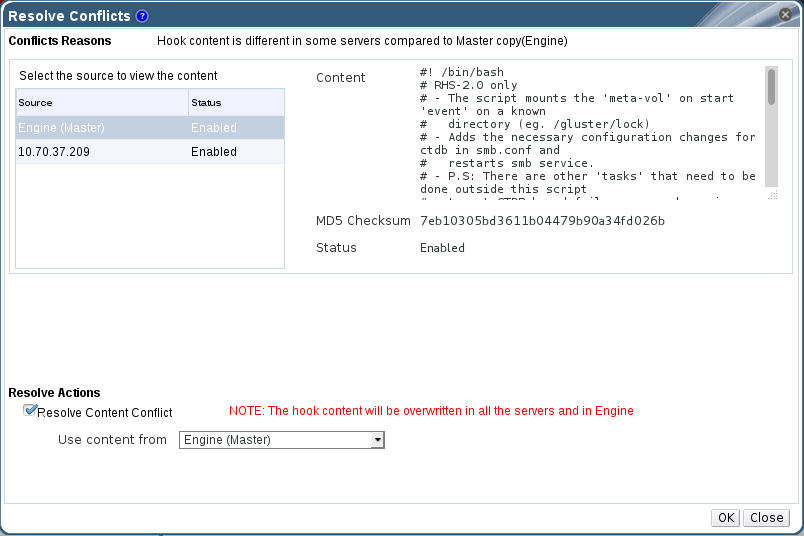
- Content Conflict - the content of the hook is different across servers.
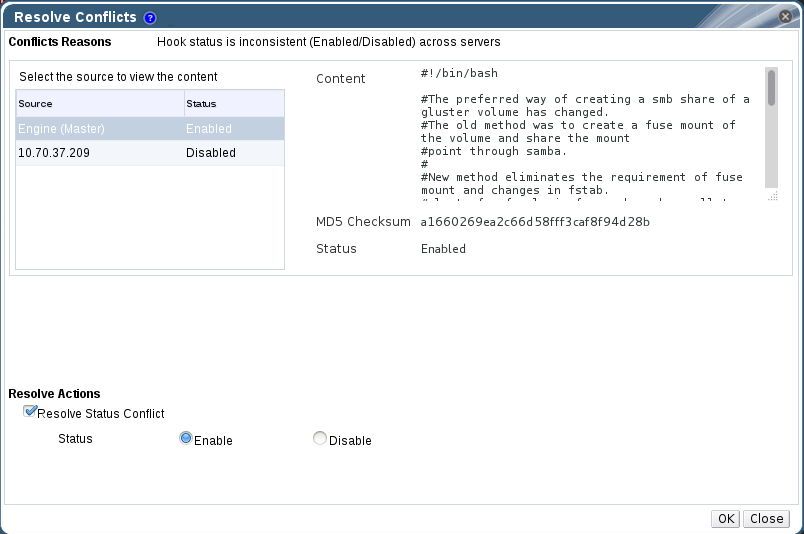
- Status Conflict - the status of the hook is different across servers.
- Missing Conflict - one or more servers of the cluster do not have the hook.
- Content + Status Conflict - both the content and status of the hook are different across servers.
- Content + Status + Missing Conflict - both the content and status of the hook are different across servers, or one or more servers of the cluster do not have the hook.
8.5.1. Resolving Missing Hook Conflicts
Procedure 8.4. Resolving a Missing Hook Conflict
- Click the Cluster tab and select a cluster. A Gluster Hooks sub-tab displays, listing the hooks in the cluster.
- Select a hook causing a conflict and click Resolve Conflicts. The Resolve Conflicts window displays.
Figure 8.3. Missing Hook Conflict
- Select one of the options give below:
- Copy the hook to all the servers to copy the hook to all servers.
- Remove the missing hook to remove the hook from all servers and the engine.
- Click OK. The conflict is resolved.
8.5.2. Resolving Content Conflicts
Procedure 8.5. Resolving a Content Conflict
- Click the Cluster tab and select a cluster. A Gluster Hooks sub-tab displays, listing the hooks in the cluster.
- Select the conflicted hook and click Resolve Conflicts. The Resolve Conflicts window displays.
Figure 8.4. Content Conflict
- Select an option from the drop-down list:
- Select a server to copy the content of the hook from the selected server.Or
- Select Engine (Master) to copy the content of the hook from the engine copy.
Note
The content of the hook will be overwritten in all servers and in the engine. - Click OK. The conflict is resolved.
8.5.3. Resolving Status Conflicts
Procedure 8.6. Resolving a Status Conflict
- Click the Cluster tab and select a cluster. A Gluster Hooks sub-tab displays, listing the hooks in the cluster.
- Select the conflicted hook and click Resolve Conflicts. The Resolve Conflicts window displays.
Figure 8.5. Status Conflict
- Set Hook Status to Enable or Disable.
- Click OK. The conflict is resolved.
8.5.4. Resolving Content and Status Conflicts
Procedure 8.7. Resolving a Content and Status Conflict
- Click the Cluster tab and select a cluster. A Gluster Hooks sub-tab displays, listing the hooks in the cluster.
- Select a hook causing a conflict and click Resolve Conflicts. The Resolve Conflicts window displays.
- Select an option from the drop-down list to resolve the content conflict:
- Select a server to copy the content of the hook from the selected server.Or
- Select Engine (Master) to copy the content of the hook from the engine copy.
Note
The content of the hook will be overwritten in all the servers and in engine. - Set Hook Status to Enable or Disable to resolve the status conflict.
- Click OK. The conflict is resolved.
8.5.5. Resolving Content, Status, and Missing Conflicts
Procedure 8.8. Resolving a Content, Status and Missing Conflict
- Click the Cluster tab and select a cluster. A Gluster Hooks sub-tab displays, listing the hooks in the cluster.
- Select the conflicted hook and click Resolve Conflicts. The Resolve Conflicts window displays.
- Select one of the options given below to resolve the missing conflict:
- Copy the hook to all the servers.
- Remove the missing hook.
- Select an option from the drop-down list to resolve the content conflict:
- Select a server to copy the content of the hook from the selected server.Or
- Select Engine (Master) to copy the content of the hook from the engine copy.
Note
The content of the hook will be overwritten in all the servers and in Engine. - Set Hook Status to Enable or Disable to resolve the status conflict.
- Click OK. The conflict is resolved.
Chapter 9. Managing Snapshots
9.1. Creating Snapshots
Procedure 9.1. Creating Snapshots
- Click the Volumes tab. The list of all volumes is displayed.
- Select the volume of which you want to create Snapshot.
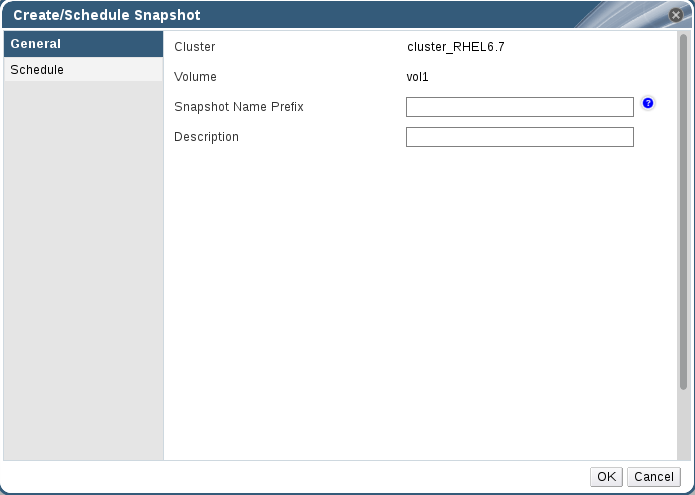
- Click Snapshot and click New to open the Create Snapshot page.
Figure 9.1. Creating Snapshots
- Enter the Snapshot Name Prefix and Description.
- Click OK to create Snapshot.The format of the snapshot is <Snapshot name prefix>_<Timezone of RHS node>-<yyyy>.<MM>.<dd>-<hh>.<mm>.<ss>
9.2. Configuring Snapshots
- Hard Limit: If the snapshot count in a volume reaches this limit then no further snapshot creation is allowed. The range is from 1 to 256. Once this limit is reached you have to remove the snapshots to create further snapshots. This limit can be set for the system or per volume. If both system limit and volume limit is configured then the effective max limit would be the lowest of the two value.
- Soft limit: This is a percentage value. The default value is 90%. This configuration works along with auto-delete feature. If auto-delete is enabled then it will delete the oldest snapshot when snapshot count in a volume crosses this limit. When auto-delete is disabled it will not delete any snapshot, but it will display a warning message to the user.
- Auto deletion flag: This will enable or disable auto-delete feature. By default auto-delete is disabled. When enabled it will delete the oldest snapshot when snapshot count in a volume crosses the snap-max-soft-limit. When disabled it will not delete any snapshot, but it will display a warning message to the user.
- Activate-on-Create: Volume snapshots would be auto activated after creation.
Procedure 9.2. Configuring Snapshots
- Click the Volumes tab. The list of all volumes in the system is displayed.
- Select the volume for which you want to configure Snapshot.If a volume is not selected from the list, only the cluster level parameters can be modified and set.
- Click Snapshot.
- Click Options - Clusters or Options - Volume to configure Snapshot for Cluster or Volume respectively.
- Click Snapshot and select Options- Clusters.
- Select the cluster from the drop down list.
- Modify the Snapshot Options. You can set the hard limit, soft limit percentage and enable or disable auto deletion of Snapshots for Clusters.
- Click Update to update the details.
- Click Snapshot and select Options- Volume.
- Modify the Snapshot Options. You can set maximum number of Snapshots for selected volume.
- Click Update to update the details.
9.3. Scheduling Snapshots
Note
Procedure 9.3. Scheduling Snapshots
- Click the Volumes tab. The list of all volumes in the system is displayed.
- Select the volume of which you want to schedule Snapshot.
- Click Snapshot and click New to open Create/Schedule Snapshot page.
- In General tab, enter Snapshot Name Prefix and Description.
- Click Schedule tab.
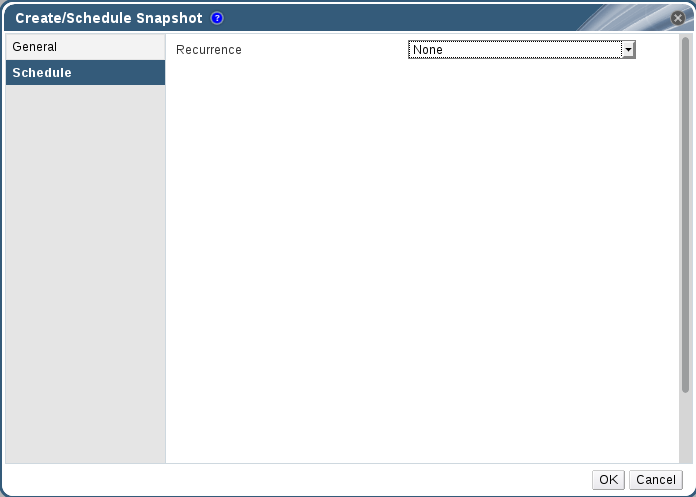
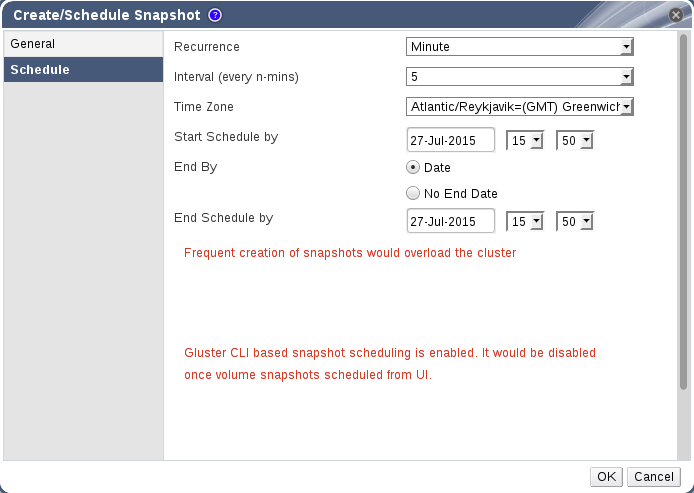
Figure 9.2. Scheduling Snapshots
- Select the recurrence schedule for the Snapshot. You can schedule the snapshot to recur at intervals of a specified number of minutes, hours, days, weeks, or months; either perpetually, or between specified dates.
Figure 9.3. Recurrence Schedule
Set Recurrence to the unit of time that you want to use as an interval between snapshots. If you do not want to set up recurring snapshots, leave this field set toNone.Minutes- Takes a snapshot every N minutes, where N is the value of the Interval field, with the first snapshot being taken at the time specified in the Start Schedule by field.
Hours- Takes a snapshot every N hours, where N is the value of the Interval field, with the first snapshot being taken after the time specified in the Start Schedule by field. Subsequent snapshots will be taken at the start of the hour. For example, if snapshots are to recur every 2 hours, and the first snapshot occurs at 2.20 PM, the next snapshot will occur at 4.00 PM.
Days- Takes a snapshot at the time specified in the Execute At field every N days, where N is the value of the Interval field, with the first snapshot being taken after the time specified in the Start Schedule by field.
Weeks- Takes a snapshot at the time specified in the Execute At field every N weeks, where N is the value of the Interval field, with the first snapshot being taken after the time specified in the Start Schedule by field.
Months- Takes a snapshot at the time specified in the Execute At field every N months, where N is the value of the Interval field, with the first snapshot being taken at the time specified in the Start Schedule by field.
The End by option determines whether snapshots will stop after a certain date. To set an end date, set End by toDate, and use the fields beside End Schedule By to enter a date and time at which snapshots should stop. To take snapshots continuously with no end date, set End by toNo End Date. - Click OK to set the snapshot recurrence schedules.
Note
Important
echo "none" > /var/run/gluster/shared_storage/snaps/current_scheduler.
9.4. Restoring Snapshots
Procedure 9.4. Restoring Snapshots
- Click the Volumes tab. The list of all volumes in the system is displayed.
- Select the volume for which you want to restore the Snapshot.
- Click Snapshots sub-tab and select the Snapshot.
- Click Restore and click OK to confirm Snapshot restore.
Note
While restoring a snapshot, you will lose current state and the volume will be brought down and restored to the state of the selected snapshot.
9.5. Activating Snapshots
Procedure 9.5. Activating Snapshots
- Click the Volumes tab. The list of all volumes in the system is displayed.
- Select the volume for which you want to activate the Snapshot.
- Click Snapshots sub-tab and select the Snapshot.
- Click Activate and click OK to confirm activation of the Snapshot.
9.6. Deactivating Snapshots
Procedure 9.6. Deactivating Snapshots
- Click the Volumes tab. The list of all volumes in the system is displayed.
- Select the volume for which you want to deactivate the Snapshot.
- Click Snapshots sub-tab and select the Snapshot.
- Click Deactivate and click OK to confirm Snapshot deactivation.
9.7. Deleting Snapshots
Procedure 9.7. Deleting Snapshots
- Click the Volumes tab. The list of all volumes in the system is displayed.
- Select the volume for which you want to delete the Snapshot.
- Click Snapshots sub-tab and select the Snapshot.
- Click Delete and click OK confirm deleting the selected Snapshot.To delete all Snapshots for the selected volume, click Delete All.
Chapter 10. Managing Geo-replication
- Source – a Red Hat Gluster Storage volume.
- Destination - a Red Hat Gluster Storage volume.
Note
10.1. Geo-replication Operations
Important
- Manually set the cluster option "cluster.enable-shared-storage" from CLI.
- Set the option use_meta_volume to true.
- For every new node added to the cluster ensure that the cluster option "cluster.enable-shared-storage" is set to the cluster and the meta-volume is mounted.
10.1.1. Creating a Geo-replication session
- Destination and source volumes should not be from same cluster.
- Capacity of destination volume should be greater than or equal to that of source volume.
- Cluster Compatibility version of destination and source volumes should be same.
- Destination volume should not already be a part of another geo replication session.
- Destination volume should be up.
- Destination volume should be empty.
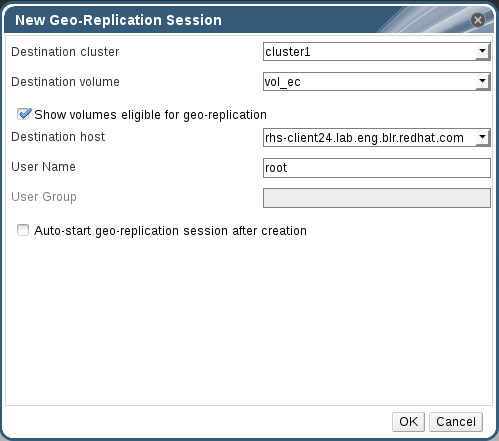
Procedure 10.1. Creating a Geo-replication session
- Click the Volumes tab. The list of volumes in the system is displayed.
- Select the volume for which the geo-replication is to be created and click the Geo-replication option.
- Click New option. The New Geo-Replication Session page is displayed.
Note
- You can also create Geo-Replication session from Geo-Replication sub-tab.
Figure 10.1. New Geo-replication session
- Select the Destination Cluster, Destination Volume, and Destination Host.
- Select Show volumes eligible for geo-replication option to view the list of volumes eligible for geo-replication.
- Enter the User Name. For non-root user, enter the corresponding User roup.
- Select Auto-start geo-replication session after creation option to start the session immediately after creation and click OK.
10.1.2. Viewing Geo-replication session Details
- Initializing: This is the initial phase of the Geo-replication session; it remains in this state for a minute in order to make sure no abnormalities are present.
- Created: The geo-replication session is created, but not started.
- Active: The gsync daemon in this node is active and syncing the data.
- Passive: A replica pair of the active node. The data synchronization is handled by active node. Hence, this node does not sync any data.
- Faulty: The geo-replication session has experienced a problem, and the issue needs to be investigated further.
- Stopped: The geo-replication session has stopped, but has not been deleted.
- Crawl Status
- Changelog Crawl: The changelog translator has produced the changelog and that is being consumed by gsyncd daemon to sync data.
- Hybrid Crawl: The gsyncd daemon is crawling the glusterFS file system and generating pseudo changelog to sync data.
- Checkpoint Status: Displays the status of the checkpoint, if set. Otherwise, it displays as N/A.
Procedure 10.2. Viewing a Geo-replication session Details
- Click the Volumes tab. The list of volumes is displayed.
- Select the desired volume and click Geo-Replication sub-tab.
- Select the session from the Geo-Replication sub-tab.
- Click View Details. The Geo-replication details, Destination Host, Destination Volume, User Name, and Status are displayed.
10.1.3. Starting or Stopping a Geo-replication session
Important
Note
- any node that is a part of the volume is offline.
- if it is unable to stop the geo-replication session on any particular node.
- if the geo-replication session between the master and slave is not active.
Procedure 10.3. Starting and Stopping Geo-replication session
- Click the Volumes tab. The list of volumes is displayed.
- Select the desired volume and click the Geo-Replication sub-tab.
- Select the session from the Geo-Replication sub-tab.
- Click Start or Stop to start or stop the session respectively.
Note
Click Force start session to force the operation on geo-replication session on the nodes that are part of the master volume. If it is unable to successfully perform the operation on any node which is online and part of the master volume, the command will still perform the operation on as many nodes as it can. This command can also be used to re-perform the operation on the nodes where the session has died, or the operation has not been executed.
10.1.4. Pausing or Resuming a Geo-replication session
Procedure 10.4. Pausing or Resuming Geo-replication session
- Click the Volumes tab. The list of volumes is displayed.
- Select the desired volume and click the Geo-Replication sub-tab.
- Select the session from the Geo-Replication sub-tab.
- Click Pause or Resume to pause or resume the Geo-replication session.
10.1.5. Removing a Geo-replication session
Note
Procedure 10.5. Removing Geo-replication session
- Click the Volumes tab. The list of volumes is displayed.
- Select the desired volume and click the Geo-Replication sub-tab.
- Select the session from the Geo-Replication sub-tab.
- Click Remove to remove the Geo-replication session.
10.1.6. Synchronizing a Geo-replication session
Procedure 10.6. Synchronizing a Geo-replication session
- Click the Volumes tab. The list of volumes is displayed.
- Select the desired volume and click the Geo-Replication sub-tab.
- Select the session from the Geo-Replication sub-tab.
- Click Sync. The geo-replication session is synchronized.
Note
- New Sessions and Config options for a session are synced every 1 hour.
- Existing sessions status are updated every 5 minutes.
- Session configs are also automatically synchronized whenever a config is set/reset from the Console.
10.1.7. Configuring Options for a Geo-replication
Procedure 10.7. Configuring Options for a Geo-replication
- Click the Volumes tab. The list of volumes is displayed.
- Select the desired volume and click the Geo-Replication sub-tab.
- Select the session from the Geo-Replication sub-tab.
- Click Options. The Geo-Replication Options page is displayed.
- To set the config, modify the Option Value. To reset, select reset check box corresponding to the Option Key.
- Click OK. The Option Keys are modified for the Geo-Replication session.
10.1.8. Non-root Geo-replication
- Ensure to create the geo-replication users and groups using CLI. Currently, creation of users and groups using Red Hat Gluster Storage Console is not supported.
- Ensure the presence of a home directory corresponding to the geo-rep user in every destination node.
- A user with the same user name should always exist under the home directory. If user was created using useradd command through CLI, then that user will automatically get synchronized in Red Hat Gluster Storage Console.
Chapter 11. Users
Note
11.1. Directory Services Support in Red Hat Gluster Storage Console
admin. This account is intended for use when initially configuring the environment, and for troubleshooting. To add other users to Red Hat Gluster Storage Console you will need to attach a directory server to the Console using the Domain Management Tool, rhsc-manage-domains.
user@domain. Attachment of more than one directory server to the Console is also supported.
- Active Directory;
- Identity Management (IdM); and
- Red Hat Directory Server(RHDS).
- A valid pointer record (PTR) for the directory server's reverse look-up address.
- A valid service record (SRV) for LDAP over TCP port
389. - A valid service record (SRV) for Kerberos over TCP port
88. - A valid service record (SRV) for Kerberos over UDP port
88.
rhsc-manage-domains.
- Active Directory - http://technet.microsoft.com/en-us/windowsserver/dd448614.
- Red Hat Directory Server (RHDS) Documentation - https://access.redhat.com/site/documentation/en-US/Red_Hat_Directory_Server/
Important
Important
Note
- Configure the
memberOfplug-in for RHDS to allow group membership. In particular ensure that the value of thememberofgroupattrattribute of thememberOfplug-in is set touniqueMember.Consult the Red Hat Directory Server Plug-in Guide for more information on configuring thememberOfplug-in. - Define the directory server as a service of the form
ldap/hostname@REALMNAMEin the Kerberos realm. Replace hostname with the fully qualified domain name associated with the directory server and REALMNAME with the fully qualified Kerberos realm name. The Kerberos realm name must be specified in capital letters. - Generate a
keytabfile for the directory server in the Kerberos realm. Thekeytabfile contains pairs of Kerberos principals and their associated encrypted keys. These keys will allow the directory server to authenticate itself with the Kerberos realm.Consult the documentation for your Kerberos principle for more information on generating akeytabfile. - Install the
keytabfile on the directory server. Then configure RHDS to recognize thekeytabfile and accept Kerberos authentication using GSSAPI.Consult the Red Hat Directory Server Administration Guide for more information on configuring RHDS to use an externalkeytabfile. - Test the configuration on the directory server by using the
kinitcommand to authenticate as a user defined in the Kerberos realm. Once authenticated run theldapsearchcommand against the directory server. Use the-Y GSSAPIparameters to ensure the use of Kerberos for authentication.
11.2. Authorization Model
- The user performing the action
- The type of action being performed
- The object on which the action is being performed
For an action to be successfully performed, the user must have the appropriate permission for the object being acted upon. Each type of action corresponds to a permission. There are many different permissions in the system, so for simplicity they are grouped together in roles.
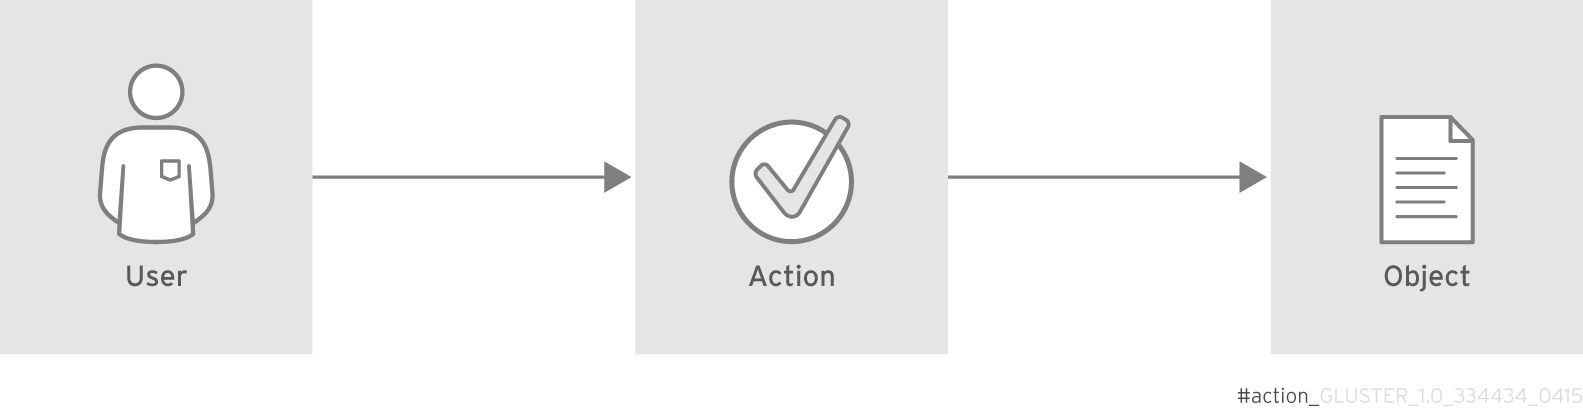
Figure 11.1. Actions
Permissions enable users to perform actions on objects, where objects are either individual objects or container objects.
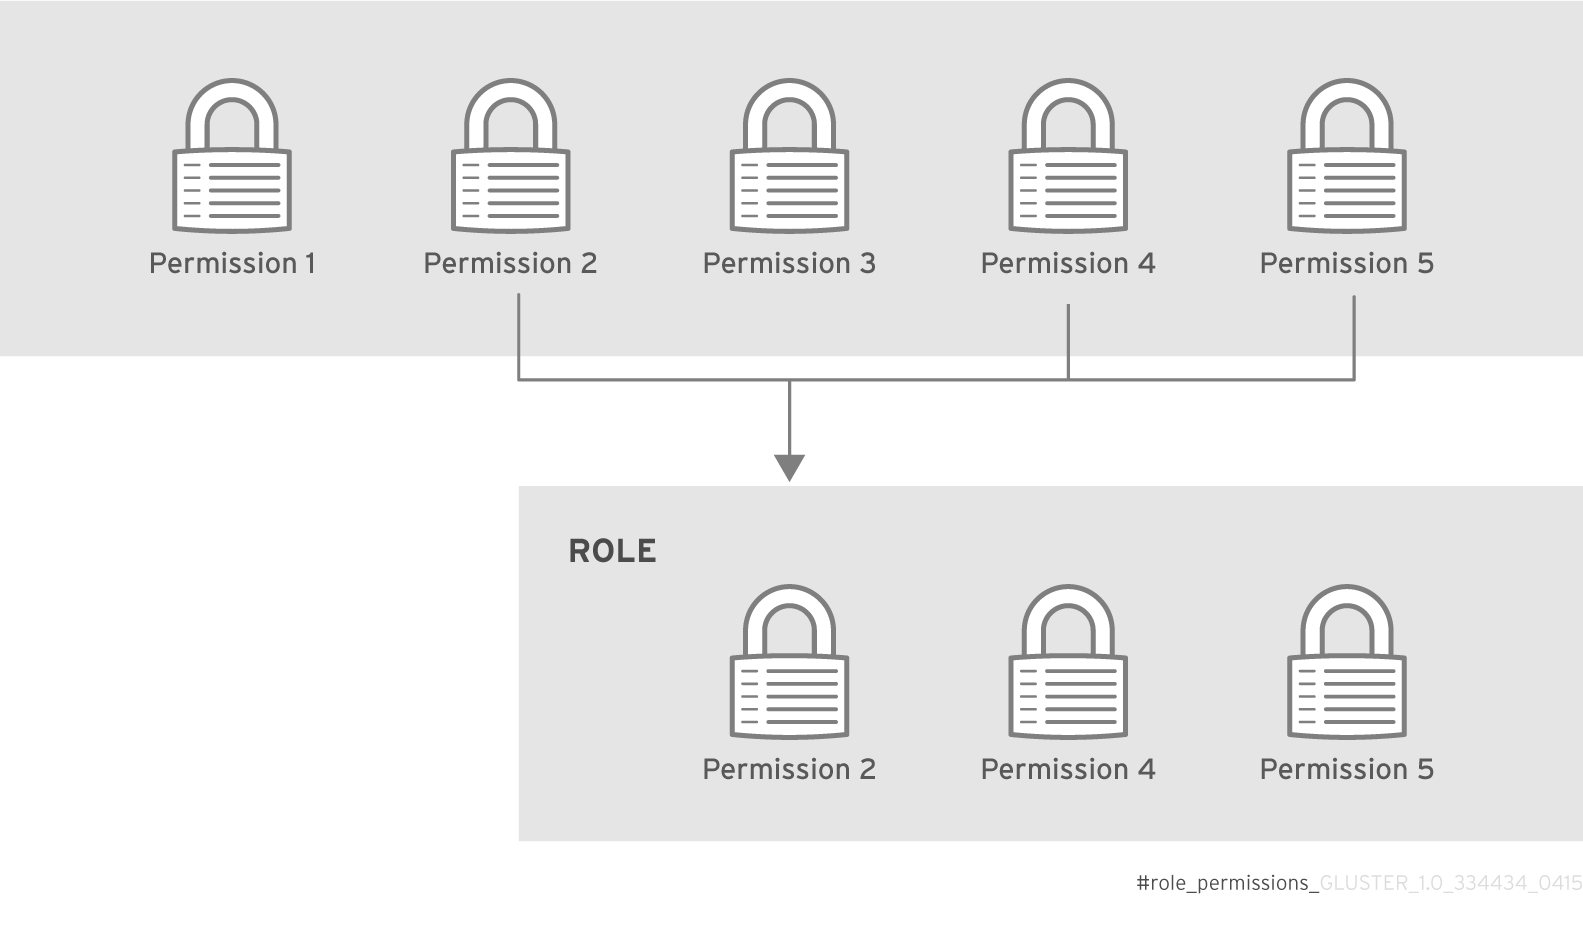
Figure 11.2. Permissions & Roles
Important
11.3. User Properties
11.3.1. Roles
administrator role. The privileges provided by this role are shown in this section.
Note
Administrator Role
- Allows access to the Administration Portal for managing servers and volumes.For example, if a user has an
administratorrole on a cluster, they could manage all servers in the cluster using the Administration Portal.
| Role | Privileges | Notes |
|---|---|---|
| SuperUser | Full permissions across all objects and levels | Can manage all objects across all clusters. |
| ClusterAdmin | Cluster Administrator | Can use, create, delete, and manage all resources in a specific cluster, including servers and volumes. |
| GlusterAdmin | Gluster Administrator | Can create, delete, configure and manage a specific volume. Can also add or remove host. |
| HostAdmin | Host Administrator | Can configure, manage, and remove a specific host. Can also perform network-related operations on a specific host. |
| NetworkAdmin | Network Administrator | Can configure and manage networks attached to servers. |
11.3.2. Permissions
| Object | Action |
|---|---|
| System - Configure RHS-C | Manipulate Users, Manipulate Permissions, Manipulate Roles, Generic Configuration |
| Cluster - Configure Cluster | Create, Delete, Edit Cluster Properties, Edit Network |
| Server - Configure Server | Create, Delete, Edit Host Properties, Manipulate Status, Edit Network |
| Gluster Storage - Configure Gluster Storage | Create, Delete, Edit Volumes, Volume Options, Manipulate Status |
11.4. Assigning an Administrator or User Role to a Resource
Assign administrator or user roles to resources to allow users to access or manage that resource.
Procedure 11.1. Assigning a Role to a Resource
- Click Networks tab and select a network from the results list.
- Click Permissions sub-tab of the details pane to list the assigned users, the user's role, and the inherited permissions for the selected resource.
- Click to open the Add Permission to User window.
Figure 11.3. Add Permission to User
- Enter the name or user name of an existing user into the Search text box and click . Select a user from the resulting list of possible matches.
- Select a role from the Role to Assign: drop-down menu.
- Click to assign the role and close the window.
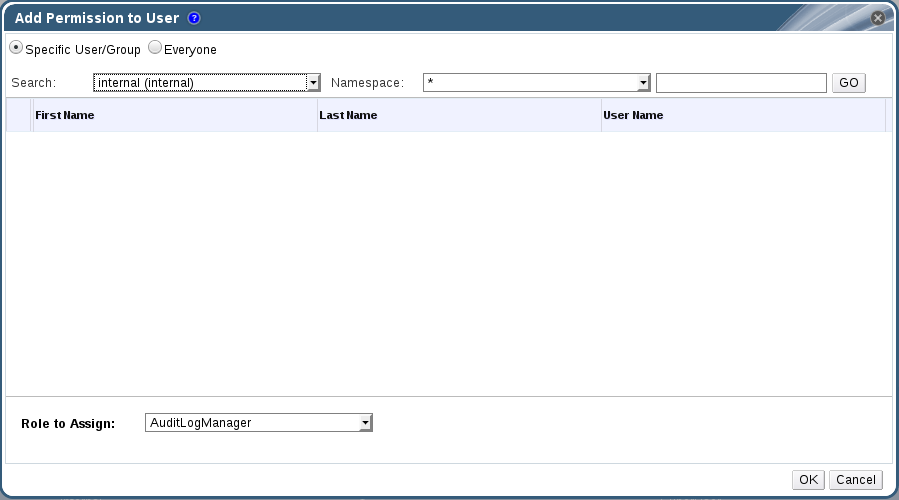
You have assigned a role to a user; the user now has the inherited permissions of that role enabled for that resource.
11.5. Removing an Administrator or User Role from a Resource
Remove an administrator or user role from a resource; the user loses the inherited permissions associated with the role for that resource.
Procedure 11.2. Removing a Role from a Resource
- Click Networks tab and select a network from the results list.
- Click Permissions sub-tab of the details pane to list the assigned users, the user's role, and the inherited permissions for the selected resource.
- Select the user to remove from the resource.
- Click . The Remove Permission window opens to confirm permissions removal.
- Click to remove the user role.
You have removed the user's role, and the associated permissions, from the resource.
11.6. Users Operations
Note
11.6.1. Adding Users and Groups
Adding Users
- Click the Users tab. The list of authorized users for Red Hat Gluster Storage Console displays.
- Click . The Add Users and Groups dialog box displays.
Figure 11.4. Add Users and Groups Dialog Box
- The default Search domain displays. If there are multiple search domains, select the appropriate search domain. Enter a name or part of a name in the search text field, and click . Alternatively, click to view a list of all users and groups.
- Select the group, user or users check boxes. The added user displays on the Users tab.
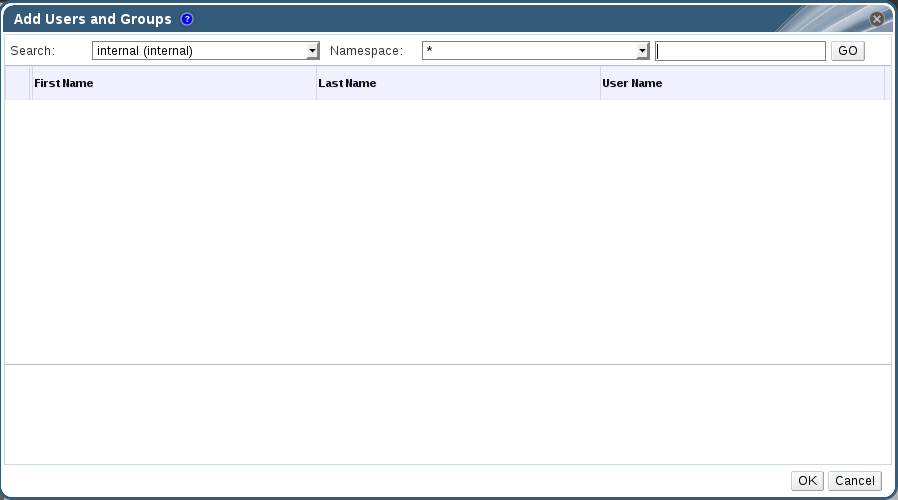
Users are not created from within the Red Hat Gluster Storage; Red Hat Gluster Storage Console accesses user information from the organization's Directory Service. This means that you can only assign roles to users who already exist in your Directory Services domain. To assign permissions to users, use the Permissions tab on the Details pane of the relevant resource.
Example 11.1. Assigning a user permissions to use a particular server
To view general user information:
- Click the Users tab. The list of authorized users for Red Hat Gluster Storage Console displays.
- Select the user, or perform a search if the user is not visible on the results list.
- The Details pane displays for the selected user, usually with the General tab displaying general information, such as the domain name, email, and status of the user.
- The other tabs allow you to view groups, permissions, and events for the user.For example, to view the groups to which the user belongs, click the Directory Groups tab.
11.6.2. Removing Users
To remove a user:
- Click the Users tab. The list of authorized users for Red Hat Gluster Storage Console displays.
Figure 11.5. Users Tab
- Select the user to be removed.
- Click the button. A message displays prompting you to confirm the removal.
- Click .
- The user is removed from Red Hat Gluster Storage Console.
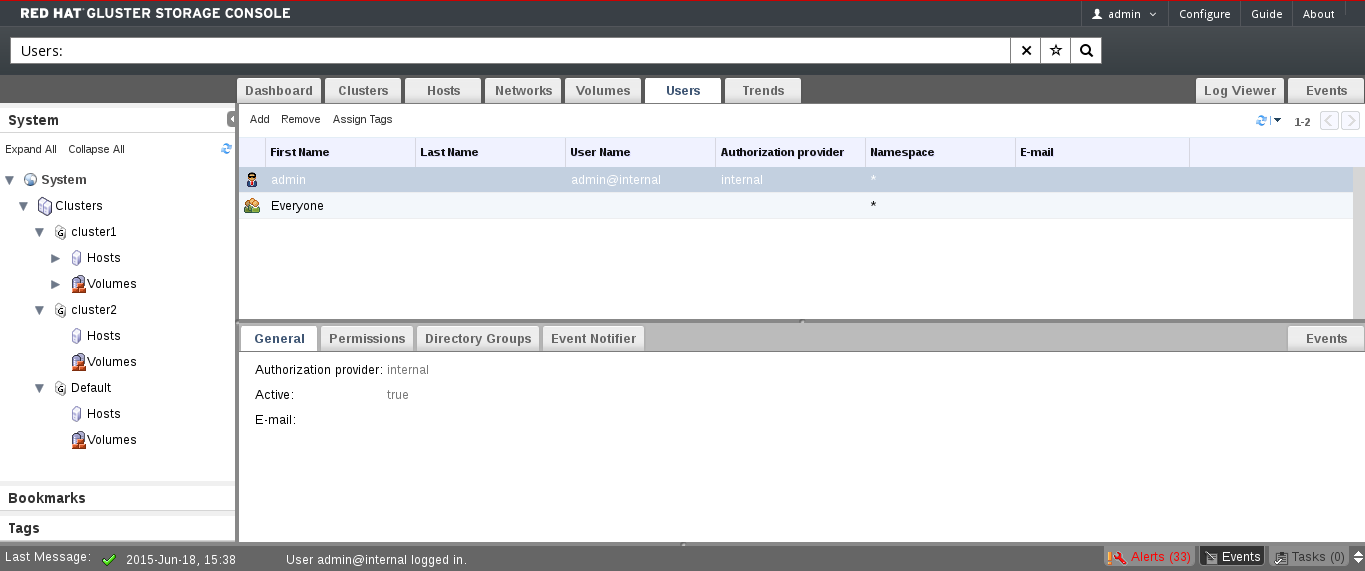
Note
11.7. Event Notifications
11.7.1. Managing Event Notifiers
To set up event notifications:
- Click the Users tab. The list of authorized users for Red Hat Gluster Storage Console displays.
- Select the user who requires notification, or perform a search if the user is not visible on the results list.
- Click the Event Notifier tab. The Event Notifier tab displays a list of events for which the user will be notified, if any.
- Click the button. The Add Event Notification dialog box displays a list of events for Services, Hosts, Volumes, Hooks, and General Management events. You can select all, or pick individual events from the list. Click the button to see complete lists of events.
Figure 11.6. The Add Events Dialog Box
- Enter an email address in the Mail Recipient: field.
- Click to save changes and close the window. The selected events display on the Event Notifier tab for the user.
- Configure the ovirt-engine-notifier service on the Red Hat Gluster Storage Console.
Important
The MAIL_SERVER parameter is mandatory.The event notifier configuration file can be found in /usr/share/ovirt-engine/services/ovirt-engine-notifier/ovirt-engine-notifier.conf. The parameters for event notifications in ovirt-engine-notifier.conf are listed in Table 11.3, “ovirt-engine-notifier.conf variables”Expand Table 11.3. ovirt-engine-notifier.conf variables Variable name Default Remarks INTERVAL_IN_SECONDS 120 The interval in seconds between instances of dispatching messages to subscribers. MAIL_SERVER none The SMTP mail server address. Required. MAIL_PORT 25 The default port of a non-secured SMTP server is 25. The default port of a secured SMTP server (one with SSL enabled) is 465. MAIL_USER none If SSL is enabled to authenticate the user, then this variable must be set. This variable is also used to specify the "from" user address when the MAIL_FROM variable is not set. Some mail servers do not support this functionality. The address is in RFC822 format. MAIL_PASSWORD none This variable is required to authenticate the user if the mail server requires authentication or if SSL is enabled. MAIL_ENABLE_SSL false This indicates whether SSL should be used to communicate with the mail server. HTML_MESSAGE_FORMAT false The mail server sends messages in HTML format if this variable is set to "true". MAIL_FROM none This variable specifies a "from" address in RFC822 format, if supported by the mail server. MAIL_REPLY_TO none This variable specifies "reply-to" addresses in RFC822 format on sent mail, if supported by the mail server. DAYS_TO_KEEP_HISTORY none This variable sets the number of days dispatched events will be preserved in the history table. If this variable is not set, events remain on the history table indefinitely. DAYS_TO_SEND_ON_STARTUP 0 This variable specifies the number of days of old events that are processed and sent when the notifier starts. If set to 2, for example, the notifier will process and send the events of the last two days. Older events will just be marked as processed and won't be sent. The default is 0, so no old messages will be sent at all during startup. - Start the ovirt-engine-notifier service on the Red Hat Gluster Storage Console. This activates the changes you have made:
/etc/init.d/ovirt-engine-notifier start
# /etc/init.d/ovirt-engine-notifier startCopy to Clipboard Copied! Toggle word wrap Toggle overflow
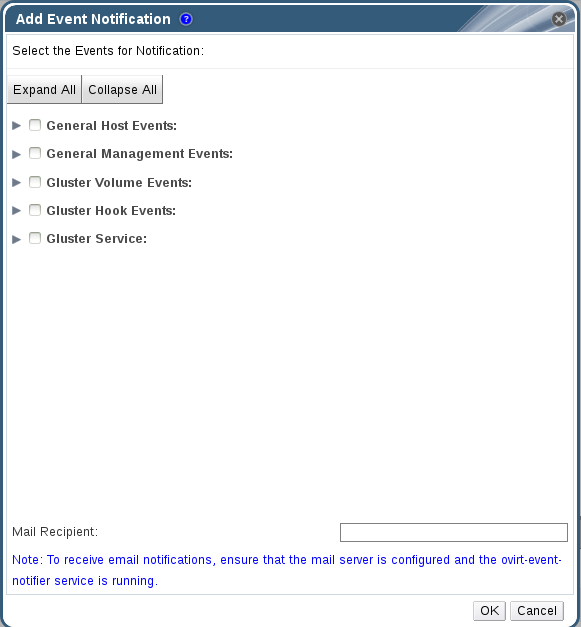
To cancel event notification:
- In the Users tab, select the user or the user group.
- Select the Event Notifier tab. The Details pane displays the events for which the user will receive notifications.
- Click the button. The Add Event Notification dialog box displays a list of events for Servers, Gluster Volume, and General Management events. To remove an event notification, deselect events from the list. Click the Expand All button to see the complete lists of events.
- Click . The deselected events are removed from the display on the Event Notifier tab for the user.
Part III. Monitoring
Chapter 12. Monitoring Red Hat Gluster Storage Console
12.1. Viewing the Event List
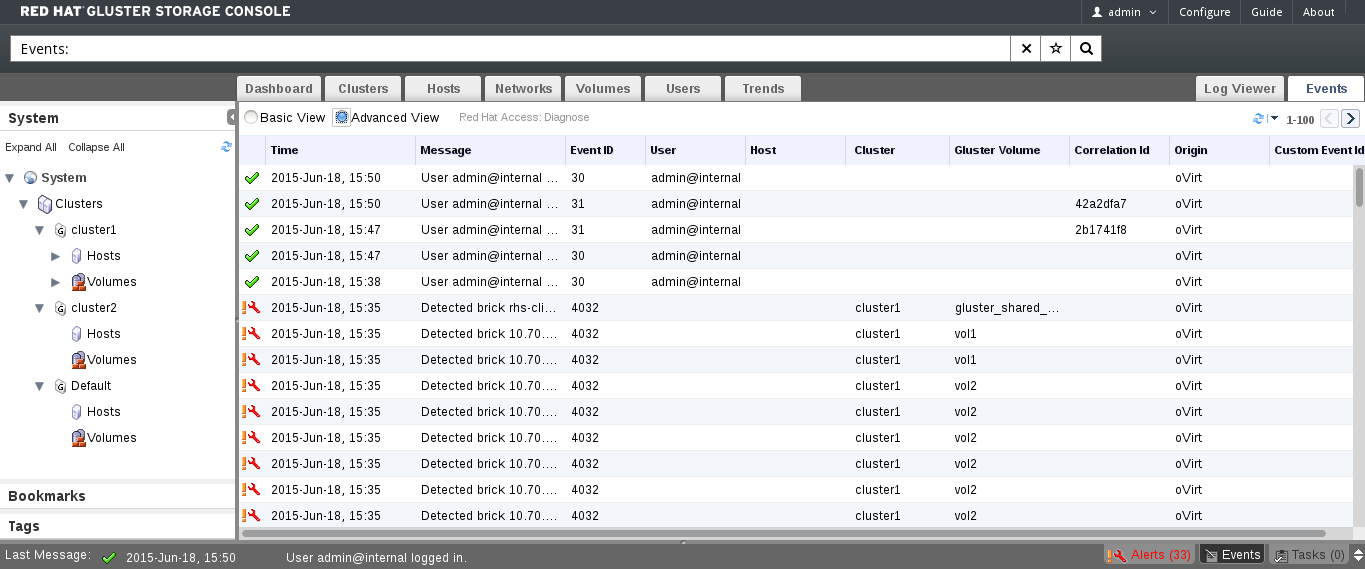
Figure 12.1. Event List - Advanced View
Event list:
| Column | Description |
|---|---|
| Event |
The type of event. The possible event types are:
 Audit notification (e.g. log on).
 Warning notification.
 Error notification.
|
| Time |
The time that the event occurred.
|
| Message |
The message describing that an event occurred.
|
| User |
The user that received the event.
|
| Host |
The host on which the event occurred.
|
| Cluster |
The cluster on which the event occurred.
|
12.2. Viewing Alert Information
Chapter 13. Monitoring Red Hat Gluster Storage using Nagios
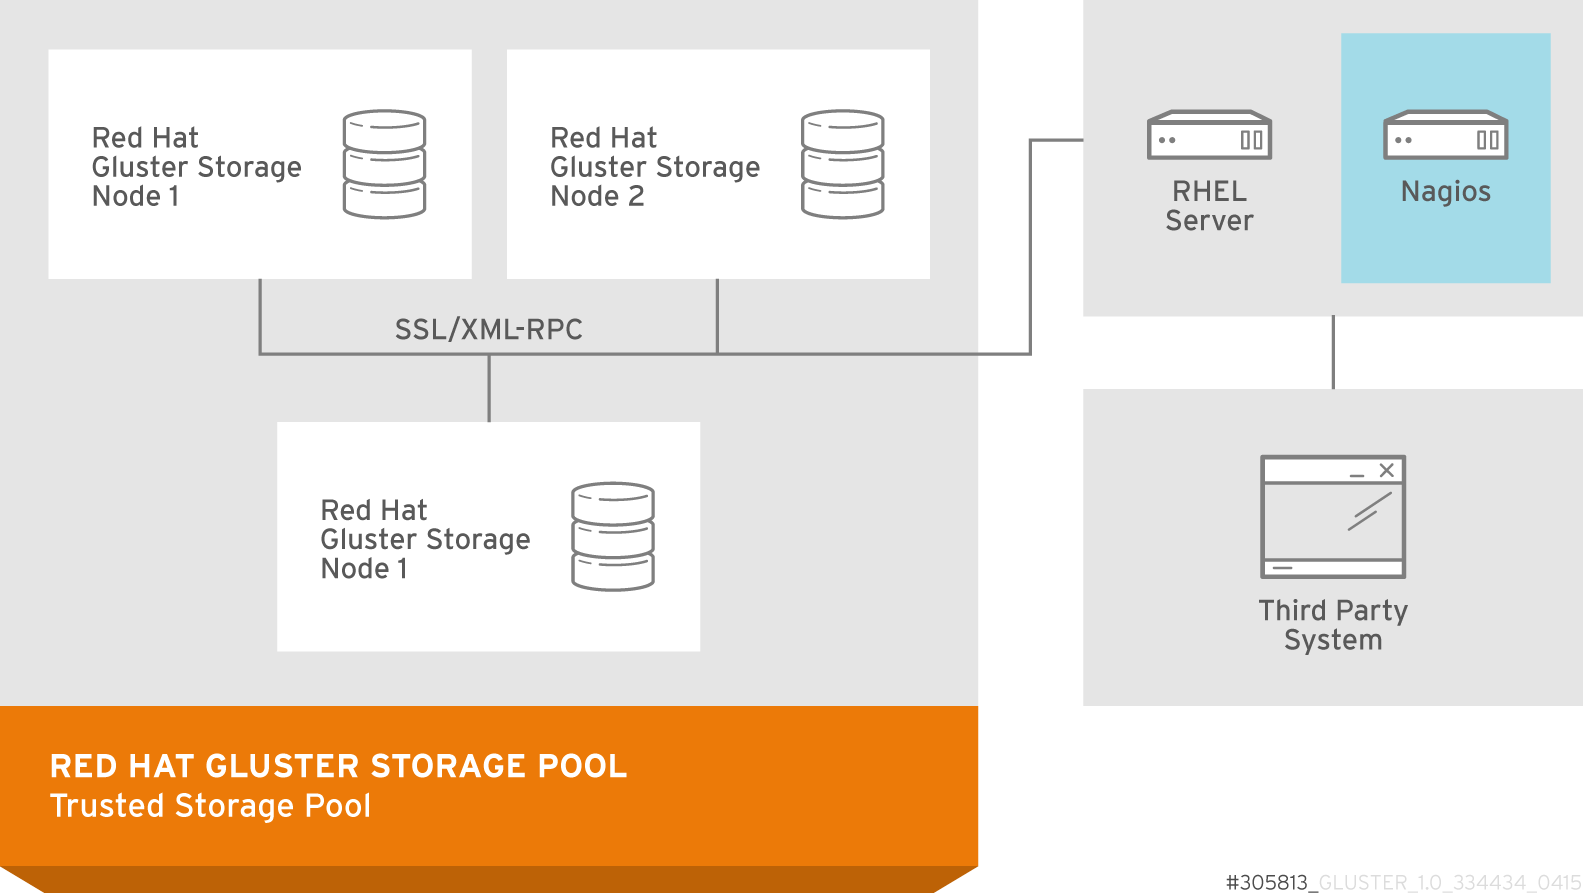
Figure 13.1. Nagios deployed on Red Hat Gluster Storage Console Server
13.1. Configuring Nagios
Note
configure-gluster-nagios command, ensure that all the Red Hat Gluster Storage nodes are configured.
- Execute
configure-gluster-nagioscommand manually only the first time with cluster name and host address on the Nagios server using the following command:configure-gluster-nagios -c cluster-name -H HostName-or-IP-address
# configure-gluster-nagios -c cluster-name -H HostName-or-IP-addressCopy to Clipboard Copied! Toggle word wrap Toggle overflow For-c, provide a cluster name (a logical name for the cluster) and for-H, provide the host name or ip address of a node in the Red Hat Gluster Storage trusted storage pool. - Perform the steps given below when
configure-gluster-nagioscommand runs:- Confirm the configuration when prompted.
- Enter the current Nagios server host name or IP address to be configured all the nodes.
- Confirm restarting Nagios server when prompted.
Copy to Clipboard Copied! Toggle word wrap Toggle overflow All the hosts, volumes and bricks are added and displayed.
- Login to the Nagios server GUI using the following URL.
https://NagiosServer-HostName-or-IPaddress/nagios
https://NagiosServer-HostName-or-IPaddress/nagiosCopy to Clipboard Copied! Toggle word wrap Toggle overflow Note
- The default Nagios user name and password is nagiosadmin / nagiosadmin.
- You can manually update/discover the services by executing the
configure-gluster-nagioscommand or by runningCluster Auto Configservice through Nagios Server GUI. - If the node with which auto-discovery was performed is down or removed from the cluster, run the
configure-gluster-nagioscommand with a different node address to continue discovering or monitoring the nodes and services. - If new nodes or services are added, removed, or if snapshot restore was performed on Red Hat Gluster Storage node, run
configure-gluster-nagioscommand.
13.2. Configuring Nagios Server for Send Mail Notifications
- In the
/etc/nagios/gluster/gluster-contacts.cfgfile, add contacts to send mail in the format shown below:Modifycontact_name,alias, andemail.Copy to Clipboard Copied! Toggle word wrap Toggle overflow Theservice_notification_optionsdirective is used to define the service states for which notifications can be sent out to this contact. Valid options are a combination of one or more of the following:w: Notify on WARNING service statesu: Notify on UNKNOWN service statesc: Notify on CRITICAL service statesr: Notify on service RECOVERY (OK states)f: Notify when the service starts and stops FLAPPINGn (none): Do not notify the contact on any type of service notifications
Thehost_notification_optionsdirective is used to define the host states for which notifications can be sent out to this contact. Valid options are a combination of one or more of the following:d: Notify on DOWN host statesu: Notify on UNREACHABLE host statesr: Notify on host RECOVERY (UP states)f: Notify when the host starts and stops FLAPPINGs: Send notifications when host or service scheduled downtime starts and endsn (none): Do not notify the contact on any type of host notifications.
Note
By default, a contact and a contact group are defined for administrators incontacts.cfgand all the services and hosts will notify the administrators. Add suitable email id for administrator incontacts.cfgfile. - To add a group to which the mail need to be sent, add the details as given below:
  define contactgroup{
        contactgroup_name                   Group1
        alias                               GroupAlias
        members                             Contact1,Contact2
}
define contactgroup{ contactgroup_name Group1 alias GroupAlias members Contact1,Contact2 }Copy to Clipboard Copied! Toggle word wrap Toggle overflow - In the
/etc/nagios/gluster/gluster-templates.cfgfile specify the contact name and contact group name for the services for which the notification need to be sent, as shown below:Addcontact_groupsname andcontactsname.Copy to Clipboard Copied! Toggle word wrap Toggle overflow You can configure notification for individual services by editing the corresponding node configuration file. For example, to configure notification for brick service, edit the corresponding node configuration file as shown below:Copy to Clipboard Copied! Toggle word wrap Toggle overflow - To receive detailed information on every update when Cluster Auto-Config is run, edit
/etc/nagios/objects/commands.cfgfile add$NOTIFICATIONCOMMENT$\nafter$SERVICEOUTPUT$\noption innotify-service-by-emailandnotify-host-by-emailcommand definition as shown below:Copy to Clipboard Copied! Toggle word wrap Toggle overflow This will send emails similar to the following when the service alert is triggered.Copy to Clipboard Copied! Toggle word wrap Toggle overflow - Restart the Nagios server using the following command:
service nagios restart
# service nagios restartCopy to Clipboard Copied! Toggle word wrap Toggle overflow
Note
- By default, the system ensures three occurrences of the event before sending mail notifications.
- By default, Nagios Mail notification is sent using
/bin/mailcommand. To change this, modify the definition fornotify-host-by-emailcommand andnotify-service-by-emailcommand in/etc/nagios/objects/commands.cfgfile and configure the mail server accordingly.
13.3. Verifying the Configuration
- Verify the updated configurations using the following command:
nagios -v /etc/nagios/nagios.cfg
# nagios -v /etc/nagios/nagios.cfgCopy to Clipboard Copied! Toggle word wrap Toggle overflow If error occurs, verify the parameters set in/etc/nagios/nagios.cfgand update the configuration files. - Restart Nagios server using the following command:
service nagios restart
# service nagios restartCopy to Clipboard Copied! Toggle word wrap Toggle overflow - Log into the Nagios server GUI using the following URL with the Nagios Administrator user name and password.
https://NagiosServer-HostName-or-IPaddress/nagios
https://NagiosServer-HostName-or-IPaddress/nagiosCopy to Clipboard Copied! Toggle word wrap Toggle overflow Note
To change the default password, see Changing Nagios Password section in Red Hat Gluster Storage Administration Guide. - Click Services in the left pane of the Nagios server GUI and verify the list of hosts and services displayed.
Figure 13.2. Nagios Services

13.4. Using Nagios Server GUI
https://NagiosServer-HostName-or-IPaddress/nagios
https://NagiosServer-HostName-or-IPaddress/nagios
Figure 13.3. Nagios Login
To view the overview of the hosts and services being monitored, click Tactical Overview in the left pane. The overview of Network Outages, Hosts, Services, and Monitoring Features are displayed.
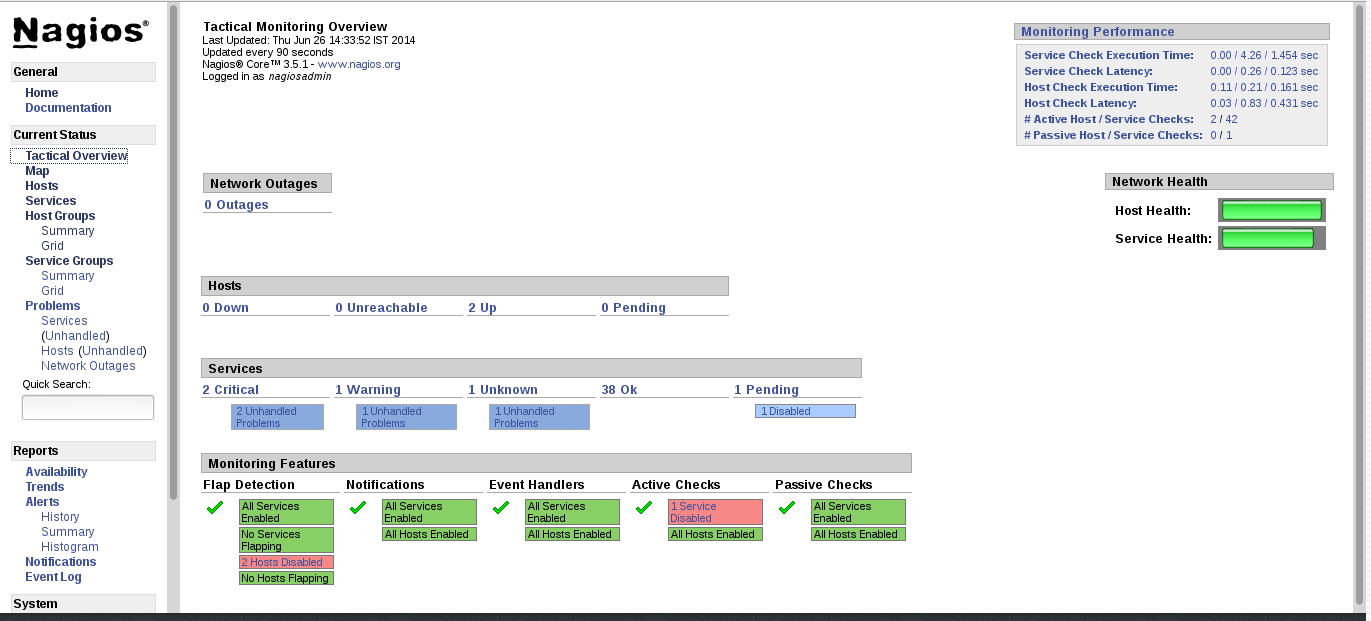
Figure 13.4. Tactical Overview
To view the status summary of all the hosts, click Summary under Host Groups in the left pane.
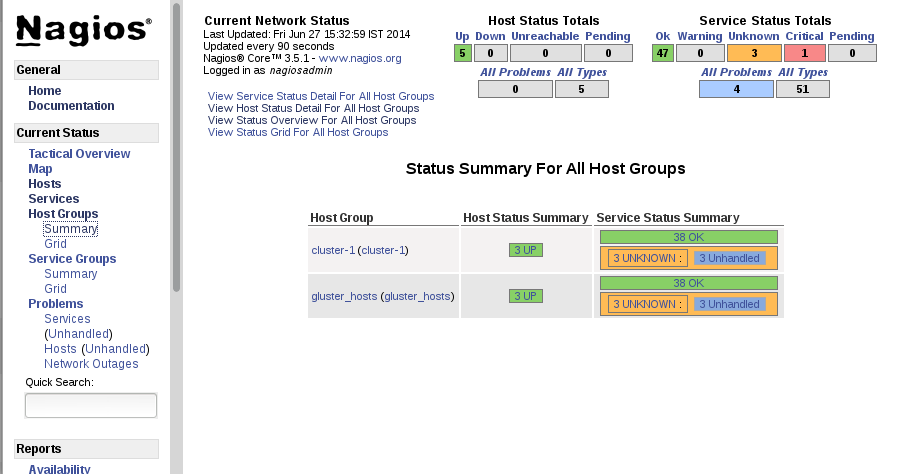
Figure 13.5. Host Groups Summary
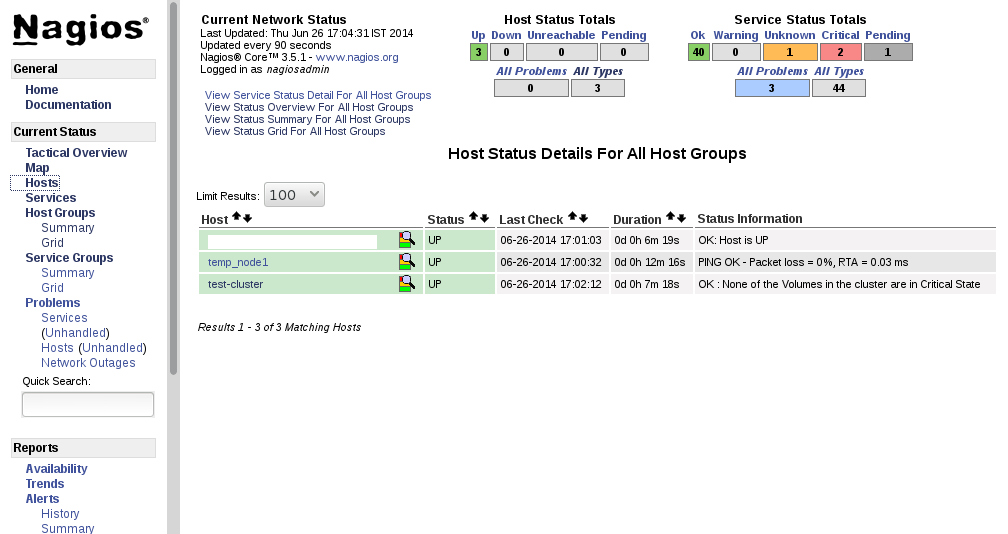
Figure 13.6. Host Status
To view the list of all hosts and their service status click Services in the left pane.

Figure 13.7. Service Status
Note
- Click
Hostsin the left pane. The list of hosts are displayed. - Click
 corresponding to the host name to view the host details.
- Select the service name to view the Service State Information. You can view the utilization of the following services:
- Memory
- Swap
- CPU
- Network
- Brick
- DiskThe Brick/Disk Utilization Performance data has four sets of information for every mount point which are brick/disk space detail, inode detail of a brick/disk, thin pool utilization and thin pool metadata utilization if brick/disk is made up of thin LV.The Performance data for services is displayed in the following format: value[UnitOfMeasurement];warningthreshold;criticalthreshold;min;max.For Example,Performance Data: /bricks/brick2=31.596%;80;90;0;0.990 /bricks/brick2.inode=0.003%;80;90;0;1048064 /bricks/brick2.thinpool=19.500%;80;90;0;1.500 /bricks/brick2.thinpool-metadata=4.100%;80;90;0;0.004As part of disk utilization service, the following mount points will be monitored:
/ , /boot, /home, /var and /usrif available.
- To view the utilization graph, click
 corresponding to the service name. The utilization graph is displayed.
Figure 13.8. CPU Utilization
- To monitor status, click on the service name. You can monitor the status for the following resources:
- Disk
- Network
- To monitor process, click on the process name. You can monitor the following processes:
- Gluster NFS (Network File System)
- Self-Heal (Self Heal)
- Gluster Management (glusterd)
- Quota (Quota daemon)
- CTDB
- SMB
Note
Monitoring Openstack Swift operations is not supported.
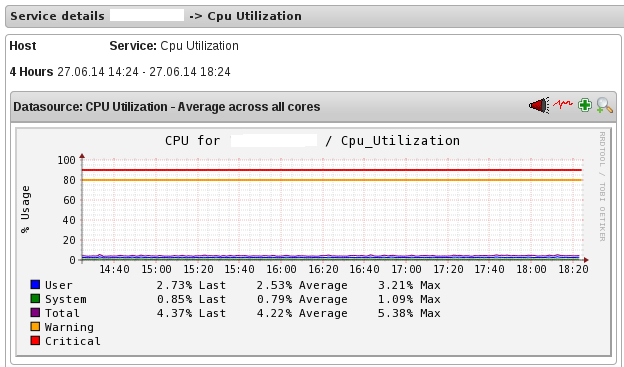
- Click
Hostsin the left pane. The list of hosts and clusters are displayed. - Click
corresponding to the cluster name to view the cluster details.
- To view utilization graph, click
corresponding to the service name. You can monitor the following utilizations:
- Cluster
- Volume
Figure 13.9. Cluster Utilization
- To monitor status, click on the service name. You can monitor the status for the following resources:
- Host
- Volume
- Brick
- To monitor cluster services, click on the service name. You can monitor the following:
- Volume Quota
- Volume Geo-replication
- Volume Split-Brain
- Cluster Quorum (A cluster quorum service would be present only when there are volumes in the cluster.)
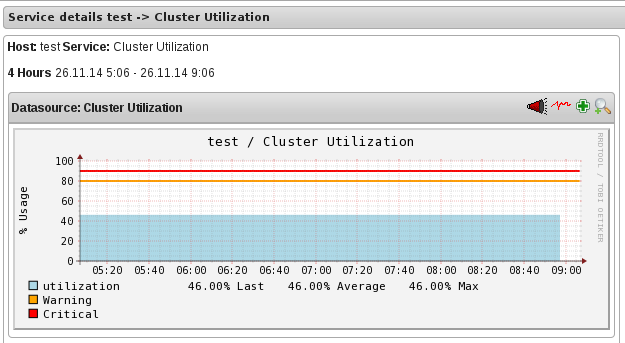
If new nodes or services are added or removed, or if snapshot restore is performed on Red Hat Gluster Storage node, reschedule the Cluster Auto config service using Nagios Server GUI or execute the configure-gluster-nagios command. To synchronize the configurations using Nagios Server GUI, perform the steps given below:
- Login to the Nagios Server GUI using the following URL in your browser with nagiosadmin user name and password.
https://NagiosServer-HostName-or-IPaddress/nagios
https://NagiosServer-HostName-or-IPaddress/nagiosCopy to Clipboard Copied! Toggle word wrap Toggle overflow - Click Services in left pane of Nagios server GUI and click Cluster Auto Config.
Figure 13.10. Nagios Services
- In Service Commands, click Re-schedule the next check of this service. The Command Options window is displayed.
Figure 13.11. Service Commands
- In Command Options window, click .
Figure 13.12. Command Options

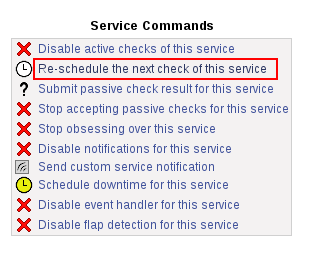
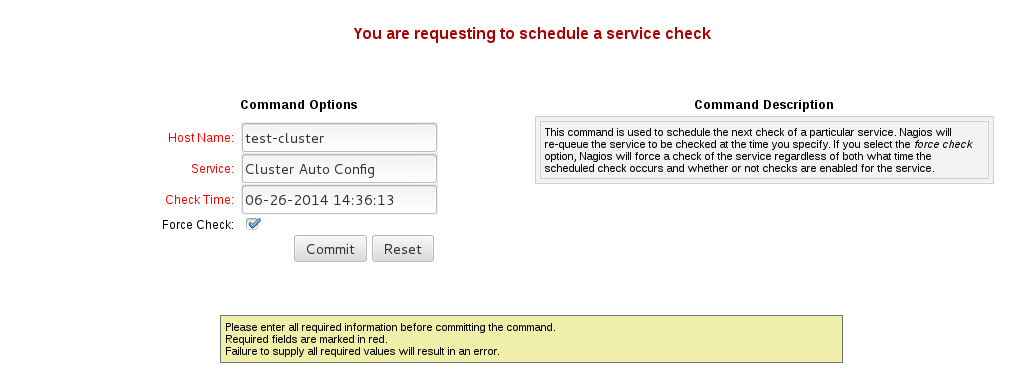
You can enable or disable Host and Service notifications through Nagios GUI.
- To enable and disable Host Notifications:
- Login to the Nagios Server GUI using the following URL in your browser with nagiosadmin user name and password.
https://NagiosServer-HostName-or-IPaddress/nagios
https://NagiosServer-HostName-or-IPaddress/nagiosCopy to Clipboard Copied! Toggle word wrap Toggle overflow - Click Hosts in left pane of Nagios server GUI and select the host.
- Click Enable notifications for this host or Disable notifications for this host in Host Commands section.
- Click Commit to enable or disable notification for the selected host.
- To enable and disable Service Notification:
- Login to the Nagios Server GUI.
- Click Services in left pane of Nagios server GUI and select the service to enable or disable.
- Click Enable notifications for this service or Disable notifications for this service from the Service Commands section.
- Click Commit to enable or disable the selected service notification.
- To enable and disable all Service Notifications for a host:
- Login to the Nagios Server GUI.
- Click Hosts in left pane of Nagios server GUI and select the host to enable or disable all services notifications.
- Click Enable notifications for all services on this host or Disable notifications for all services on this host from the Service Commands section.
- Click Commit to enable or disable all service notifications for the selected host.
- To enable or disable all Notifications:
- Login to the Nagios Server GUI.
- Click Process Info under Systems section from left pane of Nagios server GUI.
- Click Enable notifications or Disable notifications in Process Commands section.
- Click Commit.
You can enable a service to monitor or disable a service you have been monitoring using the Nagios GUI.
- To enable Service Monitoring:
- Login to the Nagios Server GUI using the following URL in your browser with nagiosadmin user name and password.
https://NagiosServer-HostName-or-IPaddress/nagios
https://NagiosServer-HostName-or-IPaddress/nagiosCopy to Clipboard Copied! Toggle word wrap Toggle overflow - Click Services in left pane of Nagios server GUI and select the service to enable monitoring.
- Click Enable active checks of this service from the Service Commands and click Commit.
- Click Start accepting passive checks for this service from the Service Commands and click Commit.Monitoring is enabled for the selected service.
- To disable Service Monitoring:
- Login to the Nagios Server GUI using the following URL in your browser with nagiosadmin user name and password.
https://NagiosServer-HostName-or-IPaddress/nagios
https://NagiosServer-HostName-or-IPaddress/nagiosCopy to Clipboard Copied! Toggle word wrap Toggle overflow - Click Services in left pane of Nagios server GUI and select the service to disable monitoring.
- Click Disable active checks of this service from the Service Commands and click Commit.
- Click Stop accepting passive checks for this service from the Service Commands and click Commit.Monitoring is disabled for the selected service.
Note
| Service Name | Status | Messsage | Description |
|---|---|---|---|
| SMB | OK | OK: No gluster volume uses smb | When no volumes are exported through smb. |
| OK | Process smb is running | When SMB service is running and when volumes are exported using SMB. | |
| CRITICAL | CRITICAL: Process smb is not running | When SMB service is down and one or more volumes are exported through SMB. | |
| CTDB | UNKNOWN | CTDB not configured | When CTDB service is not running, and smb or nfs service is running. |
| CRITICAL | Node status: BANNED/STOPPED | When CTDB service is running but Node status is BANNED/STOPPED. | |
| WARNING | Node status: UNHEALTHY/DISABLED/PARTIALLY_ONLINE | When CTDB service is running but Node status is UNHEALTHY/DISABLED/PARTIALLY_ONLINE. | |
| OK | Node status: OK | When CTDB service is running and healthy. | |
| Gluster Management | OK | Process glusterd is running | When glusterd is running as unique. |
| WARNING | PROCS WARNING: 3 processes | When there are more then one glusterd is running. | |
| CRITICAL | CRITICAL: Process glusterd is not running | When there is no glusterd process running. | |
| UNKNOWN | NRPE: Unable to read output | When unable to communicate or read output | |
| Gluster NFS | OK | OK: No gluster volume uses nfs | When no volumes are configured to be exported through NFS. |
| OK | Process glusterfs-nfs is running | When glusterfs-nfs process is running. | |
| CRITICAL | CRITICAL: Process glusterfs-nfs is not running | When glusterfs-nfs process is down and there are volumes which requires NFS export. | |
| Split-brain | OK | No Split brain entries found. | When there are files present with out any split brain issues. |
| WARNING | Volume split brain status could not be determined | ||
| CRITICAL | CRITICAL: No.of files in split brain state found. | When there are some files in split brain state. | |
| Auto-Config | OK | Cluster configurations are in sync | When auto-config has not detected any change in Gluster configuration. This shows that Nagios configuration is already in synchronization with the Gluster configuration and auto-config service has not made any change in Nagios configuration. |
| OK | Cluster configurations synchronized successfully from host host-address | When auto-config has detected change in the Gluster configuration and has successfully updated the Nagios configuration to reflect the change Gluster configuration. | |
| CRITICAL | Can't remove all hosts except sync host in 'auto' mode. Run auto discovery manually. | When the host used for auto-config itself is removed from the Gluster peer list. Auto-config will detect this as all host except the synchronized host is removed from the cluster. This will not change the Nagios configuration and the user need to manually run the auto-config. | |
| QUOTA | OK | OK: Quota not enabled | When quota is not enabled in any volumes. |
| OK | Process quotad is running | When glusterfs-quota service is running. | |
| CRITICAL | CRITICAL: Process quotad is not running | When glusterfs-quota service is down and quota is enabled for one or more volumes. | |
| CPU Utilization | OK | CPU Status OK: Total CPU:4.6% Idle CPU:95.40% | When CPU usage is less than 80%. |
| WARNING | CPU Status WARNING: Total CPU:82.40% Idle CPU:17.60% | When CPU usage is more than 80%. | |
| CRITICAL | CPU Status CRITICAL: Total CPU:97.40% Idle CPU:2.6% | When CPU usage is more than 90%. | |
| Memory Utilization | OK | OK- 65.49% used(1.28GB out of 1.96GB) | When used memory is below warning threshold. (Default warning threshold is 80%) |
| WARNING | WARNING- 85% used(1.78GB out of 2.10GB) | When used memory is below critical threshold (Default critical threshold is 90%) and greater than or equal to warning threshold (Default warning threshold is 80%). | |
| CRITICAL | CRITICAL- 92% used(1.93GB out of 2.10GB) | When used memory is greater than or equal to critical threshold (Default critical threshold is 90% ) | |
| Brick Utilization | OK | OK | When used space of any of the four parameters, space detail, inode detail, thin pool, and thin pool-metadata utilizations, are below threshold of 80%. |
| WARNING | WARNING:mount point /brick/brk1 Space used (0.857 / 1.000) GB | If any of the four parameters, space detail, inode detail, thin pool utilization, and thinpool-metadata utilization, crosses warning threshold of 80% (Default is 80%). | |
| CRITICAL | CRITICAL : mount point /brick/brk1 (inode used 9980/1000) | If any of the four parameters, space detail, inode detail, thin pool utilization, and thinpool-metadata utilizations, crosses critical threshold 90% (Default is 90%). | |
| Disk Utilization | OK | OK | When used space of any of the four parameters, space detail, inode detail, thin pool utilization, and thinpool-metadata utilizations, are below threshold of 80%. |
| WARNING | WARNING:mount point /boot Space used (0.857 / 1.000) GB | When used space of any of the four parameters, space detail, inode detail, thin pool utilization, and thinpool-metadata utilizations, are above warning threshold of 80%. | |
| CRITICAL | CRITICAL : mount point /home (inode used 9980/1000) | If any of the four parameters, space detail, inode detail, thin pool utilization, and thinpool-metadata utilizations, crosses critical threshold 90% (Default is 90%). | |
| Network Utilization | OK | OK: tun0:UP,wlp3s0:UP,virbr0:UP | When all the interfaces are UP. |
| WARNING | WARNING: tun0:UP,wlp3s0:UP,virbr0:DOWN | When any of the interfaces is down. | |
| UNKNOWN | UNKNOWN | When network utilization/status is unknown. | |
| Swap Utilization | OK | OK- 0.00% used(0.00GB out of 1.00GB) | When used memory is below warning threshold (Default warning threshold is 80%). |
| WARNING | WARNING- 83% used(1.24GB out of 1.50GB) | When used memory is below critical threshold (Default critical threshold is 90%) and greater than or equal to warning threshold (Default warning threshold is 80%). | |
| CRITICAL | CRITICAL- 83% used(1.42GB out of 1.50GB) | When used memory is greater than or equal to critical threshold (Default critical threshold is 90%). | |
| Cluster- Quorum | PENDING | When cluster.quorum-type is not set to server; or when there are no problems in the cluster identified. | |
| OK | Quorum regained for volume | When quorum is regained for volume. | |
| CRITICAL | Quorum lost for volume | When quorum is lost for volume. | |
| Volume Geo-replication | OK | "Session Status: slave_vol1-OK .....slave_voln-OK. | When all sessions are active. |
| Session status :No active sessions found | When Geo-replication sessions are deleted. | ||
| CRITICAL | Session Status: slave_vol1-FAULTY slave_vol2-OK | If one or more nodes are Faulty and there's no replica pair that's active. | |
| WARNING | Session Status: slave_vol1-NOT_STARTED slave_vol2-STOPPED slave_vol3- PARTIAL_FAULTY |
| |
| WARNING | Geo replication status could not be determined. | When there's an error in getting Geo replication status. This error occurs when volfile is locked as another transaction is in progress. | |
| UNKNOWN | Geo replication status could not be determined. | When glusterd is down. | |
| Volume Quota | OK | QUOTA: not enabled or configured | When quota is not set |
| OK | QUOTA:OK | When quota is set and usage is below quota limits. | |
| WARNING | QUOTA:Soft limit exceeded on path of directory | When quota exceeds soft limit. | |
| CRITICAL | QUOTA:hard limit reached on path of directory | When quota reaches hard limit. | |
| UNKNOWN | QUOTA: Quota status could not be determined as command execution failed | When there's an error in getting Quota status. This occurs when
| |
| Volume Status | OK | Volume : volume type - All bricks are Up | When all volumes are up. |
| WARNING | Volume :volume type Brick(s) - list of bricks is|are down, but replica pair(s) are up | When bricks in the volume are down but replica pairs are up. | |
| UNKNOWN | Command execution failed Failure message | When command execution fails. | |
| CRITICAL | Volume not found. | When volumes are not found. | |
| CRITICAL | Volume: volume-type is stopped. | When volumes are stopped. | |
| CRITICAL | Volume : volume type - All bricks are down. | When all bricks are down. | |
| CRITICAL | Volume : volume type Bricks - brick list are down, along with one or more replica pairs | When bricks are down along with one or more replica pairs. | |
| Volume Self-Heal | OK | When volume is not a replicated volume, there is no self-heal to be done. | |
| OK | No unsynced entries present | When there are no unsynched entries in a replicated volume. | |
| WARNING | Unsynched entries present : There are unsynched entries present. | If self-heal process is turned on, these entries may be auto healed. If not, self-heal will need to be run manually. If unsynchronized entries persist over time, this could indicate a split brain scenario. | |
| WARNING | Self heal status could not be determined as the volume was deleted | When self-heal status can not be determined as the volume is deleted. | |
| UNKNOWN | When there's an error in getting self heal status. This error occurs when:
| ||
| Cluster Utilization | OK | OK : 28.0% used (1.68GB out of 6.0GB) | When used % is below the warning threshold (Default warning threshold is 80%). |
| WARNING | WARNING: 82.0% used (4.92GB out of 6.0GB) | Used% is above the warning limit. (Default warning threshold is 80%) | |
| CRITICAL | CRITICAL : 92.0% used (5.52GB out of 6.0GB) | Used% is above the warning limit. (Default critical threshold is 90%) | |
| UNKNOWN | Volume utilization data could not be read | When volume services are present, but the volume utilization data is not available as it's either not populated yet or there is error in fetching volume utilization data. | |
| Volume Utilization | OK | OK: Utilization: 40 % | When used % is below the warning threshold (Default warning threshold is 80%). |
| WARNING | WARNING - used 84% of available 200 GB | When used % is above the warning threshold (Default warning threshold is 80%). | |
| CRITICAL | CRITICAL - used 96% of available 200 GB | When used % is above the critical threshold (Default critical threshold is 90%). | |
| UNKNOWN | UNKNOWN - Volume utilization data could not be read | When all the bricks in the volume are killed or if glusterd is stopped in all the nodes in a cluster. |
13.5. Monitoring Host and Cluster Utilization
13.5.1. Monitoring Host and Cluster Utilization
Note
Procedure 13.1. To Monitor Cluster Utilization
- Click System and select Clusters in the Tree pane.
- Click Trends tab.
Figure 13.13. Trends
- Select the date and time duration to view the cluster utilization report.
- Click Submit. The Cluster Utilization graph of all clusters for the selected period is displayed.You can refresh the status by clicking the refresh button and also print the report or save as a pdf file by clicking the print button. Click Glusterfs Monitoring Home to view the Nagios Home page.
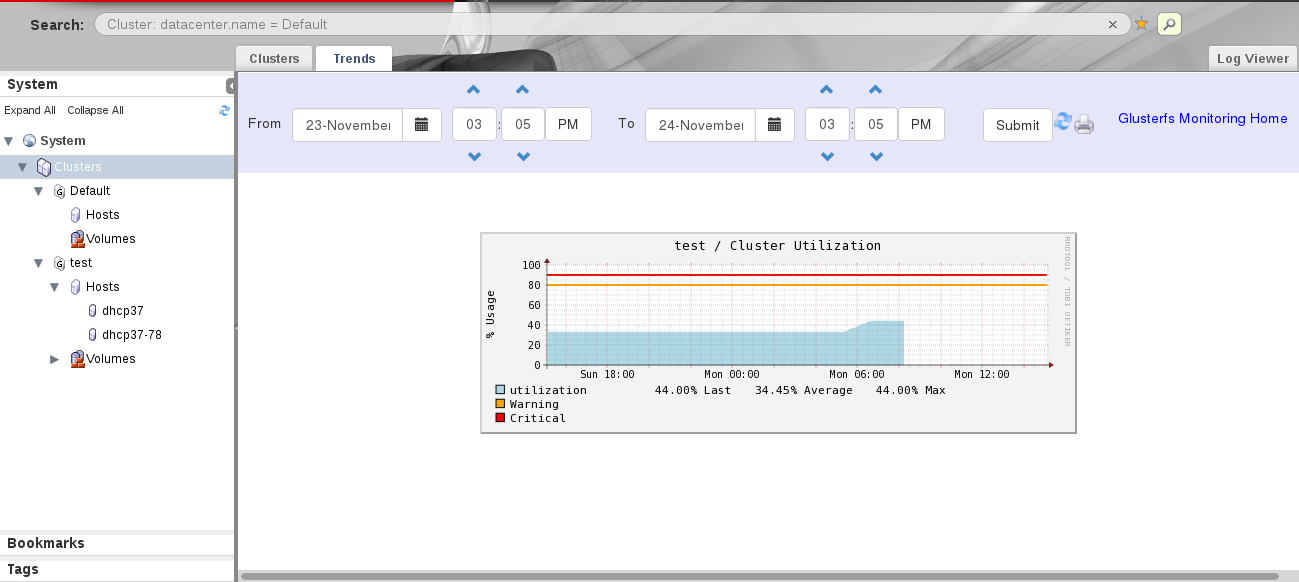
Procedure 13.2. To Monitor Utilization for Hosts
- Click System and select Clusters in the Tree pane.
- Click Hosts in the tree pane and click Trends tab to view the CPU Utilization for all the hosts.To view CPU Utilization, Network Interface Utilization, Disk Utilization,Memory Uttilization and Swap Utilization for each host, select the Host name from the tree pane and click Trends tab.
Figure 13.14. Utilization for selected Host
- Select the date and time to view the Host Utilization report.
- Click Submit. The CPU Utilization graph for all the Hosts for the selected period is displayed.You can refresh the status by clicking the refresh button and also print the report or save as a pdf file by clicking the print button. To view the Nagios Home page, click Glusterfs Monitoring Home.
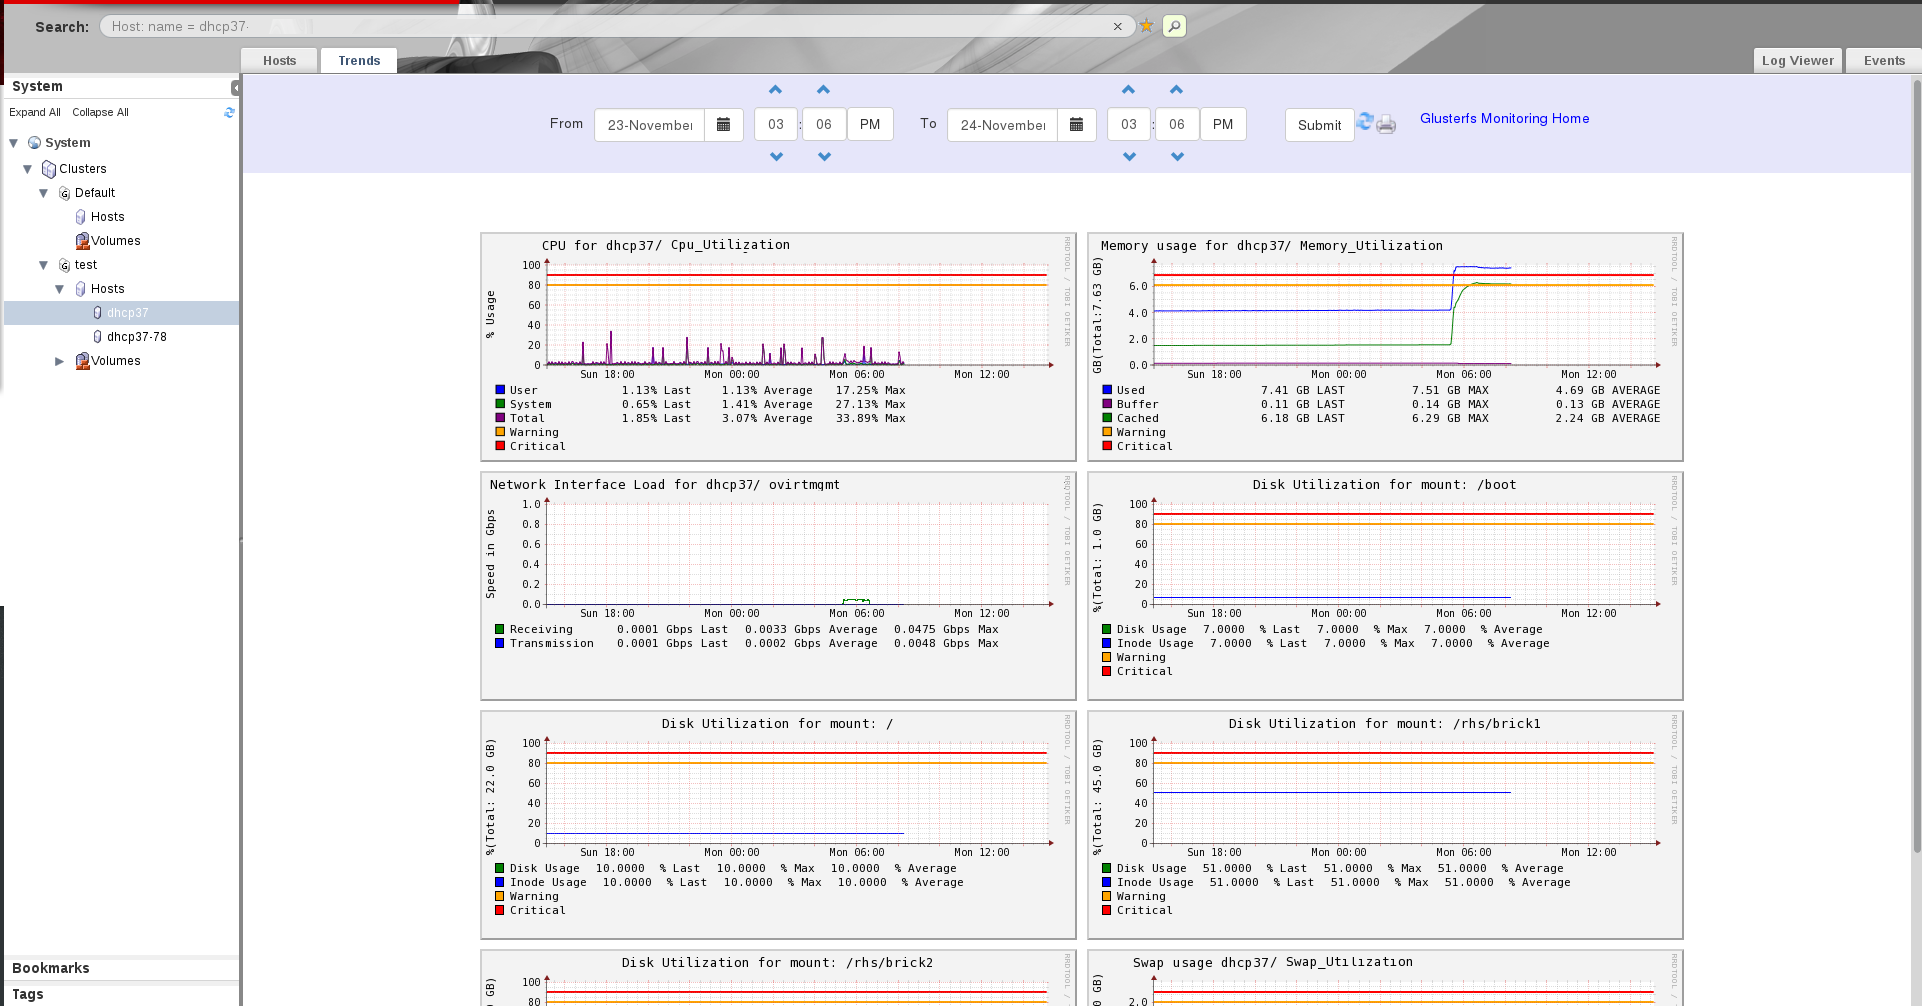
Procedure 13.3. To monitor Volume and Brick Utilization
- Open the Volumes view in the tree pane and select Volumes.
- Click Trends tab.
- Select the date and time duration to view the volume and brick utilization report.
- Click Submit. The Volume Utilization graph and Brick Utilization graph for the selected period is displayed.
Figure 13.15. Volume and Brick Utilization
You can refresh the status by clicking the refresh button and also print the report or save as a pdf file by clicking the print button. To view the Nagios Home page, click Glusterfs Monitoring Home.
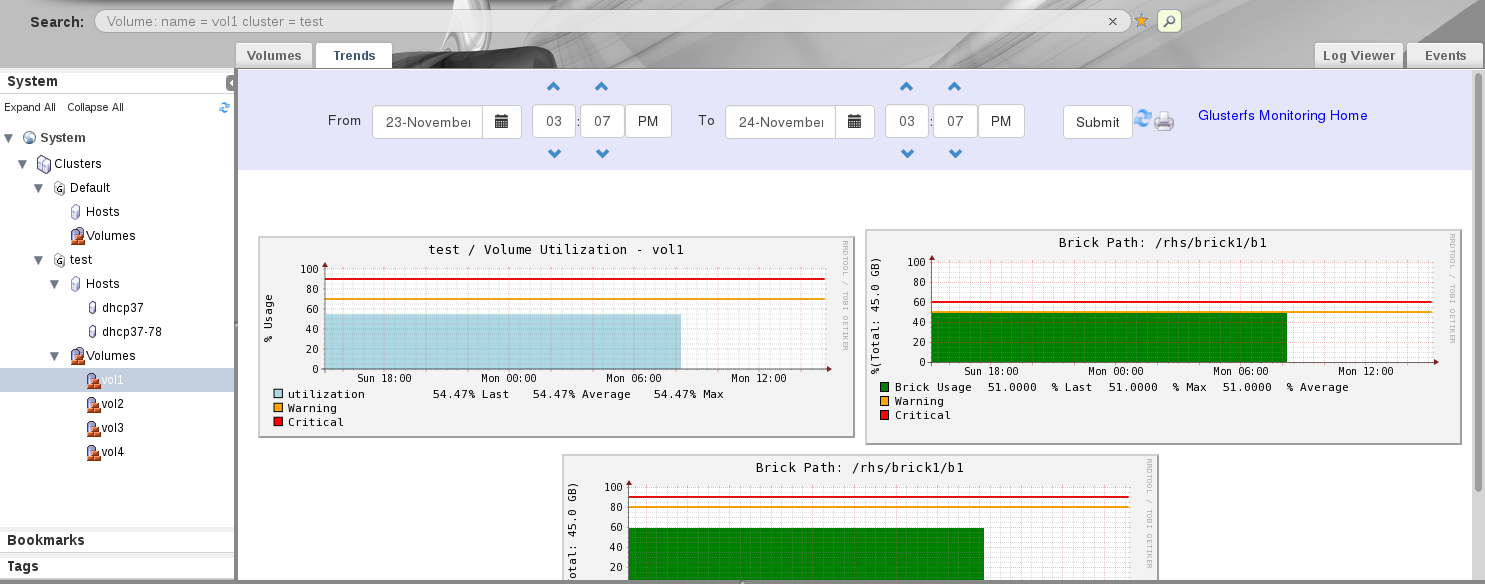
13.5.2. Enabling and Disabling Monitoring
Important
- To enable monitoring, run the following command in the Red Hat Gluster Storage Console Server :
rhsc-monitoring enable
# rhsc-monitoring enable
Setting the monitoring flag...
Starting nagios: done.
Starting nsca: [  OK  ]
INFO: Move the nodes of existing cluster (with compatibilty version >= 3.4) to maintenance and re-install them.
Copy to Clipboard Copied! Toggle word wrap Toggle overflow The Trends tab is displayed in the Red Hat Gluster Storage Console Administrator portal with the host and cluster utilization details. - To disable monitoring, run the following command in the Red Hat Gluster Storage Console Server:
rhsc-monitoring disable
# rhsc-monitoring disable
Setting the monitoring flag...
Stopping nagios: .done.
Shutting down nsca: [  OK  ]
Copy to Clipboard Copied! Toggle word wrap Toggle overflow The Trends tab is not displayed in the Red Hat Gluster Storage Console Administrator portal and the user cannot view host and cluster utilization details. Receiving email and SNMP notifications are disabled. Disabling monitoring also stops Nagios and NSCA services.Disabling monitoring does not stop theglusterpmdservice. Run the following commands on all the Red Hat Gluster Storage nodes to stopglusterpmdservice and to removechkconfigfor glusterpmd service:service glusterpmd stop chkconfig glusterpmd off
# service glusterpmd stop
# chkconfig glusterpmd off
Copy to Clipboard Copied! Toggle word wrap Toggle overflow
13.6. Troubleshooting Nagios
13.6.1. Troubleshooting NSCA and NRPE Configuration Issues
- Check Firewall and Port Settings on Nagios ServerIf port 5667 is not opened on the server host's firewall, a timeout error is displayed. Ensure that port 5667 is opened.
On Red Hat Gluster Storage based on Red Hat Enterprise Linux 6
- Log in as root and run the following command on the Red Hat Gluster Storage node to get the list of current iptables rules:
iptables -L
# iptables -LCopy to Clipboard Copied! Toggle word wrap Toggle overflow - The output is displayed as shown below:
ACCEPT tcp -- anywhere anywhere tcp dpt:5667
ACCEPT tcp -- anywhere anywhere tcp dpt:5667Copy to Clipboard Copied! Toggle word wrap Toggle overflow
On Red Hat Gluster Storage based on Red Hat Enterprise Linux 7:
- Run the following command on the Red Hat Gluster Storage node as root to get a listing of the current firewall rules:
firewall-cmd --list-all-zones
# firewall-cmd --list-all-zonesCopy to Clipboard Copied! Toggle word wrap Toggle overflow - If the port is open,
5667/tcpis listed besideports:under one or more zones in your output.
- If the port is not open, add a firewall rule for the port:
On Red Hat Gluster Storage based on Red Hat Enterprise Linux 6
- If the port is not open, add an iptables rule by adding the following line in
/etc/sysconfig/iptablesfile:-A INPUT -m state --state NEW -m tcp -p tcp --dport 5667 -j ACCEPT
-A INPUT -m state --state NEW -m tcp -p tcp --dport 5667 -j ACCEPTCopy to Clipboard Copied! Toggle word wrap Toggle overflow - Restart the iptables service using the following command:
service iptables restart
# service iptables restartCopy to Clipboard Copied! Toggle word wrap Toggle overflow - Restart the NSCA service using the following command:
service nsca restart
# service nsca restartCopy to Clipboard Copied! Toggle word wrap Toggle overflow
On Red Hat Gluster Storage based on Red Hat Enterprise Linux 7:
- Run the following commands to open the port:
firewall-cmd --zone=public --add-port=5667/tcp
firewall-cmd --zone=public --add-port=5667/tcp --permanent
# firewall-cmd --zone=public --add-port=5667/tcp
# firewall-cmd --zone=public --add-port=5667/tcp --permanent
Copy to Clipboard Copied! Toggle word wrap Toggle overflow
- Check the Configuration File on Red Hat Gluster Storage NodeMessages cannot be sent to the NSCA server, if Nagios server IP or FQDN, cluster name and hostname (as configured in Nagios server) are not configured correctly.Open the Nagios server configuration file /etc/nagios/nagios_server.conf and verify if the correct configurations are set as shown below:
Copy to Clipboard Copied! Toggle word wrap Toggle overflow If Host name is updated, restart the NSCA service using the following command:service nsca restart
# service nsca restartCopy to Clipboard Copied! Toggle word wrap Toggle overflow
- CHECK_NRPE: Error - Could Not Complete SSL HandshakeThis error occurs if the IP address of the Nagios server is not defined in the
nrpe.cfgfile of the Red Hat Gluster Storage node. To fix this issue, follow the steps given below:- Add the Nagios server IP address in
/etc/nagios/nrpe.cfgfile in theallowed_hostsline as shown below:allowed_hosts=127.0.0.1, NagiosServerIP
allowed_hosts=127.0.0.1, NagiosServerIPCopy to Clipboard Copied! Toggle word wrap Toggle overflow Theallowed_hostsis the list of IP addresses which can execute NRPE commands. - Save the
nrpe.cfgfile and restart the NRPE service using the following command:service nrpe restart
# service nrpe restartCopy to Clipboard Copied! Toggle word wrap Toggle overflow
- CHECK_NRPE: Socket Timeout After n SecondsTo resolve this issue perform the steps given below:On Nagios Server:The default timeout value for the NRPE calls is 10 seconds and if the server does not respond within 10 seconds, Nagios GUI displays an error that the NRPE call has timed out in 10 seconds. To fix this issue, change the timeout value for NRPE calls by modifying the command definition configuration files.
- Changing the NRPE timeout for services which directly invoke check_nrpe.For the services which directly invoke check_nrpe (check_disk_and_inode, check_cpu_multicore, and check_memory), modify the command definition configuration file
/etc/nagios/gluster/gluster-commands.cfgby adding -t Time in Seconds as shown below:define command { command_name check_disk_and_inode command_line $USER1$/check_nrpe -H $HOSTADDRESS$ -c check_disk_and_inode -t TimeInSeconds }define command { command_name check_disk_and_inode command_line $USER1$/check_nrpe -H $HOSTADDRESS$ -c check_disk_and_inode -t TimeInSeconds }Copy to Clipboard Copied! Toggle word wrap Toggle overflow - Changing the NRPE timeout for the services in
nagios-server-addonspackage which invoke NRPE call through code.The services which invoke/usr/lib64/nagios/plugins/gluster/check_vol_server.py(check_vol_utilization, check_vol_status, check_vol_quota_status, check_vol_heal_status, and check_vol_georep_status) make NRPE call to the Red Hat Gluster Storage nodes for the details through code. To change the timeout for the NRPE calls, modify the command definition configuration file/etc/nagios/gluster/gluster-commands.cfgby adding -t No of seconds as shown below:define command { command_name check_vol_utilization command_line $USER1$/gluster/check_vol_server.py $ARG1$ $ARG2$ -w $ARG3$ -c $ARG4$ -o utilization -t TimeInSeconds }define command { command_name check_vol_utilization command_line $USER1$/gluster/check_vol_server.py $ARG1$ $ARG2$ -w $ARG3$ -c $ARG4$ -o utilization -t TimeInSeconds }Copy to Clipboard Copied! Toggle word wrap Toggle overflow The auto configuration servicegluster_auto_discoverymakes NRPE calls for the configuration details from the Red Hat Gluster Storage nodes. To change the NRPE timeout value for the auto configuration service, modify the command definition configuration file/etc/nagios/gluster/gluster-commands.cfgby adding -t TimeInSeconds as shown below:define command{ command_name gluster_auto_discovery command_line sudo $USER1$/gluster/configure-gluster-nagios.py -H $ARG1$ -c $HOSTNAME$ -m auto -n $ARG2$ -t TimeInSeconds }define command{ command_name gluster_auto_discovery command_line sudo $USER1$/gluster/configure-gluster-nagios.py -H $ARG1$ -c $HOSTNAME$ -m auto -n $ARG2$ -t TimeInSeconds }Copy to Clipboard Copied! Toggle word wrap Toggle overflow - Restart Nagios service using the following command:
service nagios restart
# service nagios restartCopy to Clipboard Copied! Toggle word wrap Toggle overflow
On Red Hat Gluster Storage node:- Add the Nagios server IP address as described in CHECK_NRPE: Error - Could Not Complete SSL Handshake section in Troubleshooting NRPE Configuration Issues section.
- Edit the
nrpe.cfgfile using the following command:vi /etc/nagios/nrpe.cfg
# vi /etc/nagios/nrpe.cfgCopy to Clipboard Copied! Toggle word wrap Toggle overflow - Search for the
command_timeoutandconnection_timeoutsettings and change the value. Thecommand_timeoutvalue must be greater than or equal to the timeout value set in Nagios server.The timeout on checks can be set as connection_timeout=300 and the command_timeout=60 seconds. - Restart the NRPE service using the following command:
service nrpe restart
# service nrpe restartCopy to Clipboard Copied! Toggle word wrap Toggle overflow
- Check the NRPE Service StatusThis error occurs if the NRPE service is not running. To resolve this issue perform the steps given below:
- Verify the status of NRPE service by logging into the Red Hat Gluster Storage node as root and running the following command:
service nrpe status
# service nrpe statusCopy to Clipboard Copied! Toggle word wrap Toggle overflow - If NRPE is not running, start the service using the following command:
service nrpe start
# service nrpe startCopy to Clipboard Copied! Toggle word wrap Toggle overflow
- Check Firewall and Port SettingsThis error is associated with firewalls and ports. The timeout error is displayed if the NRPE traffic is not traversing a firewall, or if port 5666 is not open on the Red Hat Gluster Storage node.Ensure that port 5666 is open on the Red Hat Gluster Storage node.
- Run
check_nrpecommand from the Nagios server to verify if the port is open and if NRPE is running on the Red Hat Gluster Storage Node . - Log into the Nagios server as root and run the following command:
/usr/lib64/nagios/plugins/check_nrpe -H RedHatStorageNodeIP
# /usr/lib64/nagios/plugins/check_nrpe -H RedHatStorageNodeIPCopy to Clipboard Copied! Toggle word wrap Toggle overflow - The output is displayed as given below:
NRPE v2.14
NRPE v2.14Copy to Clipboard Copied! Toggle word wrap Toggle overflow
If not, ensure the that port 5666 is opened on the Red Hat Gluster Storage node.On Red Hat Gluster Storage based on Red Hat Enterprise Linux 6:
- Run the following command on the Red Hat Gluster Storage node as root to get a listing of the current iptables rules:
iptables -L
# iptables -LCopy to Clipboard Copied! Toggle word wrap Toggle overflow - If the port is open, the following appears in your output.
ACCEPT tcp -- anywhere anywhere tcp dpt:5666
ACCEPT tcp -- anywhere anywhere tcp dpt:5666Copy to Clipboard Copied! Toggle word wrap Toggle overflow
On Red Hat Gluster Storage based on Red Hat Enterprise Linux 7:
- Run the following command on the Red Hat Gluster Storage node as root to get a listing of the current firewall rules:
firewall-cmd --list-all-zones
# firewall-cmd --list-all-zonesCopy to Clipboard Copied! Toggle word wrap Toggle overflow - If the port is open,
5666/tcpis listed besideports:under one or more zones in your output.
- If the port is not open, add an iptables rule for the port.
On Red Hat Gluster Storage based on Red Hat Enterprise Linux 6:
- To add iptables rule, edit the
iptablesfile as shown below:vi /etc/sysconfig/iptables
# vi /etc/sysconfig/iptablesCopy to Clipboard Copied! Toggle word wrap Toggle overflow - Add the following line in the file:
-A INPUT -m state --state NEW -m tcp -p tcp --dport 5666 -j ACCEPT
-A INPUT -m state --state NEW -m tcp -p tcp --dport 5666 -j ACCEPTCopy to Clipboard Copied! Toggle word wrap Toggle overflow - Restart the iptables service using the following command:
service iptables restart
# service iptables restartCopy to Clipboard Copied! Toggle word wrap Toggle overflow - Save the file and restart the NRPE service:
service nrpe restart
# service nrpe restartCopy to Clipboard Copied! Toggle word wrap Toggle overflow
On Red Hat Gluster Storage based on Red Hat Enterprise Linux 7:
- Run the following commands to open the port:
firewall-cmd --zone=public --add-port=5666/tcp
firewall-cmd --zone=public --add-port=5666/tcp --permanent
# firewall-cmd --zone=public --add-port=5666/tcp
# firewall-cmd --zone=public --add-port=5666/tcp --permanent
Copy to Clipboard Copied! Toggle word wrap Toggle overflow
- Checking Port 5666 From the Nagios Server with TelnetUse telnet to verify the Red Hat Gluster Storage node's ports. To verify the ports of the Red Hat Gluster Storage node, perform the steps given below:
- Log in as root on Nagios server.
- Test the connection on port 5666 from the Nagios server to the Red Hat Gluster Storage node using the following command:
telnet RedHatStorageNodeIP 5666
# telnet RedHatStorageNodeIP 5666Copy to Clipboard Copied! Toggle word wrap Toggle overflow - The output displayed is similar to:
telnet 10.70.36.49 5666
Trying 10.70.36.49...
Connected to 10.70.36.49.
Escape character is '^]'.
telnet 10.70.36.49 5666
Trying 10.70.36.49...
Connected to 10.70.36.49.
Escape character is '^]'.
Copy to Clipboard Copied! Toggle word wrap Toggle overflow
- Connection Refused By HostThis error is due to port/firewall issues or incorrectly configured allowed_hosts directives. See the sections CHECK_NRPE: Error - Could Not Complete SSL Handshake and CHECK_NRPE: Socket Timeout After n Seconds for troubleshooting steps.
13.6.2. Troubleshooting General Issues
Ensure that the host name given in Name field of Add Host window matches the host name given while configuring Nagios. The host name of the node is used while configuring Nagios server using auto-discovery.
Part IV. Managing Advanced Functionality
Chapter 14. Managing Multilevel Administration
Note
14.1. Configuring Roles
14.1.1. Roles
administrator role. This role allows access to the Administration Portal for managing server resources. For example, if a user has an administrator role on a cluster, they can manage all servers in the cluster using the Administration Portal.
14.1.2. Creating Custom Roles
Procedure 14.1. Creating a New Role
- On the header bar of the Red Hat Gluster Storage Console menu, click Configure. The Configure dialog box displays. The dialog box includes a list of Administrator roles, and any custom roles.
- Click New. The New Role dialog box displays.
- Enter the Name and Description of the new role. This name will display in the list of roles.
- Select Admin as the Account Type. If Admin is selected, this role displays with the administrator icon in the list.
- Use the or buttons to view more or fewer of the permissions for the listed objects in the Check Boxes to Allow Action list. You can also expand or collapse the options for each object.
- For each of the objects, select or deselect the actions you wish to permit/deny for the role you are setting up.
- Click to apply the changes you have made. The new role displays on the list of roles.
14.1.3. Editing Roles
Procedure 14.2. Editing a Role
- On the header bar of the Red Hat Gluster Storage Console menu, click Configure. The Configure dialog box displays. The dialog box below shows the list of administrator roles.
- Click Edit. The Edit Role dialog box displays.
Figure 14.1. The Edit Role Dialog Box
- If necessary, edit the Name and Description of the role. This name will display in the list of roles.
- Use the or buttons to view more or fewer of the permissions for the listed objects. You can also expand or collapse the options for each object.
- For each of the objects, select or deselect the actions you wish to permit/deny for the role you are editing.
- Click to apply the changes you have made.
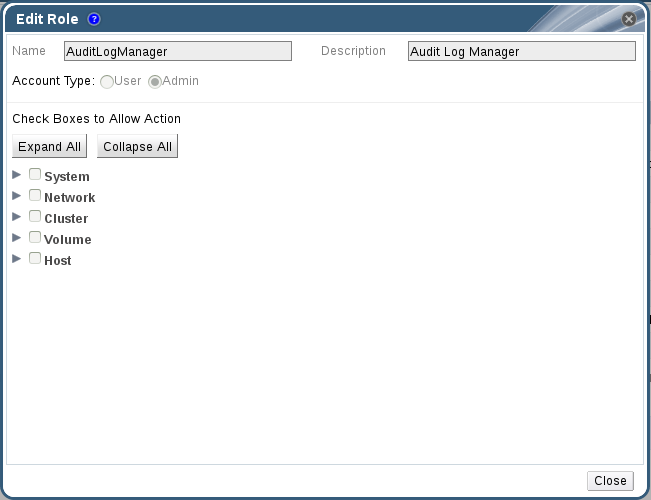
14.1.4. Copying Roles
Procedure 14.3. Copying a Role
- On the header bar of the Red Hat Gluster Storage Console, click Configure. The Configure dialog box displays. The dialog box includes a list of default roles, and any custom roles that exist on the Red Hat Gluster Storage Console.
Figure 14.2. The Configure Dialog Box
- Click Copy. The Copy Role dialog box displays.
- Change the Name and Description of the new role. This name will display in the list of roles.
- Use the or buttons to view more or fewer of the permissions for the listed objects. You can also expand or collapse the options for each object.
- For each of the objects, select or deselect the actions you wish to permit/deny for the role you are editing.
- Click to apply the changes you have made.
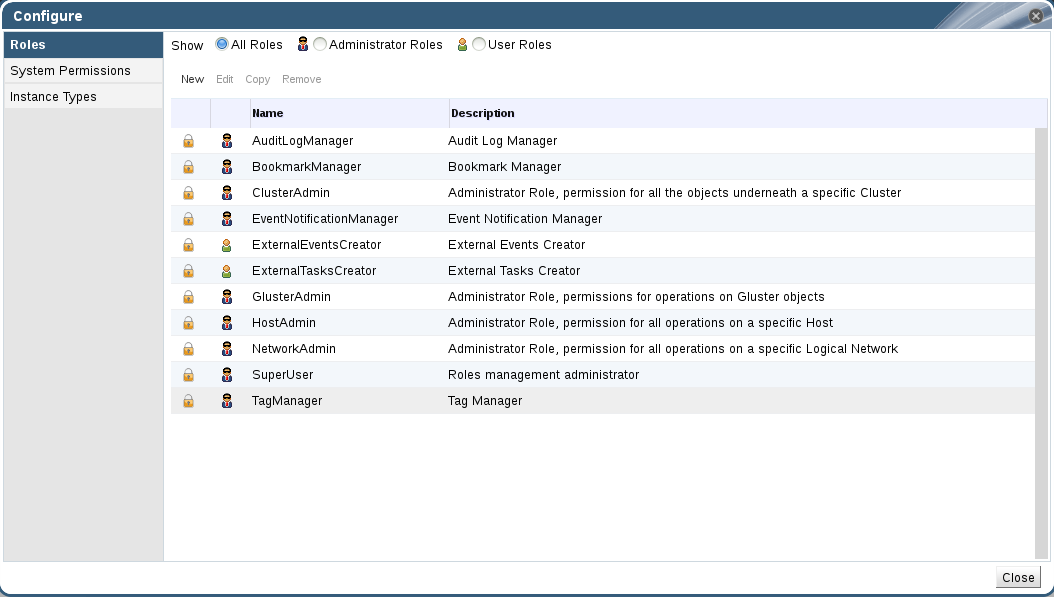
Chapter 15. Backing Up and Restoring the Red Hat Gluster Storage Console
15.1. Backing Up and Restoring the Red Hat Gluster Storage Console
15.1.1. Backing up Red Hat Gluster Storage Console - Overview
engine-backup command - can be used to rapidly back up the engine database and configuration files into a single file that can be easily stored.
15.1.2. Syntax for the engine-backup Command
engine-backup command works in one of two basic modes:
engine-backup --mode=backup
# engine-backup --mode=backupengine-backup --mode=restore
# engine-backup --mode=restoreBasic Options
-
--mode - Specifies whether the command will perform a backup operation or a restore operation. Two options are available -
backup, andrestore. This is a required parameter. -
--file - Specifies the path and name of a file into which backups are to be taken in backup mode, and the path and name of a file from which to read backup data in restore mode. This is a required parameter in both backup mode and restore mode.
-
--log - Specifies the path and name of a file into which logs of the backup or restore operation are to be written. This parameter is required in both backup mode and restore mode.
-
--scope - Specifies the scope of the backup or restore operation. There are two options -
all, which backs up both the engine database and configuration data, anddb, which backs up only the engine database.
Database Options
-
--change-db-credentials - Allows you to specify alternate credentials for restoring the engine database using credentials other than those stored in the backup itself. Specifying this parameter allows you to add the following parameters.
-
--db-host - Specifies the IP address or fully qualified domain name of the host on which the database resides. This is a required parameter.
-
--db-port - Specifies the port by which a connection to the database will be made.
-
--db-user - Specifies the name of the user by which a connection to the database will be made. This is a required parameter.
-
--db-passfile - Specifies a file containing the password by which a connection to the database will be made. Either this parameter or the
--db-passwordparameter must be specified. -
--db-password - Specifies the plain text password by which a connection to the database will be made. Either this parameter or the
--db-passfileparameter must be specified. -
--db-name - Specifies the name of the database to which the database will be restored. This is a required parameter.
-
--db-secured - Specifies that the connection with the database is to be secured.
-
--db-secured-validation - Specifies that the connection with the host is to be validated.
Help
-
--help - Provides an overview of the available modes, parameters, sample usage, how to create a new database and configure the firewall in conjunction with backing up and restoring the Red Hat Gluster Storage Console.
15.1.3. Creating a Backup with the engine-backup Command
The process for creating a backup of the engine database and the configuration data for the Red Hat Gluster Storage Console using the engine-backup command is straightforward and can be performed while the Manager is active.
Procedure 15.1. Backing up the Red Hat Gluster Storage Console
- Log on to the machine running the Red Hat Gluster Storage Console.
- Run the following command to create a full backup:Alternatively, run the following command to back up only the engine database:
Example 15.1. Creating a Full Backup
engine-backup --scope=all --mode=backup --log=[file name] --file=[file name]
# engine-backup --scope=all --mode=backup --log=[file name] --file=[file name]Copy to Clipboard Copied! Toggle word wrap Toggle overflow Example 15.2. Creating an engine database Backup
engine-backup --scope=db --mode=backup --log=[file name] --file=[file name]
# engine-backup --scope=db --mode=backup --log=[file name] --file=[file name]Copy to Clipboard Copied! Toggle word wrap Toggle overflow
A tar file containing a backup of the engine database, or the engine database and the configuration data for the Red Hat Gluster Storage Console, is created using the path and file name provided.
15.1.4. Restoring a Backup with the engine-backup Command
engine-backup command is straightforward, it involves several additional steps in comparison to that for creating a backup depending on the destination to which the backup is to be restored. For example, the engine-backup command can be used to restore backups to fresh installations of Red Hat Gluster Storage Console, on top of existing installations of Red Hat Gluster Storage Console, and using local or remote databases.
Important
version file located in the root directory of the unpacked files.
15.1.5. Restoring a Backup to a Fresh Installation
The engine-backup command can be used to restore a backup to a fresh installation of the Red Hat Gluster Storage Console. The following procedure must be performed on a machine on which the base operating system has been installed and the required packages for the Red Hat Gluster Storage Console have been installed, but the engine-setup command has not yet been run. This procedure assumes that the backup file can be accessed from the machine on which the backup is to be restored.
Note
engine-cleanup command used to prepare a machine prior to restoring a backup only cleans the engine database, and does not drop the database, delete the user that owns that database, create engine database or perform the initial configuration of the postgresql service. Therefore, these tasks must be performed manually as outlined below when restoring a backup to a fresh installation.
Procedure 15.2. Restoring a Backup to a Fresh Installation
- Log on to the machine on which the Red Hat Gluster Storage Console is installed.
- Manually create an empty database to which the database in the backup can be restored and configure the
postgresqlservice:- Run the following commands to initialize the
postgresqldatabase, start thepostgresqlservice and ensure this service starts on boot:service postgresql initdb service postgresql start chkconfig postgresql on
# service postgresql initdb
# service postgresql start
# chkconfig postgresql on
Copy to Clipboard Copied! Toggle word wrap Toggle overflow - Run the following commands to enter the postgresql command line:
su postgres
psql
# su postgres
$ psql
Copy to Clipboard Copied! Toggle word wrap Toggle overflow - Run the following command to create a new user:
postgres=# CREATE USER [user name] PASSWORD '[password]';
postgres=# CREATE USER [user name] PASSWORD '[password]';Copy to Clipboard Copied! Toggle word wrap Toggle overflow The password used while creating the database must be same as the one used while taking backup. If the password is different, follow step 3 in Section 15.1.7, “Restoring a Backup with Different Credentials” - Run the following command to create the new database:
postgres=# create database [database name] owner [user name] template template0 encoding 'UTF8' lc_collate 'en_US.UTF-8' lc_ctype 'en_US.UTF-8';
postgres=# create database [database name] owner [user name] template template0 encoding 'UTF8' lc_collate 'en_US.UTF-8' lc_ctype 'en_US.UTF-8';Copy to Clipboard Copied! Toggle word wrap Toggle overflow - Edit the
/var/lib/pgsql/data/pg_hba.conffile and add the following lines under the'local'section near the end of the file:- For local databases:
host    [database name]    [user name]    0.0.0.0/0    md5
host    [database name]    [user name]    ::0/0        md5
host    [database name]    [user name]    0.0.0.0/0    md5
host    [database name]    [user name]    ::0/0        md5
Copy to Clipboard Copied! Toggle word wrap Toggle overflow - For remote databases:
host [database name] [user name] X.X.X.X/32 md5
host [database name] [user name] X.X.X.X/32 md5Copy to Clipboard Copied! Toggle word wrap Toggle overflow Replace X.X.X.X with the IP address of the Manager.
- Run the following command to restart the
postgresqlservice:service postgresql restart
# service postgresql restartCopy to Clipboard Copied! Toggle word wrap Toggle overflow
- Restore the backup using the
engine-backupcommand:engine-backup --mode=restore --file=[file name] --log=[file name]
# engine-backup --mode=restore --file=[file name] --log=[file name]Copy to Clipboard Copied! Toggle word wrap Toggle overflow If successful, the following output displays:Copy to Clipboard Copied! Toggle word wrap Toggle overflow - Run the following command and follow the prompts to set up the Manager as per a fresh installation, selecting to manually configure the database when prompted:
engine-setup
# engine-setupCopy to Clipboard Copied! Toggle word wrap Toggle overflow
The engine database and configuration files for the Red Hat Gluster Storage Console have been restored to the version in the backup.
15.1.6. Restoring a Backup to an Existing Installation
The engine-backup command can restore a backup to a machine on which the Red Hat Gluster Storage Console has already been installed and set up.
Note
engine-cleanup command used to prepare a machine prior to restoring a backup only cleans the engine database, and does not drop the database, delete the user that owns that database, create engine database or perform the initial configuration of the postgresql service. Therefore, these tasks must be performed manually as outlined below when restoring a backup to an existing installation.
Procedure 15.3. Restoring a Backup to an Existing Installation
- Log on to the machine on which the Red Hat Gluster Storage Console is installed.
- Run the following command and follow the prompts to remove the configuration files for and clean the database associated with the Manager:
engine-cleanup
# engine-cleanupCopy to Clipboard Copied! Toggle word wrap Toggle overflow Manually drop the database and create an empty database to which the database in the backup can be restored and configure thepostgresqlservice- Run the following commands to enter the postgresql command line:
su postgres
psql
# su postgres
$ psql
Copy to Clipboard Copied! Toggle word wrap Toggle overflow - Run the following command to drop the database:
postgres=# DROP DATABASE [database name]
# postgres=# DROP DATABASE [database name]Copy to Clipboard Copied! Toggle word wrap Toggle overflow - Run the following command to create the new database:
postgres=# create database [database name] owner [user name] template template0 encoding 'UTF8' lc_collate 'en_US.UTF-8' lc_ctype 'en_US.UTF-8';
# postgres=# create database [database name] owner [user name] template template0 encoding 'UTF8' lc_collate 'en_US.UTF-8' lc_ctype 'en_US.UTF-8';Copy to Clipboard Copied! Toggle word wrap Toggle overflow
- Restore the backup using the
engine-backupcommand:engine-backup --mode=restore --file=[file name] --log=[file name]
# engine-backup --mode=restore --file=[file name] --log=[file name]Copy to Clipboard Copied! Toggle word wrap Toggle overflow If successful, the following output displays:Copy to Clipboard Copied! Toggle word wrap Toggle overflow - Run the following command and follow the prompts to re-configure the firewall and ensure the
ovirt-engineservice is correctly configured:engine-setup
# engine-setupCopy to Clipboard Copied! Toggle word wrap Toggle overflow
The engine database and configuration files for the Red Hat Gluster Storage Console have been restored to the version in the backup.
15.1.7. Restoring a Backup with Different Credentials
The engine-backup command can restore a backup to a machine on which the Red Hat Gluster Storage Console has already been installed and set up, but the credentials of the database in the backup are different to those of the database on the machine on which the backup is to be restored.
Note
engine-cleanup command used to prepare a machine prior to restoring a backup only cleans the engine database, and does not drop the database, delete the user that owns that database, create engine database or perform the initial configuration of the postgresql service. Therefore, these tasks must be performed manually as outlined below when restoring a backup with different credentials.
Procedure 15.4. Restoring a Backup with Different Credentials
- Log on to the machine on which the Red Hat Gluster Storage Console is installed.
- Run the following command and follow the prompts to remove the configuration files for and clean the database associated with the Manager:
engine-cleanup
# engine-cleanupCopy to Clipboard Copied! Toggle word wrap Toggle overflow Manually drop the database and create an empty database to which the database in the backup can be restored and configure thepostgresqlservice:- Run the following commands to enter the postgresql command line:
su postgres
psql
# su postgres
$ psql
Copy to Clipboard Copied! Toggle word wrap Toggle overflow - Run the following command to drop the database:
postgres=# DROP DATABASE [database name]
# postgres=# DROP DATABASE [database name]Copy to Clipboard Copied! Toggle word wrap Toggle overflow - Run the following command to create the new database:
postgres=# create database [database name] owner [user name] template template0 encoding 'UTF8' lc_collate 'en_US.UTF-8' lc_ctype 'en_US.UTF-8';
# postgres=# create database [database name] owner [user name] template template0 encoding 'UTF8' lc_collate 'en_US.UTF-8' lc_ctype 'en_US.UTF-8';Copy to Clipboard Copied! Toggle word wrap Toggle overflow
- Restore the backup using the
engine-backupcommand with the--change-db-credentialsparameter:engine-backup --mode=restore --file=[file name] --log=[file name] --change-db-credentials --db-host=[database location] --db-name=[database name] --db-user=[user name] --db-password=[password]
# engine-backup --mode=restore --file=[file name] --log=[file name] --change-db-credentials --db-host=[database location] --db-name=[database name] --db-user=[user name] --db-password=[password]Copy to Clipboard Copied! Toggle word wrap Toggle overflow If successful, the following output displays:Copy to Clipboard Copied! Toggle word wrap Toggle overflow - Run the following command and follow the prompts to re-configure the firewall and ensure the
ovirt-engineservice is correctly configured:engine-setup
# engine-setupCopy to Clipboard Copied! Toggle word wrap Toggle overflow
The engine database and configuration files for the Red Hat Gluster Storage Console have been restored to the version in the backup using the supplied credentials.
Appendix A. Utilities
A.1. Domain Management Tool
internal that is only used to store the admin user. To add and remove other users from the system, you must first add the directory services in which they are found.
rhsc-manage-domains, to add and remove domains provided by this service. In this way, you can grant access to the Red Hat Gluster Storage environment to users stored across multiple domains.
rhsc-manage-domains command on the machine on which Red Hat Gluster Storage Console was installed. The rhsc-manage-domains command must be run as the root user.
A.1.1. Syntax
rhsc-manage-domains action [options]
# rhsc-manage-domains action [options]-
add - Add a domain to the console directory services configuration.
-
edit - Edit a domain in the console directory services configuration.
-
delete - Delete a domain from the console directory services configuration.
-
validate - Validate the console directory services configuration. The command attempts to authenticate to each domain in the configuration using the configured user name and password.
-
list - List the current directory services configuration of the console.
- --
domain=DOMAIN - Specifies the domain on which the action must be performed. The
--domainparameter is mandatory foradd,edit, anddelete. - --
user=USER - Specifies the domain user to use. The
--userparameter is mandatory foradd, and optional foredit. -
--password-file=FILE - A file containing the password. If this is not set, the password is read interactively.
-
--config-file=FILE - Specifies an alternative configuration file that the command must load. The
--config-fileparameter is always optional. -
--report - Specifies that all validation errors encountered while performing the validate action will be reported in full.
rhsc-manage-domains command help output:
rhsc-manage-domains --help
# rhsc-manage-domains --helpA.1.2. Listing Domains in Configuration
Example A.1. rhsc-manage-domains List Action
rhsc-manage-domains list
# rhsc-manage-domains list
Domain: directory.demo.redhat.com
User name: admin@DIRECTORY.DEMO.REDHAT.COM
This domain is a remote domain.A.1.3. Adding Domains to Configuration
Example A.2. rhsc-manage-domains Add Action
A.1.4. Editing a Domain in the Configuration
Example A.3. rhsc-manage-domains Edit Action
A.1.5. Validating Domain Configuration
Example A.4. rhsc-manage-domains Validate Action
rhsc-manage-domains validate
# rhsc-manage-domains validate
User guide is: 80b71bae-98a1-11e0-8f20-525400866c73
Domain directory.demo.redhat.com is valid.A.1.6. Deleting a Domain from the Configuration
Example A.5. rhsc-manage-domains Delete Action
rhsc-manage-domains delete --domain=directory.demo.redhat.com
# rhsc-manage-domains delete --domain=directory.demo.redhat.com
WARNING: Domain directory.demo.redhat.com is the last domain in the configuration. After deleting it you will have to either add another domain, or to use the internal admin user in order to login.
Successfully deleted domain directory.demo.redhat.com. Please remove all users and groups of this domain using the Administration portal or the API.Appendix B. Changing Passwords in Red Hat Gluster Storage Console
B.1. Changing the Password for the Administrator User
admin@internal user account is automatically created on installing and configuring Red Hat Gluster Storage Console. This account is stored locally in the Red Hat Gluster Storage Console PostgreSQL database and exists separately from other directory services. Unlike IPA domains, users cannot be added to or deleted from the internal domain. The admin@internal user is the SuperUser for Red Hat Gluster Storage Console, and has administrator privileges over the environment via the Administration Portal.
admin@internal user. However, if you have forgotten the password or choose to reset the password, you can use the rhsc-config utility.
Procedure B.1. Resetting the Password for the admin@internal User
- Log in to the Red Hat Gluster Storage Console server as the
rootuser. - Use the rhsc-config utility to set a new password for the
admin@internaluser. Run the following command:rhsc-config -s AdminPassword=interactive
# rhsc-config -s AdminPassword=interactiveCopy to Clipboard Copied! Toggle word wrap Toggle overflow After typing the above command, a password prompt displays for you to enter the new password.You do not need to use quotes. However, use escape shell characters if you include them in the password. - Restart the
ovirt-engineservice to apply the changes. Run the following command:service ovirt-engine restart
# service ovirt-engine restartCopy to Clipboard Copied! Toggle word wrap Toggle overflow
Appendix C. Search Parameters
C.1. Search Query Syntax
| Example | Result |
|---|---|
| Hosts: cluster = cluster name | Displays a list of all servers in the cluster. |
| Volumes: status = up | Displays a list of all volumes with status up. |
| Events: severity > normal sortby time | Displays the list of all events whose severity is higher than Normal, sorted by time. |
Hosts: cluster = down
| Input | List Items Displayed | Action |
|---|---|---|
h | Hosts (1 option only) |
Select
Hosts or;
Type
Hosts
|
Hosts: |
All host properties
| Type c |
Hosts: c | host properties starting with c | Select cluster or type cluster |
Hosts: cluster | =
=!
| Select or type = |
Hosts: cluster = | Select or type cluster name |
C.2. Searching for Resources
C.2.1. Searching for Clusters
| Property (of resource or resource-type) | Type | Description (Reference) |
|---|---|---|
| name | String | The unique name that identifies the clusters on the network. |
| description | String | The description of the cluster. |
| initialized | String | A Boolean True or False indicating the status of the cluster. |
| sortby | List | Sorts the returned results by one of the resource properties. |
| page | Integer | The page number of results to display. |
Clusters: initialized = true or name = Default
- Initialized; or
- Named Default
C.2.2. Searching for Hosts
| Property (of resource or resource-type) | Type | Description (Reference) |
|---|---|---|
| Events.events-prop | See property types in Section C.2.5, “Searching for Events” | The property of the events associated with the host. |
| Users.users-prop | See property types in Section C.2.4, “Searching for Users” | The property of the users associated with the host. |
| name | String | The name of the host. |
| status | List | The availability of the host. |
| cluster | String | The cluster to which the host belongs. |
| address | String | The unique name that identifies the host on the network. |
| cpu_usage | Integer | The percent of processing power usage. |
| mem_usage | Integer | The percentage of memory usage. |
| network_usage | Integer | The percentage of network usage. |
| load | Integer | Jobs waiting to be executed in the run-queue per processor, in a given time slice. |
| version | Integer | The version number of the operating system. |
| cpus | Integer | The number of CPUs on the host. |
| memory | Integer | The amount of memory available. |
| cpu_speed | Integer | The processing speed of the CPU. |
| cpu_model | String | The type of CPU. |
| committed_mem | Integer | The percentage of committed memory. |
| tag | String | The tag assigned to the host. |
| type | String | The type of host. |
| sortby | List | Sorts the returned results by one of the resource properties. |
| page | Integer | The page number of results to display. |
Host: cluster = Default
- Are part of the Default cluster.
C.2.3. Searching for Volumes
| Property (of resource or resource-type) | Type | Description (Reference) |
|---|---|---|
| Clusters.clusters prop | See property types in Section C.2.1, “Searching for Clusters” | The property of the clusters associated with the volume. |
| name | String | The name of the volume. |
| status | List | The availability of the volume. |
| type | List | The type of the volume. |
| transport_type | List | The transport type of the volume. |
| replica_count | Integer | The replicate count of the volume. |
| sortby | List | Sorts the returned results by one of the resource properties. |
| page | Integer | The page number of results to display. |
Volumes: Cluster.name = Default and Status = Up
- Belong to the Default cluster and the status of the volume is Up.
C.2.4. Searching for Users
| Property (of resource or resource-type) | Type | Description (Reference) |
|---|---|---|
| Hosts.hosts- prop | See property types in Section C.2.2, “Searching for Hosts” | The property of the hosts associated with the user. |
| Events.events-prop | See property types in Section C.2.5, “Searching for Events” | The property of the events associated with the user. |
| name | String | The name of the user. |
| lastname | String | The last name of the user. |
| usrname | String | The unique name of the user. |
| department | String | The department to which the user belongs. |
| group | String | The group to which the user belongs. |
| title | String | The title of the user. |
| status | String | The status of the user. |
| role | String | The role of the user. |
| tag | String | The tag to which the user belongs. |
| pool | String | The pool to which the user belongs. |
| sortby | List | Sorts the returned results by one of the resource properties. |
| page | Integer | The page number of results to display. |
Users: Events.severity > normal and Hosts.name = Server name
- Events of a severity greater than Normal have occurred on their hosts.
C.2.5. Searching for Events
| Property (of resource or resource-type) | Type | Description (Reference) |
|---|---|---|
| Hosts.hosts-prop | See property types in Section C.2.2, “Searching for Hosts” | The property of the hosts associated with the event. |
| Users.users-prop | See property types in Section C.2.4, “Searching for Users” | The property of the users associated with the event. |
| type | List | Type of the event. |
| severity | List | The severity of the Event: Warning/Error/Normal |
| message | String | Description of the event type. |
| time | Integer | Time at which the event occurred. |
| usrname | usrname | The user name associated with the event. |
| event_host | String | The host associated with the event. |
| sortby | List | Sorts the returned results by one of the resource properties. |
| page | Integer | The page number of results to display. |
Events: event_host = gonzo.example.com
- The event occurred on the server named
gonzo.example.com.
C.3. Saving and Accessing Queries as Bookmarks
C.3.1. Creating Bookmarks
Procedure C.1. Saving a Query String as a Bookmark
- Enter the search query in the Search bar (see Appendix D).
- Click the Bookmark button to the right of the Search bar.The New Bookmark dialog box displays. The query displays in the Search String field. You can edit the query if required.
- In Name, specify a descriptive name for the search query.
- Click to save the query as a bookmark.
- The search query is saved and displays in the Bookmarks pane.
C.3.2. Editing Bookmarks
Procedure C.2. Editing a Bookmark
- Select a bookmark from the Bookmarks pane.
- The results list displays the items according to the criteria. Click the button on the Bookmark pane.The Edit Bookmark dialog box displays. The query displays in the Search String field. Edit the search string as required.
- Change the Name and Search String as necessary.
- Click to save the edited bookmark.
C.3.3. Deleting Bookmarks
Procedure C.3. Deleting a Bookmark
- Select one or more bookmark from the Bookmarks pane.
- The results list displays the items according to the criteria. Click the button on the Bookmark pane.The Remove Bookmark dialog box displays.
- Click to remove the selected bookmarks.
Appendix D. Configuration Files
D.1. Nagios Configuration Files
- In
/etc/nagios/gluster/directory, a new directoryCluster-Nameis created with the name provided asCluster-Namewhile executingconfigure-gluster-nagioscommand for auto-discovery. All configurations created by auto-discovery for the cluster are added in this folder. - In
/etc/nagios/gluster/Cluster-Namedirectory, a configuration file,Cluster-Name.cfgis generated. This file has the host and hostgroup configurations for the cluster. This also contains service configuration for all the cluster/volume level services.The following Nagios object definitions are generated inCluster-Name.cfgfile:- A hostgroup configuration with
hostgroup_nameas cluster name. - A host configuration with
host_nameas cluster name. - The following service configurations are generated for cluster monitoring:
- A Cluster - Quorum service to monitor the cluster quorum.
- A Cluster Utilization service to monitor overall utilization of volumes in the cluster. This is created only if there is any volume present in the cluster.
- A Cluster Auto Config service to periodically synchronize the configurations in Nagios with Red Hat Gluster Storage trusted storage pool.
- The following service configurations are generated for each volume in the trusted storage pool:
- A Volume Status - Volume-Name service to monitor the status of the volume.
- A Volume Utilization - Volume-Name service to monitor the utilization statistics of the volume.
- A Volume Quota - Volume-Name service to monitor the Quota status of the volume, if Quota is enabled for the volume.
- A Volume Self-Heal - Volume-Name service to monitor the Self-Heal status of the volume, if the volume is of type replicate or distributed-replicate.
- A Volume Geo-Replication - Volume-Name service to monitor the Geo Replication status of the volume, if Geo-replication is configured for the volume.
- In
/etc/nagios/gluster/Cluster-Namedirectory, a configuration file with nameHost-Name.cfgis generated for each node in the cluster. This file has the host configuration for the node and service configuration for bricks from the particular node. The following Nagios object definitions are generated inHost-name.cfg.- A host configuration which has Cluster-Name in the
hostgroupsfield. - The following services are created for each brick in the node:
- A Brick Utilization - brick-path service to monitor the utilization of the brick.
- A Brick - brick-path service to monitor the brick status.
| File Name | Description |
|---|---|
/etc/nagios/nagios.cfg
|
Main Nagios configuration file.
|
/etc/nagios/cgi.cfg
|
CGI configuration file.
|
/etc/httpd/conf.d/nagios.conf
|
Nagios configuration for httpd.
|
/etc/nagios/passwd
|
Password file for Nagios users.
|
/etc/nagios/nrpe.cfg
|
NRPE configuration file.
|
/etc/nagios/gluster/gluster-contacts.cfg
|
Email notification configuration file.
|
/etc/nagios/gluster/gluster-host-services.cfg
|
Services configuration file that's applied to every Red Hat Gluster Storage node.
|
/etc/nagios/gluster/gluster-host-groups.cfg
|
Host group templates for a Red Hat Gluster Storage trusted storage pool.
|
/etc/nagios/gluster/gluster-commands.cfg
|
Command definitions file for Red Hat Gluster Storage Monitoring related commands.
|
/etc/nagios/gluster/gluster-templates.cfg
|
Template definitions for Red Hat Gluster Storage hosts and services.
|
/etc/nagios/gluster/snmpmanagers.conf
|
SNMP notification configuration file with the IP address and community name of SNMP managers where traps need to be sent.
|
Appendix E. Revision History
| Revision History | |||
|---|---|---|---|
| Revision 3.4-1 | Tue Sep 04 2018 | ||
| |||