Dieser Inhalt ist in der von Ihnen ausgewählten Sprache nicht verfügbar.
Chapter 4. Configuring CPU pinning with NUMA
This chapter concerns NUMA topology awareness and the configuration of an OpenStack environment on systems supporting this technology. With this setup, virtual machine instances are pinned to dedicated CPU cores, which enables smarter scheduling and therefore improves guest performance.
Background information about NUMA is available in the following article: What is NUMA and how does it work on Linux ?
The following diagram provides an example of a two-node NUMA system and the way the CPU cores and memory pages are made available:
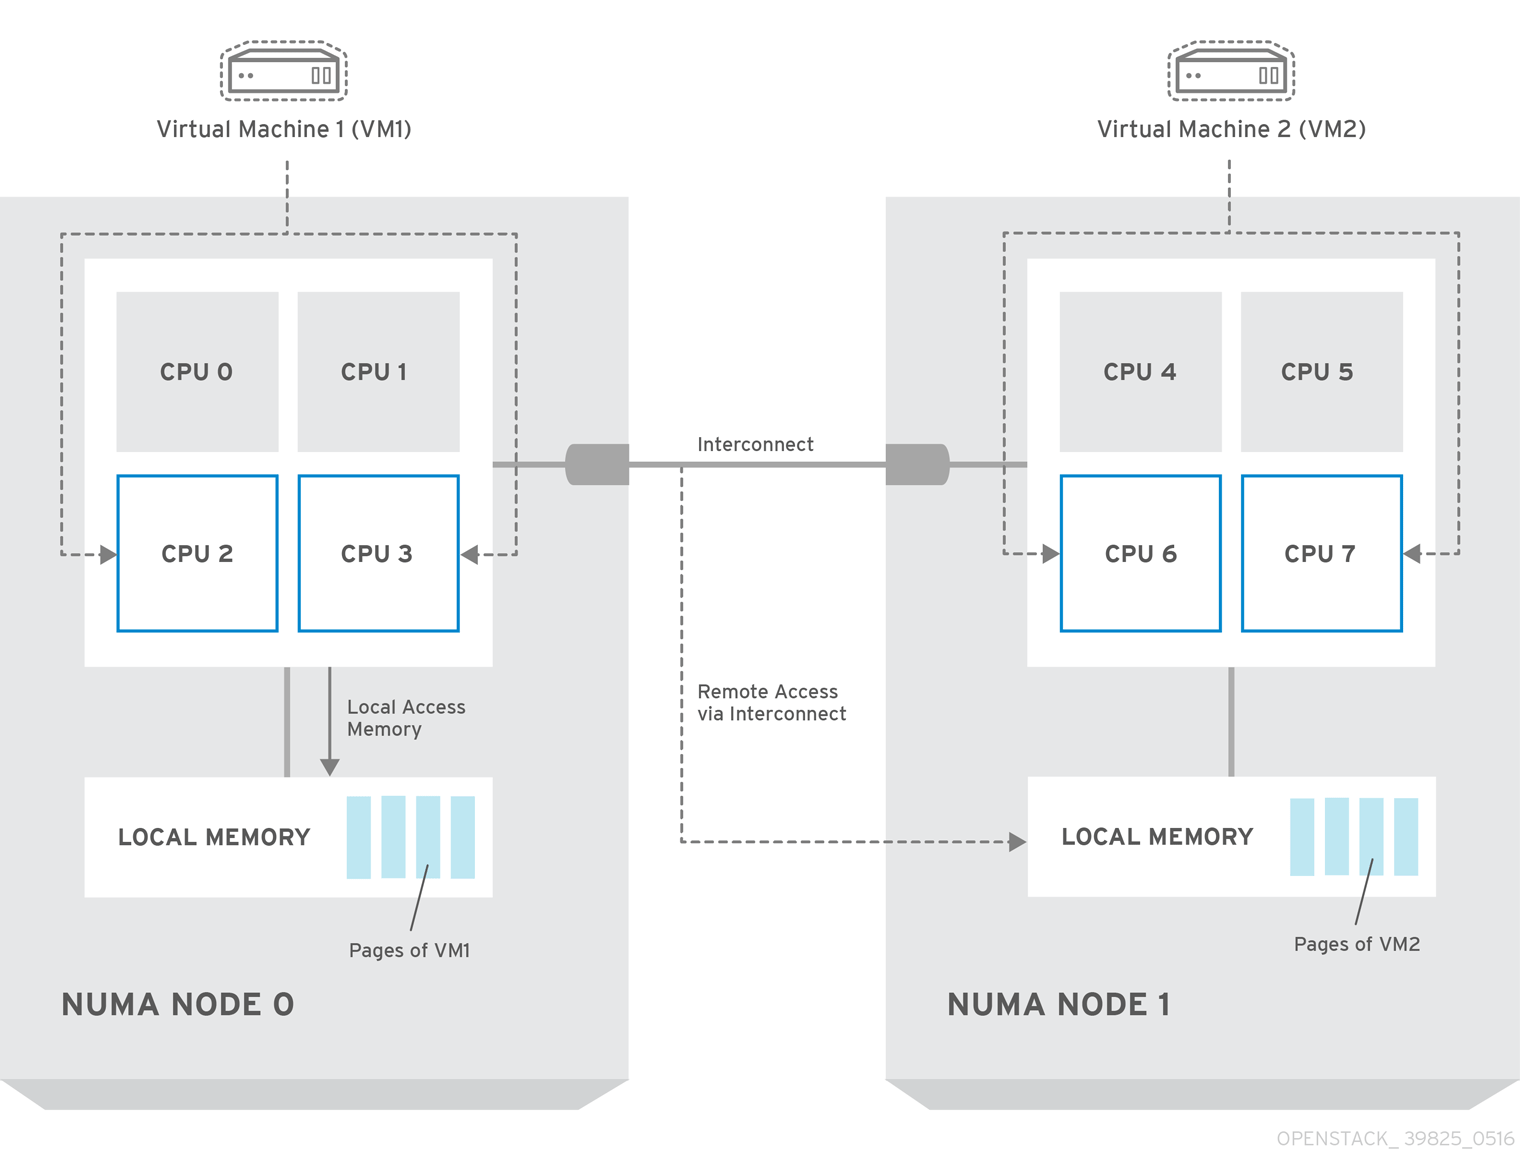
Remote memory available via Interconnect is accessed only if VM1 from NUMA node 0 has a CPU core in NUMA node 1. In this case, the memory of NUMA node 1 will act as local for the third CPU core of VM1 (for example, if VM1 is allocated with CPU 4 in the diagram above), but at the same time, it will act as remote memory for the other CPU cores of the same VM.
For more details on NUMA tuning with libvirt, see the Virtualization Tuning and Optimization Guide.
At present, it is impossible to migrate an instance which has been configured to use CPU pinning. For more information about this issue, see the following solution: Instance migration fails when using cpu-pinning from a numa-cell and flavor-property "hw:cpu_policy=dedicated".
4.1. Compute Node Configuration
The exact configuration depends on the NUMA topology of your host system; however, you must reserve some CPU cores across all the NUMA nodes for host processes and let the rest of the CPU cores handle your guest virtual machine instances. For example, with eight CPU cores evenly spread across two NUMA nodes, the layout can be illustrated as follows:
| Node 0 | Node 1 | |||
| Host processes | Core 0 | Core 1 | Core 4 | Core 5 |
| Guest processes | Core 2 | Core 3 | Core 6 | Core 7 |
The number of cores to reserve for host processes should be determined by observing the performance of the host under typical workloads.
The configuration of the Compute nodes consists of the following steps:
Set the
vcpu_pin_setoption in the/etc/nova/nova.conffile to the list of CPU cores reserved for guest processes. Using the example above, you would set:vcpu_pin_set=2,3,6,7
vcpu_pin_set=2,3,6,7Copy to Clipboard Copied! Toggle word wrap Toggle overflow The
vcpu_pin_setoption will also ensure that acpusetattribute similar to the following will be added to the XML configuration file for libvirt:<vcpu placement='static' cpuset='2-3,6-7'>1</vcpu>
<vcpu placement='static' cpuset='2-3,6-7'>1</vcpu>Copy to Clipboard Copied! Toggle word wrap Toggle overflow This will pin the guest vCPUs to the listed physical CPU cores and allow the scheduler to see only these cores.
Set the
reserved_host_memory_mboption in the same file to the amount of RAM to reserve for host processes. If you want to reserve 512 MB, use:reserved_host_memory_mb=512
reserved_host_memory_mb=512Copy to Clipboard Copied! Toggle word wrap Toggle overflow Restart the Compute service on the Compute nodes by running the following command:
systemctl restart openstack-nova-compute.service
systemctl restart openstack-nova-compute.serviceCopy to Clipboard Copied! Toggle word wrap Toggle overflow Ensure that host processes do not run on the CPU cores reserved for guest processes by adding the
isolcpusargument to the system’s boot configuration. Use the list of CPU cores reserved for guest processes as a parameter of this argument. Using the topology from the example above, you would run the following command:grubby --update-kernel=ALL --args="isolcpus=2,3,6,7"
grubby --update-kernel=ALL --args="isolcpus=2,3,6,7"Copy to Clipboard Copied! Toggle word wrap Toggle overflow NoteThe
cpusetoption along with theisolcpuskernel argument will ensure that the underlying compute node will not be able to use the corresponding pCPUs for itself. The pCPUs will be dedicated to instances.WarningThe
isolcpusargument is not fully functional on Red Hat Enterprise Linux 7.1. There is a bug which allows kernel processes to use CPUs that have been isolated. This bug was fixed in Red Hat Enterprise Linux 7.2, however some users have experienced performance problems.Because of this, the
isolcpussolution has been deprecated and there is a replacement solution which relies onsystemd. However, this solution is still a work-in-progress, since it currently cannot isolate all of the kernel threads.To use the systemd solution, edit the
/etc/systemd/system.conffile and uncomment the following line:CPUAffinity=1 2
CPUAffinity=1 2Copy to Clipboard Copied! Toggle word wrap Toggle overflow The
CPUAffinityoption takes a list of CPU indices or ranges separated by a whitespace.Update the boot record for this change to take effect:
grub2-install /dev/device
grub2-install /dev/deviceCopy to Clipboard Copied! Toggle word wrap Toggle overflow Replace device with the name of the device that contains the boot record, usually sda.
- Reboot the system.
4.2. Scheduler Configuration
Edit the
/etc/nova/nova.conffile on each system running the OpenStack Compute Scheduler. Find thescheduler_default_filtersoption, uncomment it if commented out, and addAggregateInstanceExtraSpecFilterandNUMATopologyFilterto the list of filters. The whole line can look like this:scheduler_default_filters=RetryFilter,AvailabilityZoneFilter,RamFilter, ComputeFilter,ComputeCapabilitiesFilter,ImagePropertiesFilter,CoreFilter, NUMATopologyFilter,AggregateInstanceExtraSpecsFilter
scheduler_default_filters=RetryFilter,AvailabilityZoneFilter,RamFilter, ComputeFilter,ComputeCapabilitiesFilter,ImagePropertiesFilter,CoreFilter, NUMATopologyFilter,AggregateInstanceExtraSpecsFilterCopy to Clipboard Copied! Toggle word wrap Toggle overflow Restart the openstack-nova-scheduler service:
systemctl restart openstack-nova-scheduler.service
systemctl restart openstack-nova-scheduler.serviceCopy to Clipboard Copied! Toggle word wrap Toggle overflow
4.3. Aggregate and Flavor Configuration
Prepare your OpenStack environment for running virtual machine instances pinned to specific resources by completing the following steps on a system with the Compute command-line interface:
Load the
admincredentials:source ~/keystonerc_admin
source ~/keystonerc_adminCopy to Clipboard Copied! Toggle word wrap Toggle overflow Create an aggregate for the hosts that will receive pinning requests:
nova aggregate-create name
nova aggregate-create nameCopy to Clipboard Copied! Toggle word wrap Toggle overflow Replace name with a suitable name, such as performance or cpu_pinning.
Enable the pinning by editing the metadata for the aggregate:
nova aggregate-set-metadata 1 pinned=true
nova aggregate-set-metadata 1 pinned=trueCopy to Clipboard Copied! Toggle word wrap Toggle overflow In this command, number 1 matches the ID of the aggregate created in the previous step.
Create an aggregate for other hosts:
nova aggregate-create name
nova aggregate-create nameCopy to Clipboard Copied! Toggle word wrap Toggle overflow Replace name with another suitable name, such as normal.
Edit the metadata for this aggregate accordingly:
nova aggregate-set-metadata 2 pinned=false
nova aggregate-set-metadata 2 pinned=falseCopy to Clipboard Copied! Toggle word wrap Toggle overflow Here, number 2 is used because it comes after 1, which is the ID of the first aggregate.
Change your existing flavors' specifications to this one:
for i in $(nova flavor-list | cut -f 2 -d ' ' | grep -o '[0-9]*'); do nova flavor-key $i set "aggregate_instance_extra_specs:pinned"="false"; done
for i in $(nova flavor-list | cut -f 2 -d ' ' | grep -o '[0-9]*'); do nova flavor-key $i set "aggregate_instance_extra_specs:pinned"="false"; doneCopy to Clipboard Copied! Toggle word wrap Toggle overflow Create a flavor for the hosts that will receive pinning requests:
nova flavor-create name ID RAM disk vCPUs
nova flavor-create name ID RAM disk vCPUsCopy to Clipboard Copied! Toggle word wrap Toggle overflow Replace name with an appropriate name, such as m1.small.performance or pinned.small, ID with the identifier for the new flavor (
6if you have five standard flavors, orautoif you wantnovato generate a UUID), RAM with the desired amount of RAM in MB, disk with the desired disk size in GB, and vCPUs with the number of virtual CPUs that you want to reserve.Set the
hw:cpu_policyspecification of this flavor todedicatedso as to require dedicated resources, which enables CPU pinning, and also thehw:cpu_thread_policyspecification torequire, which places each vCPU on thread siblings:nova flavor-key ID set hw:cpu_policy=dedicated nova flavor-key ID set hw:cpu_thread_policy=require
nova flavor-key ID set hw:cpu_policy=dedicated nova flavor-key ID set hw:cpu_thread_policy=requireCopy to Clipboard Copied! Toggle word wrap Toggle overflow Replace ID with the ID of the flavor created in the previous step.
NoteIf the host does not have an SMT architecture or enough CPU cores with free thread siblings, scheduling will fail. If such behavior is undesired, or if your hosts simply do not have an SMT architecture, do not use the
hw:cpu_thread_policyspecification, or set it topreferinstead ofrequire. The (default)preferpolicy ensures that thread siblings are used when available.Set the
aggregate_instance_extra_specs:pinnedspecification to true so as to ensure that instances based on this flavor have this specification in their aggregate metadata:nova flavor-key ID set aggregate_instance_extra_specs:pinned=true
nova flavor-key ID set aggregate_instance_extra_specs:pinned=trueCopy to Clipboard Copied! Toggle word wrap Toggle overflow Again, replace ID with the ID of the flavor.
Add some hosts to the new aggregates:
nova aggregate-add-host ID_1 host_1
nova aggregate-add-host ID_1 host_1Copy to Clipboard Copied! Toggle word wrap Toggle overflow Replace ID_1 with the ID of the first ("performance"/"pinning") aggregate and host_1 with the host name of the host that you want to add to the aggregate.
nova aggregate-add-host ID_2 host_2
nova aggregate-add-host ID_2 host_2Copy to Clipboard Copied! Toggle word wrap Toggle overflow Replace ID_2 with the ID of the second ("normal") aggregate and host_2 with the host name of the host that you want to add to it.
You can now boot an instance using the new flavor:
nova boot --image image --flavor flavor server_name
nova boot --image image --flavor flavor server_name
Replace image with a saved VM image name (see nova image-list), flavor with the name of the flavor (m1.small.performance, pinned.small, or any other name that you used), and server_name with the name for the new server.
To verify that the new server has been placed correctly, run the following command and check for OS-EXT-SRV-ATTR:hypervisor_hostname in the output:
nova show server_name
nova show server_name