Dieser Inhalt ist in der von Ihnen ausgewählten Sprache nicht verfügbar.
Chapter 2. Red Hat Quay user accounts overview
A user account represents an individual with authenticated access to the platform’s features and functionalities. User accounts provide the capability to create and manage repositories, upload and retrieve container images, and control access permissions for these resources. This account is pivotal for organizing and overseeing container image management within Red Hat Quay.
You can create and delete new users on the zRed Hat Quay UI or by using the Red Hat Quay API.
2.1. Creating a user account by using the UI
Use the following procedure to create a new user for your Red Hat Quay repository using the UI.
Prerequisites
- You are logged into your Red Hat Quay deployment as a superuser.
Procedure
- Log in to your Red Hat Quay repository as the superuser.
- In the navigation pane, select your account name, and then click Super User Admin Panel.
- Click the Users icon in the column.
- Click the Create User button.
- Enter the new user’s Username and Email address, and then click the Create User button.
You are redirected to the Users page, where there is now another Red Hat Quay user.
NoteYou might need to refresh the Users page to show the additional user.
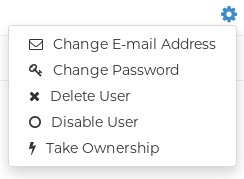
On the Users page, click the Options cogwheel associated with the new user. A drop-down menu appears, as shown in the following figure:

- Click Change Password.
Add the new password, and then click Change User Password.
The new user can now use that username and password to log in using the web UI or through their preferred container client, like Podman.
2.2. Creating a user account by using the Red Hat Quay API
Use the following procedure to create a new user for your Red Hat Quay repository by using the API.
Prerequisites
- You are logged into your Red Hat Quay deployment as a superuser.
- You have Created an OAuth access token.
-
You have set
BROWSER_API_CALLS_XHR_ONLY: falsein yourconfig.yamlfile.
Procedure
Enter the following command to create a new user using the
POST /api/v1/superuser/users/endpoint:$ curl -X POST -H "Authorization: Bearer <bearer_token>" -H "Content-Type: application/json" -d '{ "username": "newuser", "email": "newuser@example.com" }' "https://<quay-server.example.com>/api/v1/superuser/users/"Example output
{"username": "newuser", "email": "newuser@example.com", "password": "IJWZ8TIY301KPFOW3WEUJEVZ3JR11CY1", "encrypted_password": "9Q36xF54YEOLjetayC0NBaIKgcFFmIHsS3xTZDLzZSrhTBkxUc9FDwUKfnxLWhco6oBJV1NDBjoBcDGmsZMYPt1dSA4yWpPe/JKY9pnDcsw="}Navigate to your Red Hat Quay registry endpoint, for example,
quay-server.example.comand login with the username and password generated from the API call. In this scenario, the username isnewuserand the password isIJWZ8TIY301KPFOW3WEUJEVZ3JR11CY1. Alternatively, you can log in to the registry with the CLI. For example:$ podman login <quay-server.example.com>
Example output
username: newuser
password: IJWZ8TIY301KPFOW3WEUJEVZ3JR11CY1
Optional. You can obtain a list of all users, including superusers, by using the
GET /api/v1/superuser/users/endpoint:$ curl -X GET -H "Authorization: Bearer <bearer_token>" "https://<quay-server.example.com>/api/v1/superuser/users/"
Example output
{"users": [{"kind": "user", "name": "quayadmin", "username": "quayadmin", "email": "quay@quay.com", "verified": true, "avatar": {"name": "quayadmin", "hash": "b28d563a6dc76b4431fc7b0524bbff6b810387dac86d9303874871839859c7cc", "color": "#17becf", "kind": "user"}, "super_user": true, "enabled": true}, {"kind": "user", "name": "newuser", "username": "newuser", "email": "newuser@example.com", "verified": true, "avatar": {"name": "newuser", "hash": "f338a2c83bfdde84abe2d3348994d70c34185a234cfbf32f9e323e3578e7e771", "color": "#9edae5", "kind": "user"}, "super_user": false, "enabled": true}]}
2.3. Deleting a user by using the UI
Use the following procedure to delete a user from your Red Hat Quay repository using the UI. Note that after deleting the user, any repositories that the user had in their private account become unavailable.
In some cases, when accessing the Users tab in the Superuser Admin Panel of the Red Hat Quay UI, you might encounter a situation where no users are listed. Instead, a message appears, indicating that Red Hat Quay is configured to use external authentication, and users can only be created in that system.
This error occurs for one of two reasons:
- The web UI times out when loading users. When this happens, users are not accessible to perform any operations on.
- On LDAP authentication. When a userID is changed but the associated email is not. Currently, Red Hat Quay does not allow the creation of a new user with an old email address.
When this happens, you must delete the user using the Red Hat Quay API.
Prerequisites
- You are logged into your Red Hat Quay deployment as a superuser.
Procedure
- Log in to your Red Hat Quay repository as the superuser.
- In the navigation pane, select your account name, and then click Super User Admin Panel.
- Click the Users icon in the navigation pane.
- Click the Options cogwheel beside the user to be deleted.
- Click Delete User, and then confirm deletion by clicking Delete User.
2.4. Deleting a user by using the Red Hat Quay API
Use the following procedure to delete a user from Red Hat Quay using the API.
After deleting the user, any repositories that this user had in his private account become unavailable.
Prerequisites
- You are logged into your Red Hat Quay deployment as a superuser.
- You have Created an OAuth access token.
-
You have set
BROWSER_API_CALLS_XHR_ONLY: falsein yourconfig.yamlfile.
Procedure
Enter the following
DELETE /api/v1/superuser/users/{username}command to delete a user from the command line:$ curl -X DELETE -H "Authorization: Bearer <insert token here>" https://<quay-server.example.com>/api/v1/superuser/users/<username>
The CLI does not return information when deleting a user from the CLI. To confirm deletion, you can check the Red Hat Quay UI by navigating to Superuser Admin Panel
Users, or by entering the following GET /api/v1/superuser/users/command. You can then check to see if they are present.$ curl -X GET -H "Authorization: Bearer <bearer_token>" "https://<quay-server.example.com>/api/v1/superuser/users/"