Dieser Inhalt ist in der von Ihnen ausgewählten Sprache nicht verfügbar.
Chapter 7. Clair Security Scanning
Clair is a set of micro services that can be used with Red Hat Quay to perform vulnerability scanning of container images associated with a set of Linux operating systems. The micro services design of Clair makes it appropriate to run in a highly scalable configuration, where components can be scaled separately as appropriate for enterprise environments.
Clair uses the following vulnerability databases to scan for issues in your images:
- Alpine SecDB database
- AWS UpdateInfo
- Debian Oval database
- Oracle Oval database
- RHEL Oval database
- SUSE Oval database
- Ubuntu Oval database
- Pyup.io (python) database
For information on how Clair does security mapping with the different databases, see ClairCore Severity Mapping.
With the release of Red Hat Quay 3.4, the new Clair V4 (image registry.redhat.io/quay/clair-rhel8 fully replaces the prior Clair V2 (image quay.io/redhat/clair-jwt). See below for how to run V2 in read-only mode while V4 is updating.
7.1. Setting Up Clair on a Red Hat Quay OpenShift deployment
7.1.1. Deploying Via the Quay Operator
To set up Clair V4 on a new Red Hat Quay deployment on OpenShift, it is highly recommended to use the Quay Operator. By default, the Quay Operator will install or upgrade a Clair deployment along with your Red Hat Quay deployment and configure Clair security scanning automatically.
7.1.2. Manually Deploying Clair
To configure Clair V4 on an existing Red Hat Quay OpenShift deployment running Clair V2, first ensure Red Hat Quay has been upgraded to at least version 3.4.0. Then use the following steps to manually set up Clair V4 alongside Clair V2.
Set your current project to the name of the project in which Red Hat Quay is running. For example:
oc project quay-enterprise
$ oc project quay-enterpriseCopy to Clipboard Copied! Toggle word wrap Toggle overflow Create a Postgres deployment file for Clair v4 (for example,
clairv4-postgres.yaml) as follows.clairv4-postgres.yaml
Copy to Clipboard Copied! Toggle word wrap Toggle overflow Deploy the postgres database as follows:
oc create -f ./clairv4-postgres.yaml
$ oc create -f ./clairv4-postgres.yamlCopy to Clipboard Copied! Toggle word wrap Toggle overflow Create a Clair
config.yamlfile to use for Clair v4. For example:config.yaml
Copy to Clipboard Copied! Toggle word wrap Toggle overflow - 1
- To generate a Clair pre-shared key (PSK), enable
scanningin the Security Scanner section of the User Interface and clickGenerate PSK.
More information about Clair’s configuration format can be found in upstream Clair documentation.
Create a secret from the Clair
config.yaml:oc create secret generic clairv4-config-secret --from-file=./config.yaml
$ oc create secret generic clairv4-config-secret --from-file=./config.yamlCopy to Clipboard Copied! Toggle word wrap Toggle overflow Create the Clair v4 deployment file (for example,
clair-combo.yaml) and modify it as necessary:clair-combo.yaml
Copy to Clipboard Copied! Toggle word wrap Toggle overflow Create the Clair v4 deployment as follows:
oc create -f ./clair-combo.yaml
$ oc create -f ./clair-combo.yamlCopy to Clipboard Copied! Toggle word wrap Toggle overflow Modify the
config.yamlfile for your Red Hat Quay deployment to add the following entries at the end:FEATURE_SECURITY_NOTIFICATIONS: true FEATURE_SECURITY_SCANNER: true SECURITY_SCANNER_V4_ENDPOINT: http://clairv4
FEATURE_SECURITY_NOTIFICATIONS: true FEATURE_SECURITY_SCANNER: true SECURITY_SCANNER_V4_ENDPOINT: http://clairv41 Copy to Clipboard Copied! Toggle word wrap Toggle overflow - 1
- Identify the Clair v4 service endpoint
Redeploy the modified
config.yamlto the secret containing that file (for example,quay-enterprise-config-secret:oc delete secret quay-enterprise-config-secret oc create secret generic quay-enterprise-config-secret --from-file=./config.yaml
$ oc delete secret quay-enterprise-config-secret
$ oc create secret generic quay-enterprise-config-secret --from-file=./config.yaml
Copy to Clipboard Copied! Toggle word wrap Toggle overflow -
For the new
config.yamlto take effect, you need to restart the Red Hat Quay pods. Simply deleting thequay-apppods causes pods with the updated configuration to be deployed.
At this point, images in any of the organizations identified in the namespace whitelist will be scanned by Clair v4.
7.2. Setting up Clair on a non-OpenShift Red Hat Quay deployment
For Red Hat Quay deployments not running on OpenShift, it is possible to configure Clair security scanning manually. Red Hat Quay deployments already running Clair V2 can use the instructions below to add Clair V4 to their deployment.
Deploy a (preferably fault-tolerant) Postgres database server. Note that Clair requires the
uuid-osspextension to be added to its Postgres database. If the user supplied in Clair’sconfig.yamlhas the necessary privileges to create the extension then it will be added automatically by Clair itself. If not, then the extension must be added before starting Clair. If the extension is not present, the following error will be displayed when Clair attempts to start.ERROR: Please load the "uuid-ossp" extension. (SQLSTATE 42501)
ERROR: Please load the "uuid-ossp" extension. (SQLSTATE 42501)Copy to Clipboard Copied! Toggle word wrap Toggle overflow Create a Clair config file in a specific folder, for example,
/etc/clairv4/config/config.yaml).config.yaml
Copy to Clipboard Copied! Toggle word wrap Toggle overflow
More information about Clair’s configuration format can be found in upstream Clair documentation.
Run Clair via the container image, mounting in the configuration from the file you created.
podman run -p 8080:8080 -p 8089:8089 -e CLAIR_CONF=/clair/config.yaml -e CLAIR_MODE=combo -v /etc/clair4/config:/clair -d registry.redhat.io/quay/clair-rhel8:v3.6.8
$ podman run -p 8080:8080 -p 8089:8089 -e CLAIR_CONF=/clair/config.yaml -e CLAIR_MODE=combo -v /etc/clair4/config:/clair -d registry.redhat.io/quay/clair-rhel8:v3.6.8Copy to Clipboard Copied! Toggle word wrap Toggle overflow - Follow the remaining instructions from the previous section for configuring Red Hat Quay to use the new Clair V4 endpoint.
Running multiple Clair containers in this fashion is also possible, but for deployment scenarios beyond a single container the use of a container orchestrator like Kubernetes or OpenShift is strongly recommended.
7.3. Using Clair
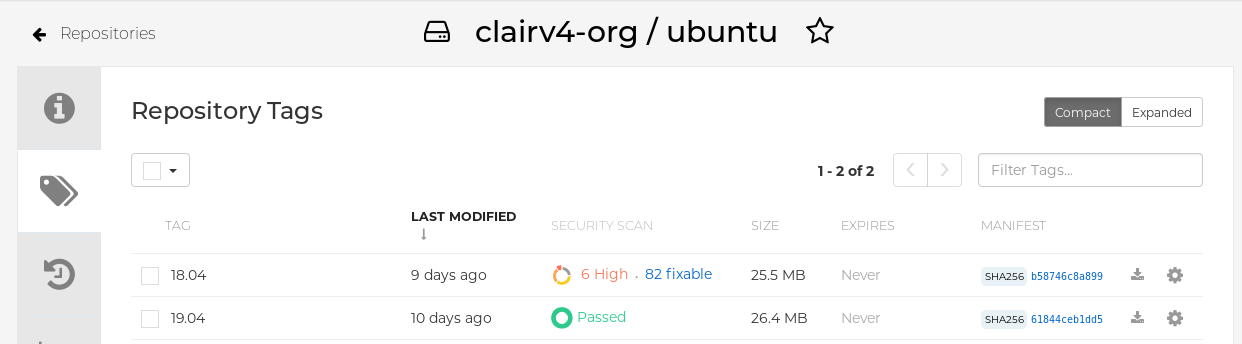
- Log in to your Red Hat Quay cluster and select an organization for which you have configured Clair scanning.
Select a repository from that organization that holds some images and select Tags from the left navigation. The following figure shows an example of a repository with two images that have been scanned:
If vulnerabilities are found, select to under the Security Scan column for the image to see either all vulnerabilities or those that are fixable. The following figure shows information on all vulnerabilities found:

7.4. CVE ratings from the National Vulnerability Database
With Clair v4.2, enrichment data is now viewable in the Quay UI. Additionally, Clair v4.2 adds CVSS scores from the National Vulnerability Database for detected vulnerabilities.
With this change, if the vulnerability has a CVSS score that is within 2 levels of the distro’s score, the Quay UI present’s the distro’s score by default. For example:
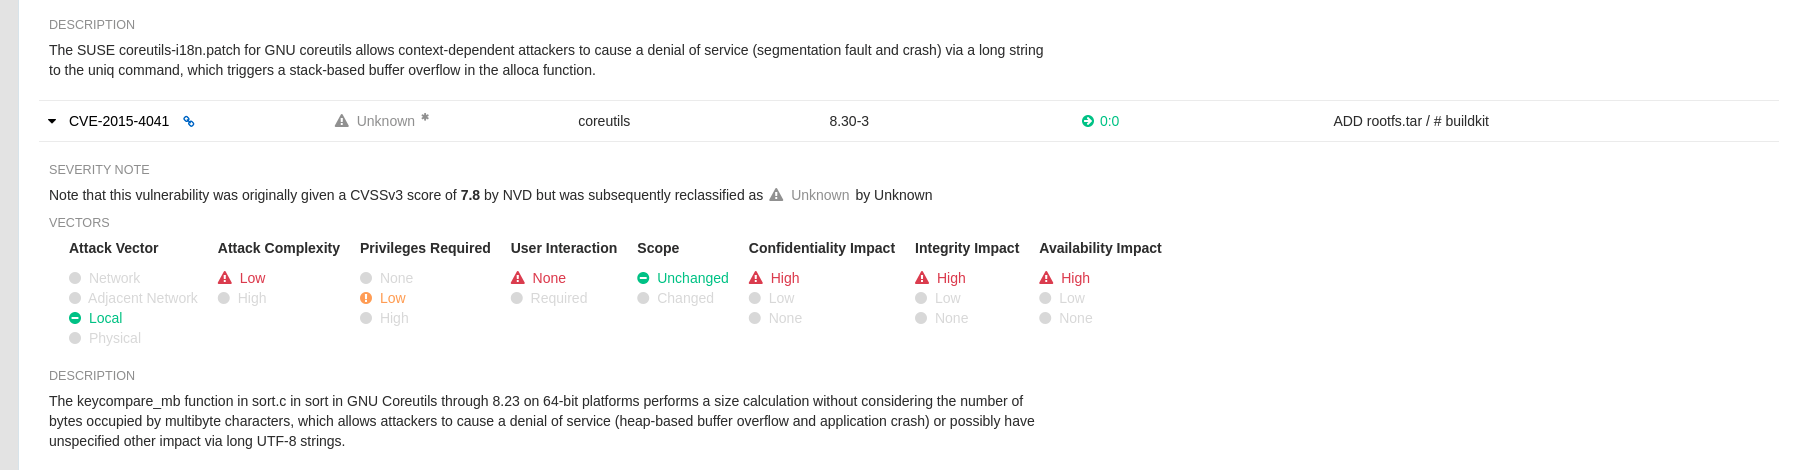
This differs from the previous interface, which would only display the following information:

7.5. Configuring Clair for Disconnected Environments
Clair utilizes a set of components called Updaters to handle the fetching and parsing of data from various vulnerability databases. These Updaters are set up by default to pull vulnerability data directly from the internet and work out of the box. For customers in disconnected environments without direct access to the internet this poses a problem. Clair supports these environments through the ability to work with different types of update workflows that take into account network isolation. Using the clairctl command line utility, any process can easily fetch Updater data from the internet via an open host, securely transfer the data to an isolated host, and then import the Updater data on the isolated host into Clair itself.
The steps are as follows.
First ensure that your Clair configuration has disabled automated Updaters from running.
config.yaml
matcher:
  disable_updaters: true
matcher:
  disable_updaters: true
Copy to Clipboard Copied! Toggle word wrap Toggle overflow Export out the latest Updater data to a local archive. This requires the
clairctltool which can be run directly as a binary, or via the Clair container image. Assuming your Clair configuration is in/etc/clairv4/config/config.yaml, to run via the container image:podman run -it --rm -v /etc/clairv4/config:/cfg:Z -v /path/to/output/directory:/updaters:Z --entrypoint /bin/clairctl registry.redhat.io/quay/clair-rhel8:v3.6.8 --config /cfg/config.yaml export-updaters /updaters/updaters.gz
$ podman run -it --rm -v /etc/clairv4/config:/cfg:Z -v /path/to/output/directory:/updaters:Z --entrypoint /bin/clairctl registry.redhat.io/quay/clair-rhel8:v3.6.8 --config /cfg/config.yaml export-updaters /updaters/updaters.gzCopy to Clipboard Copied! Toggle word wrap Toggle overflow Note that you need to explicitly reference the Clair configuration. This will create the Updater archive in
/etc/clairv4/updaters/updaters.gz. If you want to ensure the archive was created without any errors from the source databases, you can supply the--strictflag toclairctl. The archive file should be copied over to a volume that is accessible from the disconnected host running Clair. From the disconnected host, use the same procedure now to import the archive into Clair.podman run -it --rm -v /etc/clairv4/config:/cfg:Z -v /path/to/output/directory:/updaters:Z --entrypoint /bin/clairctl registry.redhat.io/quay/clair-rhel8:v3.6.8 --config /cfg/config.yaml import-updaters /updaters/updaters.gz
$ podman run -it --rm -v /etc/clairv4/config:/cfg:Z -v /path/to/output/directory:/updaters:Z --entrypoint /bin/clairctl registry.redhat.io/quay/clair-rhel8:v3.6.8 --config /cfg/config.yaml import-updaters /updaters/updaters.gzCopy to Clipboard Copied! Toggle word wrap Toggle overflow
7.6. Clair updater URLs
The following are the HTTP hosts and paths that Clair will attempt to talk to in a default configuration. This list is non-exhaustive, as some servers will issue redirects and some request URLs are constructed dynamically.
- https://secdb.alpinelinux.org/
- http://repo.us-west-2.amazonaws.com/2018.03/updates/x86_64/mirror.list
- https://cdn.amazonlinux.com/2/core/latest/x86_64/mirror.list
- https://www.debian.org/security/oval/
- https://linux.oracle.com/security/oval/
- https://packages.vmware.com/photon/photon_oval_definitions/
- https://github.com/pyupio/safety-db/archive/
- https://catalog.redhat.com/api/containers/
- https://www.redhat.com/security/data/
- https://support.novell.com/security/oval/
- https://people.canonical.com/~ubuntu-security/oval/
7.7. Additional Information
For detailed documentation on the internals of Clair, including how the microservices are structured, please see the Upstream Clair and ClairCore documentation.