Dieser Inhalt ist in der von Ihnen ausgewählten Sprache nicht verfügbar.
Ansible Playbook Bundle Development Guide
Developing with Ansible Playbook Bundle (APB)
Abstract
Chapter 1. Introduction
1.1. About This Guide
This guide outlines the design concepts and workflow of Ansible Playbook Bundles (APBs), shows how to install and use the apb CLI tooling, and provides a tutorial and reference material on writing your own APBs.
1.2. Design Overview
An APB is a lightweight application definition that borrows several concepts from the Nulecule and Atomicapp projects, namely the concept of a short-lived container with the sole purpose of orchestrating the deployment of the intended application. For the case of APBs, this short-lived container is the APB itself: a container with an Ansible runtime environment plus any files required to assist in orchestration, such as playbooks, roles, and extra dependencies.
The OpenShift Ansible broker (OAB) is an implementation of the Open Service Broker (OSB) API that manages applications defined by APBs. The OAB is supported and deployed by default starting in OpenShift Container Platform 3.7.
Specification of an APB is intended to be lightweight, consisting of several named playbooks and a metadata file to capture information such as parameters to pass into the application.
1.3. Workflow
The APB workflow is broken up into the following steps:
Preparation
- APB initialization
- APB spec file
- Actions (provision, deprovision, bind, unbind)
- Build
- Deploy
1.3.1. Preparation
You must prepare your APB’s directory structure and spec file before you can build and deploy it. The Getting Started topic provides a step by step tutorial on creating your first APB, while the following sections briefly cover this workflow.
1.3.1.1. APB Initialization
The apb init command creates the required skeleton directory structure and a few required files (for example, the apb.yml spec file) for the APB.
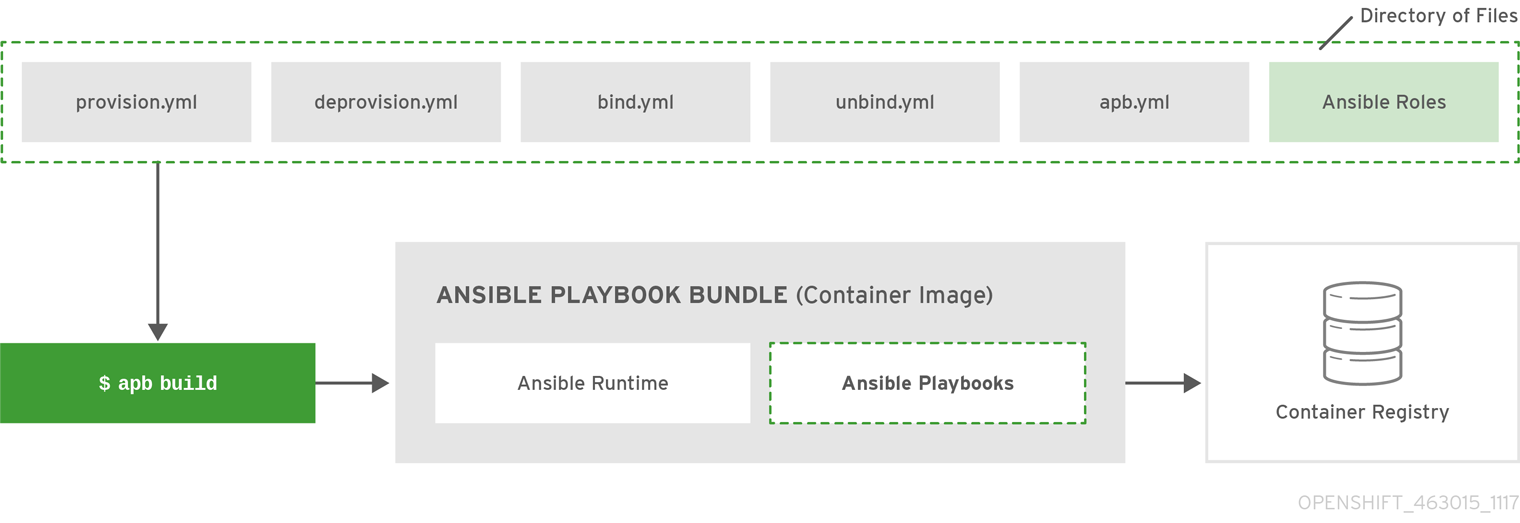
The following shows an example directory structure of an APB:
Directory Structure
example-apb/
├── Dockerfile
├── apb.yml
└── roles/
│   └── example-apb-openshift
│       ├── defaults
│       │   └── main.yml
│       └── tasks
│           └── main.yml
└── playbooks/
    └── provision.yml
    └── deprovision.yml
    └── bind.yml
    └── unbind.yml
1.3.1.2. APB Spec File
An APB spec file (apb.yml) must be edited for your specific application. For example, the default spec file after running apb init looks as follows:
version: 1.0
name: my-test-apb
description: This is a sample application generated by apb init
bindable: False
async: optional
metadata:
  displayName: my-test
plans:
  - name: default
    description: This default plan deploys my-test-apb
    free: True
    metadata: {}
parameters: [] See the Reference topic for a fully-defined example APB spec file.
1.3.1.3. Actions
The following are the actions for an APB. At a minimum, an APB must implement the provision and deprovision actions:
- provision.yml
- Playbook called to handle installing application to the cluster.
- deprovision.yml
- Playbook called to handle uninstalling.
- bind.yml
- Playbook to grant access to another service to use this service, such as generating credentials.
- unbind.yml
- Playbook to revoke access to this service.
- test.yml
- (Optional) Playbook to test that the APB is vaild.
The required named playbooks correspond to methods defined by the OSB API. For example, when the OAB needs to provision an APB it will execute provision.yml.
After the required named playbooks have been generated, the files can be used directly to test management of the application. A developer may want to work with this directory of files, make tweaks, run, repeat until they are happy with the behavior. They can test the playbooks by invoking Ansible directly with the playbook and any required variables.
1.3.2. Build
The build step is responsible for building a container image from the named playbooks for distribution. Packaging combines a base image containing an Ansible runtime with Ansible artifacts and any dependencies required to run the playbooks.
The result is a container image with an ENTRYPOINT set to take in several arguments, one of which is the method to execute, such as provision and deprovision.
Figure 1.1. APB Build
1.3.3. Deploy
Deploying an APB means invoking the container and passing in the name of the playbook to execute along with any required variables. It is possible to invoke the APB directly without going through the OAB. Each APB is packaged so its ENTRYPOINT will invoke Ansible when run. The container is intended to be short-lived, coming up to execute the Ansible playbook for managing the application then exiting.
In a typical APB deploy, the APB container will provision an application by running the provision.yml playbook, which executes an Ansible role. The role is responsible for creating the OpenShift Container Platform resources, perhaps through calling oc create commands or leveraging Ansible modules. The end result is that the APB runs Ansible to talk to OpenShift Container Platform to orchestrate the provisioning of the intended application.
The following diagrams illustrate this deployment flow in two phases: a user discovering a list of available APBs and then requesting their chosen APB be provisioned to their project:
Figure 1.2. Listing Available APBs
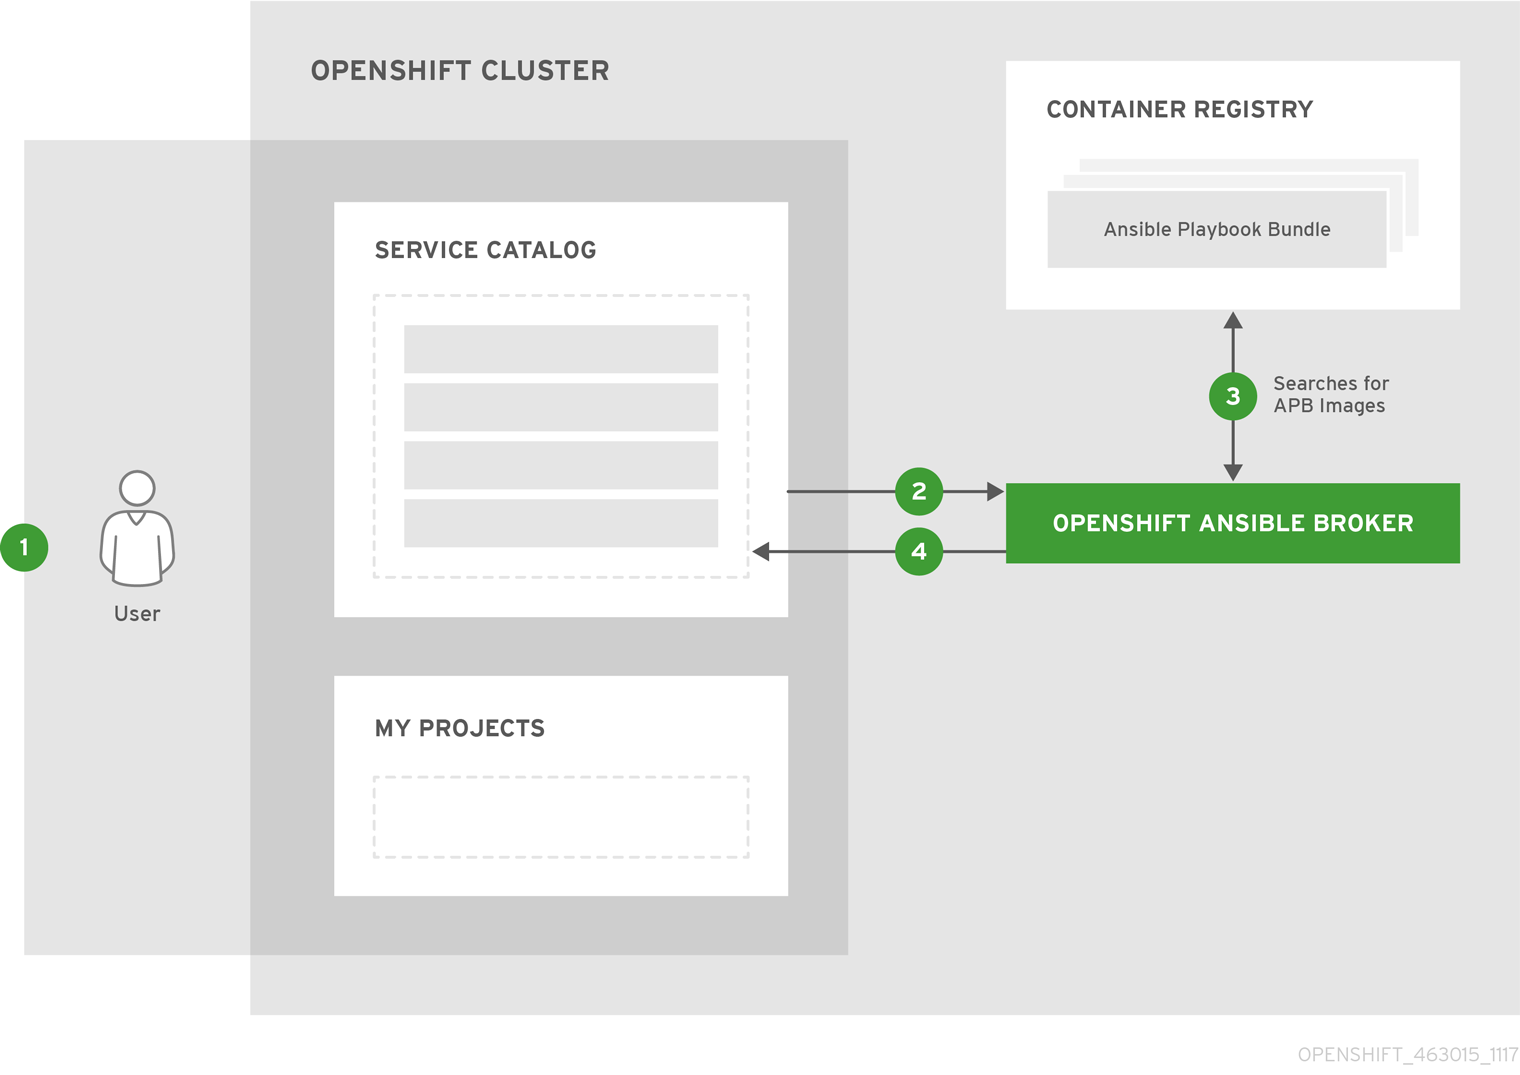
 An OpenShift Container Platform user is interested in provisioning a service into their project, so they interact with the service catalog by accessing the OpenShift Container Platform UI (web console or CLI) to discover any APBs that are already available.
 The service catalog requests a list of APBs from the OAB to show the user.
 The OAB searches all configured container registries (the cluster’s OpenShift Container Registry or any other remote registry) for any APBs (images with a specific label, for example
 LABEL=apb-1.0).
 The OAB returns the discovered list to the service catalog, to be viewed by the user in the OpenShift Container Platform UI.
Figure 1.3. Deploying a Chosen APB
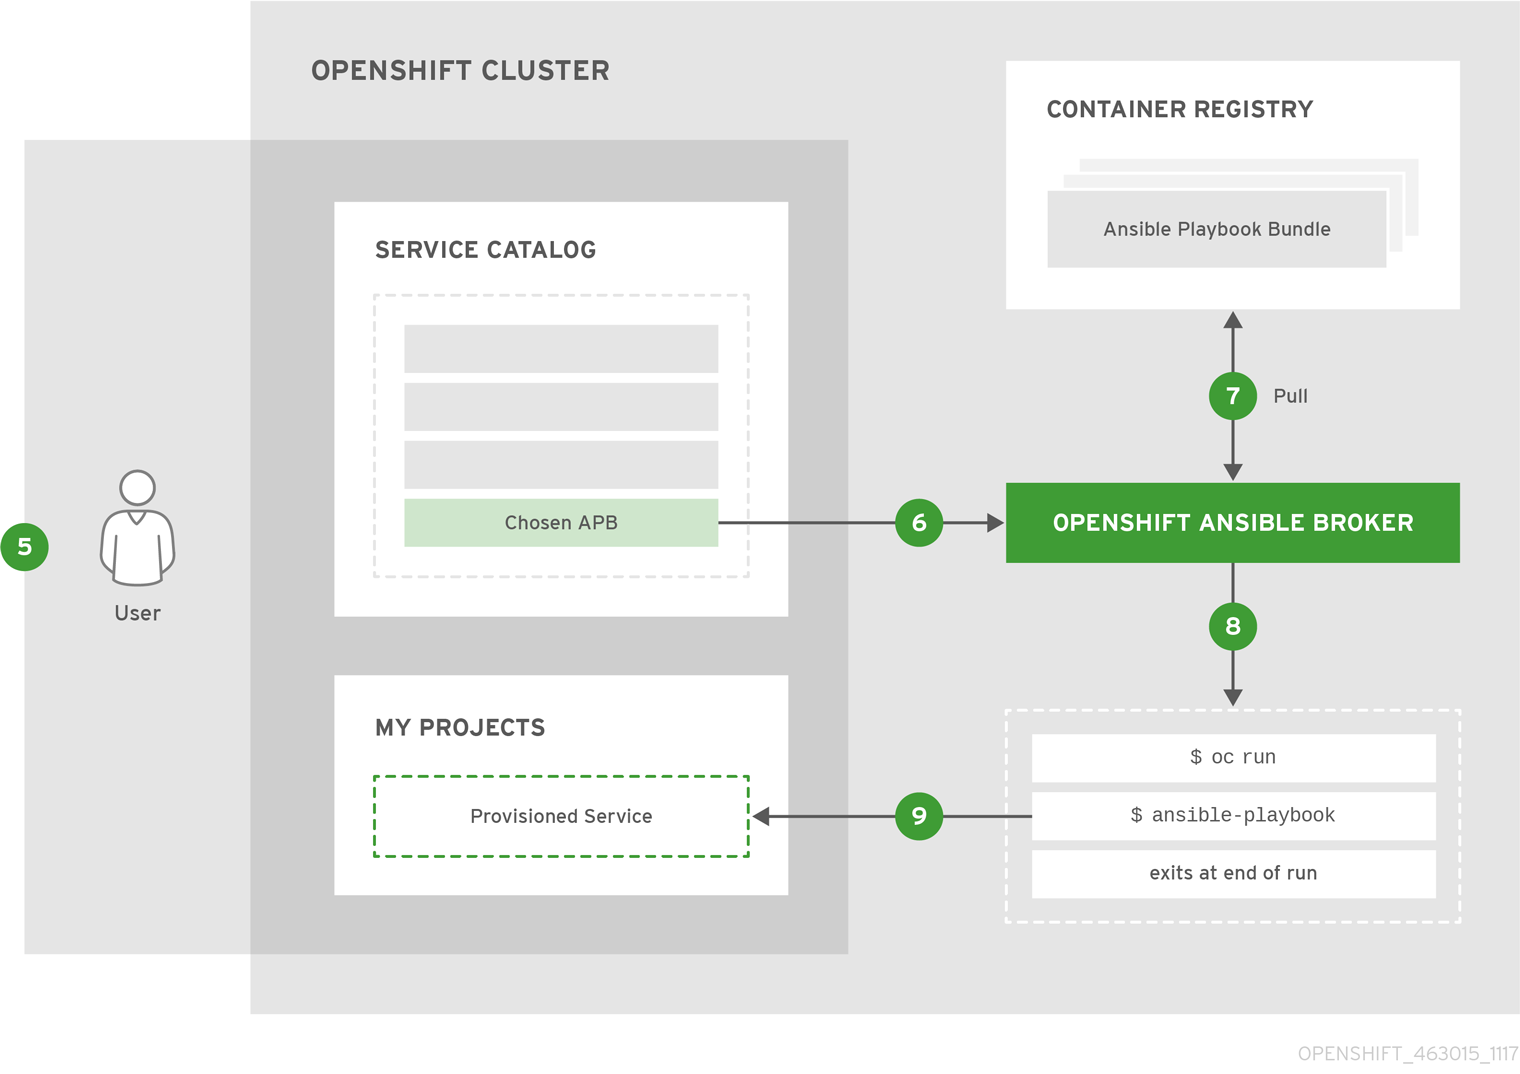
 The user now chooses an APB from the discovered list provided by the service catalog.
 The service catalog communicates with the OAB that the user has requested use of the chosen APB.
 The OAB initiates the image pull from the appropriate container registry.
 After the image is pulled, the OAB defers the logic for orchestrating the application to the APB. The service is deployed by running the APB container with a few parameters. To do so, the following command is issued against the OpenShift Container Platform cluster in a temporary namespace:
$ oc run $IMAGE $METHOD $VARS ansible-playbook ${METHOD}.yaml ${VARS}To break this command down further:
-
The
oc runcommand runs the APB image. -
In the short-lived container that is created as a result, Ansible is launched using the
ansible-playbookcommand, which runs the appropriate playbook (for example, provision.yaml) to execute the requested action. This creates OpenShift Container Platform resources in the user’s project. - The container exits at the end of the run, and the temporary namespace is removed.
 As a result, the user views via the OpenShift Container Platform UI that their requested service has been successfully provisioned in their project.
Chapter 2. CLI Tooling
2.1. Overview
The apb CLI tool helps Ansible Playbook Bundle (APB) authors create, build, and publish their APBs to container registries. It enforces best practices and takes care of the details so they should be easy to deploy.
2.2. Installing the Tool
2.2.1. Prerequisites
2.2.1.1. Docker Daemon
The docker daemon must be correctly installed and running on the system.
2.2.1.2. Access Permissions
You must be logged in via oc as a user with cluster-admin permissions:
$ oc login -u <user> <openshift_server>To add this role to another user, you can run the following as a user that already has such permissions (for example, the system:admin default system user):
$ oc process -f openshift-permissions.template.yaml \
  -p BROKER_NAMESPACE=openshift-ansible-service-broker \
  -p GLOBAL_IMAGE_PROJECT=default \
  [-p USER=<your_desired_user>] \
| oc create -f -
This permission requirement is so that the development lifecycle of the apb tool can function.
2.2.2. Installing via RPM
The APB CLI tool is provided by the apb package, which is available from the rhel-7-server-ose-3.7-rpms channel:
$ sudo yum install apb2.2.3. Verifying the Installation
Run apb help to make sure the tool is installed correctly:
$ apb help
usage: apb [-h] [--debug] [--project BASE_PATH]
           {init,help,prepare,push,bootstrap,list,remove,build} ...

APB tooling for assisting in building and packaging APBs.

optional arguments:
  -h, --help            show this help message and exit
  --debug               Enable debug output
  --project BASE_PATH, -p BASE_PATH
                        Specify a path to your project. Defaults to CWD.

subcommand:
  {init,help,prepare,push,bootstrap,list,remove,build}
    init                Initialize the directory for APB development
    help                Display this help message
    prepare             Prepare an ansible-container project for APB packaging
    push                Push local APB spec to an OAB
    bootstrap           Tell OAB to reload APBs from the
                        container repository
    list                List APBs from the target OAB
    remove              Remove APBs from the target OAB
    build               Build and package APB container
2.3. Typical Workflows
2.3.1. Local Registry
In order to use the OpenShift Container Registry to source APBs, you must have configured the OpenShift Ansible broker to use the local_openshift type registry adapter. See the config section for more information.
$ apb init my-new-apb
$ cd my-new-apb
$ apb build
$ apb push --openshift
$ apb list
If you are using a namespace other than the default openshift namespace to host your APBs, then you can use the following command:
$ apb push -o --namespace <namespace>2.3.2. Remote Registry
OAB can also be configured to use a remote registry and organization such as docker.io/ansibleplaybookbundle or your own personal account. In order to use this for developing APBs, you can build and push to your remote registry and then bootstrap to reload your APBs:
$ apb init my-new-apb
$ cd my-new-apb
$ apb build --tag docker.io/my-org/my-new-apb
$ docker push docker.io/my-org/my-new-apb
$ apb bootstrap
$ apb list
2.4. APB Creation Commands
2.4.1. init
Description
Initializes a directory structure for a new APB. Also creates example files for the new APB with sensible defaults.
Usage
$ apb init [OPTIONS] NAMEArguments
NAME: Name of the APB and directory to be created.
Options
| Option, Shorthand | Description |
|---|---|
|
| Show help message |
|
| Force re-init and overwrite the directory |
|
|
Specify asynchronous operation on application. Usually defaulted to |
|
| Generate an application with bindable settings |
|
| Do not generate provision playbook and role |
|
| Do not generate deprovision playbook and role |
|
| Do not generate bind playbook and role |
|
| Do not generate unbind playbook and role |
|
| Do not generate any roles |
Examples
Create directory my-new-apb:
$ apb init my-new-apb
# my-new-apb/
# ├── apb.yml
# ├── Dockerfile
# ├── playbooks
# │   ├── deprovision.yml
# │   └── provision.yml
# └── roles
#     ├── deprovision-my-new-apb
#     │   └── tasks
#     │       └── main.yml
#     └── provision-my-new-apb
#         └── tasks
#             └── main.yml
Create directory my-new-apb, but skip generating deprovision playbook and roles:
$ apb init my-new-apb --skip-deprovision
# my-new-apb/
# ├── apb.yml
# ├── Dockerfile
# ├── playbooks
# │   └── provision.yml
# └── roles
#     └── provision-my-new-apb
#         └── tasks
#             └── main.yml
Create directory my-new-apb, overwriting any old versions. The APB will be configured to be bindable and require async:
$ apb init my-new-apb --force --bindable --async required
# my-new-apb/
# ├── apb.yml
# ├── Dockerfile
# ├── playbooks
# │   ├── bind.yml
# │   ├── deprovision.yml
# │   ├── provision.yml
# │   └── unbind.yml
# └── roles
#     ├── bind-my-new-apb
#     │   └── tasks
#     │       └── main.yml
#     ├── deprovision-my-new-apb
#     │   └── tasks
#     │       └── main.yml
#     ├── provision-my-new-apb
#     │   └── tasks
#     │       └── main.yml
#     └── unbind-my-new-apb
#         └── tasks
#             └── main.yml
2.4.2. prepare
Description
Compiles the APB into base64 encoding and writes it as a label to the Dockerfile.
This will allow the OAB to read the APB metadata from the registry without downloading the images. This command must be run from inside the APB directory. Running the build command will automatically run prepare as well, meaning you generally do not need to run prepare by itself.
Usage
$ apb prepare [OPTIONS]Options
| Option, Shorthand | Description |
|---|---|
|
| Show help message |
|
| Writes the APB spec to the target file name instead of a file named Dockerfile |
Examples
Writes the label for the spec field in the Dockerfile:
$ apb prepareWrites the label for the spec field in Dockerfile-custom:
$ apb prepare --dockerfile Dockerfile-custom2.4.3. build
Description
Builds the image for the APB.
Similar to running apb prepare and docker build with a tag.
Usage
$ apb build [OPTIONS]Options
| Option, Shorthand | Description |
|---|---|
|
| Show help message |
|
|
Sets the tag of the built image to a string in the format |
|
|
Registry portion of the tag of the image (e.g., |
|
| User or organization portion of the tag of the image |
Examples
Build the image and use the name field from apb.yml as the tag:
$ apb build
Build the image and use the tag docker.io/my-org/my-new-apb:
$ apb build --tag docker.io/my-org/my-new-apb
Build the image and use the tag docker.io/my-org/<my-apb-name>:
$ apb build --registry docker.io --org my-orgBuild the image using the file Dockerfile-custom as the Dockerfile definition:
$ apb build --dockerfile Dockerfile-custom2.4.4. push
Description
Uploads the APB to an OpenShift Container Registry or a broker mock registry where it will be read by the OAB.
When using the broker’s mock registry, the spec is uploaded and will be displayed in OpenShift Container Platform, but OpenShift Container Platform will pull the image from the registry normally. Usually that means the registry where oc cluster up was performed.
When using the OpenShift Container Registry, the image is uploaded to OpenShift Container Platform directly.
Usage
$ apb push [OPTIONS]Options
| Option, Shorthand | Description |
|---|---|
|
| Show help message |
|
| Route to the OAB |
|
| Namespace to push to the OpenShift Container Registry |
|
| Use the OpenShift Container Registry |
|
|
Dockerfile to build internal registry image. Usually defaults to |
|
| Use secure connection to OAB |
|
| Basic authentication user name to be used in broker communication |
|
| Basic authentication password to be used in broker communication |
|
| Do not relist the catalog after pushing an APB to the broker |
|
| Name of the ServiceBroker Kubernetes resource |
Examples
Push to the OAB development endpoint:
$ apb pushPush to the local OpenShift Container Registry:
$ apb push -o
Push to the local OpenShift Container Registry under namespace myproject:
$ apb push -o --namespace myproject2.4.5. test
Description
Runs the APB unit tests.
Usage
$ apb test [OPTIONS]Options
| Option, Shorthand | Description |
|---|---|
|
| Show help message |
|
|
Sets the tag of the built image to a string in the format |
Examples
Run the tests:
$ apb testRun the tests but use a specific tag on the built image:
$ apb test --tag docker.io/my-org/my-new-apb2.5. Broker Utility Commands
2.5.1. list
Description
Lists all the APBs the broker has loaded.
Usage
$ apb list [OPTIONS]Options
| Option, Shorthand | Description |
|---|---|
|
| Show help message |
|
| Route to the OAB |
|
| Use secure connection to OAB |
|
| Output verbose spec information from OAB |
|
| Specify verbose output format in yaml (default) or json |
|
| Specify the basic authentication user name to be used |
|
| Specify the basic authentication password to be used |
Examples
Basic list of APBs including name, ID, and description:
$ apb listList verbose, easily readable specs:
$ apb list -vList all the JSON output:
$ apb list -v -o json2.5.2. bootstrap
Description
Requests the OAB to reload all APBs from the registries.
Usage
$ apb bootstrap [OPTIONS]Options
| Option, Shorthand | Description |
|---|---|
|
| Show help message |
|
| Route to the OAB |
|
| Use secure connection to OAB |
|
| Do not relist the catalog after bootstrapping the broker |
|
| Specify the basic authentication user name to be used |
|
| Specify the basic authentication password to be used |
|
| Name of the ServiceBroker Kubernetes resource |
Examples
Basic reload of APBs:
$ apb bootstrap2.5.3. remove
Description
Removes one (or all) APBs from the OAB.
Usage
$ apb remove [OPTIONS]Options
| Option, Shorthand | Description |
|---|---|
|
| Show help message |
|
| Route to the OAB |
|
| Use secure connection to OAB |
|
| Remove all stored APBs |
|
| ID of APB to remove |
|
| Use secure connection to OAB |
|
| Specify the basic authentication user name to be used |
|
| Specify the basic authentication password to be used |
|
| Do not relist the catalog after deletion |
Examples
Remove an APB using an ID:
$ apb remove --id ca91b61da8476984f18fc13883ae2fdbIf you need an ID of an APB, use:
$ apb list
ID                                NAME                     DESCRIPTION
ca91b61da8476984f18fc13883ae2fdb  dh-etherpad-apb          Note taking web application
Remove all APBs:
$ apb remove --all2.5.4. relist
Description
Forces service catalog to relist the provided services to match the broker.
Usage
$ apb relist [OPTIONS]Options
| Option, Shorthand | Description |
|---|---|
|
| Show help message |
|
| Name of the ServiceBroker Kubernetes resource |
|
| Use secure connection to OAB |
|
| Specify the basic authentication user name to be used |
|
| Specify the basic authentication password to be used |
Examples
$ apb relist2.6. Other Commands
2.6.1. help
Description
Displays a help message.
Usage
$ apb helpExamples
$ apb help$ apb -hChapter 3. Writing APBs
3.1. Writing APBs: Getting Started
3.1.1. Overview
In this tutorial, you will walk through the creation of some sample Ansible Playbook Bundles (APBs). You will create actions for them to allow provision, deprovision, bind, and unbind. You can find more information about the design of APBs in the Design topic. More in-depth information about writing APBs is available in the Reference topic.
For the remainder of this tutorial, substitute your own information for items marked in brackets; for example, <host>:<port> might need to be replaced with 172.17.0.1.nip.io:8443.
3.1.2. Before You Begin
Before getting started creating your own APBs, you must set up your development environment:
- Ensure you have access to an OpenShift Container Platform cluster. The cluster should be running both the service catalog and the OpenShift Ansible broker (OAB), which is supported starting with OpenShift Container Platform 3.7.
-
Install the APB tools as documented in the CLI Tooling topic. To verify, you can run the
apb helpcommand and check for a valid response.
3.1.3. Creating Your First APB
In this tutorial, you will create an APB for a containerized hello world application. You will work through a basic APB that will mirror the APB hello-world-apb.
Your first task is to initialize the APB using the
apbCLI tool. This creates the skeleton for your APB. The command for this is simple:$ apb init my-test-apbAfter initialization, you will see the following file structure:
my-test-apb/
├── apb.yml
├── Dockerfile
├── playbooks
│   ├── deprovision.yml
│   └── provision.yml
└── roles
    ├── deprovision-my-test-apb
    │   └── tasks
    │       └── main.yml
    └── provision-my-test-apb
        └── tasks
            └── main.yml
Two files were created at the root directory: an apb.yml (the APB spec file) and a Dockerfile. These are the minimum files required for any APB. For more information about the APB spec file, see the Reference topic. There is also an explanation of what you can do in the Dockerfile.
apb.yml
version: 1.0
name: my-test-apb
description: This is a sample application generated by apb init
bindable: False
async: optional
metadata:
  displayName: my-test
plans:
  - name: default
    description: This default plan deploys my-test-apb
    free: True
    metadata: {}
    parameters: []
Dockerfile
FROM ansibleplaybookbundle/apb-base

LABEL "com.redhat.apb.spec"=\

COPY playbooks /opt/apb/actions
COPY roles /opt/ansible/roles
RUN chmod -R g=u /opt/{ansible,apb}
USER apb
In the Dockerfile, there are two updates to make:
Change the
FROMdirective to use the image from the Red Hat Container Catalog. The first line should now read:FROM openshift3/apb-baseUpdate
com.redhat.apb.specin theLABELinstruction with a base64 encoded version of apb.yml. To do this, runapb prepare:$ cd my-test-apb $ apb prepareThis updates the Dockerfile as follows:
Dockerfile
FROM openshift3/apb-base

LABEL "com.redhat.apb.spec"=\
"dmVyc2lvbjogMS4wCm5hbWU6IG15LXRlc3QtYXBiCmRlc2NyaXB0aW9uOiBUaGlzIGlzIGEgc2Ft\
cGxlIGFwcGxpY2F0aW9uIGdlbmVyYXRlZCBieSBhcGIgaW5pdApiaW5kYWJsZTogRmFsc2UKYXN5\
bmM6IG9wdGlvbmFsCm1ldGFkYXRhOgogIGRpc3BsYXlOYW1lOiBteS10ZXN0CnBsYW5zOgogIC0g\
bmFtZTogZGVmYXVsdAogICAgZGVzY3JpcHRpb246IFRoaXMgZGVmYXVsdCBwbGFuIGRlcGxveXMg\
bXktdGVzdC1hcGIKICAgIGZyZWU6IFRydWUKICAgIG1ldGFkYXRhOiB7fQogICAgcGFyYW1ldGVy\
czogW10="

COPY playbooks /opt/apb/actions
COPY roles /opt/ansible/roles
RUN chmod -R g=u /opt/{ansible,apb}
USER apb
At this point, you have a fully formed APB that you can build. If you skipped using
apb prepare, theapb buildcommand will still prepare the APB before building the image:$ apb buildYou can now push the new APB image to the local OpenShift Container Registry:
$ apb push -oQuerying the OAB will now show your new APB listed:
$ apb list
ID                                NAME            DESCRIPTION
< ------------ ID ------------->  dh-my-test-apb  This is a sample application generated by apb init
Similarly, visiting the OpenShift Container Platform web console will now display the new APB named my-test-apb in the service catalog under the All and Other tabs.
3.1.4. Adding Actions
The brand new APB created in the last section does not do much in its current state. For that, you must add some actions. The actions supported are:
- provision
- deprovision
- bind
- unbind
- test
You will add each of these actions in the following sections. But before beginning:
Ensure that you are logged in to your OpenShift Container Platform cluster via the
ocCLI. This will ensure theapbtool can interact with OpenShift Container Platform and the OAB:# oc login <cluster_host>:<port> -u <user_name> -p <password>Log in to the OpenShift Container Platform web console and verify your APB listed in the catalog:
Figure 3.1. OpenShift Container Platform Web Console
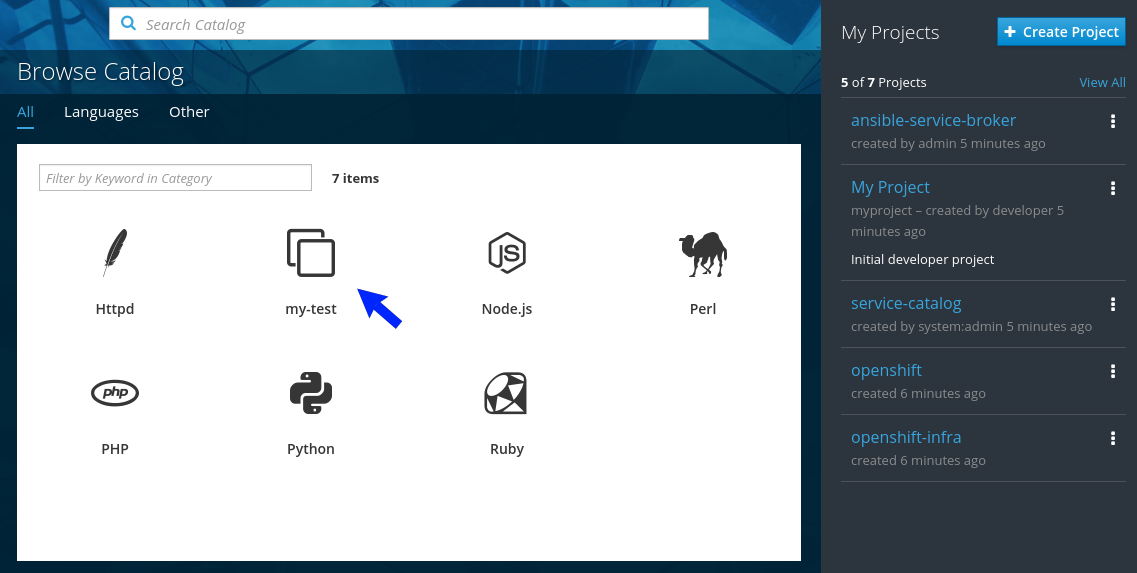
Create a project named getting-started where you will deploy OpenShift Container Platform resources. You can create it using the web console or CLI:
$ oc new-project getting-started
3.1.4.1. Provision
During the apb init process, two parts of the provision task were stubbed out. The playbook, playbooks/provision.yml, and the associated role in roles/provision-my-test-apb:
my-test-apb
├── apb.yml
├── Dockerfile
├── playbooks
│   └── provision.yml
└── roles
    └── provision-my-test-apb
        └── tasks
└── main.yml The playbooks/provision.yml file is the Ansible playbook that will be run when the provision action is called from the OAB. You can change the playbook, but for now you can just leave the code as is.
playbooks/provision.yml
- name: my-test-apb playbook to provision the application
  hosts: localhost
  gather_facts: false
  connection: local
  roles:
  - role: ansible.kubernetes-modules
    install_python_requirements: no
  - role: ansibleplaybookbundle.asb-modules
  - role: provision-my-test-apb
    playbook_debug: false
The playbook will execute on localhost and execute the role provision-my-test-apb. This playbook works on its local container created by the service broker. The ansible.kubernetes-modules role allow you to use the kubernetes-modules to create your OpenShift Container Platform resources. The asb-modules provide additional functionality for use with the OAB.
Currently, there are no tasks in the role. The contents of the roles/provision-my-test-apb/tasks/main.yml only contains comments showing common resource creation tasks. ou can currently execute the provision task, but since there are no tasks to perform, it would simply launch the APB container and exit without deploying anything.
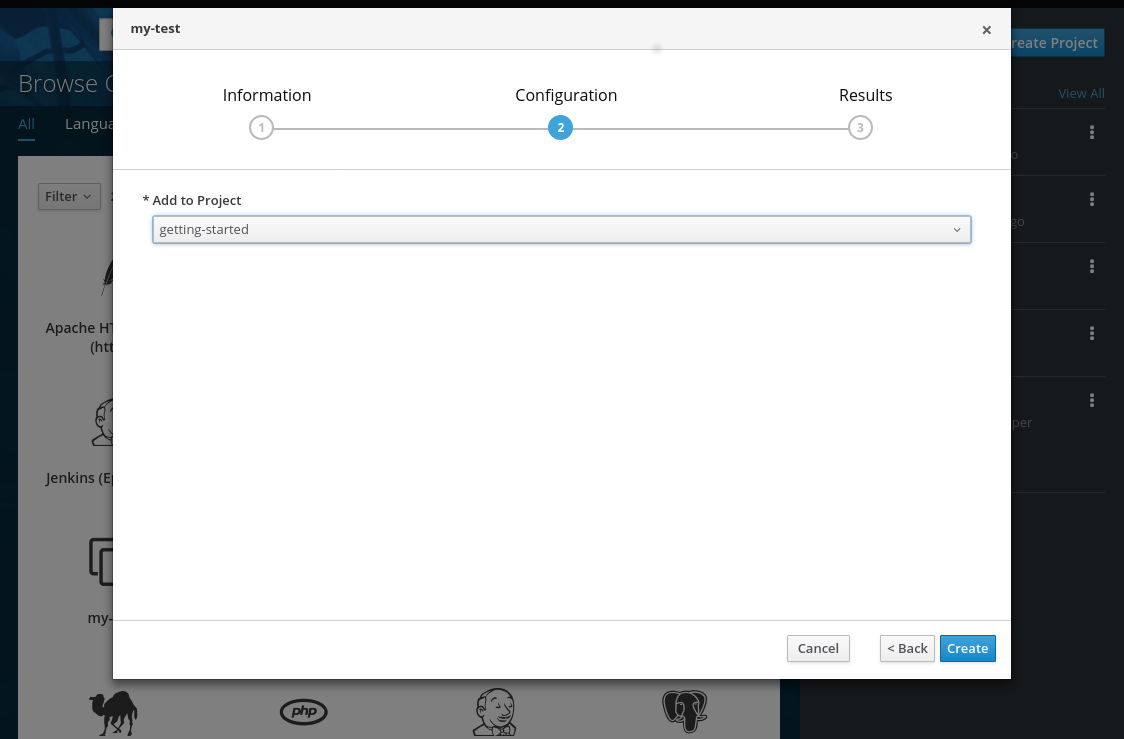
You can try this now by clicking on the my-test APB and deploying it to the getting-started project using the web console:
Figure 3.2. Provisioning my-test
When the provision is executing, a new namespace is created with the name dh-my-test-apb-prov-<random>. In development mode, it will persist, but usually this namespace would be deleted after successful completion. If the APB fails provisioning, the namespace will persist by default.
By looking at the pod resources, you can see the log for the execution of the APB. To view the pod’s logs:
Find the namespaces by either using the web console to view all namespaces and sort by creation date, or using the following command:
$ oc get ns
NAME                                STATUS    AGE
ansible-service-broker              Active    1h
default                             Active    1h
dh-my-test-apb-prov-<random>        Active    4m
Switch to the project:
$ oc project dh-my-test-apb-prov-<random>
Now using project "dh-my-test-apb-prov-<random>" on server "<cluster_host>:<port>".
Get the pod name:
$ oc get pods
NAME             READY     STATUS      RESTARTS   AGE
<apb_pod_name>   0/1       Completed   0          3m
View the logs:
$ oc logs -f <apb_pod_name>
...
+ ansible-playbook /opt/apb/actions/provision.yml --extra-vars '{"_apb_plan_id":"default","namespace":"getting-started"}'
PLAY [my-test-apb playbook to provision the application] ***********************
TASK [ansible.kubernetes-modules : Install latest openshift client] *************
skipping: [localhost]
TASK [ansibleplaybookbundle.asb-modules : debug] *******************************
skipping: [localhost]
PLAY RECAP *********************************************************************
localhost                  : ok=0    changed=0    unreachable=0    failed=0
3.1.4.1.1. Creating a Deploying Configuration
At the minimum, your APB should deploy the application pods. You can do this by specifying a deployment configuration:
One of the first tasks that is commented out in the provision-my-test-apb/tasks/main.yml file is the creation of the deployment configuration. You can uncomment it or paste the following:
NoteNormally, you would replace the
image:value with your own application image.- name: create deployment config openshift_v1_deployment_config: name: my-test namespace: '{{ namespace }}'1 labels:2 app: my-test service: my-test replicas: 13 selector:4 app: my-test service: my-test spec_template_metadata_labels: app: my-test service: my-test containers:5 - env: image: docker.io/ansibleplaybookbundle/hello-world:latest name: my-test ports: - container_port: 8080 protocol: TCP- 1
- Designates which namespace the deployment configuration should be in.
- 2
- Used to help organize, group, and select objects.
- 3
- Specifies that you only want one pod.
- 4
- The
selectorsection is a labels query over pods. - 5
- This
containerssection specifies a container with a hello-world application running on port 8080 on TCP. The image is stored at docker.io/ansibleplaybookbundle/hello-world.
For more information, Writing APBs: Reference has more detail, and you can see the ansible-kubernetes-modules documentation for a full accounting of all fields.
Build and push the APB:
$ apb build $ apb push -o- Provision the APB using the web console.
After provisioning, there will be a new running pod and a new deployment configuration. Verify by checking your OpenShift Container Platform resources:
$ oc project getting-started
$ oc get all
NAME         REVISION   DESIRED   CURRENT   TRIGGERED BY
dc/my-test   1          1         1         config

NAME           DESIRED   CURRENT   READY     AGE
rc/my-test-1   1         1         1         35s

NAME                 READY     STATUS    RESTARTS   AGE
po/my-test-1-2pw4t   1/1       Running   0          33s
You will also be able to see the deployed application in the web console on the project’s Overview page.
The only way to use this pod in its current state is to use:
$ oc describe pods/<pod_name>to find its IP address and access it directly. If there were multiple pods, they would be accessed separately. To treat them like a single host, you need to create a service, described in the next section.
To clean up before moving on and allow you to provision again, you can delete the getting-started project and recreate it or create a new one.
3.1.4.1.2. Creating a Service
You will want to use multiple pods, load balance them, and create a service so that a user can access them as a single host:
Modify the provision-my-test-apb/tasks/main.yml file and add the following:
- name: create my-test service
  k8s_v1_service:
    name: my-test
    namespace: '{{ namespace }}'
    labels:
      app: my-test
      service: my-test
    selector:
      app: my-test
      service: my-test
    ports:
      - name: web
        port: 80
        target_port: 8080
The
selectorsection will allow the my-test service to include the correct pods. Theportswill take the target port from the pods (8080) and expose them as a single port for the service (80). Notice the application was running on 8080 but has now been made available on the default HTTP port of 80.The
namefield of the port allows you to specify this port in the future with other resources. More information is available in the k8s_v1_service module.Build and push the APB:
$ apb build $ apb push -o- Provision the APB using the web console.
After provisioning, you will see a new service in the web console or CLI. In the web console, you can click on the new service under Networking in the application on the Overview page or under Applications → Services. The service’s IP address will be shown which you can use to access the load balanced application.
To view the service information from the command line, you can do the following:
$ oc project getting-started
$ oc get services
$ oc describe services/my-test
The describe command will show the IP address to access the service. However, using an IP address for users to access your application is not generally what you want. Instead, you should create a route, described in the next section.
To clean up before moving on and allow you to provision again, you can delete the getting-started project and recreate it or create a new one.
3.1.4.1.3. Creating a Route
You can expose external access to your application through a reliable named route:
Modify the provision-my-test-apb/tasks/main.yml file and adding the following:
- name: create my-test route
  openshift_v1_route:
    name: my-test
    namespace: '{{ namespace }}'
    labels:
      app: my-test
      service: my-test
    to_name: my-test
    spec_port_target_port: web
The
to_nameis the name of the target service. Thespec_port_target_portrefers to the name of the target service’s port. More information is available in the openshift_v1_route module.Build and push the APB:
$ apb build $ apb push -o- Provision the APB using the web console.
After provisioning, you will see the new route created. On the web console’s Overview page for the getting-started project, you will now see an active and clickable route link listed on the application. Clicking on the route or visiting the URL will bring up the hello-world application.
You can also view the route information from the CLI:
$ oc project getting-started

$ oc get routes
NAME      HOST/PORT                                   PATH      SERVICES   PORT      TERMINATION   WILDCARD
my-test   my-test-getting-started.172.17.0.1.nip.io             my-test    web                     None

$ oc describe routes/my-test
Name:			my-test
Namespace:		getting-started
...
At this point, your my-test application is fully functional, load balanced, scalable, and accessible. You can compare your finished APB to the hello-world APB in the hello-world-apb example repository.
3.1.4.2. Deprovision
For the deprovision task, you must destroy all provisioned resources, usually in reverse order from how they were created.
To add the deprovision action, you need a deprovision.yml file under playbooks/ directory and related tasks in the roles/deprovision-my-test-apb/tasks/main.yml. Both these files should already be created for you:
my-test-apb/
├── apb.yml
├── Dockerfile
├── playbooks
│   └── deprovision.yml
└── roles
    └── deprovision-my-test-apb
        └── tasks
└── main.yml The content of the deprovision.yml file looks the same as the provision task, except it is calling a different role:
playbooks/deprovision.yml
- name: my-test-apb playbook to deprovision the application
  hosts: localhost
  gather_facts: false
  connection: local
  roles:
  - role: ansible.kubernetes-modules
    install_python_requirements: no
  - role: ansibleplaybookbundle.asb-modules
  - role: deprovision-my-test-apb
    playbook_debug: false
Edit that role in the file roles/deprovision-my-test-apb/tasks/main.yml. By uncommenting the tasks, the resulting file without comments should look like the following:
- openshift_v1_route:
    name: my-test
    namespace: '{{ namespace }}'
    state: absent

- k8s_v1_service:
    name: my-test
    namespace: '{{ namespace }}'
    state: absent

- openshift_v1_deployment_config:
    name: my-test
    namespace: '{{ namespace }}'
    state: absent
In the provision.yml file created earlier, you created a deployment configuration, service, then route. For the deprovision action, you should delete the resources in reverse order. You can do so by identifying the resource by namespace and name, and then marking it as state: absent.
To run the deprovision template, click on the menu on the list of Deployed Services and select Delete.
3.1.4.2.1. Bind
From the previous sections, you learned how to deploy a standalone application. However, in most cases applications will need to communicate with other applications, and often with a data source. In the following sections, you will create a PostgreSQL database that the hello-world application deployed from my-test-apb can use.
3.1.4.2.1.1. Preparation
For a good starting point, create the necessary files for provision and deprovisioning PostgreSQL.
A more in-depth example can be found at the PostgreSQL example APB.
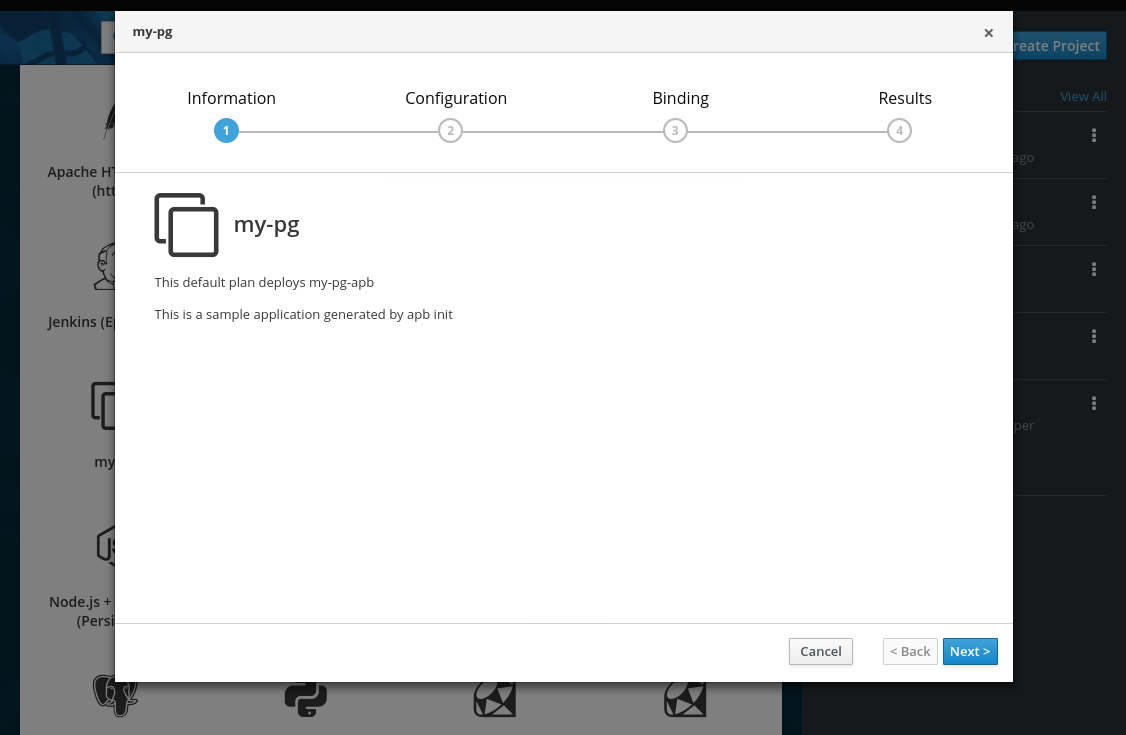
Initialize the APB using the
--bindableoption:$ apb init my-pg-apb --bindableThis creates the normal APB file structure with a few differences:
my-pg-apb/
├── apb.yml
1 ├── Dockerfile ├── playbooks │ ├── bind.yml2 │ ├── deprovision.yml │ ├── provision.yml │ └── unbind.yml3 └── roles ├── bind-my-pg-apb │ └── tasks │ └── main.yml4 ├── deprovision-my-pg-apb │ └── tasks │ └── main.yml ├── provision-my-pg-apb │ └── tasks │ └── main.yml5 └── unbind-my-pg-apb └── tasks └── main.yml6 In addition to the normal files, new playbooks bind.yml, unbind.yml, and their associated roles have been stubbed out. The bind.yml and unbind.yml files are both empty and, because you are using the default binding behavior, will remain empty.
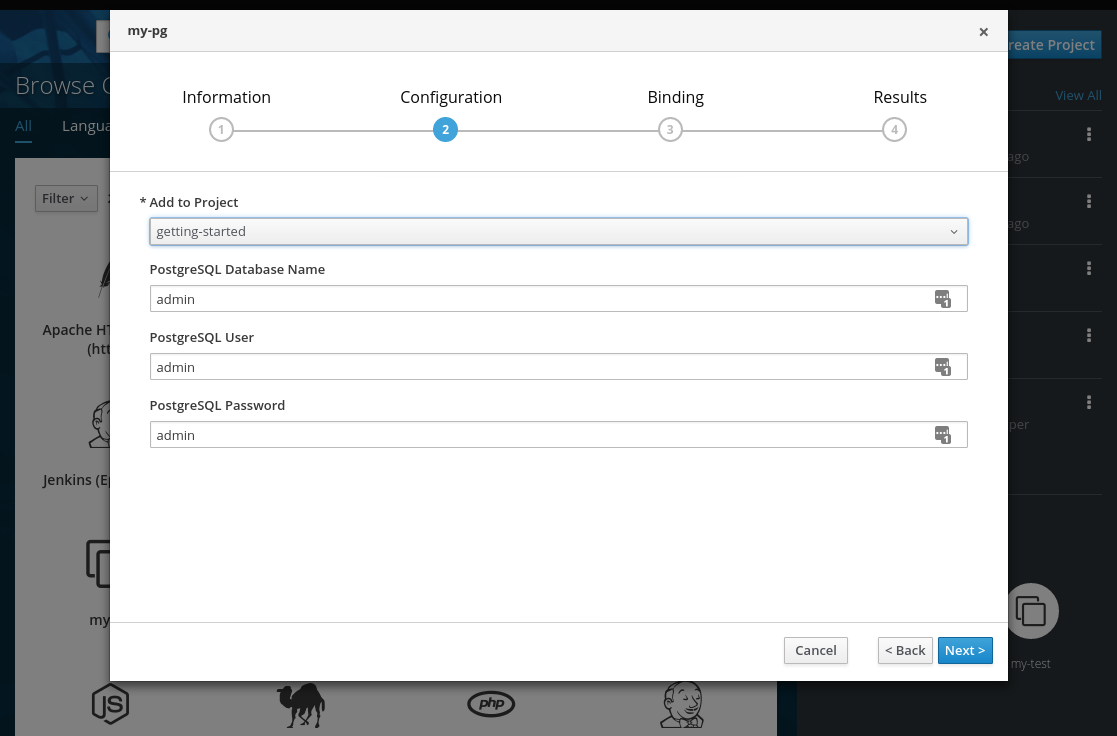
Edit the apb.yml file. Notice the setting
bindable: true. In addition to those changes, you must add some parameters to the apb.yml for configuring PostgreSQL. They will be available fields in the web console when provisioning your new APB:version: 1.0 name: my-pg-apb description: This is a sample application generated by apb init bindable: True async: optional metadata: displayName: my-pg plans: - name: default description: This default plan deploys my-pg-apb free: True metadata: {} # edit the parameters and add the ones below. parameters: - name: postgresql_database title: PostgreSQL Database Name type: string default: admin - name: postgresql_user title: PostgreSQL User type: string default: admin - name: postgresql_password title: PostgreSQL Password type: string default: adminThe playbooks/provision.yml will look like the following:
- name: my-pg-apb playbook to provision the application
  hosts: localhost
  gather_facts: false
  connection: local
  roles:
  - role: ansible.kubernetes-modules
    install_python_requirements: no
  - role: ansibleplaybookbundle.asb-modules
  - role: provision-my-pg-apb
    playbook_debug: false
The playbooks/deprovision.yml will look like the following:
- name: my-pg-apb playbook to deprovision the application
  hosts: localhost
  gather_facts: false
  connection: local
  roles:
  - role: ansible.kubernetes-modules
    install_python_requirements: no
  - role: deprovision-my-pg-apb
    playbook_debug: false
Edit the roles/provision-my-pg-apb/tasks/main.yml file. This file mirrors your hello-world application in many respects, but adds a persistent volume (PV) to save data between restarts and various configuration options for the deployment configuration.
In addition, a new task has been added at the the very bottom after the provision tasks. To save the credentials created during the provision process, you must encode them for retrieval by the OAB. The new task, using the module
asb_encode_binding, will do so for you.You can safely delete everything in that file and replace it with the following:
# New persistent volume claim
- name: create volumes
  k8s_v1_persistent_volume_claim:
    name: my-pg
    namespace: '{{ namespace }}'
    state: present
    access_modes:
      - ReadWriteOnce
    resources_requests:
      storage: 1Gi

- name: create deployment config
  openshift_v1_deployment_config:
    name: my-pg
    namespace: '{{ namespace }}'
    labels:
      app: my-pg
      service: my-pg
    replicas: 1
    selector:
      app: my-pg
      service: my-pg
    spec_template_metadata_labels:
      app: my-pg
      service: my-pg
    containers:
    - env:
      - name: POSTGRESQL_PASSWORD
        value: '{{ postgresql_password }}'
      - name: POSTGRESQL_USER
        value: '{{ postgresql_user }}'
      - name: POSTGRESQL_DATABASE
        value: '{{ postgresql_database }}'
      image: docker.io/centos/postgresql-94-centos7
      name: my-pg
      ports:
      - container_port: 5432
        protocol: TCP
      termination_message_path: /dev/termination-log
      volume_mounts:
      - mount_path: /var/lib/pgsql/data
        name: my-pg
      working_dir: /
    volumes:
    - name: my-pg
      persistent_volume_claim:
        claim_name: my-pg
      test: false
      triggers:
      - type: ConfigChange

- name: create service
  k8s_v1_service:
    name: my-pg
    namespace: '{{ namespace }}'
    state: present
    labels:
      app: my-pg
      service: my-pg
    selector:
      app: my-pg
      service: my-pg
    ports:
    - name: port-5432
      port: 5432
      protocol: TCP
      target_port: 5432

# New encoding task makes credentials available to future bind operations
- name: encode bind credentials
  asb_encode_binding:
    fields:
      DB_TYPE: postgres
      DB_HOST: my-pg
      DB_PORT: "5432"
      DB_USER: "{{ postgresql_user }}"
      DB_PASSWORD: "{{ postgresql_password }}"
      DB_NAME: "{{ postgresql_database }}"
The
encode bind credentialstask will make available several fields as environment variables:DB_TYPE,DB_HOST,DB_PORT,DB_USER,DB_PASSWORD, andDB_NAME. This is the default behavior when the bind.yml file is left empty. Any application (such as hello-world) can use these environment variables to connect to the configured database after performing a bind operation.Edit the roles/deprovision-my-pg-apb/tasks/main.yml and uncomment the following lines so that the created resources will be deleted during deprovisioning:
- k8s_v1_service:
    name: my-pg
    namespace: '{{ namespace }}'
    state: absent

- openshift_v1_deployment_config:
    name: my-pg
    namespace: '{{ namespace }}'
    state: absent

- k8s_v1_persistent_volume_claim:
    name: my-pg
    namespace: '{{ namespace }}'
    state: absent
Finally, build and push your APB:
$ apb build
$ apb push -o
At this point, the APB can create a fully functional PostgreSQL database to your cluster. You can test it out in the next section.
3.1.4.2.1.2. Executing From the UI
To test your application, you can bind a hello-world application to the provisioned PostgreSQL database. You can use the application previously created in the Provision section of this tutorial, or you can use the hello-world-apb:
- First, provision my-test-apb.
Then, provision my-pg-apb and select the option to Create a secret:
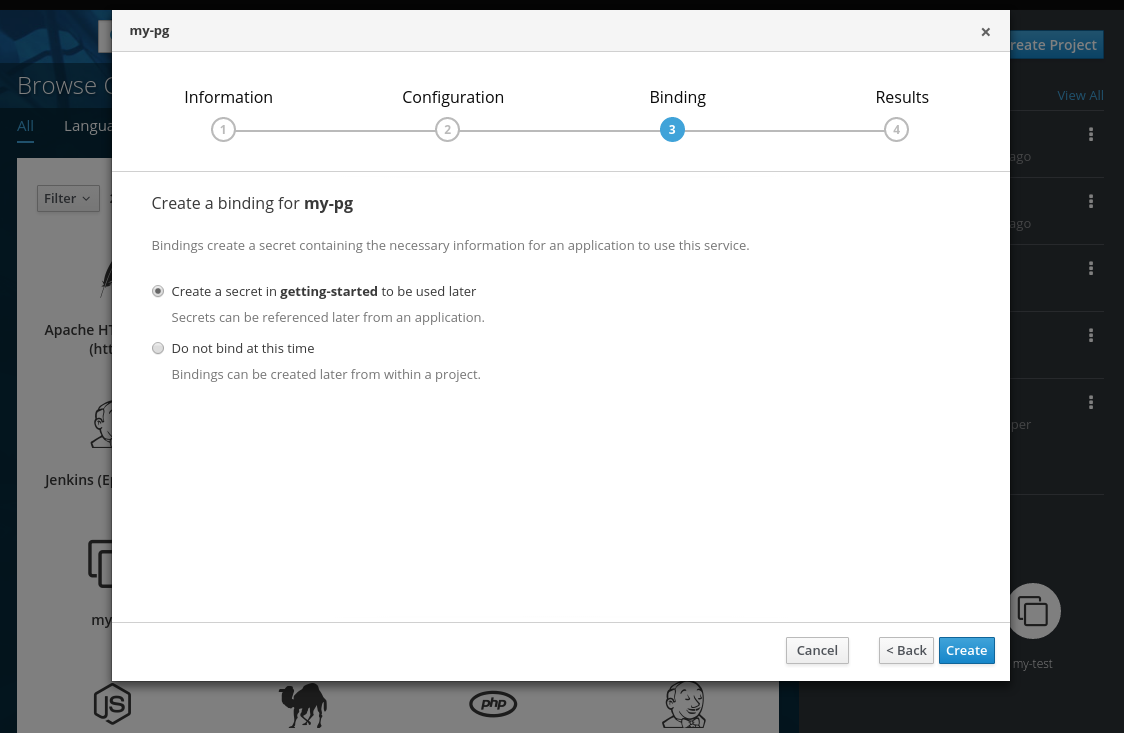
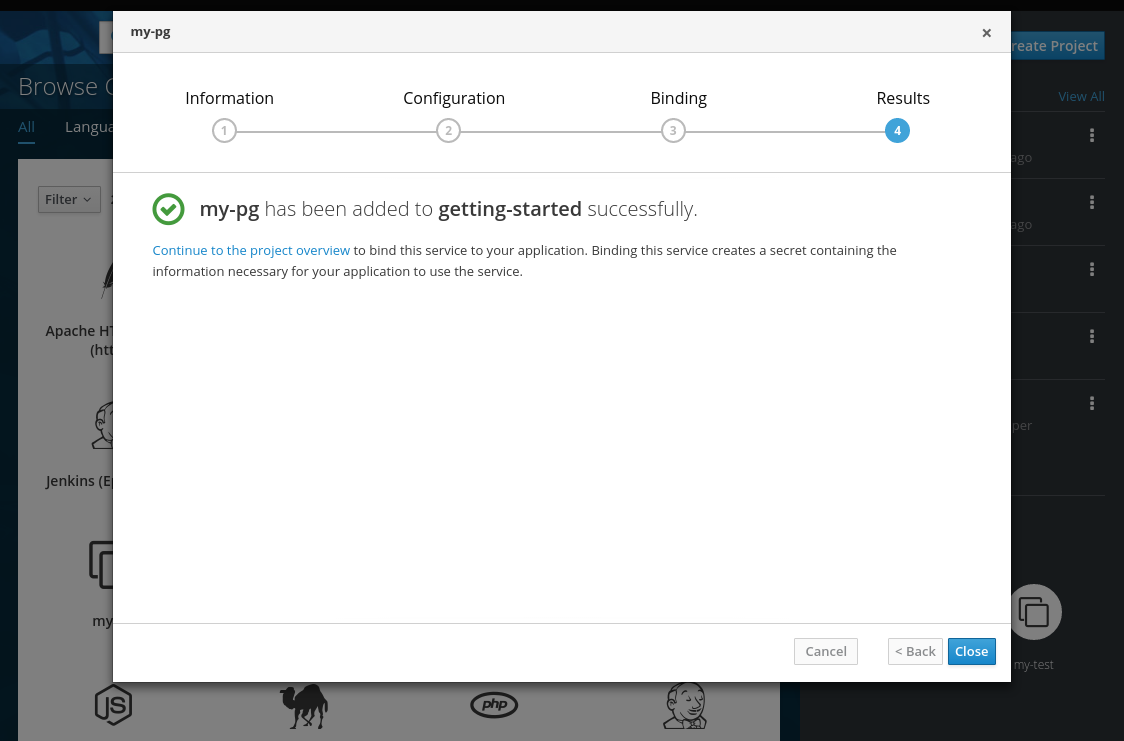
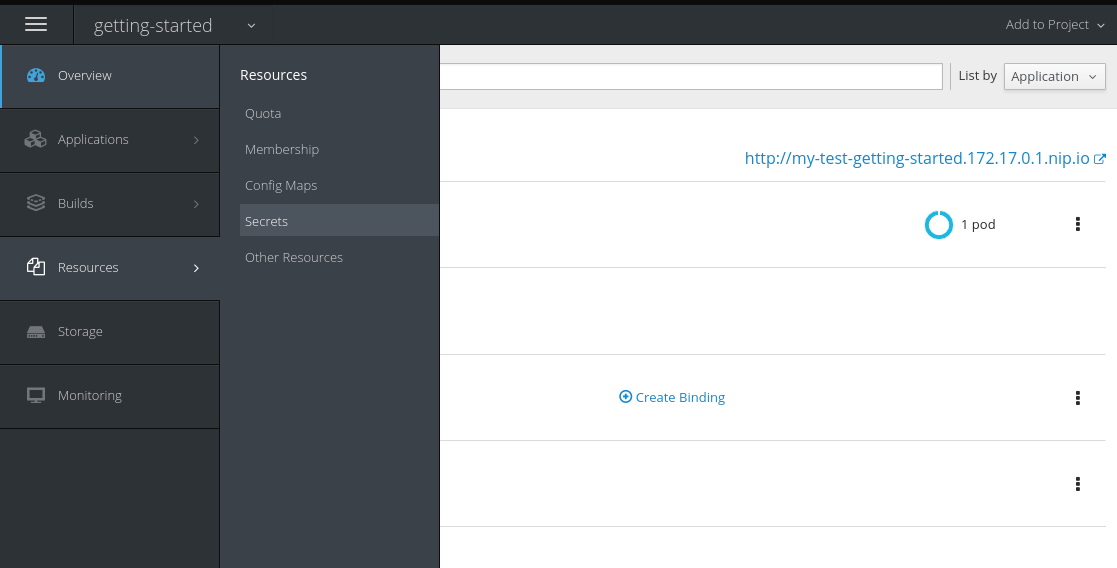
- Now, if you have not already done so, navigate to the project. You can see both your hello-world application and your PostgreSQL database. If you did not select to create a binding at provision time, you can also do so here with the Create binding link.
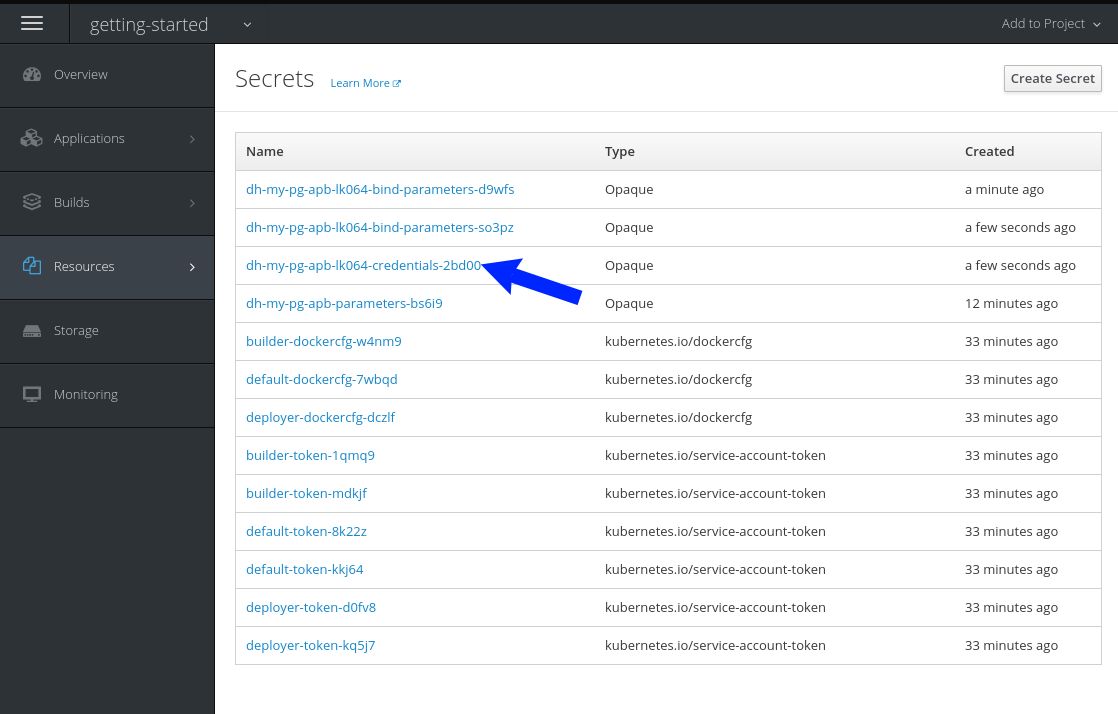
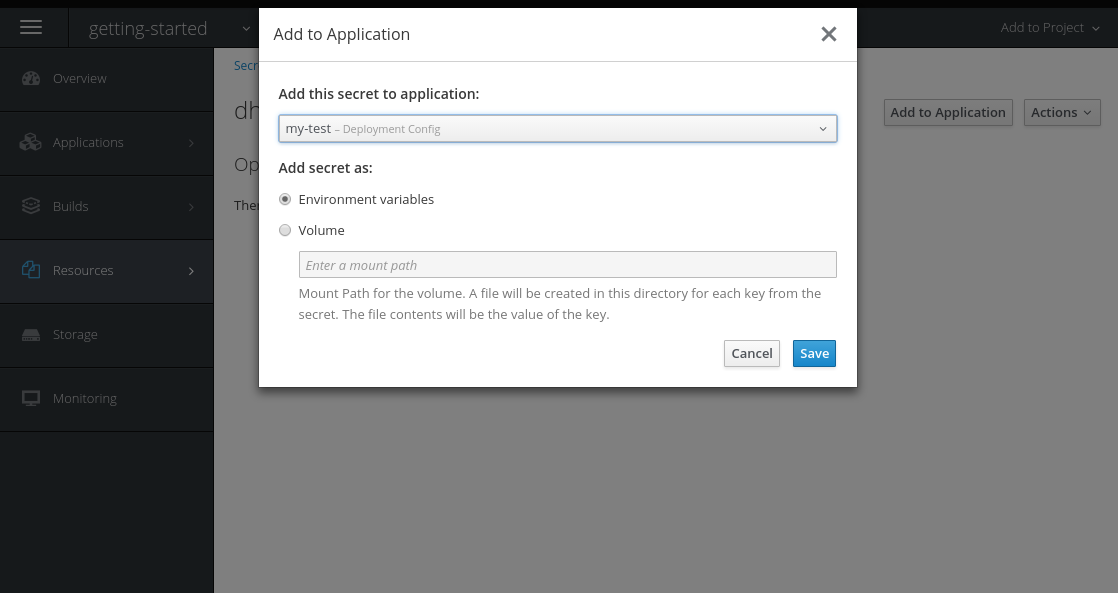
After you the binding has been created, you must add the secret created by the binding into the application. First, navigate to the secrets on the Resources → Secrets page:
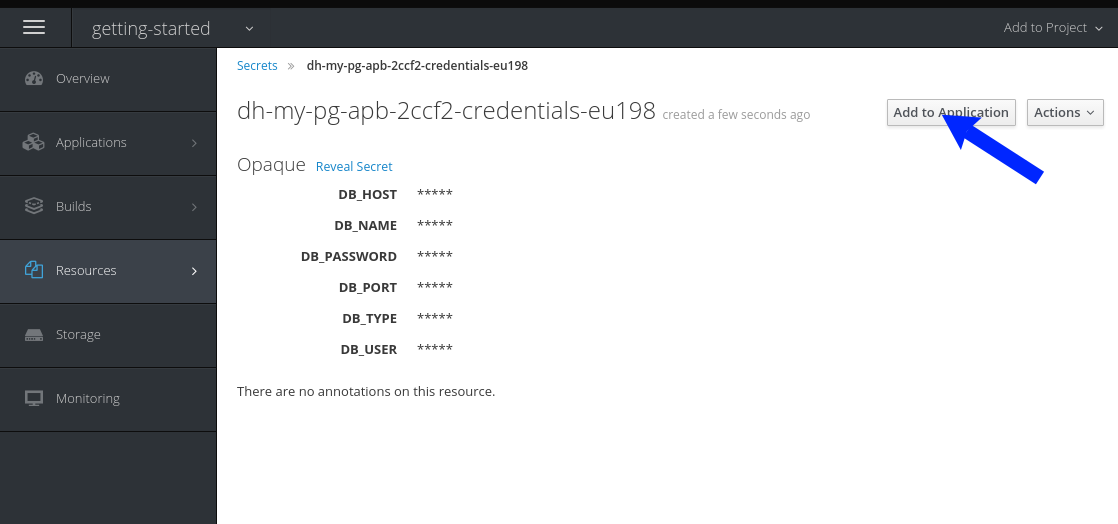
Add the secret as environment variables:
After this addition, you can return to the Overview page. The my-test application may still be redeploying from the configuration change. If so, wait until you can click on the route to view the application:
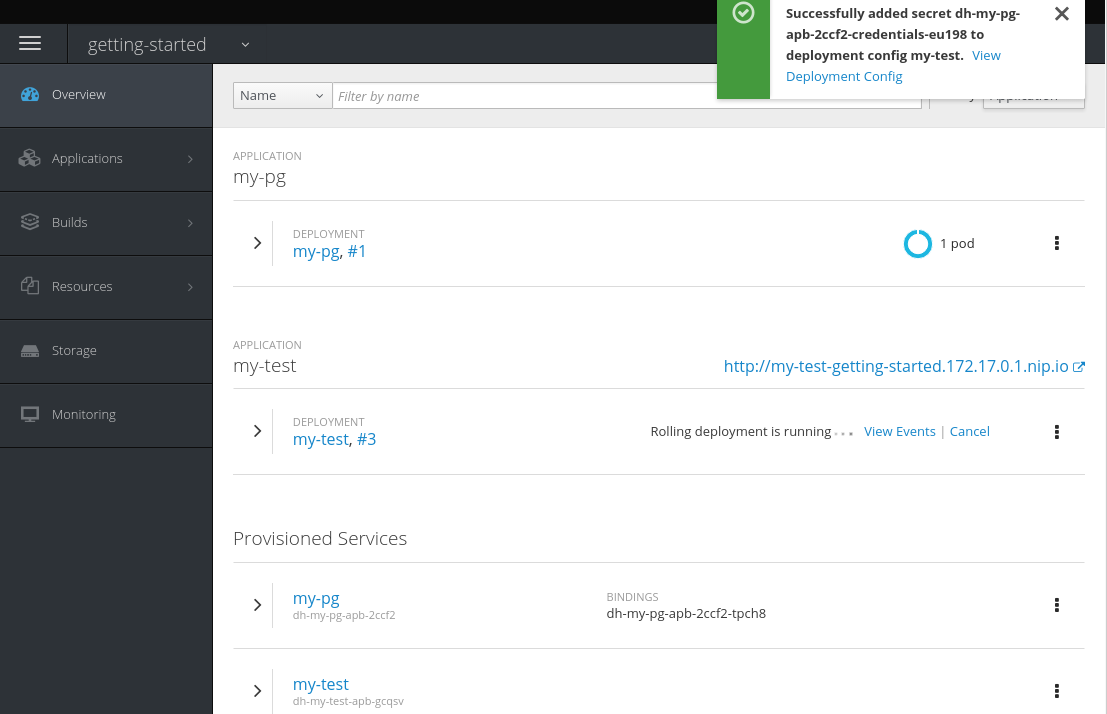
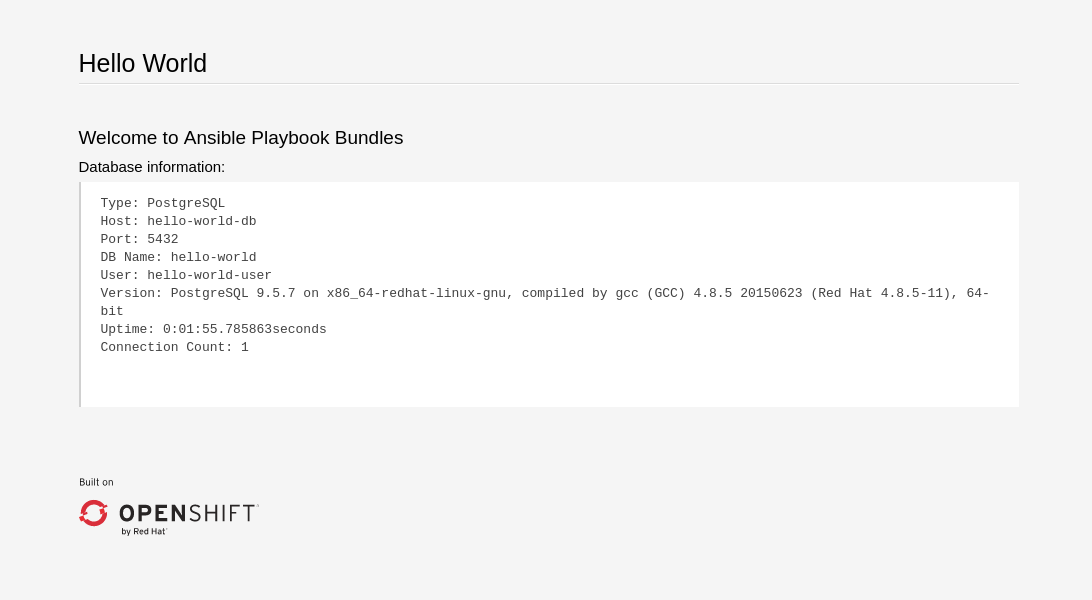
After clicking the route, you will see the hello-world application has detected and connected to the my-pg database:
3.1.4.2.2. Test
Test actions are intended to check that an APB passes a basic sanity check before publishing to the service catalog. They are not meant to test a live service. OpenShift Container Platform provides the ability to test a live service using liveness and readiness probes, which you can add when provisioning.
The actual implementation of your test is left to you as the APB author. The following sections provide guidance and best practices.
3.1.4.2.2.1. Writing a Test Action
To create a test action for your APB:
- Include a playbooks/test.yml file.
- Include defaults for the test in the playbooks/vars/ directory.
my-apb/
├── ...
├── playbooks/
    ├── test.yml
    └── vars/
        └── test_defaults.yml
To orchestrate the testing of an APB, you should use the include_vars and include_role modules in your test.yml file:
test.yml
- name: test media wiki abp
  hosts: localhost
  gather_facts: false
  connection: local

  roles:
  - role: ansible.kubernetes-modules
    install_python_requirements: no

  post_tasks:
  - name: Load default variables for testing
    include_vars: test_defaults.yaml
  - name: create project for namespace
    openshift_v1_project:
      name: '{{ namespace }}'
  - name: Run the provision role.
    include_role:
      name: provision-mediawiki123-apb
  - name: Run the verify role.
    include_role:
name: verify-mediawiki123-apb- 1
- Load the Ansible Kubernetes modules.
- 2
- Include the default values needed for provision from the test role.
- 3
- Include the provision role to run.
- 4
- Include the verify role to run. See Writing a Verify Role.
3.1.4.2.2.2. Writing a Verify Role
A verify role allows you to determine if the provision has failed or succeeded. The verify_<name> role should be in the roles/ directory. This should be a normal Ansible role.
my-apb/
├── ...
└── roles/
    ├── ...
    └── verify_<name>
        ├── defaults
             └── defaults.yml
        └── tasks
            └── main.yml
An example task in the main.yml file could look like:
 - name: url check for media wiki
   uri:
     url: "http://{{ route.route.spec.host }}"
     return_content: yes
   register: webpage
   failed_when: webpage.status != 200
3.1.4.2.2.3. Saving Test Results
The asb_save_test_result module can also be used in the verify role, allowing the APB to save test results so that the apb test command can return them. The APB pod will stay alive for the tool to retrieve the test results.
For example, adding asb_save_test_result usage to the previous main.yml example:
 - name: url check for media wiki
   uri:
     url: "http://{{ route.route.spec.host }}"
     return_content: yes
   register: webpage

  - name: Save failure for the web page
    asb_save_test_result:
      fail: true
      msg: "Could not reach route and retrieve a 200 status code. Recieved status - {{ webpage.status }}"
    when: webpage.status != 200

  - fail:
      msg: "Could not reach route and retrieve a 200 status code. Recieved status - {{ webpage.status }}"
    when: webpage.status != 200

  - name: Save test pass
    asb_save_test_result:
      fail: false
    when: webpage.status == 200
3.1.4.2.2.4. Running a Test Action
After you have defined your test action, you can use the CLI tooling to run the test:
$ apb testThe test action will:
- build the image,
- start up a pod as if it was being run by the service broker, and
- retrieve the test results if any were saved.
The status of pod after execution has finished will determine the status of the test. If the pod is in an error state, then something failed and the command reports that the test was unsuccessful.
3.2. Writing APBs: Reference
3.2.1. Overview
While the Getting Started topic provides a step by step walkthrough on creating your first Ansible Playbook Bundle (APB), this topic provides more in-depth reference material. The fundamental components that make up an APB are explained in further detail to help an experienced APB developer get a better understanding of each individual component within an APB.
For completed APB examples, you can browse APBs in the ansibleplaybookbundle organization on GitHub.
3.2.2. Directory Structure
The following shows an example directory structure of an APB:
example-apb/
├── Dockerfile
├── apb.yml
└── roles/
│   └── example-apb-openshift
│       ├── defaults
│       │   └── main.yml
│       └── tasks
│           └── main.yml
└── playbooks/
    └── provision.yml
    └── deprovision.yml
    └── bind.yml
    └── unbind.yml
3.2.3. APB Spec File
The APB spec file is located at apb.yml and is where the outline of your application is declared. The following is an example APB spec:
  version: 1.0
  name: example-apb
  description: A short description of what this APB does
  bindable: True
  async: optional
  metadata:
    documentationUrl: <link_to_documentation>
    imageUrl: <link_to_url_of_image>
    dependencies: ['<registry>/<organization>/<dependency_name_1>', '<registry>/<organization>/<dependency_name_2>']
    displayName: Example App (APB)
    longDescription: A longer description of what this APB does
    providerDisplayName: "Red Hat, Inc."
  plans:
    - name: default
      description: A short description of what this plan does
      free: true
      metadata:
        displayName: Default
        longDescription: A longer description of what this plan deploys
        cost: $0.00
      parameters:
        - name: parameter_one
          required: true
          default: foo_string
          type: string
          title: Parameter One
          maxlength: 63
        - name: parameter_two
          required: true
          default: true
          title: Parameter Two
          type: boolean
3.2.3.1. Top-level Structure
| Field | Description |
|---|---|
|
| Version of the APB spec. See APB Spec Versioning for details. |
|
| Name of the APB. Names must be valid ASCII and may contain lowercase letters, digits, underscores, periods, and dashes. See Docker’s guidelines for valid tag names. |
|
| Short description of this APB. |
|
|
Boolean option of whether or not this APB can be bound to. Accepted fields are |
|
| Dictionary field declaring relevant metadata information. |
|
| A list of plans that can be deployed. See Plans for details. |
3.2.3.2. Metadata
| Field | Description |
|---|---|
|
| URL to the application’s documentation. |
|
| URL to an image which will be displayed in the web console for the service catalog. |
|
| List of images which are consumed from within the APB. |
|
| The name that will be displayed in the web console for this APB. |
|
| Longer description that will be displayed when the APB is clicked in the web console. |
|
| Name of who is providing this APB for consumption. |
3.2.3.3. Plans
Plans are declared as a list. This section explains what each field in a plan describes.
| Field | Description |
|---|---|
|
| Unique name of plan to deploy. This will be displayed when the APB is clicked from the service catalog. |
|
| Short description of what will be deployed from this plan. |
|
|
Boolean field to determine if this plan is free or not. Accepted fields are |
|
| Dictionary field declaring relevant plan metadata information. See Plan Metadata for details. |
|
| List of parameter dictionaries used as input to the APB. See Parameters for details. |
3.2.3.4. Plan Metadata
| Field | Description |
|---|---|
|
| Name to display for the plan in the web console. |
|
| Longer description of what this plan deploys. |
|
|
How much the plan will cost to deploy. Accepted field is |
3.2.3.5. Parameters
Each item in the parameters section can have several fields. The name field is required. The order of the parameters will be displayed in sequential order in the form in the OpenShift Container Platform web console.
parameters:
  - name: my_param
    title: My Parameter
    type: enum
    enum: ['X', 'Y', 'Z']
    required: True
    default: X
    display_type: select
display_group: Group 1| Field | Description |
|---|---|
|
| Unique name of the parameter passed into the APB. |
|
| Displayed label in the web console. |
|
|
Data type of the parameters as specified by link json-schema, such as |
|
| Whether or not the parameter is required for APB execution. Required field in the web console. |
|
| Default value assigned to the parameter. |
|
|
Display type for the web console. For example, you can override a string input as a |
|
|
Will cause a parameter to display in groups with adjacent parameters with matching |
When using a long list of parameters, it can be useful to use a shared parameter list. For an example of this, see the rhscl-postgresql-apb.
3.2.3.6. APB Spec Versioning
The APB spec uses semantic versioning with the format of x.y where x is a major release and y is a minor release.
The current spec version is 1.0.
3.2.3.6.1. Major Version
The APB spec will increment the major version whenever an API breaking change is introduced to the spec. Some examples include:
- Introduction or deletion of a required field.
- Changing the YAML format.
- New features.
3.2.3.6.2. Minor Version
The APB spec will increment the minor version whenever a non-breaking change is introduced to the spec. Some examples include:
- Introduction or deletion of an optional field.
- Spelling change.
- Introduction of new options to an existing field.
3.2.4. Dockerfile
The Dockerfile is what is used to actually build the APB image. As a result, sometimes you will need to customize it for your own needs. For example, if running a playbook that requires interactions with PostgreSQL, you may want to install the required packages by adding the yum install command:
FROM ansibleplaybookbundle/apb-base
MAINTAINER Ansible Playbook Bundle Community

LABEL "com.redhat.apb.spec"=\
"<------------base64-encoded-spec------------>"


COPY roles /opt/ansible/roles
COPY playbooks /opt/apb/actions
RUN chmod -R g=u /opt/{ansible,apb}


### INSTALL THE REQUIRED PACKAGES
RUN yum -y install python-boto postgresql && yum clean all

USER apb
3.2.5. APB Actions (Playbooks)
An action for an APB is the command that the APB is run with. The standard actions that are supported are:
- provision
- deprovision
- bind
- unbind
- test
For an action to be valid, there must be a valid file in the playbooks/ directory named <action>.yml. These playbooks can do anything, which also means that you can technically create any action you would like. For example, the mediawiki-apb has playbook creating an update action.
Most APBs will normally have a provision action to create resources and a deprovision action to destroy the resources when deleting the service.
The bind and unbind actions are used when the coordinates of one service needs to be made available to another service. This is often the case when creating a data service and making it available to an application. Currently, the coordinates are made available during the provision.
To properly make your coordinates available to another service, use the asb_encode_binding module. This module should be called at the end of the APB’s provision role, and it will return bind credentials to the OpenShift Ansible broker (OAB):
- name: encode bind credentials
  asb_encode_binding:
    fields:
      EXAMPLE_FIELD: foo
      EXAMPLE_FIELD2: foo2
3.2.6. Working With Common Resources
This section describes a list of common OpenShift Container Platform resources that are created when developing APBs. See the Ansible Kubernetes Module for a full list of available resource modules.
3.2.6.1. Service
The following is a sample Ansible task to create a service named hello-world. The namespace variable in an APB will be provided by the OAB when launched from the web console.
Provision
- name: create hello-world service
  k8s_v1_service:
    name: hello-world
    namespace: '{{ namespace }}'
    labels:
      app: hello-world
      service: hello-world
    selector:
      app: hello-world
      service: hello-world
    ports:
      - name: web
        port: 8080
        target_port: 8080
Deprovision
- k8s_v1_service:
    name: hello-world
    namespace: '{{ namespace }}'
    state: absent
3.2.6.2. Deployment Configuration
The following is a sample Ansible task to create a deployment configuration for the image docker.io/ansibleplaybookbundle/hello-world which maps to service hello-world.
Provision
- name: create deployment config
  openshift_v1_deployment_config:
    name: hello-world
    namespace: '{{ namespace }}'
    labels:
      app: hello-world
      service: hello-world
    replicas: 1
    selector:
      app: hello-world
      service: hello-world
    spec_template_metadata_labels:
      app: hello-world
      service: hello-world
    containers:
    - env:
      image: docker.io/ansibleplaybookbundle/hello-world:latest
      name: hello-world
      ports:
      - container_port: 8080
        protocol: TCP
Deprovision
- openshift_v1_deployment_config:
    name: hello-world
    namespace: '{{ namespace }}'
    state: absent
3.2.6.3. Route
The following is an example of creating a route named hello-world which maps to the service hello-world.
Provision
- name: create hello-world route
  openshift_v1_route:
    name: hello-world
    namespace: '{{ namespace }}'
    spec_port_target_port: web
    labels:
      app: hello-world
      service: hello-world
    to_name: hello-world
Deprovision
- openshift_v1_route:
    name: hello-world
    namespace: '{{ namespace }}'
    state: absent
3.2.6.4. Persistent Volume
The following is an example of creating a persistent volume claim (PVC) resource and deployment configuration that uses it.
Provision
# Persistent volume resource
- name: create volume claim
  k8s_v1_persistent_volume_claim:
    name: hello-world-db
    namespace: '{{ namespace }}'
    state: present
    access_modes:
      - ReadWriteOnce
    resources_requests:
      storage: 1Gi
In addition to the resource, add your volume to the deployment configuration declaration:
- name: create hello-world-db deployment config
  openshift_v1_deployment_config:
    name: hello-world-db
    ---
    volumes:
    - name: hello-world-db
      persistent_volume_claim:
        claim_name: hello-world-db
      test: false
      triggers:
      - type: ConfigChange
Deprovision
- openshift_v1_deployment_config:
    name: hello-world-db
    namespace: '{{ namespace }}'
    state: absent

- k8s_v1_persistent_volume_claim:
    name: hello-world-db
    namespace: '{{ namespace }}'
    state: absent
3.2.7. Optional Variables
You can add optional variables to an APB by using environment variables. To pass variables into an APB, you must escape the variable substitution in your .yml files.
For example, consider the following roles/provision-etherpad-apb/tasks/main.yml file in the etherpad-apb:
- name: create mariadb deployment config
  openshift_v1_deployment_config:
    name: mariadb
    namespace: '{{ namespace }}'
    ...
    - env:
      - name: MYSQL_ROOT_PASSWORD
        value: '{{ mariadb_root_password }}'
      - name: MYSQL_DATABASE
        value: '{{ mariadb_name }}'
      - name: MYSQL_USER
        value: '{{ mariadb_user }}'
      - name: MYSQL_PASSWORD
        value: '{{ mariadb_password }}'
Variables for the APB are defined in the roles/provision-etherpad-apb/defaults/main.yml file:
playbook_debug: no
mariadb_root_password: "{{ lookup('env','MYSQL_ROOT_PASSWORD') | default('admin', true) }}"
mariadb_name: "{{ lookup('env','MYSQL_DATABASE') | default('etherpad', true) }}"
mariadb_user: "{{ lookup('env','MYSQL_USER') | default('etherpad', true) }}"
mariadb_password: "{{ lookup('env','MYSQL_PASSWORD') | default('admin', true) }}"
etherpad_admin_password: "{{ lookup('env','ETHERPAD_ADMIN_PASSWORD') | default('admin', true) }}"
etherpad_admin_user: "{{ lookup('env','ETHERPAD_ADMIN_USER') | default('etherpad', true) }}"
etherpad_db_host: "{{ lookup('env','ETHERPAD_DB_HOST') | default('mariadb', true) }}"
state: present
3.2.8. Working With the Restricted SCC
When building an OpenShift Container Platform image, it is important that you do not have your application running as the root user when at all possible. When running under the restriced security context, the application image is launched with a random UID. This causes problems if your application folder is owned by the root user.
A good way to work around this is to add a user to the root group and make the application folder owned by the root group. See OpenShift Container Platform-Specific Guidelines for details on supporting arbitrary user IDs.
The following is a Dockerfile example of a node application running in /usr/src. This command would be run after the application is installed in /usr/src and the associated environment variables set:
ENV USER_NAME=haste \
    USER_UID=1001 \
    HOME=/usr/src

RUN useradd -u ${USER_UID} -r -g 0 -M -d /usr/src -b /usr/src -s /sbin/nologin -c "<username> user" ${USER_NAME} \
               && chown -R ${USER_NAME}:0 /usr/src \
               && chmod -R g=u /usr/src /etc/passwd
USER 1001
3.2.9. Using a ConfigMap Within an APB
There is a temporary workaround for creating ConfigMaps from Ansible due to a bug in the Ansible modules.
One common use case for ConfigMaps is when the parameters of an APB will be used within a configuration file of an application or service. The ConfigMap module allows you to mount a ConfigMap into a pod as a volume, which can be used to store the configuration file. This approach allows you to also leverage the power of Ansible’s template module to create a ConfigMap out of APB paramters.
The following is an example of creating a ConfigMap from a Jinja template mounted into a pod as a volume:
- name: Create hastebin config from template
  template:
    src: config.js.j2
    dest: /tmp/config.js

- name: Create hastebin configmap
  shell: oc create configmap haste-config --from-file=haste-config=/tmp/config.js

<snip>

- name: create deployment config
  openshift_v1_deployment_config:
    name: hastebin
    namespace: '{{ namespace }}'
    labels:
      app: hastebin
      service: hastebin
    replicas: 1
    selector:
      app: hastebin
      service: hastebin
    spec_template_metadata_labels:
      app: hastebin
      service: hastebin
    containers:
    - env:
      image: docker.io/dymurray/hastebin:latest
      name: hastebin
      ports:
      - container_port: 7777
        protocol: TCP
      volumeMounts:
        - mountPath: /usr/src/haste-server/config
          name: config
    - env:
      image: docker.io/modularitycontainers/memcached:latest
      name: memcached
      ports:
      - container_port: 11211
        protocol: TCP
    volumes:
      - name: config
        configMap:
          name: haste-config
          items:
            - key: haste-config
              path: config.js
Chapter 4. Revision History: Ansible Playbook Bundle Development Guide
4.1. Tue Feb 06 2018
| Affected Topic | Description of Change |
|---|---|
|
Added a step to use |
4.2. Wed Nov 29 2017
| Affected Topic | Description of Change |
|---|---|
| All topics | New guide providing a walkthrough and reference material on developing your own Ansible Playbook Bundle (APB) |
Legal Notice
Copyright © Red Hat
OpenShift documentation is licensed under the Apache License 2.0 (https://www.apache.org/licenses/LICENSE-2.0).
Modified versions must remove all Red Hat trademarks.
Portions adapted from https://github.com/kubernetes-incubator/service-catalog/ with modifications by Red Hat.
Red Hat, Red Hat Enterprise Linux, the Red Hat logo, the Shadowman logo, JBoss, OpenShift, Fedora, the Infinity logo, and RHCE are trademarks of Red Hat, Inc., registered in the United States and other countries.
Linux® is the registered trademark of Linus Torvalds in the United States and other countries.
Java® is a registered trademark of Oracle and/or its affiliates.
XFS® is a trademark of Silicon Graphics International Corp. or its subsidiaries in the United States and/or other countries.
MySQL® is a registered trademark of MySQL AB in the United States, the European Union and other countries.
Node.js® is an official trademark of the OpenJS Foundation.
The OpenStack® Word Mark and OpenStack logo are either registered trademarks/service marks or trademarks/service marks of the OpenStack Foundation, in the United States and other countries and are used with the OpenStack Foundation’s permission. We are not affiliated with, endorsed or sponsored by the OpenStack Foundation, or the OpenStack community.
All other trademarks are the property of their respective owners.