Chapter 2. User interfaces
There are different interfaces for managing certificates and subsystems, depending on the user’s role: administrators, agents, auditors, and end users.
2.1. User interfaces overview
Administrators can use the following interfaces to securely interact with a completed Certificate System installation:
- The PKI command-line interface and other command-line utilities
- The PKI Console graphical interface
- The Certificate System web interface.
Which interface is used depends on the administrator’s preferences and functionality available. Common actions using these interfaces are described in the remainder of the guide after this chapter.
These interfaces require configuration prior to use for secure communication with the Certificate System server over TLS. Using these clients without proper configuration is not allowed. Some of these tools use TLS mutual authentication. When required, their required initialization procedure includes configuring this.
-
Some examples of using the PKI command-line utility are described in Section 2.5.1.2, “Using the "pki" CLI”. Additional examples are shown through the rest of the guide. By default, the PKI command-line interface uses the NSS database in the user’s
~/.dogtag/nssdb/directory. Section 2.5.1.1, “Initializing the pki CLI” provides detailed steps for initializing the NSS database with the administrator’s certificate and key. In addition, there are various command-line utilities used to interface with Certificate System (as an administrator in other user roles), for example to submit CMC requests, manage generated certificates, and so on. These utilities are described briefly in Section 2.5, “Command-line interfaces”, such as Section 2.5.2, “AtoB”. They are utilized in later sections such as Section 5.2.2, “Creating a CSR using PKCS10Client”. - The Certificate System web interface allows administrative access through the Firefox web browser. Section 2.4.1, “Browser initialization” describes instructions about configuring the client authentication. Other sections in Section 2.4, “Web interface” describe using the web interface of Certificate System.
-
The Certificate System’s PKI Console is a graphical interface. Please note that it is being deprecated. Section 2.3.1, “Initializing
pkiconsole” describes how to initialize this console interface. Section 2.3.2, “Usingpkiconsolefor CA, OCSP, KRA, and TKS subsystems” gives an overview of using it.
To terminate a PKI Console session, click the button. To terminate a web browser session, close the browser. A command-line utility terminates itself as soon as it performs the action and returns to the prompt, so no action is needed on the administrator’s part to terminate the session.
2.2. Client NSS database initialization
On Red Hat Certificate System, certain interfaces may need to access the server using TLS client certificate authentication (mutual authentication). Before performing server-side admin tasks, you need to:
- Prepare an NSS database for the client. This can be a new database or an existing one.
- Import the CA certificate chain and trust them.
- Have a certificate and corresponding key. They can be generated in the NSS database or imported from somewhere else, such as from a PKCS #12 file.
Based on the utility, you need to initialize the NSS database accordingly. See:
2.3. Graphical interface
The Certificate System console, pkiconsole, is a graphical interface that is designed for users with the Administrator role privilege to manage the subsystem itself. This includes adding users, configuring logs, managing profiles and plugins, and the internal database, among many other functions. This utility communicates with the Certificate System server via TLS using client-authentication and can be used to manage the server remotely.
pkiconsole is being deprecated and will be replaced by a new browser-based UI in a future major release. Although pkiconsole will continue to be available until the replacement UI is released, we encourage using the command line equivalent of pkiconsole at this time, as the pki CLI will continue to be supported and improved upon even when the new browser-based UI becomes available in the future.
2.3.1. Initializing pkiconsole
To use the
pkiconsoleinterface for the first time, specify a new password and use the following command:pki -c password -d ~/.redhat-idm-console client-init
$ pki -c password -d ~/.redhat-idm-console client-initCopy to Clipboard Copied! Toggle word wrap Toggle overflow This command creates a new client NSS database in the
~/.redhat-idm-console/directory.- To import the CA certificate into the PKI client NSS database, see 10.5 Importing a certificate into an NSS Database in the Planning, Installation and Deployment Guide (Common Criteria Edition).
- To request a new client certificate, see Chapter 5, Requesting, enrolling and managing certificates.
Execute the following command to extract the admin client certificate from the
.p12file:openssl pkcs12 -in file -clcerts -nodes -nokeys -out file.crt
$ openssl pkcs12 -in file -clcerts -nodes -nokeys -out file.crtCopy to Clipboard Copied! Toggle word wrap Toggle overflow Validate and import the admin client certificate as described in Chapter 10 Managing Certificate/Key Crypto Token in the Planning, Installation and Deployment Guide (Common Criteria Edition):
PKICertImport -d ~/.redhat-idm-console -n "nickname" -t ",," -a -i file.crt -u C
$ PKICertImport -d ~/.redhat-idm-console -n "nickname" -t ",," -a -i file.crt -u CCopy to Clipboard Copied! Toggle word wrap Toggle overflow
Make sure all intermediate certificates and the root CA certificate have been imported before importing the CA admin client certificate.
To import an existing client certificate and its key into the client NSS database:
pki -c password -d ~/.redhat-idm-console pkcs12-import --pkcs12-file file --pkcs12-password pkcs12-password
$ pki -c password -d ~/.redhat-idm-console pkcs12-import --pkcs12-file file --pkcs12-password pkcs12-passwordCopy to Clipboard Copied! Toggle word wrap Toggle overflow Verify the client certificate with the following command:
certutil -V -u C -n "nickname" -d ~/.redhat-idm-console
$ certutil -V -u C -n "nickname" -d ~/.redhat-idm-consoleCopy to Clipboard Copied! Toggle word wrap Toggle overflow
2.3.2. Using pkiconsole for CA, OCSP, KRA, and TKS subsystems
The Java console is used by four subsystems: the CA, OCSP, KRA, and TKS. The console is accessed using a locally-installed pkiconsole utility. It can access any subsystem because the command requires the host name, the subsystem’s administrative TLS port, and the specific subsystem type.
pkiconsole -d nssdb -n 'optional client cert nickname' https://server.example.com:admin_port/subsystem_type
# pkiconsole -d nssdb -n 'optional client cert nickname' https://server.example.com:admin_port/subsystem_typeIf DNS is not configured, you can use an IPv4 or IPv6 address to connect to the console. For example:
https://192.0.2.1:8443/ca
https://[2001:DB8::1111]:8443/ca
https://192.0.2.1:8443/ca
https://[2001:DB8::1111]:8443/caThis opens a console, as in the below figure:
Figure 2.1. Certificate System console

The Configuration tab controls all of the setup for the subsystem, as the name implies. The choices available in this tab are different depending on which subsystem type the instance is; the CA has the most options since it has additional configuration for jobs, notifications, and certificate enrollment authentication.
All subsystems have four basic options:
- Users and groups
- Access control lists
- Log configuration
- Subsystem certificates (meaning the certificates issued to the subsystem for use, for example, in the security domain or audit signing)
2.4. Web interface
This section describes the web interface that allows administrative access to Red Hat Certificate System through the Firefox web browser.
2.4.1. Browser initialization
This section explains browser initialization for Firefox to access PKI services.
Importing a CA certificate
Click
. 
Select the Authorities tab and click the button.

-
Select the
ca.crtfile and click .
Importing a client certificate
-
Click
. Select the Your Certificates tab.

-
Click on and select the client p12 file, such as
ca_admin_cert.p12. Enter the password for the client certificate on the prompt.

- Click .
Verify that an entry is added under Your Certificates.

Accessing the web console
You can access the PKI services by opening https://host_name:port in your browser.
2.4.2. The administrative interfaces
All subsystems use a HTML-based administrative interface. It is accessed by entering the host name and secure port as the URL, authenticating with the administrator’s certificate, and clicking the appropriate Administrators link.
There is a single TLS port for all subsystems which is used for both administrator and agent services. Access to those services is restricted by certificate-based authentication.
The HTML admin interface is much more limited than the Java console; the primary administrative function is managing the subsystem users.
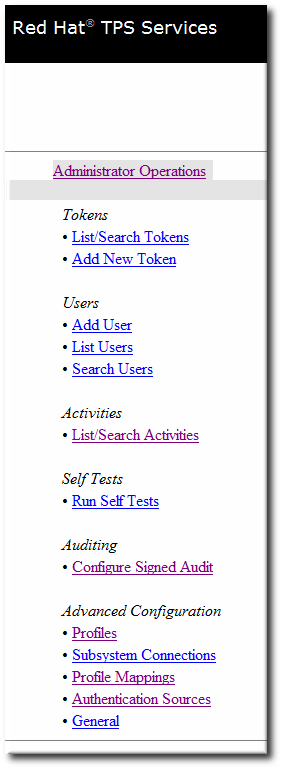
The TPS only allows operations to manage users for the TPS subsystem. However, the TPS admin page can also list tokens and display all activities (including normally-hidden administrative actions) performed on the TPS.
Figure 2.2. TPS admin page
2.4.3. Agent interfaces
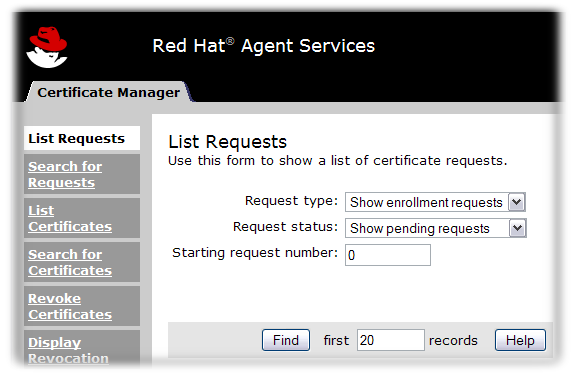
The agent services pages are where almost all of the certificate and token management tasks are performed. These services are HTML-based, and agents authenticate to the site using a special agent certificate.
Figure 2.3. Certificate Manager’s agent services page
The operations vary depending on the subsystem:
- The Certificate Manager agent services include approving certificate requests (which issues the certificates), revoking certificates, and publishing certificates and CRLs. All certificates issued by the CA can be managed through its agent services page.
- The TPS agent services, like the CA agent services, manages all of the tokens which have been formatted and have had certificates issued to them through the TPS. Tokens can be enrolled, suspended, and deleted by agents. Two other roles (operator and admin) can view tokens in web services pages, but cannot perform any actions on the tokens.
- KRA agent services pages process key recovery requests, which set whether to allow a certificate to be issued reusing an existing key pair if the certificate is lost.
- The OCSP agent services page allows agents to configure CAs which publish CRLs to the OCSP, to load CRLs to the OCSP manually, and to view the state of client OCSP requests.
The TKS is the only subsystem without an agent services page.
2.4.4. End user pages
The CA and TPS both process direct user requests in some way. That means that end users have to have a way to connect with those subsystems. The CA has end-user, or end-entities, HTML services. The TPS uses the Enterprise Security Client.
The end-user services are accessed over standard HTTP using the server’s host name and the standard port number; they can also be accessed over HTTPS using the server’s host name and the specific end-entities TLS port.
For CAs, each type of TLS certificate is processed through a specific online submission form, called a profile. There are about two dozen certificate profiles for the CA, covering all sorts of certificates - user TLS certificates, server TLS certificates, log and file signing certificates, email certificates, and every kind of subsystem certificate. There can also be custom profiles.
Figure 2.4. Certificate Manager’s end-entities page

End users retrieve their certificates through the CA pages when the certificates are issued. They can also download CA chains and CRLs and can revoke or renew their certificates through those pages.
2.5. Command-line interfaces
This section discusses command-line utilities.
2.5.1. The "pki" CLI
The pki command-line interface (CLI) provides access to various services on the server using the REST interface (see 2.3.4 REST Interface in the Planning, Installation and Deployment Guide (Common Criteria Edition). You can invoke the CLI as follows:
pki [CLI options] <command> [command parameters]
$ pki [CLI options] <command> [command parameters]Note that the CLI options must be placed before the command, and the command parameters after the command.
2.5.1.1. Initializing the pki CLI
To use the command line interface for the first time, specify a new password and use the following command:
pki -c <password> client-init
$ pki -c <password> client-initCopy to Clipboard Copied! Toggle word wrap Toggle overflow This will create a new client NSS database in the
~/.dogtag/nssdbdirectory. The password must be specified in all CLI operations that use the client NSS database.
Alternatively, if the password is stored in a file, you can specify the file using the -C option. For example:
pki -C password_file client-init
$ pki -C password_file client-initCopy to Clipboard Copied! Toggle word wrap Toggle overflow - To import the CA certificate into the client NSS database, refer to 10.5 Importing a certificate into an NSS Database in the Planning, Installation and Deployment Guide (Common Criteria Edition).
Some commands may require client certificate authentication. To import an existing client certificate and its key into the client NSS database, specify the PKCS #12 file and the password, and execute the following command:
First, extract the admin client certificate from the
.p12file:openssl pkcs12 -in file -clcerts -nodes -nokeys -out file.crt
$ openssl pkcs12 -in file -clcerts -nodes -nokeys -out file.crtCopy to Clipboard Copied! Toggle word wrap Toggle overflow Validate and import the admin client certificate as described in Chapter 10 Managing Certificate/Key Crypto Token in the Planning, Installation and Deployment Guide (Common Criteria Edition):
PKICertImport -d ~/.dogtag/nssdb -n "nickname" -t ",," -a -i file.crt -u C
$ PKICertImport -d ~/.dogtag/nssdb -n "nickname" -t ",," -a -i file.crt -u CCopy to Clipboard Copied! Toggle word wrap Toggle overflow
Make sure all intermediate certificates and the root CA certificate have been imported before importing the CA admin client certificate.
To import an existing client certificate and its key into the client NSS database, specify the PKCS #12 file and the password, and execute the following command:
pki -c <password> pkcs12-import --pkcs12-file <file> --pkcs12-password <password>
$ pki -c <password> pkcs12-import --pkcs12-file <file> --pkcs12-password <password>Copy to Clipboard Copied! Toggle word wrap Toggle overflow To verify the client certificate, run the following command:
certutil -V -u C -n "nickname" -d ~/.dogtag/nssdb
$ certutil -V -u C -n "nickname" -d ~/.dogtag/nssdbCopy to Clipboard Copied! Toggle word wrap Toggle overflow
2.5.1.2. Using the "pki" CLI
The command line interface supports a number of commands organized in a hierarchical structure. To list the top-level commands, execute the
pkicommand without any additional commands or parameters:pki
$ pkiCopy to Clipboard Copied! Toggle word wrap Toggle overflow Some commands have subcommands. To list them, execute
pkiwith the command name and no additional options. For example:pki ca
$ pki caCopy to Clipboard Copied! Toggle word wrap Toggle overflow pki ca-cert
$ pki ca-certCopy to Clipboard Copied! Toggle word wrap Toggle overflow To view command usage information, use the --help option:
pki --help
$ pki --helpCopy to Clipboard Copied! Toggle word wrap Toggle overflow pki ca-cert-find --help
$ pki ca-cert-find --helpCopy to Clipboard Copied! Toggle word wrap Toggle overflow To view manual pages, specify the
helpcommand:pki help
$ pki helpCopy to Clipboard Copied! Toggle word wrap Toggle overflow pki help ca-cert-find
$ pki help ca-cert-findCopy to Clipboard Copied! Toggle word wrap Toggle overflow To execute a command that does not require authentication, specify the command and its parameters (if required), for example:
pki ca-cert-find
$ pki ca-cert-findCopy to Clipboard Copied! Toggle word wrap Toggle overflow To execute a command that requires client certificate authentication, specify the certificate nickname, the client NSS database password, and optionally the server URL:
pki -U <server URL> -n <nickname> -c <password> <command> [command parameters]
$ pki -U <server URL> -n <nickname> -c <password> <command> [command parameters]Copy to Clipboard Copied! Toggle word wrap Toggle overflow For example:
pki -n jsmith -c password ca-user-find ...
$ pki -n jsmith -c password ca-user-find ...Copy to Clipboard Copied! Toggle word wrap Toggle overflow By default, the CLI communicates with the server at
http://local_host_name:8080. To communicate with a server at a different location, specify the URL with the -U option, for example:pki -U https://server.example.com:8443 -n jsmith -c password ca-user-find
$ pki -U https://server.example.com:8443 -n jsmith -c password ca-user-findCopy to Clipboard Copied! Toggle word wrap Toggle overflow
2.5.2. AtoB
The AtoB utility decodes the Base64-encoded certificates to their binary equivalents. For example:
AtoB input.ascii output.bin
$ AtoB input.ascii output.bin
For further details, more options, and additional examples, see the AtoB(1) man page.
2.5.3. AuditVerify
The AuditVerify utility verifies integrity of the audit logs by validating the signature on log entries.
For example:
AuditVerify -d ~jsmith/auditVerifyDir -n Log Signing Certificate -a ~jsmith/auditVerifyDir/logListFile -P "" -v
$ AuditVerify -d ~jsmith/auditVerifyDir -n Log Signing Certificate -a ~jsmith/auditVerifyDir/logListFile -P "" -v
The example verifies the audit logs using the Log Signing Certificate (-n) in the ~jsmith/auditVerifyDir NSS database (-d). The list of logs to verify (-a) are in the ~jsmith/auditVerifyDir/logListFile file, comma-separated and ordered chronologically. The prefix (-P) to prepend to the certificate and key database file names is empty. The output is verbose (-v).
For further details, more options, and additional examples, see the AuditVerify(1) man page or Section 12.2.1, “Displaying and verifying signed audit logs”.
2.5.4. BtoA
The BtoA utility encodes binary data in Base64. For example:
BtoA input.bin output.ascii
$ BtoA input.bin output.ascii
For further details, more options, and additional examples, see the BtoA(1) man page.
2.5.5. CMCRequest
The CMCRequest utility creates a certificate issuance or revocation request. For example:
CMCRequest example.cfg
$ CMCRequest example.cfg
All options to the CMCRequest utility are specified as part of the configuration filed passed to the utility. See the CMCRequest(1) man page for configuration file options and further information. Also see Section 5.3, “Requesting and receiving certificates using CMC” and Section 6.2.1.1, “Revoking a certificate using CMCRequest”.
2.5.6. CMCResponse
The CMCResponse utility is used to parse CMC responses returned from CMC issuance or revocation requests. For example:
*CMCResponse -d /home/agentSmith/certdb_dir -i /home/agentSmith/certdb_dir/cmc.dirsrv_pkcs10.resp -o /home/agentSmith/certdb_dir/Server-Cert.crt*
$ *CMCResponse -d /home/agentSmith/certdb_dir -i /home/agentSmith/certdb_dir/cmc.dirsrv_pkcs10.resp -o /home/agentSmith/certdb_dir/Server-Cert.crt*
For further details, more options, additional examples, see the CMCResponse(1) man page.
Running CMCResponse with the "-v" option returns the PEM of each certificate in the chain as Cert:0, Cert:1 etc. Below all the PEMs, the output also displays each certificate in the chain in pretty print format. Since the certificates are not displayed in a fixed order, in order to determine their position in the chain, you must examine the "Subject:" under each "Certificate". The corresponding PEM is displayed in the same position above.
2.5.7. CMCRevoke
Legacy. Do not use.
2.5.9. CRMFPopClient
The CRMFPopClient utility is Certificate Request Message Format (CRMF) client using NSS databases and supplying Proof of Possession.
For example:
CRMFPopClient -d . -p password -n "cn=subject_name" -q POP_SUCCESS -b kra.transport -w "AES/CBC/PKCS5Padding" -t false -v -o /user_or_entity_database_directory/example.csr
$ CRMFPopClient -d . -p password -n "cn=subject_name" -q POP_SUCCESS -b kra.transport -w "AES/CBC/PKCS5Padding" -t false -v -o /user_or_entity_database_directory/example.csr
This example creates a new CSR with the cn=subject_name subject DN (-n), NSS database in the current directory (-d), certificate to use for transport kra.transport (-b), the AES/CBC/PKCS5Padding key wrap algorithm verbose output is specified (-v) and the resulting CSR is written to the /user_or_entity_database_directory/example.csr file (-o).
For further details, more options, and additional examples, see the output of the CRMFPopClient --help command and also Section 5.2.3, “Creating a CSR using CRMFPopClient”.
2.5.10. HttpClient
The HttpClient utility is an NSS-aware HTTP client for submitting CMC requests.
For example:
HttpClient request.cfg
$ HttpClient request.cfg
All parameters to the HttpClient utility are stored in the request.cfg file. For further information, see the output of the HttpClient --help command.
2.5.11. OCSPClient
OCSPClient is an Online Certificate Status Protocol (OCSP) client for checking the certificate revocation status.
For example:
OCSPClient -h server.example.com -p 8080 -d /etc/pki/pki-tomcat/alias -c "caSigningCert cert-pki-ca" --serial 2
$ OCSPClient -h server.example.com -p 8080 -d /etc/pki/pki-tomcat/alias -c "caSigningCert cert-pki-ca" --serial 2
This example queries the server.example.com OCSP server (-h) on port 8080 (-p) to check whether the certificate signed by caSigningcet cert-pki-ca (-c) with serial number 2 (--serial) is valid. The NSS database in the /etc/pki/pki-tomcat/alias directory is used.
For further details, more options, and additional examples, see the output of the OCSPClient --help command.
2.5.12. PKCS10Client
The PKCS10Client utility creates a CSR in PKCS10 format for RSA and EC keys, optionally on an HSM.
For example:
PKCS10Client -d /etc/dirsrv/slapd-instance_name/ -p password -a rsa -l 2048 -o ~/ds.csr -n "CN=$HOSTNAME"
$ PKCS10Client -d /etc/dirsrv/slapd-instance_name/ -p password -a rsa -l 2048 -o ~/ds.csr -n "CN=$HOSTNAME"
This example creates a new RSA (-a) key with 2048 bits (-l) in the /etc/dirsrv/slapd-instance_name/ directory (-d with database password password (-p). The output CSR is stored in the ~/ds.cfg file (-o) and the certificate DN is CN=$HOSTNAME (-n).
For further details, more options, and additional examples, see the PKCS10Client(1) man page.
2.5.13. PrettyPrintCert
The PrettyPrintCert utility displays the contents of a certificate in a human-readable format.
For example:
PrettyPrintCert ascii_data.cert
$ PrettyPrintCert ascii_data.cert
This command parses the output of the ascii_data.cert file and displays its contents in human readable format. The output includes information like signature algorithm, exponent, modulus, and certificate extensions.
For further details, more options, and additional examples, see the PrettyPrintCert(1) man page.
2.5.14. PrettyPrintCrl
The PrettyPrintCrl utility displays the content of a CRL file in a human readable format.
For example:
PrettyPrintCrl ascii_data.crl
$ PrettyPrintCrl ascii_data.crl
This command parses the output of the ascii_data.crl and displays its contents in human readable format. The output includes information, such as revocation signature algorithm, the issuer of the revocation, and a list of revoked certificates and their reason.
For further details, more options, and additional examples, see the PrettyPrintCrl(1) man page.
2.5.15. TokenInfo
The TokenInfo utility lists all tokens in an NSS database.
For example:
TokenInfo ./nssdb/
$ TokenInfo ./nssdb/This command lists all tokens (HSMs, soft tokens, and so on) registered in the specified database directory.
For further details, more options, and additional examples, see the output of the TokenInfo command.
2.5.16. tkstool
The tkstool utility is interacting with the token Key Service (TKS) subsystem.
For example:
tkstool -M -n new_master -d /var/lib/pki/pki-tomcat/alias -h token_name
$ tkstool -M -n new_master -d /var/lib/pki/pki-tomcat/alias -h token_name
This command creates a new master key (-M) named new_master (-n) in the /var/lib/pki/pki-tomcat/alias NSS database on the HSM token_name.
For further details, more options, and additional examples, see the output of the tkstool -H command.