Chapter 5. Connecting to Red Hat Ansible Automation Platform
When network peering is complete and your Azure routing configuration is established, you can choose how your team accesses Ansible Automation Platform through your Azure network configuration.
5.1. Access details
Regardless of whether Ansible Automation Platform was deployed with public or private access, a set of DNS records is created. The DNS records are created so that Ansible Automation Platform can be issued a valid TLS certificate for your deployment and to enable easy access to your applications.
Procedure
- To view the URL for the Ansible Automation Platform applications, navigate to the Parameters and Outputs page of the Azure Marketplace managed application listing for your deployment.
5.2. Public Deployments
If you choose public access during the deployment of Ansible Automation Platform on Microsoft Azure, the application URL is accessible over the public internet through a browser.
5.3. Private deployments
If you choose private access during the deployment of Ansible Automation Platform on Microsoft Azure, the DNS record for the application points to a private address within the selected CIDR block.
To access this private address, you must configure network peering and establish connectivity. The method for connecting to the Ansible Automation Platform depends on your organization’s Azure infrastructure management practices. Azure administrators must determine the most suitable model and configure the setup accordingly.
Common access options include:
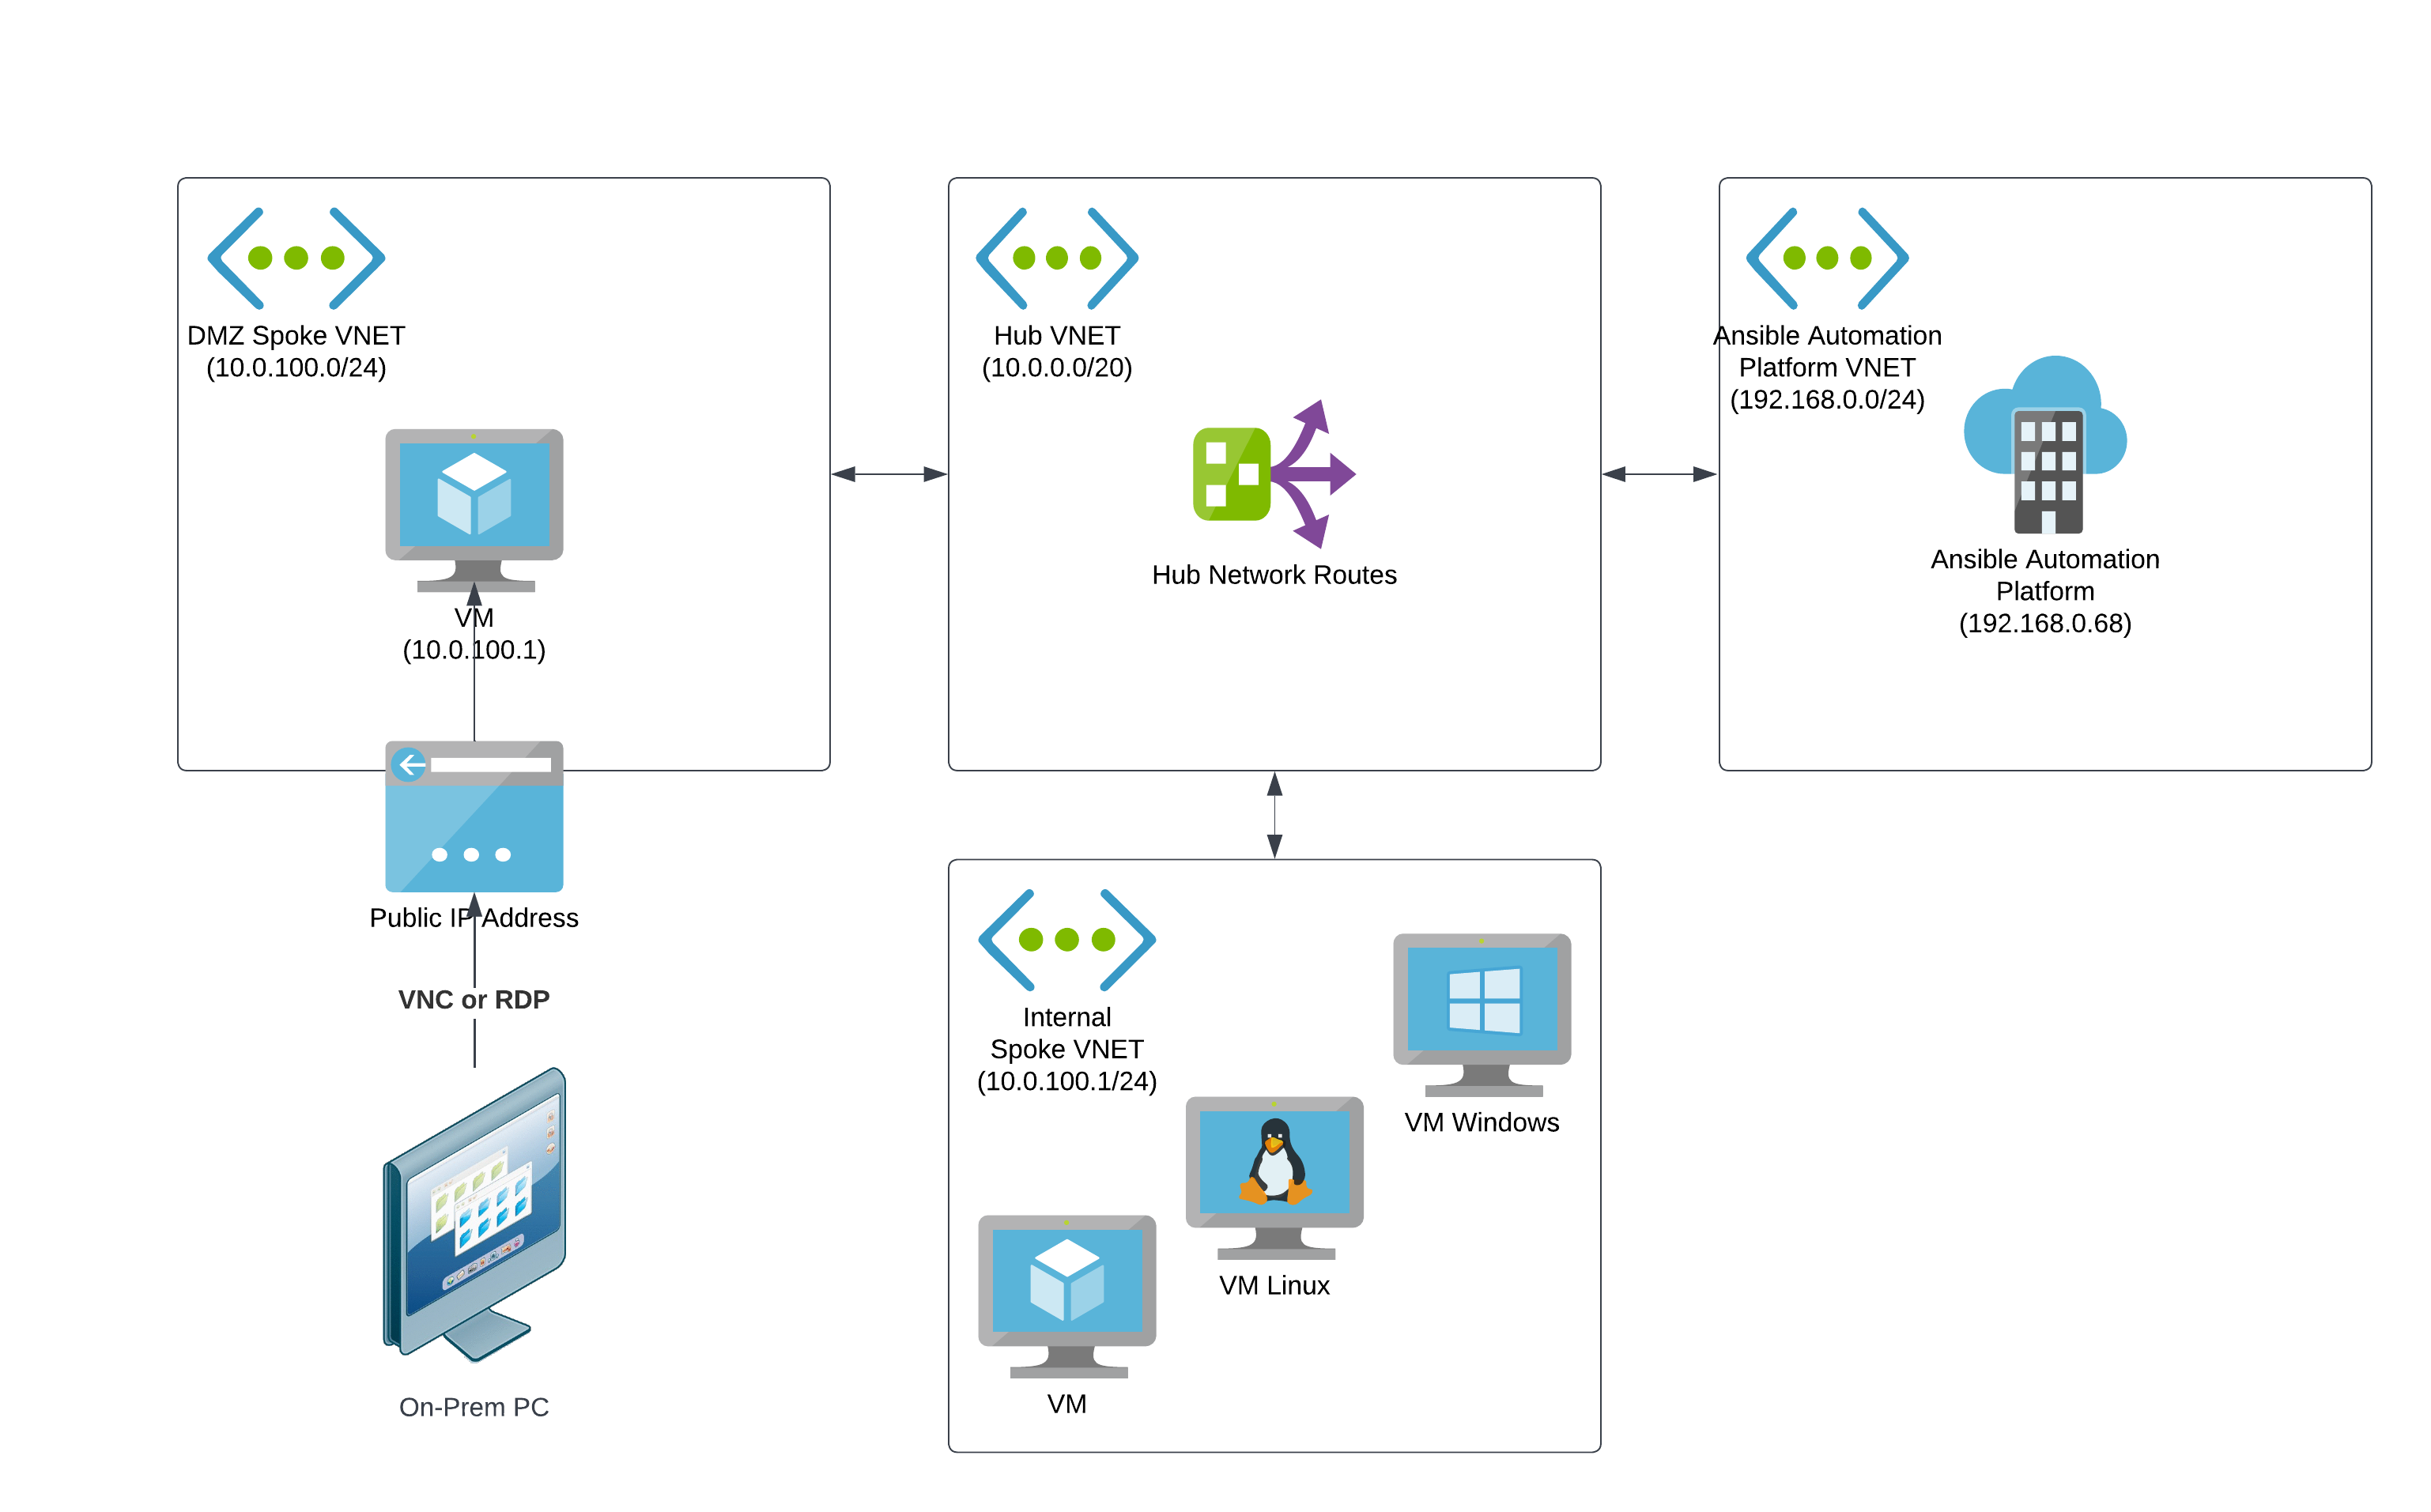
5.3.1. Azure hosted virtual machine
A straightforward way to configure access for a small set of users to access private network resources on Azure networks is to create a jumpbox VM in a perimeter network (DMZ VNet) that users can remotely log in to from the public internet. The jumpbox VM requires workstation features such as a GUI and browser.
Users can remotely log in to the publicly accessible virtual machine from on-premises machines through VNC, RDP, or other screen-sharing protocols.
To access the Ansible Automation Platform web UIs on the Azure private network, users navigate to the URL using the browser on the jumpbox VM.
You connect the DMZ VNet to other Azure VNets through network peering, with routing rules established to send network traffic to the Ansible Automation Platform VNet.
The following diagram shows the topology for an example configuration of private network access via an Azure virtual machine.
- For more information about perimeter (DMZ) networks, refer to Perimeter Networks in the Microsoft Azure Cloud Adoption Framework documentation.
- For more information about jumpboxes, refer to About Azure bastion host and jumpboxes in the Microsoft Azure Cloud Adoption Framework documentation.
5.3.2. VPN
If your organization requires that many users access Ansible Automation Platform over a private connection, or if your organization already uses VPNs or direct connections with Azure, then this approach might be suitable.
In this configuration, your on-premises infrastructure is connected to Azure through a Network Application Gateway and has routing rules that can enable access to Ansible Automation Platform to any connected computer on the local network. The VNet connected to the Virtual Network Gateway is connected to other Azure VNets through network peering, with routing rules established to send network traffic to the Ansible Automation Platform VNet.
With this configuration, users can access Ansible Automation Platform through the application URL as if they were using the public access approach.

5.4. Accessing Red Hat Ansible Automation Platform on Microsoft Azure
When you initiate the deployment of the Red Hat Ansible Automation Platform managed app from Azure marketplace, a form displays in the Create Red Hat Ansible Automation Platform on Microsoft Azure window. Complete the form to provision Ansible Automation Platform infrastructure and resources into your Azure tenant.
Procedure
- In a web browser, navigate to the Managed Applications section in the Azure console.
- Select the instance of Ansible Automation Platform on Microsoft Azure that you deployed.
Select Parameters and Outputs in the Settings section in the left navigation menu.
- If this is your first time accessing your Ansible Automation Platform through the Azure portal, you must select and copy the deploymentEngineUrl under the output section to continue setting up your deployment. After you set up your instance through the deploymentEngineUrl, it is removed from the outputs section because it is no longer needed.
- If you have already set up your Ansible Automation Platform deployment, you can go directly to it by copying the platformUrl output.
- Paste the selected URL into your browser search bar and hit enter. This brings you to your Ansible Automation Platform deployment.
- The first time you log in to Ansible Automation Platform with the URL, you must configure the subscription. For help see the Logging in for the first time section of the Getting started with Ansible Automation Platform guide.
5.4.1. License association
Red Hat provided a specific subscription entitlement manifest when you subscribed to Red Hat Ansible Automation Platform on Microsoft Azure.
When asked to submit information about your license, select your license manifest file that you obtained from access.redhat.com.
5.4.2. Microsoft Entra ID SSO configuration
Set up your Microsoft Entra ID SSO configuration.
Procedure
- For help with setting up and configuring your enterprise authentication, see the Chapter 3. Configuring Microsoft Entra ID authentication section of the Access management and authentication guide.
5.4.2.1. Creating a registered application in Microsoft Entra ID
To create a Microsoft Entra ID SSO configuration you must first register for Microsoft Entra ID.
Procedure
- In a web browser, open the Azure portal.
- Ensure that you are using the tenant where you deployed Ansible Automation Platform.
-
Type
Microsoft Entra IDin the search bar. - Select Microsoft Entra ID from the search results.
- Under Manage in the menu options, click App registrations.
- In the App registrations page, click + New registration.
Configure the new registration as follows:
- In the Name field, enter the same name that you used for the deployed application.
- Select the default value for Supported account types.
- Select Web for Redirect URI (optional).
- In the Redirect URI (optional) field, enter the Microsoft Entra ID OAuth2 Callback URL value that you fetched from Ansible Automation Platform.
- Click Register to create the registration.
Verification
When registration is complete, the registration page for the Ansible Automation Platform application is displayed.
5.4.2.2. Generating secrets for communication
Create secrets so your applications can communicate with one another.
Procedure
In the Ansible Automation Platform application registration page on Azure, copy and save the value of Application (client) ID.
You need this value for the Microsoft Entra ID OAuth2 Key in the Ansible Automation Platform settings.
- Under Manage, click Certificates & secrets.
- Click Client secrets and then New client secret.
Provide a description for the new secret.
- It is not possible to automatically renew a certificate or identify when it is about to expire.
- It is useful to include the date in the description, for example: Ansible Automation Platform Client Secret <Today’s Date in YYYY-MM-DD format>.
Provide an expiration date for the new secret.
- The maximum lifetime for the certificate is 2 years. Unless you have specific security needs that prevent the creation of a long term certificate, select an expiration date of 24 months.
- Save the secret Value to a location on your local machine. After you navigate away from this page the secret value is no longer retrievable.
5.4.2.3. Creating a service principal for automating Azure resources
To enable the Ansible Automation Platform application to access and manage Azure resources, you must provide authorization credentials after deployment. The Microsoft Azure collection supports service principal authentication.
To create a service principal, you must have administrator privileges with tenancy-wide permissions on your Azure tenant. Your Ansible Automation Platform on Microsoft Azure deployment provisions in the same Subscription ID as the service principal created in this step.
Procedure
- Navigate to the Azure portal
- Click the Cloud Shell icon to open a bash Cloud Shell in your browser.
Set the Azure CLI to use the subscription that you intend to use for automating Azure services. Run the following command from the shell:
az account set --subscription <your_subscription_id>Run the following command using the Azure CLI to create a privileged service principal in Microsoft Entra ID:
az ad sp create-for-rbac --name ansible --role ContributorThe output displays the appID and tenant keys for the service principal:
{ "appId": "xxxxxxx-xxx-xxxx", "displayName": "ansible", "name": "xxxxxxx-xxx-xxxx", "password": "xxxxxxx-xxx-xxxx", "tenant": "xxxxxxx-xxx-xxxx" }- Store the service principal details securely, as they are displayed only when you create the secret.
5.4.2.4. Maintain your service principals
Service principal credentials have a limited lifetime that is set in your Microsoft Entra ID configuration.
Track the lifespan of the service principal if you intend to automate against Azure for an extended period of time. You can create a new one when needed.
To view records of updated or deleted service principles, run the following Azure CLI command:
az ad sp list -o table | grep ansibleThis command does not display the secrets for your service principals. Delete the service principal and create a new one if the secret is lost.
When you create a new service principal to replace an expired or deleted one, you must update the credential that uses the service principal that you are replacing. If the credential is not updated, automations that use that credential will fail.