Chapter 2. Getting Started with RichFaces
This chapter tells you how to plug RichFaces components into a JSF application. The instructions are based on a simple JSF with RichFaces creation process, from downloading the required libraries to running the application in a browser. These instructions do not depend on the integrated development environment that is in use.
2.1. Simple JSF application with RichFaces
Copy linkLink copied to clipboard!
RichFaces Greeter — the simple application — is similar to a typical hello world application, with one exception: the world of RichFaces will say "Hello!" to the user first.
Create a standard JSF 1.2 project named
Greeter. Include all required libraries, and continue with the instructions that follow.
2.1.1. Adding RichFaces libraries into the project
Copy linkLink copied to clipboard!
From the
RichFaces folder where you unzipped the RichFaces binary files, open the lib. This folder contains three *.jar files with API, UI, and implementation libraries. Copy these JARs from lib to the WEB-INF/lib directory of your Greeter JSF application.
Important
A JSF application with RichFaces assumes that the following JARs are available in the project:
commons-beanutils-1.7.0.jarcommons-collections-3.2.jarcommons-digester-1.8.jarcommons-logging-1.0.4.jarjhighlight-1.0.jar
2.1.2. Registering RichFaces in web.xml
Copy linkLink copied to clipboard!
After you add the RichFaces libraries to the project, you must register them in the project
web.xml file. Add the following to web.xml:
For more information about RichFaces skins, read Section 4.4, “Skinnability”.
Finally, your
web.xml should look like this:
2.1.3. Managed bean
Copy linkLink copied to clipboard!
The RichFaces Greeter application needs a managed bean. In the project's
JavaSource directory, create a new managed bean named user in the demo package. Place the following code in user:
2.1.4. Registering the bean in faces-cofig.xml
Copy linkLink copied to clipboard!
To register the
user bean, add the following to the faces-config.xml file:
2.1.5. RichFaces Greeter index.jsp
Copy linkLink copied to clipboard!
RichFaces Greeter has only one JSP page. Create
index.jsp in the root of WEB CONTENT folder and add the following to the JSP file:
The application uses three RichFaces components: <rich:panel> is used as visual container for information; <a4j:commandButton> with built-in AJAX support lets a greeting be rendered dynamically after a response returns; and <a4j:form> helps the button to perform the action.
Note
The RichFaces tag library should be declared on each JSP page. For XHTML pages, add the following lines to declare your tag libraries:
<xmlns:a4j="http://richfaces.org/a4j">
<xmlns:rich="http://richfaces.org/rich">
<xmlns:a4j="http://richfaces.org/a4j">
<xmlns:rich="http://richfaces.org/rich">
Now, run the application on the server by pointing your browser to the
index.jsp page: http://localhost:8080/Greeter/index.jsf
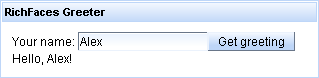
Figure 2.1. "RichFaces Greeter" application