ESB Services Guide
This guide is for developers.
Edition 5.3.1
Abstract
Preface
Chapter 1. Preface
1.1. Business Integration
1.2. What is a Service-Oriented Architecture?
A Service Oriented Architecture (SOA) is not a single program or technology. Think of it, rather, as a software design paradigm.
Note
1.3. Key Points of a Service-Oriented Architecture
- the messages being exchanged
- the agents that act as service requesters and providers
- the shared transport mechanisms that allow the messages to flow back and forth.
1.4. What is the JBoss Enterprise SOA Platform?
1.5. The Service-Oriented Architecture Paradigm
- Service Provider
- A service provider allows access to services, creates a description of a service and publishes it to the service broker.
- Service Requester
- A service requester is responsible for discovering a service by searching through the service descriptions given by the service broker. A requester is also responsible for binding to services provided by the service provider.
- Service Broker
- A service broker hosts a registry of service descriptions. It is responsible for linking a requester to a service provider.
1.6. Core and Components
1.7. Components of the JBoss Enterprise SOA Platform
- A full Java EE-compliant application server (the JBoss Enterprise Application Platform)
- an enterprise service bus (JBoss ESB)
- a business process management system (jBPM)
- a business rules engine (JBoss Rules)
- support for the optional JBoss Enterprise Data Services (EDS) product.
1.8. JBoss Enterprise SOA Platform Features
- The JBoss Enterprise Service Bus (ESB)
- The ESB sends messages between services and transforms them so that they can be processed by different types of systems.
- Business Process Execution Language (BPEL)
- You can use web services to orchestrate business rules using this language. It is included with SOA for the simple execution of business process instructions.
- Java Universal Description, Discovery and Integration (jUDDI)
- This is the default service registry in SOA. It is where all the information pertaining to services on the ESB are stored.
- Smooks
- This transformation engine can be used in conjunction with SOA to process messages. It can also be used to split messages and send them to the correct destination.
- JBoss Rules
- This is the rules engine that is packaged with SOA. It can infer data from the messages it receives to determine which actions need to be performed.
1.9. Features of the JBoss Enterprise SOA Platform's JBossESB Component
- Multiple transports and protocols
- A listener-action model (so that you can loosely-couple services together)
- Content-based routing (through the JBoss Rules engine, XPath, Regex and Smooks)
- Integration with the JBoss Business Process Manager (jBPM) in order to provide service orchestration functionality
- Integration with JBoss Rules in order to provide business rules development functionality.
- Integration with a BPEL engine.
- Be configured to work with a wide variety of transport mechanisms (such as e-mail and JMS),
- Be used as a general-purpose object repository,
- Allow you to implement pluggable data transformation mechanisms,
- Support logging of interactions.
Important
org.jboss.internal.soa.esb and org.jboss.soa.esb. Use the contents of the org.jboss.internal.soa.esb package sparingly because they are subject to change without notice. By contrast, everything within the org.jboss.soa.esb package is covered by Red Hat's deprecation policy.
1.10. Task Management
1.11. Integration Use Case
1.12. Utilising the JBoss Enterprise SOA Platform in a Business Environment
Part I. Introduction
Chapter 2. Introduction
2.1. Intended Audience
2.2. Aim of This Book
The Enterprise Service Bus Services Guide aims to teach developers how to create services for deployment to the JBoss Enterprise SOA Platform. Readers will learn how to use web applications, configure rule services and the content-based routing feature, transform messages and deploy services.
2.3. Back Up Your Data
Warning
Chapter 3. Basics
3.1. Out-of-the-Box Actions
3.2. JBoss Enterprise SOA Platform Out-of-the-Box Actions
- Transformers and Converters
- Use transformer and converter actions to change message data from one form to another.
- Business Process Management
- Use the business process management actions when integrating your software with the jBPM.
- Scripting
- Use scripting actions to automate tasks written in the supported scripting languages.
- Services
- Use service actions when integrating your code with Enterprise Java Beans.
- Routing
- Use routing actions when moving message data to destination services.
- Notifier
- Use notifier actions when sending data to ESB-unaware destinations.
- Web Services/SOAP
- Use web service actions when you need to support web services.
3.3. Quickstart
SOA_ROOT/jboss-as/samples/quickstarts/ directory. Build and deploy every quickstart by using Apache Ant.
3.4. Important Notes About Quickstarts
- Each quickstart needs to be built and deployed using Apache Ant.
- Each quickstart uses the
samples/quickstarts/conf/quickstarts.propertiesfile to store environment-specific configuration options such as the directory where the server was installed. You must create aquickstarts.propertiesfile that matches your server installation. An example properties file (quickstarts.properties-example) is included. - Each quickstart has different requirements. These are documented in their individual
readme.txtfiles. - Not every quickstart can run under every server profile.
- The jBPM quickstarts require a valid jBPM Console user name and password. Supply these by adding them as properties in the
SOA_ROOT/jboss-as/samples/quickstarts/conf/quickstarts.propertiesfile:# jBPM console security credentials jbpm.console.username=admin jbpm.console.password=adminpasswordThe quickstarts that are affected by this requirement arebpm_orchestration1,bpm_orchestration2,bpm_orchestration3andbpm_orchestration4. - You can only execute some of the quickstarts (such as groovy_gateway) if the server is not running in headless mode. (The JBoss Enterprise SOA Platform is configured to launch in headless mode by default.)
Important
Red Hat recommends that you run production servers in headless mode only.
3.5. Learn More About a Quickstart
Procedure 3.1. Task
- Study the quickstart's
readme.txtfile. - Run the
ant helpcommand in the quickstart's directory.
3.6. Overview of How the "Hello World" Quickstart Works
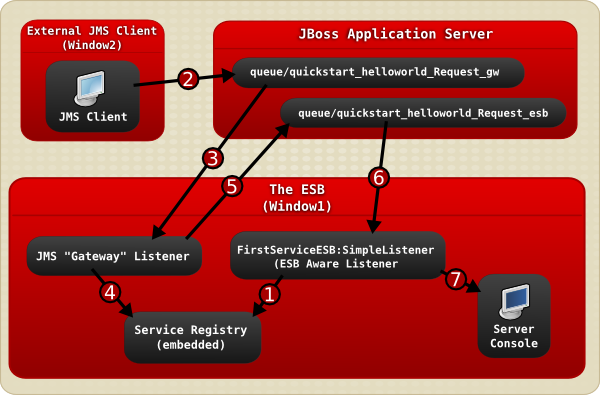
Figure 3.1. Image
- The JBoss Enterprise SOA Platform server is launched in
Window1and then theFirstServiceESB:SimpleListenerservice is added to the Service Registry service when the helloworld quickstart is deployed. - A JMS client sends an ESB-unaware "Hello World" message, (it is a plain
Stringobject), to the JMS Queue (queue/quickstart_helloworld_Request_gw). - The JMS Gateway Listener receives the ESB-unaware message and creates from it an ESB-aware message for use by ESB-aware end-points.
- The
JMS Gateway Listeneruses theservice registryto find theFirstServiceESB:SimpleListenerservice's end-point reference (EPR). In this case, the EPR is thequeue/quickstart_helloworld_Request_esbJMS queue. - The
JMS Gateway Listenertakes the new ESB-aware message and sends it to thequeue/quickstart_helloworld_Request_esbJMS queue. - The
FirstServiceESB:SimpleListenerservice receives the message. - The
FirstServiceESB:SimpleListenerservice extracts the payload from the message and outputs it to the console.
Part II. Service Registration and Hosting
Chapter 4. Introducing the Service Registry
4.1. About this Section
Read this section to learn what a service registry is and how it interacts with the ESB component. To learn how to develop for the Registry, read the jUDDI Registry Guide.
4.2. Service Registry
4.3. jUDDI Registry
4.4. jUDDI and the JBoss Enterprise SOA Platform
The JBoss Enterprise SOA Platform product includes a pre-configured installation of a jUDDI registry. You can use a specific API to access this registry through your custom client. However, any custom client that you build will not covered by your SOA Platform support agreement. You can access the full set of jUDDI examples, documentation and APIs from: http://juddi.apache.org/.
4.5. Other Supported Service Registries
- SOA Software SMS
- HP Systinet
4.6. Service Provider
4.7. Service Broker
4.8. Service Requester
4.9. Web Service
4.10. Web Service End-Point
4.11. Web Services Description Language (WSDL)
- location of the service
- the operations that the service supports
- the protocol bindings the service supports (SOAP, HTTP, etc)
- access procedure
4.12. Universal Description, Discovery and Integration (UDDI) Registry
4.13. UDDI Application Programming Interfaces
- UDDI_Security_PortType
- This defines the API to obtain a security token. With a valid security token a publisher can publish to the registry. A security token can be used for the entire session.
- UDDI_Publication_PortType
- This defines the API to publish business and service information to the UDDI registry.
- UDDI_Inquiry_PortType
- This defines the API to query the UDDI registry. This API does not normally require a security token.
- UDDI_CustodyTransfer_PortType
- This API can be used to transfer the custody of a business from one UDDI node to another.
- UDDI_Subscription_PortType
- This defines the API to register for updates on a particular business of service.
- UDDI_SubscriptionListener_PortType
- This defines the API a client must implement to receive subscription notifications from a UDDI node.
- UDDI_Replication_PortType
- This defines the API to replicate registry data between UDDI nodes.
- UDDI_ValueSetValidation_PortType
- This is used by nodes to allow external providers of value set the validation. Web services to assess whether keyedReferences or keyedReferenceGroups are valid.
- UDDI_ValueSetCaching_PortType
- UDDI nodes may perform validation of publisher references themselves using the cached values obtained from such a Web service.
4.14. UDDI Page Types
- Green Pages
- Green Pages provide information that enables you to bind a client to the service being provided.
- Yellow Pages
- Yellow Pages are used to categorize businesses based upon the industries to which they belong.
- White Pages
- White Pages contain general information, such as the name, address and other contact details for the company providing the service.
4.15. The Service Registry and the JBoss Enterprise SOA Platform
4.16. jUDDI and the ESB
4.17. How the Registry Works
- The JBoss Enterprise Service Bus funnels all interaction with the Registry through the registry interface.
- It then calls a JAXR implementation of this interface.
- The JAXR API needs to utilize a JAXR implementation. (By default, this is Apache Scout.)
- Apache Scout, in turn, calls the Registry.
Chapter 5. Publishing Contracts
5.1. Service List Application
Important
5.2. End-Point Contract
5.3. How the JBoss Enterprise SOA Platform Discovers End-Point Contracts
Unavailable on Contract5.4. Publish a Contract
Procedure 5.1. Task
- In order to publish contract information, you must give an action the following
org.jboss.internal.soa.esb.publish.Publishannotation. (This example uses the SOAPProcessor for demonstrative purposes):@Publish(JBossWSWebserviceContractPublisher.class) public class SOAPProcessor extends AbstractActionPipelineProcessor { //TODO: implement } - Implement the
org.jboss.soa.esb.actions.soap.ContractPublisherinterface (You only need to implement one method):public ContractInfo getContractInfo(EPR epr);
Part III. Service Orchestration and Business Process Management
Chapter 6. jBPM Web Applications
6.1. jBPM
6.2. jBPM and ESB Integration
- Service Orchestration: You can orchestrate services using the Business Process Manager by creating a process definition.
- Human Task Management: The Business Process Manager allows you to integrate machine-based services with the management of tasks undertaken by people.
6.3. Create a Graphical Representation of the Steps in a Business Procedure
Procedure 6.1. Task
- Use jBPM's Process Designer functionality.
Note
A side benefit of using this tool is that it can help foster good working relationships between your business analysts and your technical developers.
6.4. jBPM Web Console
6.5. Deploying a jBPM Web Application to the JBoss Enterprise SOA Platform
- You have many deployment options: choose from using the GPD deployment (Graphical Design Process) tab, the JSF console upload form and the
Ant DeployProcessTask.Warning
Do not include the jBPM libraries in your deployed ESB applications. Thejbpm.esbmodule already provides the libraries and configuration files required to run jBPM applications. Always use the provided versions and default settings as these have been refined by Red Hat's extensive Quality Engineering tests in order to prevent issues such as class loading conflicts and configuration mismatches.Note
Process definitions should be deployed separately from the web application. Red Hat recommends that you deploy the process before the web application so that the latter can operate under the assumption the process is available at all times. - The jBPM Graphical Design Process editor includes four modes: Diagram, Deployment, Design and Source, which are available as switchable tabs at the bottom of the editor. To adjust the deployment settings of the project you should select the tab that opens the Deployment mode. You can easily modify them or, if the settings do not match your needs, reset them to their defaults.
- In multi-tenancy use cases, a single server hosts many applications, each of which requires a different configuration. Red Hat recommends that you give each configuration file a unique name (something other than jbpm.cfg.xml), to avoid overriding the default configuration file that comes provided with the platform.
Chapter 7. jBPM 3 Integration
7.1. JBoss Business Process Manager
7.2. JBPM Integration Configuration
- To create a JBPM database, start the
DatabaseInitializerMBean. (You will find the configuration settings for this MBean in the first configuration element of theSOA_ROOT/jboss-as/server/PROFILE/deploy/jbpm.esb/jbpm-service.xmlfile.)Warning
The JbpmDS data source is defined in the jbpm-ds.xml file, located inSOA_ROOT/jboss-as/server/PROFILE/deploy/jbpm.esb. By default, it uses a Hypersonic database. Always change this to a production-quality database in a live environment.Warning
The JBoss Enterprise SOA Platform also comes equipped with Hypersonic, an in-memory reference database. Use this in testing environments only. - Follow the example shown below:
<classpath codebase="deploy" archives="jbpm.esb"/>
<classpath codebase="deploy/jbossesb.sar/lib"
   archives="jbossesb-rosetta.jar"/>

<mbean code="org.jboss.internal.soa.esb.dependencies.DatabaseInitializer"
       name="jboss.esb:service=JBPMDatabaseInitializer">
      <attribute name="Datasource">java:/JbpmDS</attribute>
      <attribute name="ExistsSql">select count(*) from JBPM_ID_USER</attribute>
      <attribute name="SqlFiles">
      jbpm-sql/jbpm.jpdl.hsqldb.sql
      </attribute>
      <depends>jboss.jca:service=DataSourceBinding,name=JbpmDS</depends>
      <attribute name="UseEOL">true</attribute>
</mbean>

<mbean code="org.jboss.soa.esb.services.jbpm.configuration.JbpmService"
   name="jboss.esb:service=JbpmService">
</mbean>
7.3. jBPM 5 to JBoss ESB Integration
<service category="EsbJbpm5Example"
                 name="JBpm5CallbackService"
                 description="Service which makes Callbacks into jBPM">
            <listeners>
                <jms-listener name="JMS-DCQListener"
                              busidref="jBPMCallbackBus"
                              maxThreads="1"
                />
            </listeners>
            <actions mep="OneWay">
                <action name="action" class="org.jboss.soa.esb.services.jbpm5.actions.Bpm5Callback">
                    <property name="process-definition-name" value="sample.bpmn"/>
                </action>
            </actions>
        </service>
      </services>
Important
<property name="process-definition-name" value="sample.bpmn"/>
7.4. The DatabaseInitializer MBean's Default Values
| Property | Description | Default |
|---|---|---|
Datasource | The datasource for the JBPM database. | java:/JbpmDS |
ExistsSql | Use this SQL command to confirm the existence of the database. | Select count(*) from JBPM_ID_USER |
SqlFiles | These files contain the SQL commands to create the JBPM database if it is not found. | jbpm-sql/jbpm.jpdl.hsqldb.sql, jbpm-sql/import.sql |
Note
DatabaseInitializer MBean is configured to wait until for the JbpmDS is deployed, before it then deploys itself.
7.5. The JbpmService MBean
JbpmService bean ties the life-cycle of the JBoss Business Process Manager's job executor to that of the jbpm.esb. It does so by launching a job executor instance on start-up and closes it on shutdown.
7.6. Configuring the JBPM
SOA_ROOT/jboss-as/server/PROFILE/deploy/jbpm.esb/ directory:
jbpm.cfg.xmlhibernate.cfg.xmljbpm.mail.templates.xml
- The
jbpm.cfg.xmlfile is set to tell the JBPM to use the JTA Transaction Manager:<service name="persistence"> <factory> <bean class="org.jbpm.persistence.jta.JtaDbPersistenceServiceFactory"> <property name="isTransactionEnabled"><false/></property> <property name="isCurrentSessionEnabled"><true/></property> <!--property name="sessionFactoryJndiName"> <string value="java:/myHibSessFactJndiName" /> </property--> </bean> </factory> </service> - The
hibernate.cfg.xmlfile also tells the JBPM use theJTA Transaction Manager:<!-- JTA transaction properties (begin) --> <property name="jta.UserTransaction">UserTransaction</property> <property name="hibernate.current_session_context_class">jta</property> <property name="hibernate.transaction.factory_class">org.hibernate.transaction.JTATransactionFactory</property> <property name="hibernate.transaction.manager_lookup_class">org.hibernate.transaction.JBossTransactionManagerLookup</property> <!-- JTA transaction properties (end) -->Note
Do not use Hibernate to create the database schema. Use theDatabaseInitializerMBean instead. - The
jbpm.mail.templates.xmlfile contains the following:jboss-as ]$ cat server/default/deploy/jbpm.esb/jbpm.mail.templates.xml <?xml version="1.0" encoding="UTF-8"?> <mail-templates> <variable name="taskListBaseURL" value="http://localhost:8080/jbpm-console/app/task.jsf?id=" /> <mail-template name='task-assign'> <actors>${taskInstance.actorId}</actors> <subject>Task notification: ${taskInstance.name}</subject> <text><![CDATA[Hi ${taskInstance.actorId}, Task '${taskInstance.name}' has been assigned to you. Go for it: ${taskListBaseURL}${taskInstance.id} Sent by jBPM]]></text> </mail-template> <mail-template name='task-reminder'> <actors>${taskInstance.actorId}</actors> <subject>Task reminder: ${taskInstance.name}</subject> <text><![CDATA[Hey ${taskInstance.actorId}, Do not forget about task '${taskInstance.name}'. Get going: ${taskListBaseURL}${taskInstance.id} Sent by jBPM]]></text> </mail-template> </mail-templates>Note
To learn more about each of these configuration files, refer to the JBPM Reference Guide.
7.7. Creating a Process Definition
- Use a Creation wizard to create an empty process definition. Select → → . The wizard opens on the Select Wizard page.
- Select the JBoss jBPM category, then the jBPM Process Definition item. Clicking on the button brings us to the Create Process Definition page.
- Type in a name for the process archive file. Click on the button to end the wizard and open the process definition editor.
- By viewing the Package Explorer, you can see that creating a process definition involves creating an XML file called
[process name].jpdl.xml, which contains the process definition information. A JPG file called[process name].jpgwill also be automatically generated when changes are saved to the process.
7.8. Deploying a Process Definition
- Check that the server is running.
- Activate a process archive by going to the JBPM Graphical Editor's Deployment tab.
Note
Sometimes you will only need to deploy theprocessdefinition.xmlfile but, most often, you will be deploying other types ofartifactsas well, such as task forms. - Deploy the definition using one of these methods:
- Using JBoss Developer Studio , configure the upload servlet used by the deployer. Next, click the button. This is visible in the Deployment view.
- Using the DeployProcessToServer JBPM
anttask. - Save the deployment to a local
.parfile from the Deployment view. Next, activate the archive using the JBPM console. (This requires that you have administration privileges.)
7.9. JBPM Commands
| Command | Description |
|---|---|
NewProcessInstanceCommand | This command starts a new ProcessInstance which is associated with a process definition that has been already deployed to the JBPM. The NewProcessInstanceCommand leaves the process instance in the start state. This is needed in the case of a task being associated with the Start node (such as when there is one on an actor's task-list). |
StartProcessInstanceCommand |
This is identical to the
NewProcessInstanceCommand except that the new process instance is automatically moved from the start position to the first node.
|
GetProcessInstanceVariablesCommand |
Displays the root node variables for a process instance by using the process instance identifier.
|
CancelProcessInstanceCommand |
Cancels an entire
ProcessInstance. (Requires some JBPM context variables to be set on the message, including the ProcessInstance identifier.)
|
7.10. Configuring a new Process Instance in JBPM
- The configuration for this action in the jboss-exb.xml looks like this:
<action name="create_new_process_instance" class="org.jboss.soa.esb.services.jbpm.actions.BpmProcessor"> <property name="command" value="StartProcessInstanceCommand" /> <property name="process-definition-name" value="processDefinition2"/> <property name="actor" value="FrankSinatra"/> <property name="esbToBpmVars"> <!-- esb-name maps to getBody().get("eVar1") --> <mapping esb="eVar1" bpm="counter" default="45" /> <mapping esb="BODY_CONTENT" bpm="theBody" /> </property> </action> - You are required to input these two attributes:
- nameUse any value for this name attribute, as long as it is unique in the
action pipeline. - classAlways set this attribute to
org.jboss.soa.esb.services.jbpm.actions.BpmProcessor.
7.11. JBPM Configuration Properties
| Property | Description | Required? |
|---|---|---|
| command |
This must be one of:
NewProcessInstanceCommand, StartProcessInstanceCommand, GetProcessInstanceVariablesCommand or CancelProcessInstanceCommand.
|
Yes
|
| process-definition-name |
Required for the
NewProcessInstanceCommand and StartProcessInstanceCommand if the process-definition-id property is not used. The value of this property should reference the already-deployed process definition that needs a new instance. (This property does not apply to the CancelProcessInstanceCommand.)
| Sometimes |
| process-definition-id |
Required for the
NewProcessInstanceCommand and StartProcessInstanceCommand if the process-definition-name property is not used. The value of this property should refer to the already-deployed process definition for which a new instance is to be created. (This property does not apply to the CancelProcessInstanceCommand.)
|
Sometimes
|
| actor |
Specifies the
.) JBPM actor identifier. (Only applies to the NewProcessInstanceCommand and the StartProcessInstanceCommand
| No |
| key |
Specifies the value of the JBPM key. The key is a string-based business key property on the process instance. The combination of business key and process definition must be unique if a business key is supplied. The key value can hold an MVEL expression to extract the desired value from the EsbMessage. For example, if you were to have a named parameter called
businessKey in the body of a message, body.businessKey would be used. (This property only applies to NewProcessInstanceCommand and StartProcessInstanceCommand.)
| No |
| transition-name |
This only applies to
StartProcessInstanceCommand. Use it only if there is more than one transition out of the current node. If this property is not specified, then the default transition out of the node is taken. The default transition is the first transition in the list of transitions defined for that node in the JBPM processdefinition.xml.
| No |
| esbToBpmVars |
This is an optional property for the
New- and StartProcessInstanceCommand. It defines a list of variables which need to be extracted from the ESB Message and set into the JBPM context for that particular process instance. The list consists of mapping elements, each of which can have the following attributes:
|
No
|
7.12. EsbMessage Body Configuration in JBPM
| Property | Description |
|---|---|
| jbpmProcessInstId |
This is a required ESB message Body parameter that applies to the
GetProcessInstanceVariablesCommand and CancelProcessInstanceCommand commands. Manually set this as a named parameter on the EsbMessage body.
|
7.13. ESB-to-JBPM Exception Handling
JbpmException is thrown from the JBPM Command API during an ESB call, it is passed to the action pipeline. The pipeline logs the error, directs the message to the DeadLetterService and sends an error to the faultTo endpoint reference (provided it has been set).
7.14. JBPM-JBossESB-to-ESB Integration
EsbActionHandler and EsbNotifier. The EsbActionHandler is a request-reply type action that sends a message to a service and waits for a response. By contrast, the EsbNotifier does not wait for a response.
Note
Warning
lib directory.
7.15. ESB Notifier Action in JBPM
- Attach the
EsbNotifierto the JBPMprocessdefinition.xmlfile's outgoing transition as shown below:<node name="ShipIt"> <transition name="ProcessingComplete" to="end"> <action name="ShipItAction" class="org.jboss.soa.esb.services.jbpm.actionhandlers.EsbNotifier"> <esbCategoryName>BPM_Orchestration4</esbCategoryName> <esbServiceName>ShippingService</esbServiceName> <bpmToEsbVars> <mapping bpm="entireCustomerAsObject" esb="customer" /> <mapping bpm="entireOrderAsObject" esb="orderHeader" /> <mapping bpm="entireOrderAsXML" esb="entireOrderAsXML" /> </bpmToEsbVars> </action> </transition> </node> - You can specify the following attributes:
- nameThis is required. It is the user-specified name of the action
- classThis is required. You must set it to
org.jboss.soa.esb.services.jbpm.actionhandlers.EsbNotifier
7.16. Configuring the ESB Action Handler
- Attach the
EsbActionHandlerto a node to call an action when that node is entered. When theEsbActionHandleris executed, the node waits for a transition signal (normally sent by theJBossESB callbackservice). - Configure as follows:
<action name="create_new_process_instance"
  class="org.jboss.soa.esb.services.jbpm.actions.BpmProcessor">

  <property name="command" value="StartProcessInstanceCommand" />
  <property name="process-definition-name" value="processDefinition2"/>
  <property name="actor" value="FrankSinatra"/>

  <property name="esbToBpmVars">
  <!-- esb-name maps to getBody().get("eVar1") -->
    <mapping esb="eVar1" bpm="counter" default="45" />
    <mapping esb="BODY_CONTENT" bpm="theBody" />
  </property>

</action>
7.17. EsbActionHandler Extension Configuration
EsbActionHandler relies on the configuration settings for the EsbNotifier. The extensions consist of the following sub-elements:
| Property | Description | Required? |
|---|---|---|
| esbToBpmVars |
Identical to the
esbToBpmVars property for the BpmProcessor configuration. This sub-element defines a list of variables that need to be extracted from the ESB message and set in the Business Process Manager context for that particular process instance. If left unspecified, the globalProcessScope value defaults to true when the variables are set.
The list consists of mapping elements, each of which can have the following attributes:
| No |
| exceptionTransition | This the name of the transition to utilize if an exception occurs while the service is being processed. It requires the current node to have several outgoing transitions, one of which can handle exception processing. | No |
7.18. Passing Parameters to a jBPM5 Process on startProcess
// create the ESB message
Message esbMessage = MessageFactory.getInstance().getMessage();
// add a parameter
esbMessage.getProperties().setProperty("name", "Laurel");
7.19. Passing Parameters to a jBPM5 Process on signalEvent
// create the ESB message
Message esbMessage = MessageFactory.getInstance().getMessage();
// set the process event type as defined in the process definition
esbMessage.getProperties().setProperty("processEventType", "NewMessage");
// add a parameter
esbMessage.getProperties().setProperty("name", "Hardy");

// setup data required to identify the intended target process instance
ContextImpl ctxi = (ContextImpl) esbMessage.getContext();
// set the session id
ctxi.setContext("jbpm5-session-id", sessionId);
// set the instance id.
ctxi.setContext("jbpm5-processinstance-id", processInstanceId);
<definition ...>

    <itemDefinition id="_nameItem" structureRef="String" />

    <process name="Hello" tns:packageName="defaultPackage" ...>
        <property id="name" itemSubjectRef="_nameItem"/>
        <!-- ... -->
    </process>
    <!-- ... -->
</definition>
<definition ...>

  <itemDefinition id="_objectMapItem" structureRef="java.util.Map" />

  <process name="Hello" tns:packageName="defaultPackage" ...>

    <property id="objectMap" itemSubjectRef="_objectMapItem"/>
    <!-- ... -->
  </process>
  <!-- ... -->
</definition>
String name2 = objectMap.get("name"); // will retrieve the Hardy string
7.20. Signal Event Example
<intermediateCatchEvent id="_4" name="Signal" >
      <dataOutput id="_4_Output" name="event" />
      <dataOutputAssociation>
      <sourceRef>_4_Output</sourceRef>
      <targetRef>objectMap</targetRef>
      </dataOutputAssociation>
      <outputSet>
        <dataOutputRefs>_4_Output</dataOutputRefs>
      </outputSet>
      <signalEventDefinition signalRef="NewMessage"/>
</intermediateCatchEvent>
7.21. List of ESB Notifier Sub-Elements
| Sub-element | Description |
|---|---|
esbCategoryName
|
This is the ESB service's category name and is required if you are not using the reply-to-originator functionality.
|
esbServiceName
|
This is the name of the ESB service and required if you are not using the reply-to-originator functionality.
|
replyToOriginator |
Use this to specify the 'reply' or 'fault' originator address previously stored in the process instance on creation.
|
globalProcessScope
|
This element is an optional Boolean-valued parameter. Use it to set the default scope within which the
bpmToEsbVars variables are to be found. If the globalProcessScope is set to true, it searches for the variables within the token hierarchy (the process-instance scope). If it is set to false, it retrieves the variables in the scope of the token. If the token itself does not possess a variable for a given name, the token hierarchy is used to search for that variable. If the element is omitted altogether, the globalProcessScope defaults to false.
|
bpmToEsbVars
|
This element is optional. It takes a list of sub-elements and uses them to map a JBPM context variable to an ESB message location. Each of these mapping sub-elements can have the following attributes:
|
bpm |
This is a required attribute. It is the name of the variable in JBPM context. The name can be MVEL type expression so you can extract a specific field from a larger object. The MVEL root is set to the JBPM “ContextInstance”, so for example you can use mapping like:
The JBPM context-variable names can also be referenced directly.
|
esb
|
Optional. This is the name of the variable in the Enterprise Service Bus Message. It can be an MVEL-type expression. (The attribute value TokenName in the example above is equal to
body.TokenName. A special value called BODY_CONTENT "addresses" the body directly.) By default, the variable is set as a named parameter on the body of the ESB Message. To omit the esb attribute, replace it with the value of the bpm attribute.
|
process-scope
|
This attribute is optional. It is a parameter that can contain a Boolean value used to override the setting of the
globalProcessScope for this mapping.
|
Important
debug-level logging when working on the variable mapping configuration.
7.22. List of ESBServiceWorkItemHandler Sub-Elements
| Name | Description |
|---|---|
| ServiceCategory | This is the ESB service category name for the service that jBPM 5 will deliver a message to. |
| ServiceName | This is the ESB service name for the service that jBPM 5 will deliver a message to. |
7.23. List of ESBActionWorkItemHandler Sub-Elements
| Name | Description |
|---|---|
| ServiceCategory | This is the ESB service category name for the service that jBPM 5 will deliver a message to. |
| ServiceName | This is the ESB service name for the service that jBPM 5 will deliver a message to. |
| CallbackServiceCategory | The service category of the callback service. The callback service must be provided in the jboss-esb.xml. |
| CallbackServiceName | The service name of the callback service. The callback service must be provided in the jboss-esb.xml. |
| replyToOriginator | Use this to specify the 'reply' or 'fault' originator address previously stored in the process instance on creation. |
| jbpm5-session-id | The jbpm 5 session ID of the session which started this process. This is needed so that the callback service can complete the current work item. |
7.24. Adding a Time-Out Value in JBPM
- Add a JBPM-native timer to the appropriate node. In this example, the timer has been configured so a transition called
time-outis triggered if there is no signal received in ten seconds:<timer name='timeout' duedate='10 seconds' transition='time-out'/>
7.25. JBPM-to-ESB Exception Handling
| Error | Resolution |
|---|---|
| Delivery error | Add an exceptionhandler ( TB-JBPM-USER ) to the JBPM node to deal with MessageDeliveryException caused by the user misspelling the service's name. (See http://docs.jboss.com/jbpm/v3/userguide/processmodelling.html for more information.) |
| Processing error | Sometimes the service receives a request but throws an error during processing. If the call is made from the EsbActionHandler, the exception reported back to JBoss Business Process Manager. |
7.26. Exception Handling Examples
Time-out: If you are using the EsbActionHandler action and the node is awaiting a callback, you can limit the waiting period. To do so, add a timer to the node. (That is how Service1 is configured in the process definition snippet below.) The timer can be set for a certain period, in this case, ten seconds:
<node name="Service1">

  <action class=
    "org.jboss.soa.esb.services.jbpm.actionhandlers.EsbActionHandler">
    <esbCategoryName>MockCategory</esbCategoryName>
      <esbServiceName>MockService</esbServiceName>
  </action>

  <timer name='timeout' duedate='10 seconds'
    transition='time-out-transition'/>
  <transition name="ok" to="Service2"></transition>
  <transition name="time-out-transition" to="ExceptionHandling"/>

</node>
Service1 has two outgoing transitions. The first of these is ok whilst the second one is time-out-transition.
ok , since it is defined as the first. However, if the processing of the service takes more then ten seconds, the timer will run instead. The timer's transition attribute is set to time-out-transition, meaning that this transition will be taken on timing-out.
ExceptionHandling node. From here, you can perform compensatory work.
Exception Transition: You can define an exceptionTransition to handle any exceptions that occurs in the midst of the service being processed. Doing so sets the faultTo endpoint reference on the message, meaning that the Enterprise Service Bus will make a call-back to this node. This signals the exceptionTransition.
Service2 has two outgoing transitions: the ok transition will be taken when things are happening normally, whilst the exception transition will be taken when the service has, as its name indicates, thrown an exception during processing:
<node name="Service2">
  <action class=
  "org.jboss.soa.esb.services.jbpm.actionhandlers.EsbActionHandler">
     <esbCategoryName>MockCategory</esbCategoryName>
     <esbServiceName>MockService</esbServiceName>
     <exceptionTransition>exception</exceptionTransition>
   </action>
   <transition name="ok" to="Service3"></transition>
   <transition name="exception" to="ExceptionHandling"/>
</node>
Service2, the action's exceptionTransition is set to exception. In this scenario, the process itself also ends up in the ExceptionHandling node.
Exception Decision: Observe the configuration of Service3 and the exceptionDecision node that follows it. Service3 processes to a normal conclusion and the transition out of its node occurs as one would expect.
errorCode was set, and the exceptionDecision node checks if a variable of the same name has been called here:
<node name="Service3">
  <action class=
  "org.jboss.soa.esb.services.jbpm.actionhandlers.EsbActionHandler">
     <esbCategoryName>MockCategory</esbCategoryName>
     <esbServiceName>MockService</esbServiceName>
     <esbToBpmVars>
        <mapping esb="SomeExceptionCode" bpm="errorCode"/>
     </esbToBpmVars>
  </action>
  <transition name="ok" to="exceptionDecision"></transition>
</node>

<decision name="exceptionDecision">
   <transition name="ok" to="end"></transition>
   <transition name="exceptionCondition" to="ExceptionHandling">
      <condition>#{ errorCode!=void }</condition>
   </transition>
</decision>
esbToBpmVars mapping element extracts the errorCode called SomeExceptionCode from the message's body and sets in the JBPM context. (This is assuming that the SomeExceptionCode is set.)
exceptionDecision , the ok transition is taken if processing is normal, but if a variable called errorCode is found in the JBPM context, the exceptionCondition transition is taken instead.
<condition>#{ errorCode!=void }</condition>
Note
7.27. Launching the JBPM Console
- Once the server has stopped, access the JBPM Console from this address: http://localhost:8080/jbpm-console/app/processes.jsf.
- You can now use the JBPM Console to deploy and monitor processes and tasks. The
bpm_orchestration4quick start demonstrates this feature.Warning
TheJbpmDSdata source is defined in thejbpm-ds.xmlfile. By default, it uses a Hypersonic database. Always change this to a production-quality database in a live environment.Note
Make sure that everyjbpm.esbdeployment shares the same database instance. (This is so that the various Enterprise Service Bus nodes have access to the same processes definitions.)
7.28. JBPM Deployment
| Property | Description |
|---|---|
jbpm.esb/META-INF
|
This directory contains the
deployment.xml and jboss-esb.xml files.
|
deployment.xml
|
Specifies the two resource files the ESB archive depends on: the
jbossesb.esb and the JbpmDS data source files. The information in these files is used to determine the order of deployment:
|
jboss-esb.xml
|
This file deploys an internal service called
JBpmCallbackService:
This internal service listens to the
jBPMCallbackBus, which, by default, is set to be either JBossMQ (via the jbmq-queue-service.xml file) or JBossMessaging (via the jbm-queue-service.xml file.) The latter is a messaging provider for the Java Message Service Queue. Ensure that only one of these files is deployed in the jbpm.esb archive.
|
Chapter 8. jBPM 5 Integration
8.1. Integration Configuration
8.2. jBPM 5 Configuration
<?xml version="1.0" encoding="UTF-8"?><jbossesb-deployment>
	<depends>jboss.esb:deployment=jbossesb.esb</depends>
	<depends>jboss.jca:name=jboss/datasources/jbpm5DS,service=DataSourceBinding</depends>
</jbossesb-deployment>
8.3. JBossESB to jBPM 5
| Command | Description |
|---|---|
startProcess |
Start a new ProcessInstance given a process definition that was already deployed to jBPM.
|
signalEvent |
Signal to an already-started process that an event has occurred.
|
abortProcessInstance |
Cancel a ProcessInstance. That is, when an event comes in which should result in the cancellation of the entire ProcessInstance. This action requires some jBPM context variables to be set on the message, in particular the ProcessInstance Id.
|
- nameRequired attribute. You are free to use any value for the name attribute as long as it is unique in the action pipeline.
- classRequired attribute. This attributes needs to be set to “org.jboss.soa.esb.services.jbpm5.actions.Bpm5Processor”
Warning
8.4. jBPM Context Configuration Properties
Note
Message esbMessage = MessageFactory.getInstance().getMessage();

ContextImpl ctxi = (ContextImpl) esbMessage.getContext();
ctxi.setContext("jbpm5-session-id", 10);
ctxi.setContext("jbpm5-processinstance-id", 10L);
| Property | Description | Required? |
|---|---|---|
| process-action |
Needs to be one of: startProcess, signalEvent, or abortProcessInstance.
|
Yes
|
| process-definition-name |
Required property. The value of this property should reference a process definition that is already deployed to jBPM and of which you want to create a new instance.
|
Yes
|
| process-id |
The value of this property should reference a process definition id in jBPM of which you want to create a new instance.
|
Yes
|
| esbToBpmVars |
Optional property. This property defines a list of variables that need to be extracted from the EsbMessage and set into jBPM context for the particular process instance. The list consists of mapping elements. Each mapping element can have the following attributes:
|
No
|
| handlerClass |
WS Human Task handler class (default: org.jbpm.task.service.hornetq.CommandBasedHornetQWSHumanTaskHandler)
|
Yes
|
| handlerHost |
WS Human Task server hostname (default: 127.0.0.1)
|
Yes
|
| handlerPort |
WS Human Task server hostname (default: 5446)
|
Yes
|
Note
- org.jbpm.process.workitem.wsht.CommandBasedWSHumanTaskHandler
- handlerHost - WS Human Task server hostname (default: 127.0.0.1)
- handlerPort - WS Human Task server hostname (default: 9123)
8.5. Body Configuration Properties
| Property | Description | Required? |
|---|---|---|
| jbpm5-processinstance-id |
ESB context property that applies to the signalEvent and abortProcessInstance commands.
|
Yes
|
| jbpm5-session-id |
ESB context property that tells the action what session to load.
|
Yes
|
Chapter 9. Service Orchestration and the ESB
9.1. Service Orchestration
9.2. Creating an Orchestration Diagram
- Select → → .
- Choose JBoss jBPM Process Definition from the
Selectionwizard. - Save the process definition. Use a separate directory for each process definition to avoid confusion.
- Start to "drag-and-drop" items from the jBPM Integrated Development Environment 's menu palette into the Process Design view. You can switch between the design and source modes to check XML elements as you add them.
- Add the XML fragments that are needed for the integration.
- Before building the order process diagram, create and test the three services. These are ordinary ESB services and they are defined in the
jboss-esb.xmlfile. An example configuration with service names and categories is shown below:<services> <service category="BPM_orchestration4_Starter_Service" name="Starter_Service" description="BPM Orchestration Sample 4: Use this service to start a process instance"> <!-- .... --> </service> <service category="BPM_Orchestration4" name="IntakeService" description="IntakeService: transforms, massages, calculates priority"> <!-- .... --> </service> <service category="BPM_Orchestration4" name="DiscountService" description="DiscountService"> </service> <service category="BPM_Orchestration4" name="ShippingService" description="ShippingService"> <!-- .... --> </service> </services> - Refer to these services by using either the
EsbActionHandlerorEsbNotifieraction handler. (Choose theEsbActionHandlerin cases where the JBoss Business Process Manager expects a response, and theEsbNotifierwhen none is required.) - Now that the ESB services are known, drag the
Startstate node into the design view. A new process instance will begin at this node. - Drag in a node and name it
Intake Order. - Connect the
Startand theIntake Ordernodes by selecting from the menu and then clicking on each of them. An arrow connecting them will appear. It will be pointing towards the firstIntake Order. - Add the Service and Category names to the Intake Node. Select the Source view. You will be able to see the source code for the
Intake Ordernode. It should look like this:<node name="Intake Order"> <transition name="" to="Review Order"></transition> </node> - Add the
EsbActionHandlerclass reference, followed by the sub-element configuration settings for the service category and name,BPM_Orchestration4and theIntakeService. It should look like this:<node name="Intake Order"> <action name="esbAction" class= "org.jboss.soa.esb.services.jbpm.actionhandlers.EsbActionHandler"> <esbCategoryName>BPM_Orchestration4</esbCategoryName> <esbServiceName>IntakeService</esbServiceName> <!-- async call of IntakeService --> </action> <transition name="" to="Review Order"></transition> </node> - Send some JBoss Business Process Manager context variables along with the service call using the following code. (In the example below, there is a variable named entireOrderAsXML which is to be set in the default position in the message body.)
<bpmToEsbVars>
	<mapping bpm="entireOrderAsXML" esb="BODY_CONTENT" />
</bpmToEsbVars>
This will cause the XML-based contents of the entireOrderAsXML variable to end up in the body of the message. Now theIntakeServicecan access the message and process it by letting it flow through each action in the pipeline. When the last action is reached, the replyTo property is checked and the message is sent to theJBpmCallBackservice.This makes a call back into the JBoss Business Process Manager, signaling the transition from theIntake Ordernode to the next one (in this case,Review Order). - Next, send some variables from the message to the node. Note that entire objects can be sent, as long both contexts can load the object's class. To retain the ability to "map back" to the JBoss Business Process Manager, add an esbToEsbVars element:
<node name="Intake Order">
<action name="esbAction" class=
"org.jboss.soa.esb.services.jbpm.actionhandlers.EsbActionHandler">
<esbCategoryName>BPM_Orchestration4</esbCategoryName>
<esbServiceName>IntakeService</esbServiceName>
<bpmToEsbVars>
<mapping bpm="entireOrderAsXML" esb="BODY_CONTENT" />
</bpmToEsbVars>
<esbToBpmVars>
<mapping esb="body.entireOrderAsXML" bpm="entireOrderAsXML"/>
<mapping esb="body.orderHeader" bpm="entireOrderAsObject" />
<mapping esb="body.customer" bpm="entireCustomerAsObject" />
<mapping esb="body.order_orderId" bpm="order_orderid" />
<mapping esb="body.order_totalAmount" bpm="order_totalamount" />
<mapping esb="body.order_orderPriority" bpm="order_priority" />
<mapping esb="body.customer_firstName" bpm="customer_firstName" />
<mapping esb="body.customer_lastName" bpm="customer_lastName" />
<mapping esb="body.customer_status" bpm="customer_status" />
</esbToBpmVars>
</action>
<transition name="" to="Review Order"></transition>
</node>
When this service returns, the following variables are then stored in the JBoss Business Process Manager's context:entireOrderAsXMLentireOrderAsObjectentireCustomerAsObject
In addition, for demonstration purposes, there are also some flattened variables:order_orderidorder_totalAmountorder_prioritycustomer_firstNamecustomer_lastNamecustomer_status
- You must now review the order process manually. Add a
task nodewith the task calledOrder Review. These jobs need to be performed by someone with the actor_iduser.Make sure the XML fragment looks like this:<task-node name="Review Order"> <task name="Order Review"> <assignment actor-id="user"></assignment> <controller> <variable name="customer_firstName" access="read,write,required"></variable> <variable name="customer_lastName" access="read,write,required"> <variable name="customer_status" access="read"></variable> <variable name="order_totalamount" access="read"></variable> <variable name="order_priority" access="read"></variable> <variable name="order_orderid" access="read"></variable> <variable name="order_discount" access="read"></variable> <variable name="entireOrderAsXML" access="read"></variable> </controller> </task> <transition name="" to="Calculate Discount"></transition> </task-node> - Create an XHTML data form to display these variables in a form in the jbpm-console.
Note
See the bpm_orchestration4 quick start'sReview_Order.xhtmlfile for more information about this. - Link this data form to the task node by adding these settings to the
forms.xmlfile:<forms> <form task="Order Review" form="Review_Order.xhtml"/> <form task="Discount Review" form="Review_Order.xhtml"/> </forms> - In this case, the same form is applied to two task nodes. There is a reference to the variables in the Review Order form as shown in the following sample code. (This, in turn, refers to the variables that are set in the JBoss Business Process Manager's context.)
<jbpm:datacell> <f:facet name="header"> <h:outputText value="customer_firstName"/> </f:facet> <h:inputText value="#{var['customer_firstName']}" /> </jbpm:datacell> - When the process reaches the
Review Node, you can log into the jBPM Console and click on Tasks to see a list of items. - Click on a task to examine it in detail. A form will appear. You can then update some of the values.
- Conclude by clicking , at which point the process will move to the next node.
- This one is the
Calculate Discountnode. It is, once again, an ESB service node, the configuration file for which looks like this:<node name="Calculate Discount"> <action name="esbAction" class=" org.jboss.soa.esb.services.jbpm.actionhandlers.EsbActionHandler"> <esbCategoryName>BPM_Orchestration4</esbCategoryName> <esbServiceName>DiscountService</esbServiceName> <bpmToEsbVars> <mapping bpm="entireCustomerAsObject" esb="customer" /> <mapping bpm="entireOrderAsObject" esb="orderHeader" /> <mapping bpm="entireOrderAsXML" esb="BODY_CONTENT" /> </bpmToEsbVars> <esbToBpmVars> <mapping esb="order" bpm="entireOrderAsObject" /> <mapping esb="body.order_orderDiscount" bpm="order_discount" /> </esbToBpmVars> </action> <transition name="" to="Review Discount"></transition> </node>The service receives thecustomer,orderHeaderand theentireOrderAsXMLdata. It then computes a discount. The response maps thebody.order_orderDiscountvalue onto a JBoss Business Process Manager context variable called order_-discount. The process is signaled, which tells it to move to theReview Discountnode. - Review the discount, which is set to a value of 8.5. Click on . The process will move to the
Ship Itnode, which is also an ESB service.To circumvent the order process before theShip Itservice completes, use theEsbNotifieraction handler by attaching it to the outgoing transition as shown below:<node name="ShipIt"> <transition name="ProcessingComplete" to="end"> <action name="ShipItAction" class= "org.jboss.soa.esb.services.jbpm.actionhandlers.EsbNotifier"> <esbCategoryName>BPM_Orchestration4</esbCategoryName> <esbServiceName>ShippingService</esbServiceName> <bpmToEsbVars> <mapping bpm="entireCustomerAsObject" esb="customer" /> <mapping bpm="entireOrderAsObject" esb="orderHeader" /> <mapping bpm="entireOrderAsXML" esb="entireOrderAsXML" /> </bpmToEsbVars> </action> </transition> </node>After notifying theShippingService, the order process moves to theendstate and terminates. (TheShippingServiceitself may still be finishing.)In thebpm_orchestration4quick start, the JBoss Rules engine is used to determine whether this order is to be shipped via the normal or the express method.
9.3. Deploying a Process Definition
processdefinition.xml file has been created, you can deploy it to the JBoss Business Process Manager using any of the following:
- the integrated development environment
ant- the jBPM Console
Review_Order.xhtmlforms.xmlgpd.xmlprocessdefinition.xmlprocessimage.jpg
PAR archive and deploys it to the jBPM 's database.
Warning
.PAR archives as it may cause class-loading issues. Instead, use either .JAR or .ESB archives to deploy your classes.
9.4. Instantiating a Deployment
- Create a new process instance once the process definition is deployed. (Note that you can use the
StartProcessInstanceCommand. This command allows you to create a process instance with some pre-set initial values.)<service category="BPM_orchestration4_Starter_Service" name="Starter_Service" description="BPM Orchestration Sample 4: Use this service to start a process instance"> <listeners> </listeners> <actions> <action name="setup_key" class= "org.jboss.soa.esb.actions.scripting.GroovyActionProcessor"> <property name="script" value="/scripts/setup_key.groovy" /> </action> <action name="start_a_new_order_process" class= "org.jboss.soa.esb.services.jbpm.actions.BpmProcessor"> <property name="command" value="StartProcessInstanceCommand" /> <property name="process-definition-name" value="bpm4_ESBOrderProcess" /> <property name="key" value="body.businessKey" /> <property name="esbToBpmVars"> <mapping esb="BODY_CONTENT" bpm="entireOrderAsXML" /> </property> </action> </actions> </service> - The new process instance is now invoked and using a script. The jBPM key is set to the value of the OrderId by an incoming order XML file.This same XML is subsequently put into a jBPM context, through use of the
esbToBpmVarsmapping.In thebpm_orchestration4quick start, the XML came from theSeam DVD Storeand theSampleOrder.xmllooks like this:<Order orderId="2" orderDate="Wed Nov 15 13:45:28 EST 2006" statusCode="0" netAmount="59.97" totalAmount="64.92" tax="4.95"> <Customer userName="user1" firstName="Rex" lastName="Myers" state="SD"/> <OrderLines> <OrderLine position="1" quantity="1"> <Product productId="364" title="Gandhi" price="29.98"/> </OrderLine> <OrderLine position="2" quantity="1"> <Product productId="299" title="Lost Horizon" price="29.99"/> </OrderLine> </OrderLines> </Order>Note
Enterprise Service Bus and JBoss Business Process Manager deployments are what is known as "hot."The jBPM has a special feature that results in process deployments being "versioned". Newly created process instances will use the latest version, while existing ones will run to their conclusion using the process deployment they were started on.
Chapter 10. Service Registry Integration with the BPEL Engine
10.1. BPEL Engine
Note
10.2. Business Process Execution Language (BPEL)
10.3. BPEL and the Service Registry
10.4. Activate BPEL-Service Registry Integration
Procedure 10.1. Task
- Integration is turned on by default. To confirm this, open
vi SOA_ROOT/jboss-as/server/PROFILE/deploy/riftsaw.sar/bpel.properties.xmland ensure that is set as follows:bpel.uddi.registration=true.
10.5. Partner Link
10.6. Partner Link Channel
10.7. esb.juddi.client.xml
SOA_ROOT/jboss-as/server/PROFILE/deploy/jbossesb.sar/esb.juddi.client.xml file is the client configuration file for the jUDDI Service Registry.
10.8. bpel.properties Configuration Settings
| attribute | type (default) | description |
|---|---|---|
| bpel.uddi.registration | boolean (true) | If set to 'false', the UDDI integration is turned off. The RiftSaw installation process sets this value to 'true' only if the jbossesb-registry.sar is detected containing a jUDDI v3 registry. In every other case it is automatically set to false. |
| bpel.webservice.secure | boolean (false) | The UDDI Registration process registers an WSDL AccessPoint in the BindingTemplate for the BPEL Service it is registering. The BPEL server exposes the service WSDL Endpoint on the WS stack (Currently Red Hat supports JBossWS and CXF). If your webservice stack is configured to use a secure protocol (such as https), you need to switch this setting to 'true'. (Note that this setting is used during the registration process only.) |
| bpel.uddi.client.impl | String (org.jboss.soa.bpel.uddi.UDDIRegistrationImpl) | This is the name of the class that implements the org.jboss.soa.bpel.runtime.engine.ode.UDDIRegistration interface. |
| bpel.uddi.clerk.config | String (not used by default) | This defines the path to the bpel.uddi.client.xml configuration file. This can be left "commented out" if you want to use the riftsaw.sar/META-INF/riftsaw.uddi.xml. In this case, a bpel.uddi.clerk.manager must be defined. |
| bpel.uddi.clerk.manager | String (riftsaw-manager) | This defines the name of the ClerkManager that will be used if the riftsaw.uddi.xml is left commented out. This value should correspond to the name of the manager in the esb.juddi.client.xml. Note that if the bpel.uddi.clerk.config is defined, the bpel.uddi.clerk.manager setting is ignored. |
| bpel.uddi.clerk | String (BPEL_clerk) | This defines the name of the clerk that will be used. This value should correspond to the name of the clerk in the riftsaw.uddi.xml. (By default this is set to BPEL_clerk.) |
| bpel.uddi.lookup | boolean (true) | If this is set to true, the creating process of the partner channel will do a lookup by serviceName in the UDDI, and a WSDL Endpoint is retrieved. This process makes it easier to move process deployment around within your server farm, without having to update the partnerlink WSDL files in your BPEL process deployments. If more than one end-point (BindingTemplate) is found, the default policy used by the ServiceLocator is 'PolicyLocalFirst'. Note that it is still a requirement to deploy the initial partnerlink WSDL file for each partnerLink. |
Note
bpel.properties file.
10.9. Clerk
org.apache.juddi.v3.client.config.UDDIClerk) is responsible for registering service end-points in the Service Registry.
10.10. Set the Properties to be Used by the Clerk When Registering Services
Procedure 10.2. Task
- Open the
esb.juddi.client.xmlfile in your text editor:vi SOA_ROOT/jboss-as/server/PROFILE/deploy/jbossesb.sar/esb.juddi.client.xml - Configure the settings. For example:
</nodes> <clerks registerOnStartup="false"> <clerk name="SOAExample" node="default" publisher="root" password="root"/> </clerks> </manager> </uddi> - Save the file and exit.
- Put another copy of the file in here (the files must always correspond:
SOA_ROOT/jboss-as/server/PROFILE/deploy/jbossesb-registry.sar/juddi_custom_install_data/ - Save the file and exit.
10.11. Default Settings for the Service Registry Clerk
| Property | Value |
|---|---|
| keyDomain | esb.jboss.org |
| businessKey | redhat-jboss |
| serviceDescription | BPEL Service deployed by Riftsaw |
| bindingDescription | BPEL Endpoint deployed by Riftsaw |
Important
SOA_ROOT/jboss-as/server/PROFILE/deploy/jbossesb-registry.sar/esb.juddi.xml file contains a property called juddi.seed.always which is set to false. This means that it is always trying to load the root seed data when the server starts.
10.12. UDDI Registration
10.13. UDDI End-Point Look-Up
Part IV. Message Routing
Chapter 11. Using Rules to Perform Content-Based Routing
11.1. Content-Based Router
11.2. Introducing Content-Based Routing with ESB
11.3. Defining Inline Rules for Content-Based Routing with XPath
Procedure 11.1. Task
- Open
jboss-esb.xmland set the cbrAlias property toXPath. - Define the routing rules in the route-to configurations (found in the container destinations property) as shown:
<action class="org.jboss.soa.esb.actions.ContentBasedRouter" name="ContentBasedRouter">
	<property name="cbrAlias" value="XPath"/>
	<property name="destinations">
		<route-to service-category="BlueTeam"  service-name="GoBlue"  expression="/Order[@statusCode='0']" />
		<route-to service-category="RedTeam"   service-name="GoRed"   expression="/Order[@statusCode='1']" />
		<route-to service-category="GreenTeam" service-name="GoGreen" expression="/Order[@statusCode='2']" />
	</property>
</action>
11.4. Defining External Rules for Content-Based Routing with XPath
Procedure 11.2. Task
- Open the
jboss-esb.xmlfile and set the cbrAlias property toXPath. - Define the routing expressions in a .properties file. Make sure the property keys correlate with the destination names and that the property values are the XPath expressions for routing to this destination.
- Define the routing rules in the route-to configurations via the container destinations property. The destination-name attribute will refer to the XPath rule key as defined in the external .properties file as shown:
<action class="org.jboss.soa.esb.actions.ContentBasedRouter" name="ContentBasedRouter">
   <property name="cbrAlias" value="XPath"/>
   <property name="ruleSet" value="/rules/xpath-rules.properties"/>
   <property name="ruleReload" value="true"/>
   <property name="destinations">
       <route-to destination-name="blue"  service-category="BlueTeam"  service-name="GoBlue" />
       <route-to destination-name="red"   service-category="RedTeam"   service-name="GoRed" />
       <route-to destination-name="green" service-category="GreenTeam" service-name="GoGreen" />
   </property>
</action>
11.5. XPath Rules for Content-Based Routing
blue=/Order[@statusCode='0']
red=/Order[@statusCode='1']
green=/Order[@statusCode='2']
11.6. Namespace
11.7. Defining XML Namespace Prefix-to-URI Mappings
- Define XML namespace prefix-to-URI mappings as shown below. (This applies to both external and in-line rule definitions.)
<action class="org.jboss.soa.esb.actions.ContentBasedRouter"
name="ContentBasedRouter">
    <property name="cbrAlias" value="XPath"/>
    <property name="namespaces">
        <route-to prefix="ord" uri="http://www.acne.com/order" />
    </property>
    <property name="destinations">
        <route-to service-category="BlueTeam"
        service-name="GoBlue"  expression="/ord:Order[@statusCode='0']" />
        <route-to service-category="RedTeam"
        service-name="GoRed"   expression="/ord:Order[@statusCode='1']" />
        <route-to service-category="GreenTeam"
        service-name="GoGreen" expression="/ord:Order[@statusCode='2']" />
    </property>
</action>
11.8. Defining Inline Rules for Content-Based Routing with Regex
- Open the file
jboss-esb.xmland set the cbrAlias property toRegex. - Define the routing rules in the
route-toconfigurations. (These are found in the container destinations property.)<action class="org.jboss.soa.esb.actions.ContentBasedRouter" name="ContentBasedRouter"> <property name="cbrAlias" value="Regex"/> <property name="destinations"> <route-to service-category="BlueTeam" service-name="GoBlue" expression="#*111#*" /> <route-to service-category="RedTeam" service-name="GoRed" expression="#*222#*" /> <route-to service-category="GreenTeam" service-name="GoGreen" expression="#*333#*" /> </property> </action>
11.9. Defining External Rules for Content-Based Routing with Regex
- Open the file
jboss-esb.xmland set the cbrAlias property to Regex. - Define the routing expressions in a .properties file. The property keys should be the destination names and the property values are the Regex expressions for routing to the destination.
- Define the routing rules in the
route-toconfigurations (found in the container destination property) with the destination-name attribute set to the Regex rule key as defined in the .properties file.<action class="org.jboss.soa.esb.actions.ContentBasedRouter" name="ContentBasedRouter"> <property name="cbrAlias" value="XPath"/> <property name="ruleSet" value="/rules/regex-rules.properties"/> <property name="ruleReload" value="true"/> <property name="destinations"> <route-to destination-name="blue" service-category="BlueTeam" service-name="GoBlue" /> <route-to destination-name="red" service-category="RedTeam" service-name="GoRed" /> <route-to destination-name="green" service-category="GreenTeam" service-name="GoGreen" /> </property> </action>The XPath rules are in a .properties file and are represented in this format:blue=#*111#* red=#*222#* green=#*333#*
11.10. Content Based Routing Using the JBoss Rules Engine
action classes, these being:
- a routing rule set, written in the
JBoss Rulesengine's DRL language (alternatively, you can use the DSL language if you prefer it); - the message content. This is the data that goes into the JBoss Rules engine (it comes in either XML format or as objects embedded in the message);
- the destination (which is derived from the resultant information coming out of the engine).
Note
content-based router, a rule-set will evaluate its content and return a set of service destinations.
- org.jboss.soa.esb.actions.ContentBasedRouter: This action class implements the content-based routing pattern. It routes a message to one or more destination services, based on the message content and the rule set against which it is evaluating that content. The content-based router throws an exception when no destinations are matched for a given rule set or message combination. This action will terminate any further pipeline processing, so always position it last in your pipeline.
- org.jboss.soa.esb.actions.ContentBasedWiretap: This implements the WireTap pattern. The
WireTapis an enterprise integration pattern that sends a copy of the message to a control channel. TheWireTapis identical in functionality to the standard content-based router, however it does not terminate the pipeline. It is this latter characteristic which makes it suitable to be used as a wire-tap, hence its name. For more information, see http://www.eaipatterns.com/WireTap.html. - org.jboss.soa.esb.actions.MessageFilter: This implements the message filter pattern. The message filter pattern is used in cases where messages can simply be dropped if certain content requirements are not met. In other words, it functions identically to the content-based router except that it does not throw an exception if the rule set does not match any destinations, it simply filters the message out. For more information, see http://www.eaipatterns.com/Filter.html.
11.11. XPath Domain-Specific Language
Note
- First, define the expressions in the
XPathLanguage.dslfile and use the following code to reference it in the rule set:expander XPathLanguage.dsl - The XPath Language makes sure the message is in
JBOSS_XMLand that the following items have been defined:xpathMatch<element> : this yieldstrueif an element by this name is matched.xpathEquals<element> , <value> : this yieldstrueif the element is found and its value equals the value.xpathGreaterThan<element> , <value> : this yieldstrueif the element is found and its value is greater than the value.xpathLessThan<element> , <value> : this yieldstrueif the element is found and its value is lower then the value.
Note
Thefun_cbrquick-start demonstrates this use of XPath.Note
It is possible to define a completely different domain-specific language.
11.12. XPath and Namespaces
prefix=uri,prefix=uri.
XPath Namespace-aware Statements:
xpathMatch expr "<expression>" use namespaces "<namespaces>"xpathEquals expr "<expression>", "<value>" use namespaces "<namespaces>"xpathGreaterThan expr "<expression>", "<value>" use namespaces "<namespaces>"xpathLowerThan expr "<expression>", "<value>" use namespaces "<namespaces>"
Note
expr at the beginning to stop them from clashing with non-XPath aware statements.
11.13. Configuration for Content-Based Routing
- XPath statements are connected through configuration settings stored in the jboss-esb.xml file. The
service configurationbelow shows an example service configuration fragment. (In this example, the service is listening to a Java Message Service queue.)<service> category="MessageRouting" name="YourServiceName" description="CBR Service"> <listeners> <jms-listener name="CBR-Listener" busidref="QueueA" maxThreads="1"> </jms-listener> </listeners> <actions> <action class="org.jboss.soa.esb.actions.ContentBasedRouter" name="YourActionName"> <property name="ruleSet" value="JBossESBRules.drl"/> <property name="ruleReload" value="true"/> <property name="destinations"> <route-to destination-name="xml-destination" service-category="category01" service-name="jbossesbtest1" /> <route-to destination-name="serialized-destination" service-category="category02" service-name="jbossesbtest2" /> </property> <property name="object-paths"> <object-path esb="body.test1" /> <object-path esb="body.test2" /> </property> </action> </actions> </service>Each message is passed to theContentBasedRouteraction class, which is loaded with a certain rule-set. It then sends the message to the JBoss Rules engine's working memory, runs the rules, obtains the list of destinations and sends copies of the message to the services.In this case, it uses theJBossESBRules.drlrule-set which matches two destinations-xml-destinationandserialized-destination. These names are mapped to those of real services in theroute-tosection.
11.14. Content-Based Routing Action Tag Attributes
| Attribute | Description |
|---|---|
Class | The action class, this being one of : org.jboss.soa.esb.actions.ContentBasedRouter , org.jboss.soa.esb.actions.ContentBasedWiretap or org.jboss.soa.esb.actions.MessageFilter |
Name | A custom action name. |
11.15. Content-Based Routing Action Configuration Properties
| Property | Description |
|---|---|
| ruleSet | This is the name of the file containing the JBoss Rules engine'sruleSet , which is the set of rules used to evaluate message content. (Only one ruleSet can be given for each content-based routing instance.) |
| ruleLanguage | This is an optional reference to a file containing the definition of a Domain Specific Language to be used for evaluating the rule set. |
| ruleReload | This is an optional property which can be set to true in order to enable "hot" redeployment of rule sets. Note that this feature will cause some overhead on the rules processing. Note also that the rules will reload if the .esb archive in which they reside is redeployed. |
| stateful | This is an optional property which tells the RuleService to use a stateful session where facts will be remembered between invocations. See the “Stateful Rules” section for more information about this topic. |
| destinations | This is a set of route-to properties, each of which contains the logical name of the destination, along with the Service category and name as referenced in the registry. The logical name is the name which should be used in the rule set. |
| object-paths | This is an optional property to pass message objects into working memory . |
| ruleAuditType | This is an optional property which allows the JBoss Rules engine to perform audit logging. The log can be read into the JBoss Developer Studio plug-in and inspected. Valid values are CONSOLE, FILE and THREADED_FILE. The default is that no audit logging will be performed. |
| ruleAuditFile | This is an optional property that allows you to to define the file-path for audit logging. Note that it only applies to FILE or THREADED_FILE ruleAuditType. The default is "event". Note that the JBoss Rules engine will append ".log" for you. The default location for this file is "." - the current working directory (which for JBoss is in its bin/ directory). |
| ruleAuditInterval | This is an optional property that allows you to define how often to flush audit events to the audit log. Note that this only applies to the THREADED_FILE ruleAuditType. The default is 1000 (milliseconds). |
11.16. Using Pre-Compiled Rule Packages
KnowledgeAgent is a component which is embedded in the JBoss Rules 5.0 API. No additional components are required to use the Knowledge Agent. If you are using the JBoss Enterprise BRMS Platform, the application only needs to include the drools-core dependencies in its classpath, i.e. the drools and mvel JARs only. There are no other rule-specific dependencies.
KnowledgeAgent for pre-compiled rules packages. These packages can be on the local file system or in a remote location (accessed via a URL). Once you have built your rules in a package in the BRMS Platform (or from the ant task), you are ready to use the agent in your target application.
KnowledgeAgent kagent = KnowledgeAgentFactory.newKnowledgeAgent( "MyAgent" );
kagent.applyChangeSet( ResourceFactory.newUrlResource( url ) );
KnowledgeBase kbase = kagent.getKnowledgeBase();
KnowledgeBase kbase = KnowledgeBaseFactory.newKnowledgeBase();

KnowledgeAgentConfiguration kaconf = KnowledgeAgentFactory.newKnowledgeAgentConfiguration();
kaconf.setProperty( "drools.agent.scanDirectories", "false" ); // we don't scan directories, only files

KnowledgeAgent kagent = KnowledgeAgentFactory.newKnowledgeAgent( "test agent", kaconf );
// resource to the change-set xml for the resources to add
kagent.applyChangeSet( ResourceFactory.newUrlResource( url ) );
change-set.xml.
<change-set xmlns='http://drools.org/drools-5.0/change-set'";
    xmlns:xs='http://www.w3.org/2001/XMLSchema-instance'
    xs:schemaLocation='http://drools.org/drools-5.0/change-set drools-change-set-5.0.xsd' >
    <add>
        <resource source='http://localhost:9000/TEST.pkg' type='PKG' />
    </add>
</change-set>
ResourceFactory.getResourceChangeNotifierService().start();
ResourceFactory.getResourceChangeScannerService().start();
BRMS UI provides URLs and downloads for packages. You need the Package URI's URL to include in the change-set.xml file so as to specify that you want this package. It specifies an exact version, in this case a snapshot. Each snapshot has its own URL. If you want the latest version then replace NewSnapshot with LATEST.
(PKG) from the deployment screen's list of URLs. Put that file in a directory and use the file or dir feature of the KnowledgeAgent. This will automatically contact the JBoss Enterprise BRMS Platform server for updates which may not be wanted in some scenarios.
11.17. Executing Business Rules
11.18. Using Your Own Messaging Provider
jboss-esb.xml file to refer to it. Here is an example:
<providers>
  <jms-provider name="CallbackQueue-JMS-Provider"
    connection-factory="ConnectionFactory">
    <jms-bus busid="jBPMCallbackBus">
      <jms-message-filter dest-type="QUEUE"
        dest-name="queue/CallbackQueue" />
    </jms-bus>
  </jms-provider>
</providers>
Part V. Message Transformation
Chapter 12. Transformations with Smooks
12.1. Smooks
12.2. Using Smooks
- Use the
SmooksActioncomponent to "plug" Smooks into an ESB action pipeline.Note
You will find a number of quick-starts that demonstrate transformations in thesamples/quick startsdirectory. (The name of each transformation of these quick starts is prefixed with the wordtransform_.)
12.3. Overview of Message Transformation with XSLT
12.4. Overview of Message Transformation with ActionProcessor Data
org.jboss.soa.esb.actions.ActionPipelineProcessor ) to implement a custom solution.
12.5. Process Transformation Configuration
<actions mep="OneWay">
  <action class="org.jboss.soa.esb.actions.SystemPrintln" name="print-before">
    <property name="message" value="[transform_XML2XML_simple] Message before transformation">
    </property>
  <action class="org.jboss.soa.esb.smooks.SmooksAction" name="simple-transform">
    <property name="smooksConfig" value="/smooks-res.xml">
    <property name="reportPath" value="/tmp/smooks_report.html">
    </property>
  <action class="org.jboss.soa.esb.actions.SystemPrintln" name="print-after">
    <property name="message" value="[transform_XML2XML_simple] Message after transformation">
    </property>
- Line 1
- mep stands for message exchange pattern. In this example, the requester invokes a service by sending it a message.
- Lines 2-4
- These configurations allow the message to be written to the server log before and after its transformation.
- Line 5
- This is where the SmooksAction is specified.
- Line 6
- This is where the XLST is specified.
- Line 7
- Generates a rep[ort of the transformation.
Part VI. Message Persistence
Chapter 13. Message Persistence
13.1. Message Store
Note
13.2. Message Store Interface
public interface MessageStore
{
    public MessageURIGenerator getMessageURIGenerator();
    public URI addMessage (Message message, String classification)
        throws MessageStoreException;
    public Message getMessage (URI uid)
        throws MessageStoreException;
    public void setUndelivered(URI uid)
        throws MessageStoreException;
    public void setDelivered(URI uid)
        throws MessageStoreException;
    public Map$lt;URI, Message> getUndeliveredMessages(String classification)
        throws MessageStoreException;
    public Map$lt;URI, Message> getAllMessages(String classification)
        throws MessageStoreException;
    public Message getMessage (URI uid, String classification)
        throws MessageStoreException;
    public int removeMessage (URI uid, String classification)
        throws MessageStoreException;
}
13.3. Factors to Note When Implementing a Custom Message Store
- Your implementation can use
addMessageto derive a message classification scheme. If the classification is not defined, then it is up to the individual implementation of theMessageStoreto determine for itself how it will store the message. Furthermore, the classification is only a guide: your implementation can ignore this field if need be. - It is up to the implementation as to whether or not the
MessageStoreimposes any kind of concurrency control on individual messages so always use theremoveMessageoperation with care. - Do not use the
setUndeliveredandsetDeliveredcommands or other associated operations unless you are sure they are applicable. This is because theMessageStoreinterface supports both audit trail and re-delivery functionality. - The
org.jboss.internal.soa.esb.persistence.format.db.DBMessageStoreImplclass provides the default implementation of the message store. The methods in this implementation make the required database connections via a pooled database manager, called theDBConnectionManager. - The
MessageActionGuideand theMessagePersisteractions override the message store implementation. - The MessageStore interface does not currently support transactions. Any use of the message store within the scope of a global transaction will, therefore, be uncoordinated.The implication of this is that each
MessageStoreupdate or read will be undertaken separately and independently.
13.4. Configure a Message Store
Procedure 13.1. Task
- Open the global configuration file in a text editor:
vi SOA_ROOT/jboss-as/server/PROFILE/deployers/esb.deployers/jbossesb-properties.xml. - Scroll down to the section and edit it to suit your configuration:
<properties name="dbstore">
  <!--  connection manager type -->
  <property name="org.jboss.soa.esb.persistence.db.conn.manager" value=
"org.jboss.internal.soa.esb.persistence.manager.StandaloneConnectionManager"/>
    <!-- this property is only used for the j2ee connection manager -->
    <property name="org.jboss.soa.esb.persistence.db.datasource.name"
      value="java:/JBossesbDS"/>
    <!-- standalone connection pooling settings -->
    <!--  mysql
    <property name="org.jboss.soa.esb.persistence.db.connection.url"
      value="jdbc:mysql://localhost/jbossesb"/>
    <property name="org.jboss.soa.esb.persistence.db.jdbc.driver"
      value="com.mysql.jdbc.Driver"/>
    <property name="org.jboss.soa.esb.persistence.db.user"
      value="kstam"/> -->
    <!--  postgres
    <property name="org.jboss.soa.esb.persistence.db.connection.url"
      value="jdbc:postgresql://localhost/jbossesb"/>
    <property name="org.jboss.soa.esb.persistence.db.jdbc.driver"
      value="org.postgresql.Driver"/>
    <property name="org.jboss.soa.esb.persistence.db.user"
      value="postgres"/>
    <property name="org.jboss.soa.esb.persistence.db.pwd"
      value="postgres"/> -->
    <!-- hsqldb -->
    <property name="org.jboss.soa.esb.persistence.db.connection.url"
      value="jdbc:hsqldb:hsql://localhost:9001/jbossesb"/>
    <property name="org.jboss.soa.esb.persistence.db.jdbc.driver"
      value="org.hsqldb.jdbcDriver"/>
    <property name="org.jboss.soa.esb.persistence.db.user" value="sa"/>
    <property name="org.jboss.soa.esb.persistence.db.pwd" value=""/>
    <property name="org.jboss.soa.esb.persistence.db.pool.initial.size"
      value="2"/>
    <property name="org.jboss.soa.esb.persistence.db.pool.min.size"
      value="2"/>
    <property name="org.jboss.soa.esb.persistence.db.pool.max.size"
      value="5"/>
    <!--table managed by pool to test for valid connections
        created by pool automatically -->
    <property name="org.jboss.soa.esb.persistence.db.pool.test.table"
      value="pooltest"/>
    <property name="org.jboss.soa.esb.persistence.db.pool.timeout.millis"
      value="5000"/>
</properties>
Note
You will find the scripts for the "required database" schema in theSOA_ROOT/jboss-as/server/PROFILE/deploy/jbossesb.esb/message-store-sql/DB_TYPE/create_database.sqlfile. - Sill in the global configuration file, configure the database connection manager:
<!--  connection manager type -->
<property name="org.jboss.soa.esb.persistence.db.conn.manager"
  value="org.jboss.internal.soa.esb.persistence.format.db.Standalone
ConnectionManager"/>
<!--  property name="org.jboss.soa.esb.persistence.db.conn.manager"
value="org.jboss.soa.esb.persistence.manager.J2eeConnectionManager"/ -->
<!-- this property is only used for the j2ee connection manager -->
<property name="org.jboss.soa.esb.persistence.db.datasource.name"
  value="java:/JBossesbDS"/>
Note
The Stand-Alone Manager uses C3PO to manage the connection pooling logic whilst the J2eeConnectionManager, by contrast, employs a data-source. Use the latter when deploying Enterprise Service Bus end-points inside a container such as a JBoss Application Server. - Save the file and exit.
- Alternatively, you could plug in a custom connection manager by implementing the
org.jboss.internal.soa.esb.persistence.manager.ConnectionManagerinterface and then updating thePropertiesfile by providing it with the name of the new class.
13.5. create_database.sql
SOA_ROOT/jboss-as/server/PROFILE/deploy/jbossesb.esb/message-store-sql/DB_TYPE/create_database.sql files contain scripts for database schemas.
13.6. create_database.sql Settings
create_database.sql files:
CREATE TABLE message
(
   uuid varchar(128) NOT NULL,
   type varchar(128) NOT NULL,
   message text(4000) NOT NULL,
   delivered varchar(10) NOT NULL,
   classification varchar(10),
   PRIMARY KEY (`uuid`)
);
- The UUID column is used to store a unique key for the message. This key takes the form of a standard uniform resource identifier.
- Message keys look like this:
urn:jboss:esb:message:UID: + UUID.randomUUID()_Note
This syntax makes use of the UUID's random number generator. - The "type" will be equal to that of the stored message. (The JBoss Enterprise SOA Platform ships with two different versions of "type", these being JBOSS_XML and JAVA_SERIALIZED, respectively.)
- The "message" column contains the contents of the actual message itself.
- The database message store implementation supplied works by invoking a connection to your pre-configured database. (Both a stand-alone connection manager, and another for using a JNDI data-source, are also supplied as part of the product.)
- The two pre-supplied connection managers for the database pool are:
org.jboss.soa.esb.persistence.manager.StandaloneConnectionManagerandorg.jboss.soa.esb.persistence.manager.J2eeConnectionManager.
13.7. C3PO
SOA_ROOT/jboss-as/lib directory.
13.8. J2eeConnectionManager
13.9. JmsConnectionPool
Part VII. Change Management
Chapter 14. Hot Deployment
14.1. Hot Deployment
Note
14.2. Hot Deployment and jbossesb.sar
- its time-stamp changes, (if the archive is compressed.)
- the timestamp of the
META-INF/jboss-service.xmlfile changes, (if the archive is in exploded form.)
14.3. Hot Deployment and ESB Archives
*.esb archive will automatically redeploy when:
- the time-stamp of the archive changes, (if the archive is compressed.)
- the
META-INF/jboss-esb.xmlfile's time-stamp changes, (if the archive is in exploded form.)
Chapter 15. Version Management
15.1. Redeploy a Rules File
Procedure 15.1. Task
- To redeploy a .DRL or .DSL file, redeploy the jbrules.esb directory by copying it back into
SOA_ROOT/jboss-as/server/PROFILE/deploy. - Alternatively, you can activate the Action Configuration's ruleReload feature. After activating this functionality, if a rule file changes, it is re-loaded automatically.
15.2. Redeploy a Transformation File
Procedure 15.2. Task
- Redeploy the .ESB archive in which it resides by copying it back into the
SOA_ROOT/jboss-as/server/PROFILE/deploydirectory. - Alternatively, launch a web browser and log into the Monitoring and Management Console at http://localhost:8080/admin-console.
- Send out a notification message over the Java Message Service. Smooks will process this event causing it to reload automatically.
15.3. Redeploy a Business Process Definition
Prerequisites
- JBoss Developer Studio
Procedure 15.3. Task
- Use the jBPM Eclipse plug-in to deploy a new version of a business process definition to the jBPM database.
Note
Please be aware that only a fresh process instance will use this new version. Existing process life-cycles will still use the previous definition.Note
Note that this procedure works in standalone mode, too.
15.4. Reload Rules Whilst Running in Standalone Mode
Procedure 15.4. Task
- Run
ruleReload.
Part VIII. Rules Services
Chapter 16. Rule Service
16.1. Rule Service
16.2. Stateless Service
16.3. Stateful Rules Sessions
true. You can tell stateful rule services when to continue with a current session and when to dispose of it.
16.4. Stateful Rules Session Properties
- To continue the existing stateful session, set these two message properties:
message.getProperties().setProperty(“dispose”, false); message.getProperties().setProperty(“continue”, true); - When you run the rules for the last time, set dispose to
trueto clear the JBoss Rules' engine's working memory:message.getProperties().setProperty(“dispose”, true); message.getProperties().setProperty(“continue”, true);Note
To learn more about using stateful rules sessions, please refer to thebusiness_ruleservice_statefulquick-start.
16.5. Using Rule Services with JBoss Rules
- the amount of client code required to integrate the rules into your application environment is dramatically reduced.
- rules can be accessed from either an action chain or from within an orchestrated business process.
Note
BusinessRulesProcessor and DroolsRuleService action classes, the latter of which also implements the RuleService interface.
BusinessRulesProcessor class allows rules to be loaded from the class-path. These rules are defined in .drl and .dsl files, and also in decision tables (which come in .xls format). These file-based rules exist primarily for the purpose of allowing you to test prototypes. There is no way to specify multiple rule files for a single BusinessRulesProcessor action. More complex rule services require the use of the JBoss Rules KnowledgeAgent.
RuleService uses the KnowledgeAgent to access rule packages from either the Business Rules Management System or from the local file system. Rule packages can contain thousands of rules from different sources, including these:
- the JBoss Business Rules Management System
- imported
DRLfiles - domain-specific language (DSL) files
- decision tables
Important
KnowledgeAgent approach on production systems.
Important
ruleAgentProperties file's poll property). You now configure it globally via the org.jboss.soa.esb.services.rules.resource.scanner.interval property, found within esb.deployer/jbossesb-properties.xml . (The default value is 60.) This means that every sixty seconds, the system checks for resource changes across all KnowledgeAgents.
username=admin password=admin enableBasicAuthentication=true
Note
16.6. Action Chain
16.7. Orchestrated Business Process
16.8. Integrating JBoss Rules and the SOA Platform
BusinessRulesProcessor- An action class.
- Rules
- Any rules written in JBoss Rules , DRL, DSL, decision tables or the Business Rule Editor .
- The Enterprise Service Bus message
- This is inserted into the JBoss Rules Engine's working memory
- The Enterprise Service Bus message's contents
- This consists of the "fact" objects in the message, which are sent to the JBoss Rules Engine.
16.9. Rule Set Requirements
- There are three requirements when creating rule sets on the JBoss Enterprise SOA Platform.The name and action class as shown:
<action class="org.jboss.soa.esb.actions.BusinessRulesProcessor"
  name="OrderDiscountRuleService">
One of the following is also required:- a
DRLfile:<property name="ruleSet" value="drl/OrderDiscount.drl" /> - a
DSLorDSLR( Domain Specific Language ) file:<property name="ruleSet" value="dsl/approval.dslr" /> <property name="ruleLanguage" value="dsl/acme.dsl" /> - a
decisionTableon the class-path:<property name="decisionTable" value="PolicyPricing.xls" /> - a properties file on the class-path. This tells the
rule agenthow to find the rules package. You enable it by specifying either an URL or the path to a local file:<property name="ruleAgentProperties" value="brmsdeployedrules.properties" />
16.10. Creating a Rule Set
- Ensure the rule-set imports the ESB message. To test, use this code:
import org.jboss.soa.esb.message.Message - Next, ensure the rule set defines the following global variable which creates the list of destinations:
global java.util.List destinations;The message is now sent to the JBoss Rules engine's working memory.Now you can turn a regular rule set into one that can be used for content-based routing. Do this by evaluating the ESB message's matching rule and ensuring it outputs a list of service destination names.
16.11. Rule Set Examples
<action class="org.jboss.soa.esb.actions.BusinessRulesProcessor"
name="OrderDiscountRuleService">
<property name="ruleSet" value="drl/OrderDiscount.drl" />
<property name="ruleReload" value="true" />
<property name="object-paths">
<object-path esb="body.Order" />
</property>
</action>
- The rules are in a DRL file and execution following the stateful model. In this scenario, the client can send multiple messages to the rule service. For example, the first message might contain a customer object, with the subsequent ones each containing orders for that customer. Every time a message is received, the rules are run. (The client can add a property to the final message that tells the rule service to dispose of the contents of the working memory.)
- A single, synchronized session instance is shared across all of the concurrent executions of a stateful session deployment. This greatly limits the number of use-cases for the stateful model. If you require multiple, client-oriented sessions service deployment, consider using a jBPM or BPEL solution instead.
- Stateful sessions are not persistent .
- Stateful Sessions are not clustered .
<action class="org.jboss.soa.esb.actions.BusinessRulesProcessor" name="OrderDiscountMultipleRuleServiceStateful"> <property name="ruleSet" value="drl/OrderDiscountOnMultipleOrders.drl" /> <property name="ruleReload" value="false" /> <property name="stateful" value="true" > <property name="object-paths"> <object-path esb="body.Customer" /> <object-path esb="body.Order" /> </property> </action>
Note
<action class="org.jboss.soa.esb.actions.BusinessRulesProcessor"
name="OrderEventsRuleServiceStateful">
<property name="ruleSet" value="drl/OrderEvents.drl" />
<property name="ruleReload" value="false" />
<property name="stateful" value="true" >
<property name="ruleFireMethod" value="FIRE_UNTIL_HALT" />
<property name="ruleAuditType" value="THREADED_FILE" />
<property name="ruleAuditFile" value="myaudit" />
<property name="ruleAuditInterval" value="1000" />
<property name="ruleClockType" value="REALTIME" />
<property name="ruleEventProcessingType" value="STREAM" />
<property name="ruleMultithreadEvaluation" value="false" />
<property name="ruleMaxThreads" value="1" />
<property name="object-paths">
<object-path esb="body.OrderStatus"
entry-point="OrderStatusStream" />
<object-path esb="body.OrderInfo"
entry-point="OrderInfoStream" />
</property>
<property name="channels">
<!-- chan1 and chan2 are equivalent
(but timeout only applies if async is false) -->
<send-to channel-name="chan1"
service-category="cat1" service-name="svc1" />
<send-to channel-name="chan2"
service-category="cat1" service-name="svc1"
channel-class="org.jboss.soa.esb.services.rules.ServiceChannel"
async="true" timeout="30000"
set-payload-location="org.jboss.soa.esb.message.defaultEntry" />
<!-- chan3 is a custom channel -->
<send-to channel-name="chan3"
channel-class="com.example.MyChannel" />
</property>
</action>
<action class="org.jboss.soa.esb.actions.BusinessRulesProcessor"
name="PolicyApprovalRuleService">
<property name="ruleSet" value="dsl/approval.dslr" />
<property name="ruleLanguage" value="dsl/acme.dsl" />
<property name="ruleReload" value="true" />
<property name="object-paths">
<object-path esb="body.Driver" />
<object-path esb="body.Policy" />
</property>
</action>
      <action class="org.jboss.soa.esb.actions.BusinessRulesProcessor"
  name="PolicyPricingRuleService">
    <property name="decisionTable"
              value="decisionTable/PolicyPricing.xls" />
    <property name="ruleReload" value="true" />
    <property name="object-paths">
        <object-path esb="body.Driver" />
        <object-path esb="body.Policy" />
    </property>
</action>
      <action class="org.jboss.soa.esb.actions.BusinessRulesProcessor"
  name="RuleAgentPolicyService">
    <property name="ruleAgentProperties"
              value="ruleAgent/brmsdeployedrules.properties" />
    <property name="object-paths">
        <object-path esb="body.Driver" />
        <object-path esb="body.Policy" />
    </property>
</action>
16.12. BusinessRulesProcessor Action Configuration Attributes
| Attribute | Description |
|---|---|
| Class | Action class |
| Name | Custom action name |
16.13. BusinessRulesProcessor Action Configuration Properties
| Property | Description |
|---|---|
ruleSet |
An optional reference to a file containing the
ruleSet used to evaluate the content. Only one ruleSet can be given for each rule service instance.
|
ruleLanguage |
An optional reference to a file containing the definition of a Domain Specific Language. This definition can be used for evaluating the rule set. Ensure that the file in the
ruleSet is a dslr .
|
ruleReload | Set this optional property to true to enable the hot redeployment of rule sets . (Enabling this feature will increase the overhead on the rules processing.) Note that rules will reload if the .esb archive they reside in is redeployed. |
decisionTable |
An optional reference to a file containing the definition of a rule-specification spreadsheet.
|
| stateful |
Set this optional property to
true to specify that the rule service will be receiving multiple messages over time. The rules will be re-executed each time.
|
| object-paths |
Optional property to pass message objects into JBoss Rules' working memory.
|
| ruleFireMethod |
Optional property to define the stateful rule execution method. Valid values are FIRE_ALL_RULES (default) and FIRE_UNTIL_HALT (launches its own thread. Useful for Complex Event Processing "CEP".)
|
| ruleAuditType |
Optional property to have Drools perform audit logging. The log can be read into the Drools Eclipse plugin and inspected. Valid values are CONSOLE, FILE and THREADED_FILE. The default is that no audit logging will be performed.
|
| ruleAuditFile |
Optional property to define the filepath for audit logging. Only applies to FILE or THREADED_FILE ruleAuditType. The default is "event". Note that JBoss Drools will append ".log" for you. The default location for this file is "." in the current working directory (which for JBoss is in its bin/ directory).
|
| ruleAuditInterval |
Optional property to define how often to flush audit events to the audit log. Only applies to the THREADED_FILE ruleAuditType. The default is 1000 (milliseconds).
|
| ruleClockType |
Optional property to define the clock used by JBoss Drools. Valid values are REALTIME and PSEUDO. The default is REALTIME.
|
| ruleEventProcessingType |
Optional property to define the event processing option used by Drools. The valid values are CLOUD or STREAM (useful for CEP). The default is CLOUD.
|
| ruleMultithreadEvaluation |
Optional property to define whether or not to enable KnowledgeBase partitioning. The default is null, which delegates to Drools' default (which is false).
|
| ruleMaxThreads |
Optional property to define the number of threads to use for KnowledgeBase partitioning. This is only respected if ruleMultithreadEvaluation is true. The default is null, which delegates to JBoss Rules' default.
|
| channels |
Optional property to define any Channels a rule can send Objects to. The Channel concept used to be known as an ExitPoint.
|
16.14. Object Paths
16.15. MVFLEX Expression Language (MVEL)
16.16. Using Object Paths
- Set the object-paths property to extract those objects with an
ESB Message Object Path.Note
You can use the object-paths property to drill down further into object trees. Do so by setting this property to extract those objects with an ESB Message Object Path. - The JBoss Rules engine uses the MVFLEX Expression Language (MVEL) to extract the object. Your path must abide by this syntax:
location.objectname.[beanname].[beanname]...Important
Remember to add thejava importstatements to any objects that you import into your rule set.Note
The Object Mapper cannot "flatten out" entire collections. If you need to do that, run a "transformation" process on the message first, as this "unrolls" the collection.
16.17. Object Path Properties
| Property | Description |
|---|---|
| location | This must be one of the following: {body, header, properties, attachment} |
| objectname | The name of the object. (Attachments can be named or numbered, so for attachments this can be a number too.) |
| beannames | This is optional. Use this tag to traverse a bean graph. |
16.18. MVEL Expressions
| Expression | Result |
|---|---|
properties.Order |
Use this to obtain the property object named
. Order
|
attachment.1 |
Obtains the first attachment object.
|
attachment.AttachmentOne |
Obtains the attachment named
AttachmentOne
|
attachment.1.Order |
Obtains
getOrder()return object on the attached object.
|
body.Order1.lineitem |
Obtains the object named
Order1 from the body of the message. It will then call getLineitem() on this object. More elements can be added to the query in order to traverse the bean graph.
|
16.19. Sending Objects to JBoss Rules Using Channels
- To send an object to a JBoss Rules engine channel, use this DRL syntax. (It goes on the right-hand side of the rule definition.)
channels["mychannel"].send(myobject); - For the above code to work, register
mychannelas your channel. To do this you add a channels property section to thejboss-esb.xmlconfiguration file.Define as many channels as you want. For each particular channel name, the channels will be executed in the same order as they appear in the configuration file. - The following channels are supported:
- The
ServiceChannel(default). Specify the channel-name, service-category and service-name as attributes of the send-to element.There are also optional attributes, including async, timeout and set-payload-location (where the object sent to that channel will be placed in a new ESB message).This code shows you how to set an attribute:<property name="channels"> <send-to channel-name="mychannel" service-category="cat1" service-name="svc1" /> </property>Important
Make sure you haveinvmScope="GLOBAL"defined on the target service. - Specify the custom channels by using your own
org.drools.runtime.Channelimplementation class. The send-to attribute for this is channel-class. Your implementation requires a public no-arg constructor.If you want your implementation to be configurable, implement theorg.jboss.soa.esb.Configurableinterface so yoursetConfiguration(ConfigTree()method will be called. This allows it to pass the attributes and sub- property elements to your custom channel.This code sample shows how to configure a custom channel:<property name="channels"> <send-to channel-name="mychannel" channel-class="com.example.MyChannel" /> </property>
16.20. Packaging and Deploying Rules
- Package your rule code into functional units by putting them in
.esbpackages. (The aim is to package routing rules alongside therule servicesthat use therule sets.) - Once you have created the
jbrules.esbarchive deploy and reference it via thedeployment.xmlfile. Use this code to do so:<jbossesb-deployment> <depends>jboss.esb:deployment=jbrules.esb</depends> </jbossesb-deployment>
Part IX. Protocol Translation
Chapter 17. Adapters
17.1. Resource Adapter
17.2. Provider Adapter
17.3. Java Connector Architecture (JCA) Transport
17.4. JCA Bridge
17.5. JCA Adapter
Part X. Security
Chapter 18. Security
18.1. JBoss Rules and Security
Important
18.2. Enable Serialization on the Server
Procedure 18.1. Task
- Navigate to the SOA_ROOT directory:
cd SOA_ROOT. - Run the
keytoolcommand and follow the prompts on screen:keytool -genkey -alias droolsKey -keyalg RSA -keystore MyDroolsPrivateKeyStore.keystore Enter keystore password: Re-enter new password: What is your first and last name? [Unknown]: Test User What is the name of your organizational unit? [Unknown]: HR What is the name of your organization? [Unknown]: Test Org What is the name of your City or Locality? [Unknown]: Brisbane What is the name of your State or Province? [Unknown]: QLD What is the two-letter country code for this unit? [Unknown]: AU Is CN=Test User, OU=HR, O=Test Org, L=Brisbane, ST=QLD, C=AU correct? [no]: yes Enter key password for droolsKey (RETURN if same as keystore password): Re-enter new password:After answering all of the questions, a password-protected file namedMyDroolsPrivateKeyStore.keystoreis created. This keystore file has a private key called droolsKey with the password "drools". Store this file in a safe location in your environment, which will hereafter be referred to as thekeystoredir.Important
The passwords above are examples only and should not be used in production. - Open the configuration file:
vi jboss-as/server/default/deploy/properties-service.xml - Configure the JBoss Enterprise SOA Platform to use the JBoss Rules serialization feature by adding this snippet to
properties-service.xml:<mbean code="org.jboss.varia.property.SystemPropertiesService" name="jboss:type=Service,name=SystemProperties"> <attribute name="Properties"> # Drools Security Serialization specific properties drools.serialization.sign=true drools.serialization.private.keyStoreURL=file://$keystoredir/MyDroolsPrivateKeyStore.keystore drools.serialization.private.keyStorePwd=drools drools.serialization.private.keyAlias=droolsKey drools.serialization.private.keyPwd=drools </attribute> </mbean> - Set the drools.serialization.sign property to "true":
drools.serialization.sign=true- drools.serialization.private.keyStoreURL=<RL> is the URL of the private keystore location.
- In the example above, replace
keystoredirandMyDroolsKeyStore.keystorewith your keystore directory and the name of the keystore you created with the keytool - drools.serialization.private.keyStorePwd=<password> is the password to access the private keystore.
- drools.serialization.private.keyAlias=<key> is the key alias (identifier) of the private key.
- drools.serialization.private.keyPwd=<password> is the private key password.
- Save the file and exit.
- Restart the server instance.
Warning
If the system properties were not configured properly, you will see this error when you try to build a rules package:An error occurred building the package. Error signing object store: Key store with private key not configured. Please configure it properly before using signed serialization
18.3. Enable Serialization on the Client
Prerequisites
- Server serialization must already be enabled.
Procedure 18.2. Task
- Create a public key certificate from the private keystore. (You can access the keytool by running
keytool -genkey -alias droolsKey -keyalg RSA -keystore.):keytool -export -alias droolsKey -file droolsKey.crt -keystoreMyDroolsPrivateKeyStore.keystore Enter keystore password: Certificate stored in file <droolsKey.crtU> - Import the public key certificate into a public keystore. (This is where it will be used by your client applications):
keytool -import -alias droolsKey -file droolsKey.crt -keystoreMyPublicDroolsKeyStore.keystore Enter keystore password: Re-enter new password: Owner: CN=Test User, OU=Dev, O=XYZ Corporation, L=Brisbane, ST=QLD, C=AU Issuer: CN=Test User, OU=Dev, O=XYZ Corporation, L=Brisbane, ST=QLD, C=AU Serial number: 4ca0021b Valid from: Sun Sep 26 22:31:55 EDT 2010 until: Sat Dec 25 21:31:55 EST 2010 Certificate fingerprints: MD5: 31:1D:1B:98:59:CC:0E:3C:3F:57:01:C2:FE:F2:6D:C9 SHA1: 4C:26:52:CA:0A:92:CC:7A:86:04:50:53:80:94:2A:4F:82:6F:53:AD Signature algorithm name: SHA1withRSA Version: 3 Trust this certificate? [no]: yes Certificate was added to keystore - Open the server configuration file:
vi grep drools jboss-as/server/default/deploy/properties-service.xml - Replace keystoredir and MyPublicDroolsKeyStore.keystore with your keystore directory, and the name of the public keystore you created previously:
# Drools Client Properties for Security Serialization drools.serialization.public.keyStoreURL=file://$keystoredir/MyPublicDroolsKeyStore.keystore drools.serialization.public.keyStorePwd=drools - Save the file and exit.
- Restart the JBoss Enterprise SOA Platform server.
- For Java client applications, set the system properties in your code like this:
// Set the client properties to deserialize the signed packages
URL clientKeyStoreURL = getClass().getResource( "MyPublicDroolsKeyStore.keystore" );
System.setProperty( KeyStoreHelper.PROP_SIGN,
                            "true" );
System.setProperty( KeyStoreHelper.PROP_PUB_KS_URL,
                            clientKeyStoreURL.toExternalForm() );
System.setProperty( KeyStoreHelper.PROP_PUB_KS_PWD,
                            "drools" );
...
Alternatively, open therun.shshell script (vi SOA_ROOT/jboss-as/bin/run.sh) script and edit the JAVA_OPTS section:# Serialization Security Settings JAVA_OPTS="-Ddrools.serialization.sign=true $JAVA_OPTS" JAVA_OPTS="-Ddrools.serialization.private.keyStoreURL=file://$keystoredir/MyDroolsKeyStore.keystore $JAVA_OPTS" JAVA_OPTS="-Ddrools.serialization.private.keyStorePwd=drools $JAVA_OPTS" JAVA_OPTS="-Ddrools.serialization.private.keyAlias=droolsKey $JAVA_OPTS" JAVA_OPTS="-Ddrools.serialization.private.keyPwd=drools $JAVA_OPTS" JAVA_OPTS="-Ddrools.serialization.public.keyStoreURL=file://$keystoredir/MyPublicDroolsKeyStore.keystore $JAVA_OPTS" JAVA_OPTS="-Ddrools.serialization.public.keyStorePwd=drools $JAVA_OPTS"Replace the values shown above with ones specific to your environment, and then restart the server instance.
18.4. Disable Serialization Signing
- Open the configuration file:
vi SOA_ROOT/jboss-as/server/PROFILE/deploy/properties-service.xml. - Remove the drools.serialization.sign property's value.
- Save the file and exit.An alternative way to do this task is to open the
run.shshell script (vi SOA_ROOT/jboss-as/bin/run.sh) and edit it as follows:JAVA_OPTS="-Ddrools.serialization.sign=false $JAVA_OPTS" - Restart the server instance.
- To turn signing off for Java client applications, remove the drools.serialization.sign property or add the following snippet to each application's code:
System.setProperty( KeyStoreHelper.PROP_SIGN, "false" );
18.5. Configure Security on a Per-Service Basis
- Open the global configuration file in a text editor:
vi SOA_ROOT/jboss-as/server/PROFILE/deployers/esb.deployer/jboss-esb.xml. - Scroll down to the service you want to configure.
- Add a security element. This setting shows you how to do so:
<service category="Security" name="SimpleListenerSecured"> <security moduleName="messaging" runAs="adminRole" rolesAllowed="adminRole, normalUsers" callbackHandler="org.jboss.internal.soa.esb.services.security.UserPassCallbackHandler"> <property name="property1" value="value1"/> <property name="property2" value="value2"/> </security> ... </service> - Save the file and exit.
18.6. Per-Service Security Properties
| Property | Description | Required? |
|---|---|---|
| moduleName |
This is a module that exists in the
SOA_ROOT/jboss-as/server/PROFILE/conf/login-config.xml file.
| No |
| runAs |
This is the runAs role.
| No |
| rolesAllowed |
This is an comma-separated list of those roles that have been granted the ability to execute the service. This is used as a check that is performed after a caller has been authenticated, in order to verify that they are indeed belonging to one of the roles specified. The roles will have been assigned after a successful authentication by the underlying security mechanism.
| No |
| callbackHandler |
This is the
CallbackHandler that will override that which was defined in the jbossesb-properties.xml file.
| No |
| property |
These are optional properties that, once defined, will be made available to the
CallbackHandler implementation.
| No |
18.7. Override Global Security Settings
Procedure 18.3. Task
- Open the global configuration file in a text editor:
vi SOA_ROOT/jboss-as/server/PROFILE/deployers/esb.deployer/jbossesb-properties.xml. - Configure the setting in question. Here is an example:
<security moduleName="messaging" runAs="adminRole" rolesAllowed="adminRole"> <property name="org.jboss.soa.esb.services.security.contextTimeout" value="50000"/> <property name= "org.jboss.soa.esb.services.security.contextPropagatorImplementationClass" value="org.xyz.CustomSecurityContextPropagator" /> </security> - Save the file and exit.
18.8. Security Property Overrides
| Property | Description | Required? |
|---|---|---|
| org.jboss.soa.esb.services.security.contextTimeout |
This property lets the service override the global security context time-out (milliseconds) that is specified in the
jbossesb-properties.xml file.
| No |
| org.jboss.soa.esb.services.security.contextPropagatorImplementationClass |
This property lets the service to override the "global security context propagator" class implementation, that is specified in the
jbossesb-properties.xml file.
| No |
18.9. Security Context
18.10. Authentication Request
18.11. SecurityConfig
SecurityConfig class grants access to the security configuration specified in the jboss-esb.xml file. This class is made available to the Callback Handler.
18.12. Add an Authentication Class to a Message Object
Procedure 18.4. Task
- Execute this code:
byte[] encrypted = PublicCryptoUtil.INSTANCE.encrypt((Serializable)
 authRequest);
message.getContext.setContext(SecurityService.AUTH_REQUEST, encrypted);
The authentication context is encrypted and then set within the message context. (It is later decrypted by the Enterprise Service Bus so that it can authenticate the request.)
18.13. security_basic Quick Start
SOA_ROOT/jboss-as/samples/quickstarts/security_basic quick start demonstrates how to prepare the security on a message before you use the SecurityInvoker. The quick start also demonstrates how to configure the jbossesb-properties.xml global configuration file for use by client services.
18.14. Set a Time Limit for the Security Context Globally
Procedure 18.5. Task
- Open the global configuration file in a text editor:
vi SOA_ROOT/jboss-as/server/PROFILE/deployers/esb.deployer/jbossesb-properties.xml. - Scroll down to the section that contains security.contextTimeout. Set the time-out value (in milliseconds).
- Save the file and exit.
18.15. Set a Time Limit for the Security Context on a Per-Service Basis
Procedure 18.6. Task
- Open the service's configuration file in a text editor:
vi jboss-esb.xml. - Scroll down to the section that contains Security Context. Set the time-out value (in milliseconds).
- Save the file and exit.
18.16. Security Service
SecurityService interface is the Enterprise Service Bus' central security component.
18.17. Security Propagation
18.18. SecurityContextPropagator
18.19. SecurityContextPropagator Implementations
| Class | Description |
|---|---|
|
Package: org.jboss.internal.soa.esb.services.security
Class: JBossASContextPropagator
|
This propagator will send security credentials to the ESB. If you need to write your own implementation you only have to write a class that implements
org.jboss.internal.soa.esb.services.security.SecurityContextPropagator and then either specify that implementation in jbossesb-properties.xml or jboss-esb.xml.
|
18.20. Add a Custom Log-In Module
Procedure 18.7. Task
- Open the log-in configuration file in a text editor:
vi SOA_ROOT/jboss-as/server/PROFILE/conf/login-config.xml - Add the details of your custom log-in module.
- Save the file and exit.
- Since different log-in modules require different information, you must specify the CallbackHandler attribute to be used. Open the specific security configuration for that service.
- Make sure that the
CallbackHandlerspecifies a fully-qualified classname for the class which implements theEsbCallbackHandlerinterface. This code shows you how to do so:public interface EsbCallbackHandler extends CallbackHandler { void setAuthenticationRequest(final AuthenticationRequest authRequest); void setSecurityConfig(final SecurityConfig config); } - Add both the "principle" and the credentials needed to authenticate a caller to the
AuthenticationRequestclass.
JaasSecurityService is replaced with your custom security implementation.
18.21. Certificate Log-In Module
18.22. Certificate Log-In Module Properties
<security moduleName="CertLogin" rolesAllowed="worker"
  callbackHandler="org.jboss.soa.esb.services.security.auth.loginUserPass
CallbackHandler">
  <property name="alias" value="certtest"/>
</security>
| Property | Description |
|---|---|
|
moduleName
|
This identifies the JAAS Login module to use. This module will be specified in JBossAS login-config.xml.
|
|
rolesAllow
|
This is a comma-separated list of the roles that are allowed to execute this service.
|
|
alias
|
This is the alias which is used to look up the local key-store and which will be used to verify the caller's certificate.
|
18.23. Certificate Log-In Module Configuration File Properties
<application-policy name="CertLogin">
<authentication>
  <login-module
code="org.jboss.soa.esb.services.security.auth.login.CertificateLoginModule"
flag = "required" >
  <module-option name="keyStoreURL">
    file://pathToKeyStore
  </module-option>
  <module-option name="keyStorePassword">storepassword</module-option>
  <module-option name="rolesPropertiesFile">
    file://pathToRolesFile
  </module-option>
  </login-module>
</authentication>
</application-policy>
| Property | Description |
|---|---|
|
keyStoreURL
|
This is the path to the key-store used to verify the certificates. It can be a file on the local file system or on the class-path.
|
|
keyStorePassword
|
This is the password for the key-store above.
|
|
rolesPropertiesFile
|
This is optional. It is the path to a file containing role mappings. Refer to the “Role Mapping” section of the Getting Started Guide for more details about this.
|
18.24. Callback Handler
18.25. Role Mapping
18.26. Enable Role Mapping
Procedure 18.8. Task
- Open the log-in configuration file in a text editor:
vi SOA_ROOT/jboss-as/server/PROFILE/conf/login-config.xml - Set the rolesPropertiesFile property. (This property can point to a file located on either the local file system or the class-path).
- Map users to roles. This example code shows how to do so:
# user=role1,role2,... guest=guest esbuser=esbrole # The current implementation will use the Common Name(CN) specified # for the certificate as the user name. # The unicode escape is needed only if your CN contains a space Andy\u0020Anderson=esbrole,worker - Save the file and exit.
18.27. security_cert Quickstart
18.28. Customize the Security Service Interface
Procedure 18.9. Task
- Implement the
SecurityServiceinterface:public interface SecurityService { void configure() throws ConfigurationException; void authenticate( final SecurityConfig securityConfig, final SecurityContext securityContext, final AuthenticationRequest authRequest) throws SecurityServiceException; boolean checkRolesAllowed( final List<String> rolesAllowed, final SecurityContext securityContext); boolean isCallerInRole( final Subject subject, final Principle role); void logout(final SecurityConfig securityConfig); void refreshSecurityConfig(); } - Open the global configuration file in a text editor:
vi SOA_ROOT/jboss-as/server/PROFILE/deployers/esb.deployer/jbossesb-properties.xml. - Configure the file to use the customized
SecurityService - Save the file and exit.
18.29. Remote Invocation Class
18.30. Secure Non-Remote Method Invocation Classes on Port 8083
port 8083. However, you can also configure the system's Remote Method Invocation settings to allow client applications to download any deployed resources you desire.
Procedure 18.10. Task
Edit the Settings in the jboss-service.xml File
Open the file in a text editor:vi SOA_ROOT/server/PROFILE/conf/jboss-service.xmlConfigure the Settings in the File
Here is an example:<attribute name="DownloadServerClasses">false</attribute>Set this value to false to ensure that client applications can only download Enterprise Java Bean classes.Important
By default, this value is set to false in the SOA Platform's 'production' profile. The value is set to true in all other cases, including the SOA Standalone version's default profile. Note that this is not a secure configuration and should only be used in development environments.
Chapter 19. Securing the Service Registry
19.1. Service Registry Authentication
Here is a theoretical understanding of how the authentication process works.
Authenticator interface.
GetAuthToken request is made. The goal of this phase is to turn a user id and credentials into a valid publisher id. The publisher id (referred to as the authorized name in UDDI terminology) is the value that assigns ownership within UDDI. Whenever a new entity is created, it must be tagged with ownership by the authorized name of the publisher.
GetAuthToken request, an authentication token is issued to the caller.
GetAuthToken request. This leads to the identify phase.
UddiEntityPublisher object. This object contains all the properties necessary to handle ownership of UDDI entities. Thus, the token (or publisher id) is used to identify the publisher.
Publisher entity, which is a sub-class of UddiEntityPublisher. This sub-class makes publisher properties persist within the jUDDI Registry.
19.2. authToken
19.3. authToken and the Service Registry
authToken.
Important
19.4. Obtain an authToken
Procedure 19.1. Task
- Make a
GetAuthToken()request. - A
GetAuthTokenobject is returned. Set a userid and credential (password) on this object:org.uddi.api_v3.GetAuthToken ga = new org.uddi.api_v3.GetAuthToken(); ga.setUserID(pubId); ga.setCred(""); org.uddi.api_v3.AuthToken token = securityService.getAuthToken(ga); - Locate the
juddi.propertiesconfiguration file inSOA_ROOT/jboss-as/server/PROFILE/deploy/juddi-service.sar/juddi.war/WEB-INF. Open it in a text editor. - Configure the juddi.authenticator property to how the Service Registry will check the credentials passed to it by the
GetAuthTokenrequest. (By default it uses thejUDDIAuthenticatorimplementation.) - Save the file and exit.
19.5. Security Authentication Implementations Available for the Service Registry
- jUDDI Authentication
Warning
Do not use this authentication method in a production environment. It accepts any credentials provided, and effectively removes the need for clients to authenticate when accessing the registry.The default authentication mechanism provided by the Service Registry is thejUDDIAuthenticator.jUDDIAuthenticator's authenticate phase checks to see if the, user ID submitted matches against a record in thePublishertable. No credentials checks are made. If, during the authentication process, the Publisher record is found to be non-existent, it is added "on-the-fly".In the identify phase, the publisher ID is used to retrieve the Publisher record and return it. The Publisher inherits every property it needs fromUddiEntityPublisher:juddi.authenticator = org.apache.juddi.auth.JUDDIAuthentication- XMLDocAuthentication
- The authenticate phase checks that the user id and password match a value in the XML file. The identify phase uses the user ID to populate a new
UddiEntityPublisher. - CryptedXMLDocAuthentication
- The
CryptedXMLDocAuthenticationimplementation is similar to theXMLDocAuthenticationimplementation, but the passwords are encrypted:juddi.authenticator = org.apache.juddi.auth.CryptedXMLDocAuthentication juddi.usersfile = juddi-users-encrypted.xml juddi.cryptor = org.apache.juddi.cryptor.DefaultCryptorHere, the user credential file isjuddi-users-encrypted.xml, and the content of the file will be similar to this:<?xml version="1.0" encoding="UTF-8" standalone="yes"?> <juddi-users> <user userid="anou_mana" password="+j/kXkZJftwTFTBH6Cf6IQ=="/> <user userid="bozo" password="Na2Ait+2aW0="/> <user userid="sviens" password="+j/kXkZJftwTFTBH6Cf6IQ=="/> </juddi-users>TheDefaultCryptorimplementation usesBEWithMD5AndDESandBase64to encrypt the passwords.Note
You can use the code in theAuthenticatorTestto learn more about how to use this Authenticator implementation. You can plug in your own encryption algorithm by implementing theorg.apache.juddi.cryptor.Cryptorinterface and referencing your implementation class in the juddi.cryptor property.The authenticate phase checks that the user ID and password match values in the XML file. The identify phase uses the user ID to populate a newUddiEntityPublisher. - LDAP Authentication
- Use
LdapSimpleAuthenticatorto authenticate users via LDAP's simple authentication functionality. This class allows you to authenticate a user based on an LDAP principle, provided that the principle and the jUDDI publisher ID are identical. - JBoss Authentication
- A final alternative is to interface with third-party credential stores. You can link it to the JBoss Application Server's authentication component.You will find the
JBossAuthenticatorclass provided in thedocs/examples/authdirectory. This class enables jUDDI deployments on JBoss to use a server security domain to authenticate users.
19.6. Configure XMLDocAuthentication
Procedure 19.2. Task
- Create a text file called
juddi-users.xmland save it injbossesb-registry.sar.<?xml version="1.0" encoding="UTF-8" standalone="yes"?> <juddi-users> <user userid="sscholl" password="password" /> <user userid="dsheppard" password="password" /> <user userid="vbrittain" password="password" /> </juddi-users> - Save the file and exit.
- Add the file to the class-path.
- Open the
juddi.propertiesfile in your text editor (located inSOA_ROOT/jboss-as/server/PROFILE/deploy/juddi-service.sar/juddi.war/WEB-INF). - Modify the file so that it looks like this:
juddi.authenticator = org.apache.juddi.auth.XMLDocAuthentication juddi.usersfile = juddi-users.xml - Save the file and exit.
19.7. Lightweight Directory Access Protocol (LDAP)
19.8. Configure LDAP Authentication
Procedure 19.3. Task
- Locate the
juddi.propertiesfile inSOA_ROOT/jboss-as/server/PROFILE/deploy/juddi-service.sar/juddi.war/WEB-INF. Open it in your text editor. - Add the following configuration settings:
juddi.authenticator=org.apache.juddi.auth.LdapSimpleAuthenticator
juddi.authenticator.url=ldap://localhost:389
The juddi.authenticator.url property tells theLdapSimpleAuthenticatorclass where the LDAP server resides. - Save the file and exit.
19.9. Configure JBoss Authentication
Procedure 19.4. Task
- Locate the
juddi.propertiesfile inSOA_ROOT/jboss-as/server/PROFILE/deploy/juddi-service.sar/juddi.war/WEB-INF. Open it in your text editor. - Add the following lines to the file:
uddi.auth=org.apache.juddi.auth.JBossAuthenticator
juddi.securityDomain=java:/jaas/other
The juddi.authenticator property connects theJbossAuthenticatorclass to the jUDDI Registry's Authenticator framework. Thejuddi.security.domaintellsJBossAuthenticatorwhere it can find the Application Server's security domain. It uses this domain to perform the authentications.Note that JBoss creates one security domain for each application policy element in theSOA_ROOT/jboss-as/server/PROFILE/conf/login-config.xmlfile. These domains are bound to the server JNDI tree with this name:java:/jaas/<application-policy-name>. (If a look-up refers to a non-existent application policy, a policy namedotherwill be used by default.) - Save the file and exit.
Appendix A. Revision History
| Revision History | |||
|---|---|---|---|
| Revision 5.3.1-78.400 | 2013-10-31 | ||
| |||
| Revision 5.3.1-78 | Mon Feb 18 2013 | ||
| |||