Chapter 4. Migrating virtual machines by using the Red Hat OpenShift web console
You can migrate virtual machines (VMs) by using the Red Hat OpenShift web console to:
You must ensure that all prerequisites are met.
VMware only: You must have the minimal set of VMware privileges.
VMware only: Creating a VMware Virtual Disk Development Kit (VDDK) image will increase migration speed.
4.1. The MTV user interface
The Migration Toolkit for Virtualization (MTV) user interface is integrated into the OpenShift web console.
In the left-hand panel, you can choose a page related to a component of the migration progress, for example, Providers for Migration, or, if you are an administrator, you can choose Overview, which contains information about migrations and lets you configure MTV settings.
Figure 4.1. MTV extension interface
In pages related to components, you can click on the Projects list, which is in the upper-left portion of the page, and see which projects (namespaces) you are allowed to work with.
- If you are an administrator, you can see all projects.
- If you are a non-administrator, you can see only the projects that you have permissions to work with.
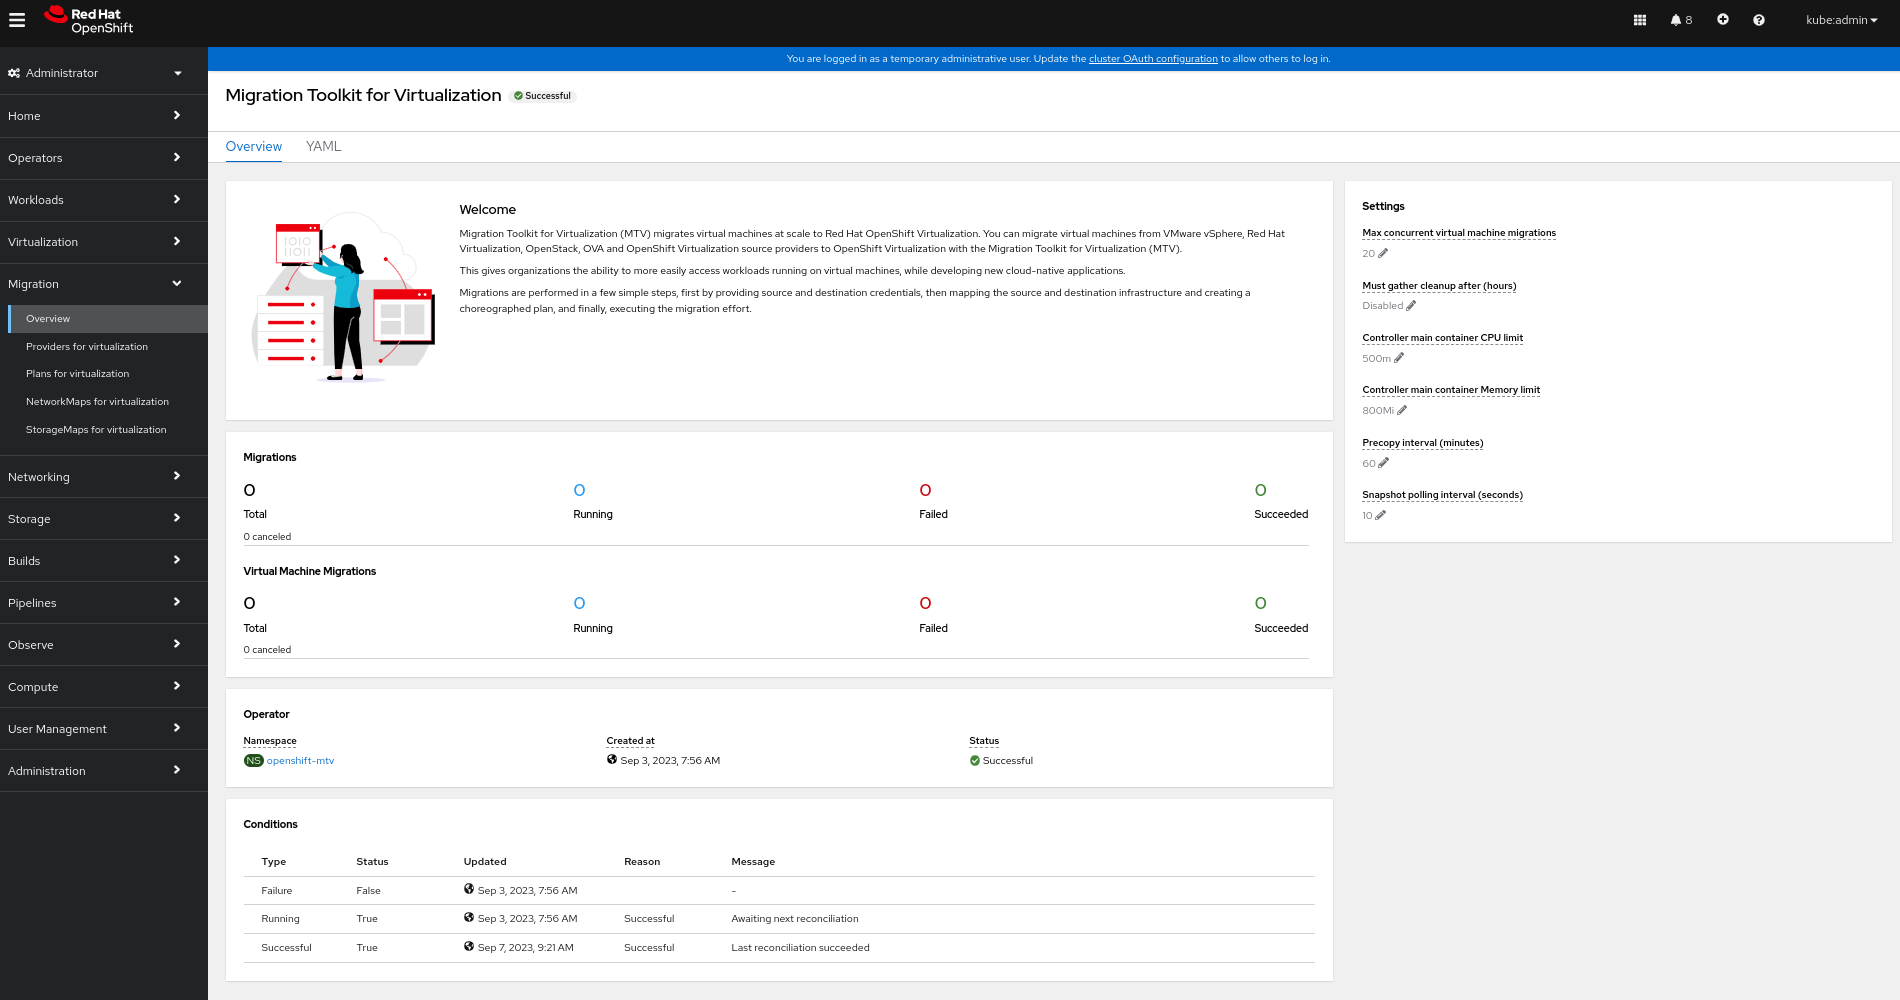
4.2. The MTV Overview page
The Migration Toolkit for Virtualization (MTV) Overview page displays system-wide information about migrations and a list of Settings you can change.
If you have Administrator privileges, you can access the Overview page by clicking Migration
The Overview page has 3 tabs:
- Overview
- YAML
- Metrics
4.2.1. Overview tab
The Overview tab lets you see:
- Operator: The namespace on which the MTV Operator is deployed and the status of the Operator
- Pods: The name, status, and creation time of each pod that was deployed by the MTV Operator
Conditions: Status of the MTV Operator:
-
Failure: Last failure.
Falseindicates no failure since deployment. - Running: Whether the Operator is currently running and waiting for the next reconciliation.
- Successful: Last successful reconciliation.
-
Failure: Last failure.
4.2.2. YAML tab
The custom resource ForkliftController that defines the operation of the MTV Operator. You can modify the custom resource from this tab.
4.2.3. Metrics tab
The Metrics tab lets you see:
Migrations: The number of migrations performed using MTV:
- Total
- Running
- Failed
- Succeeded
- Canceled
Virtual Machine Migrations: The number of VMs migrated using MTV:
- Total
- Running
- Failed
- Succeeded
- Canceled
Since a single migration might involve many virtual machines, the number of migrations performed using MTV might vary significantly from the number of virtual machines that have been migrated using MTV.
- Chart showing the number of running, failed, and succeeded migrations performed using MTV for each of the last 7 days
- Chart showing the number of running, failed, and succeeded virtual machine migrations performed using MTV for each of the last 7 days
4.3. Configuring MTV settings
If you have Administrator privileges, you can access the Overview page and change the following settings in it:
| Setting | Description | Default value |
|---|---|---|
| Max concurrent virtual machine migrations | The maximum number of VMs per plan that can be migrated simultaneously | 20 |
| Must gather cleanup after (hours) |
The duration for retaining | Disabled |
| Controller main container CPU limit | The CPU limit allocated to the main controller container | 500 m |
| Controller main container Memory limit | The memory limit allocated to the main controller container | 800 Mi |
| Precopy internal (minutes) | The interval at which a new snapshot is requested before initiating a warm migration | 60 |
| Snapshot polling interval (seconds) | The frequency with which the system checks the status of snapshot creation or removal during a warm migration | 10 |
Procedure
-
In the Red Hat OpenShift web console, click Migration
Overview. The Settings list is on the right-hand side of the page. - In the Settings list, click the Edit icon of the setting you want to change.
- Choose a setting from the list.
- Click Save.
4.4. Adding providers
You can add source providers and destination providers for a virtual machine migration by using the Red Hat OpenShift web console.
4.4.1. Adding source providers
You can use MTV to migrate VMs from the following source providers:
- VMware vSphere
- Red Hat Virtualization
- OpenStack
- Open Virtual Appliances (OVAs) that were created by VMware vSphere
- OpenShift Virtualization
You can add a source provider by using the Red Hat OpenShift web console.
4.4.1.1. Adding a VMware vSphere source provider
You can migrate VMware vSphere VMs from VMware vCenter or from a VMWare ESX/ESXi server. In MTV versions 2.6 and later, you can migrate directly from an ESX/ESXi server, without going through vCenter, by specifying the SDK endpoint to that of an ESX/ESXi server.
EMS enforcement is disabled for migrations with VMware vSphere source providers in order to enable migrations from versions of vSphere that are supported by Migration Toolkit for Virtualization but do not comply with the 2023 FIPS requirements. Therefore, users should consider whether migrations from vSphere source providers risk their compliance with FIPS. Supported versions of vSphere are specified in Software compatibility guidelines.
Prerequisites
- It is strongly recommended to create a VMware Virtual Disk Development Kit (VDDK) image in a secure registry that is accessible to all clusters. A VDDK image accelerates migration. For more information, see Creating a VDDK image.
Procedure
-
In the Red Hat OpenShift web console, click Migration
Providers for virtualization. - Click Create Provider.
- Click vSphere.
- Specify the following fields:
Provider Details
- Provider resource name: Name of the source provider.
- Endpoint type: Select the vSphere provider endpoint type. Options: vCenter or ESXi. You can migrate virtual machines from vCenter, an ESX/ESXi server that is not managed by vCenter, or from an ESX/ESXi server that is managed by vCenter but does not go through vCenter.
-
URL: URL of the SDK endpoint of the vCenter on which the source VM is mounted. Ensure that the URL includes the
sdkpath, usually/sdk. For example,https://vCenter-host-example.com/sdk. If a certificate for FQDN is specified, the value of this field needs to match the FQDN in the certificate. -
VDDK init image:
VDDKInitImagepath. It is strongly recommended to create a VDDK init image to accelerate migrations. For more information, see Creating a VDDK image.
Provider details
-
Username: vCenter user or ESXi user. For example,
user@vsphere.local. Password: vCenter user password or ESXi user password.
Choose one of the following options for validating CA certificates:
- Use a custom CA certificate: Migrate after validating a custom CA certificate.
- Use the system CA certificate: Migrate after validating the system CA certificate.
Skip certificate validation : Migrate without validating a CA certificate.
- To use a custom CA certificate, leave the Skip certificate validation switch toggled to left, and either drag the CA certificate to the text box or browse for it and click Select.
- To use the system CA certificate, leave the Skip certificate validation switch toggled to the left, and leave the CA certificate text box empty.
- To skip certificate validation, toggle the Skip certificate validation switch to the right.
Optional: Ask MTV to fetch a custom CA certificate from the provider’s API endpoint URL.
- Click Fetch certificate from URL. The Verify certificate window opens.
If the details are correct, select the I trust the authenticity of this certificate checkbox, and then, click Confirm. If not, click Cancel, and then, enter the correct certificate information manually.
Once confirmed, the CA certificate will be used to validate subsequent communication with the API endpoint.
Click Create provider to add and save the provider.
The provider appears in the list of providers.
NoteIt might take a few minutes for the provider to have the status
Ready.
4.4.1.1.1. Selecting a migration network for a VMware source provider
You can select a migration network in the Red Hat OpenShift web console for a source provider to reduce risk to the source environment and to improve performance.
Using the default network for migration can result in poor performance because the network might not have sufficient bandwidth. This situation can have a negative effect on the source platform because the disk transfer operation might saturate the network.
You can also control the network from which disks are transferred from a host by using the Network File Copy (NFC) service in vSphere.
Prerequisites
- The migration network must have sufficient throughput, minimum speed of 10 Gbps, for disk transfer.
The migration network must be accessible to the OpenShift Virtualization nodes through the default gateway.
NoteThe source virtual disks are copied by a pod that is connected to the pod network of the target namespace.
- The migration network should have jumbo frames enabled.
Procedure
-
In the Red Hat OpenShift web console, click Migration
Providers for virtualization. - Click the host number in the Hosts column beside a provider to view a list of hosts.
- Select one or more hosts and click Select migration network.
Specify the following fields:
- Network: Network name
-
ESXi host admin username: For example,
root - ESXi host admin password: Password
- Click Save.
Verify that the status of each host is Ready.
If a host status is not Ready, the host might be unreachable on the migration network or the credentials might be incorrect. You can modify the host configuration and save the changes.
4.4.1.2. Adding a Red Hat Virtualization source provider
You can add a Red Hat Virtualization source provider by using the Red Hat OpenShift web console.
Prerequisites
- Manager CA certificate, unless it was replaced by a third-party certificate, in which case, specify the Manager Apache CA certificate
Procedure
-
In the Red Hat OpenShift web console, click Migration
Providers for virtualization. - Click Create Provider.
- Click Red Hat Virtualization
Specify the following fields:
- Provider resource name: Name of the source provider.
-
URL: URL of the API endpoint of the Red Hat Virtualization Manager (RHVM) on which the source VM is mounted. Ensure that the URL includes the path leading to the RHVM API server, usually
/ovirt-engine/api. For example,https://rhv-host-example.com/ovirt-engine/api. - Username: Username.
- Password: Password.
Choose one of the following options for validating CA certificates:
- Use a custom CA certificate: Migrate after validating a custom CA certificate.
- Use the system CA certificate: Migrate after validating the system CA certificate.
Skip certificate validation : Migrate without validating a CA certificate.
- To use a custom CA certificate, leave the Skip certificate validation switch toggled to left, and either drag the CA certificate to the text box or browse for it and click Select.
- To use the system CA certificate, leave the Skip certificate validation switch toggled to the left, and leave the CA certificate text box empty.
- To skip certificate validation, toggle the Skip certificate validation switch to the right.
Optional: Ask MTV to fetch a custom CA certificate from the provider’s API endpoint URL.
- Click Fetch certificate from URL. The Verify certificate window opens.
If the details are correct, select the I trust the authenticity of this certificate checkbox, and then, click Confirm. If not, click Cancel, and then, enter the correct certificate information manually.
Once confirmed, the CA certificate will be used to validate subsequent communication with the API endpoint.
Click Create provider to add and save the provider.
The provider appears in the list of providers.
4.4.1.3. Adding an OpenStack source provider
You can add an OpenStack source provider by using the Red Hat OpenShift web console.
When you migrate an image-based VM from an OpenStack provider, a snapshot is created for the image that is attached to the source VM and the data from the snapshot is copied over to the target VM. This means that the target VM will have the same state as that of the source VM at the time the snapshot was created.
Procedure
-
In the Red Hat OpenShift web console, click Migration
Providers for virtualization. - Click Create Provider.
- Click OpenStack.
Specify the following fields:
- Provider resource name: Name of the source provider.
-
URL: URL of the OpenStack Identity (Keystone) endpoint. For example,
http://controller:5000/v3. Authentication type: Choose one of the following methods of authentication and supply the information related to your choice. For example, if you choose Application credential ID as the authentication type, the Application credential ID and the Application credential secret fields become active, and you need to supply the ID and the secret.
Application credential ID
- Application credential ID: OpenStack application credential ID
-
Application credential secret: OpenStack https://github.com/kubev2v/forklift-documentation/pull/402pplication credential
Secret
Application credential name
- Application credential name: OpenStack application credential name
-
Application credential secret: : OpenStack application credential
Secret - Username: OpenStack username
- Domain: OpenStack domain name
Token with user ID
- Token: OpenStack token
- User ID: OpenStack user ID
- Project ID: OpenStack project ID
Token with user Name
- Token: OpenStack token
- Username: OpenStack username
- Project: OpenStack project
- Domain name: OpenStack domain name
Password
- Username: OpenStack username
- Password: OpenStack password
- Project: OpenStack project
- Domain: OpenStack domain name
Choose one of the following options for validating CA certificates:
- Use a custom CA certificate: Migrate after validating a custom CA certificate.
- Use the system CA certificate: Migrate after validating the system CA certificate.
Skip certificate validation : Migrate without validating a CA certificate.
- To use a custom CA certificate, leave the Skip certificate validation switch toggled to left, and either drag the CA certificate to the text box or browse for it and click Select.
- To use the system CA certificate, leave the Skip certificate validation switch toggled to the left, and leave the CA certificate text box empty.
- To skip certificate validation, toggle the Skip certificate validation switch to the right.
Optional: Ask MTV to fetch a custom CA certificate from the provider’s API endpoint URL.
- Click Fetch certificate from URL. The Verify certificate window opens.
If the details are correct, select the I trust the authenticity of this certificate checkbox, and then, click Confirm. If not, click Cancel, and then, enter the correct certificate information manually.
Once confirmed, the CA certificate will be used to validate subsequent communication with the API endpoint.
Click Create provider to add and save the provider.
The provider appears in the list of providers.
4.4.1.4. Adding an Open Virtual Appliance (OVA) source provider
You can add Open Virtual Appliance (OVA) files that were created by VMware vSphere as a source provider by using the Red Hat OpenShift web console.
Procedure
-
In the Red Hat OpenShift web console, click Migration
Providers for virtualization. - Click Create Provider.
- Click Open Virtual Appliance (OVA).
Specify the following fields:
- Provider resource name: Name of the source provider
- URL: URL of the NFS file share that serves the OVA
Click Create provider to add and save the provider.
The provider appears in the list of providers.
NoteAn error message might appear that states that an error has occurred. You can ignore this message.
4.4.1.5. Adding a Red Hat OpenShift Virtualization source provider
You can use a Red Hat OpenShift Virtualization provider as both a source provider and destination provider.
Specifically, the host cluster that is automatically added as a OpenShift Virtualization provider can be used as both a source provider and a destination provider.
You can migrate VMs from the cluster that MTV is deployed on to another cluster, or from a remote cluster to the cluster that MTV is deployed on.
The Red Hat OpenShift cluster version of the source provider must be 4.13 or later.
Procedure
-
In the Red Hat OpenShift web console, click Migration
Providers for virtualization. - Click Create Provider.
- Click OpenShift Virtualization.
Specify the following fields:
- Provider resource name: Name of the source provider
- URL: URL of the endpoint of the API server
Service account bearer token: Token for a service account with
cluster-adminprivilegesIf both URL and Service account bearer token are left blank, the local OpenShift cluster is used.
Choose one of the following options for validating CA certificates:
- Use a custom CA certificate: Migrate after validating a custom CA certificate.
- Use the system CA certificate: Migrate after validating the system CA certificate.
Skip certificate validation : Migrate without validating a CA certificate.
- To use a custom CA certificate, leave the Skip certificate validation switch toggled to left, and either drag the CA certificate to the text box or browse for it and click Select.
- To use the system CA certificate, leave the Skip certificate validation switch toggled to the left, and leave the CA certificate text box empty.
- To skip certificate validation, toggle the Skip certificate validation switch to the right.
Optional: Ask MTV to fetch a custom CA certificate from the provider’s API endpoint URL.
- Click Fetch certificate from URL. The Verify certificate window opens.
If the details are correct, select the I trust the authenticity of this certificate checkbox, and then, click Confirm. If not, click Cancel, and then, enter the correct certificate information manually.
Once confirmed, the CA certificate will be used to validate subsequent communication with the API endpoint.
Click Create provider to add and save the provider.
The provider appears in the list of providers.
4.4.2. Adding destination providers
You can add a OpenShift Virtualization destination provider by using the Red Hat OpenShift web console.
4.4.2.1. Adding an OpenShift Virtualization destination provider
You can use a Red Hat OpenShift Virtualization provider as both a source provider and destination provider.
Specifically, the host cluster that is automatically added as a OpenShift Virtualization provider can be used as both a source provider and a destination provider.
You can also add another OpenShift Virtualization destination provider to the Red Hat OpenShift web console in addition to the default OpenShift Virtualization destination provider, which is the cluster where you installed MTV.
You can migrate VMs from the cluster that MTV is deployed on to another cluster, or from a remote cluster to the cluster that MTV is deployed on.
Prerequisites
-
You must have an OpenShift Virtualization service account token with
cluster-adminprivileges.
Procedure
-
In the Red Hat OpenShift web console, click Migration
Providers for virtualization. - Click Create Provider.
- Click OpenShift Virtualization.
Specify the following fields:
- Provider resource name: Name of the source provider
- URL: URL of the endpoint of the API server
Service account bearer token: Token for a service account with
cluster-adminprivilegesIf both URL and Service account bearer token are left blank, the local OpenShift cluster is used.
Choose one of the following options for validating CA certificates:
- Use a custom CA certificate: Migrate after validating a custom CA certificate.
- Use the system CA certificate: Migrate after validating the system CA certificate.
Skip certificate validation : Migrate without validating a CA certificate.
- To use a custom CA certificate, leave the Skip certificate validation switch toggled to left, and either drag the CA certificate to the text box or browse for it and click Select.
- To use the system CA certificate, leave the Skip certificate validation switch toggled to the left, and leave the CA certificate text box empty.
- To skip certificate validation, toggle the Skip certificate validation switch to the right.
Optional: Ask MTV to fetch a custom CA certificate from the provider’s API endpoint URL.
- Click Fetch certificate from URL. The Verify certificate window opens.
If the details are correct, select the I trust the authenticity of this certificate checkbox, and then, click Confirm. If not, click Cancel, and then, enter the correct certificate information manually.
Once confirmed, the CA certificate will be used to validate subsequent communication with the API endpoint.
Click Create provider to add and save the provider.
The provider appears in the list of providers.
4.4.2.2. Selecting a migration network for an OpenShift Virtualization provider
You can select a default migration network for an OpenShift Virtualization provider in the Red Hat OpenShift web console to improve performance. The default migration network is used to transfer disks to the namespaces in which it is configured.
If you do not select a migration network, the default migration network is the pod network, which might not be optimal for disk transfer.
You can override the default migration network of the provider by selecting a different network when you create a migration plan.
Procedure
-
In the Red Hat OpenShift web console, click Migration
Providers for virtualization. -
On the right side of the provider, select Select migration network from the Options menu
 .
.
- Select a network from the list of available networks and click Select.
4.5. Creating migration plans
You can create a migration plan by using the Red Hat OpenShift web console to specify a source provider, the virtual machines (VMs) you want to migrate, and other plan details.
For your convenience, there are two procedures to create migration plans, starting with either a source provider or with specific VMs:
- To start with a source provider, see Creating a migration plan starting with a source provider.
- To start with specific VMs, see Creating a migration plan starting with specific VMs.
Virtual machines with guest initiated storage connections, such as Internet Small Computer Systems Interface (iSCSI) connections or Network File System (NFS) mounts, are not handled by MTV and could require additional planning before or reconfiguration after the migration.
This is to ensure that no issues arise due to the addition or newly migrated VM accessing this storage.
4.5.1. Creating a migration plan starting with a source provider
You can create a migration plan based on a source provider, starting on the Plans for virtualization page. Note the specific options for migrations from VMware or RHV providers.
Procedure
In the Red Hat OpenShift web console, click Plans for virtualization and then click Create Plan.
The Create migration plan wizard opens to the Select source provider interface.
Select the source provider of the VMs you want to migrate.
The Select virtual machines interface opens.
Select the VMs you want to migrate and click Next.
The Create migration plan pane opens. It displays the source provider’s name and suggestions for a target provider and namespace, a network map, and a storage map.
- Enter the Plan name.
- Make any needed changes to the editable items.
- Click Add mapping to edit a suggested network mapping or a storage mapping, or to add one or more additional mappings.
Click Create migration plan.
MTV validates the migration plan and the Plan details page opens, indicating whether the plan is ready for use or contains an error. The details of the plan are listed, and you can edit the items you filled in on the previous page. If you make any changes, MTV validates the plan again.
VMware source providers only (All optional):
Preserving static IPs of VMs: By default, virtual network interface controllers (vNICs) change during the migration process. This results in vNICs that are set with a static IP in vSphere losing their IP. To avoid this by preserving static IPs of VMs, click the Edit icon next to Preserve static IPs and toggle the Whether to preserve the static IPs switch in the window that opens. Then click Save.
MTV then issues a warning message about any VMs with a Windows operating system for which vNIC properties are missing. To retrieve any missing vNIC properties, run those VMs in vSphere in order for the vNIC properties to be reported to MTV.
- Entering a list of decryption passphrases for disks encrypted using Linux Unified Key Setup (LUKS): To enter a list of decryption passphrases for LUKS-encrypted devices, in the Settings section, click the Edit icon next to Disk decryption passphrases, enter the passphrases, and then click Save. You do not need to enter the passphrases in a specific order - for each LUKS-encrypted device, MTV tries each passphrase until one unlocks the device.
Specifying a root device: Applies to multi-boot VM migrations only. By default, MTV uses the first bootable device detected as the root device.
To specify a different root device, in the Settings section, click the Edit icon next to Root device and choose a device from the list of commonly-used options, or enter a device in the text box.
MTV uses the following format for disk location:
/dev/sd<disk_identifier><disk_partition>. For example, if the second disk is the root device and the operating system is on the disk’s second partition, the format would be:/dev/sdb2. After you enter the boot device, click Save.If the conversion fails because the boot device provided is incorrect, it is possible to get the correct information by looking at the conversion pod logs.
RHV source providers only (Optional):
Preserving the CPU model of VMs that are migrated from RHV: Generally, the CPU model (type) for RHV VMs is set at the cluster level, but it can be set at the VM level, which is called a custom CPU model. By default, MTV sets the CPU model on the destination cluster as follows: MTV preserves custom CPU settings for VMs that have them, but, for VMs without custom CPU settings, MTV does not set the CPU model. Instead, the CPU model is later set by OpenShift Virtualization.
To preserve the cluster-level CPU model of your RHV VMs, in the Settings section, click the Edit icon next to Preserve CPU model. Toggle the Whether to preserve the CPU model switch, and then click Save.
If the plan is valid,
- You can run the plan now by clicking Start migration.
- You can run the plan later by selecting it on the Plans for virtualization page and following the procedure in Running a migration plan.
4.5.2. Creating a migration plan starting with specific VMs
You can create a migration plan based on specific VMs, starting on the Providers for virtualization page. Note the specific options for migrations from VMware or RHV providers.
Procedure
- In the Red Hat OpenShift web console, click Providers for virtualization.
In the row of the appropriate source provider, click VMs.
The Virtual Machines tab opens.
Select the VMs you want to migrate and click Create migration plan.
The Create migration plan pane opens. It displays the source provider’s name and suggestions for a target provider and namespace, a network map, and a storage map.
- Enter the Plan name.
- Make any needed changes to the editable items.
- Click Add mapping to edit a suggested network mapping or a storage mapping, or to add one or more additional mappings.
Click Create migration plan.
MTV validates the migration plan and the Plan details page opens, indicating whether the plan is ready for use or contains an error. The details of the plan are listed, and you can edit the items you filled in on the previous page. If you make any changes, MTV validates the plan again.
VMware source providers only (All optional):
Preserving static IPs of VMs: By default, virtual network interface controllers (vNICs) change during the migration process. This results in vNICs that are set with a static IP in vSphere losing their IP. To avoid this by preserving static IPs of VMs, click the Edit icon next to Preserve static IPs and toggle the Whether to preserve the static IPs switch in the window that opens. Then click Save.
MTV then issues a warning message about any VMs with a Windows operating system for which vNIC properties are missing. To retrieve any missing vNIC properties, run those VMs in vSphere in order for the vNIC properties to be reported to MTV.
- Entering a list of decryption passphrases for disks encrypted using Linux Unified Key Setup (LUKS): To enter a list of decryption passphrases for LUKS-encrypted devices, in the Settings section, click the Edit icon next to Disk decryption passphrases, enter the passphrases, and then click Save. You do not need to enter the passphrases in a specific order - for each LUKS-encrypted device, MTV tries each passphrase until one unlocks the device.
Specifying a root device: Applies to multi-boot VM migrations only. By default, MTV uses the first bootable device detected as the root device.
To specify a different root device, in the Settings section, click the Edit icon next to Root device and choose a device from the list of commonly-used options, or enter a device in the text box.
MTV uses the following format for disk location:
/dev/sd<disk_identifier><disk_partition>. For example, if the second disk is the root device and the operating system is on the disk’s second partition, the format would be:/dev/sdb2. After you enter the boot device, click Save.If the conversion fails because the boot device provided is incorrect, it is possible to get the correct information by looking at the conversion pod logs.
RHV source providers only (Optional):
Preserving the CPU model of VMs that are migrated from RHV: Generally, the CPU model (type) for RHV VMs is set at the cluster level, but it can be set at the VM level, which is called a custom CPU model. By default, MTV sets the CPU model on the destination cluster as follows: MTV preserves custom CPU settings for VMs that have them, but, for VMs without custom CPU settings, MTV does not set the CPU model. Instead, the CPU model is later set by OpenShift Virtualization.
To preserve the cluster-level CPU model of your RHV VMs, in the Settings section, click the Edit icon next to Preserve CPU model. Toggle the Whether to preserve the CPU model switch, and then click Save.
If the plan is valid,
- You can run the plan now by clicking Start migration.
- You can run the plan later by selecting it on the Plans for virtualization page and following the procedure in Running a migration plan.
4.6. Running a migration plan
You can run a migration plan and view its progress in the Red Hat OpenShift web console.
Prerequisites
- Valid migration plan.
Procedure
In the Red Hat OpenShift web console, click Migration
Plans for virtualization. The Plans list displays the source and target providers, the number of virtual machines (VMs) being migrated, the status, and the description of each plan.
- Click Start beside a migration plan to start the migration.
Click Start in the confirmation window that opens.
The Migration details by VM screen opens, displaying the migration’s progress
Warm migration only:
- The precopy stage starts.
- Click Cutover to complete the migration.
If the migration fails:
- Click Get logs to retrieve the migration logs.
- Click Get logs in the confirmation window that opens.
- Wait until Get logs changes to Download logs and then click the button to download the logs.
Click a migration’s Status, whether it failed or succeeded or is still ongoing, to view the details of the migration.
The Migration details by VM screen opens, displaying the start and end times of the migration, the amount of data copied, and a progress pipeline for each VM being migrated.
- Expand an individual VM to view its steps and the elapsed time and state of each step.
4.7. Migration plan options
On the Plans for virtualization page of the Red Hat OpenShift web console, you can click the Options menu
![]() beside a migration plan to access the following options:
beside a migration plan to access the following options:
- Get logs: Retrieves the logs of a migration. When you click Get logs, a confirmation window opens. After you click Get logs in the window, wait until Get logs changes to Download logs and then click the button to download the logs.
- Edit: Edit the details of a migration plan. You cannot edit a migration plan while it is running or after it has completed successfully.
Duplicate: Create a new migration plan with the same virtual machines (VMs), parameters, mappings, and hooks as an existing plan. You can use this feature for the following tasks:
- Migrate VMs to a different namespace.
- Edit an archived migration plan.
- Edit a migration plan with a different status, for example, failed, canceled, running, critical, or ready.
Archive: Delete the logs, history, and metadata of a migration plan. The plan cannot be edited or restarted. It can only be viewed.
NoteThe Archive option is irreversible. However, you can duplicate an archived plan.
Delete: Permanently remove a migration plan. You cannot delete a running migration plan.
NoteThe Delete option is irreversible.
Deleting a migration plan does not remove temporary resources such as
importerpods,conversionpods, config maps, secrets, failed VMs, and data volumes. (BZ#2018974) You must archive a migration plan before deleting it in order to clean up the temporary resources.- View details: Display the details of a migration plan.
- Restart: Restart a failed or canceled migration plan.
- Cancel scheduled cutover: Cancel a scheduled cutover migration for a warm migration plan.
4.8. Canceling a migration
You can cancel the migration of some or all virtual machines (VMs) while a migration plan is in progress by using the Red Hat OpenShift web console.
Procedure
- In the Red Hat OpenShift web console, click Plans for virtualization.
- Click the name of a running migration plan to view the migration details.
- Select one or more VMs and click Cancel.
Click Yes, cancel to confirm the cancellation.
In the Migration details by VM list, the status of the canceled VMs is Canceled. The unmigrated and the migrated virtual machines are not affected.
You can restart a canceled migration by clicking Restart beside the migration plan on the Migration plans page.