Cluster Administration
OpenShift Enterprise 3.2 Cluster Administration
Abstract
Chapter 1. Overview
These Cluster Administration topics cover the day-to-day tasks for managing your OpenShift Enterprise cluster and other advanced configuration topics.
Chapter 2. Managing Nodes
2.1. Overview
You can manage nodes in your instance using the CLI.
When you perform node management operations, the CLI interacts with node objects that are representations of actual node hosts. The master uses the information from node objects to validate nodes with health checks.
2.2. Listing Nodes
To list all nodes that are known to the master:
$ oc get nodes
NAME                 LABELS                                        STATUS
node1.example.com    kubernetes.io/hostname=node1.example.com      Ready
node2.example.com    kubernetes.io/hostname=node2.example.com      Ready
To only list information about a single node, replace <node> with the full node name:
$ oc get node <node>
The STATUS column in the output of these commands can show nodes with the following conditions:
| Condition | Description |
|---|---|
|
|
The node is passing the health checks performed from the master by returning |
|
| The node is not passing the health checks performed from the master. |
|
| Pods cannot be scheduled for placement on the node. |
The STATUS column can also show Unknown for a node if the CLI cannot find any node condition.
To get more detailed information about a specific node, including the reason for the current condition:
$ oc describe node <node>
For example:
$ oc describe node node1.example.com
Name:			node1.example.com
Labels:			kubernetes.io/hostname=node1.example.com
CreationTimestamp:	Wed, 10 Jun 2015 17:22:34 +0000
Conditions:
  Type		Status	LastHeartbeatTime			LastTransitionTime			Reason					Message
  Ready 	True 	Wed, 10 Jun 2015 19:56:16 +0000 	Wed, 10 Jun 2015 17:22:34 +0000 	kubelet is posting ready status
Addresses:	127.0.0.1
Capacity:
 memory:	1017552Ki
 pods:		100
 cpu:		2
Version:
 Kernel Version:		3.17.4-301.fc21.x86_64
 OS Image:			Fedora 21 (Twenty One)
 Container Runtime Version:	docker://1.6.0
 Kubelet Version:		v0.17.1-804-g496be63
 Kube-Proxy Version:		v0.17.1-804-g496be63
ExternalID:			node1.example.com
Pods:				(2 in total)
  docker-registry-1-9yyw5
  router-1-maytv
No events.
2.3. Adding Nodes
To add nodes to your existing OpenShift Enterprise cluster, you can run an Ansible playbook that handles installing the node components, generating the required certificates, and other important steps. See the advanced installation method for instructions on running the playbook directly.
Alternatively, if you used the quick installation method, you can re-run the installer to add nodes, which performs the same steps.
2.4. Deleting Nodes
When you delete a node using the CLI, the node object is deleted in Kubernetes, but the pods that exist on the node itself are not deleted. Any bare pods not backed by a replication controller would be inaccessible to OpenShift Enterprise, pods backed by replication controllers would be rescheduled to other available nodes, and local manifest pods would need to be manually deleted.
To delete a node from the OpenShift Enterprise cluster:
- Evacuate pods from the node you are preparing to delete.
Delete the node object:
$ oc delete node <node>
Check that the node has been removed from the node list:
$ oc get nodes
Pods should now be only scheduled for the remaining nodes that are in Ready state.
- If you want to uninstall all OpenShift Enterprise content from the node host, including all pods and containers, continue to Uninstalling Nodes and follow the procedure using the uninstall.yml playbook. The procedure assumes general understanding of the advanced installation method using Ansible.
2.5. Updating Labels on Nodes
To add or update labels on a node:
$ oc label node <node> <key_1>=<value_1> ... <key_n>=<value_n>
To see more detailed usage:
$ oc label -h
2.6. Listing Pods on Nodes
To list all or selected pods on one or more nodes:
$ oadm manage-node <node1> <node2> \
    --list-pods [--pod-selector=<pod_selector>] [-o json|yaml]
To list all or selected pods on selected nodes:
$ oadm manage-node --selector=<node_selector> \
    --list-pods [--pod-selector=<pod_selector>] [-o json|yaml]
2.7. Marking Nodes as Unschedulable or Schedulable
By default, healthy nodes with a Ready status are marked as schedulable, meaning that new pods are allowed for placement on the node. Manually marking a node as unschedulable blocks any new pods from being scheduled on the node. Existing pods on the node are not affected.
To mark a node or nodes as unschedulable:
$ oadm manage-node <node1> <node2> --schedulable=false
For example:
$ oadm manage-node node1.example.com --schedulable=false
NAME                 LABELS                                        STATUS
node1.example.com    kubernetes.io/hostname=node1.example.com      Ready,SchedulingDisabled
To mark a currently unschedulable node or nodes as schedulable:
$ oadm manage-node <node1> <node2> --schedulable
Alternatively, instead of specifying specific node names (e.g., <node1> <node2>), you can use the --selector=<node_selector> option to mark selected nodes as schedulable or unschedulable.
2.8. Evacuating Pods on Nodes
Evacuating pods allows you to migrate all or selected pods from a given node or nodes. Nodes must first be marked unschedulable to perform pod evacuation.
Only pods backed by a replication controller can be evacuated; the replication controllers create new pods on other nodes and remove the existing pods from the specified node(s). Bare pods, meaning those not backed by a replication controller, are unaffected by default. You can evacuate a subset of pods by specifying a pod-selector. Pod selector is based on labels, so all the pods with the specified label will be evacuated.
To list pods that will be migrated without actually performing the evacuation, use the --dry-run option:
$ oadm manage-node <node1> <node2> \
    --evacuate --dry-run [--pod-selector=<pod_selector>]
To actually evacuate all or selected pods on one or more nodes:
$ oadm manage-node <node1> <node2> \
    --evacuate [--pod-selector=<pod_selector>]
You can force deletion of bare pods by using the --force option:
$ oadm manage-node <node1> <node2> \
    --evacuate --force [--pod-selector=<pod_selector>]
Alternatively, instead of specifying specific node names (e.g., <node1> <node2>), you can use the --selector=<node_selector> option to evacuate pods on selected nodes.
2.9. Configuring Node Resources
You can configure node resources by adding kubelet arguments to the node configuration file (/etc/origin/node/node-config.yaml). Add the kubeletArguments section and include any desired options:
kubeletArguments:
  max-pods: 1
    - "110"
  resolv-conf: 2
    - "/etc/resolv.conf"
  image-gc-high-threshold: 3
    - "90"
  image-gc-low-threshold: 4
    - "80"
- 1
- Number of pods that can run on this kubelet.
- 2
- Resolver configuration file used as the basis for the container DNS resolution configuration.
- 3
- The percent of disk usage after which image garbage collection is always run. Default: 90%
- 4
- The percent of disk usage before which image garbage collection is never run. Lowest disk usage to garbage collect to. Default: 80%
To view all available kubelet options:
$ kubelet -h
This can also be set during an advanced installation using the openshift_node_kubelet_args variable. For example:
openshift_node_kubelet_args={'max-pods': ['110'], 'resolv-conf': ['/etc/resolv.conf'], 'image-gc-high-threshold': ['90'], 'image-gc-low-threshold': ['80']}2.10. Changing Node Traffic Interface
By default, DNS routes all node traffic. During node registration, the master receives the node IP addresses from the DNS configuration, and therefore accessing nodes via DNS is the most flexible solution for most deployments.
If your deployment is using a cloud provider, then the node gets the IP information from the cloud provider. However, openshift-sdn attempts to determine the IP through a variety of methods, including a DNS lookup on the nodeName (if set), or on the system hostname (if nodeName is not set).
However, you may need to change the node traffic interface. For example, where:
- OpenShift Enterprise is installed in a cloud provider where internal hostnames are not configured/resolvable by all hosts.
- The node’s IP from the master’s perspective is not the same as the node’s IP from its own perspective.
Configuring the openshift_set_node_ip Ansible variable forces node traffic through an interface other than the default network interface.
To change the node traffic interface:
-
Set the
openshift_set_node_ipAnsible variable totrue. -
Set the
openshift_ipto the IP address for the node you want to configure.
Although openshift_set_node_ip can be useful as a workaround for the cases stated in this section, it is generally not suited for production environments. This is because the node will no longer function properly if it receives a new IP address.
Chapter 3. Managing Users
3.1. Overview
This topic describes the management of user accounts, including how new user accounts are created in OpenShift Enterprise and how they can be deleted.
3.2. Adding a User
After new users log in to OpenShift Enterprise, an account is created for that user per the identity provider configured on the master. The cluster administrator can manage the access level of each user.
3.3. Viewing User and Identity Lists
OpenShift Enterprise user configuration is stored in several locations within OpenShift Enterprise. Regardless of the identity provider, OpenShift Enterprise internally stores details like role-based access control (RBAC) information and group membership. To completely remove user information, this data must be removed in addition to the user account.
In OpenShift Enterprise, two object types contain user data outside the identification provider: user and identity.
To get the current list of users:
$ oc get user
NAME      UID                                    FULL NAME   IDENTITIES
demo     75e4b80c-dbf1-11e5-8dc6-0e81e52cc949               htpasswd_auth:demo
To get the current list of identities:
$ oc get identity
NAME                  IDP NAME        IDP USER NAME   USER NAME   USER UID
htpasswd_auth:demo    htpasswd_auth   demo            demo        75e4b80c-dbf1-11e5-8dc6-0e81e52cc949
Note the matching UID between the two object types. If you attempt to change the authentication provider after starting to use OpenShift Enterprise, the user names that overlap will not work because of the entries in the identity list, which will still point to the old authentication method.
3.4. Managing User and Group Labels
To add a label to a user or group:
$ oc label user/<user_name> <label_name>
For example, if the user name is theuser and the label is level=gold:
$ oc label user/theuser level=gold
To remove the label:
$ oc label user/<user_name> <label_name>-
To show labels for a user or group:
$ oc describe user/<user_name>
3.5. Deleting a User
To delete a user:
Delete the user record:
$ oc delete user demo
user "demo" deleted
Delete the user identity.
The identity of the user is related to the identification provider you use. Get the provider name from the user record in
oc get user.In this example, the identity provider name is htpasswd_auth. The command is:
# oc delete identity htpasswd_auth:demo
identity "htpasswd_auth:demo" deleted
If you skip this step, the user will not be able to log in again.
After you complete these steps, a new account will be created in OpenShift Enterprise when the user logs in again.
If your intention is to prevent the user from being able to log in again (for example, if an employee has left the company and you want to permanently delete the account), you can also remove the user from your authentication back end (like htpasswd, kerberos, or others) for the configured identity provider.
For example, if you are using htpasswd, delete the entry in the htpasswd file that is configured for OpenShift Enterprise with the user name and password.
For external identification management like Lightweight Directory Access Protocol (LDAP) or Internet Download Manager (IDM), use the user management tools to remove the user entry.
Chapter 4. Managing Projects
4.1. Overview
In OpenShift Enterprise, projects are used to group and isolate related objects. As an administrator, you can give developers access to certain projects, allow them to create their own, and give them administrative rights within individual projects.
4.2. Self-provisioning Projects
You can allow developers to create their own projects. There is an endpoint that will provision a project according to a template. The web console and oc new-project command use this endpoint when a developer creates a new project.
4.2.1. Modifying the Template for New Projects
The API server automatically provisions projects based on the template that is identified by the projectRequestTemplate parameter of the master-config.yaml file. If the parameter is not defined, the API server creates a default template that creates a project with the requested name, and assigns the requesting user to the "admin" role for that project.
To create your own custom project template:
Start with the current default project template:
$ oadm create-bootstrap-project-template -o yaml > template.yaml
- Use a text editor to modify the template.yaml file by adding objects or modifying existing objects.
Load the template:
$ oc create -f template.yaml -n default
Modify the master-config.yaml file to reference the loaded template:
...
projectConfig:
  projectRequestTemplate: "default/project-request"
  ...
When a project request is submitted, the API substitutes the following parameters into the template:
| Parameter | Description |
|---|---|
| PROJECT_NAME | The name of the project. Required. |
| PROJECT_DISPLAYNAME | The display name of the project. May be empty. |
| PROJECT_DESCRIPTION | The description of the project. May be empty. |
| PROJECT_ADMIN_USER | The username of the administrating user. |
| PROJECT_REQUESTING_USER | The username of the requesting user. |
Access to the API is granted to developers with the self-provisioner role and the self-provisioners cluster role binding. This role is available to all authenticated developers by default.
4.2.2. Disabling Self-provisioning
You can prevent an authenticated user group from self-provisioning new projects.
- Log in as a user with cluster-admin privileges.
Remove the
self-provisionerscluster role from the group.$ oadm policy remove-cluster-role-from-group self-provisioner system:authenticated system:authenticated:oauth
Set the
projectRequestMessageparameter value in the master-config.yaml file to instruct developers how to request a new project. This parameter value is a string that will be presented to a user in the web console and command line when the user attempts to self-provision a project. You might use one of the following messages:- To request a project, contact your system administrator at projectname@example.com.
- To request a new project, fill out the project request form located at https://internal.example.com/openshift-project-request.
Example YAML file
...
projectConfig:
  ProjectRequestMessage: "message"
  ...
Edit the
self-provisionerscluster role to prevent automatic updates to the role. Automatic updates reset the cluster roles to the default state.To update the role from the command line:
Run the following command:
$ oc edit clusterrole self-provisioner
In the displayed role, set the
openshift.io/reconcile-protectparameter value totrue, as shown in the following example:apiVersion: authorization.openshift.io/v1 kind: ClusterRole metadata: annotations: authorization.openshift.io/system-only: "true" openshift.io/description: A user that can request project. openshift.io/reconcile-protect: "true" ...
To update the role by using automation, use the following command:
$ oc patch clusterrole self-provisioner -p '{ "metadata": { "annotations": { "openshift.io/reconcile-protect": "true" } } }'
4.3. Using Node Selectors
Node selectors are used in conjunction with labeled nodes to control pod placement.
Labels can be assigned during an advanced installation, or added to a node after installation.
4.3.1. Setting the Cluster-wide Default Node Selector
As a cluster administrator, you can set the cluster-wide default node selector to restrict pod placement to specific nodes.
Edit the master configuration file at /etc/origin/master/master-config.yaml and add a value for a default node selector. This is applied to the pods created in all projects without a specified nodeSelector value:
...
projectConfig:
  defaultNodeSelector: "type=user-node,region=east"
...
Restart the OpenShift service for the changes to take effect:
# systemctl restart atomic-openshift-master
4.3.2. Setting the Project-wide Node Selector
To create an individual project with a node selector, use the --node-selector option when creating a project. For example, if you have an OpenShift Enterprise topology with multiple regions, you can use a node selector to restrict specific OpenShift Enterprise projects to only deploy pods onto nodes in a specific region.
The following creates a new project named myproject and dictates that pods be deployed onto nodes labeled user-node and east:
$ oadm new-project myproject \
    --node-selector='type=user-node,region=east'
Once this command is run, this becomes the adminstrator-set node selector for all pods contained in the specified project.
While the new-project subcommand is available for both oadm and oc, the cluster administrator and developer commands respectively, creating a new project with a node selector is only available with the oadm command. The new-project subcommand is not available to project developers when self-provisioning projects.
Using the oadm new-project command adds an annotation section to the project. You can edit a project, and change the openshift.io/node-selector value to override the default:
...
metadata:
  annotations:
    openshift.io/node-selector: type=user-node,region=east
...
If openshift.io/node-selector is set to an empty string (oadm new-project --node-selector=""), the project will not have an adminstrator-set node selector, even if the cluster-wide default has been set. This means that, as a cluster administrator, you can set a default to restrict developer projects to a subset of nodes and still enable infrastructure or other projects to schedule the entire cluster.
4.3.3. Developer-specified Node Selectors
OpenShift Enterprise developers can set a node selector on their pod configuration if they wish to restrict nodes even further. This will be in addition to the project node selector, meaning that you can still dictate node selector values for all projects that have a node selector value.
For example, if a project has been created with the above annotation (openshift.io/node-selector: type=user-node,region=east) and a developer sets another node selector on a pod in that project, for example clearance=classified, the pod will only ever be scheduled on nodes that have all three labels (type=user-node, region=east, and clearance=classified). If they set region=west on a pod, their pods would be demanding nodes with labels region=east and region=west, which cannot work. The pods will never be scheduled, because labels can only be set to one value.
4.4. Limiting Number of Self-Provisioned Projects Per User
The number of self-provisioned projects requested by a given user can be limited with the ProjectRequestLimitadmission control plug-in.
If your project request template was created in OpenShift Enterprise 3.1 or earlier using the process described in Modifying the Template for New Projects, then the generated template does not include the annotation openshift.io/requester: ${PROJECT_REQUESTING_USER}, which is used for the ProjectRequestLimitConfig. You must add the annotation.
In order to specify limits for users, a configuration must be specified for the plug-in within the master configuration file (/etc/origin/master/master-config.yaml). The plug-in configuration takes a list of user label selectors and the associated maximum project requests.
Selectors are evaluated in order. The first one matching the current user will be used to determine the maximum number of projects. If a selector is not specified, a limit applies to all users. If a maximum number of projects is not specified, then an unlimited number of projects are allowed for a specific selector.
The following configuration sets a global limit of 2 projects per user while allowing 10 projects for users with a label of level=advanced and unlimited projects for users with a label of level=admin.
admissionConfig:
  pluginConfig:
    ProjectRequestLimit:
      configuration:
        apiVersion: v1
        kind: ProjectRequestLimitConfig
        limits:
        - selector:
            level: admin 1
        - selector:
            level: advanced 2
          maxProjects: 10
- maxProjects: 2 3- 1
- For selector
level=admin, nomaxProjectsis specified. This means that users with this label will not have a maximum of project requests. - 2
- For selector
level=advanced, a maximum number of 10 projects will be allowed. - 3
- For the third entry, no selector is specified. This means that it will be applied to any user that doesn’t satisfy the previous two rules. Because rules are evaluated in order, this rule should be specified last.
Managing User and Group Labels provides further guidance on how to add, remove, or show labels for users and groups.
Once your changes are made, restart OpenShift Enterprise for the changes to take effect.
# systemctl restart atomic-openshift-master
Chapter 5. Configuring Service Accounts
5.1. Overview
When a person uses the OpenShift Enterprise CLI or web console, their API token authenticates them to the OpenShift Enterprise API. However, when a regular user’s credentials are not available, it is common for components to make API calls independently. For example:
- Replication controllers make API calls to create or delete pods.
- Applications inside containers can make API calls for discovery purposes.
- External applications can make API calls for monitoring or integration purposes.
Service accounts provide a flexible way to control API access without sharing a regular user’s credentials.
5.2. User Names and Groups
Every service account has an associated user name that can be granted roles, just like a regular user. The user name is derived from its project and name:
system:serviceaccount:<project>:<name>
For example, to add the view role to the robot service account in the top-secret project:
$ oc policy add-role-to-user view system:serviceaccount:top-secret:robot
Every service account is also a member of two groups:
- system:serviceaccounts
- Includes all service accounts in the system.
- system:serviceaccounts:<project>
- Includes all service accounts in the specified project.
For example, to allow all service accounts in all projects to view resources in the top-secret project:
$ oc policy add-role-to-group view system:serviceaccounts -n top-secret
To allow all service accounts in the managers project to edit resources in the top-secret project:
$ oc policy add-role-to-group edit system:serviceaccounts:managers -n top-secret
5.3. Enabling Service Account Authentication
Service accounts authenticate to the API using tokens signed by a private RSA key. The authentication layer verifies the signature using a matching public RSA key.
To enable service account token generation, update the serviceAccountConfig stanza in the /etc/origin/master/master-config.yml file on the master to specify a privateKeyFile (for signing), and a matching public key file in the publicKeyFiles list:
serviceAccountConfig:
  ...
  masterCA: ca.crt 1
  privateKeyFile: serviceaccounts.private.key 2
  publicKeyFiles:
  - serviceaccounts.public.key 3
  - ...
- 1
- CA file used to validate the API server’s serving certificate.
- 2
- Private RSA key file (for token signing).
- 3
- Public RSA key files (for token verification). If private key files are provided, then the public key component is used. Multiple public key files can be specified, and a token will be accepted if it can be validated by one of the public keys. This allows rotation of the signing key, while still accepting tokens generated by the previous signer.
5.4. Managed Service Accounts
Service accounts are required in each project to run builds, deployments, and other pods. The managedNames setting in the /etc/origin/master/master-config.yml file on the master controls which service accounts are automatically created in every project:
serviceAccountConfig:
  ...
  managedNames: 1
  - builder 2
  - deployer 3
  - default 4
  - ...
- 1
- List of service accounts to automatically create in every project.
- 2
- A builder service account in each project is required by build pods, and is given the system:image-builder role, which allows pushing images to any image stream in the project using the internal container registry.
- 3
- A deployer service account in each project is required by deployment pods, and is given the system:deployer role, which allows viewing and modifying replication controllers and pods in the project.
- 4
- A default service account is used by all other pods unless they specify a different service account.
All service accounts in a project are given the system:image-puller role, which allows pulling images from any image stream in the project using the internal container registry.
5.5. Infrastructure Service Accounts
Several infrastructure controllers run using service account credentials. The following service accounts are created in the OpenShift Enterprise infrastructure project (openshift-infra) at server start, and given the following roles cluster-wide:
| Service Account | Description |
|---|---|
| replication-controller | Assigned the system:replication-controller role |
| deployment-controller | Assigned the system:deployment-controller role |
| build-controller | Assigned the system:build-controller role. Additionally, the build-controller service account is included in the privileged security context constraint in order to create privileged build pods. |
To configure the project where those service accounts are created, set the openshiftInfrastructureNamespace field in in the /etc/origin/master/master-config.yml file on the master:
policyConfig:
  ...
  openshiftInfrastructureNamespace: openshift-infra
5.6. Service Accounts and Secrets
Set the limitSecretReferences field in the /etc/origin/master/master-config.yml file on the master to true to require pod secret references to be whitelisted by their service accounts. Set its value to false to allow pods to reference any secret in the project.
serviceAccountConfig:
  ...
  limitSecretReferences: false
Chapter 6. Managing Authorization Policies
6.1. Overview
You can use the CLI to view authorization policies and the administrator CLI to manage the roles and bindings within a policy.
6.2. Viewing Roles and Bindings
Roles grant various levels of access in the system-wide cluster policy as well as project-scoped local policies. Users and groups can be associated with, or bound to, multiple roles at the same time. You can view details about the roles and their bindings using the oc describe command.
Users with the cluster-admindefault role in the cluster policy can view cluster policy and all local policies. Users with the admindefault role in a given local policy can view that project-scoped policy.
Review a full list of verbs in the Evaluating Authorization section.
6.2.1. Viewing Cluster Policy
To view the cluster roles and their associated rule sets in the cluster policy:
$ oc describe clusterPolicy default
Example 6.1. Viewing Cluster Roles
$ oc describe clusterPolicy default
Name:					default
Created:				5 days ago
Labels:					<none>
Annotations:				<none>
Last Modified:				2016-03-17 13:25:27 -0400 EDT
admin					Verbs								Non-Resource URLs		Extension			Resource Names		API Groups			Resources
					[create delete deletecollection get list patch update watch]	[]				[]			[]				[configmaps endpoints persistentvolumeclaims pods pods/attach pods/exec pods/log pods/portforward pods/proxy replicationcontrollers replicationcontrollers/scale secrets serviceaccounts services services/proxy]
					[create delete deletecollection get list patch update watch]	[]				[]			[]				[buildconfigs buildconfigs/instantiate buildconfigs/instantiatebinary buildconfigs/webhooks buildlogs builds builds/clone builds/custom builds/docker builds/log builds/source deploymentconfigrollbacks deploymentconfigs deploymentconfigs/log deploymentconfigs/scale deployments generatedeploymentconfigs imagestreamimages imagestreamimports imagestreammappings imagestreams imagestreams/secrets imagestreamtags localresourceaccessreviews localsubjectaccessreviews processedtemplates projects resourceaccessreviews rolebindings roles routes subjectaccessreviews templateconfigs templates]
					[create delete deletecollection get list patch update watch]	[]				[]			[autoscaling]			[horizontalpodautoscalers]
					[create delete deletecollection get list patch update watch]	[]				[]			[batch]				[jobs]
					[create delete deletecollection get list patch update watch]	[]				[]			[extensions]			[daemonsets horizontalpodautoscalers jobs replicationcontrollers/scale]
					[get list watch]						[]				[]			[]				[bindings configmaps endpoints events imagestreams/status limitranges minions namespaces namespaces/status nodes persistentvolumeclaims persistentvolumes pods pods/log pods/status policies policybindings replicationcontrollers replicationcontrollers/status resourcequotas resourcequotas/status resourcequotausages routes/status securitycontextconstraints serviceaccounts services]
					[get update]							[]				[]			[]				[imagestreams/layers]
					[update]							[]				[]			[]				[routes/status]
basic-user				Verbs								Non-Resource URLs		Extension			Resource Names		API Groups			Resources
					[get]								[]				[~]			[]				[users]
					[list]								[]				[]			[]				[projectrequests]
					[get list]							[]				[]			[]				[clusterroles]
					[list]								[]				[]			[]				[projects]
					[create]							[]				IsPersonalSubjectAccessReview	[]			[]				[localsubjectaccessreviews subjectaccessreviews]
cluster-admin				Verbs								Non-Resource URLs		Extension			Resource Names		API Groups			Resources
					[*]								[]				[]			[*]				[*]
					[*]								[*]				[]			[]				[]
cluster-reader				Verbs								Non-Resource URLs		Extension			Resource Names		API Groups			Resources
					[get list watch]						[]				[]			[]				[bindings buildconfigs buildconfigs/instantiate buildconfigs/instantiatebinary buildconfigs/webhooks buildlogs builds builds/clone builds/details builds/log clusternetworks clusterpolicies clusterpolicybindings clusterrolebindings clusterroles configmaps deploymentconfigrollbacks deploymentconfigs deploymentconfigs/log deploymentconfigs/scale deployments endpoints events generatedeploymentconfigs groups hostsubnets identities images imagestreamimages imagestreamimports imagestreammappings imagestreams imagestreams/status imagestreamtags limitranges localresourceaccessreviews localsubjectaccessreviews minions namespaces netnamespaces nodes oauthclientauthorizations oauthclients persistentvolumeclaims persistentvolumes pods pods/log policies policybindings processedtemplates projectrequests projects replicationcontrollers resourceaccessreviews resourcequotas resourcequotausages rolebindings roles routes routes/status securitycontextconstraints serviceaccounts services subjectaccessreviews templateconfigs templates useridentitymappings users]
					[get list watch]						[]				[]			[autoscaling]			[horizontalpodautoscalers]
					[get list watch]						[]				[]			[batch]				[jobs]
					[get list watch]						[]				[]			[extensions]			[daemonsets horizontalpodautoscalers jobs replicationcontrollers/scale]
					[create]							[]				[]			[]				[resourceaccessreviews subjectaccessreviews]
					[get]								[]				[]			[]				[nodes/metrics]
					[create get]							[]				[]			[]				[nodes/stats]
					[get]								[*]				[]			[]				[]
cluster-status				Verbs								Non-Resource URLs		Extension			Resource Names		API Groups			Resources
					[get]								[/api /api/* /apis /apis/* /healthz /healthz/* /oapi /oapi/* /osapi /osapi/ /version]					[]			[]		[]
edit					Verbs								Non-Resource URLs		Extension			Resource Names		API Groups			Resources
					[create delete deletecollection get list patch update watch]	[]				[]			[]				[configmaps endpoints persistentvolumeclaims pods pods/attach pods/exec pods/log pods/portforward pods/proxy replicationcontrollers replicationcontrollers/scale secrets serviceaccounts services services/proxy]
					[create delete deletecollection get list patch update watch]	[]				[]			[]				[buildconfigs buildconfigs/instantiate buildconfigs/instantiatebinary buildconfigs/webhooks buildlogs builds builds/clone builds/custom builds/docker builds/log builds/source deploymentconfigrollbacks deploymentconfigs deploymentconfigs/log deploymentconfigs/scale deployments generatedeploymentconfigs imagestreamimages imagestreamimports imagestreammappings imagestreams imagestreams/secrets imagestreamtags processedtemplates routes templateconfigs templates]
					[create delete deletecollection get list patch update watch]	[]				[]			[autoscaling]			[horizontalpodautoscalers]
					[create delete deletecollection get list patch update watch]	[]				[]			[batch]				[jobs]
					[create delete deletecollection get list patch update watch]	[]				[]			[extensions]			[daemonsets horizontalpodautoscalers jobs replicationcontrollers/scale]
					[get list watch]						[]				[]			[]				[bindings configmaps endpoints events imagestreams/status limitranges minions namespaces namespaces/status nodes persistentvolumeclaims persistentvolumes pods pods/log pods/status projects replicationcontrollers replicationcontrollers/status resourcequotas resourcequotas/status resourcequotausages routes/status securitycontextconstraints serviceaccounts services]
					[get update]							[]				[]			[]				[imagestreams/layers]
registry-admin				Verbs								Non-Resource URLs		Extension			Resource Names		API Groups			Resources
					[create delete deletecollection get list patch update watch]	[]				[]			[]				[imagestreamimages imagestreamimports imagestreammappings imagestreams imagestreams/secrets imagestreamtags]
					[create delete deletecollection get list patch update watch]	[]				[]			[]				[localresourceaccessreviews localsubjectaccessreviews resourceaccessreviews rolebindings roles subjectaccessreviews]
					[get update]							[]				[]			[]				[imagestreams/layers]
					[get list watch]						[]				[]			[]				[policies policybindings]
					[get]								[]				[]			[]				[namespaces projects]
registry-editor				Verbs								Non-Resource URLs		Extension			Resource Names		API Groups			Resources
					[get]								[]				[]			[]				[namespaces projects]
					[create delete deletecollection get list patch update watch]	[]				[]			[]				[imagestreamimages imagestreamimports imagestreammappings imagestreams imagestreams/secrets imagestreamtags]
					[get update]							[]				[]			[]				[imagestreams/layers]
registry-viewer				Verbs								Non-Resource URLs		Extension			Resource Names		API Groups			Resources
					[get list watch]						[]				[]			[]				[imagestreamimages imagestreamimports imagestreammappings imagestreams imagestreamtags]
					[get]								[]				[]			[]				[imagestreams/layers namespaces projects]
self-provisioner			Verbs								Non-Resource URLs		Extension			Resource Names		API Groups			Resources
					[create]							[]				[]			[]				[projectrequests]
system:build-controller			Verbs								Non-Resource URLs		Extension			Resource Names		API Groups			Resources
					[get list watch]						[]				[]			[]				[builds]
					[update]							[]				[]			[]				[builds]
					[create]							[]				[]			[]				[builds/custom builds/docker builds/source]
					[get]								[]				[]			[]				[imagestreams]
					[create delete get list]					[]				[]			[]				[pods]
					[create patch update]						[]				[]			[]				[events]
system:daemonset-controller		Verbs								Non-Resource URLs		Extension			Resource Names		API Groups			Resources
					[list watch]							[]				[]			[extensions]			[daemonsets]
					[list watch]							[]				[]			[]				[pods]
					[list watch]							[]				[]			[]				[nodes]
					[update]							[]				[]			[extensions]			[daemonsets/status]
					[create delete]							[]				[]			[]				[pods]
					[create]							[]				[]			[]				[pods/binding]
					[create patch update]						[]				[]			[]				[events]
system:deployer				Verbs								Non-Resource URLs		Extension			Resource Names		API Groups			Resources
					[get list]							[]				[]			[]				[replicationcontrollers]
					[get update]							[]				[]			[]				[replicationcontrollers]
					[create get list watch]						[]				[]			[]				[pods]
					[get]								[]				[]			[]				[pods/log]
					[update]							[]				[]			[]				[imagestreamtags]
system:deployment-controller		Verbs								Non-Resource URLs		Extension			Resource Names		API Groups			Resources
					[list watch]							[]				[]			[]				[replicationcontrollers]
					[get update]							[]				[]			[]				[replicationcontrollers]
					[create delete get list update]					[]				[]			[]				[pods]
					[create patch update]						[]				[]			[]				[events]
system:discovery			Verbs								Non-Resource URLs		Extension			Resource Names		API Groups			Resources
					[get]								[/api /api/* /apis /apis/* /oapi /oapi/* /osapi /osapi/ /version]							[]			[]			[]
system:hpa-controller			Verbs								Non-Resource URLs		Extension			Resource Names		API Groups			Resources
					[get list watch]						[]				[]			[extensions autoscaling]	[horizontalpodautoscalers]
					[update]							[]				[]			[extensions autoscaling]	[horizontalpodautoscalers/status]
					[get update]							[]				[]			[extensions ]			[replicationcontrollers/scale]
					[get update]							[]				[]			[]				[deploymentconfigs/scale]
					[create patch update]						[]				[]			[]				[events]
					[list]								[]				[]			[]				[pods]
					[proxy]								[]				[https:heapster:]	[]				[services]
system:image-builder			Verbs								Non-Resource URLs		Extension			Resource Names		API Groups			Resources
					[get update]							[]				[]			[]				[imagestreams/layers]
					[update]							[]				[]			[]				[builds/details]
system:image-pruner			Verbs								Non-Resource URLs		Extension			Resource Names		API Groups			Resources
					[delete]							[]				[]			[]				[images]
					[get list]							[]				[]			[]				[buildconfigs builds deploymentconfigs images imagestreams pods replicationcontrollers]
					[update]							[]				[]			[]				[imagestreams/status]
system:image-puller			Verbs								Non-Resource URLs		Extension			Resource Names		API Groups			Resources
					[get]								[]				[]			[]				[imagestreams/layers]
system:image-pusher			Verbs								Non-Resource URLs		Extension			Resource Names		API Groups			Resources
					[get update]							[]				[]			[]				[imagestreams/layers]
system:job-controller			Verbs								Non-Resource URLs		Extension			Resource Names		API Groups			Resources
					[list watch]							[]				[]			[extensions batch]		[jobs]
					[update]							[]				[]			[extensions batch]		[jobs/status]
					[list watch]							[]				[]			[]				[pods]
					[create delete]							[]				[]			[]				[pods]
					[create patch update]						[]				[]			[]				[events]
system:master				Verbs								Non-Resource URLs		Extension			Resource Names		API Groups			Resources
					[*]								[]				[]			[*]				[*]
system:namespace-controller		Verbs								Non-Resource URLs		Extension			Resource Names		API Groups			Resources
					[delete get list watch]						[]				[]			[]				[namespaces]
					[update]							[]				[]			[]				[namespaces/finalize namespaces/status]
					[delete deletecollection get list]				[]				[]			[*]				[*]
system:node				Verbs								Non-Resource URLs		Extension			Resource Names		API Groups			Resources
					[create]							[]				[]			[]				[localsubjectaccessreviews subjectaccessreviews]
					[get list watch]						[]				[]			[]				[services]
					[create get list watch]						[]				[]			[]				[nodes]
					[update]							[]				[]			[]				[nodes/status]
					[create patch update]						[]				[]			[]				[events]
					[get list watch]						[]				[]			[]				[pods]
					[create delete get]						[]				[]			[]				[pods]
					[update]							[]				[]			[]				[pods/status]
					[get]								[]				[]			[]				[configmaps secrets]
					[get]								[]				[]			[]				[persistentvolumeclaims persistentvolumes]
					[get]								[]				[]			[]				[endpoints]
system:node-admin			Verbs								Non-Resource URLs		Extension			Resource Names		API Groups			Resources
					[get list watch]						[]				[]			[]				[nodes]
					[proxy]								[]				[]			[]				[nodes]
					[*]								[]				[]			[]				[nodes/log nodes/metrics nodes/proxy nodes/stats]
system:node-proxier			Verbs								Non-Resource URLs		Extension			Resource Names		API Groups			Resources
					[list watch]							[]				[]			[]				[endpoints services]
system:node-reader			Verbs								Non-Resource URLs		Extension			Resource Names		API Groups			Resources
					[get list watch]						[]				[]			[]				[nodes]
					[get]								[]				[]			[]				[nodes/metrics]
					[create get]							[]				[]			[]				[nodes/stats]
system:oauth-token-deleter		Verbs								Non-Resource URLs		Extension			Resource Names		API Groups			Resources
					[delete]							[]				[]			[]				[oauthaccesstokens oauthauthorizetokens]
system:pv-binder-controller		Verbs								Non-Resource URLs		Extension			Resource Names		API Groups			Resources
					[list watch]							[]				[]			[]				[persistentvolumes]
					[create delete get update]					[]				[]			[]				[persistentvolumes]
					[update]							[]				[]			[]				[persistentvolumes/status]
					[list watch]							[]				[]			[]				[persistentvolumeclaims]
					[get update]							[]				[]			[]				[persistentvolumeclaims]
					[update]							[]				[]			[]				[persistentvolumeclaims/status]
system:pv-provisioner-controller	Verbs								Non-Resource URLs		Extension			Resource Names		API Groups			Resources
					[list watch]							[]				[]			[]				[persistentvolumes]
					[create delete get update]					[]				[]			[]				[persistentvolumes]
					[update]							[]				[]			[]				[persistentvolumes/status]
					[list watch]							[]				[]			[]				[persistentvolumeclaims]
					[get update]							[]				[]			[]				[persistentvolumeclaims]
					[update]							[]				[]			[]				[persistentvolumeclaims/status]
system:pv-recycler-controller		Verbs								Non-Resource URLs		Extension			Resource Names		API Groups			Resources
					[list watch]							[]				[]			[]				[persistentvolumes]
					[create delete get update]					[]				[]			[]				[persistentvolumes]
					[update]							[]				[]			[]				[persistentvolumes/status]
					[list watch]							[]				[]			[]				[persistentvolumeclaims]
					[get update]							[]				[]			[]				[persistentvolumeclaims]
					[update]							[]				[]			[]				[persistentvolumeclaims/status]
					[list watch]							[]				[]			[]				[pods]
					[create delete get]						[]				[]			[]				[pods]
					[create patch update]						[]				[]			[]				[events]
system:registry				Verbs								Non-Resource URLs		Extension			Resource Names		API Groups			Resources
					[delete get]							[]				[]			[]				[images]
					[get]								[]				[]			[]				[imagestreamimages imagestreams imagestreams/secrets imagestreamtags]
					[update]							[]				[]			[]				[imagestreams]
					[create]							[]				[]			[]				[imagestreammappings]
					[list]								[]				[]			[]				[resourcequotas]
system:replication-controller		Verbs								Non-Resource URLs		Extension			Resource Names		API Groups			Resources
					[list watch]							[]				[]			[]				[replicationcontrollers]
					[get update]							[]				[]			[]				[replicationcontrollers]
					[update]							[]				[]			[]				[replicationcontrollers/status]
					[list watch]							[]				[]			[]				[pods]
					[create delete]							[]				[]			[]				[pods]
					[create patch update]						[]				[]			[]				[events]
system:router				Verbs								Non-Resource URLs		Extension			Resource Names		API Groups			Resources
					[list watch]							[]				[]			[]				[endpoints routes]
					[update]							[]				[]			[]				[routes/status]
system:sdn-manager			Verbs								Non-Resource URLs		Extension			Resource Names		API Groups			Resources
					[create delete get list watch]					[]				[]			[]				[hostsubnets]
					[create delete get list watch]					[]				[]			[]				[netnamespaces]
					[get list watch]						[]				[]			[]				[nodes]
					[create get]							[]				[]			[]				[clusternetworks]
system:sdn-reader			Verbs								Non-Resource URLs		Extension			Resource Names		API Groups			Resources
					[get list watch]						[]				[]			[]				[hostsubnets]
					[get list watch]						[]				[]			[]				[netnamespaces]
					[get list watch]						[]				[]			[]				[nodes]
					[get]								[]				[]			[]				[clusternetworks]
					[get list watch]						[]				[]			[]				[namespaces]
system:webhook				Verbs								Non-Resource URLs		Extension			Resource Names		API Groups			Resources
					[create get]							[]				[]			[]				[buildconfigs/webhooks]
view					Verbs								Non-Resource URLs		Extension			Resource Names		API Groups			Resources
					[get list watch]						[]				[]			[]				[bindings buildconfigs buildconfigs/instantiate buildconfigs/instantiatebinary buildconfigs/webhooks buildlogs builds builds/clone builds/log configmaps deploymentconfigrollbacks deploymentconfigs deploymentconfigs/log deploymentconfigs/scale deployments endpoints events generatedeploymentconfigs imagestreamimages imagestreamimports imagestreammappings imagestreams imagestreams/status imagestreamtags limitranges minions namespaces namespaces/status nodes persistentvolumeclaims persistentvolumes pods pods/log pods/status processedtemplates projects replicationcontrollers replicationcontrollers/status resourcequotas resourcequotas/status resourcequotausages routes routes/status securitycontextconstraints serviceaccounts services templateconfigs templates]
					[get list watch]						[]				[]			[autoscaling]			[horizontalpodautoscalers]
					[get list watch]						[]				[]			[batch]				[jobs]
					[get list watch]						[]				[]			[extensions]			[daemonsets horizontalpodautoscalers jobs]
To view the current set of cluster bindings, which shows the users and groups that are bound to various roles:
$ oc describe clusterPolicyBindings :default
Example 6.2. Viewing Cluster Bindings
$ oc describe clusterPolicyBindings :default
Name:						:default
Created:					4 hours ago
Labels:						<none>
Last Modified:					2015-06-10 17:22:26 +0000 UTC
Policy:						<none>
RoleBinding[basic-users]:
						Role:	basic-user
						Users:	[]
						Groups:	[system:authenticated]
RoleBinding[cluster-admins]:
						Role:	cluster-admin
						Users:	[]
						Groups:	[system:cluster-admins]
RoleBinding[cluster-readers]:
						Role:	cluster-reader
						Users:	[]
						Groups:	[system:cluster-readers]
RoleBinding[cluster-status-binding]:
						Role:	cluster-status
						Users:	[]
						Groups:	[system:authenticated system:unauthenticated]
RoleBinding[self-provisioners]:
						Role:	self-provisioner
						Users:	[]
						Groups:	[system:authenticated]
RoleBinding[system:build-controller]:
						Role:	system:build-controller
						Users:	[system:serviceaccount:openshift-infra:build-controller]
						Groups:	[]
RoleBinding[system:deployment-controller]:
						Role:	system:deployment-controller
						Users:	[system:serviceaccount:openshift-infra:deployment-controller]
						Groups:	[]
RoleBinding[system:masters]:
						Role:	system:master
						Users:	[]
						Groups:	[system:masters]
RoleBinding[system:node-proxiers]:
						Role:	system:node-proxier
						Users:	[]
						Groups:	[system:nodes]
RoleBinding[system:nodes]:
						Role:	system:node
						Users:	[]
						Groups:	[system:nodes]
RoleBinding[system:oauth-token-deleters]:
						Role:	system:oauth-token-deleter
						Users:	[]
						Groups:	[system:authenticated system:unauthenticated]
RoleBinding[system:registrys]:
						Role:	system:registry
						Users:	[]
						Groups:	[system:registries]
RoleBinding[system:replication-controller]:
						Role:	system:replication-controller
						Users:	[system:serviceaccount:openshift-infra:replication-controller]
						Groups:	[]
RoleBinding[system:routers]:
						Role:	system:router
						Users:	[]
						Groups:	[system:routers]
RoleBinding[system:sdn-readers]:
						Role:	system:sdn-reader
						Users:	[]
						Groups:	[system:nodes]
RoleBinding[system:webhooks]:
						Role:	system:webhook
						Users:	[]
						Groups:	[system:authenticated system:unauthenticated]
6.2.2. Viewing Local Policy
While the list of local roles and their associated rule sets are not viewable within a local policy, all of the default roles are still applicable and can be added to users or groups, other than the cluster-admin default role. The local bindings, however, are viewable.
To view the current set of local bindings, which shows the users and groups that are bound to various roles:
$ oc describe policyBindings :default
By default, the current project is used when viewing local policy. Alternatively, a project can be specified with the -n flag. This is useful for viewing the local policy of another project, if the user already has the admindefault role in it.
Example 6.3. Viewing Local Bindings
$ oc describe policyBindings :default -n joe-project
Name:					:default
Created:				About a minute ago
Labels:					<none>
Last Modified:				2015-06-10 21:55:06 +0000 UTC
Policy:					<none>
RoleBinding[admins]:
					Role:	admin
					Users:	[joe]
					Groups:	[]
RoleBinding[system:deployers]:
					Role:	system:deployer
					Users:	[system:serviceaccount:joe-project:deployer]
					Groups:	[]
RoleBinding[system:image-builders]:
					Role:	system:image-builder
					Users:	[system:serviceaccount:joe-project:builder]
					Groups:	[]
RoleBinding[system:image-pullers]:
					Role:	system:image-puller
					Users:	[]
					Groups:	[system:serviceaccounts:joe-project]
By default in a local policy, only the binding for the admin role is immediately listed. However, if other default roles are added to users and groups within a local policy, they become listed as well.
6.3. Managing Role Bindings
Adding, or binding, a role to users or groups gives the user or group the relevant access granted by the role. You can add and remove roles to and from users and groups using oadm policy commands.
When managing a user or group’s associated roles for a local policy using the following operations, a project may be specified with the -n flag. If it is not specified, then the current project is used.
| Command | Description |
|---|---|
|
| Indicates which users can perform an action on a resource. |
|
| Binds a given role to specified users in the current project. |
|
| Removes a given role from specified users in the current project. |
|
| Removes specified users and all of their roles in the current project. |
|
| Binds a given role to specified groups in the current project. |
|
| Removes a given role from specified groups in the current project. |
|
| Removes specified groups and all of their roles in the current project. |
You can also manage role bindings for the cluster policy using the following operations. The -n flag is not used for these operations because the cluster policy uses non-namespaced resources.
| Command | Description |
|---|---|
|
| Binds a given role to specified users for all projects in the cluster. |
|
| Removes a given role from specified users for all projects in the cluster. |
|
| Binds a given role to specified groups for all projects in the cluster. |
|
| Removes a given role from specified groups for all projects in the cluster. |
For example, you can add the admin role to the alice user in joe-project by running:
$ oadm policy add-role-to-user admin alice -n joe-project
You can then view the local bindings and verify the addition in the output:
$ oc describe policyBindings :default -n joe-project
Name:					:default
Created:				5 minutes ago
Labels:					<none>
Last Modified:				2015-06-10 22:00:44 +0000 UTC
Policy:					<none>
RoleBinding[admins]:
					Role:	admin
					Users:	[alice joe] 1
					Groups:	[]
RoleBinding[system:deployers]:
					Role:	system:deployer
					Users:	[system:serviceaccount:joe-project:deployer]
					Groups:	[]
RoleBinding[system:image-builders]:
					Role:	system:image-builder
					Users:	[system:serviceaccount:joe-project:builder]
					Groups:	[]
RoleBinding[system:image-pullers]:
					Role:	system:image-puller
					Users:	[]
Groups: [system:serviceaccounts:joe-project]- 1
- The alice user has been added to the admins
RoleBinding.
6.4. Granting Users Daemonset Permissions
By default, project developers do not have the permission to create daemonsets. As a cluster administrator, you can grant them the abilities.
Define a ClusterRole file:
apiVersion: v1
kind: ClusterRole
metadata:
  name: daemonset-admin
rules:
  - resources:
    - daemonsets
    apiGroups:
    - extensions
    verbs:
    - create
    - get
    - list
    - watch
    - delete
    - update
Create the role:
$ oadm policy add-role-to-user daemonset-admin <user>
6.5. Creating a Local Role
To create a local role for a project, you can either copy and modify an existing role or build a new role from scratch. It is recommended that you build it from scratch so that you understand each of the permissions assigned.
To copy the cluster role view to use as a local role, run:
$ oc get clusterrole view -o yaml > clusterrole_view.yaml
$ cp clusterrole_view.yaml localrole_exampleview.yaml
$ vim localrole_exampleview.yaml
# 1. Update kind: ClusterRole to kind: Role
# 2. Update name: view to name: exampleview
# 3. Remove resourceVersion, selfLink, uid, and creationTimestamp
$ oc create -f path/to/localrole_exampleview.yaml -n <project_you_want_to_add_the_local_role_exampleview_to>
To create a new role from scratch, save this snippet into the file role_exampleview.yaml:
Example Role Named exampleview
apiVersion: v1
kind: Role
metadata:
  name: exampleview
rules:
- apiGroups: null
  attributeRestrictions: null
  resources:
  - pods
  - builds
  verbs:
  - get
	- list
	- watch
Then, to use the current project, run:
$ oc project <project_you_want_to_add_the_local_role_exampleview_to>
Optionally, annotate it with a description.
To use the new role, run:
$ oadm policy add-role-to-user exampleview user2
A clusterrolebinding is a role binding that exists at the cluster level. A rolebinding exists at the project level. This can be confusing. The clusterrolebinding view must be assigned to a user within a project for that user to view the project. Local roles are only created if a cluster role does not provide the set of permissions needed for a particular situation, which is unlikely.
Some cluster role names are initially confusing. The clusterroleclusteradmin can be assigned to a user within a project, making it appear that this user has the privileges of a cluster administrator. This is not the case. The clusteradmin cluster role bound to a certain project is more like a super administrator for that project, granting the permissions of the cluster role admin, plus a few additional permissions like the ability to edit rate limits. This can appear especially confusing via the web console UI, which does not list cluster policy (where cluster administrators exist). However, it does list local policy (where a locally bound clusteradmin may exist).
Within a project, project administrators should be able to see rolebindings, not clusterrolebindings.
Chapter 7. Managing Security Context Constraints
7.1. Overview
Security context constraints allow administrators to control permissions for pods. To learn more about this API type, see the security context constraints (SCCs) architecture documentation. You can manage SCCs in your instance as normal API objects using the CLI.
You must have cluster-admin privileges to manage SCCs.
7.2. Listing Security Context Constraints
To get a current list of SCCs:
$ oc get scc

NAME               PRIV      CAPS      SELINUX     RUNASUSER          FSGROUP     SUPGROUP    PRIORITY   READONLYROOTFS   VOLUMES
anyuid             false     []        MustRunAs   RunAsAny           RunAsAny    RunAsAny    10         false            [configMap downwardAPI emptyDir persistentVolumeClaim secret]
hostaccess         false     []        MustRunAs   MustRunAsRange     MustRunAs   RunAsAny    <none>     false            [configMap downwardAPI emptyDir hostPath persistentVolumeClaim secret]
hostmount-anyuid   false     []        MustRunAs   RunAsAny           RunAsAny    RunAsAny    <none>     false            [configMap downwardAPI emptyDir hostPath persistentVolumeClaim secret]
hostnetwork        false     []        MustRunAs   MustRunAsRange     MustRunAs   MustRunAs   <none>     false            [configMap downwardAPI emptyDir persistentVolumeClaim secret]
nonroot            false     []        MustRunAs   MustRunAsNonRoot   RunAsAny    RunAsAny    <none>     false            [configMap downwardAPI emptyDir persistentVolumeClaim secret]
privileged         true      []        RunAsAny    RunAsAny           RunAsAny    RunAsAny    <none>     false            [*]
restricted         false     []        MustRunAs   MustRunAsRange     MustRunAs   RunAsAny    <none>     false            [configMap downwardAPI emptyDir persistentVolumeClaim secret]
7.3. Examining a Security Context Constraints Object
To examine a particular SCC, use oc get, oc describe, oc export, or oc edit. For example, to examine the restricted SCC:
$ oc describe scc restricted

Name:						restricted
Priority:					<none>
Access:
  Users:					<none>
  Groups:					system:authenticated
Settings:
  Allow Privileged:				false
  Default Add Capabilities:			<none>
  Required Drop Capabilities:			<none>
  Allowed Capabilities:				<none>
  Allowed Volume Types:				awsElasticBlockStore,azureFile,cephFS,cinder,configMap,downwardAPI,emptyDir,fc,flexVolume,flocker,gcePersistentDisk,gitRepo,glusterfs,iscsi,nfs,persistentVolumeClaim,rbd,secret
  Allow Host Network:				false
  Allow Host Ports:				false
  Allow Host PID:				false
  Allow Host IPC:				false
  Read Only Root Filesystem:			false
  Run As User Strategy: MustRunAsRange
    UID:					<none>
    UID Range Min:				<none>
    UID Range Max:				<none>
  SELinux Context Strategy: MustRunAs
    User:					<none>
    Role:					<none>
    Type:					<none>
    Level:					<none>
  FSGroup Strategy: RunAsAny
    Ranges:					<none>
  Supplemental Groups Strategy: RunAsAny
Ranges: <none>In order to preserve customized SCCs during upgrades, do not edit settings on the default SCCs other than priority, users, groups, labels, and annotations.
7.4. Creating New Security Context Constraints
To create a new SCC:
Define the SCC in a JSON or YAML file:
Example 7.1. Security Context Constraint Object Definition
kind: SecurityContextConstraints
apiVersion: v1
metadata:
  name: scc-admin
allowPrivilegedContainer: true
runAsUser:
  type: RunAsAny
seLinuxContext:
  type: RunAsAny
fsGroup:
  type: RunAsAny
supplementalGroups:
  type: RunAsAny
users:
- my-admin-user
groups:
- my-admin-group
Optionally, you can add drop capabilities to an SCC by setting the
requiredDropCapabilities:field with the desired values. Any specified capabilities will be dropped from the container. For example, to create an SCC with theKILL,MKNOD, andSYS_CHROOTrequired drop capabilities, add the following to the SCC object:requiredDropCapabilities: - KILL - MKNOD - SYS_CHROOT
You can see the list of possible values in the Docker documentation.
Then, run
oc createpassing the file to create it:$ oc create -f scc_admin.yaml securitycontextconstraints/scc-admin
Verify that the SCC was created:
$ oc get scc
NAME         PRIV      CAPS      HOSTDIR   SELINUX     RUNASUSER
privileged   true      []        true      RunAsAny    RunAsAny
restricted   false     []        false     MustRunAs   MustRunAsRange
scc-admin    true      []        false     RunAsAny    RunAsAny
7.5. Deleting Security Context Constraints
To delete an SCC:
$ oc delete scc <scc_name>
If you delete the default SCCs, they will not be regenerated upon restart, unless you delete all SCCs. If any constraint already exists within the system, no regeneration will take place.
7.6. Updating Security Context Constraints
To update an existing SCC:
$ oc edit scc <scc_name>
In order to preserve customized SCCs during upgrades, do not edit settings on the default SCCs other than priority, users, and groups.
7.7. Updating the Default Security Context Constraints
Default SCCs will be created when the master is started if they are missing. To reset SCCs to defaults, or update existing SCCs to new default definitions after an upgrade you may:
- Delete any SCC you would like to be reset and let it be recreated by restarting the master
-
Use the
oadm policy reconcile-sccscommand
The oadm policy reconcile-sccs command will set all SCC policies to the default values but retain any additional users, groups, labels, and annotations as well as priorities you may have already set. To view which SCCs will be changed you may run the command with no options or by specifying your preferred output with the -o <format> option.
After reviewing it is recommended that you back up your existing SCCs and then use the --confirm option to persist the data.
If you would like to reset priorities and grants, use the --additive-only=false option.
If you have customized settings other than priority, users, groups, labels, or annotations in an SCC, you will lose those settings when you reconcile.
7.8. How Do I?
The following describe common scenarios and procedures using SCCs.
7.8.1. Grant Access to the Privileged SCC
In some cases, an administrator might want to allow users or groups outside the administrator group access to create more privileged pods. To do so, you can:
- Determine the user or group you would like to have access to the SCC.
Run:
$ oadm policy add-scc-to-user <scc_name> <user_name>
$ oadm policy add-scc-to-group <scc_name> <group_name>
For example, to allow the e2e-user access to the privileged SCC, run:
$ oadm policy add-scc-to-user privileged e2e-user
7.8.2. Grant a Service Account Access to the Privileged SCC
First, create a service account. For example, to create service account mysvcacct in project myproject:
$ oc create serviceaccount mysvcacct -n myproject
Then, add the service account to the privileged SCC.
$ oadm policy add-scc-to-user privileged system:serviceaccount:myproject:mysvcacct
7.8.3. Enable Images to Run with USER in the Dockerfile
To relax the security in your cluster so that images are not forced to run as a pre-allocated UID, without granting everyone access to the privileged SCC:
Grant all authenticated users access to the anyuid SCC:
$ oadm policy add-scc-to-group anyuid system:authenticated
This allows images to run as the root UID if no USER is specified in the Dockerfile.
7.8.4. Enable Container Images that Require Root
Some container images (examples: postgres and redis) require root access and have certain expectations about how volumes are owned. For these images, add the service account to the anyuid SCC.
$ oadm policy add-scc-to-user anyuid system:serviceaccount:myproject:mysvcacct
7.8.5. Use --mount-host on the Registry
It is recommended that persistent storage using PersistentVolume and PersistentVolumeClaim objects be used for registry deployments. If you are testing and would like to instead use the oadm registry command with the --mount-host option, you must first create a new service account for the registry and add it to the privileged SCC. See the Administrator Guide for full instructions.
7.8.6. Provide Additional Capabilities
In some cases, an image may require capabilities that Docker does not provide out of the box. You can provide the ability to request additional capabilities in the pod specification which will be validated against an SCC.
This allows images to run with elevated capabilities and should be used only if necessary. You should not edit the default restricted SCC to enable additional capabilities.
When used in conjunction with a non-root user, you must also ensure that the file that requires the additional capability is granted the capabilities using the setcap command. For example, in the Dockerfile of the image:
setcap cap_net_raw,cap_net_admin+p /usr/bin/ping
Further, if a capability is provided by default in Docker, you do not need to modify the pod specification to request it. For example, NET_RAW is provided by default and capabilities should already be set on ping, therefore no special steps should be required to run ping.
To provide additional capabilities:
- Create a new SCC
-
Add the allowed capability using the
allowedCapabilitiesfield. -
When creating the pod, request the capability in the
securityContext.capabilities.addfield.
7.8.7. Modify Cluster Default Behavior
To modify your cluster so that it does not pre-allocate UIDs, allows containers to run as any user, and prevents privileged containers:
In order to preserve customized SCCs during upgrades, do not edit settings on the default SCCs other than priority, users, groups, labels, and annotations.
Edit the restricted SCC:
$ oc edit scc restricted
-
Change
runAsUser.Typeto RunAsAny. -
Ensure
allowPrivilegedContaineris set to false. - Save the changes.
To modify your cluster so that it does not pre-allocate UIDs and does not allow containers to run as root:
Edit the restricted SCC:
$ oc edit scc restricted
-
Change
runAsUser.Typeto MustRunAsNonRoot. - Save the changes.
7.8.8. Use the hostPath Volume Plug-in
To relax the security in your cluster so that pods are allowed to use the hostPath volume plug-in without granting everyone access to the privileged SCC:
Edit the restricted SCC:
$ oc edit scc restricted
-
Add
allowHostDirVolumePlugin: true. - Save the changes.
7.8.9. Ensure That Admission Attempts to Use a Specific SCC First
You may control the sort ordering of SCCs in admission by setting the Priority field of the SCCs. Please see the SCC Prioritization section for more information on sorting.
7.8.10. Add an SCC to a User or Group
To add an SCC to a user:
$ oadm policy add-scc-to-user <scc_name> <user_name>
To add an SCC to a service account:
$ oadm policy add-scc-to-user <scc_name>  \
    system:serviceaccount:<serviceaccount_namespace>:<serviceaccount_name>
To add an SCC to a group:
$ oadm policy add-scc-to-group <scc_name> <group_name>
To add an SCC to all service accounts in a namespace:
$ oadm policy add-scc-to-group <scc_name>  \
    system:serviceaccounts:<serviceaccount_namespace>
Chapter 8. Setting Quotas
8.1. Overview
A resource quota, defined by a ResourceQuota object, provides constraints that limit aggregate resource consumption per project. It can limit the quantity of objects that can be created in a project by type, as well as the total amount of compute resources that may be consumed by resources in that project.
See the Developer Guide for more on compute resources.
8.2. Resources Managed by Quota
The following describes the set of compute resources and object types that may be managed by a quota.
A pod is in a terminal state if status.phase in (Failed, Succeeded) is true.
| Resource Name | Description |
|---|---|
|
|
The sum of CPU requests across all pods in a non-terminal state cannot exceed this value. |
|
|
The sum of memory requests across all pods in a non-terminal state cannot exceed this value. |
|
|
The sum of CPU requests across all pods in a non-terminal state cannot exceed this value. |
|
|
The sum of memory requests across all pods in a non-terminal state cannot exceed this value. |
|
|
The sum of storage requests across all persistent volume claims cannot exceed this value. |
|
| The sum of CPU limits across all pods in a non-terminal state cannot exceed this value. |
|
| The sum of memory limits across all pods in a non-terminal state cannot exceed this value. |
|
| The sum of storage limits across all persistent volume claims cannot exceed this value. |
| Resource Name | Description |
|---|---|
|
| The total number of pods in a non-terminal state that can exist in the project. |
|
| The total number of replication controllers that can exist in the project. |
|
| The total number of resource quotas that can exist in the project. |
|
| The total number of services that can exist in the project. |
|
| The total number of secrets that can exist in the project. |
|
|
The total number of |
|
| The total number of persistent volume claims that can exist in the project. |
8.3. Quota Scopes
Each quota can have an associated set of scopes. A quota will only measure usage for a resource if it matches the intersection of enumerated scopes.
Adding a scope to a quota restricts the set of resources to which that quota can apply. Specifying a resource outside of the allowed set results in a validation error.
| Scope | Description |
|---|---|
| Terminating |
Match pods where |
| NotTerminating |
Match pods where |
| BestEffort |
Match pods that have best effort quality of service for either |
| NotBestEffort |
Match pods that do not have best effort quality of service for |
A BestEffort scope restricts a quota to limiting the following resources:
-
pods
A Terminating, NotTerminating, or NotBestEffort scope restricts a quota to tracking the following resources:
-
pods -
memory -
requests.memory -
limits.memory -
cpu -
requests.cpu -
limits.cpu
8.4. Quota Enforcement
After a resource quota for a project is first created, the project restricts the ability to create any new resources that may violate a quota constraint until it has calculated updated usage statistics.
After a quota is created and usage statistics are updated, the project accepts the creation of new content. When you create or modify resources, your quota usage is incremented immediately upon the request to create or modify the resource.
When you delete a resource, your quota use is decremented during the next full recalculation of quota statistics for the project. A configurable amount of time determines how long it takes to reduce quota usage statistics to their current observed system value.
If project modifications exceed a quota usage limit, the server denies the action, and an appropriate error message is returned to the user explaining the quota constraint violated, and what their currently observed usage stats are in the system.
8.5. Requests vs Limits
When allocating compute resources, each container may specify a request and a limit value each for CPU and memory. Quotas can restrict any of these values.
If the quota has a value specified for requests.cpu or requests.memory, then it requires that every incoming container make an explicit request for those resources. If the quota has a value specified for limits.cpu or limits.memory, then it requires that every incoming container specify an explicit limit for those resources.
8.6. Sample Resource Quota Definitions
Example 8.1. object-counts.yaml
apiVersion: v1
kind: ResourceQuota
metadata:
  name: object-counts
spec:
  hard:
    configmaps: "10" 1
    persistentvolumeclaims: "4" 2
    replicationcontrollers: "20" 3
    secrets: "10" 4
services: "10" 5- 1
- The total number of
ConfigMapobjects that can exist in the project. - 2
- The total number of persistent volume claims (PVCs) that can exist in the project.
- 3
- The total number of replication controllers that can exist in the project.
- 4
- The total number of secrets that can exist in the project.
- 5
- The total number of services that can exist in the project.
Example 8.2. compute-resources.yaml
apiVersion: v1
kind: ResourceQuota
metadata:
  name: compute-resources
spec:
  hard:
    pods: "4" 1
    requests.cpu: "1" 2
    requests.memory: 1Gi 3
    limits.cpu: "2" 4
limits.memory: 2Gi 5- 1
- The total number of pods in a non-terminal state that can exist in the project.
- 2
- Across all pods in a non-terminal state, the sum of CPU requests cannot exceed 1 core.
- 3
- Across all pods in a non-terminal state, the sum of memory requests cannot exceed 1Gi.
- 4
- Across all pods in a non-terminal state, the sum of CPU limits cannot exceed 2 cores.
- 5
- Across all pods in a non-terminal state, the sum of memory limits cannot exceed 2Gi.
Example 8.3. besteffort.yaml
apiVersion: v1
kind: ResourceQuota
metadata:
  name: besteffort
spec:
  hard:
    pods: "1" 1
  scopes:
- BestEffort 2Example 8.4. compute-resources-long-running.yaml
apiVersion: v1
kind: ResourceQuota
metadata:
  name: compute-resources-long-running
spec:
  hard:
    pods: "4" 1
    limits.cpu: "4" 2
    limits.memory: "2Gi" 3
  scopes:
- NotTerminating 4- 1
- The total number of pods in a non-terminal state.
- 2
- Across all pods in a non-terminal state, the sum of CPU limits cannot exceed this value.
- 3
- Across all pods in a non-terminal state, the sum of memory limits cannot exceed this value.
- 4
- Restricts the quota to only matching pods where
spec.activeDeadlineSeconds is nil. For example, this quota would not charge for build or deployer pods.
Example 8.5. compute-resources-time-bound.yaml
apiVersion: v1
kind: ResourceQuota
metadata:
  name: compute-resources-time-bound
spec:
  hard:
    pods: "2" 1
    limits.cpu: "1" 2
    limits.memory: "1Gi" 3
  scopes:
- Terminating 4- 1
- The total number of pods in a non-terminal state.
- 2
- Across all pods in a non-terminal state, the sum of CPU limits cannot exceed this value.
- 3
- Across all pods in a non-terminal state, the sum of memory limits cannot exceed this value.
- 4
- Restricts the quota to only matching pods where
spec.activeDeadlineSeconds >=0. For example, this quota would charge for build or deployer pods, but not long running pods like a web server or database.
8.7. Creating a Quota
To create a quota, first define the quota to your specifications in a file, for example as seen in Sample Resource Quota Definitions. Then, create using that file to apply it to a project:
$ oc create -f <resource_quota_definition> [-n <project_name>]
For example:
$ oc create -f resource-quota.json -n demoproject
8.8. Viewing a Quota
You can view usage statistics related to any hard limits defined in a project’s quota by navigating in the web console to the project’s Settings tab.
You can also use the CLI to view quota details:
First, get the list of quotas defined in the project. For example, for a project called demoproject:
$ oc get quota -n demoproject
NAME                AGE
besteffort          11m
compute-resources   2m
object-counts       29m
Then, describe the quota you are interested in, for example the object-counts quota:
$ oc describe quota object-counts -n demoproject
Name:			object-counts
Namespace:		demoproject
Resource		Used	Hard
--------		----	----
configmaps		3	10
persistentvolumeclaims	0	4
replicationcontrollers	3	20
secrets			9	10
services		2	10
8.9. Configuring Quota Synchronization Period
When a set of resources are deleted, the synchronization time frame of resources is determined by the resource-quota-sync-period setting in the /etc/origin/master/master-config.yaml file.
Before quota usage is restored, a user may encounter problems when attempting to reuse the resources. You can change the resource-quota-sync-period setting to have the set of resources regenerate at the desired amount of time (in seconds) and for the resources to be available again:
kubernetesMasterConfig:
  apiLevels:
  - v1beta3
  - v1
  apiServerArguments: null
  controllerArguments:
    resource-quota-sync-period:
      - "10s"
After making any changes, restart the master service to apply them.
Adjusting the regeneration time can be helpful for creating resources and determining resource usage when automation is used.
The resource-quota-sync-period setting is designed to balance system performance. Reducing the sync period can result in a heavy load on the master.
8.10. Accounting for Quota in Deployment Configurations
If a quota has been defined for your project, see Deployment Resources for considerations on any deployment configurations.
Chapter 9. Setting Limit Ranges
9.1. Overview
A limit range, defined by a LimitRange object, enumerates compute resource constraints in a project at the pod and container level, and specifies the amount of resources that a pod or container can consume.
All resource create and modification requests are evaluated against each LimitRange object in the project. If the resource violates any of the enumerated constraints, then the resource is rejected. If the resource does not set an explicit value, and if the constraint supports a default value, then the default value is applied to the resource.
Example 9.1. Limit Range Object Definition
apiVersion: "v1"
kind: "LimitRange"
metadata:
  name: "resource-limits" 1
spec:
  limits:
    -
      type: "Pod"
      max:
        cpu: "2" 2
        memory: "1Gi" 3
      min:
        cpu: "200m" 4
        memory: "6Mi" 5
    -
      type: "Container"
      max:
        cpu: "2" 6
        memory: "1Gi" 7
      min:
        cpu: "100m" 8
        memory: "4Mi" 9
      default:
        cpu: "300m" 10
        memory: "200Mi" 11
      defaultRequest:
        cpu: "200m" 12
        memory: "100Mi" 13
      maxLimitRequestRatio:
        cpu: "10" 14
- 1
- The name of the limit range object.
- 2
- The maximum amount of CPU that a pod can request on a node across all containers.
- 3
- The maximum amount of memory that a pod can request on a node across all containers.
- 4
- The minimum amount of CPU that a pod can request on a node across all containers.
- 5
- The minimum amount of memory that a pod can request on a node across all containers.
- 6
- The maximum amount of CPU that a single container in a pod can request.
- 7
- The maximum amount of memory that a single container in a pod can request.
- 8
- The minimum amount of CPU that a single container in a pod can request.
- 9
- The minimum amount of memory that a single container in a pod can request.
- 10
- The default amount of CPU that a container will be limited to use if not specified.
- 11
- The default amount of memory that a container will be limited to use if not specified.
- 12
- The default amount of CPU that a container will request to use if not specified.
- 13
- The default amount of memory that a container will request to use if not specified.
- 14
- The maximum amount of CPU burst that a container can make as a ratio of its limit over request.
9.1.1. Container Limits
Supported Resources:
- CPU
- Memory
Supported Constraints:
Per container, the following must hold true if specified:
| Constraint | Behavior |
|---|---|
|
|
If the configuration defines a |
|
|
If the configuration defines a |
|
|
If a configuration defines a
For example, if a container has |
Supported Defaults:
Default[resource]-
Defaults
container.resources.limit[resource]to specified value if none. Default Requests[resource]-
Defaults
container.resources.requests[resource]to specified value if none.
9.1.2. Pod Limits
Supported Resources:
- CPU
- Memory
Supported Constraints:
Across all containers in a pod, the following must hold true:
| Constraint | Enforced Behavior |
|---|---|
|
|
|
|
|
|
|
|
|
9.1.3. Image Limits
Supported Resources:
- Storage
Resource type name:
-
openshift.io/Image
Per image, the following must hold true if specified:
| Constraint | Behavior |
|---|---|
|
|
|
To prevent blobs exceeding the limit from being uploaded to the registry, the registry must be configured to enforce quota. An environment variable REGISTRY_MIDDLEWARE_REPOSITORY_OPENSHIFT_ENFORCEQUOTA must be set to true which is done by default for new deployments. To update older deployment configuration, refer to Enforcing quota in the Registry.
The image size is not always available in the manifest of an uploaded image. This is especially the case for images built with Docker 1.10 or higher and pushed to a v2 registry. If such an image is pulled with an older Docker daemon, the image manifest will be converted by the registry to schema v1 lacking all the size information. No storage limit set on images will prevent it from being uploaded.
The issue is being addressed.
9.1.4. Image Stream Limits
Supported Resources:
-
openshift.io/image-tags -
openshift.io/images
Resource type name:
-
openshift.io/ImageStream
Per image stream, the following must hold true if specified:
| Constraint | Behavior |
|---|---|
|
|
|
|
|
|
9.1.4.1. Counting of Image References
Resource openshift.io/image-tags represents unique image references. Possible references are an ImageStreamTag, an ImageStreamImage and a DockerImage. They may be created using commands oc tag and oc import-image or by using tag tracking. No distinction is made between internal and external references. However, each unique reference tagged in the image stream’s specification is counted just once. It does not restrict pushes to an internal container registry in any way, but is useful for tag restriction.
Resource openshift.io/images represents unique image names recorded in image stream status. It allows for restriction of a number of images that can be pushed to the internal registry. Internal and external references are not distinguished.
9.2. Creating a Limit Range
To apply a limit range to a project, create a limit range object definition on your file system to your desired specifications, then run:
$ oc create -f <limit_range_file> -n <project>
9.3. Viewing Limits
You can view any limit ranges defined in a project by navigating in the web console to the project’s Settings tab.
You can also use the CLI to view limit range details:
First, get the list of limit ranges defined in the project. For example, for a project called demoproject:
$ oc get limits -n demoproject
NAME              AGE
resource-limits   6d
Then, describe the limit range you are interested in, for example the resource-limits limit range:
<<<<<<< HEAD
$ oc describe limits resource-limits
Name:		resource-limits
Namespace:	demoproject
Type		Resource	Min	Max	Default Request	Default Limit	Max Limit/Request Ratio
----		--------	---	---	---------------	-------------	-----------------------
Pod		cpu		30m	2	-		-		-
Pod		memory		150Mi	1Gi	-		-		-
Container	memory		150Mi	1Gi	307Mi		512Mi		-
Container	cpu		30m	2	60m		1		-
=======
$ oc describe limits resource-limits -n demoproject
Name:                           resource-limits
Namespace:                      demoproject
Type                            Resource                Min     Max     Default Request Default Limit   Max Limit/Request Ratio
----                            --------                ---     ---     --------------- -------------   -----------------------
Pod                             cpu                     200m    2       -               -               -
Pod                             memory                  6Mi     1Gi     -               -               -
Container                       cpu                     100m    2       200m            300m            10
Container                       memory                  4Mi     1Gi     100Mi           200Mi           -
openshift.io/Image              storage                 -       1Gi     -               -               -
openshift.io/ImageStream        openshift.io/image      -       12      -               -               -
openshift.io/ImageStream        openshift.io/image-tags -       10      -               -               -
>>>>>>> 7fb6456... Fix `oc describe limits` example
9.4. Deleting Limits
Remove any active limit range to no longer enforce the limits of a project:
$ oc delete limits <limit_name>
Chapter 10. Pruning Objects
10.1. Overview
Over time, API objects created in OpenShift Enterprise can accumulate in the etcd data store through normal user operations, such as when building and deploying applications.
As an administrator, you can periodically prune older versions of objects from your OpenShift Enterprise instance that are no longer needed. For example, by pruning images you can delete older images and layers that are no longer in use, but are still taking up disk space.
10.2. Basic Prune Operations
The CLI groups prune operations under a common parent command.
$ oadm prune <object_type> <options>
This specifies:
-
The
<object_type>to perform the action on, such asbuilds,deployments, orimages. -
The
<options>supported to prune that object type.
10.3. Pruning Deployments
In order to prune deployments that are no longer required by the system due to age and status, administrators may run the following command:
$ oadm prune deployments [<options>]
| Option | Description |
|---|---|
|
| Indicate that pruning should occur, instead of performing a dry-run. |
|
| Prune all deployments whose deployment config no longer exists, status is complete or failed, and replica count is zero. |
|
|
Per deployment config, keep the last N deployments whose status is complete and replica count is zero. (default |
|
|
Per deployment config, keep the last N deployments whose status is failed and replica count is zero. (default |
|
|
Do not prune any object that is younger than |
To see what a pruning operation would delete:
$ oadm prune deployments --orphans --keep-complete=5 --keep-failed=1 \
    --keep-younger-than=60m
To actually perform the prune operation:
$ oadm prune deployments --orphans --keep-complete=5 --keep-failed=1 \
    --keep-younger-than=60m --confirm
10.4. Pruning Builds
In order to prune builds that are no longer required by the system due to age and status, administrators may run the following command:
$ oadm prune builds [<options>]
| Option | Description |
|---|---|
|
| Indicate that pruning should occur, instead of performing a dry-run. |
|
| Prune all builds whose build config no longer exists, status is complete, failed, error, or canceled. |
|
|
Per build config, keep the last N builds whose status is complete. (default |
|
|
Per build config, keep the last N builds whose status is failed, error, or canceled (default |
|
|
Do not prune any object that is younger than |
To see what a pruning operation would delete:
$ oadm prune builds --orphans --keep-complete=5 --keep-failed=1 \
    --keep-younger-than=60m
To actually perform the prune operation:
$ oadm prune builds --orphans --keep-complete=5 --keep-failed=1 \
    --keep-younger-than=60m --confirm
10.5. Pruning Images
In order to prune images that are no longer required by the system due to age and status, administrators may run the following command:
$ oadm prune images [<options>]
Currently, to prune images you must first log in to the CLI as a user with an access token. The user must also have the cluster rolesystem:image-pruner or greater (for example, cluster-admin).
Pruning images removes data from the integrated registry. For this operation to work properly, ensure your registry is configured with storage:delete:enabled set to true.
| Option | Description |
|---|---|
|
| The path to a certificate authority file to use when communicating with the OpenShift Enterprise-managed registries. Defaults to the certificate authority data from the current user’s config file. |
|
| Indicate that pruning should occur, instead of performing a dry-run. |
|
|
For each image stream, keep up to at most N image revisions per tag. (default |
|
|
Do not prune any image that is younger than |
OpenShift Enterprise uses the following logic to determine which images and layers to prune:
Remove any image "managed by OpenShift Enterprise" (i.e., images with the annotation
openshift.io/image.managed) that was created at least--keep-younger-thanminutes ago and is not currently referenced by:-
any pod created less than
--keep-younger-thanminutes ago. -
any image stream created less than
--keep-younger-thanminutes ago. - any running pods.
- any pending pods.
- any replication controllers.
- any deployment configurations.
- any build configurations.
- any builds.
-
the
--keep-tag-revisionsmost recent items instream.status.tags[].items.
-
any pod created less than
- There is no support for pruning from external registries.
-
When an image is pruned, all references to the image are removed from all image streams that have a reference to the image in
status.tags. - Image layers that are no longer referenced by any images are removed as well.
To see what a pruning operation would delete:
$ oadm prune images --keep-tag-revisions=3 --keep-younger-than=60m
To actually perform the prune operation:
$ oadm prune images --keep-tag-revisions=3 --keep-younger-than=60m --confirm
Chapter 11. Garbage Collection
11.1. Overview
The OpenShift Enterprise node performs two types of garbage collection:
- Container garbage collection: Removes terminated containers. Typically run every minute.
- Image garbage collection: Removes images not referenced by any running pods. Typically run every five minutes.
11.2. Container Garbage Collection
The policy for container garbage collection is based on three node settings:
| Setting | Description |
|---|---|
|
| The minimum age that a container is eligible for garbage collection. The default is 1m (one minute). Use 0 for no limit. Values for this setting can be specified using unit suffixes such as h for hour, m for minutes, s for seconds. |
|
| The number of instances to retain per pod container. The default is 2. |
|
| The maximum number of total dead containers in the node. The default is 100. |
The maximum-dead-containers setting takes precedence over the maximum-dead-containers-per-container setting when there is a conflict. For example, if retaining the number of maximum-dead-containers-per-container would result in a total number of containers that is greater than maximum-dead-containers, the oldest containers will be removed to satisfy the maximum-dead-containers limit.
When the node removes the dead containers, all files inside those containers are removed as well. Only containers created by the node will be garbage collected.
You can specify values for these settings in the kubeletArguments section of the /etc/origin/node/node-config.yaml file on node hosts. Add the section if it does not already exist:
Container Garbage Collection Settings
kubeletArguments:
  minimum-container-ttl-duration:
    - "10s"
  maximum-dead-containers-per-container:
    - "2"
  maximum-dead-containers:
    - "100"
11.2.1. Detecting Containers for Deletion
Each spin of the garbage collector loop goes through the following steps:
- Retrieve a list of available containers.
-
Filter out all containers that are running or are not alive longer than the
minimum-container-ttl-durationparameter. - Classify all remaining containers into equivalence classes based on pod and image name membership.
- Remove all unidentified containers (containers that are managed by kubelet but their name is malformed).
-
For each class that contains more containers than the
maximum-dead-containers-per-containerparameter, sort containers in the class by creation time. -
Start removing containers from the oldest first until the
maximum-dead-containers-per-containerparameter is met. -
If there are still more containers in the list than the
maximum-dead-containersparameter, the collector starts removing containers from each class so the number of containers in each one is not greater than the average number of containers per class, or<all_remaining_containers>/<number_of_classes>. -
If this is still not enough, sort all containers in the list and start removing containers from the oldest first until the
maximum-dead-containerscriterion is met.
11.3. Image Garbage Collection
Image garbage collection relies on disk usage as reported by cAdvisor on the node to decide which images to remove from the node. It takes the following settings into consideration:
| Setting | Description |
|---|---|
|
| The percent of disk usage (expressed as an integer) which triggers image garbage collection. The default is 90. |
|
| The percent of disk usage (expressed as an integer) to which image garbage collection attempts to free. Default is 80. |
You can specify values for these settings in the kubeletArguments section of the /etc/origin/node/node-config.yaml file on node hosts. Add the section if it does not already exist:
Image Garbage Collection Settings
kubeletArguments:
  image-gc-high-threshold:
    - "90"
  image-gc-low-threshold:
    - "80"
11.3.1. Detecting Images for Deletion
Two lists of images are retrieved in each garbage collector run:
- A list of images currently running in at least one pod
- A list of images available on a host
As new containers are run, new images appear. All images are marked with a time stamp. If the image is running (the first list above) or is newly detected (the second list above), it is marked with the current time. The remaining images are already marked from the previous spins. All images are then sorted by the time stamp.
Once the collection starts, the oldest images get deleted first until the stopping criterion is met.
Chapter 12. Scheduler
12.1. Overview
The Kubernetes pod scheduler is responsible for determining placement of new pods onto nodes within the cluster. It reads data from the pod and tries to find a node that is a good fit based on configured policies. It is completely independent and exists as a standalone/pluggable solution. It does not modify the pod and just creates a binding for the pod that ties the pod to the particular node.
12.2. Generic Scheduler
The existing generic scheduler is the default platform-provided scheduler "engine" that selects a node to host the pod in a 3-step operation:
- Filter the nodes
- Prioritize the filtered list of nodes
- Select the best fit node
12.2.1. Filter the Nodes
The available nodes are filtered based on the constraints or requirements specified. This is done by running each of the nodes through the list of filter functions called 'predicates'.
12.2.2. Prioritize the Filtered List of Nodes
This is achieved by passing each node through a series of 'priority' functions that assign it a score between 0 - 10, with 0 indicating a bad fit and 10 indicating a good fit to host the pod. The scheduler configuration can also take in a simple "weight" (positive numeric value) for each priority function. The node score provided by each priority function is multiplied by the "weight" (default weight is 1) and then combined by just adding the scores for each node provided by all the priority functions. This weight attribute can be used by administrators to give higher importance to some priority functions.
12.2.3. Select the Best Fit Node
The nodes are sorted based on their scores and the node with the highest score is selected to host the pod. If multiple nodes have the same high score, then one of them is selected at random.
12.3. Available Predicates
There are several predicates provided out of the box in Kubernetes. Some of these predicates can be customized by providing certain parameters. Multiple predicates can be combined to provide additional filtering of nodes.
12.3.1. Static Predicates
These predicates do not take any configuration parameters or inputs from the user. These are specified in the scheduler configuration using their exact name.
PodFitsPorts deems a node to be fit for hosting a pod based on the absence of port conflicts.
{"name" : "PodFitsPorts"}PodFitsResources determines a fit based on resource availability. The nodes can declare their resource capacities and then pods can specify what resources they require. Fit is based on requested, rather than used resources.
{"name" : "PodFitsResources"}NoDiskConflict determines fit based on non-conflicting disk volumes. It evaluates if a pod can fit due to the volumes it requests, and those that are already mounted. It is GCE and Amazon EBS specific.
{"name" : "NoDiskConflict"}MatchNodeSelector determines fit based on node selector query that is defined in the pod.
{"name" : "MatchNodeSelector"}HostName determines fit based on the presence of the Host parameter and a string match with the name of the host.
{"name" : "HostName"}12.3.2. Configurable Predicates
These predicates can be configured by the user to tweak their functioning. They can be given any user-defined name. The type of the predicate is identified by the argument that they take. Since these are configurable, multiple predicates of the same type (but different configuration parameters) can be combined as long as their user-defined names are different.
ServiceAffinity filters out nodes that do not belong to the specified topological level defined by the provided labels. This predicate takes in a list of labels and ensures affinity within the nodes (that have the same label values) for pods belonging to the same service. If the pod specifies a value for the labels in its NodeSelector, then the nodes matching those labels are the ones where the pod is scheduled. If the pod does not specify the labels in its NodeSelector, then the first pod can be placed on any node based on availability and all subsequent pods of the service will be scheduled on nodes that have the same label values.
{"name" : "Zone", "argument" : {"serviceAffinity" : {"labels" : ["zone"]}}}LabelsPresence checks whether a particular node has a certain label defined or not, regardless of its value. Matching by label can be useful, for example, where nodes have their physical location or status defined by labels.
{"name" : "RequireRegion", "argument" : {"labelsPresence" : {"labels" : ["region"], "presence" : true}}}- If "presence" is false, and any of the requested labels match any of the nodes’s labels, it returns false. Otherwise, it returns true.
- If "presence" is true, and any of the requested labels do not match any of the node’s labels, it returns false. Otherwise, it returns true.
12.4. Available Priority Functions
A custom set of priority functions can be specified to configure the scheduler. There are several priority functions provided out-of-the-box in Kubernetes. Some of these priority functions can be customized by providing certain parameters. Multiple priority functions can be combined and different weights can be given to each in order to impact the prioritization. A weight is required to be specified and cannot be 0 or negative.
12.4.1. Static Priority Functions
These priority functions do not take any configuration parameters or inputs from the user. These are specified in the scheduler configuration using their exact name as well as the weight.
LeastRequestedPriority favors nodes with fewer requested resources. It calculates the percentage of memory and CPU requested by pods scheduled on the node, and prioritizes nodes that have the highest available/remaining capacity.
{"name" : "LeastRequestedPriority", "weight" : 1}BalancedResourceAllocation favors nodes with balanced resource usage rate. It calculates the difference between the consumed CPU and memory as a fraction of capacity, and prioritizes the nodes based on how close the two metrics are to each other. This should always be used together with LeastRequestedPriority.
{"name" : "BalancedResourceAllocation", "weight" : 1}ServiceSpreadingPriority spreads pods by minimizing the number of pods belonging to the same service onto the same machine.
{"name" : "ServiceSpreadingPriority", "weight" : 1}EqualPriority gives an equal weight of one to all nodes, if no priority configs are provided. It is not required/recommended outside of testing.
{"name" : "EqualPriority", "weight" : 1}12.4.2. Configurable Priority Functions
These priority functions can be configured by the user by providing certain parameters. They can be given any user-defined name. The type of the priority function is identified by the argument that they take. Since these are configurable, multiple priority functions of the same type (but different configuration parameters) can be combined as long as their user-defined names are different.
ServiceAntiAffinity takes a label and ensures a good spread of the pods belonging to the same service across the group of nodes based on the label values. It gives the same score to all nodes that have the same value for the specified label. It gives a higher score to nodes within a group with the least concentration of pods.
{"name" : "RackSpread", "weight" : 1, "argument" : {"serviceAntiAffinity" : {"label" : "rack"}}}LabelPreference prefers nodes that have a particular label defined or not, regardless of its value.
{"name" : "RackPreferred", "weight" : 1, "argument" : {"labelPreference" : {"label" : "rack"}}}12.5. Scheduler Policy
The selection of the predicate and priority functions defines the policy for the scheduler. Administrators can provide a JSON file that specifies the predicates and priority functions to configure the scheduler. The path to the scheduler policy file can be specified in the master configuration file. In the absence of the scheduler policy file, the default configuration gets applied.
It is important to note that the predicates and priority functions defined in the scheduler configuration file will completely override the default scheduler policy. If any of the default predicates and priority functions are required, they have to be explicitly specified in the scheduler configuration file.
12.5.1. Default Scheduler Policy
The default scheduler policy includes the following predicates:
- PodFitsPorts
- PodFitsResources
- NoDiskConflict
- MatchNodeSelector
- HostName
The default scheduler policy includes the following priority functions. Each of the priority function has a weight of '1' applied to it:
- LeastRequestedPriority
- BalancedResourceAllocation
- ServiceSpreadingPriority
12.5.2. Modifying Scheduler Policy
The scheduler policy is defined in a file on the master, named /etc/origin/master/scheduler.json by default, unless overridden by the kubernetesMasterConfig.schedulerConfigFile field in the master configuration file.
To modify the scheduler policy:
- Edit the scheduler configuration file to set the desired predicates and priority functions. You can create a custom configuration, or modify one of the sample policy configurations.
- Restart the OpenShift Enterprise master services for the changes to take effect.
12.6. Use Cases
One of the important use cases for scheduling within OpenShift Enterprise is to support flexible affinity and anti-affinity policies.
12.6.1. Infrastructure Topological Levels
Administrators can define multiple topological levels for their infrastructure (nodes). This is done by specifying labels on nodes (e.g., region=r1, zone=z1, rack=s1). These label names have no particular meaning and administrators are free to name their infrastructure levels anything (eg, city/building/room). Also, administrators can define any number of levels for their infrastructure topology, with three levels usually being adequate (eg. regions → zones → racks). Lastly, administrators can specify affinity and anti-affinity rules at each of these levels in any combination.
12.6.2. Affinity
Administrators should be able to configure the scheduler to specify affinity at any topological level, or even at multiple levels. Affinity at a particular level indicates that all pods that belong to the same service will be scheduled onto nodes that belong to the same level. This handles any latency requirements of applications by allowing administrators to ensure that peer pods do not end up being too geographically separated. If no node is available within the same affinity group to host the pod, then the pod will not get scheduled.
12.6.3. Anti Affinity
Administrators should be able to configure the scheduler to specify anti-affinity at any topological level, or even at multiple levels. Anti-Affinity (or 'spread') at a particular level indicates that all pods that belong to the same service will be spread across nodes that belong to that level. This ensures that the application is well spread for high availability purposes. The scheduler will try to balance the service pods across all applicable nodes as evenly as possible.
12.7. Sample Policy Configurations
The configuration below specifies the default scheduler configuration, if it were to be specified via the scheduler policy file.
kind: "Policy"
version: "v1"
predicates:
  - name: "PodFitsPorts"
  - name: "PodFitsResources"
  - name: "NoDiskConflict"
  - name: "MatchNodeSelector"
  - name: "HostName"
priorities:
  - name: "LeastRequestedPriority"
    weight: 1
  - name: "BalancedResourceAllocation"
    weight: 1
  - name: "ServiceSpreadingPriority"
weight: 1In all of the sample configurations below, the list of predicates and priority functions is truncated to include only the ones that pertain to the use case specified. In practice, a complete/meaningful scheduler policy should include most, if not all, of the default predicates and priority functions listed above.
Three topological levels defined as region (affinity) -→ zone (affinity) -→ rack (anti-affinity)
kind: "Policy"
version: "v1"
predicates:
...
  - name: "RegionZoneAffinity"
    argument:
      serviceAffinity:
        labels:
          - "region"
          - "zone"
priorities:
...
  - name: "RackSpread"
    weight: 1
    argument:
      serviceAntiAffinity:
        label: "rack"
Three topological levels defined as city (affinity) → building (anti-affinity) → room (anti-affinity):
kind: "Policy"
version: "v1"
predicates:
...
  - name: "CityAffinity"
    argument:
      serviceAffinity:
        labels:
          - "city"
priorities:
...
  - name: "BuildingSpread"
    weight: 1
    argument:
      serviceAntiAffinity:
        label: "building"
  - name: "RoomSpread"
    weight: 1
    argument:
      serviceAntiAffinity:
        label: "room"
Only use nodes with the 'region' label defined and prefer nodes with the 'zone' label defined:
kind: "Policy"
version: "v1"
predicates:
...
  - name: "RequireRegion"
    argument:
      labelsPresence:
        labels:
          - "region"
        presence: true
priorities:
...
  - name: "ZonePreferred"
    weight: 1
    argument:
      labelPreference:
        label: "zone"
        presence: true
Configuration example combining static and configurable predicates and priority functions:
kind: "Policy"
version: "v1"
predicates:
...
  - name: "RegionAffinity"
    argument:
      serviceAffinity:
        labels:
          - "region"
  - name: "RequireRegion"
    argument:
      labelsPresence:
        labels:
          - "region"
        presence: true
  - name: "BuildingNodesAvoid"
    argument:
      labelsPresence:
        labels:
          - "building"
        presence: false
  - name: "PodFitsPorts"
  - name: "MatchNodeSelector"
priorities:
...
  - name: "ZoneSpread"
    weight: 2
    argument:
      serviceAntiAffinity:
        label: "zone"
  - name: "ZonePreferred"
    weight: 1
    argument:
      labelPreference:
        label: "zone"
        presence: true
  - name: "ServiceSpreadingPriority"
    weight: 1
12.8. Scheduler Extensibility
As is the case with almost everything else in Kubernetes/OpenShift Enterprise, the scheduler is built using a plug-in model and the current implementation itself is a plug-in. There are two ways to extend the scheduler functionality:
- Enhancements
- Replacement
12.8.1. Enhancements
The scheduler functionality can be enhanced by adding new predicates and priority functions. They can either be contributed upstream or maintained separately. These predicates and priority functions would need to be registered with the scheduler factory and then specified in the scheduler policy file.
12.8.2. Replacement
Since the scheduler is a plug-in, it can be replaced in favor of an alternate implementation. The scheduler code has a clean separation that watches new pods as they get created and identifies the most suitable node to host them. It then creates bindings (pod to node bindings) for the pods using the master API.
12.9. Controlling Pod Placement
As a cluster administrator, you can set a policy to prevent application developers with certain roles from targeting specific nodes when scheduling pods.
This process involves the pods/binding permission role, which is needed to target particular nodes. The constraint on the use of the nodeSelector field of a pod configuration is based on the pods/binding permission and the nodeSelectorLabelBlacklist configuration option.
The nodeSelectorLabelBlacklist field of a master configuration file gives you control over the labels that certain roles can specify in a pod configuration’s nodeSelector field. Users, service accounts, and groups that have the pods/binding permission can specify any node selector. Those without the pods/binding permission are prohibited from setting a nodeSelector for any label that appears in nodeSelectorLabelBlacklist.
As a hypothetical example, an OpenShift Enterprise cluster might consist of five data centers spread across two regions. In the U.S., us-east, us-central, and us-west; and in the Asia-Pacific region (APAC),"apac-east and apac-west. Each node in each geographical region is labeled accordingly. For example, region: us-east.
See Updating Labels on Nodes for details on assigning labels.
As a cluster administrator, you can create an infrastructure where application developers should be deploying pods only onto the nodes closest to their geographical location. You can create a node selector, grouping the U.S. data centers into superregion: us and the APAC data centers into superregion: apac.
To maintain an even loading of resources per data center, you can add the desired region to the nodeSelectorLabelBlacklist section of a master configuration. Then, whenever a developer located in the U.S. creates a pod, it is deployed onto a node in one of the regions with the superregion: us label. If the developer tries to target a specific region for their pod (for example, region: us-east), they will receive an error. If they try again, without the node selector on their pod, it can still be deployed onto the region they tried to target, because superregion: us is set as the project-level node selector, and nodes labeled region: us-east are also labeled superregion: us.
12.9.1. Constraining Pod Placement Using Node Name
Ensure a pod is deployed onto only a specified node host by assigning it a label and specifying this in the nodeName setting in a pod configuration.
Ensure you have the desired labels and node selector set up in your environment.
For example, make sure that your pod configuration features the
nodeNamevalue indicating the desired label:apiVersion: v1 kind: Pod spec: nodeName: <key: value>
Modify the master configuration file, /etc/origin/master/master-config.yaml, in two places to add
nodeSelectorLabelBlacklistto theadmissionConfigsection:... admissionConfig: pluginConfig: PodNodeConstraints: configuration: apiversion: v1 kind: PodNodeConstraintsConfig ...Restart OpenShift Enterprise for the changes to take effect.
# systemctl restart atomic-openshift-master
12.9.2. Constraining Pod Placement Using a Node Selector
Using nodeSelector in a pod configuration, you can ensure that pods are only placed onto nodes with specific labels.
Ensure you have the desired labels (see Updating Labels on Nodes for details) and node selector set up in your environment.
For example, make sure that your pod configuration features the
nodeSelectorvalue indicating the desired label:apiVersion: v1 kind: Pod spec: nodeSelector: <key>: <value> ...Modify the master configuration file, /etc/origin/master/master-config.yaml, to add
nodeSelectorLabelBlacklistto theadmissionConfigsection with the labels that are assigned to the node hosts you want to deny pod placement:... admissionConfig: pluginConfig: PodNodeConstraints: configuration: apiversion: v1 kind: PodNodeConstraintsConfig nodeSelectorLabelBlacklist: - kubernetes.io/hostname - <label> ...Restart OpenShift Enterprise for the changes to take effect.
# systemctl restart atomic-openshift-master
Chapter 13. Allocating Node Resources
13.1. Overview
To provide more reliable scheduling and minimize node resource overcommitment, each node can reserve a portion of its resources for use by all underlying node components (e.g., kubelet, kube-proxy, Docker) and the remaining system components (e.g., sshd, NetworkManager) on the host. Once specified, the scheduler has more information about the resources (e.g., memory, CPU) a node has allocated for pods.
13.2. Configuring Nodes for Allocated Resources
Resources reserved for node components are based on two node settings:
| Setting | Description |
|---|---|
|
| Resources reserved for node components. Default is none. |
|
| Resources reserved for the remaining system components. Default is none. |
You can set these in the kubeletArguments section of the node configuration file (the /etc/origin/node/node-config.yaml file by default) using a set of <resource_type>=<resource_quantity> pairs (e.g., cpu=200m,memory=512Mi). Add the section if it does not already exist:
Example 13.1. Node Allocatable Resources Settings
kubeletArguments:
  kube-reserved:
    - "cpu=200m,memory=512Mi"
  system-reserved:
    - "cpu=200m,memory=512Mi"
Currently, the cpu and memory resource types are supported. For cpu, the resource quantity is specified in units of cores (e.g., 200m, 0.5, 1). For memory, it is specified in units of bytes (e.g., 200Ki, 50Mi, 5Gi).
See Compute Resources for more details.
If a flag is not set, it defaults to 0. If none of the flags are set, the allocated resource is set to the node’s capacity as it was before the introduction of allocatable resources.
13.3. Computing Allocated Resources
An allocated amount of a resource is computed based on the following formula:
[Allocatable] = [Node Capacity] - [kube-reserved] - [system-reserved]
If [Allocatable] is negative, it is set to 0.
13.4. Viewing Node Allocatable Resources and Capacity
To see a node’s current capacity and allocatable resources, you can run:
$ oc get node/<node_name> -o yaml
...
status:
...
  allocatable:
    cpu: "4"
    memory: 8010948Ki
    pods: "110"
  capacity:
    cpu: "4"
    memory: 8010948Ki
    pods: "110"
...
13.5. Scheduler
The scheduler now uses the value of node.Status.Allocatable instead of node.Status.Capacity to decide if a node will become a candidate for pod scheduling.
By default, the node will report its machine capacity as fully schedulable by the cluster.
Chapter 14. Overcommitting
14.1. Overview
Containers can specify compute resource requests and limits. Requests are used for scheduling your container and provide a minimum service guarantee. Limits constrain the amount of compute resource that may be consumed on your node.
The scheduler attempts to optimize the utilization of compute resources across all nodes in the cluster. It places pods on nodes with consideration to the pods' compute resource requests and nodes' available capacity to find for each pod the node that provides the best fit.
Requests and limits enable administrators to allow and manage the overcommitment of resources on a node, which may be desirable in development environments where a tradeoff of guaranteed performance for capacity is acceptable.
14.2. Requests and Limits
For each compute resource, a container may specify a resource request and limit. Scheduling decisions are made based on the request to ensure that a node has enough capacity available to meet the requested value. If a container specifies limits, but omits requests, the requests are defaulted to the limits. A container is not able to exceed the specified limit on the node.
The enforcement of limits is dependent upon the compute resource type. If a container makes no request or limit, the container is scheduled to a node with no resource guarantees. In practice, the container is able to consume as much of the specified resource as is available with the lowest local priority. In low resource situations, containers that specify no resource requests are given the lowest quality of service.
14.3. Compute Resources
The node-enforced behavior for compute resources is specific to the resource type.
14.3.1. CPU
A container is guaranteed the amount of CPU it requests and is additionally able to consume excess CPU available on the node, up to any limit specified by the container. If multiple containers are attempting to use excess CPU, CPU time is distributed based on the amount of CPU requested by each container.
For example, if one container requested 500m of CPU time and another container requested 250m of CPU time, then any extra CPU time available on the node is distributed among the containers in a 2:1 ratio. If a container specified a limit, it will be throttled not to use more CPU than the specified limit.
CPU requests are enforced using the CFS shares support in the Linux kernel. By default, CPU limits are enforced using the CFS quota support in the Linux kernel over a 100ms measuring interval, though this can be disabled.
14.3.2. Memory
A container is guaranteed the amount of memory it requests. A container may use more memory than requested, but once it exceeds its requested amount, it could be killed in a low memory situation on the node.
If a container uses less memory than requested, it will not be killed unless system tasks or daemons need more memory than was accounted for in the node’s resource reservation. If a container specifies a limit on memory, it is immediately killed if it exceeds the limit amount.
14.4. Quality of Service Classes
A node is overcommitted when it has a pod scheduled that makes no request, or when the sum of limits across all pods on that node exceeds available machine capacity.
In an overcommitted environment, it is possible that the pods on the node will attempt to use more compute resource than is available at any given point in time. When this occurs, the node must give priority to one pod over another. The facility used to make this decision is referred to as a Quality of Service (QoS) Class.
For each compute resource, a container is divided into one of three QoS classes with decreasing order of priority:
| Priority | Class Name | Description |
|---|---|---|
| 1 (highest) | Guaranteed | If limits and optionally requests are set (not equal to 0) for all resources and they are equal, then the container is classified as Guaranteed. |
| 2 | Burstable | If requests and optionally limits are set (not equal to 0) for all resources, and they are not equal, then the container is classified as Burstable. |
| 3 (lowest) | BestEffort | If requests and limits are not set for any of the resources, then the container is classified as BestEffort. |
Memory is an incompressible resource, so in low memory situations, containers that have the lowest priority are killed first:
- Guaranteed containers are considered top priority, and are guaranteed to only be killed if they exceed their limits, or if the system is under memory pressure and there are no lower priority containers that can be evicted.
- Burstable containers under system memory pressure are more likely to be killed once they exceed their requests and no other BestEffort containers exist.
- BestEffort containers are treated with the lowest priority. Processes in these containers are first to be killed if the system runs out of memory.
14.5. Configuring Masters for Overcommitment
Scheduling is based on resources requested, while quota and hard limits refer to resource limits, which can be set higher than requested resources. The difference between request and limit determines the level of overcommit; for instance, if a container is given a memory request of 1Gi and a memory limit of 2Gi, it is scheduled based on the 1Gi request being available on the node, but could use up to 2Gi; so it is 200% overcommitted.
If OpenShift Enterprise administrators would like to control the level of overcommit and manage container density on nodes, masters can be configured to override the ratio between request and limit set on developer containers. In conjunction with a per-project LimitRange specifying limits and defaults, this adjusts the container limit and request to achieve the desired level of overcommit.
This requires configuring the ClusterResourceOverride admission controller in the master-config.yaml as in the following example (reuse the existing configuration tree if it exists, or introduce absent elements as needed):
kubernetesMasterConfig:
  admissionConfig:
    pluginConfig:
      ClusterResourceOverride:   1
        configuration:
          apiVersion: v1
          kind: ClusterResourceOverrideConfig
          memoryRequestToLimitPercent: 25  2
          cpuRequestToLimitPercent: 25     3
limitCPUToMemoryPercent: 200 4- 1
- This is the plug-in name; case matters and anything but an exact match for a plug-in name is ignored.
- 2
- (optional, 1-100) If a container memory limit has been specified or defaulted, the memory request is overridden to this percentage of the limit.
- 3
- (optional, 1-100) If a container CPU limit has been specified or defaulted, the CPU request is overridden to this percentage of the limit.
- 4
- (optional, positive integer) If a container memory limit has been specified or defaulted, the CPU limit is overridden to a percentage of the memory limit, with a 100 percentage scaling 1Gi of RAM to equal 1 CPU core. This is processed prior to overriding CPU request (if configured).
After changing the master configuration, a master restart is required.
Note that these overrides have no effect if no limits have been set on containers. Create a LimitRange object with default limits (per individual project, or in the project template) in order to ensure that the overrides apply.
Note also that after overrides, the container limits and requests must still be validated by any LimitRange objects in the project. It is possible, for example, for developers to specify a limit close to the minimum limit, and have the request then be overridden below the minimum limit, causing the pod to be forbidden. This unfortunate user experience should be addressed with future work, but for now, configure this capability and LimitRanges with caution.
When configured, overrides can be disabled per-project (for example, to allow infrastructure components to be configured independently of overrides) by editing the project and adding the following annotation:
quota.openshift.io/cluster-resource-override-enabled: "false"
14.6. Configuring Nodes for Overcommitment
In an overcommitted environment, it is important to properly configure your node to provide best system behavior.
14.6.1. Enforcing CPU Limits
Nodes by default enforce specified CPU limits using the CPU CFS quota support in the Linux kernel. If you do not want to enforce CPU limits on the node, you can disable its enforcement by modifying the node configuration file (the node-config.yaml file) to include the following:
kubeletArguments:
  cpu-cfs-quota:
    - "false"
If CPU limit enforcement is disabled, it is important to understand the impact that will have on your node:
- If a container makes a request for CPU, it will continue to be enforced by CFS shares in the Linux kernel.
- If a container makes no explicit request for CPU, but it does specify a limit, the request will default to the specified limit, and be enforced by CFS shares in the Linux kernel.
- If a container specifies both a request and a limit for CPU, the request will be enforced by CFS shares in the Linux kernel, and the limit will have no impact on the node.
14.6.2. Reserving Resources for System Processes
The scheduler ensures that there are enough resources for all pods on a node based on the pod requests. It verifies that the sum of requests of containers on the node is no greater than the node capacity. It includes all containers started by the node, but not containers or processes started outside the knowledge of the cluster.
It is recommended that you reserve some portion of the node capacity to allow for the system daemons that are required to run on your node for your cluster to function (sshd, docker, etc.). In particular, it is recommended that you reserve resources for incompressible resources such as memory.
If you want to explicitly reserve resources for non-pod processes, there are two ways to do so:
- The preferred method is to allocate node resources by specifying resources available for scheduling. See Allocating Node Resources for more details.
Alternatively, you can create a resource-reserver pod that does nothing but reserve capacity from being scheduled on the node by the cluster. For example:
Example 14.1. resource-reserver Pod Definition
apiVersion: v1 kind: Pod metadata: name: resource-reserver spec: containers: - name: sleep-forever image: gcr.io/google_containers/pause:0.8.0 resources: limits: cpu: 100m 1 memory: 150Mi 2You can save your definition to a file, for example resource-reserver.yaml, then place the file in the node configuration directory, for example /etc/origin/node/ or the
--config=<dir>location if otherwise specified.Additionally, the node server needs to be configured to read the definition from the node configuration directory, by naming the directory in the
kubeletArguments.configfield of the node configuration file (usually named node-config.yaml):kubeletArguments: config: - "/etc/origin/node" 1- 1
- If
--config=<dir>is specified, use<dir>here.
With the resource-reserver.yaml file in place, starting the node server also launches the sleep-forever container. The scheduler takes into account the remaining capacity of the node, adjusting where to place cluster pods accordingly.
To remove the resource-reserver pod, you can delete or move the resource-reserver.yaml file from the node configuration directory.
14.6.3. Kernel Tunable Flags
When the node starts, it ensures that the kernel tunable flags for memory management are set properly. The kernel should never fail memory allocations unless it runs out of physical memory.
To ensure this behavior, the node instructs the kernel to always overcommit memory:
$ sysctl -w vm.overcommit_memory=1
The node also instructs the kernel not to panic when it runs out of memory. Instead, the kernel OOM killer should kill processes based on priority:
$ sysctl -w vm.panic_on_oom=0
The above flags should already be set on nodes, and no further action is required.
14.6.4. Disabling Swap Memory
It is important to understand that oversubscribing the physical resources on a node affects resource guarantees the Kubernetes scheduler makes during pod placement. For example, suppose two guaranteed pods have reached their memory limit. Each container may start using swap. Eventually, if there is not enough swap space, processes in the pods can be terminated (due to the system being oversubscribed).
There are options that can help you avoid having to swap, such as moving pods to nodes with free resources, adding physical memory, reducing vm.swappiness, the use of huge pages, or disabling vm.overcommit.
Swap can also be disabled, but that is not recommended. Disable swap memory on each node by running:
$ swapoff -a
Chapter 15. Limit Run-once Pod Duration
15.1. Overview
OpenShift Enterprise relies on run-once pods to perform tasks such as deploying a pod or performing a build. Run-once pods are pods that have a RestartPolicy of Never or OnFailure.
The cluster administrator can use the RunOnceDuration admission control plug-in to force a limit on the time that those run-once pods can be active. Once the time limit expires, the cluster will try to actively terminate those pods. The main reason to have such a limit is to prevent tasks such as builds to run for an excessive amount of time.
15.2. Configuring the RunOnceDuration Plug-in
The plug-in configuration should include the default active deadline for run-once pods. This deadline will be enforced globally, but can be superseded on a per-project basis.
kubernetesMasterConfig:
  admissionConfig:
    pluginConfig:
      RunOnceDuration:
        configuration:
          apiVersion: v1
          kind: RunOnceDurationConfig
activeDeadlineSecondsOverride: 3600 1- 1
- Specify the global default for run-once pods in seconds.
15.3. Specifying a Custom Duration per Project
In addition to specifying a global maximum duration for run-once pods, an administrator can add an annotation (openshift.io/active-deadline-seconds-override) to a specific project to override the global default.
apiVersion: v1
kind: Project
metadata:
  annotations:
openshift.io/active-deadline-seconds-override: "1000" 1- 1
- Overrides the default active deadline seconds for run-once pods to 1000 seconds. Note that the value of the override must be specified in string form.
Chapter 16. Monitoring Routers
16.1. Overview
Depending on the underlying implementation, you can monitor a running router in multiple ways. This topic discusses the HAProxy template router and the components to check to ensure its health.
16.2. Viewing Statistics
The HAProxy router exposes a web listener for the HAProxy statistics. Enter the router’s public IP address and the correctly configured port (1936 by default) to view the statistics page, and enter the administrator password when prompted. This password and port are configured during the router installation, but they can be found by viewing the haproxy.config file on the container.
16.3. Disabling Statistics View
By default the HAProxy statistics are exposed on port 1936 (with a password protected account). To disable exposing the HAProxy statistics, specify 0 as the stats port number.
$ oadm router hap --service-account=router --stats-port=0
Note: HAProxy will still collect and store statistics, it would just not expose them via a web listener. You can still get access to the statistics by sending a request to the HAProxy AF_UNIX socket inside the HAProxy Router container.
$ cmd="echo 'show stat' | socat - UNIX-CONNECT:/var/lib/haproxy/run/haproxy.sock"
$ routerPod=$(oc get pods --selector="router=router"  \
    --template="{{with index .items 0}}{{.metadata.name}}{{end}}")
$ oc exec $routerPod -- bash -c "$cmd"
For security purposes, the oc exec command does not work when accessing privileged containers. Instead, you can SSH into a node host, then use the docker exec command on the desired container.
16.4. Viewing Logs
To view a router log, run the oc logs command on the pod. Since the router is running as a plug-in process that manages the underlying implementation, the log is for the plug-in, not the actual HAProxy log.
To view the logs generated by HAProxy, start a syslog server and pass the location to a router pod using the following environment variables.
| Environment Variable | Description |
|---|---|
|
| The IP address of the syslog server. Port 514 is the default if no port is specified. |
|
| Optional. Set to change the HAProxy log level. If not set, the default log level is warning. This can be changed to any log level that HAProxy supports. |
To set a running router pod to send messages to a syslog server:
$ oc set env dc/router ROUTER_SYSLOG_ADDRESS=<dest_ip:dest_port> ROUTER_LOG_LEVEL=<level>
For example, the following sets HAProxy to send logs to 127.0.0.1 with the default port 514 and changes the log level to debug.
$ oc set env dc/router ROUTER_SYSLOG_ADDRESS=127.0.0.1 ROUTER_LOG_LEVEL=debug
16.5. Viewing the Router Internals
routes.json
Routes are processed by the HAProxy router, and are stored both in memory, on disk, and in the HAProxy configuration file. The internal route representation, which is passed to the template to generate the HAProxy configuration file, is found in the /var/lib/containers/router/routes.json file. When troubleshooting a routing issue, view this file to see the data being used to drive configuration.
HAProxy configuration
You can find the HAProxy configuration and the backends that have been created for specific routes in the /var/lib/haproxy/conf/haproxy.config file. The mapping files are found in the same directory. The helper frontend and backends use mapping files when mapping incoming requests to a backend.
Certificates
Certificates are stored in two places:
- Certificates for edge terminated and re-encrypt terminated routes are stored in the /var/lib/containers/router/certs directory.
- Certificates that are used for connecting to backends for re-encrypt terminated routes are stored in the /var/lib/containers/router/cacerts directory.
The files are keyed by the namespace and name of the route. The key, certificate, and CA certificate are concatenated into a single file. You can use OpenSSL to view the contents of these files.
Chapter 17. High Availability
17.1. Overview
This topic describes how to set up highly-available services on your OpenShift Enterprise cluster.
The Kubernetes replication controller ensures that the deployment requirements, in particular the number of replicas, are satisfied when the appropriate resources are available. When run with two or more replicas, the router can be resilient to failures, providing a highly-available service. Depending on how the router instances are discovered (via a service, DNS entry, or IP addresses), this could impose operational requirements to handle failure cases when one or more router instances are "unreachable".
For some IP-based traffic services, virtual IP addresses (VIPs) should always be serviced for as long as a single instance is available. This simplifies the operational overhead and handles failure cases gracefully.
Even though a service is highly available, performance can still be affected.
Use cases for high-availability include:
- I want my cluster to be assigned a resource set and I want the cluster to automatically manage those resources.
- I want my cluster to be assigned a set of VIPs that the cluster manages and migrates (with zero or minimal downtime) on failure conditions, and I should not be required to perform any manual interactions to update the upstream "discovery" sources (e.g., DNS). The cluster should service all the assigned VIPs when at least a single node is available, despite the current available resources not being sufficient to reach the desired state.
You can configure a highly-available router or network setup by running multiple instances of the pod and fronting them with a balancing tier. This can be something as simple as DNS round robin, or as complex as multiple load-balancing layers.
17.2. Configuring IP Failover
Using IP failover involves switching IP addresses to a redundant or stand-by set of nodes on failure conditions.
At this time of writing, ipfailover is not compatible with cloud infrastructures. In the case of AWS, an Elastic Load Balancer (ELB) can be used to make OpenShift Enterprise highly available, using the AWS console.
The oadm ipfailover command helps set up the VIP failover configuration. As an administrator, you can configure IP failover on an entire cluster, or on a subset of nodes, as defined by the labeled selector. If you are running in production, match the labeled selector with at least two nodes to ensure you have failover protection and provide a --replicas=<n> value that matches the number of nodes for the given labeled selector:
$ oadm ipfailover [<Ip_failover_config_name>] <options> --replicas=<n>
The oadm ipfailover command ensures that a failover pod runs on each of the nodes matching the constraints or label used. This pod uses VRRP (Virtual Router Redundancy Protocol) with Keepalived to ensure that the service on the watched port is available, and, if needed, Keepalived will automatically float the VIPs if the service is not available.
17.2.1. Virtual IP Addresses
Keepalived manages a set of virtual IP addresses. The administrator must make sure that all these addresses:
- Are accessible on the configured hosts from outside the cluster.
- Are not used for any other purpose within the cluster.
Keepalived on each node determines whether the needed service is running. If it is, VIPs are supported and Keepalived participates in the negotiation to determine which node will serve the VIP. For a node to participate, the service must be listening on the watch port on a VIP or the check must be disabled.
Each VIP in the set may end up being served by a different node.
| Option | Variable Name | Notes |
|---|---|---|
|
|
| The list of IP address ranges to replicate. This must be provided. (For example, 1.2.3.4-6,1.2.3.9.) |
17.2.2. Configuring a Highly-available Routing Service
The following steps describe how to set up a highly-available router environment with IP failover:
Label the nodes for the service. This step can be optional if you run the service on any of the nodes in your Kubernetes cluster and use VIPs that can float within those nodes. This process may already exist within a complex cluster, in that nodes may be filtered by any constraints or requirements specified (e.g., nodes with SSD drives, or higher CPU, memory, or disk requirements, etc.).
The following example defines a label as router instances that are servicing traffic in the US west geography ha-router=geo-us-west:
#!/bin/bash
    # Whatever tests are needed
    # E.g., send request and verify response
exit 0
Create the ConfigMap:
$ oc create configmap mycustomcheck --from-file=mycheckscript.sh
There are two approaches to adding the script to the pod: use
occommands or edit the deployment configuration.Using
occommands:$ oc set env dc/ipf-ha-router \ OPENSHIFT_HA_CHECK_SCRIPT=/etc/keepalive/mycheckscript.sh $ oc volume dc/ipf-ha-router --add --overwrite \ --name=config-volume \ --mount-path=/etc/keepalive \ --source='{"configMap": { "name": "mycustomcheck"}}'Editing the ipf-ha-router deployment configuration:
Use
oc edit dc ipf-ha-routerto edit the router deployment configuration with a text editor.$ oc label nodes openshift-node-{5,6,7,8,9} "ha-router=geo-us-west"
OpenShift Enterprise’s ipfailover internally uses keepalived, so ensure that multicast is enabled on the nodes labeled above and that the nodes can accept network traffic for 224.0.0.18 (the VRRP multicast IP address). Depending on your environment’s multicast configuration, you may need to add an
iptablesrule to each of the above labeled nodes. If you do need to add theiptablesrules, please also ensure that the rules persist after a system restart:$ for node in openshift-node-{5,6,7,8,9}; do ssh $node <<EOF export interface=${interface:-"eth0"} echo "Check multicast enabled ... "; ip addr show $interface | grep -i MULTICAST echo "Check multicast groups ... " ip maddr show $interface | grep 224.0.0 | grep $interface echo "Optionally, add accept rule and persist it ... " sudo /sbin/iptables -I INPUT -i $interface -d 224.0.0.18/32 -j ACCEPT echo "Please ensure the above rule is added on system restarts." EOF done;Depending on your environment policies, you can either reuse the router service account created previously or create a new ipfailover service account.
Ensure that either the router service account exists as described in Deploying a Router or create a new ipfailover service account. The example below creates a new service account with the name ipfailover in the default namespace:
$ oc create serviceaccount ipfailover -n default
Add the ipfailover service account in the default namespace to the privileged SCC:
$ oadm policy add-scc-to-user privileged system:serviceaccount:default:ipfailover
Start the router with at least two replicas on nodes matching the labels used in the first step. The following example runs three instances using the ipfailover service account:
$ oadm router ha-router-us-west --replicas=5 \ --selector="ha-svc-nodes=geo-us-west" \ --labels="ha-svc-nodes=geo-us-west" \ --service-account=ipfailoverNoteThe above command runs fewer router replicas than available nodes, so that, in the chance of node failures, Kubernetes can still ensure three available instances until the number of available nodes labeled ha-router=geo-us-west is below three. Additionally, the router uses the host network as well as ports 80 and 443, so fewer number of replicas are running to ensure a higher Service Level Availability (SLA). If there are no constraints on the service being setup for failover, it is possible to target the service to run on one or more, or even all, of the labeled nodes.
Finally, configure the VIPs and failover for the nodes labeled with ha-router=geo-us-west in the first step. Ensure the number of replicas match the number of nodes and that they satisfy the label setup in the first step. The name of the ipfailover configuration (ipf-ha-router-us-west in the example below) should be different from the name of the router configuration (ha-router-us-west) as both the router and ipfailover create deployment configuration with those names. Specify the VIPs addresses and the port number that ipfailover should monitor on the desired instances:
$ oadm ipfailover ipf-ha-router-us-west \
    --replicas=5 --watch-port=80 \
    --selector="ha-router=geo-us-west" \
    --virtual-ips="10.245.2.101-105" \
    --iptables-chain="INPUT" \
    --service-account=ipfailover --create
For details on how to dynamically update the virtual IP addresses for high availability, see Dynamically Updating Virtual IPs for a Highly-available Service.
17.2.3. Configuring a Highly-available Network Service
The following steps describe how to set up a highly-available IP-based network service with IP failover:
Label the nodes for the service. This step can be optional if you run the service on any of the nodes in your Kubernetes cluster and use VIPs that can float within those nodes. This process may already exist within a complex cluster, in that the nodes may be filtered by any constraints or requirements specified (e.g., nodes with SSD drives, or higher CPU, memory, or disk requirements, etc.).
The following example labels a highly-available cache service that is listening on port 9736 as ha-cache=geo:
$ oc label nodes openshift-node-{6,3,7,9} "ha-cache=geo"OpenShift Enterprise’s ipfailover internally uses keepalived, so ensure that multicast is enabled on the nodes labeled above and that the nodes can accept network traffic for 224.0.0.18 (the VRRP multicast IP address). Depending on your environment’s multicast configuration, you may need to add an
iptablesrule to each of the above labeled nodes. If you do need to add theiptablesrules, please also ensure that the rules persist after a system restart:$ for node in openshift-node-{6,3,7,9}; do ssh $node <<EOF export interface=${interface:-"eth0"} echo "Check multicast enabled ... "; ip addr show $interface | grep -i MULTICAST echo "Check multicast groups ... " ip maddr show $interface | grep 224.0.0 | grep $interface echo "Optionally, add accept rule and persist it ... " sudo /sbin/iptables -I INPUT -i $interface -d 224.0.0.18/32 -j ACCEPT echo "Please ensure the above rule is added on system restarts." EOF done;Create a new ipfailover service account in the default namespace:
$ oc create serviceaccount ipfailover -n default
Add the ipfailover service account in the default namespace to the privileged SCC:
$ oadm policy add-scc-to-user privileged system:serviceaccount:default:ipfailover
Run a geo-cache service with two or more replicas. An example configuration for running a geo-cache service is provided here.
ImportantBe sure to replace the myimages/geo-cache container image referenced in the file with your intended image. Also, change the number of replicas to the desired amount and ensure the label matches the one used in the first step.
$ oc create -n <namespace> -f ./examples/geo-cache.json
Finally, configure the VIPs and failover for the nodes labeled with ha-cache=geo in the first step. Ensure the number of replicas match the number of nodes and that they satisfy the label setup in first step. Specify the VIP addresses and the port number that ipfailover should monitor for the desired instances:
$ oadm ipfailover ipf-ha-geo-cache \\
    --replicas=5 --watch-port=9736 \
    --selector="ha-svc-nodes=geo-us-west" \
    --virtual-ips=10.245.3.101-105 \
    --vrrp-id-offset=10 \
    --service-account=ipfailover --create
Using the above example, you can now use the VIPs 10.245.2.101 through 10.245.2.104 to send traffic to the geo-cache service. If a particular geo-cache instance is "unreachable", perhaps due to a node failure, Keepalived ensures that the VIPs automatically float amongst the group of nodes labeled "ha-cache=geo" and the service is still reachable via the virtual IP addresses.
17.2.4. Dynamically Updating Virtual IPs for a Highly-available Service
The default deployment strategy for the IP failover service is to recreate the deployment. In order to dynamically update the virtual IPs for a highly available routing service with minimal or no downtime, you must:
- update the IP failover service deployment configuration to use a rolling update strategy, and
-
update the
OPENSHIFT_HA_VIRTUAL_IPSenvironment variable with the updated list or sets of virtual IP addresses.
The following example shows how to dynamically update the deployment strategy and the virtual IP addresses:
Consider an IP failover configuration that was created using the following:
$ oadm ipfailover ipf-ha-router-us-west \
    --replicas=5 --watch-port=80 \
    --selector="ha-router=geo-us-west" \
    --virtual-ips="10.245.2.101-105" \
    --service-account=ipfailover --create
Edit the deployment configuration:
$ oc edit dc/ipf-ha-router-us-west
Update the
spec.strategy.typefield fromRecreatetoRolling:spec: replicas: 5 selector: ha-router: geo-us-west strategy: recreateParams: timeoutSeconds: 600 resources: {} type: Rolling 1- 1
- Set to
Rolling.
Update the
OPENSHIFT_HA_VIRTUAL_IPSenvironment variable to contain the additional virtual IP addresses:- name: OPENSHIFT_HA_VIRTUAL_IPS value: 10.245.2.101-105,10.245.2.110,10.245.2.201-205 1- 1
10.245.2.110,10.245.2.201-205have been added to the list.
17.2.5. Multiple Highly Available Services In a Network
The IPFailover service uses VRRP (Virtual Router Redundancy Protocol) to communicate with its peers. By default, the generated Keepalived configuration uses a VRRP ID offset starting from 0 (and sequentially increasing) to denote the peers in a network. If you wish to run multiple highly available services in the same network (have multiple IP Failover deployments), you need to ensure that there is no overlap of the VRRP IDs by using a different starting offset for your IPFailover deployment using the --vrrp-id-offset=<n> parameter.
$ oadm ipfailover ipf-ha-router-us-west \
    --replicas=5 --watch-port=80 \
    --selector="ha-router=geo-us-west" \
    --virtual-ips="10.245.2.101-105" \
    --credentials=/etc/origin/master/openshift-router.kubeconfig \
    --service-account=ipfailover --create

$ # Second IPFailover service with VRRP ids starting at 10.
$ oadm ipfailover ipf-service-redux \
    --replicas=2 --watch-port=6379  --vrrp-id-offset=10 \
    --selector="ha-service=redux" \
    --virtual-ips="10.245.2.199" \
    --credentials=/etc/origin/master/openshift-router.kubeconfig \
    --service-account=ipfailover --create
Chapter 18. Managing Pod Networks
18.1. Overview
When your cluster is configured to use the ovs-multitenant SDN plug-in, you can manage the separate pod overlay networks for projects using the administrator CLI. See the Configuring the SDN section for plug-in configuration steps, if necessary.
18.2. Joining Project Networks
To join projects to an existing project network:
$ oadm pod-network join-projects --to=<project1> <project2> <project3>
In the above example, all the pods and services in <project2> and <project3> can now access any pods and services in <project1> and vice versa.
Alternatively, instead of specifying specific project names, you can use the --selector=<project_selector> option.
18.3. Making Project Networks Global
To allow projects to access all pods and services in the cluster and vice versa:
$ oadm pod-network make-projects-global <project1> <project2>
In the above example, all the pods and services in <project1> and <project2> can now access any pods and services in the cluster and vice versa.
Alternatively, instead of specifying specific project names, you can use the --selector=<project_selector> option.
Chapter 19. IPtables
19.1. Overview
This topic describes how administrators should work with iptables. openshift-sdn takes care of adding the necessary iptables rules to make it work. Kubernetes and Docker also manage iptables for port forwarding and services.
19.2. Restarting
Docker doesn’t monitor the iptables rules that it adds for exposing ports from containers and hence if iptables service is restarted, then these rules are lost. So, to safely restart iptables, it is recommended that the rules are saved and restored.
$ iptables-save > /path/to/iptables.bkp
$ systemctl restart iptables
$ iptables-restore < /path/to/iptables.bkp
Chapter 20. Securing Builds by Strategy
20.1. Overview
Builds in OpenShift Enterprise are run in privileged containers that have access to the Docker daemon socket. As a security measure, it is recommended to limit who can run builds and the strategy that is used for those builds. Custom builds are inherently less safe than Source builds, given that they can execute any code in the build with potentially full access to the node’s Docker socket, and as such are disabled by default. Docker build permission should also be granted with caution as a vulnerability in the Docker build logic could result in a privileges being granted on the host node.
By default, all users that can create builds are granted permission to use the Docker and Source-to-Image build strategies. Users with cluster-admin privileges can enable the Custom build strategy, as referenced in the Restricting Build Strategies to a User Globally section of this page.
You can control who can build with what build strategy using an authorization policy. Each build strategy has a corresponding build subresource. A user must have permission to create a build and permission to create on the build strategy subresource in order to create builds using that strategy. Default roles are provided which grant the create permission on the build strategy subresource.
| Strategy | Subresource | Role |
|---|---|---|
| Docker | builds/docker | system:build-strategy-docker |
| Source-to-Image | builds/source | system:build-strategy-source |
| Custom | builds/custom | system:build-strategy-custom |
20.2. Disabling a Build Strategy Globally
To prevent access to a particular build strategy globally, log in as a user with cluster-admin privileges and remove the corresponding role from the system:authenticated group:
$ oadm policy remove-cluster-role-from-group system:build-strategy-custom system:authenticated
$ oadm policy remove-cluster-role-from-group system:build-strategy-docker system:authenticated
$ oadm policy remove-cluster-role-from-group system:build-strategy-source system:authenticated
In versions prior to 3.2, the build strategy subresources were included in the admin and edit roles. Ensure the build strategy subresources are also removed from these roles:
$ oc edit clusterrole admin
$ oc edit clusterrole edit
For each role, remove the line that corresponds to the resource of the strategy to disable.
Example 20.1. Disable the Docker Build Strategy for admin
kind: ClusterRole
metadata:
  name: admin
...
rules:
- resources:
  - builds/custom
  - builds/docker 1
  - builds/source
  ...
...- 1
- Delete this line to disable Docker builds globally for users with the admin role.
20.3. Restricting Build Strategies to a User Globally
To allow only a set of specific users to create builds with a particular strategy:
- Disable global access to the build strategy.
Assign the role corresponding to the build strategy to a specific user. For example, to add the system:build-strategy-docker cluster role to the user devuser:
$ oadm policy add-cluster-role-to-user system:build-strategy-docker devuser
Granting a user access at the cluster level to the builds/docker subresource means that the user will be able to create builds with the Docker strategy in any project in which they can create builds.
20.4. Restricting Build Strategies to a User Within a Project
Similar to granting the build strategy role to a user globally, to allow only a set of specific users within a project to create builds with a particular strategy:
- Disable global access to the build strategy.
Assign the role corresponding to the build strategy to a specific user within a project. For example, to add the system:build-strategy-docker role within the project devproject to the user devuser:
$ oadm policy add-role-to-user system:build-strategy-docker devuser -n devproject
Chapter 21. Building Dependency Trees
21.1. Overview
OpenShift Enterprise uses image change triggers in a build configuration to detect when an image stream tag has been updated. You can use the oadm build-chain command to build a dependency tree that identifies which images would be affected by updating an image in a specified image stream.
The build-chain tool can determine which builds to trigger; it analyzes the output of those builds to determine if they will in turn update another image stream tag. If they do, the tool continues to follow the dependency tree. Lastly, it outputs a graph specifying the image stream tags that would be impacted by an update to the top-level tag. The default output syntax for this tool is set to a human-readable format; the DOT format is also supported.
21.2. Usage
The following table describes common build-chain usage and general syntax:
| Description | Syntax |
|---|---|
|
Build the dependency tree for the latest tag in |
$ oadm build-chain <image-stream> |
| Build the dependency tree for the v2 tag in DOT format, and visualize it using the DOT utility. |
$ oadm build-chain <image-stream>:v2 \
    -o dot \
    | dot -T svg -o deps.svg
|
| Build the dependency tree across all projects for the specified image stream tag found the test project. |
$ oadm build-chain <image-stream>:v1 \
    -n test --all
|
You may need to install the graphviz package to use the dot command.
Chapter 22. Backup and Restore
22.1. Overview
In OpenShift Enterprise, you can back up (saving state to separate storage) and restore (recreating state from separate storage) at the cluster level. There is also some preliminary support for per-project backup. The full state of a cluster installation includes:
- etcd data on each master
- API objects
- registry storage
- volume storage
This topic does not cover how to back up and restore persistent storage, as those topics are left to the underlying storage provider. However, an example of how to perform a generic backup of application data is provided.
This topic only provides a generic way of backing up applications and the OpenShift Enterprise cluster. It can not take into account custom requirements. Therefore, you should create a full backup and restore procedure. To prevent data loss, necessary precautions should be taken.
22.2. Prerequisites
Because the restore procedure involves a complete reinstallation, save all the files used in the initial installation. This may include:
- ~/.config/openshift/installer.cfg.yml (from the Quick Installation method)
- Ansible playbooks and inventory files (from the Advanced Installation method)
- /etc/yum.repos.d/ose.repo (from the Disconnected Installation method)
- Backup the procedures for post-installation steps. Some installations may involve steps that are not included in the installer. This may include changes to the services outside of the control of OpenShift Enterprise or the installation of extra services like monitoring agents. Additional configuration that is not supported yet by the advanced installer might also be affected, for example when using multiple authentication providers.
Install packages that provide various utility commands:
# yum install etcd
If using a container-based installation, pull the etcd image instead:
# docker pull rhel7/etcd
Note the location of the etcd data directory (or $ETCD_DATA_DIR in the following sections), which depends on how etcd is deployed.
| Deployment Type | Description | Data Directory |
|---|---|---|
| separate etcd | etcd runs as a separate service, either co-located on master nodes or on separate nodes. | /var/lib/etcd |
| embedded etcd | etcd runs as part of the master service. | /var/lib/origin/openshift.local.etcd |
22.3. Cluster Backup
Save all the certificates and keys, on each master:
# cd /etc/origin/master
# tar cf /tmp/certs-and-keys-$(hostname).tar *.key *.crt
If etcd is running on more than one host, stop it on each host:
# sudo systemctl stop etcd
Although this step is not strictly necessary, doing so ensures that the etcd data is fully synchronized.
Create an etcd backup:
# etcdctl backup \ --data-dir $ETCD_DATA_DIR \ --backup-dir $ETCD_DATA_DIR.bakNoteIf etcd is running on more than one host, the various instances regularly synchronize their data, so creating a backup for one of them is sufficient.
NoteFor a container-based installation, you must use
docker execto run etcdctl inside the container.Copy the db file over to the backup you created:
# cp "$ETCD_DATA_DIR"/member/snap/db "$ETCD_DATA_DIR.bak"/member/snap/db
22.4. Cluster Restore for Single-member etcd Clusters
To restore the cluster:
Reinstall OpenShift Enterprise.
This should be done in the same way that OpenShift Enterprise was previously installed.
- Run all necessary post-installation steps.
Restore the certificates and keys, on each master:
# cd /etc/origin/master
# tar xvf /tmp/certs-and-keys-$(hostname).tar
Restore from the etcd backup:
# mv $ETCD_DATA_DIR $ETCD_DATA_DIR.orig
# cp -Rp $ETCD_DATA_DIR.bak $ETCD_DATA_DIR
# chcon -R --reference $ETCD_DATA_DIR.orig $ETCD_DATA_DIR
# chown -R etcd:etcd $ETCD_DATA_DIR
Create the new single node cluster using etcd’s
--force-new-clusteroption. You can do this using the values from /etc/etcd/etcd.conf, or you can temporarily modify the systemd unit file and start the service normally.To do so, edit the /usr/lib/systemd/system/etcd.service file, and add
--force-new-cluster:# sed -i '/ExecStart/s/"$/ --force-new-cluster"/' /usr/lib/systemd/system/etcd.service # systemctl show etcd.service --property ExecStart --no-pager ExecStart=/bin/bash -c "GOMAXPROCS=$(nproc) /usr/bin/etcd --force-new-cluster"
Then, restart the etcd service:
# systemctl daemon-reload
# systemctl start etcd
Verify the etcd service started correctly, then re-edit the /usr/lib/systemd/system/etcd.service file and remove the
--force-new-clusteroption:# sed -i '/ExecStart/s/ --force-new-cluster//' /usr/lib/systemd/system/etcd.service # systemctl show etcd.service --property ExecStart --no-pager ExecStart=/bin/bash -c "GOMAXPROCS=$(nproc) /usr/bin/etcd"
Restart the etcd service, then verify the etcd cluster is running correctly and displays OpenShift Enterprise’s configuration:
# systemctl daemon-reload
# systemctl restart etcd
22.5. Cluster Restore for Multiple-member etcd Clusters
When using a separate etcd cluster, you must first restore the etcd backup by creating a new, single node etcd cluster. If you run etcd as a stand-alone service on your master nodes, you can create the single node etcd cluster on a master node. If you use separate etcd with multiple members, you must then also add any additional etcd members to the etcd cluster one by one.
However, the details of the restoration process differ between embedded and external etcd. See the following section and follow the relevant steps before Bringing OpenShift Services Back Online.
22.5.1. Embedded etcd
Restore your etcd backup and configuration:
Run the following on the master with the embedded etcd:
# ETCD_DIR=/var/lib/origin/openshift.local.etcd
# mv $ETCD_DIR /var/lib/etcd.orig
# cp -Rp /var/lib/origin/etcd-backup-<timestamp>/ $ETCD_DIR
# chcon -R --reference /var/lib/etcd.orig/ $ETCD_DIR
# chown -R etcd:etcd $ETCD_DIR
WarningThe
$ETCD_DIRlocation differs between external and embedded etcd.Create the new, single node etcd cluster:
# etcd -data-dir=/var/lib/origin/openshift.local.etcd \
    -force-new-cluster
Verify etcd has started successfully by checking the output from the above command, which should look similar to the following near the end:
[...]
2016-06-24 12:14:45.644073 I | etcdserver: starting server... [version: 2.2.5, cluster version: 2.2]
[...]
2016-06-24 12:14:46.834394 I | etcdserver: published {Name:default ClientURLs:[http://localhost:2379 http://localhost:4001]} to cluster 5580663a6e0002
Shut down the process by running the following from a separate terminal:
# pkill etcd
- Continue to Bringing OpenShift Enterprise Services Back Online.
22.5.2. Separate etcd
Choose a system to be the initial etcd member, and restore its etcd backup and configuration:
Run the following on the etcd host:
# ETCD_DIR=/var/lib/etcd/
# mv $ETCD_DIR /var/lib/etcd.orig
# cp -Rp /var/lib/origin/etcd-backup-<timestamp>/ $ETCD_DIR
# chcon -R --reference /var/lib/etcd.orig/ $ETCD_DIR
# chown -R etcd:etcd $ETCD_DIR
WarningThe
$ETCD_DIRlocation differs between external and embedded etcd.- Restore your /etc/etcd/etcd.conf file from backup or .rpmsave.
Create the new single node cluster using etcd’s
--force-new-clusteroption. You can do this with a long complex command using the values from /etc/etcd/etcd.conf, or you can temporarily modify the systemd unit file and start the service normally.To do so, edit the /usr/lib/systemd/system/etcd.service file, and add
--force-new-cluster:# sed -i '/ExecStart/s/"$/ --force-new-cluster"/' /usr/lib/systemd/system/etcd.service # systemctl show etcd.service --property ExecStart --no-pager ExecStart=/bin/bash -c "GOMAXPROCS=$(nproc) /usr/bin/etcd --force-new-cluster"
Then restart the etcd service:
# systemctl daemon-reload
# systemctl start etcd
Verify the etcd service started correctly, then re-edit the /usr/lib/systemd/system/etcd.service file and remove the
--force-new-clusteroption:# sed -i '/ExecStart/s/ --force-new-cluster//' /usr/lib/systemd/system/etcd.service # systemctl show etcd.service --property ExecStart --no-pager ExecStart=/bin/bash -c "GOMAXPROCS=$(nproc) /usr/bin/etcd"
Restart the etcd service, then verify the etcd cluster is running correctly and displays OpenShift Enterprise’s configuration:
# systemctl daemon-reload # systemctl restart etcd # etcdctl --cert-file=/etc/etcd/peer.crt \ --key-file=/etc/etcd/peer.key \ --ca-file=/etc/etcd/ca.crt \ --peers="https://172.16.4.18:2379,https://172.16.4.27:2379" \ 1 ls /- 1
- Ensure that you specify the URLs of only active etcd members in the
--peersparameter value.
- If you have additional etcd members to add to your cluster, continue to Adding Additional etcd Members. Otherwise, if you only want a single node separate etcd cluster, continue to Bringing OpenShift Enterprise Services Back Online.
22.5.2.1. Adding Additional etcd Members
To add additional etcd members to the cluster, you must first adjust the default localhost peer in the peerURLs value for the first member:
Get the member ID for the first member using the
member listcommand:# etcdctl --cert-file=/etc/etcd/peer.crt \ --key-file=/etc/etcd/peer.key \ --ca-file=/etc/etcd/ca.crt \ --peers="https://172.18.1.18:2379,https://172.18.9.202:2379,https://172.18.0.75:2379" \ 1 member list- 1
- Ensure that you specify the URLs of only active etcd members in the
--peersparameter value.
Update the value of
peerURLsusing theetcdctl member updatecommand by passing the member ID obtained from the previous step:# etcdctl --cert-file=/etc/etcd/peer.crt \ --key-file=/etc/etcd/peer.key \ --ca-file=/etc/etcd/ca.crt \ --peers="https://172.18.1.18:2379,https://172.18.9.202:2379,https://172.18.0.75:2379" \ member update 511b7fb6cc0001 https://172.18.1.18:2380Alternatively, you can use
curl:# curl --cacert /etc/etcd/ca.crt \ --cert /etc/etcd/peer.crt \ --key /etc/etcd/peer.key \ https://172.18.1.18:2379/v2/members/511b7fb6cc0001 \ -XPUT -H "Content-Type: application/json" \ -d '{"peerURLs":["https://172.18.1.18:2380"]}'-
Re-run the
member listcommand and ensure the peer URLs no longer include localhost. Now, add each additional member to the cluster one at a time.
WarningEach member must be fully added and brought online one at a time. When adding each additional member to the cluster, the
peerURLslist must be correct for that point in time, so it will grow by one for each member added. Theetcdctl member addcommand will output the values that need to be set in the etcd.conf file as you add each member, as described in the following instructions.For each member, add it to the cluster using the values that can be found in that system’s etcd.conf file:
# etcdctl --cert-file=/etc/etcd/peer.crt \ --key-file=/etc/etcd/peer.key \ --ca-file=/etc/etcd/ca.crt \ --peers="https://172.16.4.18:2379,https://172.16.4.27:2379" \ member add 10.3.9.222 https://172.16.4.27:2380 1 Added member named 10.3.9.222 with ID 4e1db163a21d7651 to cluster ETCD_NAME="10.3.9.222" ETCD_INITIAL_CLUSTER="10.3.9.221=https://172.16.4.18:2380,10.3.9.222=https://172.16.4.27:2380" ETCD_INITIAL_CLUSTER_STATE="existing"- 1
- In this line,
10.3.9.222is a label for the etcd member. You can specify the host name, IP address, or a simple name.
-
Using the environment variables provided in the output of the above
etcdctl member addcommand, edit the /etc/etcd/etcd.conf file on the member system itself and ensure these settings match. Now start etcd on the new member:
# rm -rf /var/lib/etcd/member
# systemctl enable etcd
# systemctl start etcd
Ensure the service starts correctly and the etcd cluster is now healthy:
# etcdctl --cert-file=/etc/etcd/peer.crt \ --key-file=/etc/etcd/peer.key \ --ca-file=/etc/etcd/ca.crt \ --peers="https://172.16.4.18:2379,https://172.16.4.27:2379" \ member list 51251b34b80001: name=10.3.9.221 peerURLs=https://172.16.4.18:2380 clientURLs=https://172.16.4.18:2379 d266df286a41a8a4: name=10.3.9.222 peerURLs=https://172.16.4.27:2380 clientURLs=https://172.16.4.27:2379 # etcdctl --cert-file=/etc/etcd/peer.crt \ --key-file=/etc/etcd/peer.key \ --ca-file=/etc/etcd/ca.crt \ --peers="https://172.16.4.18:2379,https://172.16.4.27:2379" \ cluster-health cluster is healthy member 51251b34b80001 is healthy member d266df286a41a8a4 is healthy- Now repeat this process for the next member to add to the cluster.
- After all additional etcd members have been added, continue to Bringing OpenShift Enterprise Services Back Online.
22.6. Bringing OpenShift Enterprise Services Back Online
On each OpenShift Enterprise master, restore your master and node configuration from backup and enable and restart all relevant services.
On the master in a single master cluster:
# cp /etc/sysconfig/atomic-openshift-master.rpmsave /etc/sysconfig/atomic-openshift-master
# cp /etc/origin/master/master-config.yaml.<timestamp> /etc/origin/master/master-config.yaml
# cp /etc/origin/node/node-config.yaml.<timestamp> /etc/origin/node/node-config.yaml
# systemctl enable atomic-openshift-master
# systemctl enable atomic-openshift-node
# systemctl start atomic-openshift-master
# systemctl start atomic-openshift-node
On each master in a multi-master cluster:
# cp /etc/sysconfig/atomic-openshift-master-api.rpmsave /etc/sysconfig/atomic-openshift-master-api
# cp /etc/sysconfig/atomic-openshift-master-controllers.rpmsave /etc/sysconfig/atomic-openshift-master-controllers
# cp /etc/origin/master/master-config.yaml.<timestamp> /etc/origin/master/master-config.yaml
# cp /etc/origin/node/node-config.yaml.<timestamp> /etc/origin/node/node-config.yaml
# systemctl enable atomic-openshift-master-api
# systemctl enable atomic-openshift-master-controllers
# systemctl enable atomic-openshift-node
# systemctl start atomic-openshift-master-api
# systemctl start atomic-openshift-master-controllers
# systemctl start atomic-openshift-node
On each OpenShift Enterprise node, restore your node-config.yaml file from backup and enable and restart the atomic-openshift-node service:
# cp /etc/origin/node/node-config.yaml.<timestamp> /etc/origin/node/node-config.yaml
# systemctl enable atomic-openshift-node
# systemctl start atomic-openshift-node
Your OpenShift Enterprise cluster should now be back online.
22.7. Project Backup
A future release of OpenShift Enterprise will feature specific support for per-project back up and restore.
For now, to back up API objects at the project level, use oc export for each object to be saved. For example, to save the deployment configuration frontend in YAML format:
$ oc export dc frontend -o yaml > dc-frontend.yaml
To back up all of the project (with the exception of cluster objects like namespaces and projects):
$ oc export all -o yaml > project.yaml
22.7.1. Role Bindings
Sometimes custom policy role bindings are used in a project. For example, a project administrator can give another user a certain role in the project and grant that user project access.
These role bindings can be exported:
$ oc get rolebindings -o yaml --export=true > rolebindings.yaml
22.7.2. Service Accounts
If custom service accounts are created in a project, these need to be exported:
$ oc get serviceaccount -o yaml --export=true > serviceaccount.yaml
22.7.3. Secrets
Custom secrets like source control management secrets (SSH Public Keys, Username/Password) should be exported if they are used:
$ oc get secret -o yaml --export=true > secret.yaml
22.7.4. Persistent Volume Claims
If the an application within a project uses a persistent volume through a persistent volume claim (PVC), these should be backed up:
$ oc get pvc -o yaml --export=true > pvc.yaml
22.8. Project Restore
To restore a project, recreate the project and recreate all all of the objects that were exported during the backup:
$ oc new-project myproject
$ oc create -f project.yaml
$ oc create -f secret.yaml
$ oc create -f serviceaccount.yaml
$ oc create -f pvc.yaml
$ oc create -f rolebindings.yaml
Some resources can fail to be created (for example, pods and default service accounts).
22.9. Application Data Backup
In many cases, application data can be backed up using the oc rsync command, assuming rsync is installed within the container image. The Red Hat rhel7 base image does contain rsync. Therefore, all images that are based on rhel7 contain it as well.
This is a generic backup of application data and does not take into account application-specific backup procedures, for example special export/import procedures for database systems.
Other means of backup may exist depending on the type of the persistent volume (for example, Cinder, NFS, Gluster, or others).
The paths to back up are also application specific. You can determine what path to back up by looking at the mountPath for volumes in the deploymentconfig.
Example of Backing up a Jenkins Deployment’s Application Data
Get the application data
mountPathfrom thedeploymentconfig:$ oc get dc/jenkins -o jsonpath='{ .spec.template.spec.containers[?(@.name=="jenkins")].volumeMounts[?(@.name=="jenkins-data")].mountPath }' /var/lib/jenkinsGet the name of the pod that is currently running:
$ oc get pod --selector=deploymentconfig=jenkins -o jsonpath='{ .metadata.name }'
jenkins-1-37nux
Use the
oc rsynccommand to copy application data:$ oc rsync jenkins-1-37nux:/var/lib/jenkins /tmp/
This type of application data backup can only be performed while an application pod is currently running.
22.10. Application Data Restore
The process for restoring application data is similar to the application backup procedure using the oc rsync tool. The same restrictions apply and the process of restoring application data requires a persistent volume.
Example of Restoring a Jenkins Deployment’s Application Data
Verify the backup:
$ ls -la /tmp/jenkins-backup/
total 8
drwxrwxr-x.  3 user     user   20 Sep  6 11:14 .
drwxrwxrwt. 17 root     root 4096 Sep  6 11:16 ..
drwxrwsrwx. 12 user     user 4096 Sep  6 11:14 jenkins
Use the
oc rsynctool to copy the data into the running pod:$ oc rsync /tmp/jenkins-backup/jenkins jenkins-1-37nux:/var/lib
NoteDepending on the application, you may be required to restart the application.
Restart the application with new data (optional):
$ oc delete pod jenkins-1-37nux
Alternatively, you can scale down the deployment to 0, and then up again:
$ oc scale --replicas=0 dc/jenkins
$ oc scale --replicas=1 dc/jenkins
Chapter 23. Troubleshooting OpenShift SDN
23.1. Overview
As described in the SDN documentation there are multiple layers of interfaces that are created to correctly pass the traffic from one container to another. In order to debug connectivity issues, you have to test the different layers of the stack to work out where the problem arises. This guide will help you dig down through the layers to identify the problem and how to fix it.
Part of the problem is that OpenShift Enterprise can be set up many ways, and the networking can be wrong in a few different places. So this document will work through some scenarios that, hopefully, will cover the majority of cases. If your problem is not covered, the tools and concepts that are introduced should help guide debugging efforts.
23.2. Nomenclature
- Cluster
- The set of machines in the cluster. i.e. the Masters and the Nodes.
- Master
- A controller of the OpenShift Enterprise cluster. Note that the master may not be a node in the cluster, and thus, may not have IP connectivity to the pods.
- Node
- Host in the cluster running OpenShift Enterprise that can host pods.
- Pod
- Group of containers running on a node, managed by OpenShift Enterprise.
- Service
- Abstraction that presents a unified network interface that is backed by one or more pods.
- Router
- A web proxy that can map various URLs and paths into OpenShift Enterprise services to allow external traffic to travel into the cluster.
- Node Address
- The IP address of a node. This is assigned and managed by the owner of the network to which the node is attached. Must be reachable from any node in the cluster (master and client).
- Pod Address
- The IP address of a pod. These are assigned and managed by OpenShift Enterprise. By default they are assigned out of the 10.128.0.0/14 network (or, in older versions, 10.1.0.0/16). Only reachable from the client nodes.
- Service Address
- An IP address that represents the service, and is mapped to a pod address internally. These are assigned and managed by OpenShift Enterprise. By default they are assigned out of the 172.30.0.0/16 network. Only reachable from the client nodes.
The following diagram shows all of the pieces involved with external access.
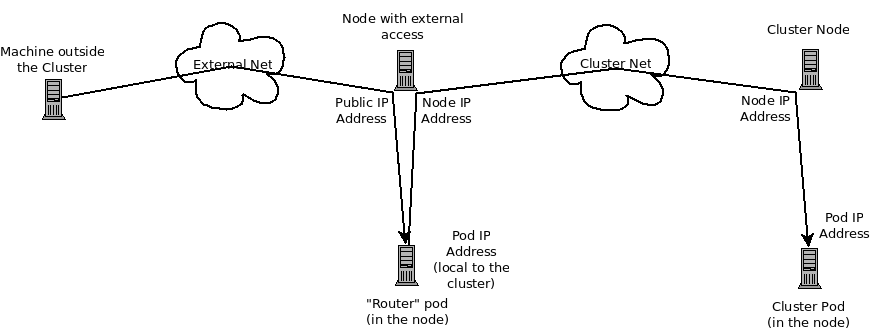
23.3. Debugging External Access to an HTTP Service
If you are on an machine outside the cluster and are trying to access a resource provided by the cluster there needs to be a process running in a pod that listens on a public IP address and "routes" that traffic inside the cluster. The OpenShift Enterprise router serves that purpose for HTTP, HTTPS (with SNI), WebSockets, or TLS (with SNI).
Assuming you can’t access an HTTP service from the outside of the cluster, let’s start by reproducing the problem on the command line of the machine where things are failing. Try:
curl -kv http://foo.example.com:8000/bar # But replace the argument with your URL
If that works, are you reproducing the bug from the right place? It is also possible that the service has some pods that work, and some that don’t. So jump ahead to the Section 23.4, “Debugging the Router” section.
If that failed, then let’s resolve the DNS name to an IP address (assuming it isn’t already one):
dig +short foo.example.com # But replace the hostname with yours
If that doesn’t give back an IP address, it’s time to troubleshoot DNS, but that’s outside the scope of this guide.
Make sure that the IP address that you got back is one that you expect to be running the router. If it’s not, fix your DNS.
Next, use ping -c address and tracepath address to check that you can reach the router host. It is possible that they will not respond to ICMP packets, in which case those tests will fail, but the router machine may be reachable. In which case, try using the telnet command to access the port for the router directly:
telnet 1.2.3.4 8000
You may get:
Trying 1.2.3.4...
Connected to 1.2.3.4.
Escape character is '^]'.
If so, there’s something listening on the port on the IP address. That’s good. Hit ctrl-] then hit the enter key and then type close to quit telnet. Move on to the Section 23.4, “Debugging the Router” section to check other things on the router.
Or you could get:
Trying 1.2.3.4...
telnet: connect to address 1.2.3.4: Connection refused
Which tells us that the router is not listening on that port. Please see the Section 23.4, “Debugging the Router” section for more pointers on how to configure the router.
Or if you see:
Trying 1.2.3.4...
  telnet: connect to address 1.2.3.4: Connection timed out
Which tells us that you can’t talk to anything on that IP address. Check your routing, firewalls, and that you have a router listening on that IP address. To debug the router, see the Section 23.4, “Debugging the Router” section. For IP routing and firewall issues, debugging that is beyond the purview of this guide.
23.4. Debugging the Router
Now that you have an IP address, we need to ssh to that machine and check that the router software is running on that machine and configured correctly. So let’s ssh there and get administrative OpenShift Enterprise credentials.
If you have access to administrator credentials but are no longer logged in as the default system user system:admin, you can log back in as this user at any time as long as the credentials are still present in your CLI configuration file. The following command logs in and switches to the default project:
$ oc login -u system:admin -n default
Check that the router is running:
# oc get endpoints --namespace=default --selector=router
NAMESPACE   NAME              ENDPOINTS
default     router            10.128.0.4:80
If that command fails, then your OpenShift Enterprise configuration is broken. Fixing that is outside the scope of this document.
You should see one or more router endpoints listed, but that won’t tell you if they are running on the machine with the given external IP address, since the endpoint IP address will be one of the pod addresses that is internal to the cluster. To get the list of router host IP addresses, run:
# oc get pods --all-namespaces --selector=router --template='{{range .items}}HostIP: {{.status.hostIP}}   PodIP: {{.status.podIP}}{{end}}{{"\n"}}'
HostIP: 192.168.122.202   PodIP: 10.128.0.4
You should see the host IP that corresponds to your external address. If you do not, please refer to the router documentation to configure the router pod to run on the right node (by setting the affinity correctly) or update your DNS to match the IP addresses where the routers are running.
At this point in the guide, you should be on a node, running your router pod, but you still cannot get the HTTP request to work. First we need to make sure that the router is mapping the external URL to the correct service, and if that works, we need to dig into that service to make sure that all endpoints are reachable.
Let’s list all of the routes that OpenShift Enterprise knows about:
# oc get route --all-namespaces
NAME              HOST/PORT         PATH      SERVICE        LABELS    TLS TERMINATION
route-unsecured   www.example.com   /test     service-name
If the host name and path from your URL don’t match anything in the list of returned routes, then you need to add a route. See the router documentation.
If your route is present, then you need to debug access to the endpoints. That’s the same as if you were debugging problems with a service, so please continue on with the next Section 23.5, “Debugging a Service” section.
23.5. Debugging a Service
If you can’t communicate with a service from inside the cluster (either because your services can’t communicate directly, or because you are using the router and everything works until you get into the cluster) then you need to work out what endpoints are associated with a service and debug them.
First, let’s get the services:
# oc get services --all-namespaces
NAMESPACE   NAME              LABELS                                    SELECTOR                  IP(S)            PORT(S)
default     docker-registry   docker-registry=default                   docker-registry=default   172.30.243.225   5000/TCP
default     kubernetes        component=apiserver,provider=kubernetes   <none>                    172.30.0.1       443/TCP
default     router            router=router                             router=router             172.30.213.8     80/TCP
You should see your service in the list. If not, then you need to define your service.
The IP addresses listed in the service output are the Kubernetes service IP addresses that Kubernetes will map to one of the pods that backs that service. So you should be able to talk to that IP address. But, unfortunately, even if you can, it doesn’t mean all pods are reachable; and if you can’t, it doesn’t mean all pods aren’t reachable. It just tells you the status of the one that kubeproxy hooked you up to.
Let’s test the service anyway. From one of your nodes:
curl -kv http://172.30.243.225:5000/bar # Replace the argument with your service IP address and port
Then, let’s work out what pods are backing our service (replace docker-registry with the name of the broken service):
# oc get endpoints --selector=docker-registry
NAME              ENDPOINTS
docker-registry   10.128.2.2:5000
From this, we can see that there’s only one endpoint. So, if your service test succeeded, and the router test succeeded, then something really odd is going on. But if there’s more than one endpoint, or the service test failed, try the following for each endpoint. Once you identify what endpoints aren’t working, then proceed to the next section.
First, test each endpoint (change the URL to have the right endpoint IP, port, and path):
curl -kv http://10.128.2.2:5000/bar
If that works, great, try the next one. If it failed, make a note of it and we’ll work out why, in the next section.
If all of them failed, then it is possible that the local node is not working, jump to the Section 23.7, “Debugging Local Networking” section.
If all of them worked, then jump to the Section 23.11, “Debugging Kubernetes” section to work out why the service IP address isn’t working.
23.6. Debugging Node to Node Networking
Using our list of non-working endpoints, we need to test connectivity to the node.
Make sure that all nodes have the expected IP addresses:
# oc get hostsubnet
NAME                   HOST                   HOST IP           SUBNET
rh71-os1.example.com   rh71-os1.example.com   192.168.122.46    10.1.1.0/24
rh71-os2.example.com   rh71-os2.example.com   192.168.122.18    10.1.2.0/24
rh71-os3.example.com   rh71-os3.example.com   192.168.122.202   10.1.0.0/24
If you are using DHCP they could have changed. Ensure the host names, IP addresses, and subnets match what you expect. If any node details have changed, use
oc edit hostsubnetto correct the entries.After ensuring the node addresses and host names are correct, list the endpoint IPs and node IPs:
# oc get pods --selector=docker-registry \
    --template='{{range .items}}HostIP: {{.status.hostIP}}   PodIP: {{.status.podIP}}{{end}}{{"\n"}}'

HostIP: 192.168.122.202   PodIP: 10.128.0.4
Find the endpoint IP address you made note of before and look for it in the
PodIPentry, and find the correspondingHostIPaddress. Then test connectivity at the node host level using the address fromHostIP:-
ping -c 3 <IP_address>: No response could mean that an intermediate router is eating the ICMP traffic. tracepath <IP_address>: Shows the IP route taken to the target, if ICMP packets are returned by all hops.If both
tracepathandpingfail, then look for connectivity issues with your local or virtual network.
-
For local networking, check the following:
Check the route the packet takes out of the box to the target address:
# ip route get 192.168.122.202
  192.168.122.202 dev ens3  src 192.168.122.46
    cache
In the above example, it will go out the interface named
ens3with the source address of192.168.122.46and go directly to the target. If that is what you expected, useip a show dev ens3to get the interface details and make sure that is the expected interface.An alternate result may be the following:
# ip route get 192.168.122.202
  1.2.3.4 via 192.168.122.1 dev ens3  src 192.168.122.46
It will pass through the
viaIP value to route appropriately. Ensure that the traffic is routing correctly. Debugging route traffic is beyond the scope of this guide.
Other debugging options for node to node networking can be solved with the following:
-
Do you have ethernet link on both ends? Look for
Link detected: yesin the output fromethtool <network_interface>. -
Are your duplex settings, and ethernet speeds right on both ends? Look through the rest of the
ethtool <network_interface>information. - Are the cables plugged in correctly? To the correct ports?
- Are the switches configured correctly?
Once you have ascertained that the node to node connectivity is fine, we need to look at the SDN configuration on both ends.
23.7. Debugging Local Networking
At this point we should have a list of one or more endpoints that you can’t communicate with, but that have node to node connectivity. For each one, we need to work out what is wrong, but first you need to understand how the SDN sets up the networking on a node for the different pods.
23.7.1. The Interfaces on a Node
These are the interfaces that the OpenShift Enterprise SDN creates:
-
br0: The OVS bridge device that containers will be attached to. OpenShift Enterprise SDN also configures a set of non-subnet-specific flow rules on this bridge. (Themultitenantplug-in does this immediately; theovssubnetplug-in waits until the SDN master announces the creation of the new node subnet.) -
lbr0: A Linux bridge device, which is configured as Docker’s bridge and given the cluster subnet gateway address (eg, 10.128.x.1/23). -
tun0: An OVS internal port (port 2 onbr0). This also gets assigned the cluster subnet gateway address, and is used for external network access. OpenShift Enterprise SDN configuresnetfilterand routing rules to enable access from the cluster subnet to the external network via NAT. -
vlinuxbrandvovsbr: Two Linux peer virtual Ethernet interfaces.vlinuxbris added tolbr0, andvovsbris added tobr0(port 3), to provide connectivity for containers created directly with Docker outside of OpenShift Enterprise. -
vxlan0: The OVS VXLAN device (port 1 onbr0), which provides access to containers on remote nodes. -
vethX(in the main netns): A Linux virtual ethernet peer ofeth0in the docker netns. It will be attached to the OVS bridge on one of the other ports.
23.7.2. SDN Flows Inside a Node
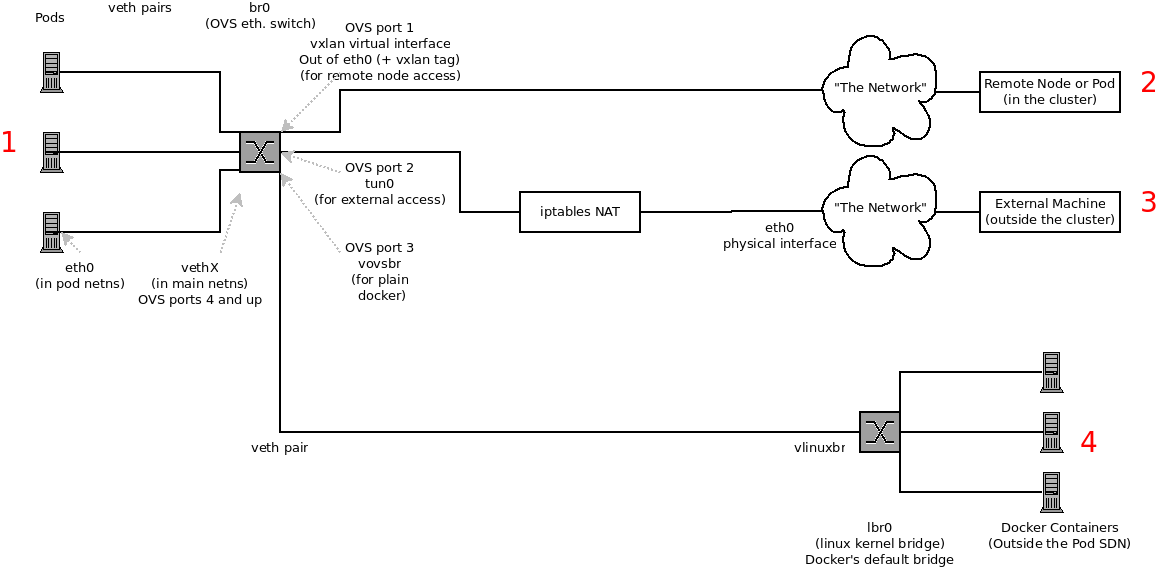
Depending on what you are trying to access (or be accessed from) the path will vary. There are four different places the SDN connects (inside a node). They are labeled in red on the diagram above.
- Pod: Traffic is going from one pod to another on the same machine (1 to a different 1)
- Remote Node (or Pod): Traffic is going from a local pod to a remote node or pod in the same cluster (1 to 2)
- External Machine: Traffic is going from a local pod outside the cluster (1 to 3)
- Local Docker: Traffic is going from a local pod to a local container that is not managed by Kubernetes (1 to 4)
Of course the opposite traffic flows are also possible.
23.7.3. Debugging Steps
23.7.3.1. Is IP Forwarding Enabled?
Check that sysctl net.ipv4.ip_forward is set to 1 (and check the host if this is a VM)
23.7.3.2. Is firewalld Disabled?
Check that firewalld is disabled using systemctl status firewalld. If it is running, you either need to disable it, or check that it is not blocking traffic. That is outside the scope of this guide.
23.7.3.3. Are your routes correct?
Check the route tables with ip route:
# ip route
default via 192.168.122.1 dev ens3
10.128.0.0/14 dev tun0  proto kernel  scope link                        # This sends all pod traffic into OVS
10.128.2.0/23 dev tun0  proto kernel  scope link  src 10.128.2.1        # This is traffic going to local pods, overriding the above
169.254.0.0/16 dev ens3  scope link  metric 1002                        # This is for Zeroconf (may not be present)
172.17.0.0/16 dev docker0  proto kernel  scope link  src 172.17.42.1    # Docker's private IPs... used only by things directly configured by docker; not {product-title}
192.168.122.0/24 dev ens3  proto kernel  scope link  src 192.168.122.46 # The physical interface on the local subnet
You should see the 10.128.x.x lines (assuming you have your pod network set to the default range in your configuration). If you do not, check the OpenShift Enterprise logs (see the Section 23.10, “Reading the Logs” section)
23.7.4. Is the Open vSwitch configured correctly?
Check the Open vSwitch bridges on both sides:
# ovs-vsctl list-br
br0
This should just be br0.
You can list all of the ports that ovs knows about:
# ovs-ofctl -O OpenFlow13 dump-ports-desc br0
OFPST_PORT_DESC reply (OF1.3) (xid=0x2):
 1(vxlan0): addr:9e:f1:7d:4d:19:4f
     config:     0
     state:      0
     speed: 0 Mbps now, 0 Mbps max
 2(tun0): addr:6a:ef:90:24:a3:11
     config:     0
     state:      0
     speed: 0 Mbps now, 0 Mbps max
 8(vethe19c6ea): addr:1e:79:f3:a0:e8:8c
     config:     0
     state:      0
     current:    10GB-FD COPPER
     speed: 10000 Mbps now, 0 Mbps max
 9(vovsbr): addr:6e:dc:28:df:63:c3
     config:     0
     state:      0
     current:    10GB-FD COPPER
     speed: 10000 Mbps now, 0 Mbps max
 LOCAL(br0): addr:0a:7f:b4:33:c2:43
     config:     PORT_DOWN
     state:      LINK_DOWN
     speed: 0 Mbps now, 0 Mbps max
Next list the flows that are configured on that bridge. In output below I have removed the cookie, duration, n_packets and n_bytes columns; and I have lined up the various columns to make it easier to understand, and added in-line comments and blank lines:
# ovs-ofctl -O OpenFlow13 dump-flows br0
OFPST_FLOW reply (OF1.3) (xid=0x2):

# External access is the default if no higher priority matches
table=0, priority=50                           actions=output:2

# ARP and IP Traffic destined for the local subnet gateway goes out of the switch to
# IP tables and the main route table
table=0, priority=100,arp,arp_tpa=10.128.2.1     actions=output:2
table=0, priority=100, ip, nw_dst=10.128.2.1     actions=output:2

# All remote nodes should have two entries here, one for IP and one for ARP.
# Here we see the entries for two remote nodes
table=0, priority=100,arp,arp_tpa=10.128.4.0/23  actions=set_field:192.168.122.18->tun_dst,output:1
table=0, priority=100, ip, nw_dst=10.128.4.0/23  actions=set_field:192.168.122.18->tun_dst,output:1

table=0, priority=100,arp,arp_tpa=10.128.0.0/23  actions=set_field:192.168.122.202->tun_dst,output:1
table=0, priority=100, ip, nw_dst=10.128.0.0/23  actions=set_field:192.168.122.202->tun_dst,output:1

# Other traffic destined for a local pod IP that hasn't been handled by a higher priority rule
# goes out port 9 to the virtual bridge for docker
table=0, priority=75,  ip, nw_dst=10.128.2.0/23  actions=output:9
table=0, priority=75, arp,arp_tpa=10.128.2.0/23  actions=output:9

# Then ports 3-8 or 10+ are for local pods, here there are two local pods
table=0, priority=100, ip, nw_dst=10.128.2.7     actions=output:8
table=0, priority=100,arp,arp_tpa=10.128.2.7     actions=output:8

table=0, priority=100, ip, nw_dst=10.128.2.10    actions=output:12
table=0, priority=100,arp,arp_tpa=10.128.2.10    actions=output:12
The SDN networking plug-in configures two entries (one for arp and one for ip) with output=1 per peer endpoint (i.e. if there are five nodes, then there should be 4 * 2 rules; In the example above we have 3 nodes total, so there are four entries above). It also sets up the other entries on ports 2 and 9 that are shown above. If there are flows missing, please look in the Section 23.10, “Reading the Logs” section.
23.7.4.1. Is the iptables configuration correct?
Check the output from iptables-save to make sure you are not filtering traffic. However, OpenShift Enterprise sets up iptables rules during normal operation, so do not be surprised to see entries there.
23.7.4.2. Is your external network correct?
Check external firewalls, if any, allow traffic to the target address (this is site-dependent, and beyond the purview of this guide).
23.8. Debugging Virtual Networking
23.8.1. Builds on a Virtual Network are Failing
If you are installing OpenShift Enterprise using a virtual network (for example, OpenStack), and a build is failing, the maximum transmission unit (MTU) of the target node host might not be compatible with the MTU of the primary network interface (for example, eth0).
For a build to complete successfully, the MTU of an SDN must be less than the eth0 network MTU in order to pass data to between node hosts.
Check the MTU of your network by running the
ip addrcommand:# ip addr --- 2: eth0: <BROADCAST,MULTICAST,UP,LOWER_UP> mtu 1500 qdisc pfifo_fast state UP qlen 1000 link/ether fa:16:3e:56:4c:11 brd ff:ff:ff:ff:ff:ff inet 172.16.0.0/24 brd 172.16.0.0 scope global dynamic eth0 valid_lft 168sec preferred_lft 168sec inet6 fe80::f816:3eff:fe56:4c11/64 scope link valid_lft forever preferred_lft forever ---The MTU of the above network is 1500.
The MTU in your node configuration must be lower than the network value. Check the
mtuin the node configuration of the targeted node host:# cat /etc/origin/node/node-config.yaml ... networkConfig: mtu: 1450 networkPluginName: company/openshift-ovs-subnet ...
In the above node configuration file, the
mtuvalue is lower than the network MTU, so no configuration is needed. If themtuvalue was higher, edit the file and lower the value to at least 50 units fewer than the MTU of the primary network interface, then restart the node service. This would allow larger packets of data to pass between nodes.
23.9. Debugging Pod Egress
If you are trying to access an external service from a pod, e.g.:
curl -kv github.com
Make sure that the DNS is resolving correctly:
dig +search +noall +answer github.com
That should return the IP address for the github server, but check that you got back the correct address. If you get back no address, or the address of one of your machines, then you may be matching the wildcard entry in your local DNS server.
To fix that, you either need to make sure that DNS server that has the wildcard entry is not listed as a nameserver in your /etc/resolv.conf or you need to make sure that the wildcard domain is not listed in the search list.
If the correct IP address was returned, then try the debugging advice listed above in Section 23.7, “Debugging Local Networking”. Your traffic should leave the Open vSwitch on port 2 to pass through the iptables rules, then out the route table normally.
23.10. Reading the Logs
Run: journalctl -u atomic-openshift-node.service --boot | less
Look for the Output of setup script: line. Everything starting with '+' below that are the script steps. Look through that for obvious errors.
Following the script you should see lines with Output of adding table=0. Those are the OVS rules, and there should be no errors.
23.11. Debugging Kubernetes
Check iptables -t nat -L to make sure that the service is being NAT’d to the right port on the local machine for the kubeproxy.
This is all changing soon… Kubeproxy is being eliminated and replaced with an iptables-only solution.
23.12. Further Help
- Run the script at https://raw.githubusercontent.com/openshift/openshift-sdn/master/hack/debug.sh on the master (or from another machine with access to the master) to generate useful debugging information.
- When debugging IP failover problems, run the script at https://raw.githubusercontent.com/openshift/openshift-sdn/master/hack/ipf-debug.sh on the master (or from another machine with access to the master) to generate useful debugging information.
23.13. Miscellaneous Notes
23.13.1. Other clarifications on ingress
- Kube - declare a service as NodePort and it will claim that port on all machines in the cluster (on what interface?) and then route into kube-proxy and then to a backing pod. See http://kubernetes.io/v1.0/docs/user-guide/services.html#type-nodeport (some node must be accessible from outside)
- Kube - declare as a LoadBalancer and something you have to write does the rest
- OS/AE - Both use the router
23.13.2. TLS Handshake Timeout
When a pod fails to deploy, check its docker log for a TLS handshake timeout:
$ docker log <container_id>
...
[...] couldn't get deployment [...] TLS handshake timeout
...
This condition, and generally, errors in establishing a secure connection, may be caused by a large difference in the MTU values between tun0 and the primary interface (e.g., eth0), such as when tun0 MTU is 1500 and eth0 MTU is 9000 (jumbo frames).
23.13.3. Other debugging notes
-
Peer interfaces (of a Linux virtual ethernet pair) can be determined with
ethtool -S ifname -
Driver type:
ethtool -i ifname
Chapter 24. Revision History: Cluster Administration
Red Hat OpenShift Documentation Team 3.2 :experimental:
24.1. Tue May 02 2017
| Affected Topic | Description of Change |
|---|---|
| Added that custom builds are disabled by default. |
24.2. Thu Apr 13 2017
| Affected Topic | Description of Change |
|---|---|
| Added information about preserving labels and annotations, in addition to groups. |
24.3. Mon Mar 27 2017
| Affected Topic | Description of Change |
|---|---|
|
Added the missing |
24.4. Mon Mar 20 2017
| Affected Topic | Description of Change |
|---|---|
| Updated the ClusterRole file in the Granting Users Daemonset Permissions section. |
24.5. Tue Mar 14 2017
| Affected Topic | Description of Change |
|---|---|
|
Renamed instances of |
24.6. Wed Jan 25 2017
| Affected Topic | Description of Change |
|---|---|
|
Removed references to the deprecated | |
|
Removed references to the deprecated |
24.7. Mon Jan 09 2017
| Affected Topic | Description of Change |
|---|---|
| Added clarifying details about cluster roles. |
24.8. Tue Dec 20 2016
| Affected Topic | Description of Change |
|---|---|
| Added to the note with information on host backups over 700 MB. |
24.9. Mon Dec 05 2016
| Affected Topic | Description of Change |
|---|---|
| Added the Backup and Restore section. |
24.10. Mon Nov 21 2016
| Affected Topic | Description of Change |
|---|---|
|
Updated the output for |
24.11. Tue Nov 01 2016
| Affected Topic | Description of Change |
|---|---|
| Added a NOTE box to the Cluster Restore section, indicating that the outlined procedure only works for single-member etcd clusters. |
24.12. Mon Oct 24 2016
| Affected Topic | Description of Change |
|---|---|
| Added a Service Accounts and Secrets heading. |
24.13. Mon Oct 17 2016
| Affected Topic | Description of Change |
|---|---|
| Added the Multiple Highly Available Services In a Network section. |
24.14. Tue Oct 11 2016
| Affected Topic | Description of Change |
|---|---|
|
Added that |
24.15. Tue Oct 04 2016
| Affected Topic | Description of Change |
|---|---|
| Fixed deprecated commands in the Configuring a Highly-available Routing Service section. | |
| Added Prerequisites details and created new sections for Application Data Backup, Application Data Restore, Project Restore, as well as backing up Role Bindings, Service Accounts, Secrets, and Persistent Volume Claims. | |
|
Added a Note box about the required |
24.16. Tue Sep 13 2016
| Affected Topic | Description of Change |
|---|---|
| Added the Granting Users Daemonset Permissions section. |
24.17. Tue Sep 06 2016
| Affected Topic | Description of Change |
|---|---|
|
Removed an invalid |
24.18. Tue Aug 23 2016
| Affected Topic | Description of Change |
|---|---|
| New topic discussing back up (saving state to separate storage) and restore (recreating state from separate storage) at the cluster level. | |
| Added details on how to change the node traffic interface. | |
| Added information about required drop capabilities to the Creating New Security Context Constraints section. |
24.19. Mon Aug 01 2016
| Affected Topic | Description of Change |
|---|---|
| Clarified how to remove self-provisioning capabilities in the Disabling Self-provisioning section. |
24.20. Wed Jul 27 2016
| Affected Topic | Description of Change |
|---|---|
| Added a Note box in the Limiting Number of Self-Provisioned Projects Per User section with a pointer to the new Managing User and Group Labels section. | |
| Added a new Managing User and Group Labels section. |
24.21. Thu Jul 14 2016
| Affected Topic | Description of Change |
|---|---|
|
Added an Important box to the Limiting Number of Self-Provisioned Projects Per User section about the | |
| Added an Important box to the Configuring IP Failover section about using high availability with AWS. | |
| Added the TLS Handshake Timeout section. |
24.22. Tue Jun 14 2016
| Affected Topic | Description of Change |
|---|---|
| Added examples for long running versus timebound quota. | |
| Updated for build strategy role changes. | |
|
Added the Configuring Masters for Overcommitment section about the |
24.23. Fri Jun 10 2016
| Affected Topic | Description of Change |
|---|---|
| Fixed callout numbering in the Managed Service Accounts example. | |
| Added instructions on how to make the resource-reserver pod start automatically. | |
| Added a Modifying Scheduler Policy section. |
24.24. Mon May 30 2016
| Affected Topic | Description of Change |
|---|---|
| Updated the Disabling Swap Memory section with options that can help users avoid having to swap and added a Warning box stating that disabling swap memory is not recommended. | |
| Fixed command typos. |
24.25. Thu May 12 2016
| Affected Topic | Description of Change |
|---|---|
| Added the Dynamically Updating Virtual IPs for a Highly-available Service section. | |
| New topic on the RunOnceDuration plug-in. | |
| Moved the "Resource Quota" topic from the Developer Guide to Cluster Administration, as it involves cluster administration tasks, and renamed it Setting Quotas. | |
|
Added reference to the | |
| Moved the "Resource Limits" topic from the Developer Guide to Cluster Administration, as it involves cluster administration tasks, and renamed it Setting Limit Ranges. | |
| Updated the Reserving Resources for System Processes section to mention the new allocating node resources method. | |
| New topic on reserving node resources. | |
| Added the Controlling Pod Placement section. | |
|
Updated to use | |
| Added the Limiting Number of Self-Provisioned Projects Per User section. | |
| Added new registry roles to output in the Viewing Cluster Policy section. | |
| Added a Limiting Number of Self-Provisioned Projects Per User section. |
Legal Notice
Copyright © 2024 Red Hat, Inc.
OpenShift documentation is licensed under the Apache License 2.0 (https://www.apache.org/licenses/LICENSE-2.0).
Modified versions must remove all Red Hat trademarks.
Portions adapted from https://github.com/kubernetes-incubator/service-catalog/ with modifications by Red Hat.
Red Hat, Red Hat Enterprise Linux, the Red Hat logo, the Shadowman logo, JBoss, OpenShift, Fedora, the Infinity logo, and RHCE are trademarks of Red Hat, Inc., registered in the United States and other countries.
Linux® is the registered trademark of Linus Torvalds in the United States and other countries.
Java® is a registered trademark of Oracle and/or its affiliates.
XFS® is a trademark of Silicon Graphics International Corp. or its subsidiaries in the United States and/or other countries.
MySQL® is a registered trademark of MySQL AB in the United States, the European Union and other countries.
Node.js® is an official trademark of Joyent. Red Hat Software Collections is not formally related to or endorsed by the official Joyent Node.js open source or commercial project.
The OpenStack® Word Mark and OpenStack logo are either registered trademarks/service marks or trademarks/service marks of the OpenStack Foundation, in the United States and other countries and are used with the OpenStack Foundation’s permission. We are not affiliated with, endorsed or sponsored by the OpenStack Foundation, or the OpenStack community.
All other trademarks are the property of their respective owners.