This documentation is for a release that is no longer maintained
See documentation for the latest supported version 3 or the latest supported version 4.CLI Reference
OpenShift Container Platform 3.3 CLI Reference
Abstract
Chapter 1. Overview
With the OpenShift Container Platform command line interface (CLI), you can create applications and manage OpenShift Container Platform projects from a terminal. The CLI is ideal in situations where you are:
- Working directly with project source code.
- Scripting OpenShift Container Platform operations.
- Restricted by bandwidth resources and cannot use the web console.
The CLI is available using the oc command:
oc <command>
$ oc <command>See Get Started with the CLI for installation and setup instructions.
Chapter 2. Get Started with the CLI
2.1. Overview
The OpenShift Container Platform CLI exposes commands for managing your applications, as well as lower level tools to interact with each component of your system. This topic guides you through getting started with the CLI, including installation and logging in to create your first project.
2.2. Prerequisites
Certain operations require Git to be locally installed on a client. For example, the command to create an application using a remote Git repository:
oc new-app https://github.com/<your_user>/<your_git_repo>
$ oc new-app https://github.com/<your_user>/<your_git_repo>Before proceeding, install Git on your workstation. See the official Git documentation for instructions per your workstation’s operating system.
2.3. Installing the CLI
The easiest way to download the CLI is by accessing the About page on the web console if your cluster administrator has enabled the download links:
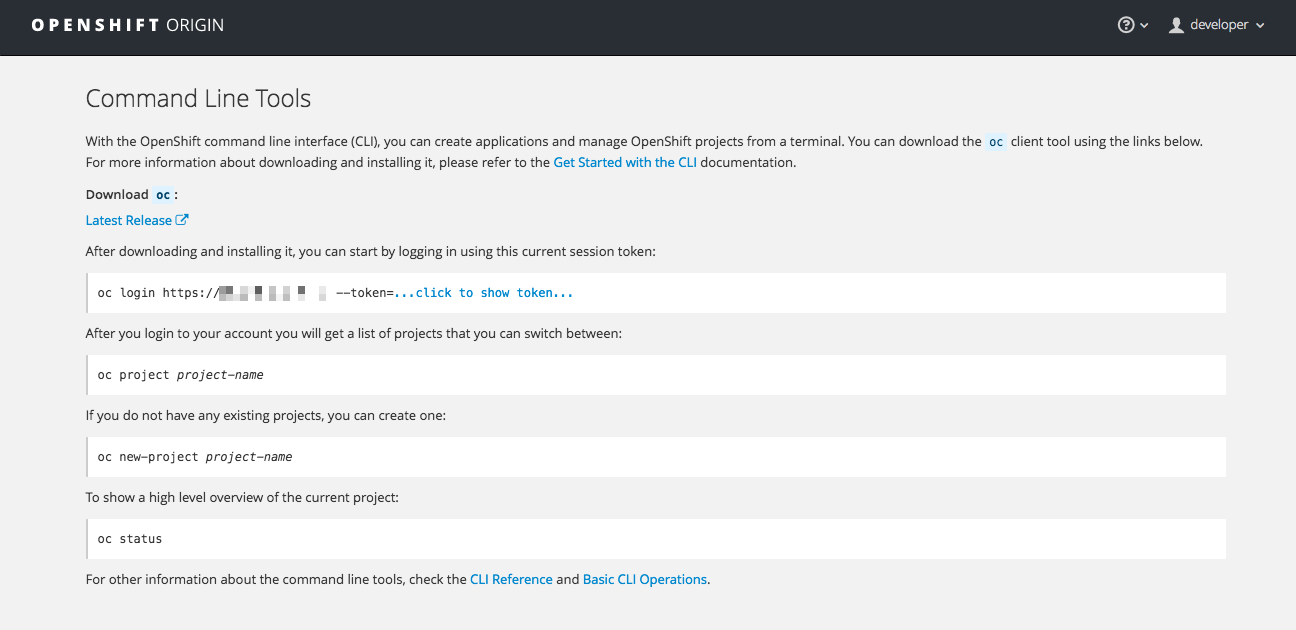
Installation options for the CLI vary depending on your operating system.
2.3.1. For Windows
The CLI for Windows is provided as a zip archive; you can download it from the Red Hat Customer Portal. After logging in with your Red Hat account, you must have an active OpenShift Enterprise subscription to access the downloads page:
Download the CLI from the Red Hat Customer Portal
Alternatively, if the cluster administrator has enabled it, you can download and unpack the CLI from the About page on the web console.
Tutorial Video:
The following video walks you through this process: Click here to watch

Then, unzip the archive with a ZIP program and move the oc binary to a directory on your PATH. To check your PATH, open the Command Prompt and run:
path
C:\> path2.3.2. For Mac OS X
The CLI for Mac OS X is provided as a tar.gz archive; you can download it from the Red Hat Customer Portal. After logging in with your Red Hat account, you must have an active OpenShift Enterprise subscription to access the downloads page:
Download the CLI from the Red Hat Customer Portal
Alternatively, if the cluster administrator has enabled it, you can download and unpack the CLI from the About page on the web console.
Tutorial Video:
The following video walks you through this process: Click here to watch
Then, unpack the archive and move the oc binary to a directory on your PATH. To check your PATH, open a Terminal window and run:
echo $PATH
$ echo $PATH2.3.3. For Linux
For Red Hat Enterprise Linux (RHEL) 7, you can install the CLI as an RPM using Red Hat Subscription Management (RHSM) if you have an active OpenShift Enterprise subscription on your Red Hat account:
subscription-manager register
subscription-manager attach --pool=<pool_ID>
subscription-manager repos --enable="rhel-7-server-ose-3.3-rpms"
yum install atomic-openshift-clients
# subscription-manager register
# subscription-manager attach --pool=<pool_ID>
# subscription-manager repos --enable="rhel-7-server-ose-3.3-rpms"
# yum install atomic-openshift-clients- 1
- Pool ID for an active OpenShift Enterprise subscription
For RHEL, Fedora, and other Linux distributions, you can also download the CLI directly from the Red Hat Customer Portal as a tar.gz archive. After logging in with your Red Hat account, you must have an active OpenShift Enterprise subscription to access the downloads page.
Download the CLI from the Red Hat Customer Portal
Tutorial Video:
The following video walks you through this process: Click here to watch
Alternatively, if the cluster administrator has enabled it, you can download and unpack the CLI from the About page on the web console.
Then, unpack the archive and move the oc binary to a directory on your PATH. To check your path, run:
echo $PATH
$ echo $PATHTo unpack the archive:
tar -xf <file>
$ tar -xf <file>If you do not use RHEL or Fedora, ensure that libc is installed and on your library path. If libc is not available, you might see the following error when you run CLI commands:
oc: No such file or directory
oc: No such file or directory2.4. Basic Setup and Login
The oc login command is the best way to initially set up the CLI, and it serves as the entry point for most users. The interactive flow helps you establish a session to an OpenShift Container Platform server with the provided credentials. The information is automatically saved in a CLI configuration file that is then used for subsequent commands.
The following example shows the interactive setup and login using the oc login command:
Example 2.1. Initial CLI Setup
When you have completed the CLI configuration, subsequent commands use the configuration file for the server, session token, and project information.
You can log out of CLI using the oc logout command:
oc logout
$ oc logout
User, alice, logged out of https://openshift.example.comIf you log in after creating or being granted access to a project, a project you have access to is automatically set as the current default, until switching to another one:
Additional options are also available for the oc login command.
If you have access to administrator credentials but are no longer logged in as the default system user system:admin, you can log back in as this user at any time as long as the credentials are still present in your CLI configuration file. The following command logs in and switches to the default project:
oc login -u system:admin -n default
$ oc login -u system:admin -n default2.5. CLI Configuration Files
A CLI configuration file permanently stores oc options and contains a series of authentication mechanisms and OpenShift Container Platform server connection information associated with nicknames.
As described in the previous section, the oc login command automatically creates and manages CLI configuration files. All information gathered by the command is stored in a configuration file located in ~/.kube/config. The current CLI configuration can be viewed using the following command:
Example 2.2. Viewing the CLI Configuration
CLI configuration files can be used to setup multiple CLI profiles using various OpenShift Container Platform servers, namespaces, and users so that you can switch easily between them. The CLI can support multiple configuration files; they are loaded at runtime and merged together along with any override options specified from the command line.
2.6. Projects
A project in OpenShift Container Platform contains multiple objects to make up a logical application.
Most oc commands run in the context of a project. The oc login selects a default project during initial setup to be used with subsequent commands. Use the following command to display the project currently in use:
oc project
$ oc projectIf you have access to multiple projects, use the following syntax to switch to a particular project by specifying the project name:
oc project <project_name>
$ oc project <project_name>For example:
The oc status command shows a high level overview of the project currently in use, with its components and their relationships, as shown in the following example:
2.7. What’s Next?
After you have logged in, you can create a new application and explore some common CLI operations.
Chapter 3. Managing CLI Profiles
3.1. Overview
A CLI configuration file allows you to configure different profiles, or contexts, for use with the OpenShift CLI. A context consists of user authentication and OpenShift Container Platform server information associated with a nickname.
3.2. Switching Between CLI Profiles
Contexts allow you to easily switch between multiple users across multiple OpenShift Container Platform servers, or clusters, when using issuing CLI operations. Nicknames make managing CLI configuration easier by providing short-hand references to contexts, user credentials, and cluster details.
After logging in with the CLI for the first time, OpenShift Container Platform creates a ~/.kube/config file if one does not already exist. As more authentication and connection details are provided to the CLI, either automatically during an oc login operation or by setting them explicitly, the updated information is stored in the configuration file:
Example 3.1. CLI Configuration File
- 1
- The
clusterssection defines connection details for OpenShift Container Platform clusters, including the address for their master server. In this example, one cluster is nicknamed openshift1.example.com:8443 and another is nicknamed openshift2.example.com:8443. - 2
- This
contextssection defines two contexts: one nicknamed alice-project/openshift1.example.com:8443/alice, using the alice-project project, openshift1.example.com:8443 cluster, and alice user, and another nicknamed joe-project/openshift1.example.com:8443/alice, using the joe-project project, openshift1.example.com:8443 cluster and alice user. - 3
- The
current-contextparameter shows that the joe-project/openshift1.example.com:8443/alice context is currently in use, allowing the alice user to work in the joe-project project on the openshift1.example.com:8443 cluster. - 4
- The
userssection defines user credentials. In this example, the user nickname alice/openshift1.example.com:8443 uses an access token.
The CLI can support multiple configuration files; they are loaded at runtime and merged together along with any override options specified from the command line.
After you are logged in, you can use the oc status command or the oc project command to verify your current working environment:
Example 3.2. Verifying the Current Working Environment
oc project
$ oc project
Using project "joe-project" from context named "joe-project/openshift1.example.com:8443/alice" on server "https://openshift1.example.com:8443".
To log in using any other combination of user credentials and cluster details, run the oc login command again and supply the relevant information during the interactive process. A context is constructed based on the supplied information if one does not already exist.
If you are already logged in and want to switch to another project the current user already has access to, use the oc project command and supply the name of the project:
oc project alice-project
$ oc project alice-project
Now using project "alice-project" on server "https://openshift1.example.com:8443".
At any time, you can use the oc config view command to view your current, full CLI configuration, as seen in the above output.
Additional CLI configuration commands are also available for more advanced usage.
If you have access to administrator credentials but are no longer logged in as the default system user system:admin, you can log back in as this user at any time as long as the credentials are still present in your CLI configuration file. The following command logs in and switches to the default project:
oc login -u system:admin -n default
$ oc login -u system:admin -n default3.3. Manually Configuring CLI Profiles
This section covers more advanced usage of CLI configurations. In most situations, you can simply use the oc login and oc project commands to log in and switch between contexts and projects.
If you want to manually configure your CLI configuration files, you can use the oc config command instead of modifying the files themselves. The oc config command includes a number of helpful subcommands for this purpose:
| Subcommand | Usage |
|---|---|
|
| Sets a user entry in the CLI configuration file. If the referenced user nickname already exists, the specified information is merged in. oc config set-credentials <user_nickname> |
|
| Sets a cluster entry in the CLI configuration file. If the referenced cluster nickname already exists, the specified information is merged in. oc config set-cluster <cluster_nickname> [--server=<master_ip_or_fqdn>] |
|
| Sets a context entry in the CLI configuration file. If the referenced context nickname already exists, the specified information is merged in. oc config set-context <context_nickname> [--cluster=<cluster_nickname>] |
|
| Sets the current context using the specified context nickname. oc config use-context <context_nickname> |
|
| Sets an individual value in the the CLI configuration file. oc config set <property_name> <property_value>
The |
|
| Unsets individual values in the CLI configuration file. oc config unset <property_name>
The |
|
| Displays the merged CLI configuration currently in use. oc config view Displays the result of the specified CLI configuration file. oc config view --config=<specific_filename> |
Example Usage
Consider the following configuration workflow. First, set credentials for a user nickname alice that uses an access token:
oc config set-credentials alice --token=NDM2N2MwODgtNjI1Yy10N3VhLTg1YmItYzI4NDEzZDUyYzVi
$ oc config set-credentials alice --token=NDM2N2MwODgtNjI1Yy10N3VhLTg1YmItYzI4NDEzZDUyYzViSet a cluster entry named openshift1:
oc config set-cluster openshift1 --server=https://openshift1.example.com
$ oc config set-cluster openshift1 --server=https://openshift1.example.comSet a context named alice that uses the alice user and the openshift1 cluster:
oc config set-context alice --cluster=openshift1 --user=alice
$ oc config set-context alice --cluster=openshift1 --user=aliceNow that the alice context has been created, switch to that context:
oc config use-context alice
$ oc config use-context aliceSet the aliceproject namespace for the alice context:
oc config set contexts.alice.namespace aliceproject
$ oc config set contexts.alice.namespace aliceprojectYou can now view the configuration that has been created:
- 1
- The current context is set to alice.
All subsequent CLI operations will use the alice context, unless otherwise specified by overriding CLI options or until the context is switched.
3.4. Loading and Merging Rules
When issuing CLI operations, the loading and merging order for the CLI configuration follows these rules:
CLI configuration files are retrieved from your workstation, using the following hierarchy and merge rules:
-
If the
--configoption is set, then only that file is loaded. The flag may only be set once and no merging takes place. -
If
$KUBECONFIGenvironment variable is set, then it is used. The variable can be a list of paths, and if so the paths are merged together. When a value is modified, it is modified in the file that defines the stanza. When a value is created, it is created in the first file that exists. If no files in the chain exist, then it creates the last file in the list. -
Otherwise, the ~/.kube/config file is used and no merging takes place.
-
If the
The context to use is determined based on the first hit in the following chain:
-
The value of the
--contextoption. -
The
current-contextvalue from the CLI configuration file. -
An empty value is allowed at this stage.
-
The value of the
The user and cluster to use is determined. At this point, you may or may not have a context; they are built based on the first hit in the following chain, which is run once for the user and once for the cluster:
-
The value of the
--useroption for user name and the--clusteroption for cluster name. -
If the
--contextoption is present, then use the context’s value. -
An empty value is allowed at this stage.
-
The value of the
The actual cluster information to use is determined. At this point, you may or may not have cluster information. Each piece of the cluster information is built based on the first hit in the following chain:
The values of any of the following command line options:
-
--server, -
--api-version -
--certificate-authority -
--insecure-skip-tls-verify
-
- If cluster information and a value for the attribute is present, then use it.
-
If you do not have a server location, then there is an error.
The actual user information to use is determined. Users are built using the same rules as clusters, except that you can only have one authentication technique per user; conflicting techniques cause the operation to fail. Command line options take precedence over configuration file values. Valid command line options are:
-
--auth-path -
--client-certificate -
--client-key -
--token
-
- For any information that is still missing, default values are used and prompts are given for additional information.
Chapter 4. Developer CLI Operations
4.1. Overview
This topic provides information on the developer CLI operations and their syntax. You must setup and login with the CLI before you can perform these operations.
The developer CLI uses the oc command, and is used for project-level operations. This differs from the administrator CLI, which uses the oc adm command for more advanced, administrator operations.
4.2. Common Operations
The developer CLI allows interaction with the various objects that are managed by OpenShift Container Platform. Many common oc operations are invoked using the following syntax:
oc <action> <object_type> <object_name>
$ oc <action> <object_type> <object_name>This specifies:
-
An
<action>to perform, such asgetordescribe. -
The
<object_type>to perform the action on, such asserviceor the abbreviatedsvc. -
The
<object_name>of the specified<object_type>.
For example, the oc get operation returns a complete list of services that are currently defined:
oc get svc
$ oc get svc
NAME              LABELS                                    SELECTOR                  IP              PORT(S)
docker-registry   docker-registry=default                   docker-registry=default   172.30.78.158   5000/TCP
kubernetes        component=apiserver,provider=kubernetes   <none>                    172.30.0.2      443/TCP
kubernetes-ro     component=apiserver,provider=kubernetes   <none>                    172.30.0.1      80/TCP
The oc describe operation can then be used to return detailed information about a specific object:
Versions of oc prior to 3.0.2.0 did not have the ability to negotiate API versions against a server. So if you are using oc up to 3.0.1.0 with a server that only supports v1 or higher versions of the API, make sure to pass --api-version in order to point the oc client to the correct API endpoint. For example: oc get svc --api-version=v1.
4.3. Object Types
The CLI supports the following object types, some of which have abbreviated syntax:
| Object Type | Abbreviated Version |
|---|---|
|
| |
|
|
|
|
|
|
|
|
|
|
|
|
|
|
|
|
|
|
|
| |
|
|
|
|
| |
|
|
|
|
|
|
|
|
|
|
| |
|
|
|
|
|
|
|
|
|
|
|
|
4.4. Basic CLI Operations
The following table describes basic oc operations and their general syntax:
4.4.1. types
Display an introduction to some core OpenShift Container Platform concepts:
oc types
$ oc types4.4.2. login
Log in to the OpenShift Container Platform server:
oc login
$ oc login4.4.3. logout
End the current session:
oc logout
$ oc logout4.4.4. new-project
Create a new project:
oc new-project <project_name>
$ oc new-project <project_name>4.4.5. new-app
Creates a new application based on the source code in the current directory:
oc new-app .
$ oc new-app .4.4.6. status
Show an overview of the current project:
oc status
$ oc status4.4.7. project
Switch to another project. Run without options to display the current project. To view all projects you have access to run oc projects. Run without options to display the current project. To view all projects you have access to run oc projects.
oc project <project_name>
$ oc project <project_name>4.5. Application Modification CLI Operations
4.5.1. get
Return a list of objects for the specified object type. If the optional <object_name> is included in the request, then the list of results is filtered by that value.
oc get <object_type> [<object_name>]
$ oc get <object_type> [<object_name>]4.5.2. describe
Returns information about the specific object returned by the query. A specific <object_name> must be provided. The actual information that is available varies as described in object type.
oc describe <object_type> <object_name>
$ oc describe <object_type> <object_name>4.5.3. edit
Edit the desired object type:
oc edit <object_type>/<object_name>
$ oc edit <object_type>/<object_name>Edit the desired object type with a specified text editor:
OC_EDITOR="<text_editor>" oc edit <object_type>/<object_name>
$ OC_EDITOR="<text_editor>" oc edit <object_type>/<object_name>Edit the desired object in a specified format (eg: JSON):
oc edit <object_type>/<object_name> \
    --output-version=<object_type_version> \
    -o <object_type_format>
$ oc edit <object_type>/<object_name> \
    --output-version=<object_type_version> \
-o <object_type_format>4.5.4. volume
Modify a volume:
oc volume <object_type>/<object_name> [--option]
$ oc volume <object_type>/<object_name> [--option]4.5.5. label
Update the labels on a object:
oc label <object_type> <object_name> <label>
$ oc label <object_type> <object_name> <label>4.5.6. expose
Look up a service and expose it as a route. There is also the ability to expose a deployment configuration, replication controller, service, or pod as a new service on a specified port. If no labels are specified, the new object will re-use the labels from the object it exposes.
If you are exposing a service, the default generator is --generator=route/v1. For all other cases the default is --generator=service/v2, which leaves the port unnamed. Generally, there is no need to set a generator with the oc expose command. A third generator, --generator=service/v1, is available with the port name default.
oc expose <object_type> <object_name>
$ oc expose <object_type> <object_name>4.5.7. delete
Delete the specified object. An object configuration can also be passed in through STDIN. The oc delete all -l <label> operation deletes all objects matching the specified <label>, including the replication controller so that pods are not re-created.
oc delete -f <file_path>
$ oc delete -f <file_path>oc delete <object_type> <object_name>
$ oc delete <object_type> <object_name>oc delete <object_type> -l <label>
$ oc delete <object_type> -l <label>oc delete all -l <label>
$ oc delete all -l <label>4.6. Build and Deployment CLI Operations
One of the fundamental capabilities of OpenShift Container Platform is the ability to build applications into a container from source.
OpenShift Container Platform provides CLI access to inspect and manipulate deployment configurations using standard oc resource operations, such as get, create, and describe.
4.6.1. start-build
Manually start the build process with the specified build configuration file:
oc start-build <buildconfig_name>
$ oc start-build <buildconfig_name>Manually start the build process by specifying the name of a previous build as a starting point:
oc start-build --from-build=<build_name>
$ oc start-build --from-build=<build_name>Manually start the build process by specifying either a configuration file or the name of a previous build and retrieve its build logs:
oc start-build --from-build=<build_name> --follow
$ oc start-build --from-build=<build_name> --followoc start-build <buildconfig_name> --follow
$ oc start-build <buildconfig_name> --followWait for a build to complete and exit with a non-zero return code if the build fails:
oc start-build --from-build=<build_name> --wait
$ oc start-build --from-build=<build_name> --wait
Set or override environment variables for the current build without changing the build configuration. Alternatively, use -e.
oc start-build --env <var_name>=<value>
$ oc start-build --env <var_name>=<value>Set or override the default build log level output during the build:
oc start-build --build-loglevel [0-5]
$ oc start-build --build-loglevel [0-5]Specify the source code commit identifier the build should use; requires a build based on a Git repository:
oc start-build --commit=<hash>
$ oc start-build --commit=<hash>
Re-run build with name <build_name>:
oc start-build --from-build=<build_name>
$ oc start-build --from-build=<build_name>
Archive <dir_name> and build with it as the binary input:
oc start-build --from-dir=<dir_name>
$ oc start-build --from-dir=<dir_name>
Use <file_name> as the binary input for the build. This file must be the only one in the build source. For example, pom.xml or Dockerfile.
oc start-build --from-file=<file_name>
$ oc start-build --from-file=<file_name>The path to a local source code repository to use as the binary input for a build:
oc start-build --from-repo=<path_to_repo>
$ oc start-build --from-repo=<path_to_repo>Specify a webhook URL for an existing build configuration to trigger:
oc start-build --from-webhook=<webhook_URL>
$ oc start-build --from-webhook=<webhook_URL>The contents of the post-receive hook to trigger a build:
oc start-build --git-post-receive=<contents>
$ oc start-build --git-post-receive=<contents>The path to the Git repository for post-receive; defaults to the current directory:
oc start-build --git-repository=<path_to_repo>
$ oc start-build --git-repository=<path_to_repo>
List the webhooks for the specified build configuration or build; accepts all, generic, or github:
oc start-build --list-webhooks
$ oc start-build --list-webhooks4.6.2. deploy
View a deployment, or manually start, cancel, or retry a deployment:
oc deploy <deploymentconfig>
$ oc deploy <deploymentconfig>4.6.3. rollback
Perform a rollback:
oc rollback <deployment_name>
$ oc rollback <deployment_name>4.6.4. new-build
Create a build configuration based on the source code in the current Git repository (with a public remote) and a container image:
oc new-build .
$ oc new-build .4.6.5. cancel-build
Stop a build that is in progress:
oc cancel-build <build_name>
$ oc cancel-build <build_name>Cancel multiple builds at the same time:
oc cancel-build <build1_name> <build2_name> <build3_name>
$ oc cancel-build <build1_name> <build2_name> <build3_name>Cancel all builds created from the build configuration:
oc cancel-build bc/<buildconfig_name>
$ oc cancel-build bc/<buildconfig_name>Specify the builds to be canceled:
oc cancel-build bc/<buildconfig_name> --state=<state>
$ oc cancel-build bc/<buildconfig_name> --state=<state>
Example values for state are new or pending.
4.6.6. import-image
Import tag and image information from an external image repository:
oc import-image <image_stream>
$ oc import-image <image_stream>4.6.7. scale
Set the number of desired replicas for a replication controller or a deployment configuration to the number of specified replicas:
oc scale <object_type> <object_name> --replicas=<#_of_replicas>
$ oc scale <object_type> <object_name> --replicas=<#_of_replicas>4.6.8. tag
Take an existing tag or image from an image stream, or a container image "pull spec", and set it as the most recent image for a tag in one or more other image streams:
oc tag <current_image> <image_stream>
$ oc tag <current_image> <image_stream>4.7. Advanced Commands
4.7.1. create
Parse a configuration file and create one or more OpenShift Container Platform objects based on the file contents. The -f flag can be passed multiple times with different file or directory paths. When the flag is passed multiple times, oc create iterates through each one, creating the objects described in all of the indicated files. Any existing resources are ignored.
oc create -f <file_or_dir_path>
$ oc create -f <file_or_dir_path>4.7.2. replace
Attempt to modify an existing object based on the contents of the specified configuration file. The -f flag can be passed multiple times with different file or directory paths. When the flag is passed multiple times, oc replace iterates through each one, updating the objects described in all of the indicated files.
oc replace -f <file_or_dir_path>
$ oc replace -f <file_or_dir_path>4.7.3. process
Transform a project template into a project configuration file:
oc process -f <template_file_path>
$ oc process -f <template_file_path>4.7.4. run
Create and run a particular image, possibly replicated. Create a deployment configuration to manage the created container(s). You can choose to run in the foreground for an interactive container execution.
4.7.5. patch
Updates one or more fields of an object using strategic merge patch:
oc patch <object_type> <object_name> -p <changes>
$ oc patch <object_type> <object_name> -p <changes>
The <changes> is a JSON or YAML expression containing the new fields and the values. For example, to update the spec.unschedulable field of the node node1 to the value true, the json expression is:
oc patch node node1 -p '{"spec":{"unschedulable":true}}'
$ oc patch node node1 -p '{"spec":{"unschedulable":true}}'4.7.6. export
Export resources to be used elsewhere:
oc export <object_type> [--options]
$ oc export <object_type> [--options]See Creating a Template from Existing Objects for more information on exporting existing objects from your project in template form.
4.7.7. policy
Manage authorization policies:
oc policy [--options]
$ oc policy [--options]4.7.8. secrets
Configure secrets:
oc secrets [--options] path/to/ssh_key
$ oc secrets [--options] path/to/ssh_key4.7.9. autoscale
Setup an autoscaler for your application. Requires metrics to be enabled in the cluster. See Enabling Cluster Metrics for cluster administrator instructions, if needed.
oc autoscale dc/<dc_name> [--options]
$ oc autoscale dc/<dc_name> [--options]4.8. Troubleshooting and Debugging CLI Operations
4.8.1. logs
Retrieve the log output for a specific build, deployment, or pod. This command works for builds, build configurations, deployment configurations, and pods.
oc logs -f <pod>
$ oc logs -f <pod>4.8.2. exec
Execute a command in an already-running container. You can optionally specify a container ID, otherwise it defaults to the first container.
oc exec <pod> [-c <container>] <command>
$ oc exec <pod> [-c <container>] <command>4.8.3. rsh
Open a remote shell session to a container:
oc rsh <pod>
$ oc rsh <pod>4.8.4. rsync
Copy the contents to or from a directory in an already-running pod container. If you do not specify a container, it defaults to the first container in the pod.
To copy contents from a local directory to a directory in a pod:
oc rsync <local_dir> <pod>:<pod_dir> -c <container>
$ oc rsync <local_dir> <pod>:<pod_dir> -c <container>To copy contents from a directory in a pod to a local directory:
oc rsync <pod>:<pod_dir> <local_dir> -c <container>
$ oc rsync <pod>:<pod_dir> <local_dir> -c <container>4.8.5. port-forward
Forward one or more local ports to a pod:
oc port-forward <pod> <local_port>:<remote_port>
$ oc port-forward <pod> <local_port>:<remote_port>4.8.6. proxy
Run a proxy to the Kubernetes API server:
oc proxy --port=<port> --www=<static_directory>
$ oc proxy --port=<port> --www=<static_directory>
For security purposes, the oc exec command does not work when accessing privileged containers except when the command is executed by a cluster-admin user. Administrators can SSH into a node host, then use the docker exec command on the desired container.
Chapter 5. Administrator CLI Operations
5.1. Overview
This topic provides information on the administrator CLI operations and their syntax. You must setup and login with the CLI before you can perform these operations.
The openshift command is used for starting services that make up the OpenShift Container Platform cluster. For example, openshift start [master|node]. However, it is also an all-in-one command that can perform all the same actions as the oc and oc adm commands via openshift cli and openshift admin respectively.
The administrator CLI differs from the normal set of commands under the developer CLI, which uses the oc command, and is used more for project-level operations.
5.2. Common Operations
The administrator CLI allows interaction with the various objects that are managed by OpenShift Container Platform. Many common oc adm operations are invoked using the following syntax:
oc adm <action> <option>
$ oc adm <action> <option>This specifies:
-
An
<action>to perform, such asnew-projectorgroups. -
An available
<option>to perform the action on as well as a value for the option. Options include--output.
5.3. Basic CLI Operations
5.3.1. new-project
Creates a new project:
oc adm new-project <project_name>
$ oc adm new-project <project_name>5.3.2. policy
Manages authorization policies:
oc adm policy
$ oc adm policy5.3.3. groups
Manages groups:
oc adm groups
$ oc adm groups5.4. Install CLI Operations
5.4.1. router
Installs a router:
ocadm router <router_name>
$ ocadm router <router_name>5.4.2. ipfailover
Installs an IP failover group for a set of nodes:
oc adm ipfailover <ipfailover_config>
$ oc adm ipfailover <ipfailover_config>5.4.3. registry
Installs an integrated container registry:
oc adm registry
$ oc adm registry5.5. Maintenance CLI Operations
5.5.1. build-chain
Outputs the inputs and dependencies of any builds:
oc adm build-chain <image_stream>[:<tag>]
$ oc adm build-chain <image_stream>[:<tag>]5.5.2. manage-node
Manages nodes. For example, list or evacuate pods, or mark them ready:
oc adm manage-node
$ oc adm manage-node5.5.3. prune
Removes older versions of resources from the server:
oc adm prune
$ oc adm prune5.6. Settings CLI Operations
5.6.1. config
Changes kubelet configuration files:
oc adm config <subcommand>
$ oc adm config <subcommand>5.6.2. create-kubeconfig
Creates a basic .kubeconfig file from client certificates:
oc adm create-kubeconfig
$ oc adm create-kubeconfig5.6.3. create-api-client-config
Creates a configuration file for connecting to the server as a user:
oc adm create-api-client-config
$ oc adm create-api-client-config5.7. Advanced CLI Operations
5.7.1. create-bootstrap-project-template
Creates a bootstrap project template:
oc adm create-bootstrap-project-template
$ oc adm create-bootstrap-project-template5.7.2. create-bootstrap-policy-file
Creates the default bootstrap policy:
oc adm create-bootstrap-policy-file
$ oc adm create-bootstrap-policy-file5.7.3. create-login-template
Creates a login template:
oc adm create-login-template
$ oc adm create-login-template5.7.4. overwrite-policy
Resets the policy to the default values:
oc adm overwrite-policy
$ oc adm overwrite-policy5.7.5. create-node-config
Creates a configuration bundle for a node:
oc adm create-node-config
$ oc adm create-node-config5.7.6. ca
Manages certificates and keys:
oc adm ca
$ oc adm ca5.8. Other CLI Operations
5.8.1. version
Displays the version of the indicated object:
oc adm version
$ oc adm version5.8.2. help
Displays help about any command:
oc adm help <command>
$ oc adm help <command>Chapter 6. Revision History: CLI Reference
6.1. Thu Jul 27 2017
| Affected Topic | Description of Change |
|---|---|
|
Updated | |
6.2. Wed Jul 12 2017
| Affected Topic | Description of Change |
|---|---|
|
Added more information about the |
6.3. Thu Feb 16 2017
| Affected Topic | Description of Change |
|---|---|
| Added additional information about the generator parameter in the Expose section. |
6.4. Wed Jan 25 2017
| Affected Topic | Description of Change |
|---|---|
|
Removed references to the deprecated | |
|
Removed reference to the deprecated |
6.5. Mon Nov 07 2016
| Affected Topic | Description of Change |
|---|---|
|
Added information on |
6.6. Tue Sep 27 2016
OpenShift Container Platform 3.3 initial release.
| Affected Topic | Description of Change |
|---|---|
| Added information about the ability to cancel multiple builds. |
Legal Notice
Copyright © 2025 Red Hat
OpenShift documentation is licensed under the Apache License 2.0 (https://www.apache.org/licenses/LICENSE-2.0).
Modified versions must remove all Red Hat trademarks.
Portions adapted from https://github.com/kubernetes-incubator/service-catalog/ with modifications by Red Hat.
Red Hat, Red Hat Enterprise Linux, the Red Hat logo, the Shadowman logo, JBoss, OpenShift, Fedora, the Infinity logo, and RHCE are trademarks of Red Hat, Inc., registered in the United States and other countries.
Linux® is the registered trademark of Linus Torvalds in the United States and other countries.
Java® is a registered trademark of Oracle and/or its affiliates.
XFS® is a trademark of Silicon Graphics International Corp. or its subsidiaries in the United States and/or other countries.
MySQL® is a registered trademark of MySQL AB in the United States, the European Union and other countries.
Node.js® is an official trademark of Joyent. Red Hat Software Collections is not formally related to or endorsed by the official Joyent Node.js open source or commercial project.
The OpenStack® Word Mark and OpenStack logo are either registered trademarks/service marks or trademarks/service marks of the OpenStack Foundation, in the United States and other countries and are used with the OpenStack Foundation’s permission. We are not affiliated with, endorsed or sponsored by the OpenStack Foundation, or the OpenStack community.
All other trademarks are the property of their respective owners.