CLI tools
Learning how to use the command-line tools for OpenShift Container Platform
Abstract
Chapter 1. OpenShift Container Platform CLI tools overview
A user performs a range of operations while working on OpenShift Container Platform such as the following:
- Managing clusters
- Building, deploying, and managing applications
- Managing deployment processes
- Developing Operators
- Creating and maintaining Operator catalogs
OpenShift Container Platform offers a set of command-line interface (CLI) tools that simplify these tasks by enabling users to perform various administration and development operations from the terminal. These tools expose simple commands to manage the applications, as well as interact with each component of the system.
1.1. List of CLI tools
The following set of CLI tools are available in OpenShift Container Platform:
- OpenShift CLI (oc): This is the most commonly used CLI tool by OpenShift Container Platform users. It helps both cluster administrators and developers to perform end-to-end operations across OpenShift Container Platform using the terminal. Unlike the web console, it allows the user to work directly with the project source code using command scripts.
-
Developer CLI (odo): The
odoCLI tool helps developers focus on their main goal of creating and maintaining applications on OpenShift Container Platform by abstracting away complex Kubernetes and OpenShift Container Platform concepts. It helps the developers to write, build, and debug applications on a cluster from the terminal without the need to administer the cluster. - Helm CLI: Helm is a package manager for Kubernetes applications which enables defining, installing, and upgrading applications packaged as Helm charts. Helm CLI helps the user deploy applications and services to OpenShift Container Platform clusters using simple commands from the terminal.
-
Knative CLI (kn): The Knative (
kn) CLI tool provides simple and intuitive terminal commands that can be used to interact with OpenShift Serverless components, such as Knative Serving and Eventing. -
Pipelines CLI (tkn): OpenShift Pipelines is a continuous integration and continuous delivery (CI/CD) solution in OpenShift Container Platform, which internally uses Tekton. The
tknCLI tool provides simple and intuitive commands to interact with OpenShift Pipelines using the terminal. -
opm CLI: The
opmCLI tool helps the Operator developers and cluster administrators to create and maintain the catalogs of Operators from the terminal.
Chapter 2. OpenShift CLI (oc)
2.1. Getting started with the OpenShift CLI
2.1.1. About the OpenShift CLI
With the OpenShift command-line interface (CLI), the oc command, you can create applications and manage OpenShift Container Platform projects from a terminal. The OpenShift CLI is ideal in the following situations:
- Working directly with project source code
- Scripting OpenShift Container Platform operations
- Managing projects while restricted by bandwidth resources and the web console is unavailable
2.1.2. Installing the OpenShift CLI
You can install the OpenShift CLI (oc) either by downloading the binary or by using an RPM.
2.1.2.1. Installing the OpenShift CLI by downloading the binary
You can install the OpenShift CLI (oc) in order to interact with OpenShift Container Platform from a command-line interface. You can install oc on Linux, Windows, or macOS.
If you installed an earlier version of oc, you cannot use it to complete all of the commands in OpenShift Container Platform 4.6. Download and install the new version of oc.
2.1.2.1.1. Installing the OpenShift CLI on Linux
You can install the OpenShift CLI (oc) binary on Linux by using the following procedure.
Procedure
- Navigate to the OpenShift Container Platform downloads page on the Red Hat Customer Portal.
- Select the appropriate version in the Version drop-down menu.
- Click Download Now next to the OpenShift v4.6 Linux Client entry and save the file.
Unpack the archive:
$ tar xvzf <file>Place the
ocbinary in a directory that is on yourPATH.To check your
PATH, execute the following command:$ echo $PATH
After you install the OpenShift CLI, it is available using the oc command:
$ oc <command>2.1.2.1.2. Installing the OpenShift CLI on Windows
You can install the OpenShift CLI (oc) binary on Windows by using the following procedure.
Procedure
- Navigate to the OpenShift Container Platform downloads page on the Red Hat Customer Portal.
- Select the appropriate version in the Version drop-down menu.
- Click Download Now next to the OpenShift v4.6 Windows Client entry and save the file.
- Unzip the archive with a ZIP program.
Move the
ocbinary to a directory that is on yourPATH.To check your
PATH, open the command prompt and execute the following command:C:\> path
After you install the OpenShift CLI, it is available using the oc command:
C:\> oc <command>2.1.2.1.3. Installing the OpenShift CLI on macOS
You can install the OpenShift CLI (oc) binary on macOS by using the following procedure.
Procedure
- Navigate to the OpenShift Container Platform downloads page on the Red Hat Customer Portal.
- Select the appropriate version in the Version drop-down menu.
- Click Download Now next to the OpenShift v4.6 MacOSX Client entry and save the file.
- Unpack and unzip the archive.
Move the
ocbinary to a directory on your PATH.To check your
PATH, open a terminal and execute the following command:$ echo $PATH
After you install the OpenShift CLI, it is available using the oc command:
$ oc <command>2.1.2.2. Installing the OpenShift CLI by using the web console
You can install the OpenShift CLI (oc) to interact with OpenShift Container Platform from a web console. You can install oc on Linux, Windows, or macOS.
If you installed an earlier version of oc, you cannot use it to complete all of the commands in OpenShift Container Platform 4.6. Download and install the new version of oc.
2.1.2.2.1. Installing the OpenShift CLI on Linux using the web console
You can install the OpenShift CLI (oc) binary on Linux by using the following procedure.
Procedure
From the web console, click ?.
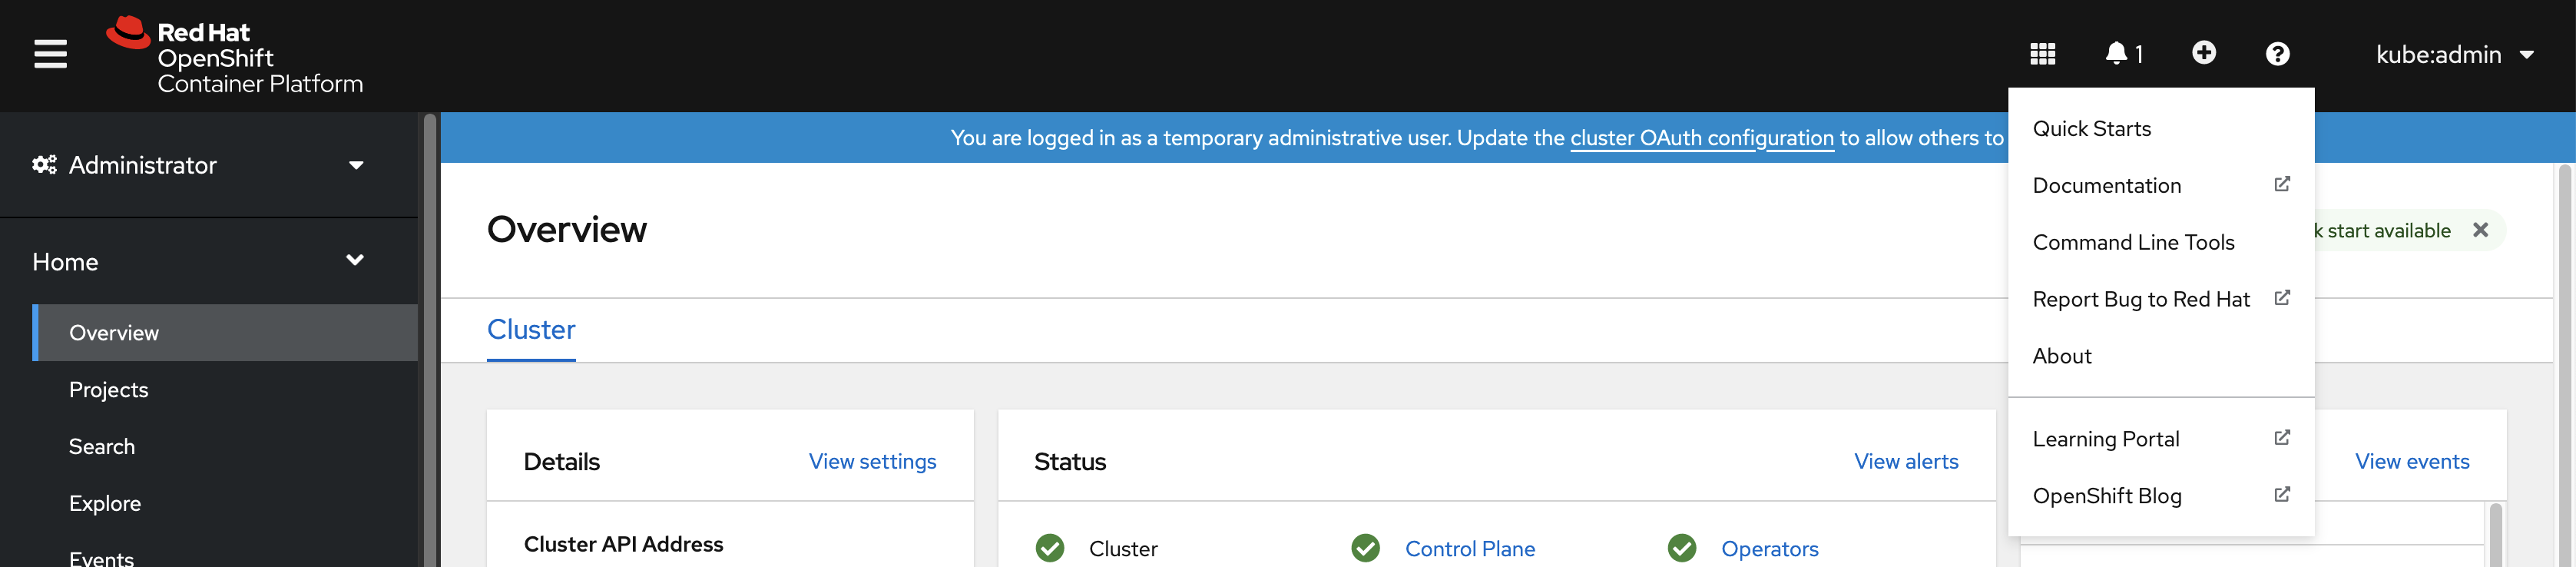
Click Command Line Tools.

-
Select appropriate
ocbinary for your Linux platform, and then click Download oc for Linux. - Save the file.
Unpack the archive.
$ tar xvzf <file>Move the
ocbinary to a directory that is on yourPATH.To check your
PATH, execute the following command:$ echo $PATH
After you install the OpenShift CLI, it is available using the oc command:
$ oc <command>2.1.2.2.2. Installing the OpenShift CLI on Windows using the web console
You can install the OpenShift CLI (oc) binary on Winndows by using the following procedure.
Procedure
From the web console, click ?.
Click Command Line Tools.
-
Select the
ocbinary for Windows platform, and then click Download oc for Windows for x86_64. - Save the file.
- Unzip the archive with a ZIP program.
Move the
ocbinary to a directory that is on yourPATH.To check your
PATH, open the command prompt and execute the following command:C:\> path
After you install the OpenShift CLI, it is available using the oc command:
C:\> oc <command>2.1.2.2.3. Installing the OpenShift CLI on macOS using the web console
You can install the OpenShift CLI (oc) binary on macOS by using the following procedure.
Procedure
From the web console, click ?.
Click Command Line Tools.
-
Select the
ocbinary for macOS platform, and then click Download oc for Mac for x86_64. - Save the file.
- Unpack and unzip the archive.
Move the
ocbinary to a directory on your PATH.To check your
PATH, open a terminal and execute the following command:$ echo $PATH
After you install the OpenShift CLI, it is available using the oc command:
$ oc <command>2.1.2.3. Installing the OpenShift CLI by using an RPM
For Red Hat Enterprise Linux (RHEL), you can install the OpenShift CLI (oc) as an RPM if you have an active OpenShift Container Platform subscription on your Red Hat account.
Prerequisites
- Must have root or sudo privileges.
Procedure
Register with Red Hat Subscription Manager:
# subscription-manager registerPull the latest subscription data:
# subscription-manager refreshList the available subscriptions:
# subscription-manager list --available --matches '*OpenShift*'In the output for the previous command, find the pool ID for an OpenShift Container Platform subscription and attach the subscription to the registered system:
# subscription-manager attach --pool=<pool_id>Enable the repositories required by OpenShift Container Platform 4.6.
For Red Hat Enterprise Linux 8:
# subscription-manager repos --enable="rhocp-4.6-for-rhel-8-x86_64-rpms"For Red Hat Enterprise Linux 7:
# subscription-manager repos --enable="rhel-7-server-ose-4.6-rpms"
Install the
openshift-clientspackage:# yum install openshift-clients
After you install the CLI, it is available using the oc command:
$ oc <command>2.1.2.4. Installing the OpenShift CLI by using Homebrew
For macOS, you can install the OpenShift CLI (oc) by using the Homebrew package manager.
Prerequisites
-
You must have Homebrew (
brew) installed.
Procedure
Run the following command to install the openshift-cli package:
$ brew install openshift-cli
2.1.3. Logging in to the OpenShift CLI
You can log in to the oc CLI to access and manage your cluster.
Prerequisites
- You must have access to an OpenShift Container Platform cluster.
- You must have installed the CLI.
To access a cluster that is accessible only over an HTTP proxy server, you can set the HTTP_PROXY, HTTPS_PROXY and NO_PROXY variables. These environment variables are respected by the oc CLI so that all communication with the cluster goes through the HTTP proxy.
Authentication headers are sent only when using HTTPS transport.
Procedure
Log in to the CLI using the
oc logincommand and enter the required information when prompted.$ oc loginExample output
Server [https://localhost:8443]: https://openshift.example.com:64431 The server uses a certificate signed by an unknown authority. You can bypass the certificate check, but any data you send to the server could be intercepted by others. Use insecure connections? (y/n): y2 Authentication required for https://openshift.example.com:6443 (openshift) Username: user13 Password:4 Login successful. You don't have any projects. You can try to create a new project, by running oc new-project <projectname> Welcome! See 'oc help' to get started.
If you are logged in to the web console, you can generate an oc login command that includes your token and server information. You can use the command to log in to the OpenShift Container Platform CLI without the interactive prompts. To generate the command, select Copy login command from the username drop-down menu at the top right of the web console.
You can now create a project or issue other commands for managing your cluster.
2.1.4. Using the OpenShift CLI
Review the following sections to learn how to complete common tasks using the CLI.
2.1.4.1. Creating a project
Use the oc new-project command to create a new project.
$ oc new-project my-projectExample output
Now using project "my-project" on server "https://openshift.example.com:6443".2.1.4.2. Creating a new app
Use the oc new-app command to create a new application.
$ oc new-app https://github.com/sclorg/cakephp-exExample output
--> Found image 40de956 (9 days old) in imagestream "openshift/php" under tag "7.2" for "php"

...

    Run 'oc status' to view your app.
2.1.4.3. Viewing pods
Use the oc get pods command to view the pods for the current project.
When you run oc inside a pod and do not specify a namespace, the namespace of the pod is used by default.
$ oc get pods -o wideExample output
NAME                  READY   STATUS      RESTARTS   AGE     IP            NODE                           NOMINATED NODE
cakephp-ex-1-build    0/1     Completed   0          5m45s   10.131.0.10   ip-10-0-141-74.ec2.internal    <none>
cakephp-ex-1-deploy   0/1     Completed   0          3m44s   10.129.2.9    ip-10-0-147-65.ec2.internal    <none>
cakephp-ex-1-ktz97    1/1     Running     0          3m33s   10.128.2.11   ip-10-0-168-105.ec2.internal   <none>
2.1.4.4. Viewing pod logs
Use the oc logs command to view logs for a particular pod.
$ oc logs cakephp-ex-1-deployExample output
--> Scaling cakephp-ex-1 to 1
--> Success
2.1.4.5. Viewing the current project
Use the oc project command to view the current project.
$ oc projectExample output
Using project "my-project" on server "https://openshift.example.com:6443".2.1.4.6. Viewing the status for the current project
Use the oc status command to view information about the current project, such as services, deployments, and build configs.
$ oc statusExample output
In project my-project on server https://openshift.example.com:6443

svc/cakephp-ex - 172.30.236.80 ports 8080, 8443
  dc/cakephp-ex deploys istag/cakephp-ex:latest <-
    bc/cakephp-ex source builds https://github.com/sclorg/cakephp-ex on openshift/php:7.2
    deployment #1 deployed 2 minutes ago - 1 pod

3 infos identified, use 'oc status --suggest' to see details.
2.1.4.7. Listing supported API resources
Use the oc api-resources command to view the list of supported API resources on the server.
$ oc api-resourcesExample output
NAME                                  SHORTNAMES       APIGROUP                              NAMESPACED   KIND
bindings                                                                                     true         Binding
componentstatuses                     cs                                                     false        ComponentStatus
configmaps                            cm                                                     true         ConfigMap
...
2.1.5. Getting help
You can get help with CLI commands and OpenShift Container Platform resources in the following ways.
Use
oc helpto get a list and description of all available CLI commands:Example: Get general help for the CLI
$ oc helpExample output
OpenShift Client

This client helps you develop, build, deploy, and run your applications on any OpenShift or Kubernetes compatible
platform. It also includes the administrative commands for managing a cluster under the 'adm' subcommand.

Usage:
  oc [flags]

Basic Commands:
  login           Log in to a server
  new-project     Request a new project
  new-app         Create a new application

...
Use the
--helpflag to get help about a specific CLI command:Example: Get help for the
oc createcommand$ oc create --helpExample output
Create a resource by filename or stdin

JSON and YAML formats are accepted.

Usage:
  oc create -f FILENAME [flags]

...
Use the
oc explaincommand to view the description and fields for a particular resource:Example: View documentation for the
Podresource$ oc explain podsExample output
KIND:     Pod
VERSION:  v1

DESCRIPTION:
     Pod is a collection of containers that can run on a host. This resource is
     created by clients and scheduled onto hosts.

FIELDS:
   apiVersion	<string>
     APIVersion defines the versioned schema of this representation of an
     object. Servers should convert recognized schemas to the latest internal
     value, and may reject unrecognized values. More info:
     https://git.k8s.io/community/contributors/devel/api-conventions.md#resources

...
2.1.6. Logging out of the OpenShift CLI
You can log out the OpenShift CLI to end your current session.
Use the
oc logoutcommand.$ oc logoutExample output
Logged "user1" out on "https://openshift.example.com"
This deletes the saved authentication token from the server and removes it from your configuration file.
2.2. Configuring the OpenShift CLI
2.2.1. Enabling tab completion
You can enable tab completion for the Bash or Zsh shells.
2.2.1.1. Enabling tab completion for Bash
After you install the OpenShift CLI (oc), you can enable tab completion to automatically complete oc commands or suggest options when you press Tab. The following procedure enables tab completion for the Bash shell.
Prerequisites
-
You must have the OpenShift CLI (
oc) installed. -
You must have the package
bash-completioninstalled.
Procedure
Save the Bash completion code to a file:
$ oc completion bash > oc_bash_completionCopy the file to
/etc/bash_completion.d/:$ sudo cp oc_bash_completion /etc/bash_completion.d/You can also save the file to a local directory and source it from your
.bashrcfile instead.
Tab completion is enabled when you open a new terminal.
2.2.1.2. Enabling tab completion for Zsh
After you install the OpenShift CLI (oc), you can enable tab completion to automatically complete oc commands or suggest options when you press Tab. The following procedure enables tab completion for the Zsh shell.
Prerequisites
-
You must have the OpenShift CLI (
oc) installed.
Procedure
To add tab completion for
octo your.zshrcfile, run the following command:$ cat >>~/.zshrc<<EOF if [ $commands[oc] ]; then source <(oc completion zsh) compdef _oc oc fi EOF
Tab completion is enabled when you open a new terminal.
2.3. Managing CLI profiles
A CLI configuration file allows you to configure different profiles, or contexts, for use with the CLI tools overview. A context consists of user authentication and OpenShift Container Platform server information associated with a nickname.
2.3.1. About switches between CLI profiles
Contexts allow you to easily switch between multiple users across multiple OpenShift Container Platform servers, or clusters, when using CLI operations. Nicknames make managing CLI configurations easier by providing short-hand references to contexts, user credentials, and cluster details. After logging in with the CLI for the first time, OpenShift Container Platform creates a ~/.kube/config file if one does not already exist. As more authentication and connection details are provided to the CLI, either automatically during an oc login operation or by manually configuring CLI profiles, the updated information is stored in the configuration file:
CLI config file
apiVersion: v1
clusters:
- cluster:
    insecure-skip-tls-verify: true
    server: https://openshift1.example.com:8443
  name: openshift1.example.com:8443
- cluster:
    insecure-skip-tls-verify: true
    server: https://openshift2.example.com:8443
  name: openshift2.example.com:8443
contexts:
- context:
    cluster: openshift1.example.com:8443
    namespace: alice-project
    user: alice/openshift1.example.com:8443
  name: alice-project/openshift1.example.com:8443/alice
- context:
    cluster: openshift1.example.com:8443
    namespace: joe-project
    user: alice/openshift1.example.com:8443
  name: joe-project/openshift1/alice
current-context: joe-project/openshift1.example.com:8443/alice
kind: Config
preferences: {}
users:
- name: alice/openshift1.example.com:8443
  user:
token: xZHd2piv5_9vQrg-SKXRJ2Dsl9SceNJdhNTljEKTb8k- 1
- The
clusterssection defines connection details for OpenShift Container Platform clusters, including the address for their master server. In this example, one cluster is nicknamedopenshift1.example.com:8443and another is nicknamedopenshift2.example.com:8443. - 2
- This
contextssection defines two contexts: one nicknamedalice-project/openshift1.example.com:8443/alice, using thealice-projectproject,openshift1.example.com:8443cluster, andaliceuser, and another nicknamedjoe-project/openshift1.example.com:8443/alice, using thejoe-projectproject,openshift1.example.com:8443cluster andaliceuser. - 3
- The
current-contextparameter shows that thejoe-project/openshift1.example.com:8443/alicecontext is currently in use, allowing thealiceuser to work in thejoe-projectproject on theopenshift1.example.com:8443cluster. - 4
- The
userssection defines user credentials. In this example, the user nicknamealice/openshift1.example.com:8443uses an access token.
The CLI can support multiple configuration files which are loaded at runtime and merged together along with any override options specified from the command line. After you are logged in, you can use the oc status or oc project command to verify your current working environment:
Verify the current working environment
$ oc statusExample output
oc status
In project Joe's Project (joe-project)

service database (172.30.43.12:5434 -> 3306)
  database deploys docker.io/openshift/mysql-55-centos7:latest
    #1 deployed 25 minutes ago - 1 pod

service frontend (172.30.159.137:5432 -> 8080)
  frontend deploys origin-ruby-sample:latest <-
    builds https://github.com/openshift/ruby-hello-world with joe-project/ruby-20-centos7:latest
    #1 deployed 22 minutes ago - 2 pods

To see more information about a service or deployment, use 'oc describe service <name>' or 'oc describe dc <name>'.
You can use 'oc get all' to see lists of each of the types described in this example.
List the current project
$ oc projectExample output
Using project "joe-project" from context named "joe-project/openshift1.example.com:8443/alice" on server "https://openshift1.example.com:8443".
You can run the oc login command again and supply the required information during the interactive process, to log in using any other combination of user credentials and cluster details. A context is constructed based on the supplied information if one does not already exist. If you are already logged in and want to switch to another project the current user already has access to, use the oc project command and enter the name of the project:
$ oc project alice-projectExample output
Now using project "alice-project" on server "https://openshift1.example.com:8443".
At any time, you can use the oc config view command to view your current CLI configuration, as seen in the output. Additional CLI configuration commands are also available for more advanced usage.
If you have access to administrator credentials but are no longer logged in as the default system user system:admin, you can log back in as this user at any time as long as the credentials are still present in your CLI config file. The following command logs in and switches to the default project:
$ oc login -u system:admin -n default2.3.2. Manual configuration of CLI profiles
This section covers more advanced usage of CLI configurations. In most situations, you can use the oc login and oc project commands to log in and switch between contexts and projects.
If you want to manually configure your CLI config files, you can use the oc config command instead of directly modifying the files. The oc config command includes a number of helpful sub-commands for this purpose:
| Subcommand | Usage |
|---|---|
|
| Sets a cluster entry in the CLI config file. If the referenced cluster nickname already exists, the specified information is merged in. |
|
| Sets a context entry in the CLI config file. If the referenced context nickname already exists, the specified information is merged in. |
|
| Sets the current context using the specified context nickname. |
|
| Sets an individual value in the CLI config file.
The |
|
| Unsets individual values in the CLI config file.
The |
|
| Displays the merged CLI configuration currently in use. Displays the result of the specified CLI config file. |
Example usage
-
Log in as a user that uses an access token. This token is used by the
aliceuser:
$ oc login https://openshift1.example.com --token=ns7yVhuRNpDM9cgzfhhxQ7bM5s7N2ZVrkZepSRf4LC0- View the cluster entry automatically created:
$ oc config viewExample output
apiVersion: v1
clusters:
- cluster:
    insecure-skip-tls-verify: true
    server: https://openshift1.example.com
  name: openshift1-example-com
contexts:
- context:
    cluster: openshift1-example-com
    namespace: default
    user: alice/openshift1-example-com
  name: default/openshift1-example-com/alice
current-context: default/openshift1-example-com/alice
kind: Config
preferences: {}
users:
- name: alice/openshift1.example.com
  user:
token: ns7yVhuRNpDM9cgzfhhxQ7bM5s7N2ZVrkZepSRf4LC0- Update the current context to have users log in to the desired namespace:
$ oc config set-context `oc config current-context` --namespace=<project_name>- Examine the current context, to confirm that the changes are implemented:
$ oc whoami -cAll subsequent CLI operations uses the new context, unless otherwise specified by overriding CLI options or until the context is switched.
2.3.3. Load and merge rules
You can follow these rules, when issuing CLI operations for the loading and merging order for the CLI configuration:
CLI config files are retrieved from your workstation, using the following hierarchy and merge rules:
-
If the
--configoption is set, then only that file is loaded. The flag is set once and no merging takes place. -
If the
$KUBECONFIGenvironment variable is set, then it is used. The variable can be a list of paths, and if so the paths are merged together. When a value is modified, it is modified in the file that defines the stanza. When a value is created, it is created in the first file that exists. If no files in the chain exist, then it creates the last file in the list. -
Otherwise, the
~/.kube/configfile is used and no merging takes place.
-
If the
The context to use is determined based on the first match in the following flow:
-
The value of the
--contextoption. -
The
current-contextvalue from the CLI config file. - An empty value is allowed at this stage.
-
The value of the
The user and cluster to use is determined. At this point, you may or may not have a context; they are built based on the first match in the following flow, which is run once for the user and once for the cluster:
-
The value of the
--userfor user name and--clusteroption for cluster name. -
If the
--contextoption is present, then use the context’s value. - An empty value is allowed at this stage.
-
The value of the
The actual cluster information to use is determined. At this point, you may or may not have cluster information. Each piece of the cluster information is built based on the first match in the following flow:
The values of any of the following command line options:
-
--server, -
--api-version -
--certificate-authority -
--insecure-skip-tls-verify
-
- If cluster information and a value for the attribute is present, then use it.
- If you do not have a server location, then there is an error.
The actual user information to use is determined. Users are built using the same rules as clusters, except that you can only have one authentication technique per user; conflicting techniques cause the operation to fail. Command line options take precedence over config file values. Valid command line options are:
-
--auth-path -
--client-certificate -
--client-key -
--token
-
- For any information that is still missing, default values are used and prompts are given for additional information.
2.4. Extending the OpenShift CLI with plug-ins
You can write and install plug-ins to build on the default oc commands, allowing you to perform new and more complex tasks with the OpenShift Container Platform CLI.
2.4.1. Writing CLI plug-ins
You can write a plug-in for the OpenShift Container Platform CLI in any programming language or script that allows you to write command-line commands. Note that you can not use a plug-in to overwrite an existing oc command.
OpenShift CLI plug-ins are currently a Technology Preview feature. Technology Preview features are not supported with Red Hat production service level agreements (SLAs), might not be functionally complete, and Red Hat does not recommend to use them for production. These features provide early access to upcoming product features, enabling customers to test functionality and provide feedback during the development process.
See the Red Hat Technology Preview features support scope for more information.
Procedure
This procedure creates a simple Bash plug-in that prints a message to the terminal when the oc foo command is issued.
Create a file called
oc-foo.When naming your plug-in file, keep the following in mind:
-
The file must begin with
oc-orkubectl-in order to be recognized as a plug-in. -
The file name determines the command that invokes the plug-in. For example, a plug-in with the file name
oc-foo-barcan be invoked by a command ofoc foo bar. You can also use underscores if you want the command to contain dashes. For example, a plug-in with the file nameoc-foo_barcan be invoked by a command ofoc foo-bar.
-
The file must begin with
Add the following contents to the file.
#!/bin/bash

# optional argument handling
if [[ "$1" == "version" ]]
then
    echo "1.0.0"
    exit 0
fi

# optional argument handling
if [[ "$1" == "config" ]]
then
    echo $KUBECONFIG
    exit 0
fi

echo "I am a plugin named kubectl-foo"
After you install this plug-in for the OpenShift Container Platform CLI, it can be invoked using the oc foo command.
2.4.2. Installing and using CLI plug-ins
After you write a custom plug-in for the OpenShift Container Platform CLI, you must install it to use the functionality that it provides.
OpenShift CLI plug-ins are currently a Technology Preview feature. Technology Preview features are not supported with Red Hat production service level agreements (SLAs), might not be functionally complete, and Red Hat does not recommend to use them for production. These features provide early access to upcoming product features, enabling customers to test functionality and provide feedback during the development process.
See the Red Hat Technology Preview features support scope for more information.
Prerequisites
-
You must have the
ocCLI tool installed. -
You must have a CLI plug-in file that begins with
oc-orkubectl-.
Procedure
If necessary, update the plug-in file to be executable.
$ chmod +x <plugin_file>Place the file anywhere in your
PATH, such as/usr/local/bin/.$ sudo mv <plugin_file> /usr/local/bin/.Run
oc plugin listto make sure that the plug-in is listed.$ oc plugin listExample output
The following compatible plugins are available:

/usr/local/bin/<plugin_file>
If your plug-in is not listed here, verify that the file begins with
oc-orkubectl-, is executable, and is on yourPATH.Invoke the new command or option introduced by the plug-in.
For example, if you built and installed the
kubectl-nsplug-in from the Sample plug-in repository, you can use the following command to view the current namespace.$ oc nsNote that the command to invoke the plug-in depends on the plug-in file name. For example, a plug-in with the file name of
oc-foo-baris invoked by theoc foo barcommand.
2.5. OpenShift CLI developer commands
2.5.1. Basic CLI commands
2.5.1.1. explain
Display documentation for a certain resource.
Example: Display documentation for pods
$ oc explain pods2.5.1.2. login
Log in to the OpenShift Container Platform server and save login information for subsequent use.
Example: Interactive login
$ oc loginExample: Log in specifying a user name
$ oc login -u user12.5.1.3. new-app
Create a new application by specifying source code, a template, or an image.
Example: Create a new application from a local Git repository
$ oc new-app .Example: Create a new application from a remote Git repository
$ oc new-app https://github.com/sclorg/cakephp-exExample: Create a new application from a private remote repository
$ oc new-app https://github.com/youruser/yourprivaterepo --source-secret=yoursecret2.5.1.4. new-project
Create a new project and switch to it as the default project in your configuration.
Example: Create a new project
$ oc new-project myproject2.5.1.5. project
Switch to another project and make it the default in your configuration.
Example: Switch to a different project
$ oc project test-project2.5.1.6. projects
Display information about the current active project and existing projects on the server.
Example: List all projects
$ oc projects2.5.1.7. status
Show a high-level overview of the current project.
Example: Show the status of the current project
$ oc status2.5.2. Build and Deploy CLI commands
2.5.2.1. cancel-build
Cancel a running, pending, or new build.
Example: Cancel a build
$ oc cancel-build python-1Example: Cancel all pending builds from the python build config
$ oc cancel-build buildconfig/python --state=pending2.5.2.2. import-image
Import the latest tag and image information from an image repository.
Example: Import the latest image information
$ oc import-image my-ruby2.5.2.3. new-build
Create a new build config from source code.
Example: Create a build config from a local Git repository
$ oc new-build .Example: Create a build config from a remote Git repository
$ oc new-build https://github.com/sclorg/cakephp-ex2.5.2.4. rollback
Revert an application back to a previous deployment.
Example: Roll back to the last successful deployment
$ oc rollback phpExample: Roll back to a specific version
$ oc rollback php --to-version=32.5.2.5. rollout
Start a new rollout, view its status or history, or roll back to a previous revision of your application.
Example: Roll back to the last successful deployment
$ oc rollout undo deploymentconfig/phpExample: Start a new rollout for a deployment with its latest state
$ oc rollout latest deploymentconfig/php2.5.2.6. start-build
Start a build from a build config or copy an existing build.
Example: Start a build from the specified build config
$ oc start-build pythonExample: Start a build from a previous build
$ oc start-build --from-build=python-1Example: Set an environment variable to use for the current build
$ oc start-build python --env=mykey=myvalue2.5.2.7. tag
Tag existing images into image streams.
Example: Configure the ruby image’s latest tag to refer to the image for the 2.0 tag
$ oc tag ruby:latest ruby:2.02.5.3. Application management CLI commands
2.5.3.1. annotate
Update the annotations on one or more resources.
Example: Add an annotation to a route
$ oc annotate route/test-route haproxy.router.openshift.io/ip_whitelist="192.168.1.10"Example: Remove the annotation from the route
$ oc annotate route/test-route haproxy.router.openshift.io/ip_whitelist-2.5.3.2. apply
Apply a configuration to a resource by file name or standard in (stdin) in JSON or YAML format.
Example: Apply the configuration in pod.json to a pod
$ oc apply -f pod.json2.5.3.3. autoscale
Autoscale a deployment or replication controller.
Example: Autoscale to a minimum of two and maximum of five pods
$ oc autoscale deploymentconfig/parksmap-katacoda --min=2 --max=52.5.3.4. create
Create a resource by file name or standard in (stdin) in JSON or YAML format.
Example: Create a pod using the content in pod.json
$ oc create -f pod.json2.5.3.5. delete
Delete a resource.
Example: Delete a pod named parksmap-katacoda-1-qfqz4
$ oc delete pod/parksmap-katacoda-1-qfqz4Example: Delete all pods with the app=parksmap-katacoda label
$ oc delete pods -l app=parksmap-katacoda2.5.3.6. describe
Return detailed information about a specific object.
Example: Describe a deployment named example
$ oc describe deployment/exampleExample: Describe all pods
$ oc describe pods2.5.3.7. edit
Edit a resource.
Example: Edit a deployment using the default editor
$ oc edit deploymentconfig/parksmap-katacodaExample: Edit a deployment using a different editor
$ OC_EDITOR="nano" oc edit deploymentconfig/parksmap-katacodaExample: Edit a deployment in JSON format
$ oc edit deploymentconfig/parksmap-katacoda -o json2.5.3.8. expose
Expose a service externally as a route.
Example: Expose a service
$ oc expose service/parksmap-katacodaExample: Expose a service and specify the host name
$ oc expose service/parksmap-katacoda --hostname=www.my-host.com2.5.3.9. get
Display one or more resources.
Example: List pods in the default namespace
$ oc get pods -n defaultExample: Get details about the python deployment in JSON format
$ oc get deploymentconfig/python -o json2.5.3.10. label
Update the labels on one or more resources.
Example: Update the python-1-mz2rf pod with the label status set to unhealthy
$ oc label pod/python-1-mz2rf status=unhealthy2.5.3.11. scale
Set the desired number of replicas for a replication controller or a deployment.
Example: Scale the ruby-app deployment to three pods
$ oc scale deploymentconfig/ruby-app --replicas=32.5.3.12. secrets
Manage secrets in your project.
Example: Allow my-pull-secret to be used as an image pull secret by the default service account
$ oc secrets link default my-pull-secret --for=pull2.5.3.13. serviceaccounts
Get a token assigned to a service account or create a new token or kubeconfig file for a service account.
Example: Get the token assigned to the default service account
$ oc serviceaccounts get-token default2.5.3.14. set
Configure existing application resources.
Example: Set the name of a secret on a build config
$ oc set build-secret --source buildconfig/mybc mysecret2.5.4. Troubleshooting and debugging CLI commands
2.5.4.1. attach
Attach the shell to a running container.
Example: Get output from the python container from pod python-1-mz2rf
$ oc attach python-1-mz2rf -c python2.5.4.2. cp
Copy files and directories to and from containers.
Example: Copy a file from the python-1-mz2rf pod to the local file system
$ oc cp default/python-1-mz2rf:/opt/app-root/src/README.md ~/mydirectory/.2.5.4.3. debug
Launch a command shell to debug a running application.
Example: Debug the python deployment
$ oc debug deploymentconfig/python2.5.4.4. exec
Execute a command in a container.
Example: Execute the ls command in the python container from pod python-1-mz2rf
$ oc exec python-1-mz2rf -c python ls2.5.4.5. logs
Retrieve the log output for a specific build, build config, deployment, or pod.
Example: Stream the latest logs from the python deployment
$ oc logs -f deploymentconfig/python2.5.4.6. port-forward
Forward one or more local ports to a pod.
Example: Listen on port 8888 locally and forward to port 5000 in the pod
$ oc port-forward python-1-mz2rf 8888:50002.5.4.7. proxy
Run a proxy to the Kubernetes API server.
Example: Run a proxy to the API server on port 8011 serving static content from ./local/www/
$ oc proxy --port=8011 --www=./local/www/2.5.4.8. rsh
Open a remote shell session to a container.
Example: Open a shell session on the first container in the python-1-mz2rf pod
$ oc rsh python-1-mz2rf2.5.4.9. rsync
Copy contents of a directory to or from a running pod container. Only changed files are copied using the rsync command from your operating system.
Example: Synchronize files from a local directory with a pod directory
$ oc rsync ~/mydirectory/ python-1-mz2rf:/opt/app-root/src/2.5.4.10. run
Create a pod running a particular image.
Example: Start a pod running the perl image
$ oc run my-test --image=perl2.5.4.11. wait
Wait for a specific condition on one or more resources.
This command is experimental and might change without notice.
Example: Wait for the python-1-mz2rf pod to be deleted
$ oc wait --for=delete pod/python-1-mz2rf2.5.5. Advanced developer CLI commands
2.5.5.1. api-resources
Display the full list of API resources that the server supports.
Example: List the supported API resources
$ oc api-resources2.5.5.2. api-versions
Display the full list of API versions that the server supports.
Example: List the supported API versions
$ oc api-versions2.5.5.3. auth
Inspect permissions and reconcile RBAC roles.
Example: Check whether the current user can read pod logs
$ oc auth can-i get pods --subresource=logExample: Reconcile RBAC roles and permissions from a file
$ oc auth reconcile -f policy.json2.5.5.4. cluster-info
Display the address of the master and cluster services.
Example: Display cluster information
$ oc cluster-info2.5.5.5. convert
Convert a YAML or JSON configuration file to a different API version and print to standard output (stdout).
Example: Convert pod.yaml to the latest version
$ oc convert -f pod.yaml2.5.5.6. extract
Extract the contents of a config map or secret. Each key in the config map or secret is created as a separate file with the name of the key.
Example: Download the contents of the ruby-1-ca config map to the current directory
$ oc extract configmap/ruby-1-caExample: Print the contents of the ruby-1-ca config map to stdout
$ oc extract configmap/ruby-1-ca --to=-2.5.5.7. idle
Idle scalable resources. An idled service will automatically become unidled when it receives traffic or it can be manually unidled using the oc scale command.
Example: Idle the ruby-app service
$ oc idle ruby-app2.5.5.8. image
Manage images in your OpenShift Container Platform cluster.
Example: Copy an image to another tag
$ oc image mirror myregistry.com/myimage:latest myregistry.com/myimage:stable2.5.5.9. observe
Observe changes to resources and take action on them.
Example: Observe changes to services
$ oc observe services2.5.5.10. patch
Updates one or more fields of an object using strategic merge patch in JSON or YAML format.
Example: Update the spec.unschedulable field for node node1 to true
$ oc patch node/node1 -p '{"spec":{"unschedulable":true}}'
If you must patch a custom resource definition, you must include the --type merge or --type json option in the command.
2.5.5.11. policy
Manage authorization policies.
Example: Add the edit role to user1 for the current project
$ oc policy add-role-to-user edit user12.5.5.12. process
Process a template into a list of resources.
Example: Convert template.json to a resource list and pass to oc create
$ oc process -f template.json | oc create -f -2.5.5.13. registry
Manage the integrated registry on OpenShift Container Platform.
Example: Display information about the integrated registry
$ oc registry info2.5.5.14. replace
Modify an existing object based on the contents of the specified configuration file.
Example: Update a pod using the content in pod.json
$ oc replace -f pod.json2.5.6. Settings CLI commands
2.5.6.1. completion
Output shell completion code for the specified shell.
Example: Display completion code for Bash
$ oc completion bash2.5.6.2. config
Manage the client configuration files.
Example: Display the current configuration
$ oc config viewExample: Switch to a different context
$ oc config use-context test-context2.5.6.3. logout
Log out of the current session.
Example: End the current session
$ oc logout2.5.6.4. whoami
Display information about the current session.
Example: Display the currently authenticated user
$ oc whoami2.5.7. Other developer CLI commands
2.5.7.1. help
Display general help information for the CLI and a list of available commands.
Example: Display available commands
$ oc helpExample: Display the help for the new-project command
$ oc help new-project2.5.7.2. plugin
List the available plug-ins on the user’s PATH.
Example: List available plug-ins
$ oc plugin list2.5.7.3. version
Display the oc client and server versions.
Example: Display version information
$ oc versionFor cluster administrators, the OpenShift Container Platform server version is also displayed.
2.6. OpenShift CLI administrator commands
You must have cluster-admin or equivalent permissions to use these administrator commands.
2.6.1. Cluster management CLI commands
2.6.1.1. inspect
Gather debugging information for a particular resource.
This command is experimental and might change without notice.
Example: Collect debugging data for the OpenShift API server cluster Operator
$ oc adm inspect clusteroperator/openshift-apiserver2.6.1.2. must-gather
Bulk collect data about the current state of your cluster to debug issues.
This command is experimental and might change without notice.
Example: Gather debugging information
$ oc adm must-gather2.6.1.3. top
Show usage statistics of resources on the server.
Example: Show CPU and memory usage for pods
$ oc adm top podsExample: Show usage statistics for images
$ oc adm top images2.6.2. Node management CLI commands
2.6.2.1. cordon
Mark a node as unschedulable. Manually marking a node as unschedulable blocks any new pods from being scheduled on the node, but does not affect existing pods on the node.
Example: Mark node1 as unschedulable
$ oc adm cordon node12.6.2.2. drain
Drain a node in preparation for maintenance.
Example: Drain node1
$ oc adm drain node12.6.2.3. node-logs
Display and filter node logs.
Example: Get logs for NetworkManager
$ oc adm node-logs --role master -u NetworkManager.service2.6.2.4. taint
Update the taints on one or more nodes.
Example: Add a taint to dedicate a node for a set of users
$ oc adm taint nodes node1 dedicated=groupName:NoScheduleExample: Remove the taints with key dedicated from node node1
$ oc adm taint nodes node1 dedicated-2.6.2.5. uncordon
Mark a node as schedulable.
Example: Mark node1 as schedulable
$ oc adm uncordon node12.6.3. Security and policy CLI commands
2.6.3.1. certificate
Approve or reject certificate signing requests (CSRs).
Example: Approve a CSR
$ oc adm certificate approve csr-sqgzp2.6.3.2. groups
Manage groups in your cluster.
Example: Create a new group
$ oc adm groups new my-group2.6.3.3. new-project
Create a new project and specify administrative options.
Example: Create a new project using a node selector
$ oc adm new-project myproject --node-selector='type=user-node,region=east'2.6.3.4. pod-network
Manage pod networks in the cluster.
Example: Isolate project1 and project2 from other non-global projects
$ oc adm pod-network isolate-projects project1 project22.6.3.5. policy
Manage roles and policies on the cluster.
Example: Add the edit role to user1 for all projects
$ oc adm policy add-cluster-role-to-user edit user1Example: Add the privileged security context constraint to a service account
$ oc adm policy add-scc-to-user privileged -z myserviceaccount2.6.4. Maintenance CLI commands
2.6.4.1. migrate
Migrate resources on the cluster to a new version or format depending on the subcommand used.
Example: Perform an update of all stored objects
$ oc adm migrate storageExample: Perform an update of only pods
$ oc adm migrate storage --include=pods2.6.4.2. prune
Remove older versions of resources from the server.
Example: Prune older builds including those whose build configs no longer exist
$ oc adm prune builds --orphans2.6.5. Configuration CLI commands
2.6.5.1. create-bootstrap-project-template
Create a bootstrap project template.
Example: Output a bootstrap project template in YAML format to stdout
$ oc adm create-bootstrap-project-template -o yaml2.6.5.2. create-error-template
Create a template for customizing the error page.
Example: Output a template for the error page to stdout
$ oc adm create-error-template2.6.5.3. create-kubeconfig
Creates a basic .kubeconfig file from client certificates.
Example: Create a .kubeconfig file with the provided client certificates
$ oc adm create-kubeconfig \
  --client-certificate=/path/to/client.crt \
  --client-key=/path/to/client.key \
  --certificate-authority=/path/to/ca.crt
2.6.5.4. create-login-template
Create a template for customizing the login page.
Example: Output a template for the login page to stdout
$ oc adm create-login-template2.6.5.5. create-provider-selection-template
Create a template for customizing the provider selection page.
Example: Output a template for the provider selection page to stdout
$ oc adm create-provider-selection-template2.6.6. Other Administrator CLI commands
2.6.6.1. build-chain
Output the inputs and dependencies of any builds.
Example: Output dependencies for the perl imagestream
$ oc adm build-chain perl2.6.6.2. completion
Output shell completion code for the oc adm commands for the specified shell.
Example: Display oc adm completion code for Bash
$ oc adm completion bash2.6.6.3. config
Manage the client configuration files. This command has the same behavior as the oc config command.
Example: Display the current configuration
$ oc adm config viewExample: Switch to a different context
$ oc adm config use-context test-context2.6.6.4. release
Manage various aspects of the OpenShift Container Platform release process, such as viewing information about a release or inspecting the contents of a release.
Example: Generate a changelog between two releases and save to changelog.md
$ oc adm release info --changelog=/tmp/git \
    quay.io/openshift-release-dev/ocp-release:4.6.0-rc.7-x86_64 \
    quay.io/openshift-release-dev/ocp-release:4.6.4-x86_64 \
    > changelog.md
2.6.6.5. verify-image-signature
Verify the image signature of an image imported to the internal registry using the local public GPG key.
Example: Verify the nodejs image signature
$ oc adm verify-image-signature \
    sha256:2bba968aedb7dd2aafe5fa8c7453f5ac36a0b9639f1bf5b03f95de325238b288 \
    --expected-identity 172.30.1.1:5000/openshift/nodejs:latest \
    --public-key /etc/pki/rpm-gpg/RPM-GPG-KEY-redhat-release \
    --save
2.7. Usage of oc and kubectl commands
The Kubernetes command-line interface (CLI), kubectl, can be used to run commands against a Kubernetes cluster. Because OpenShift Container Platform is a certified Kubernetes distribution, you can use the supported kubectl binaries that ship with OpenShift Container Platform, or you can gain extended functionality by using the oc binary.
2.7.1. The oc binary
The oc binary offers the same capabilities as the kubectl binary, but it extends to natively support additional OpenShift Container Platform features, including:
Full support for OpenShift Container Platform resources
Resources such as
DeploymentConfig,BuildConfig,Route,ImageStream, andImageStreamTagobjects are specific to OpenShift Container Platform distributions, and build upon standard Kubernetes primitives.Authentication
The
ocbinary offers a built-inlogincommand that allows authentication and enables you to work with OpenShift Container Platform projects, which map Kubernetes namespaces to authenticated users. See Understanding authentication for more information.Additional commands
The additional command
oc new-app, for example, makes it easier to get new applications started using existing source code or pre-built images. Similarly, the additional commandoc new-projectmakes it easier to start a project that you can switch to as your default.
If you installed an earlier version of the oc binary, you cannot use it to complete all of the commands in OpenShift Container Platform 4.6. If you want the latest features, you must download and install the latest version of the oc binary corresponding to your OpenShift Container Platform server version.
Non-security API changes will involve, at minimum, two minor releases (4.1 to 4.2 to 4.3, for example) to allow older oc binaries to update. Using new capabilities might require newer oc binaries. A 4.3 server might have additional capabilities that a 4.2 oc binary cannot use and a 4.3 oc binary might have additional capabilities that are unsupported by a 4.2 server.
|
X.Y ( |
X.Y+N footnote:versionpolicyn[Where N is a number greater than or equal to 1.] ( | |
| X.Y (Server) |
|
|
| X.Y+N footnote:versionpolicyn[] (Server) |
|
|
 Fully compatible.

oc client might be unable to access server features.

oc client might provide options and features that might not be compatible with the accessed server.
2.7.2. The kubectl binary
The kubectl binary is provided as a means to support existing workflows and scripts for new OpenShift Container Platform users coming from a standard Kubernetes environment, or for those who prefer to use the kubectl CLI. Existing users of kubectl can continue to use the binary to interact with Kubernetes primitives, with no changes required to the OpenShift Container Platform cluster.
You can install the supported kubectl binary by following the steps to Install the OpenShift CLI. The kubectl binary is included in the archive if you download the binary, or is installed when you install the CLI by using an RPM.
For more information, see the kubectl documentation.
Chapter 3. Developer CLI (odo)
3.1. odo release notes
3.1.1. Notable changes and improvements in odo version 2.5.0
-
Creates unique routes for each component, using
adler32hashing Supports additional fields in the devfile for assigning resources:
- cpuRequest
- cpuLimit
- memoryRequest
- memoryLimit
Adds the
--deployflag to theodo deletecommand, to remove components deployed using theodo deploycommand:$ odo delete --deploy-
Adds mapping support to the
odo linkcommand -
Supports ephemeral volumes using the
ephemeralfield involumecomponents -
Sets the default answer to
yeswhen asking for telemetry opt-in - Improves metrics by sending additional telemetry data to the devfile registry
-
Updates the bootstrap image to
registry.access.redhat.com/ocp-tools-4/odo-init-container-rhel8:1.1.11 - The upstream repository is available at https://github.com/redhat-developer/odo
3.1.2. Bug fixes
-
Previously,
odo deploywould fail if the.odo/envfile did not exist. The command now creates the.odo/envfile if required. -
Previously, interactive component creation using the
odo createcommand would fail if disconnect from the cluster. This issue is fixed in the latest release.
3.1.3. Getting support
For Product
If you find an error, encounter a bug, or have suggestions for improving the functionality of odo, file an issue in Bugzilla. Choose the Red Hat odo for OpenShift Container Platform product type.
Provide as many details in the issue description as possible.
For Documentation
If you find an error or have suggestions for improving the documentation, file a Jira issue for the most relevant documentation component.
3.2. Understanding odo
Red Hat OpenShift Developer CLI (odo) is a tool for creating applications on OpenShift Container Platform and Kubernetes. With odo, you can develop, test, debug, and deploy microservices-based applications on a Kubernetes cluster without having a deep understanding of the platform.
odo follows a create and push workflow. As a user, when you create, the information (or manifest) is stored in a configuration file. When you push, the corresponding resources are created on the Kubernetes cluster. All of this configuration is stored in the Kubernetes API for seamless accessibility and functionality.
odo uses service and link commands to link components and services together. odo achieves this by creating and deploying services based on Kubernetes Operators in the cluster. Services can be created using any of the Operators available on the Operator Hub. After linking a service, odo injects the service configuration into the component. Your application can then use this configuration to communicate with the Operator-backed service.
3.2.1. odo key features
odo is designed to be a developer-friendly interface to Kubernetes, with the ability to:
- Quickly deploy applications on a Kubernetes cluster by creating a new manifest or using an existing one
- Use commands to easily create and update the manifest, without the need to understand and maintain Kubernetes configuration files
- Provide secure access to applications running on a Kubernetes cluster
- Add and remove additional storage for applications on a Kubernetes cluster
- Create Operator-backed services and link your application to them
-
Create a link between multiple microservices that are deployed as
odocomponents -
Remotely debug applications you deployed using
odoin your IDE -
Easily test applications deployed on Kubernetes using
odo
3.2.2. odo core concepts
odo abstracts Kubernetes concepts into terminology that is familiar to developers:
- Application
A typical application, developed with a cloud-native approach, that is used to perform a particular task.
Examples of applications include online video streaming, online shopping, and hotel reservation systems.
- Component
A set of Kubernetes resources that can run and be deployed separately. A cloud-native application is a collection of small, independent, loosely coupled components.
Examples of components include an API back-end, a web interface, and a payment back-end.
- Project
- A single unit containing your source code, tests, and libraries.
- Context
-
A directory that contains the source code, tests, libraries, and
odoconfig files for a single component. - URL
- A mechanism to expose a component for access from outside the cluster.
- Storage
- Persistent storage in the cluster. It persists the data across restarts and component rebuilds.
- Service
An external application that provides additional functionality to a component.
Examples of services include PostgreSQL, MySQL, Redis, and RabbitMQ.
In
odo, services are provisioned from the OpenShift Service Catalog and must be enabled within your cluster.- devfile
An open standard for defining containerized development environments that enables developer tools to simplify and accelerate workflows. For more information, see the documentation at https://devfile.io.
You can connect to publicly available devfile registries, or you can install a Secure Registry.
3.2.3. Listing components in odo
odo uses the portable devfile format to describe components and their related URLs, storage, and services. odo can connect to various devfile registries to download devfiles for different languages and frameworks. See the documentation for the odo registry command for more information on how to manage the registries used by odo to retrieve devfile information.
You can list all the devfiles available of the different registries with the odo catalog list components command.
Procedure
Log in to the cluster with
odo:$ odo login -u developer -p developerList the available
odocomponents:$ odo catalog list componentsExample output
Odo Devfile Components:
NAME                             DESCRIPTION                                                         REGISTRY
dotnet50                         Stack with .NET 5.0                                                 DefaultDevfileRegistry
dotnet60                         Stack with .NET 6.0                                                 DefaultDevfileRegistry
dotnetcore31                     Stack with .NET Core 3.1                                            DefaultDevfileRegistry
go                               Stack with the latest Go version                                    DefaultDevfileRegistry
java-maven                       Upstream Maven and OpenJDK 11                                       DefaultDevfileRegistry
java-openliberty                 Java application Maven-built stack using the Open Liberty ru...     DefaultDevfileRegistry
java-openliberty-gradle          Java application Gradle-built stack using the Open Liberty r...     DefaultDevfileRegistry
java-quarkus                     Quarkus with Java                                                   DefaultDevfileRegistry
java-springboot                  Spring Boot® using Java                                             DefaultDevfileRegistry
java-vertx                       Upstream Vert.x using Java                                          DefaultDevfileRegistry
java-websphereliberty            Java application Maven-built stack using the WebSphere Liber...     DefaultDevfileRegistry
java-websphereliberty-gradle     Java application Gradle-built stack using the WebSphere Libe...     DefaultDevfileRegistry
java-wildfly                     Upstream WildFly                                                    DefaultDevfileRegistry
java-wildfly-bootable-jar        Java stack with WildFly in bootable Jar mode, OpenJDK 11 and...     DefaultDevfileRegistry
nodejs                           Stack with Node.js 14                                               DefaultDevfileRegistry
nodejs-angular                   Stack with Angular 12                                               DefaultDevfileRegistry
nodejs-nextjs                    Stack with Next.js 11                                               DefaultDevfileRegistry
nodejs-nuxtjs                    Stack with Nuxt.js 2                                                DefaultDevfileRegistry
nodejs-react                     Stack with React 17                                                 DefaultDevfileRegistry
nodejs-svelte                    Stack with Svelte 3                                                 DefaultDevfileRegistry
nodejs-vue                       Stack with Vue 3                                                    DefaultDevfileRegistry
php-laravel                      Stack with Laravel 8                                                DefaultDevfileRegistry
python                           Python Stack with Python 3.7                                        DefaultDevfileRegistry
python-django                    Python3.7 with Django                                               DefaultDevfileRegistry
3.2.4. Telemetry in odo
odo collects information about how it is being used, including metrics on the operating system, RAM, CPU, number of cores, odo version, errors, success/failures, and how long odo commands take to complete.
You can modify your telemetry consent by using the odo preference command:
-
odo preference set ConsentTelemetry trueconsents to telemetry. -
odo preference unset ConsentTelemetrydisables telemetry. -
odo preference viewshows the current preferences.
3.3. Installing odo
You can install the odo CLI on Linux, Windows, or macOS by downloading a binary. You can also install the OpenShift VS Code extension, which uses both the odo and the oc binaries to interact with your OpenShift Container Platform cluster. For Red Hat Enterprise Linux (RHEL), you can install the odo CLI as an RPM.
Currently, odo does not support installation in a restricted network environment.
3.3.1. Installing odo on Linux
The odo CLI is available to download as a binary and as a tarball for multiple operating systems and architectures including:
| Operating System | Binary | Tarball |
|---|---|---|
| Linux | ||
| Linux on IBM Power | ||
| Linux on IBM Z and LinuxONE |
Procedure
Navigate to the content gateway and download the appropriate file for your operating system and architecture.
If you download the binary, rename it to
odo:$ curl -L https://developers.redhat.com/content-gateway/rest/mirror/pub/openshift-v4/clients/odo/latest/odo-linux-amd64 -o odoIf you download the tarball, extract the binary:
$ curl -L https://developers.redhat.com/content-gateway/rest/mirror/pub/openshift-v4/clients/odo/latest/odo-linux-amd64.tar.gz -o odo.tar.gz
$ tar xvzf odo.tar.gz
Change the permissions on the binary:
$ chmod +x <filename>Place the
odobinary in a directory that is on yourPATH.To check your
PATH, execute the following command:$ echo $PATHVerify that
odois now available on your system:$ odo version
3.3.2. Installing odo on Windows
The odo CLI for Windows is available to download as a binary and as an archive.
| Operating System | Binary | Tarball |
|---|---|---|
| Windows |
Procedure
Navigate to the content gateway and download the appropriate file:
-
If you download the binary, rename it to
odo.exe. -
If you download the archive, unzip the binary with a ZIP program and then rename it to
odo.exe.
-
If you download the binary, rename it to
Move the
odo.exebinary to a directory that is on yourPATH.To check your
PATH, open the command prompt and execute the following command:C:\> pathVerify that
odois now available on your system:C:\> odo version
3.3.3. Installing odo on macOS
The odo CLI for macOS is available to download as a binary and as a tarball.
| Operating System | Binary | Tarball |
|---|---|---|
| macOS |
Procedure
Navigate to the content gateway and download the appropriate file:
If you download the binary, rename it to
odo:$ curl -L https://developers.redhat.com/content-gateway/rest/mirror/pub/openshift-v4/clients/odo/latest/odo-darwin-amd64 -o odoIf you download the tarball, extract the binary:
$ curl -L https://developers.redhat.com/content-gateway/rest/mirror/pub/openshift-v4/clients/odo/latest/odo-darwin-amd64.tar.gz -o odo.tar.gz
$ tar xvzf odo.tar.gz
Change the permissions on the binary:
# chmod +x odoPlace the
odobinary in a directory that is on yourPATH.To check your
PATH, execute the following command:$ echo $PATHVerify that
odois now available on your system:$ odo version
3.3.4. Installing odo on VS Code
The OpenShift VS Code extension uses both odo and the oc binary to interact with your OpenShift Container Platform cluster. To work with these features, install the OpenShift VS Code extension on VS Code.
Prerequisites
- You have installed VS Code.
Procedure
- Open VS Code.
-
Launch VS Code Quick Open with
Ctrl+P. Enter the following command:
$ ext install redhat.vscode-openshift-connector
3.3.5. Installing odo on Red Hat Enterprise Linux (RHEL) using an RPM
For Red Hat Enterprise Linux (RHEL), you can install the odo CLI as an RPM.
Procedure
Register with Red Hat Subscription Manager:
# subscription-manager registerPull the latest subscription data:
# subscription-manager refreshList the available subscriptions:
# subscription-manager list --available --matches '*OpenShift Developer Tools and Services*'In the output of the previous command, find the
Pool IDfield for your OpenShift Container Platform subscription and attach the subscription to the registered system:# subscription-manager attach --pool=<pool_id>Enable the repositories required by
odo:# subscription-manager repos --enable="ocp-tools-4.9-for-rhel-8-x86_64-rpms"Install the
odopackage:# yum install odoVerify that
odois now available on your system:$ odo version
3.4. Configuring the odo CLI
You can find the global settings for odo in the preference.yaml file which is located by default in your $HOME/.odo directory.
You can set a different location for the preference.yaml file by exporting the GLOBALODOCONFIG variable.
3.4.1. Viewing the current configuration
You can view the current odo CLI configuration by using the following command:
$ odo preference viewExample output
PARAMETER             CURRENT_VALUE
UpdateNotification
NamePrefix
Timeout
BuildTimeout
PushTimeout
Ephemeral
ConsentTelemetry      true
3.4.2. Setting a value
You can set a value for a preference key by using the following command:
$ odo preference set <key> <value>Preference keys are case-insensitive.
Example command
$ odo preference set updatenotification falseExample output
Global preference was successfully updated3.4.3. Unsetting a value
You can unset a value for a preference key by using the following command:
$ odo preference unset <key>
You can use the -f flag to skip the confirmation.
Example command
$ odo preference unset updatenotification
? Do you want to unset updatenotification in the preference (y/N) y
Example output
Global preference was successfully updated3.4.4. Preference key table
The following table shows the available options for setting preference keys for the odo CLI:
| Preference key | Description | Default value |
|---|---|---|
|
|
Control whether a notification to update | True |
|
|
Set a default name prefix for an | Current directory name |
|
| Timeout for the Kubernetes server connection check. | 1 second |
|
| Timeout for waiting for a build of the git component to complete. | 300 seconds |
|
| Timeout for waiting for a component to start. | 240 seconds |
|
|
Controls whether | True |
|
|
Controls whether | False |
3.4.5. Ignoring files or patterns
You can configure a list of files or patterns to ignore by modifying the .odoignore file in the root directory of your application. This applies to both odo push and odo watch.
If the .odoignore file does not exist, the .gitignore file is used instead for ignoring specific files and folders.
To ignore .git files, any files with the .js extension, and the folder tests, add the following to either the .odoignore or the .gitignore file:
.git
*.js
tests/
The .odoignore file allows any glob expressions.
3.5. odo CLI reference
3.5.1. odo build-images
odo can build container images based on Dockerfiles, and push these images to their registries.
When running the odo build-images command, odo searches for all components in the devfile.yaml with the image type, for example:
components:
- image:
    imageName: quay.io/myusername/myimage
    dockerfile:
      uri: ./Dockerfile <.>
      buildContext: ${PROJECTS_ROOT} <.>
  name: component-built-from-dockerfile
<.> The uri field indicates the relative path of the Dockerfile to use, relative to the directory containing the devfile.yaml. The devfile specification indicates that uri could also be an HTTP URL, but this case is not supported by odo yet. <.> The buildContext indicates the directory used as build context. The default value is ${PROJECTS_ROOT}.
For each image component, odo executes either podman or docker (the first one found, in this order), to build the image with the specified Dockerfile, build context, and arguments.
If the --push flag is passed to the command, the images are pushed to their registries after they are built.
3.5.2. odo catalog
odo uses different catalogs to deploy components and services.
3.5.2.1. Components
odo uses the portable devfile format to describe the components. It can connect to various devfile registries to download devfiles for different languages and frameworks. See odo registry for more information.
3.5.2.1.1. Listing components
To list all the devfiles available on the different registries, run the command:
$ odo catalog list componentsExample output
 NAME             DESCRIPTION                          REGISTRY
 go               Stack with the latest Go version     DefaultDevfileRegistry
 java-maven       Upstream Maven and OpenJDK 11        DefaultDevfileRegistry
 nodejs           Stack with Node.js 14                DefaultDevfileRegistry
 php-laravel      Stack with Laravel 8                 DefaultDevfileRegistry
 python           Python Stack with Python 3.7         DefaultDevfileRegistry
 [...]
3.5.2.1.2. Getting information about a component
To get more information about a specific component, run the command:
$ odo catalog describe componentFor example, run the command:
$ odo catalog describe component nodejsExample output
* Registry: DefaultDevfileRegistry <.>

Starter Projects: <.>
---
name: nodejs-starter
attributes: {}
description: ""
subdir: ""
projectsource:
  sourcetype: ""
  git:
    gitlikeprojectsource:
      commonprojectsource: {}
      checkoutfrom: null
      remotes:
        origin: https://github.com/odo-devfiles/nodejs-ex.git
  zip: null
  custom: null
<.> Registry is the registry from which the devfile is retrieved. <.> Starter projects are sample projects in the same language and framework of the devfile, that can help you start a new project.
See odo create for more information on creating a project from a starter project.
3.5.2.2. Services
odo can deploy services with the help of Operators.
Only Operators deployed with the help of the Operator Lifecycle Manager are supported by odo.
3.5.2.2.1. Listing services
To list the available Operators and their associated services, run the command:
$ odo catalog list servicesExample output
 Services available through Operators
 NAME                                 CRDs
 postgresql-operator.v0.1.1           Backup, Database
 redis-operator.v0.8.0                RedisCluster, Redis
In this example, two Operators are installed in the cluster. The postgresql-operator.v0.1.1 Operator deploys services related to PostgreSQL: Backup and Database. The redis-operator.v0.8.0 Operator deploys services related to Redis: RedisCluster and Redis.
To get a list of all the available Operators, odo fetches the ClusterServiceVersion (CSV) resources of the current namespace that are in a Succeeded phase. For Operators that support cluster-wide access, when a new namespace is created, these resources are automatically added to it. However, it may take some time before they are in the Succeeded phase, and odo may return an empty list until the resources are ready.
3.5.2.2.2. Searching services
To search for a specific service by a keyword, run the command:
$ odo catalog search serviceFor example, to retrieve the PostgreSQL services, run the command:
$ odo catalog search service postgresExample output
 Services available through Operators
 NAME                           CRDs
 postgresql-operator.v0.1.1     Backup, Database
You will see a list of Operators that contain the searched keyword in their name.
3.5.2.2.3. Getting information about a service
To get more information about a specific service, run the command:
$ odo catalog describe serviceFor example:
$ odo catalog describe service postgresql-operator.v0.1.1/DatabaseExample output
KIND:    Database
VERSION: v1alpha1

DESCRIPTION:
     Database is the Schema for the the Database Database API

FIELDS:
   awsAccessKeyId (string)
     AWS S3 accessKey/token ID

     Key ID of AWS S3 storage. Default Value: nil Required to create the Secret
     with the data to allow send the backup files to AWS S3 storage.
[...]
A service is represented in the cluster by a CustomResourceDefinition (CRD) resource. The previous command displays the details about the CRD such as kind, version, and the list of fields available to define an instance of this custom resource.
The list of fields is extracted from the OpenAPI schema included in the CRD. This information is optional in a CRD, and if it is not present, it is extracted from the ClusterServiceVersion (CSV) resource representing the service instead.
It is also possible to request the description of an Operator-backed service, without providing CRD type information. To describe the Redis Operator on a cluster, without CRD, run the following command:
$ odo catalog describe service redis-operator.v0.8.0Example output
NAME:	redis-operator.v0.8.0
DESCRIPTION:

	A Golang based redis operator that will make/oversee Redis
	standalone/cluster mode setup on top of the Kubernetes. It can create a
	redis cluster setup with best practices on Cloud as well as the Bare metal
	environment. Also, it provides an in-built monitoring capability using

... (cut short for beverity)

	Logging Operator is licensed under [Apache License, Version
	2.0](https://github.com/OT-CONTAINER-KIT/redis-operator/blob/master/LICENSE)


CRDs:
	NAME           DESCRIPTION
	RedisCluster   Redis Cluster
	Redis          Redis
3.5.3. odo create
odo uses a devfile to store the configuration of a component and to describe the component’s resources such as storage and services. The odo create command generates this file.
3.5.3.1. Creating a component
To create a devfile for an existing project, run the odo create command with the name and type of your component (for example, nodejs or go):
odo create nodejs mynodejs
In the example, nodejs is the type of the component and mynodejs is the name of the component that odo creates for you.
For a list of all the supported component types, run the command odo catalog list components.
If your source code exists outside the current directory, the --context flag can be used to specify the path. For example, if the source for the nodejs component is in a folder called node-backend relative to the current working directory, run the command:
odo create nodejs mynodejs --context ./node-backend
The --context flag supports relative and absolute paths.
To specify the project or app where your component will be deployed, use the --project and --app flags. For example, to create a component that is part of the myapp app inside the backend project, run the command:
odo create nodejs --app myapp --project backendIf these flags are not specified, they will default to the active app and project.
3.5.3.2. Starter projects
Use the starter projects if you do not have existing source code but want to get up and running quickly to experiment with devfiles and components. To use a starter project, add the --starter flag to the odo create command.
To get a list of available starter projects for a component type, run the odo catalog describe component command. For example, to get all available starter projects for the nodejs component type, run the command:
odo catalog describe component nodejs
Then specify the desired project using the --starter flag on the odo create command:
odo create nodejs --starter nodejs-starter
This will download the example template corresponding to the chosen component type, in this instance, nodejs. The template is downloaded to your current directory, or to the location specified by the --context flag. If a starter project has its own devfile, then this devfile will be preserved.
3.5.3.3. Using an existing devfile
If you want to create a new component from an existing devfile, you can do so by specifying the path to the devfile using the --devfile flag. For example, to create a component called mynodejs, based on a devfile from GitHub, use the following command:
odo create mynodejs --devfile https://raw.githubusercontent.com/odo-devfiles/registry/master/devfiles/nodejs/devfile.yaml3.5.3.4. Interactive creation
You can also run the odo create command interactively, to guide you through the steps needed to create a component:
$ odo create

? Which devfile component type do you wish to create go
? What do you wish to name the new devfile component go-api
? What project do you want the devfile component to be created in default
Devfile Object Validation
 ✓  Checking devfile existence [164258ns]
 ✓  Creating a devfile component from registry: DefaultDevfileRegistry [246051ns]
Validation
 ✓  Validating if devfile name is correct [92255ns]
? Do you want to download a starter project Yes

Starter Project
 ✓  Downloading starter project go-starter from https://github.com/devfile-samples/devfile-stack-go.git [429ms]

Please use odo push command to create the component with source deployed
You are prompted to choose the component type, name, and the project for the component. You can also choose whether or not to download a starter project. Once finished, a new devfile.yaml file is created in the working directory.
To deploy these resources to your cluster, run the command odo push.
3.5.4. odo delete
The odo delete command is useful for deleting resources that are managed by odo.
3.5.4.1. Deleting a component
To delete a devfile component, run the odo delete command:
$ odo deleteIf the component has been pushed to the cluster, the component is deleted from the cluster, along with its dependent storage, URL, secrets, and other resources. If the component has not been pushed, the command exits with an error stating that it could not find the resources on the cluster.
Use the -f or --force flag to avoid the confirmation questions.
3.5.4.2. Undeploying devfile Kubernetes components
To undeploy the devfile Kubernetes components, that have been deployed with odo deploy, execute the odo delete command with the --deploy flag:
$ odo delete --deploy
Use the -f or --force flag to avoid the confirmation questions.
3.5.4.3. Delete all
To delete all artifacts including the following items, run the odo delete command with the --all flag :
- devfile component
-
Devfile Kubernetes component that was deployed using the
odo deploycommand - Devfile
- Local configuration
$ odo delete --all3.5.4.4. Available flags
-f,--force- Use this flag to avoid the confirmation questions.
-w,--wait- Use this flag to wait for component deletion and any dependencies. This flag does not work when undeploying.
The documentation on Common Flags provides more information on the flags available for commands.
3.5.5. odo deploy
odo can be used to deploy components in a manner similar to how they would be deployed using a CI/CD system. First, odo builds the container images, and then it deploys the Kubernetes resources required to deploy the components.
When running the command odo deploy, odo searches for the default command of kind deploy in the devfile, and executes this command. The kind deploy is supported by the devfile format starting from version 2.2.0.
The deploy command is typically a composite command, composed of several apply commands:
-
A command referencing an
imagecomponent that, when applied, will build the image of the container to deploy, and then push it to its registry. - A command referencing a Kubernetes component that, when applied, will create a Kubernetes resource in the cluster.
With the following example devfile.yaml file, a container image is built using the Dockerfile present in the directory. The image is pushed to its registry and then a Kubernetes Deployment resource is created in the cluster, using this freshly built image.
schemaVersion: 2.2.0
[...]
variables:
  CONTAINER_IMAGE: quay.io/phmartin/myimage
commands:
  - id: build-image
    apply:
      component: outerloop-build
  - id: deployk8s
    apply:
      component: outerloop-deploy
  - id: deploy
    composite:
      commands:
        - build-image
        - deployk8s
      group:
        kind: deploy
        isDefault: true
components:
  - name: outerloop-build
    image:
      imageName: "{{CONTAINER_IMAGE}}"
      dockerfile:
        uri: ./Dockerfile
        buildContext: ${PROJECTS_ROOT}
  - name: outerloop-deploy
    kubernetes:
      inlined: |
        kind: Deployment
        apiVersion: apps/v1
        metadata:
          name: my-component
        spec:
          replicas: 1
          selector:
            matchLabels:
              app: node-app
          template:
            metadata:
              labels:
                app: node-app
            spec:
              containers:
                - name: main
                  image: {{CONTAINER_IMAGE}}
3.5.6. odo link
The odo link command helps link an odo component to an Operator-backed service or another odo component. It does this by using the Service Binding Operator. Currently, odo makes use of the Service Binding library and not the Operator itself to achieve the desired functionality.
3.5.6.1. Various linking options
odo provides various options for linking a component with an Operator-backed service or another odo component. All these options (or flags) can be used whether you are linking a component to a service or to another component.
3.5.6.1.1. Default behavior
By default, the odo link command creates a directory named kubernetes/ in your component directory and stores the information (YAML manifests) about services and links there. When you use odo push, odo compares these manifests with the state of the resources on the Kubernetes cluster and decides whether it needs to create, modify or destroy resources to match what is specified by the user.
3.5.6.1.2. The --inlined flag
If you specify the --inlined flag to the odo link command, odo stores the link information inline in the devfile.yaml in the component directory, instead of creating a file under the kubernetes/ directory. The behavior of the --inlined flag is similar in both the odo link and odo service create commands. This flag is helpful if you want everything stored in a single devfile.yaml. You have to remember to use --inlined flag with each odo link and odo service create command that you execute for the component.
3.5.6.1.3. The --map flag
Sometimes, you might want to add more binding information to the component, in addition to what is available by default. For example, if you are linking the component with a service and would like to bind some information from the service’s spec (short for specification), you could use the --map flag. Note that odo does not do any validation against the spec of the service or component being linked. Using this flag is only recommended if you are comfortable using the Kubernetes YAML manifests.
3.5.6.1.4. The --bind-as-files flag
For all the linking options discussed so far, odo injects the binding information into the component as environment variables. If you would like to mount this information as files instead, you can use the --bind-as-files flag. This will make odo inject the binding information as files into the /bindings location within your component’s Pod. Compared to the environment variables scenario, when you use --bind-as-files, the files are named after the keys and the value of these keys is stored as the contents of these files.
3.5.6.2. Examples
3.5.6.2.1. Default odo link
In the following example, the backend component is linked with the PostgreSQL service using the default odo link command. For the backend component, make sure that your component and service are pushed to the cluster:
$ odo listSample output
APP     NAME        PROJECT       TYPE       STATE      MANAGED BY ODO
app     backend     myproject     spring     Pushed     Yes
$ odo service listSample output
NAME                      MANAGED BY ODO     STATE      AGE
PostgresCluster/hippo     Yes (backend)      Pushed     59m41s
Now, run odo link to link the backend component with the PostgreSQL service:
$ odo link PostgresCluster/hippoExample output
 ✓  Successfully created link between component "backend" and service "PostgresCluster/hippo"

To apply the link, please use `odo push`
And then run odo push to actually create the link on the Kubernetes cluster.
After a successful odo push, you will see a few outcomes:
When you open the URL for the application deployed by backend component, it shows a list of
todoitems in the database. For example, in the output for theodo url listcommand, the path wheretodosare listed is included:$ odo url listSample output
Found the following URLs for component backend
NAME         STATE      URL                                       PORT     SECURE     KIND
8080-tcp     Pushed     http://8080-tcp.192.168.39.112.nip.io     8080     false      ingress
The correct path for the URL would be http://8080-tcp.192.168.39.112.nip.io/api/v1/todos. The exact URL depends on your setup. Also note that there are no
todosin the database unless you add some, so the URL might just show an empty JSON object.You can see binding information related to the Postgres service injected into the backend component. This binding information is injected, by default, as environment variables. You can check it using the
odo describecommand from the backend component’s directory:$ odo describeExample output:
Component Name: backend
Type: spring
Environment Variables:
  · PROJECTS_ROOT=/projects
  · PROJECT_SOURCE=/projects
  · DEBUG_PORT=5858
Storage:
  · m2 of size 3Gi mounted to /home/user/.m2
URLs:
  · http://8080-tcp.192.168.39.112.nip.io exposed via 8080
Linked Services:
  · PostgresCluster/hippo
    Environment Variables:
    · POSTGRESCLUSTER_PGBOUNCER-EMPTY
    · POSTGRESCLUSTER_PGBOUNCER.INI
    · POSTGRESCLUSTER_ROOT.CRT
    · POSTGRESCLUSTER_VERIFIER
    · POSTGRESCLUSTER_ID_ECDSA
    · POSTGRESCLUSTER_PGBOUNCER-VERIFIER
    · POSTGRESCLUSTER_TLS.CRT
    · POSTGRESCLUSTER_PGBOUNCER-URI
    · POSTGRESCLUSTER_PATRONI.CRT-COMBINED
    · POSTGRESCLUSTER_USER
    · pgImage
    · pgVersion
    · POSTGRESCLUSTER_CLUSTERIP
    · POSTGRESCLUSTER_HOST
    · POSTGRESCLUSTER_PGBACKREST_REPO.CONF
    · POSTGRESCLUSTER_PGBOUNCER-USERS.TXT
    · POSTGRESCLUSTER_SSH_CONFIG
    · POSTGRESCLUSTER_TLS.KEY
    · POSTGRESCLUSTER_CONFIG-HASH
    · POSTGRESCLUSTER_PASSWORD
    · POSTGRESCLUSTER_PATRONI.CA-ROOTS
    · POSTGRESCLUSTER_DBNAME
    · POSTGRESCLUSTER_PGBOUNCER-PASSWORD
    · POSTGRESCLUSTER_SSHD_CONFIG
    · POSTGRESCLUSTER_PGBOUNCER-FRONTEND.KEY
    · POSTGRESCLUSTER_PGBACKREST_INSTANCE.CONF
    · POSTGRESCLUSTER_PGBOUNCER-FRONTEND.CA-ROOTS
    · POSTGRESCLUSTER_PGBOUNCER-HOST
    · POSTGRESCLUSTER_PORT
    · POSTGRESCLUSTER_ROOT.KEY
    · POSTGRESCLUSTER_SSH_KNOWN_HOSTS
    · POSTGRESCLUSTER_URI
    · POSTGRESCLUSTER_PATRONI.YAML
    · POSTGRESCLUSTER_DNS.CRT
    · POSTGRESCLUSTER_DNS.KEY
    · POSTGRESCLUSTER_ID_ECDSA.PUB
    · POSTGRESCLUSTER_PGBOUNCER-FRONTEND.CRT
    · POSTGRESCLUSTER_PGBOUNCER-PORT
    · POSTGRESCLUSTER_CA.CRT
Some of these variables are used in the backend component’s
src/main/resources/application.propertiesfile so that the Java Spring Boot application can connect to the PostgreSQL database service.Lastly,
odohas created a directory calledkubernetes/in your backend component’s directory that contains the following files:$ ls kubernetes odo-service-backend-postgrescluster-hippo.yaml odo-service-hippo.yamlThese files contain the information (YAML manifests) for two resources:
-
odo-service-hippo.yaml- the Postgres service created usingodo service create --from-file ../postgrescluster.yamlcommand. -
odo-service-backend-postgrescluster-hippo.yaml- the link created usingodo linkcommand.
-
3.5.6.2.2. Using odo link with the --inlined flag
Using the --inlined flag with the odo link command has the same effect as an odo link command without the flag, in that it injects binding information. However, the subtle difference is that in the above case, there are two manifest files under kubernetes/ directory, one for the Postgres service and another for the link between the backend component and this service. However, when you pass the --inlined flag, odo does not create a file under the kubernetes/ directory to store the YAML manifest, but rather stores it inline in the devfile.yaml file.
To see this, unlink the component from the PostgreSQL service first:
$ odo unlink PostgresCluster/hippoExample output:
 ✓  Successfully unlinked component "backend" from service "PostgresCluster/hippo"

To apply the changes, please use `odo push`
To unlink them on the cluster, run odo push. Now if you inspect the kubernetes/ directory, you see only one file:
$ ls kubernetes
odo-service-hippo.yaml
Next, use the --inlined flag to create a link:
$ odo link PostgresCluster/hippo --inlinedExample output:
 ✓  Successfully created link between component "backend" and service "PostgresCluster/hippo"

To apply the link, please use `odo push`
You need to run odo push for the link to get created on the cluster, like the procedure that omits the --inlined flag. odo stores the configuration in devfile.yaml. In this file, you can see an entry like the following:
 kubernetes:
    inlined: |
      apiVersion: binding.operators.coreos.com/v1alpha1
      kind: ServiceBinding
      metadata:
        creationTimestamp: null
        name: backend-postgrescluster-hippo
      spec:
        application:
          group: apps
          name: backend-app
          resource: deployments
          version: v1
        bindAsFiles: false
        detectBindingResources: true
        services:
        - group: postgres-operator.crunchydata.com
          id: hippo
          kind: PostgresCluster
          name: hippo
          version: v1beta1
      status:
        secret: ""
  name: backend-postgrescluster-hippo
Now if you were to run odo unlink PostgresCluster/hippo, odo would first remove the link information from the devfile.yaml, and then a subsequent odo push would delete the link from the cluster.
3.5.6.2.3. Custom bindings
odo link accepts the flag --map which can inject custom binding information into the component. Such binding information will be fetched from the manifest of the resource that you are linking to your component. For example, in the context of the backend component and PostgreSQL service, you can inject information from the PostgreSQL service’s manifest postgrescluster.yaml file into the backend component.
If the name of your PostgresCluster service is hippo (or the output of odo service list, if your PostgresCluster service is named differently), when you want to inject the value of postgresVersion from that YAML definition into your backend component, run the command:
$ odo link PostgresCluster/hippo --map pgVersion='{{ .hippo.spec.postgresVersion }}'
Note that, if the name of your Postgres service is different from hippo, you will have to specify that in the above command in the place of .hippo in the value for pgVersion.
After a link operation, run odo push as usual. Upon successful completion of the push operation, you can run the following command from your backend component directory, to validate if the custom mapping got injected properly:
$ odo exec -- env | grep pgVersionExample output:
pgVersion=13
Since you might want to inject more than just one piece of custom binding information, odo link accepts multiple key-value pairs of mappings. The only constraint is that these should be specified as --map <key>=<value>. For example, if you want to also inject PostgreSQL image information along with the version, you could run:
$ odo link PostgresCluster/hippo --map pgVersion='{{ .hippo.spec.postgresVersion }}' --map pgImage='{{ .hippo.spec.image }}'
and then run odo push. To validate if both the mappings got injected correctly, run the following command:
$ odo exec -- env | grep -e "pgVersion\|pgImage"Example output:
pgVersion=13
pgImage=registry.developers.crunchydata.com/crunchydata/crunchy-postgres-ha:centos8-13.4-0
3.5.6.2.3.1. To inline or not?
You can accept the default behavior where odo link generate a manifests file for the link under kubernetes/ directory. Alternatively, you can use the --inlined flag if you prefer to store everything in a single devfile.yaml file.
3.5.6.3. Binding as files
Another helpful flag that odo link provides is --bind-as-files. When this flag is passed, the binding information is not injected into the component’s Pod as environment variables but is mounted as a filesystem.
Ensure that there are no existing links between the backend component and the PostgreSQL service. You could do this by running odo describe in the backend component’s directory and check if you see output similar to the following:
Linked Services:
 · PostgresCluster/hippo
Unlink the service from the component using:
$ odo unlink PostgresCluster/hippo
$ odo push
3.5.6.4. --bind-as-files examples
3.5.6.4.1. Using the default odo link
By default, odo creates the manifest file under the kubernetes/ directory, for storing the link information. Link the backend component and PostgreSQL service using:
$ odo link PostgresCluster/hippo --bind-as-files
$ odo push
Example odo describe output:
$ odo describe

Component Name: backend
Type: spring
Environment Variables:
 · PROJECTS_ROOT=/projects
 · PROJECT_SOURCE=/projects
 · DEBUG_PORT=5858
 · SERVICE_BINDING_ROOT=/bindings
 · SERVICE_BINDING_ROOT=/bindings
Storage:
 · m2 of size 3Gi mounted to /home/user/.m2
URLs:
 · http://8080-tcp.192.168.39.112.nip.io exposed via 8080
Linked Services:
 · PostgresCluster/hippo
   Files:
    · /bindings/backend-postgrescluster-hippo/pgbackrest_instance.conf
    · /bindings/backend-postgrescluster-hippo/user
    · /bindings/backend-postgrescluster-hippo/ssh_known_hosts
    · /bindings/backend-postgrescluster-hippo/clusterIP
    · /bindings/backend-postgrescluster-hippo/password
    · /bindings/backend-postgrescluster-hippo/patroni.yaml
    · /bindings/backend-postgrescluster-hippo/pgbouncer-frontend.crt
    · /bindings/backend-postgrescluster-hippo/pgbouncer-host
    · /bindings/backend-postgrescluster-hippo/root.key
    · /bindings/backend-postgrescluster-hippo/pgbouncer-frontend.key
    · /bindings/backend-postgrescluster-hippo/pgbouncer.ini
    · /bindings/backend-postgrescluster-hippo/uri
    · /bindings/backend-postgrescluster-hippo/config-hash
    · /bindings/backend-postgrescluster-hippo/pgbouncer-empty
    · /bindings/backend-postgrescluster-hippo/port
    · /bindings/backend-postgrescluster-hippo/dns.crt
    · /bindings/backend-postgrescluster-hippo/pgbouncer-uri
    · /bindings/backend-postgrescluster-hippo/root.crt
    · /bindings/backend-postgrescluster-hippo/ssh_config
    · /bindings/backend-postgrescluster-hippo/dns.key
    · /bindings/backend-postgrescluster-hippo/host
    · /bindings/backend-postgrescluster-hippo/patroni.crt-combined
    · /bindings/backend-postgrescluster-hippo/pgbouncer-frontend.ca-roots
    · /bindings/backend-postgrescluster-hippo/tls.key
    · /bindings/backend-postgrescluster-hippo/verifier
    · /bindings/backend-postgrescluster-hippo/ca.crt
    · /bindings/backend-postgrescluster-hippo/dbname
    · /bindings/backend-postgrescluster-hippo/patroni.ca-roots
    · /bindings/backend-postgrescluster-hippo/pgbackrest_repo.conf
    · /bindings/backend-postgrescluster-hippo/pgbouncer-port
    · /bindings/backend-postgrescluster-hippo/pgbouncer-verifier
    · /bindings/backend-postgrescluster-hippo/id_ecdsa
    · /bindings/backend-postgrescluster-hippo/id_ecdsa.pub
    · /bindings/backend-postgrescluster-hippo/pgbouncer-password
    · /bindings/backend-postgrescluster-hippo/pgbouncer-users.txt
    · /bindings/backend-postgrescluster-hippo/sshd_config
    · /bindings/backend-postgrescluster-hippo/tls.crt
Everything that was an environment variable in the key=value format in the earlier odo describe output is now mounted as a file. Use the cat command to view the contents of some of these files:
Example command:
$ odo exec -- cat /bindings/backend-postgrescluster-hippo/passwordExample output:
q({JC:jn^mm/Bw}eu+j.GX{kExample command:
$ odo exec -- cat /bindings/backend-postgrescluster-hippo/userExample output:
hippoExample command:
$ odo exec -- cat /bindings/backend-postgrescluster-hippo/clusterIPExample output:
10.101.78.563.5.6.4.2. Using --inlined
The result of using --bind-as-files and --inlined together is similar to using odo link --inlined. The manifest of the link gets stored in the devfile.yaml, instead of being stored in a separate file under kubernetes/ directory. Other than that, the odo describe output would be the same as earlier.
3.5.6.4.3. Custom bindings
When you pass custom bindings while linking the backend component with the PostgreSQL service, these custom bindings are injected not as environment variables but are mounted as files. For example:
$ odo link PostgresCluster/hippo --map pgVersion='{{ .hippo.spec.postgresVersion }}' --map pgImage='{{ .hippo.spec.image }}' --bind-as-files
$ odo push
These custom bindings get mounted as files instead of being injected as environment variables. To validate that this worked, run the following command:
Example command:
$ odo exec -- cat /bindings/backend-postgrescluster-hippo/pgVersionExample output:
13Example command:
$ odo exec -- cat /bindings/backend-postgrescluster-hippo/pgImageExample output:
registry.developers.crunchydata.com/crunchydata/crunchy-postgres-ha:centos8-13.4-03.5.7. odo registry
odo uses the portable devfile format to describe the components. odo can connect to various devfile registries, to download devfiles for different languages and frameworks.
You can connect to publicly available devfile registries, or you can install your own Secure Registry.
You can use the odo registry command to manage the registries that are used by odo to retrieve devfile information.
3.5.7.1. Listing the registries
To list the registries currently contacted by odo, run the command:
$ odo registry listExample output:
NAME                       URL                             SECURE
DefaultDevfileRegistry     https://registry.devfile.io     No
DefaultDevfileRegistry is the default registry used by odo; it is provided by the devfile.io project.
3.5.7.2. Adding a registry
To add a registry, run the command:
$ odo registry addExample output:
$ odo registry add StageRegistry https://registry.stage.devfile.io
New registry successfully added
If you are deploying your own Secure Registry, you can specify the personal access token to authenticate to the secure registry with the --token flag:
$ odo registry add MyRegistry https://myregistry.example.com --token <access_token>
New registry successfully added
3.5.7.3. Deleting a registry
To delete a registry, run the command:
$ odo registry deleteExample output:
$ odo registry delete StageRegistry
? Are you sure you want to delete registry "StageRegistry" Yes
Successfully deleted registry
Use the --force (or -f) flag to force the deletion of the registry without confirmation.
3.5.7.4. Updating a registry
To update the URL or the personal access token of a registry already registered, run the command:
$ odo registry updateExample output:
 $ odo registry update MyRegistry https://otherregistry.example.com --token <other_access_token>
 ? Are you sure you want to update registry "MyRegistry" Yes
 Successfully updated registry
Use the --force (or -f) flag to force the update of the registry without confirmation.
3.5.8. odo service
odo can deploy services with the help of Operators.
The list of available Operators and services available for installation can be found using the odo catalog command.
Services are created in the context of a component, so run the odo create command before you deploy services.
A service is deployed using two steps:
- Define the service and store its definition in the devfile.
-
Deploy the defined service to the cluster, using the
odo pushcommand.
3.5.8.1. Creating a new service
To create a new service, run the command:
$ odo service create
For example, to create an instance of a Redis service named my-redis-service, you can run the following command:
Example output
$ odo catalog list services
Services available through Operators
NAME                      CRDs
redis-operator.v0.8.0     RedisCluster, Redis

$ odo service create redis-operator.v0.8.0/Redis my-redis-service
Successfully added service to the configuration; do 'odo push' to create service on the cluster
This command creates a Kubernetes manifest in the kubernetes/ directory, containing the definition of the service, and this file is referenced from the devfile.yaml file.
$ cat kubernetes/odo-service-my-redis-service.yamlExample output
 apiVersion: redis.redis.opstreelabs.in/v1beta1
 kind: Redis
 metadata:
   name: my-redis-service
 spec:
   kubernetesConfig:
     image: quay.io/opstree/redis:v6.2.5
     imagePullPolicy: IfNotPresent
     resources:
       limits:
         cpu: 101m
         memory: 128Mi
       requests:
         cpu: 101m
         memory: 128Mi
     serviceType: ClusterIP
   redisExporter:
     enabled: false
     image: quay.io/opstree/redis-exporter:1.0
   storage:
     volumeClaimTemplate:
       spec:
         accessModes:
         - ReadWriteOnce
         resources:
           requests:
             storage: 1Gi
Example command
$ cat devfile.yamlExample output
[...]
components:
- kubernetes:
    uri: kubernetes/odo-service-my-redis-service.yaml
  name: my-redis-service
[...]
Note that the name of the created instance is optional. If you do not provide a name, it will be the lowercase name of the service. For example, the following command creates an instance of a Redis service named redis:
$ odo service create redis-operator.v0.8.0/Redis3.5.8.1.1. Inlining the manifest
By default, a new manifest is created in the kubernetes/ directory, referenced from the devfile.yaml file. It is possible to inline the manifest inside the devfile.yaml file using the --inlined flag:
$ odo service create redis-operator.v0.8.0/Redis my-redis-service --inlined
Successfully added service to the configuration; do 'odo push' to create service on the cluster
Example command
$ cat devfile.yamlExample output
[...]
components:
- kubernetes:
    inlined: |
      apiVersion: redis.redis.opstreelabs.in/v1beta1
      kind: Redis
      metadata:
        name: my-redis-service
      spec:
        kubernetesConfig:
          image: quay.io/opstree/redis:v6.2.5
          imagePullPolicy: IfNotPresent
          resources:
            limits:
              cpu: 101m
              memory: 128Mi
            requests:
              cpu: 101m
              memory: 128Mi
          serviceType: ClusterIP
        redisExporter:
          enabled: false
          image: quay.io/opstree/redis-exporter:1.0
        storage:
          volumeClaimTemplate:
            spec:
              accessModes:
              - ReadWriteOnce
              resources:
                requests:
                  storage: 1Gi
  name: my-redis-service
[...]
3.5.8.1.2. Configuring the service
Without specific customization, the service will be created with a default configuration. You can use either command-line arguments or a file to specify your own configuration.
3.5.8.1.2.1. Using command-line arguments
Use the --parameters (or -p) flag to specify your own configuration.
The following example configures the Redis service with three parameters:
$ odo service create redis-operator.v0.8.0/Redis my-redis-service \
    -p kubernetesConfig.image=quay.io/opstree/redis:v6.2.5 \
    -p kubernetesConfig.serviceType=ClusterIP \
    -p redisExporter.image=quay.io/opstree/redis-exporter:1.0
Successfully added service to the configuration; do 'odo push' to create service on the cluster
Example command
$ cat kubernetes/odo-service-my-redis-service.yamlExample output
apiVersion: redis.redis.opstreelabs.in/v1beta1
kind: Redis
metadata:
  name: my-redis-service
spec:
  kubernetesConfig:
    image: quay.io/opstree/redis:v6.2.5
    serviceType: ClusterIP
  redisExporter:
    image: quay.io/opstree/redis-exporter:1.0
You can obtain the possible parameters for a specific service using the odo catalog describe service command.
3.5.8.1.2.2. Using a file
Use a YAML manifest to configure your own specification. In the following example, the Redis service is configured with three parameters.
Create a manifest:
$ cat > my-redis.yaml <<EOF
apiVersion: redis.redis.opstreelabs.in/v1beta1
kind: Redis
metadata:
  name: my-redis-service
spec:
  kubernetesConfig:
    image: quay.io/opstree/redis:v6.2.5
    serviceType: ClusterIP
  redisExporter:
    image: quay.io/opstree/redis-exporter:1.0
EOF
Create the service from the manifest:
$ odo service create --from-file my-redis.yaml
Successfully added service to the configuration; do 'odo push' to create service on the cluster
3.5.8.2. Deleting a service
To delete a service, run the command:
$ odo service deleteExample output
$ odo service list
NAME                       MANAGED BY ODO     STATE               AGE
Redis/my-redis-service     Yes (api)          Deleted locally     5m39s
$ odo service delete Redis/my-redis-service
? Are you sure you want to delete Redis/my-redis-service Yes
Service "Redis/my-redis-service" has been successfully deleted; do 'odo push' to delete service from the cluster
Use the --force (or -f) flag to force the deletion of the service without confirmation.
3.5.8.3. Listing services
To list the services created for your component, run the command:
$ odo service listExample output
$ odo service list
NAME                       MANAGED BY ODO     STATE             AGE
Redis/my-redis-service-1   Yes (api)          Not pushed
Redis/my-redis-service-2   Yes (api)          Pushed            52s
Redis/my-redis-service-3   Yes (api)          Deleted locally   1m22s
For each service, STATE indicates if the service has been pushed to the cluster using the odo push command, or if the service is still running on the cluster but removed from the devfile locally using the odo service delete command.
3.5.8.4. Getting information about a service
To get details of a service such as its kind, version, name, and list of configured parameters, run the command:
$ odo service describeExample output
$ odo service describe Redis/my-redis-service
Version: redis.redis.opstreelabs.in/v1beta1
Kind: Redis
Name: my-redis-service
Parameters:
NAME                           VALUE
kubernetesConfig.image         quay.io/opstree/redis:v6.2.5
kubernetesConfig.serviceType   ClusterIP
redisExporter.image            quay.io/opstree/redis-exporter:1.0
3.5.9. odo storage
odo lets users manage storage volumes that are attached to the components. A storage volume can be either an ephemeral volume using an emptyDir Kubernetes volume, or a Persistent Volume Claim (PVC). A PVC allows users to claim a persistent volume (such as a GCE PersistentDisk or an iSCSI volume) without understanding the details of the particular cloud environment. The persistent storage volume can be used to persist data across restarts and rebuilds of the component.
3.5.9.1. Adding a storage volume
To add a storage volume to the cluster, run the command:
$ odo storage createExample output:
$ odo storage create store --path /data --size 1Gi
✓  Added storage store to nodejs-project-ufyy

$ odo storage create tempdir --path /tmp --size 2Gi --ephemeral
✓  Added storage tempdir to nodejs-project-ufyy

Please use `odo push` command to make the storage accessible to the component
In the above example, the first storage volume has been mounted to the /data path and has a size of 1Gi, and the second volume has been mounted to /tmp and is ephemeral.
3.5.9.2. Listing the storage volumes
To check the storage volumes currently used by the component, run the command:
$ odo storage listExample output:
$ odo storage list
The component 'nodejs-project-ufyy' has the following storage attached:
NAME      SIZE     PATH      STATE
store     1Gi      /data     Not Pushed
tempdir   2Gi      /tmp      Not Pushed
3.5.9.3. Deleting a storage volume
To delete a storage volume, run the command:
$ odo storage deleteExample output:
$ odo storage delete store -f
Deleted storage store from nodejs-project-ufyy

Please use `odo push` command to delete the storage from the cluster
In the above example, using the -f flag force deletes the storage without asking user permission.
3.5.9.4. Adding storage to specific container
If your devfile has multiple containers, you can specify which container you want the storage to attach to, using the --container flag in the odo storage create command.
The following example is an excerpt from a devfile with multiple containers :
components:
  - name: nodejs1
    container:
      image: registry.access.redhat.com/ubi8/nodejs-12:1-36
      memoryLimit: 1024Mi
      endpoints:
        - name: "3000-tcp"
          targetPort: 3000
      mountSources: true
  - name: nodejs2
    container:
      image: registry.access.redhat.com/ubi8/nodejs-12:1-36
      memoryLimit: 1024Mi
In the example, there are two containers,nodejs1 and nodejs2. To attach storage to the nodejs2 container, use the following command:
$ odo storage create --containerExample output:
$ odo storage create store --path /data --size 1Gi --container nodejs2
✓  Added storage store to nodejs-testing-xnfg

Please use `odo push` command to make the storage accessible to the component
You can list the storage resources, using the odo storage list command:
$ odo storage listExample output:
The component 'nodejs-testing-xnfg' has the following storage attached:
NAME      SIZE     PATH      CONTAINER     STATE
store     1Gi      /data     nodejs2       Not Pushed
3.5.10. Common flags
The following flags are available with most odo commands:
| Command | Description |
|---|---|
|
| Set the context directory where the component is defined. |
|
| Set the project for the component. Defaults to the project defined in the local configuration. If none is available, then current project on the cluster. |
|
| Set the application of the component. Defaults to the application defined in the local configuration. If none is available, then app. |
|
|
Set the path to the |
|
| Use this flag to see the logs. |
|
| Use this flag to tell the command not to prompt the user for confirmation. |
|
| Set the verbosity level. See Logging in odo for more information. |
|
| Output the help for a command. |
Some flags might not be available for some commands. Run the command with the --help flag to get a list of all the available flags.
3.5.11. JSON output
The odo commands that output content generally accept a -o json flag to output this content in JSON format, suitable for other programs to parse this output more easily.
The output structure is similar to Kubernetes resources, with the kind, apiVersion, metadata, spec, and status fields.
List commands return a List resource, containing an items (or similar) field listing the items of the list, with each item also being similar to Kubernetes resources.
Delete commands return a Status resource; see the Status Kubernetes resource.
Other commands return a resource associated with the command, for example, Application, Storage, URL, and so on.
The full list of commands currently accepting the -o json flag is:
| Commands | Kind (version) | Kind (version) of list items | Complete content? |
|---|---|---|---|
| odo application describe | Application (odo.dev/v1alpha1) | n/a | no |
| odo application list | List (odo.dev/v1alpha1) | Application (odo.dev/v1alpha1) | ? |
| odo catalog list components | List (odo.dev/v1alpha1) | missing | yes |
| odo catalog list services | List (odo.dev/v1alpha1) | ClusterServiceVersion (operators.coreos.com/v1alpha1) | ? |
| odo catalog describe component | missing | n/a | yes |
| odo catalog describe service | CRDDescription (odo.dev/v1alpha1) | n/a | yes |
| odo component create | Component (odo.dev/v1alpha1) | n/a | yes |
| odo component describe | Component (odo.dev/v1alpha1) | n/a | yes |
| odo component list | List (odo.dev/v1alpha1) | Component (odo.dev/v1alpha1) | yes |
| odo config view | DevfileConfiguration (odo.dev/v1alpha1) | n/a | yes |
| odo debug info | OdoDebugInfo (odo.dev/v1alpha1) | n/a | yes |
| odo env view | EnvInfo (odo.dev/v1alpha1) | n/a | yes |
| odo preference view | PreferenceList (odo.dev/v1alpha1) | n/a | yes |
| odo project create | Project (odo.dev/v1alpha1) | n/a | yes |
| odo project delete | Status (v1) | n/a | yes |
| odo project get | Project (odo.dev/v1alpha1) | n/a | yes |
| odo project list | List (odo.dev/v1alpha1) | Project (odo.dev/v1alpha1) | yes |
| odo registry list | List (odo.dev/v1alpha1) | missing | yes |
| odo service create | Service | n/a | yes |
| odo service describe | Service | n/a | yes |
| odo service list | List (odo.dev/v1alpha1) | Service | yes |
| odo storage create | Storage (odo.dev/v1alpha1) | n/a | yes |
| odo storage delete | Status (v1) | n/a | yes |
| odo storage list | List (odo.dev/v1alpha1) | Storage (odo.dev/v1alpha1) | yes |
| odo url list | List (odo.dev/v1alpha1) | URL (odo.dev/v1alpha1) | yes |
Chapter 4. Helm CLI
4.1. Getting started with Helm 3
4.1.1. Understanding Helm
Helm is a software package manager that simplifies deployment of applications and services to OpenShift Container Platform clusters.
Helm uses a packaging format called charts. A Helm chart is a collection of files that describes the OpenShift Container Platform resources.
A running instance of the chart in a cluster is called a release. A new release is created every time a chart is installed on the cluster.
Each time a chart is installed, or a release is upgraded or rolled back, an incremental revision is created.
4.1.1.1. Key features
Helm provides the ability to:
- Search through a large collection of charts stored in the chart repository.
- Modify existing charts.
- Create your own charts with OpenShift Container Platform or Kubernetes resources.
- Package and share your applications as charts.
4.1.2. Installing Helm
The following section describes how to install Helm on different platforms using the CLI.
You can also find the URL to the latest binaries from the OpenShift Container Platform web console by clicking the ? icon in the upper-right corner and selecting Command Line Tools.
Prerequisites
- You have installed Go, version 1.13 or higher.
4.1.2.1. On Linux
Download the Helm binary and add it to your path:
# curl -L https://mirror.openshift.com/pub/openshift-v4/clients/helm/latest/helm-linux-amd64 -o /usr/local/bin/helmMake the binary file executable:
# chmod +x /usr/local/bin/helmCheck the installed version:
$ helm versionExample output
version.BuildInfo{Version:"v3.0", GitCommit:"b31719aab7963acf4887a1c1e6d5e53378e34d93", GitTreeState:"clean", GoVersion:"go1.13.4"}
4.1.2.2. On Windows 7/8
-
Download the latest
.exefile and put in a directory of your preference. - Right click Start and click Control Panel.
- Select System and Security and then click System.
- From the menu on the left, select Advanced systems settings and click Environment Variables at the bottom.
- Select Path from the Variable section and click Edit.
-
Click New and type the path to the folder with the
.exefile into the field or click Browse and select the directory, and click OK.
4.1.2.3. On Windows 10
-
Download the latest
.exefile and put in a directory of your preference. -
Click Search and type
envorenvironment. - Select Edit environment variables for your account.
- Select Path from the Variable section and click Edit.
- Click New and type the path to the directory with the exe file into the field or click Browse and select the directory, and click OK.
4.1.2.4. On MacOS
Download the Helm binary and add it to your path:
# curl -L https://mirror.openshift.com/pub/openshift-v4/clients/helm/latest/helm-darwin-amd64 -o /usr/local/bin/helmMake the binary file executable:
# chmod +x /usr/local/bin/helmCheck the installed version:
$ helm versionExample output
version.BuildInfo{Version:"v3.0", GitCommit:"b31719aab7963acf4887a1c1e6d5e53378e34d93", GitTreeState:"clean", GoVersion:"go1.13.4"}
4.1.3. Installing a Helm chart on an OpenShift Container Platform cluster
Prerequisites
- You have a running OpenShift Container Platform cluster and you have logged into it.
- You have installed Helm.
Procedure
Create a new project:
$ oc new-project mysqlAdd a repository of Helm charts to your local Helm client:
$ helm repo add stable https://kubernetes-charts.storage.googleapis.com/Example output
"stable" has been added to your repositoriesUpdate the repository:
$ helm repo updateInstall an example MySQL chart:
$ helm install example-mysql stable/mysqlVerify that the chart has installed successfully:
$ helm listExample output
NAME NAMESPACE REVISION UPDATED STATUS CHART APP VERSION
example-mysql mysql 1 2019-12-05 15:06:51.379134163 -0500 EST deployed mysql-1.5.0 5.7.27
4.1.4. Creating a custom Helm chart on OpenShift Container Platform
Procedure
Create a new project:
$ oc new-project nodejs-ex-kDownload an example Node.js chart that contains OpenShift Container Platform objects:
$ git clone https://github.com/redhat-developer/redhat-helm-chartsGo to the directory with the sample chart:
$ cd redhat-helm-charts/alpha/nodejs-ex-k/Edit the
Chart.yamlfile and add a description of your chart:apiVersion: v21 name: nodejs-ex-k2 description: A Helm chart for OpenShift3 icon: https://static.redhat.com/libs/redhat/brand-assets/latest/corp/logo.svg4 Verify that the chart is formatted properly:
$ helm lintExample output
[INFO] Chart.yaml: icon is recommended

1 chart(s) linted, 0 chart(s) failed
Navigate to the previous directory level:
$ cd ..Install the chart:
$ helm install nodejs-chart nodejs-ex-kVerify that the chart has installed successfully:
$ helm listExample output
NAME NAMESPACE REVISION UPDATED STATUS CHART APP VERSION
nodejs-chart nodejs-ex-k 1 2019-12-05 15:06:51.379134163 -0500 EST deployed nodejs-0.1.0  1.16.0
4.2. Configuring custom Helm chart repositories
The Developer Catalog, in the Developer perspective of the web console, displays the Helm charts available in the cluster. By default, it lists the Helm charts from the Red Hat Helm chart repository. For a list of the charts see the Red Hat Helm index file.
As a cluster administrator, you can add multiple Helm chart repositories, apart from the default one, and display the Helm charts from these repositories in the Developer Catalog.
4.2.1. Adding custom Helm chart repositories
You can add custom Helm chart repositories to your cluster, and enable access to the Helm charts from these repositories in the Developer Catalog.
Procedure
To add a new Helm Chart Repository, you must add the Helm Chart Repository custom resource (CR) to your cluster.
Sample Helm Chart Repository CR
apiVersion: helm.openshift.io/v1beta1
kind: HelmChartRepository
metadata:
  name: <name>
spec:
 # optional name that might be used by console
 # name: <chart-display-name>
  connectionConfig:
    url: <helm-chart-repository-url>
For example, to add an Azure sample chart repository, run:
$ cat <<EOF | oc apply -f - apiVersion: helm.openshift.io/v1beta1 kind: HelmChartRepository metadata: name: azure-sample-repo spec: name: azure-sample-repo connectionConfig: url: https://raw.githubusercontent.com/Azure-Samples/helm-charts/master/docs EOF- Navigate to the Developer Catalog in the web console to verify that the helm charts from the Azure chart repository are displayed.
4.2.2. Creating credentials and CA certificates to add Helm chart repositories
Some Helm chart repositories need credentials and custom certificate authority (CA) certificates to connect to it. You can use the web console as well as the CLI to add credentials and certificates.
Procedure
To configure the credentials and certificates, and then add a Helm chart repository using the CLI:
In the
openshift-confignamespace, create aConfigMapobject with a custom CA certificate in PEM encoded format, and store it under theca-bundle.crtkey within the config map:$ oc create configmap helm-ca-cert \ --from-file=ca-bundle.crt=/path/to/certs/ca.crt \ -n openshift-configIn the
openshift-confignamespace, create aSecretobject to add the client TLS configurations:$ oc create secret generic helm-tls-configs \ --from-file=tls.crt=/path/to/certs/client.crt \ --from-file=tls.key=/path/to/certs//client.key \ -n openshift-configNote that the client certificate and key must be in PEM encoded format and stored under the keys
tls.crtandtls.key, respectively.Add the Helm repository as follows:
$ cat <<EOF | oc apply -f -
apiVersion: helm.openshift.io/v1beta1
kind: HelmChartRepository
metadata:
  name: <helm-repository>
spec:
  name: <helm-repository>
  connectionConfig:
    url: <URL for the Helm repository>
    tlsConfig:
        name: helm-tls-configs
    ca:
	name: helm-ca-cert
EOF
The
ConfigMapandSecretare consumed in the HelmChartRepository CR using thetlsConfigandcafields. These certificates are used to connect to the Helm repository URL.By default, all authenticated users have access to all configured charts. However, for chart repositories where certificates are needed, you must provide users with read access to the
helm-ca-certconfig map andhelm-tls-configssecret in theopenshift-confignamespace, as follows:$ cat <<EOF | kubectl apply -f - apiVersion: rbac.authorization.k8s.io/v1 kind: Role metadata: namespace: openshift-config name: helm-chartrepos-tls-conf-viewer rules: - apiGroups: [""] resources: ["configmaps"] resourceNames: ["helm-ca-cert"] verbs: ["get"] - apiGroups: [""] resources: ["secrets"] resourceNames: ["helm-tls-configs"] verbs: ["get"] --- kind: RoleBinding apiVersion: rbac.authorization.k8s.io/v1 metadata: namespace: openshift-config name: helm-chartrepos-tls-conf-viewer subjects: - kind: Group apiGroup: rbac.authorization.k8s.io name: 'system:authenticated' roleRef: apiGroup: rbac.authorization.k8s.io kind: Role name: helm-chartrepos-tls-conf-viewer EOF
Chapter 5. Knative CLI for use with OpenShift Serverless
The Knative (kn) CLI enables simple interaction with Knative components on OpenShift Container Platform.
5.1. Key features
The Knative (kn) CLI is designed to make serverless computing tasks simple and concise. Key features of the Knative CLI include:
- Deploy serverless applications from the command line.
- Manage features of Knative Serving, such as services, revisions, and traffic-splitting.
- Create and manage Knative Eventing components, such as event sources and triggers.
- Create sink bindings to connect existing Kubernetes applications and Knative services.
-
Extend the Knative CLI with flexible plug-in architecture, similar to the
kubectlCLI. - Configure autoscaling parameters for Knative services.
- Scripted usage, such as waiting for the results of an operation, or deploying custom rollout and rollback strategies.
5.2. Installing the Knative CLI
Chapter 6. Pipelines CLI (tkn)
6.1. Installing tkn
Use the tkn CLI to manage Red Hat OpenShift Pipelines from a terminal. The following section describes how to install tkn on different platforms.
You can also find the URL to the latest binaries from the OpenShift Container Platform web console by clicking the ? icon in the upper-right corner and selecting Command Line Tools.
6.1.1. Installing Red Hat OpenShift Pipelines CLI (tkn) on Linux
For Linux distributions, you can download the CLI directly as a tar.gz archive.
Procedure
Download the relevant CLI.
Unpack the archive:
$ tar xvzf <file>-
Place the
tknbinary in a directory that is on yourPATH. To check your
PATH, run:$ echo $PATH
6.1.2. Installing Red Hat OpenShift Pipelines CLI (tkn) on Linux using an RPM
For Red Hat Enterprise Linux (RHEL) version 8, you can install the Red Hat OpenShift Pipelines CLI (tkn) as an RPM.
Prerequisites
- You have an active OpenShift Container Platform subscription on your Red Hat account.
- You have root or sudo privileges on your local system.
Procedure
Register with Red Hat Subscription Manager:
# subscription-manager registerPull the latest subscription data:
# subscription-manager refreshList the available subscriptions:
# subscription-manager list --available --matches '*pipelines*'In the output for the previous command, find the pool ID for your OpenShift Container Platform subscription and attach the subscription to the registered system:
# subscription-manager attach --pool=<pool_id>Enable the repositories required by Red Hat OpenShift Pipelines:
# subscription-manager repos --enable="pipelines-1.2-for-rhel-8-x86_64-rpms"Install the
openshift-pipelines-clientpackage:# yum install openshift-pipelines-client
After you install the CLI, it is available using the tkn command:
$ tkn version6.1.3. Installing Red Hat OpenShift Pipelines CLI (tkn) on Windows
For Windows, the tkn CLI is provided as a zip archive.
Procedure
- Download the CLI.
- Unzip the archive with a ZIP program.
-
Add the location of your
tkn.exefile to yourPATHenvironment variable. To check your
PATH, open the command prompt and run the command:C:\> path
6.1.4. Installing Red Hat OpenShift Pipelines CLI (tkn) on macOS
For macOS, the tkn CLI is provided as a tar.gz archive.
Procedure
- Download the CLI.
- Unpack and unzip the archive.
-
Move the
tknbinary to a directory on your PATH. To check your
PATH, open a terminal window and run:$ echo $PATH
6.2. Configuring the OpenShift Pipelines tkn CLI
Configure the Red Hat OpenShift Pipelines tkn CLI to enable tab completion.
6.2.1. Enabling tab completion
After you install the tkn CLI, you can enable tab completion to automatically complete tkn commands or suggest options when you press Tab.
Prerequisites
-
You must have the
tknCLI tool installed. -
You must have
bash-completioninstalled on your local system.
Procedure
The following procedure enables tab completion for Bash.
Save the Bash completion code to a file:
$ tkn completion bash > tkn_bash_completionCopy the file to
/etc/bash_completion.d/:$ sudo cp tkn_bash_completion /etc/bash_completion.d/Alternatively, you can save the file to a local directory and source it from your
.bashrcfile instead.
Tab completion is enabled when you open a new terminal.
6.3. OpenShift Pipelines tkn reference
This section lists the basic tkn CLI commands.
6.3.1. Basic syntax
tkn [command or options] [arguments…]
6.3.2. Global options
--help, -h
6.3.3. Utility commands
6.3.3.1. tkn
Parent command for tkn CLI.
Example: Display all options
$ tkn6.3.3.2. completion [shell]
Print shell completion code which must be evaluated to provide interactive completion. Supported shells are bash and zsh.
Example: Completion code for bash shell
$ tkn completion bash6.3.3.3. version
Print version information of the tkn CLI.
Example: Check the tkn version
$ tkn version6.3.4. Pipelines management commands
6.3.4.1. pipeline
Manage Pipelines.
Example: Display help
$ tkn pipeline --help6.3.4.2. pipeline delete
Delete a Pipeline.
Example: Delete the mypipeline Pipeline from a namespace
$ tkn pipeline delete mypipeline -n myspace6.3.4.3. pipeline describe
Describe a Pipeline.
Example: Describe mypipeline Pipeline
$ tkn pipeline describe mypipeline6.3.4.4. pipeline list
List Pipelines.
Example: Display a list of Pipelines
$ tkn pipeline list6.3.4.5. pipeline logs
Display Pipeline logs for a specific Pipeline.
Example: Stream live logs for the mypipeline Pipeline
$ tkn pipeline logs -f mypipeline6.3.4.6. pipeline start
Start a Pipeline.
Example: Start mypipeline Pipeline
$ tkn pipeline start mypipeline6.3.5. PipelineRun commands
6.3.5.1. pipelinerun
Manage PipelineRuns.
Example: Display help
$ tkn pipelinerun -h6.3.5.2. pipelinerun cancel
Cancel a PipelineRun.
Example: Cancel the mypipelinerun PipelineRun from a namespace
$ tkn pipelinerun cancel mypipelinerun -n myspace6.3.5.3. pipelinerun delete
Delete a PipelineRun.
Example: Delete PipelineRuns from a namespace
$ tkn pipelinerun delete mypipelinerun1 mypipelinerun2 -n myspace6.3.5.4. pipelinerun describe
Describe a PipelineRun.
Example: Describe the mypipelinerun PipelineRun in a namespace
$ tkn pipelinerun describe mypipelinerun -n myspace6.3.5.5. pipelinerun list
List PipelineRuns.
Example: Display a list of PipelineRuns in a namespace
$ tkn pipelinerun list -n myspace6.3.5.6. pipelinerun logs
Display the logs of a PipelineRun.
Example: Display the logs of the mypipelinerun PipelineRun with all tasks and steps in a namespace
$ tkn pipelinerun logs mypipelinerun -a -n myspace6.3.6. Task management commands
6.3.6.1. task
Manage Tasks.
Example: Display help
$ tkn task -h6.3.6.2. task delete
Delete a Task.
Example: Delete mytask1 and mytask2 Tasks from a namespace
$ tkn task delete mytask1 mytask2 -n myspace6.3.6.3. task describe
Describe a Task.
Example: Describe the mytask Task in a namespace
$ tkn task describe mytask -n myspace6.3.6.4. task list
List Tasks.
Example: List all the Tasks in a namespace
$ tkn task list -n myspace6.3.6.5. task logs
Display Task logs.
Example: Display logs for the mytaskrun TaskRun of the mytask Task
$ tkn task logs mytask mytaskrun -n myspace6.3.6.6. task start
Start a Task.
Example: Start the mytask Task in a namespace
$ tkn task start mytask -s <ServiceAccountName> -n myspace6.3.7. TaskRun commands
6.3.7.1. taskrun
Manage TaskRuns.
Example: Display help
$ tkn taskrun -h6.3.7.2. taskrun cancel
Cancel a TaskRun.
Example: Cancel the mytaskrun TaskRun from a namespace
$ tkn taskrun cancel mytaskrun -n myspace6.3.7.3. taskrun delete
Delete a TaskRun.
Example: Delete mytaskrun1 and mytaskrun2 TaskRuns from a namespace
$ tkn taskrun delete mytaskrun1 mytaskrun2 -n myspace6.3.7.4. taskrun describe
Describe a TaskRun.
Example: Describe the mytaskrun TaskRun in a namespace
$ tkn taskrun describe mytaskrun -n myspace6.3.7.5. taskrun list
List TaskRuns.
Example: List all TaskRuns in a namespace
$ tkn taskrun list -n myspace6.3.7.6. taskrun logs
Display TaskRun logs.
Example: Display live logs for the mytaskrun TaskRun in a namespace
$ tkn taskrun logs -f mytaskrun -n myspace6.3.8. Condition management commands
6.3.8.1. condition
Manage Conditions.
Example: Display help
$ tkn condition --help6.3.8.2. condition delete
Delete a Condition.
Example: Delete the mycondition1 Condition from a namespace
$ tkn condition delete mycondition1 -n myspace6.3.8.3. condition describe
Describe a Condition.
Example: Describe the mycondition1 Condition in a namespace
$ tkn condition describe mycondition1 -n myspace6.3.8.4. condition list
List Conditions.
Example: List Conditions in a namespace
$ tkn condition list -n myspace6.3.9. Pipeline Resource management commands
6.3.9.1. resource
Manage Pipeline Resources.
Example: Display help
$ tkn resource -h6.3.9.2. resource create
Create a Pipeline Resource.
Example: Create a Pipeline Resource in a namespace
$ tkn resource create -n myspaceThis is an interactive command that asks for input on the name of the Resource, type of the Resource, and the values based on the type of the Resource.
6.3.9.3. resource delete
Delete a Pipeline Resource.
Example: Delete the myresource Pipeline Resource from a namespace
$ tkn resource delete myresource -n myspace6.3.9.4. resource describe
Describe a Pipeline Resource.
Example: Describe the myresource Pipeline Resource
$ tkn resource describe myresource -n myspace6.3.9.5. resource list
List Pipeline Resources.
Example: List all Pipeline Resources in a namespace
$ tkn resource list -n myspace6.3.10. ClusterTask management commands
6.3.10.1. clustertask
Manage ClusterTasks.
Example: Display help
$ tkn clustertask --help6.3.10.2. clustertask delete
Delete a ClusterTask resource in a cluster.
Example: Delete mytask1 and mytask2 ClusterTasks
$ tkn clustertask delete mytask1 mytask26.3.10.3. clustertask describe
Describe a ClusterTask.
Example: Describe the mytask ClusterTask
$ tkn clustertask describe mytask16.3.10.4. clustertask list
List ClusterTasks.
Example: List ClusterTasks
$ tkn clustertask list6.3.10.5. clustertask start
Start ClusterTasks.
Example: Start the mytask ClusterTask
$ tkn clustertask start mytask6.3.11. Trigger management commands
6.3.11.1. eventlistener
Manage EventListeners.
Example: Display help
$ tkn eventlistener -h6.3.11.2. eventlistener delete
Delete an EventListener.
Example: Delete mylistener1 and mylistener2 EventListeners in a namespace
$ tkn eventlistener delete mylistener1 mylistener2 -n myspace6.3.11.3. eventlistener describe
Describe an EventListener.
Example: Describe the mylistener EventListener in a namespace
$ tkn eventlistener describe mylistener -n myspace6.3.11.4. eventlistener list
List EventListeners.
Example: List all the EventListeners in a namespace
$ tkn eventlistener list -n myspace6.3.11.5. triggerbinding
Manage TriggerBindings.
Example: Display TriggerBindings help
$ tkn triggerbinding -h6.3.11.6. triggerbinding delete
Delete a TriggerBinding.
Example: Delete mybinding1 and mybinding2 TriggerBindings in a namespace
$ tkn triggerbinding delete mybinding1 mybinding2 -n myspace6.3.11.7. triggerbinding describe
Describe a TriggerBinding.
Example: Describe the mybinding TriggerBinding in a namespace
$ tkn triggerbinding describe mybinding -n myspace6.3.11.8. triggerbinding list
List TriggerBindings.
Example: List all the TriggerBindings in a namespace
$ tkn triggerbinding list -n myspace6.3.11.9. triggertemplate
Manage TriggerTemplates.
Example: Display TriggerTemplate help
$ tkn triggertemplate -h6.3.11.10. triggertemplate delete
Delete a TriggerTemplate.
Example: Delete mytemplate1 and mytemplate2 TriggerTemplates in a namespace
$ tkn triggertemplate delete mytemplate1 mytemplate2 -n `myspace`6.3.11.11. triggertemplate describe
Describe a TriggerTemplate.
Example: Describe the mytemplate TriggerTemplate in a namespace
$ tkn triggertemplate describe mytemplate -n `myspace`6.3.11.12. triggertemplate list
List TriggerTemplates.
Example: List all the TriggerTemplates in a namespace
$ tkn triggertemplate list -n myspace6.3.11.13. clustertriggerbinding
Manage ClusterTriggerBindings.
Example: Display ClusterTriggerBindings help
$ tkn clustertriggerbinding -h6.3.11.14. clustertriggerbinding delete
Delete a ClusterTriggerBinding.
Example: Delete myclusterbinding1 and myclusterbinding2 ClusterTriggerBindings
$ tkn clustertriggerbinding delete myclusterbinding1 myclusterbinding26.3.11.15. clustertriggerbinding describe
Describe a ClusterTriggerBinding.
Example: Describe the myclusterbinding ClusterTriggerBinding
$ tkn clustertriggerbinding describe myclusterbinding6.3.11.16. clustertriggerbinding list
List ClusterTriggerBindings.
Example: List all ClusterTriggerBindings
$ tkn clustertriggerbinding listChapter 7. opm CLI
7.1. About opm
The opm CLI tool is provided by the Operator Framework for use with the Operator Bundle Format. This tool allows you to create and maintain catalogs of Operators from a list of bundles, called an index, that are similar to software repositories. The result is a container image, called an index image, which can be stored in a container registry and then installed on a cluster.
An index contains a database of pointers to Operator manifest content that can be queried through an included API that is served when the container image is run. On OpenShift Container Platform, Operator Lifecycle Manager (OLM) can use the index image as a catalog by referencing it in a CatalogSource object, which polls the image at regular intervals to enable frequent updates to installed Operators on the cluster.
7.2. Installing opm
You can install the opm CLI tool on your Linux, macOS, or Windows workstation.
Prerequisites
For Linux, you must provide the following packages. RHEL 8 meets these requirements:
-
podmanversion 1.9.3+ (version 2.0+ recommended) -
glibcversion 2.28+
-
Procedure
- Navigate to the OpenShift mirror site and download the latest version of the tarball that matches your operating system.
Unpack the archive.
For Linux or macOS:
$ tar xvf <file>- For Windows, unzip the archive with a ZIP program.
Place the file anywhere in your
PATH.For Linux or macOS:
Check your
PATH:$ echo $PATHMove the file. For example:
$ sudo mv ./opm /usr/local/bin/
For Windows:
Check your
PATH:C:\> pathMove the file:
C:\> move opm.exe <directory>
Verification
After you install the
opmCLI, verify that it is available:$ opm versionExample output
Version: version.Version{OpmVersion:"v1.14.3-29-ge82c4649", GitCommit:"e82c4649b208cd0b08dbd5b88da55450f97b3a2d", BuildDate:"2021-02-13T02:20:52Z", GoOs:"linux", GoArch:"amd64"}
Legal Notice
Copyright © Red Hat
OpenShift documentation is licensed under the Apache License 2.0 (https://www.apache.org/licenses/LICENSE-2.0).
Modified versions must remove all Red Hat trademarks.
Portions adapted from https://github.com/kubernetes-incubator/service-catalog/ with modifications by Red Hat.
Red Hat, Red Hat Enterprise Linux, the Red Hat logo, the Shadowman logo, JBoss, OpenShift, Fedora, the Infinity logo, and RHCE are trademarks of Red Hat, Inc., registered in the United States and other countries.
Linux® is the registered trademark of Linus Torvalds in the United States and other countries.
Java® is a registered trademark of Oracle and/or its affiliates.
XFS® is a trademark of Silicon Graphics International Corp. or its subsidiaries in the United States and/or other countries.
MySQL® is a registered trademark of MySQL AB in the United States, the European Union and other countries.
Node.js® is an official trademark of the OpenJS Foundation.
The OpenStack® Word Mark and OpenStack logo are either registered trademarks/service marks or trademarks/service marks of the OpenStack Foundation, in the United States and other countries and are used with the OpenStack Foundation’s permission. We are not affiliated with, endorsed or sponsored by the OpenStack Foundation, or the OpenStack community.
All other trademarks are the property of their respective owners.