Chapter 7. APIcast and OAuth 2.0
Please note that OAuth authentication mode is not available on APIcast hosted yet.
This document refers to configuring OAuth 2.0 for the latest version of APIcast. To run APIcast, follow any of its deployment method instructions: Self-Managed, the Docker containerized environment or OpenShift.
For details on OAuth support in the previous version of APIcast (Nginx downloadable configuration files), please see here.
7.1. Prerequisites
APIcast offers support for the OAuth 2.0 Authorization Code flow out of the box as long as the following pre-requisites are met:
- An Authorization Server as defined in RFC6749#1.1 with the one exception that the access tokens will be issued by APIcast instead. In this case the Authorization Server will only authenticate the resource owner and obtain their authorization.
- A Redis instance.
7.2. APIcast Configuration in 3scale Admin Portal
In order to configure this, we will first need to choose the OAuth Authentication method from the Integration Settings ( API > Integration > edit integration settings ) screen on our 3scale Admin Portal. We will also need to ensure we have selected the Self-managed Gateway option, as it is not currently possible to run APIcast with OAuth 2.0 Authorization Code support on the APIcast cloud gateway.
Once that is done, we will see an additional field in the Integration Screen ( API > Integration ) under Authentication Settings: OAuth Authorization Endpoint. Here we define where Resource Owners will be redirected to in order to authenticate and confirm they authorize a given client access to their resources (as per RFC6749#4.1).
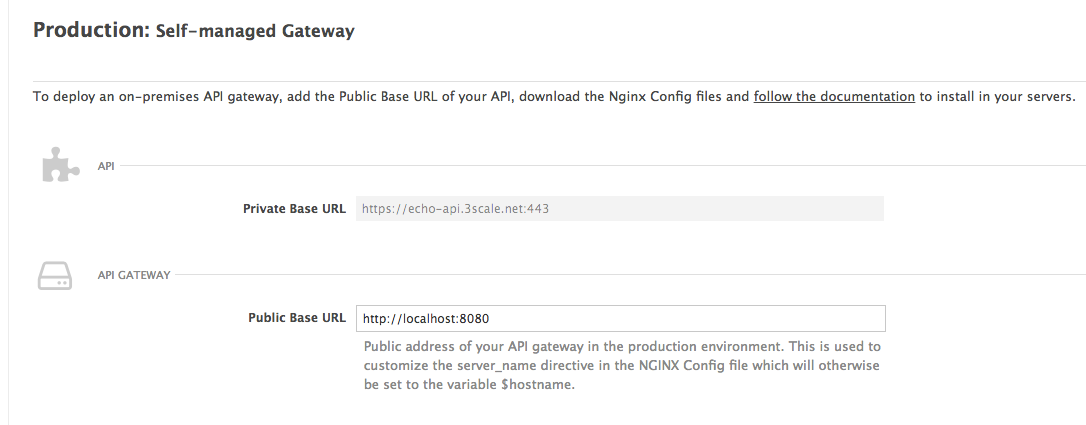
All other fields on the Integration Screen should be configured as per the APIcast Overview document. Since we will be running all components locally for this example, my Public Base URL where APIcast is running will be http://localhost:8080.
In order to show a sample integration with an Authorization Server we will use a very simple Ruby app to act as an Authorization Server. This app will run on localhost port 3000 with the OAuth Authorization Endpoint at http://localhost:3000/auth/login.
The sample code for this app can be found in the apicast/examples directory under oauth2/auth-server. There is also a file named docker-compose.yml that allows you to deploy a test environment to test the API Integration and OAuth 2.0 Authorization Code Flow..
7.3. Running APIcast with OAuth
In order to start APIcast in OAuth mode, we will first need to have a Redis instance running and pass in the instance details when running APIcast.
In our case, this is running on localhost:6379. Since this is running on the default port, we only need to specify REDIS_HOST, if this were running on any other port, we would also have to specify REDIS_PORT. We can then start APIcast like so:
REDIS_HOST=localhost THREESCALE_PORTAL_ENDPOINT=https://MY_PROVIDER_KEY@MY_ADMIN_PORTAL.3scale.net bin/apicast -v
REDIS_HOST=localhost THREESCALE_PORTAL_ENDPOINT=https://MY_PROVIDER_KEY@MY_ADMIN_PORTAL.3scale.net bin/apicast -v
Here we have added the -v flag to run APIcast in verbose mode, in order to allow us to get more debugging output in case anything goes wrong, but this can be omitted.
Our Authorization Server should also be up and running and ready to receive requests.
7.4. Testing the Flow
In order to test this flow, we will be running all components: APIcast, Redis, Authorization Server and Client, using the Docker Compose tool as per the oauth2 example listed in the examples directory in the APIcast GitHub repository. This will take care of starting up all of the required components. However, you can also start each of them up individually. Please ensure you do not already have any APIcast, Redis or other component instances already running on the same ports at the same time. Note that you will need to have the Docker containerized environment and the Docker Compose tool installed to use these examples.
The first component to come into play is the sample client application, which would be written by a Developer to request an access token from APIcast. This is a simple Ruby app that will act as the client (as per the client role defined in RFC6749#1.1) in the Authorization Code Flow. The sample code for the client app can be found in the apicast/examples folder under oauth2/client.
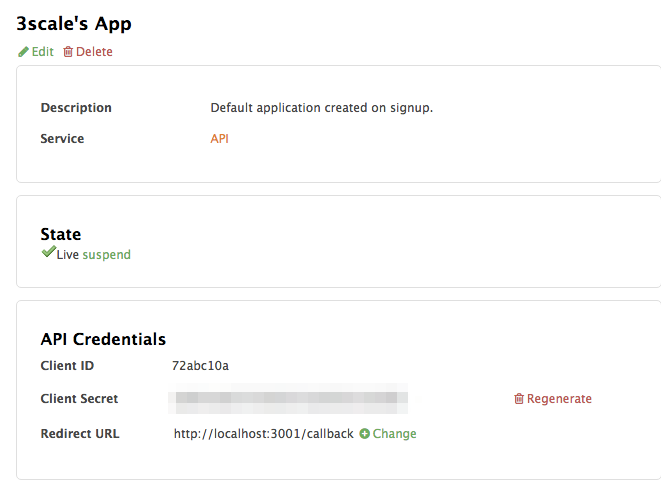
We will be running this application on localhost:3001. The application has a /callback endpoint defined to receive and process any authorization codes and access tokens from APIcast. As such, this location will need to be set up on our 3scale account, under a test application, as the Redirect URL.
7.4.1. Requesting an Authorization Code
Once all the configuration is in place and we have started all of our components (either using the docker-compose template or individually,) we can navigate to http://localhost:3001. Here we can enter a client_id, redirect_uri and scope, then click Authorize to request an authorization code. We will get the client_id and client_secret values from the 3scale application above. The redirect_url will be defined by the client application itself, and as such will already come pre-filled. The scope value defines the type of access requested. In this case it can be any string value and it will be displayed to the resource owner when they provide their consent.
The client application will then redirect the resource owner to the Authorization endpoint (as per RFC6749#4.1.1), in this case the /authorize endpoint on our APIcast instance: localhost:8080/authorize. The resulting client request will be something like:
GET /authorize?response_type=code&client_id=CLIENT_ID&state=STATE_VALUE&redirect_uri=https%3A%2F%2Flocalhost%3A3001%2Fcallback HTTP/1.1
Host: localhost:8080
GET /authorize?response_type=code&client_id=CLIENT_ID&state=STATE_VALUE&redirect_uri=https%3A%2F%2Flocalhost%3A3001%2Fcallback HTTP/1.1
Host: localhost:8080
APIcast will check the client_id and redirect_uri values and redirect the resource owner to the Authorization Server endpoint (http://localhost:3000/auth/login) for authentication. APIcast will forward on the original request parameters to the Authorization Server.
The resource owner should log in to the Authorization Server (our sample Authorization Server will accept any values for username and password) at which point they will be presented with a consent page to accept or deny the request for access.
The Authorization server will then either redirect back to APIcast (on http://localhost:8080/callback) to issue an authorization code on request acceptance or the application’s redirect_uri directly on request denial. This redirection request should include the original state value as well as the client’s redirect_uri, e.g
HTTP/1.1 302 Found
Location: https://localhost:8080/callback?state=STATE_VALUE&redirect_uri=http://localhost:3001/callback
HTTP/1.1 302 Found
Location: https://localhost:8080/callback?state=STATE_VALUE&redirect_uri=http://localhost:3001/callbackIf the request is accepted, an authorization code will be issued (as per RFC6749#4.1.2) by APIcast for the client.
This Authorization Code is sent to the client’s Redirect URL (client callback endpoint on http://localhost:3001/callback in this case) and will be displayed at the sample client. The redirection request back to the client will be something like:
HTTP/1.1 302 Found
Location: https://localhost:3001/callback?state=STATE_VALUE&code=AUTHORIZATION_CODE
HTTP/1.1 302 Found
Location: https://localhost:3001/callback?state=STATE_VALUE&code=AUTHORIZATION_CODE
We can then exchange this for an access token, by filling in our application’s client_secret.
7.4.2. Exchanging the Authorization Code for an Access Token
Once an authorization code is returned back to the sample client, you can exchange that for an access token by once again entering in the client_id, additionally providing a client_secret and clicking Get Token to request an access token. At this point, the client application makes a request to the APIcast access token endpoint, in our case http://localhost:8080/oauth/token, sending the client credentials and Redirect URL along with the authorization code. This client request will be something like:
POST /oauth/token HTTP/1.1
Host: localhost:8080
Content-Type: application/x-www-form-urlencoded
POST /oauth/token HTTP/1.1
Host: localhost:8080
Content-Type: application/x-www-form-urlencodedgrant_type=authorization_code&code=AUTHORIZATION_CODE&client_id=CLIENT_ID&client_secret=CLIENT_SECRET&redirect_uri=https%3A%2F%2Flocalhost%3A3001%2Fcallback
grant_type=authorization_code&code=AUTHORIZATION_CODE&client_id=CLIENT_ID&client_secret=CLIENT_SECRET&redirect_uri=https%3A%2F%2Flocalhost%3A3001%2Fcallback
Ideally the client_id and client_secret would be sent in the Authorization header using Basic HTTP Authentication but, for simplicity, the example client we’re using sends them as body parameters.
APIcast will then validate these credentials and generate an access token with a fixed TTL of one week. An example token will look something like:
{
  "token_type": "bearer",
  "expires_in": 604800,
  "access_token": "b2ca2d108c193ef7c96a1f07b3a7c66d289aba42"
}
{
  "token_type": "bearer",
  "expires_in": 604800,
  "access_token": "b2ca2d108c193ef7c96a1f07b3a7c66d289aba42"
}And that’s it! We have now added and tested OAuth 2.0 Authorization Code Flow for our APIcast instance.


