Chapter 3. Getting Started
By the end of this guide, your API traffic will be protected by API keys, tracked, and monitored by 3scale with basic rate limits and controls in place. A fictional "Echo API" serves as an example, which you can substitute with your own API.
Getting your API up and running with 3scale is straightforward and easy to accomplish by following the steps here. You’ll get traffic flowing and monitored as well as be able to issue rate-limited developer keys.
For more background on architecture and a general overview, head to the Technical Overview page.
Remember that if you have a production API, you should do this in a staging/non-production environment initially to avoid disruption for existing API users.
3.1. Prerequisites
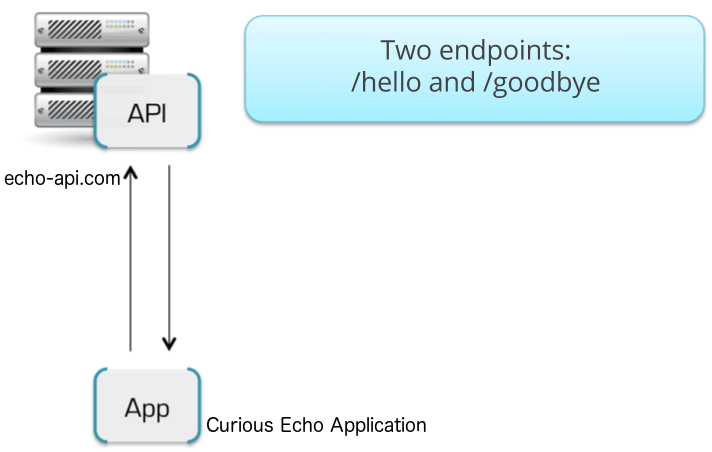
To run this example you can use a simple test API called "Echo API" hosted at https://echo-api.3scale.net.
You’d need to have a simple application, for example "Curious echo," which will call the API. This may be as simple as a command line call, a mobile app, or any code that can call a remote server.
3.2. Connecting Echo API to 3scale
In order to connect Echo API to 3scale, you need to follow three simple steps:
- Access your 3scale Admin Portal and set up your first plans and metrics and your first API keys.
- Integrate your API with 3scale using the API gateway in the staging environment (for development only).
- Map your API endpoints to 3scale methods and metrics.
3.2.1. Step 1: Define your API and create your first API key
Your 3scale Admin Portal (http://YOURDOMAIN-admin.3scale.net) provides access to a number of configuration features. For now, focus on getting the minimum setup required to deploy your API:
- Define your API: Add the metrics and methods.
- Configure any limits you may wish to impose on API usage.
- Head to the Developers area to create a new developer account and API credentials.
3.2.1.1. 1. Define your API: Add metrics and methods
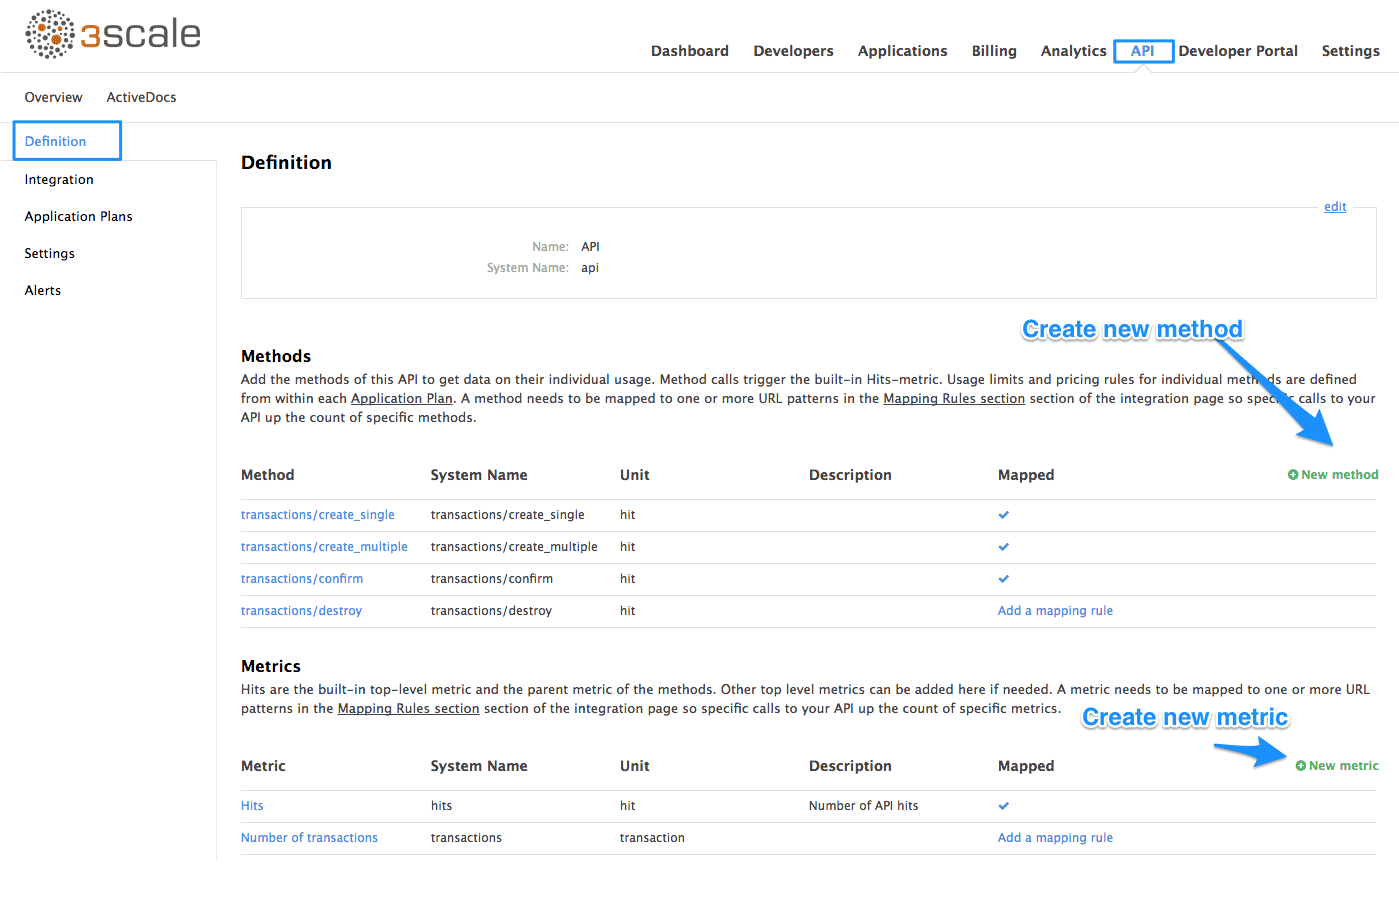
Here you can add as many methods and metrics as you need. By default, they’ll be available in all plans of your service.
For more details about how to add methods and metrics, you can check out our documentation page about /docs/access-control/api-definition-methods-metrics[defining your API on 3scale].
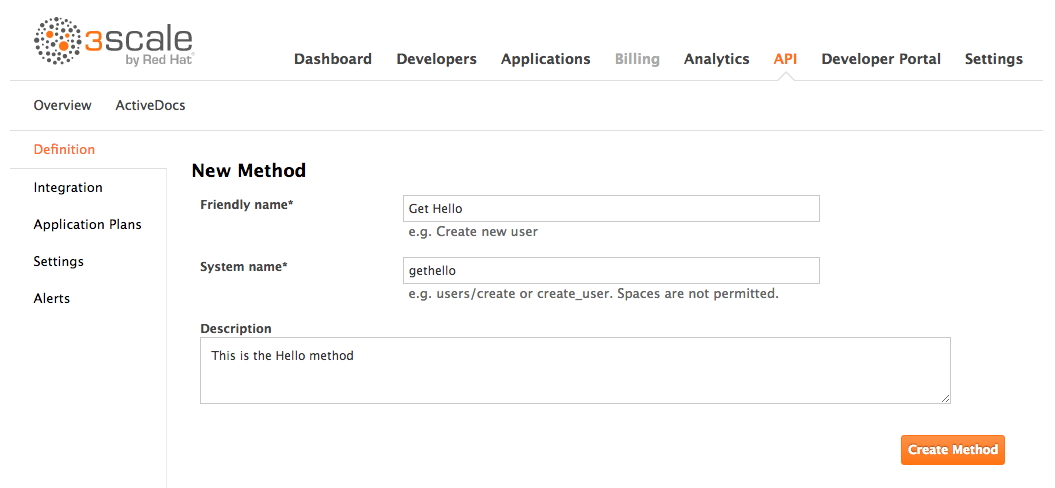
For this simple test, add just two methods under "hits" with system names:
- gethello
- getgoodbye
3.2.1.2. 2. Configure any limits you wish to impose on API usage
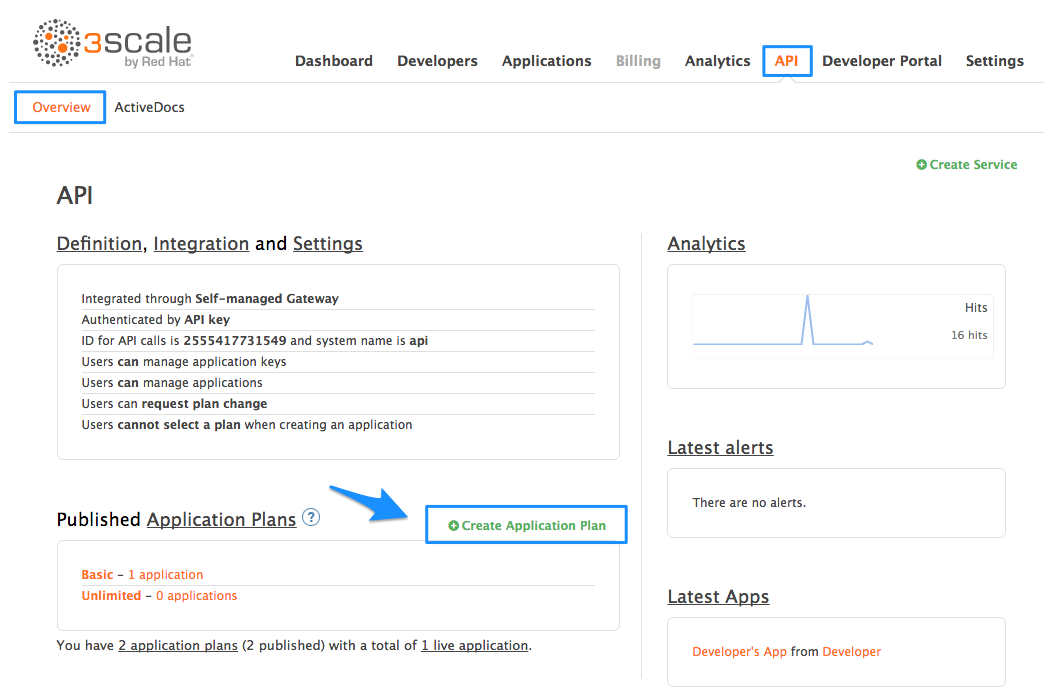
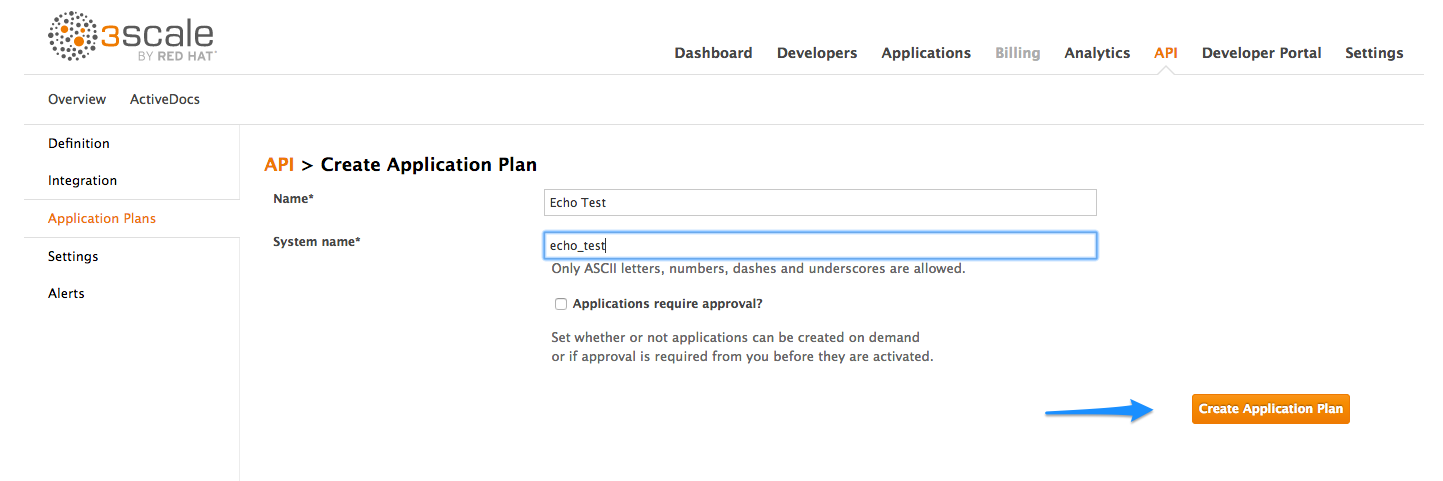
In addition to creating the metrics/methods, you can also add limits to any of the API usage metrics under each plan. Let’s create a new application plan for this example. In order to do this, navigate to the API tab and click on Create Application Plan.
In the form that opens, specify the desired name – for example "HelloEchoTest" – and the system name. Then click on Create Application Plan button.
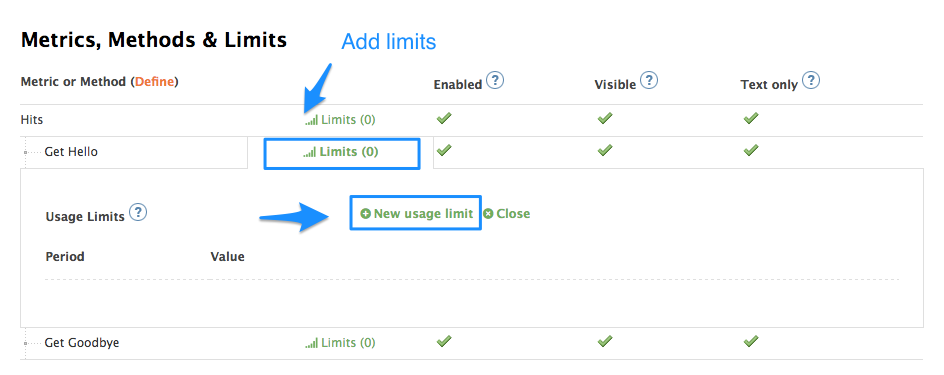
After the previous step, you should see the list of application plans. Click on the "HelloEchoTest" plan to create limits for the metrics and methods. You should be able to see all the metrics and methods that you defined in the previous step. Click on the "Limits" icon under any metric or method. Adding a limit to the Hits metric applies the rule across all the methods under Hits; adding limits to a method only applies to that method. You can create different plans with different limits later on.
Limits restrict the number of API calls an application on this plan can do per minute/hour/day/etc.
3.2.1.3. 3. Create a new developer account and API credentials
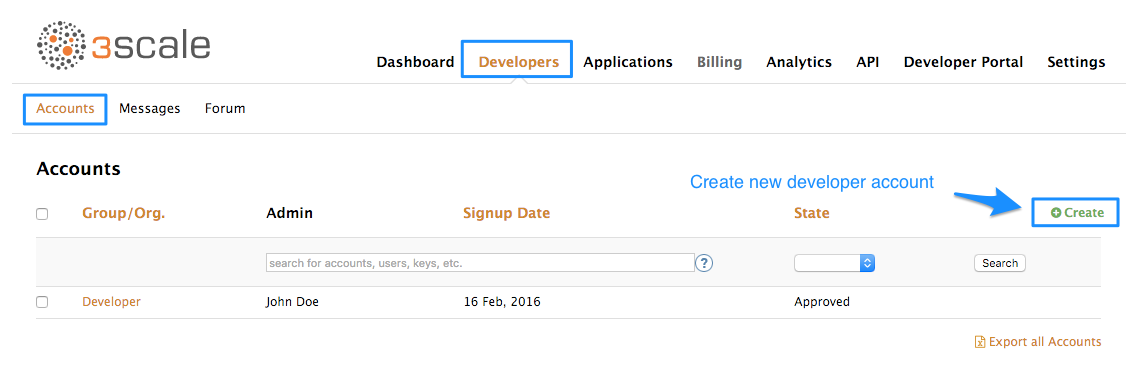
Select the Developers > Accounts menu item and click on the create button.
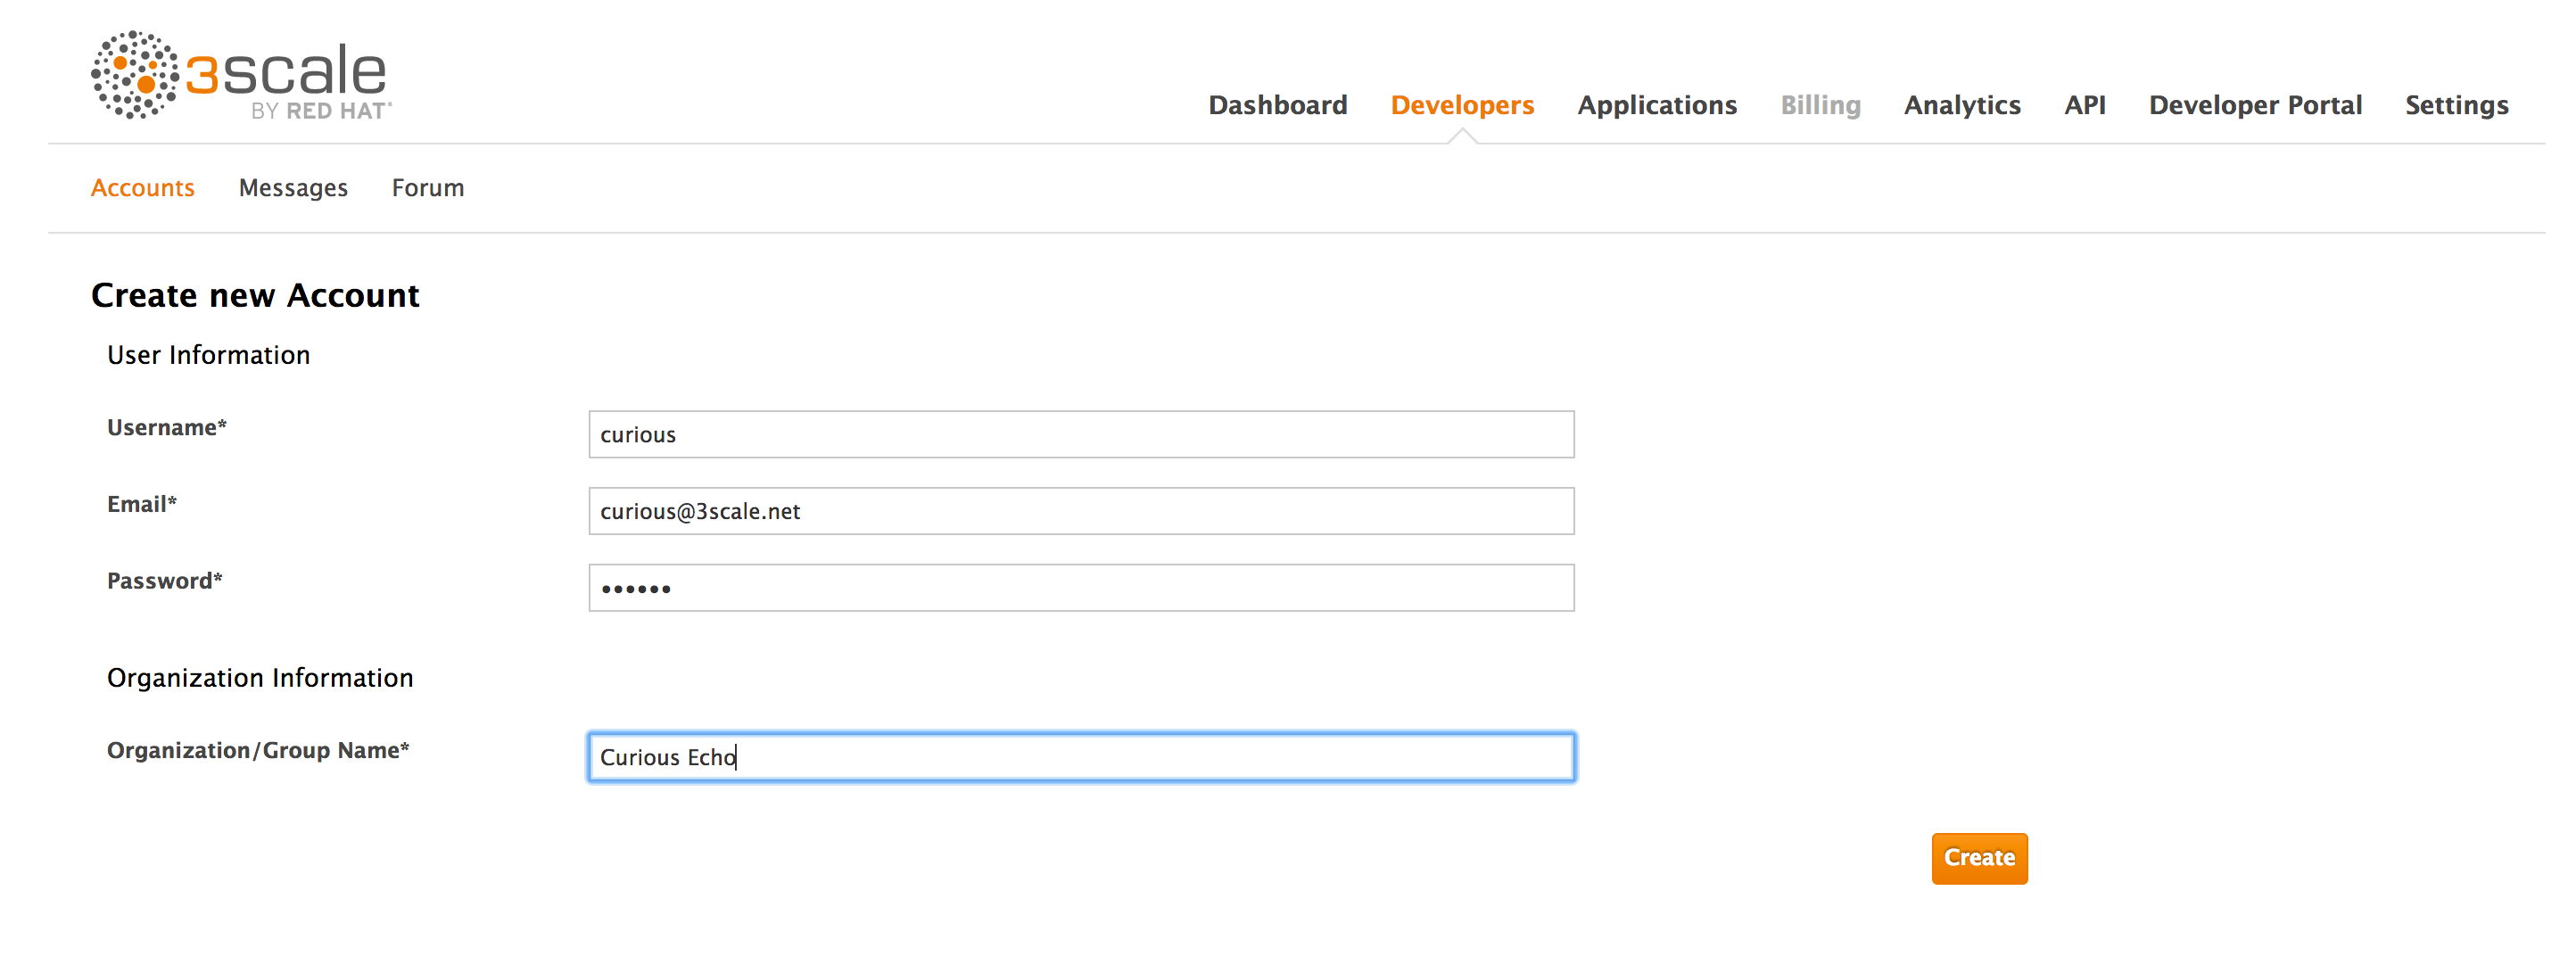
Fill in some information for the new developer who will access the API.
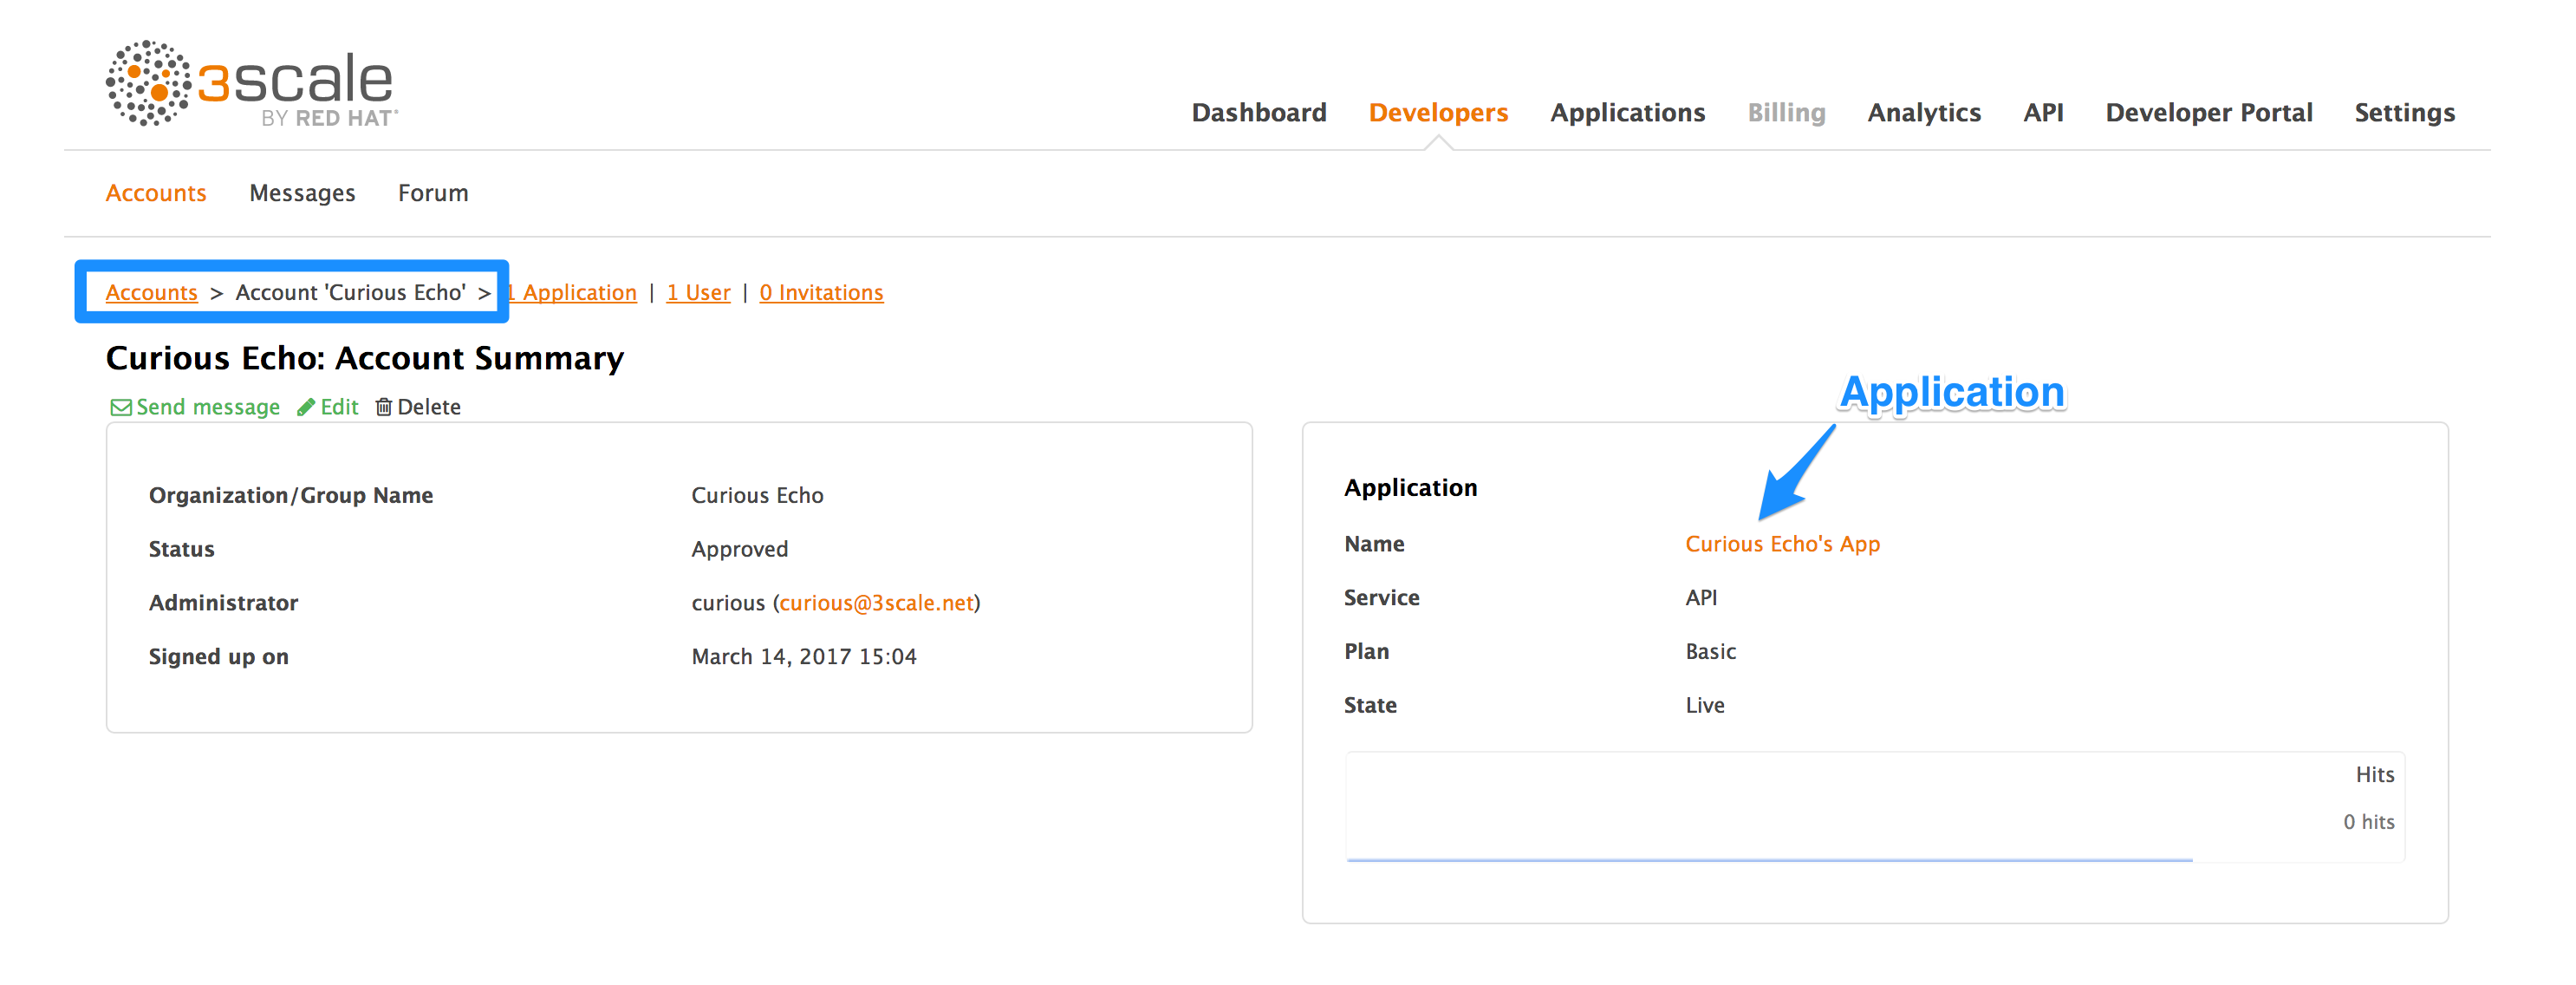
Once you click create, select the new account from the list to go to the home page.
The account area lists all the companies and developers signed up to use the API. New companies can be added from the dashboard, from the API, or by self-service signup on the developer portal.
When you create a new developer account, you will also be creating a new application for that account.
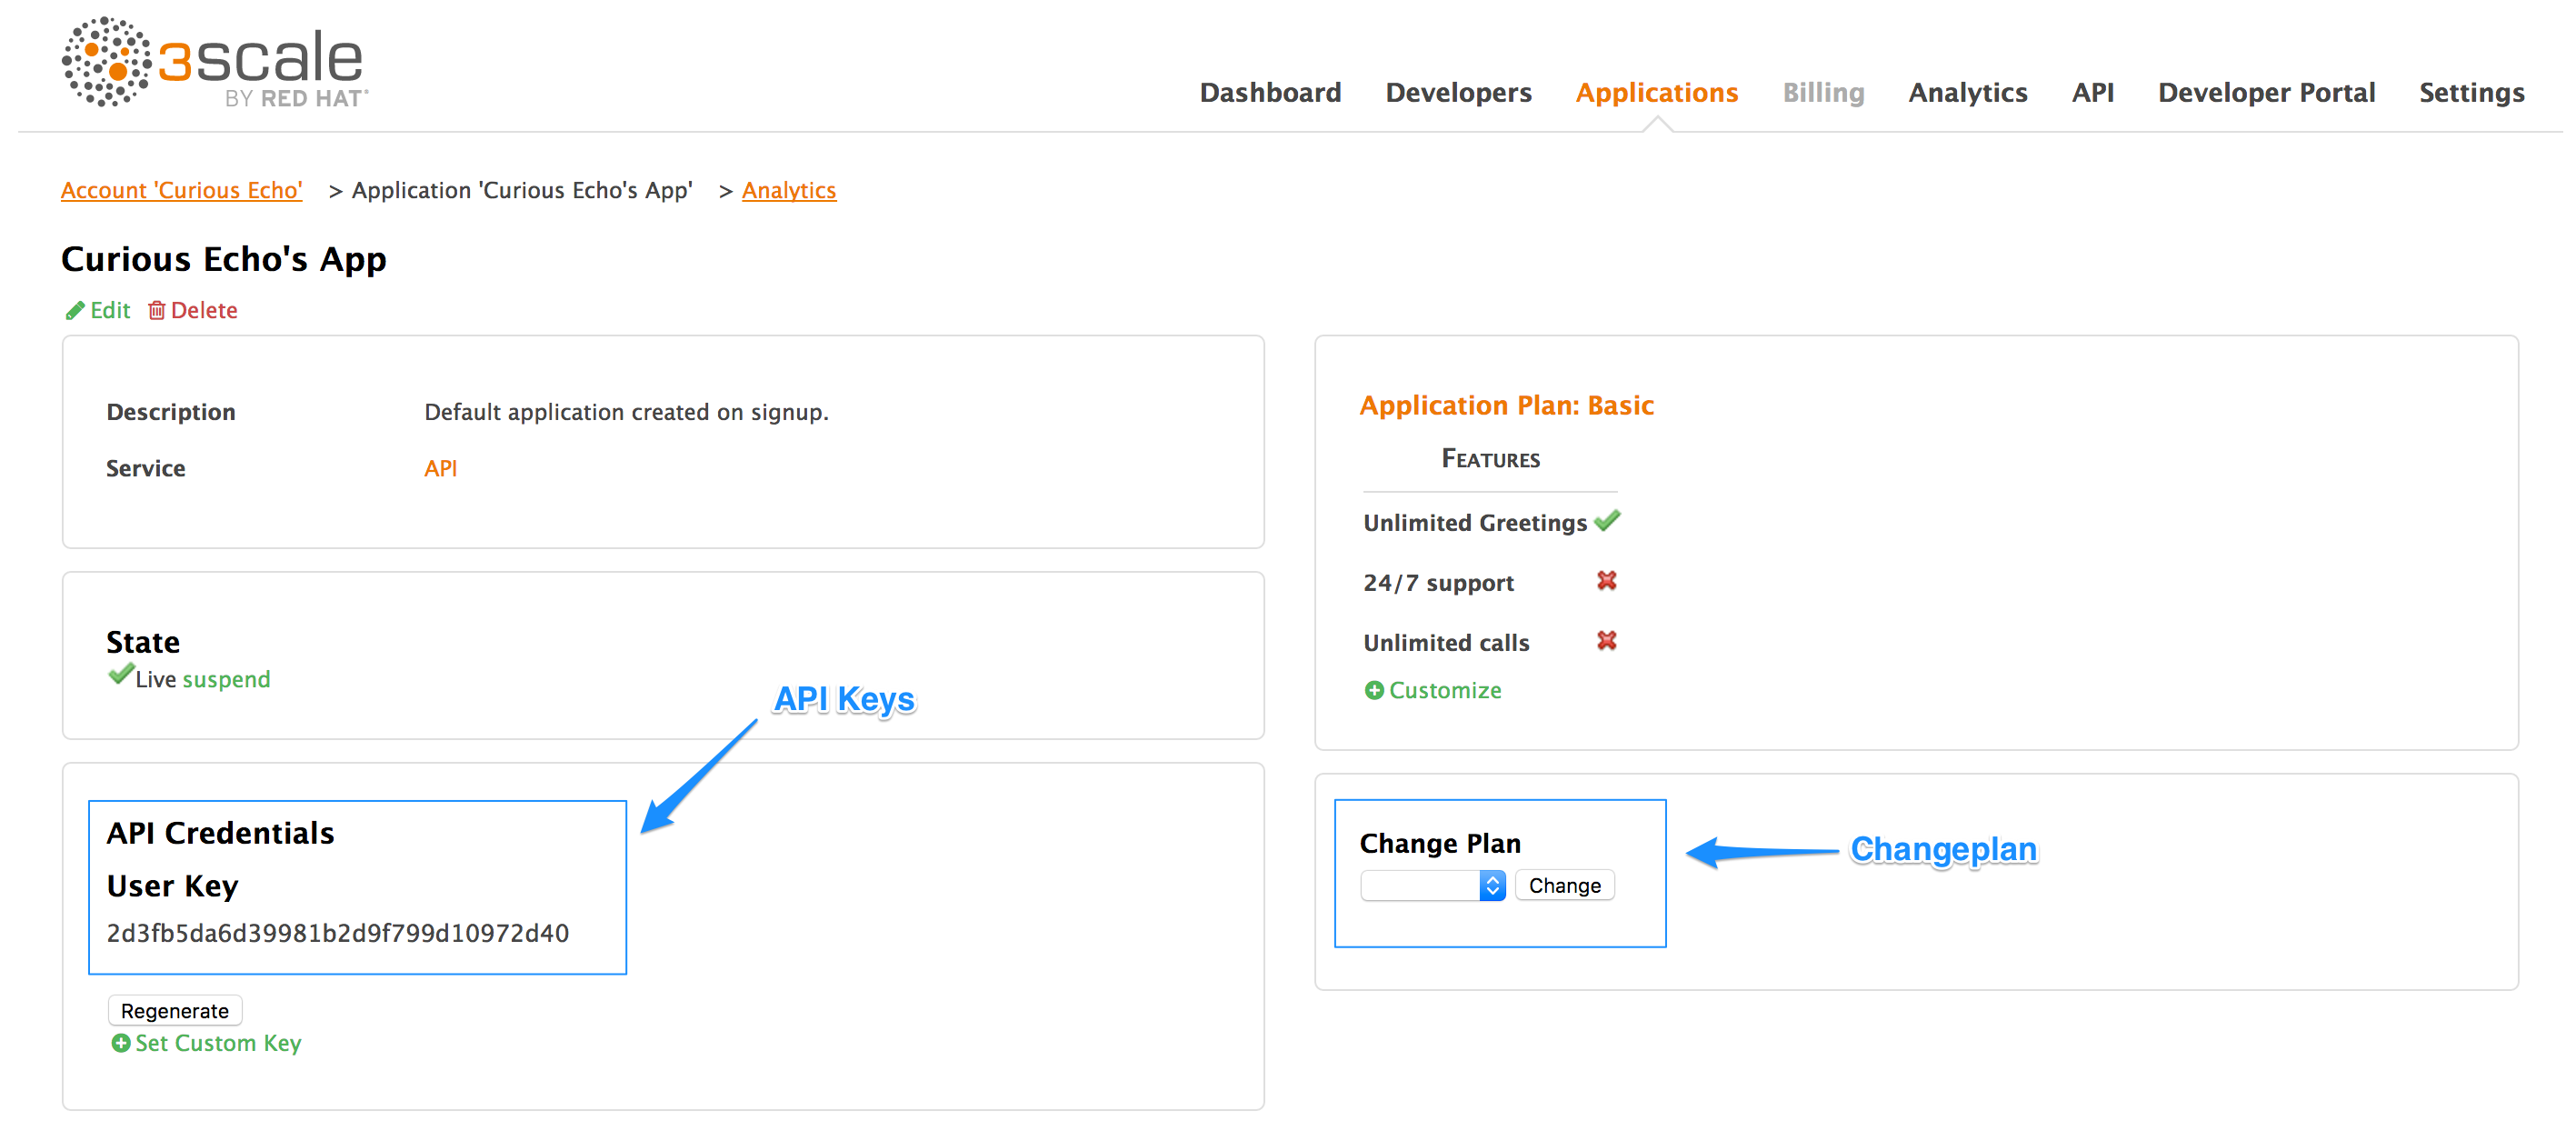
Applications will each have a unique key to access the API. To find that key, click on the application name and check the API credentials section.
These are the keys the "Curious Echo" app will use to call the Echo API. Lastly, on the right-hand side of the application details page (see screenshot above), select the change plan dropdown and select the plan you created and named earlier ("Echo Test" in the example) and confirm the change. This applies the new plan to this application.
You have now configured the management system for your first application.
For the next steps, make sure you’re using one of the APIcast deployment options: APIcast hosted or self-managed gateway. These two options have a staging area where you can easily try out your configuration.
3.2.2. Step 2: Integrate via API gateway in the staging environment
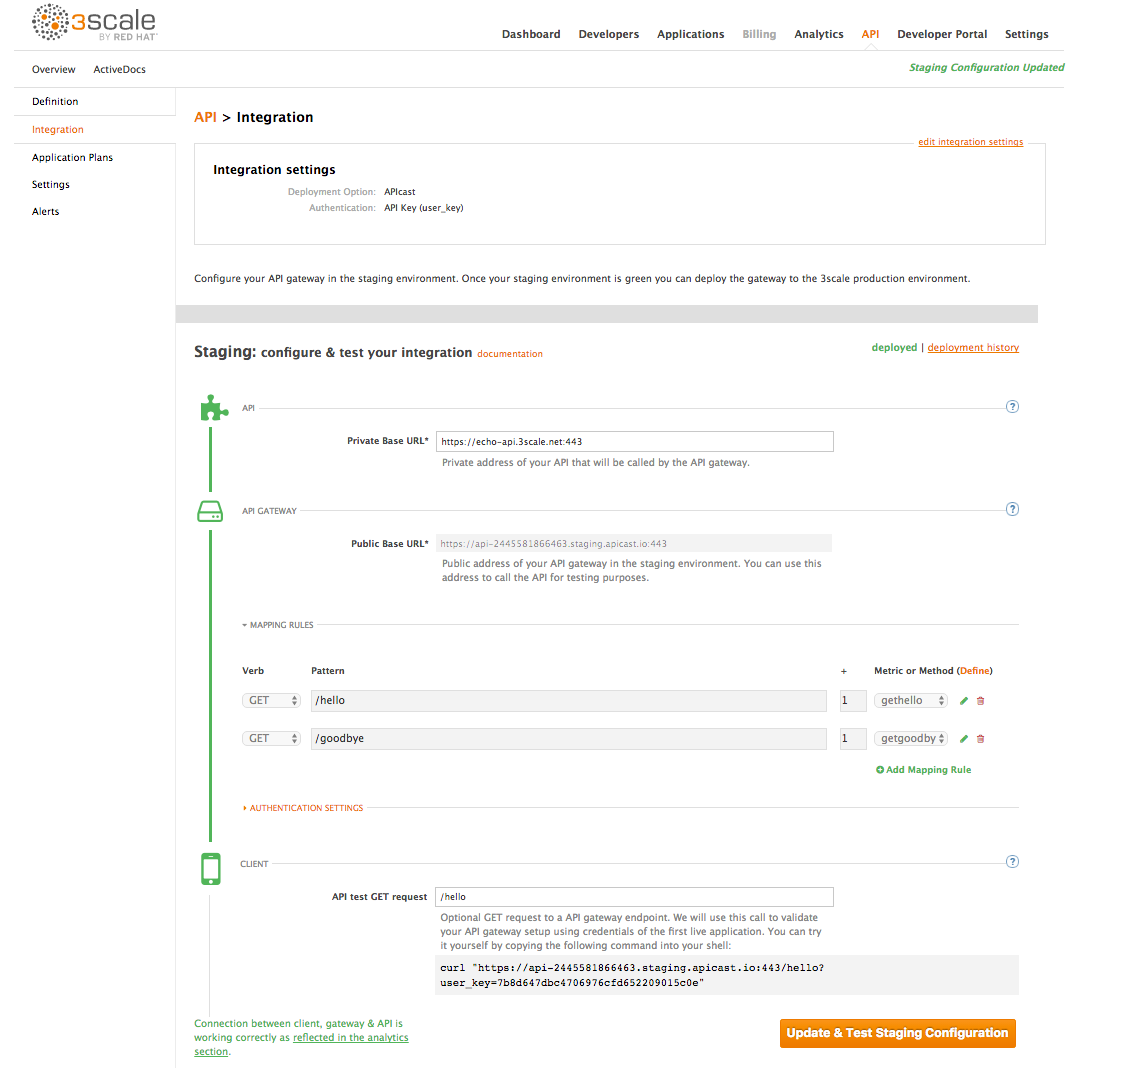
Once you sign into your 3scale account, go to API > Integration.
Set the address of your API backend in the staging environment. This is the address of the server where your API is running. Now you can input a valid resource path for your API, which will be used to validate the API gateway in the staging environment. After that, hit update & test staging configuration. If everything goes well, you will see a green vertical line in the staging area and the full test call made to verify connection. It will look like this:
curl "https://api-xxx.staging.apicast.io/hello?user_key=USER_KEY"
curl "https://api-xxx.staging.apicast.io/hello?user_key=USER_KEY"USER_KEY is the key of one of the sample applications that were created when you first logged into your 3scale account. (If you missed that step, just create a developer account and an application within that account.)
Try it without app credentials, then with incorrect credentials. Then once authenticated, try to send API calls within and over any rate limits that you’ve defined.
3.2.3. Step 3: Capture traffic for specific methods
By default you start with a very simple mapping rule.
This rule says that any GET request that starts with "/" will increment the metric hits by 1. You will most likely remove this rule since it’s too generic. You can learn more about how to manage Mapping rules on this documentation page .
The mapping rules define which metrics (and methods) you want to report depending on the requests to your API. For instance, below you can see the rules for the Echo API.
You’re matching the API endpoints with the methods, which you defined earlier in application plans.
- /hello
- /goodbye
Now you can repeat traffic testing for the mapped methods and check their traffic in the Analytics section of your Admin Portal.
3.3. Congratulations!
Your API is now connected to 3scale. You can now apply API management features to manage and track your API traffic!
3.4. What’s next?
Now that you’ve tested your integration with 3scale in a staging environment, you can select a production deployment option. You can either continue with the NGINX gateway solution or try the plugin integration. For NGINX gateway integration, check out the following documentation:
If you prefer to integrate with 3scale though one of the available code plugins, you can find more information about how to set them up and what programming languages are supported on the following documentation pages:
3.5. Closing the loop
In the example, new API credentials were generated from the Admin Portal to keep things simple. Once you’ve set up a developer portal, new developers can use the it to automatically create accounts and receive their credentials.
3.6. Help
If you have trouble setting up your API, head over to the troubleshooting tutorial.
