Chapter 2. Partner Integration
The "partner ecosystem" use case involves allowing third parties to provide added value to your existing service, either for your own platform or customers using your platform. It can also be used to create a marketplace of products built on top of your API.
Salesforce and New Relic are great examples of successful companies that expose their APIs to enable their ecosystems to flourish. They’re service providers that have taken advantage of partner programs and extended their APIs to meet larger requirements.
What does it take for a company to provide a successful partner API?
2.1. API requirements
There are some main areas that are important to think about and cover before jumping in and exposing an API:
2.1.1. Purpose
A typical reason to open up your API to partners is to allow third parties to provide a specific service to your customers that enhances or complements your existing offering. This has the dual benefit of driving extra traffic to your business as well as to your chosen partner.
If you have many customers, you’ll find that they each have very specific and varied needs that are not always exactly met by your service. One alternative to providing bespoke integrations on a case-by-case basis (or losing potential customers to in-house builds) is to provide an API that others can use to provide these integrations. For example, Twitter’s API has created a sandbox for third-party apps, which leverages the reach and user base of the social network.
2.1.2. Audience
You’ll probably want to expose your API to individual developers as well as to potential partners, so it’s important to have a clear vision of how you’re going to differentiate between these two groups up front.
Typically when exposing an API to private partners, it’s to enable them to provide connectors to their own services. This increases customer traffic to both your service and theirs. For example, the Heroku add-ons ecosystem (https://addons.heroku.com/) allows Heroku to offer functionality and services beyond what their own platform can provide. Similarly, New Relic Connect (http://newrelic.com/connect) allows partners to provide New Relic integrations within their apps.
With public developers, the idea is more to provide a public marketplace of applications to augment the functionality of your product – just as Facebook did with its API, which enabled a whole marketplace of social gaming. They managed to diversify their revenue and find new ways to engage with their users.
2.1.3. Functionality
Once you’ve thought about your use cases and audience, you’ll probably want to think about how to enable these through your API. If you’re aiming to become a platform, you might want to think about exposing multiple APIs. This gives you more fine-grained control over the services that you expose as well as the ability to track access to each API separately.
One way that Twitter does this is by providing different APIs for different audiences: a public REST API, beta access to the Collections API on request, as well as both restricted public access to their Streams API.
2.1.4. Access Control and Security
Once you’ve defined the purpose, audience, and functionality for your API, think about which resources you want to expose as well as the operations you’ll allow on them. For example, you may wish only to expose read-only methods on your API. Alternatively, you might choose to expose write methods to a certain segment of your API consumers.
You’ll also want to think about usage limits, if any, you want to impose on the methods available through your API. These will probably be based on customer segment, with private partners receiving a higher allowance than public developers.
Choosing the correct authentication method for your API is also important. You’ll need to think about the trade-off between API credential security and the usability of your API. If you want to expose any APIs to enhance the offering to your customers, you’ll probably want to implement an OAuth 2.0 flow. This way your users can have complete control over which of the applications that are using your API can access their data and under which conditions, just as you see every day when you use social network credentials from Google, Facebook, or Twitter to sign up to new applications.
For other APIs not requiring access to your users' data, you will probably want to use the combination of an application identifier and a secret key to secure access to your API. Ideally, applications should be able to keep a number of valid secret keys in rotation that can be easily revoked if any of them become compromised.
2.1.5. Visibility
An important next step is to think about the signup flow you want potential partners to follow in order to get access to your API. Although APIs to enable partner integrations are generally publicly documented and might be free to use, they’re often restricted for use by strategic partners and access is only available on-demand after following some sort of approval process.
You’ll probably want to provide a public Developer Portal to allow people to learn more about your API and potentially provision some sort of trial access with restricted functionality, so they can do a proof of concept integration against your API. This sort of self-service approach can leave you free to spend more time helping larger partners to integrate.
Additionally, you probably want to have some areas and documentation on your Developer Portal that are only accessible to fully qualified partners.
2.1.6. APIUX
Once you’re clear on all of the above, it’s important to think about what the experience is going to be like for partners discovering and integrating with your API. Part of this will be relevant when designing your APIs and choosing an authentication method, but it’s also important to document your API in a way that allows for quick and easy testing and integration by your partners.
A forum is another way to build community around your API and to share knowledge about how to use the platform. The more usable and useful your API is, the more partners which will flock to your platform and grow your market share. Both Salesforce and Twitter, as well as many other companies with successful partner API programs, provide forums for their developers to share. As well as building a community, a forum can also be another channel through which to reach your API consumers by answering any questions they might have, making announcements about your API, and providing additional documentation.
Finally, you want to make sure that your partners are successful by making sure they are visible to your customers. A marketplace or app gallery is a good way to achieve this. A lot of successful platforms have dedicated subdomains devoted to showcasing applications or integrations that complement their service. Heroku has their addons "app store for developers" at addons.heroku.com, whereas Salesforce opts for the aspirational success.salesforce.com.
These are all conscious decisions that should be taken up front when deciding to expose your API. It doesn’t mean you can’t change them later, but it’s good to have a clear idea of the above and how you’re going to implement them.
Dive in and see the best way to achieve this with 3scale. Twitter and their APIs will serve as an example. You can see an overview of their offering on the Twitter platform here.
This example will integrate their public REST API with 3scale. This API provides access to read and write Twitter data programmatically. The API uses OAuth for identifying both users and applications and returns JSON data responses. For the purpose of this example, pretend that this API currently has no authentication mechanisms in place and is completely unsecured and open for anyone to use.
2.2. Defining the API in 3scale
The first thing to do, after creating a 3scale account of course, is to define all of the existing endpoints for your API and set these up within 3scale. Set this up within the API service which is created by default with your 3scale account by going to the Definition view within the API service.
Now create all of the endpoints that you want to expose and track as methods. Methods are the means by which 3scale tracks usage of your API endpoints. You need to set up a method for each of the API endpoints (and potentially also operations on those API endpoints) that you want to track. These methods will then be shared across all application plans and can be enabled/disabled accordingly. You can be as specific or as broad as you like when defining your methods. In this case, you’ll create a method for each method defined in the Twitter Public REST API.
2.3. Integrating the API with 3scale
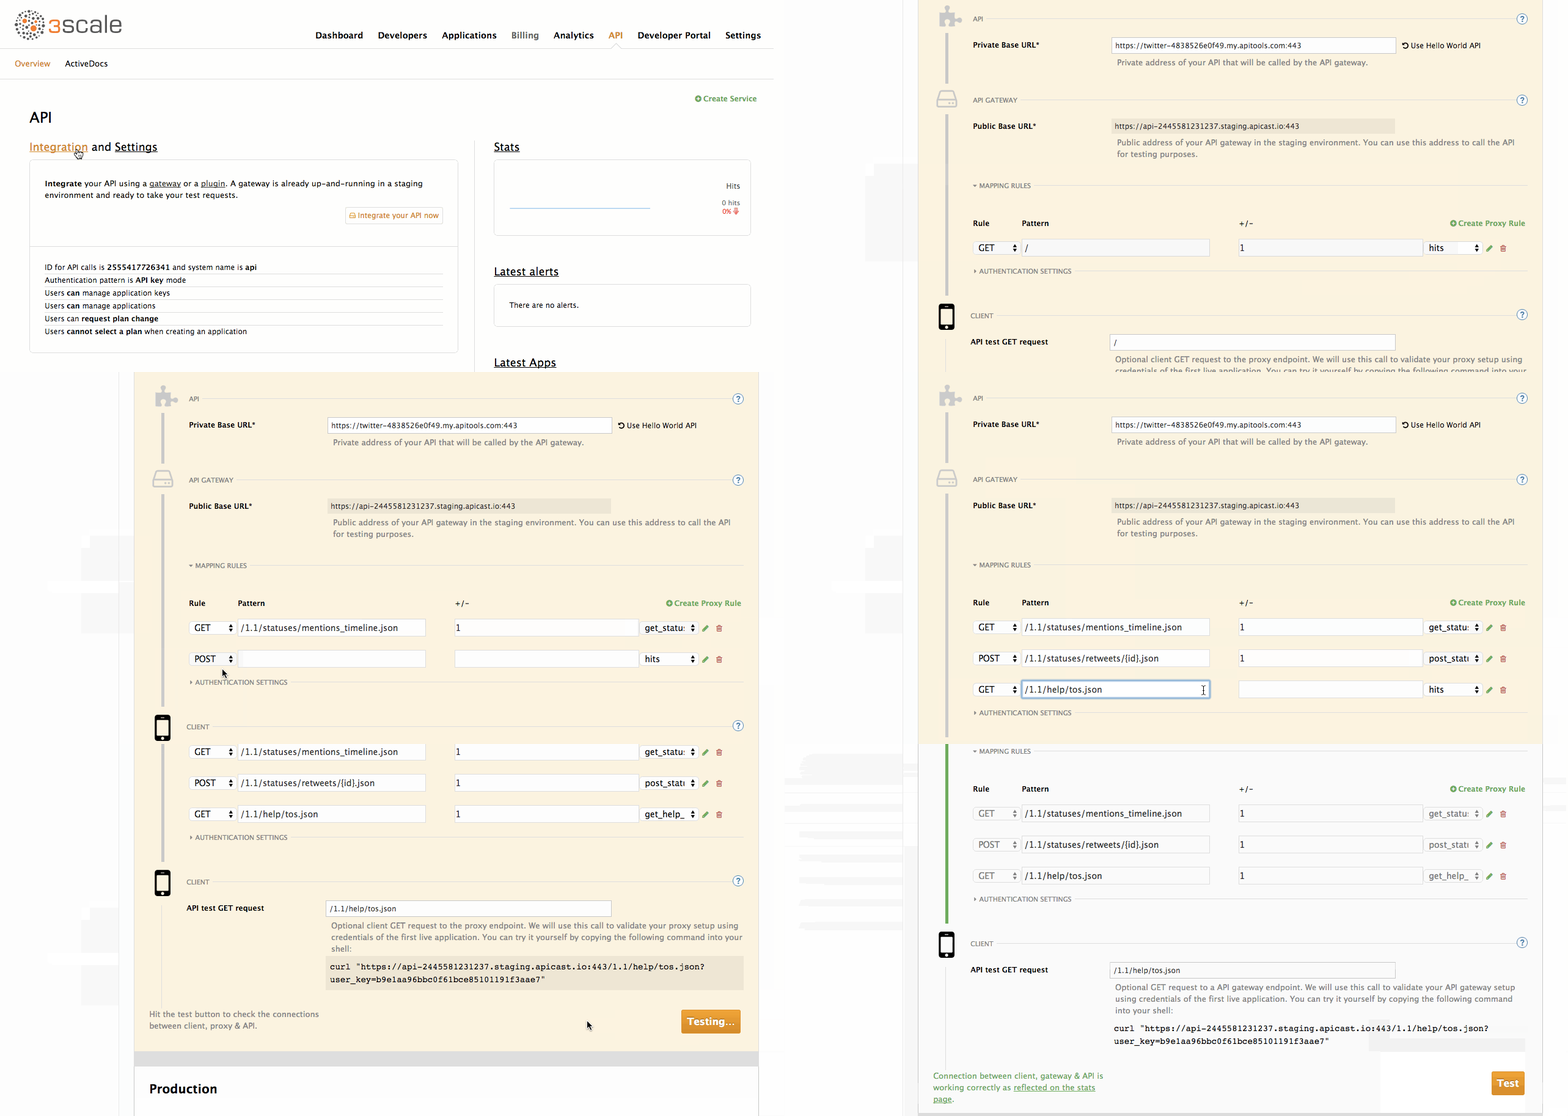
Now that you’ve created all of the endpoints that you want to expose and you’ve defined how your partners will access the API, you need to set up the API gateway to easily integrate with 3scale. For this, you’re first going to use the APIcast Cloud Gateway, a hosted API gateway based on NGINX that 3scale provides to test-run your API integration with 3scale in a staging environment. This will allow you to confirm that the setup is correct so far and that the endpoints you’ve entered will be tracked correctly in 3scale.
Go ahead and set up the staging cloud gateway by navigating to the Integration page. The first thing to do here is to enter in your API base URL, including the port number such as 80 for HTTP and 443 for HTTPS. This will be your private API backend, which will only be accessible through the API gateway. This would typically be some internal address for the API backend. The next field specifies the APIcast Cloud Gateway location. Your calls to your API backend will go to through this host, and this will be what you’ll hit during your tests instead of calling the private API backend directly.
The next step is to map your actual API endpoints or paths to the methods you just defined in the application plan. You’ll choose the HTTP method that’s available on the specific endpoint path as well and select the equivalent method to map against. Different operations (GET, PUT, POST, DELETE, etc…) on the same endpoint can be tracked separately.
Once the setup is done, you can test the integration with the staging APIcast Cloud Gateway to ensure your setup will work in production. If all is well, you should get a green line showing a correct test integration between 3scale and your API backend.
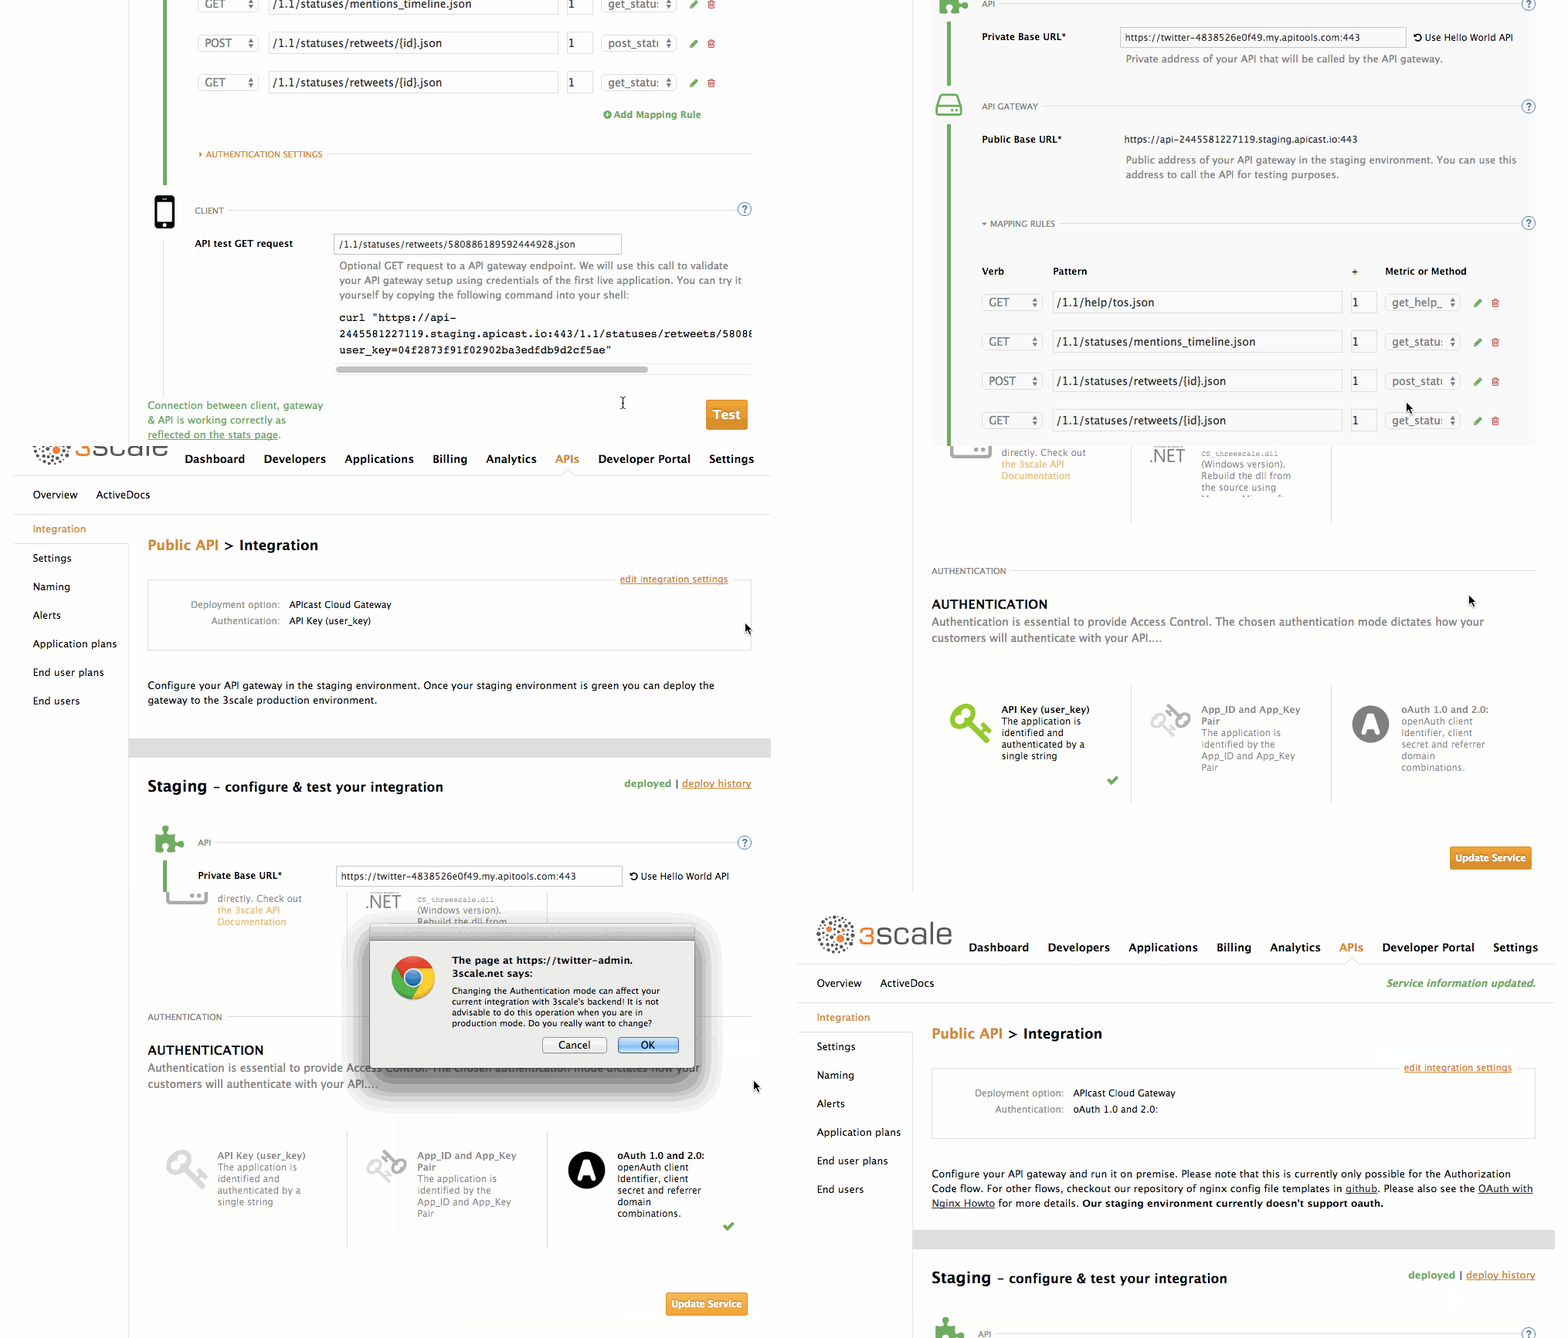
Now that you’ve tested the integration, the final step is to set up the authentication mode that your customers will use to access your API. Since you’re interested in building a secure API, and one where your customers have complete control over what data they expose to applications consuming your API, select OAuth mode.
Changing the OAuth mode will require some extra data to be entered in the Integration page. If you navigate there now, you’ll see there’s an additional field to fill in, the OAuth login URL. This is an authorization page that you’ll host where your (Twitter’s) users can log in to authenticate themselves and authorize access to their data on the Twitter platform.
At this point, it’s worth giving a brief overview of how OAuth flows work at 3scale. Since 3scale does not hold any details on our customers, we need to have some way for them to authorize access to their data and for us to let the API gateway know that this has happened so that the access token can be issued and generated. This is typically done by providing an authorization page, which is hidden behind a login page. When a user authorizes an application to access their data, the authorization page should then call back the API gateway so that an access token for that user can be issued to the application.
Once all of this is done, the API gateway can inform 3scale of the access_token that has been issued for the application and user, so they can then be used to check for authorization and report usage against the correct application. This authentication mode requires a bit more integration between your application backend and our gateway.
You’ll also modify the gateway authentication settings. In order to match the Twitter API as closely as possible, you’ll set the authentication parameters to be sent in the headers.
You also want to restrict calls to your API backend to come from the gateway only. You can do this by specifying a secret token that the gateway should send with every request. That way, you can ensure any calls you get are from the gateway, and your API backend can reject any calls not containing this token.
We can now download the generated NGINX configuration to set up our own self-managed gateway.
2.4. Manage API access
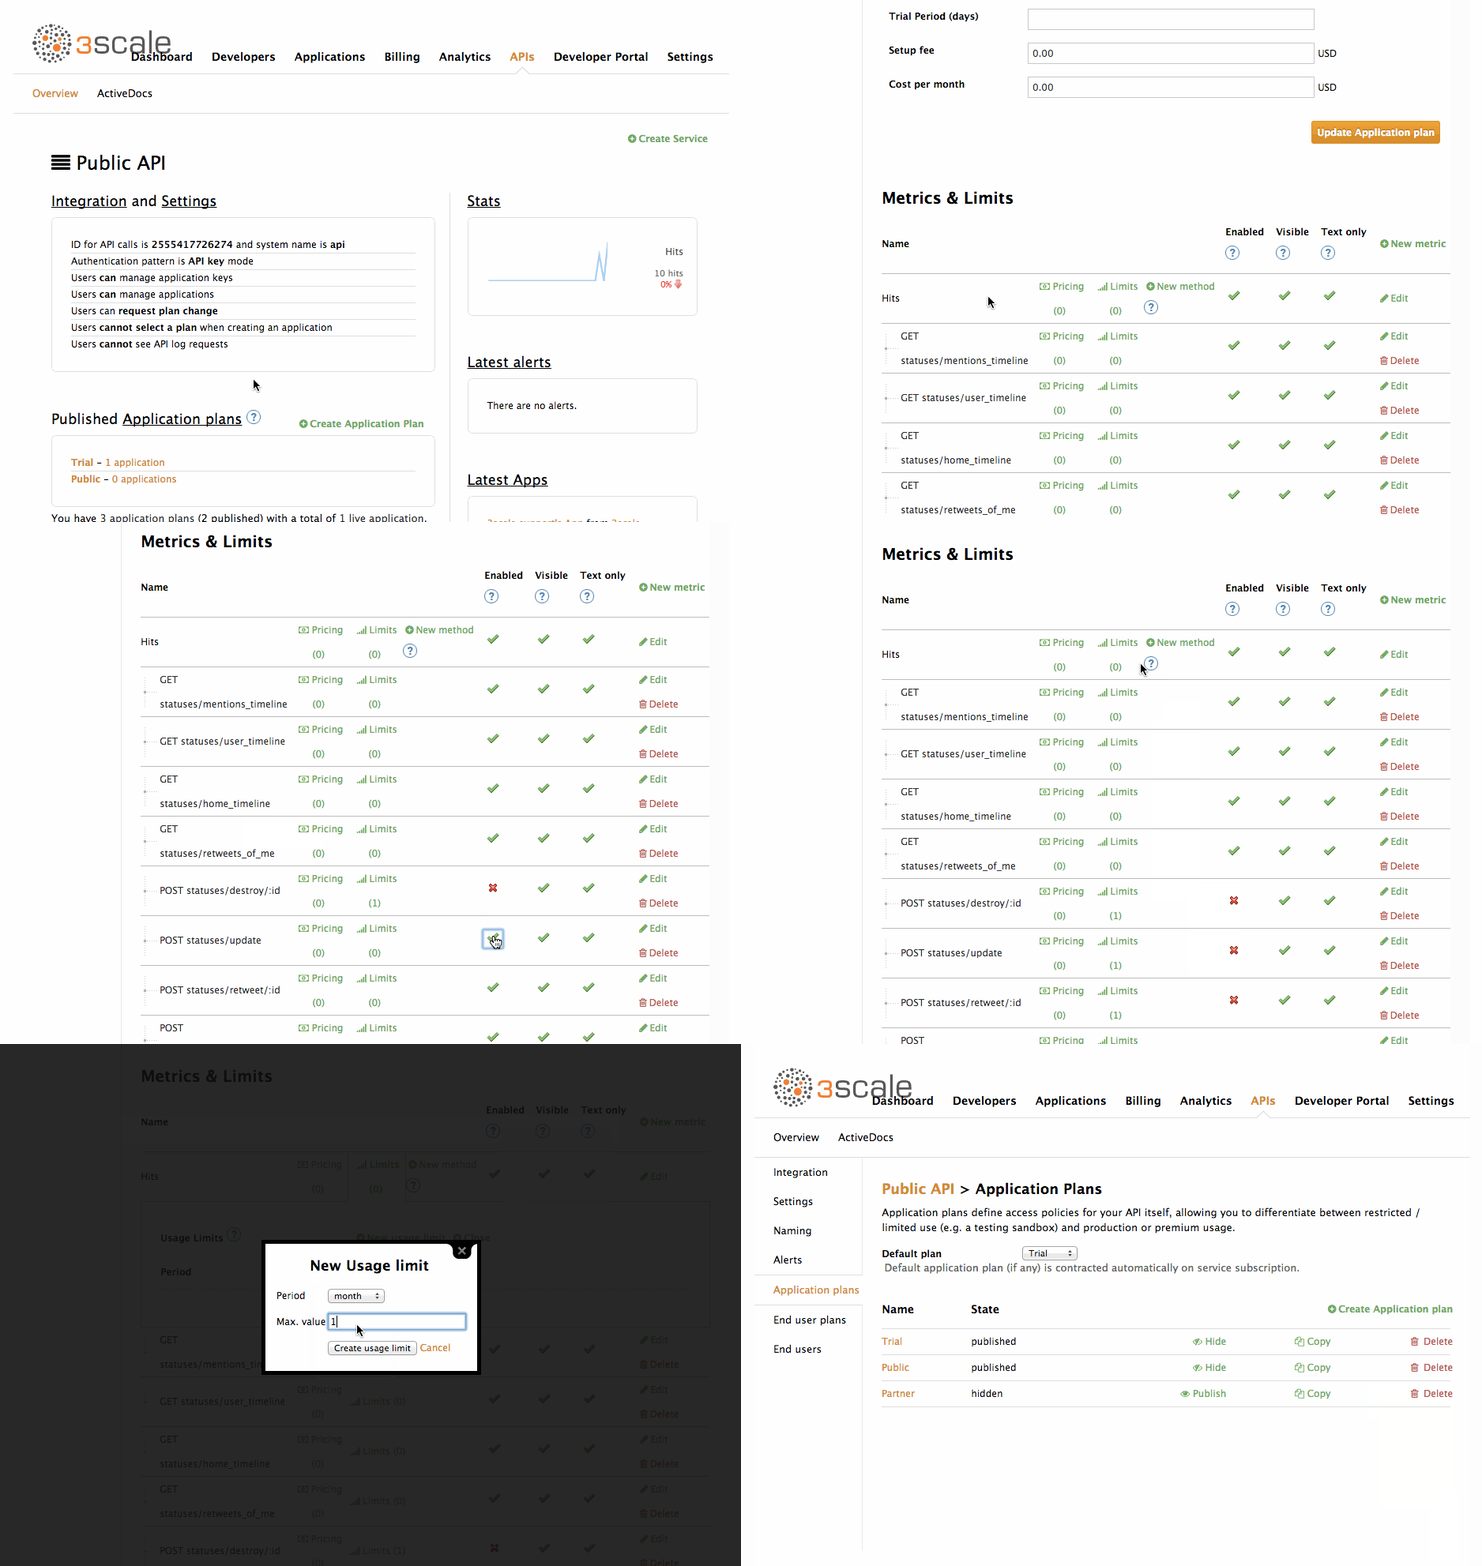
Now that you have the gateway set up, you can start creating application plans to allow different types of access to your API. You’ll want to look which methods you want to expose for the different application plans, as well as what usage limits you want to enforce for the applications using your API.
2.4.1. Application plans
Application plans can determine rate limits, which methods or resources are accessible, and which features are enabled. Every application accessing your API will be associated with an application plan.
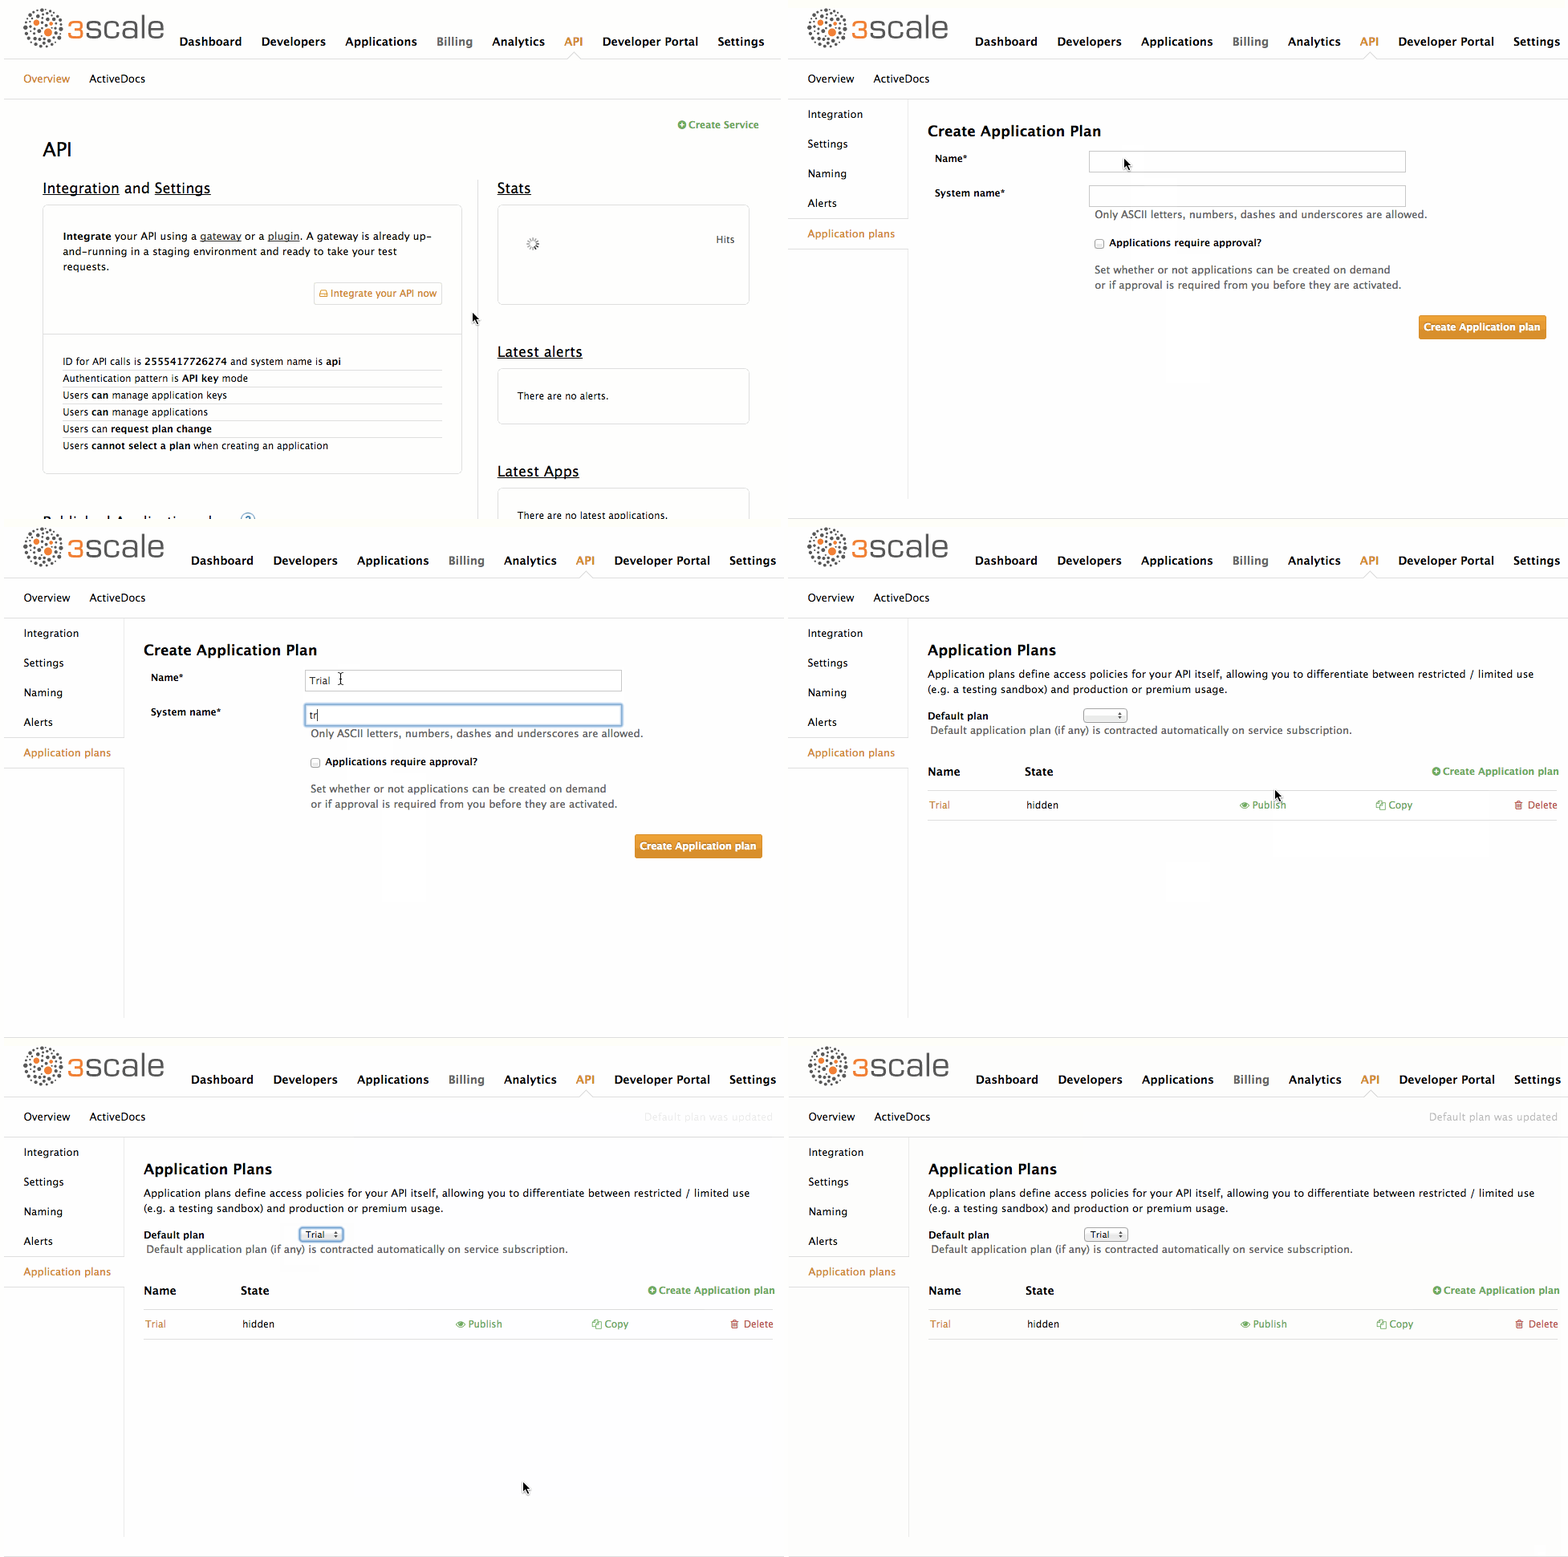
You’ll already have two application plans created by default with your 3scale account: Basic and Unlimited. Delete these and create new ones to fit in with your plans for exposing your API to different types of partners.
To begin with, you’ll want to allow potential new partners to test-run the API so they can see if it fits their needs, but you’ll also want some way to upsell them to a more powerful plan later on if there’s a good fit. For this, you’ll create a Trial plan to give anyone who’s interested a limited number of calls to play around with the API and get a taste for what’s possible. You want this to be the default plan when people sign up to register their interest in becoming a partner and use your API.
The next plan you’ll set up will be for public developers. Make this plan visible to everyone who signs up, but make developers request to be put on this plan so you can qualify them.
You’ll also add a hidden partner plan for when you’ve weeded out some meatier integration prospects. You don’t want any signups to see this plan, so you’ll keep it hidden.
2.4.2. Limits and access
The Twitter API enforces two types of limits, per user (user auth) and per application (app auth). Concentrate on the application rate limits first. In 3scale, these are specified for each method under the application plan.
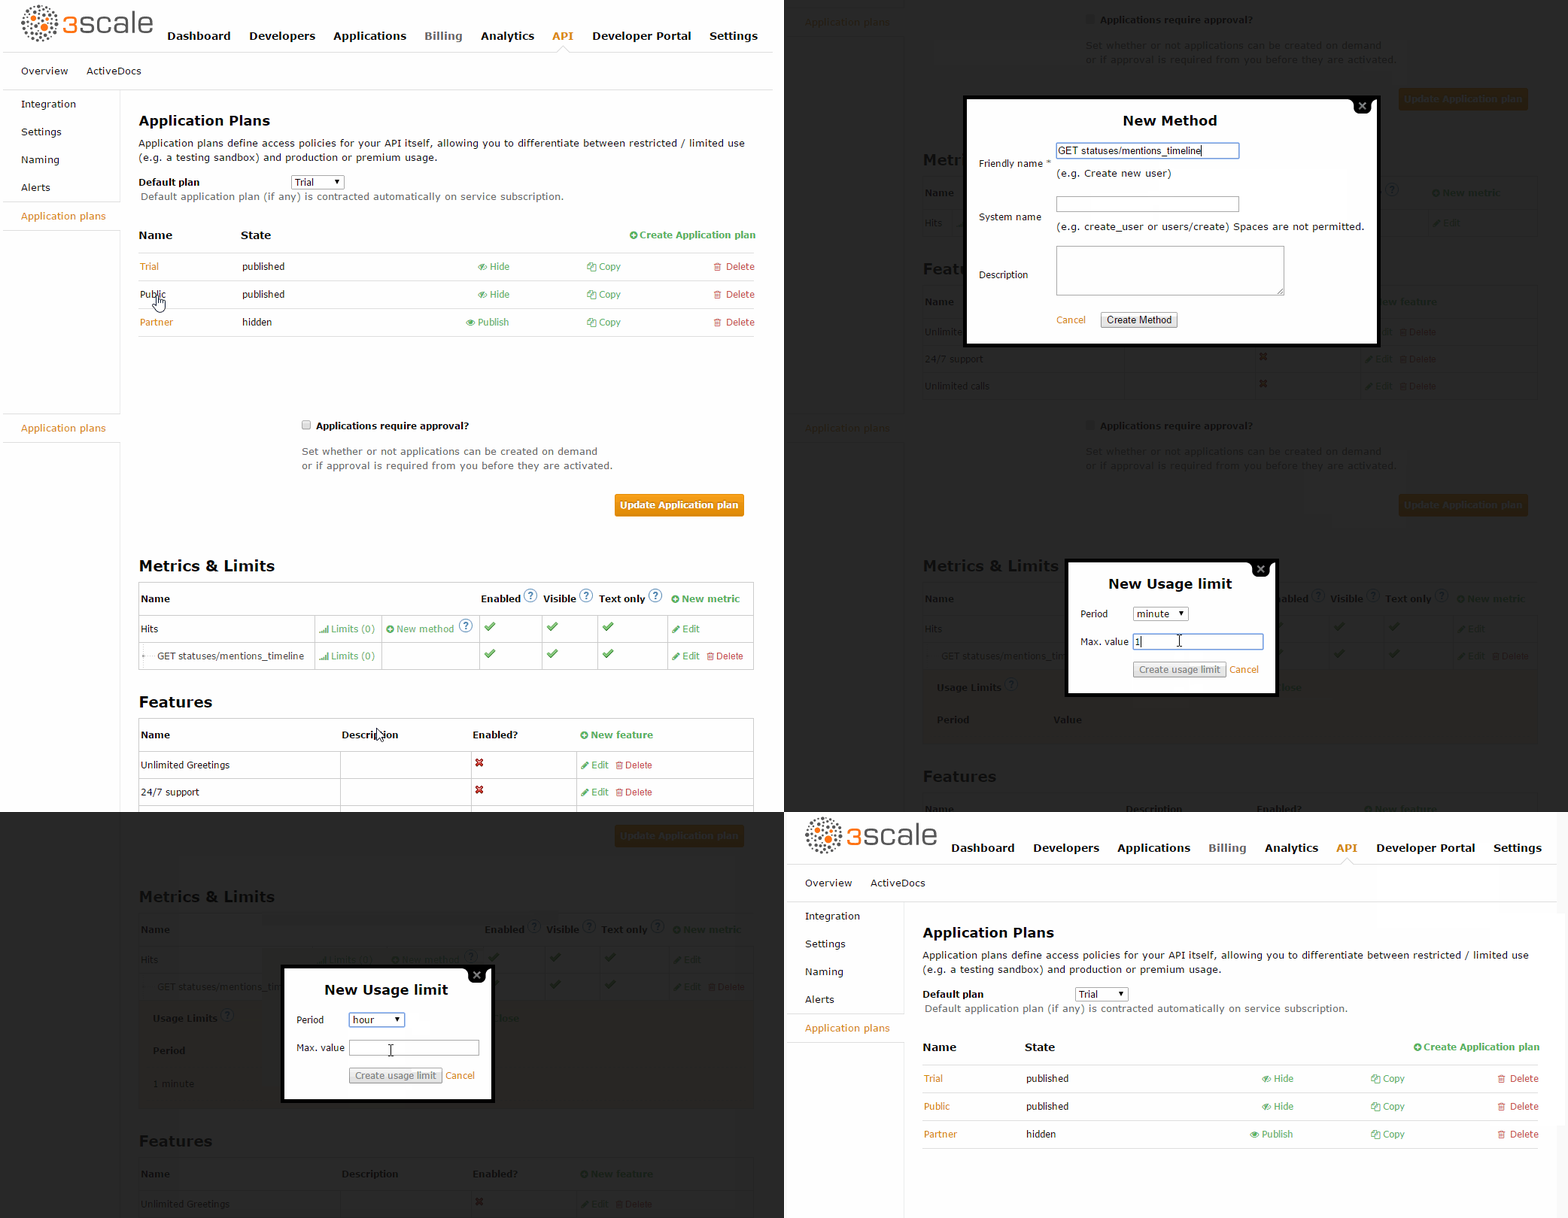
Go to API> Application plans and click on the Public application plan to get started applying limits. You can start with the GET statuses/mentions_timeline method. Since Twitter only allows 15 calls in a 15 minute period to this method, set this up in 3scale as a limit of 1 call per minute as well as a limit of 60 calls per hour. Repeat the same process with the rest of the methods, applying any limits specified for the each method.
For the Trial plan, you’ll only allow read operations, so you’ll disable any methods that are not GETs. Additionally, you’ll only allow a very limited allowance of 100 calls per month, enough for people to play with and evaluate the API, but not enough for full production use.
For the Partner plan, you want to encourage your partners to use your API, so you want to be generous with the daily allowance you give them so they can get the data they need as often as they need it. At the same time, you want to enforce some throttling or burst limits at the minute level so your API backend is not overwhelmed by high numbers of requests in a short period of time.
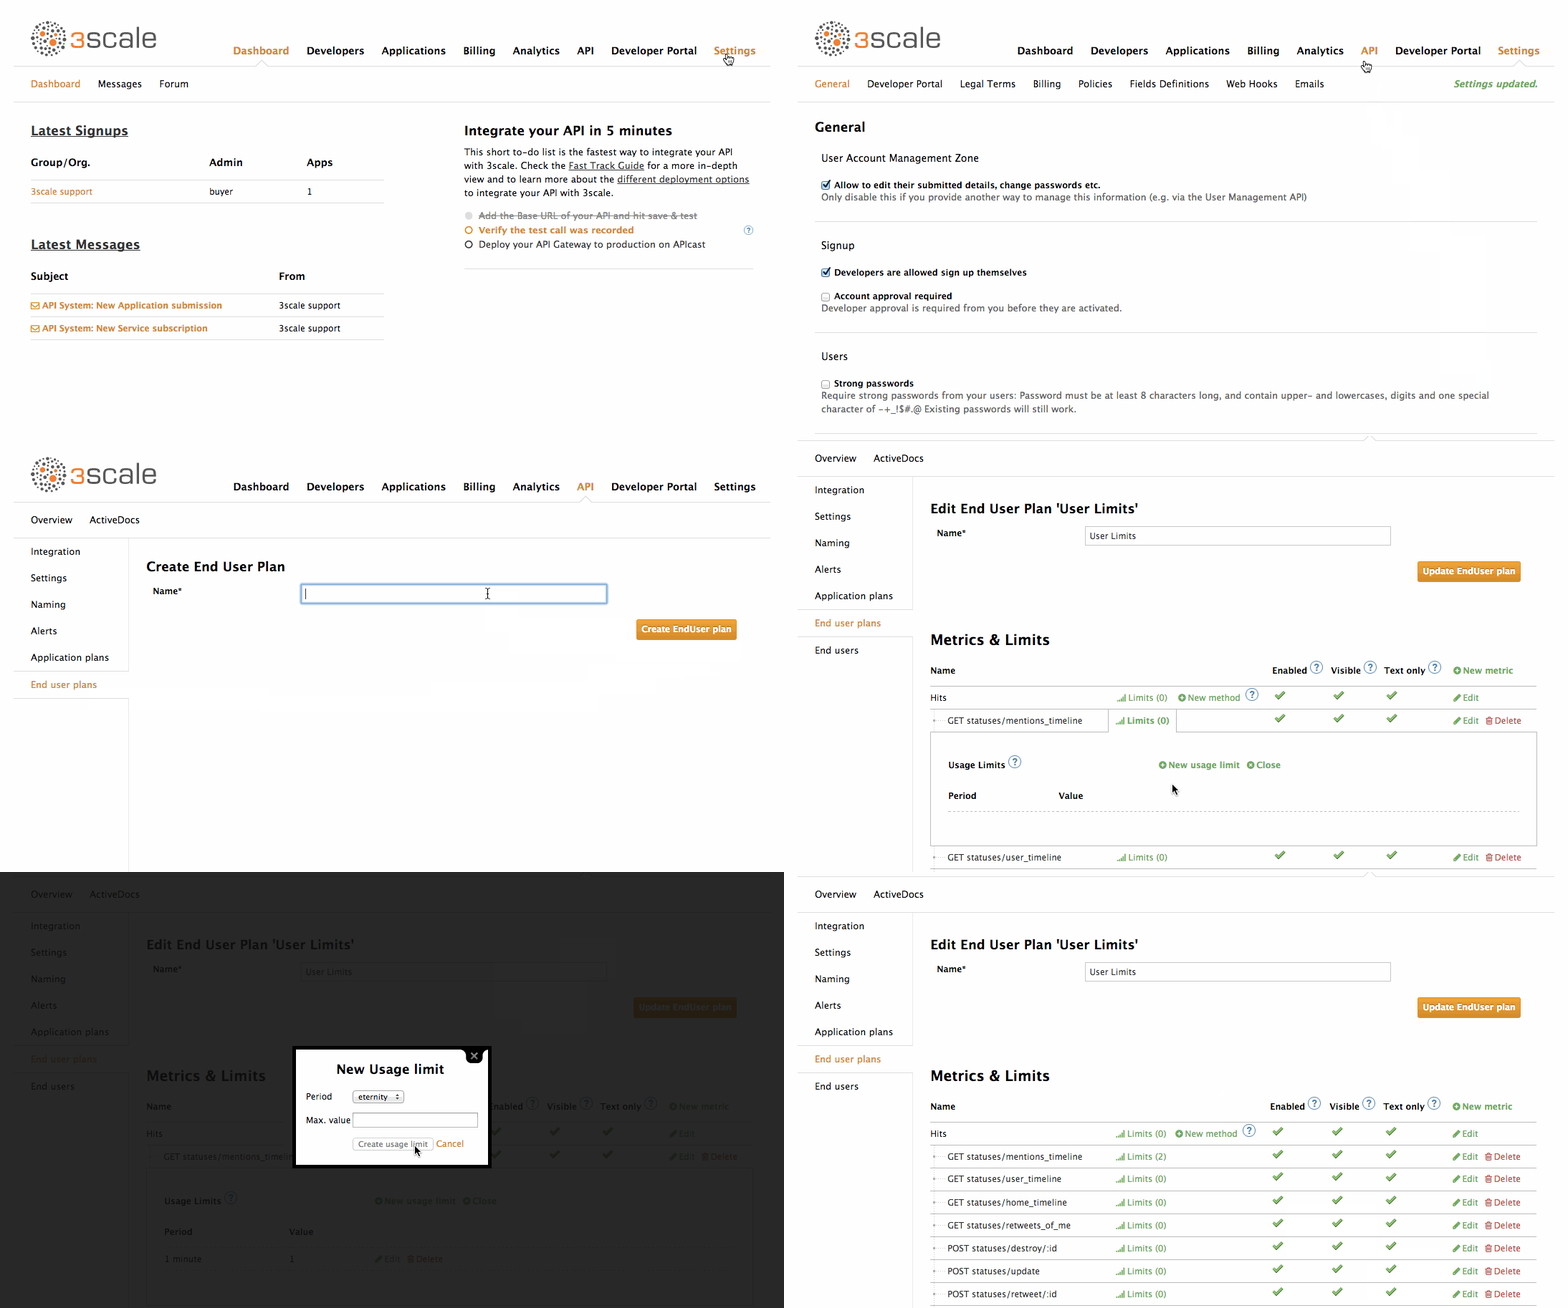
To set up the per user rate limits, you want to set up end user plans in 3scale. As for the Twitter user rate limits, end user plans rate limit each individual user of an application, not the application itself. Since this is an advanced feature in 3scale, you need to enable it first in the overall account settings.
Once it’s enabled, you’ll see the End User Plans section in the API menu. You’ll want to go in here and create a new end user plan. Call this plan "User Limits". It will apply to all Twitter users accessing Twitter through third-party applications that use the API.
Once the End User plan is created, you can add the required limits to all of the methods that you created previously.
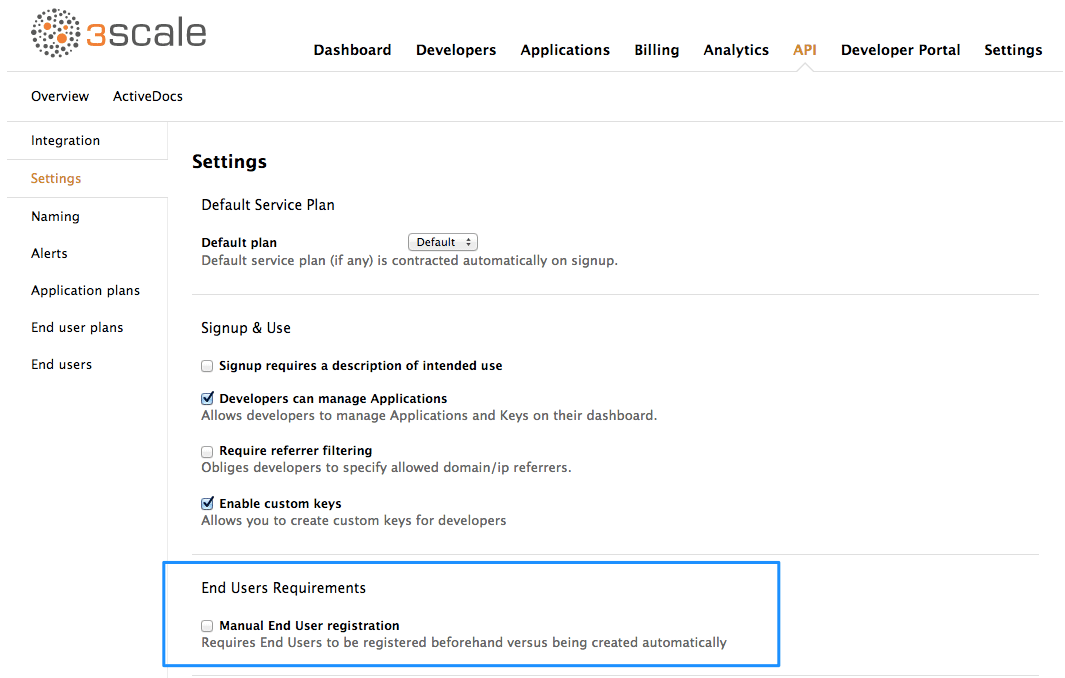
One final thing you want to do in the API settings is to disable Manual End User Registration so that end users are created in 3scale automatically the first time they are seen.
That’s the initial setup you need to do. You can always come back to your application plans to add any new methods as well as change or refine any limits later on, once your API is running in production and you have a better understanding of your customers' usage patterns.
2.5. Engage developers
Now that you’ve set some limits, the next step is to set up your Developer Portal so potential partners can find out more about the API and sign up for a trial.
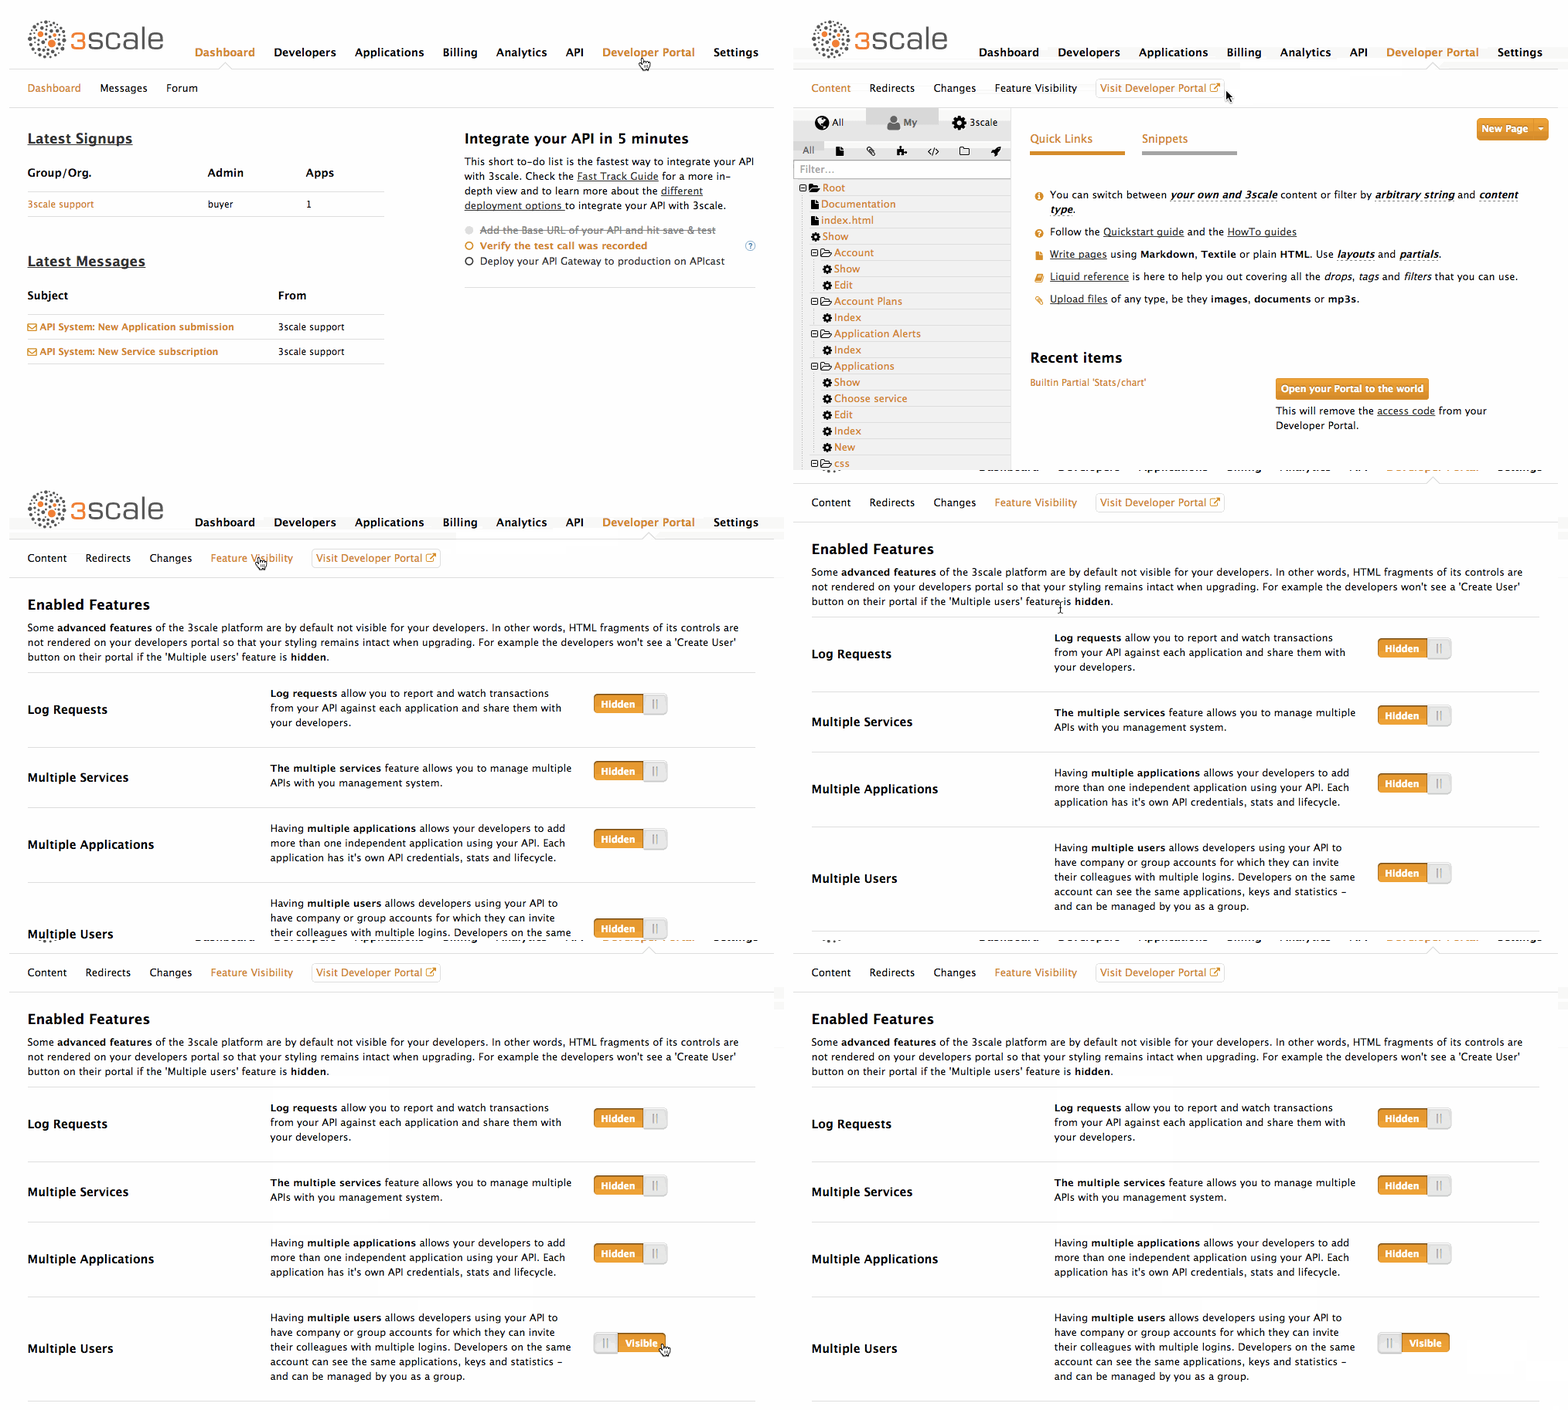
It’s likely that your partners will be large companies with a number of stakeholders in the integration project, so you’ll want to allow them to create or invite multiple users to their developer account. You’ll need to enable this in 3scale by going to the Developer Portal section and enabling the ability for your partners to invite multiple users to their account.
In this view, you can see other features that you’ll probably want to enable such as multiple services so you can set up multiple, separate APIs as well as multiple applications so your partners can register more than one application using your API.
That’s pretty much everything you need to do to integrate your API with 3scale.
Now that you have your first API set up in 3scale, you can easily create new services for your other APIs from the API overview page and set them up as you did for your Public REST API. You want to create a new service for each of your different APIs. You could also create a new separate service for each version of your API, or even separate services for each of the different environments your API might be available on, such as if you want to expose your API’s QA environment for partner testing.
To create a new service, simply navigate to the API view and select Create Service. This will prompt you to choose a name for your API and enter a description. You can also start specifying some settings for the API such as the authentication mode. In this case, you’ll choose OAuth mode from the start.
At this point, you can also rename your original API to be more descriptive by going to the API settings' naming section. There, you can change the name and description of your API.
The final things that you want to set up on your 3scale account are all around customizing the Developer Portal to fit your particular needs and so that it conforms to the look and feel of your product branding.
You can do this through:
- Setting up a custom domain for you Developer Portal such as developer.twitter.com.
- Setting up an API contact email such as api@twitter.com for emails from your 3scale account to your API consumers.
- Customizing the Developer Portal so that it matches the look and feel of your brand.
- Editing the email templates to tailor the messages you want to send to your partners.
- Using liquids to control the information that gets shown to different customers.
- Adding a favicon.
For the favicon, the path has to be different than the standard /favicon.ico as this is already taken by the default 3scale one.
You need to upload your favicon into the 3scale CMS by creating a new file. In this case, place it in the images folder and call it icon.ico. You’ll then refer to it from the main layout with the following snippet placed in the head element, as below:
<!-- Favicon -->
    <link rel="shortcut icon" href="/images/icon.ico" type="image/x-icon" />
<!-- Favicon -->
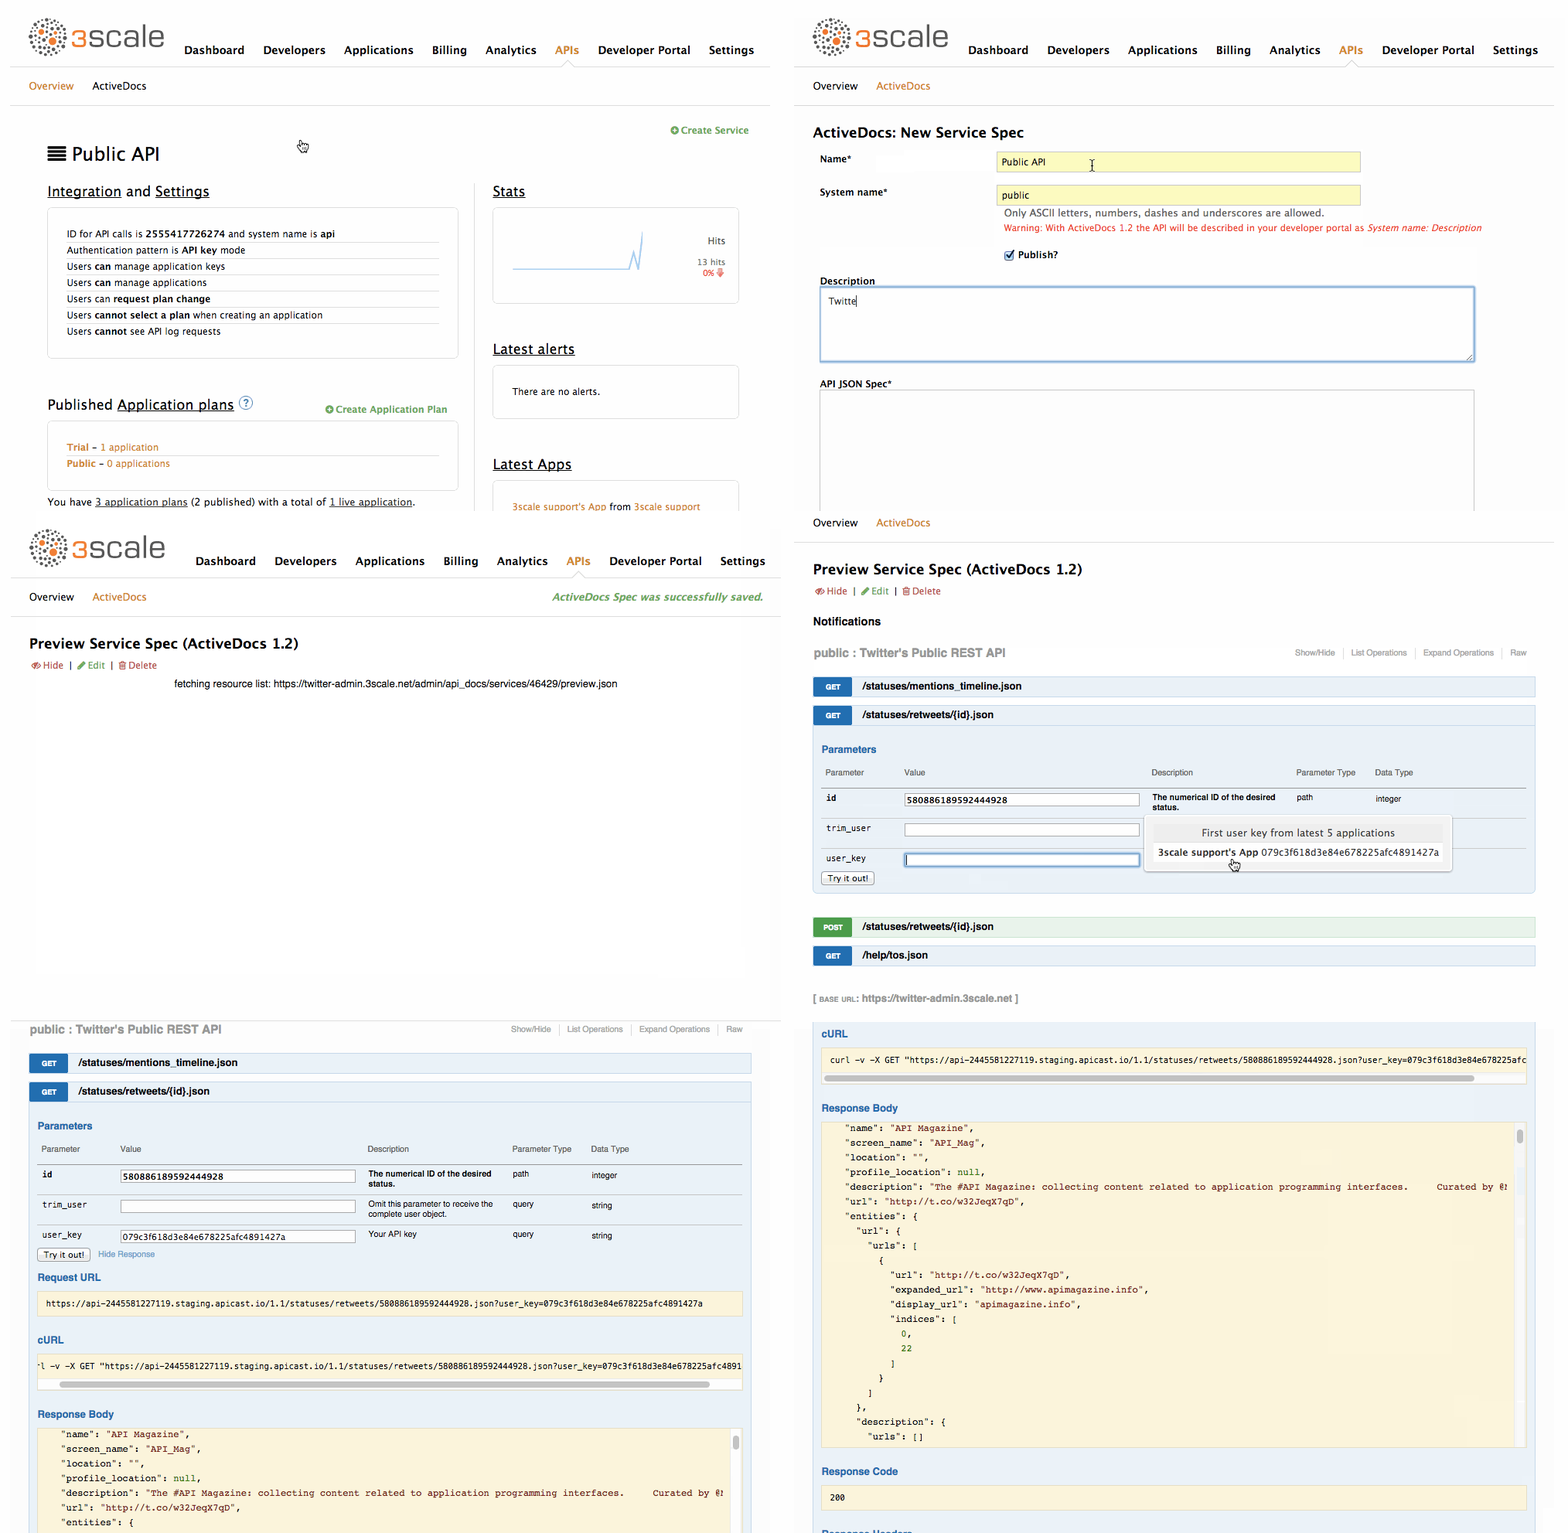
<link rel="shortcut icon" href="/images/icon.ico" type="image/x-icon" />You also want to set up some interactive documentation (ActiveDocs) so your customers can explore the API without needing to write any code. If you already have a Swagger spec for your API, simply navigate to the API and ActiveDocs section, Create a new spec and paste your Swagger spec in.
2.6. Exposing the API
Now that you have your API integrated and have customized your Developer Portal to fit your needs, you can now start thinking about getting some users for your API and what the signup process is going to look like for them.
You’ve already done a lot of the groundwork by enabling signups, so anyone can create a developer account on your API. By setting the Trial plan as the default application plan, they’ll have access to the API on a trial basis from the beginning. They can also see and request access to the Public Application plan if they want to take their API usage further.
One last thing to do now is to collect some extra data on your API users once they sign up. For this, you can set up some extra fields to be collected by 3scale on signup as well as application creation. Extra fields can be created for:
- Accounts
- Users of an account
- Applications
There are two types of extra fields, 3scale’s built-in ones and custom ones that you can define. You can make most fields optional, although there are a few that are required by 3scale such as username for a user.
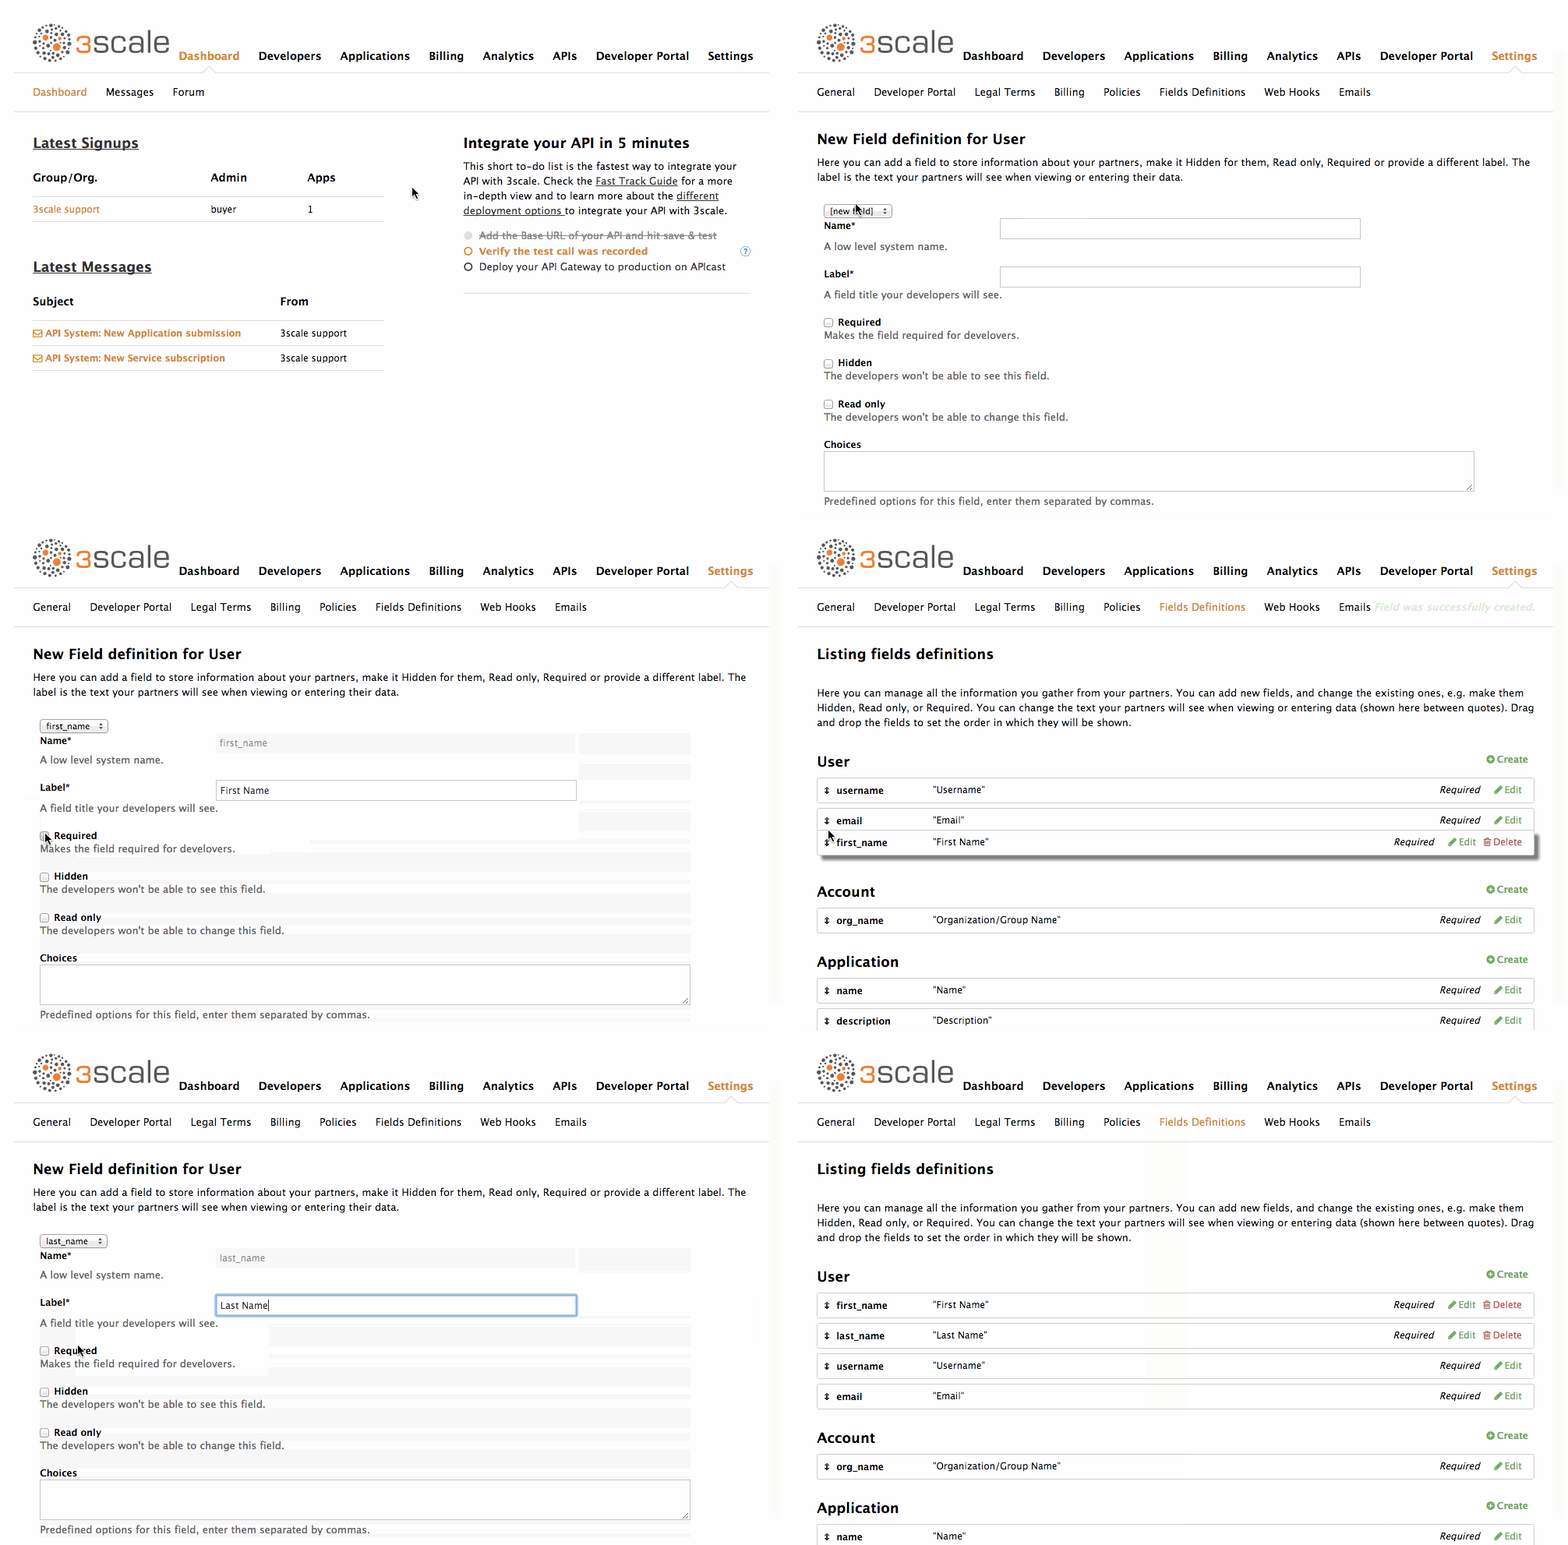
First of all, you want to collect the actual names of your users, so you’ll add the "First Name" and "Last Name" extra fields to the user object. To make these mandatory for developers to fill in, make them required. You also want these to appear as the first and second fields to be filled out in the signup form, so drag them up to the relevant positions.
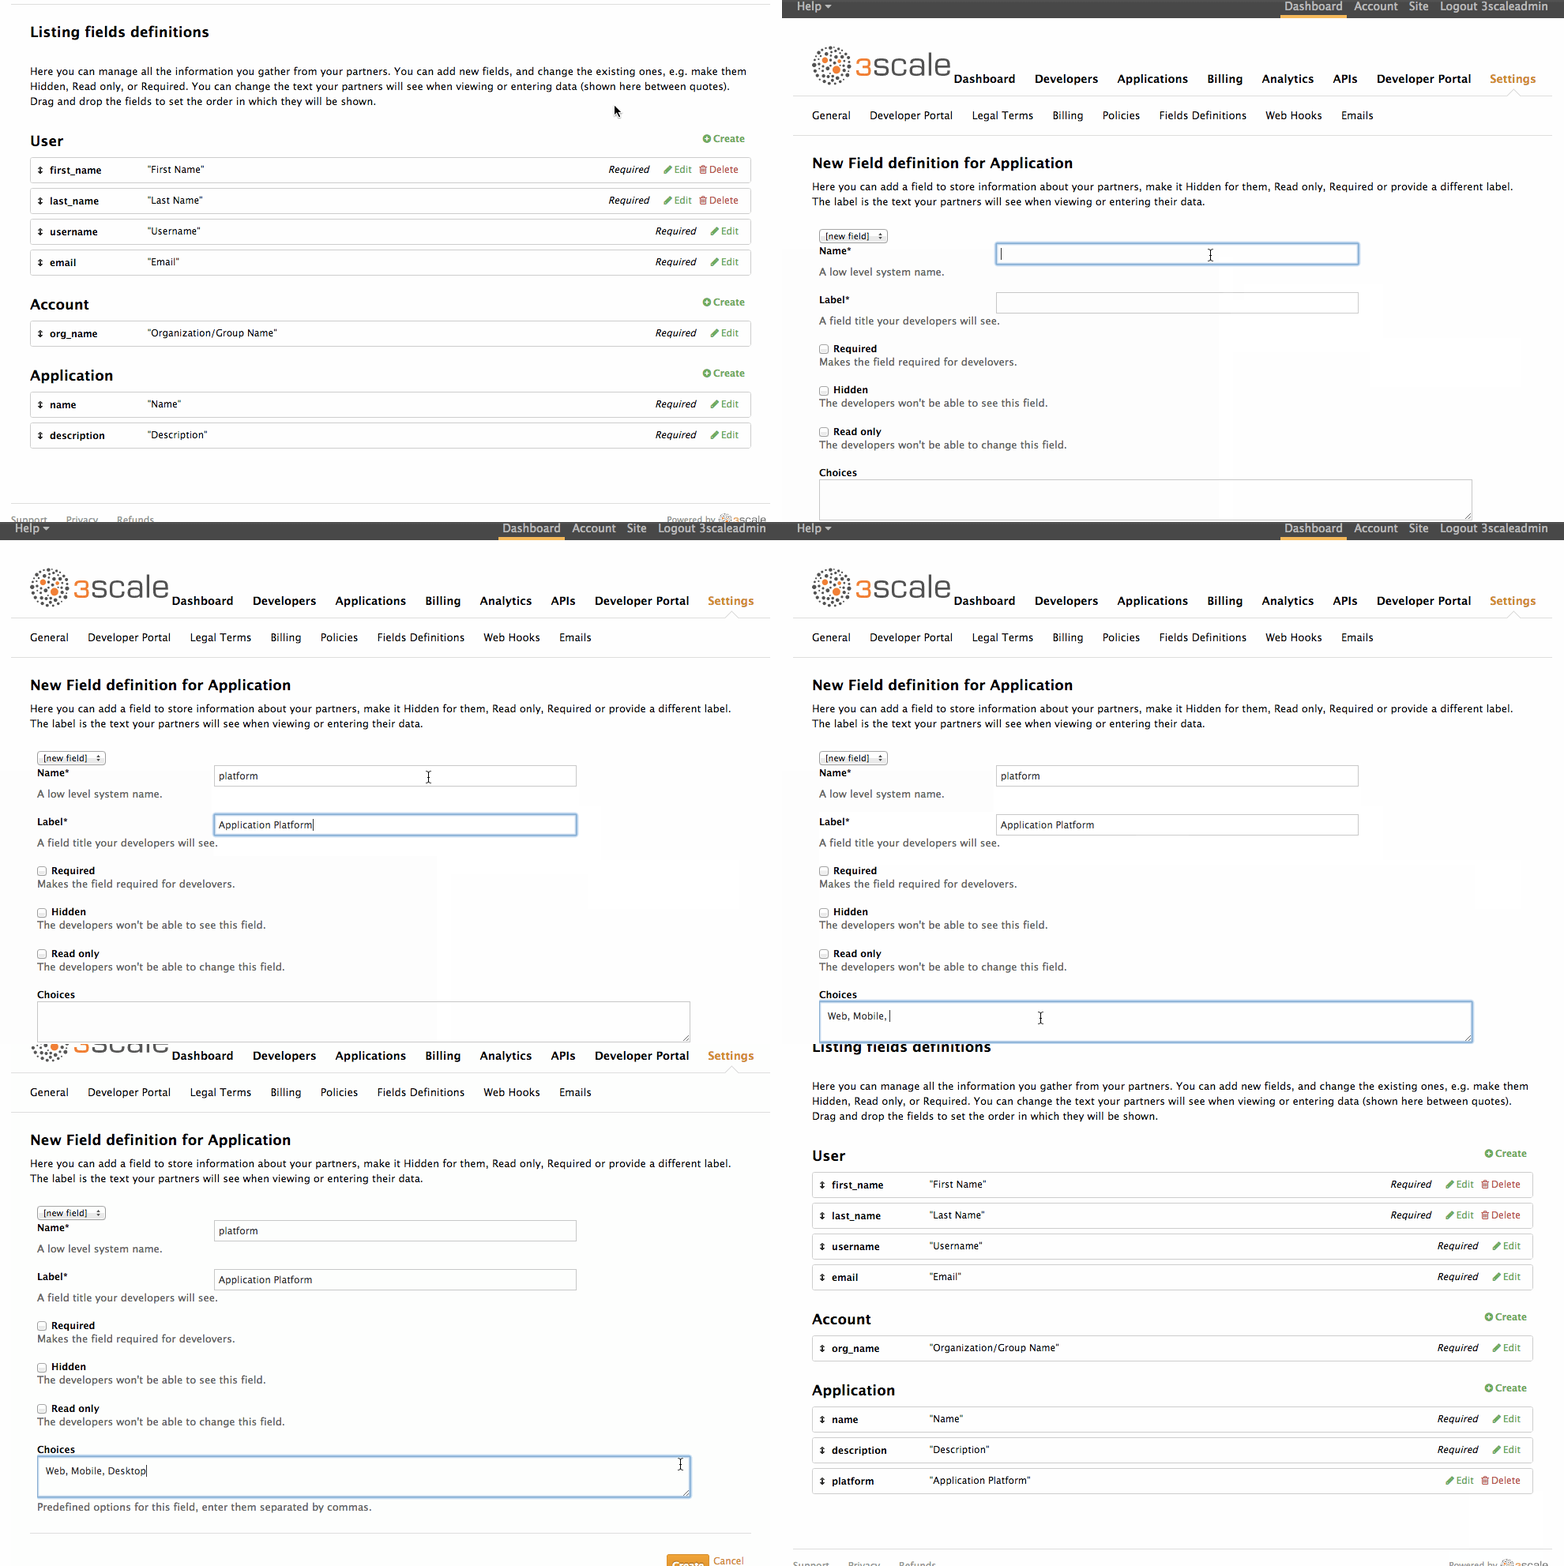
For the application, you want to collect some information about the sort of application it is: mobile, web, or desktop. Create a custom field under "Application" with these options so that users can choose between them. This field will be optional.
Now that you have some more data, you’ll also want to import a lot of it into other services that you use, such as Salesforce, to enable tracking for any interesting leads for upsell to your Partner Application plan and other services that you provide outside of your API. For this, you’ll use webhooks to send a message with the account details whenever a new account is created on your 3scale Developer Portal.
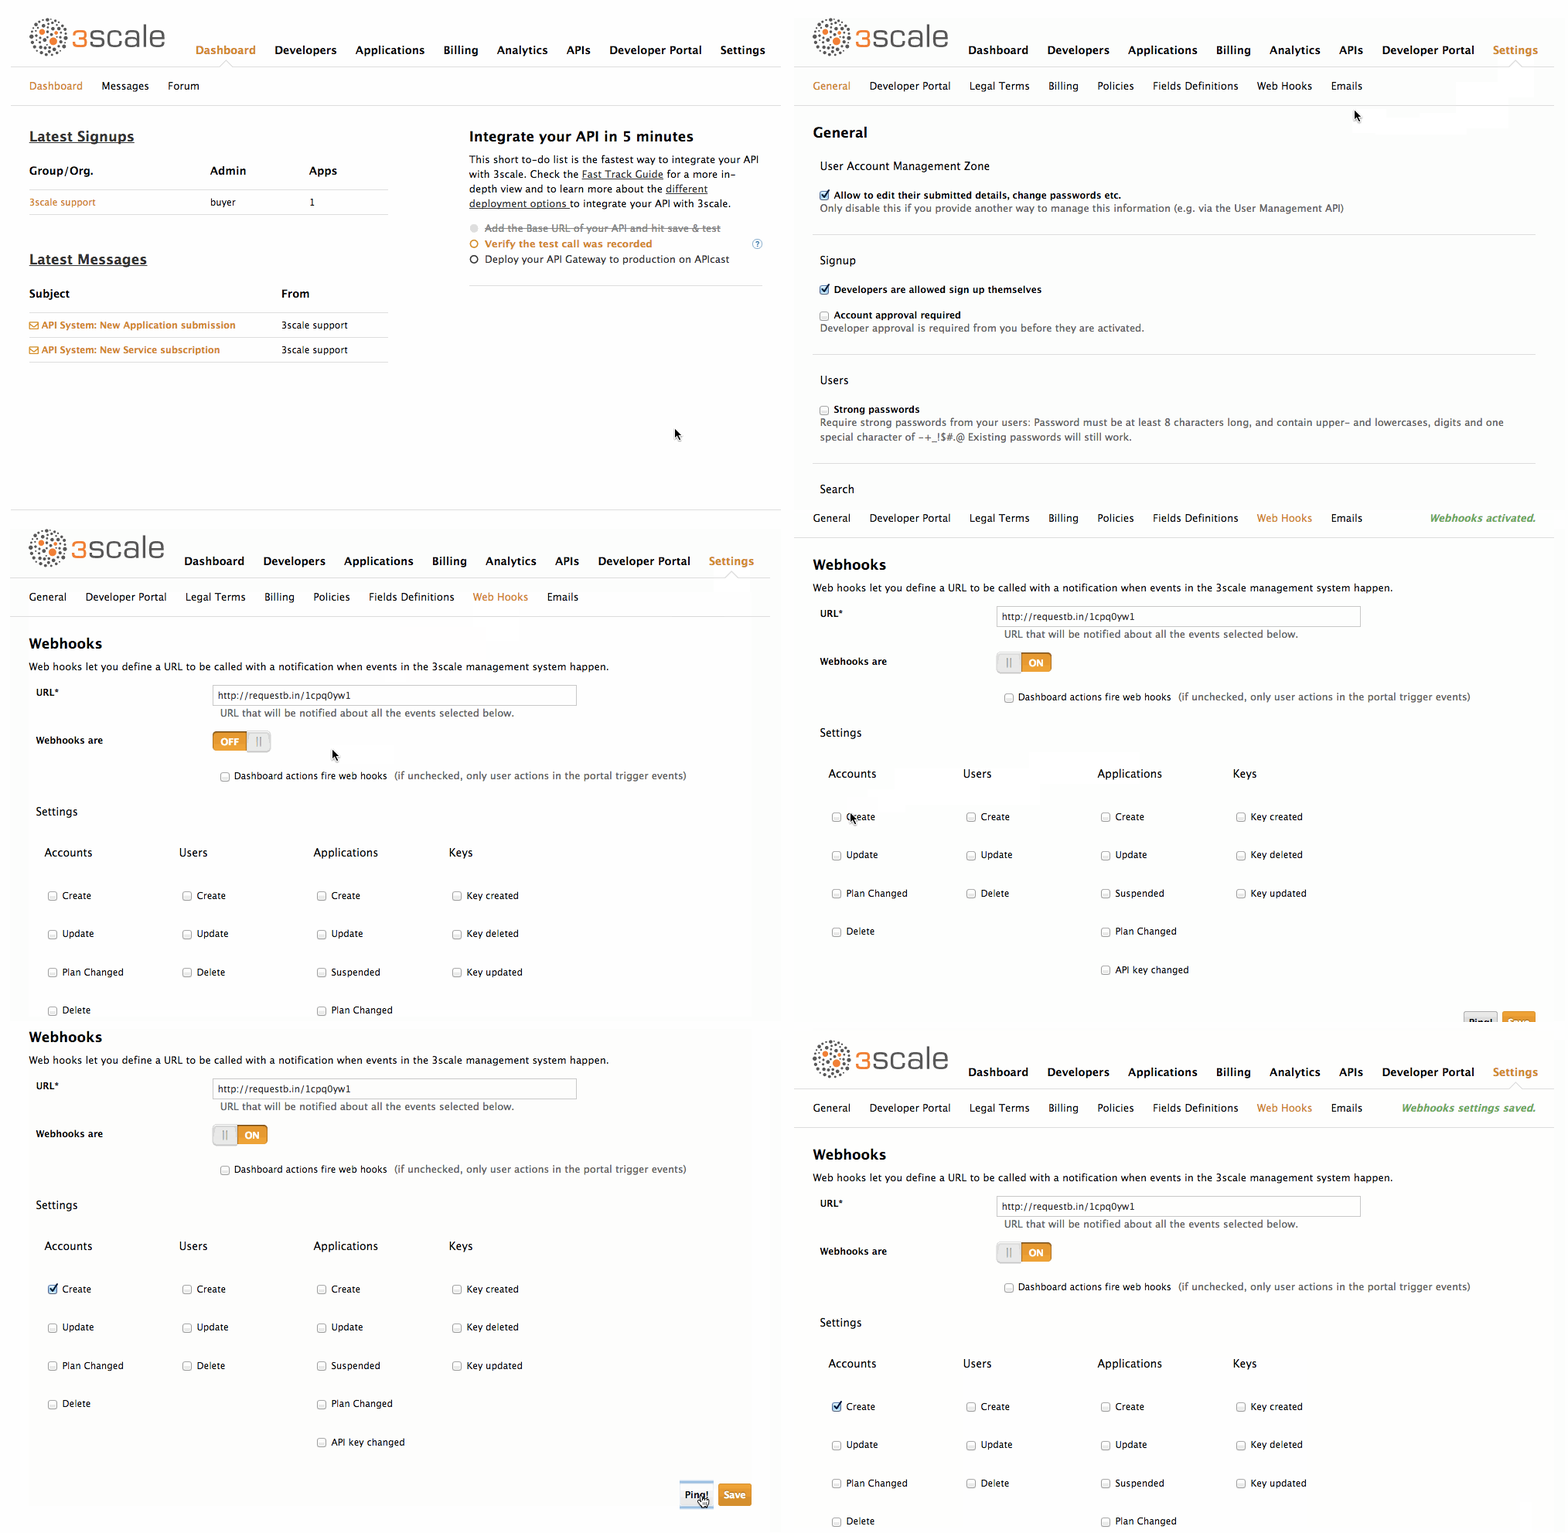
For this, you just need to provide an endpoint that’s listening for these messages and knows how to process them. Then it’s just a case of entering in the URL for this endpoint, turning webhooks on, and selecting the events you want to trigger messages – in this case, account creation. Once that’s done, just click save. Now, every time a new account is created in 3scale, you’ll receive a copy of all the details ready for processing.
You can read more about webhooks here.
That’s all regarding the integration and setup of your 3scale account. However that’s by no means all that 3scale provides. Once your API has been up and running for a while, the analytics module can help give some insight into the usage patterns for your API, which of your partners are most engaged, as well as which are the busiest hours and days for your API. You can read all about how to make the most of the 3scale Analytics here and here.
What are you waiting for? If you haven’t already done so, start your free trial of 3scale and give it a go.

