Deployment Options
Deploy APIcast API Gateway on OpenShift, natively, or using Docker.
Abstract
Chapter 1. APIcast Overview
APIcast is an NGINX based API gateway used to integrate your internal and external API services with the 3scale API Management Platform. APIcast does load balancing by using round-robin. In this guide you’ll learn more about deployment options, environments provided, and how to get started.
See the articles Red Hat 3scale API Management Supported Configurations and Red Hat 3scale API Management - Component Details to get information about the latest released and supported version of APIcast.
1.1. Prerequisites
APIcast is not a standalone API gateway, it needs connection to 3scale API Manager.
- You will need a working 3scale On-Premises instance.
1.2. Deployment options
You can use APIcast hosted or self-managed, in both cases, it needs connection to the rest of the 3scale API management platform:
- APIcast built-in: Two APIcast gateways (staging and production) come by default with the 3scale API Management installation. They come pre-configured and ready to use out-of-the-box.
APIcast self-managed: You can deploy APIcast wherever you want. Here are a few recommended options to deploy APIcast:
- the Docker containerized environment: Download a ready to use Docker-formatted container image, which includes all of the dependencies to run APIcast in a Docker-formatted container.
- OpenShift: Run APIcast on a supported version of OpenShift. You can connect self-managed APIcasts both to a 3scale API Management on-premise installation or to a 3scale hosted account.
1.3. Environments
By default, when you create a 3scale account, you get built-in APIcast in two different environments:
-
Staging: Intended to be used only while configuring and testing your API integration. When you have confirmed that your setup is working as expected, then you can choose to deploy it to the production environment. The OpenShift template sets the parameters of the Staging APIcast in a way that the configuration is reloaded on each API call (
APICAST_CONFIGURATION_LOADER: lazy,APICAST_CONFIGURATION_CACHE: 0). It is useful to test the changes in APIcast configuration quickly. -
Production: This environment is intended for production use. The following parameters are set for the Production APIcast in the OpenShift template:
APICAST_CONFIGURATION_LOADER: boot,APICAST_CONFIGURATION_CACHE: 300. This means that the configuration will be fully loaded when APIcast is started, and will be cached for 300 seconds (5 minutes). After 5 minutes the configuration will be reloaded. This means that when you promote the configuration to production, it may take up to 5 minutes to be applied, unless you trigger a new deployment of APIcast.
1.4. Configuring the integration settings
Go to [your_API_name] > Integration > Configuration.
The integration options are displayed on the Integration page, in the upper right-hand side. By default, the deployment option is APIcast hosted, and the authentication mode is API key. You can change these settings by clicking on edit integration settings in the top right corner. Note that OAuth 2.0 authentication is only available for the self-managed deployment.
1.5. Configuring your service
You will need to declare your API backend in the Private Base URL field, which is the endpoint host of your API backend. APIcast will redirect all traffic to your API backend after all authentication, authorization, rate limits and statistics have been processed.
Typically, the Private Base URL of your API will be something like https://api-backend.yourdomain.com:443, on the domain that you manage (yourdomain.com). For instance, if you were integrating with the Twitter API the Private Base URL would be https://api.twitter.com/. In this example will use the Echo API hosted by 3scale – a simple API that accepts any path and returns information about the request (path, request parameters, headers, etc.). Its Private Base URL is https://echo-api.3scale.net:443.

Test your private (unmanaged) API is working. For example, for the Echo API you can make the following call with curl command:
curl "https://echo-api.3scale.net:443"
You will get the following response:
{
    "method": "GET",
    "path": "/",
    "args": "",
    "body": "",
    "headers": {
      "HTTP_VERSION": "HTTP/1.1",
      "HTTP_HOST": "echo-api.3scale.net",
      "HTTP_ACCEPT": "*/*",
      "HTTP_USER_AGENT": "curl/7.51.0",
      "HTTP_X_FORWARDED_FOR": "2.139.235.79, 10.0.103.58",
      "HTTP_X_FORWARDED_HOST": "echo-api.3scale.net",
      "HTTP_X_FORWARDED_PORT": "443",
      "HTTP_X_FORWARDED_PROTO": "https",
      "HTTP_FORWARDED": "for=10.0.103.58;host=echo-api.3scale.net;proto=https"
    },
    "uuid": "ee626b70-e928-4cb1-a1a4-348b8e361733"
  }
Once you have confirmed that your API is working, you will need to configure the test call for the hosted staging environment. Enter a path existing in your API in the API test GET request field (for example, /v1/word/good.json).
Save the settings by clicking on the Update & Test Staging Configuration button in the bottom right part of the page. This will deploy the APIcast configuration to the 3scale hosted staging environment. If everything is configured correctly, the vertical line on the left should turn green.
1.5.1. Configuring the authentication settings
If you are using one of the self-managed deployment options, save the configuration from the GUI and make sure it is pointing to your deployed API gateway by adding the correct host in the staging or production Public base URL field. Before making any calls to your production gateway, click on the Promote v.x to Production button.
Find the sample curl at the bottom of the staging section and run it from the console:
curl "https://XXX.staging.apicast.io:443/v1/word/good.json?user_key=YOUR_USER_KEY"
You should get the same response as above, however, this time the request will go through the 3scale hosted APIcast instance. Note: You must have an application with valid credentials for the service. If you are using the default API service created on sign up to 3scale, you should already have an application. Otherwise, if you see USER_KEY or APP_ID and APP_KEY values in the test curl, you need to create an application for this service first.
Now you have your API integrated with 3scale.
3scale hosted APIcast gateway does the validation of the credentials and applies the rate limits that you defined for the application plan of the application. If you try to make a call without credentials, or with invalid credentials, you will see an error message. The code and the text of the message can be configured, check out the Advanced APIcast configuration article for more information.
1.6. Mapping rules
The mapping rules define which metrics (and methods) you want to report depending on the requests to your API.
By default we start with a very simple mapping rule,

This rule means that any GET request that starts with / will increment the metric hits by 1. This mapping rule will match any request to your API. Most likely you will change this rule since it is too generic.
APIcast fetches the parameters in the following ways:
- For a GET method: APIcast fetches the parameters from the query string.
- For any of these methods (POST, DELETE, PUT): APIcast fetches the parameters from the body.
Parameters can also have named wildcards. Wildcards can appear between slashes or between slash and dot.
For instance, below you can see the rules for the Echo API:
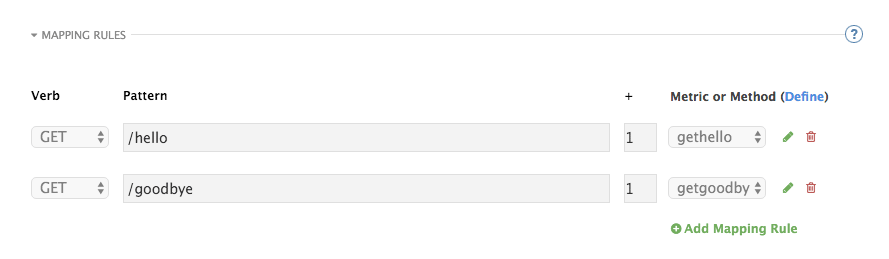
Mapping rules can also include parameters on the query string or in the body: /{word}?value={value}.
The matching of the rules is done by prefix and can be arbitrarily complex (the notation follows Swagger and ActiveDocs specification)
-
You can do a match on the path over a literal string:
/hello -
Mapping rules can contain named wildcards:
/{word}
This rule will match anything in the placeholder {word}, making requests like /morning match the rule.
Wildcards can appear between slashes or between slash and dot.
-
Mapping rules can also include parameters on the query string or in the body:
/{word}?value={value}
APIcast will try to fetch the parameters from the query string when it is a GET and from the body when it is a POST, DELETE, PUT.
Parameters can also have named wildcards.
By default, all mapping rules are evaluated from first to last, according to the sort you specified. If you add a rule /v1 to the example on the figure above, it would be matched for the requests whose path starts with /v1, considering if it is either /v1/word or /v1/sentence.
1.7. Mapping rules workflow
The intended workflow to define mapping rules is as follows:
- You can add new rules by clicking the Add Mapping Rule button. Then you select an HTTP method, a pattern, a metric (or method) and finally its increment. When you are done, click Update & Test Staging Configuration to apply the changes.
- Mapping rules will be grayed out on the next reload to prevent accidental modifications.
- To edit an existing mapping rule you must enable it first by clicking the pencil icon on the right.
- To delete a rule click on the trash icon.
- Modifications and deletions will be saved when you hit the Update & Test Staging Configuration button.
In addition to this workflow, you have two features:
- To sort mapping rules, you can drag and drop them using the green arrows next to the checkbox of each mapping rule in the Last? column. The specified sort is saved in the database and it is kept in the content of the proxy configuration specifications after you click the Update & test in Staging Environment button.
- You can select the Last? checkbox to stop processing other mapping rules. For example, if you have the following mapping rules defined in API Integration Settings and you have different metrics associated to each rule:
(get) /path/to/example/search
(get) /path/to/example/{id}
When calling with: (get) /path/to/example/search, it will stop processing the remaining mapping rules and incrementing their metrics after the rule is matched.
For more advanced configuration options, you can check the APIcast advanced configuration tutorial.
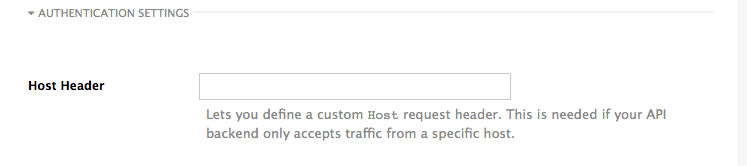
1.8. Host Header
This option is only needed for those API backends that reject traffic unless the Host header matches the expected one. In these cases, having a gateway in front of your API backend will cause problems since the Host will be the one of the gateway, e.g. xxx-yyy.staging.apicast.io
To avoid this issue you can define the host your API backend expects in the Host Header field in the Authentication Settings, and the hosted APIcast instance will rewrite the host.
1.9. Production deployment
Once you have configured your API integration and verified it is working in the Staging environment, you can go ahead with one of the APIcast production deployments. See the Deployment options in the beginning of this article.
At the bottom of the Integration page you will find the Production section. You will find two fields here: the Private Base URL, which will be the same as you configured in the Staging section, and the Public Base URL.
1.10. Public Base URL
The Public Base URL is the URL, which your developers will use to make requests to your API, protected by 3scale. This will be the URL of your APIcast instance.
If you are using one of the self-managed deployment options, you can choose your own Public Base URL for each one of the environments provided (staging and production), on a domain name you are managing. Note that this URL should be different from the one of your API backend, and could be something like https://api.yourdomain.com:443, where yourdomain.com is the domain that belongs to you. After setting the Public Base URL make sure you save the changes and, if necessary, promote the changes in staging to production.
Please note that APIcast will only accept calls to the hostname which is specified in the Public Base URL. For example, for the Echo API example used above, if you specify https://echo-api.3scale.net:443 as the Public Base URL, the correct call would be be:
curl "https://echo-api.3scale.net:443/hello?user_key=YOUR_USER_KEY"
In case you don’t yet have a public domain for your API, you can also use the APIcast IP in the requests, but you still need to specify a value in the Public Base URL field (even if the domain is not real), and in this case make sure you provide the host in the Host header, for example:
curl "http://192.0.2.12:80/hello?user_key=YOUR_USER_KEY" -H "Host: echo-api.3scale.net"
If you are deploying on local machine, you can also just use "localhost" as the domain, so the Public Base URL will look like http://localhost:80, and then you can make requests like this:
curl "http://localhost:80/hello?user_key=YOUR_USER_KEY"
In case you have multiple API services, you will need to set this Public Base URL appropriately for each service. APIcast will route the requests based on the hostname.
1.11. Protecting your API backend
Once you have APIcast working in production, you might want to restrict direct access to your API backend without credentials. The easiest way to do this is by using the Secret Token set by APIcast. Please refer to the Advanced APIcast configuration for information on how to set it up.
1.12. Using APIcast with private APIs
With APIcast, you can protect the APIs that are not publicly accessible from the Internet. The requirements are as follows:
- APIcast self-managed must be used as the deployment option.
- APIcast needs to be accessible from the public Internet and be able to make outbound calls to the 3scale Service Management API.
- The API backend should be accessible by APIcast.
In this case you can set your internal domain name or the IP address of your API in the Private Base URL field and follow the rest of the steps as usual. Note, however, that you will not be able to take advantage of the Staging environment, and the test calls will not be successful, as the Staging APIcast instance is hosted by 3scale and will not have access to your private API backend). But once you deploy APIcast in your production environment, if the configuration is correct, APIcast will work as expected.
1.13. Configuring APIcast with OpenTracing
OpenTracing is an API specification and method used to profile and monitor microservices. From version 3.3 onwards, APIcast includes OpenTracing Libraries and the Jaeger Tracer library.
1.13.1. Prerequisites
To add distributed tracing to your APIcast deployment, you need to ensure the following prerequisites:
- Each external request should have a unique request ID attached, usually via a HTTP header.
- Each service should forward the request ID to other services.
- Each service should output the request ID in the logs.
- Each service should record additional information, like start and end time of the request.
- Logs need to be aggregated, and provide a way to parse via HTTP request ID.
1.13.2. Procedure
To configure OpenTracing, use the following environment variables:
- OPENTRACING_TRACER: To define which tracer implementation to use. Currently, only Jaeger is available.
- OPENTRACING_CONFIG: To specify the default configuration file of your tracer. You can see an example here.
- OPENTRACING_HEADER_FORWARD: Optional. You can set this environment variable according to your OpenTracing configuration.
For more information about these variables, refer to APIcast environment variables.
To test if the integration is properly working, you need to check if traces are reported in the Jaeger tracing interface.
1.13.3. Additional information
The OpenTracing and Jaeger integration are available in the upstream project: https://github.com/3scale/apicast
1.13.4. Installing Jaeger on your OpenShift instance
This section provides information about the installation of Jaeger on the OpenShift instance you are running.
Jaeger is a third-party component, which 3scale does not provide support for, with the exception of uses with APIcast. The following instructions are provided as a reference example only, and are not suitable for production use.
Install the Jaeger all-in-one in the current namespace:
oc process -f https://raw.githubusercontent.com/jaegertracing/jaeger-openshift/master/all-in-one/jaeger-all-in-one-template.yml | oc create -f -
Create a Jaeger configuration file
jaeger_config.jsonand add the following:{ "service_name": "apicast", "disabled": false, "sampler": { "type": "const", "param": 1 }, "reporter": { "queueSize": 100, "bufferFlushInterval": 10, "logSpans": false, "localAgentHostPort": "jaeger-agent:6831" }, "headers": { "jaegerDebugHeader": "debug-id", "jaegerBaggageHeader": "baggage", "TraceContextHeaderName": "uber-trace-id", "traceBaggageHeaderPrefix": "testctx-" }, "baggage_restrictions": { "denyBaggageOnInitializationFailure": false, "hostPort": "127.0.0.1:5778", "refreshInterval": 60 } }-
set a
samplerconstant of 1 to sample all requests -
set the location and queue size of the
reporter -
set
headers, includingTraceContextHeaderNamewhich we will use to track requests
-
set a
Create a ConfigMap from our Jaeger configuration file and mount it into APIcast:
oc create configmap jaeger-config --from-file=jaeger_config.json
oc volume dc/apicast --add -m /tmp/jaeger/ --configmap-name jaeger-config
Enable OpenTracing and Jaeger with the configuration we have just added:
oc env deploymentConfig/apicast OPENTRACING_TRACER=jaeger OPENTRACING_CONFIG=/tmp/jaeger/jaeger_config.json
Find the URL the Jaeger interface is running on:
oc get route
(…) jaeger-query-myproject.127.0.0.1.nip.io
- Open the Jaeger interface from the previous step, which shows data being populated from Openshift Health checks.
- The final step is to add OpenTracing and Jaeger support to your backend APIs so that you can see the complete request trace. This varies in each back end, depending on the frameworks and languages used. As a reference example, you can see Using OpenTracing with Jaeger to collect Application Metrics in Kubernetes.
For more information on configuring Jaeger, see: * Jaeger on OpenShift development setup * Jaeger on OpenShift production setup * Distributed tracing on OpenShift Service Mesh
Chapter 2. APIcast on the Docker containerized environment
This is a step-by-step guide to deploy APIcast inside a Docker-formatted container that is ready to be used as a 3scale API gateway.
2.1. Prerequisites
You must configure APIcast in your 3scale Admin Portal as per the APIcast Overview.
2.2. Step 1: Install the Docker containerized environment
This guide covers the steps to set up the Docker containerized environment on Red Hat Enterprise Linux (RHEL) 7.
Docker-formatted containers provided by Red Hat are released as part of the Extras channel in RHEL. To enable additional repositories, you can use either the Subscription Manager or the yum config manager. For details, see the RHEL product documentation.
To deploy RHEL 7 on an AWS EC2 instance, take the following steps:
-
List all repositories:
sudo yum repolist all. -
Find the
*-extrasrepository. -
Enable the
extrasrepository:sudo yum-config-manager --enable rhui-REGION-rhel-server-extras. -
Install the Docker containerized environment package:
sudo yum install docker.
For other operating systems, refer to the following Docker documentation:
2.3. Step 2: Run the Docker containerized environment gateway
Start the Docker daemon:
sudo systemctl start docker.service.Check if the Docker daemon is running:
sudo systemctl status docker.service.You can download a ready to use Docker-formatted container image from the Red Hat registry:
sudo docker pull registry.access.redhat.com/3scale-amp24/apicast-gateway.Run APIcast in a Docker-formatted container:
sudo docker run --name apicast --rm -p 8080:8080 -e THREESCALE_PORTAL_ENDPOINT=https://<access_token>@<domain>-admin.3scale.net registry.access.redhat.com/3scale-amp24/apicast-gateway.Here,
<access_token>is the Access Token for the 3scale Account Management API. You can use the the Provider Key instead of the access token.<domain>-admin.3scale.netis the URL of your 3scale admin portal.
This command runs a Docker-formatted container called "apicast" on port 8080 and fetches the JSON configuration file from your 3scale portal. For other configuration options, see the APIcast Overview guide.
2.3.1. The Docker command options
You can use the following options with the docker run command:
-
--rm: Automatically removes the container when it exits. -
-dor--detach: Runs the container in the background and prints the container ID. When it is not specified, the container runs in the foreground mode and you can stop it usingCTRL + c. When started in the detached mode, you can reattach to the container with thedocker attachcommand, for example,docker attach apicast. -
-por--publish: Publishes a container’s port to the host. The value should have the format<host port="">:<container port="">, so-p 80:8080will bind port8080of the container to port80of the host machine. For example, the Management API uses port8090, so you may want to publish this port by adding-p 8090:8090to thedocker runcommand. -
-eor--env: Sets environment variables. -
-vor--volume: Mounts a volume. The value is typically represented as<host path="">:<container path="">[:<options>].<options>is an optional attribute; you can set it to:roto specify that the volume will be read only (by default, it is mounted in read-write mode). Example:-v /host/path:/container/path:ro.
For more information on available options, see Docker run reference.
2.4. Step 3: Testing APIcast
The preceding steps ensure that your Docker-formatted container is running with your own configuration file and the Docker-formatted image from the 3scale registry. You can test calls through APIcast on port 8080 and provide the correct authentication credentials, which you can get from your 3scale account.
Test calls will not only verify that APIcast is running correctly but also that authentication and reporting is being handled successfully.
Ensure that the host you use for the calls is the same as the one configured in the Public Base URL field on the Integration page.
2.5. Step 4: Troubleshooting APIcast on the Docker containerized environment
2.5.1. Cannot connect to the Docker daemon error
The docker: Cannot connect to the Docker daemon. Is the docker daemon running on this host? error message may be because the Docker service hasn’t started. You can check the status of the Docker daemon by running the sudo systemctl status docker.service command.
Ensure that you are run this command as the root user because the Docker containerized environment requires root permissions in RHEL by default. For more information, see here).
2.5.2. Basic Docker command-line interface commands
If you started the container in the detached mode (-d option) and want to check the logs for the running APIcast instance, you can use the log command: sudo docker logs <container>. Where ,<container> is the container name ("apicast" in the example above) or the container ID. You can get a list of the running containers and their IDs and names by using the sudo docker ps command.
To stop the container, run the sudo docker stop <container> command. You can also remove the container by running the sudo docker rm <container> command.
For more information on available commands, see Docker commands reference.
Chapter 3. Running APIcast on Red Hat OpenShift
This tutorial describes how to deploy the APIcast API Gateway on Red Hat OpenShift.
3.1. Prerequisites
To follow the tutorial steps below, you will first need to configure APIcast in your 3scale Admin Portal as per the APIcast Overview. Make sure Self-managed Gateway is selected as the deployment option in the integration settings. You should have both Staging and Production environment configured to proceed.
3.2. Step 1: Set up OpenShift
If you already have a running OpenShift cluster, you can skip this step. Otherwise, continue reading.
For production deployments you can follow the instructions for OpenShift installation.
In this tutorial the OpenShift cluster will be installed using:
- Red Hat Enterprise Linux (RHEL) 7
- Docker containerized environment v1.10.3
- OpenShift Origin command line interface (CLI) - v1.3.1
3.2.1. Install the Docker containerized environment
Docker-formatted container images provided by Red Hat are released as part of the Extras channel in RHEL. To enable additional repositories, you can use either the Subscription Manager, or yum config manager. See the RHEL product documentation for details.
For a RHEL 7 deployed on a AWS EC2 instance you will use the following the instructions:
List all repositories:
sudo yum repolist all
Find and enable the
*-extrasrepository.sudo yum-config-manager --enable rhui-REGION-rhel-server-extras
Install Docker-formatted container images:
sudo yum install docker docker-registry
Add an insecure registry of
172.30.0.0/16by adding or uncommenting the following line in/etc/sysconfig/dockerfile:INSECURE_REGISTRY='--insecure-registry 172.30.0.0/16'
Start the Docker service:
sudo systemctl start docker
With the following command, you can verify that the container service is running:
sudo systemctl status docker
3.2.2. Start OpenShift cluster
Download the latest stable release of the client tools (openshift-origin-client-tools-VERSION-linux-64bit.tar.gz) from OpenShift releases page, and place the Linux oc binary extracted from the archive in your PATH.
-
Please be aware that the
oc clusterset of commands are only available in the 1.3+ or newer releases. -
the docker command runs as the
rootuser, so you will need to run anyocor docker commands with root privileges.
Open a terminal with a user that has permission to run docker commands and run:
oc cluster up
At the bottom of the output you will find information about the deployed cluster:
    -- Server Information ...
      OpenShift server started.
      The server is accessible via web console at:
      https://172.30.0.112:8443

      You are logged in as:
        User:     developer
        Password: developer

      To login as administrator:
        oc login -u system:admin
Note the IP address that is assigned to your OpenShift server. You will refer to it in the tutorial as OPENSHIFT-SERVER-IP.
3.2.2.1. Setting up OpenShift cluster on a remote server
If you are deploying the OpenShift cluster on a remote server, you will need to explicitly specify a public hostname and a routing suffix on starting the cluster, so that you will be able to access the OpenShift web console remotely.
For example, if you are deploying on an AWS EC2 instance, you should specify the following options:
oc cluster up --public-hostname=ec2-54-321-67-89.compute-1.amazonaws.com --routing-suffix=54.321.67.89.xip.io
where ec2-54-321-67-89.compute-1.amazonaws.com is the Public Domain, and 54.321.67.89 is the IP of the instance. You will then be able to access the OpenShift web console at https://ec2-54-321-67-89.compute-1.amazonaws.com:8443.
3.3. Step 2: Deploy APIcast using the OpenShift template
By default you are logged in as developer and can proceed to the next step.
Otherwise login into OpenShift using the
oc logincommand from the OpenShift Client tools you downloaded and installed in the previous step. The default login credentials are username = "developer" and password = "developer":oc login https://OPENSHIFT-SERVER-IP:8443
You should see
Login successful.in the output.Create your project. This example sets the display name as gateway
oc new-project "3scalegateway" --display-name="gateway" --description="3scale gateway demo"
The response should look like this:
Now using project "3scalegateway" on server "https://172.30.0.112:8443".
Ignore the suggested next steps in the text output at the command prompt and proceed to the next step below.
Create a new secret to reference your project by replacing
<access_token>and<domain>with your own credentials. See below for more information about the<access_token>and<domain>.oc create secret generic apicast-configuration-url-secret --from-literal=password=https://<access_token>@<admin_portal_domain> --type=kubernetes.io/basic-auth
Here
<access_token>is an Access Token (not a Service Token) for the 3scale Account Management API, and<domain>-admin.3scale.netis the URL of your 3scale Admin Portal.The response should look like this:
secret/apicast-configuration-url-secret
Create an application for your APIcast Gateway from the template, and start the deployment:
oc new-app -f https://raw.githubusercontent.com/3scale/3scale-amp-openshift-templates/2.4.0.GA/apicast-gateway/apicast.yml
You should see the following messages at the bottom of the output:
--> Creating resources with label app=3scale-gateway ...
    deploymentconfig "apicast" created
    service "apicast" created
--> Success
    Run 'oc status' to view your app.
3.4. Step 3: Create routes in OpenShift console
Open the web console for your OpenShift cluster in your browser: https://OPENSHIFT-SERVER-IP:8443/console/
Use the value specified in
--public-hostnameinstead ofOPENSHIFT-SERVER-IPif you started OpenShift cluster on a remote server.You should see the login screen:
 Note
NoteYou may receive a warning about an untrusted web-site. This is expected, as you are trying to access the web console through secure protocol, without having configured a valid certificate. While you should avoid this in production environment, for this test setup you can go ahead and create an exception for this address.
Log in using the developer credentials created or obtained in the Setup OpenShift section above.
You will see a list of projects, including the gateway project you created from the command line above.
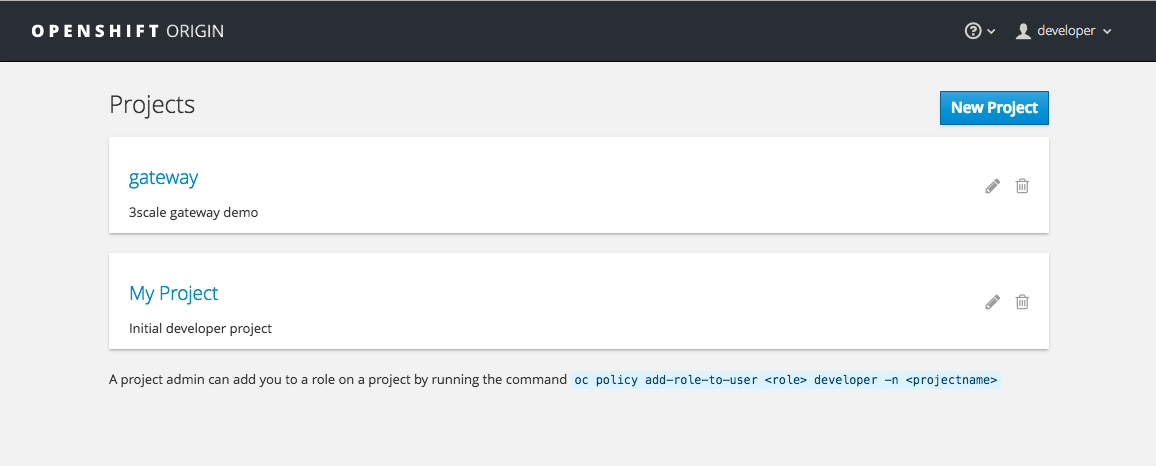
If you do not see your gateway project, you probably created it with a different user and will need to assign the policy role to to this user.
Click on the gateway link and you will see the Overview tab.
OpenShift downloaded the code for APIcast and started the deployment. You may see the message Deployment #1 running when the deployment is in progress.
When the build completes, the UI will refresh and show two instances of APIcast ( 2 pods ) that have been started by OpenShift, as defined in the template.
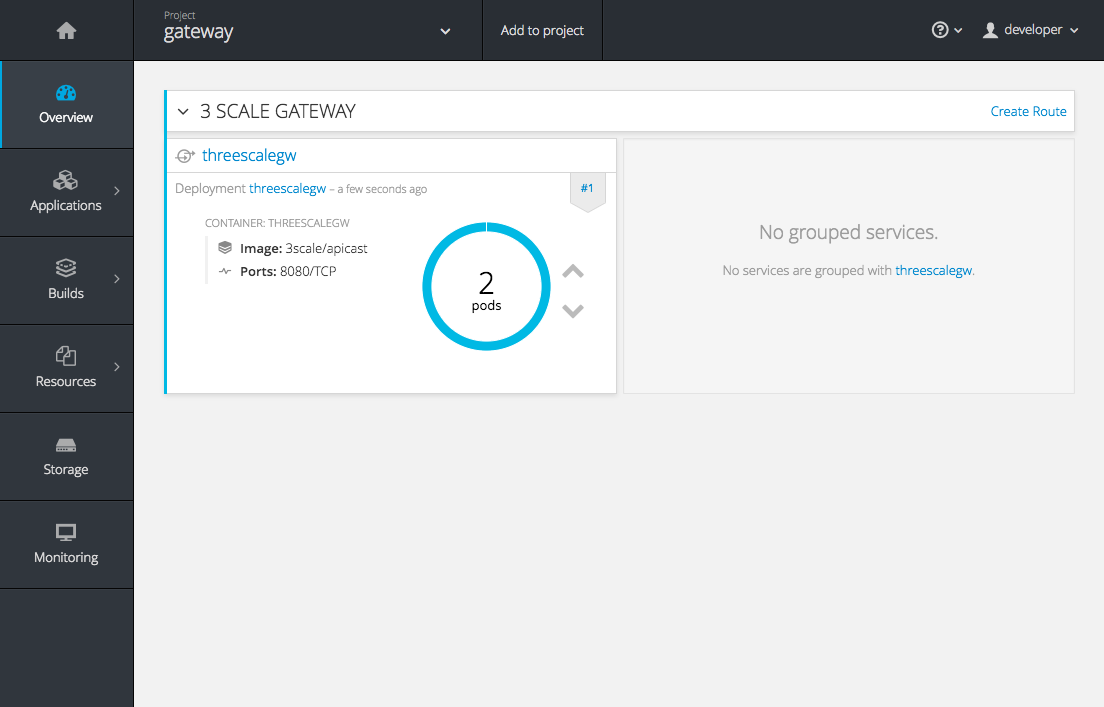
Each APIcast instance, upon starting, downloads the required configuration from 3scale using the settings you provided on the Integration page of your 3scale Admin Portal.
OpenShift will maintain two APIcast instances and monitor the health of both; any unhealthy APIcast instance will automatically be replaced with a new one.
To allow your APIcast instances to receive traffic, you need to create a route. Start by clicking on Create Route.
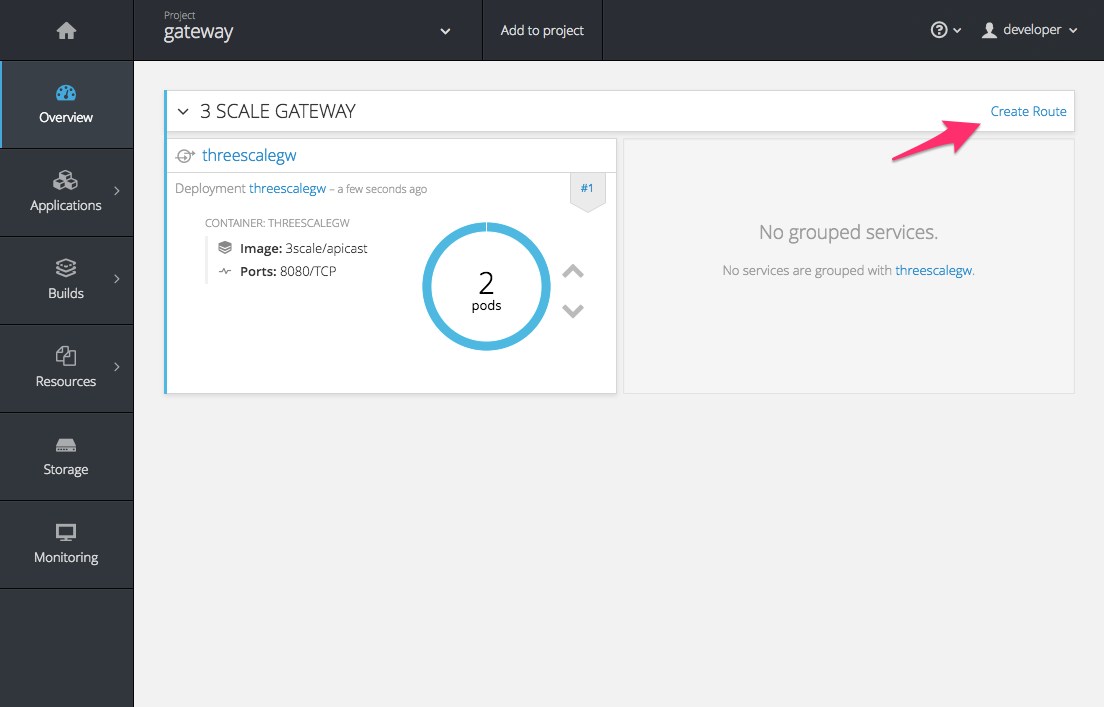
Enter the same host you set in 3scale above in the section Public Base URL (without the http:// and without the port) , e.g.
gateway.openshift.demo, then click the Create button.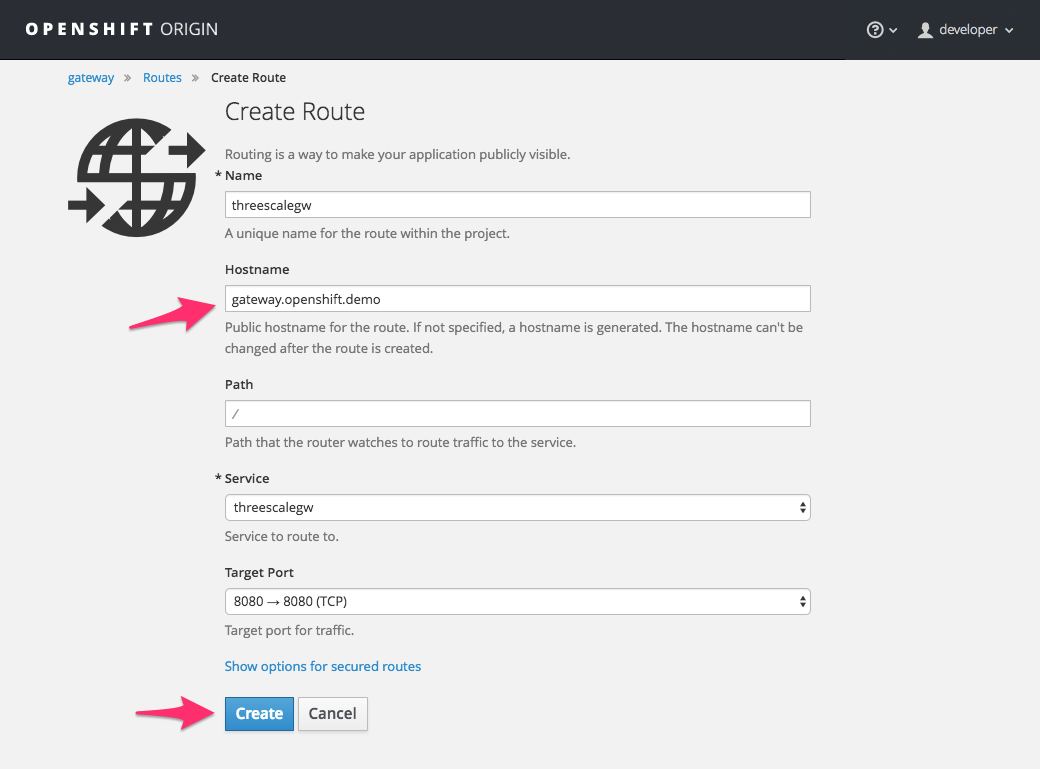
For every 3scale service you define, you must create a new route. Alternatively, you can configure the APIcast wildcard router to avoid creating a new route for every 3scale service you define.
Chapter 4. Advanced APIcast Configuration
This section covers the advanced settings option of 3scale’s API gateway in the staging environment.
4.1. Define a secret token
For security reasons, any request from the 3scale gateway to your API backend contains a header called X-3scale-proxy-secret-token. You can set the value of this header in Authentication Settings on the Integration page.

Setting the secret token acts as a shared secret between the proxy and your API so that you can block all API requests that do not come from the gateway if you do not want them to. This adds an extra layer of security to protect your public endpoint while you are in the process of setting up your traffic management policies with the sandbox gateway.
Your API backend must have a public resolvable domain for the gateway to work, so anyone who knows your API backend can bypass the credentials checking. This should not be a problem because the API gateway in the staging environment is not meant for production use, but it is always better to have a fence available.
4.2. Credentials
The API credentials within 3scale are either user_key or app_id/app_key depending on the authentication mode that you are using. OpenID Connect is valid for the API gateway in the staging environment, but it cannot be tested in the Integration page.
However, you might want to use different credential names in your API. In this case, you need to set custom names for the user_key if you are using the API key mode:

Alternatively, for the app_id and app_key:
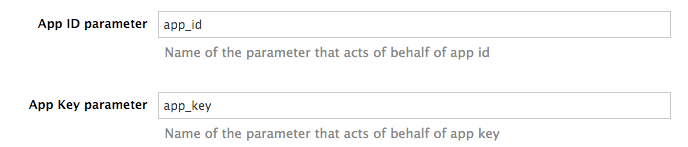
For instance, you could rename app_id to key if that fits your API better. The gateway will take the name key and convert it to app_id before doing the authorization call to the 3scale backend. Note that the new credential name has to be alphanumeric.
You can decide if your API passes credentials in the query string (or body if not a GET) or in the headers.

APIcast normalizes header names when extracting credentials. This means they are case insensitive, and underscores and hyphens are treated equally. For example, if you set the App Key parameter as App_Key, other values such as app-key are also accepted as valid app key headers.
4.3. Error messages
Another important element for a full-fledged configuration is to define your own custom error messages.
It is important to note that the 3scale API gateway in the staging environment will do a pass of any error message generated by your API. However, since the management layer of your API is now carried out by the gateway, there are some errors that your API will never see because some requests will be terminated by the gateway.
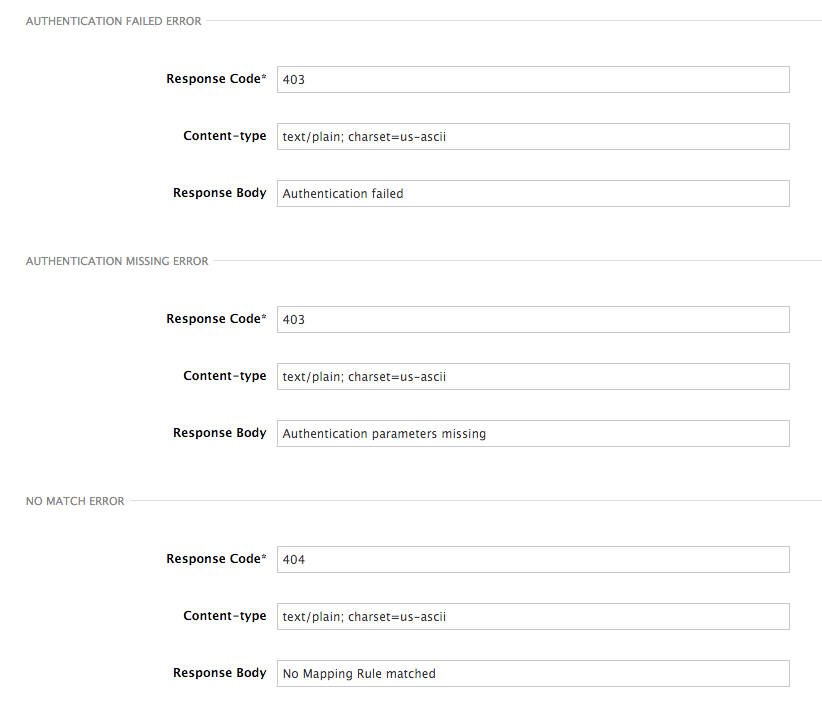
Following are some of the errors:
- Authentication missing: This error is generated whenever an API request does not contain any credentials. It occurs when users do not add their credentials to an API request.
- Authentication failed: This error is generated whenever an API request does not contain the valid credentials. It can be because the credentials are fake or because the application has been temporarily suspended.
- No match: This error means that the request did not match any mapping rule and therefore no metric is updated. This is not necessarily an error, but it means that either the user is trying random paths or that your mapping rules do not cover legitimate cases.
- Retry after: This error is triggered when an API request exceeds the rate limit. A Retry-After header is returned, with a status code of 429 and the number of seconds until the limit expires.
4.4. Configuration History
Every time you click the Update & Test Staging Configuration button, the current configuration is saved in a JSON file. The staging gateway will pull the latest configuration with each new request. For each environment, staging or production, you can see a history of all the previous configuration files.
Note that it is not possible to automatically roll back to previous versions. Instead a history of all your configuration versions with their associated JSON files is provided. Use these files to check what configuration you had deployed at any point of time. If you want to, you can recreate any deployments manually.
4.5. Debugging
Setting up the gateway configuration is easy, but you may still encounter errors. In such cases, the gateway can return useful debug information to track the error.
To get the debugging information from APIcast, you must add the following header to the API request: X-3scale-debug: {SERVICE_TOKEN} with the service token corresponding to the API service that you are reaching to.
When the header is found and the service token is valid, the gateway will add the following information to the response headers:
X-3scale-matched-rules: /v1/word/{word}.json, /v1
X-3scale-credentials: app_key=APP_KEY&app_id=APP_ID
X-3scale-usage: usage%5Bversion_1%5D=1&usage%5Bword%5D=1
X-3scale-matched-rules indicates which mapping rules have been matched for the request in a comma-separated list.
The header X-3scale-credentials returns the credentials that were passed to 3scale backend.
X-3scale-usage indicates the usage that was reported to 3scale backend. usage%5Bversion_1%5D=1&usage%5Bword%5D=1 is a URL-encoded usage[version_1]=1&usage[word]=1 and shows that the API request incremented the methods (metrics) version_1 and word by 1 hit each.
4.6. Path routing
APIcast handles all the API services configured on a 3scale account (or a subset of services, if the APICAST_SERVICES_LIST environment variable is configured). Normally, APIcast routes the API requests to the appropriate API service based on the hostname of the request, by matching it with the Public Base URL. The first service where the match is found is used for the authorization.
The Path routing feature allows using the same Public Base URL on multiple services and routes the requests using the path of the request. To enable the feature, set the APICAST_PATH_ROUTING environment variable to true or 1. When enabled, APIcast will map the incoming requests to the services based on both hostname and path.
This feature can be used if you want to expose multiple backend services hosted on different domains through one gateway using the same Public Base URL. To achieve this you can configure several API services for each API backend (i.e. Private Base URL) and enable the path routing feature.
For example, you have 3 services configured in the following way:
-
Service A Public Base URL:
api.example.comMapping rule:/a -
Service B Public Base URL:
api2.example.comMapping rule:/b -
Service C Public Base URL:
api.example.comMapping rule:/c
If path routing is disabled (APICAST_PATH_ROUTING=false), all calls to api.example.com will try to match Service A. So, the calls api.example.com/c and api.example.com/b will fail with a "No Mapping Rule matched" error.
If path routing is enabled (APICAST_PATH_ROUTING=true), the calls will be matched by both host and path. So:
-
api.example.com/awill be routed to Service A -
api.example.com/cwill be routed to Service C -
api.example.com/bwill fail with "No Mapping Rule matched" error, i.e. it will NOT match Service B, as the Public Base URL does not match.
If path routing is used, you must ensure there is no conflict between the mapping rules in different services that use the same Public Base URL, i.e. each combination of method + path pattern is only used in one service.
Chapter 5. APIcast Policies
APIcast policies are units of functionality that modify how APIcast operates. Policies can be enabled, disabled, and configured to control how they modify APIcast. Use policies to add functionality that is not available in a default APIcast deployment. You can create your own policies, or use standard policies provided by Red Hat 3scale.
The following topics provide information about the standard APIcast policies, creating your own custom APIcast policies, and creating a policy chain.
Control policies for a service with a policy chain. Policy chains do the following:
- specify what policies APIcast uses
- provide configuration information for policies 3scale uses
- specify the order in which 3scale loads policies
Red Hat 3scale provides a method for adding custom policies, but does not support custom policies.
In order to modify APIcast behavior with custom policies, you must do the following:
- Add custom policies to APIcast
- Define a policy chain that configures APIcast policies
- Add the policy chain to APIcast
5.1. APIcast Standard Policies
Red Hat 3scale provides the following standard policies:
- Section 5.1.1, “3scale Auth Caching policy”
- Section 5.1.2, “3scale Batcher Policy”
- Section 5.1.3, “Anonymous Access Policy”
- Section 5.1.4, “CORS Request Handling Policy”
- Section 5.1.5, “Echo Policy”
- Section 5.1.6, “Edge Limiting Policy”
- Section 5.1.7, “Header Modification Policy”
- Section 5.1.9, “Liquid Context Debug Policy”
- Section 5.1.10, “Logging Policy”
- Section 5.1.14, “Prometheus Metrics”
- Section 5.1.11, “OAuth 2.0 Token Introspection Policy”
- Section 5.1.12, “Referrer Policy”
- Section 5.1.13, “RH-SSO/Keycloak Role Check Policy”
- Section 5.1.15, “SOAP Policy”
- Section 5.1.16, “Upstream Policy”
- Section 5.1.17, “URL Rewriting Policy”
- Section 5.1.18, “URL Rewriting with Captures Policy”
You can enable and configure standard policies in the 3scale API Management.
5.1.1. 3scale Auth Caching policy
The 3scale Auth Caching policy caches authentication calls made to APIcast. You can select an operating mode to configure the cache operations.
3scale Auth Caching is available in the following modes:
1. Strict - Cache only authorized calls.
"Strict" mode only caches authorized calls. If a policy is running under the "strict" mode and if a call fails or is denied, the policy invalidates the cache entry. If the backend becomes unreachable, all cached calls are rejected, regardless of their cached status.
2. Resilient – Authorize according to last request when backend is down.
The "Resilient" mode caches both authorized and denied calls. If the policy is running under the "resilient" mode, failed calls do not invalidate an existing cache entry. If the backend becomes unreachable, calls hitting the cache continue to be authorized or denied based on their cached status.
3. Allow - When backend is down, allow everything unless seen before and denied.
The "Allow" mode caches both authorized and denied calls. If the policy is running under the "allow" mode, cached calls continue to be denied or allowed based on the cached status. However, any new calls are cached as authorized.
Operating in the "allow" mode has security implications. Consider these implications and exercise caution when using the "allow" mode.
4. None - Disable caching.
The "None" mode disables caching. This mode is useful if you want the policy to remain active, but do not want to use caching.
Configuration properties
| property | description | values | required? |
|---|---|---|---|
| caching_type |
The | data type: enumerated string [resilient, strict, allow, none] | yes |
Policy object example
{
  "name": "caching",
  "version": "builtin",
  "configuration": {
    "caching_type": "allow"
  }
}
For information on how to configure policies, see the Creating a policy chain section of the documentation.
5.1.2. 3scale Batcher Policy
The 3scale Batcher policy provides an alternative to the standard APIcast authorization mechanism, in which one call to the 3scale backend (Service Management API) is made for each API request APIcast receives.
The 3scale Batcher policy reduces latency and increases throughput by significantly reducing the number of requests to the 3scale backend. In order to achieve this, this policy caches authorization statuses and batches usage reports.
When the 3scale Batcher policy is enabled, APIcast uses the following authorization flow:
On each request, the policy checks whether the credentials are cached:
- If the credentials are cached, the policy uses the cached authorization status instead of calling the 3scale backend.
- If the credentials are not cached, the policy calls the backend and caches the authorization status with a configurable Time to Live (TTL).
- Instead of reporting the usage corresponding to the request to the 3scale backend immediately, the policy accumulates their usage counters to report them to the backend in batches. A separate thread reports the accumulated usage counters to the 3scale backend in a single call, with a configurable frequency.
The 3scale Batcher policy improves the throughput, but with reduced accuracy. The usage limits and the current utilization are stored in 3scale, and APIcast can only get the correct authorization status when making calls to the 3scale backend. When the 3scale Batcher policy is enabled, there is a period of time APIcast is not sending calls to 3scale. During this window, applications making calls might go over the defined limits.
Use this policy for high-load APIs if the throughput is more important than the accuracy of the rate limiting. The 3scale Batcher policy gives better results in terms of accuracy when the reporting frequency and authorization TTL are much less than the rate limiting period. For example, if the limits are per day and the reporting frequency and authorization TTL are configured to be several minutes.
The 3scale Batcher policy supports the following configuration settings:
auths_ttl: Sets the TTL in seconds when the authorization cache expires.When the authorization for the current call is cached, APIcast uses the cached value. After the time set in the
auths_ttlparameter, APIcast removes the cache and calls the 3scale backend to retrieve the authorization status.-
batch_report_seconds: Sets the frequency of batch reports APIcast sends to the 3scale backend. The default value is10seconds.
To use this policy, enable both the 3scale APIcast and 3scale Batcher policy in the policy chain.
5.1.3. Anonymous Access Policy
The Anonymous access policy exposes a service without authentication. It can be useful, for example, for legacy applications that cannot be adapted to send the authentication parameters. The Anonymous policy only supports services with API Key and App Id / App Key authentication options. When the policy is enabled for API requests that do not have any credentials provided, APIcast will authorize the calls using the default credentials configured in the policy. For the API calls to be authorized, the application with the configured credentials must exist and be active.
Using the Application Plans, you can configure the rate limits on the application used for the default credentials.
You need to place the Anonymous Access policy before the APIcast Policy, when using these two policies together in the policy chain.
Following are the required configuration properties for the policy:
auth_type: Select a value from one of the alternatives below and make sure the property corresponds to the authentication option configured for the API:
- app_id_and_app_key: For App ID / App Key authentication option.
- user_key: For API key authentication option.
- app_id (only for app_id_and_app_key auth type): The App Id of the application that will be used for authorization if no credentials are provided with the API call.
- app_key (only for app_id_and_app_key auth type): The App Key of the application that will be used for authorization if no credentials are provided with the API call.
- user_key (only for the user_key auth_type): The API Key of the application that will be used for authorization if no credentials are provided with the API call.
Figure 5.1. Anonymous Access Policy

5.1.4. CORS Request Handling Policy
The Cross Origin Resource Sharing (CORS) request handling policy allows you to control CORS behavior by allowing you to specify:
- Allowed headers
- Allowed methods
- Allow credentials
- Allowed origin headers
The CORS request handling policy will block all unspecified CORS requests.
You need to place the CORS Request Handling policy before the APIcast Policy, when using these two policies together in the policy chain.
Configuration properties
| property | description | values | required? |
|---|---|---|---|
| allow_headers |
The | data type: array of strings, must be a CORS header | no |
| allow_methods |
The | data type: array of enumerated strings [GET, HEAD, POST, PUT, DELETE, PATCH, OPTIONS, TRACE, CONNECT] | no |
| allow_origin |
The | data type: string | no |
| allow_credentials |
The | data type: boolean | no |
Policy object example
{
  "name": "cors",
  "version": "builtin",
  "configuration": {
    "allow_headers": [
      "App-Id", "App-Key",
      "Content-Type", "Accept"
    ],
    "allow_credentials": true,
    "allow_methods": [
      "GET", "POST"
    ],
    "allow_origin": "https://example.com"
  }
}
For information on how to configure policies, refer to the Creating a policy chain section of the documentation.
5.1.5. Echo Policy
The echo policy prints an incoming request back to the client, along with an optional HTTP status code.
Configuration properties
| property | description | values | required? |
|---|---|---|---|
| status | The HTTP status code the echo policy will return to the client | data type: integer | no |
| exit |
Specifies which exit mode the echo policy will use. The | data type: enumerated string [request, set] | yes |
Policy object example
{
  "name": "echo",
  "version": "builtin",
  "configuration": {
    "status": 404,
    "exit": "request"
  }
}
For information on how to configure policies, refer to the Creating a policy chain section of the documentation.
5.1.6. Edge Limiting Policy
The Edge Limiting policy aims to provide flexible rate limiting for the traffic sent to the backend API and can be used with the default 3scale authorization. Some examples of the use cases supported by the policy include:
-
End-user rate limiting: Rate limit by the value of the "sub" (subject) claim of a JWT token passed in the Authorization header of the request (configured as
{{ jwt.sub }}). - Requests Per Second (RPS) rate limiting.
- Global rate limits per service: Apply limits per service rather than per application.
- Concurrent connection limit: Set the number of concurrent connections allowed.
5.1.6.1. Types of limits
The policy supports the following types of limits that are provided by the lua-resty-limit-traffic library:
-
leaky_bucket_limiters: Based on the "leaky_bucket" algorithm that is based on the average number of requests plus a maximum burst size. -
fixed_window_limiters: Based on a fixed window of time (last X seconds). -
connection_limiters: Based on the concurrent number of connections.
You can scope any limit by service or globally.
5.1.6.2. Limit definition
The limits have a key that encodes the entities that are used to define the limit (an IP, a service, an endpoint, an ID, the value for a specific header, etc.). The Key is specified in the key parameter of the limiter.
key is an object that is defined by the following properties:
-
name: It is the name of the key. It must be unique in the scope. scope: It defines the scope of the key. The supported scopes are:-
Per service scope that affects one service (
service). -
Global scope that affects all the services (
global).
-
Per service scope that affects one service (
name_type: It defines how the "name" value will be evaluated:-
As plain text (
plain) -
As Liquid (
liquid)
-
As plain text (
Each limit also has some parameters that vary depending on their types:
leaky_bucket_limiters:rate,burst.-
rate: It defines how many requests can be made per second without a delay. -
burst: It defines the amount of requests per second that can exceed the allowed rate. An artificial delay is introduced for requests above the allowed rate (specified byrate). After exceeding the rate by more requests per second than defined inburst, the requests get rejected.
-
-
fixed_window_limiters:count,window.countdefines how many requests can be made per number of seconds defined inwindow. connection_limiters:conn,burst,delay.-
conn: Defines the maximum number of the concurrent connections allowed. It allows exceeding that number byburstconnections per second. -
delay: It is the number of seconds to delay the connections that exceed the limit.
-
Examples
Allow 10 requests per minute to service_A:
{
  "key": { "name": "service_A" },
  "count": 10,
  "window": 60
}
Allow 100 connections with bursts of 10 with a delay of 1s:
{
  "key": { "name": "service_A" },
  "conn": 100,
  "burst": 10,
  "delay": 1
}
You can define several limits for each service. In case multiple limits are defined, the request can be rejected or delayed if at least one limit is reached.
5.1.6.3. Liquid templating
The Edge Limiting policy allows specifying the limits for the dynamic keys by supporting Liquid variables in the keys. For this, the name_type parameter of the key must be set to "liquid" and the name parameter can then use Liquid variables. Example: {{ remote_addr }} for the client IP address or {{ jwt.sub }} for the "sub" claim of the JWT token.
Example:
{
  "key": { "name": "{{ jwt.sub }}", "name_type": "liquid" },
  "count": 10,
  "window": 60
}
For more information about Liquid support, see Section 6.1, “Using variables and filters in policies”.
5.1.6.4. Applying conditions
The condition defines when the API gateway applies the limiter. You must specify at least one operation in the condition property of each limiter.
condition is defined by the following properties:
-
combine_op. It is the boolean operator applied to the list of operations. The following two values are supported:orandand. operations. It is a list of conditions that need to be evaluated. Each operation is represented by an object with the following properties:-
left: The left part of the operation. -
left_type: How theleftproperty is evaluated (plain or liquid). -
right: The right part of the operation. -
right_type: How therightproperty is evaluated (plain or liquid). -
op: Operator applied between the left and the right parts. The following two values are supported:==(equals) and!=(not equals).
-
Example:
"condition": {
  "combine_op": "and",
  "operations": [
    {
      "op": "==",
      "right": "GET",
      "left_type": "liquid",
      "left": "{{ http_method }}",
      "right_type": "plain"
    }
  ]
}
5.1.6.5. Configuring the store
By default, Edge Limiting policy uses OpenResty shared dictionary for the rate limiting counters. However, an external Redis server can be used instead of the shared dictionary. This can be useful when multiple APIcast instances are used. Redis server can be configured using the redis_url parameter.
5.1.6.6. Error handling
The limiters support the following parameters to configure how the errors are handled:
limits_exceeded_errorallows to configure the error status code and message that will be returned to the client when the configured limits are exceeded. The following parameters should be configured:-
status_code: The status code of the request when the limits are exceeded. Default:429. error_handling: How to handle the error.-
exit: "Respond with an error". -
log: "Let the request go through and only output logs"
-
-
configuration_errorallows to configure the error status code and message that will be returned to the client in case of incorrect configuration. The following parameters should be configured:-
status_code: The status code when there is a configuration issue. Default: 500. error_handling: How to handle the error.-
exit: "Respond with an error". -
log: "Let the request go through and only output logs".
-
-
5.1.7. Header Modification Policy
The Header modification policy allows you to modify the existing headers or define additional headers to add to or remove from an incoming request or response. You can modify both response and request headers.
The Header modification policy supports the following configuration parameters:
-
request: List of operations to apply to the request headers -
response: List of operations to apply to the response headers
Each operation consists of the following parameters:
-
op: Specifies the operation to be applied. Theaddoperation adds a value to an existing header. Thesetoperation creates a header and value, and will overwrite an existing header’s value if one already exists. Thepushoperation creates a header and value, but will not overwrite an existing header’s value if one already exists. Instead,pushwill add the value to the existing header. Thedeleteoperation removes the header. -
header: Specifies the header to be created or modified and can be any string that can be used as a header name (e.g.Custom-Header). -
value_type: Defines how the header value will be evaluated and can either beplainfor plain text orliquidfor evaluation as a Liquid template. For more information, see Section 6.1, “Using variables and filters in policies”. -
value: Specifies the value that will be used for the header. For value type "liquid" the value should be in the format{{ variable_from_context }}. Not needed when deleting.
Policy object example
{
  "name": "headers",
  "version": "builtin",
  "configuration": {
    "response": [
      {
        "op": "add",
        "header": "Custom-Header",
        "value_type": "plain",
        "value": "any-value"
      }
    ],
    "request": [
      {
        "op": "set",
        "header": "Authorization",
        "value_type": "plain",
        "value": "Basic dXNlcm5hbWU6cGFzc3dvcmQ="
      },
      {
        "op": "set",
        "header": "Service-ID",
        "value_type": "liquid",
        "value": "{{service.id}}"
      }
    ]
  }
}
For information on how to configure policies, see the Creating a policy chain section of the documentation.
5.1.8. IP Check Policy
The IP check policy is used to deny or allow requests based on a list of IPs.
Configuration properties
| property | description | data type | required? |
|---|---|---|---|
| check_type |
The |
string, must be either | yes |
| ips |
The | array of strings, must be valid IP addresses | yes |
| error_msg |
The | string | no |
| client_ip_sources |
The |
array of strings, valid options are one or more of | no |
Policy object example
{
  "name": "ip_check",
  "configuration": {
    "ips": [ "3.4.5.6", "1.2.3.0/4" ],
    "check_type": "blacklist",
    "client_ip_sources": ["X-Forwarded-For", "X-Real-IP", "last_caller"],
    "error_msg": "A custom error message"
  }
}
For information on how to configure policies, refer to the Creating a policy chain section of the documentation.
5.1.9. Liquid Context Debug Policy
The Liquid Context Debug policy is meant only for debugging purposes in the development environment and not in production.
This policy responds to the API request with a JSON, containing the objects and values that are available in the context and can be used for evaluating Liquid templates. When combined with the 3scale APIcast or Upstream policy, Liquid Context Debug must be placed before them in the policy chain in order to work correctly. To avoid circular references, the policy only includes duplicated objects once and replaces them with a stub value.
An example of the value returned by APIcast when the policy is enabled:
{
  "jwt": {
    "azp": "972f7b4f",
    "iat": 1537538097,
    ...
    "exp": 1537574096,
    "typ": "Bearer"
  },
  "credentials": {
    "app_id": "972f7b4f"
  },
  "usage": {
    "deltas": {
      "hits": 1
    },
    "metrics": [
      "hits"
    ]
  },
  "service": {
    "id": "2",
    ...
  }
  ...
}
5.1.10. Logging Policy
The logging policy allows enabling or disabling APIcast (NGINX) access logs for each API service individually. By default, this policy is not enabled in policy chains.
This policy only supports the enable_access_logs configuration parameter. To disable access logging for a service, enable the policy, unselect the enable_access_logs parameter and click the Submit button. To enable the access logs, select the enable_access_logs parameter or disable the Logging policy.
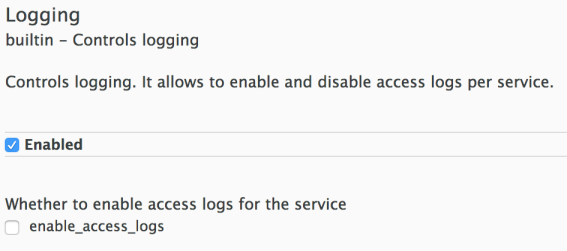
You can combine the Logging policy with the global setting for the location of access logs. Set the APICAST_ACCESS_LOG_FILE environment variable to configure the location of APIcast access logs. By default, this variable is set to /dev/stdout, which is the standard output device. For further details about global APIcast parameters, see Chapter 7, APIcast Environment Variables.
5.1.11. OAuth 2.0 Token Introspection Policy
The OAuth 2.0 Token Introspection policy allows validating the JSON Web Token (JWT) token used for services with the OpenID Connect authentication option using the Token Introspection Endpoint of the token issuer (Red Hat Single Sign-On).
APIcast supports the following authentication types in the auth_type field to determine the Token Introspection Endpoint and the credentials APIcast uses when calling this endpoint:
use_3scale_oidc_issuer_endpointWith this setting, APIcast uses the client credentials (Client ID and Client Secret) and the Token Introspection Endpoint from the OpenID Connect Issuer setting configured on the Service Integration page.
APIcast discovers the Token Introspection endpoint from the
token_introspection_endpointfield the.well-known/openid-configurationendpoint of the OpenID Connect issuer returns.Example 5.1. Authentication type set to
use_3scale_oidc_issuer_endpointThe following is a configuration example if the authentication type is set to
use_3scale_oidc_issuer_endpoint:"policy_chain": [ … { "name": "apicast.policy.token_introspection", "configuration": { "auth_type": "use_3scale_oidc_issuer_endpoint" } } … ],client_id+client_secretThis option enables you to specify a different Token Introspection Endpoint, as well as the Client ID and Client Secret APIcast uses to request token information.
When using this option, set the following configuration parameters:
-
client_id: Sets the Client ID for the Token Introspection Endpoint. -
client_secret: Sets the Client Secret for the Token Introspection Endpoint. introspection_url: Sets the Introspection Endpoint URL.Example 5.2. Authentication type set to
client_id+client_secretThe following is a configuration example if the authentication type is set to
client_id+client_secret:"policy_chain": [ … { "name": "apicast.policy.token_introspection", "configuration": { "auth_type": "client_id+client_secret", "client_id": "myclient", "client_secret": "mysecret", "introspection_url": "http://red_hat_single_sign-on/token/introspection" } } … ],
-
Regardless of the setting in the auth_type field, APIcast uses Basic Authentication to authorize the Token Introspection call (Authorization: Basic <token> header, where <token> is Base64-encoded <client_id>:<client_secret> setting).
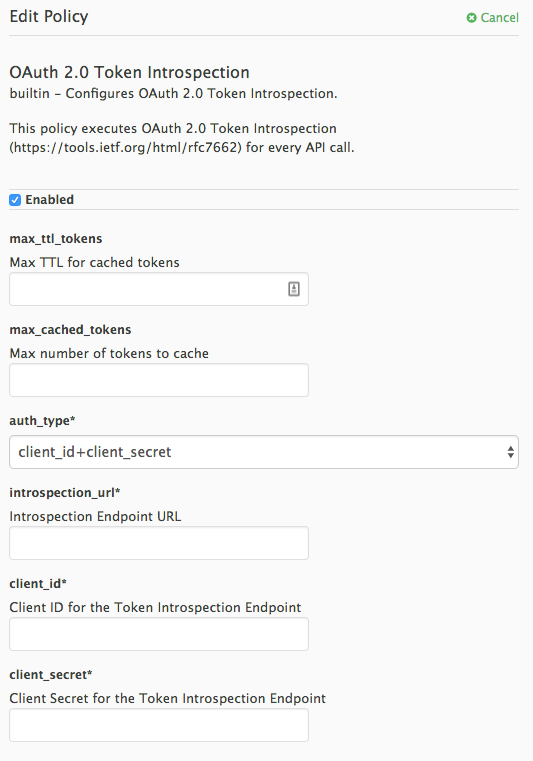
The response of the Token Introspection Endpoint contains the active attribute. APIcast checks the value of this attribute. Depending on the value of the attribute, APIcast authorizes or rejects the call:
-
true: The call is authorized -
false: The call is rejected with theAuthentication Failederror
The policy allows enabling caching of the tokens to avoid calling the Token Introspection Endpoint on every call for the same JWT token. To enable token caching for the Token Introspection Policy, set the max_cached_tokens field to a value from 0, which disables the feature, and 10000. Additionally, you can set a Time to Live (TTL) value from 1 to 3600 seconds for tokens in the max_ttl_tokens field.
5.1.12. Referrer Policy
The Referrer policy enables the Referrer Filtering feature. When the policy is enabled in the service policy chain, APIcast sends the value of the Referer policy of the upcoming request to the Service Management API (AuthRep call) in the referrer parameter. For more information on how Referrer Filtering works, see the Referrer Filtering section in Authentication Patterns.
5.1.13. RH-SSO/Keycloak Role Check Policy
This policy adds role check when used with the OpenID Connect authentication option. This policy verifies realm roles and client roles in the access token issued by Red Hat Single Sign-On. The realm roles are specified when you want to add role check to every client’s resources or 3Scale.
Following are the two types of role checks that the type property specifies in the policy configuration:
- whitelist (default): When whitelist is used, APIcast will check if the specified scopes are present in the JWT token and will reject the call if the JWT doesn’t have the scopes.
- blacklist: When blacklist is used, APIcast will reject the calls if the JWT token contains the blacklisted scopes.
It is not possible to configure both checks – blacklist and whitelist in the same policy, but you can add more than one instances of the RH-SSO/Keycloak role check policy to the APIcast policy chain.
You can configure a list of scopes via the scopes property of the policy configuration.
Each scope object has the following properties:
- resource: Resource (endpoint) controlled by the role. This is the same format as Mapping Rules. The pattern matches from the beginning of the string and to make an exact match you must append $ at the end.
resource_type: This defines how the resource value is evaluated.
- As plain text (plain): Evaluates the resource value as plain text. Example: /api/v1/products$.
- As Liquid text (liquid): Allows using Liquid in the resource value. Example: /resource_{{ jwt.aud }} manages access to the resource including the Client ID (contained in the JWT aud claim).
realm_roles: Use it to check the realm role (see the Realm Roles in Red Hat Single Sign-On documentation).
The realm roles are present in the JWT issued by Red Hat Single Sign-On.
  "realm_access": {
    "roles": [
      "<realm_role_A>", "<realm_role_B>"
    ]
  }
The real roles must be specified in the policy.
"realm_roles": [
  { "name": "<realm_role_A>" }, { "name": "<realm_role_B>" }
]
Following are the available properties of each object in the realm_roles array:
- name: Specifies the name of the role.
- name_type: Defines how the name must be evaluated; it can be plain or liquid (works the same way as for the resource_type).
client_roles: Use client_roles to check for the particular access roles in the client namespace (see the Client Roles in Red Hat Single Sign-On documentation).
The client roles are present in the JWT under the resource_access claim.
  "resource_access": {
    "<client_A>": {
      "roles": [
        "<client_role_A>", "<client_role_B>"
      ]
    },
    "<client_B>": {
      "roles": [
        "<client_role_A>", "<client_role_B>"
      ]
    }
  }
Specify the client roles in the policy.
"client_roles": [
  { "name": "<client_role_A>", "client": "<client_A>" },
  { "name": "<client_role_B>", "client": "<client_A>" },
  { "name": "<client_role_A>", "client": "<client_B>" },
  { "name": "<client_role_B>", "client": "<client_B>" }
]
Following are the available properties of each object in the client_roles array:
- name: Specifies the name of the role.
- name_type: Defines how the name value must be evaluated; it can be plain or liquid (works the same way as for the resource_type).
- client: Specifies the client of the role. When it is not defined, this policy uses the aud claim as the client.
- client_type: Defines how the client value must be evaluated; it can be plain or liquid (works the same way as for the resource_type).
5.1.14. Prometheus Metrics
Prometheus is a stand-alone, open source systems monitoring and alerting toolkit.
For this release of Red Hat 3scale, Prometheus installation and configuration are not supported. Optionally, you can use the community version of Prometheus to visualize metrics and alerts for APIcast-managed API services.
Prometheus metrics availability
APIcast integration with Prometheus is available for the following deployment options:
- Self-managed APIcast (both with hosted or on-premises API manager)
- Built-in APIcast on-premise
APIcast integration with Prometheus is not available in hosted API manager and hosted APIcast.
Prometheus metrics list
The following metrics are always available:
| Metric | Description | Type | Labels |
|---|---|---|---|
| nginx_http_connections | Number of HTTP connections | gauge | state(accepted,active,handled,reading,total,waiting,writing) |
| nginx_error_log | APIcast errors | counter | level(debug,info,notice,warn,error,crit,alert,emerg) |
| openresty_shdict_capacity | Capacity of the dictionaries shared between workers | gauge | dict(one for every dictionary) |
| openresty_shdict_free_space | Free space of the dictionaries shared between workers | gauge | dict(one for every dictionary) |
| nginx_metric_errors_total | Number of errors of the Lua library that manages the metrics | counter | - |
| total_response_time_seconds | Time needed to sent a response to the client (in seconds) | histogram | - |
| upstream_response_time_seconds | Response times from upstream servers (in seconds) | histogram | - |
| upstream_status | HTTP status from upstream servers | counter | status |
| threescale_backend_calls | Authorize and report requests to the 3scale backend (Apisonator) | counter | endpoint(authrep, auth, report), status(2xx, 4xx, 5xx) |
The following metrics are only available when using the 3scale Batcher policy:
| Metric | Description | Type | Labels |
|---|---|---|---|
| batching_policy_auths_cache_hits | Hits in the auths cache of the 3scale batching policy | counter | - |
| batching_policy_auths_cache_misses | Misses in the auths cache of the 3scale batching policy | counter | - |
Metrics with no value
If a metric has no value, the metric is hidden. For example, if nginx_error_log has no errors to report, the nginx_error_log metric is not displayed. It will only be visible once it has a value.
5.1.15. SOAP Policy
The SOAP policy matches SOAP action URIs provided in the SOAPAction or Content-Type header of an HTTP request with mapping rules specified in the policy.
Configuration properties
| property | description | values | required? |
|---|---|---|---|
| pattern |
The | data type: string | yes |
| metric_system_name |
The | data type: string, must be a valid metric | yes |
Policy object example
{
  "name": "soap",
  "version": "builtin",
  "configuration": {
    "mapping_rules": [
      {
        "pattern": "http://example.com/soap#request",
        "metric_system_name": "soap",
        "delta": 1
      }
    ]
  }
}
For information on how to configure policies, refer to the Creating a policy chain section of the documentation.
5.1.16. Upstream Policy
The Upstream policy allows you to parse the Host request header using regular expressions and replace the upstream URL defined in the Private Base URL with a different URL.
For Example:
A policy with a regex /foo, and URL field newexample.com would replace the URL https://www.example.com/foo/123/ with newexample.com
Policy chain reference:
| property | description | values | required? |
|---|---|---|---|
| regex |
The | data type: string, Must be a valid regular expression syntax | yes |
| url |
Using the | data type: string, ensure this is a valid URL | yes |
Policy object example
{
  "name": "upstream",
  "version": "builtin",
  "configuration": {
    "rules": [
      {
        "regex": "^/v1/.*",
        "url": "https://api-v1.example.com",

      }
    ]
  }
}
For information on how to configure policies, refer to the Creating a policy chain section of the documentation.
5.1.17. URL Rewriting Policy
The URL rewriting policy allows you to modify the path of a request and the query string.
When combined with the 3scale APIcast policy, if the URL rewriting policy is placed before the 3scale APIcast policy in the policy chain, the APIcast mapping rules will apply to the modified path. If the URL rewriting policy is placed after APIcast in the policy chain, then the mapping rules will apply to the original path.
The policy supports the following two sets of operations:
-
commands: List of commands to be applied to rewrite the path of the request. -
query_args_commands: List of commands to be applied to rewrite the query string of the request.
5.1.17.1. Commands for rewriting the path
Following are the configuration parameters that each command in the commands list consists of:
-
op: Operation to be applied. The options available are:subandgsub. Thesuboperation replaces only the first occurrence of a match with your specified regular expression. Thegsuboperation replaces all occurrences of a match with your specified regular expression. See the documentation for the sub and gsub operations. -
regex: Perl-compatible regular expression to be matched. -
replace: Replacement string that is used in the event of a match. -
options(optional): Options that define how the regex matching is performed. For information on available options, see the ngx.re.match section of the OpenResty Lua module project documentation. -
break(optional): When set to true (checkbox enabled), if the command rewrote the URL, it will be the last one applied (all posterior commands in the list will be discarded).
5.1.17.2. Commands for rewriting the query string
Following are configuration parameters that each command in the query_args_commands list consists of:
op: Operation to be applied to the query arguments. The following options are available:-
add: Add a value to an existing argument. -
set: Create the arg when not set and replace its value when set. -
push: Create the arg when not set and add the value when set. -
delete: Delete an arg.
-
-
arg: The query argument name that the operation is applied on. -
value: Specifies the value that is used for the query argument. For value type "liquid" the value should be in the format{{ variable_from_context }}. For thedeleteoperation the value is not taken into account. -
value_type(optional): Defines how the query argument value is evaluated and can either beplainfor plain text orliquidfor evaluation as a Liquid template. For more information, see Section 6.1, “Using variables and filters in policies”. If not specified, the type "plain" is used by default.
Example
The URL Rewriting policy is configured as follows:
{
  "name": "url_rewriting",
  "version": "builtin",
  "configuration": {
    "query_args_commands": [
      {
        "op": "add",
        "arg": "addarg",
        "value_type": "plain",
        "value": "addvalue"
      },
      {
        "op": "delete",
        "arg": "user_key",
        "value_type": "plain",
        "value": "any"
      },
      {
        "op": "push",
        "arg": "pusharg",
        "value_type": "plain",
        "value": "pushvalue"
      },
      {
        "op": "set",
        "arg": "setarg",
        "value_type": "plain",
        "value": "setvalue"
      }
    ],
    "commands": [
      {
        "op": "sub",
        "regex": "^/api/v\\d+/",
        "replace": "/internal/",
        "options": "i"
      }
    ]
  }
The original request URI that is sent to the APIcast:
https://api.example.com/api/v1/products/123/details?user_key=abc123secret&pusharg=first&setarg=original
The URI that APIcast sends to the API backend after applying the URL rewriting:
https://api-backend.example.com/internal/products/123/details?pusharg=first&pusharg=pushvalue&setarg=setvalue
The following transformations are applied:
-
The substring
/api/v1/matches the only path rewriting command and it is replaced by/internal/. -
user_keyquery argument is deleted. -
The value
pushvalueis added as an additional value to thepushargquery argument. -
The value
originalof the query argumentsetargis replaced with the configured valuesetvalue. -
The command
addwas not applied because the query argumentaddargis not present in the original URL.
For information on how to configure policies, see the Creating a policy chain section of the documentation.
5.1.18. URL Rewriting with Captures Policy
The URL Rewriting with Captures policy is an alternative to the Section 5.1.17, “URL Rewriting Policy” policy and allows rewriting the URL of the API request before passing it to the API backend.
The URL Rewriting with Captures policy captures arguments in the URL and uses their values in the rewritten URL.
The policy supports the transformations configuration parameter. It is a list of objects that describe which transformations are applied to the request URL. Each tranformation object consist of two properties:
-
match_rule: This rule is matched to the incoming request URL. It can contain named arguments in the{nameOfArgument}format; these arguments can be used in the rewritten URL. The URL is compared tomatch_ruleas a regular expression. The value that matches named arguments must contain only the following characters (in PCRE regex notation):[\w-.~%!$&'()*,;=@:]. Other regex tokens can be used in thematch_ruleexpression, such as^for the beginning of the string and$for the end of the string. -
template: The template for the URL that the original URL is rewritten with; it can use named arguments from thematch_rule.
The query parameters of the original URL are merged with the query parameters specified in the template.
Example
The URL Rewriting with Captures is configured as follows:
{
  "name": "rewrite_url_captures",
  "version": "builtin",
  "configuration": {
    "transformations": [
      {
        "match_rule": "/api/v1/products/{productId}/details",
        "template": "/internal/products/details?id={productId}&extraparam=anyvalue"
      }
    ]
  }
}
The original request URI that is sent to the APIcast:
https://api.example.com/api/v1/products/123/details?user_key=abc123secret
The URI that APIcast sends to the API backend after applying the URL rewriting:
https://api-backend.example.com/internal/products/details?user_key=abc123secret&extraparam=anyvalue&id=123
5.2. Enabling a standard policy
Perform the following steps to enable policies in the Admin Portal:
- Log in to 3scale.
- Navigate to the API service.
-
From [your_API_name] > Integration > Configuration, select
edit APIcast configuration. -
Under the POLICIES section, click
add policy. - Select the policy you want to add and fill out the required fields.
- Click the Update and test in Staging Environment button to save the policy chain.
5.3. Creating custom APIcast policies
You can create custom APIcast policies entirely or modify the standard policies.
In order to create custom policies, you must understand the following:
- Policies are written in Lua.
- Policies must adhere to and be placed in the proper file directory.
- Policy behavior is affected by how they are placed in a policy chain.
- The interface to add custom policies is fully supported, but not the custom policies themselves.
5.4. Adding custom policies to APIcast
If you have created custom policies, you must add them to APIcast. How you do this depends on where APIcast is deployed.
You can add custom policies to the following APIcast self-managed deployments:
- APIcast built-in gateways as part of a 3scale on-premises deployment on OpenShift
- APIcast on OpenShift and the Docker containerized environment
You cannot add custom policies to APIcast hosted.
Never make policy changes directly onto a production gateway. Always test your changes.
5.4.1. Adding custom policies to APIcast built-in
To add custom APIcast policies to an On-Premises deployment, you must build an OpenShift image containing your custom policies and add it to your deployment. Red Hat 3scale provides a sample repository you can use as a framework to create and add custom policies to an on-premises deployment.
This sample repository contains the correct directory structure for a custom policy, as well as a template which creates an image stream and BuildConfigs for building a new APIcast OpenShift image containing any custom policies you create.
When you build apicast-custom-policies, the build process "pushes" a new image to the amp-apicast:latest tag. When there is an image change on this image stream tag (:latest), both the apicast-staging and the apicast-production tags, by default, are configured to automatically start new deployment. To avoid any disruptions to your production service (or staging, if you prefer) it is recommended to disable automatic deployment ("Automatically start a new deployment when the image changes" checkbox), or configure a different image stream tag for production (e.g. amp-apicast:production).
Follow these steps to add a custom policy to an on-premises deployment:
- Fork the https://github.com/3scale/apicast-example-policy [public repository with the policy example] or create a private repository with its content. You need to have the code of your custom policy available in a Git repository for OpenShift to build the image. Note that in order to use a private Git repository, you must set up the secrets in OpenShift.
- Clone the repository locally, add the implementation for your policy, and push the changes to your Git repository.
Update the
openshift.ymltemplate. Specifically, change the following parameters:-
spec.source.git.uri: https://github.com/3scale/apicast-example-policy.gitin the policy BuildConfig – change it to your Git repository location. -
spec.source.images[0].paths.sourcePath: /opt/app-root/policies/examplein the custom policies BuildConfig - changeexampleto the name of the custom policy that you have added under thepoliciesdirectory in the repository. -
Optionally, update the OpenShift object names and image tags. However, you must ensure that the changes are coherent (example:
apicast-example-policyBuildConfig builds and pushes theapicast-policy:exampleimage that is then used as a source by theapicast-custom-policiesBuildConfig. So, the tag should be the same).
-
Create the OpenShift objects by running the command:
oc new-app -f openshift.yml --param AMP_RELEASE=2.3.0
In case the builds do not start automatically, run the following two commands. In case you changed it, replace
apicast-example-policywith your own BuildConfig name (e.g.apicast-<name>-policy). Wait for the first command to complete before you execute the second one.oc start-build apicast-example-policy oc start-build apicast-custom-policies
If the build-in APIcast images have a trigger on them tracking the changes in the amp-apicast:latest image stream, the new deployment for APIcast will start. After apicast-staging has restarted, go to the Integration page on the admin portal, and click the Add Policy button to see your custom policy listed. After selecting and configuring it, click Update & test in Staging Environment to make your custom policy work in the staging APIcast.
5.4.2. Adding custom policies to APIcast on another OpenShift Container Platform
You can add custom policies to APIcast on OpenShift Container Platform (OCP) by fetching APIcast images containing your custom policies from the the Integrated OpenShift Container Registry.
Add custom policies to APIcast on another OpenShift Container Platform
- Add policies to APIcast built-in
- If you are not deploying your APIcast gateway on your primary OpenShift cluster, establish access to the internal registry on your primary OpenShift cluster.
- Download the 3scale 2.4 APIcast OpenShift template.
To modify the template, replace the default
imagedirectory with the full image name in your internal registry.image: <registry>/<project>/amp-apicast:latest
Deploy APIcast using the OpenShift template, specifying your customized image:
oc new-app -f customizedApicast.yml
5.5. Creating a policy chain in the AMP
Create a policy chain in the AMP as part of your APIcast gateway configuration. Follow these steps to modify the policy chain in the UI:
- Log in to your AMP
Navigate to the API service
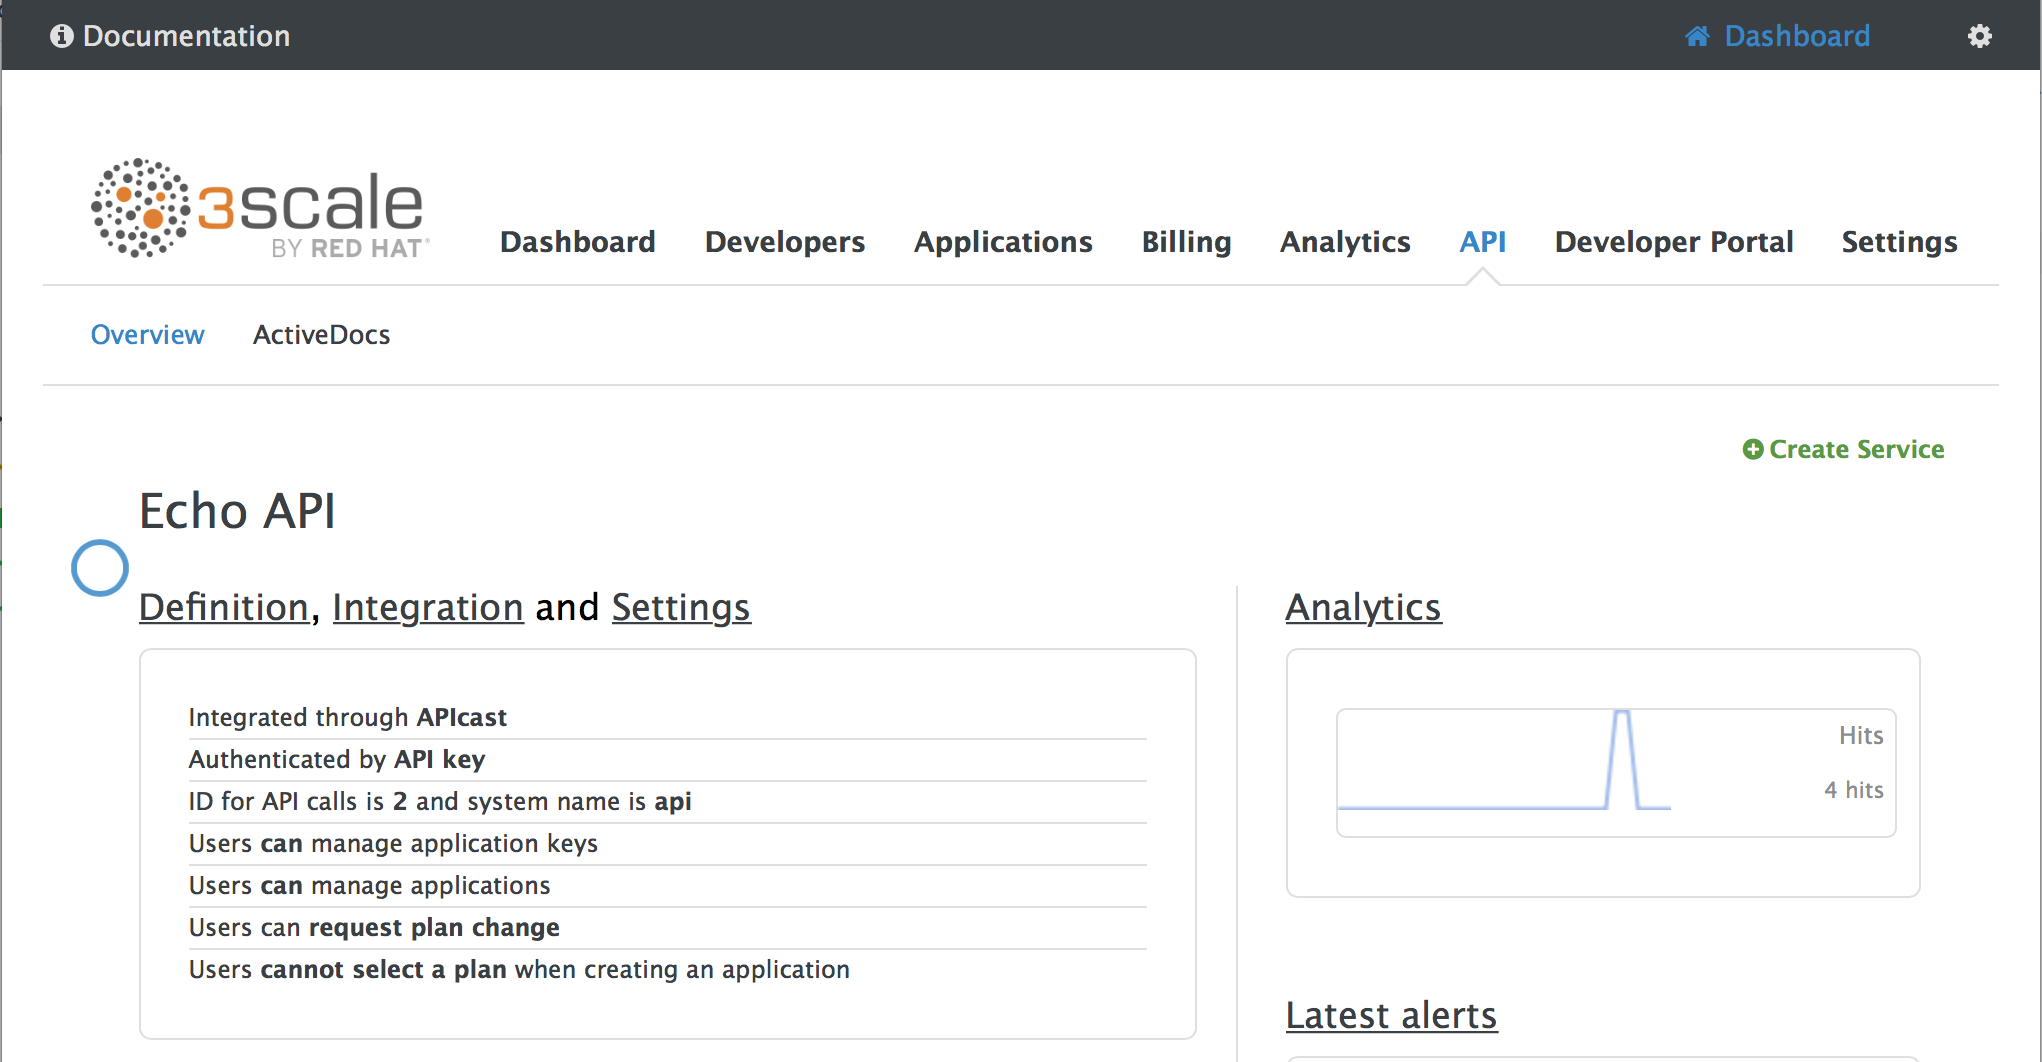
From [your_API_name] > Integration > Configuration, select
edit APIcast configuration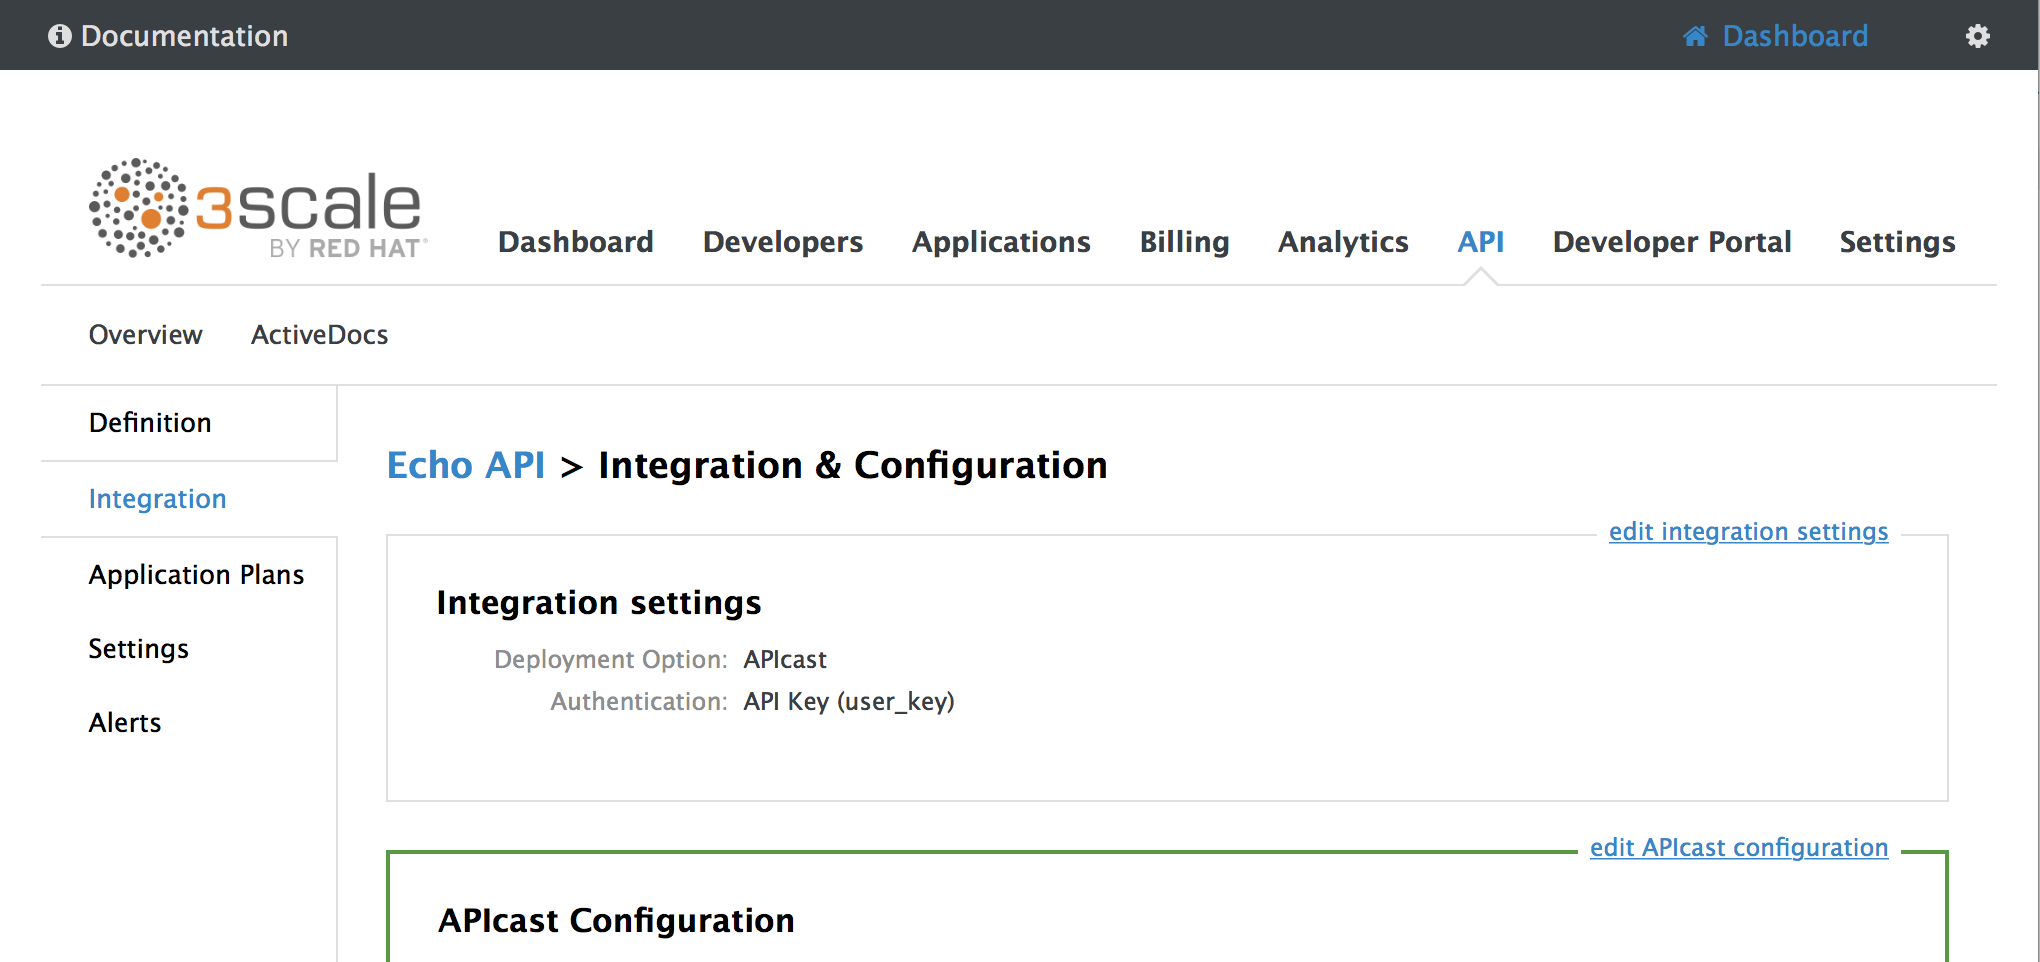
Under the POLICIES section, use the arrow icons to reorder policies in the policy chain. Always place the APIcast policy last in the policy chain.
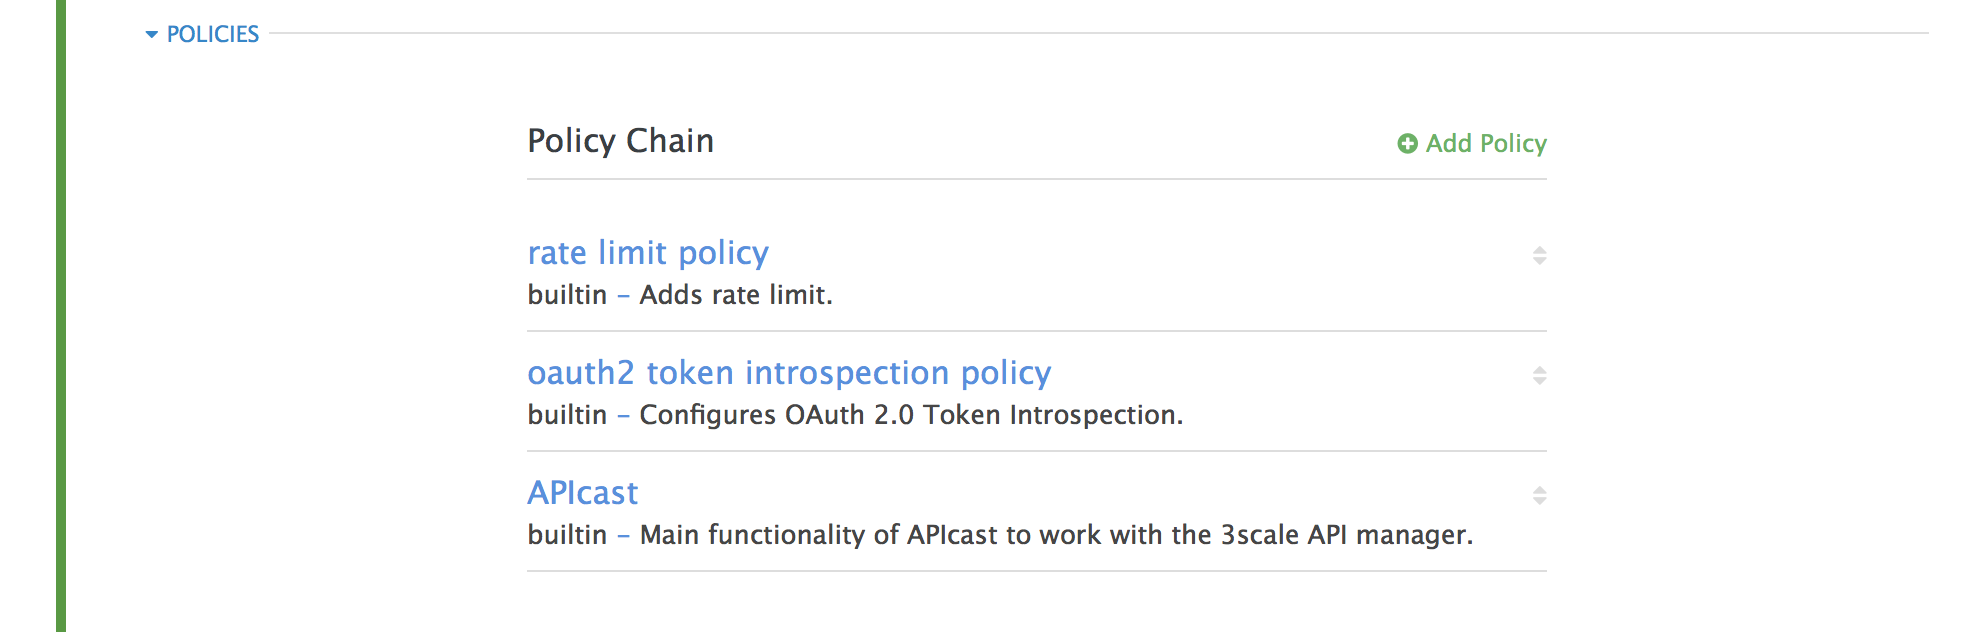
- Click the Update and test in Staging Environment button to save the policy chain
5.6. Creating a policy chain JSON configuration file
If you are using a native deployment of APIcast, you can create a JSON configuration file to control your policy chain outside of the AMP.
A JSON configuration file policy chain contains a JSON array composed of the following information:
-
the
servicesobject with anidvalue that specifies which service the policy chain applies to by number -
the
proxyobject, which contains the policy_chain and subsequent objects -
the
policy_chainobject, which contains the values that define the policy chain -
individual
policyobjects which specify bothnameandconfigurationdata necessary to identify the policy and configure policy behavior
The following is an example policy chain for a custom policy sample_policy_1 and the API introspection standard policy token_introspection:
{
  "services":[
    {
      "id":1,
      "proxy":{
        "policy_chain":[
          {
            "name":"sample_policy_1", "version": "1.0",
            "configuration":{
              "sample_config_param_1":["value_1"],
              "sample_config_param_2":["value_2"]
            }
          },
          {
            "name": "token_introspection", "version": "builtin",
            "configuration": {
              introspection_url:["https://tokenauthorityexample.com"],
              client_id:["exampleName"],
              client_secret:["secretexamplekey123"]
          },
          {
             "name": "apicast", "version": "builtin",
          }
        ]
      }
    }
  ]
}
All policy chains must include the built-in policy apicast. Where you place APIcast in the policy chain will affect policy behavior.
Chapter 6. Integrating a policy chain with APIcast native deployments
For native APIcast deployments, you can integrate a custom policy chain by specifying a configuration file using the THREESCALE_CONFIG_FILE environment variable. The following example specifies the config file example.json:
THREESCALE_CONFIG_FILE=example.json bin/apicast
6.1. Using variables and filters in policies
Some Section 5.1, “APIcast Standard Policies” support Liquid templating that allows using not only plain string values, but also variables that are present in the context of the request.
To use a context variable, wrap its name in {{ and }}, example: {{ uri }}. If the variable is an object, you can also access its attributes, for example: {{ somevar.attr }}.
Following are the standard variables that are available in all the policies:
-
uri: The path of the request without query parameters (the value of the embedded NGINX variable$uri). -
host: The host of the request (the value of the embedded NGINX variable$host). -
remote_addr: The IP address of the client (the value of the embedded NGINX variable$remote_addr). -
headers: The object containing the request headers. Use{{headers['Some-Header']}}to get a specific header value. -
http_method: The request method: GET, POST, etc.
The variables are available in the context of the request. Policies can add extra variables to the context. These variables can be used by the same or other policies in the policy chain, provided that the phase where they are used is executed after the phase where the variable was added. It can also be the same phase if the variable is used in the policy that appears after the policy in which the variable was added.
Following are some examples of variables that the standard 3scale APIcast policy adds to the context:
-
jwt: A parsed JSON payload of the JWT token (for OpenID Connect authentication). -
credentials: An object that holds the application credentials. Example:"app_id": "972f7b4f","user_key": "13b668c4d1e10eaebaa5144b4749713f". -
service: An object that holds the configuration for the service that the current request is handled by. Example: the service ID would be available as {{ service.id }}.
For a full list of objects and values available in the context, see the Section 5.1.9, “Liquid Context Debug Policy”).
The variables are used with the help of Liquid templates. Example: {{ remote_addr }}, {{ headers['Some-Header'] }}, {{ jwt.aud }}. The policies that support variables for the values have a special parameter, usually with the _type suffix (example: value_type, name_type, etc.) that accepts two values: "plain" for plain text and "liquid" for liquid template.
APIcast also supports Liquid filters that can be applied to the variables' values. The filters apply NGINX functions to the value of the Liquid variable.
The filters are placed within the variable output tag {{ }}, following the name of the variable or the literal value by a pipe character | and the name of the filter. Examples: {{ 'username:password' | encode_base64 }}, {{ uri | escape_uri }}.
Some filters do not require parameters, so you can use an empty string instead of the variable. Example: {{ '' | utctime }} will return the current time in UTC time zone.
Filters can be chained as follows: {{ variable | function1 | function2 }}. Example: {{ '' | utctime | escape_uri }}.
Following is the list of the available functions:
Chapter 7. APIcast Environment Variables
APIcast environment variables allow you to modify behavior for APIcast. The following values are supported environment variables:
- Unsupported or deprecated environment variables are not listed
- Some environment variable functionality may have moved to APIcast policies
APICAST_BACKEND_CACHE_HANDLER
Values: strict | resilient
Default: strict
Deprecated: Use the Caching policy instead.
Defines how the authorization cache behaves when backend is unavailable. Strict will remove cached application when backend is unavailable. Resilient will do so only on getting authorization denied from backend.
APICAST_CONFIGURATION_CACHE
Values: a number
Default: 0
Specifies the interval (in seconds) that the configuration will be stored for. The value should be set to 0 (not compatible with boot value of APICAST_CONFIGURATION_LOADER) or more than 60. For example, if APICAST_CONFIGURATION_CACHE is set to 120, the gateway will reload the configuration from the API manager every 2 minutes (120 seconds). A value < 0 disables reloading.
APICAST_CONFIGURATION_LOADER
Values: boot | lazy
Default: lazy
Defines how to load the configuration. Boot will request the configuration to the API manager when the gateway starts. Lazy will load it on demand for each incoming request (to guarantee a complete refresh on each request APICAST_CONFIGURATION_CACHE should be 0).
APICAST_CUSTOM_CONFIG
Deprecated: Use policies instead.
Defines the name of the Lua module that implements custom logic overriding the existing APIcast logic.
APICAST_ENVIRONMENT
Default:
Value: string[:]
Example: production:cloud-hosted
Double colon (:) separated list of environments (or paths) APIcast should load. It can be used instead of -e or ---environment parameter on the CLI and for example stored in the container image as default environment. Any value passed on the CLI overrides this variable.
APICAST_LOG_FILE
Default: stderr
Defines the file that will store the OpenResty error log. It is used by bin/apicast in the error_log directive. Refer to NGINX documentation for more information. The file path can be either absolute, or relative to the prefix directory (apicast by default).
APICAST_LOG_LEVEL
Values: debug | info | notice | warn | error | crit | alert | emerg
Default: warn
Specifies the log level for the OpenResty logs.
APICAST_ACCESS_LOG_FILE
Default: stdout
Defines the file that will store the access logs.
APICAST_OIDC_LOG_LEVEL
Values: debug | info | notice | warn | error | crit | alert | emerg
Default: err
Allows to set the log level for the logs related to OpenID Connect integration.
APICAST_MANAGEMENT_API
Values:
-
disabled: completely disabled, just listens on the port -
status: only the/status/endpoints enabled for health checks -
debug: full API is open
The Management API is powerful and can control the APIcast configuration. You should enable the debug level only for debugging.
APICAST_MODULE
Default: apicast
Deprecated: Use policies instead.
Specifies the name of the main Lua module that implements the API gateway logic. Custom modules can override the functionality of the default apicast.lua module. See an example of how to use modules.
APICAST_PATH_ROUTING
Values:
-
trueor1for true -
false,0or empty for false
When this parameter is set to true, the gateway will use path-based routing in addition to the default host-based routing. The API request will be routed to the first service that has a matching mapping rule, from the list of services for which the value of the Host header of the request matches the Public Base URL.
APICAST_POLICY_LOAD_PATH
Default: APICAST_DIR/policies
Value: string[:]
Example: ~/apicast/policies:$PWD/policies
Double colon (:) separated list of paths where APIcast should look for policies. It can be used to first load policies from a development directory or to load examples.
APICAST_PROXY_HTTPS_CERTIFICATE_KEY
Default:
Value: string
Example: /home/apicast/my_certificate.key
The path to the key of the client SSL certificate.
APICAST_PROXY_HTTPS_CERTIFICATE
Default:
Value: string
Example: /home/apicast/my_certificate.crt
The path to the client SSL certificate that APIcast will use when connecting with the upstream. Notice that this certificate will be used for all the services in the configuration.
APICAST_PROXY_HTTPS_PASSWORD_FILE
Default:
Value: string
Example: /home/apicast/passwords.txt
Path to a file with passphrases for the SSL cert keys specified with APICAST_PROXY_HTTPS_CERTIFICATE_KEY.
APICAST_PROXY_HTTPS_SESSION_REUSE
Default: on
Values:
-
on: reuses SSL sessions. -
off: does not reuse SSL sessions.
APICAST_REPORTING_THREADS
Default: 0
Value: integer >= 0
Experimental: Under extreme load might have unpredictable performance and lose reports.
Value greater than 0 is going to enable out-of-band reporting to backend. This is a new experimental feature for increasing performance. Client won’t see the backend latency and everything will be processed asynchronously. This value determines how many asynchronous reports can be running simultaneously before the client is throttled by adding latency.
APICAST_RESPONSE_CODES
Values:
-
trueor1for true -
false,0or empty for false
Default: <empty> (false)
When set to true, APIcast will log the response code of the response returned by the API backend in 3scale. In some plans this information can later be consulted from the 3scale admin portal. Find more information about the Response Codes feature on the 3scale support site.
APICAST_SERVICES_LIST
Value: a comma-separated list of service IDs
Used to filter the services configured in the 3scale API Manager, and only use the configuration for specific services in the gateway, discarding those services' IDs that are not specified in the list. Service IDs can be found on the Dashboard > APIs page, tagged as ID for API calls.
APICAST_SERVICE_${ID}_CONFIGURATION_VERSION
Replace ${ID} with the actual Service ID. The value should be the configuration version you can see in the configuration history on the Admin Portal. Setting it to a particular version will prevent it from auto-updating and will always use that version.
APICAST_WORKERS
Default: auto
Values: number | auto
This is the value that will be used in the nginx worker_processes directive. By default, APIcast uses auto, except for the development environment where 1 is used.
BACKEND_ENDPOINT_OVERRIDE
URI that overrides backend endpoint from the configuration. Useful when deploying outside OpenShift deployed AMP. Example: https://backend.example.com.
OPENSSL_VERIFY
Values:
-
0,false: disable peer verification -
1,true: enable peer verification
Controls the OpenSSL Peer Verification. It is off by default, because OpenSSL can’t use system certificate store. It requires custom certificate bundle and adding it to trusted certificates.
It is recommended to use https://github.com/openresty/lua-nginx-module#lua_ssl_trusted_certificate and point to to certificate bundle generated by export-builtin-trusted-certs.
RESOLVER
Allows to specify a custom DNS resolver that will be used by OpenResty. If the RESOLVER parameter is empty, the DNS resolver will be autodiscovered.
THREESCALE_CONFIG_FILE
Path to the JSON file with the configuration for the gateway. The configuration can be downloaded from the 3scale admin portal using the URL: <schema>://<admin-portal-domain>/admin/api/nginx/spec.json (Example: https://account-admin.3scale.net/admin/api/nginx/spec.json).
When the gateway is deployed using Docker, the file has to be injected to the docker image as a read only volume, and the path should indicate where the volume is mounted, i.e. path local to the docker container.
You can find sample configuration files in examples folder.
It is required to provide either THREESCALE_PORTAL_ENDPOINT or THREESCALE_CONFIG_FILE (takes precedence) for the gateway to run successfully.
THREESCALE_DEPLOYMENT_ENV
Values: staging | production
Default: production
The value of this environment variable will be used to define the environment for which the configuration will be downloaded from 3scale (Staging or Production), when using new APIcast.
The value will also be used in the header X-3scale-User-Agent in the authorize/report requests made to 3scale Service Management API. It is used by 3scale just for statistics.
THREESCALE_PORTAL_ENDPOINT
URI that includes your password and portal endpoint in the following format: <schema>://<password>@<admin-portal-domain>. The <password> can be either the provider key or an access token for the 3scale Account Management API. <admin-portal-domain> is the URL used to log into the admin portal.
Example: https://access-token@account-admin.3scale.net.
When THREESCALE_PORTAL_ENDPOINT environment variable is provided, the gateway will download the configuration from 3scale on initializing. The configuration includes all the settings provided on the Integration page of the API(s).
It is required to provide either THREESCALE_PORTAL_ENDPOINT or THREESCALE_CONFIG_FILE (takes precedence) for the gateway to run successfully.
OPENTRACING_TRACER
Example: jaeger
This environment variable controls which tracing library will be loaded, right now, there’s only one opentracing tracer available, jaeger.
If empty, opentracing support will be disabled.
OPENTRACING_CONFIG
This environment variable is used to determine the config file for the opentracing tracer, if OPENTRACING_TRACER is not set, this variable will be ignored.
Each tracer has a default configuration file: * jaeger: conf.d/opentracing/jaeger.example.json
You can choose to mount a different configuration than the provided by default by setting the file path using this variable.
Example: /tmp/jaeger/jaeger.json
OPENTRACING_HEADER_FORWARD
Default: uber-trace-id
This environment variable controls the HTTP header used for forwarding opentracing information, this HTTP header will be forwarded to upstream servers.
APICAST_HTTPS_PORT
Default: no value
Controls on which port APIcast should start listening for HTTPS connections. If this clashes with HTTP port it will be used only for HTTPS.
APICAST_HTTPS_CERTIFICATE
Default: no value
Path to a file with X.509 certificate in the PEM format for HTTPS.
APICAST_HTTPS_CERTIFICATE_KEY
Default: no value
Path to a file with the X.509 certificate secret key in the PEM format.
all_proxy, ALL_PROXY
Default: no value Value: string Example: http://forward-proxy:80
Defines a HTTP proxy to be used for connecting to services if a protocol-specific proxy is not specified. Authentication is not supported.
http_proxy, HTTP_PROXY
Default: no value Value: string Example: http://forward-proxy:80
Defines a HTTP proxy to be used for connecting to HTTP services. Authentication is not supported.
https_proxy, HTTPS_PROXY
Default: no value Value: string Example: https://forward-proxy:443
Defines a HTTP proxy to be used for connecting to HTTPS services. Authentication is not supported.
no_proxy, NO_PROXY
Default: no value Value: string\[,<string>\]; *Example: foo,bar.com,.extra.dot.com
Defines a comma-separated list of hostnames and domain names for which the requests should not be proxied. Setting to a single * character, which matches all hosts, effectively disables the proxy.