Chapter 4. Configuring Operator-based broker deployments
4.1. How the Operator generates the broker configuration
Before you use Custom Resource (CR) instances to configure your broker deployment, you should understand how the Operator generates the broker configuration.
When you create an Operator-based broker deployment, a Pod for each broker runs in a StatefulSet in your OpenShift project. An application container for the broker runs within each Pod.
The Operator runs a type of container called an Init Container when initializing each Pod. In OpenShift Container Platform, Init Containers are specialized containers that run before application containers. Init Containers can include utilities or setup scripts that are not present in the application image.
By default, the AMQ Broker Operator uses a built-in Init Container. The Init Container uses the main CR instance for your deployment to generate the configuration used by each broker application container.
If you have specified address settings in the CR, the Operator generates a default configuration and then merges or replaces that configuration with the configuration specified in the CR. This process is described in the section that follows.
4.1.1. How the Operator generates the address settings configuration
If you have included an address settings configuration in the main Custom Resource (CR) instance for your deployment, the Operator generates the address settings configuration for each broker as described below.
The Operator runs the Init Container before the broker application container. The Init Container generates a default address settings configuration. The default address settings configuration is shown below.
<address-settings> <!-- if you define auto-create on certain queues, management has to be auto-create --> <address-setting match="activemq.management#"> <dead-letter-address>DLQ</dead-letter-address> <expiry-address>ExpiryQueue</expiry-address> <redelivery-delay>0</redelivery-delay> <!-- with -1 only the global-max-size is in use for limiting --> <max-size-bytes>-1</max-size-bytes> <message-counter-history-day-limit>10</message-counter-history-day-limit> <address-full-policy>PAGE</address-full-policy> <auto-create-queues>true</auto-create-queues> <auto-create-addresses>true</auto-create-addresses> <auto-create-jms-queues>true</auto-create-jms-queues> <auto-create-jms-topics>true</auto-create-jms-topics> </address-setting> <!-- default for catch all --> <address-setting match="#"> <dead-letter-address>DLQ</dead-letter-address> <expiry-address>ExpiryQueue</expiry-address> <redelivery-delay>0</redelivery-delay> <!-- with -1 only the global-max-size is in use for limiting --> <max-size-bytes>-1</max-size-bytes> <message-counter-history-day-limit>10</message-counter-history-day-limit> <address-full-policy>PAGE</address-full-policy> <auto-create-queues>true</auto-create-queues> <auto-create-addresses>true</auto-create-addresses> <auto-create-jms-queues>true</auto-create-jms-queues> <auto-create-jms-topics>true</auto-create-jms-topics> </address-setting> <address-settings>- If you have also specified an address settings configuration in your Custom Resource (CR) instance, the Init Container processes that configuration and converts it to XML.
-
Based on the value of the
applyRuleproperty in the CR, the Init Container merges or replaces the default address settings configuration shown above with the configuration that you have specified in the CR. The result of this merge or replacement is the final address settings configuration that the broker will use. -
When the Init Container has finished generating the broker configuration (including address settings), the broker application container starts. When starting, the broker container copies its configuration from the installation directory previously used by the Init Container. You can inspect the address settings configuration in the
broker.xmlconfiguration file. For a running broker, this file is located in the/home/jboss/amq-broker/etcdirectory.
Additional resources
-
For an example of using the
applyRuleproperty in a CR, see Section 4.2.3, “Matching address settings to configured addresses in an Operator-based broker deployment”.
4.1.2. Directory structure of a broker Pod
When you create an Operator-based broker deployment, a Pod for each broker runs in a StatefulSet in your OpenShift project. An application container for the broker runs within each Pod.
The Operator runs a type of container called an Init Container when initializing each Pod. In OpenShift Container Platform, Init Containers are specialized containers that run before application containers. Init Containers can include utilities or setup scripts that are not present in the application image.
When generating the configuration for a broker instance, the Init Container uses files contained in a default installation directory. This installation directory is on a volume that the Operator mounts to the broker Pod and which the Init Container and broker container share. The path that the Init Container uses to mount the shared volume is defined in an environment variable called CONFIG_INSTANCE_DIR. The default value of CONFIG_INSTANCE_DIR is /amq/init/config. In the documentation, this directory is referred to as <install_dir>.
You cannot change the value of the CONFIG_INSTANCE_DIR environment variable.
By default, the installation directory has the following sub-directories:
| Sub-directory | Contents |
|---|---|
|
| Binaries and scripts needed to run the broker. |
|
| Configuration files. |
|
| The broker journal. |
|
| JARs and libraries needed to run the broker. |
|
| Broker log files. |
|
| Temporary web application files. |
When the Init Container has finished generating the broker configuration, the broker application container starts. When starting, the broker container copies its configuration from the installation directory previously used by the Init Container. When the broker Pod is initialized and running, the broker configuration is located in the /home/jboss/amq-broker directory (and subdirectories) of the broker.
Additional resources
- For more information about how the Operator chooses a container image for the built-in Init Container, see Section 2.4, “How the Operator chooses container images”.
- To learn how to build and specify a custom Init Container image, see Section 4.7, “Specifying a custom Init Container image”.
4.2. Configuring addresses and queues for Operator-based broker deployments
For an Operator-based broker deployment, you use two separate Custom Resource (CR) instances to configure address and queues and their associated settings.
To create address and queues on your brokers, you deploy a CR instance based on the address Custom Resource Definition (CRD).
-
If you used the OpenShift command-line interface (CLI) to install the Operator, the address CRD is the
broker_activemqartemisaddress_crd.yamlfile that was included in thedeploy/crdsof the Operator installation archive that you downloaded and extracted. -
If you used OperatorHub to install the Operator, the address CRD is the
ActiveMQAretmisAddressCRD listed underin the OpenShift Container Platform web console.
-
If you used the OpenShift command-line interface (CLI) to install the Operator, the address CRD is the
To configure address and queue settings that you then match to specific addresses, you include configuration in the main Custom Resource (CR) instance used to create your broker deployment .
-
If you used the OpenShift CLI to install the Operator, the main broker CRD is the
broker_activemqartemis_crd.yamlfile that was included in thedeploy/crdsof the Operator installation archive that you downloaded and extracted. -
If you used OperatorHub to install the Operator, the main broker CRD is the
ActiveMQAretmisCRD listed underin the OpenShift Container Platform web console.
In general, the address and queue settings that you can configure for a broker deployment on OpenShift Container Platform are fully equivalent to those of standalone broker deployments on Linux or Windows. However, you should be aware of some differences in how those settings are configured. Those differences are described in the following sub-section.
-
If you used the OpenShift CLI to install the Operator, the main broker CRD is the
4.2.1. Differences in configuration of address and queue settings between OpenShift and standalone broker deployments
-
To configure address and queue settings for broker deployments on OpenShift Container Platform, you add configuration to an
addressSettingssection of the main Custom Resource (CR) instance for the broker deployment. This contrasts with standalone deployments on Linux or Windows, for which you add configuration to anaddress-settingselement in thebroker.xmlconfiguration file. The format used for the names of configuration items differs between OpenShift Container Platform and standalone broker deployments. For OpenShift Container Platform deployments, configuration item names are in camel case, for example,
defaultQueueRoutingType. By contrast, configuration item names for standalone deployments are in lower case and use a dash (-) separator, for example,default-queue-routing-type.The following table shows some further examples of this naming difference.
Expand Configuration item for standalone broker deployment Configuration item for OpenShift broker deployment address-full-policy
addressFullPolicy
auto-create-queues
autoCreateQueues
default-queue-routing-type
defaultQueueRoutingType
last-value-queue
lastValueQueue
Additional resources
For examples of creating addresses and queues and matching settings for OpenShift Container Platform broker deployments, see:
- To learn about all of the configuration options for addresses, queues, and address settings for OpenShift Container Platform broker deployments, see Section 8.1, “Custom Resource configuration reference”.
- For comprehensive information about configuring addresses, queues, and associated address settings for standalone broker deployments, see Configuring addresses and queues in Configuring AMQ Broker. You can use this information to create equivalent configurations for broker deployments on OpenShift Container Platform.
4.2.2. Creating addresses and queues for an Operator-based broker deployment
The following procedure shows how to use a Custom Resource (CR) instance to add an address and associated queue to an Operator-based broker deployment.
To create multiple addresses and/or queues in your broker deployment, you need to create separate CR files and deploy them individually, specifying new address and/or queue names in each case. In addition, the name attribute of each CR instance must be unique.
Prerequisites
You must have already installed the AMQ Broker Operator, including the dedicated Custom Resource Definition (CRD) required to create addresses and queues on your brokers. For information on two alternative ways to install the Operator, see:
- You should be familiar with how to use a CR instance to create a basic broker deployment. For more information, see Section 3.4.1, “Deploying a basic broker instance”.
Procedure
Start configuring a Custom Resource (CR) instance to define addresses and queues for the broker deployment.
Using the OpenShift command-line interface:
Log in to OpenShift as a user that has privileges to deploy CRs in the project for the broker deployment.
oc login -u <user> -p <password> --server=<host:port>-
Open the sample CR file called
broker_activemqartemisaddress_cr.yamlthat was included in thedeploy/crsdirectory of the Operator installation archive that you downloaded and extracted.
Using the OpenShift Container Platform web console:
- Log in to the console as a user that has privileges to deploy CRs in the project for the broker deployment.
-
Start a new CR instance based on the address CRD. In the left pane, click
. - Click the ActiveMQArtemisAddresss CRD.
- Click the Instances tab.
Click Create ActiveMQArtemisAddress.
Within the console, a YAML editor opens, enabling you to configure a CR instance.
In the
specsection of the CR, add lines to define an address, queue, and routing type. For example:apiVersion: broker.amq.io/v1beta1 kind: ActiveMQArtemisAddress metadata: name: myAddressDeployment0 namespace: myProject spec: ... addressName: myAddress0 queueName: myQueue0 routingType: anycast ...The preceding configuration defines an address named
myAddress0with a queue namedmyQueue0and ananycastrouting type.NoteIn the
metadatasection, you need to include thenamespaceproperty and specify a value only if you are using the OpenShift Container Platform web console to create your CR instance. The value that you should specify is the name of the OpenShift project for your broker deployment.Deploy the CR instance.
Using the OpenShift command-line interface:
- Save the CR file.
Switch to the project for the broker deployment.
$ oc project <project_name>Create the CR instance.
$ oc create -f <path/to/address_custom_resource_instance>.yaml
Using the OpenShift web console:
- When you have finished configuring the CR, click Create.
(Optional) To delete an address and queue previously added to your deployment using a CR instance, use the following command:
$ oc delete -f <path/to/address_custom_resource_instance>.yaml
4.2.3. Matching address settings to configured addresses in an Operator-based broker deployment
If delivery of a message to a client is unsuccessful, you might not want the broker to make ongoing attempts to deliver the message. To prevent infinite delivery attempts, you can define a dead letter address and an associated dead letter queue. After a specified number of delivery attempts, the broker removes an undelivered message from its original queue and sends the message to the configured dead letter address. A system administrator can later consume undelivered messages from a dead letter queue to inspect the messages.
The following example shows how to configure a dead letter address and queue for an Operator-based broker deployment. The example demonstrates how to:
-
Use the
addressSettingsection of the main broker Custom Resource (CR) instance to configure address settings. - Match those address settings to addresses in your broker deployment.
Prerequisites
- You should be familiar with how to use a CR instance to create a basic broker deployment. For more information, see Section 3.4.1, “Deploying a basic broker instance”.
- You should be familiar with the default address settings configuration that the Operator merges or replaces with the configuration specified in your CR instance. For more information, see Section 4.1.1, “How the Operator generates the address settings configuration”.
Procedure
Start configuring a CR instance to add a dead letter address and queue to receive undelivered messages for each broker in the deployment.
Using the OpenShift command-line interface:
Log in to OpenShift as a user that has privileges to deploy CRs in the project for the broker deployment.
oc login -u <user> -p <password> --server=<host:port>-
Open the sample CR file called
broker_activemqartemisaddress_cr.yamlthat was included in thedeploy/crsdirectory of the Operator installation archive that you downloaded and extracted.
Using the OpenShift Container Platform web console:
- Log in to the console as a user that has privileges to deploy CRs in the project for the broker deployment.
-
Start a new CR instance based on the address CRD. In the left pane, click
. - Click the ActiveMQArtemisAddresss CRD.
- Click the Instances tab.
Click Create ActiveMQArtemisAddress.
Within the console, a YAML editor opens, enabling you to configure a CR instance.
In the
specsection of the CR, add lines to specify a dead letter address and queue to receive undelivered messages. For example:apiVersion: broker.amq.io/v1beta1 kind: ActiveMQArtemisAddress metadata: name: ex-aaoaddress spec: ... addressName: myDeadLetterAddress queueName: myDeadLetterQueue routingType: anycast ...The preceding configuration defines a dead letter address named
myDeadLetterAddresswith a dead letter queue namedmyDeadLetterQueueand ananycastrouting type.NoteIn the
metadatasection, you need to include thenamespaceproperty and specify a value only if you are using the OpenShift Container Platform web console to create your CR instance. The value that you should specify is the name of the OpenShift project for your broker deployment.Deploy the address CR instance.
Using the OpenShift command-line interface:
- Save the CR file.
Switch to the project for the broker deployment.
$ oc project <project_name>Create the address CR.
$ oc create -f <path/to/address_custom_resource_instance>.yaml
Using the OpenShift web console:
- When you have finished configuring the CR, click Create.
Start configuring a Custom Resource (CR) instance for a broker deployment.
From a sample CR file:
-
Open the sample CR file called
broker_activemqartemis_cr.yamlthat was included in thedeploy/crsdirectory of the Operator installation archive that you downloaded and extracted.
-
Open the sample CR file called
Using the OpenShift Container Platform web console:
-
Start a new CR instance based on the main broker CRD. In the left pane, click
. - Click the ActiveMQArtemis CRD.
- Click the Instances tab.
Click Create ActiveMQArtemis.
Within the console, a YAML editor opens, enabling you to configure a CR instance.
-
Start a new CR instance based on the main broker CRD. In the left pane, click
For a basic broker deployment, a configuration might resemble that shown below.
apiVersion: broker.amq.io/v1beta1
kind: ActiveMQArtemis
metadata:
  name: ex-aao
  application: ex-aao-app
spec:
  deploymentPlan:
    size: 1
    image: placeholder
    requireLogin: false
    persistenceEnabled: true
    journalType: nio
    messageMigration: true
Observe that in the
broker_activemqartemis_cr.yamlsample CR file, theimageproperty is set to a default value ofplaceholder. This value indicates that, by default, theimageproperty does not specify a broker container image to use for the deployment. To learn how the Operator determines the appropriate broker container image to use, see Section 2.4, “How the Operator chooses container images”.NoteIn the
metadatasection, you need to include thenamespaceproperty and specify a value only if you are using the OpenShift Container Platform web console to create your CR instance. The value that you should specify is the name of the OpenShift project for your broker deployment.In the
deploymentPlansection of the CR, add a newaddressSettingssection that contains a singleaddressSettingsection, as shown below.spec: deploymentPlan: size: 1 image: placeholder requireLogin: false persistenceEnabled: true journalType: nio messageMigration: true addressSettings: addressSetting:Add a single instance of the
matchproperty to theaddressSettingblock. Specify an address-matching expression. For example:spec: deploymentPlan: size: 1 image: placeholder requireLogin: false persistenceEnabled: true journalType: nio messageMigration: true addressSettings: addressSetting: - match: myAddressmatch-
Specifies the address, or set of address to which the broker applies the configuration that follows. In this example, the value of the
matchproperty corresponds to a single address calledmyAddress.
Add properties related to undelivered messages and specify values. For example:
spec: deploymentPlan: size: 1 image: placeholder requireLogin: false persistenceEnabled: true journalType: nio messageMigration: true addressSettings: addressSetting: - match: myAddress deadLetterAddress: myDeadLetterAddress maxDeliveryAttempts: 5deadLetterAddress- Address to which the broker sends undelivered messages.
maxDeliveryAttemptsMaximum number of delivery attempts that a broker makes before moving a message to the configured dead letter address.
In the preceding example, if the broker makes five unsuccessful attempts to deliver a message to an address that begins with
myAddress, the broker moves the message to the specified dead letter address,myDeadLetterAddress.
(Optional) Apply similar configuration to another address or set of addresses. For example:
spec: deploymentPlan: size: 1 image: placeholder requireLogin: false persistenceEnabled: true journalType: nio messageMigration: true addressSettings: addressSetting: - match: myAddress deadLetterAddress: myDeadLetterAddress maxDeliveryAttempts: 5 - match: 'myOtherAddresses*' deadLetterAddress: myDeadLetterAddress maxDeliveryAttempts: 3In this example, the value of the second
matchproperty includes an asterisk wildcard character. The wildcard character means that the preceding configuration is applied to any address that begins with the stringmyOtherAddresses.NoteIf you use a wildcard expression as a value for the
matchproperty, you must enclose the value in single quotation marks, for example,'myOtherAddresses*'.At the beginning of the
addressSettingssection, add theapplyRuleproperty and specify a value. For example:spec: deploymentPlan: size: 1 image: placeholder requireLogin: false persistenceEnabled: true journalType: nio messageMigration: true addressSettings: applyRule: merge_all addressSetting: - match: myAddress deadLetterAddress: myDeadLetterAddress maxDeliveryAttempts: 5 - match: 'myOtherAddresses*' deadLetterAddress: myDeadLetterAddress maxDeliveryAttempts: 3The
applyRuleproperty specifies how the Operator applies the configuration that you add to the CR for each matching address or set of addresses. The values that you can specify are:merge_allFor address settings specified in both the CR and the default configuration that match the same address or set of addresses:
- Replace any property values specified in the default configuration with those specified in the CR.
- Keep any property values that are specified uniquely in the CR or the default configuration. Include each of these in the final, merged configuration.
- For address settings specified in either the CR or the default configuration that uniquely match a particular address or set of addresses, include these in the final, merged configuration.
merge_replace- For address settings specified in both the CR and the default configuration that match the same address or set of addresses, include the settings specified in the CR in the final, merged configuration. Do not include any properties specified in the default configuration, even if these are not specified in the CR.
- For address settings specified in either the CR or the default configuration that uniquely match a particular address or set of addresses, include these in the final, merged configuration.
replace_all- Replace all address settings specified in the default configuration with those specified in the CR. The final, merged configuration corresponds exactly to that specified in the CR.
NoteIf you do not explicitly include the
applyRuleproperty in your CR, the Operator uses a default value ofmerge_all.Deploy the broker CR instance.
Using the OpenShift command-line interface:
- Save the CR file.
Create the CR instance.
$ oc create -f <path/to/broker_custom_resource_instance>.yaml
Using the OpenShift web console:
- When you have finished configuring the CR, click Create.
Additional resources
- To learn about all of the configuration options for addresses, queues, and address settings for OpenShift Container Platform broker deployments, see Section 8.1, “Custom Resource configuration reference”.
If you installed the AMQ Broker Operator using the OpenShift command-line interface (CLI), the installation archive that you downloaded and extracted contains some additional examples of configuring address settings. In the
deploy/examplesfolder of the installation archive, see:-
artemis-basic-address-settings-deployment.yaml -
artemis-merge-replace-address-settings-deployment.yaml -
artemis-replace-address-settings-deployment.yaml
-
- For comprehensive information about configuring addresses, queues, and associated address settings for standalone broker deployments, see Configuring addresses and queues in Configuring AMQ Broker. You can use this information to create equivalent configurations for broker deployments on OpenShift Container Platform.
- For more information about Init Containers in OpenShift Container Platform, see Using Init Containers to perform tasks before a pod is deployed in the OpenShift Container Platform documentation.
4.3. Creating a security configuration for an Operator-based broker deployment
4.3.1. Creating a security configuration for an Operator-based broker deployment
The following procedure shows how to use a Custom Resource (CR) instance to add users and associated security configuration to an Operator-based broker deployment.
Prerequisites
You must have already installed the AMQ Broker Operator. For information on two alternative ways to install the Operator, see:
- You should be familiar with broker security as described in Securing brokers
- You should be familiar with how to use a CR instance to create a basic broker deployment. For more information, see Section 3.4.1, “Deploying a basic broker instance”.
You can deploy the security CR before or after you create a broker deployment. However, if you deploy the security CR after creating the broker deployment, the broker pod is restarted to accept the new configuration.
Start configuring a Custom Resource (CR) instance to define users and associated security configuration for the broker deployment.
Using the OpenShift command-line interface:
Log in to OpenShift as a user that has privileges to deploy CRs in the project for the broker deployment.
oc login -u <user> -p <password> --server=<host:port>-
Open the sample CR file called
broker_activemqartemissecurity_cr.yamlthat was included in thedeploy/crsdirectory of the Operator installation archive that you downloaded and extracted.
Using the OpenShift Container Platform web console:
- Log in to the console as a user that has privileges to deploy CRs in the project for the broker deployment.
-
Start a new CR instance based on the address CRD. In the left pane, click
. - Click the ActiveMQArtemisSecurity CRD.
- Click the Instances tab.
Click Create ActiveMQArtemisSecurity.
Within the console, a YAML editor opens, enabling you to configure a CR instance.
In the
specsection of the CR, add lines to define users and roles. For example:apiVersion: broker.amq.io/v1beta1 kind: ActiveMQArtemisSecurity metadata: name: ex-prop spec: loginModules: propertiesLoginModules: - name: "prop-module" users: - name: "sam" password: "samspassword" roles: - "sender" - name: "rob" password: "robspassword" roles: - "receiver" securityDomains: brokerDomain: name: "activemq" loginModules: - name: "prop-module" flag: "sufficient" securitySettings: broker: - match: "#" permissions: - operationType: "send" roles: - "sender" - operationType: "createAddress" roles: - "sender" - operationType: "createDurableQueue" roles: - "sender" - operationType: "consume" roles: - "receiver" ...NoteAlways specify values for the elements in the preceding example. For example, if you do not specify values for
securityDomains.brokerDomainor values for roles, the resulting configuration might cause unexpected results.The preceding configuration defines two users:
-
a
propertiesLoginModulenamedprop-modulethat defines a user namedsamwith a role namedsender. -
a
propertiesLoginModulenamedprop-modulethat defines a user namedrobwith a role namedreceiver.
The properties of these roles are defined in the
brokerDomainandbrokersections of thesecurityDomainssection. For example, thesendrole is defined to allow users with that role to create a durable queue on any address. By default, the configuration applies to all deployed brokers defined by CRs in the current namespace. To limit the configuration to particular broker deployments, use theapplyToCrNamesoption described in Section 8.1.3, “Security Custom Resource configuration reference”.NoteIn the
metadatasection, you need to include thenamespaceproperty and specify a value only if you are using the OpenShift Container Platform web console to create your CR instance. The value that you should specify is the name of the OpenShift project for your broker deployment.-
a
Deploy the CR instance.
Using the OpenShift command-line interface:
- Save the CR file.
Switch to the project for the broker deployment.
$ oc project <project_name>Create the CR instance.
$ oc create -f <path/to/address_custom_resource_instance>.yaml
Using the OpenShift web console:
- When you have finished configuring the CR, click Create.
4.3.2. Storing user passwords in a secret
In the Creating a security configuration for an Operator-based broker deployment procedure, user passwords are stored in clear text in the ActiveMQArtemisSecurity CR. If you do not want to store passwords in clear text in the CR, you can exclude the passwords from the CR and store them in a secret. When you apply the CR, the Operator retrieves each user’s password from the secret and inserts it in the artemis-users.properties file on the broker pod.
Procedure
Use the
oc create secretcommand to create a secret and add each user’s name and password. The secret name must follow a naming convention ofsecurity-properties-module name, where module name is the name of the login module configured in the CR. For example:oc create secret generic security-properties-prop-module \ --from-literal=sam=samspassword \ --from-literal=rob=robspasswordIn the
specsection of the CR, add the user names that you specified in the secret along with the role information, but do not include each user’s password. For example:apiVersion: broker.amq.io/v1beta1 kind: ActiveMQArtemisSecurity metadata: name: ex-prop spec: loginModules: propertiesLoginModules: - name: "prop-module" users: - name: "sam" roles: - "sender" - name: "rob" roles: - "receiver" securityDomains: brokerDomain: name: "activemq" loginModules: - name: "prop-module" flag: "sufficient" securitySettings: broker: - match: "#" permissions: - operationType: "send" roles: - "sender" - operationType: "createAddress" roles: - "sender" - operationType: "createDurableQueue" roles: - "sender" - operationType: "consume" roles: - "receiver" ...Deploy the CR instance.
Using the OpenShift command-line interface:
- Save the CR file.
Switch to the project for the broker deployment.
$ oc project <project_name>Create the CR instance.
$ oc create -f <path/to/address_custom_resource_instance>.yaml
Using the OpenShift web console:
- When you finish configuring the CR, click Create.
Additional resources
For more information about secrets in OpenShift Container Platform, see Providing sensitive data to pods in the OpenShift Container Platform documentation.
4.4. Configuring broker storage requirements
To use persistent storage in an Operator-based broker deployment, you set persistenceEnabled to true in the Custom Resource (CR) instance used to create the deployment. If you do not have container-native storage in your OpenShift cluster, you need to manually provision Persistent Volumes (PVs) and ensure that these are available to be claimed by the Operator using a Persistent Volume Claim (PVC). If you want to create a cluster of two brokers with persistent storage, for example, then you need to have two PVs available.
When you manually provision PVs in OpenShift Container Platform, ensure that you set the reclaim policy for each PV to Retain. If the reclaim policy for a PV is not set to Retain and the PVC that the Operator used to claim the PV is deleted, the PV is also deleted. Deleting a PV results in the loss of any data on the volume. For more information, about setting the reclaim policy, see Understanding persistent storage in the OpenShift Container Platform documentation.
By default, a PVC obtains 2 GiB of storage for each broker from the default storage class configured for the cluster. You can override the default size and storage class requested in the PVC, but only by configuring new values in the CR before deploying the CR for the first time.
4.4.1. Configuring broker storage size and storage class
The following procedure shows how to configure the Custom Resource (CR) instance for your broker deployment to specify the size and storage class of the Persistent Volume Claim (PVC) required by each broker for persistent message storage.
You must add the configuration for broker storage size and storage class to the main CR for your broker deployment before deploying the CR for the first time. You cannot add the configuration to a broker deployment that is already running.
Prerequisites
- You should be familiar with how to use a CR instance to create a basic broker deployment. See Section 3.4.1, “Deploying a basic broker instance”.
You must have already provisioned Persistent Volumes (PVs) and made these available to be claimed by the Operator. For example, if you want to create a cluster of two brokers with persistent storage, you need to have two PVs available.
For more information about provisioning persistent storage, see Understanding persistent storage in the OpenShift Container Platform documentation.
Procedure
Start configuring a Custom Resource (CR) instance for the broker deployment.
Using the OpenShift command-line interface:
Log in to OpenShift as a user that has privileges to deploy CRs in the project in which you are creating the deployment.
oc login -u <user> -p <password> --server=<host:port>-
Open the sample CR file called
broker_activemqartemis_cr.yamlthat was included in thedeploy/crsdirectory of the Operator installation archive that you downloaded and extracted.
Using the OpenShift Container Platform web console:
- Log in to the console as a user that has privileges to deploy CRs in the project in which you are creating the deployment.
-
Start a new CR instance based on the main broker CRD. In the left pane, click
. - Click the ActiveMQArtemis CRD.
- Click the Instances tab.
Click Create ActiveMQArtemis.
Within the console, a YAML editor opens, enabling you to configure a CR instance.
For a basic broker deployment, a configuration might resemble that shown below.
apiVersion: broker.amq.io/v1beta1
kind: ActiveMQArtemis
metadata:
  name: ex-aao
  application: ex-aao-app
spec:
  deploymentPlan:
    size: 1
    image: placeholder
    requireLogin: false
    persistenceEnabled: true
    journalType: nio
    messageMigration: true
Observe that in the
broker_activemqartemis_cr.yamlsample CR file, theimageproperty is set to a default value ofplaceholder. This value indicates that, by default, theimageproperty does not specify a broker container image to use for the deployment. To learn how the Operator determines the appropriate broker container image to use, see Section 2.4, “How the Operator chooses container images”.To specify the broker storage size, in the
deploymentPlansection of the CR, add astoragesection. Add asizeproperty and specify a value. For example:spec: deploymentPlan: size: 1 image: placeholder requireLogin: false persistenceEnabled: true journalType: nio messageMigration: true storage: size: 4Gistorage.size-
Size, in bytes, of the Persistent Volume Claim (PVC) that each broker Pod requires for persistent storage. This property applies only when
persistenceEnabledis set totrue. The value that you specify must include a unit using byte notation (for example, K, M, G), or the binary equivalents (Ki, Mi, Gi).
To specify the storage class that each broker Pod requires for persistent storage, in the
storagesection, add astorageClassNameproperty and specify a value. For example:spec: deploymentPlan: size: 1 image: placeholder requireLogin: false persistenceEnabled: true journalType: nio messageMigration: true storage: size: 4Gi storageClassName: gp3storage.storageClassNameThe name of the storage class to request in the Persistent Volume Claim (PVC). Storage classes provide a way for administrators to describe and classify the available storage. For example, different storage classes might map to specific quality-of-service levels, backup policies and so on.
If you do do not specify a storage class, a persistent volume with the default storage class configured for the cluster is claimed by the PVC.
NoteIf you specify a storage class, a persistent volume is claimed by the PVC only if the volume’s storage class matches the specified storage class.
Deploy the CR instance.
Using the OpenShift command-line interface:
- Save the CR file.
Switch to the project in which you are creating the broker deployment.
$ oc project <project_name>Create the CR instance.
$ oc create -f <path/to/custom_resource_instance>.yaml
Using the OpenShift web console:
- When you have finished configuring the CR, click Create.
4.5. Configuring resource limits and requests for Operator-based broker deployments
When you create an Operator-based broker deployment, the broker Pods in the deployment run in a StatefulSet on a node in your OpenShift cluster. You can configure the Custom Resource (CR) instance for the deployment to specify the host-node compute resources used by the broker container that runs in each Pod. By specifying limit and request values for CPU and memory (RAM), you can ensure satisfactory performance of the broker Pods.
- You must add configuration for limits and requests to the CR instance for your broker deployment before deploying the CR for the first time. You cannot add the configuration to a broker deployment that is already running.
- It is not possible for Red Hat to recommend values for limits and requests because these are based on your specific messaging system use-cases and the resulting architecture that you have implemented. However, it is recommended that you test and tune these values in a development environment before configuring them for your production environment.
- The Operator runs a type of container called an Init Container when initializing each broker Pod. Any resource limits and requests that you configure for each broker container also apply to each Init Container. For more information about the use of Init Containers in broker deployments, see Section 4.1, “How the Operator generates the broker configuration”.
You can specify the following limit and request values:
CPU limit- For each broker container running in a Pod, this value is the maximum amount of host-node CPU that the container can consume. If a broker container attempts to exceed the specified CPU limit, OpenShift throttles the container. This ensures that containers have consistent performance, regardless of the number of Pods running on a node.
Memory limit- For each broker container running in a Pod, this value is the maximum amount of host-node memory that the container can consume. If a broker container attempts to exceed the specified memory limit, OpenShift terminates the container. The broker Pod restarts.
CPU requestFor each broker container running in a Pod, this value is the amount of host-node CPU that the container requests. The OpenShift scheduler considers the CPU request value during Pod placement, to bind the broker Pod to a node with sufficient compute resources.
The CPU request value is the minimum amount of CPU that the broker container requires to run. However, if there is no contention for CPU on the node, the container can use all available CPU. If you have specified a CPU limit, the container cannot exceed that amount of CPU usage. If there is CPU contention on the node, CPU request values provide a way for OpenShift to weigh CPU usage across all containers.
Memory requestFor each broker container running in a Pod, this value is the amount of host-node memory that the container requests. The OpenShift scheduler considers the memory request value during Pod placement, to bind the broker Pod to a node with sufficient compute resources.
The memory request value is the minimum amount of memory that the broker container requires to run. However, the container can consume as much available memory as possible. If you have specified a memory limit, the broker container cannot exceed that amount of memory usage.
CPU is measured in units called millicores. Each node in an OpenShift cluster inspects the operating system to determine the number of CPU cores on the node. Then, the node multiplies that value by 1000 to express the total capacity. For example, if a node has two cores, the CPU capacity of the node is expressed as 2000m. Therefore, if you want to use one-tenth of a single core, you specify a value of 100m.
Memory is measured in bytes. You can specify the value using byte notation (E, P, T, G, M, K) or the binary equivalents (Ei, Pi, Ti, Gi, Mi, Ki). The value that you specify must include a unit.
4.5.1. Configuring broker resource limits and requests
The following example shows how to configure the main Custom Resource (CR) instance for your broker deployment to set limits and requests for CPU and memory for each broker container that runs in a Pod in the deployment.
- You must add configuration for limits and requests to the CR instance for your broker deployment before deploying the CR for the first time. You cannot add the configuration to a broker deployment that is already running.
- It is not possible for Red Hat to recommend values for limits and requests because these are based on your specific messaging system use-cases and the resulting architecture that you have implemented. However, it is recommended that you test and tune these values in a development environment before configuring them for your production environment.
Prerequisites
- You should be familiar with how to use a CR instance to create a basic broker deployment. See Section 3.4.1, “Deploying a basic broker instance”.
Procedure
Start configuring a Custom Resource (CR) instance for the broker deployment.
Using the OpenShift command-line interface:
Log in to OpenShift as a user that has privileges to deploy CRs in the project in which you are creating the deployment.
oc login -u <user> -p <password> --server=<host:port>-
Open the sample CR file called
broker_activemqartemis_cr.yamlthat was included in thedeploy/crsdirectory of the Operator installation archive that you downloaded and extracted.
Using the OpenShift Container Platform web console:
- Log in to the console as a user that has privileges to deploy CRs in the project in which you are creating the deployment.
-
Start a new CR instance based on the main broker CRD. In the left pane, click
. - Click the ActiveMQArtemis CRD.
- Click the Instances tab.
Click Create ActiveMQArtemis.
Within the console, a YAML editor opens, enabling you to configure a CR instance.
For a basic broker deployment, a configuration might resemble that shown below.
apiVersion: broker.amq.io/v1beta1
kind: ActiveMQArtemis
metadata:
  name: ex-aao
  application: ex-aao-app
spec:
  deploymentPlan:
    size: 1
    image: placeholder
    requireLogin: false
    persistenceEnabled: true
    journalType: nio
    messageMigration: true
Observe that in the
broker_activemqartemis_cr.yamlsample CR file, theimageproperty is set to a default value ofplaceholder. This value indicates that, by default, theimageproperty does not specify a broker container image to use for the deployment. To learn how the Operator determines the appropriate broker container image to use, see Section 2.4, “How the Operator chooses container images”.In the
deploymentPlansection of the CR, add aresourcessection. Addlimitsandrequestssub-sections. In each sub-section, add acpuandmemoryproperty and specify values. For example:spec: deploymentPlan: size: 1 image: placeholder requireLogin: false persistenceEnabled: true journalType: nio messageMigration: true resources: limits: cpu: "500m" memory: "1024M" requests: cpu: "250m" memory: "512M"limits.cpu- Each broker container running in a Pod in the deployment cannot exceed this amount of host-node CPU usage.
limits.memory- Each broker container running in a Pod in the deployment cannot exceed this amount of host-node memory usage.
requests.cpu- Each broker container running in a Pod in the deployment requests this amount of host-node CPU. This value is the minimum amount of CPU required for the broker container to run.
requests.memory- Each broker container running in a Pod in the deployment requests this amount of host-node memory. This value is the minimum amount of memory required for the broker container to run.
Deploy the CR instance.
Using the OpenShift command-line interface:
- Save the CR file.
Switch to the project in which you are creating the broker deployment.
$ oc project <project_name>Create the CR instance.
$ oc create -f <path/to/custom_resource_instance>.yaml
Using the OpenShift web console:
- When you have finished configuring the CR, click Create.
4.6. Overriding the default memory limit for a broker
You can override the default memory limit that is set for a broker. By default, a broker is assigned half of the maximum memory that is available to the broker’s Java Virtual Machine. The following procedure shows how to configure the Custom Resource (CR) instance for your broker deployment to override the default memory limit.
Prerequisites
- You should be familiar with how to use a CR instance to create a basic broker deployment. See Section 3.4.1, “Deploying a basic broker instance”.
Procedure
Start configuring a Custom Resource (CR) instance to create a basic broker deployment.
Using the OpenShift command-line interface:
Log in to OpenShift as a user that has privileges to deploy CRs in the project for the broker deployment.
oc login -u <user> -p <password> --server=<host:port>-
Open the sample CR file called
broker_activemqartemis_cr.yamlthat was included in thedeploy/crsdirectory of the Operator installation archive that you downloaded and extracted.
Using the OpenShift Container Platform web console:
- Log in to the console as a user that has privileges to deploy CRs in the project for the broker deployment.
-
Start a new CR instance based on the main broker CRD. In the left pane, click
. - Click the ActiveMQArtemis CRD.
- Click the Instances tab.
Click Create ActiveMQArtemis.
Within the console, a YAML editor opens, enabling you to configure a CR instance.
For example, the CR for a basic broker deployment might resemble the following:
apiVersion: broker.amq.io/v1beta1
kind: ActiveMQArtemis
metadata:
  name: ex-aao
  application: ex-aao-app
spec:
  deploymentPlan:
    size: 1
    image: placeholder
    requireLogin: false
    persistenceEnabled: true
    journalType: nio
    messageMigration: true
In the
specsection of the CR, add abrokerPropertiessection. Within thebrokerPropertiessection, add aglobalMaxSizeproperty and specify a memory limit. For example:spec: ... brokerProperties: - globalMaxSize=500m ...The default unit for the
globalMaxSizeproperty is bytes. To change the default unit, add a suffix of m (for MB) or g (for GB) to the value.Apply the changes to the CR.
Using the OpenShift command-line interface:
- Save the CR file.
Switch to the project for the broker deployment.
$ oc project <project_name>Apply the CR.
$ oc apply -f <path/to/broker_custom_resource_instance>.yaml
Using the OpenShift web console:
- When you finish editing the CR, click Save.
(Optional) Verify that the new value you set for the
globalMaxSizeproperty overrides the default memory limit assigned to the broker.- Connect to the AMQ Management Console. For more information, see Chapter 5, Connecting to AMQ Management Console for an Operator-based broker deployment.
- From the menu, select JMX.
- Select org.apache.activemq.artemis.
-
Search for
global. -
In the table that is displayed, confirm that the value in the Global max column is the same as the value that you configured for the
globalMaxSizeproperty.
4.7. Specifying a custom Init Container image
As described in Section 4.1, “How the Operator generates the broker configuration”, the AMQ Broker Operator uses a default, built-in Init Container to generate the broker configuration. To generate the configuration, the Init Container uses the main Custom Resource (CR) instance for your deployment. The only items that you can specify in the CR are those that are exposed in the main broker Custom Resource Definition (CRD).
However, there might a case where you need to include configuration that is not exposed in the CRD. In this case, in your main CR instance, you can specify a custom Init Container. The custom Init Container can modify or add to the configuration that has already been created by the Operator. For example, you might use a custom Init Container to modify the broker logging settings. Or, you might use a custom Init Container to include extra runtime dependencies (that is, .jar files) in the broker installation directory.
When you build a custom Init Container image, you must follow these important guidelines:
In the build script (for example, a Docker Dockerfile or Podman Containerfile) that you create for the custom image, the
FROMinstruction must specify the latest version of the AMQ Broker Operator built-in Init Container as the base image. In your script, include the following line:FROM registry.redhat.io/amq7/amq-broker-init-rhel8:7.10-
The custom image must include a script called
post-config.shthat you include in a directory called/amq/scripts. Thepost-config.shscript is where you can modify or add to the initial configuration that the Operator generates. When you specify a custom Init Container, the Operator runs thepost-config.shscript after it uses your CR instance to generate a configuration, but before it starts the broker application container. -
As described in Section 4.1.2, “Directory structure of a broker Pod”, the path to the installation directory used by the Init Container is defined in an environment variable called
CONFIG_INSTANCE_DIR. Thepost-config.shscript should use this environment variable name when referencing the installation directory (for example,${CONFIG_INSTANCE_DIR}/lib) and not the actual value of this variable (for example,/amq/init/config/lib). -
If you want to include additional resources (for example,
.xmlor.jarfiles) in your custom broker configuration, you must ensure that these are included in the custom image and accessible to thepost-config.shscript.
The following procedure describes how to specify a custom Init Container image.
Prerequisites
- You must have built a custom Init Container image that meets the guidelines described above. For a complete example of building and specifying a custom Init Container image for the ArtemisCloud Operator, see custom Init Container image for JDBC-based persistence.
- To provide a custom Init Container image for the AMQ Broker Operator, you need to be able to add the image to a repository in a container registry such as the Quay container registry.
- You should understand how the Operator uses an Init Container to generate the broker configuration. For more information, see Section 4.1, “How the Operator generates the broker configuration”.
- You should be familiar with how to use a CR to create a broker deployment. For more information, see Section 3.4, “Creating Operator-based broker deployments”.
Procedure
Start configuring a Custom Resource (CR) instance for the broker deployment.
Using the OpenShift command-line interface:
Log in to OpenShift as a user that has privileges to deploy CRs in the project in which you are creating the deployment.
oc login -u <user> -p <password> --server=<host:port>-
Open the sample CR file called
broker_activemqartemis_cr.yamlthat was included in thedeploy/crsdirectory of the Operator installation archive that you downloaded and extracted.
Using the OpenShift Container Platform web console:
- Log in to the console as a user that has privileges to deploy CRs in the project in which you are creating the deployment.
-
Start a new CR instance based on the main broker CRD. In the left pane, click
. - Click the ActiveMQArtemis CRD.
- Click the Instances tab.
Click Create ActiveMQArtemis.
Within the console, a YAML editor opens, enabling you to configure a CR instance.
For a basic broker deployment, a configuration might resemble that shown below.
apiVersion: broker.amq.io/v1beta1
kind: ActiveMQArtemis
metadata:
  name: ex-aao
  application: ex-aao-app
spec:
  deploymentPlan:
    size: 1
    image: placeholder
    requireLogin: false
    persistenceEnabled: true
    journalType: nio
    messageMigration: true
Observe that in the
broker_activemqartemis_cr.yamlsample CR file, theimageproperty is set to a default value ofplaceholder. This value indicates that, by default, theimageproperty does not specify a broker container image to use for the deployment. To learn how the Operator determines the appropriate broker container image to use, see Section 2.4, “How the Operator chooses container images”.In the
deploymentPlansection of the CR, add theinitImageproperty.apiVersion: broker.amq.io/v1beta1 kind: ActiveMQArtemis metadata: name: ex-aao application: ex-aao-app spec: deploymentPlan: size: 1 image: placeholder initImage: requireLogin: false persistenceEnabled: true journalType: nio messageMigration: trueSet the value of the
initImageproperty to the URL of your custom Init Container image.apiVersion: broker.amq.io/v1beta1 kind: ActiveMQArtemis metadata: name: ex-aao application: ex-aao-app spec: deploymentPlan: size: 1 image: placeholder initImage: <custom_init_container_image_url> requireLogin: false persistenceEnabled: true journalType: nio messageMigration: trueinitImage- Specifies the full URL for your custom Init Container image, which you must have added to repository in a container registry.
Deploy the CR instance.
Using the OpenShift command-line interface:
- Save the CR file.
Switch to the project in which you are creating the broker deployment.
$ oc project <project_name>Create the CR instance.
$ oc create -f <path/to/custom_resource_instance>.yaml
Using the OpenShift web console:
- When you have finished configuring the CR, click Create.
Additional resources
- For a complete example of building and specifying a custom Init Container image for the ArtemisCloud Operator, see custom Init Container image for JDBC-based persistence.
4.8. Configuring Operator-based broker deployments for client connections
4.8.1. Configuring acceptors
To enable client connections to broker Pods in your OpenShift deployment, you define acceptors for your deployment. Acceptors define how a broker Pod accepts connections. You define acceptors in the main Custom Resource (CR) used for your broker deployment. When you create an acceptor, you specify information such as the messaging protocols to enable on the acceptor, and the port on the broker Pod to use for these protocols.
The following procedure shows how to define a new acceptor in the CR for your broker deployment.
Procedure
-
In the
deploy/crsdirectory of the Operator archive that you downloaded and extracted during your initial installation, open thebroker_activemqartemis_cr.yamlCustom Resource (CR) file. In the
acceptorselement, add a named acceptor. Add theprotocolsandportparameters. Set values to specify the messaging protocols to be used by the acceptor and the port on each broker Pod to expose for those protocols. For example:spec: ... acceptors: - name: my-acceptor protocols: amqp port: 5672 ...The configured acceptor exposes port 5672 to AMQP clients. The full set of values that you can specify for the
protocolsparameter is shown in the table.Expand Protocol Value Core Protocol
coreAMQP
amqpOpenWire
openwireMQTT
mqttSTOMP
stompAll supported protocols
allNote- For each broker Pod in your deployment, the Operator also creates a default acceptor that uses port 61616. This default acceptor is required for broker clustering and has Core Protocol enabled.
- By default, the AMQ Broker management console uses port 8161 on the broker Pod. Each broker Pod in your deployment has a dedicated Service that provides access to the console. For more information, see Chapter 5, Connecting to AMQ Management Console for an Operator-based broker deployment.
To use another protocol on the same acceptor, modify the
protocolsparameter. Specify a comma-separated list of protocols. For example:spec: ... acceptors: - name: my-acceptor protocols: amqp,openwire port: 5672 ...The configured acceptor now exposes port 5672 to AMQP and OpenWire clients.
To specify the number of concurrent client connections that the acceptor allows, add the
connectionsAllowedparameter and set a value. For example:spec: ... acceptors: - name: my-acceptor protocols: amqp,openwire port: 5672 connectionsAllowed: 5 ...By default, an acceptor is exposed only to clients in the same OpenShift cluster as the broker deployment. To also expose the acceptor to clients outside OpenShift, add the
exposeparameter and set the value totrue.spec: ... acceptors: - name: my-acceptor protocols: amqp,openwire port: 5672 connectionsAllowed: 5 expose: true ... ...When you expose an acceptor to clients outside OpenShift, the Operator automatically creates a dedicated Service and Route for each broker Pod in the deployment.
To enable secure connections to the acceptor from clients outside OpenShift, add the
sslEnabledparameter and set the value totrue.spec: ... acceptors: - name: my-acceptor protocols: amqp,openwire port: 5672 connectionsAllowed: 5 expose: true sslEnabled: true ... ...When you enable SSL (that is, Secure Sockets Layer) security on an acceptor (or connector), you can add related configuration, such as:
- The secret name used to store authentication credentials in your OpenShift cluster. A secret is required when you enable SSL on the acceptor. For more information on generating this secret, see Section 4.8.2, “Securing broker-client connections”.
-
The Transport Layer Security (TLS) protocols to use for secure network communication. TLS is an updated, more secure version of SSL. You specify the TLS protocols in the
enabledProtocolsparameter. -
Whether the acceptor uses two-way TLS, also known as mutual authentication, between the broker and the client. You specify this by setting the value of the
needClientAuthparameter totrue.
Additional resources
- To learn how to configure TLS to secure broker-client connections, including generating a secret to store authentication credentials, see Section 4.8.2, “Securing broker-client connections”.
- For a complete Custom Resource configuration reference, including configuration of acceptors and connectors, see Section 8.1, “Custom Resource configuration reference”.
4.8.2. Securing broker-client connections
If you have enabled security on your acceptor or connector (that is, by setting sslEnabled to true), you must configure Transport Layer Security (TLS) to allow certificate-based authentication between the broker and clients. TLS is an updated, more secure version of SSL. There are two primary TLS configurations:
- One-way TLS
- Only the broker presents a certificate. The certificate is used by the client to authenticate the broker. This is the most common configuration.
- Two-way TLS
- Both the broker and the client present certificates. This is sometimes called mutual authentication.
The sections that follow describe:
For both one-way and two-way TLS, you complete the configuration by generating a secret that stores the credentials required for a successful TLS handshake between the broker and the client. This is the secret name that you must specify in the sslSecret parameter of your secured acceptor or connector. The secret must contain a Base64-encoded broker key store (both one-way and two-way TLS), a Base64-encoded broker trust store (two-way TLS only), and the corresponding passwords for these files, also Base64-encoded. The one-way and two-way TLS configuration procedures show how to generate this secret.
If you do not explicitly specify a secret name in the sslSecret parameter of a secured acceptor or connector, the acceptor or connector assumes a default secret name. The default secret name uses the format <custom_resource_name>-<acceptor_name>-secret or <custom_resource_name>-<connector_name>-secret. For example, my-broker-deployment-my-acceptor-secret.
Even if the acceptor or connector assumes a default secrete name, you must still generate this secret yourself. It is not automatically created.
4.8.2.1. Configuring a broker certificate for host name verification
This section describes some requirements for the broker certificate that you must generate when configuring one-way or two-way TLS.
When a client tries to connect to a broker Pod in your deployment, the verifyHost option in the client connection URL determines whether the client compares the Common Name (CN) of the broker’s certificate to its host name, to verify that they match. The client performs this verification if you specify verifyHost=true or similar in the client connection URL.
You might omit this verification in rare cases where you have no concerns about the security of the connection, for example, if the brokers are deployed on an OpenShift cluster in an isolated network. Otherwise, for a secure connection, it is advisable for a client to perform this verification. In this case, correct configuration of the broker key store certificate is essential to ensure successful client connections.
In general, when a client is using host verification, the CN that you specify when generating the broker certificate must match the full host name for the Route on the broker Pod that the client is connecting to. For example, if you have a deployment with a single broker Pod, the CN might look like the following:
CN=my-broker-deployment-0-svc-rte-my-openshift-project.my-openshift-domain
To ensure that the CN can resolve to any broker Pod in a deployment with multiple brokers, you can specify an asterisk (*) wildcard character in place of the ordinal of the broker Pod. For example:
CN=my-broker-deployment-*-svc-rte-my-openshift-project.my-openshift-domain
The CN shown in the preceding example successfully resolves to any broker Pod in the my-broker-deployment deployment.
In addition, the Subject Alternative Name (SAN) that you specify when generating the broker certificate must individually list all broker Pods in the deployment, as a comma-separated list. For example:
"SAN=DNS:my-broker-deployment-0-svc-rte-my-openshift-project.my-openshift-domain,DNS:my-broker-deployment-1-svc-rte-my-openshift-project.my-openshift-domain,..."4.8.2.2. Configuring one-way TLS
The procedure in this section shows how to configure one-way Transport Layer Security (TLS) to secure a broker-client connection.
In one-way TLS, only the broker presents a certificate. This certificate is used by the client to authenticate the broker.
Prerequisites
- You should understand the requirements for broker certificate generation when clients use host name verification. For more information, see Section 4.8.2.1, “Configuring a broker certificate for host name verification”.
Procedure
Generate a self-signed certificate for the broker key store.
$ keytool -genkey -alias broker -keyalg RSA -keystore ~/broker.ksExport the certificate from the broker key store, so that it can be shared with clients. Export the certificate in the Base64-encoded
.pemformat. For example:$ keytool -export -alias broker -keystore ~/broker.ks -file ~/broker_cert.pemOn the client, create a client trust store that imports the broker certificate.
$ keytool -import -alias broker -keystore ~/client.ts -file ~/broker_cert.pemLog in to OpenShift Container Platform as an administrator. For example:
$ oc login -u system:adminSwitch to the project that contains your broker deployment. For example:
$ oc project <my_openshift_project>Create a secret to store the TLS credentials. For example:
$ oc create secret generic my-tls-secret \ --from-file=broker.ks=~/broker.ks \ --from-file=client.ts=~/client.ks \ --from-literal=keyStorePassword=<password> \ --from-literal=trustStorePassword=<password>NoteWhen generating a secret, OpenShift requires you to specify both a key store and a trust store. The trust store key is generically named
client.ts. For one-way TLS between the broker and a client, a trust store is not actually required. However, to successfully generate the secret, you need to specify some valid store file as a value forclient.ts. The preceding step provides a "dummy" value forclient.tsby reusing the previously-generated broker key store file. This is sufficient to generate a secret with all of the credentials required for one-way TLS.Link the secret to the service account that you created when installing the Operator. For example:
$ oc secrets link sa/amq-broker-operator secret/my-tls-secretSpecify the secret name in the
sslSecretparameter of your secured acceptor or connector. For example:spec: ... acceptors: - name: my-acceptor protocols: amqp,openwire port: 5672 sslEnabled: true sslSecret: my-tls-secret expose: true connectionsAllowed: 5 ...
4.8.2.3. Configuring two-way TLS
The procedure in this section shows how to configure two-way Transport Layer Security (TLS) to secure a broker-client connection.
In two-way TLS, both the broker and client presents certificates. The broker and client use these certificates to authenticate each other in a process sometimes called mutual authentication.
Prerequisites
- You should understand the requirements for broker certificate generation when clients use host name verification. For more information, see Section 4.8.2.1, “Configuring a broker certificate for host name verification”.
Procedure
Generate a self-signed certificate for the broker key store.
$ keytool -genkey -alias broker -keyalg RSA -keystore ~/broker.ksExport the certificate from the broker key store, so that it can be shared with clients. Export the certificate in the Base64-encoded
.pemformat. For example:$ keytool -export -alias broker -keystore ~/broker.ks -file ~/broker_cert.pemOn the client, create a client trust store that imports the broker certificate.
$ keytool -import -alias broker -keystore ~/client.ts -file ~/broker_cert.pemOn the client, generate a self-signed certificate for the client key store.
$ keytool -genkey -alias broker -keyalg RSA -keystore ~/client.ksOn the client, export the certificate from the client key store, so that it can be shared with the broker. Export the certificate in the Base64-encoded
.pemformat. For example:$ keytool -export -alias broker -keystore ~/client.ks -file ~/client_cert.pemCreate a broker trust store that imports the client certificate.
$ keytool -import -alias broker -keystore ~/broker.ts -file ~/client_cert.pemLog in to OpenShift Container Platform as an administrator. For example:
$ oc login -u system:adminSwitch to the project that contains your broker deployment. For example:
$ oc project <my_openshift_project>Create a secret to store the TLS credentials. For example:
$ oc create secret generic my-tls-secret \ --from-file=broker.ks=~/broker.ks \ --from-file=client.ts=~/broker.ts \ --from-literal=keyStorePassword=<password> \ --from-literal=trustStorePassword=<password>NoteWhen generating a secret, OpenShift requires you to specify both a key store and a trust store. The trust store key is generically named
client.ts. For two-way TLS between the broker and a client, you must generate a secret that includes the broker trust store, because this holds the client certificate. Therefore, in the preceding step, the value that you specify for theclient.tskey is actually the broker trust store file.Link the secret to the service account that you created when installing the Operator. For example:
$ oc secrets link sa/amq-broker-operator secret/my-tls-secretSpecify the secret name in the
sslSecretparameter of your secured acceptor or connector. For example:spec: ... acceptors: - name: my-acceptor protocols: amqp,openwire port: 5672 sslEnabled: true sslSecret: my-tls-secret expose: true connectionsAllowed: 5 ...
4.8.3. Networking services in your broker deployments
On the Networking pane of the OpenShift Container Platform web console for your broker deployment, there are two running services; a headless service and a ping service. The default name of the headless service uses the format <custom_resource_name>-hdls-svc, for example, my-broker-deployment-hdls-svc. The default name of the ping service uses a format of <custom_resource_name>-ping-svc, for example, `my-broker-deployment-ping-svc.
The headless service provides access to port 61616, which is used for internal broker clustering.
The ping service is used by the brokers for discovery, and enables brokers to form a cluster within the OpenShift environment. Internally, this service exposes port 8888.
4.8.4. Connecting to the broker from internal and external clients
The examples in this section show how to connect to the broker from internal clients (that is, clients in the same OpenShift cluster as the broker deployment) and external clients (that is, clients outside the OpenShift cluster).
4.8.4.1. Connecting to the broker from internal clients
To connect an internal client to a broker, in the client connection details, specify the DNS resolvable name of the broker pod. For example:
$ tcp://ex–aao-ss-0:<port>
If the internal client is using the Core protocol and the useTopologyForLoadBalancing=false key was not set in the connection URL, after the client connects to the broker for the first time, the broker can inform the client of the addresses of all the brokers in the cluster. The client can then load balance connections across all brokers.
If your brokers have durable subscription queues or request/reply queues, be aware of the caveats associated with using these queues when client connections are load balanced. For more information, see Section 4.8.4.4, “Caveats to load balancing client connections when you have durable subscription queues or reply/request queues”.
4.8.4.2. Connecting to the broker from external clients
When you expose an acceptor to external clients (that is, by setting the value of the expose parameter to true), the Operator automatically creates a dedicated service and route for each broker pod in the deployment.
An external client can connect to the broker by specifying the full host name of the route created for the broker pod. You can use a basic curl command to test external access to this full host name. For example:
$ curl https://my-broker-deployment-0-svc-rte-my-openshift-project.my-openshift-domain
The full host name of the route for the broker pod must resolve to the node that is hosting the OpenShift router. The OpenShift router uses the host name to determine where to send the traffic inside the OpenShift internal network. By default, the OpenShift router listens to port 80 for non-secured (that is, non-SSL) traffic and port 443 for secured (that is, SSL-encrypted) traffic. For an HTTP connection, the router automatically directs traffic to port 443 if you specify a secure connection URL (that is, https), or to port 80 if you specify a non-secure connection URL (that is, http).
If you want external clients to load balance connections across the brokers in the cluster:
-
Enable load balancing by configuring the
haproxy.router.openshift.io/balanceroundrobin option on the OpenShift route for each broker pod. -
If the external client uses the Core protocol, by default, the
useTopologyForLoadBalancingconfiguration option is set totrue. Make sure that this value is not set to false in the connection URL.
If your brokers have durable subscription queues or request/reply queues, be aware of the caveats associated with using these queues when load balancing client connections. For more information, see Section 4.8.4.4, “Caveats to load balancing client connections when you have durable subscription queues or reply/request queues”.
If you don’t want external clients to load balance connections across the brokers in the cluster:
-
Set the
useTopologyForLoadBalancing=falsekey in the connection URL that each client uses. - In each client’s connection URL, specify the full host name of the route for each broker pod. The client attempts to connect to the first host name in the connection URL. However, if the first host name is unavailable, the client automatically connects to the next host name in the connection URL, and so on.
For non-HTTP connections:
- Clients must explicitly specify the port number (for example, port 443) as part of the connection URL.
- For one-way TLS, the client must specify the path to its trust store and the corresponding password, as part of the connection URL.
- For two-way TLS, the client must also specify the path to its key store and the corresponding password, as part of the connection URL.
Some example client connection URLs, for supported messaging protocols, are shown below.
External Core client, using one-way TLS
tcp://my-broker-deployment-0-svc-rte-my-openshift-project.my-openshift-domain:443?useTopologyForLoadBalancing=false&sslEnabled=true \
&trustStorePath=~/client.ts&trustStorePassword=<password>
The useTopologyForLoadBalancing key is explicitly set to false in the connection URL because an external Core client cannot use topology information returned by the broker. If this key is set to true or you do not specify a value, it results in a DEBUG log message.
External Core client, using two-way TLS
tcp://my-broker-deployment-0-svc-rte-my-openshift-project.my-openshift-domain:443?useTopologyForLoadBalancing=false&sslEnabled=true \
&keyStorePath=~/client.ks&keyStorePassword=<password> \
&trustStorePath=~/client.ts&trustStorePassword=<password>
External OpenWire client, using one-way TLS
ssl://my-broker-deployment-0-svc-rte-my-openshift-project.my-openshift-domain:443"

# Also, specify the following JVM flags
-Djavax.net.ssl.trustStore=~/client.ts -Djavax.net.ssl.trustStorePassword=<password>
External OpenWire client, using two-way TLS
ssl://my-broker-deployment-0-svc-rte-my-openshift-project.my-openshift-domain:443"

# Also, specify the following JVM flags
-Djavax.net.ssl.keyStore=~/client.ks -Djavax.net.ssl.keyStorePassword=<password> \
-Djavax.net.ssl.trustStore=~/client.ts -Djavax.net.ssl.trustStorePassword=<password>
External AMQP client, using one-way TLS
amqps://my-broker-deployment-0-svc-rte-my-openshift-project.my-openshift-domain:443?transport.verifyHost=true \
&transport.trustStoreLocation=~/client.ts&transport.trustStorePassword=<password>
External AMQP client, using two-way TLS
amqps://my-broker-deployment-0-svc-rte-my-openshift-project.my-openshift-domain:443?transport.verifyHost=true \
&transport.keyStoreLocation=~/client.ks&transport.keyStorePassword=<password> \
&transport.trustStoreLocation=~/client.ts&transport.trustStorePassword=<password>
4.8.4.3. Connecting to the Broker using a NodePort
As an alternative to using a route, an OpenShift administrator can configure a NodePort to connect to a broker pod from a client outside OpenShift. The NodePort should map to one of the protocol-specific ports specified by the acceptors configured for the broker.
By default, NodePorts are in the range 30000 to 32767, which means that a NodePort typically does not match the intended port on the broker Pod.
To connect from a client outside OpenShift to the broker via a NodePort, you specify a URL in the format <protocol>://<ocp_node_ip>:<node_port_number>.
4.8.4.4. Caveats to load balancing client connections when you have durable subscription queues or reply/request queues
Durable subscriptions
A durable subscription is represented as a queue on a broker and is created when a durable subscriber first connects to the broker. This queue exists and receives messages until the client unsubscribes. If the client reconnects to a different broker, another durable subscription queue is created on that broker. This can cause the following issues.
| Issue | Mitigation |
|---|---|
| Messages may get stranded in the original subscription queue. | Ensure that message redistribution is enabled. For more information, see Enabling message redistribution. |
| Messages may be received in the wrong order as there is a window during message redistribution when other messages are still routed. | None. |
| When a client unsubscribes, it deletes the queue only on the broker it last connected to. This means that the other queues can still exist and receive messages. | To delete other empty queues that may exist for a client that unsubscribed, configure both of the following properties:
Set the For more information, see Configuring automatic creation and deletion of addresses and queues. |
Request/Reply queues
When a JMS Producer creates a temporary reply queue, the queue is created on the broker. If the client that is consuming from the work queue and replying to the temporary queue connects to a different broker, the following issues can occur.
| Issue | Mitigation |
|---|---|
| Since the reply queue does not exist on the broker that the client is connected to, the client may generate an error. |
Ensure that the |
| Messages sent to the work queue may not be distributed. |
Ensure that messages are load balanced on demand by setting the |
Additional resources
For more information about using methods such as Routes and NodePorts for communicating from outside an OpenShift cluster with services running in the cluster, see:
- Configuring ingress cluster traffic overview in the OpenShift Container Platform documentation.
4.9. Configuring large message handling for AMQP messages
Clients might send large AMQP messages that can exceed the size of the broker’s internal buffer, causing unexpected errors. To prevent this situation, you can configure the broker to store messages as files when the messages are larger than a specified minimum value. Handling large messages in this way means that the broker does not hold the messages in memory. Instead, the broker stores the messages in a dedicated directory used for storing large message files.
For a broker deployment on OpenShift Container Platform, the large messages directory is /opt/<custom_resource_name>/data/large-messages on the Persistent Volume (PV) used by the broker for message storage. When the broker stores a message as a large message, the queue retains a reference to the file in the large messages directory.
For Operator-based broker deployments in AMQ Broker 7.10, large message handling is available only for the AMQP protocol.
4.9.1. Configuring AMQP acceptors for large message handling
The following procedure shows how to configure an acceptor to handle an AMQP message larger than a specified size as a large message.
Prerequisites
- You should be familiar with how to configure acceptors for Operator-based broker deployments. See Section 4.8.1, “Configuring acceptors”.
To store large AMQP messages in a dedicated large messages directory, your broker deployment must be using persistent storage (that is,
persistenceEnabledis set totruein the Custom Resource (CR) instance used to create the deployment). For more information about configuring persistent storage, see:
Procedure
Open the Custom Resource (CR) instance in which you previously defined an AMQP acceptor.
Using the OpenShift command-line interface:
$ oc edit -f <path/to/custom_resource_instance>.yamlUsing the OpenShift Container Platform web console:
-
In the left navigation menu, click
-
Click the
ActiveMQArtemisCRD. -
Click the
Instancestab. - Locate the CR instance that corresponds to your project namespace.
-
In the left navigation menu, click
A previously-configured AMQP acceptor might resemble the following:
spec:
...
  acceptors:
  - name: my-acceptor
    protocols: amqp
    port: 5672
    connectionsAllowed: 5
    expose: true
    sslEnabled: true
...
Specify the minimum size, in bytes, of an AMQP message that the broker handles as a large message. For example:
spec:
...
  acceptors:
  - name: my-acceptor
    protocols: amqp
    port: 5672
    connectionsAllowed: 5
    expose: true
    sslEnabled: true
    amqpMinLargeMessageSize: 204800
    ...
...
In the preceding example, the broker is configured to accept AMQP messages on port 5672. Based on the value of
amqpMinLargeMessageSize, if the acceptor receives an AMQP message with a body larger than or equal to 204800 bytes (that is, 200 kilobytes), the broker stores the message as a large message.The broker stores the message in the large messages directory (
/opt/<custom_resource_name>/data/large-messages, by default) on the persistent volume (PV) used by the broker for message storage.If you do not explicitly specify a value for the
amqpMinLargeMessageSizeproperty, the broker uses a default value of 102400 (that is, 100 kilobytes).If you set
amqpMinLargeMessageSizeto a value of-1, large message handling for AMQP messages is disabled.
4.10. Configuring broker health checks
You can configure periodic health checks on a running broker container by using liveness and readiness probes. A liveness probe checks if the broker is running by pinging the broker’s HTTP port. A readiness probe checks if the broker can accept network traffic by opening a connection to each of the acceptor ports configured for the broker.
A limitation of validating the broker’s health by using basic liveness and readiness probes to open connections to HTTP and acceptor ports is that these checks are unable to identify underlying issues, for example, issues with the broker’s file system. You can incorporate the broker’s command-line utility, artemis, into a liveness or readiness probe configuration to create more comprehensive health checks that include sending messages to the broker.
4.10.1. Configuring liveness and readiness probes
The following example shows how to configure the main Custom Resource (CR) instance for your broker deployment to run health checks by using liveness and readiness probes.
Prerequisites
- You should be familiar with how to use a CR instance to create a basic broker deployment. See Section 3.4.1, “Deploying a basic broker instance”.
Procedure
Create a CR instance.
Using the OpenShift command-line interface:
Log in to OpenShift as a user that has privileges to deploy CRs in the project for the broker deployment.
oc login -u <user> -p <password> --server=<host:port>-
Open the sample CR file called
broker_activemqartemis_cr.yamlthat was included in thedeploy/crsdirectory of the Operator installation archive that you downloaded and extracted.
Using the OpenShift Container Platform web console:
- Log in to the console as a user that has privileges to deploy CRs in the project for the broker deployment.
-
Start a new CR instance based on the main broker CRD. In the left pane, click
. - Click the ActiveMQArtemis CRD.
- Click the Instances tab.
Click Create ActiveMQArtemis.
Within the console, a YAML editor opens, enabling you to configure a CR instance.
To configure a liveness probe, in the
deploymentPlansection of the CR, add alivenessProbesection. For example:spec: deploymentPlan: livenessProbe: initialDelaySeconds: 5 periodSeconds: 5initialDelaySeconds-
The delay, in seconds, before the probe runs after the container starts. The default is
5. periodSecondsThe interval, in seconds, at which the probe runs. The default is
5.NoteIf you don’t configure a liveness probe or if the handler is missing from a configured probe, the AMQ Operator creates a default TCP probe that has the following configuration. The default TCP probe attempts to open a socket to the broker container on the specified port.
spec:
  deploymentPlan:
    livenessProbe:
      tcpSocket:
        port: 8181
      initialDelaySeconds: 30
      timeoutSeconds: 5
To configure a readiness probe, in the
deploymentPlansection of the CR, add areadinessProbesection. For example:spec: deploymentPlan: readinessProbe: initialDelaySeconds: 5 periodSeconds: 5If you don’t configure a readiness probe, a built-in script checks if all acceptors can accept connections.
If you want to configure more comprehensive health checks, add the
artemis checkcommand-line utility to the liveness or readiness probe configuration.If you want to configure a health check that creates a full client connection to the broker, in the
livenessProbeorreadinessProbesection, add anexecsection. In theexecsection, add acommandsection. In thecommandsection, add theartemis check nodecommand syntax. For example:spec: deploymentPlan: readinessProbe: exec: command: - bash - '-c' - /home/jboss/amq-broker/bin/artemis - check - node - '--silent' - '--acceptor' - <acceptor name> - '--user' - $AMQ_USER - '--password' - $AMQ_PASSWORD initialDelaySeconds: 30 timeoutSeconds: 5By default, the
artemis check nodecommand uses the URI of an acceptor calledartemis. If the broker has an acceptor calledartemis, you can exclude the--acceptor <acceptor name>option from the command.Note$AMQ_USERand$AMQ_PASSWORDare environment variables that are configured by the AMQ Operator.If you want to configure a health check that produces and consumes messages, which also validates the health of the broker’s file system, in the
livenessProbeorreadinessProbesection, add anexecsection. In theexecsection, add acommandsection. In thecommandsection, add theartemis check queuecommand syntax. For example:spec: deploymentPlan: readinessProbe: exec: command: - bash - '-c' - /home/jboss/amq-broker/bin/artemis - check - queue - '--name' - livenessqueue - '--produce' - "1" - '--consume' - "1" - '--silent' - '--user' - $AMQ_USER - '--password' - $AMQ_PASSWORD initialDelaySeconds: 30 timeoutSeconds: 5NoteThe queue name that you specify must be configured on the broker and have a
routingTypeofanycast. For example:apiVersion: broker.amq.io/v1beta1 kind: ActiveMQArtemisAddress metadata: name: livenessqueue namespace: activemq-artemis-operator spec: addressName: livenessqueue queueConfiguration: purgeOnNoConsumers: false maxConsumers: -1 durable: true enabled: true queueName: livenessqueue routingType: anycast
Deploy the CR instance.
Using the OpenShift command-line interface:
- Save the CR file.
Switch to the project in which you are creating the broker deployment.
$ oc project <project_name>Create the CR instance.
$ oc create -f <path/to/custom_resource_instance>.yaml
Using the OpenShift web console:
- When you finish configuring the CR, click Create.
Additional resources
For more information about liveness and readiness probes in OpenShift Container Platform, see Monitoring application health by using health checks in the OpenShift Container Platform documentation.
4.11. High availability and message migration
4.11.1. High availability
The term high availability refers to a system that can remain operational even when part of that system fails or is shut down. For AMQ Broker on OpenShift Container Platform, this means ensuring the integrity and availability of messaging data if a broker Pod fails, or shuts down due to intentional scaledown of your deployment.
To allow high availability for AMQ Broker on OpenShift Container Platform, you run multiple broker Pods in a broker cluster. Each broker Pod writes its message data to an available Persistent Volume (PV) that you have claimed for use with a Persistent Volume Claim (PVC). If a broker Pod fails or is shut down, the message data stored in the PV is migrated to another available broker Pod in the broker cluster. The other broker Pod stores the message data in its own PV.
The following figure shows a StatefulSet-based broker deployment. In this case, the two broker Pods in the broker cluster are still running.
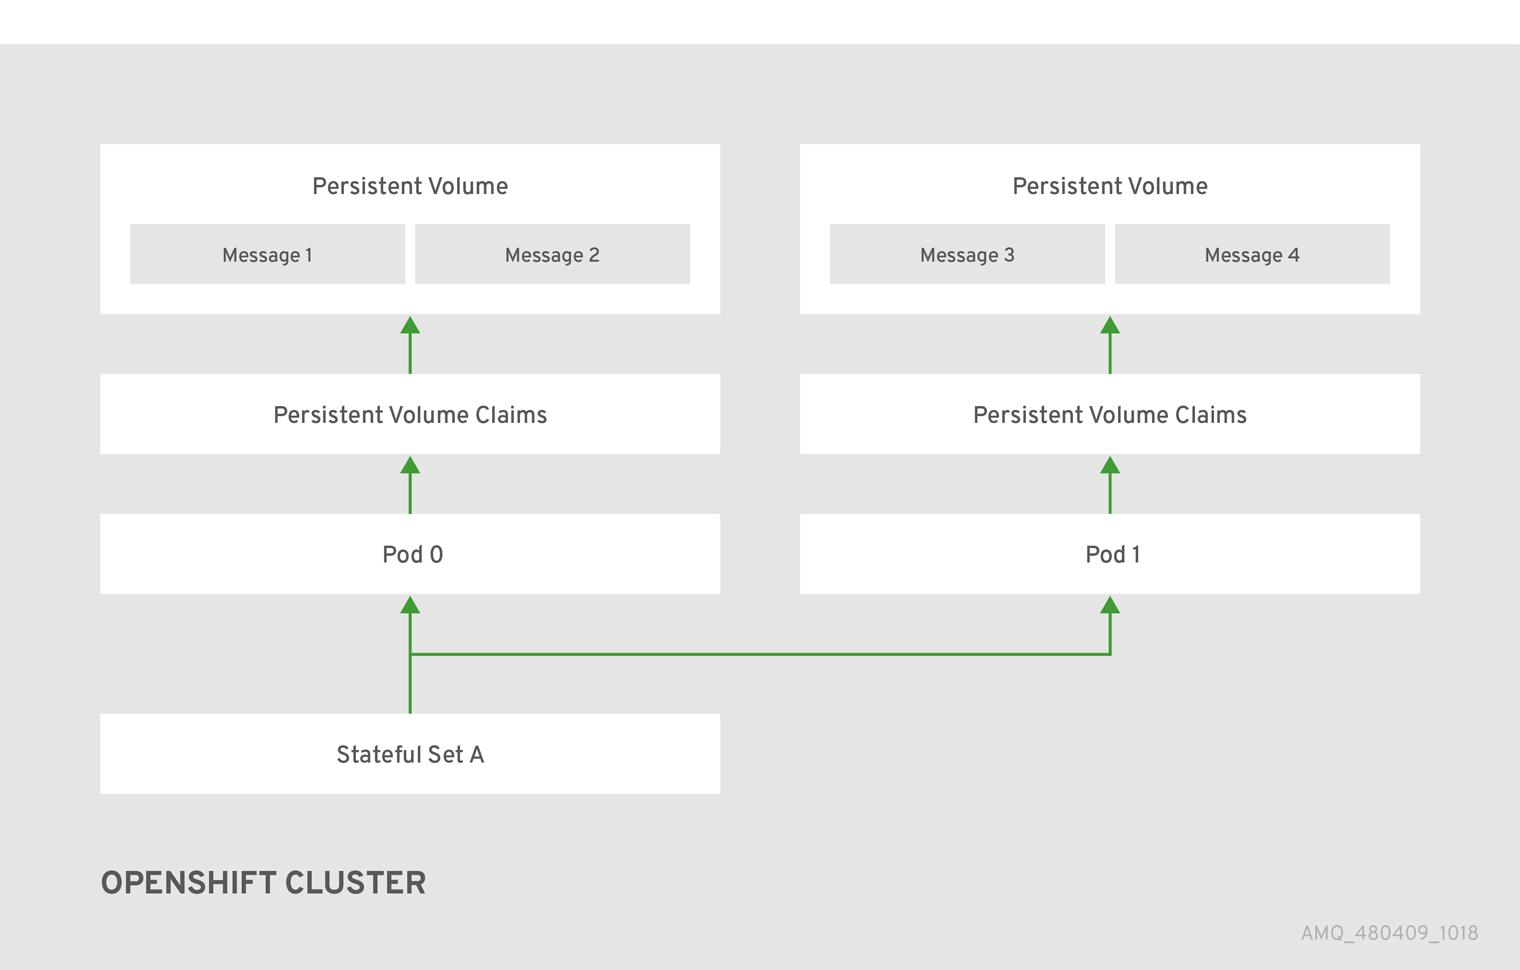
When a broker Pod shuts down, the AMQ Broker Operator automatically starts a scaledown controller that performs the migration of messages to an another broker Pod that is still running in the broker cluster. This message migration process is also known as Pod draining. The section that follows describes message migration.
4.11.2. Message migration
Message migration is how you ensure the integrity of messaging data when a broker in a clustered deployment shuts down due to an intentional scaledown of the deployment. Also known as Pod draining, this process refers to removal and redistribution of messages from a broker Pod that has shut down.
- The scaledown controller that performs message migration can operate only within a single OpenShift project. The controller cannot migrate messages between brokers in separate projects.
- To use message migration, you must have a minimum of two brokers in your deployment. A broker with two or more brokers is clustered by default.
For an Operator-based broker deployment, you enable message migration by setting messageMigration to true in the main broker Custom Resource for your deployment.
The message migration process follows these steps:
- When a broker Pod in the deployment shuts down due to an intentional scaledown of the deployment, the Operator automatically starts a scaledown controller to prepare for message migration. The scaledown controller runs in the same OpenShift project name as the broker cluster.
- The scaledown controller registers itself and listens for Kubernetes events that are related to Persistent Volume Claims (PVCs) in the project.
To check for Persistent Volumes (PVs) that have been orphaned, the scaledown controller looks at the ordinal on the volume claim. The controller compares the ordinal on the volume claim to that of the broker Pods that are still running in the StatefulSet (that is, the broker cluster) in the project.
If the ordinal on the volume claim is higher than the ordinal on any of the broker Pods still running in the broker cluster, the scaledown controller determines that the broker Pod at that ordinal has been shut down and that messaging data must be migrated to another broker Pod.
The scaledown controller starts a drainer Pod. The drainer Pod runs the broker and executes the message migration. Then, the drainer Pod identifies an alternative broker Pod to which the orphaned messages can be migrated.
NoteThere must be at least one broker Pod still running in your deployment for message migration to occur.
The following figure illustrates how the scaledown controller (also known as a drain controller) migrates messages to a running broker Pod.
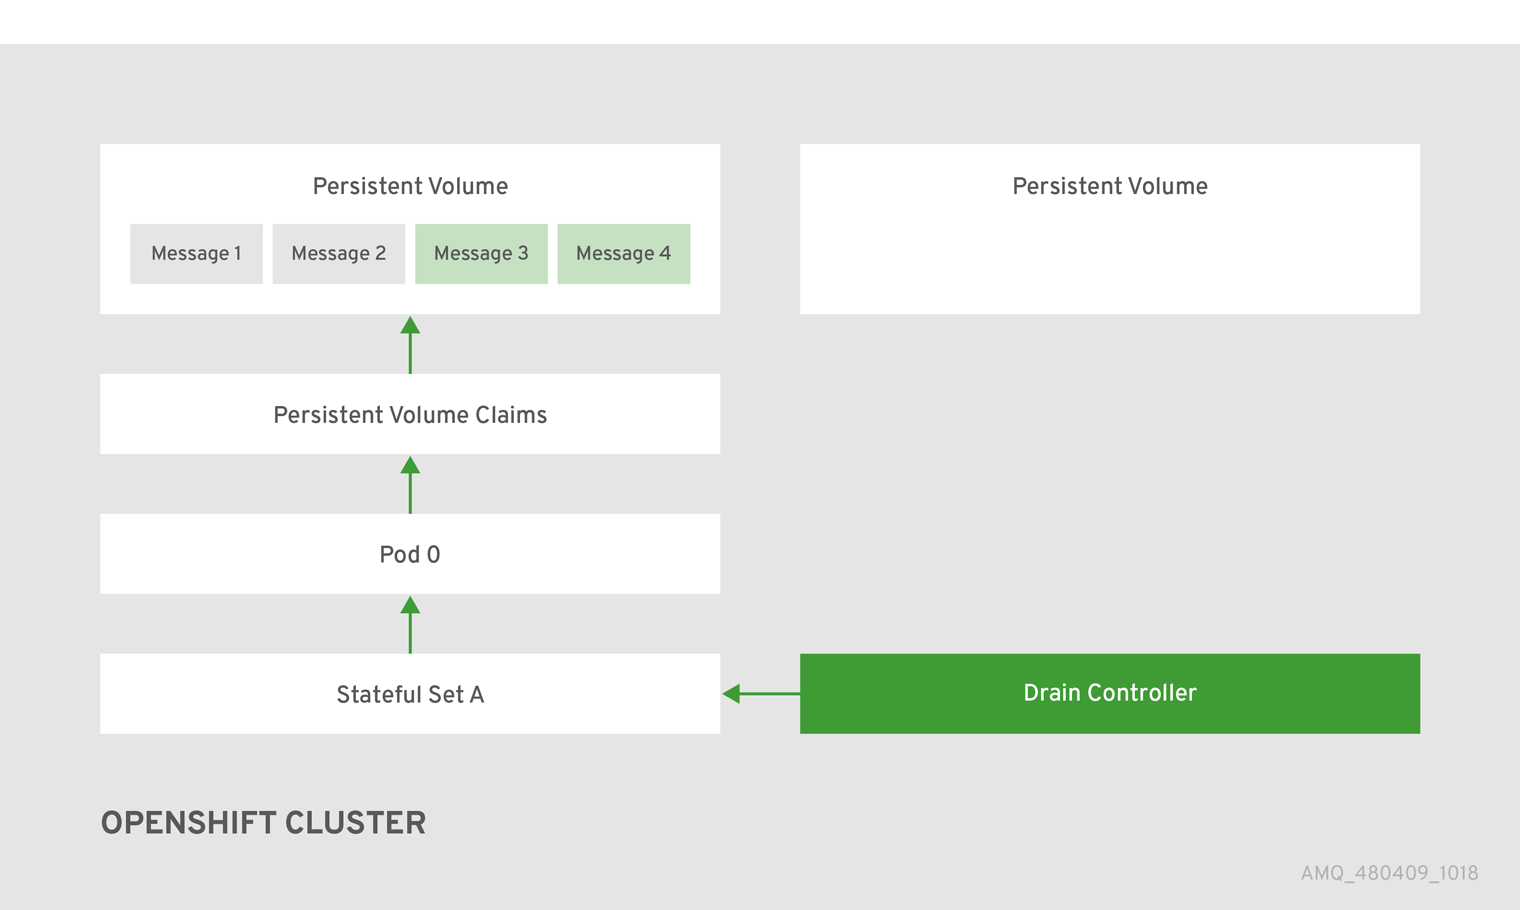
After the messages are successfully migrated to an operational broker Pod, the drainer Pod shuts down and the scaledown controller removes the PVC for the orphaned PV. The PV is returned to a "Released" state.
If you scale a broker deployment down to 0 (zero), message migration does not occur, since there is no running broker Pod to which messaging data can be migrated. However, if you scale a deployment down to zero and then back up to a size that is smaller than the original deployment, drainer Pods are started for the brokers that remain shut down.
Additional resources
- For an example of message migration when you scale down a broker deployment, see Migrating messages upon scaledown.
4.11.3. Migrating messages upon scaledown
To migrate messages upon scaledown of your broker deployment, use the main broker Custom Resource (CR) to enable message migration. The AMQ Broker Operator automatically runs a dedicated scaledown controller to execute message migration when you scale down a clustered broker deployment.
With message migration enabled, the scaledown controller within the Operator detects shutdown of a broker Pod and starts a drainer Pod to execute message migration. The drainer Pod connects to one of the other live broker Pods in the cluster and migrates messages to that live broker Pod. After migration is complete, the scaledown controller shuts down.
- A scaledown controller operates only within a single OpenShift project. The controller cannot migrate messages between brokers in separate projects.
- If you scale a broker deployment down to 0 (zero), message migration does not occur, since there is no running broker Pod to which the messaging data can be migrated. However, if you scale a deployment down to zero brokers and then back up to only some of the brokers that were in the original deployment, drainer Pods are started for the brokers that remain shut down.
The following example procedure shows the behavior of the scaledown controller.
Prerequisites
- You already have a basic broker deployment. See Section 3.4.1, “Deploying a basic broker instance”.
- You should understand how message migration works. For more information, see Section 4.11.2, “Message migration”.
Procedure
-
In the
deploy/crsdirectory of the Operator repository that you originally downloaded and extracted, open the main broker CR,broker_activemqartemis_cr.yaml. In the main broker CR set
messageMigrationandpersistenceEnabledtotrue.These settings mean that when you later scale down the size of your clustered broker deployment, the Operator automatically starts a scaledown controller and migrates messages to a broker Pod that is still running.
In your existing broker deployment, verify which Pods are running.
$ oc get podsYou see output that looks like the following.
activemq-artemis-operator-8566d9bf58-9g25l   1/1   Running   0   3m38s
ex-aao-ss-0                                  1/1   Running   0   112s
ex-aao-ss-1                                  1/1   Running   0   8s
The preceding output shows that there are three Pods running; one for the broker Operator itself, and a separate Pod for each broker in the deployment.
Log into each Pod and send some messages to each broker.
Supposing that Pod
ex-aao-ss-0has a cluster IP address of172.17.0.6, run the following command:$ /opt/amq/bin/artemis producer --url tcp://172.17.0.6:61616 --user admin --password adminSupposing that Pod
ex-aao-ss-1has a cluster IP address of172.17.0.7, run the following command:$ /opt/amq/bin/artemis producer --url tcp://172.17.0.7:61616 --user admin --password adminThe preceding commands create a queue called
TESTon each broker and add 1000 messages to each queue.
Scale the cluster down from two brokers to one.
-
Open the main broker CR,
broker_activemqartemis_cr.yaml. -
In the CR, set
deploymentPlan.sizeto1. At the command line, apply the change:
$ oc apply -f deploy/crs/broker_activemqartemis_cr.yamlYou see that the Pod
ex-aao-ss-1starts to shut down. The scaledown controller starts a new drainer Pod of the same name. This drainer Pod also shuts down after it migrates all messages from broker Podex-aao-ss-1to the other broker Pod in the cluster,ex-aao-ss-0.
-
Open the main broker CR,
-
When the drainer Pod is shut down, check the message count on the
TESTqueue of broker Podex-aao-ss-0. You see that the number of messages in the queue is 2000, indicating that the drainer Pod successfully migrated 1000 messages from the broker Pod that shut down.
4.12. Controlling placement of broker pods on OpenShift Container Platform nodes
You can control the placement of AMQ Broker pods on OpenShift Container Platform nodes by using node selectors, tolerations, or affinity and anti-affinity rules.
- Node selectors
- A node selector allows you to schedule a broker pod on a specific node.
- Tolerations
- A toleration enables a broker pod to be scheduled on a node if the toleration matches a taint configured for the node. Without a matching pod toleration, a taint allows a node to refuse to accept a pod.
- Affinity/Anti-affinity
- Node affinity rules control which nodes a pod can be scheduled on based on the node’s labels. Pod affinity and anti-affinity rules control which nodes a pod can be scheduled on based on the pods already running on that node.
4.12.1. Placing pods on specific nodes using node selectors
A node selector specifies a key-value pair that requires the broker pod to be scheduled on a node that has matching key-value pair in the node label.
The following example shows how to configure a node selector to schedule a broker pod on a specific node.
Prerequisites
- You should be familiar with how to use a CR instance to create a basic broker deployment. See Section 3.4.1, “Deploying a basic broker instance”.
- Add a label to the OpenShift Container Platform node on which you want to schedule the broker pod. For more information about adding node labels, see Using node selectors to control pod placement in the OpenShift Container Platform documentation.
Procedure
Create a Custom Resource (CR) instance based on the main broker CRD.
Using the OpenShift command-line interface:
Log in to OpenShift as a user that has privileges to deploy CRs in the project for the broker deployment.
oc login -u <user> -p <password> --server=<host:port>-
Open the sample CR file called
broker_activemqartemis_cr.yamlthat was included in thedeploy/crsdirectory of the Operator installation archive that you downloaded and extracted.
Using the OpenShift Container Platform web console:
- Log in to the console as a user that has privileges to deploy CRs in the project for the broker deployment.
-
Start a new CR instance based on the main broker CRD. In the left pane, click
. - Click the ActiveMQArtemis CRD.
- Click the Instances tab.
Click Create ActiveMQArtemis.
Within the console, a YAML editor opens, enabling you to configure a CR instance.
In the
deploymentPlansection of the CR, add anodeSelectorsection and add the node label that you want to match to select a node for the pod. For example:spec: deploymentPlan: nodeSelector: app: broker1In this example, the broker pod is scheduled on a node that has a
app: broker1label.Deploy the CR instance.
Using the OpenShift command-line interface:
- Save the CR file.
Switch to the project in which you are creating the broker deployment.
$ oc project <project_name>Create the CR instance.
$ oc create -f <path/to/custom_resource_instance>.yaml
Using the OpenShift web console:
- When you have finished configuring the CR, click Create.
Additional resources
For more information about node selectors in OpenShift Container Platform, see Placing pods on specific nodes using node selectors in the OpenShift Container Platform documentation.
4.12.2. Controlling pod placement using tolerations
Taints and tolerations control whether pods can or cannot be scheduled on specific nodes. A taint allows a node to refuse to schedule a pod unless the pod has a matching toleration. You can use taints to exclude pods from a node so the node is reserved for specific pods, such as broker pods, that have a matching toleration.
Having a matching toleration permits a broker pod to be scheduled on a node but does not guarantee that the pod is scheduled on that node. To guarantee that the broker pod is scheduled on the node that has a taint configured, you can configure affinity rules. For more information, see Section 4.12.3, “Controlling pod placement using affinity and anti-affinity rules”
The following example shows how to configure a toleration to match a taint that is configured on a node.
Prerequisites
- You should be familiar with how to use a CR instance to create a basic broker deployment. See Section 3.4.1, “Deploying a basic broker instance”.
Apply a taint to the nodes which you want to reserve for scheduling broker pods. A taint consists of a key, value, and effect. The taint effect determines if:
- existing pods on the node are evicted
- existing pods are allowed to remain on the node but new pods cannot be scheduled unless they have a matching toleration
- new pods can be scheduled on the node if necessary, but preference is to not schedule new pods on the node.
For more information about applying taints, see Controlling pod placement using node taints in the OpenShift Container Platform documentation.
Procedure
Create a Custom Resource (CR) instance based on the main broker CRD.
Using the OpenShift command-line interface:
Log in to OpenShift as a user that has privileges to deploy CRs in the project for the broker deployment.
oc login -u <user> -p <password> --server=<host:port>-
Open the sample CR file called
broker_activemqartemis_cr.yamlthat was included in thedeploy/crsdirectory of the Operator installation archive that you downloaded and extracted.
Using the OpenShift Container Platform web console:
- Log in to the console as a user that has privileges to deploy CRs in the project for the broker deployment.
-
Start a new CR instance based on the main broker CRD. In the left pane, click
. - Click the ActiveMQArtemis CRD.
- Click the Instances tab.
Click Create ActiveMQArtemis.
Within the console, a YAML editor opens, enabling you to configure a CR instance.
In the
deploymentPlansection of the CR, add atolerationssection. In thetolerationssection, add a toleration for the node taint that you want to match. For example:spec: deploymentPlan: tolerations: - key: "app" value: "amq-broker" effect: "NoSchedule"In this example, the toleration matches a node taint of
app=amq-broker:NoSchedule, so the pod can be scheduled on a node that has this taint configured.
To ensure that the broker pods are scheduled correctly, do not specify a tolerationsSeconds attribute in the tolerations section of the CR.
Deploy the CR instance.
Using the OpenShift command-line interface:
- Save the CR file.
Switch to the project in which you are creating the broker deployment.
$ oc project <project_name>Create the CR instance.
$ oc create -f <path/to/custom_resource_instance>.yaml
Using the OpenShift web console:
- When you have finished configuring the CR, click Create.
Additional resources
For more information about taints and tolerations in OpenShift Container Platform, see Controlling pod placement using node taints in the OpenShift Container Platform documentation.
4.12.3. Controlling pod placement using affinity and anti-affinity rules
You can control pod placement using node affinity, pod affinity, or pod anti-affinity rules. Node affinity allows a pod to specify an affinity towards a group of target nodes. Pod affinity and anti-affinity allows you to specify rules about how pods can or cannot be scheduled relative to other pods that are already running on a node.
4.12.3.1. Controlling pod placement using node affinity rules
Node affinity allows a broker pod to specify an affinity towards a group of nodes that it can be placed on. A broker pod can be scheduled on any node that has a label with the same key-value pair as the affinity rule that you create for a pod.
The following example shows how to configure a broker to control pod placement by using node affinity rules.
Prerequisites
- You should be familiar with how to use a CR instance to create a basic broker deployment. See Section 3.4.1, “Deploying a basic broker instance”.
-
Assign a common label to the nodes in your OpenShift Container Platform cluster that can schedule the broker pod, for example,
zone: emea.
Procedure
Create a Custom Resource (CR) instance based on the main broker CRD.
Using the OpenShift command-line interface:
Log in to OpenShift as a user that has privileges to deploy CRs in the project for the broker deployment.
oc login -u <user> -p <password> --server=<host:port>-
Open the sample CR file called
broker_activemqartemis_cr.yamlthat was included in thedeploy/crsdirectory of the Operator installation archive that you downloaded and extracted.
Using the OpenShift Container Platform web console:
- Log in to the console as a user that has privileges to deploy CRs in the project for the broker deployment.
-
Start a new CR instance based on the main broker CRD. In the left pane, click
. - Click the ActiveMQArtemis CRD.
- Click the Instances tab.
Click Create ActiveMQArtemis.
Within the console, a YAML editor opens, enabling you to configure a CR instance.
In the
deploymentPlansection of the CR, add the following sections:affinity,nodeAffinity,requiredDuringSchedulingIgnoredDuringExecution, andnodeSelectorTerms. In thenodeSelectorTermssection, add the- matchExpressionsparameter and specify the key-value string of a node label to match. For example:spec: deploymentPlan: affinity: nodeAffinity: requiredDuringSchedulingIgnoredDuringExecution: nodeSelectorTerms: - matchExpressions: - key: zone operator: In values: - emeaIn this example, the affinity rule allows the pod to be scheduled on any node that has a label with a key of
zoneand a value ofemea.Deploy the CR instance.
Using the OpenShift command-line interface:
- Save the CR file.
Switch to the project in which you are creating the broker deployment.
$ oc project <project_name>Create the CR instance.
$ oc create -f <path/to/custom_resource_instance>.yaml
Using the OpenShift web console:
- When you have finished configuring the CR, click Create.
Additional resources
For more information about affinity rules in OpenShift Container Platform, see Controlling pod placement on nodes using node affinity rules in the OpenShift Container Platform documentation.
4.12.3.2. Placing pods relative to other pods using anti-affinity rules
Anti-affinity rules allow you to constrain which nodes the broker pods can be scheduled on based on the labels of pods already running on that node.
A use case for using anti-affinity rules is to ensure that multiple broker pods in a cluster are not scheduled on the same node, which creates a single point of failure. If you do not control the placement of pods, 2 or more broker pods in a cluster can be scheduled on the same node.
The following example shows how to configure anti-affinity rules to prevent 2 broker pods in a cluster from being scheduled on the same node.
Prerequisites
- You should be familiar with how to use a CR instance to create a basic broker deployment. See Section 3.4.1, “Deploying a basic broker instance”.
Procedure
Create a CR instance for the first broker in the cluster based on the main broker CRD.
Using the OpenShift command-line interface:
Log in to OpenShift as a user that has privileges to deploy CRs in the project for the broker deployment.
oc login -u <user> -p <password> --server=<host:port>-
Open the sample CR file called
broker_activemqartemis_cr.yamlthat was included in thedeploy/crsdirectory of the Operator installation archive that you downloaded and extracted.
Using the OpenShift Container Platform web console:
- Log in to the console as a user that has privileges to deploy CRs in the project for the broker deployment.
-
Start a new CR instance based on the main broker CRD. In the left pane, click
. - Click the ActiveMQArtemis CRD.
- Click the Instances tab.
Click Create ActiveMQArtemis.
Within the console, a YAML editor opens, enabling you to configure a CR instance.
In the
deploymentPlansection of the CR, add alabelssection. Create an identifying label for the first broker pod so that you can create an anti-affinity rule on the second broker pod to prevent both pods from being scheduled on the same node. For example:spec: deploymentPlan: labels: name: broker1Deploy the CR instance.
Using the OpenShift command-line interface:
- Save the CR file.
Switch to the project in which you are creating the broker deployment.
$ oc project <project_name>Create the CR instance.
$ oc create -f <path/to/custom_resource_instance>.yaml
Using the OpenShift web console:
- When you have finished configuring the CR, click Create.
Create a CR instance for the second broker in the cluster based on the main broker CRD.
In the
deploymentPlansection of the CR, add the following sections:affinity,podAntiAffinity,requiredDuringSchedulingIgnoredDuringExecution, andlabelSelector. In thelabelSelectorsection, add the- matchExpressionsparameter and specify the key-value string of the broker pod label to match, so this pod is not scheduled on the same node.spec: deploymentPlan: affinity: podAntiAffinity: requiredDuringSchedulingIgnoredDuringExecution: labelSelector: - matchExpressions: - key: name operator: In values: - broker1 topologyKey: topology.kubernetes.io/zoneIn this example, the pod anti-affinity rule prevents the pod from being placed on the same node as a pod that has a label with a key of
nameand a value ofbroker1, which is the label assigned to the first broker in the cluster.
Deploy the CR instance.
Using the OpenShift command-line interface:
- Save the CR file.
Switch to the project in which you are creating the broker deployment.
$ oc project <project_name>Create the CR instance.
$ oc create -f <path/to/custom_resource_instance>.yaml
Using the OpenShift web console:
- When you have finished configuring the CR, click Create.
Additional resources
For more information about affinity rules in OpenShift Container Platform, see Controlling pod placement on nodes using node affinity rules in the OpenShift Container Platform documentation.