Chapter 4. Configuring addresses and queues
4.1. Addresses, queues, and routing types
In AMQ Broker, the addressing model comprises three main concepts; addresses, queues, and routing types.
An address represents a messaging endpoint. Within the configuration, a typical address is given a unique name, one or more queues, and a routing type.
A queue is associated with an address. There can be multiple queues per address. Once an incoming message is matched to an address, the message is sent on to one or more of its queues, depending on the routing type configured. Queues can be configured to be automatically created and deleted. You can also configure an address (and hence its associated queues) as durable. Messages in a durable queue can survive a crash or restart of the broker, as long as the messages in the queue are also persistent. By contrast, messages in a non-durable queue do not survive a crash or restart of the broker, even if the messages themselves are persistent.
A routing type determines how messages are sent to the queues associated with an address. In AMQ Broker, you can configure an address with two different routing types, as shown in the table.
| If you want your messages routed to… | Use this routing type… |
|---|---|
| A single queue within the matching address, in a point-to-point manner |
|
| Every queue within the matching address, in a publish-subscribe manner |
|
An address must have at least one defined routing type.
It is possible to define more than one routing type per address, but this is not recommended.
If an address does have both routing types defined, and the client does not show a preference for either one, the broker defaults to the multicast routing type.
Additional resources
For more information about configuring:
-
Point-to-point messaging using the
anycastrouting type, see Section 4.3, “Configuring addresses for point-to-point messaging” -
Publish-subscribe messaging using the
multicastrouting type, see Section 4.4, “Configuring addresses for publish-subscribe messaging”
-
Point-to-point messaging using the
4.1.1. Address and queue naming requirements
Be aware of the following requirements when you configure addresses and queues:
To ensure that a client can connect to a queue, regardless of which wire protocol the client uses, your address and queue names should not include any of the following characters:
&::,?>-
The number sign (
#) and asterisk (*) characters are reserved for wildcard expressions and should not be used in address and queue names. For more information, see Section 4.2.1, “AMQ Broker wildcard syntax”. - Address and queue names should not include spaces.
-
To separate words in an address or queue name, use the configured delimiter character. The default delimiter character is a period (
.). For more information, see Section 4.2.1, “AMQ Broker wildcard syntax”.
4.2. Applying address settings to sets of addresses
In AMQ Broker, you can apply the configuration specified in an address-setting element to a set of addresses by using a wildcard expression to represent the matching address name.
The following sections describe how to use wildcard expressions.
4.2.1. AMQ Broker wildcard syntax
AMQ Broker uses a specific syntax for representing wildcards in address settings. Wildcards can also be used in security settings, and when creating consumers.
-
A wildcard expression contains words delimited by a period (
.). The number sign (
#) and asterisk (*) characters also have special meaning and can take the place of a word, as follows:- The number sign character means "match any sequence of zero or more words". Use this at the end of your expression.
- The asterisk character means "match a single word". Use this anywhere within your expression.
Matching is not done character by character, but at each delimiter boundary. For example, an address-setting element that is configured to match queues with my in their name would not match with a queue named myqueue.
When more than one address-setting element matches an address, the broker overlays configurations, using the configuration of the least specific match as the baseline. Literal expressions are more specific than wildcards, and an asterisk (*) is more specific than a number sign (#). For example, both my.destination and my.* match the address my.destination. In this case, the broker first applies the configuration found under my.*, since a wildcard expression is less specific than a literal. Next, the broker overlays the configuration of the my.destination address setting element, which overwrites any configuration shared with my.*. For example, given the following configuration, a queue associated with my.destination has max-delivery-attempts set to 3 and last-value-queue set to false.
<address-setting match="my.*">
    <max-delivery-attempts>3</max-delivery-attempts>
    <last-value-queue>true</last-value-queue>
</address-setting>
<address-setting match="my.destination">
    <last-value-queue>false</last-value-queue>
</address-setting>
The examples in the following table illustrate how wildcards are used to match a set of addresses.
| Example | Description |
|---|---|
|
|
The default |
|
|
Matches |
|
|
Matches |
|
|
Matches |
4.2.2. Configuring the broker wildcard syntax
The following procedure show how to customize the syntax used for wildcard addresses.
Procedure
-
Open the
<broker_instance_dir>/etc/broker.xmlconfiguration file. Add a
<wildcard-addresses>section to the configuration, as in the example below.<configuration> <core> ... <wildcard-addresses> // <enabled>true</enabled> // <delimiter>,</delimiter> // <any-words>@</any-words> // <single-word>$</single-word> </wildcard-addresses> ... </core> </configuration>enabled-
When set to
true, instruct the broker to use your custom settings. delimiter-
Provide a custom character to use as the
delimiterinstead of the default, which is.. any-words-
The character provided as the value for
any-wordsis used to mean 'match any sequence of zero or more words' and will replace the default#. Use this character at the end of your expression. single-word-
The character provided as the value for
single-wordis used to mean 'match a single word' and will replaced the default*. Use this character anywhere within your expression.
4.3. Configuring addresses for point-to-point messaging
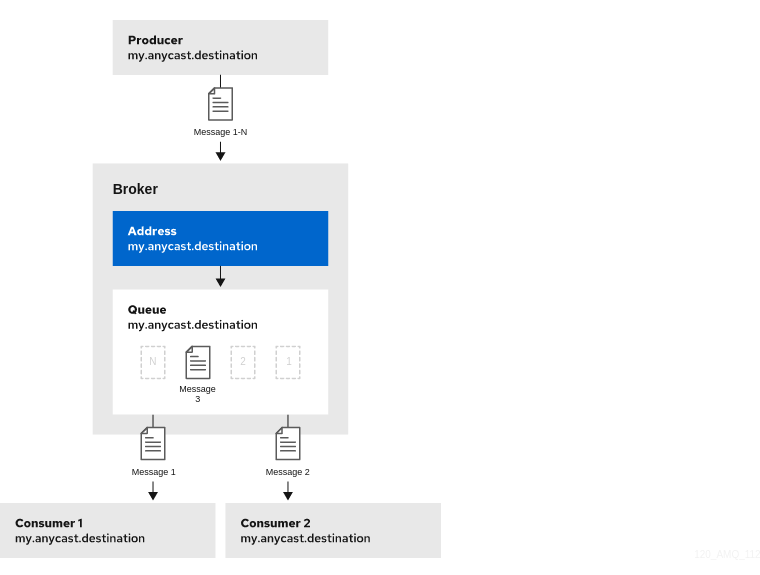
Point-to-point messaging is a common scenario in which a message sent by a producer has only one consumer. AMQP and JMS message producers and consumers can make use of point-to-point messaging queues, for example. To ensure that the queues associated with an address receive messages in a point-to-point manner, you define an anycast routing type for the given address element in your broker configuration.
When a message is received on an address using anycast, the broker locates the queue associated with the address and routes the message to it. A consumer might then request to consume messages from that queue. If multiple consumers connect to the same queue, messages are distributed between the consumers equally, provided that the consumers are equally able to handle them.
The following figure shows an example of point-to-point messaging.
4.3.1. Configuring basic point-to-point messaging
The following procedure shows how to configure an address with a single queue for point-to-point messaging.
Procedure
-
Open the
<broker_instance_dir>/etc/broker.xmlconfiguration file. Wrap an
anycastconfiguration element around the chosenqueueelement of anaddress. Ensure that the values of thenameattribute for both theaddressandqueueelements are the same. For example:<configuration ...> <core ...> ... <address name="my.anycast.destination"> <anycast> <queue name="my.anycast.destination"/> </anycast> </address> </core> </configuration>
4.3.2. Configuring point-to-point messaging for multiple queues
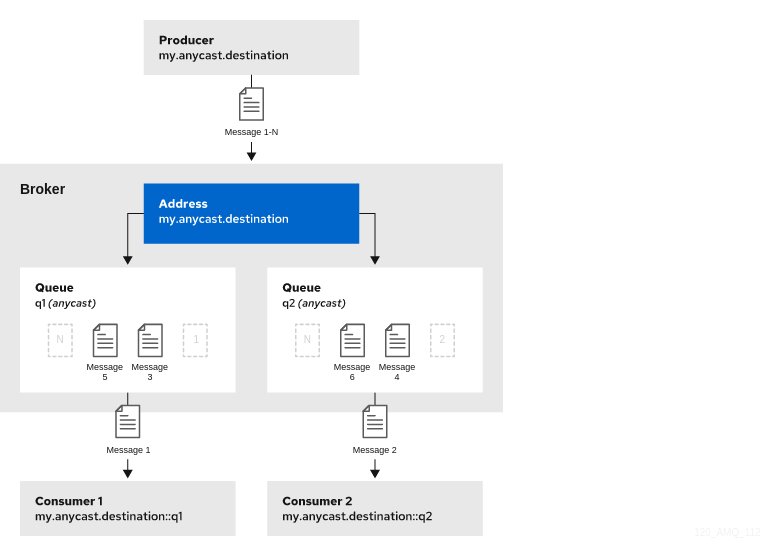
You can define more than one queue on an address that uses an anycast routing type. The broker distributes messages sent to an anycast address evenly across all associated queues. By specifying a Fully Qualified Queue Name (FQQN), you can connect a client to a specific queue. If more than one consumer connects to the same queue, the broker distributes messages evenly between the consumers.
The following figure shows an example of point-to-point messaging using two queues.
The following procedure shows how to configure point-to-point messaging for an address that has multiple queues.
Procedure
-
Open the
<broker_instance_dir>/etc/broker.xmlconfiguration file. Wrap an
anycastconfiguration element around thequeueelements in theaddresselement. For example:<configuration ...> <core ...> ... <address name="my.anycast.destination"> <anycast> <queue name="q1"/> <queue name="q2"/> </anycast> </address> </core> </configuration>
If you have a configuration such as that shown above mirrored across multiple brokers in a cluster, the cluster can load-balance point-to-point messaging in a way that is opaque to producers and consumers. The exact behavior depends on how the message load balancing policy is configured for the cluster.
Additional resources
For more information about:
- Specifying Fully Qualified Queue Names, see Section 4.9, “Specifying a fully qualified queue name”.
- How to configure message load balancing for a broker cluster, see Section 14.1.1, “How broker clusters balance message load”.
4.4. Configuring addresses for publish-subscribe messaging
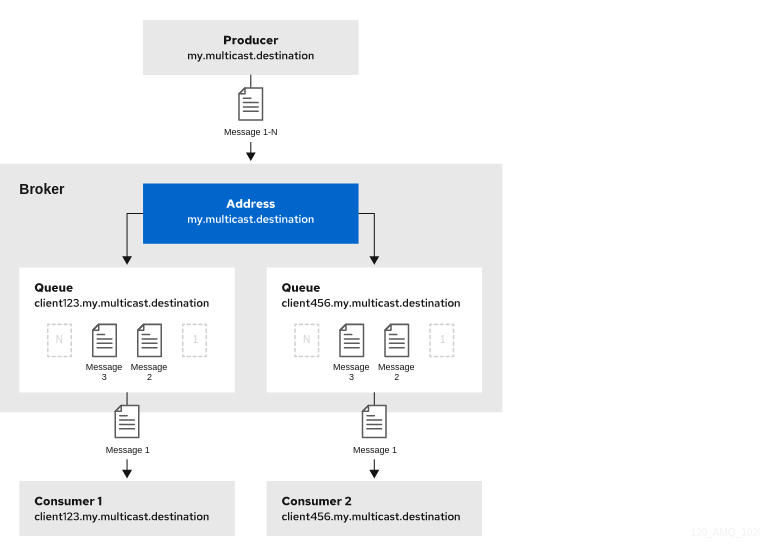
In a publish-subscribe scenario, messages are sent to every consumer subscribed to an address. JMS topics and MQTT subscriptions are two examples of publish-subscribe messaging. To ensure that the queues associated with an address receive messages in a publish-subscribe manner, you define a multicast routing type for the given address element in your broker configuration.
When a message is received on an address with a multicast routing type, the broker routes a copy of the message to each queue associated with the address. To reduce the overhead of copying, each queue is sent only a reference to the message, and not a full copy.
The following figure shows an example of publish-subscribe messaging.
The following procedure shows how to configure an address for publish-subscribe messaging.
Procedure
-
Open the
<broker_instance_dir>/etc/broker.xmlconfiguration file. Add an empty
multicastconfiguration element to the address.<configuration ...> <core ...> ... <address name="my.multicast.destination"> <multicast/> </address> </core> </configuration>(Optional) Add one or more
queueelements to the address and wrap themulticastelement around them. This step is typically not needed since the broker automatically creates a queue for each subscription requested by a client.<configuration ...> <core ...> ... <address name="my.multicast.destination"> <multicast> <queue name="client123.my.multicast.destination"/> <queue name="client456.my.multicast.destination"/> </multicast> </address> </core> </configuration>
4.5. Configuring an address for both point-to-point and publish-subscribe messaging
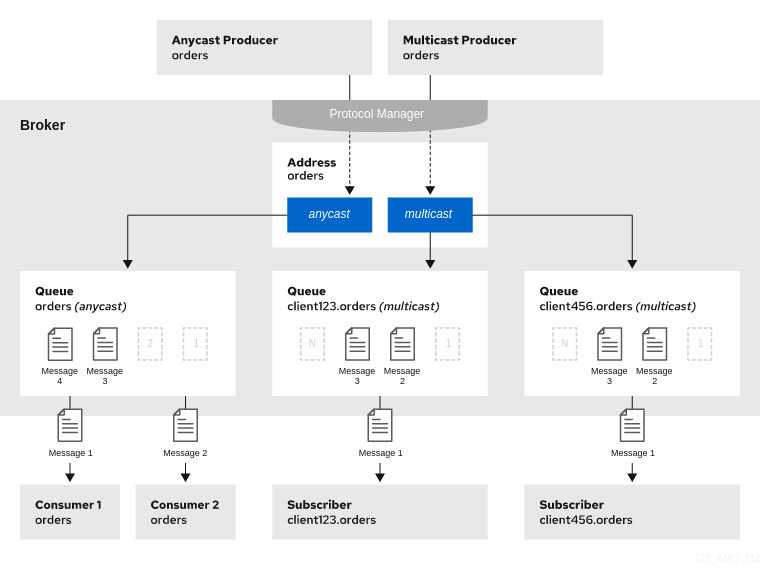
You can also configure an address with both point-to-point and publish-subscribe semantics.
Configuring an address that uses both point-to-point and publish-subscribe semantics is not typically recommended. However, it can be useful when you want, for example, a JMS queue named orders and a JMS topic also named orders. The different routing types make the addresses appear to be distinct for client connections. In this situation, messages sent by a JMS queue producer use the anycast routing type. Messages sent by a JMS topic producer use the multicast routing type. When a JMS topic consumer connects to the broker, it is attached to its own subscription queue. A JMS queue consumer, however, is attached to the anycast queue.
The following figure shows an example of point-to-point and publish-subscribe messaging used together.
The following procedure shows how to configure an address for both point-to-point and publish-subscribe messaging.
The behavior in this scenario is dependent on the protocol being used. For JMS, there is a clear distinction between topic and queue producers and consumers, which makes the logic straightforward. Other protocols like AMQP do not make this distinction. A message being sent via AMQP is routed by both anycast and multicast and consumers default to anycast. For more information, see Chapter 3, Configuring messaging protocols in network connections.
Procedure
-
Open the
<broker_instance_dir>/etc/broker.xmlconfiguration file. Wrap an
anycastconfiguration element around thequeueelements in theaddresselement. For example:<configuration ...> <core ...> ... <address name="orders"> <anycast> <queue name="orders"/> </anycast> </address> </core> </configuration>Add an empty
multicastconfiguration element to the address.<configuration ...> <core ...> ... <address name="orders"> <anycast> <queue name="orders"/> </anycast> <multicast/> </address> </core> </configuration>NoteTypically, the broker creates subscription queues on demand, so there is no need to list specific queue elements inside the
multicastelement.
4.6. Adding a routing type to an acceptor configuration
Normally, if a message is received by an address that uses both anycast and multicast, one of the anycast queues receives the message and all of the multicast queues. However, clients can specify a special prefix when connecting to an address to specify whether to connect using anycast or multicast. The prefixes are custom values that are designated using the anycastPrefix and multicastPrefix parameters within the URL of an acceptor in the broker configuration.
The following procedure shows how to configure prefixes for a given acceptor.
Procedure
-
Open the
<broker_instance_dir>/etc/broker.xmlconfiguration file. For a given acceptor, to configure an
anycastprefix, addanycastPrefixto the configured URL. Set a custom value. For example:<configuration ...> <core ...> ... <acceptors> <!-- Acceptor for every supported protocol --> <acceptor name="artemis">tcp://0.0.0.0:61616?protocols=AMQP;anycastPrefix=anycast://</acceptor> </acceptors> ... </core> </configuration>Based on the preceding configuration, the acceptor is configured to use
anycast://for theanycastprefix. Client code can specifyanycast://<my.destination>/if the client needs to send a message to only one of theanycastqueues.For a given acceptor, to configure a
multicastprefix, addmulticastPrefixto the configured URL. Set a custom value. For example:<configuration ...> <core ...> ... <acceptors> <!-- Acceptor for every supported protocol --> <acceptor name="artemis">tcp://0.0.0.0:61616?protocols=AMQP;multicastPrefix=multicast://</acceptor> </acceptors> ... </core> </configuration>Based on the preceding configuration, the acceptor is configured to use
multicast://for themulticastprefix. Client code can specifymulticast://<my.destination>/if the client needs the message sent to only themulticastqueues.
4.7. Configuring subscription queues
In most cases, it is not necessary to manually create subscription queues because protocol managers create subscription queues automatically when clients first request to subscribe to an address. See Section 4.8.3, “Protocol managers and addresses” for more information. For durable subscriptions, the generated queue name is usually a concatenation of the client ID and the address.
The following sections show how to manually create subscription queues, when required.
4.7.1. Configuring a durable subscription queue
When a queue is configured as a durable subscription, the broker saves messages for any inactive subscribers and delivers them to the subscribers when they reconnect. Therefore, a client is guaranteed to receive each message delivered to the queue after subscribing to it.
Procedure
-
Open the
<broker_instance_dir>/etc/broker.xmlconfiguration file. Add the
durableconfiguration element to a chosen queue. Set a value oftrue.<configuration ...> <core ...> ... <address name="my.durable.address"> <multicast> <queue name="q1"> <durable>true</durable> </queue> </multicast> </address> </core> </configuration>NoteBecause queues are durable by default, including the
durableelement and setting the value totrueis not strictly necessary to create a durable queue. However, explicitly including the element enables you to later change the behavior of the queue to non-durable, if necessary.
4.7.3. Configuring a non-durable subscription queue
Non-durable subscriptions are usually managed by the relevant protocol manager, which creates and deletes temporary queues.
However, if you want to manually create a queue that behaves like a non-durable subscription queue, you can use the purge-on-no-consumers attribute on the queue. When purge-on-no-consumers is set to true, the queue does not start receiving messages until a consumer is connected. In addition, when the last consumer is disconnected from the queue, the queue is purged (that is, its messages are removed). The queue does not receive any further messages until a new consumer is connected to the queue.
Procedure
-
Open the
<broker_instance_dir>/etc/broker.xmlconfiguration file. Add the
purge-on-no-consumersattribute to each chosen queue. Set a value oftrue.<configuration ...> <core ...> ... <address name="my.non.durable.address"> <multicast> <queue name="orders1" purge-on-no-consumers="true"/> </multicast> </address> </core> </configuration>
4.8. Creating and deleting addresses and queues automatically
You can configure the broker to automatically create addresses and queues, and to delete them after they are no longer in use. This saves you from having to pre-configure each address before a client can connect to it.
4.8.1. Configuration options for automatic queue creation and deletion
The following table lists the configuration elements available when configuring an address-setting element to automatically create and delete queues and addresses.
If you want the address-setting to… | Add this configuration… |
|---|---|
| Create addresses when a client sends a message to or attempts to consume a message from a queue mapped to an address that does not exist. |
|
| Create a queue when a client sends a message to or attempts to consume a message from a queue. |
|
| Delete an automatically created address when it no longer has any queues. |
|
| Delete an automatically created queue when the queue has 0 consumers and 0 messages. |
|
| Use a specific routing type if the client does not specify one. |
|
4.8.2. Configuring automatic creation and deletion of addresses and queues
The following procedure shows how to configure automatic creation and deletion of addresses and queues.
Procedure
-
Open the
<broker_instance_dir>/etc/broker.xmlconfiguration file. Configure an
address-settingfor automatic creation and deletion. The following example uses all of the configuration elements mentioned in the previous table.<configuration ...> <core ...> ... <address-settings> <address-setting match="activemq.#"> <auto-create-addresses>true</auto-create-addresses> <auto-delete-addresses>true</auto-delete-addresses> <auto-create-queues>true</auto-create-queues> <auto-delete-queues>true</auto-delete-queues> <default-address-routing-type>ANYCAST</default-address-routing-type> </address-setting> </address-settings> ... </core> </configuration>address-setting-
The configuration of the
address-settingelement is applied to any address or queue that matches the wildcard addressactivemq.#. auto-create-addresses- When a client requests to connect to an address that does not yet exist, the broker creates the address.
auto-delete-addresses- An automatically created address is deleted when it no longer has any queues associated with it.
auto-create-queues- When a client requests to connect to a queue that does not yet exist, the broker creates the queue.
auto-delete-queues- An automatically created queue is deleted when it no longer has any consumers or messages.
default-address-routing-type-
If the client does not specify a routing type when connecting, the broker uses
ANYCASTwhen delivering messages to an address. The default value isMULTICAST.
Additional resources
For more information about:
- The wildcard syntax that you can use when configuring addresses, see Section 4.2, “Applying address settings to sets of addresses”.
- Routing types, see Section 4.1, “Addresses, queues, and routing types”.
4.8.3. Protocol managers and addresses
A component called a protocol manager maps protocol-specific concepts to concepts used in the AMQ Broker address model; queues and routing types. In certain situations, a protocol manager might automatically create queues on the broker.
For example, when a client sends an MQTT subscription packet with the addresses /house/room1/lights and /house/room2/lights, the MQTT protocol manager understands that the two addresses require multicast semantics. Therefore, the protocol manager first looks to ensure that multicast is enabled for both addresses. If not, it attempts to dynamically create them. If successful, the protocol manager then creates special subscription queues for each subscription requested by the client.
Each protocol behaves slightly differently. The table below describes what typically happens when subscribe frames to various types of queue are requested.
| If the queue is of this type… | The typical action for a protocol manager is to… |
|---|---|
| Durable subscription queue |
Look for the appropriate address and ensures that The special name allows the protocol manager to quickly identify the required client subscription queues should the client disconnect and reconnect at a later date. When the client unsubscribes the queue is deleted. |
| Temporary subscription queue |
Look for the appropriate address and ensures that When the client disconnects the queue is deleted. |
| Point-to-point queue |
Look for the appropriate address and ensures that If the queue is auto created, it is automatically deleted once there are no consumers and no messages in it. |
4.9. Specifying a fully qualified queue name
Internally, the broker maps a client’s request for an address to specific queues. The broker decides on behalf of the client to which queues to send messages, or from which queue to receive messages. However, more advanced use cases might require that the client specifies a queue name directly. In these situations the client can use a fully qualified queue name (FQQN). An FQQN includes both the address name and the queue name, separated by a ::.
The following procedure shows how to specify an FQQN when connecting to an address with multiple queues.
Prerequisites
You have an address configured with two or more queues, as shown in the example below.
<configuration ...>
  <core ...>
    ...
    <addresses>
       <address name="my.address">
          <anycast>
             <queue name="q1" />
             <queue name="q2" />
          </anycast>
       </address>
    </addresses>
  </core>
</configuration>
Procedure
In the client code, use both the address name and the queue name when requesting a connection from the broker. Use two colons,
::, to separate the names. For example:String FQQN = "my.address::q1"; Queue q1 session.createQueue(FQQN); MessageConsumer consumer = session.createConsumer(q1);
4.10. Configuring sharded queues
A common pattern for processing of messages across a queue where only partial ordering is required is to use queue sharding. This means that you define an anycast address that acts as a single logical queue, but which is backed by many underlying physical queues.
Procedure
-
Open the
<broker_instance_dir>/etc/broker.xmlconfiguration file. Add an
addresselement and set thenameattribute. For example:<configuration ...> <core ...> ... <addresses> <address name="my.sharded.address"></address> </addresses> </core> </configuration>Add the
anycastrouting type and include the desired number of sharded queues. In the example below, the queuesq1,q2, andq3are added asanycastdestinations.<configuration ...> <core ...> ... <addresses> <address name="my.sharded.address"> <anycast> <queue name="q1" /> <queue name="q2" /> <queue name="q3" /> </anycast> </address> </addresses> </core> </configuration>
Based on the preceding configuration, messages sent to my.sharded.address are distributed equally across q1, q2 and q3. Clients are able to connect directly to a specific physical queue when using a Fully Qualified Queue Name (FQQN). and receive messages sent to that specific queue only.
To tie particular messages to a particular queue, clients can specify a message group for each message. The broker routes grouped messages to the same queue, and one consumer processes them all.
Additional resources
For more information about:
- Fully Qualified Queue Names, see Section 4.9, “Specifying a fully qualified queue name”
- Message grouping, see Using message groups in the AMQ Core Protocol JMS documentation.
4.11. Configuring last value queues
A last value queue is a type of queue that discards messages in the queue when a newer message with the same last value key value is placed in the queue. Through this behavior, last value queues retain only the last values for messages of the same key.
A simple use case for a last value queue is for monitoring stock prices, where only the latest value for a particular stock is of interest.
If a message without a configured last value key is sent to a last value queue, the broker handles this message as a "normal" message. Such messages are not purged from the queue when a new message with a configured last value key arrives.
You can configure last value queues individually, or for all of the queues associated with a set of addresses.
The following procedures show how to configure last value queues in these ways.
4.11.1. Configuring last value queues individually
The following procedure shows to configure last value queues individually.
-
Open the
<broker_instance_dir>/etc/broker.xmlconfiguration file. For a given queue, add the
last-value-keykey and specify a custom value. For example:<address name="my.address"> <multicast> <queue name="prices1" last-value-key="stock_ticker"/> </multicast> </address>Alternatively, you can configure a last value queue that uses the default last value key name of
_AMQ_LVQ_NAME. To do this, add thelast-valuekey to a given queue. Set the value totrue. For example:<address name="my.address"> <multicast> <queue name="prices1" last-value="true"/> </multicast> </address>
4.11.2. Configuring last value queues for addresses
The following procedure shows to configure last value queues for an address or set of addresses.
-
Open the
<broker_instance_dir>/etc/broker.xmlconfiguration file. In the
address-settingelement, for a matching address, adddefault-last-value-key. Specify a custom value. For example:<address-setting match="lastValue"> <default-last-value-key>stock_ticker</default-last-value-key> </address-setting>Based on the preceding configuration, all queues associated with the
lastValueaddress use a last value key ofstock_ticker. By default, the value ofdefault-last-value-keyis not set.To configure last value queues for a set of addresses, you can specify an address wildcard. For example:
<address-setting match="lastValue.*"> <default-last-value-key>stock_ticker</default-last-value-key> </address-setting>Alternatively, you can configure all queues associated with an address or set of addresses to use the default last value key name of
_AMQ_LVQ_NAME. To do this, adddefault-last-value-queueinstead ofdefault-last-value-key. Set the value totrue. For example:<address-setting match="lastValue"> <default-last-value-queue>true</default-last-value-queue> </address-setting>
Additional resources
- For more information about the wildcard syntax that you can use when configuring addresses, see Section 4.2, “Applying address settings to sets of addresses”.
4.11.3. Example of last value queue behavior
This example shows the behavior of a last value queue.
In your broker.xml configuration file, suppose that you have added configuration that looks like the following:
<address name="my.address">
    <multicast>
        <queue name="prices1" last-value-key="stock_ticker"/>
    </multicast>
</address>
The preceding configuration creates a queue called prices1, with a last value key of stock_ticker.
Now, suppose that a client sends two messages. Each message has the same value of ATN for the property stock_ticker. Each message has a different value for a property called stock_price. Each message is sent to the same queue, prices1.
TextMessage message = session.createTextMessage("First message with last value property set");
message.setStringProperty("stock_ticker", "ATN");
message.setStringProperty("stock_price", "36.83");
producer.send(message);
TextMessage message = session.createTextMessage("Second message with last value property set");
message.setStringProperty("stock_ticker", "ATN");
message.setStringProperty("stock_price", "37.02");
producer.send(message);
When two messages with the same value for the stock_ticker last value key (in this case, ATN) arrive to the prices1 queue, only the latest message remains in the queue, with the first message being purged. At the command line, you can enter the following lines to validate this behavior:
TextMessage messageReceived = (TextMessage)messageConsumer.receive(5000);
System.out.format("Received message: %s\n", messageReceived.getText());
In this example, the output you see is the second message, since both messages use the same value for the last value key and the second message was received in the queue after the first.
4.11.4. Enforcing non-destructive consumption for last value queues
When a consumer connects to a queue, the normal behavior is that messages sent to that consumer are acquired exclusively by the consumer. When the consumer acknowledges receipt of the messages, the broker removes the messages from the queue.
As an alternative to the normal consumption behaviour, you can configure a queue to enforce non-destructive consumption. In this case, when a queue sends a message to a consumer, the message can still be received by other consumers. In addition, the message remains in the queue even when a consumer has consumed it. When you enforce this non-destructive consumption behavior, the consumers are known as queue browsers.
Enforcing non-destructive consumption is a useful configuration for last value queues, because it ensures that the queue always holds the latest value for a particular last value key.
The following procedure shows how to enforce non-destructive consumption for a last value queue.
Prerequisites
You have already configured last-value queues individually, or for all queues associated with an address or set of addresses. For more information, see:
Procedure
-
Open the
<broker_instance_dir>/etc/broker.xmlconfiguration file. If you previously configured a queue individually as a last value queue, add the
non-destructivekey. Set the value totrue. For example:<address name="my.address"> <multicast> <queue name="orders1" last-value-key="stock_ticker" non-destructive="true" /> </multicast> </address>If you previously configured an address or set of addresses for last value queues, add the
default-non-destructivekey. Set the value totrue. For example:<address-setting match="lastValue"> <default-last-value-key>stock_ticker </default-last-value-key> <default-non-destructive>true</default-non-destructive> </address-setting>NoteBy default, the value of
default-non-destructiveisfalse.
4.12. Moving expired messages to an expiry address
For a queue other than a last value queue, if you have only non-destructive consumers, the broker never deletes messages from the queue, causing the queue size to increase over time. To prevent this unconstrained growth in queue size, you can configure when messages expire and specify an address to which the broker moves expired messages.
4.12.1. Configuring message expiry
The following procedure shows how to configure message expiry.
Procedure
-
Open the
<broker_instance_dir>/etc/broker.xmlconfiguration file. In the
coreelement, set themessage-expiry-scan-periodto specify how frequently the broker scans for expired messages.<configuration ...> <core ...> ... <message-expiry-scan-period>1000</message-expiry-scan-period> ...Based on the preceding configuration, the broker scans queues for expired messages every 1000 milliseconds.
In the
address-settingelement for a matching address or set of addresses, specify an expiry address. Also, set a message expiration time. For example:<configuration ...> <core ...> ... <address-settings> ... <address-setting match="stocks"> ... <expiry-address>ExpiryAddress</expiry-address> <expiry-delay>10</expiry-delay> ... </address-setting> ... <address-settings> <configuration ...>expiry-address-
Expiry address for the matching address or addresses. In the preceding example, the broker sends expired messages for the
stocksaddress to an expiry address calledExpiryAddress. expiry-delayExpiration time, in milliseconds, that the broker applies to messages that are using the default expiration time. By default, messages have an expiration time of
0, meaning that they don’t expire. For messages with an expiration time greater than the default,expiry-delayhas no effect.For example, suppose you set
expiry-delayon an address to10, as shown in the preceding example. If a message with the default expiration time of0arrives to a queue at this address, then the broker changes the expiration time of the message from0to10. However, if another message that is using an expiration time of20arrives, then its expiration time is unchanged. If you set expiry-delay to-1, this feature is disabled. By default,expiry-delayis set to-1.
Alternatively, instead of specifying a value for
expiry-delay, you can specify minimum and maximum expiry delay values. For example:<configuration ...> <core ...> ... <address-settings> ... <address-setting match="stocks"> ... <expiry-address>ExpiryAddress</expiry-address> <min-expiry-delay>10</min-expiry-delay> <max-expiry-delay>100</max-expiry-delay> ... </address-setting> ... <address-settings> <configuration ...>min-expiry-delay- Minimum expiration time, in milliseconds, that the broker applies to messages.
max-expiry-delayMaximum expiration time, in milliseconds, that the broker applies to messages.
The broker applies the values of
min-expiry-delayandmax-expiry-delayas follows:-
For a message with the default expiration time of
0, the broker sets the expiration time to the specified value ofmax-expiry-delay. If you have not specified a value formax-expiry-delay, the broker sets the expiration time to the specified value ofmin-expiry-delay. If you have not specified a value formin-expiry-delay, the broker does not change the expiration time of the message. -
For a message with an expiration time above the value of
max-expiry-delay, the broker sets the expiration time to the specified value ofmax-expiry-delay. -
For a message with an expiration time below the value of
min-expiry-delay, the broker sets the expiration time to the specified value ofmin-expiry-delay. -
For a message with an expiration between the values of
min-expiry-delayandmax-expiry-delay, the broker does not change the expiration time of the message. -
If you specify a value for
expiry-delay(that is, other than the default value of-1), this overrides any values that you specify formin-expiry-delayandmax-expiry-delay. -
The default value for both
min-expiry-delayandmax-expiry-delayis-1(that is, disabled).
-
For a message with the default expiration time of
In the
addresseselement of your configuration file, configure the address previously specified forexpiry-address. Define a queue at this address. For example:<addresses> ... <address name="ExpiryAddress"> <anycast> <queue name="ExpiryQueue"/> </anycast> </address> ... </addresses>The preceding example configuration associates an expiry queue,
ExpiryQueue, with the expiry address,ExpiryAddress.
4.12.2. Creating expiry resources automatically
A common use case is to segregate expired messages according to their original addresses. For example, you might choose to route expired messages from an address called stocks to an expiry queue called EXP.stocks. Likewise, you might route expired messages from an address called orders to an expiry queue called EXP.orders.
This type of routing pattern makes it easy to track, inspect, and administer expired messages. However, a pattern such as this is difficult to implement in an environment that uses mainly automatically-created addresses and queues. In this type of environment, an administrator does not want the extra effort required to manually create addresses and queues to hold expired messages.
As a solution, you can configure the broker to automatically create resources (that is, addressees and queues) to handle expired messages for a given address or set of addresses. The following procedure shows an example.
Prerequisites
- You have already configured an expiry address for a given address or set of addresses. For more information, see Section 4.12.1, “Configuring message expiry”.
Procedure
-
Open the
<broker_instance_dir>/etc/broker.xmlconfiguration file. Locate the
<address-setting>element that you previously added to the configuration file to define an expiry address for a matching address or set of addresses. For example:<configuration ...> <core ...> ... <address-settings> ... <address-setting match="stocks"> ... <expiry-address>ExpiryAddress</expiry-address> ... </address-setting> ... <address-settings> <configuration ...>In the
<address-setting>element, add configuration items that instruct the broker to automatically create expiry resources (that is, addresses and queues) and how to name these resources. For example:<configuration ...> <core ...> ... <address-settings> ... <address-setting match="stocks"> ... <expiry-address>ExpiryAddress</expiry-address> <auto-create-expiry-resources>true</auto-create-expiry-resources> <expiry-queue-prefix>EXP.</expiry-queue-prefix> <expiry-queue-suffix></expiry-queue-suffix> ... </address-setting> ... <address-settings> <configuration ...>auto-create-expiry-resourcesSpecifies whether the broker automatically creates an expiry address and queue to receive expired messages. The default value is
false.If the parameter value is set to
true, the broker automatically creates an<address>element that defines an expiry address and an associated expiry queue. The name value of the automatically-created<address>element matches the name value specified for<expiry-address>.The automatically-created expiry queue has the
multicastrouting type. By default, the broker names the expiry queue to match the address to which expired messages were originally sent, for example,stocks.The broker also defines a filter for the expiry queue that uses the
_AMQ_ORIG_ADDRESSproperty. This filter ensures that the expiry queue receives only messages sent to the corresponding original address.expiry-queue-prefixPrefix that the broker applies to the name of the automatically-created expiry queue. The default value is
EXP.When you define a prefix value or keep the default value, the name of the expiry queue is a concatenation of the prefix and the original address, for example,
EXP.stocks.expiry-queue-suffix- Suffix that the broker applies to the name of an automatically-created expiry queue. The default value is not defined (that is, the broker applies no suffix).
You can directly access the expiry queue using either the queue name by itself (for example, when using the AMQ Broker Core Protocol JMS client) or using the fully qualified queue name (for example, when using another JMS client).
Because the expiry address and queue are automatically created, any address settings related to deletion of automatically-created addresses and queues also apply to these expiry resources.
Additional resources
- For more information about address settings used to configure automatic deletion of automatically-created addresses and queues, see Section 4.8.2, “Configuring automatic creation and deletion of addresses and queues”.
4.13. Moving undelivered messages to a dead letter address
If delivery of a message to a client is unsuccessful, you might not want the broker to make ongoing attempts to deliver the message. To prevent infinite delivery attempts, you can define a dead letter address and one or more asscociated dead letter queues. After a specified number of delivery attempts, the broker removes an undelivered message from its original queue and sends the message to the configured dead letter address. A system administrator can later consume undelivered messages from a dead letter queue to inspect the messages.
If you do not configure a dead letter address for a given queue, the broker permanently removes undelivered messages from the queue after the specified number of delivery attempts.
Undelivered messages that are consumed from a dead letter queue have the following properties:
_AMQ_ORIG_ADDRESS- String property that specifies the original address of the message
_AMQ_ORIG_QUEUE- String property that specifies the original queue of the message
4.13.1. Configuring a dead letter address
The following procedure shows how to configure a dead letter address and an associated dead letter queue.
Procedure
-
Open the
<broker_instance_dir>/etc/broker.xmlconfiguration file. In an
<address-setting>element that matches your queue name(s), set values for the dead letter address name and the maximum number of delivery attempts. For example:<configuration ...> <core ...> ... <address-settings> ... <address-setting match="exampleQueue"> <dead-letter-address>DLA</dead-letter-address> <max-delivery-attempts>3</max-delivery-attempts> </address-setting> ... <address-settings> <configuration ...>match-
Address to which the broker applies the configuration in this
address-settingsection. You can specify a wildcard expression for thematchattribute of the<address-setting>element. Using a wildcard expression is useful if you want to associate the dead letter settings configured in the<address-setting>element with a matching set of addresses. dead-letter-address- Name of the dead letter address. In this example, the broker moves undelivered messages from the queue exampleQueue to the dead letter address, DLA.
max-delivery-attempts-
Maximum number of delivery attempts made by the broker before it moves an undelivered message to the configured dead letter address. In this example, the broker moves undelivered messages to the dead letter address after three unsuccessful delivery attempts. The default value is
10. If you want the broker to make an infinite number of redelivery attempts, specify a value of-1.
In the
addressessection, add anaddresselement for the dead letter address, DLA. To associate a dead letter queue with the dead letter address, specify a name value forqueue. For example:<configuration ...> <core ...> ... <addresses> <address name="DLA"> <anycast> <queue name="DLQ" /> </anycast> </address> ... </addresses> </core> </configuration>
In the preceding configuration, you associate a dead letter queue named DLQ with the dead letter address, DLA.
Additional resources
- For more information about using wildcards in address settings, see Section 4.2, “Applying address settings to sets of addresses”.
4.13.2. Creating dead letter queues automatically
A common use case is to segregate undelivered messages according to their original addresses. For example, you might choose to route undelivered messages from an address called stocks to a dead letter queue called DLA.stocks that has an associated dead letter queue called DLQ.stocks. Likewise, you might route undelivered messages from an address called orders to a dead letter address called DLA.orders.
This type of routing pattern makes it easy to track, inspect, and administrate undelivered messages. However, a pattern such as this is difficult to implement in an environment that uses mainly automatically-created addresses and queues. It is likely that a system administrator for this type of environment does not want the additional effort required to manually create addresses and queues to hold undelivered messages.
As a solution, you can configure the broker to automatically create addressees and queues to handle undelivered messages, as shown in the procedure that follows.
Prerequisites
- You have already configured a dead letter address for a queue or set of queues. For more information, see Section 4.13.1, “Configuring a dead letter address”.
Procedure
-
Open the
<broker_instance_dir>/etc/broker.xmlconfiguration file. Locate the
<address-setting>element that you previously added to define a dead letter address for a matching queue or set of queues. For example:<configuration ...> <core ...> ... <address-settings> ... <address-setting match="exampleQueue"> <dead-letter-address>DLA</dead-letter-address> <max-delivery-attempts>3</max-delivery-attempts> </address-setting> ... <address-settings> <configuration ...>In the
<address-setting>element, add configuration items that instruct the broker to automatically create dead letter resources (that is, addresses and queues) and how to name these resources. For example:<configuration ...> <core ...> ... <address-settings> ... <address-setting match="exampleQueue"> <dead-letter-address>DLA</dead-letter-address> <max-delivery-attempts>3</max-delivery-attempts> <auto-create-dead-letter-resources>true</auto-create-dead-letter-resources> <dead-letter-queue-prefix>DLQ.</dead-letter-queue-prefix> <dead-letter-queue-suffix></dead-letter-queue-suffix> </address-setting> ... <address-settings> <configuration ...>auto-create-dead-letter-resourcesSpecifies whether the broker automatically creates a dead letter address and queue to receive undelivered messages. The default value is
false.If
auto-create-dead-letter-resourcesis set totrue, the broker automatically creates an<address>element that defines a dead letter address and an associated dead letter queue. The name of the automatically-created<address>element matches the name value that you specify for<dead-letter-address>.The dead letter queue that the broker defines in the automatically-created
<address>element has themulticastrouting type . By default, the broker names the dead letter queue to match the original address of the undelivered message, for example,stocks.The broker also defines a filter for the dead letter queue that uses the
_AMQ_ORIG_ADDRESSproperty. This filter ensures that the dead letter queue receives only messages sent to the corresponding original address.dead-letter-queue-prefixPrefix that the broker applies to the name of an automatically-created dead letter queue. The default value is
DLQ.When you define a prefix value or keep the default value, the name of the dead letter queue is a concatenation of the prefix and the original address, for example,
DLQ.stocks.dead-letter-queue-suffix- Suffix that the broker applies to an automatically-created dead letter queue. The default value is not defined (that is, the broker applies no suffix).
4.14. Annotations and properties on expired or undelivered AMQP messages
Before the broker moves an expired or undelivered AMQP message to an expiry or dead letter queue that you have configured, the broker applies annotations and properties to the message. A client can create a filter based on these properties or annotations, to select particular messages to consume from the expiry or dead letter queue.
The properties that the broker applies are internal properties These properties are are not exposed to clients for regular use, but can be specified by a client in a filter.
The following table shows the annotations and internal properties that the broker applies to expired or undelivered AMQP messages.
| Annotation name | Internal property name | Description |
|---|---|---|
| x-opt-ORIG-MESSAGE-ID | _AMQ_ORIG_MESSAGE_ID | Original message ID, before the message was moved to an expiry or dead letter queue. |
| x-opt-ACTUAL-EXPIRY | _AMQ_ACTUAL_EXPIRY | Message expiry time, specified as the number of milliseconds since the last epoch started. |
| x-opt-ORIG-QUEUE | _AMQ_ORIG_QUEUE | Original queue name of the expired or undelivered message. |
| x-opt-ORIG-ADDRESS | _AMQ_ORIG_ADDRESS | Original address name of the expired or undelivered message. |
Additional resources
- For an example of configuring an AMQP client to filter AMQP messages based on annotations, see Section 13.3, “Filtering AMQP Messages Based on Properties on Annotations”.
4.15. Disabling queues
If you manually define a queue in your broker configuration, the queue is enabled by default.
However, there might be a case where you want to define a queue so that clients can subscribe to it, but are not ready to use the queue for message routing. Alternatively, there might be a situation where you want to stop message flow to a queue, but still keep clients bound to the queue. In these cases, you can disable the queue.
The following example shows how to disable a queue that you have defined in your broker configuration.
Prerequisites
- You should be familiar with how to define an address and associated queue in your broker configuration. For more information, see Chapter 4, Configuring addresses and queues.
Procedure
-
Open the
<broker_instance_dir>/etc/broker.xmlconfiguration file. For a queue that you previously defined, add the
enabledattribute. To disable the queue, set the value of this attribute tofalse. For example:<addresses> <address name="orders"> <multicast> <queue name="orders" enabled="false"/> </multicast> </address> </addresses>The default value of the
enabledproperty istrue. When you set the value tofalse, message routing to the queue is disabled.
If you disable all queues on an address, any messages sent to that address are silently dropped.
4.16. Limiting the number of consumers connected to a queue
Limit the number of consumers connected to a particular queue by using the max-consumers attribute. Create an exclusive consumer by setting max-consumers flag to 1. The default value is -1, which sets an unlimited number of consumers.
The following procedure shows how to set a limit on the number of consumers that can connect to a queue.
Procedure
-
Open the
<broker_instance_dir>/etc/broker.xmlconfiguration file. For a given queue, add the
max-consumerskey and set a value.<configuration ...> <core ...> ... <addresses> <address name="my.address"> <anycast> <queue name="q3" max-consumers="20"/> </anycast> </address> </addresses> </core> </configuration>Based on the preceding configuration, only 20 consumers can connect to queue
q3at the same time.To create an exclusive consumer, set
max-consumersto1.<configuration ...> <core ...> ... <address name="my.address"> <anycast> <queue name="q3" max-consumers="1"/> </anycast> </address> </core> </configuration>To allow an unlimited number of consumers, set
max-consumersto-1.<configuration ...> <core ...> ... <address name="my.address"> <anycast> <queue name="q3" max-consumers="-1"/> </anycast> </address> </core> </configuration>
4.17. Configuring exclusive queues
Exclusive queues are special queues that route all messages to only one consumer at a time. This configuration is useful when you want all messages to be processed serially by the same consumer. If there are multiple consumers for a queue, only one consumer will receive messages. If that consumer disconnects from the queue, another consumer is chosen.
4.17.1. Configuring exclusive queues individually
The following procedure shows to how to individually configure a given queue as exclusive.
Procedure
-
Open the
<broker_instance_dir>/etc/broker.xmlconfiguration file. For a given queue, add the
exclusivekey. Set the value totrue.<configuration ...> <core ...> ... <address name="my.address"> <multicast> <queue name="orders1" exclusive="true"/> </multicast> </address> </core> </configuration>
4.17.2. Configuring exclusive queues for addresses
The following procedure shows how to configure an address or set of addresses so that all associated queues are exclusive.
-
Open the
<broker_instance_dir>/etc/broker.xmlconfiguration file. In the
address-settingelement, for a matching address, add thedefault-exclusive-queuekey. Set the value totrue.<address-setting match="myAddress"> <default-exclusive-queue>true</default-exclusive-queue> </address-setting>Based on the preceding configuration, all queues associated with the
myAddressaddress are exclusive. By default, the value ofdefault-exclusive-queueisfalse.To configure exclusive queues for a set of addresses, you can specify an address wildcard. For example:
<address-setting match="myAddress.*">
    <default-exclusive-queue>true</default-exclusive-queue>
</address-setting>
Additional resources
- For more information about the wildcard syntax that you can use when configuring addresses, see Section 4.2, “Applying address settings to sets of addresses”.
4.18. Applying specific address settings to temporary queues
When using JMS, for example, the broker creates temporary queues by assigning a universally unique identifier (UUID) as both the address name and the queue name.
The default <address-setting match="#"> applies the configured address settings to all queues, including temporary ones. If you want to apply specific address settings to temporary queues only, you can optionally specify a temporary-queue-namespace as described below. You can then specify address settings that match the namespace and the broker applies those settings to all temporary queues.
When a temporary queue is created and a temporary queue namespace exists, the broker prepends the temporary-queue-namespace value and the configured delimiter (default .) to the address name. It uses that to reference the matching address settings.
Procedure
-
Open the
<broker_instance_dir>/etc/broker.xmlconfiguration file. Add a
temporary-queue-namespacevalue. For example:<temporary-queue-namespace>temp-example</temporary-queue-namespace>Add an
address-settingelement with amatchvalue that corresponds to the temporary queues namespace. For example:<address-settings> <address-setting match="temp-example.#"> <enable-metrics>false</enable-metrics> </address-setting> </address-settings>This example disables metrics in all temporary queues created by the broker.
NoteSpecifying a temporary queue namespace does not affect temporary queues. For example, the namespace does not change the names of temporary queues. The namespace is used to reference the temporary queues.
Additional resources
- For more information about using wildcards in address settings, see Section 4.2, “Applying address settings to sets of addresses”.
4.19. Configuring ring queues
Generally, queues in AMQ Broker use first-in, first-out (FIFO) semantics. This means that the broker adds messages to the tail of the queue and removes them from the head. A ring queue is a special type of queue that holds a specified, fixed number of messages. The broker maintains the fixed queue size by removing the message at the head of the queue when a new message arrives but the queue already holds the specified number of messages.
For example, consider a ring queue configured with a size of 3 and a producer that sequentially sends messages A, B, C, and D. Once message C arrives to the queue, the number of messages in the queue has reached the configured ring size. At this point, message A is at the head of the queue, while message C is at the tail. When message D arrives to the queue, the broker adds the message to the tail of the queue. To maintain the fixed queue size, the broker removes the message at the head of the queue (that is, message A). Message B is now at the head of the queue.
4.19.1. Configuring ring queues
The following procedure shows how to configure a ring queue.
Procedure
-
Open the
<broker_instance_dir>/etc/broker.xmlconfiguration file. To define a default ring size for all queues on matching addresses that don’t have an explicit ring size set, specify a value for
default-ring-sizein theaddress-settingelement. For example:<address-settings> <address-setting match="ring.#"> <default-ring-size>3</default-ring-size> </address-setting> </address-settings>The
default-ring-sizeparameter is especially useful for defining the default size of auto-created queues. The default value ofdefault-ring-sizeis-1(that is, no size limit).To define a ring size on a specific queue, add the
ring-sizekey to thequeueelement. Specify a value. For example:<addresses> <address name="myRing"> <anycast> <queue name="myRing" ring-size="5" /> </anycast> </address> </addresses>
You can update the value of ring-size while the broker is running. The broker dynamically applies the update. If the new ring-size value is lower than the previous value, the broker does not immediately delete messages from the head of the queue to enforce the new size. New messages sent to the queue still force the deletion of older messages, but the queue does not reach its new, reduced size until it does so naturally, through the normal consumption of messages by clients.
4.19.2. Troubleshooting ring queues
This section describes situations in which the behavior of a ring queue appears to differ from its configuration.
In-delivery messages and rollbacks
When a message is in delivery to a consumer, the message is in an "in-between" state, where the message is technically no longer on the queue, but is also not yet acknowledged. A message remains in an in-delivery state until acknowledged by the consumer. Messages that remain in an in-delivery state cannot be removed from the ring queue.
Because the broker cannot remove in-delivery messages, a client can send more messages to a ring queue than the ring size configuration seems to allow. For example, consider this scenario:
-
A producer sends three messages to a ring queue configured with
ring-size="3". All messages are immediately dispatched to a consumer.
At this point,
messageCount=3anddeliveringCount=3.The producer sends another message to the queue. The message is then dispatched to the consumer.
Now,
messageCount=4anddeliveringCount=4. The message count of4is greater than the configured ring size of3. However, the broker is obliged to allow this situation because it cannot remove the in-delivery messages from the queue.Now, suppose that the consumer is closed without acknowledging any of the messages.
In this case, the four in-delivery, unacknowledged messages are canceled back to the broker and added to the head of the queue in the reverse order from which they were consumed. This action puts the queue over its configured ring size. Because a ring queue prefers messages at the tail of the queue over messages at the head, the queue discards the first message sent by the producer, because this was the last message added back to the head of the queue. Transaction or core session rollbacks are treated in the same way.
If you are using the core client directly, or using an AMQ Core Protocol JMS client, you can minimize the number of messages in delivery by reducing the value of the consumerWindowSize parameter (1024 * 1024 bytes by default).
Scheduled messages
When a scheduled message is sent to a queue, the message is not immediately added to the tail of the queue like a normal message. Instead, the broker holds the scheduled message in an intermediate buffer and schedules the message for delivery onto the head of the queue, according to the details of the message. However, scheduled messages are still reflected in the message count of the queue. As with in-delivery messages, this behavior can make it appear that the broker is not enforcing the ring queue size. For example, consider this scenario:
At 12:00, a producer sends a message,
A, to a ring queue configured withring-size="3". The message is scheduled for 12:05.At this point,
messageCount=1andscheduledCount=1.At 12:01, producer sends message
Bto the same ring queue.Now,
messageCount=2andscheduledCount=1.At 12:02, producer sends message
Cto the same ring queue.Now,
messageCount=3andscheduledCount=1.At 12:03, producer sends message
Dto the same ring queue.Now,
messageCount=4andscheduledCount=1.The message count for the queue is now
4, one greater than the configured ring size of3. However, the scheduled message is not technically on the queue yet (that is, it is on the broker and scheduled to be put on the queue). At the scheduled delivery time of 12:05, the broker puts the message on the head of the queue. However, since the ring queue has already reached its configured size, the scheduled messageAis immediately removed.
Paged messages
Similar to scheduled messages and messages in delivery, paged messages do not count towards the ring queue size enforced by the broker, because messages are actually paged at the address level, not the queue level. A paged message is not technically on a queue, although it is reflected in a queue’s messageCount value.
It is recommended that you do not use paging for addresses with ring queues. Instead, ensure that the entire address can fit into memory. Or, configure the address-full-policy parameter to a value of DROP, BLOCK or FAIL.
Additional resources
- The broker creates internal instances of ring queues when you configure retroactive addresses. To learn more, see Section 4.20, “Configuring retroactive addresses”.
4.20. Configuring retroactive addresses
Configuring an address as retroactive enables you to preserve messages sent to that address, including when there are no queues yet bound to the address. When queues are later created and bound to the address, the broker retroactively distributes messages to those queues. If an address is not configured as retroactive and does not yet have a queue bound to it, the broker discards messages sent to that address.
When you configure a retroactive address, the broker creates an internal instance of a type of queue known as a ring queue. A ring queue is a special type of queue that holds a specified, fixed number of messages. Once the queue has reached the specified size, the next message that arrives to the queue forces the oldest message out of the queue. When you configure a retroactive address, you indirectly specify the size of the internal ring queue. By default, the internal queue uses the multicast routing type.
The internal ring queue used by a retroactive address is exposed via the management API. You can inspect metrics and perform other common management operations, such as emptying the queue. The ring queue also contributes to the overall memory usage of the address, which affects behavior such as message paging.
The following procedure shows how to configure an address as retroactive.
Procedure
-
Open the
<broker_instance_dir>/etc/broker.xmlconfiguration file. Specify a value for the
retroactive-message-countparameter in theaddress-settingelement. The value you specify defines the number of messages you want the broker to preserve. For example:<configuration> <core> ... <address-settings> <address-setting match="orders"> <retroactive-message-count>100</retroactive-message-count> </address-setting> </address-settings> ... </core> </configuration>NoteYou can update the value of
retroactive-message-countwhile the broker is running, in either thebroker.xmlconfiguration file or the management API. However, if you reduce the value of this parameter, an additional step is required, because retroactive addresses are implemented via ring queues. A ring queue whosering-sizeparameter is reduced does not automatically delete messages from the queue to achieve the newring-sizevalue. This behavior is a safeguard against unintended message loss. In this case, you need to use the management API to manually reduce the number of messages in the ring queue.
Additional resources
- For more information about ring queues, see Section 4.19, “Configuring ring queues”.
4.21. Disabling advisory messages for internally-managed addresses and queues
By default, AMQ Broker creates advisory messages about addresses and queues when an OpenWire client is connected to the broker. Advisory messages are sent to internally-managed addresses created by the broker. These addresses appear on the AMQ Management Console within the same display as user-deployed addresses and queues. Although they provide useful information, advisory messages can cause unwanted consequences when the broker manages a large number of destinations. For example, the messages might increase memory usage or strain connection resources. Also, the AMQ Management Console might become cluttered when attempting to display all of the addresses created to send advisory messages. To avoid these situations, you can use the following parameters to configure the behavior of advisory messages on the broker.
supportAdvisory-
Set this option to
trueto enable creation of advisory messages orfalseto disable them. The default value istrue. suppressInternalManagementObjects-
Set this option to
trueto expose the advisory messages to management services such as JMX registry and AMQ Management Console, orfalseto not expose them. The default value istrue.
The following procedure shows how to disable advisory messages on the broker.
Procedure
-
Open the
<broker_instance_dir>/etc/broker.xmlconfiguration file. For an OpenWire connector, add the
supportAdvisoryandsuppressInternalManagementObjectsparameters to the configured URL. Set the values as described earlier in this section. For example:<acceptor name="artemis">tcp://127.0.0.1:61616?protocols=CORE,AMQP,OPENWIRE;supportAdvisory=false;suppressInternalManagementObjects=false</acceptor>
4.22. Federating addresses and queues
Federation enables transmission of messages between brokers, without requiring the brokers to be in a common cluster. Brokers can be standalone, or in separate clusters. In addition, the source and target brokers can be in different administrative domains, meaning that the brokers might have different configurations, users, and security setups. The brokers might even be using different versions of AMQ Broker.
For example, federation is suitable for reliably sending messages from one cluster to another. This transmission might be across a Wide Area Network (WAN), Regions of a cloud infrastructure, or over the Internet. If connection from a source broker to a target broker is lost (for example, due to network failure), the source broker tries to reestablish the connection until the target broker comes back online. When the target broker comes back online, message transmission resumes.
Administrators can use address and queue policies to manage federation. Policy configurations can be matched to specific addresses or queues, or the policies can include wildcard expressions that match configurations to sets of addresses or queues. Therefore, federation can be dynamically applied as queues or addresses are added to- or removed from matching sets. Policies can include multiple expressions that include and/or exclude particular addresses and queues. In addition, multiple policies can be applied to brokers or broker clusters.
In AMQ Broker, the two primary federation options are address federation and queue federation. These options are described in the sections that follow.
A broker can include configuration for federated and local-only components. That is, if you configure federation on a broker, you don’t need to federate everything on that broker.
4.22.1. About address federation
Address federation is like a full multicast distribution pattern between connected brokers. For example, every message sent to an address on BrokerA is delivered to every queue on that broker. In addition, each of the messages is delivered to BrokerB and all attached queues there.
Address federation dynamically links a broker to addresses in remote brokers. For example, if a local broker wants to fetch messages from an address on a remote broker, a queue is automatically created on the remote address. Messages on the remote broker are then consumed to this queue. Finally, messages are copied to the corresponding address on the local broker, as though they were originally published directly to the local address.
The remote broker does not need to be reconfigured to allow federation to create an address on it. However, the local broker does need to be granted permissions to the remote address.
4.22.2. Common topologies for address federation
Some common topologies for the use of address federation are described below.
- Symmetric topology
In a symmetric topology, a producer and consumer are connected to each broker. Queues and their consumers can receive messages published by either producer. An example of a symmetric topology is shown below.
Figure 4.1. Address federation in a symmetric topology
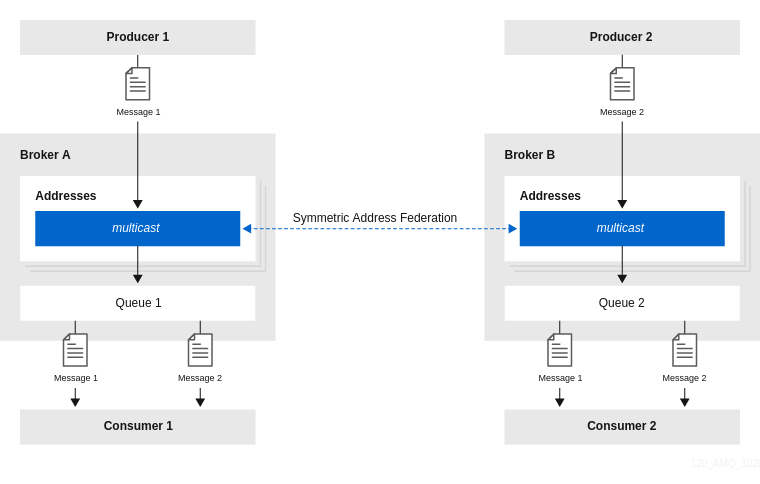
When configuring address federation for a symmetric topology, it is important to set the value of the
max-hopsproperty of the address policy to1. This ensures that messages are copied only once, avoiding cyclic replication. If this property is set to a larger value, consumers will receive multiple copies of the same message.- Full mesh topology
A full mesh topology is similar to a symmetric setup. Three or more brokers symmetrically federate to each other, creating a full mesh. In this setup, a producer and consumer are connected to each broker. Queues and their consumers can receive messages published by any producer. An example of this topology is shown below.
Figure 4.2. Address federation in a full mesh topology
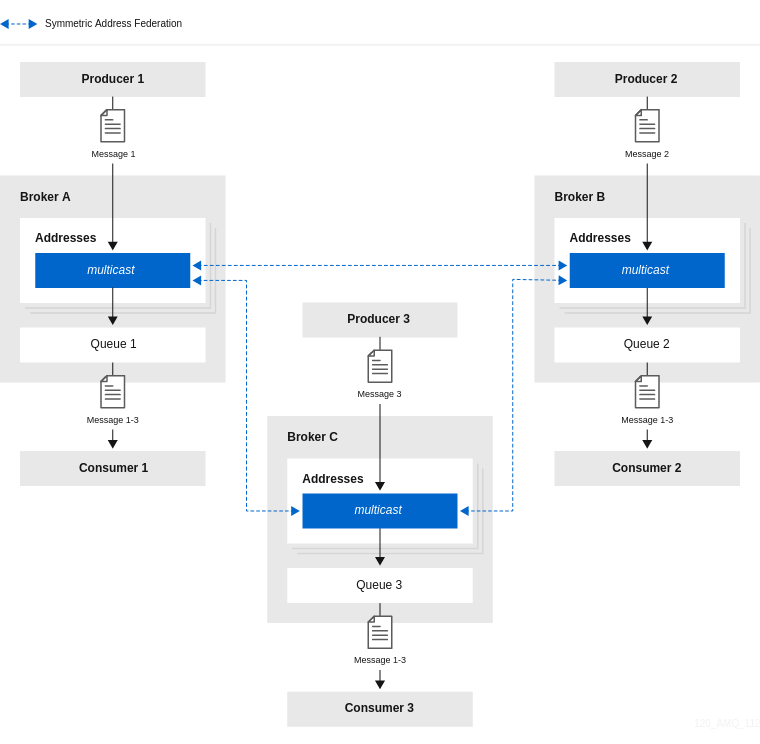
As with a symmetric setup, when configuring address federation for a full mesh topology, it is important to set the value of the
max-hopsproperty of the address policy to1. This ensures that messages are copied only once, avoiding cyclic replication.- Ring topology
In a ring of brokers, each federated address is upstream to just one other in the ring. An example of this topology is shown below.
Figure 4.3. Address federation in a ring topology
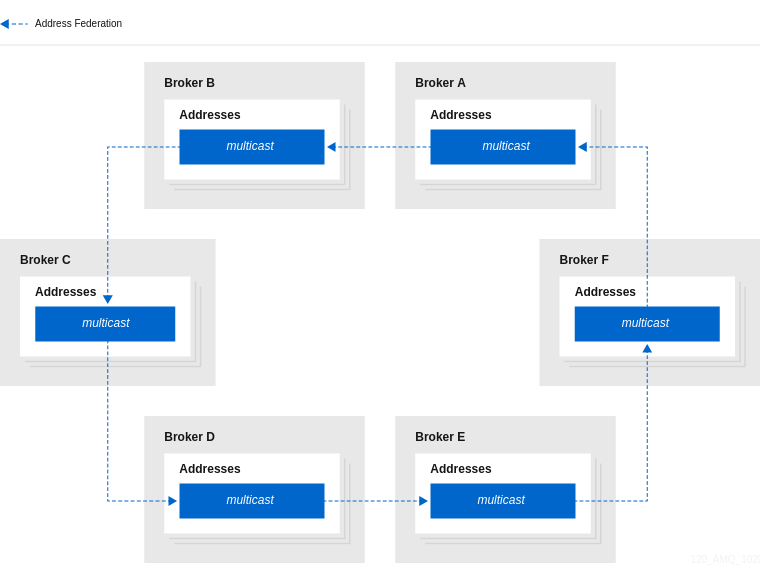
When you configure federation for a ring topology, to avoid cyclic replication, it is important to set the
max-hopsproperty of the address policy to a value ofn-1, where n is the number of nodes in the ring. For example, in the ring topology shown above, the value ofmax-hopsis set to5. This ensures that every address in the ring sees the message exactly once.An advantage of a ring topology is that it is cheap to set up, in terms of the number of physical connections that you need to make. However, a drawback of this type of topology is that if a single broker fails, the whole ring fails.
- Fan-out topology
In a fan-out topology, a single master address is linked-to by a tree of federated addresses. Any message published to the master address can be received by any consumer connected to any broker in the tree. The tree can be configured to any depth. The tree can also be extended without the need to re-configure existing brokers in the tree. An example of this topology is shown below.
Figure 4.4. Address federation in a fan-out topology
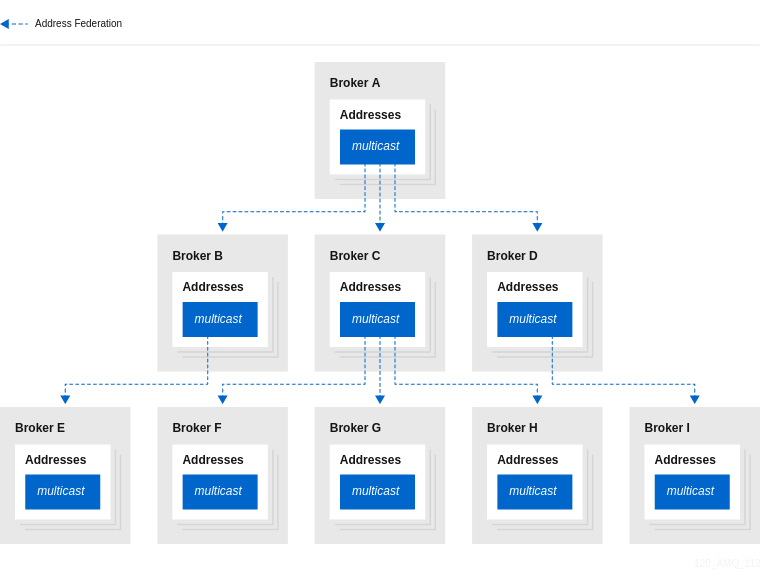
When you configure federation for a fan-out topology, ensure that you set the
max-hopsproperty of the address policy to a value ofn-1, where n is the number of levels in the tree. For example, in the fan-out topology shown above, the value ofmax-hopsis set to2. This ensures that every address in the tree sees the message exactly once.
4.22.3. Support for divert bindings in address federation configuration
When configuring address federation, you can add support for divert bindings in the address policy configuration. Adding this support enables the federation to respond to divert bindings to create a federated consumer for a given address on a remote broker.
For example, suppose that an address called test.federation.source is included in the address policy, and another address called test.federation.target is not included. Normally, when a queue is created on test.federation.target, this would not cause a federated consumer to be created, because the address is not part of the address policy. However, if you create a divert binding such that test.federation.source is the source address and test.federation.target is the forwarding address, then a durable consumer is created at the forwarding address. The source address still must use the multicast routing type , but the target address can use multicast or anycast.
An example use case is a divert that redirects a JMS topic (multicast address) to a JMS queue (anycast address). This enables load balancing of messages on the topic for legacy consumers not supporting JMS 2.0 and shared subscriptions.
4.22.4. Configuring federation for a broker cluster
The examples in the sections that follow show how to configure address and queue federation between standalone local and remote brokers. For federation between standalone brokers, the name of the federation configuration, as well as the names of any address and queue policies, must be unique between the local and remote brokers.
However, if you are configuring federation for brokers in a cluster, there is an additional requirement. For clustered brokers, the names of the federation configuration, as well as the names of any address and queues policies within that configuration, must be the same for every broker in that cluster.
Ensuring that brokers in the same cluster use the same federation configuration and address and queue policy names avoids message duplication. For example, if brokers within the same cluster have different federation configuration names, this might lead to a situation where multiple, differently-named forwarding queues are created for the same address, resulting in message duplication for downstream consumers. By contrast, if brokers in the same cluster use the same federation configuration name, this essentially creates replicated, clustered forwarding queues that are load-balanced to the downstream consumers. This avoids message duplication.
4.22.5. Configuring upstream address federation
The following example shows how to configure upstream address federation between standalone brokers. In this example, you configure federation from a local (that is, downstream) broker, to some remote (that is, upstream) brokers.
Prerequisites
- The following example shows how to configure address federation between standalone brokers. However, you should also be familiar with the requirements for configuring federation for a broker cluster. For more information, see Section 4.22.4, “Configuring federation for a broker cluster”.
Procedure
-
Open the
<broker_instance_dir>/etc/broker.xmlconfiguration file. Add a new
<federations>element that includes a<federation>element. For example:<federations> <federation name="eu-north-1" user="federation_username" password="32a10275cf4ab4e9"> </federation> </federations>name- Name of the federation configuration. In this example, the name corresponds to the name of the local broker.
user- Shared user name for connection to the upstream brokers.
password- Shared password for connection to the upstream brokers.
NoteIf user and password credentials differ for remote brokers, you can separately specify credentials for those brokers when you add them to the configuration. This is described later in this procedure.
Within the
federationelement, add an<address-policy>element. For example:<federations> <federation name="eu-north-1" user="federation_username" password="32a10275cf4ab4e9"> <address-policy name="news-address-federation" auto-delete="true" auto-delete-delay="300000" auto-delete-message-count="-1" enable-divert-bindings="false" max-hops="1" transformer-ref="news-transformer"> </address-policy> </federation> </federations>name- Name of the address policy. All address policies that are configured on the broker must have unique names.
auto-delete-
During address federation, the local broker dynamically creates a durable queue at the remote address. The value of the
auto-deleteproperty specifies whether the remote queue should be deleted once the local broker disconnects and the values of theauto-delete-delayandauto-delete-message-countproperties have also been reached. This is a useful option if you want to automate the cleanup of dynamically-created queues. It is also a useful option if you want to prevent a buildup of messages on a remote broker if the local broker is disconnected for a long time. However, you might set this option tofalseif you want messages to always remain queued for the local broker while it is disconnected, avoiding message loss on the local broker. auto-delete-delay- After the local broker has disconnected, the value of this property specifies the amount of time, in milliseconds, before dynamically-created remote queues are eligible to be automatically deleted.
auto-delete-message-count- After the local broker has been disconnected, the value of this property specifies the maximum number of messages that can still be in a dynamically-created remote queue before that queue is eligible to be automatically deleted.
enable-divert-bindings-
Setting this property to
trueenables divert bindings to be listened-to for demand. If there is a divert binding with an address that matches the included addresses for the address policy, then any queue bindings that match the forwarding address of the divert will create demand. The default value isfalse. max-hops- Maximum number of hops that a message can make during federation. Particular topologies require specific values for this property. To learn more about these requirements, see Section 4.22.2, “Common topologies for address federation”.
transformer-ref- Name of a transformer configuration. You might add a transformer configuration if you want to transform messages during federated message transmission. Transformer configuration is described later in this procedure.
Within the
<address-policy>element, add address-matching patterns to include and exclude addresses from the address policy. For example:<federations> <federation name="eu-north-1" user="federation_username" password="32a10275cf4ab4e9"> <address-policy name="news-address-federation" auto-delete="true" auto-delete-delay="300000" auto-delete-message-count="-1" enable-divert-bindings="false" max-hops="1" transformer-ref="news-transformer"> <include address-match="queue.bbc.new" /> <include address-match="queue.usatoday" /> <include address-match="queue.news.#" /> <exclude address-match="queue.news.sport.#" /> </address-policy> </federation> </federations>include-
The value of the
address-matchproperty of this element specifies addresses to include in the address policy. You can specify an exact address, for example,queue.bbc.neworqueue.usatoday. Or, you can use a wildcard expression to specify a matching set of addresses. In the preceding example, the address policy also includes all address names that start with the stringqueue.news. exclude-
The value of the
address-matchproperty of this element specifies addresses to exclude from the address policy. You can specify an exact address name or use a wildcard expression to specify a matching set of addresses. In the preceding example, the address policy excludes all address names that start with the stringqueue.news.sport.
(Optional) Within the
federationelement, add atransformerelement to reference a custom transformer implementation. For example:<federations> <federation name="eu-north-1" user="federation_username" password="32a10275cf4ab4e9"> <address-policy name="news-address-federation" auto-delete="true" auto-delete-delay="300000" auto-delete-message-count="-1" enable-divert-bindings="false" max-hops="1" transformer-ref="news-transformer"> <include address-match="queue.bbc.new" /> <include address-match="queue.usatoday" /> <include address-match="queue.news.#" /> <exclude address-match="queue.news.sport.#" /> </address-policy> <transformer name="news-transformer"> <class-name>org.myorg.NewsTransformer</class-name> <property key="key1" value="value1"/> <property key="key2" value="value2"/> </transformer> </federation> </federations>name-
Name of the transformer configuration. This name must be unique on the local broker. This is the name that you specify as a value for the
transformer-refproperty of the address policy. class-nameName of a user-defined class that implements the
org.apache.activemq.artemis.core.server.transformer.Transformerinterface.The transformer’s
transform()method is invoked with the message before the message is transmitted. This enables you to transform the message header or body before it is federated.property- Used to hold key-value pairs for specific transformer configuration.
Within the
federationelement, add one or moreupstreamelements. Eachupstreamelement defines a connection to a remote broker and the policies to apply to that connection. For example:<federations> <federation name="eu-north-1" user="federation_username" password="32a10275cf4ab4e9"> <upstream name="eu-east-1"> <static-connectors> <connector-ref>eu-east-connector1</connector-ref> </static-connectors> <policy ref="news-address-federation"/> </upstream> <upstream name="eu-west-1" > <static-connectors> <connector-ref>eu-west-connector1</connector-ref> </static-connectors> <policy ref="news-address-federation"/> </upstream> <address-policy name="news-address-federation" auto-delete="true" auto-delete-delay="300000" auto-delete-message-count="-1" enable-divert-bindings="false" max-hops="1" transformer-ref="news-transformer"> <include address-match="queue.bbc.new" /> <include address-match="queue.usatoday" /> <include address-match="queue.news.#" /> <exclude address-match="queue.news.sport.#" /> </address-policy> <transformer name="news-transformer"> <class-name>org.myorg.NewsTransformer</class-name> <property key="key1" value="value1"/> <property key="key2" value="value2"/> </transformer> </federation> </federations>static-connectors-
Contains a list of
connector-refelements that referenceconnectorelements that are defined elsewhere in thebroker.xmlconfiguration file of the local broker. A connector defines what transport (TCP, SSL, HTTP, and so on) and server connection parameters (host, port, and so on) to use for outgoing connections. The next step of this procedure shows how to add the connectors that are referenced in thestatic-connectorselement. policy-ref- Name of the address policy configured on the downstream broker that is applied to the upstream broker.
The additional options that you can specify for an
upstreamelement are described below:name-
Name of the upstream broker configuration. In this example, the names correspond to upstream brokers called
eu-east-1andeu-west-1. user-
User name to use when creating the connection to the upstream broker. If not specified, the shared user name that is specified in the configuration of the
federationelement is used. password-
Password to use when creating the connection to the upstream broker. If not specified, the shared password that is specified in the configuration of the
federationelement is used. call-failover-timeout-
Similar to
call-timeout, but used when a call is made during a failover attempt. The default value is-1, which means that the timeout is disabled. call-timeout-
Time, in milliseconds, that a federation connection waits for a reply from a remote broker when it transmits a packet that is a blocking call. If this time elapses, the connection throws an exception. The default value is
30000. check-period-
Period, in milliseconds, between consecutive “keep-alive” messages that the local broker sends to a remote broker to check the health of the federation connection. If the federation connection is healthy, the remote broker responds to each keep-alive message. If the connection is unhealthy, when the downstream broker fails to receive a response from the upstream broker, a mechanism called a circuit breaker is used to block federated consumers. See the description of the
circuit-breaker-timeoutparameter for more information. The default value of thecheck-periodparameter is30000. circuit-breaker-timeout- A single connection between a downstream and upstream broker might be shared by many federated queue and address consumers. In the event that the connection between the brokers is lost, each federated consumer might try to reconnect at the same time. To avoid this, a mechanism called a circuit breaker blocks the consumers. When the specified timeout value elapses, the circuit breaker re-tries the connection. If successful, consumers are unblocked. Otherwise, the circuit breaker is applied again.
connection-ttl-
Time, in milliseconds, that a federation connection stays alive if it stops receiving messages from the remote broker. The default value is
60000. discovery-group-ref-
As an alternative to defining static connectors for connections to upstream brokers, this element can be used to specify a discovery group that is already configured elsewhere in the
broker.xmlconfiguration file. Specifically, you specify an existing discovery group as a value for thediscovery-group-nameproperty of this element. For more information about discovery groups, see Section 14.1.6, “Broker discovery methods”. ha-
Specifies whether high availability is enabled for the connection to the upstream broker. If the value of this parameter is set to
true, the local broker can connect to any available broker in an upstream cluster and automatically fails over to a backup broker if the live upstream broker shuts down. The default value isfalse. initial-connect-attempts-
Number of initial attempts that the downstream broker will make to connect to the upstream broker. If this value is reached without a connection being established, the upstream broker is considered permanently offline. The downstream broker no longer routes messages to the upstream broker. The default value is
-1, which means that there is no limit. max-retry-interval-
Maximum time, in milliseconds, between subsequent reconnection attempts when connection to the remote broker fails. The default value is
2000. reconnect-attempts-
Number of times that the downstream broker will try to reconnect to the upstream broker if the connection fails. If this value is reached without a connection being re-established, the upstream broker is considered permanently offline. The downstream broker no longer routes messages to the upstream broker. The default value is
-1, which means that there is no limit. retry-interval-
Period, in milliseconds, between subsequent reconnection attempts, if connection to the remote broker has failed. The default value is
500. retry-interval-multiplier-
Multiplying factor that is applied to the value of the
retry-intervalparameter. The default value is1. share-connection-
If there is both a downstream and upstream connection configured for the same broker, then the same connection will be shared, as long as both of the downstream and upstream configurations set the value of this parameter to
true. The default value isfalse.
On the local broker, add connectors to the remote brokers. These are the connectors referenced in the
static-connectorselements of your federated address configuration. For example:<connectors> <connector name="eu-west-1-connector">tcp://localhost:61616</connector> <connector name="eu-east-1-connector">tcp://localhost:61617</connector> </connectors>
4.22.6. Configuring downstream address federation
The following example shows how to configure downstream address federation for standalone brokers.
Downstream address federation enables you to add configuration on the local broker that one or more remote brokers use to connect back to the local broker. The advantage of this approach is that you can keep all federation configuration on a single broker. This might be a useful approach for a hub-and-spoke topology, for example.
Downstream address federation reverses the direction of the federation connection versus upstream address configuration. Therefore, when you add remote brokers to your configuration, these become considered as the downstream brokers. The downstream brokers use the connection information in the configuration to connect back to the local broker, which is now considered to be upstream. This is illustrated later in this example, when you add configuration for the remote brokers.
Prerequisites
- You should be familiar with the configuration for upstream address federation. See Section 4.22.5, “Configuring upstream address federation”.
- The following example shows how to configure address federation between standalone brokers. However, you should also be familiar with the requirements for configuring federation for a broker cluster. For more information, see Section 4.22.4, “Configuring federation for a broker cluster”.
Procedure
-
On the local broker, open the
<broker_instance_dir>/etc/broker.xmlconfiguration file. Add a
<federations>element that includes a<federation>element. For example:<federations> <federation name="eu-north-1" user="federation_username" password="32a10275cf4ab4e9"> </federation> </federations>Add an address policy configuration. For example:
<federations>
    ...
    <federation name="eu-north-1" user="federation_username" password="32a10275cf4ab4e9">

        <address-policy name="news-address-federation" max-hops="1" auto-delete="true" auto-delete-delay="300000" auto-delete-message-count="-1" transformer-ref="news-transformer">

            <include address-match="queue.bbc.new" />
            <include address-match="queue.usatoday" />
            <include address-match="queue.news.#" />

            <exclude address-match="queue.news.sport.#" />
        </address-policy>

    </federation>
  ...
</federations>
If you want to transform messages before transmission, add a transformer configuration. For example:
<federations>
    ...
    <federation name="eu-north-1" user="federation_username" password="32a10275cf4ab4e9">

        <address-policy name="news-address-federation" max-hops="1" auto-delete="true" auto-delete-delay="300000" auto-delete-message-count="-1" transformer-ref="news-transformer">

            <include address-match="queue.bbc.new" />
            <include address-match="queue.usatoday" />
            <include address-match="queue.news.#" />

            <exclude address-match="queue.news.sport.#" />
        </address-policy>

        <transformer name="news-transformer">
            <class-name>org.myorg.NewsTransformer</class-name>
            <property key="key1" value="value1"/>
            <property key="key2" value="value2"/>
        </transformer>

    </federation>
  ...
</federations>
Add a
downstreamelement for each remote broker. For example:<federations> ... <federation name="eu-north-1" user="federation_username" password="32a10275cf4ab4e9"> <downstream name="eu-east-1"> <static-connectors> <connector-ref>eu-east-connector1</connector-ref> </static-connectors> <upstream-connector-ref>netty-connector</upstream-connector-ref> <policy ref="news-address-federation"/> </downstream> <downstream name="eu-west-1" > <static-connectors> <connector-ref>eu-west-connector1</connector-ref> </static-connectors> <upstream-connector-ref>netty-connector</upstream-connector-ref> <policy ref="news-address-federation"/> </downstream> <address-policy name="news-address-federation" max-hops="1" auto-delete="true" auto-delete-delay="300000" auto-delete-message-count="-1" transformer-ref="news-transformer"> <include address-match="queue.bbc.new" /> <include address-match="queue.usatoday" /> <include address-match="queue.news.#" /> <exclude address-match="queue.news.sport.#" /> </address-policy> <transformer name="news-transformer"> <class-name>org.myorg.NewsTransformer</class-name> <property key="key1" value="value1"/> <property key="key2" value="value2"/> </transformer> </federation> ... </federations>As shown in the preceding configuration, the remote brokers are now considered to be downstream of the local broker. The downstream brokers use the connection information in the configuration to connect back to the local (that is, upstream) broker.
On the local broker, add connectors and acceptors used by the local and remote brokers to establish the federation connection. For example:
<connectors>
   <connector name="netty-connector">tcp://localhost:61616</connector>
   <connector name="eu-west-1-connector">tcp://localhost:61616</connector>
   <connector name="eu-east-1-connector">tcp://localhost:61617</connector>
</connectors>

<acceptors>
   <acceptor name="netty-acceptor">tcp://localhost:61616</acceptor>
</acceptors>
connector name="netty-connector"- Connector configuration that the local broker sends to the remote broker. The remote broker use this configuration to connect back to the local broker.
connector name="eu-west-1-connector",connector name="eu-east-1-connector"- Connectors to remote brokers. The local broker uses these connectors to connect to the remote brokers and share the configuration that the remote brokers need to connect back to the local broker.
acceptor name="netty-acceptor"- Acceptor on the local broker that corresponds to the connector used by the remote broker to connect back to the local broker.
4.22.7. About queue federation
Queue federation provides a way to balance the load of a single queue on a local broker across other, remote brokers.
To achieve load balancing, a local broker retrieves messages from remote queues in order to satisfy demand for messages from local consumers. An example is shown below.
Figure 4.5. Symmetric queue federation
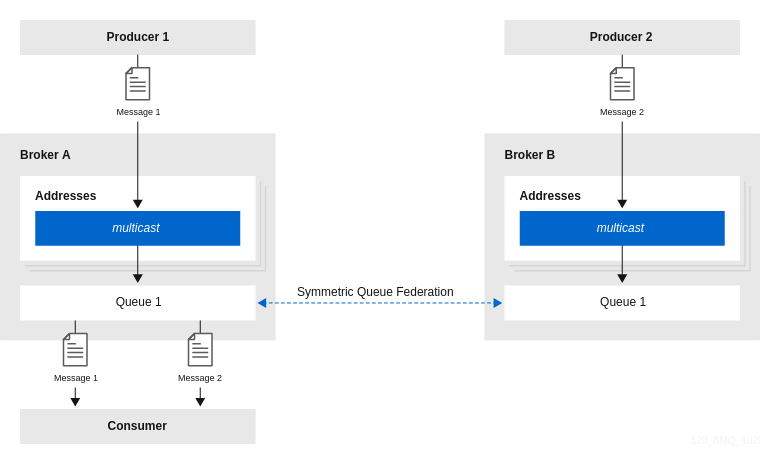
The remote queues do not need to be reconfigured and they do not have to be on the same broker or in the same cluster. All of the configuration needed to establish the remote links and the federated queue is on the local broker.
4.22.7.1. Advantages of queue federation
Described below are some reasons you might choose to configure queue federation.
- Increasing capacity
- Queue federation can create a "logical" queue that is distributed over many brokers. This logical distributed queue has a much higher capacity than a single queue on a single broker. In this setup, as many messages as possible are consumed from the broker they were originally published to. The system moves messages around in the federation only when load balancing is needed.
- Deploying multi-region setups
In a multi-region setup, you might have a message producer in one region or venue and a consumer in another. However, you should ideally keep producer and consumer connections local to a given region. In this case, you can deploy brokers in each region where producers and consumers are, and use queue federation to move messages over a Wide Area Network (WAN), between regions. An example is shown below.
Figure 4.6. Multi-region queue federation
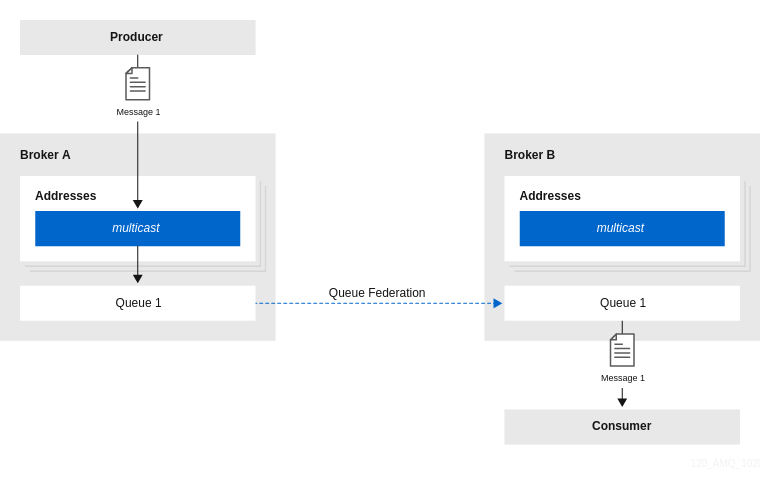
- Communicating between a secure enterprise LAN and a DMZ
In networking security, a demilitarized zone (DMZ) is a physical or logical subnetwork that contains and exposes an enterprise’s external-facing services to an untrusted, usually larger, network such as the Internet. The remainder of the enterprise’s Local Area Network (LAN) remains isolated from this external network, behind a firewall.
In a situation where a number of message producers are in the DMZ and a number of consumers in the secure enterprise LAN, it might not be appropriate to allow the producers to connect to a broker in the secure enterprise LAN. In this case, you could deploy a broker in the DMZ that the producers can publish messages to. Then, the broker in the enterprise LAN can connect to the broker in the DMZ and use federated queues to receive messages from the broker in the DMZ.
4.22.8. Configuring upstream queue federation
The following example shows how to configure upstream queue federation for standalone brokers. In this example, you configure federation from a local (that is, downstream) broker, to some remote (that is, upstream) brokers.
Prerequisites
- The following example shows how to configure queue federation between standalone brokers. However, you should also be familiar with the requirements for configuring federation for a broker cluster. For more information, see Section 4.22.4, “Configuring federation for a broker cluster”.
Procedure
-
Open the
<broker_instance_dir>/etc/broker.xmlconfiguration file. Within a new
<federations>element, add a<federation>element. For example:<federations> <federation name="eu-north-1" user="federation_username" password="32a10275cf4ab4e9"> </federation> </federations>name- Name of the federation configuration. In this example, the name corresponds to the name of the downstream broker.
user- Shared user name for connection to the upstream brokers.
password- Shared password for connection to the upstream brokers.
Note- If user and password credentials differ for upstream brokers, you can separately specify credentials for those brokers when you add them to the configuration. This is described later in this procedure.
Within the
federationelement, add a<queue-policy>element. Specify values for properties of the<queue-policy>element. For example:<federations> <federation name="eu-north-1" user="federation_username" password="32a10275cf4ab4e9"> <queue-policy name="news-queue-federation" include-federated="true" priority-adjustment="-5" transformer-ref="news-transformer"> </queue-policy> </federation> </federations>name- Name of the queue policy. All queue policies that are configured on the broker must have unique names.
include-federatedWhen the value of this property is set to
false, the configuration does not re-federate an already-federated consumer (that is, a consumer on a federated queue). This avoids a situation where in a symmetric or closed-loop topology, there are no non-federated consumers, and messages flow endlessly around the system.You might set the value of this property to
trueif you do not have a closed-loop topology. For example, suppose that you have a chain of three brokers,BrokerA,BrokerB, andBrokerC, with a producer atBrokerAand a consumer atBrokerC. In this case, you would wantBrokerBto re-federate the consumer toBrokerA.priority-adjustment-
When a consumer connects to a queue, its priority is used when the upstream (that is federated) consumer is created. The priority of the federated consumer is adjusted by the value of the
priority-adjustmentproperty. The default value of this property is-1, which ensures that the local consumer get prioritized over the federated consumer during load balancing. However, you can change the value of the priority adjustment as needed.
If, despite the priority given to local consumers, federated consumers consume messages at a rate that causes too many messages to move to federated consumers, you can limit the rate at which federated consumers consume messages. To limit the rate of message consumption, configure the consumerMaxRate flow control option in the client connection URI of federated consumers. For more information, see the flow control options in the AMQ Core Protocol JMS Client documentation.
transformer-refName of a transformer configuration. You might add a transformer configuration if you want to transform messages during federated message transmission. Transformer configuration is described later in this procedure.
Within the
<queue-policy>element, add address-matching patterns to include and exclude addresses from the queue policy. For example:<federations> <federation name="eu-north-1" user="federation_username" password="32a10275cf4ab4e9"> <queue-policy name="news-queue-federation" include-federated="true" priority-adjustment="-5" transformer-ref="news-transformer"> <include queue-match="#" address-match="queue.bbc.new" /> <include queue-match="#" address-match="queue.usatoday" /> <include queue-match="#" address-match="queue.news.#" /> <exclude queue-match="#.local" address-match="#" /> </queue-policy> </federation> </federations>
includeThe value of the
address-matchproperty of this element specifies addresses to include in the queue policy. You can specify an exact address, for example,queue.bbc.neworqueue.usatoday. Or, you can use a wildcard expression to specify a matching set of addresses. In the preceding example, the queue policy also includes all address names that start with the stringqueue.news.In combination with the
address-matchproperty, you can use thequeue-matchproperty to include specific queues on those addresses in the queue policy. Like theaddress-matchproperty, you can specify an exact queue name, or you can use a wildcard expression to specify a set of queues. In the preceding example, the number sign (#) wildcard character means that all queues on each address or set of addresses are included in the queue policy.excludeThe value of the
address-matchproperty of this element specifies addresses to exclude from the queue policy. You can specify an exact address or use a wildcard expression to specify a matching set of addresses. In the preceding example, the number sign (#) wildcard character means that any queues that match thequeue-matchproperty across all addresses are excluded. In this case, any queue that ends with the string.localis excluded. This indicates that certain queues are kept as local queues, and not federated.Within the
federationelement, add atransformerelement to reference a custom transformer implementation. For example:<federations> <federation name="eu-north-1" user="federation_username" password="32a10275cf4ab4e9"> <queue-policy name="news-queue-federation" include-federated="true" priority-adjustment="-5" transformer-ref="news-transformer"> <include queue-match="#" address-match="queue.bbc.new" /> <include queue-match="#" address-match="queue.usatoday" /> <include queue-match="#" address-match="queue.news.#" /> <exclude queue-match="#.local" address-match="#" /> </queue-policy> <transformer name="news-transformer"> <class-name>org.myorg.NewsTransformer</class-name> <property key="key1" value="value1"/> <property key="key2" value="value2"/> </transformer> </federation> </federations>
name-
Name of the transformer configuration. This name must be unique on the broker in question. You specify this name as a value for the
transformer-refproperty of the address policy. class-nameName of a user-defined class that implements the
org.apache.activemq.artemis.core.server.transformer.Transformerinterface.The transformer’s
transform()method is invoked with the message before the message is transmitted. This enables you to transform the message header or body before it is federated.propertyUsed to hold key-value pairs for specific transformer configuration.
Within the
federationelement, add one or moreupstreamelements. Eachupstreamelement defines an upstream broker connection and the policies to apply to that connection. For example:<federations> <federation name="eu-north-1" user="federation_username" password="32a10275cf4ab4e9"> <upstream name="eu-east-1"> <static-connectors> <connector-ref>eu-east-connector1</connector-ref> </static-connectors> <policy ref="news-queue-federation"/> </upstream> <upstream name="eu-west-1" > <static-connectors> <connector-ref>eu-west-connector1</connector-ref> </static-connectors> <policy ref="news-queue-federation"/> </upstream> <queue-policy name="news-queue-federation" include-federated="true" priority-adjustment="-5" transformer-ref="news-transformer"> <include queue-match="#" address-match="queue.bbc.new" /> <include queue-match="#" address-match="queue.usatoday" /> <include queue-match="#" address-match="queue.news.#" /> <exclude queue-match="#.local" address-match="#" /> </queue-policy> <transformer name="news-transformer"> <class-name>org.myorg.NewsTransformer</class-name> <property key="key1" value="value1"/> <property key="key2" value="value2"/> </transformer> </federation> </federations>static-connectors-
Contains a list of
connector-refelements that referenceconnectorelements that are defined elsewhere in thebroker.xmlconfiguration file of the local broker. A connector defines what transport (TCP, SSL, HTTP, and so on) and server connection parameters (host, port, and so on) to use for outgoing connections. The following step of this procedure shows how to add the connectors referenced by thestatic-connectorselements of your federated queue configuration. policy-ref- Name of the queue policy configured on the downstream broker that is applied to the upstream broker.
The additional options that you can specify for an
upstreamelement are described below:
name-
Name of the upstream broker configuration. In this example, the names correspond to upstream brokers called
eu-east-1andeu-west-1. user-
User name to use when creating the connection to the upstream broker. If not specified, the shared user name that is specified in the configuration of the
federationelement is used. password-
Password to use when creating the connection to the upstream broker. If not specified, the shared password that is specified in the configuration of the
federationelement is used. call-failover-timeout-
Similar to
call-timeout, but used when a call is made during a failover attempt. The default value is-1, which means that the timeout is disabled. call-timeout-
Time, in milliseconds, that a federation connection waits for a reply from a remote broker when it transmits a packet that is a blocking call. If this time elapses, the connection throws an exception. The default value is
30000. check-period-
Period, in milliseconds, between consecutive “keep-alive” messages that the local broker sends to a remote broker to check the health of the federation connection. If the federation connection is healthy, the remote broker responds to each keep-alive message. If the connection is unhealthy, when the downstream broker fails to receive a response from the upstream broker, a mechanism called a circuit breaker is used to block federated consumers. See the description of the
circuit-breaker-timeoutparameter for more information. The default value of thecheck-periodparameter is30000. circuit-breaker-timeout- A single connection between a downstream and upstream broker might be shared by many federated queue and address consumers. In the event that the connection between the brokers is lost, each federated consumer might try to reconnect at the same time. To avoid this, a mechanism called a circuit breaker blocks the consumers. When the specified timeout value elapses, the circuit breaker re-tries the connection. If successful, consumers are unblocked. Otherwise, the circuit breaker is applied again.
connection-ttl-
Time, in milliseconds, that a federation connection stays alive if it stops receiving messages from the remote broker. The default value is
60000. discovery-group-ref-
As an alternative to defining static connectors for connections to upstream brokers, this element can be used to specify a discovery group that is already configured elsewhere in the
broker.xmlconfiguration file. Specifically, you specify an existing discovery group as a value for thediscovery-group-nameproperty of this element. For more information about discovery groups, see Section 14.1.6, “Broker discovery methods”. ha-
Specifies whether high availability is enabled for the connection to the upstream broker. If the value of this parameter is set to
true, the local broker can connect to any available broker in an upstream cluster and automatically fails over to a backup broker if the live upstream broker shuts down. The default value isfalse. initial-connect-attempts-
Number of initial attempts that the downstream broker will make to connect to the upstream broker. If this value is reached without a connection being established, the upstream broker is considered permanently offline. The downstream broker no longer routes messages to the upstream broker. The default value is
-1, which means that there is no limit. max-retry-interval-
Maximum time, in milliseconds, between subsequent reconnection attempts when connection to the remote broker fails. The default value is
2000. reconnect-attempts-
Number of times that the downstream broker will try to reconnect to the upstream broker if the connection fails. If this value is reached without a connection being re-established, the upstream broker is considered permanently offline. The downstream broker no longer routes messages to the upstream broker. The default value is
-1, which means that there is no limit. retry-interval-
Period, in milliseconds, between subsequent reconnection attempts, if connection to the remote broker has failed. The default value is
500. retry-interval-multiplier-
Multiplying factor that is applied to the value of the
retry-intervalparameter. The default value is1. share-connectionIf there is both a downstream and upstream connection configured for the same broker, then the same connection will be shared, as long as both of the downstream and upstream configurations set the value of this parameter to
true. The default value isfalse.On the local broker, add connectors to the remote brokers. These are the connectors referenced in the
static-connectorselements of your federated address configuration. For example:<connectors> <connector name="eu-west-1-connector">tcp://localhost:61616</connector> <connector name="eu-east-1-connector">tcp://localhost:61617</connector> </connectors>
4.22.9. Configuring downstream queue federation
The following example shows how to configure downstream queue federation.
Downstream queue federation enables you to add configuration on the local broker that one or more remote brokers use to connect back to the local broker. The advantage of this approach is that you can keep all federation configuration on a single broker. This might be a useful approach for a hub-and-spoke topology, for example.
Downstream queue federation reverses the direction of the federation connection versus upstream queue configuration. Therefore, when you add remote brokers to your configuration, these become considered as the downstream brokers. The downstream brokers use the connection information in the configuration to connect back to the local broker, which is now considered to be upstream. This is illustrated later in this example, when you add configuration for the remote brokers.
Prerequisites
- You should be familiar with the configuration for upstream queue federation. See Section 4.22.8, “Configuring upstream queue federation”.
- The following example shows how to configure queue federation between standalone brokers. However, you should also be familiar with the requirements for configuring federation for a broker cluster. For more information, see Section 4.22.4, “Configuring federation for a broker cluster”.
Procedure
-
Open the
<broker_instance_dir>/etc/broker.xmlconfiguration file. Add a
<federations>element that includes a<federation>element. For example:<federations> <federation name="eu-north-1" user="federation_username" password="32a10275cf4ab4e9"> </federation> </federations>Add a queue policy configuration. For example:
<federations>
    ...
    <federation name="eu-north-1" user="federation_username" password="32a10275cf4ab4e9">

        <queue-policy name="news-queue-federation" priority-adjustment="-5" include-federated="true" transformer-ref="new-transformer">

            <include queue-match="#" address-match="queue.bbc.new" />
            <include queue-match="#" address-match="queue.usatoday" />
            <include queue-match="#" address-match="queue.news.#" />

            <exclude queue-match="#.local" address-match="#" />

        </queue-policy>

    </federation>
  ...
</federations>
If you want to transform messages before transmission, add a transformer configuration. For example:
<federations>
    ...
    <federation name="eu-north-1" user="federation_username" password="32a10275cf4ab4e9">

        <queue-policy name="news-queue-federation" priority-adjustment="-5" include-federated="true" transformer-ref="news-transformer">

            <include queue-match="#" address-match="queue.bbc.new" />
            <include queue-match="#" address-match="queue.usatoday" />
            <include queue-match="#" address-match="queue.news.#" />

            <exclude queue-match="#.local" address-match="#" />

        </queue-policy>

        <transformer name="news-transformer">
            <class-name>org.myorg.NewsTransformer</class-name>
            <property key="key1" value="value1"/>
            <property key="key2" value="value2"/>
        </transformer>

    </federation>
  ...
</federations>
Add a
downstreamelement for each remote broker. For example:<federations> ... <federation name="eu-north-1" user="federation_username" password="32a10275cf4ab4e9"> <downstream name="eu-east-1"> <static-connectors> <connector-ref>eu-east-connector1</connector-ref> </static-connectors> <upstream-connector-ref>netty-connector</upstream-connector-ref> <policy ref="news-address-federation"/> </downstream> <downstream name="eu-west-1" > <static-connectors> <connector-ref>eu-west-connector1</connector-ref> </static-connectors> <upstream-connector-ref>netty-connector</upstream-connector-ref> <policy ref="news-address-federation"/> </downstream> <queue-policy name="news-queue-federation" priority-adjustment="-5" include-federated="true" transformer-ref="new-transformer"> <include queue-match="#" address-match="queue.bbc.new" /> <include queue-match="#" address-match="queue.usatoday" /> <include queue-match="#" address-match="queue.news.#" /> <exclude queue-match="#.local" address-match="#" /> </queue-policy> <transformer name="news-transformer"> <class-name>org.myorg.NewsTransformer</class-name> <property key="key1" value="value1"/> <property key="key2" value="value2"/> </transformer> </federation> ... </federations>As shown in the preceding configuration, the remote brokers are now considered to be downstream of the local broker. The downstream brokers use the connection information in the configuration to connect back to the local (that is, upstream) broker.
On the local broker, add connectors and acceptors used by the local and remote brokers to establish the federation connection. For example:
<connectors>
   <connector name="netty-connector">tcp://localhost:61616</connector>
   <connector name="eu-west-1-connector">tcp://localhost:61616</connector>
   <connector name="eu-east-1-connector">tcp://localhost:61617</connector>
</connectors>

<acceptors>
   <acceptor name="netty-acceptor">tcp://localhost:61616</acceptor>
</acceptors>
connector name="netty-connector"- Connector configuration that the local broker sends to the remote broker. The remote broker use this configuration to connect back to the local broker.
connector name="eu-west-1-connector",connector name="eu-east-1-connector"- Connectors to remote brokers. The local broker uses these connectors to connect to the remote brokers and share the configuration that the remote brokers need to connect back to the local broker.
acceptor name="netty-acceptor"- Acceptor on the local broker that corresponds to the connector used by the remote broker to connect back to the local broker.