Using automation decisions
Configure and use Event-Driven Ansible controller to enhance and expand automation
Abstract
Preface
Event-Driven Ansible controller is a new way to enhance and expand automation by improving IT speed and agility while enabling consistency and resilience. Developed by Red Hat, this feature is designed for simplicity and flexibility.
Providing feedback on Red Hat documentation
If you have a suggestion to improve this documentation, or find an error, you can contact technical support at https://access.redhat.com to open a request.
Chapter 1. Event-Driven Ansible controller overview
Event-Driven Ansible is a highly scalable, flexible automation capability that works with event sources such as other software vendors' monitoring tools. These tools monitor IT solutions and identify events and automatically implement the documented changes or response in a rulebook to handle that event.
The following procedures form the user configuration:
- Credentials
- Credential types
- Projects
- Decision environments
- Red Hat Ansible Automation Platform credential
- Rulebook activations
- Rulebook activations troubleshooting
- Rule audit
- Simplified event routing
- Performance tuning for Event-Driven Ansible controller
- Event filter plugins
- Event-Driven Ansible logging strategy
- API documentation for Event-Driven Ansible controller is available at https://<gateway-host>/api/eda/v1/docs
- To meet high availability demands, Event-Driven Ansible controller shares centralized Redis (REmote DIctionary Server) with the Ansible Automation Platform UI. When Redis is unavailable, you will not be able to create or sync projects, or enable rulebook activations.
Chapter 2. Credentials
You can use credentials to store secrets that can be used for authentication purposes with resources, such as decision environments, rulebook activations and projects for Event-Driven Ansible controller, and projects for automation controller.
Credentials authenticate users when launching jobs against machines and importing project content from a version control system.
You can grant users and teams the ability to use these credentials without exposing the credential to the user. If a user moves to a different team or leaves the organization, you do not have to rekey all of your systems just because that credential was previously available.
In the context of automation controller and Event-Driven Ansible controller, you can use both extra_vars and credentials to store a variety of information. However, credentials are the preferred method of storing sensitive information such as passwords or API keys because they offer better security and centralized management, whereas extra_vars are more suitable for passing dynamic, non-sensitive data.
2.1. Credentials list view
When you log in to the Ansible Automation Platform and select → → , the Credentials page has a pre-loaded Decision Environment Container Registry credential. When you create your own credentials, they will be added to this list view. .
From the menu bar, you can search for credentials in the Name search field.
You also have the following options in the menu bar:
Manage columns - You can choose how fields are shown in the list view by clicking this option. You have four ways you can arrange your fields:
- Column - Shows the column in the table.
- Description - Shows the column when the item is expanded as a full width description.
- Expanded - Shows the column when the item is expanded as a detail.
- Hidden - Hides the column.
- List view or Card view - You can choose between these views by clicking the applicable icons.
2.2. Setting up credentials
You can create a credential to use with a source plugin or a private container registry that you select. You can make your credential available to a team or individuals.
Procedure
- Log in to the Ansible Automation Platform Dashboard.
- From the navigation panel, select → → .
- Click .
Insert the following:
- Name
- Insert the name.
- Description
- This field is optional.
- Organization
- Click the list to select an organization or select Default.
- Credential type
Click the list to select your Credential type.
NoteWhen you select the credential type, the Type Details section is displayed with fields that are applicable for the credential type you chose.
- Complete the fields that are applicable to the credential type you selected.
- Click .
Next steps
After saving the credential, the credentials details page is displayed. From there or the Credentials list view, you can edit or delete it.
2.3. Editing a credential
You can edit existing credentials to ensure the appropriate level of access for your organization.
Procedure
Edit the credential by using one of these methods:
- From the Credentials list view, click the icon next to the desired credential.
- From the Credentials list view, select the name of the credential, click .
- Edit the appropriate details and click .
2.4. Duplicating a credential
When setting up a new credential with field inputs that are similar to your existing credentials, you can use the Duplicate credential feature in the Details tab to duplicate information instead of manually entering it. While setting up credentials can be a lengthy process, the ability to duplicate the required fields from an existing credential saves time and, in some cases, reduces the possibility of human error.
Procedure
- On the Credentials list page, click the name of the credential that you want to duplicate. This takes you to the Details tab of the credential.
Click in the top right of the Details tab.
NoteYou can also click the icon next to the desired credential on the Credentials list page.
A message is displayed confirming that your selected credential has been duplicated: "<Name of credential> duplicated."
Click the tab to view the credential you just duplicated.
The duplicated credential is displayed with the same name as the original credential followed by a time stamp in 24-hour format (for example, <Name of credential> @ 17:26:30).
- Edit the details you prefer for your duplicated credential.
- Click .
2.5. Deleting a credential
You can delete credentials if they are no longer needed for your organization.
Procedure
Delete the credential by using one of these methods:
- From the Credentials list view, click the icon ⋮ next to the desired credential and click .
- From the Credentials list view, select the name of the credential, click the icon ⋮ next to , and click .
In the pop-up window, select Yes, I confirm that I want to delete this credential.
NoteIf your credential is still in use by other resources in your organization, a warning message is displayed letting you know that the credential cannot be deleted. Also, if your credential is being used in an event stream, you cannot delete it until the event stream is deleted or attached to a different credential. In general, avoid deleting a credential that is in use because it can lead to broken activations.
- Click .
Results
You can delete multiple credentials at a time by selecting the checkbox next to each credential, clicking the icon ⋮ in the menu bar, and then clicking .
Chapter 3. Credential types
Event-Driven Ansible controller comes with several built-in credential types that you can use for syncing projects, running rulebook activations, executing job templates through Automation Execution (automation controller), fetching images from container registries, and processing data through event streams.
These built-in credential types are not editable. So if you want credential types that support authentication with other systems, you can create your own credential types that can be used in your source plugins. Each credential type contains an input configuration and an injector configuration that can be passed to an Ansible rulebook to configure your sources.
For more information, see Custom credential types.
3.1. Custom credential types
As a system administrator, you can define a custom credential type that works in ways similar to existing credential types in a standard format using a YAML or JSON-like definition.
Each credential type displays its own unique configurations in the Input Configuration and the Injector Configuration fields, if applicable. Both YAML and JSON formats are supported in the configuration fields.
Custom credentials support Ansible extra variables as a means of injecting their authentication information.
You can attach one or more cloud, vault, and Red Hat Ansible Automation Platform credential types to a rulebook activation.
-
When creating a new credential type, you must avoid collisions in the
extra_vars. - Extra variable names must not start with EDA_ because they are reserved.
- You must have System administrator (superuser) permissions to be able to create and edit a credential type and to be able to view the Injector configuration field.
When you customize your own credential types, they display on the Credential Types page along with a list of built-in credential types.
3.1.1. Input Configuration
The Input configuration has two attributes:
- fields - a collection of properties for a credential type.
- required - a list of required fields.
Fields can have multiple properties, depending on the credential type you select.
| Fields | Description | Mandatory (Y/N) |
|---|---|---|
| id | Unique id of the field; must be a string type and stores the variable name | Yes |
| type | Can be string or boolean type | No, default is string |
| label | Used by the UI when rendering the UI element | Yes |
| secret | Will be encrypted | No, default false |
| multiline | If the field contains data from a file the multiline can be set to True | No, default false |
| help_text | The help text associated with this field | No |
3.1.2. Injector Configuration
You can use Injector configuration to extract information from Input configuration fields and map them into injector types that can be sent to ansible-rulebook when running a rulebook activation. Event-Driven Ansible supports the following types of injectors:
-
Environment variables (
env) - Used in source plugins for the underlying package or shared library. -
Ansible extra variables (
extra_vars) - Used for substitution in the rulebook conditions, actions or source plugin parameters. -
File-based templating (
file) - Used to create file contents from the credential inputs such as certificates and keys, which might be required by source plugins. File injectors provide a way to deliver these certificates and keys to ansible-rulebook at runtime without having to store them in decision environments. As a result, ansible-rulebook creates temporary files and the file names can be accessed usingeda.filenamevariables, which are automatically created for you after the files have been created (for instance, "{{eda.filename.my_cert}}”).
When creating extra_vars in rulebook activations and credential type injectors, avoid using eda or ansible as key names since that conflicts with internal usage and might cause failure in both rulebook activations and credential type creation.
Injectors enable you to adjust the fields so that they can be injected into a rulebook as one of the above-mentioned injector types, which cannot have duplicate keys at the top level. If you have two sources in a rulebook that both require parameters such as username and password, the injectors, along with the rulebook, help you adapt the arguments for each source.
To view a sample injector and input, see the following GitHub gists, respectively:
3.2. Creating a new credential type
You can create a credential type to use with a source plugin that you select based on the supported, default credential types. You can make your credential type available to a team or individuals.
Procedure
- Log in to the Ansible Automation Platform Dashboard.
- From the navigation panel, select → → .
- Click .
Insert the following:
- Name
- Insert the name.
- Description
- This field is optional.
In the Input Configuration field, specify an input schema that defines a set of ordered fields for that type. The format can be in YAML or JSON:
YAML
fields:
  - type: string
    id: username
    label: Username
  - type: string
    id: password
    label: Password
    secret: true
required:
  - username
  - password
View more YAML examples at the YAML page.
JSON
{
"fields": [
  {
  "type": "string",
  "id": "username",
  "label": "Username"
  },
  {
  "secret": true,
  "type": "string",
  "id": "password",
  "label": "Password"
   }
  ],
 "required": ["username", "password"]
}
View more JSON examples at The JSON website.
In the Injector Configuration field, enter environment variables or extra variables that specify the values a credential type can inject. The format can be in YAML or JSON (see examples in the previous step).
The following configuration in JSON format shows each field and how they are used:
{
    "extra_vars": {
      "some_extra_var": "{{ username }}:{{ password }}"
  }
}
Click .
Your newly created credential type is displayed in the list of credential types.
-
Click the
 icon to modify the credential type options.
Verification
- Verify that the newly created credential type can be selected from the Credential Type list when creating a new credential.
Next steps
- On the Edit page, you can modify the details or delete the credential.
- If the Delete option is disabled, this means that the credential type is being used by a credential, and you must delete the credential type from all the credentials that use it before you can delete it.
Additional resources
- link:https://docs.redhat.com/en/do cumentation/red_hat_ansible_automation_platform/2.5/html/using_automation_decisions/eda-credentials#eda-set-up-credential[Setting up credentials]
Chapter 4. Projects
Projects are a logical collection of rulebooks. They must be a git repository and located in the path defined for Event-Driven Ansible content in Ansible collections: /extensions/eda/rulebooks at the root of the project.
To meet high availability demands, Event-Driven Ansible controller shares centralized Redis (REmote DIctionary Server) with the Ansible Automation Platform UI. When Redis is unavailable, you will not be able to create or sync projects.
4.1. Setting up a new project
You can set up projects to manage and store your rulebooks in Event-Driven Ansible controller.
Prerequisites
- You are logged in to the Ansible Automation Platform Dashboard as a Content Consumer.
- You have set up a credential, if necessary. For more information, see the Setting up credentials[Setting up credentials] section.
- You have an existing repository containing rulebooks.
Procedure
- Log in to the Ansible Automation Platform Dashboard.
- Navigate to → .
- Click .
Insert the following:
- Name
- Enter project name.
- Description
- This field is optional.
- Source control type
- Git is the only source control type available for use. This field is optional.
- Source control URL
Enter Git, SSH, or HTTP[S] protocol address of a repository, such as GitHub or GitLab. This required field is editable. See Editing a project to view details of how editing this field impacts rulebook activations.
NoteThis field accepts SSH private key or private key phrase. To enable the use of these private keys, your project URL must begin with
git@.- Proxy
- This is used to access HTTP or HTTPS servers. This field is optional and editable. See Editing a project to view details of how editing this field impacts rulebook activations.
- Source control branch/tag/commit
- This is the branch to checkout. In addition to branches, you can input tags, commit hashes, and arbitrary refs. Some commit hashes and refs may not be available unless you also provide a custom refspec. This field is optional and editable. See Editing a project to view details of how editing this field impacts rulebook activations.
- Source control refspec
- A refspec to fetch (passed to the Ansible git module). This parameter allows access to references via the branch field not otherwise available. This field is optional and editable. See Editing a project to view details of how editing this field impacts rulebook activations. For more information, see Examples.
- Source control credential
- This is an optional credential used to authenticate with the provided Source control URL.
- Content signature validation credential
- Enable content signing to verify that the content has remained secure when a project is synced. If the content has been tampered with, the job will not run. This field is optional.
- Options
The Verify SSL option is enabled by default. Enabling this option verifies the SSL with HTTPS when the project is imported.
NoteYou can disable this option if you have a local repository that uses self-signed certificates.
- Select .
Results
Your project is now created and can be managed in the Projects page.
After saving the new project, the project’s details page is displayed. From there or the Projects list view, you can edit or delete it.
4.2. Projects list view
On the Projects page, you can view the projects that you have created along with the Status and the Git hash.
If a rulebook changes in source control, you can re-sync a project by selecting the sync icon next to the project from the Projects list view. The Git hash updates represent the latest commit on that repository. An activation must be restarted or recreated if you want to use the updated project.
4.3. Editing a project
You can modify various aspects of a project after you create it. Depending on the changes you make, a rulebook activation might be impacted, requiring you to review and restart it.
Procedure
- From the Projects list view, select the icon ⋮ next to the desired project. The Edit page is displayed.
Edit the desired fields.
ImportantWhen you update a project’s Source control URL, Source control branch/tag/commit, or Source control refspec, Event-Driven Ansible automatically triggers a project resync. This process updates the rulebooks available within Event-Driven Ansible controller and can significantly impact existing rulebook activations:
- Rulebook Content Updates: Running activations continue to use old content when a rulebook’s content changes. To apply the newer content, you must restart the affected rulebook activation. If the rulebook content you update is attached to an activation that uses event streams, you must re-attach the event stream to that activation after the updates are applied and then, restart the activation.
- New Rulebooks: Any new rulebook added to the repository becomes available in the database after the sync.
- Deleted Rulebooks: A removed rulebook is deleted from the database upon sync. Its associated activations, however, continue to run and can be restarted. Review and update any activations detached from their source rulebook.
- Select .
4.4. Deleting a project
If you need to delete a project, the Event-Driven Ansible controller interface provides multiple options.
Procedure
To delete a project, complete one of the following:
- From the Projects list view, select the checkbox next to the desired project, and click the icon ⋮ from the page menu.
- From the Projects list view, click the icon ⋮ next to the desired project.
- Select .
- In the Permanently delete projects window, select .
- Select .
Chapter 5. Decision environments
Decision environments are container images that run Ansible rulebooks. They create a common language for communicating automation dependencies, and give a standard way to build and distribute the automation environment. You can find the default decision environment in the Ansible-Rulebook.
To create your own decision environment, see Installing ansible-builder and Building a custom decision environment for Event-Driven Ansible within Ansible Automation Platform.
5.1. Installing ansible-builder
To build images, you must have Podman or Docker installed, along with the ansible-builder Python package.
The --container-runtime option must correspond to the Podman or Docker executable you intend to use.
When building a decision environment image, it must support the architecture that Ansible Automation Platform is deployed with.
For more information, see Quickstart for Ansible Builder or Creating and using execution environments.
5.2. Building a custom decision environment for Event-Driven Ansible
Decision Environments are execution environments tailored towards running Ansible Rulebooks.
Similar to execution environments that run Ansible playbooks for automation controller, decision environments are designed to run rulebooks for Event-Driven Ansible controller.
You can create a custom decision environment for Event-Driven Ansible that provides a custom maintained or third-party event source plugin that is not available in the default decision environment.
Prerequisites
- Ansible Automation Platform > = 2.5
- Event-Driven Ansible
- Ansible Builder > = 3.0
Use the correct Event-Driven Ansible controller decision environment in Ansible Automation Platform to prevent rulebook activation failure.
-
If you want to connect Event-Driven Ansible controller to Ansible Automation Platform 2.4, you must use
registry.redhat.io/ansible-automation-platform-24/de-minimal-rhel9:latest(recommended) orregistry.redhat.io/ansible-automation-platform-24/de-minimal-rhel8:latest -
If you want to connect Event-Driven Ansible controller to Ansible Automation Platform 2.5, you must use
registry.redhat.io/ansible-automation-platform-25/de-minimal-rhel9:latest(recommended) orregistry.redhat.io/ansible-automation-platform-25/de-minimal-rhel8:latest -
If you want to connect Event-Driven Ansible controller to Ansible Automation Platform 2.5, you must use
registry.redhat.io/ansible-automation-platform-26/de-minimal-rhel9:latest
-
If you want to connect Event-Driven Ansible controller to Ansible Automation Platform 2.4, you must use
Procedure
Use
de-minimalas the base image with Ansible Builder to build your custom decision environments. This image is built from a base image provided by Red Hat at Ansible Automation Platform minimal decision environment.ImportantThe
ansible.edacollection is already installed in thede-minimalbase image. To prevent Ansible Builder from attempting to reinstall it, addansible.edato theexclude.all_from_collectionslist as shown in the following examples.The following is an example of the Ansible Builder definition file that uses
de-minimalas a base image to build a custom decision environment with theservicenow.itsmcollection:version: 3 images: base_image: name: 'registry.redhat.io/ansible-automation-platform-25/de-minimal-rhel9:latest' dependencies: galaxy: collections: - name: servicenow.itsm python_interpreter: package_system: "python3.12" exclude: all_from_collections: # ansible.eda is already installed in de-minimal - ansible.eda options: package_manager_path: /usr/bin/microdnfOptional: If you need other Python packages or RPMs, add the following to a single definition file:
version: 3

images:
  base_image:
    name: 'registry.redhat.io/ansible-automation-platform-25/de-minimal-rhel9:latest'

dependencies:
  galaxy:
    collections:
      - name: servicenow.itsm
  python:
    - six
    - psutil
  python_interpreter:
    package_system: "python3.12"
  exclude:
    all_from_collections:
      # ansible.eda is already installed in de-minimal
      - ansible.eda

options:
  package_manager_path: /usr/bin/microdnf
5.3. Setting up a new decision environment
You can import a decision environment into your Event-Driven Ansible controller using a default or custom decision environment.
Prerequisites
- You have set up a credential, if necessary. For more information, see the Setting up credentials section.
-
You have pushed a decision environment image to an image repository or you chose to use the
de-minimalimage located in registry.redhat.io.
Procedure
- Log in to Ansible Automation Platform.
- Navigate to → .
- Click .
Insert the following:
- Name
- Insert the name.
- Description
- This field is optional.
- Organization
- Select an organization to associate with the decision environment.
- Image
- This is the full image location, including the container registry, image name, and version tag.
- Credential
- This field is optional. This is the credential needed to use the decision environment image.
- Select .
Results
Your decision environment is now created and can be managed on the Decision Environments page.
After saving the new decision environment, the decision environment’s details page is displayed. From there or the Decision Environments list view, you can edit or delete it.
Chapter 6. Red Hat Ansible Automation Platform credential
When Event-Driven Ansible controller is deployed on Ansible Automation Platform 2.5, you can create a Red Hat Ansible Automation Platform credential to connect to automation controller through the use of an automation controller URL and a username and password. After it has been created, you can attach the Red Hat Ansible Automation Platform credential to a rulebook and use it to run rulebook activations. These credentials provide a simple way to configure communication between automation controller and Event-Driven Ansible controller, enabling your rulebook activations to launch job templates.
If you deployed Event-Driven Ansible controller with Ansible Automation Platform 2.4, you probably used controller tokens to connect automation controller and Event-Driven Ansible controller. These controller tokens have been deprecated in Ansible Automation Platform 2.5. To delete deprecated controller tokens and the rulebook activations associated with them, complete the following procedures starting with Replacing controller tokens in Ansible Automation Platform 2.5 before proceeding with Setting up a Red Hat Ansible Automation Platform credential.
6.1. Replacing controller tokens in Red Hat Ansible Automation Platform 2.5
To use Event-Driven Ansible controller in Red Hat Ansible Automation Platform 2.5, you must replace legacy controller tokens configured in your environment with Red Hat Ansible Automation Platform credentials because controller tokens have been deprecated.
6.1.1. Deleting rulebook activations with controller tokens
To replace the controller tokens, you must delete the rulebook activations that were associated with them.
Procedure
- Log in to the Ansible Automation Platform Dashboard.
- From the top navigation panel, select → .
- Select the rulebook activations that have controller tokens.
- Select the icon ⋮ next to the Rulebook Activation enabled/disabled toggle.
- Select .
- In the window, select .
- Select .
6.1.2. Deleting controller tokens
Before you can set up Red Hat Ansible Automation Platform credentials, you must delete any existing controller tokens.
Prerequisites
- You have deleted all rulebook activations that use controller tokens.
Procedure
- Log in to the Ansible Automation Platform Dashboard.
- From the top navigation panel, select your profile.
- Click User details.
- Select the Tokens tab.
- Delete all of your previous controller tokens.
Next steps
After deleting the controller tokens and rulebook activations, proceed with Setting up a Red Hat Ansible Automation Platform credential.
6.2. Setting up a Red Hat Ansible Automation Platform credential
Create a Red Hat Ansible Automation Platform credential to connect to automation controller through the use of an automation controller URL and a username and password.
Prerequisites
- You have created a user.
- You have obtained the URL and the credentials to access automation controller.
Procedure
- Log in to the Ansible Automation Platform Dashboard.
- From the navigation panel, select → → .
- Click .
Insert the following:
- Name
- Insert the name.
- Description
- This field is optional.
- Organization
- Click the list to select an organization or select Default.
- Credential type
Click the list and select Red Hat Ansible Automation Platform.
NoteWhen you select the credential type, the Type Details section is displayed with fields that are applicable for the credential type you chose.
WarningIf you plan to use a backup and restore operation to migrate your Ansible Automation Platform instance to a different cluster or new set of hostnames, the Red Hat Ansible Automation Platform credential will break, and your rulebook activation will fail. You must manually edit and update the automation controller URL and associated credentials after the restore operation is complete to restore connectivity.
In the required Red Hat Ansible Automation Platform field, enter your automation controller URL.
NoteFor Event-Driven Ansible controller 2.5 with automation controller 2.4, use the following example: https://<your_controller_host>
For Ansible Automation Platform 2.5, use the following example: https://<your_gateway_host>/api/controller/
- Enter a valid Username and Password, or Oauth Token.
- Click .
Next step
After you create this credential, you can use it for configuring your rulebook activations.
Chapter 7. Rulebook activations
A rulebook is a set of conditional rules that Event-Driven Ansible uses to perform IT actions in an event-driven automation model. Rulebooks are the means by which users tell Event-Driven Ansible which source to check for an event and when that event occurs what to do when certain conditions are met.
A rulebook specifies actions to be performed when a rule is triggered. A rule gets triggered when the events match the conditions for the rules. The following actions are currently supported:
-
run_playbook(only supported with ansible-rulebook CLI) -
run_module -
run_job_template -
run_workflow_template -
set_fact -
post_event -
retract_fact -
print_event -
shutdown -
debug -
none
To view further details, see Actions.
A rulebook activation is a process running in the background defined by a decision environment executing a specific rulebook. You can set up your rulebook activation by following Setting up a rulebook activation.
Red Hat does not recommend the use of a non-supported source plugin with 1 postgres database. This can pose a potential risk to your use of Ansible Automation Platform.
To meet high availability demands, Event-Driven Ansible controller shares centralized Redis (REmote DIctionary Server) with the Ansible Automation Platform UI. When Redis is unavailable, the following functions will not be available:
-
Creating an activation, if
is_enabledis True - Deleting an activation
- Enabling an activation, if not already enabled
- Disabling an activation, if not already disabled
- Restarting an activation
7.1. Supported event sources
Event sources are a fundamental component of Event-Driven Ansible because they determine where a rulebook can receive events from. The effectiveness of a rulebook activation depends on selecting an event source that is compatible with your automation environment. Certain event sources are designed for use with the web-based Event-Driven Ansible controller, while others, due to their reliance on local host functionality, are exclusive to the ansible-rulebook command-line interface (CLI). Understanding this distinction is crucial for successful rulebook activations.
The following list includes currently supported event sources for use with the web-based Event-Driven Ansible controller. You can decide which event sources provide the desired outcome for your rulebook activations.
-
alertmanager -
aws_cloudtrail -
aws_sqs_queue -
azure_service_bus -
kafka -
pg_listener -
webhook
7.2. Setting up a rulebook activation
You can create and configure a rulebook activation within the Ansible Automation Platform Dashboard. This process ensures effective management and deployment of your event-driven automation.
Prerequisites
- You are logged in to the Ansible Automation Platform Dashboard as a Content Consumer.
- You have set up a project.
- You have set up a decision environment.
Procedure
- Log in to Ansible Automation Platform.
- Navigate to the → .
- Click .
Insert the following:
- Name
- Insert the name.
- Description
- This field is optional.
- Organization
- Enter your organization name or select Default from the list.
- Project
- Projects are a logical collection of rulebooks. This field is optional.
- Rulebook
- Rulebooks are displayed according to the project selected.
- Credential
Select 0 or more credentials for this rulebook activation. This field is optional.
Note- The credentials that display in this field are customized based on your rulebook activation and only include the following credential types: Vault, Red Hat Ansible Automation Platform, or any custom credential types that you have created. For more information about credentials, see Credentials.
- If you plan to use a Red Hat Ansible Automation Platform credential, you can only select 1 Red Hat Ansible Automation Platform credential type for a rulebook activation.
- Decision environment
Decision environments are a container image to run Ansible rulebooks.
NoteIn Event-Driven Ansible controller, you cannot customize the pull policy of the decision environment. By default, it follows the behavior of the always policy. Every time an activation is started, the system tries to pull the most recent version of the image.
- Restart policy
This is the policy that determines how an activation should restart after the container process running the source plugin ends.
Policies:
- Always: This restarts the rulebook activation immediately, regardless of whether it ends successfully or not, and occurs no more than 5 times.
- Never: This never restarts a rulebook activation when the container process ends.
- On failure: This restarts the rulebook activation after 60 seconds by default, only when the container process fails, and occurs no more than 5 times.
- Log level
This field defines the severity and type of content in your logged events.
Levels:
- Error: Logs that contain error messages that are displayed in the History tab of an activation.
- Info: Logs that contain useful information about rulebook activations, such as a success or failure, triggered action names and their related action events, and errors.
- Debug: Logs that contain information that is only useful during the debug phase and might be of little value during production. This log level includes both error and log level data.
- Service name
- This defines a service name for Kubernetes to configure inbound connections if the activation exposes a port. This field is optional.
- Rulebook activation enabled?
- This automatically enables the rulebook activation to run.
- Variables
The variables for the rulebook are in a JSON or YAML format. The content would be equivalent to the file passed through the
--varsflag of ansible-rulebook command.NoteIn the context of automation controller and Event-Driven Ansible controller, you can use both
extra_varsand credentials to store a variety of information. However, credentials are the preferred method of storing sensitive information such as passwords or API keys because they offer better security and centralized management, whereasextra_varsare more suitable for passing dynamic, non-sensitive data.- Options
- Check the Skip audit events option if you do not want to see your events in the Rule Audit.
- Click .
Results
Your rulebook activation is now created and can be managed on the Rulebook Activations page.
After saving the new rulebook activation, the rulebook activation’s details page is displayed, with either a Pending, Running, or Failed status. From there or the Rulebook Activations list view, you can restart or delete it.
Occasionally, when a source plugin shuts down, it causes a rulebook to exit gracefully after a certain amount of time. When a rulebook activation shuts down, any tasks that are waiting to be performed will be canceled, and an info level message is sent to the activation log. For more information, see Rulebooks.
7.3. Rulebook activation list view
On the Rulebook Activations page, you can view the rulebook activations that you have created along with the Status, Number of rules with the rulebook, the Fire count, and Restart count.
If the Status is Running, it means that the rulebook activation is running in the background and executing the required actions according to the rules declared in the rulebook.
You can view more details by selecting the activation from the Rulebook Activations list view.
For all activations that have run, you can view the Details and History tabs to get more information about what happened.
7.3.1. Viewing activation output
You can view the output of the activations in the History tab.
Procedure
- Select the History tab to access the list of all the activation instances. An activation instance represents a single execution of the activation.
- Then select the activation instance you want to view. The Output for the activation instance is displayed.
Next steps
To view events that came in and triggered an action, navigate to → and follow instructions in the Rule Audit section.
7.4. Enabling and disabling rulebook activations
You can enable or disable rulebook activations to control when they run. Disabling an activation is useful for troubleshooting or to temporarily halt automation without deleting the configuration.
Procedure
- Select the switch on the row level to enable or disable your chosen rulebook.
- In the window, select .
- Select .
7.5. Restarting rulebook activations
You can restart a rulebook activation to quickly re-engage its automation, which is useful after making updates or to recover from an error.
You can only restart a rulebook activation if it is currently enabled and the restart policy was set to Always when it was created.
Procedure
- Select the icon ⋮ next to Rulebook Activation enabled/disabled toggle.
- Select .
- In the window, select .
- Select .
7.6. Editing a rulebook activation
You can edit a rulebook activation after you have created or run it to correct input for fields (log levels, Restart policy, turn auditing off or on, and the like) or help mitigate issues caused by failure.
Procedure
On the Rulebook Activations page, next to the activation you want to edit, toggle the button to the off position first to disable the activation.
The Disable rulebook activations message is displayed asking you to confirm that you want to disable the activation.
- Select the Yes, I confirm that I want to disable these <1> rulebook activations checkbox and click .
Next to the rulebook activation, click the Edit icon. This takes you to the Edit form.
NoteYou can also access the Edit feature by clicking the rulebook activation on the Rulebook Activations page, toggling the button to the off position, confirming that you want to disable the activation, and clicking the button on the top right of the page to access the Edit form.
Edit the desired fields.
NoteIf you prefer to run your activation immediately, you can toggle the button to the on position, and then save your changes.
- Click .
Results
This takes you back to the Rulebook Activations page.
7.7. Duplicating a rulebook activation
When setting up a new rulebook activation with field inputs that are similar to one of your existing rulebook activations, you can use the Duplicate rulebook activation feature instead of manually entering input into each field. While setting up rulebook activations can be a lengthy process, the ability to duplicate the required fields from an existing activation saves time and, in some cases, reduces the possibility of human error.
Procedure
On the Rulebook Activations page, click the More Actions icon ⋮ on the row of the activation you want to duplicate. The More Actions list is displayed with three options:
- Restart rulebook activation
- Duplicate rulebook activation
- Delete rulebook activation
Select .
A message is displayed: "<Name of rulebook activation 1> duplicated." Initially, the newly duplicated activation is displayed as disabled on the Rulebook Activations page with the same name as the original activation followed by a time stamp in 24-hour format (for example, <Name of rulebook activation 1> @ 18:43:27).
ImportantThe original rulebook activation continues to run after you have duplicated it. If you try to enable the duplicated activation without editing the fields (including the Name field) to distinguish it from the original, a message is displayed reminding you that the rulebook activation was duplicated from an original, and enabling it might fail or result in duplicate jobs and other complications.
Before you run the duplicated rulebook activation, edit the fields by completing the following:
- Next to the duplicated rulebook activation, click the Edit icon. This takes you to the Edit form.
Edit the desired fields.
NoteEnsure that you have given your newly duplicated activation a meaningful Name that distinguishes it from the original activation.
- Toggle the button to the on position.
- After confirming all of your edits are complete, click .
Results
This initiates the rulebook activation, and if it runs successfully, the status changes to Running or Completed.
7.8. Deleting rulebook activations
You can delete rulebook activations to permanently remove them when they are no longer needed.
Procedure
- Select the icon ⋮ next to the Rulebook Activation enabled/disabled toggle.
- Select .
- In the window, select .
- Select .
7.9. Activating webhook rulebooks
In Openshift environments, you can allow webhooks to reach an activation-job-pod over a given port by creating a route that exposes that rulebook activation’s Kubernetes service.
Prerequisites
- You have created a rulebook activation.
The following is an example of rulebook with a given webhook:
- name: Listen for storage-monitor events
  hosts: all
  sources:
    - ansible.eda.webhook:
        host: 0.0.0.0
        port: 5000
  rules:
    - name: Rule - Print event information
    condition: event.meta.headers is defined
    action:
      run_job_template:
        name: StorageRemediation
        organization: Default
        job_args:
          extra_vars:
             message: from eda
             sleep: 1
Procedure
Create a Route (on OpenShift Container Platform) to expose the service. The following is an example Route for an ansible-rulebook source that expects POST’s on port 5000 on the decision environment pod:
kind: Route
apiVersion: route.openshift.io/v1
metadata:
  name: test-sync-bug
  namespace: dynatrace
  labels:
    app: eda
    job-name: activation-job-1-5000
spec:
  host: test-sync-bug-dynatrace.apps.aap-dt.ocp4.testing.ansible.com
  to:
    kind: Service
    name: activation-job-1-5000
    weight: 100
  port:
    targetPort: 5000
  tls:
    termination: edge
    insecureEdgeTerminationPolicy: Redirect
  wildcardPolicy: None
When you create the Route, test it with a Post to the Route URL:
NoteYou do not need the port as it is specified on the Route (targetPort).
curl -H "Content-Type: application/json" -X POST
test-sync-bug-dynatrace.apps.aap-dt.ocp4.testing.ansible.com -d
'{}'
7.10. Testing with Kubernetes
With Kubernetes you can create an Ingress, or expose the port, but not for production.
Procedure
Run the following command to expose the port on the cluster for a given service:
kubectl port-forward svc/<ACTIVATION_SVC_NAME> 5000:5000Make the HTTP requests against the
localhost:5000to trigger the rulebook:curl -H "Content-Type: application/json" -X POST test-sync-bug-dynatrace.apps.aap-dt.ocp4.testing.ansible.com -d '{}'
Chapter 8. Rulebook activations troubleshooting
Rulebook activations might occasionally fail due to various reasons. While many issues can be resolved through basic checks, diagnosing failures across a distributed system requires robust logging.
Event-Driven Ansible’s enhanced logging strategy includes the addition of unique tracking identifiers to all output to significantly improve troubleshooting.
Review the list of possible issues contained in this chapter that can cause activation failures and suggestions on how you can resolve them. For detailed log filtering using the new identifiers, see Event-Driven Ansible log filtering.
8.1. Event-Driven Ansible log filtering
Event-Driven Ansible includes tracking identifiers in all log output to significantly improve troubleshooting. These identifiers help track user actions and activation processes across multiple services and log files.
| Identifier | Abbreviation | Purpose | Location |
|---|---|---|---|
| X-REQUEST-ID |
| Tracks HTTP requests from the platform gateway through the entire Event-Driven Ansible request lifecycle. Use this to correlate UI actions or API calls with backend processing. | Included in the HTTP response headers and Event-Driven Ansible log entries. |
| Log Tracking ID |
| Tracks the activation lifecycle from creation through completion, persisting across restarts and multiple log files. | Included in all activation-related log entries. It can be obtained from the activation History tab in the UI. |
| Activation Instance ID |
|
Identifies the logs specific to a single execution instance of a rulebook activation, allowing you to view | Included in activation logs. |
Not all processes originate from a user or external client. When an Event-Driven Ansible orchestrator internally triggers a process (for example, a monitor request), the rid UUID is generated internally to track that process lifecycle and will not be present in the platform gateway logs.
The enhanced log format places these identifiers at the start of the message, making them easy to filter:
[rid: <UUID>] [tid: <UUID>] [aiid: <ID>] aap_eda.tasks.orchestrator Processing request…
8.1.1. Using log filtering for troubleshooting
Learn to utilize unique tracking identifiers to efficiently search and filter all system logs. This process pinpoints the exact timeline and cause of failure for a specific rulebook activation or API request.
Procedure
Collect identifiers:
-
When an issue occurs, retrieve the Log Tracking ID (
tid) from the failed activation instance’s logs in the UI History tab. -
If the issue was triggered by a user action (like restarting an activation), obtain the X-REQUEST-ID (
rid) from the HTTP response headers.
-
When an issue occurs, retrieve the Log Tracking ID (
Search system logs:
- Use the collected UUID to search through your backend logs (worker, scheduler, API, and the like.). This filters out irrelevant noise, allowing you to focus on the full timeline of the specific request or activation across all services.
Correlate timeline:
-
Use the common
tidto follow the activation’s progress (or failure) across different log files and services.
-
Use the common
Use support tools:
-
If necessary, use
sosreportormustgathertools, which automatically collect all relevant Event-Driven Ansible logs from/var/log/ansible-automation-platform/eda/.
-
If necessary, use
8.2. Activation stuck in Pending state
Perform the following steps if your rulebook activation is stuck in Pending state.
Procedure
Confirm whether there are other running activations and if you have reached the limits (for example, memory or CPU limits).
- If there are other activations running, terminate one or more of them, if possible.
If not, check that the default worker, Redis, and activation worker are all running. If all systems are working as expected, check your eda-server internal logs in the worker, scheduler, API, and nginx containers and services to see if the problem can be determined.
NoteThese logs reveal the source of the issue, such as an exception thrown by the code, a runtime error with network issues, or an error with the rulebook code. If your internal logs do not provide information that leads to resolution, report the issue to Red Hat support.
If you need to make adjustments, see the Modifying the number of simultaneous rulebook activations.
NoteTo adjust the maximum number of simultaneous activations for Ansible Automation Platform Operator on OpenShift Container Platform deployments, see Modifying the number of simultaneous rulebook activations during or after Event-Driven Ansible controller installation in Installing on OpenShift Container Platform.
8.3. Activation keeps restarting
Perform the following steps if your rulebook activation keeps restarting.
Procedure
- Log in to Ansible Automation Platform.
- From the navigation panel, select → .
- From the Rulebook Activations page, select the activation in your list that keeps restarting. The Details page is displayed.
- Click the History tab for more information and select the rulebook activation that keeps restarting. The Details tab is displayed and shows the output information.
Check the Restart policy field for your activation.
There are three selections available: On failure (restarts a rulebook activation when the container process fails), Always (always restarts regardless of success or failure with no more than 5 restarts), or Never (never restarts when the container process ends).
- Confirm that your rulebook activation Restart policy is set to On failure. This is an indication that an issue is causing it to fail.
- To possibly diagnose the problem, check the YAML code and the instance logs of the rulebook activation for errors.
- If you cannot find a solution with the restart policy values, proceed to the next steps related to the Log level.
Check your log level for your activation.
- If your default log level is Error, go back to the Rulebook Activation page and recreate your activation following procedures in Setting up rulebook a activation.
- Change the Log level to Debug.
- Run the activation again and navigate to the History tab from the activation details page.
- On the History page, click one of your recent activations and view the Output.
8.4. Events are not being processed by rulebook activation
If your rulebook activation is running but not processing events, the most common cause is a mismatch between the expected event source and the source defined in the rulebook.
Procedure
- Check the rulebook source: Review the source plugin defined in your rulebook YAML (for example, ansible.eda.webhook, ansible.eda.kafka).
- Verify event input: Confirm that the events you are sending to Event-Driven Ansible controller are compatible with the source plugin defined in the rulebook. If the rulebook expects a Kafka message, it cannot process a generic webhook event.
- Confirm activation mapping: If you are using event streams, ensure the correct event stream is mapped to the rulebook during the activation setup. A mismatch here will result in the activation receiving no data.
8.5. Actions not triggering despite receiving events
If your rulebook activation is Running and successfully receiving events, but no actions are being executed, the issue is likely within the logic of your rulebook.
Procedure
- Check rule conditions: Review the rulebook YAML to confirm that the conditions (the when statements) are accurately written and precisely match the structure and values of the incoming event payload.
- Verify indentation and syntax: Ensure all rulebook syntax and indentation are correct, as a simple error can prevent the rule engine from evaluating conditions.
-
Validate actions: Confirm that the specified action is a recognized and correctly configured action (for example,
run_job_templatewith the proper arguments).
8.6. Event streams not sending events to activation
If you are using event streams to send events to your rulebook activations, occasionally those events might not be successfully routed to your rulebook activation.
Procedure
Try the following options to resolve this.
- Ensure that each of your event streams in Event-Driven Ansible controller is not in Test mode . This means activations would not receive the events.
- Verify that the origin service is sending the request properly.
- Check that the network connection to your platform gateway instance is stable. If you have set up event streams, this is the entry of the event stream request from the sender.
- Verify that the proxy in the platform gateway is running.
- Confirm that the event stream worker is up and running, and able to process the request.
- Verify that your credential is correctly set up in the event stream.
Confirm that the request complies with the authentication mechanism determined by the set credential (for example, basic must contain a header with the credentials or HMAC must contain the signature of the content in a header, and similar).
NoteThe credentials might have been changed in Event-Driven Ansible controller, but not updated in the origin service.
- Verify that the rulebook that is running in the activation reacts to these events. This would indicate that you wrote down the event source and added actions that consume the events coming in. Otherwise, the event does reach the activation but there is nothing to activate it.
- If you are using self-signed certificates, you might want to disable certificate validation when sending webhooks from vendors. Most of the vendors have an option to disable certificate validation for testing or non-production environments.
8.7. Cannot connect to the 2.5 automation controller when running activations
You might experience a failed connection to automation controller when you run your activations.
Procedure
To help resolve the issue, confirm that you have set up a Red Hat Ansible Automation Platform credential and have obtained the correct automation controller URL.
- If you have not set up a Red Hat Ansible Automation Platform credential, follow the procedures in Setting up a Red Hat Ansible Automation Platform credential. Ensure that this credential has the host set to the following URL format: https://<your_gateway>/api/controller
- When you have completed this process, try setting up your rulebook activation again.
Chapter 9. Rule Audit
Rule audit allows the auditing of rules which have been triggered by all the rules that were activated at some point.
The Rule Audit list view shows you a list of every time an event came in that matched a condition within a rulebook and triggered an action. The list shows you rules within your rulebook and each heading matches up to a rule that has been executed.
9.1. Viewing rule audit details
From the Rule Audit list view you can check the event that triggered specific actions.
Procedure
- From the navigation panel select → .
- Select the desired rule, this brings you to the Details tab.
Results
From here you can view when it was created, when it was last fired, and the rulebook activation that it corresponds to.
9.2. Viewing rule audit events
You can select a specific rule to view a list of its corresponding events, then inspect each event’s log, source type, and timestamp for detailed information.
Procedure
- From the navigation panel, select → .
- Select the desired rule, this brings you to the Details tab. To view all the events that triggered an action, select the Events tab. This shows you the event that triggered actions.
- Select an event to view the Event log, along with the Source type and Timestamp.
9.3. Viewing rule audit actions
You can select a specific rule to view a list of its corresponding actions and view their output.
Procedure
- From the navigation panel select → .
- Select the desired rule, then select the Actions tab.
Results
From here, you can view executed actions that were taken. Some actions are linked out to Automation Execution where you can view the output.
Chapter 10. Simplified event routing
Simplified event routing enables Event-Driven Ansible controller to capture and analyze data from various remote systems using event streams. With event streams, you can send events from a remote system like GitHub or GitLab into Event-Driven Ansible controller. You can attach 1 or more event streams to an activation by swapping out sources in a rulebook.
Event streams are an easy way to connect your sources to your rulebooks. This capability lets you create a single endpoint to receive alerts from an event source and then use the events in multiple rulebooks.
10.1. Event streams
Event streams can send events from remote systems to Event-Driven Ansible controller. In a typical set-up, a server sends data to an event stream over the internet to an Event-Driven Ansible event stream receiver. When the data comes over the internet, the request must be authenticated. Depending on the webhook vendor or remote system, the authentication method could differ.
Event-Driven Ansible controller supports six different event stream types.
| Type | Description | Vendors |
|---|---|---|
| HMAC | Hashed Message Authentication Code (HMAC). Uses a shared secret between Event-Driven Ansible controller and the vendors webhook server. This guarantees message integrity. | Github |
| Basic Authentication | Uses HTTP basic authentication. | Datadog, Dynatrace |
| Token Authentication | Uses Token Authentication. Usually the HTTP Header is Authorization but some vendors like Gitlab use X-Gitlab-Token. | Gitlab, ServiceNow |
| OAuth2 | Uses Machine-to-Machine (M2M) mode with a grant type called client credentials. The token is opaque. | Dynatrace |
| OAuth2 with JWT | Uses M2M mode with a grant type called client credentials. The token is JSON Web Token (JWT). | Datadog |
| ECDSA | Elliptic Curve Digital Signature Algorithm | SendGrid, Twilio |
Event-Driven Ansible controller also supports four other specialized event streams that are based on the six basic event stream types:
- GitLab Event Stream
- GitHub Event Stream
- ServiceNow Event Stream
- Dynatrace Event Stream
These specialized types limit the parameters you use by adding default values. For example, the GitHub Event Stream is a specialization of the HMAC Event Stream with many of the fields already populated. After the GitHub Event Stream credential has been saved, the recommended defaults for the GitHub Event Stream are displayed.
10.2. Creating an event stream credential
You must create an event stream credential first before you can use an event stream.
Prerequisites
- Each event stream must have exactly one credential.
Procedure
- Log in to the Ansible Automation Platform Dashboard.
- From the navigation panel, select → → .
- Click .
Insert the following:
- Name
- Insert the name.
- Description
- This field is optional.
- Organization
- Click the list to select an organization or select Default.
- Credential type
Click the list to select your Credential type.
NoteWhen you select the credential type, the Type Details section is displayed with fields that are applicable for the credential type you selected.
- Type Details
- Add the requested information for the credential type you selected. For example, if you selected the GitHub Event Stream credential type, you are required to add an HMAC Secret (symmetrical shared secret) between Event-Driven Ansible controller and the remote server.
- Click .
Results
The Details page is displayed. From there or the Credentials list view, you can edit or delete it.
10.3. Creating an event stream
You can create event streams that will be attached to a rulebook activation.
Prerequisites
- If you will be attaching your event stream to a rulebook activation, ensure that your activation has a decision environment and project already set up.
- If you plan to connect to automation controller to run your rulebook activation, ensure that you have created a Red Hat Ansible Automation Platform credential type in addition to the decision environment and project. For more information, see Setting up a Red Hat Ansible Automation Platform credential.
Procedure
- Log in to Ansible Automation Platform.
- From the navigation panel, select → .
- Click .
Insert the following:
- Name
- Insert the name.
- Organization
- Click the list to select an organization or select Default.
- Event stream type
Select the event stream type you prefer.
NoteThis list displays at least 10 default event stream types that can be used to authenticate the connection coming from your remote server.
- Credentials
- Select a credential from the list, preferably the one you created for your event stream.
- Headers
Enter HTTP header keys, separated by commas, that you want to include in the event payload.
ImportantIf your automation relies on HTTP headers being present in the event payload, you must explicitly define them to avoid unintentional exposure of sensitive information. For more information about HTTP headers and how to securely configure them, see HTTP headers and Configuring HTTP headers securely for event streams.
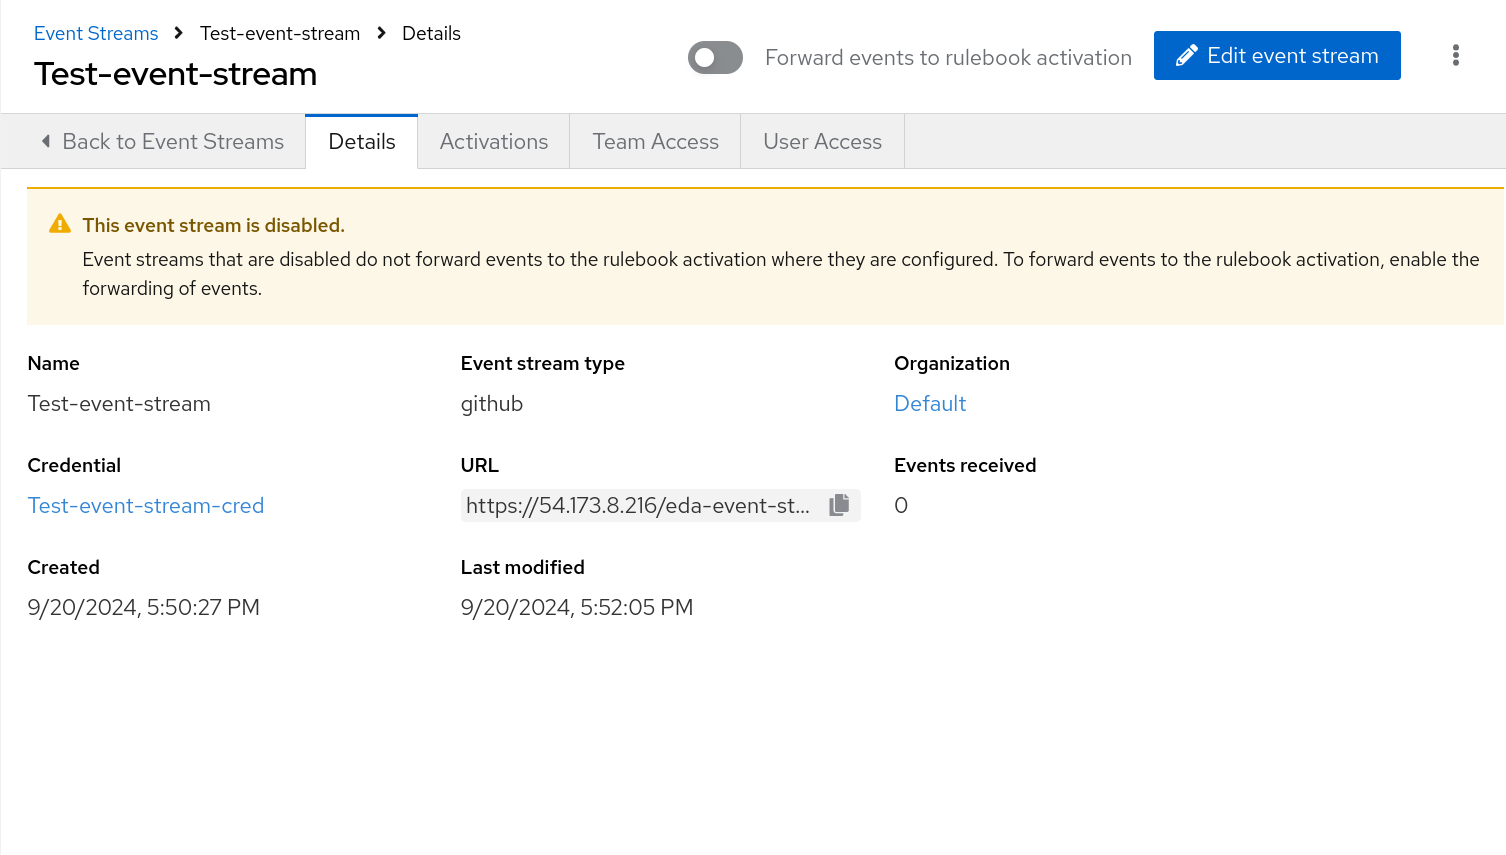
- Forward events to rulebook activation
Use this option to enable or disable the capability of forwarding events to rulebook activations.
NoteThe event stream’s event forwarding can be disabled for testing purposes while diagnosing connections and evaluating the incoming data. Disabling the Forward events to rulebook activation option allows you to test the event stream connection with the remote system, analyze the header and payload, and if necessary, diagnose credential issues. This ensures that events are not be forwarded to rulebook activations causing rules and conditions to be triggered inadvertently while you are in test mode. Some enterprises might have policies to change secrets and passwords at regular cadence. You can enable/disable this option anytime after the event stream is created.
- Click .
Results
After creating your event stream, the following outputs occur:
- The Details page is displayed. From there or the Event Streams list view, you can edit or delete it. Also, the Event Streams page shows all of the event streams you have created and the following columns for each event: Events received, Last event received, and Event stream type. As the first two columns receive external data through the event stream, they are continuously updated to let you know they are receiving events from remote systems.
If you disabled the event stream, the Details page is displayed with a warning message, This event stream is disabled.
NoteAfter an event stream is created, the associated credential cannot be deleted until the event stream it is attached to is deleted.
- Your new event stream generates a URL that is necessary when you configure the webhook on the remote system that sends events.
10.4. HTTP headers
In the context of Event-Driven Ansible and event streams, HTTP headers play a significant role because they carry the necessary context and security information about the incoming event from a third-party source (for example, GitHub, a monitoring tool, or a proprietary webhook). They include the following capabilities:
- Authentication and non-repudiation
-
This is the most critical use. Headers often contain tokens, API keys, or security signatures (like an HMAC in an
X-Hub-Signatureheader) that Event-Driven Ansible uses to verify the sender’s identity and ensure the event payload has not been tampered with. This supports non-repudiation—proof that the event came from a legitimate source. - Debugging and Logging
-
Headers provide crucial data points (
Date,User-Agent,X-Request-ID) for tracing the event’s path, helping system administrators and SREs debug issues related to delayed or failed event processing.
Headers are essential for all HTTP communication, serving several distinct purposes:
-
Context and metadata: Describe the data being sent (for example,
Content-Type: application/json, Content-Length: 1024). -
Client/Server Capabilities: Inform the receiving party of the sender’s capabilities or preferences (for example,
Accept-Language: en-US). -
Authentication/Authorization: Carry security credentials (for example,
Authorization: Bearer <token>). -
Caching: Controls how content should be cached by clients and proxies (for example,
Cache-Control: max-age=3600). -
Routing and Tracking: They facilitate network routing and transaction tracking, often via custom headers (for example,
X-Request-ID).
10.4.1. Configuring HTTP headers securely for event streams
To enhance event stream security, you must explicitly define which HTTP headers are passed. These headers carry the critical context and authentication data required for processing.
Procedure
To include all HTTP headers, enter an asterisk (*) in the Headers field. This allows all HTTP headers with the exception of a few headers:
-
Excluded: Headers that begin with
X-Envoy,X-Trusted-Proxy,X-Forwarded-For, andX-Real-Id Redacted: Authorization header (for example,
Authorization: Redacted)ImportantIf the Headers field is empty, none of the HTTP headers will be added to the event payload in Production and Test mode.
-
Excluded: Headers that begin with
-
To include a specific set of HTTP headers, enter the names of the desired headers as a comma-delimited string (for example,
Host,Authorization,X-Request-ID).
10.5. Configuring your remote system to send events
After you have created your event stream, you must configure your remote system to send events to Event-Driven Ansible controller. The method used for this configuration varies, depending on the vendor for the event stream credential type you select.
The following example demonstrates how to configure webhooks in a remote system like GitHub to send events to Event-Driven Ansible controller. Each vendor will have unique methods for configuring your remote system to send events to Event-Driven Ansible controller.
Prerequisites
- The URL that was generated when you created your event stream
- Secrets or passwords that you set up in your event stream credential
Procedure
- Log in to your GitHub repository.
Click Your profile name → Your repositories.
NoteIf you do not have a repository, click New to create a new one, select an owner, add a Repository name, and click Create repository.
- Navigate to Settings (tool bar).
- In the General navigation pane, select Webhooks.
- Click Add webhook.
- In the Payload URL field, paste the URL you saved when you created your event stream.
- Select application/json in the Content type list.
- Enter your Secret.
- Click Add webhook.
Results
After the webhook has been added, it attempts to send a test payload to ensure there is connectivity between the two systems (GitHub and Event-Driven Ansible controller). If it can successfully send the data, you will see a green check mark next to the Webhook URL with the message, Last delivery was successful.
10.6. Verifying your event streams work
Verify that you can use your event stream to connect to a remote system and receive data.
- Log in to Ansible Automation Platform.
- From the navigation panel, select → .
- Select the event stream that you created to validate connectivity and ensure that the event stream sends data to the rulebook activation.
Verify that the events were received. The number of Events received is displayed along with a header that contains details about the event.
If you scroll down in the UI, you can also see the body of the payload with more information about the webhook.
The Header and Body sections for the event stream are displayed on the Details page. They differ based on the vendor who is sending the event. The header and body can be used to check the attributes in the event payload, which will help you in writing conditions in your rulebook.
- Toggle the Forward events to rulebook activation option to enable you to push your events to a rulebook activation.
Results
This moves the event stream to production mode and makes it easy to attach to rulebook activations. When this option is toggled off, your ability to forward events to a rulebook activation is disabled and the This event stream is disabled message is displayed.
10.7. Replacing sources and attaching event streams to activations
When you create rulebook activations, you can use event streams to swap out source mappings in rulebook activations and simplify routing from external sources to Event-Driven Ansible controller.
There are several key points to keep in mind regarding source mapping:
- An event stream can only be used once in a rulebook source swap. If you have multiple sources in the rulebook, you can only replace each source once.
- The source mapping happens only in the current rulebook activation. You must repeat this process for any other activations using the same rulebook.
- The source mapping is valid only if the rulebook doesn’t get modified. If the rulebook gets modified during the source mapping process, the source mapping would fail and it would have to be repeated.
- If the rulebook is modified after the source mapping has been created and a Restart happens, the rulebook activation fails.
Procedure
- Log in to Ansible Automation Platform.
- From the navigation panel, select → .
- Click .
Insert the following:
- Name
- Insert the name.
- Description
- This field is optional.
- Organization
- Enter your organization name or select Default from the list.
- Project
Projects are a logical collection of rulebooks. This field is optional.
NoteAlthough this field is optional, selecting a project helps refine your list of rulebooks choices.
- Rulebook
Rulebooks are shown according to the project selected. Select a rulebook.
NoteAfter you have selected a rulebook, the Event streams field is enabled. You can click the gear icon to display the Event streams mapping form.
- Event streams
All the event streams available and set up to forward events to rulebook actiavtions are displayed. If you have not created any event streams, this field remains disabled.
Click the gear icon to display the Event streams mapping UI.

Complete the following fields:
- Rulebook source
A rulebook can contain multiple sources across multiple rulesets. You can map the same rulebook in multiple activations to multiple event streams. While managing event streams, unnamed sources are assigned temporary names (__SOURCE {n}) for identification purposes.
Select __SOURCE_1 from the list.
- Event stream
Select your event stream name from the list.
Click .
Event streams can replace matching sources in a rulebook, and are server-side webhooks that enable you to connect various event sources to your rulebook activations. Source types that can be replaced with the event stream’s source of type ansible.eda.pg_listener include ansible.eda.webhook and other compatible webhook source plugins. Replacing selected sources affects this activation only, and modifies the rulebook’s source type, source name, and arguments. Filters, rules, conditions, and actions are all unaffected.
You can select which source you want to replace with a single event stream. If there are multiple sources in your rulebook, you can choose to replace each one of them with event streams, but you are not required to replace each one. The following image displays which sources can be replaced.
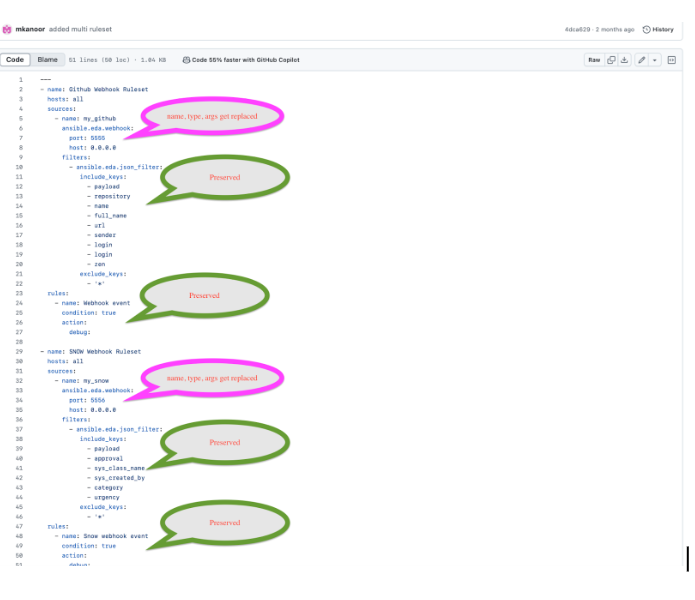
The items in pink demonstrate the sources that can be replaced: source type, source name, and arguments. The remaining items (filters, rules, and actions) are not replaced.
- Credential
Select 0 or more credentials for this rulebook activation. This field is optional.
NoteThe credentials that display in this field are customized based on your rulebook activation and only include the following credential types: Vault, Red Hat Ansible Automation Platform, or any custom credential types that you have created. For more information on credentials, see Credentials.
- Decision environment
A decision environment is a container image used to run Ansible rulebooks.
NoteIn Event-Driven Ansible controller, you cannot customize the pull policy of the decision environment. By default, it follows the behavior of the always policy. Every time an activation is started, the system tries to pull the most recent version of the image.
- Restart policy
This is the policy that determines how an activation should restart after the container process running the source plugin ends.
Policies:
- Always: This restarts the rulebook activation immediately, regardless of whether it ends successfully or not, and occurs no more than 5 times.
- Never: This never restarts a rulebook activation when the container process ends.
- On failure: This restarts the rulebook activation after 60 seconds by default, only when the container process fails, and occurs no more than 5 times.
- Log level
This field defines the severity and type of content in your logged events.
Levels:
- Error: Logs that contain error messages that are displayed in the History tab of an activation.
- Info: Logs that contain useful information about rulebook activations, such as a success or failure, triggered action names and their related action events, and errors.
- Debug: Logs that contain information that is only useful during the debug phase and might be of little value during production. This log level includes both error and log level data.
- Service name
- This defines a service name for Kubernetes to configure inbound connections if the activation exposes a port. This field is optional.
- Rulebook activation enabled?
- This automatically enables the rulebook activation to run.
- Variables
-
The variables for the rulebook are in a JSON or YAML format. The content would be equivalent to the file passed through the
--varsflag of ansible-rulebook command. - Options
- Check the Skip audit events option if you do not want to see your events in the Rule Audit.
- Click .
Results
After you create your rulebook activation, the Details page is displayed. You can navigate to the Event streams page to confirm your events have been received.
10.8. Resending webhook data from your event stream type
After you have replaced your sources with the event stream you created, you can now resend data from the event stream to ensure that it is attached to your rulebook activation. In the example shared earlier, the GitHub event stream was used. The following example demonstrates how to resend webhook data if you were using a GitHub event stream.
Procedure
- Go back to the GitHub Webhook / Manage webhook page.
- Click the Recent Deliveries tab.
- Click the .
- Click . A Redeliver payload? window is displayed with a delivery message.
- Click Yes, redeliver this payload.
- Return to the Ansible Automation Platform to check your rule audit.
10.9. Check the Rule Audit for events on your new event stream
When events have been sent and received by Event-Driven Ansible controller, you can confirm that actions have been triggered by going to the Rule Audit page and viewing the event stream results.
Procedure
- Log in to Ansible Automation Platform.
- From the navigation panel, select → .
Results
If your rulebook activation received the event data from the event stream type you selected, the Rule Audit page displays the results for Status, Rulebook activation, and the Last fired date fields.
Chapter 11. Performance tuning for Event-Driven Ansible controller
Event-Driven Ansible is a highly scalable, flexible automation capability. Event-Driven Ansible controller provides the interface in which Event-Driven Ansible automation performs. Tune your Event-Driven Ansible controller to optimize performance and scalability through:
- Characterizing your workload
- System level monitoring
- Performance troubleshooting
11.1. Characterizing your workload
In Event-Driven Ansible controller, your workload includes the number of rulebook activations and events being received. Consider the following factors to characterize your Event-Driven Ansible controller workload:
- Number of simultaneous rulebook activations
- Number of events received by Event-Driven Ansible controller
11.2. Modifying the default memory limit for each rulebook activation
Memory usage is based on the number of events that Event-Driven Ansible controller has to process. By default, each rulebook activation container has a 200 MB memory limit. For example, with 4 CPU and 16 GB of RAM, one rulebook activation container with an assigned 200 MB memory limit cannot handle more than 150,000 events per minute. If the number of parallel running rulebook activations is higher, then the maximum number of events each rulebook activation can process is reduced. If there are too many incoming events at a very high rate, the container can run out of memory trying to process the events. This will kill the container, and your rulebook activation will fail with a status code of 137.
To mitigate this status, you can modify the default memory limit for each rulebook activation during or after installation.
Procedure
Perform the following steps to modify your default memory limit for your rulebook activations during installation:
- Navigate to the setup inventory file.
-
Add
automationedacontroller_podman_mem_limitin the [all:vars] section. For example,automationedacontroller_podman_mem_limit='400m'. - Run the setup.
Perform the following steps to modify your default memory limit for your rulebook activations after installation:
-
Navigate to the environment file at
/etc/ansible-automation-platform/eda/settings.yaml. -
Modify the default container memory limit. For example,
PODMAN_MEM_LIMIT = '300m'. -
Restart the Event-Driven Ansible controller services using
automation-eda-controller-service restart.
-
Navigate to the environment file at
11.3. System level monitoring for Event-Driven Ansible controller
After characterizing your workload to determine how many rulebook activations you are running in parallel and how many events you are receiving at any given point, you must consider monitoring your Event-Driven Ansible controller host at the system level. Using system level monitoring to review information about Event-Driven Ansible’s performance over time helps when diagnosing problems or when considering capacity for future growth.
System level monitoring includes the following information:
- Disk I/O
- RAM utilization
- CPU utilization
- Network traffic
Higher CPU, RAM, or Disk utilization can affect the overall performance of Event-Driven Ansible controller. For example, a high utilization of any of these system level resources indicates that either the Event-Driven Ansible controller is running too many rulebook activations, or some of the individual rulebook activations are using a high volume of resources. In this case, you must increase your system level resources to support your workload.
Chapter 12. Event filter plugins
Events sometimes have extra data that is unnecessary and might overwhelm the rule engine. Use event filters to remove that extra data so you can focus on what matters to your rules. Event filters might also change the format of the data so that the rule conditions can better match the data.
Events are defined as python code and distributed as collections. The default eda collection has the following filters:
| Name | Description |
|---|---|
| json_filter | This filter includes and excludes keys from the event object |
| dashes_to_underscores | This filter changes the dashes in all keys in the payload to be underscore |
| ansible.eda.insert_hosts_to_meta | This filter is used to add host information into the event so that ansible-rulebook can locate it and use it |
| ansible.eda.normalize_keys | This filter is used if you want to change non alpha numeric keys to underscore |
You can chain event filters one after the other, and the updated data is sent from one filter to the next. Event filters are defined in the rulebook after a source is defined. When the rulebook starts the source plugin it associates the correct filters and transforms the data before putting it into the queue.
sources:
  - name: azure_service_bus
    ansible.eda.azure_service_bus:
      conn_str: "{{connection_str}}"
      queue_name: "{{queue_name}}"
    filters:
      - json_filter:
          include_keys: ['clone_url']
          exclude_keys: ['*_url', '_links', 'base', 'sender', 'owner', 'user']
      - dashes_to_underscores:
In this example the data is first passed through the json_filter and then through the dashes_to_underscores filter. In the event payload, keys can only contain letters, numbers, and underscores. The period (.) is used to access nested keys.
Since every event should record the origin of the event the filter eda.builtin.insert_meta_info is added automatically by ansible-rulebook to add the source name, type, and received_at. The received_at stores a date time in UTC ISO8601 format and includes the microseconds. The uuid stores the unique id for the event. The meta key is used to store metadata about the event and its needed to correctly report about the events in the aap-server.
12.1. Author event filters
Event filters are functions in a python module that perform transformations on the event data. They can remove, add, change, or move any data in the event data structure. Event filters take the event as the first argument and additional keyword arguments are provided by the configuration in the rulebook.
The basic structure follows:
   # my_namespace.my_collection/extensions/eda/plugins/event_filter/my_filter.py
    def main(event: dict, arg1, arg2):
        # Process event data here
        return event
You can use this filter in a rulebook by adding it to the filters list in an event source:
  sources:
    - name: azure_service_bus
      ansible.eda.azure_service_bus:
        conn_str: "{{connection_str}}"
        queue_name: "{{queue_name}}"
      filters:
        - my_namespace.my_collection.my_filter:
            arg1: hello
            arg2: world
Additional resources
Chapter 13. Event-Driven Ansible logging strategy
Event-Driven Ansible offers an audit logging solution over its resources. Each supported create, read, update and delete (CRUD) operation is logged against rulebook activations, event streams, decision environments, projects, and activations. Some of these resources support further operations, such as sync, enable, disable, restart, start, and stop; for these operations, logging is supported as well. These logs are only retained for the lifecycle of its associated container. See the following sample logs for each supported logging operation.
13.1. Logging samples
When the following APIs are called for each operation, you see the following audit logs:
- Rulebook activation
1. Create
    1. 2024-08-15 14:13:20,384 aap_eda.api.views.activation INFO   Action: Create / ResourceType: RulebookActivation / ResourceName: quick_start_project / ResourceID: 53 / Organization: Default
2. Read
    1. 2024-08-15 14:21:26,844 aap_eda.api.views.activation INFO   Action: Read / ResourceType: RulebookActivation / ResourceName: quick_start_activation / ResourceID: 1 / Organization: Default
3. Disable
    1. 2024-08-15 14:23:57,798 aap_eda.api.views.activation INFO   Action: Disable / ResourceType: RulebookActivation / ResourceName: quick_start_activation / ResourceID: 1 / Organization: Default
4. Enable
    1. 2024-08-15 14:24:16,472 aap_eda.api.views.activation INFO   Action: Enable / ResourceType: RulebookActivation / ResourceName: quick_start_activation / ResourceID: 1 / Organization: Default
5. Delete
    1. 2024-08-15 14:24:53,847 aap_eda.api.views.activation INFO   Action: Delete / ResourceType: RulebookActivation / ResourceName: quick_start_activation / ResourceID: 1 / Organization: Default
6. Restart
2024-08-15 14:24:34,169 aap_eda.api.views.activation INFO Action: Restart / ResourceType: RulebookActivation / ResourceName: quick_start_activation / ResourceID: 1 / Organization: Default- EventStream Logs
1. Create
    1. 2024-08-15 13:46:26,903 aap_eda.api.views.webhook INFO     Action: Create / ResourceType: EventStream / ResourceName: ZackTest / ResourceID: 1 / Organization: Default
2. Update
    1. 2024-08-15 13:56:17,440 aap_eda.api.views.webhook INFO     Action: Update / ResourceType: EventStream / ResourceName: ZackTest / ResourceID: 1 / Organization: Default
3. Read
    1. 2024-08-15 13:56:56,271 aap_eda.api.views.webhook INFO     Action: Read / ResourceType: EventStream / ResourceName: ZackTest / ResourceID: 1 / Organization: Default
4. List
    1. 2024-08-15 13:56:17,492 aap_eda.api.views.webhook INFO     Action: List / ResourceType: EventStream / ResourceName: * / ResourceID: * / Organization: *
5. Delete
1. 2024-08-15 13:57:13,124 aap_eda.api.views.webhook INFO Action: Delete / ResourceType: EventStream / ResourceName: ZackTest / ResourceID: None / Organization: Default- Decision Environment
1. Create
    1. 2024-08-15 14:10:53,311 aap_eda.api.views.decision_environment INFO     Action: Create / ResourceType: DecisionEnvironment / ResourceName: quick_start_de / ResourceID: 86 / Organization: Default
2. Read
    1. 2024-08-15 14:10:53,349 aap_eda.api.views.decision_environment INFO     Action: Read / ResourceType: DecisionEnvironment / ResourceName: quick_start_de / ResourceID: 86 / Organization: Default
3. Update
    2024-08-15 14:11:20,970 aap_eda.api.views.decision_environment INFO     Action: Update / ResourceType: DecisionEnvironment / ResourceName: quick_start_de / ResourceID: 86 / Organization: Default
4. Delete
2024-08-15 14:11:42,369 aap_eda.api.views.decision_environment INFO Action: Delete / ResourceType: DecisionEnvironment / ResourceName: quick_start_de / ResourceID: None / Organization: Default- Project
1. Create
    1. 2024-08-15 14:05:26,874 aap_eda.api.views.project INFO     Action: Create / ResourceType: Project / ResourceName: quick_start_project / ResourceID: 86 / Organization: Default
2. Read
    1. 2024-08-15 14:05:26,913 aap_eda.api.views.project INFO     Action: Read / ResourceType: Project / ResourceName: quick_start_project / ResourceID: 86 / Organization: Default
3. Update
    1. 2024-08-15 14:06:08,255 aap_eda.api.views.project INFO     Action: Update / ResourceType: Project / ResourceName: quick_start_project / ResourceID: 86 / Organization: Default
4. Sync
    1. 2024-08-15 14:06:30,580 aap_eda.api.views.project INFO     Action: Sync / ResourceType: Project / ResourceName: quick_start_project / ResourceID: 86 / Organization: Default
5. Delete
1. 2024-08-15 14:06:49,481 aap_eda.api.views.project INFO Action: Delete / ResourceType: Project / ResourceName: quick_start_project / ResourceID: 86 / Organization: Default- Activation Start/Stop
1. Start
    1. 2024-08-15 14:21:29,076 aap_eda.services.activation.activation_manager INFO     Requested to start activation 1, starting.
    2024-08-15 14:21:29,093 aap_eda.services.activation.activation_manager INFO     Creating a new activation instance for activation: 1
    2024-08-15 14:21:29,104 aap_eda.services.activation.activation_manager INFO     Starting container for activation instance: 1
2. Stop
    1. eda-activation-worker-1  | 2024-08-15 14:40:52,547 aap_eda.services.activation.activation_manager INFO     Stop operation requested for activation id: 2 Stopping activation.
    eda-activation-worker-1  | 2024-08-15 14:40:52,550 aap_eda.services.activation.activation_manager INFO     Activation 2 is already stopped.
    eda-activation-worker-1  | 2024-08-15 14:40:52,550 aap_eda.services.activation.activation_manager INFO     Activation manager activation id: 2 Activation restart scheduled for 1 second.
    eda-activation-worker-1  | 2024-08-15 14:40:52,562 rq.worker INFO     activation: Job OK (activation-2)