Chapter 5. Installing and configuring the Ansible VS Code extension
Red Hat Ansible Lightspeed with IBM watsonx Code Assistant is integrated with the Ansible Visual Studio (VS) Code extension in VS Code. The Ansible VS Code extension, with Red Hat Ansible Lightspeed features enabled, automatically collects recommendations, usage telemetry, and Ansible YAML file state through automated events.
To access Red Hat Ansible Lightspeed, all Ansible users must install and configure the Ansible VS Code extension in their VS Code. The Ansible VS Code extension uses the Ansible-specific IBM watsonx Granite model configured in the Red Hat Ansible Lightspeed administrator portal as the default mode for all users in your organization.
You can also use a custom, fine-tuned model if your organization administrator has created a custom model and has shared the model ID with you separately. Use the model-override setting in the Ansible VS Code extension to override the default model, and use the custom model instead. Using a custom model enables you to improve the code recommendation experience and tune the model to your organizational automation patterns. For example, if you are using Red Hat Ansible Lightspeed both as an organization administrator and a user, you can test the custom model for select Ansible users before making it available for all users in your organization. For more information, see Configuring custom models.
5.1. Connectivity requirements
To generate code recommendations, the Ansible Lightspeed service in Visual Studio (VS) Code editor requires access to the following outbound domains:
The outbound connections are encrypted on TCP protocol port 443.
5.2. Installing the Ansible VS Code extension
Prerequisites
- VS Code version 1.70.1 or later.
You can also install VScode derivatives, such as VScode Insider or VS Codium.
Procedure
- Open the VS Code application.
- From the navigation menu, click the Extensions icon.
- In the Search field, enter Ansible.
- Select Ansible to choose the Ansible language support extension published by Red Hat.
- Click Install.
After installation is complete, verify your VSCode installation:
-
Create a new YAML file using the
.ymlor.yamlfile extension. - From the Status toolbar, click the language indicator and select Ansible to associate the Ansible language type with the new YAML file.
- Start writing a test playbook. Contextual aids are displayed as you start creating your content.
-
Create a new YAML file using the
5.3. Configuring the Ansible VS Code extension
You can configure the Ansible VS Code extension to enable Red Hat Ansible Lightspeed and specify it’s portal URL and IBM watsonx Code Assistant model ID.
Prerequisites
- Your organization administrator has configured an IBM watsonx Code Assistant model for your organization.
Procedure
- Open the VS Code application.
-
From the Activity bar, click the Extensions icon
 .
.
- From the Installed Extensions list, select Ansible.
- From the Ansible extension page, click the Settings icon and select Extension Settings.
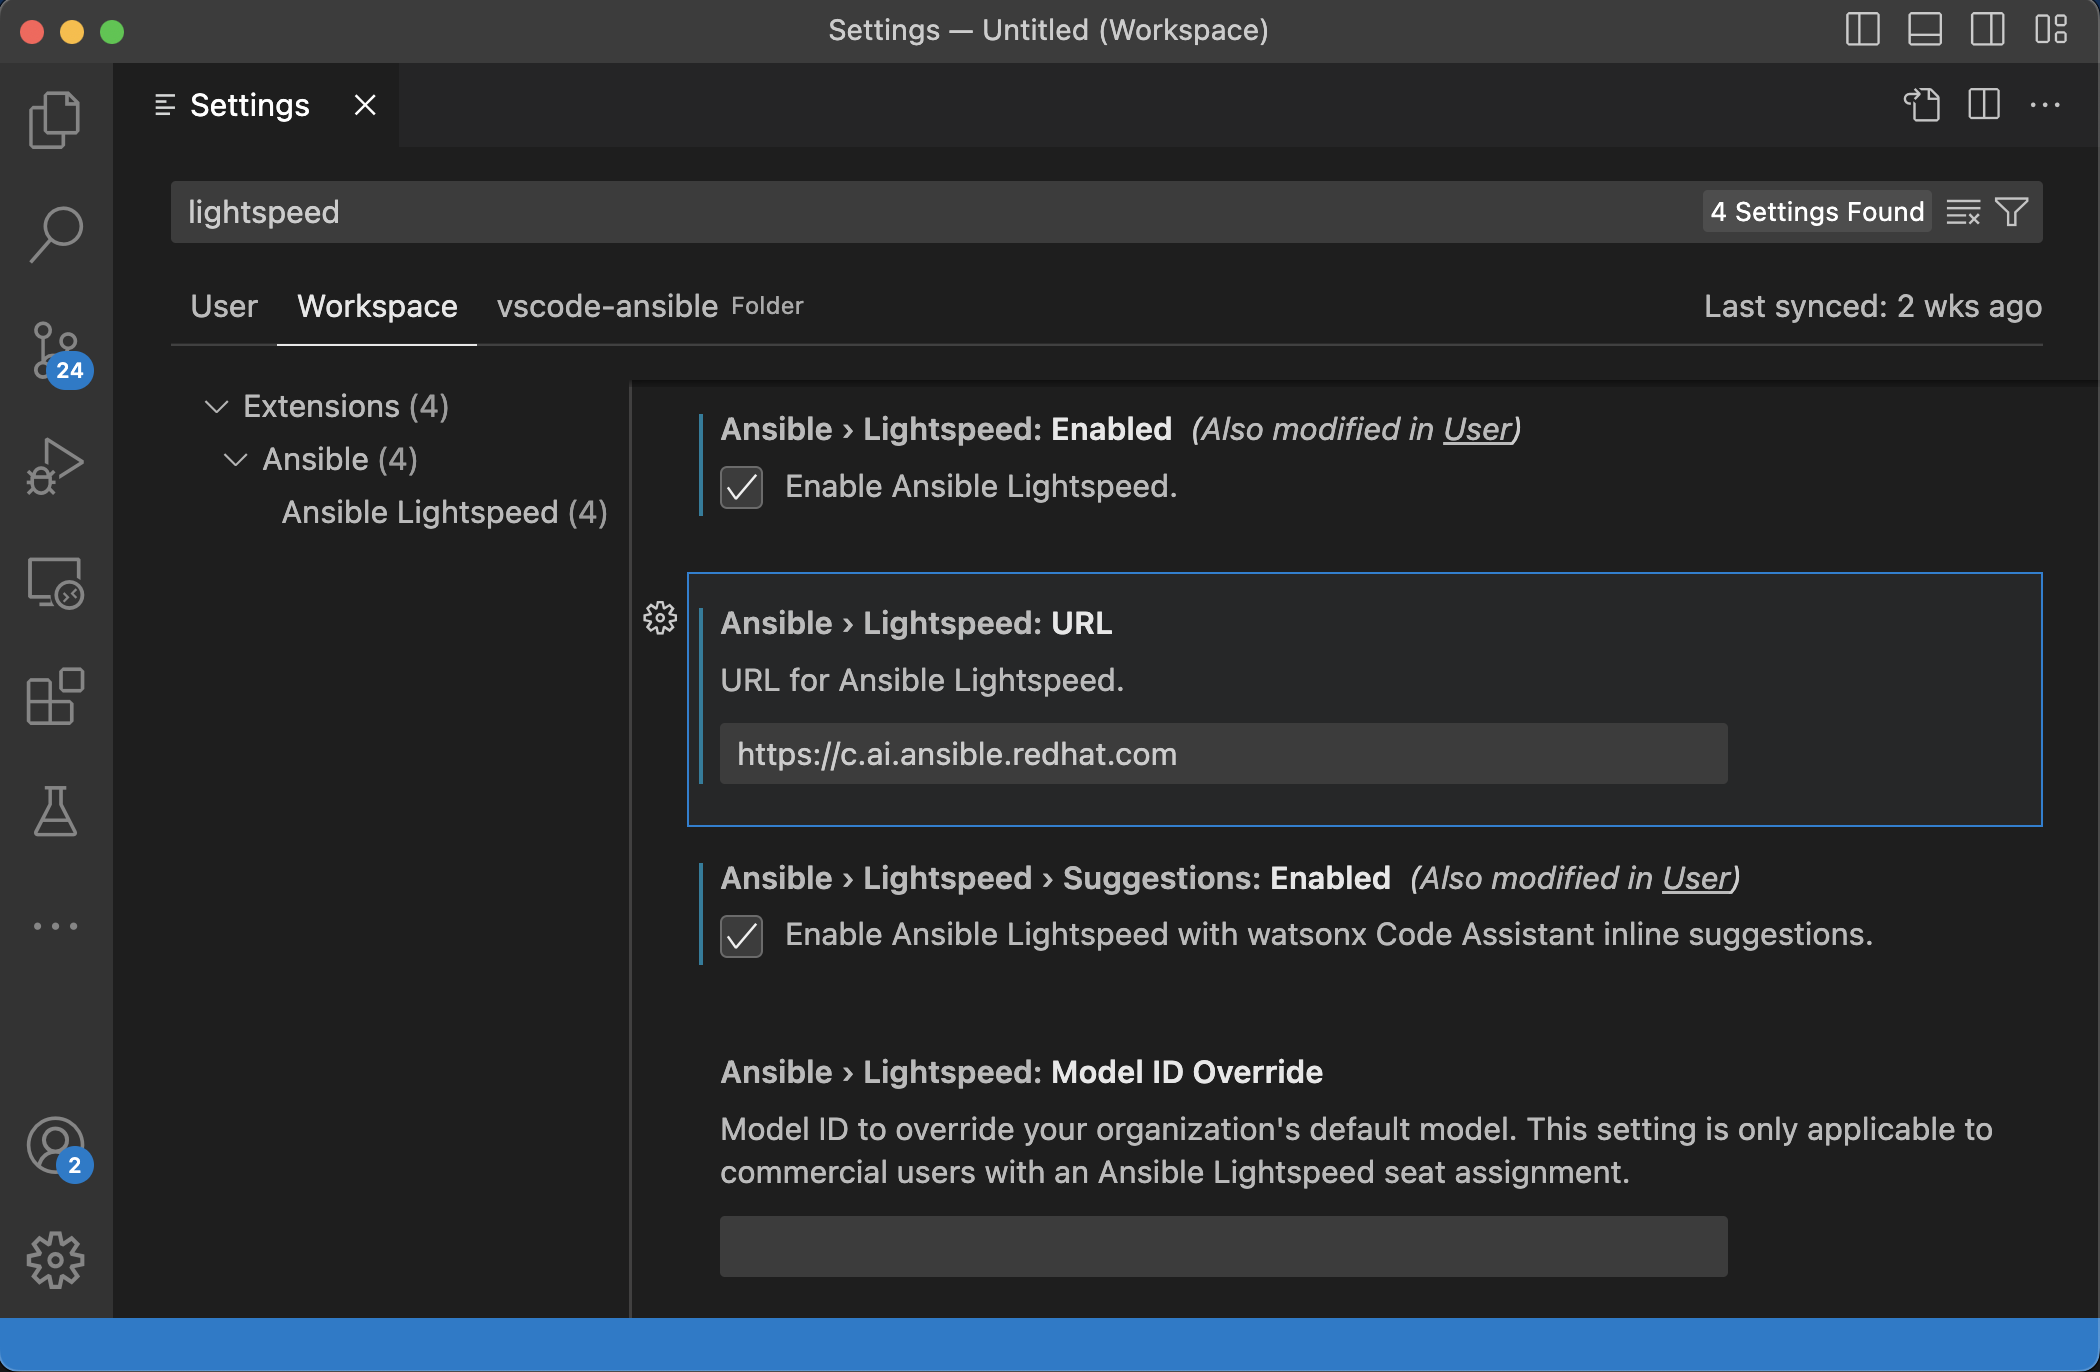
Select Ansible Lightspeed settings, and specify the following information:
- Select the Enable Ansible Lightspeed checkbox.
-
In the URL for Ansible Lightspeed field, verify that you have the following URL:
https://c.ai.ansible.redhat.com/. - Select the Enable Ansible Lightspeed with watsonx Code Assistant inline suggestions checkbox.
Optional: If you want to use the custom model instead of the default model, in the Model ID Override field, enter the custom model ID. The model-override setting enables you to override the default model and use the custom model, after your organization administrator has created a custom model and has shared the model ID with you separately.
Your settings are automatically saved in VS Code.
The following illustration displays the configured settings for the Ansible VS Code extension:
Figure 5.1. Configured settings for the Ansible VS Code extension
Additional resources
5.4. Logging in to Ansible Lightspeed through the Ansible VS Code extension
After installing and configuring the VS Code extension, you can log in to the Ansible Lightspeed service.
5.4.1. Sign-in options
Red Hat Ansible Lightspeed provides different sign-in methods depending on whether you are using the cloud service or the on-premise deployment.
Ansible Lightspeed on-premise deployments
Users are authenticated using your Red Hat Ansible Automation Platform login.
To sign in, you can use the Connect button in the Ansible Lightspeed view, or the Sign in with Ansible Lightspeed to use Ansible option in the menu. Once prompted in the browser, select Log in with Ansible Automation Platform, and log in with the authorization mechanism that your automation controller is configured with.
Ansible Lightspeed cloud service
Users are authenticated using Red Hat Single Sign-On (RH-SSO).
To sign in from VS Code, you can use the Connect button in the Ansible Lightspeed view, or the Sign in with Ansible Lightspeed to use Ansible option in the menu. Follow the on-screen prompts to log in and access the Ansible Lightspeed service using your RH-SSO.
NoteIf you are using a cloud development environment at a domain unknown by Ansible Lightspeed, such as on-premise Red Hat OpenShift Dev Spaces, your sign-in menu provides the option Sign-in with Red Hat to use Ansible. This option uses a device code flow to successfully complete the sign-in process and requires the Red Hat Authentication extension v0.2.0 or later. If you require this authentication flow but don’t see the Sign-in with Red Hat to use Ansible option, ensure you are using the Ansible VS Code extension v24.5.2 or later.
5.4.2. Procedure
- Open the VS Code application.
Sign in using either the Connect button in the Ansible Lightspeed view or the menu.
Sign in using the Connect button:
- From the VS Code activity bar, click the Ansible icon.
- In the Ansible Lightspeed view, click Connect.
- Follow the on-screen prompts to sign in to Ansible Lightspeed.
Sign in using the menu:
- From the VS Code activity bar, click the menu.
Sign in with Ansible Lightspeed to use Ansible or sign in with Red Hat to use Ansible, depending on the sign-in option you are presented with.
Note- The sign-in options are displayed when the VS Code extension is in an active state. The extension is activated after you open the Ansible side panel or after you open an Ansible file in the VS Code editor. If you do not see this option, use the Connect button to link to the Ansible Lightspeed service.
- If you are using a cloud development environment at a domain unknown by Ansible Lightspeed, such as on-premise Red Hat OpenShift Dev Spaces, your sign-in menu provides the option Sign-in with Red Hat to use Ansible. This option uses a device code flow to successfully complete the sign-in process and requires the Red Hat Authentication extension v0.2.0 or later. If you require this authentication flow but don’t see the Sign-in with Red Hat to use Ansible option, ensure you are using the Ansible VS Code extension v24.5.2 or later.
- Follow the on-screen prompts to sign in to Ansible Lightspeed.
On successful authentication, the login screen is displayed along with your username and your assigned user role.
5.5. Logging out of the Ansible Lightspeed Service
To log out of the Ansible Lightspeed Service, you must log out of both the Ansible Lightspeed VS Code extension and the Ansible Lightspeed portal.
Procedure
Log out of the Ansible Lightspeed VS Code extension:
-
Click the Person icon
 . You will see a list of accounts that VS Code is logged into.
-
Select
.
-
Click the Person icon
Log out of the Ansible Lightspeed portal:
- Navigate to the Ansible Lightspeed portal login page.
- Click Log out.