Chapter 5. Managing users
From the Admin Console, you have a wide range of actions you can perform to manage users.
5.1. Creating users
You create users in the realm where you intend to have applications needed by those users. Avoid creating users in the master realm, which is only intended for creating other realms.
Prerequisite
- You are in a realm other than the master realm.
Procedure
- Click Users in the menu.
- Click Add User.
Enter the details for the new user.
NoteUsername is the only required field.
- Click Save. After saving the details, the Management page for the new user is displayed.
5.2. Managing user attributes
In Red Hat build of Keycloak a user is associated with a set of attributes. These attributes are used to better describe and identify users within Red Hat build of Keycloak as well as to pass over additional information about them to applications.
A user profile defines a well-defined schema for representing user attributes and how they are managed within a realm. By providing a consistent view over user information, it allows administrators to control the different aspects on how attributes are managed as well as to make it much easier to extend Red Hat build of Keycloak to support additional attributes.
Although the user profile is mainly targeted for attributes that end-users can manage (e.g.: first and last names, phone, etc) it also serves for managing any other metadata you want to associate with your users.
Among other capabilities, user profile enables administrators to:
- Define a schema for user attributes
- Define whether an attribute is required based on contextual information (e.g.: if required only for users, or admins, or both, or depending on the scope being requested.)
- Define specific permissions for viewing and editing user attributes, making possible to adhere to strong privacy requirements where some attributes can not be seen or be changed by third-parties (including administrators)
- Dynamically enforce user profile compliance so that user information is always updated and in compliance with the metadata and rules associated with attributes
- Define validation rules on a per-attribute basis by leveraging the built-in validators or writing custom ones
- Dynamically render forms that users interact with like registration, update profile, brokering, and personal information in the account console, according to the attribute definitions and without any need to manually change themes.
- Customize user management interfaces in the administration console so that attributes are rendered dynamically based on the user profile schema
The user profile schema or configuration uses a JSON format to represent attributes and their metadata. From the administration console, you are able to manage the configuration by clicking on the Realm Settings on the left side menu and then clicking on the User Profile tab on that page.
In the next sections, we’ll be looking at how to create your own user profile schema or configuration, and how to manage attributes.
5.2.1. Understanding the Default Configuration
By default, Red Hat build of Keycloak provides a basic user profile configuration covering some of the most common user attributes:
| Name | Description |
|---|---|
|
| The username |
|
| End-User’s preferred e-mail address. |
|
| Given name(s) or first name(s) of the end-user |
|
| Surname(s) or last name(s) of the End-User |
In Red Hat build of Keycloak, both username and email attributes have a special handling as they are often used to identify, authenticate, and link user accounts. For those attributes, you are limited to changing their settings, and you can not remove them.
The behavior of both username and email attributes changes accordingly to the Login settings of your realm. For instance, changing the Email as username or the Edit username settings will override any configuration you have set in the user profile configuration.
As you will see in the following sections, you are free to change the default configuration by bringing your own attributes or changing the settings for any of the available attributes to better fit it to your needs.
5.2.2. Understanding the User Profile Contexts
In Red Hat build of Keycloak, users are managed through different contexts:
- Registration
- Update Profile
- Reviewing Profile when authenticating through a broker or social provider
- Account Console
- Administrative (e.g.: administration console and Admin REST API)
Except for the Administrative context, all other contexts are considered end-user contexts as they are related to user self-service flows.
Knowing these contexts is important to understand where your user profile configuration will take effect when managing users. Regardless of the context where the user is being managed, the same user profile configuration will be used to render UIs and validate attribute values.
As you will see in the following sections, you might restrict certain attributes to be available only from the administrative context and disable them completely for end-users. The other way around is also true if you don’t want administrators to have access to certain user attributes but only the end-user.
5.2.3. Understanding Managed and Unmanaged Attributes
By default, Red Hat build of Keycloak will only recognize the attributes defined in your user profile configuration. The server ignores any other attribute not explicitly defined there.
By being strict about which user attributes can be set to your users, as well as how their values are validated, Red Hat build of Keycloak can add another defense barrier to your realm and help you to prevent unexpected attributes and values associated to your users.
That said, user attributes can be categorized as follows:
- Managed. These are attributes controlled by your user profile, to which you want to allow end-users and administrators to manage from any user profile context. For these attributes, you want complete control on how and when they are managed.
- Unmanaged. These are attributes you do not explicitly define in your user profile so that they are completely ignored by Red Hat build of Keycloak, by default.
Although unmanaged attributes are disabled by default, you can configure your realm using different policies to define how they are handled by the server. For that, click on the Realm Settings at the left side menu, click on the General tab, and then choose any of the following options from the Unmanaged Attributes setting:
- Disabled. This is the default policy so that unmanaged attributes are disabled from all user profile contexts.
- Enabled. This policy enables unmanaged attributes to all user profile contexts.
- Admin can view. This policy enables unmanaged attributes only from the administrative context as read-only.
- Admin can edit. This policy enables unmanaged attributes only from the administrative context for reads and writes.
These policies give you a fine-grained control over how the server will handle unmanaged attributes. You can choose to completely disable or only support unmanaged attributes when managing users through the administrative context.
When unmanaged attributes are enabled (even if partially) you can manage them from the administration console at the Attributes tab in the User Details UI. If the policy is set to Disabled this tab is not available.
As a security recommendation, try to adhere to the most strict policy as much as possible (e.g.: Disabled or Admin can edit) to prevent unexpected attributes (and values) set to your users when they are managing their profile through end-user contexts. Avoid setting the Enabled policy and prefer defining all the attributes that end-users can manage in your user profile configuration, under your control.
The Enabled policy is targeted for realms migrating from previous versions of Red Hat build of Keycloak and to avoid breaking behavior when using custom themes and extending the server with their own custom user attributes.
As you will see in the following sections, you can also restrict the audience for an attribute by choosing if it should be visible or writable by users and/or administrators.
For unmanaged attributes, the maximum length is 2048 characters. To specify a different minimum or maximum length, change the unmanaged attribute to a managed attribute and add a length validator.
Red Hat build of Keycloak caches user-related objects in its internal caches. The longer the attributes are, the more memory the cache consumes. Therefore, limiting the size of the length attributes is recommended. Consider storing large objects outside Red Hat build of Keycloak and reference them by ID or URL.
5.2.4. Managing the User Profile
The user profile configuration is managed on a per-realm basis. For that, click on the Realm Settings link on the left side menu and then click on the User Profile tab.
User Profile Tab
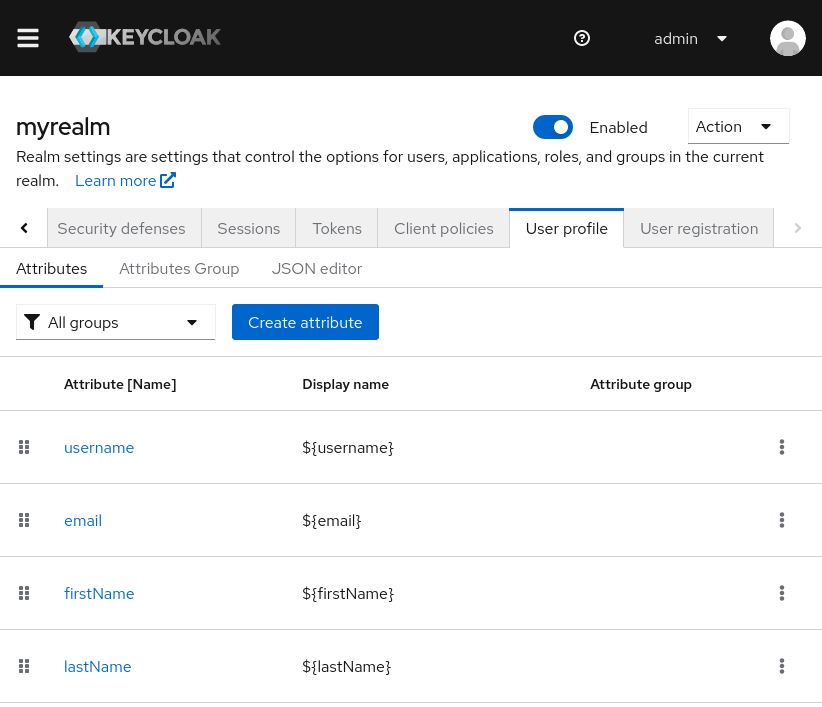
In the Attributes sub-tab you have a list of all managed attributes.
In the Attribute Groups sub-tab you can manage attribute groups. An attribute group allows you to correlate attributes so that they are displayed together when rendering user facing forms.
In the JSON Editor sub-tab you can view and edit the JSON configuration. You can use this tab to grab your current configuration or manage it manually. Any change you make to this tab is reflected in the other tabs, and vice-versa.
In the next section, you are going to learn how to manage attributes.
5.2.5. Managing Attributes
At the Attributes sub-tab you can create, edit, and delete the managed attributes.
To define a new attribute and associate it with the user profile, click on the Create attribute button at the top of the attribute listing.
Attribute Configuration
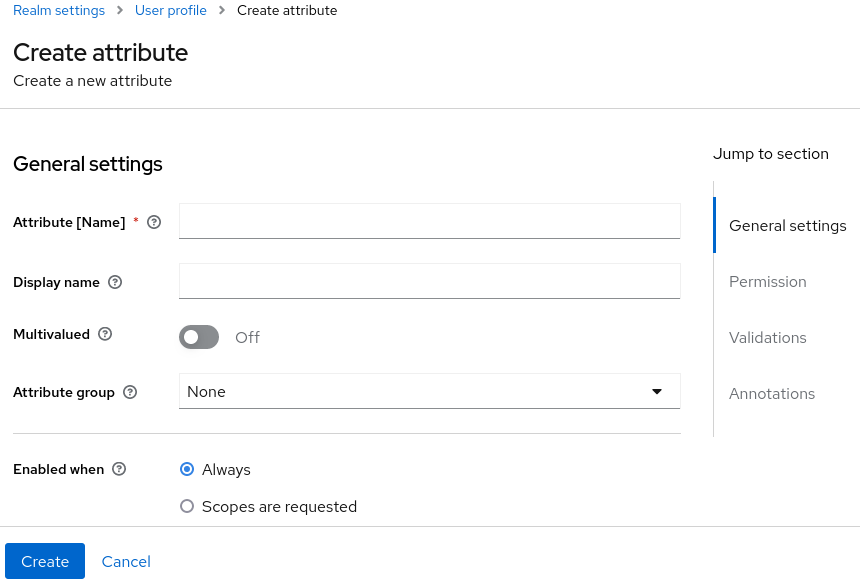
When configuring the attribute you can define the following settings:
- Name
- The name of the attribute, used to uniquely identify an attribute.
- Display name
- A user-friendly name for the attribute, mainly used when rendering user-facing forms. It also supports Using Internationalized Messages
- Multivalued
- If enabled, the attribute supports multiple values and UIs are rendered accordingly to allow setting many values. When enabling this setting, make sure to add a validator to set a hard limit to the number of values.
- Attribute Group
- The attribute group to which the attribute belongs to, if any.
- Enabled when
-
Enables or disables an attribute. If set to
Always, the attribute is available from any user profile context. If set toScopes are requested, the attribute is only available when the client acting on behalf of the user is requesting a set of one or more scopes. You can use this option to dynamically enforce certain attributes depending on the client scopes being requested. For the account and administration consoles, scopes are not evaluated and the attribute is always enabled. That is because filtering attributes by scopes only works when running authentication flows. - Required
-
Set the conditions to mark an attribute as required. If disabled, the attribute is optional. If enabled, you can set the
Required forsetting to mark the attribute as required depending on the user profile context so that the attribute is required for end-users (via end-user contexts) or to administrators (via administrative context), or both. You can also set theRequired whensetting to mark the attribute as required only when a set of one or more client scopes are requested. If set toAlways, the attribute is required from any user profile context. If set toScopes are requested, the attribute is only required when the client acting on behalf of the user is requesting a set of one or more scopes. For the account and administration consoles, scopes are not evaluated and the attribute is not required. That is because filtering attributes by scopes only works when running authentication flows. - Permission
-
In this section, you can define read and write permissions when the attribute is being managed from an end-user or administrative context. The
Who can editsetting mark an attribute as writable byUserand/orAdmin, from an end-user and administrative context, respectively. TheWho can viewsetting mark an attribute as read-only byUserand/orAdminfrom an end-user and administrative context, respectively. - Validation
- In this section, you can define the validations that will be performed when managing the attribute value. Red Hat build of Keycloak provides a set of built-in validators you can choose from with the possibility to add your own. For more details, look at the Validating Attributes section.
- Annotation
- In this section, you can associate annotations to the attribute. Annotations are mainly useful to pass over additional metadata to frontends for rendering purposes. For more details, look at the Defining UI Annotations section.
When you create an attribute, the attribute is only available from administrative contexts to avoid unexpectedly exposing attributes to end-users. Effectively, the attribute won’t be accessible to end-users when they are managing their profile through the end-user contexts. You can change the Permissions settings anytime accordingly to your needs.
5.2.6. Validating Attributes
You can enable validation to managed attributes to make sure the attribute value conforms to specific rules. For that, you can add or remove validators from the Validations settings when managing an attribute.
Attribute Validation
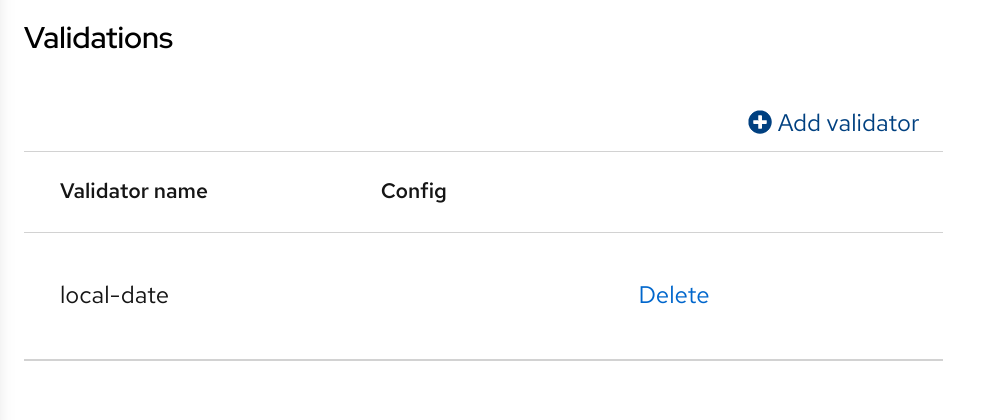
Validation happens at any time when writing to an attribute, and they can throw errors that will be shown in UIs when the value fails a validation.
For security reasons, every attribute that is editable by users should have a validation to restrict the size of the values users enter. If no length validator has been specified, Red Hat build of Keycloak defaults to a maximum length of 2048 characters.
5.2.6.1. Built-in Validators
Red Hat build of Keycloak provides some built-in validators that you can choose from, and you are also able to provide your own validators by extending the Validator SPI.
The list below provides a list of all the built-in validators:
| Name | Description | Configuration |
|---|---|---|
| length | Check the length of a string value based on a minimum and maximum length. | min: an integer to define the minimum allowed length. max: an integer to define the maximum allowed length. trim-disabled: a boolean to define whether the value is trimmed prior to validation. |
| integer | Check if the value is an integer and within a lower and/or upper range. If no range is defined, the validator only checks whether the value is a valid number. | min: an integer to define the lower range. max: an integer to define the upper range. |
| double | Check if the value is a double and within a lower and/or upper range. If no range is defined, the validator only checks whether the value is a valid number. | min: an integer to define the lower range. max: an integer to define the upper range. |
| uri | Check if the value is a valid URI. | None |
| pattern | Check if the value matches a specific RegEx pattern. | pattern: the RegEx pattern to use when validating values. error-message: the key of the error message in i18n bundle. If not set a generic message is used. |
| | Check if the value has a valid e-mail format. | max-local-length: an integer to define the maximum length for the local part of the email. It defaults to 64 per specification. |
| local-date | Check if the value has a valid format based on the realm and/or user locale. | None |
| person-name-prohibited-characters | Check if the value is a valid person name as an additional barrier for attacks such as script injection. The validation is based on a default RegEx pattern that blocks characters not common in person names. | error-message: the key of the error message in i18n bundle. If not set a generic message is used. |
| username-prohibited-characters | Check if the value is a valid username as an additional barrier for attacks such as script injection. The validation is based on a default RegEx pattern that blocks characters not common in usernames. | error-message: the key of the error message in i18n bundle. If not set a generic message is used. |
| options | Check if the value is from the defined set of allowed values. Useful to validate values entered through select and multiselect fields. | options: array of strings containing allowed values. |
| up-username-not-idn-homograph | The field can contain only latin characters and common unicode characters. Useful for the fields, which can be subject of IDN homograph attacks (typically username). | error-message: the key of the error message in i18n bundle. If not set a generic message is used. |
| multivalued | Validates the size of a multivalued attribute. | min: an integer to define the minimum allowed count of attribute values. max: an integer to define the maximum allowed count of attribute values. |
5.2.7. Defining UI Annotations
In order to pass additional information to frontends, attributes can be decorated with annotations to dictate how attributes are rendered. This capability is mainly useful when extending Red Hat build of Keycloak themes to render pages dynamically based on the annotations associated with attributes.
Annotations are used, for example, for Changing the HTML type for an Attribute and Changing the DOM representation of an Attribute, as you will see in the following sections.
Attribute Annotation
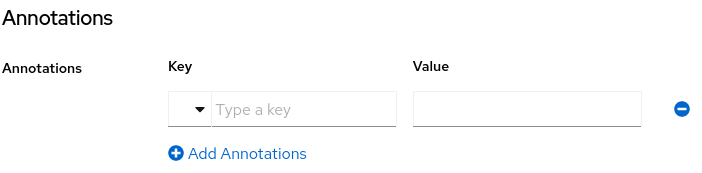
An annotation is a key/value pair shared with the UI so that they can change how the HTML element corresponding to the attribute is rendered. You can set any annotation you want to an attribute as long as the annotation is supported by the theme your realm is using.
The only restriction you have is to avoid using annotations using the kc prefix in their keys because these annotations using this prefix are reserved for Red Hat build of Keycloak.
5.2.7.1. Built-in Annotations
The following annotations are supported by Red Hat build of Keycloak built-in themes:
| Name | Description |
|---|---|
| inputType | Type of the form input field. Available types are described in a table below. |
| inputHelperTextBefore |
Helper text rendered before (above) the input field. Direct text or internationalization pattern (like |
| inputHelperTextAfter |
Helper text rendered after (under) the input field. Direct text or internationalization pattern (like |
| inputOptionsFromValidation | Annotation for select and multiselect types. Optional name of custom attribute validation to get input options from. See detailed description below. |
| inputOptionLabelsI18nPrefix | Annotation for select and multiselect types. Internationalization key prefix to render options in UI. See detailed description below. |
| inputOptionLabels | Annotation for select and multiselect types. Optional map to define UI labels for options (directly or using internationalization). See detailed description below. |
| inputTypePlaceholder |
HTML input |
| inputTypeSize |
HTML input |
| inputTypeCols |
HTML input |
| inputTypeRows |
HTML input |
| inputTypePattern |
HTML input |
| inputTypeMaxLength |
HTML input |
| inputTypeMinLength |
HTML input |
| inputTypeMax |
HTML input |
| inputTypeMin |
HTML input |
| inputTypeStep |
HTML input |
| Number Format |
If set, the |
| Number UnFormat |
If set, the |
Field types use HTML form field tags and attributes applied to them - they behave based on the HTML specifications and browser support for them.
Visual rendering also depends on css styles applied in the used theme.
5.2.7.2. Changing the HTML type for an Attribute
You can change the type of a HTML5 input element by setting the inputType annotation. The available types are:
| Name | Description | HTML tag used |
|---|---|---|
| text | Single line text input. | input |
| textarea | Multiple line text input. | textarea |
| select | Common single select input. See description how to configure options below. | select |
| select-radiobuttons | Single select input through group of radio buttons. See description how to configure options below. | group of input |
| multiselect | Common multiselect input. See description how to configure options below. | select |
| multiselect-checkboxes | Multiselect input through group of checkboxes. See description how to configure options below. | group of input |
| html5-email | Single line text input for email address based on HTML 5 spec. | input |
| html5-tel | Single line text input for phone number based on HTML 5 spec. | input |
| html5-url | Single line text input for URL based on HTML 5 spec. | input |
| html5-number |
Single line input for number (integer or float depending on | input |
| html5-range | Slider for number entering based on HTML 5 spec. | input |
| html5-datetime-local | Date Time input based on HTML 5 spec. | input |
| html5-date | Date input based on HTML 5 spec. | input |
| html5-month | Month input based on HTML 5 spec. | input |
| html5-week | Week input based on HTML 5 spec. | input |
| html5-time | Time input based on HTML 5 spec. | input |
5.2.7.3. Defining options for select and multiselect fields
Options for select and multiselect fields are taken from validation applied to the attribute to be sure validation and field options presented in UI are always consistent. By default, options are taken from built-in options validation.
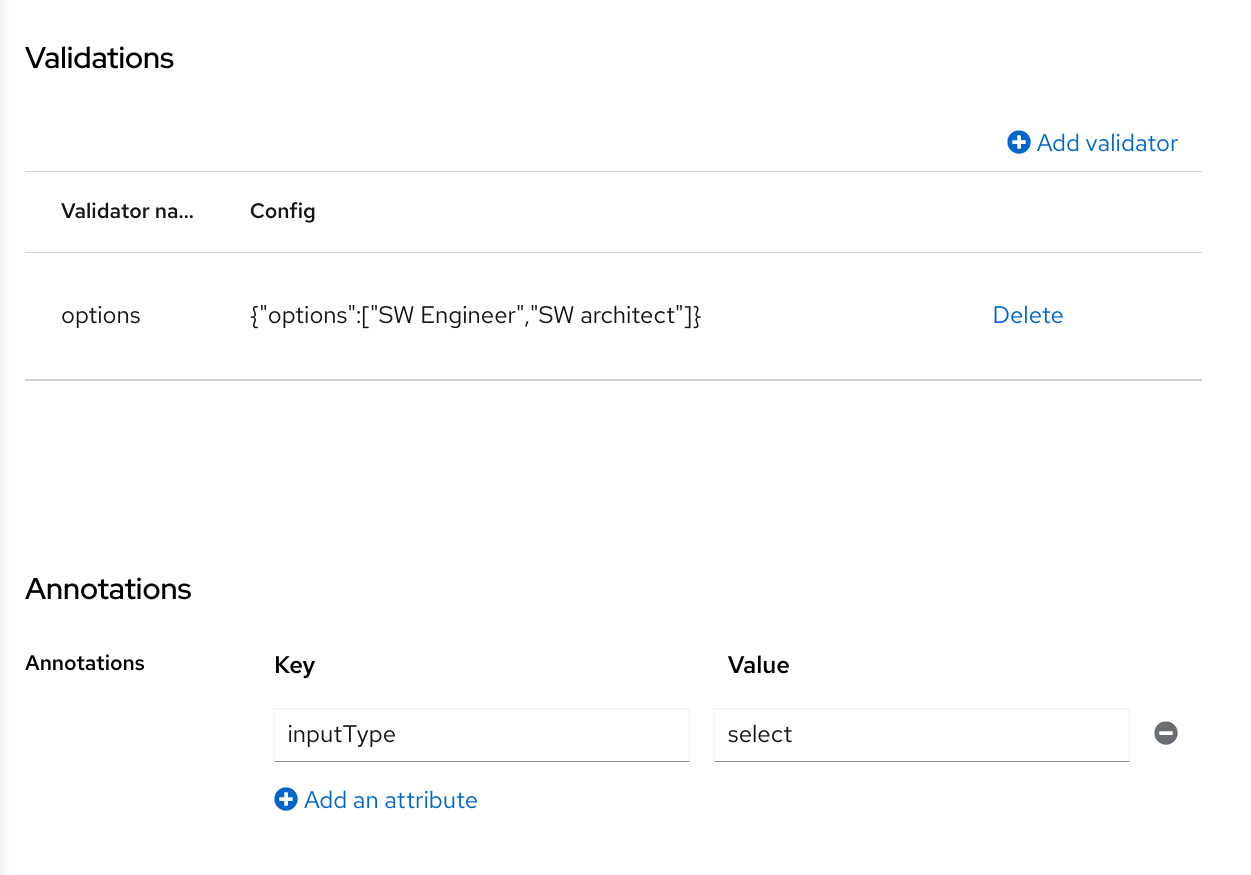
You can use various ways to provide nice human-readable labels for select and multiselect options. The simplest case is when attribute values are same as UI labels. No extra configuration is necessary in this case.
Option values same as UI labels
When attribute value is kind of ID not suitable for UI, you can use simple internationalization support provided by inputOptionLabelsI18nPrefix annotation. It defines prefix for internationalization keys, option value is dot appended to this prefix.
Simple internationalization for UI labels using i18n key prefix
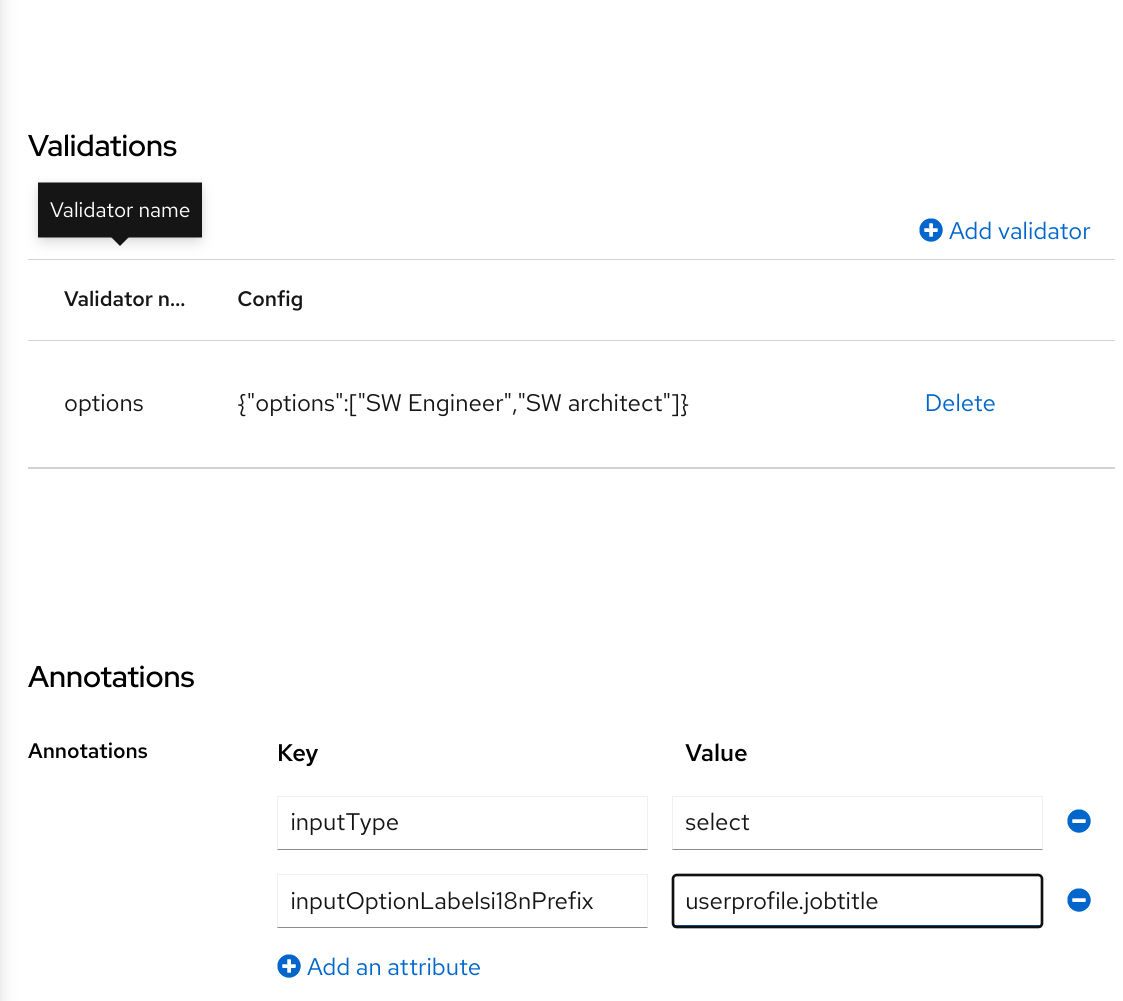
Localized UI label texts for option value have to be provided by userprofile.jobtitle.sweng and userprofile.jobtitle.swarch keys then, using common localization mechanism.
You can also use inputOptionLabels annotation to provide labels for individual options. It contains a map of labels for option - key in the map is option value (defined in validation), and value in the map is UI label text itself or its internationalization pattern (like ${i18n.key}) for that option.
You have to use User Profile JSON Editor to enter map as inputOptionLabels annotation value.
Example of directly entered labels for individual options without internationalization:
"attributes": [
<...
{
  "name": "jobTitle",
  "validations": {
    "options": {
      "options":[
        "sweng",
        "swarch"
      ]
    }
  },
  "annotations": {
    "inputType": "select",
    "inputOptionLabels": {
      "sweng": "Software Engineer",
      "swarch": "Software Architect"
    }
  }
}
...
]
Example of the internationalized labels for individual options:
"attributes": [
...
{
  "name": "jobTitle",
  "validations": {
    "options": {
      "options":[
        "sweng",
        "swarch"
      ]
    }
  },
  "annotations": {
    "inputType": "select-radiobuttons",
    "inputOptionLabels": {
      "sweng": "${jobtitle.swengineer}",
      "swarch": "${jobtitle.swarchitect}"
    }
  }
}
...
]
Localized texts have to be provided by jobtitle.swengineer and jobtitle.swarchitect keys then, using common localization mechanism.
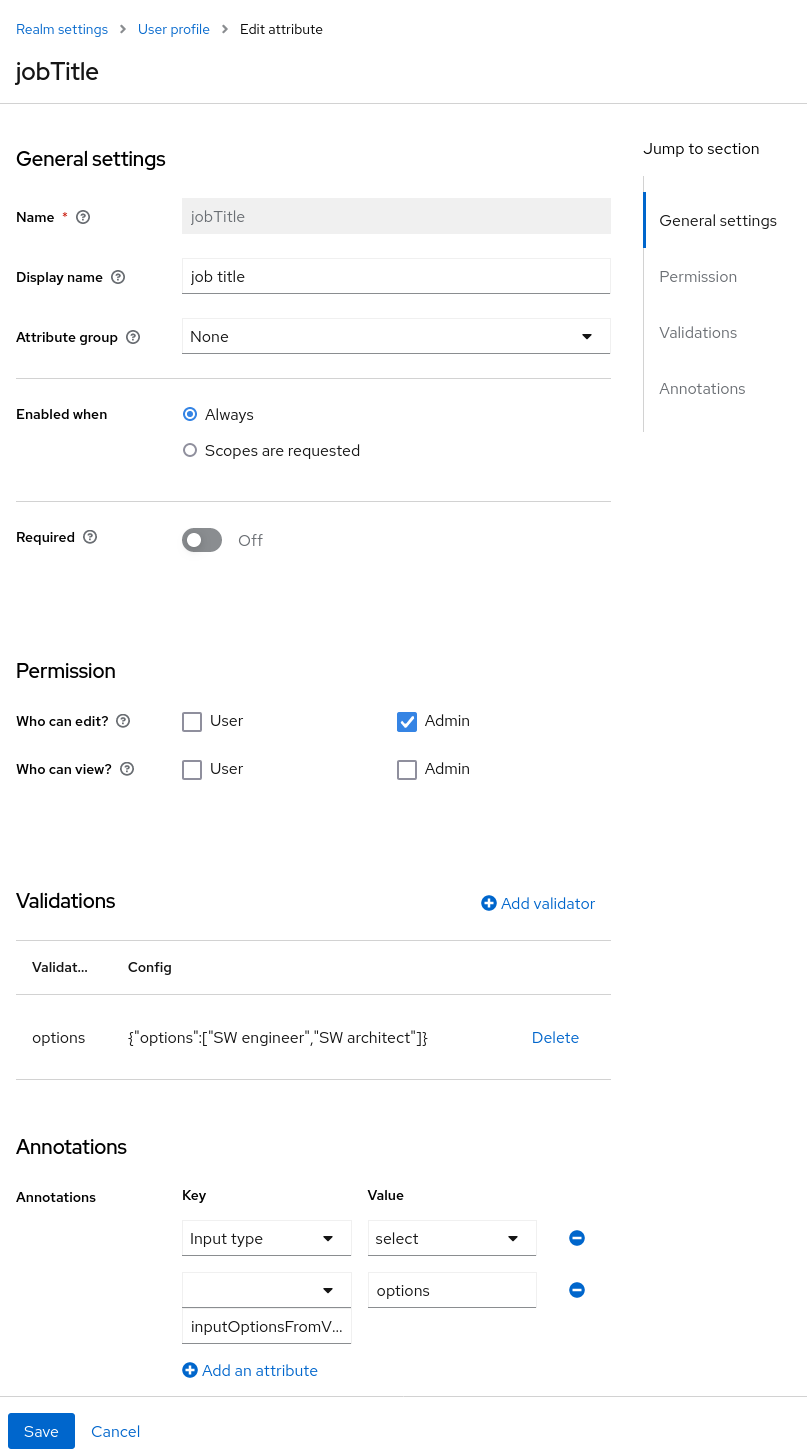
Custom validator can be used to provide options thanks to inputOptionsFromValidation attribute annotation. This validation have to have options config providing array of options. Internationalization works the same way as for options provided by built-in options validation.
Options provided by custom validator
5.2.7.4. Changing the DOM representation of an Attribute
You can enable additional client-side behavior by setting annotations with the kc prefix. These annotations are going to translate into an HTML attribute in the corresponding element of an attribute, prefixed with data-, and a script with the same name will be loaded to the dynamic pages so that you can select elements from the DOM based on the custom data- attribute and decorate them accordingly by modifying their DOM representation.
For instance, if you add a kcMyCustomValidation annotation to an attribute, the HTML attribute data-kcMyCustomValidation is added to the corresponding HTML element for the attribute, and a JavaScript module is loaded from your custom theme at <THEME TYPE>/resources/js/kcMyCustomValidation.js. See the Server Developer Guide for more information about how to deploy a custom JavaScript module to your theme.
The JavaScript module can run any code to customize the DOM and the elements rendered for each attribute. For that, you can use the userProfile.js module to register an annotation descriptor for your custom annotation as follows:
import { registerElementAnnotatedBy } from "./userProfile.js";

registerElementAnnotatedBy({
  name: 'kcMyCustomValidation',
  onAdd(element) {
    var listener = function (event) {
        // do something on keyup
    };

    element.addEventListener("keyup", listener);

    // returns a cleanup function to remove the event listener
    return () => element.removeEventListener("keyup", listener);
  }
});
The registerElementAnnotatedBy is a method to register annotation descriptors. A descriptor is an object with a name, referencing the annotation name, and a onAdd function. Whenever the page is rendered or an attribute with the annotation is added to the DOM, the onAdd function is invoked so that you can customize the behavior for the element.
The onAdd function can also return a function to perform a cleanup. For instance, if you are adding event listeners to elements, you might want to remove them in case the element is removed from the DOM.
Alternatively, you can also use any JavaScript code you want if the userProfile.js is not enough for your needs:
document.querySelectorAll(`[data-kcMyCustomValidation]`).forEach((element) => {
    var listener = function (evt) {
        // do something on keyup
    };

    element.addEventListener("keyup", listener);
  });
5.2.8. Managing Attribute Groups
At the Attribute Groups sub-tab you can create, edit, and delete attribute groups. An attribute group allows you to define a container for correlated attributes so that they are rendered together when at the user-facing forms.
Attribute Group List
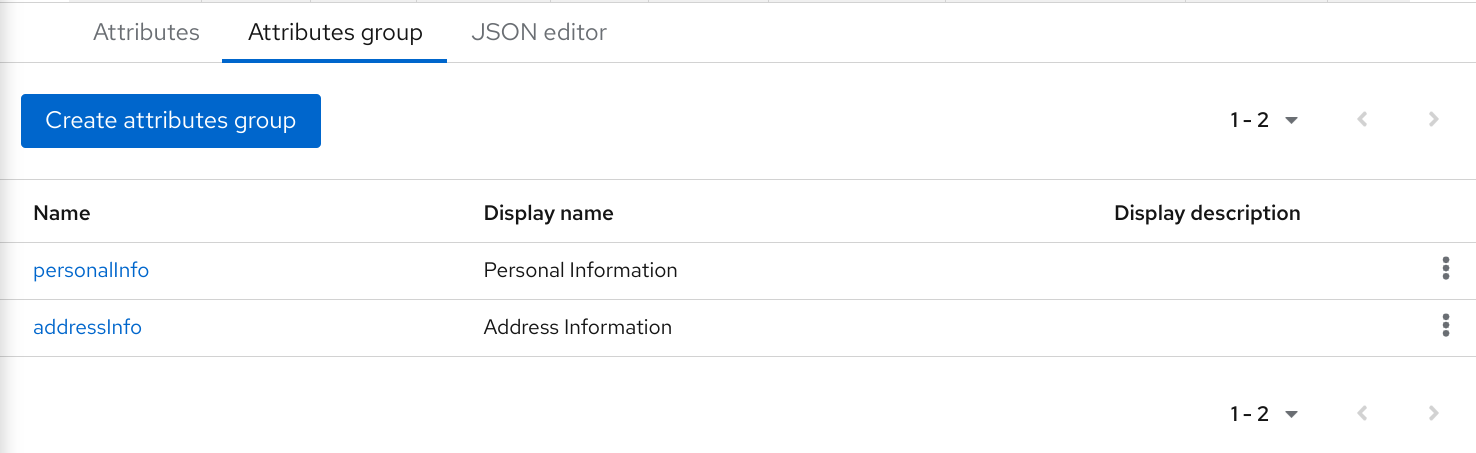
You can’t delete attribute groups that are bound to attributes. For that, you should first update the attributes to remove the binding.
To create a new group, click on the Create attributes group button on the top of the attribute groups listing.
Attribute Group Configuration
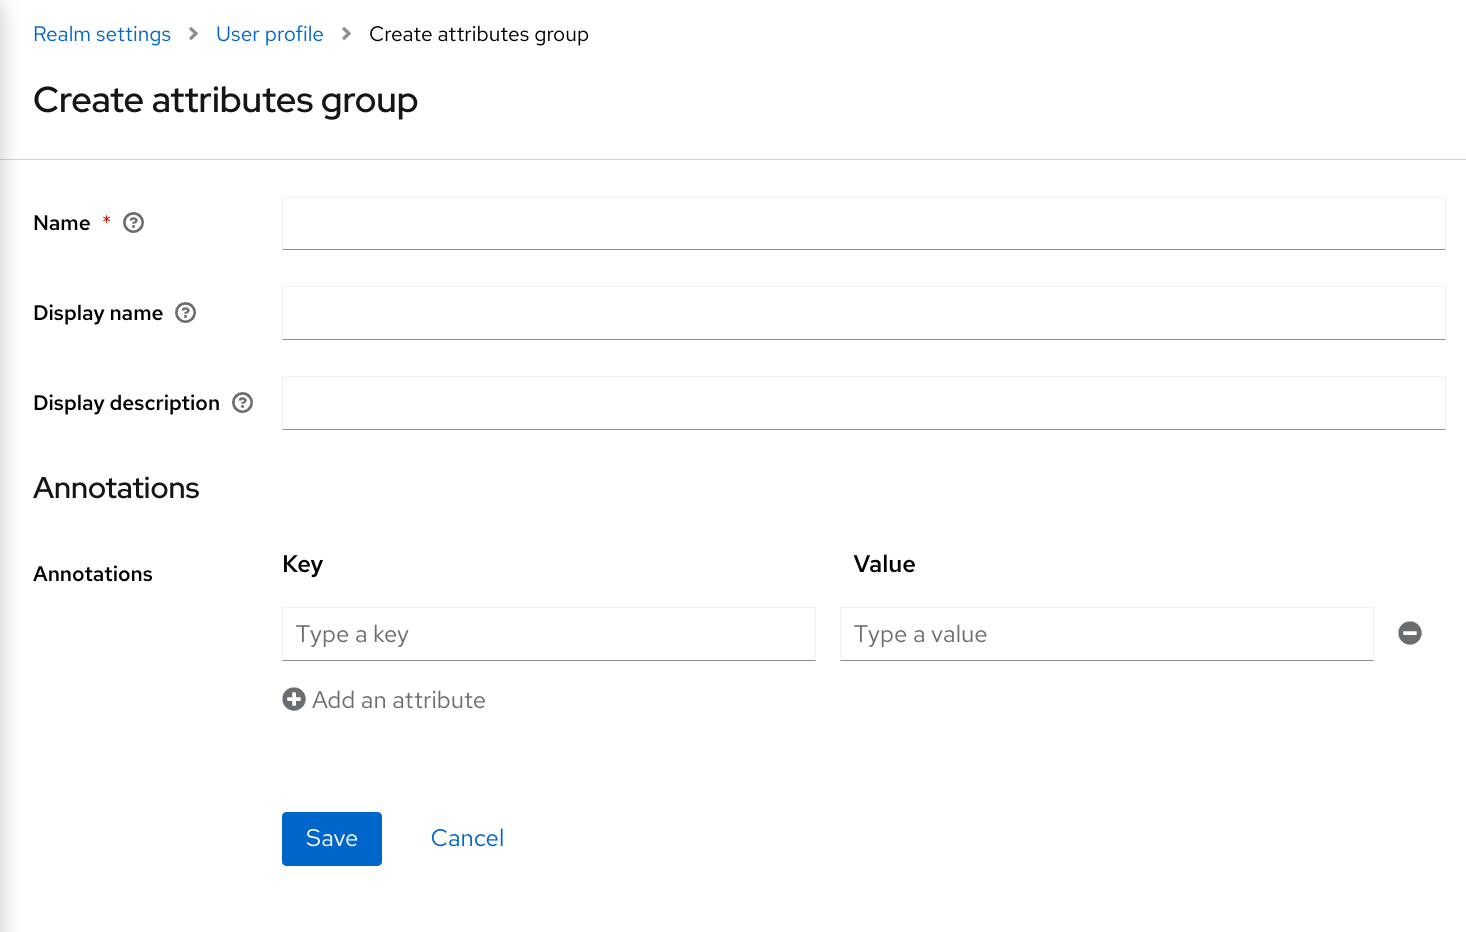
When configuring the group you can define the following settings:
- Name
- The name of the attribute, used to uniquely identify an attribute.
- Display name
- A user-friendly name for the attribute, mainly used when rendering user-facing forms. It also supports Using Internationalized Messages
- Display description
- A user-friendly text that will be displayed as a tooltip when rendering user-facing forms. It also supports Using Internationalized Messages
- Annotation
- In this section, you can associate annotations to the attribute. Annotations are mainly useful to pass over additional metadata to frontends for rendering purposes.
5.2.9. Using the JSON configuration
The user profile configuration is stored using a well-defined JSON schema. You can choose from editing the user profile configuration directly by clicking on the JSON Editor sub-tab.
JSON Configuration
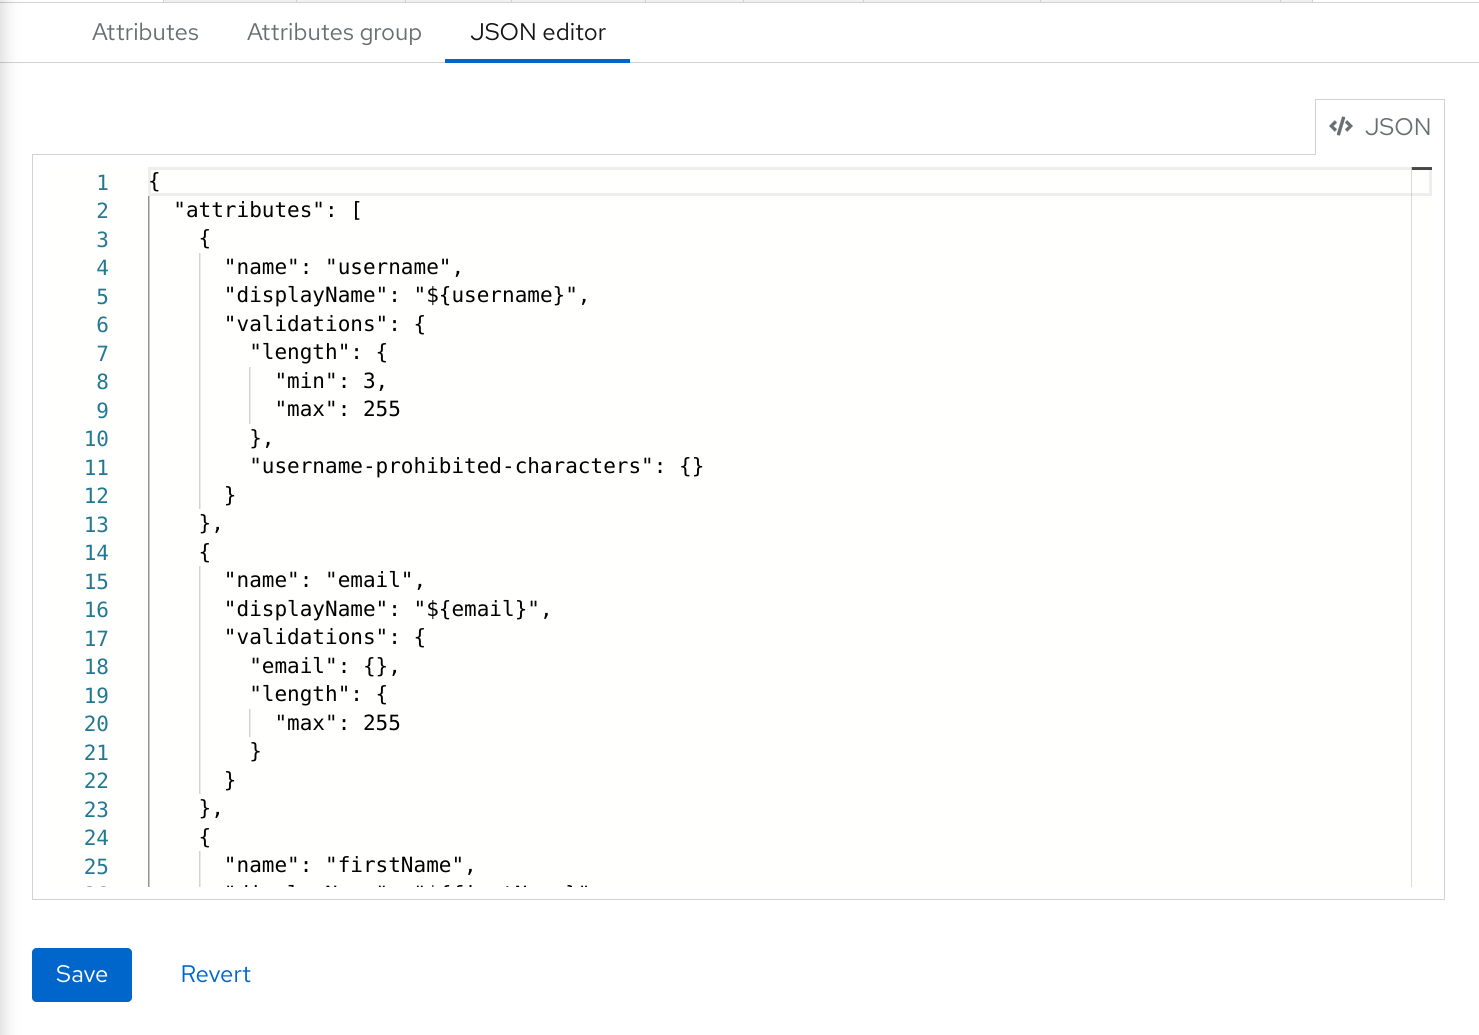
The JSON schema is defined as follows:
{
  "unmanagedAttributePolicy": "DISABLED",
  "attributes": [
    {
      "name": "myattribute",
      "multivalued": false,
      "displayName": "My Attribute",
      "group": "personalInfo",
      "required": {
        "roles": [ "user", "admin" ],
        "scopes": [ "foo", "bar" ]
      },
      "permissions": {
        "view": [ "admin", "user" ],
        "edit": [ "admin", "user" ]
      },
      "validations": {
        "email": {
          "max-local-length": 64
        },
        "length": {
          "max": 255
        }
      },
      "annotations": {
        "myannotation": "myannotation-value"
      }
    }
  ],
  "groups": [
    {
      "name": "personalInfo",
      "displayHeader": "Personal Information",
      "annotations": {
        "foo": ["foo-value"],
        "bar": ["bar-value"]
      }
    }
  ]
}
The schema supports as many attributes and groups as you need.
The unmanagedAttributePolicy property defines the unmanaged attribute policy by setting one of following values. For more details, look at the Understanding Managed and Unmanaged Attributes.
-
DISABLED -
ENABLED -
ADMIN_VIEW -
ADMIN_EDIT
5.2.9.1. Attribute Schema
For each attribute you should define a name and, optionally, the required, permission, and the annotations settings.
The required property defines whether an attribute is required. Red Hat build of Keycloak allows you to set an attribute as required based on different conditions.
When the required property is defined as an empty object, the attribute is always required.
{
  "attributes": [
    {
      "name": "myattribute",
      "required": {}
  ]
}
On the other hand, you can choose to make the attribute required only for users, or administrators, or both. As well as mark the attribute as required only in case a specific scope is requested when the user is authenticating in Red Hat build of Keycloak.
To mark an attribute as required for a user and/or administrator, set the roles property as follows:
{
  "attributes": [
    {
      "name": "myattribute",
      "required": {
        "roles": ["user"]
      }
  ]
}
The roles property expects an array whose values can be either user or admin, depending on whether the attribute is required by the user or the administrator, respectively.
Similarly, you can choose to make the attribute required when a set of one or more scopes is requested by a client when authenticating a user. For that, you can use the scopes property as follows:
{
  "attributes": [
    {
      "name": "myattribute",
      "required": {
        "scopes": ["foo"]
      }
  ]
}
The scopes property is an array whose values can be any string representing a client scope.
The attribute-level permissions property can be used to define the read and write permissions to an attribute. The permissions are set based on whether these operations can be performed on the attribute by a user, or administrator, or both.
{
  "attributes": [
    {
      "name": "myattribute",
      "permissions": {
        "view": ["admin"],
        "edit": ["user"]
      }
  ]
}
Both view and edit properties expect an array whose values can be either user or admin, depending on whether the attribute is viewable or editable by the user or the administrator, respectively.
When the edit permission is granted, the view permission is implicitly granted.
The attribute-level annotation property can be used to associate additional metadata to attributes. Annotations are mainly useful for passing over additional information about attributes to frontends rendering user attributes based on the user profile configuration. Each annotation is a key/value pair.
{
  "attributes": [
    {
      "name": "myattribute",
      "annotations": {
        "foo": ["foo-value"],
        "bar": ["bar-value"]
      }
  ]
}
5.2.9.2. Attribute Group Schema
For each attribute group you should define a name and, optionally, the annotations settings.
The attribute-level annotation property can be used to associate additional metadata to attributes. Annotations are mainly useful for passing over additional information about attributes to frontends rendering user attributes based on the user profile configuration. Each annotation is a key/value pair.
5.2.10. Customizing How UIs are Rendered
The UIs from all the user profile contexts (including the administration console) are rendered dynamically accordingly to your user profile configuration.
The default rendering mechanism provides the following capabilities:
- Show or hide fields based on the permissions set to attributes.
- Render markers for required fields based on the constraints set to the attributes.
- Change the field input type (text, date, number, select, multiselect) set to an attribute.
- Mark fields as read-only depending on the permissions set to an attribute.
- Order fields depending on the order set to the attributes.
- Group fields that belong to the same attribute group.
- Dynamically group fields that belong to the same attribute group.
5.2.10.1. Ordering attributes
The attribute order is set by dragging and dropping the attribute rows on the attribute listing page.
Ordering Attributes
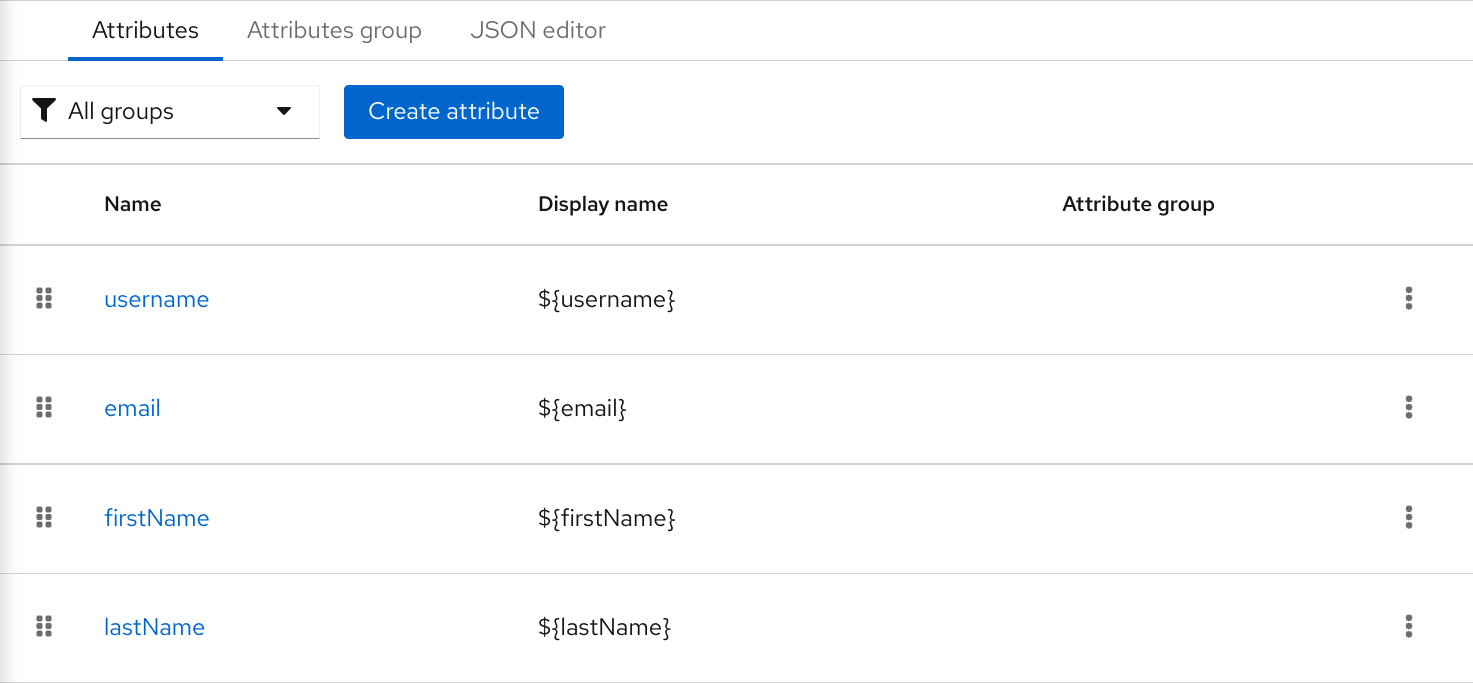
The order you set in this page is respected when fields are rendered in dynamic forms.
5.2.10.2. Grouping attributes
When dynamic forms are rendered, they will try to group together attributes that belong to the same attribute group.
Dynamic Update Profile Form
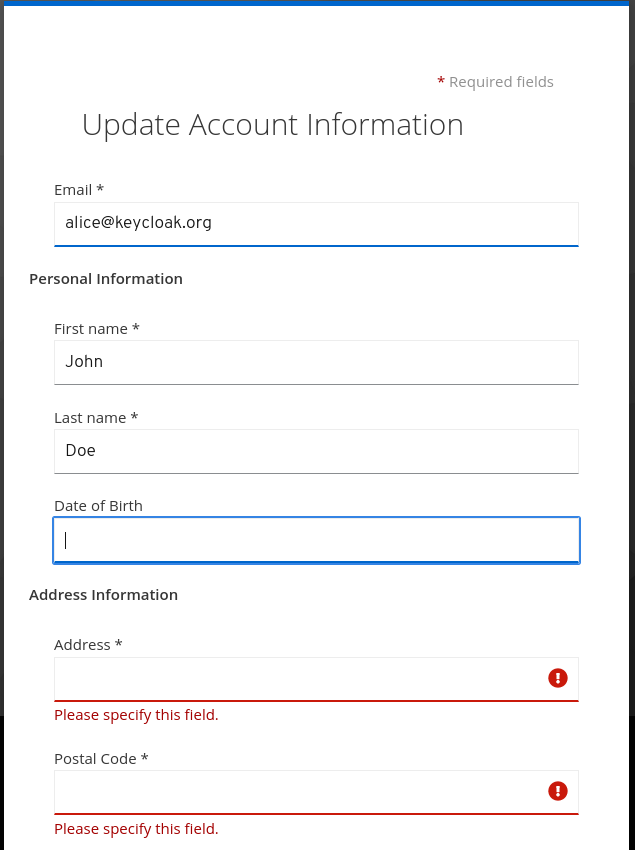
When attributes are linked to an attribute group, the attribute order is also important to make sure attributes within the same group are close together, within a same group header. Otherwise, if attributes within a group do not have a sequential order you might have the same group header rendered multiple times in the dynamic form.
5.2.11. Enabling Progressive Profiling
In order to make sure end-user profiles are in compliance with the configuration, administrators can use the VerifyProfile required action to eventually force users to update their profiles when authenticating to Red Hat build of Keycloak.
The VerifyProfile action is similar to the UpdateProfile action. However, it leverages all the capabilities provided by the user profile to automatically enforce compliance with the user profile configuration.
When enabled, the VerifyProfile action is going to perform the following steps when the user is authenticating:
- Check whether the user profile is fully compliant with the user profile configuration set to the realm. That means running validations and make sure all of them are successful.
- If not, perform an additional step during the authentication so that the user can update any missing or invalid attribute.
- If the user profile is compliant with the configuration, no additional step is performed, and the user continues with the authentication process.
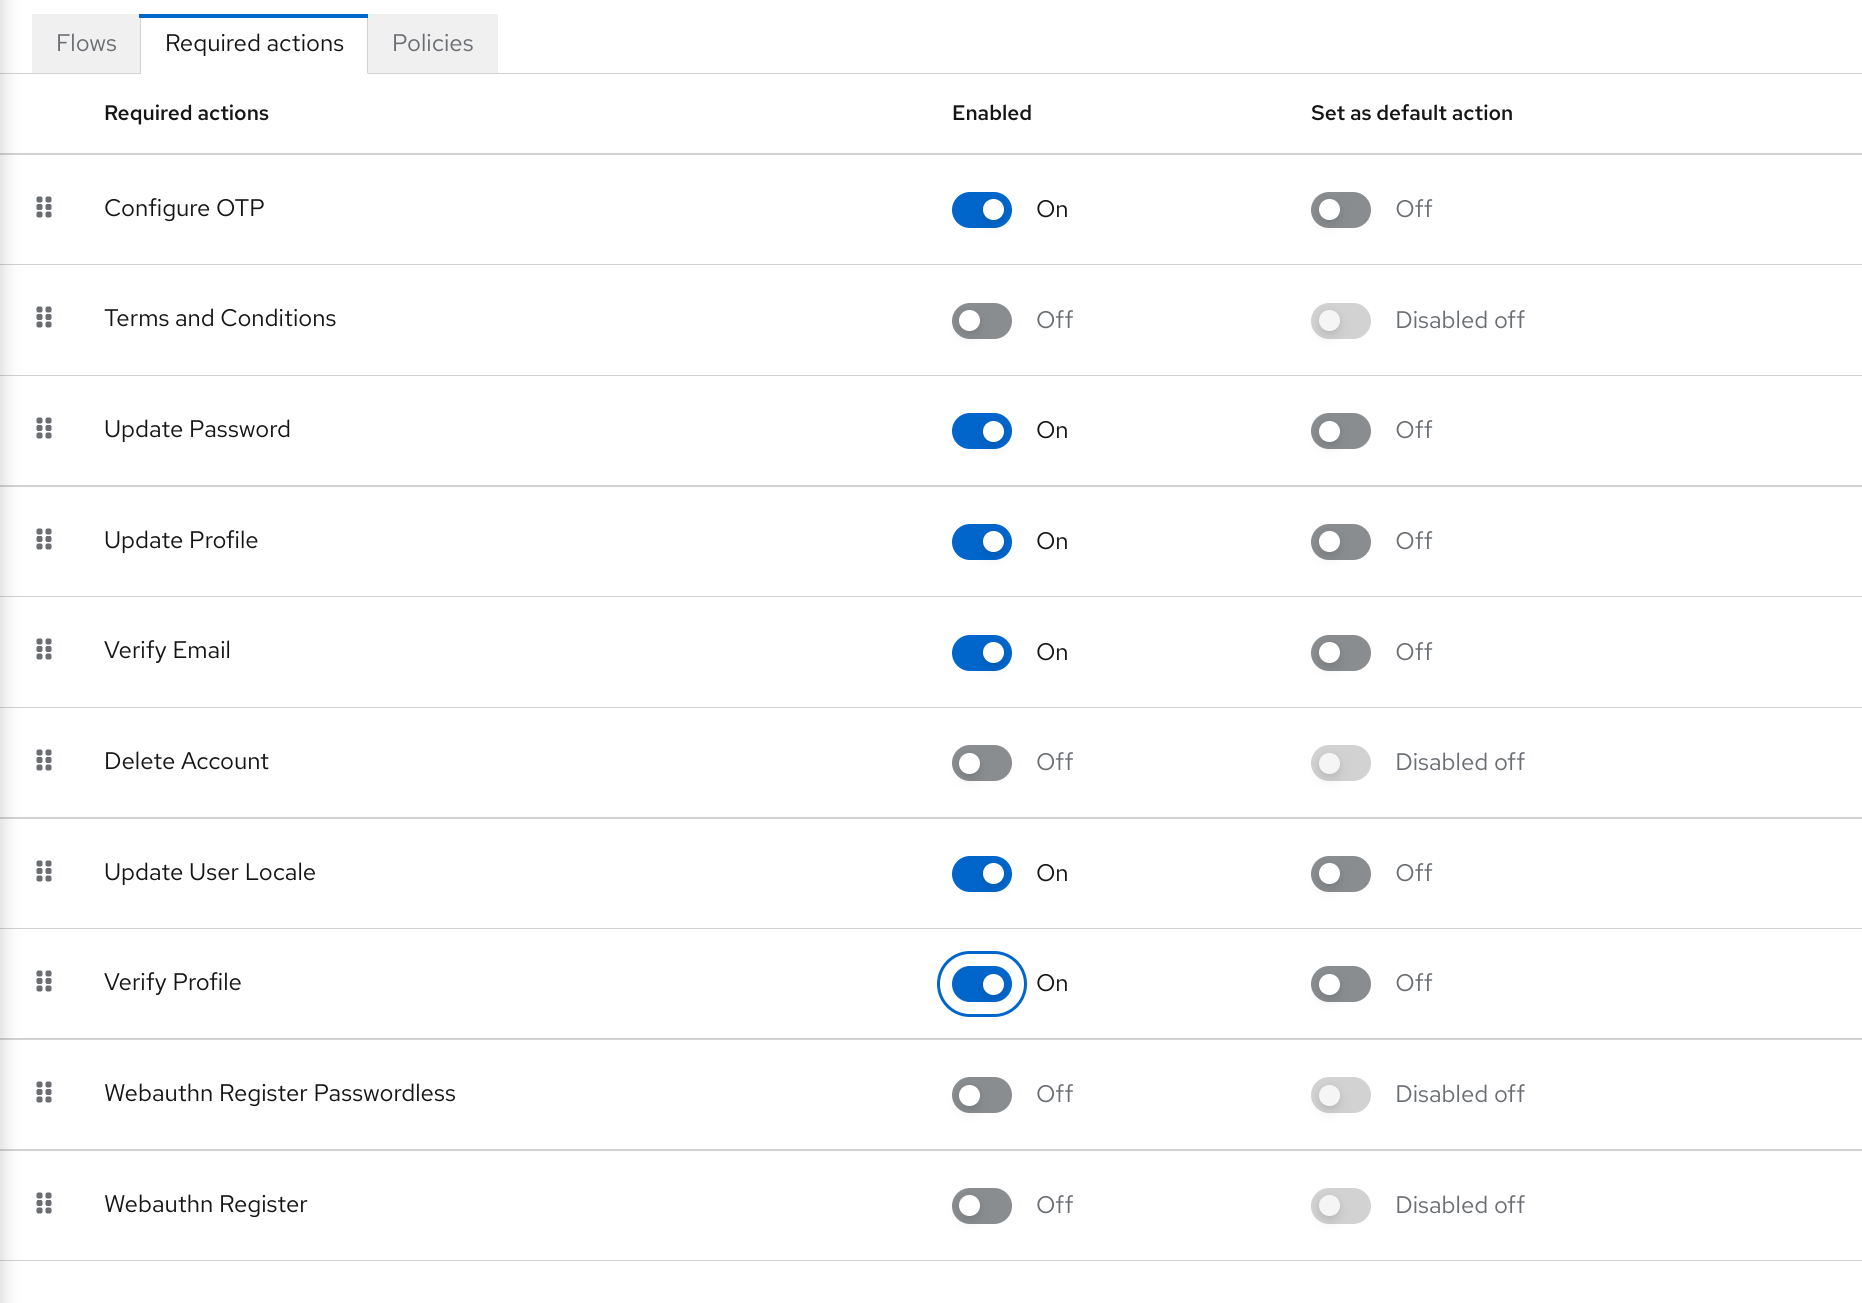
The VerifyProfile action is enabled by default. To disable it, click on the Authentication link on the left side menu and then click on the Required Actions tab. At this tab, use the Enabled switch of the VerifyProfile action to disable it.
Registering the VerifyProfile Required Action
5.2.12. Using Internationalized Messages
If you want to use internationalized messages when configuring attributes, attributes groups, and annotations, you can set their display name, description, and values, using a placeholder that will translate to a message from a message bundle.
For that, you can use a placeholder to resolve messages keys such as ${myAttributeName}, where myAttributeName is the key for a message in a message bundle. For more details, look at Server Developer Guide about how to add message bundles to custom themes.
5.3. Defining user credentials
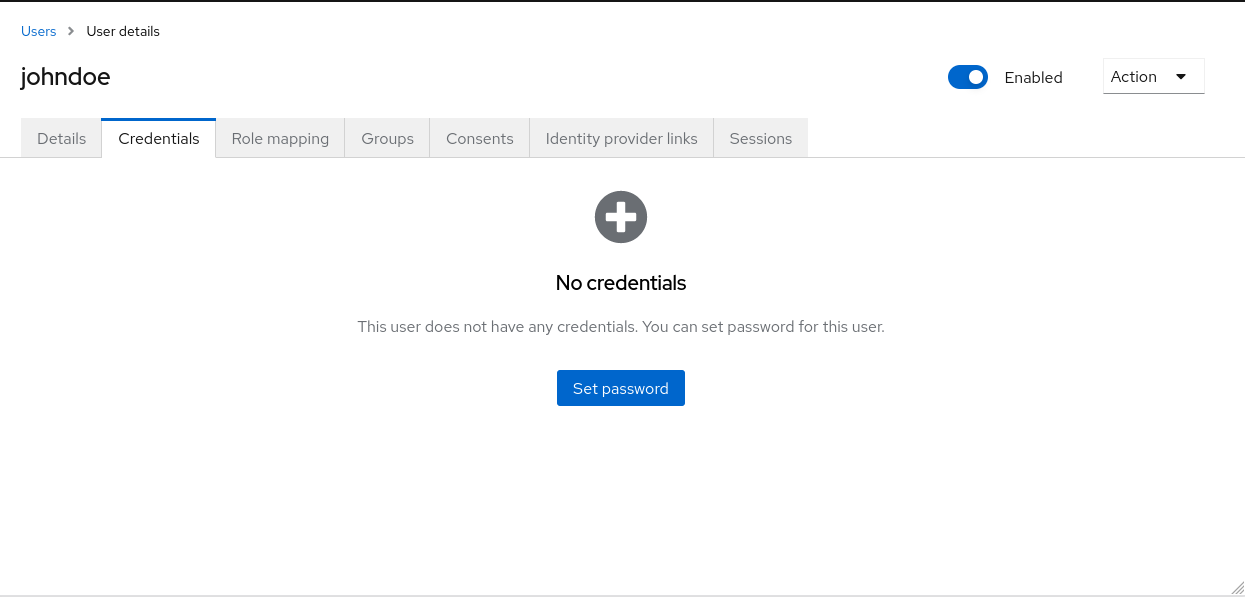
You can manage credentials of a user in the Credentials tab.
Credential management
You change the priority of credentials by dragging and dropping rows. The new order determines the priority of the credentials for that user. The topmost credential has the highest priority. The priority determines which credential is displayed first after a user logs in.
- Type
- This column displays the type of credential, for example password or OTP.
- User Label
- This is an assignable label to recognize the credential when presented as a selection option during login. It can be set to any value to describe the credential.
- Data
- This is the non-confidential technical information about the credential. It is hidden, by default. You can click Show data… to display the data for a credential.
- Actions
- Click Reset password to change the password for the user and Delete to remove the credential.
You cannot configure other types of credentials for a specific user in the Admin Console; that task is the user’s responsibility.
You can delete the credentials of a user in the event a user loses an OTP device or if credentials have been compromised. You can only delete credentials of a user in the Credentials tab.
5.3.1. Setting a password for a user
If a user does not have a password, or if the password has been deleted, the Set Password section is displayed.
If a user already has a password, it can be reset in the Reset Password section.
Procedure
- Click Users in the menu. The Users page is displayed.
- Select a user.
- Click the Credentials tab.
- Type a new password in the Set Password section.
Click Set Password.
NoteIf Temporary is ON, the user must change the password at the first login. To allow users to keep the password supplied, set Temporary to OFF. The user must click Set Password to change the password.
5.3.2. Requesting a user reset a password
You can also request that the user reset the password.
Procedure
- Click Users in the menu. The Users page is displayed.
- Select a user.
- Click the Credentials tab.
- Click Credential Reset.
- Select Update Password from the list.
- Click Send Email. The sent email contains a link that directs the user to the Update Password window.
- Optionally, you can set the validity of the email link. This is set to the default preset in the Tokens tab in Realm Settings.
5.3.3. Creating an OTP
If OTP is conditional in your realm, the user must navigate to Red Hat build of Keycloak Account Console to reconfigure a new OTP generator. If OTP is required, then the user must reconfigure a new OTP generator when logging in.
Alternatively, you can send an email to the user that requests the user reset the OTP generator. The following procedure also applies if the user already has an OTP credential.
Prerequisite
- You are logged in to the appropriate realm.
Procedure
- Click Users in the main menu. The Users page is displayed.
- Select a user.
- Click the Credentials tab.
- Click Credential Reset.
- Set Reset Actions to Configure OTP.
- Click Send Email. The sent email contains a link that directs the user to the OTP setup page.
5.4. Allowing users to self-register
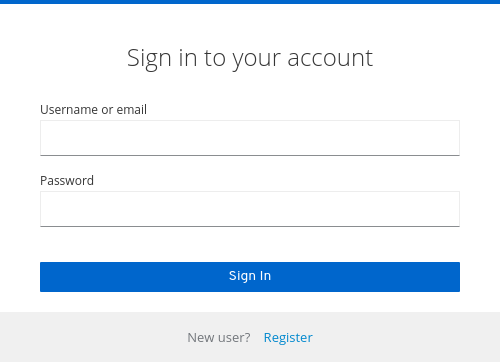
You can use Red Hat build of Keycloak as a third-party authorization server to manage application users, including users who self-register. If you enable self-registration, the login page displays a registration link so that user can create an account.
Registration link
A user must add profile information to the registration form to complete registration. The registration form can be customized by removing or adding the fields that must be completed by a user.
Clarification on identity brokering and admin API
Even when self-registrations is disabled, new users can be still added to Red Hat build of Keycloak by either:
- Administrator can add new users with the usage of admin console (or admin REST API)
- When identity brokering is enabled, new users authenticated by identity provider may be automatically added/registered in Red Hat build of Keycloak storage. See the First login flow section in the Identity Brokering chapter for more information.
Also users coming from the 3rd-party user storage (for example LDAP) are automatically available in Red Hat build of Keycloak when the particular user storage is enabled
5.4.1. Enabling user registration
Enable users to self-register.
Procedure
- Click Realm Settings in the main menu.
- Click the Login tab.
- Toggle User Registration to ON.
After you enable this setting, a Register link displays on the login page of the Admin Console.
5.4.2. Registering as a new user
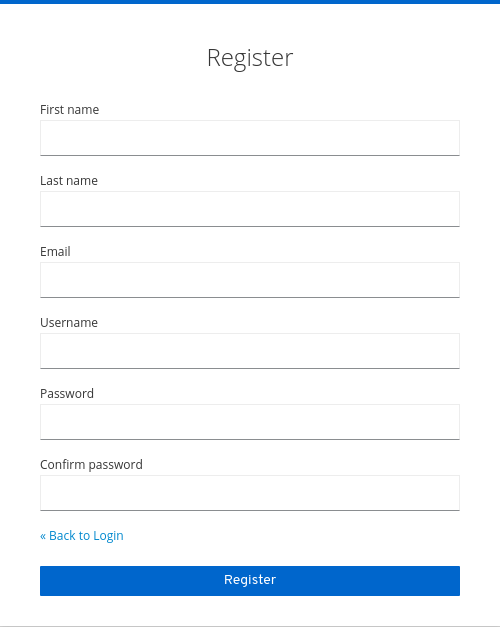
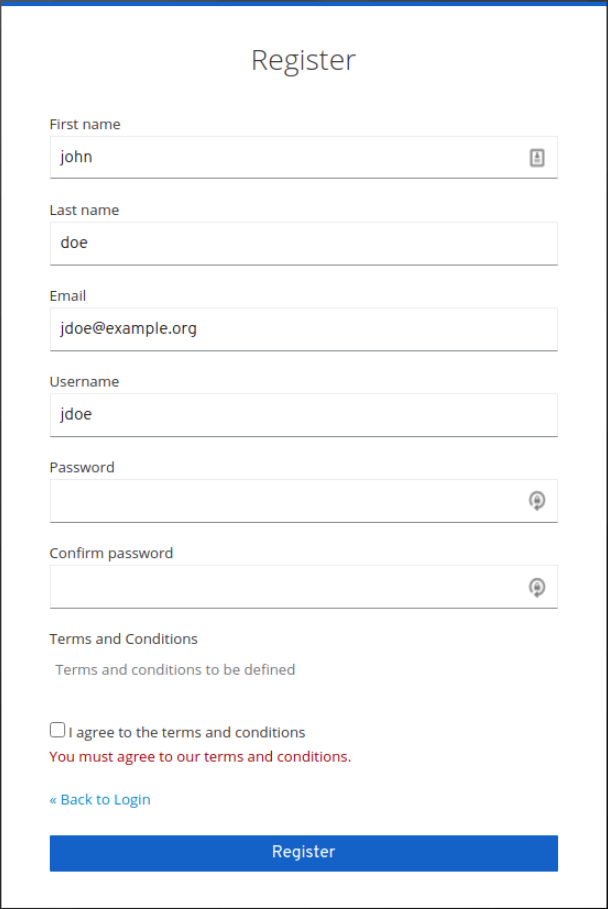
As a new user, you must complete a registration form to log in for the first time. You add profile information and a password to register.
Registration form
Prerequisite
- User registration is enabled.
Procedure
- Click the Register link on the login page. The registration page is displayed.
- Enter the user profile information.
- Enter the new password.
- Click Register.
5.4.3. Requiring user to agree to terms and conditions during registration
For a user to register, you can require agreement to your terms and conditions.
Registration form with required terms and conditions agreement
Prerequisite
- User registration is enabled.
- Terms and conditions required action is enabled.
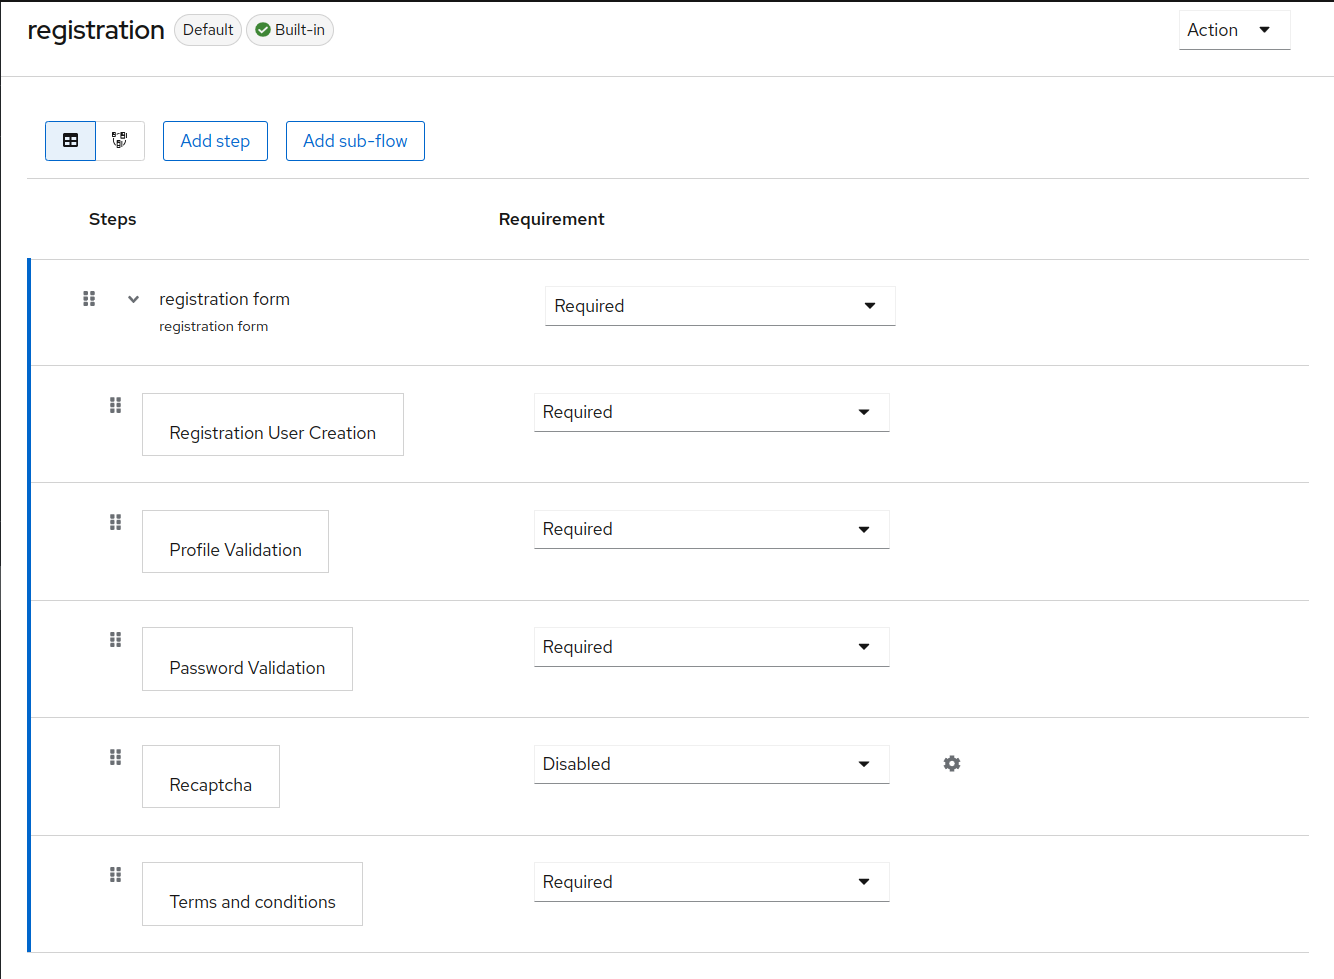
Procedure
- Click Authentication in the menu. Click the Flows tab.
- Click the registration flow.
Select Required on the Terms and Conditions row.
Make the terms and conditions agreement required at registration
5.5. Defining actions required at login
You can set the actions that a user must perform at the first login. These actions are required after the user provides credentials. After the first login, these actions are no longer required. You add required actions on the Details tab of that user.
Some required actions are automatically triggered for the user during login even if they are not explicitly added to this user by the administrator. For example Update password action can be triggered if Password policies are configured in a way that the user password needs to be changed every X days. Or verify profile action can require the user to update the User profile as long as some user attributes do not match the requirements according to the user profile configuration.
The following are examples of required action types:
- Update Password
- The user must change their password.
- Configure OTP
- The user must configure a one-time password generator on their mobile device using either the Free OTP or Google Authenticator application.
- Verify Email
- The user must verify their email account. An email will be sent to the user with a validation link that they must click. Once this workflow is successfully completed, the user will be allowed to log in.
- Update Profile
- The user must update profile information, such as name, address, email, and phone number.
Some actions do not makes sense to be added to the user account directly. For example, the Update User Locale is a helper action to handle some localization related parameters. Another example is the Delete Credential action, which is supposed to be triggered as a Parameterized AIA. Regarding this one, if the administrator wants to delete the credential of some user, that administrator can do it directly in the Admin Console. The Delete Credential action is dedicated to be used for example by the Red Hat build of Keycloak Account Console.
5.5.1. Setting required actions for one user
You can set the actions that are required for any user.
Procedure
- Click Users in the menu.
- Select a user from the list.
Navigate to the Required User Actions list.

- Select all the actions you want to add to the account.
- Click the X next to the action name to remove it.
- Click Save after you select which actions to add.
5.5.2. Setting required actions for all users
You can specify what actions are required before the first login of all new users. The requirements apply to a user created by the Add User button on the Users page or the Register link on the login page.
Procedure
- Click Authentication in the menu.
- Click the Required Actions tab.
- Click the checkbox in the Set as default action column for one or more required actions. When a new user logs in for the first time, the selected actions must be executed.
5.5.3. Enabling terms and conditions as a required action
You can enable a required action that new users must accept the terms and conditions before logging in to Red Hat build of Keycloak for the first time.
Procedure
- Click Authentication in the menu.
- Click the Required Actions tab.
- Enable the Terms and Conditions action.
-
Edit the
terms.ftlfile in the base login theme.
Additional resources
- For more information on extending and creating themes, see the Server Developer Guide.
5.6. Application initiated actions
Application initiated actions (AIA) allow client applications to request a user to perform an action on the Red Hat build of Keycloak side. Usually, when an OIDC client application wants a user to log in, it redirects that user to the login URL as described in the OIDC section. After login, the user is redirected back to the client application. The user performs the actions that were required by the administrator as described in the previous section and then is immediately redirected back to the application. However, AIA allows the client application to request some required actions from the user during login. This can be done even if the user is already authenticated on the client and has an active SSO session. It is triggered by adding the kc_action parameter to the OIDC login URL with the value containing the requested action. For instance kc_action=UPDATE_PASSWORD parameter.
The kc_action parameter is a Red Hat build of Keycloak proprietary mechanism unsupported by the OIDC specification.
Application initiated actions are supported only for OIDC clients.
So if AIA is used, an example flow is similar to the following:
-
A client application redirects the user to the OIDC login URL with the additional parameter such as
kc_action=UPDATE_PASSWORD -
There is a
browserflow always triggered as described in the Authentication flows section. If the user was not authenticated, that user needs to authenticate as during normal login. In case the user was already authenticated, that user might be automatically re-authenticated by an SSO cookie without needing to actively re-authenticate and supply the credentials again. In this case, that user will be directly redirected to the screen with the particular action (update password in this case). However, in some cases, active re-authentication is required even if the user has an SSO cookie (See below for the details). -
The screen with particular action (in this case
update password) is displayed to the user, so that user needs to perform a particular action - Then user is redirected back to the client application
Note that AIA are used by the Red Hat build of Keycloak Account Console to request update password or to reset other credentials such as OTP or WebAuthn.
Even if the parameter kc_action was used, it is not sufficient to assume that the user always performs the action. For example, a user could have manually deleted the kc_action parameter from the browser URL. Therefore, no guarantee exists that the user has an OTP for the account after the client requested kc_action=CONFIGURE_TOTP. If you want to verify that the user configured two-factor authenticator, the client application may need to check it was configured. For instance by checking the claims like acr in the tokens.
5.6.1. Re-authentication during AIA
In case the user is already authenticated due to an active SSO session, that user usually does not need to actively re-authenticate. However, if that user actively authenticated longer than five minutes ago, the client can still request re-authentication when some AIA is requested. Exceptions exist from this guideline as follows:
-
The action
delete_accountwill always require the user to actively re-authenticate -
The action
update_passwordmight require the user to actively re-authenticate according to the configured Maximum Authentication Age Password policy. In case the policy is not configured, it is also possible to configure it on the required action itself in the Required actions tab when configuring the particular required action. If the policy is not configured in any of those places, it defaults to five minutes. -
If you want to use a shorter re-authentication, you can still use a parameter query parameter such as
max_agewith the specified shorter value or eventuallyprompt=login, which will always require user to actively re-authenticate as described in the OIDC specification. Note that usingmax_agefor a longer value than the default five minutes (or the one prescribed by password policy) is not supported. Themax_agecan be currently used only to make the value shorter than the default five minutes. -
If Step-up authentication is enabled and the action is to add or delete a credential, authentication is required with the level corresponding to the given credential. This requirement exists in case the user already has the credential of the particular level. For example, if
otpandwebauthnare configured in the authentication flow as 2nd-factor authenticators (both in the authentication flow at level 2) and the user already has a 2nd-factor credential (otporwebauthnin this case), the user is required to authenticate with an existing 2nd-factor credential to add another 2nd-level credential. In the same manner, deleting an existing 2nd-factor credential (otporwebauthnin this case), authentication with an existing 2nd-factor level credential is required. The requirement exists for security reasons.
5.6.2. Parameterized AIA
Some AIA can require the parameter to be sent together with the action name. For instance, the Delete Credential action can be triggered only by AIA and it requires a parameter to be sent together with the name of the action, which points to the ID of the removed credential. So the URL for this example would be kc_action=delete_credential:ce1008ac-f811-427f-825a-c0b878d1c24b. In this case, the part after the colon character (ce1008ac-f811-427f-825a-c0b878d1c24b) contains the ID of the credential of the particular user, which is to be deleted. The Delete Credential action displays the confirmation screen where the user can confirm agreement to delete the credential.
The Red Hat build of Keycloak Account Console typically uses the Delete Credential action when deleting a 2nd-factor credential. You can check the Account Console for examples if you want to use this action directly from your own applications. However, relying on the Account Console is best instead of managing credentials from your own applications.
5.6.3. Available actions
To see all available actions, log in to the Admin Console and go to the top right top corner to click Realm info Provider info required-action . But note that this can be further restricted based on what actions are enabled for your realm in the Required actions tab.
5.7. Searching for a user
Search for a user to view detailed information about the user, such as the user’s groups and roles.
Prerequisite
- You are in the realm where the user exists.
5.7.1. Default search
Procedure
- Click Users in the main menu. This Users page is displayed.
Type the full name, last name, first name, or email address of the user you want to search for in the search box. The search returns all users that match your criteria.
The criteria used to match users depends on the syntax used on the search box:
-
"somevalue"performs exact search of the string "somevalue"; -
*somevalue*performs infix search, akin to a LIKE '%somevalue%'DB query; -
somevalue*orsomevalueperforms prefix search, akin to a LIKE 'somevalue%'DB query.
-
5.7.2. Attribute search
Procedure
- Click Users in the main menu. This Users page is displayed.
- Click Default search button and switch it to Attribute search.
- Click Select attributes button and specify the attributes to search by.
- Check Exact search checkbox to perform exact match or keep it unchecked to use an infix search for attribute values.
- Click Search button to perform the search. It returns all users that match the criteria.
Searches performed in the Users page encompass both Red Hat build of Keycloak’s database and configured user federation backends, such as LDAP. Users found in federated backends will be imported into Red Hat build of Keycloak’s database if they don’t already exist there.
Additional Resources
- For more information on user federation, see User Federation.
5.8. Deleting a user
You can delete a user, who no longer needs access to applications. If a user is deleted, the user profile and data is also deleted.
Procedure
- Click Users in the menu. The Users page is displayed.
Click View all users to find a user to delete.
NoteAlternatively, you can use the search bar to find a user.
- Click Delete from the action menu next to the user you want to remove and confirm deletion.
5.9. Enabling account deletion by users
End users and applications can delete their accounts in the Account Console if you enable this capability in the Admin Console. Once you enable this capability, you can give that capability to specific users.
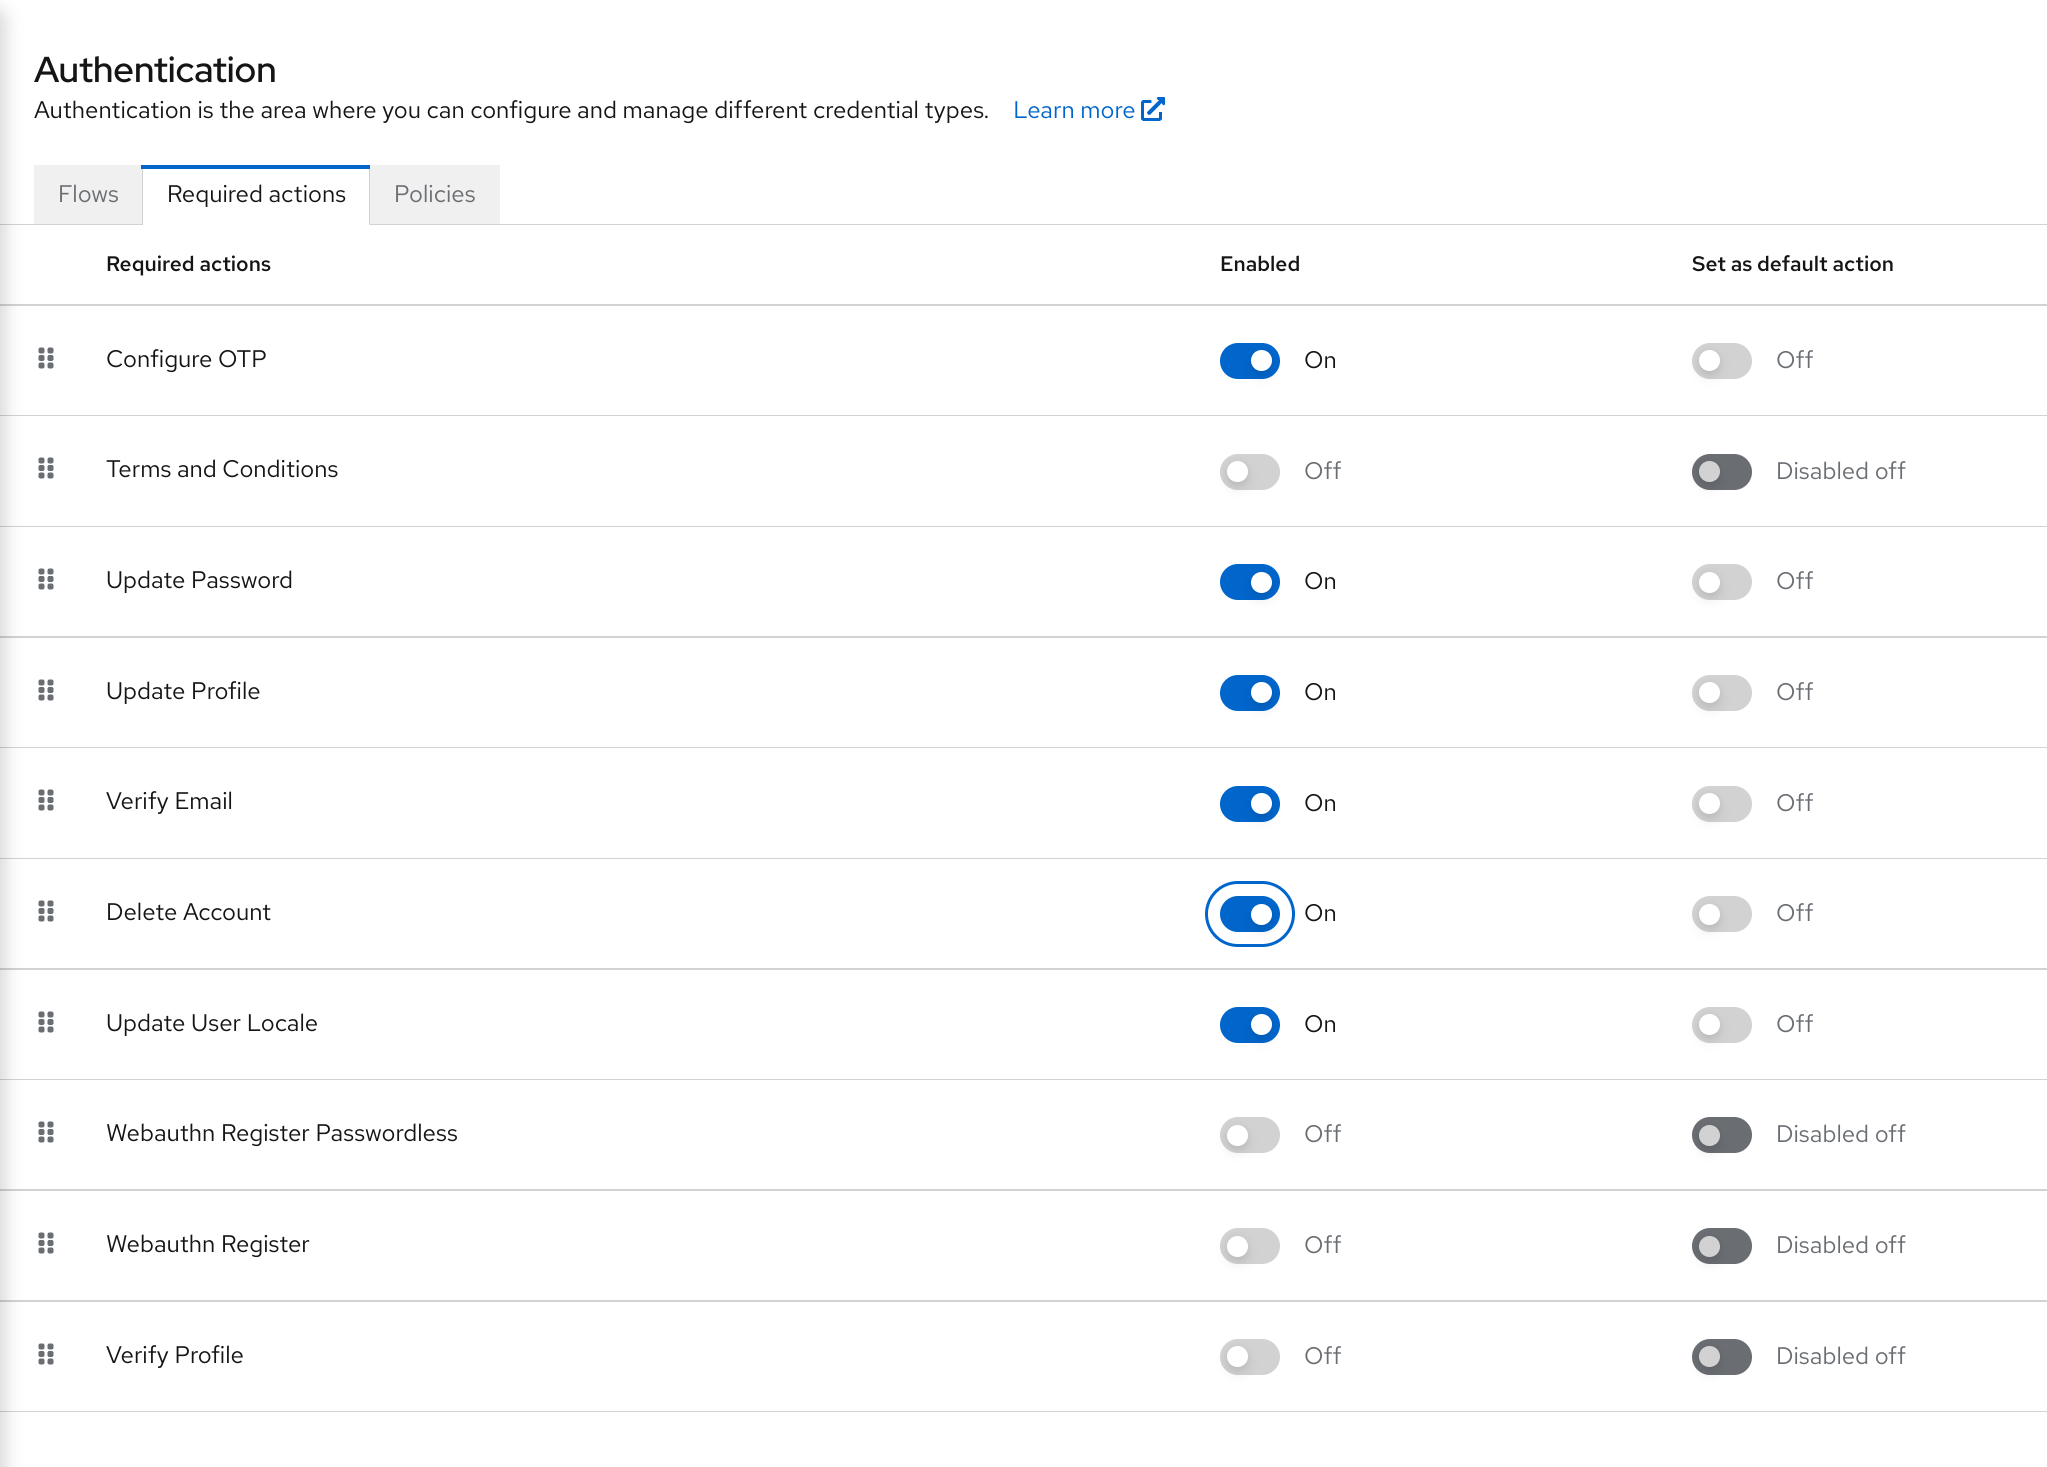
5.9.1. Enabling the Delete Account Capability
You enable this capability on the Required Actions tab.
Procedure
- Click Authentication in the menu.
- Click the Required Actions tab.
Select Enabled on the Delete Account row.
Delete account on required actions tab
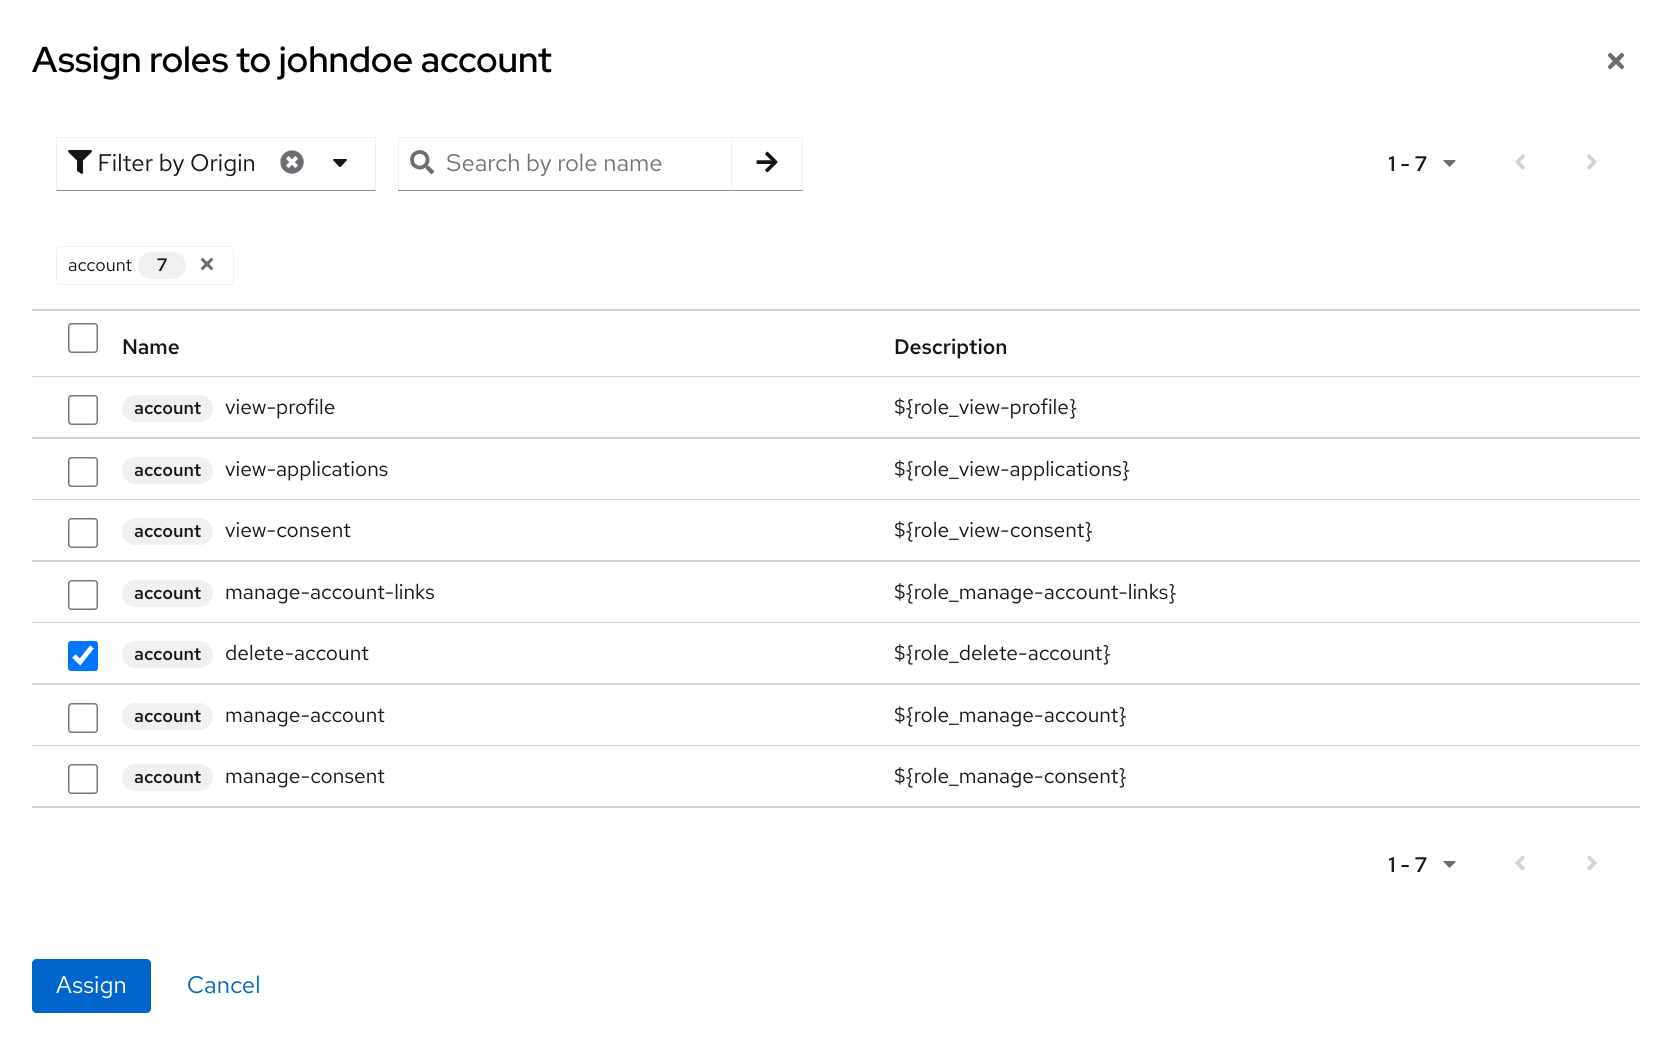
5.9.2. Giving a user the delete-account role
You can give specific users a role that allows account deletion.
Procedure
- Click Users in the menu.
- Select a user.
- Click the Role Mappings tab.
- Click the Assign role button.
- Click account delete-account.
Click Assign.
Delete-account role
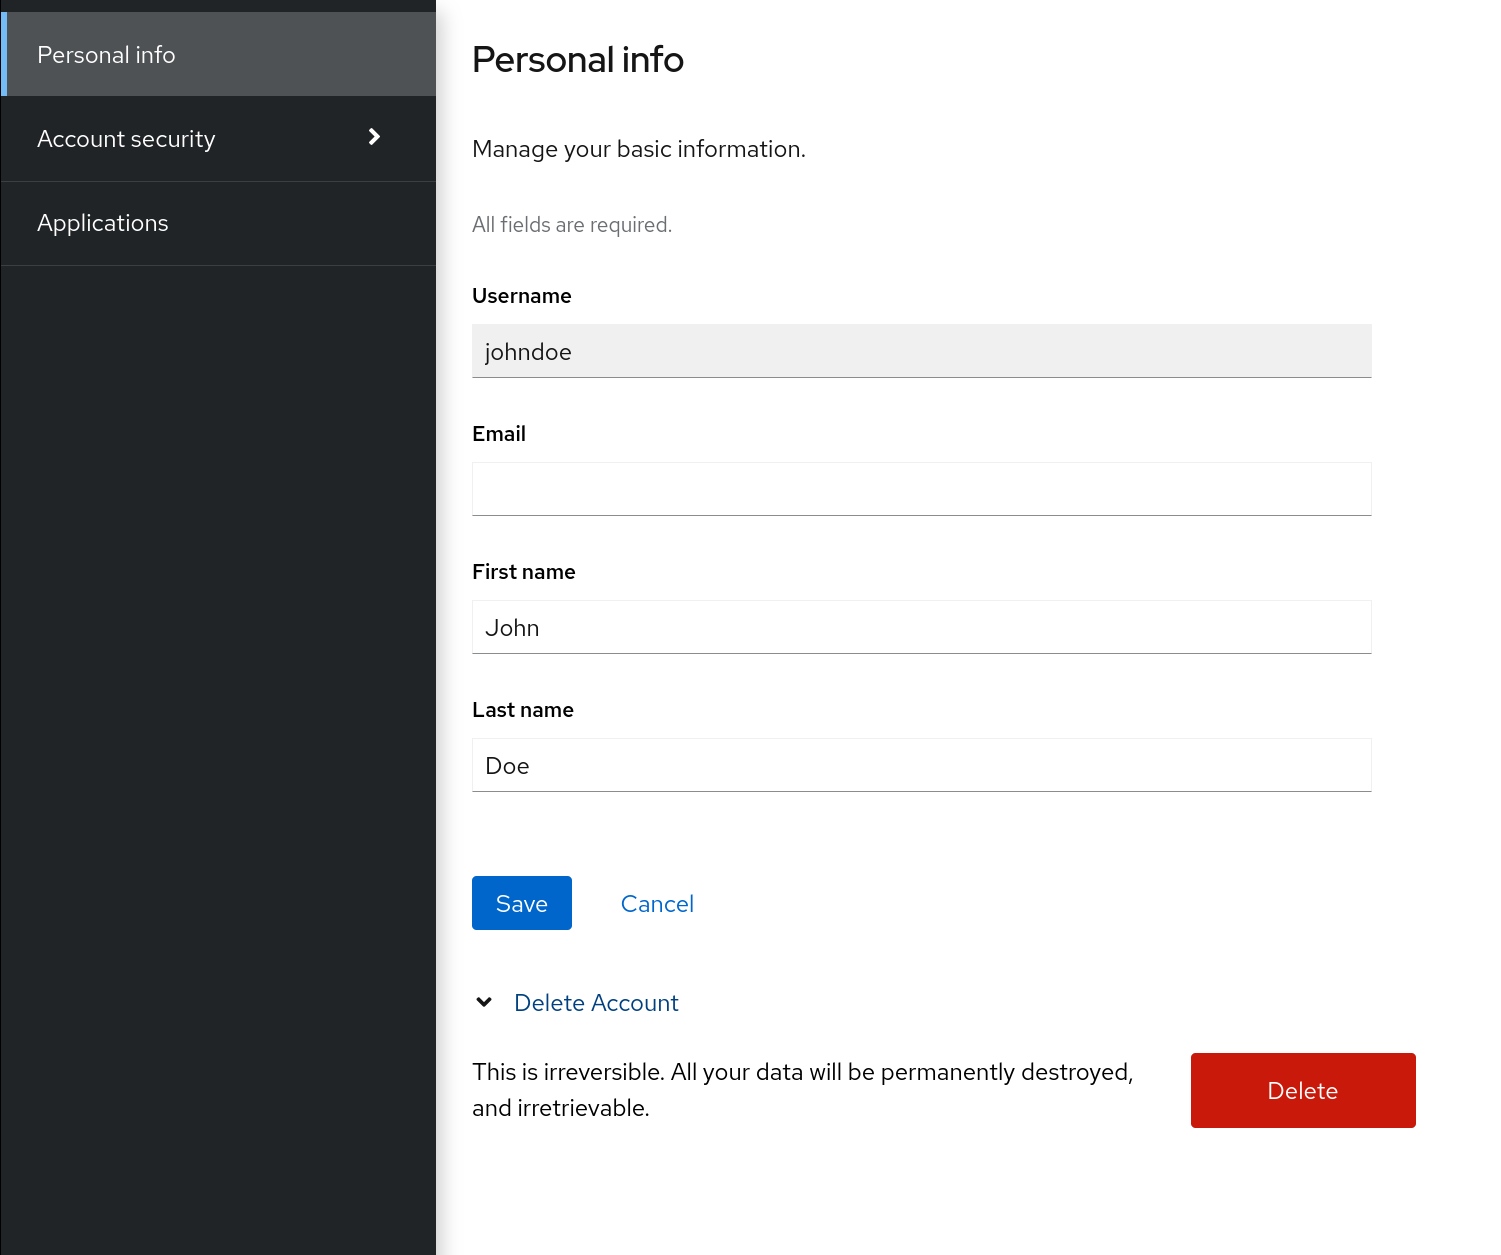
5.9.3. Deleting your account
Once you have the delete-account role, you can delete your own account.
- Log into the Account Console.
At the bottom of the Personal Info page, click Delete Account.
Delete account page
Enter your credentials and confirm the deletion.
Delete confirmation
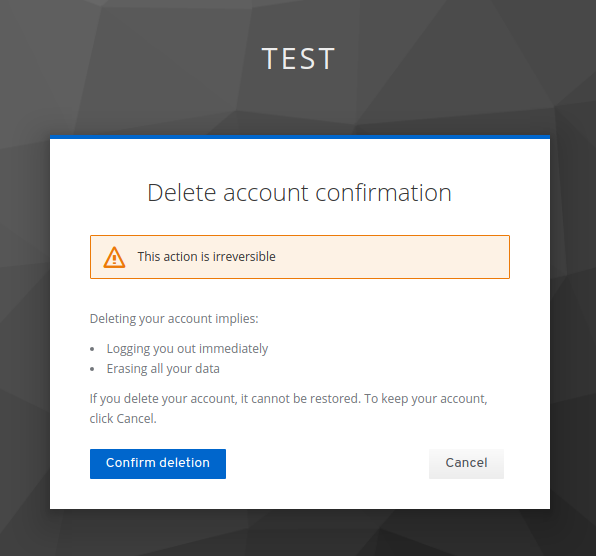 Note
NoteThis action is irreversible. All your data in Red Hat build of Keycloak will be removed.
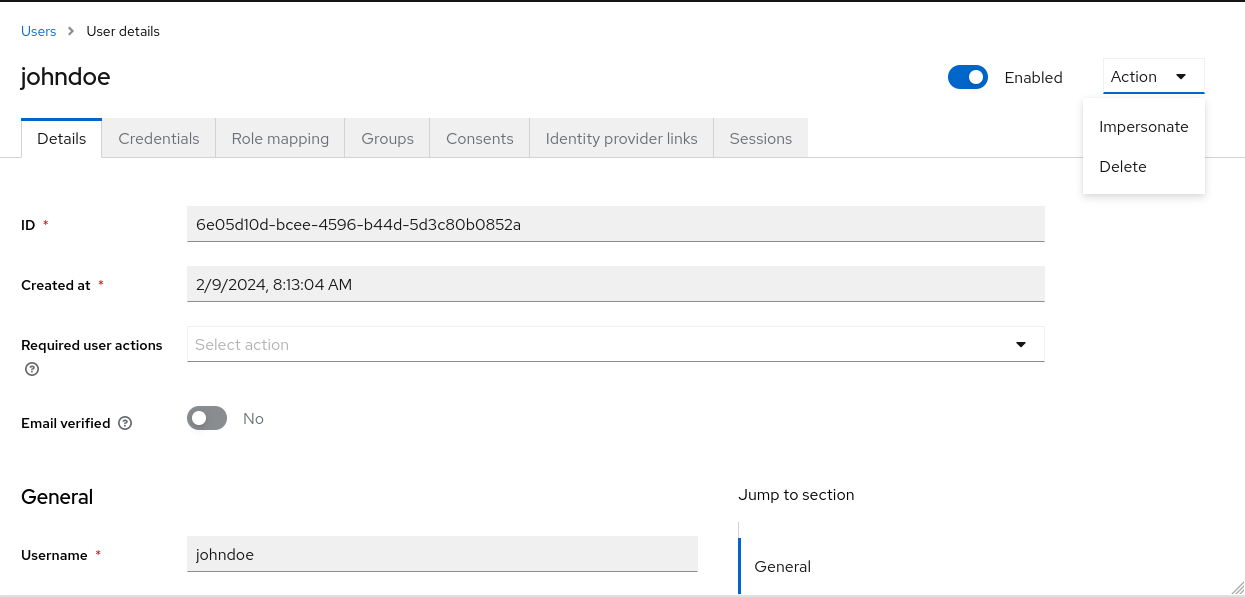
5.10. Impersonating a user
An administrator with the appropriate permissions can impersonate a user. For example, if a user experiences a bug in an application, an administrator can impersonate the user to investigate or duplicate the issue.
Any user with the impersonation role in the realm can impersonate a user.
Procedure
- Click Users in the menu.
- Click a user to impersonate.
From the Actions list, select Impersonate.
- If the administrator and the user are in the same realm, then the administrator will be logged out and automatically logged in as the user being impersonated.
- If the administrator and user are in different realms, the administrator will remain logged in, and additionally will be logged in as the user in that user’s realm.
In both instances, the Account Console of the impersonated user is displayed.
Additional resources
- For more information on assigning administration permissions, see the Admin Console Access Control chapter.
5.11. Enabling reCAPTCHA
To safeguard registration against bots, Red Hat build of Keycloak has integration with Google reCAPTCHA.
Once reCAPTCHA is enabled, you can edit register.ftl in your login theme to configure the placement and styling of the reCAPTCHA button on the registration page.
Procedure
Enter the following URL in a browser:
https://developers.google.com/recaptcha/Create an API key to get your reCAPTCHA site key and secret. Note the reCAPTCHA site key and secret for future use in this procedure.
NoteThe localhost works by default. You do not have to specify a domain.
- Navigate to the Red Hat build of Keycloak admin console.
- Click Authentication in the menu.
- Click the Flows tab.
- Select Registration from the list.
- Set the reCAPTCHA requirement to Required. This enables reCAPTCHA.
- Click the gear icon ⚙️ on the reCAPTCHA row.
Click the Config link.
Recaptcha config page
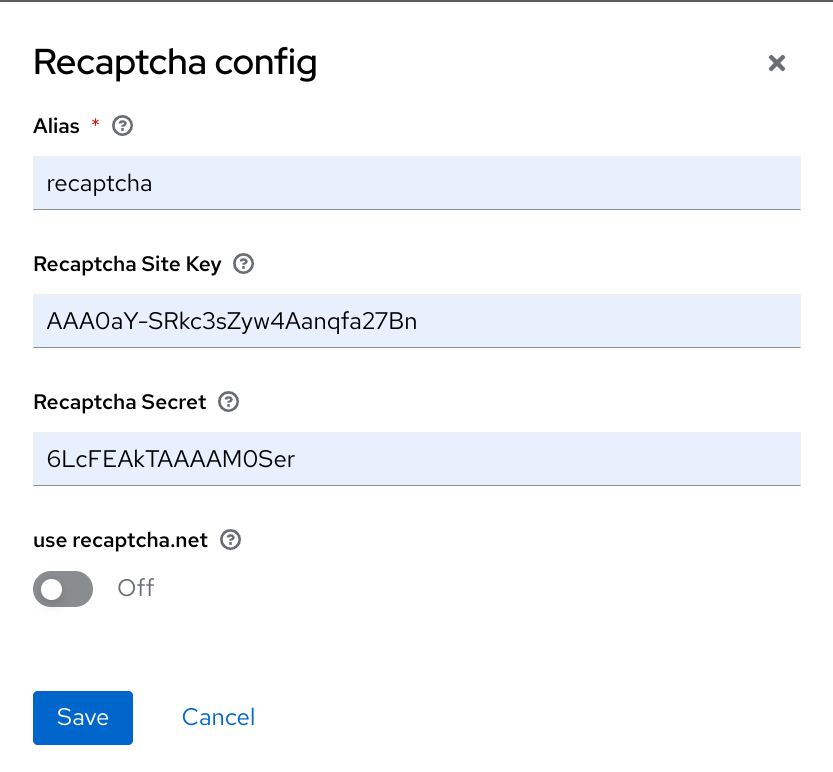
- Enter the Recaptcha Site Key generated from the Google reCAPTCHA website.
- Enter the Recaptcha Secret generated from the Google reCAPTCHA website.
Authorize Google to use the registration page as an iframe.
NoteIn Red Hat build of Keycloak, websites cannot include a login page dialog in an iframe. This restriction is to prevent clickjacking attacks. You need to change the default HTTP response headers that is set in Red Hat build of Keycloak.
- Click Realm Settings in the menu.
- Click the Security Defenses tab.
-
Enter
https://www.google.comin the field for the X-Frame-Options header. -
Enter
https://www.google.comin the field for the Content-Security-Policy header.
5.12. Personal data collected by Red Hat build of Keycloak
By default, Red Hat build of Keycloak collects the following data:
- Basic user profile data, such as the user email, first name, and last name.
- Basic user profile data used for social accounts and references to the social account when using a social login.
- Device information collected for audit and security purposes, such as the IP address, operating system name, and the browser name.
The information collected in Red Hat build of Keycloak is highly customizable. The following guidelines apply when making customizations:
- Registration and account forms can contain custom fields, such as birthday, gender, and nationality. An administrator can configure Red Hat build of Keycloak to retrieve data from a social provider or a user storage provider such as LDAP.
- Red Hat build of Keycloak collects user credentials, such as password, OTP codes, and WebAuthn public keys. This information is encrypted and saved in a database, so it is not visible to Red Hat build of Keycloak administrators. Each type of credential can include non-confidential metadata that is visible to administrators such as the algorithm that is used to hash the password and the number of hash iterations used to hash the password.
- With authorization services and UMA support enabled, Red Hat build of Keycloak can hold information about some objects for which a particular user is the owner.