Chapter 2. Introduction to JDK Mission Control
JDK Mission Control (JMC) is a collection of tools to read and analyze JFR files. JMC includes detailed views and graphs that plot JFR events. With JFR analysis, JMC also consists of the following components:
- JMX Console MBean
-
Historical analysis through flight recordings and
hproffiles (as of JMC 7.1.0) - HPROF-dump analyzer
JMC is based on the Eclipse platform. You can extend JMC by using the Eclipse RCP API and other specific APIs to add plug-ins.
You can use JMC and its plug-ins on either Red Hat Enterprise Linux or Microsoft Windows.
For Red Hat Enterprise Linux (RHEL), the CodeReady Linux Builder (CRB) repository with RHEL 9 provides the JMC package.
The CRB repository is also known as the Builder repository.
You must enable the CRB repository on RHEL, so that you can install JMC on RHEL. CRB packages are built with the Source Red Hat Package Manager (SRPM) as productized RHEL packages, so CRB packages receive regular updates.
The CRB is a developer repository that is disabled on RHEL by default. The CRB contains parts of the buildroot root file system that are shipped to your RHEL user account. The buildroot root file system contains developer-level build dependencies for building applications.
For more information about the CRB repository, see The CodeReady Linux Builder repository (Package manifest).
2.1. Downloading and installing JMC
Red Hat build of OpenJDK builds for Red Hat Enterprise Linux (RHEL) and Microsoft Windows include a version of JDK Mission Control (JMC).
For RHEL, you can use the Red Hat Subscription Manager tool to download and install JMC on your local operating system.
On Microsoft Windows, the JMC package is included with the archive file that you can download from the Red Hat Customer Portal. After you download and install Red Hat build of OpenJDK 17 on Microsoft Windows, you can navigate to the directory that contains the jmc.exe file, and then issue the jmc command.
2.1.1. Downloading and installing JMC on RHEL 9
You can download and install JDK Mission Control (JMC) on your local Red Hat Enterprise Linux (RHEL) 9 operating system by using the Red Hat Subscription Manager (RHSM) tool.
Prerequisites
- Downloaded and installed Red Hat build of OpenJDK 17.0.11 on RHEL 9.
- Logged in as the root user on your operating system.
- Registered an account on the Red Hat Customer Portal.
- Registered an RHSM account that has an active subscription for providing you access to the Red Hat build of OpenJDK 17 repository. For more information about registering your system to your RHSM account, see Registering a system using Red Hat Subscription Manager ({Using Red Hat Subscription Management}).
Procedure
Enable the CodeReady Linux Builder (CRB) repository on RHEL, so that you can install the downloaded JMC package on RHEL. You can enable the CRB repository by completing the following actions:
To enable the CRB repository on RHEL, issue the following RHSM command.
# subscription-manager repos --enable codeready-builder-for-rhel-9-x86_64-rpmsTo check the list of modules in the CRB repository, issue the following command:
# yum module list --disablerepo=* --enablerepo=codeready-builder-for-rhel-9-x86_64-rpmsThe following example output shows a
javapackages-toolsmodule that is defined in thecommonprofile of the repository:# yum module list --disablerepo=* --enablerepo=codeready-builder-for-rhel-9-x86_64-rpms Updating Subscription Management repositories. Last metadata expiration check: 0:40:08 ago on Tue 02 May 2023 08:49:29 AM EDT. Red Hat CodeReady Linux Builder for RHEL 9 x86_64 (RPMs) Name Stream Profiles Summary javapackages-tools 201801 common Tools and macros for Java packaging support virt-devel rhel Virtualization module Hint: [d]efault, [e]nabled, [x]disabled, [i]nstalledThe previous example also shows a
virt-develmodule that is not assigned to any profile.Install your target package. For example, to install a package called
xz-java, issue the following command and ensure that you follow any CLI command prompts:# yum install xz-java
To start the JMC console on your operating system, choose one of the following options:
Navigate to the directory that contains the JMC executable file and then issue the following command:
$ jmc -vm /usr/lib/jvm/java-11/bin/java-
Use your system’s file explorer application to navigate to the JDK Mission Control directory, such as
/usr/bin/jmc, and then double-click the JMC executable file.
2.1.2. Downloading and installing JMC on RHEL 8
You can download and install JDK Mission Control (JMC) on your local Red Hat Enterprise Linux (RHEL) 8 operating system by using the Red Hat Subscription Manager (RHSM) tool.
Prerequisites
- Downloaded and installed Red Hat build of OpenJDK 17.0.11 on RHEL.
- Logged in as the root user on your operating system.
- Registered an account on the Red Hat Customer Portal.
- Registered an RHSM account that has an active subscription for providing you access to the Red Hat build of OpenJDK 17 repository. For more information about registering your system to your RHSM account, see Registering a system using Red Hat Subscription Manager (Using Red Hat Subscription Management).
Procedure
To download the JMC package on your version of RHEL, issue the following command:
# sudo yum module install jmc:rhel8/commonThe previous command uses the Red Hat Subscription Manager tool to download the JMC package to your RHEL operating system. The JMC package is available in the
jmcmodule stream of the Red Hat Subscription Manager service.To start the JMC console on your operating system, choose one of the following options:
Navigate to the directory that contains the JMC executable file and then issue the following command:
$ jmc -vm /usr/lib/jvm/java-11/bin/java-
Use your system’s file explorer application to navigate to the JDK Mission Control directory, such as
/usr/bin/jmc, and then double-click the JMC executable file.
2.2. JDK Mission Control (JMC) Agent
You can use the JMC Agent to add JDK Flight Recorder (JFR) functionality to a running application. You can also use the JMC Agent to add a custom flight recorder event into a running Java Virtual Machine (JVM).
The JMC Agent includes the following capabilities:
- Better control of enabling or disabling generated events when using JFR templates.
-
Efficient timestamp capturing when using the
Timestampclass. - Low memory consumption when generating flight recordings.
The Red Hat build of OpenJDK 17.0.11 installation files for Red Hat Enterprise Linux and Microsoft Windows do not include the JMC Agent with the JMC package. You must download and install a third-party version of the JMC Agent, and then check its compatibility with the JMC package for the Red Hat build of OpenJDK on your chosen platform.
Third-party applications, such as the JMC Agent, are not supported by Red Hat. Before you decide to use any third-party applications with Red Hat products, ensure you test the security and trustworthiness of the downloaded software.
The graphical user interface (GUI) for the JMC Agent displays similarly on both Red Hat Enterprise Linux and Microsoft Windows, except for graphical changes introduced by the Standard Widget Toolkit (SWT) for Java that is specific to either platform.
When you have built the JMC Agent, and you have a JMC Agent JAR file, you can access the JMC Agent Plugin in the JVM Browser panel of your JMC console. With this plug-in you can use the JMC Agent functionality on the JMC console, such as configuring the JMC Agent or managing how the JMC Agent interacts with JFR data.
2.3. Starting the JDK Mission Control (JMC) Agent
You can start the JMC Agent by using the JMC Agent Plugin. Red Hat Enterprise Linux and Microsoft Windows support the use of this plug-in.
After you start your JMC Agent, you can configure the agent or manage how the agent interacts with your JFR data.
Prerequisites
-
Downloaded and installed the
jmcpackage on either Red Hat Enterprise Linux or Microsoft Windows - Downloaded the Eclipse Adoptium Agent JAR file. See adoptium/jmc-build (GitHub).
-
Started your Java application with the
--add-opens=java.base/jdk.internal.misc=ALL-UNNAMEDflag. For example,./<your_application> --add-opens=java.base/jdk.internal.misc=ALL-UNNAMED.
Eclipse Adoptium is a community-supported project. Using the agent.jar file from Eclipse Adoptium is not supported with Red Hat production service level agreements (SLAs).
Procedure
Depending on your operating system, choose one of the following methods to start your JMC console:
-
On Red Hat Enterprise Linux, navigate to the directory that contains the executable file, and then issue the
./jmccommand. On Microsoft Windows, navigate to the directory that contains the
jmc.exefile, and then issue thejmccommand.NoteYou can also start your JMC application on either operating system by using your system’s file explorer application to navigate to the JDK Mission Control directory, and then double-click the JMC executable file.
-
On Red Hat Enterprise Linux, navigate to the directory that contains the executable file, and then issue the
- Navigate to the JVM Browser navigation panel. On this panel, you can view any available JVM connections.
-
Expand your target JVM instance, such as
[11.0.13] The JVM Running Mission Control, in the JVM Browser panel. A list of items displays under your target JVM instance. Double-click the JMC Agent item in the navigation panel. A Start JMC Agent window opens in your JMC console:
Figure 2.1. Start JMC Agent window

Use the Browse button to add your JMC Agent’s JAR file to the Agent JAR field. The Agent XML field is optional.
NoteYou do not need to enter a value in the Target JVM field, because JMC automatically adds a value based on your selected target JVM instance.
Click the Start button.
JMC adds the Agent Plugin item under your target JVM instance in the JVM Browser navigation panel. The JMC console automatically opens the Agent Live Config pane.
Figure 2.2. Agent Live Config pane

You can now configure your JMC Agent or manage interactions between the JMC Agent and your JFR data. After you generate an XML configuration and then upload it to the JMC console, the Agent Live Config pane displays metadata associated with that XML file.
Figure 2.3. Example of an XML configuration file that has been added to the JMC console

2.4. Creating presets with the JMC Agent
You can configure your JMC Agent instance in the JMC console.
The JMC console provides the following JMC Agent configuration options, to name but a few:
- Create customized presets with the Agent Preset Manager option.
- Import XML configurations into your JMC Agent preset.
-
Use the
defineEventProbesfunction to add an XML description of custom JFR events. - Store active custom JFR events as a preset, so you can retrieve them at a later stage.
Prerequisites
- Started a JMC Agent instance on your JMC console.
Procedure
- You can create a new preset by clicking Window from the menu bar, and then clicking the JMC Agent Preset Manager menu item. A JMC Agent Configuration Preset Manager wizard opens in your JMC console.
Click the Add button to access the Edit Preset Global Configurations window.
Figure 2.4. Edit Preset Global Configurations window
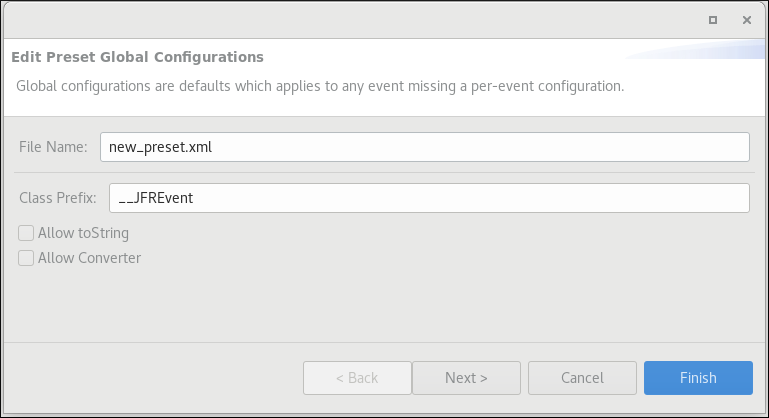
From this window, you can enter a name for your preset. Optionally, you can enter a class prefix for any events that you want to inject into your target JVM. You can also select the AllowtoString check box and the Allow Converter check box.
Click the Next button. An Add or Remove Preset Events window opens. From this window, you can add new events, edit events, or remove events for your preset.
Figure 2.5. Add or Remove Preset Events
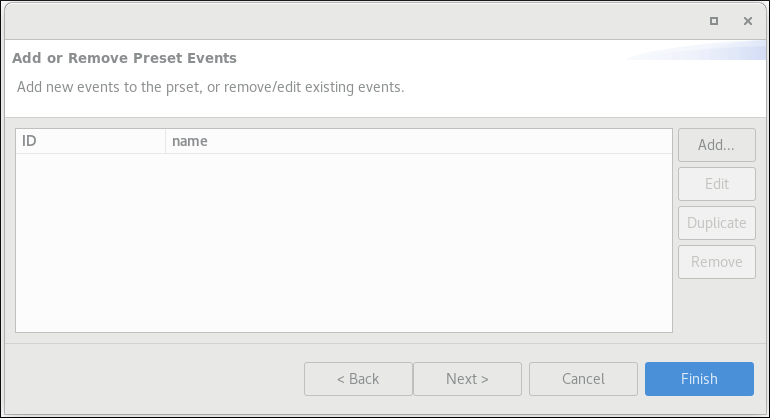
Follow the wizard’s instructions, where you can complete the following steps:
- Edit Event Configurations
- Edit a Parameter or Return Value step
Edit a Parameter or Return Value Capturing
TipYou can select any of the available buttons on each wizard step to complete your desired configuration, such as Add, Remove, and so on. You can click the Back button at any stage to edit a previous wizard step.
- Click the Finish button to return to the Add or Remove Preset Events window.
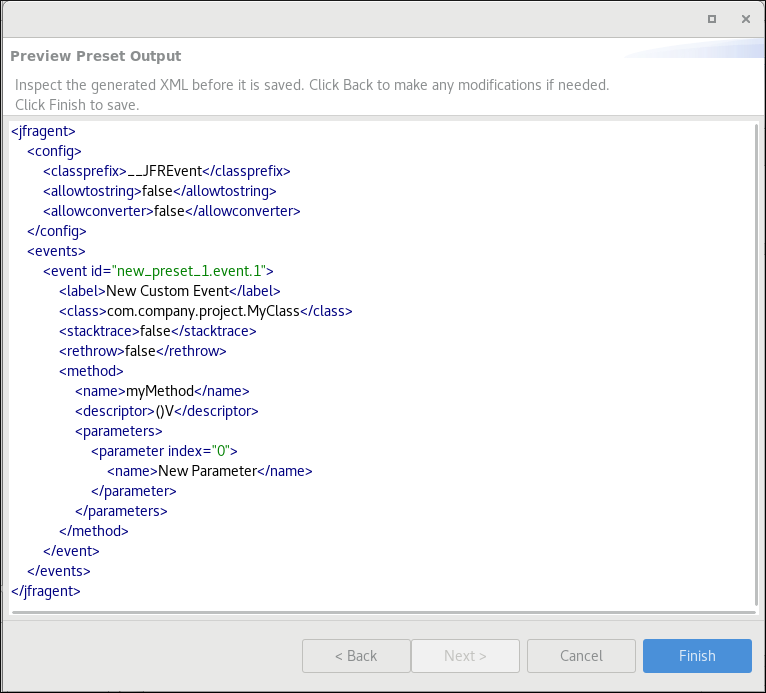
- Click Next. A Preview Preset Output window opens.
Review the generated XML data before clicking the Finish button:
Figure 2.6. Preview Preset Output
- Click the Load preset button on the top-right side of the JMC console window, and then upload your preset to the JMC application.
On the JMC Agent Configuration Preset Manager window, click the OK button to load your preset into your target JVM. The Agent Live Present panel on your JMC console shows your active agent configuration and any of its injected events. For example:
Figure 2.7. Example output on the Agent Live Present pane

2.5. JMC Agent Plugin attributes
The JMC console supports many attributes in the form of buttons, drop-down lists, text fields, and so on. You can use specific JMC Agent attributes to configure your agent.
The following tables outline categories of attributes that you can use to configure your JMC Agent, so that you can use the agent to monitor JFR data specific to your needs.
| Attribute | Description |
|---|---|
|
| Determines if the JMC Agent can use converters. With converters enabled, you can convert custom data types or objects to JFR content types. JFR can then record these types alongside the custom events. |
|
| Determines if the JMC Agent can record arrays and object parameters as strings.
Note: Check that the |
|
|
Determines the prefix for injected events. For example: |
|
| Contains the configuration options for the JMC Agent. |
|
|
Begins the event definition. The |
| Attribute | Description |
|---|---|
|
| Defines the class that receives event types from the method. |
|
| Describes the event type. |
|
| Lists the set of events that the agent injects into a defined method.The event tag requires an ID. The JFR uses the event tag for the custom event. |
|
| Defines the name of the event type. |
|
|
Determines the location in the method that receives injected events. For example: |
|
| Path that points to the location that stores custom events. This path relates to any events listed under the JVM Browser navigation panel on the JMC console. |
|
|
Defines the method that receives injected events. The
|
|
| Determines whether the event type records a stack trace. |
| Attribute | Description |
|---|---|
|
| Qualified name of the converter class that converts an attribute to a JFR data type. |
|
| Defines the JFR content type that the converter attribute receives. |
|
| The description of the custom caption attribute. |
|
| Optional attribute. Lists method parameters based on the index value assigned to a parameter tag. |
|
| The name of the custom caption attribute. |
| Attribute | Description |
|---|---|
|
| The description of the field that you want to capture. |
|
| Defines an expression that the agent analyzes to locate a defined field. |
|
| Determines class field values that the JMC Agent captures and emits with any defined event types. |
|
| The name of the class field capturing attribute . |