Chapter 2. Network Configuration Reference
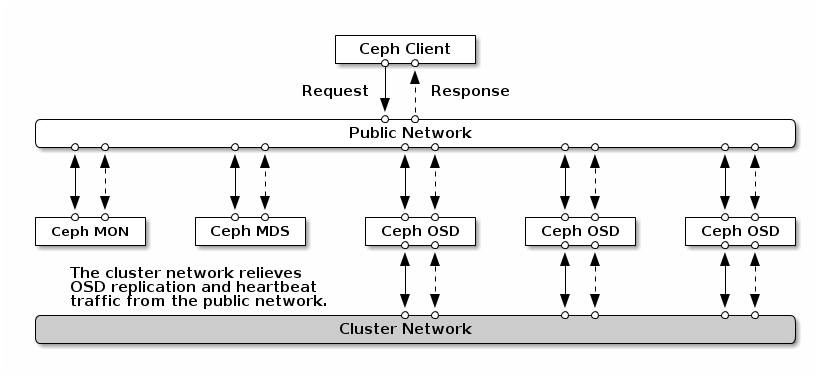
Network configuration is critical for building a high performance Red Hat Ceph Storage cluster. The Ceph storage cluster does not perform request routing or dispatching on behalf of the Ceph client. Instead, Ceph clients make requests directly to Ceph OSD daemons. Ceph OSDs perform data replication on behalf of Ceph clients, which means replication and other factors impose additional loads on the networks of Ceph storage clusters.
All Ceph clusters must use a public network. However, unless you specify a cluster (internal) network, Ceph assumes a single public network. Ceph can function with a public network only, but you will see significant performance improvement with a second "cluster" network in a large cluster.
Red Hat recommends running a Ceph storage cluster with two networks:
- a public network
- and a cluster network.
To support two networks, each Ceph Node will need to have more than one network interface card (NIC).
There are several reasons to consider operating two separate networks:
- Performance: Ceph OSDs handle data replication for the Ceph clients. When Ceph OSDs replicate data more than once, the network load between Ceph OSDs easily dwarfs the network load between Ceph clients and the Ceph storage cluster. This can introduce latency and create a performance problem. Recovery and rebalancing can also introduce significant latency on the public network.
-
Security: While most people are generally civil, some actors will engage in what is known as a Denial of Service (DoS) attack. When traffic between Ceph OSDs gets disrupted, peering may fail and placement groups may no longer reflect an
active + cleanstate, which may prevent users from reading and writing data. A great way to defeat this type of attack is to maintain a completely separate cluster network that does not connect directly to the internet.
2.1. Network Configuration Settings
Network configuration settings are not required. Ceph can function with a public network only, assuming a public network is configured on all hosts running a Ceph daemon. However, Ceph allows you to establish much more specific criteria, including multiple IP networks and subnet masks for your public network. You can also establish a separate cluster network to handle OSD heartbeat, object replication, and recovery traffic.
Do not confuse the IP addresses you set in the configuration with the public-facing IP addresses network clients might use to access your service. Typical internal IP networks are often 192.168.0.0 or 10.0.0.0.
If you specify more than one IP address and subnet mask for either the public or the cluster network, the subnets within the network must be capable of routing to each other. Additionally, make sure you include each IP address/subnet in your IP tables and open ports for them as necessary.
Ceph uses CIDR notation for subnets (for example, 10.0.0.0/24).
When you configured the networks, you can restart the cluster or restart each daemon. Ceph daemons bind dynamically, so you do not have to restart the entire cluster at once if you change the network configuration.
2.1.1. Public Network
To configure a public network, add the following option to the [global] section of the Ceph configuration file.
[global]
    ...
    public_network = <public-network/netmask>
The public network configuration allows you specifically define IP addresses and subnets for the public network. You may specifically assign static IP addresses or override public network settings using the public addr setting for a specific daemon.
- public_network
- Description
-
The IP address and netmask of the public (front-side) network (for example,
192.168.0.0/24). Set in[global]. You can specify comma-delimited subnets. - Type
-
<ip-address>/<netmask> [, <ip-address>/<netmask>] - Required
- No
- Default
- N/A
- public_addr
- Description
- The IP address for the public (front-side) network. Set for each daemon.
- Type
- IP Address
- Required
- No
- Default
- N/A
2.1.2. Cluster Network
If you declare a cluster network, OSDs will route heartbeat, object replication, and recovery traffic over the cluster network. This can improve performance compared to using a single network. To configure a cluster network, add the following option to the [global] section of the Ceph configuration file.
[global]
    ...
    cluster_network = <cluster-network/netmask>
It is preferable, that the cluster network is not reachable from the public network or the Internet for added security.
The cluster network configuration allows you to declare a cluster network, and specifically define IP addresses and subnets for the cluster network. You can specifically assign static IP addresses or override cluster network settings using the cluster addr setting for specific OSD daemons.
- cluster_network
- Description
-
The IP address and netmask of the cluster network (for example,
10.0.0.0/24). Set in[global]. You can specify comma-delimited subnets. - Type
-
<ip-address>/<netmask> [, <ip-address>/<netmask>] - Required
- No
- Default
- N/A
- cluster_addr
- Description
- The IP address for the cluster network. Set for each daemon.
- Type
- Address
- Required
- No
- Default
- N/A
2.1.3. Bind
Bind settings set the default port ranges Ceph OSD daemons use. The default range is 6800:7100. Ensure that the firewall configuration allows you to use the configured port range.
You can also enable Ceph daemons to bind to IPv6 addresses.
- ms_bind_port_min
- Description
- The minimum port number to which an OSD daemon will bind.
- Type
- 32-bit Integer
- Default
-
6800 - Required
- No
- ms_bind_port_max
- Description
- The maximum port number to which an OSD daemon will bind.
- Type
- 32-bit Integer
- Default
-
7100 - Required
- No.
- ms_bind_ipv6
- Description
- Enables Ceph daemons to bind to IPv6 addresses.
- Type
- Boolean
- Default
-
false - Required
- No
2.1.4. Hosts
Ceph expects at least one monitor declared in the Ceph configuration file, with a mon addr setting under each declared monitor. Ceph expects a host setting under each declared monitor, metadata server and OSD in the Ceph configuration file.
- mon addr
- Description
-
A list of
<hostname>:<port>entries that clients can use to connect to a Ceph monitor. If not set, Ceph searches[mon.*]sections. - Type
- String
- Required
- No
- Default
- N/A
- host
- Description
-
The host name. Use this setting for specific daemon instances (for example,
[osd.0]). - Type
- String
- Required
- Yes, for daemon instances.
- Default
-
localhost
Do not use localhost. To get your host name, execute the hostname -s command and use the name of your host to the first period, not the fully-qualified domain name.
Do not specify any value for host when using a third party deployment system that retrieves the host name for you.
2.1.5. TCP
Ceph disables TCP buffering by default.
- ms_tcp_nodelay
- Description
-
Ceph enables
tcp nodelayso that each request is sent immediately (no buffering). Disabling Nagle’s algorithm increases network traffic, which can introduce latency. If you experience large numbers of small packets, you may try disablingtcp nodelay. - Type
- Boolean
- Required
- No
- Default
-
true
- ms_tcp_rcvbuf
- Description
- The size of the socket buffer on the receiving end of a network connection. Disable by default.
- Type
- 32-bit Integer
- Required
- No
- Default
-
0
- ms_tcp_read_timeout
- Description
-
If a client or daemon makes a request to another Ceph daemon and does not drop an unused connection, the
tcp read timeoutdefines the connection as idle after the specified number of seconds. - Type
- Unsigned 64-bit Integer
- Required
- No
- Default
-
90015 minutes.
2.1.6. Firewall
By default, daemons bind to ports within the 6800:7100 range. You can configure this range at your discretion. Before configuring the firewall, check the default firewall configuration. You can configure this range at your discretion.
sudo iptables -L
For the firewalld daemon, execute the following command as root:
# firewall-cmd --list-all-zones
Some Linux distributions include rules that reject all inbound requests except SSH from all network interfaces. For example:
REJECT all -- anywhere anywhere reject-with icmp-host-prohibited
2.1.6.1. Monitor Firewall
Ceph monitors listen on port 6789 by default. Additionally, Ceph monitors always operate on the public network. When you add the rule using the example below, make sure you replace <iface> with the public network interface (for example, eth0, eth1, and so on), <ip-address> with the IP address of the public network and <netmask> with the netmask for the public network.
sudo iptables -A INPUT -i <iface> -p tcp -s <ip-address>/<netmask> --dport 6789 -j ACCEPT
For the firewalld daemon, execute the following commands as root:
# firewall-cmd --zone=public --add-port=6789/tcp
# firewall-cmd --zone=public --add-port=6789/tcp --permanent
2.1.6.2. OSD Firewall
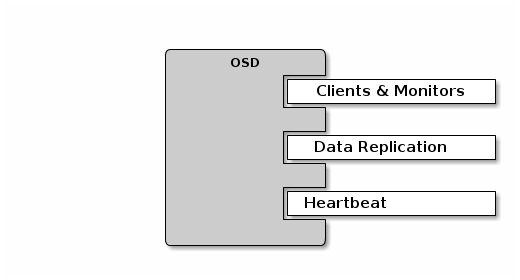
By default, Ceph OSDs bind to the first available ports on a Ceph node beginning at port 6800. Ensure to open at least three ports beginning at port 6800 for each OSD that runs on the host:
- One for talking to clients and monitors (public network).
- One for sending data to other OSDs (cluster network).
- One for sending heartbeat packets (cluster network).
Ports are node-specific. However, you might need to open more ports than the number of ports needed by Ceph daemons running on that Ceph node in the event that processes get restarted and the bound ports do not get released. Consider to open a few additional ports in case a daemon fails and restarts without releasing the port such that the restarted daemon binds to a new port. Also, consider opening the port range of 6800:7300 on each OSD host.
If you set separate public and cluster networks, you must add rules for both the public network and the cluster network, because clients will connect using the public network and other Ceph OSD Daemons will connect using the cluster network.
When you add the rule using the example below, make sure you replace <iface> with the network interface (for example, eth0 or eth1), `<ip-address> with the IP address and <netmask> with the netmask of the public or cluster network. For example:
sudo iptables -A INPUT -i <iface> -m multiport -p tcp -s <ip-address>/<netmask> --dports 6800:6810 -j ACCEPT
For the firewalld daemon, execute the following commands as root:
# firewall-cmd --zone=public --add-port=6800-6810/tcp
# firewall-cmd --zone=public --add-port=6800-6810/tcp --permanent
If you put the cluster network into another zone, open the ports within that zone as appropriate.
2.2. Ceph Daemons
Ceph has one network configuration requirement that applies to all daemons. The Ceph configuration file must specify the host for each daemon. Ceph no longer requires that a Ceph configuration file specify the monitor IP address and its port.
Some deployment utilities might create a configuration file for you. Do not set these values if the deployment utility does it for you.
The host setting is the short name of the host (that is, not an FQDN). It is not an IP address either. Use the hostname -s command to retrieve the name of the host.
[mon.a]

    host = <hostname>
    mon addr = <ip-address>:6789

[osd.0]
    host = <hostname>
You do not have to set the host IP address for a daemon. If you have a static IP configuration and both public and cluster networks running, the Ceph configuration file might specify the IP address of the host for each daemon. To set a static IP address for a daemon, the following option(s) should appear in the daemon instance sections of the Ceph configuration file.
[osd.0]
    public_addr = <host-public-ip-address>
    cluster_addr = <host-cluster-ip-address>
One NIC OSD in a Two Network Cluster
Generally, Red Hat does not recommend deploying an OSD host with a single NIC in a cluster with two networks. However, you cam accomplish this by forcing the OSD host to operate on the public network by adding a public addr entry to the [osd.n] section of the Ceph configuration file, where n refers to the number of the OSD with one NIC. Additionally, the public network and cluster network must be able to route traffic to each other, which Red Hat does not recommend for security reasons.