Chapter 5. Multisite
A single zone configuration typically consists of one zone group containing one zone and one or more ceph-radosgw instances where you may load-balance gateway client requests between the instances. In a single zone configuration, typically multiple gateway instances point to a single Ceph storage cluster. However, Red Hat supports several multi-site configuration options for the Ceph Object Gateway:
-
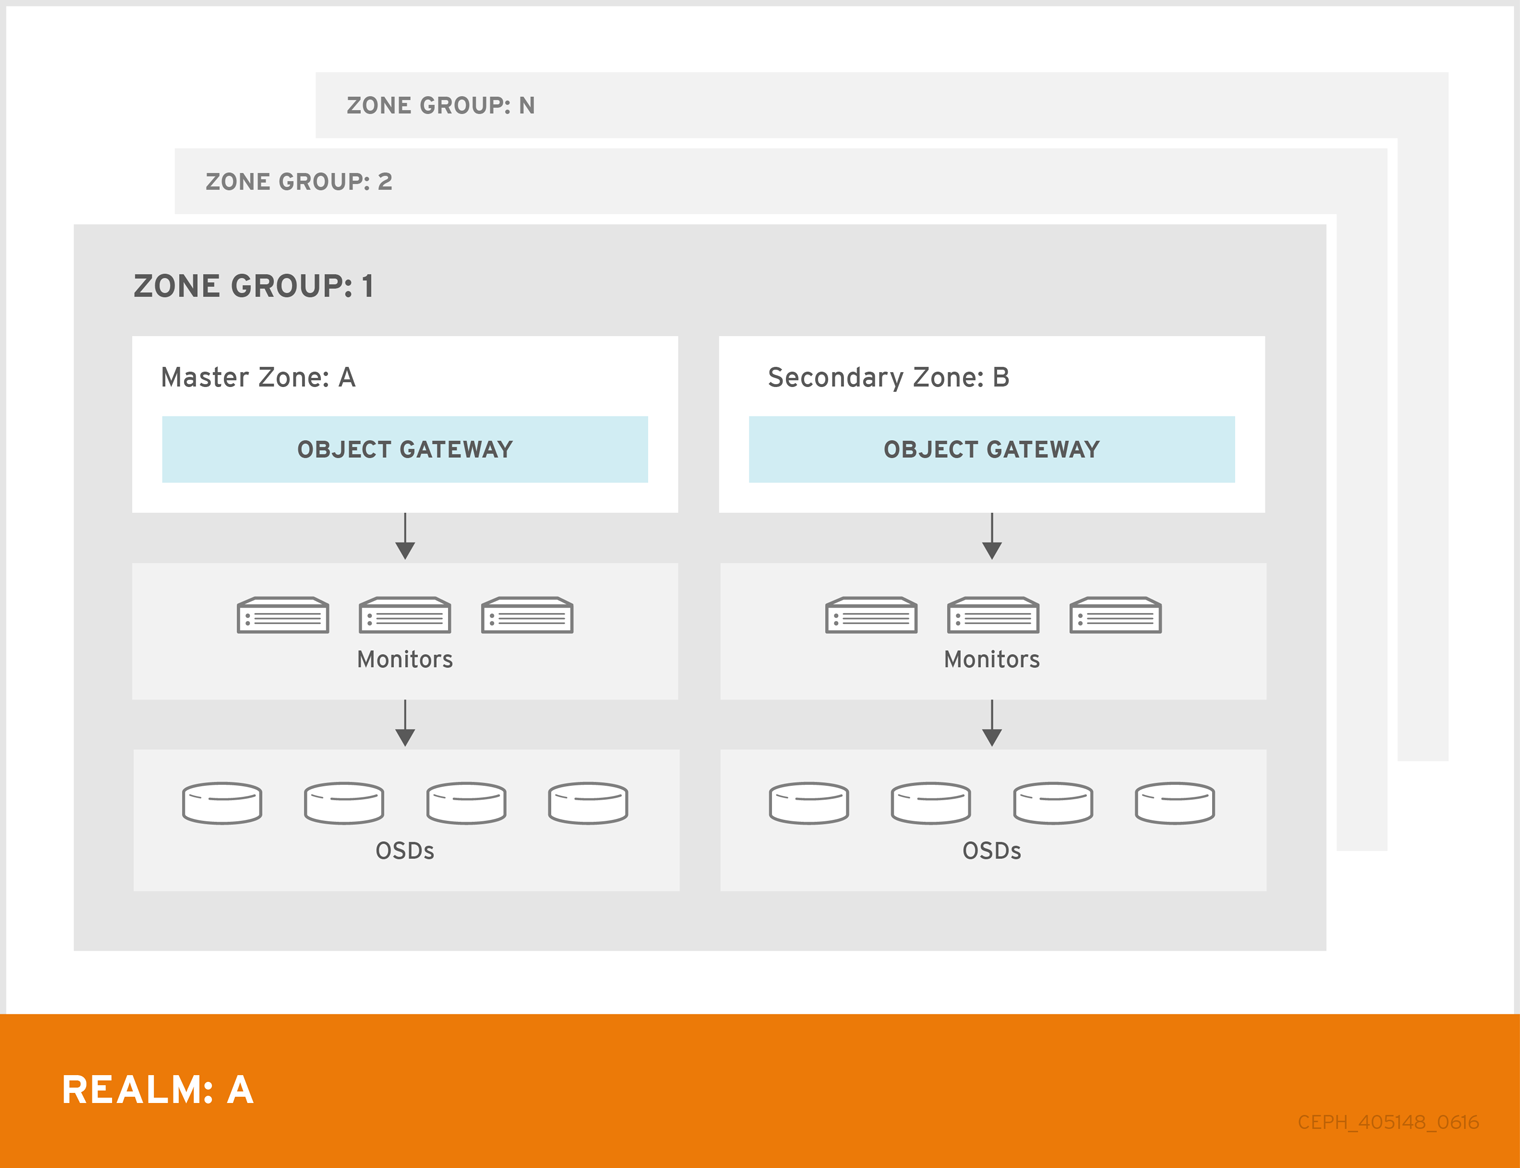
Multi-zone: A more advanced configuration consists of one zone group and multiple zones, each zone with one or more
ceph-radosgwinstances. Each zone is backed by its own Ceph Storage Cluster. Multiple zones in a zone group provides disaster recovery for the zone group should one of the zones experience a significant failure. Each zone is active and may receive write operations. In addition to disaster recovery, multiple active zones may also serve as a foundation for content delivery networks. To configure multiple zones without replication, see Section 5.12, “Configuring Multiple Zones without Replication”. - Multi-zone-group: Formerly called 'regions', the Ceph Object Gateway can also support multiple zone groups, each zone group with one or more zones. Objects stored to zone groups within the same realm share a global namespace, ensuring unique object IDs across zone groups and zones.
- Multiple Realms: The Ceph Object Gateway supports the notion of realms, which can be a single zone group or multiple zone groups and a globally unique namespace for the realm. Multiple realms provides the ability to support numerous configurations and namespaces.
5.1. Requirements and Assumptions
A multi-site configuration requires at least two Ceph storage clusters, and At least two Ceph object gateway instances, one for each Ceph storage cluster.
This guide assumes at least two Ceph storage clusters in geographically separate locations; however, the configuration can work on the same physical site. This guide also assumes four Ceph object gateway servers named rgw1, rgw2, rgw3 and rgw4 respectively.
A multi-site configuration requires a master zone group and a master zone. Additionally, each zone group requires a master zone. Zone groups may have one or more secondary or non-master zones.
The master zone within the master zone group of a realm is responsible for storing the master copy of the realm’s metadata, including users, quotas and buckets (created by the radosgw-admin CLI). This metadata gets synchronized to secondary zones and secondary zone groups automatically. Metadata operations executed with the radosgw-admin CLI MUST be executed on a host within the master zone of the master zone group in order to ensure that they get synchronized to the secondary zone groups and zones. Currently, it is possible to execute metadata operations on secondary zones and zone groups, but it is NOT recommended because they WILL NOT be syncronized, leading to fragmented metadata.
In the following examples, the rgw1 host will serve as the master zone of the master zone group; the rgw2 host will serve as the secondary zone of the master zone group; the rgw3 host will serve as the master zone of the secondary zone group; and the rgw4 host will serve as the secondary zone of the secondary zone group.
5.2. Pools
Red Hat recommends using the Ceph Placement Group’s per Pool Calculator to calculate a suitable number of placement groups for the pools the ceph-radosgw daemon will create. Set the calculated values as defaults in your Ceph configuration file. For example:
osd pool default pg num = 50
osd pool default pgp num = 50
osd pool default pg num = 50
osd pool default pgp num = 50Make this change to the Ceph configuration file on your storage cluster; then, either make a runtime change to the configuration so that it will use those defaults when the gateway instance creates the pools.
Alternatively, create the pools manually. See Pools chapter in the Storage Strategies guide for details on creating pools.
Pool names particular to a zone follow the naming convention {zone-name}.pool-name. For example, a zone named us-east will have the following pools:
-
.rgw.root -
us-east.rgw.control -
us-east.rgw.meta -
us-east.rgw.log -
us-east.rgw.buckets.index -
us-east.rgw.buckets.data -
us-east.rgw.buckets.non-ec -
us-east.rgw.meta:users.keys -
us-east.rgw.meta:users.email -
us-east.rgw.meta:users.swift -
us-east.rgw.meta:users.uid
5.3. Installing an Object Gateway
To install the Ceph Object Gateway, see the Red Hat Ceph Storage Installation Guide for details.
All Ceph Object Gateway nodes must follow the tasks listed in the Requirements for Installing Red Hat Ceph Storage section.
Ansible can install and configure Ceph Object Gateways for use with a Ceph Storage cluster. For multi-site and multi-site group deployments, you should have an Ansible configuration for each zone.
If you install Ceph Object Gateway with Ansible, the Ansible playbooks will handle the initial configuration for you. To install the Ceph Object Gateway with Ansible, add your hosts to the /etc/ansible/hosts file. Add the Ceph Object Gateway hosts under an [rgws] section to identify their roles to Ansible. If your hosts have sequential naming, you may use a range. For example:
[rgws]
<rgw-host-name-1>
<rgw-host-name-2>
<rgw-host-name[3..10]>
[rgws]
<rgw-host-name-1>
<rgw-host-name-2>
<rgw-host-name[3..10]>Once you have added the hosts, you may rerun your Ansible playbooks.
Ansible will ensure your gateway is running, so the default zones and pools may need to be deleted manually. This guide provides those steps.
When updating an existing multi-site cluster with an asynchronous update, follow the installation instruction for the update. Then, restart the gateway instances.
There is no required order for restarting the instances. Red Hat recommends restarting the master zone group and master zone first, followed by the secondary zone groups and secondary zones.
5.4. Establish a Multisite Realm
All gateways in a cluster have a configuration. In a multi-site realm, these gateways may reside in different zone groups and zones. Yet, they must work together within the realm. In a multi-site realm, all gateway instances MUST retrieve their configuration from a ceph-radosgw daemon on a host within the master zone group and master zone.
Consequently, the first step in creating a multi-site cluster involves establishing the realm, master zone group and master zone. To configure your gateways in a multi-site configuration, choose a ceph-radosgw instance that will hold the realm configuration, master zone group and master zone.
5.4.1. Create a Realm
A realm contains the multi-site configuration of zone groups and zones and also serves to enforce a globally unique namespace within the realm.
Create a new realm for the multi-site configuration by opening a command line interface on a host identified to serve in the master zone group and zone. Then, execute the following:
radosgw-admin realm create --rgw-realm={realm-name} [--default]
[root@master-zone]# radosgw-admin realm create --rgw-realm={realm-name} [--default]For example:
radosgw-admin realm create --rgw-realm=movies --default
[root@master-zone]# radosgw-admin realm create --rgw-realm=movies --default
If the cluster will have a single realm, specify the --default flag. If --default is specified, radosgw-admin will use this realm by default. If --default is not specified, adding zone-groups and zones requires specifying either the --rgw-realm flag or the --realm-id flag to identify the realm when adding zone groups and zones.
After creating the realm, radosgw-admin will echo back the realm configuration. For example:
Ceph generates a unique ID for the realm, which allows the renaming of a realm if the need arises.
5.4.2. Create a Master Zone Group
A realm must have at least one zone group, which will serve as the master zone group for the realm.
Create a new master zone group for the multi-site configuration by opening a command line interface on a host identified to serve in the master zone group and zone. Then, execute the following:
radosgw-admin zonegroup create --rgw-zonegroup={name} --endpoints={url} [--rgw-realm={realm-name}|--realm-id={realm-id}] --master --default
[root@master-zone]# radosgw-admin zonegroup create --rgw-zonegroup={name} --endpoints={url} [--rgw-realm={realm-name}|--realm-id={realm-id}] --master --defaultFor example:
radosgw-admin zonegroup create --rgw-zonegroup=us --endpoints=http://rgw1:80 --rgw-realm=movies --master --default
[root@master-zone]# radosgw-admin zonegroup create --rgw-zonegroup=us --endpoints=http://rgw1:80 --rgw-realm=movies --master --default
If the realm will only have a single zone group, specify the --default flag. If --default is specified, radosgw-admin will use this zone group by default when adding new zones. If --default is not specified, adding zones will require either the --rgw-zonegroup flag or the --zonegroup-id flag to identify the zone group when adding or modifying zones.
After creating the master zone group, radosgw-admin will echo back the zone group configuration. For example:
5.4.3. Create a Master Zone
Zones must be created on a Ceph Object Gateway node that will be within the zone.
Create a master zone for the multi-site configuration by opening a command line interface on a host identified to serve in the master zone group and zone. Then, execute the following:
radosgw-admin zone create
[root@master-zone]# radosgw-admin zone create
                            --rgw-zonegroup={zone-group-name} \
                            --rgw-zone={zone-name} \
                            --master --default \
--endpoints={http://fqdn:port}[,{http://fqdn:port}]For example:
radosgw-admin zone create --rgw-zonegroup=us \
                            --rgw-zone=us-east \
                            --master --default \
                            --endpoints={http://fqdn:port}[,{http://fqdn:port}]
[root@master-zone]# radosgw-admin zone create --rgw-zonegroup=us \
                            --rgw-zone=us-east \
                            --master --default \
                            --endpoints={http://fqdn:port}[,{http://fqdn:port}]
The --access-key and --secret aren’t specified. These settings will be added to the zone once the user is created in the next section.
5.4.4. Delete the Default Zone Group and Zone
Delete the default zone if it exists. Make sure to remove it from the default zone group first.
The following steps assume a multi-site configuration using newly installed systems that aren’t storing data yet. DO NOT DELETE the default zonegroup, zone, and its pools if you are already using it to store data, or the data will be deleted and unrecoverable.
In order to access old data in the default zone and zonegroup, use --rgw-zone default and --rgw-zonegroup default in radosgw-admin commands.
Remove the zonegroup and the zone:
Example
radosgw-admin zonegroup remove --rgw-zonegroup=default --rgw-zone=default
radosgw-admin zone delete --rgw-zone=default
radosgw-admin zonegroup delete --rgw-zonegroup=default
[root@master-zone]# radosgw-admin zonegroup remove --rgw-zonegroup=default --rgw-zone=default
[root@master-zone]# radosgw-admin zone delete --rgw-zone=default
[root@master-zone]# radosgw-admin zonegroup delete --rgw-zonegroup=default
Copy to Clipboard Copied! Toggle word wrap Toggle overflow Update and commit the period if the cluster is in a multi-site configuration:
Example
radosgw-admin period update --commit
[root@master-zone]# radosgw-admin period update --commitCopy to Clipboard Copied! Toggle word wrap Toggle overflow Delete the
defaultpools in your Ceph storage cluster if they exist.Example
ceph osd pool delete default.rgw.control default.rgw.control --yes-i-really-really-mean-it
ceph osd pool delete default.rgw.data.root default.rgw.data.root --yes-i-really-really-mean-it
ceph osd pool delete default.rgw.log default.rgw.log --yes-i-really-really-mean-it
ceph osd pool delete default.rgw.users.uid default.rgw.users.uid --yes-i-really-really-mean-it
[root@master-zone]# ceph osd pool delete default.rgw.control default.rgw.control --yes-i-really-really-mean-it
[root@master-zone]# ceph osd pool delete default.rgw.data.root default.rgw.data.root --yes-i-really-really-mean-it
[root@master-zone]# ceph osd pool delete default.rgw.log default.rgw.log --yes-i-really-really-mean-it
[root@master-zone]# ceph osd pool delete default.rgw.users.uid default.rgw.users.uid --yes-i-really-really-mean-it
Copy to Clipboard Copied! Toggle word wrap Toggle overflow ImportantAfter deleting the pools, restart the Ceph Object Gateway process.
5.4.5. Create a System User
The ceph-radosgw daemons must authenticate before pulling realm and period information. In the master zone, create a system user to facilitate authentication between daemons.
radosgw-admin user create --uid="{user-name}" --display-name="{Display Name}" --system
[root@master-zone]# radosgw-admin user create --uid="{user-name}" --display-name="{Display Name}" --systemFor example:
radosgw-admin user create --uid="synchronization-user" --display-name="Synchronization User" --system
[root@master-zone]# radosgw-admin user create --uid="synchronization-user" --display-name="Synchronization User" --system
Make a note of the access_key and secret_key, as the secondary zones will require them to authenticate with the master zone.
Finally, add the system user to the master zone.
radosgw-admin zone modify --rgw-zone=us-east --access-key={access-key} --secret={secret}
radosgw-admin period update --commit
[root@master-zone]# radosgw-admin zone modify --rgw-zone=us-east --access-key={access-key} --secret={secret}
[root@master-zone]# radosgw-admin period update --commit5.4.6. Update the Period
After updating the master zone configuration, update the period.
radosgw-admin period update --commit
# radosgw-admin period update --commitUpdating the period changes the epoch, and ensures that other zones will receive the updated configuration.
5.4.7. Update the Ceph Configuration File
Update the Ceph configuration file on master zone hosts by adding the rgw_zone configuration option and the name of the master zone to the instance entry.
[client.rgw.{instance-name}]
...
rgw_zone={zone-name}
[client.rgw.{instance-name}]
...
rgw_zone={zone-name}For example:
[client.rgw.rgw1.rgw0]
host = rgw1
rgw frontends = "civetweb port=80"
rgw_zone=us-east
[client.rgw.rgw1.rgw0]
host = rgw1
rgw frontends = "civetweb port=80"
rgw_zone=us-east5.4.8. Start the Gateway
On the object gateway host, start and enable the Ceph Object Gateway service:
systemctl start ceph-radosgw@rgw.`hostname -s`.rgw0
systemctl enable ceph-radosgw@rgw.`hostname -s`.rgw0
# systemctl start ceph-radosgw@rgw.`hostname -s`.rgw0
# systemctl enable ceph-radosgw@rgw.`hostname -s`.rgw0If the service is already running, restart the service instead of starting and enabling it:
systemctl restart ceph-radosgw@rgw.`hostname -s`.rgw0
# systemctl restart ceph-radosgw@rgw.`hostname -s`.rgw05.5. Establish a Secondary Zone
Zones within a zone group replicate all data to ensure that each zone has the same data. When creating the secondary zone, execute ALL of the radosgw-admin zone operations on a host identified to serve the secondary zone.
To add a additional zones, follow the same procedures as for adding the secondary zone. Use a different zone name.
You must execute metadata operations, such as user creation and quotas, on a host within the master zone of the master zonegroup. The master zone and the secondary zone can receive bucket operations from the RESTful APIs, but the secondary zone redirects bucket operations to the master zone. If the master zone is down, bucket operations will fail. If you create a bucket using the radosgw-admin CLI, you must execute it on a host within the master zone of the master zone group, or the buckets will not synchronize to other zone groups and zones.
5.5.1. Pull the Realm
Using the URL path, access key and secret of the master zone in the master zone group, pull the realm to the host. To pull a non-default realm, specify the realm using the --rgw-realm or --realm-id configuration options.
radosgw-admin realm pull --url={url-to-master-zone-gateway} --access-key={access-key} --secret={secret}
# radosgw-admin realm pull --url={url-to-master-zone-gateway} --access-key={access-key} --secret={secret}If this realm is the default realm or the only realm, make the realm the default realm.
radosgw-admin realm default --rgw-realm={realm-name}
# radosgw-admin realm default --rgw-realm={realm-name}5.5.2. Pull the Period
Using the URL path, access key and secret of the master zone in the master zone group, pull the period to the host. To pull a period from a non-default realm, specify the realm using the --rgw-realm or --realm-id configuration options.
radosgw-admin period pull --url={url-to-master-zone-gateway} --access-key={access-key} --secret={secret}
# radosgw-admin period pull --url={url-to-master-zone-gateway} --access-key={access-key} --secret={secret}Pulling the period retrieves the latest version of the zone group and zone configurations for the realm.
5.5.3. Create a Secondary Zone
Zones must be created on a Ceph Object Gateway node that will be within the zone.
Create a secondary zone for the multi-site configuration by opening a command line interface on a host identified to serve the secondary zone. Specify the zone group ID, the new zone name and an endpoint for the zone. DO NOT use the --master or --default flags. All zones run in an active-active configuration by default; that is, a gateway client may write data to any zone and the zone will replicate the data to all other zones within the zone group. If the secondary zone should not accept write operations, specify the --read-only flag to create an active-passive configuration between the master zone and the secondary zone. Additionally, provide the access_key and secret_key of the generated system user stored in the master zone of the master zone group. Execute the following:
Syntax
Example
radosgw-admin zone create
[root@second-zone]# radosgw-admin zone create
                            --rgw-zonegroup=us \
                            --rgw-zone=us-west \
                            --access-key={system-key} --secret={secret} \
                            --endpoints=http://rgw2:80
The following steps assume a multi-site configuration using newly installed systems that aren’t storing data. DO NOT DELETE the default zone and its pools if you are already using them to store data, or the data will be lost and unrecoverable.
Delete the default zone if needed.
radosgw-admin zone delete --rgw-zone=default
[root@second-zone]# radosgw-admin zone delete --rgw-zone=defaultFinally, delete the default pools in your Ceph storage cluster if needed.
ceph osd pool delete default.rgw.control default.rgw.control --yes-i-really-really-mean-it
ceph osd pool delete default.rgw.data.root default.rgw.data.root --yes-i-really-really-mean-it
ceph osd pool delete default.rgw.log default.rgw.log --yes-i-really-really-mean-it
ceph osd pool delete default.rgw.users.uid default.rgw.users.uid --yes-i-really-really-mean-it
# ceph osd pool delete default.rgw.control default.rgw.control --yes-i-really-really-mean-it
# ceph osd pool delete default.rgw.data.root default.rgw.data.root --yes-i-really-really-mean-it
# ceph osd pool delete default.rgw.log default.rgw.log --yes-i-really-really-mean-it
# ceph osd pool delete default.rgw.users.uid default.rgw.users.uid --yes-i-really-really-mean-itAfter deleting the pools, restart the RGW process.
5.5.4. Update the Period
After updating the master zone configuration, update the period.
radosgw-admin period update --commit
# radosgw-admin period update --commitUpdating the period changes the epoch, and ensures that other zones will receive the updated configuration.
5.5.5. Update the Ceph Configuration File
Update the Ceph configuration file on the secondary zone hosts by adding the rgw_zone configuration option and the name of the secondary zone to the instance entry.
[client.rgw.{instance-name}]
...
rgw_zone={zone-name}
[client.rgw.{instance-name}]
...
rgw_zone={zone-name}For example:
[client.rgw.rgw2.rgw0]
host = rgw2
rgw frontends = "civetweb port=80"
rgw_zone=us-west
[client.rgw.rgw2.rgw0]
host = rgw2
rgw frontends = "civetweb port=80"
rgw_zone=us-west5.5.6. Start the Gateway
On the object gateway host, start and enable the Ceph Object Gateway service:
systemctl start ceph-radosgw@rgw.`hostname -s`.rgw0
systemctl enable ceph-radosgw@rgw.`hostname -s`.rgw0
# systemctl start ceph-radosgw@rgw.`hostname -s`.rgw0
# systemctl enable ceph-radosgw@rgw.`hostname -s`.rgw0If the service is already running, restart the service instead of starting and enabling it:
systemctl restart ceph-radosgw@rgw.`hostname -s`.rgw0
# systemctl restart ceph-radosgw@rgw.`hostname -s`.rgw05.6. Configuring the archive sync module (Technology Preview)
The archive sync module leverages the versioning feature of S3 objects in Ceph object gateway to have an archive zone. The archive zone has a history of versions of S3 objects that can only be eliminated through the gateways associated with the archive zone. It captures all the data updates and metadata to consolidate them as versions of S3 objects.
The archive sync module is a Technology Preview feature only. Technology Preview features are not supported with Red Hat production service level agreements (SLAs), might not be functionally complete, and Red Hat does not recommend to use them for production. These features provide early access to upcoming product features, enabling customers to test functionality and provide feedback during the development process. See the support scope for Red Hat Technology Preview features for more details.
Prerequisites
- A running Red Hat Ceph Storage cluster.
-
rootorsudoaccess. - Installation of the Ceph Object Gateway.
Procedure
-
Configure the archive sync module when creating a new zone by using the
archivetier:
Syntax
radosgw-admin zone create --rgw-zonegroup={ZONE_GROUP_NAME} --rgw-zone={ZONE_NAME} --endpoints={http://fqdn:port}[,{http://fqdn:port] --tier-type=archive
radosgw-admin zone create --rgw-zonegroup={ZONE_GROUP_NAME} --rgw-zone={ZONE_NAME} --endpoints={http://fqdn:port}[,{http://fqdn:port] --tier-type=archiveExample
radosgw-admin zone create --rgw-zonegroup=us --rgw-zone=us-east --endpoints={http://fqdn:port}[,{http://fqdn:port}] --tier-type=archive
[root@master-zone]# radosgw-admin zone create --rgw-zonegroup=us --rgw-zone=us-east --endpoints={http://fqdn:port}[,{http://fqdn:port}] --tier-type=archiveAdditional resources
- See the Establish a Multisite Realm section in the Red Hat Ceph Storage Object Gateway Guide for more details.
5.7. Failover and Disaster Recovery
If the master zone would fail, failover to the secondary zone for disaster recovery.
Make the secondary zone the master and default zone. For example:
radosgw-admin zone modify --rgw-zone={zone-name} --master --default# radosgw-admin zone modify --rgw-zone={zone-name} --master --defaultCopy to Clipboard Copied! Toggle word wrap Toggle overflow By default, Ceph Object Gateway runs in an active-active configuration. If the cluster was configured to run in an active-passive configuration, the secondary zone is a read-only zone. Remove the
--read-onlystatus to allow the zone to receive write operations. For example:radosgw-admin zone modify --rgw-zone={zone-name} --master --default --read-only=false# radosgw-admin zone modify --rgw-zone={zone-name} --master --default --read-only=falseCopy to Clipboard Copied! Toggle word wrap Toggle overflow Update the period to make the changes take effect.
radosgw-admin period update --commit
# radosgw-admin period update --commitCopy to Clipboard Copied! Toggle word wrap Toggle overflow Restart the Ceph Object Gateway.
systemctl restart ceph-radosgw@rgw.`hostname -s`.rgw0
# systemctl restart ceph-radosgw@rgw.`hostname -s`.rgw0Copy to Clipboard Copied! Toggle word wrap Toggle overflow
If the former master zone recovers, revert the operation.
From the recovered zone, pull the realm from the current master zone.
radosgw-admin realm pull --url={url-to-master-zone-gateway} \
                            --access-key={access-key} --secret={secret}
# radosgw-admin realm pull --url={url-to-master-zone-gateway} \ --access-key={access-key} --secret={secret}Copy to Clipboard Copied! Toggle word wrap Toggle overflow Make the recovered zone the master and default zone.
radosgw-admin zone modify --rgw-zone={zone-name} --master --default# radosgw-admin zone modify --rgw-zone={zone-name} --master --defaultCopy to Clipboard Copied! Toggle word wrap Toggle overflow Update the period to make the changes take effect.
radosgw-admin period update --commit
# radosgw-admin period update --commitCopy to Clipboard Copied! Toggle word wrap Toggle overflow Restart the Ceph Object Gateway in the recovered zone.
systemctl restart ceph-radosgw@rgw.`hostname -s`.rgw0
# systemctl restart ceph-radosgw@rgw.`hostname -s`.rgw0Copy to Clipboard Copied! Toggle word wrap Toggle overflow If the secondary zone needs to be a read-only configuration, update the secondary zone.
radosgw-admin zone modify --rgw-zone={zone-name} --read-only# radosgw-admin zone modify --rgw-zone={zone-name} --read-onlyCopy to Clipboard Copied! Toggle word wrap Toggle overflow Update the period to make the changes take effect.
radosgw-admin period update --commit
# radosgw-admin period update --commitCopy to Clipboard Copied! Toggle word wrap Toggle overflow Restart the Ceph Object Gateway in the secondary zone.
systemctl restart ceph-radosgw@rgw.`hostname -s`.rgw0
# systemctl restart ceph-radosgw@rgw.`hostname -s`.rgw0Copy to Clipboard Copied! Toggle word wrap Toggle overflow
5.8. Migrating a Single Site System to Multi-Site
To migrate from a single site system with a default zone group and zone to a multi site system, use the following steps:
Create a realm. Replace
<name>with the realm name.radosgw-admin realm create --rgw-realm=<name> --default
[root@master-zone]# radosgw-admin realm create --rgw-realm=<name> --defaultCopy to Clipboard Copied! Toggle word wrap Toggle overflow Rename the default zone and zonegroup. Replace
<name>with the zonegroup or zone name.radosgw-admin zonegroup rename --rgw-zonegroup default --zonegroup-new-name=<name> radosgw-admin zone rename --rgw-zone default --zone-new-name us-east-1 --rgw-zonegroup=<name>
[root@master-zone]# radosgw-admin zonegroup rename --rgw-zonegroup default --zonegroup-new-name=<name>
[root@master-zone]# radosgw-admin zone rename --rgw-zone default --zone-new-name us-east-1 --rgw-zonegroup=<name>
Copy to Clipboard Copied! Toggle word wrap Toggle overflow Configure the master zonegroup. Replace
<name>with the realm or zonegroup name. Replace<fqdn>with the fully qualified domain name(s) in the zonegroup.radosgw-admin zonegroup modify --rgw-realm=<name> --rgw-zonegroup=<name> --endpoints http://<fqdn>:80 --master --default
[root@master-zone]# radosgw-admin zonegroup modify --rgw-realm=<name> --rgw-zonegroup=<name> --endpoints http://<fqdn>:80 --master --defaultCopy to Clipboard Copied! Toggle word wrap Toggle overflow Configure the master zone. Replace
<name>with the realm, zonegroup or zone name. Replace<fqdn>with the fully qualified domain name(s) in the zonegroup.radosgw-admin zone modify --rgw-realm=<name> --rgw-zonegroup=<name> \ --rgw-zone=<name> --endpoints http://<fqdn>:80 \ --access-key=<access-key> --secret=<secret-key> \ --master --default[root@master-zone]# radosgw-admin zone modify --rgw-realm=<name> --rgw-zonegroup=<name> \ --rgw-zone=<name> --endpoints http://<fqdn>:80 \ --access-key=<access-key> --secret=<secret-key> \ --master --defaultCopy to Clipboard Copied! Toggle word wrap Toggle overflow Create a system user. Replace
<user-id>with the username. Replace<display-name>with a display name. It may contain spaces.radosgw-admin user create --uid=<user-id> \ --display-name="<display-name>" \ --access-key=<access-key> --secret=<secret-key> \ --system[root@master-zone]# radosgw-admin user create --uid=<user-id> \ --display-name="<display-name>" \ --access-key=<access-key> --secret=<secret-key> \ --systemCopy to Clipboard Copied! Toggle word wrap Toggle overflow Commit the updated configuration.
radosgw-admin period update --commit
# radosgw-admin period update --commitCopy to Clipboard Copied! Toggle word wrap Toggle overflow Restart the Ceph Object Gateway.
systemctl restart ceph-radosgw@rgw.`hostname -s`.rgw0
# systemctl restart ceph-radosgw@rgw.`hostname -s`.rgw0Copy to Clipboard Copied! Toggle word wrap Toggle overflow
After completing this procedure, proceed to Establish a Secondary Zone to create a secondary zone in the master zone group.
5.9. Multisite Command Line Usage
5.9.1. Realms
A realm represents a globally unique namespace consisting of one or more zonegroups containing one or more zones, and zones containing buckets, which in turn contain objects. A realm enables the Ceph Object Gateway to support multiple namespaces and their configuration on the same hardware.
A realm contains the notion of periods. Each period represents the state of the zone group and zone configuration in time. Each time you make a change to a zonegroup or zone, update the period and commit it.
By default, the Ceph Object Gateway version 2 does not create a realm for backward compatibility with version 1.3 and earlier releases. However, as a best practice, Red Hat recommends creating realms for new clusters.
5.9.1.1. Creating a Realm
To create a realm, execute realm create and specify the realm name. If the realm is the default, specify --default.
radosgw-admin realm create --rgw-realm={realm-name} [--default]
[root@master-zone]# radosgw-admin realm create --rgw-realm={realm-name} [--default]For example:
radosgw-admin realm create --rgw-realm=movies --default
[root@master-zone]# radosgw-admin realm create --rgw-realm=movies --default
By specifying --default, the realm will be called implicitly with each radosgw-admin call unless --rgw-realm and the realm name are explicitly provided.
5.9.1.2. Making a Realm the Default
One realm in the list of realms should be the default realm. There may be only one default realm. If there is only one realm and it wasn’t specified as the default realm when it was created, make it the default realm. Alternatively, to change which realm is the default, execute:
radosgw-admin realm default --rgw-realm=movies
[root@master-zone]# radosgw-admin realm default --rgw-realm=movies
When the realm is default, the command line assumes --rgw-realm=<realm-name> as an argument.
5.9.1.3. Deleting a Realm
To delete a realm, execute realm delete and specify the realm name.
radosgw-admin realm delete --rgw-realm={realm-name}
[root@master-zone]# radosgw-admin realm delete --rgw-realm={realm-name}For example:
radosgw-admin realm delete --rgw-realm=movies
[root@master-zone]# radosgw-admin realm delete --rgw-realm=movies5.9.1.4. Getting a Realm
To get a realm, execute realm get and specify the realm name.
radosgw-admin realm get --rgw-realm=<name>
# radosgw-admin realm get --rgw-realm=<name>For example:
radosgw-admin realm get --rgw-realm=movies [> filename.json]
# radosgw-admin realm get --rgw-realm=movies [> filename.json]The CLI will echo a JSON object with the realm properties.
Use > and an output file name to output the JSON object to a file.
5.9.1.5. Setting a Realm
To set a realm, execute realm set, specify the realm name, and --infile= with an input file name.
radosgw-admin realm set --rgw-realm=<name> --infile=<infilename>
[root@master-zone]# radosgw-admin realm set --rgw-realm=<name> --infile=<infilename>For example:
radosgw-admin realm set --rgw-realm=movies --infile=filename.json
[root@master-zone]# radosgw-admin realm set --rgw-realm=movies --infile=filename.json5.9.1.6. Listing Realms
To list realms, execute realm list.
radosgw-admin realm list
# radosgw-admin realm list5.9.1.7. Listing Realm Periods
To list realm periods, execute realm list-periods.
radosgw-admin realm list-periods
# radosgw-admin realm list-periods5.9.1.8. Pulling a Realm
To pull a realm from the node containing the master zone group and master zone to a node containing a secondary zone group or zone, execute realm pull on the node that will receive the realm configuration.
radosgw-admin realm pull --url={url-to-master-zone-gateway} --access-key={access-key} --secret={secret}
# radosgw-admin realm pull --url={url-to-master-zone-gateway} --access-key={access-key} --secret={secret}5.9.1.9. Renaming a Realm
A realm is not part of the period. Consequently, renaming the realm is only applied locally, and will not get pulled with realm pull. When renaming a realm with multiple zones, run the command on each zone. To rename a realm, execute the following:
radosgw-admin realm rename --rgw-realm=<current-name> --realm-new-name=<new-realm-name>
# radosgw-admin realm rename --rgw-realm=<current-name> --realm-new-name=<new-realm-name>
Do NOT use realm set to change the name parameter. That changes the internal name only. Specifying --rgw-realm would still use the old realm name.
5.9.2. Zone Groups
The Ceph Object Gateway supports multi-site deployments and a global namespace by using the notion of zone groups. Formerly called a region, a zone group defines the geographic location of one or more Ceph Object Gateway instances within one or more zones.
Configuring zone groups differs from typical configuration procedures, because not all of the settings end up in a Ceph configuration file. You can list zone groups, get a zone group configuration, and set a zone group configuration.
The radosgw-admin zonegroup operations can be performed on any node within the realm, because the step of updating the period propagates the changes throughout the cluster. However, radosgw-admin zone operations MUST be performed on a host within the zone.
5.9.2.1. Creating a Zone Group
Creating a zone group consists of specifying the zone group name. Creating a zone assumes it will live in the default realm unless --rgw-realm=<realm-name> is specified. If the zonegroup is the default zonegroup, specify the --default flag. If the zonegroup is the master zonegroup, specify the --master flag. For example:
radosgw-admin zonegroup create --rgw-zonegroup=<name> [--rgw-realm=<name>][--master] [--default]
# radosgw-admin zonegroup create --rgw-zonegroup=<name> [--rgw-realm=<name>][--master] [--default]
Use zonegroup modify --rgw-zonegroup=<zonegroup-name> to modify an existing zone group’s settings.
5.9.2.2. Making a Zone Group the Default
One zonegroup in the list of zonegroups should be the default zonegroup. There may be only one default zonegroup. If there is only one zonegroup and it wasn’t specified as the default zonegroup when it was created, make it the default zonegroup. Alternatively, to change which zonegroup is the default, execute:
radosgw-admin zonegroup default --rgw-zonegroup=comedy
# radosgw-admin zonegroup default --rgw-zonegroup=comedy
When the zonegroup is default, the command line assumes --rgw-zonegroup=<zonegroup-name> as an argument.
Then, update the period:
radosgw-admin period update --commit
# radosgw-admin period update --commit5.9.2.3. Adding a Zone to a Zone Group
To add a zone to a zonegroup, you MUST execute this step on a host that will be in the zone. To add a zone to a zonegroup, execute the following:
radosgw-admin zonegroup add --rgw-zonegroup=<name> --rgw-zone=<name>
# radosgw-admin zonegroup add --rgw-zonegroup=<name> --rgw-zone=<name>Then, update the period:
radosgw-admin period update --commit
# radosgw-admin period update --commit5.9.2.4. Removing a Zone from a Zone Group
To remove a zone from a zonegroup, execute the following:
radosgw-admin zonegroup remove --rgw-zonegroup=<name> --rgw-zone=<name>
# radosgw-admin zonegroup remove --rgw-zonegroup=<name> --rgw-zone=<name>Then, update the period:
radosgw-admin period update --commit
# radosgw-admin period update --commit5.9.2.5. Renaming a Zone Group
To rename a zonegroup, execute the following:
radosgw-admin zonegroup rename --rgw-zonegroup=<name> --zonegroup-new-name=<name>
# radosgw-admin zonegroup rename --rgw-zonegroup=<name> --zonegroup-new-name=<name>Then, update the period:
radosgw-admin period update --commit
# radosgw-admin period update --commit5.9.2.6. Deleting a Zone Group
To delete a zonegroup, execute the following:
radosgw-admin zonegroup delete --rgw-zonegroup=<name>
# radosgw-admin zonegroup delete --rgw-zonegroup=<name>Then, update the period:
radosgw-admin period update --commit
# radosgw-admin period update --commit5.9.2.7. Listing Zone Groups
A Ceph cluster contains a list of zone groups. To list the zone groups, execute:
radosgw-admin zonegroup list
# radosgw-admin zonegroup list
The radosgw-admin returns a JSON formatted list of zone groups.
5.9.2.8. Getting a Zone Group
To view the configuration of a zone group, execute:
radosgw-admin zonegroup get [--rgw-zonegroup=<zonegroup>]
# radosgw-admin zonegroup get [--rgw-zonegroup=<zonegroup>]The zone group configuration looks like this:
5.9.2.9. Setting a Zone Group
Defining a zone group consists of creating a JSON object, specifying at least the required settings:
-
name: The name of the zone group. Required. -
api_name: The API name for the zone group. Optional. -
is_master: Determines if the zone group is the master zone group. Required. note: You can only have one master zone group. -
endpoints: A list of all the endpoints in the zone group. For example, you may use multiple domain names to refer to the same zone group. Remember to escape the forward slashes (\/). You may also specify a port (fqdn:port) for each endpoint. Optional. -
hostnames: A list of all the hostnames in the zone group. For example, you may use multiple domain names to refer to the same zone group. Optional. Thergw dns namesetting will automatically be included in this list. You should restart the gateway daemon(s) after changing this setting. -
master_zone: The master zone for the zone group. Optional. Uses the default zone if not specified. note: You can only have one master zone per zone group. -
zones: A list of all zones within the zone group. Each zone has a name (required), a list of endpoints (optional), and whether or not the gateway will log metadata and data operations (false by default). -
placement_targets: A list of placement targets (optional). Each placement target contains a name (required) for the placement target and a list of tags (optional) so that only users with the tag can use the placement target (i.e., the user’splacement_tagsfield in the user info). -
default_placement: The default placement target for the object index and object data. Set todefault-placementby default. You may also set a per-user default placement in the user info for each user.
To set a zone group, create a JSON object consisting of the required fields, save the object to a file (e.g., zonegroup.json); then, execute the following command:
radosgw-admin zonegroup set --infile zonegroup.json
# radosgw-admin zonegroup set --infile zonegroup.json
Where zonegroup.json is the JSON file you created.
The default zone group is_master setting is true by default. If you create a new zone group and want to make it the master zone group, you must either set the default zone group is_master setting to false, or delete the default zone group.
Finally, update the period:
radosgw-admin period update --commit
# radosgw-admin period update --commit5.9.2.10. Setting a Zone Group Map
Setting a zone group map consists of creating a JSON object consisting of one or more zone groups, and setting the master_zonegroup for the cluster. Each zone group in the zone group map consists of a key/value pair, where the key setting is equivalent to the name setting for an individual zone group configuration, and the val is a JSON object consisting of an individual zone group configuration.
You may only have one zone group with is_master equal to true, and it must be specified as the master_zonegroup at the end of the zone group map. The following JSON object is an example of a default zone group map.
To set a zone group map, execute the following:
radosgw-admin zonegroup-map set --infile zonegroupmap.json
# radosgw-admin zonegroup-map set --infile zonegroupmap.json
Where zonegroupmap.json is the JSON file you created. Ensure that you have zones created for the ones specified in the zone group map. Finally, update the period.
radosgw-admin period update --commit
# radosgw-admin period update --commit5.9.3. Zones
Ceph Object Gateway supports the notion of zones. A zone defines a logical group consisting of one or more Ceph Object Gateway instances.
Configuring zones differs from typical configuration procedures, because not all of the settings end up in a Ceph configuration file. You can list zones, get a zone configuration and set a zone configuration.
All radosgw-admin zone operations MUST be executed on a host that operates or will operate within the zone.
5.9.3.1. Creating a Zone
To create a zone, specify a zone name. If it is a master zone, specify the --master option. Only one zone in a zone group may be a master zone. To add the zone to a zonegroup, specify the --rgw-zonegroup option with the zonegroup name.
Zones must be created on a Ceph Object Gateway node that will be within the zone.
[root@zone] radosgw-admin zone create --rgw-zone=<name> \
                [--zonegroup=<zonegroup-name]\
                [--endpoints=<endpoint:port>[,<endpoint:port>] \
                [--master] [--default] \
                --access-key $SYSTEM_ACCESS_KEY --secret $SYSTEM_SECRET_KEY
[root@zone] radosgw-admin zone create --rgw-zone=<name> \
                [--zonegroup=<zonegroup-name]\
                [--endpoints=<endpoint:port>[,<endpoint:port>] \
                [--master] [--default] \
--access-key $SYSTEM_ACCESS_KEY --secret $SYSTEM_SECRET_KEYThen, update the period:
radosgw-admin period update --commit
# radosgw-admin period update --commit5.9.3.2. Deleting a Zone
To delete zone, first remove it from the zonegroup.
radosgw-admin zonegroup remove --rgw-zonegroup=<name>\
                                 --rgw-zone=<name>
# radosgw-admin zonegroup remove --rgw-zonegroup=<name>\
--rgw-zone=<name>Then, update the period:
radosgw-admin period update --commit
# radosgw-admin period update --commitNext, delete the zone.
This procedure MUST be executed on a host within the zone.
Execute the following:
radosgw-admin zone delete --rgw-zone<name>
[root@zone]# radosgw-admin zone delete --rgw-zone<name>Finally, update the period:
radosgw-admin period update --commit
# radosgw-admin period update --commitDo not delete a zone without removing it from a zone group first. Otherwise, updating the period will fail.
If the pools for the deleted zone will not be used anywhere else, consider deleting the pools. Replace <del-zone> in the example below with the deleted zone’s name.
Once Ceph deletes the zone pools, it deletes all of the data within them in an unrecoverable manner. Only delete the zone pools if Ceph clients no longer need the pool contents.
In a multi-realm cluster, deleting the .rgw.root pool along with the zone pools will remove ALL the realm information for the cluster. Ensure that .rgw.root does not contain other active realms before deleting the .rgw.root pool.
ceph osd pool delete <del-zone>.rgw.control <del-zone>.rgw.control --yes-i-really-really-mean-it
ceph osd pool delete <del-zone>.rgw.data.root <del-zone>.rgw.data.root --yes-i-really-really-mean-it
ceph osd pool delete <del-zone>.rgw.log <del-zone>.rgw.log --yes-i-really-really-mean-it
ceph osd pool delete <del-zone>.rgw.users.uid <del-zone>.rgw.users.uid --yes-i-really-really-mean-it
# ceph osd pool delete <del-zone>.rgw.control <del-zone>.rgw.control --yes-i-really-really-mean-it
# ceph osd pool delete <del-zone>.rgw.data.root <del-zone>.rgw.data.root --yes-i-really-really-mean-it
# ceph osd pool delete <del-zone>.rgw.log <del-zone>.rgw.log --yes-i-really-really-mean-it
# ceph osd pool delete <del-zone>.rgw.users.uid <del-zone>.rgw.users.uid --yes-i-really-really-mean-itAfter deleting the pools, restart the RGW process.
5.9.3.3. Modifying a Zone
To modify a zone, specify the zone name and the parameters you wish to modify.
Zones should be modified on a Ceph Object Gateway node that will be within the zone.
radosgw-admin zone modify [options]
[root@zone]# radosgw-admin zone modify [options]
--access-key=<key>--secret/--secret-key=<key>--master--default--endpoints=<list>
Then, update the period:
radosgw-admin period update --commit
# radosgw-admin period update --commit5.9.3.4. Listing Zones
As root, to list the zones in a cluster, execute:
radosgw-admin zone list
# radosgw-admin zone list5.9.3.5. Getting a Zone
As root, to get the configuration of a zone, execute:
radosgw-admin zone get [--rgw-zone=<zone>]
# radosgw-admin zone get [--rgw-zone=<zone>]
The default zone looks like this:
5.9.3.6. Setting a Zone
Configuring a zone involves specifying a series of Ceph Object Gateway pools. For consistency, we recommend using a pool prefix that is the same as the zone name. See Pools_ for details of configuring pools.
Zones should be set on a Ceph Object Gateway node that will be within the zone.
To set a zone, create a JSON object consisting of the pools, save the object to a file (e.g., zone.json); then, execute the following command, replacing {zone-name} with the name of the zone:
radosgw-admin zone set --rgw-zone={zone-name} --infile zone.json
[root@zone]# radosgw-admin zone set --rgw-zone={zone-name} --infile zone.json
Where zone.json is the JSON file you created.
Then, as root, update the period:
radosgw-admin period update --commit
# radosgw-admin period update --commit5.9.3.7. Renaming a Zone
To rename a zone, specify the zone name and the new zone name. Execute the following on a host within the zone:
radosgw-admin zone rename --rgw-zone=<name> --zone-new-name=<name>
[root@zone]# radosgw-admin zone rename --rgw-zone=<name> --zone-new-name=<name>Then, update the period:
radosgw-admin period update --commit
# radosgw-admin period update --commit5.10. Zone Group and Zone Configuration Settings
When configuring a default zone group and zone, the pool name includes the zone name. For example:
-
default.rgw.control
To change the defaults, include the following settings in your Ceph configuration file under each [client.rgw.{instance-name}] instance.
| Name | Description | Type | Default |
|---|---|---|---|
|
| The name of the zone for the gateway instance. | String | None |
|
| The name of the zone group for the gateway instance. | String | None |
|
| The root pool for the zone group. | String |
|
|
| The root pool for the zone. | String |
|
|
| The OID for storing the default zone group. We do not recommend changing this setting. | String |
|
5.11. Manually Resharding Buckets with Multisite
To manually reshard buckets in a multisite cluster, use the following procedure.
Manual resharding is a very expensive process, especially for huge buckets that warrant manual resharding. Every secondary zone deletes all of the objects, and then resynchronizes them from the master zone.
Prerequisites
- Stop all Ceph Object Gateway instances.
Procedure
On a node within the master zone of the master zone group, execute the following command:
Syntax
radosgw-admin bucket sync disable --bucket=BUCKET_NAME
# radosgw-admin bucket sync disable --bucket=BUCKET_NAMECopy to Clipboard Copied! Toggle word wrap Toggle overflow Wait for
sync statuson all zones to report that data synchronization is up to date.-
Stop ALL
ceph-radosgwdaemons in ALL zones. On a node within the master zone of the master zone group, reshard the bucket.
Syntax
radosgw-admin bucket reshard --bucket=BUCKET_NAME --num-shards=NEW_SHARDS_NUMBER
# radosgw-admin bucket reshard --bucket=BUCKET_NAME --num-shards=NEW_SHARDS_NUMBERCopy to Clipboard Copied! Toggle word wrap Toggle overflow On EACH secondary zone, execute the following:
Syntax
radosgw-admin bucket rm --purge-objects --bucket=BUCKET_NAME
# radosgw-admin bucket rm --purge-objects --bucket=BUCKET_NAMECopy to Clipboard Copied! Toggle word wrap Toggle overflow -
Restart ALL
ceph-radosgwdaemons in ALL zones. On a node within the master zone of the master zone group, execute the following command:
Syntax
radosgw-admin bucket sync enable --bucket=BUCKET_NAME
# radosgw-admin bucket sync enable --bucket=BUCKET_NAMECopy to Clipboard Copied! Toggle word wrap Toggle overflow
The metadata synchronization process will fetch the updated bucket entry point and bucket instance metadata. The data synchronization process will perform a full synchronization.
5.12. Configuring Multiple Zones without Replication
You can configure multiple zones that will not replicate each other. For example you can create a dedicated zone for each team in a company.
Prerequisites
- A Ceph Storage Cluster with the Ceph Object Gateway installed.
Procedure
Create a realm.
radosgw-admin realm create --rgw-realm=realm-name [--default]
radosgw-admin realm create --rgw-realm=realm-name [--default]Copy to Clipboard Copied! Toggle word wrap Toggle overflow For example:
Copy to Clipboard Copied! Toggle word wrap Toggle overflow Create a zone group.
radosgw-admin zonegroup create --rgw-zonegroup=zone-group-name --endpoints=url [--rgw-realm=realm-name|--realm-id=realm-id] --master --default
radosgw-admin zonegroup create --rgw-zonegroup=zone-group-name --endpoints=url [--rgw-realm=realm-name|--realm-id=realm-id] --master --defaultCopy to Clipboard Copied! Toggle word wrap Toggle overflow For example:
Copy to Clipboard Copied! Toggle word wrap Toggle overflow Create one or more zones depending on your use case.
radosgw-admin zone create
             --rgw-zonegroup=zone-group-name \
             --rgw-zone=zone-name \
             --master --default \
             --endpoints=http://fqdn:port[,http://fqdn:port]
radosgw-admin zone create --rgw-zonegroup=zone-group-name \ --rgw-zone=zone-name \ --master --default \ --endpoints=http://fqdn:port[,http://fqdn:port]Copy to Clipboard Copied! Toggle word wrap Toggle overflow For example:
radosgw-admin zone create --rgw-zonegroup=us \
                                              --rgw-zone=us-east \
                                              --master --default \
                                              --endpoints=http://rgw1:80
[root@master-zone]# radosgw-admin zone create --rgw-zonegroup=us \ --rgw-zone=us-east \ --master --default \ --endpoints=http://rgw1:80Copy to Clipboard Copied! Toggle word wrap Toggle overflow Get the JSON file with the configuration of the zone group.
radosgw-admin zonegroup get --rgw-zonegroup=zone-group-name > zonegroup.json
radosgw-admin zonegroup get --rgw-zonegroup=zone-group-name > zonegroup.jsonCopy to Clipboard Copied! Toggle word wrap Toggle overflow For example:
radosgw-admin zonegroup get --rgw-zonegroup=us > zonegroup.json
[root@master-zone]# radosgw-admin zonegroup get --rgw-zonegroup=us > zonegroup.jsonCopy to Clipboard Copied! Toggle word wrap Toggle overflow In the file, set the
log_meta,log_data, andsync_from_allparameters tofalse.Copy to Clipboard Copied! Toggle word wrap Toggle overflow Use the updated JSON file.
radosgw-admin zonegroup set --rgw-zonegroup=zone-group-name --infile=zonegroup.json
radosgw-admin zonegroup set --rgw-zonegroup=zone-group-name --infile=zonegroup.jsonCopy to Clipboard Copied! Toggle word wrap Toggle overflow For example:
radosgw-admin zonegroup set --rgw-zonegroup=us --infile=zonegroup.json
[root@master-zone]# radosgw-admin zonegroup set --rgw-zonegroup=us --infile=zonegroup.jsonCopy to Clipboard Copied! Toggle word wrap Toggle overflow Update the period.
radosgw-admin period update --commit
# radosgw-admin period update --commitCopy to Clipboard Copied! Toggle word wrap Toggle overflow
Additional Resources
5.13. Configuring multiple realms in the same storage cluster
This section discusses how to configure multiple realms in the same storage cluster. This is a more advanced use case for multi-site. Configuring multiple realms in the same storage cluster enables you to use a local realm to handle local Ceph Object Gateway client traffic, as well as a replicated realm for data that will be replicated to a secondary site.
Red Hat recommends that each realm has its own Ceph Object Gateway.
Prerequisites
- The access key and secret key for each data center in the storage cluster.
- Two running Red Hat Ceph Storage data centers in a storage cluster.
- Root-level or sudo access to all the nodes.
- Each data center has its own local realm. They share a realm that replicates on both sites.
- On the Ceph Object Gateway nodes, perform the tasks listed in the Requirements for Installing Red Hat Ceph Storage found in the Red Hat Ceph Storage Installation Guide.
- For each Ceph Object Gateway node, perform steps 1-7 in the Installing the Ceph Object Gateway section of the Red Hat Ceph Storage Installation Guide.
Procedure
Create one local realm on the first data center in the storage cluster:
Syntax
radosgw-admin realm create --rgw-realm=REALM_NAME --default
radosgw-admin realm create --rgw-realm=REALM_NAME --defaultCopy to Clipboard Copied! Toggle word wrap Toggle overflow Example
radosgw-admin realm create --rgw-realm=ldc1 --default
[root@rgw1 ~]# radosgw-admin realm create --rgw-realm=ldc1 --defaultCopy to Clipboard Copied! Toggle word wrap Toggle overflow Create one local master zonegroup on the first data center:
Syntax
radosgw-admin zonegroup create --rgw-zonegroup=ZONE_GROUP_NAME --endpoints=http://RGW_NODE_NAME:80 --rgw-realm=REALM_NAME --master --default
radosgw-admin zonegroup create --rgw-zonegroup=ZONE_GROUP_NAME --endpoints=http://RGW_NODE_NAME:80 --rgw-realm=REALM_NAME --master --defaultCopy to Clipboard Copied! Toggle word wrap Toggle overflow Example
radosgw-admin zonegroup create --rgw-zonegroup=ldc1zg --endpoints=http://rgw1:80 --rgw-realm=ldc1 --master --default
[root@rgw1 ~]# radosgw-admin zonegroup create --rgw-zonegroup=ldc1zg --endpoints=http://rgw1:80 --rgw-realm=ldc1 --master --defaultCopy to Clipboard Copied! Toggle word wrap Toggle overflow Create one local zone on the first data center:
Syntax
radosgw-admin zone create --rgw-zonegroup=ZONE_GROUP_NAME --rgw-zone=ZONE_NAME --master --default --endpoints=HTTP_FQDN[,HTTP_FQDN]
radosgw-admin zone create --rgw-zonegroup=ZONE_GROUP_NAME --rgw-zone=ZONE_NAME --master --default --endpoints=HTTP_FQDN[,HTTP_FQDN]Copy to Clipboard Copied! Toggle word wrap Toggle overflow Example
radosgw-admin zone create --rgw-zonegroup=ldc1zg --rgw-zone=ldc1z --master --default --endpoints=http://rgw.example.com
[root@rgw1 ~]# radosgw-admin zone create --rgw-zonegroup=ldc1zg --rgw-zone=ldc1z --master --default --endpoints=http://rgw.example.comCopy to Clipboard Copied! Toggle word wrap Toggle overflow Commit the period:
Example
radosgw-admin period update --commit
[root@rgw1 ~]# radosgw-admin period update --commitCopy to Clipboard Copied! Toggle word wrap Toggle overflow Update
ceph.confwith thergw_realm,rgw_zonegroupandrgw_zonenames:Syntax
rgw_realm = REALM_NAME
rgw_zonegroup = ZONE_GROUP_NAME
rgw_zone = ZONE_NAME
rgw_realm = REALM_NAME
rgw_zonegroup = ZONE_GROUP_NAME
rgw_zone = ZONE_NAME
Copy to Clipboard Copied! Toggle word wrap Toggle overflow Example
rgw_realm = ldc1
rgw_zonegroup = ldc1zg
rgw_zone = ldc1z
rgw_realm = ldc1
rgw_zonegroup = ldc1zg
rgw_zone = ldc1z
Copy to Clipboard Copied! Toggle word wrap Toggle overflow Restart the RGW daemon:
Syntax
systemctl restart ceph-radosgw@rgw.$(hostname -s).rgw0.service
systemctl restart ceph-radosgw@rgw.$(hostname -s).rgw0.serviceCopy to Clipboard Copied! Toggle word wrap Toggle overflow Create one local realm on the second data center in the storage cluster:
Syntax
radosgw-admin realm create --rgw-realm=REALM_NAME --default
radosgw-admin realm create --rgw-realm=REALM_NAME --defaultCopy to Clipboard Copied! Toggle word wrap Toggle overflow Example
radosgw-admin realm create --rgw-realm=ldc2 --default
[root@rgw2 ~]# radosgw-admin realm create --rgw-realm=ldc2 --defaultCopy to Clipboard Copied! Toggle word wrap Toggle overflow Create one local master zonegroup on the second data center:
Syntax
radosgw-admin zonegroup create --rgw-zonegroup=ZONE_GROUP_NAME --endpoints=http://RGW_NODE_NAME:80 --rgw-realm=REALM_NAME --master --default
radosgw-admin zonegroup create --rgw-zonegroup=ZONE_GROUP_NAME --endpoints=http://RGW_NODE_NAME:80 --rgw-realm=REALM_NAME --master --defaultCopy to Clipboard Copied! Toggle word wrap Toggle overflow Example
radosgw-admin zonegroup create --rgw-zonegroup=ldc2zg --endpoints=http://rgw2:80 --rgw-realm=ldc2 --master --default
[root@rgw2 ~]# radosgw-admin zonegroup create --rgw-zonegroup=ldc2zg --endpoints=http://rgw2:80 --rgw-realm=ldc2 --master --defaultCopy to Clipboard Copied! Toggle word wrap Toggle overflow Create one local zone on the second data center:
Syntax
radosgw-admin zone create --rgw-zonegroup=ZONE_GROUP_NAME --rgw-zone=ZONE_NAME --master --default --endpoints=HTTP_FQDN[, HTTP_FQDN]
radosgw-admin zone create --rgw-zonegroup=ZONE_GROUP_NAME --rgw-zone=ZONE_NAME --master --default --endpoints=HTTP_FQDN[, HTTP_FQDN]Copy to Clipboard Copied! Toggle word wrap Toggle overflow Example
radosgw-admin zone create --rgw-zonegroup=ldc2zg --rgw-zone=ldc2z --master --default --endpoints=http://rgw.example.com
[root@rgw2 ~]# radosgw-admin zone create --rgw-zonegroup=ldc2zg --rgw-zone=ldc2z --master --default --endpoints=http://rgw.example.comCopy to Clipboard Copied! Toggle word wrap Toggle overflow Commit the period:
Example
radosgw-admin period update --commit
[root@rgw2 ~]# radosgw-admin period update --commitCopy to Clipboard Copied! Toggle word wrap Toggle overflow Update
ceph.confwith thergw_realm,rgw_zonegroupandrgw_zonenames:Syntax
rgw_realm = REALM_NAME
rgw_zonegroup = ZONE_GROUP_NAME
rgw_zone = ZONE_NAME
rgw_realm = REALM_NAME
rgw_zonegroup = ZONE_GROUP_NAME
rgw_zone = ZONE_NAME
Copy to Clipboard Copied! Toggle word wrap Toggle overflow Example
rgw_realm = ldc2
rgw_zonegroup = ldc2zg
rgw_zone = ldc2z
rgw_realm = ldc2
rgw_zonegroup = ldc2zg
rgw_zone = ldc2z
Copy to Clipboard Copied! Toggle word wrap Toggle overflow Restart the RGW daemon:
Syntax
systemctl restart ceph-radosgw@rgw.$(hostname -s).rgw0.service
systemctl restart ceph-radosgw@rgw.$(hostname -s).rgw0.serviceCopy to Clipboard Copied! Toggle word wrap Toggle overflow Create a replicated realm on the first data center in the storage cluster:
Syntax
radosgw-admin realm create --rgw-realm=REPLICATED_REALM_1 --default
radosgw-admin realm create --rgw-realm=REPLICATED_REALM_1 --defaultCopy to Clipboard Copied! Toggle word wrap Toggle overflow Example
[user@rgw1 ~] radosgw-admin realm create --rgw-realm=rdc1 --default
[user@rgw1 ~] radosgw-admin realm create --rgw-realm=rdc1 --defaultCopy to Clipboard Copied! Toggle word wrap Toggle overflow Use the
--defaultflag to make the replicated realm default on the primary site.Create a master zonegroup for the first data center:
Syntax
radosgw-admin zonegroup create --rgw-zonegroup=RGW_ZONE_GROUP --endpoints=http://_RGW_NODE_NAME:80 --rgw-realm=_RGW_REALM_NAME --master --default
radosgw-admin zonegroup create --rgw-zonegroup=RGW_ZONE_GROUP --endpoints=http://_RGW_NODE_NAME:80 --rgw-realm=_RGW_REALM_NAME --master --defaultCopy to Clipboard Copied! Toggle word wrap Toggle overflow Example
radosgw-admin zonegroup create --rgw-zonegroup=rdc1zg --endpoints=http://rgw1:80 --rgw-realm=rdc1 --master --default
[root@rgw1 ~]# radosgw-admin zonegroup create --rgw-zonegroup=rdc1zg --endpoints=http://rgw1:80 --rgw-realm=rdc1 --master --defaultCopy to Clipboard Copied! Toggle word wrap Toggle overflow Create a master zone on the first data center:
Syntax
radosgw-admin zone create --rgw-zonegroup=RGW_ZONE_GROUP --rgw-zone=_MASTER_RGW_NODE_NAME --master --default --endpoints=HTTP_FQDN[,HTTP_FQDN]
radosgw-admin zone create --rgw-zonegroup=RGW_ZONE_GROUP --rgw-zone=_MASTER_RGW_NODE_NAME --master --default --endpoints=HTTP_FQDN[,HTTP_FQDN]Copy to Clipboard Copied! Toggle word wrap Toggle overflow Example
radosgw-admin zone create --rgw-zonegroup=rdc1zg --rgw-zone=rdc1z --master --default --endpoints=http://rgw.example.com
[root@rgw1 ~]# radosgw-admin zone create --rgw-zonegroup=rdc1zg --rgw-zone=rdc1z --master --default --endpoints=http://rgw.example.comCopy to Clipboard Copied! Toggle word wrap Toggle overflow Create a replication/synchronization user and add the system user to the master zone for multi-site:
Syntax
radosgw-admin user create --uid="r_REPLICATION_SYNCHRONIZATION_USER_" --display-name="Replication-Synchronization User" --system
radosgw-admin zone modify --rgw-zone=RGW_ZONE --access-key=ACCESS_KEY --secret=SECRET_KEY
radosgw-admin user create --uid="r_REPLICATION_SYNCHRONIZATION_USER_" --display-name="Replication-Synchronization User" --system
radosgw-admin zone modify --rgw-zone=RGW_ZONE --access-key=ACCESS_KEY --secret=SECRET_KEY
Copy to Clipboard Copied! Toggle word wrap Toggle overflow Example
radosgw-admin zone modify --rgw-zone=rdc1zg --access-key=3QV0D6ZMMCJZMSCXJ2QJ --secret=VpvQWcsfI9OPzUCpR4kynDLAbqa1OIKqRB6WEnH8
[root@rgw1 ~]# radosgw-admin zone modify --rgw-zone=rdc1zg --access-key=3QV0D6ZMMCJZMSCXJ2QJ --secret=VpvQWcsfI9OPzUCpR4kynDLAbqa1OIKqRB6WEnH8Copy to Clipboard Copied! Toggle word wrap Toggle overflow Commit the period:
Syntax
radosgw-admin period update --commit
radosgw-admin period update --commitCopy to Clipboard Copied! Toggle word wrap Toggle overflow Update
ceph.confwith thergw_realm,rgw_zonegroupandrgw_zonenames for the first data center:Syntax
rgw_realm = REALM_NAME
rgw_zonegroup = ZONE_GROUP_NAME
rgw_zone = ZONE_NAME
rgw_realm = REALM_NAME
rgw_zonegroup = ZONE_GROUP_NAME
rgw_zone = ZONE_NAME
Copy to Clipboard Copied! Toggle word wrap Toggle overflow Example
rgw_realm = rdc1
rgw_zonegroup = rdc1zg
rgw_zone = rdc1z
rgw_realm = rdc1
rgw_zonegroup = rdc1zg
rgw_zone = rdc1z
Copy to Clipboard Copied! Toggle word wrap Toggle overflow Restart the RGW daemon:
Syntax
systemctl restart ceph-radosgw@rgw.$(hostname -s).rgw0.service
systemctl restart ceph-radosgw@rgw.$(hostname -s).rgw0.serviceCopy to Clipboard Copied! Toggle word wrap Toggle overflow Pull the replicated realm on the second data center:
Syntax
radosgw-admin realm pull --url=https://tower-osd1.cephtips.com --access-key=ACCESS_KEY --secret-key=SECRET_KEY
radosgw-admin realm pull --url=https://tower-osd1.cephtips.com --access-key=ACCESS_KEY --secret-key=SECRET_KEYCopy to Clipboard Copied! Toggle word wrap Toggle overflow Example
radosgw-admin realm pull --url=https://tower-osd1.cephtips.com --access-key=3QV0D6ZMMCJZMSCXJ2QJ --secret-key=VpvQWcsfI9OPzUCpR4kynDLAbqa1OIKqRB6WEnH8
radosgw-admin realm pull --url=https://tower-osd1.cephtips.com --access-key=3QV0D6ZMMCJZMSCXJ2QJ --secret-key=VpvQWcsfI9OPzUCpR4kynDLAbqa1OIKqRB6WEnH8Copy to Clipboard Copied! Toggle word wrap Toggle overflow Pull the period from the first data center:
Syntax
radosgw-admin period pull --url=https://tower-osd1.cephtips.com --access-key=ACCESS_KEY --secret-key=SECRET_KEY
radosgw-admin period pull --url=https://tower-osd1.cephtips.com --access-key=ACCESS_KEY --secret-key=SECRET_KEYCopy to Clipboard Copied! Toggle word wrap Toggle overflow Example
radosgw-admin period pull --url=https://tower-osd1.cephtips.com --access-key=3QV0D6ZMMCJZMSCXJ2QJ --secret-key=VpvQWcsfI9OPzUCpR4kynDLAbqa1OIKqRB6WEnH8
radosgw-admin period pull --url=https://tower-osd1.cephtips.com --access-key=3QV0D6ZMMCJZMSCXJ2QJ --secret-key=VpvQWcsfI9OPzUCpR4kynDLAbqa1OIKqRB6WEnH8Copy to Clipboard Copied! Toggle word wrap Toggle overflow Create the secondary zone on the second data center:
Syntax
radosgw-admin zone create --rgw-zone=RGW_ZONE --rgw-zonegroup=RGW_ZONE_GROUP --endpoints=https://tower-osd4.cephtips.com --access-key=_ACCESS_KEY --secret-key=SECRET_KEY
radosgw-admin zone create --rgw-zone=RGW_ZONE --rgw-zonegroup=RGW_ZONE_GROUP --endpoints=https://tower-osd4.cephtips.com --access-key=_ACCESS_KEY --secret-key=SECRET_KEYCopy to Clipboard Copied! Toggle word wrap Toggle overflow Example
radosgw-admin zone create --rgw-zone=rdc2z --rgw-zonegroup=rdc1zg --endpoints=https://tower-osd4.cephtips.com --access-key=3QV0D6ZMMCJZMSCXJ2QJ --secret-key=VpvQWcsfI9OPzUCpR4kynDLAbqa1OIKqRB6WEnH8
[root@rgw2 ~]# radosgw-admin zone create --rgw-zone=rdc2z --rgw-zonegroup=rdc1zg --endpoints=https://tower-osd4.cephtips.com --access-key=3QV0D6ZMMCJZMSCXJ2QJ --secret-key=VpvQWcsfI9OPzUCpR4kynDLAbqa1OIKqRB6WEnH8Copy to Clipboard Copied! Toggle word wrap Toggle overflow Commit the period:
Syntax
radosgw-admin period update --commit
radosgw-admin period update --commitCopy to Clipboard Copied! Toggle word wrap Toggle overflow Update
ceph.confwith thergw_realm,rgw_zonegroupandrgw_zonenames for the second data center:Syntax
rgw_realm = REALM_NAME
rgw_zonegroup = ZONE_GROUP_NAME
rgw_zone = ZONE_NAME
rgw_realm = REALM_NAME
rgw_zonegroup = ZONE_GROUP_NAME
rgw_zone = ZONE_NAME
Copy to Clipboard Copied! Toggle word wrap Toggle overflow Example
rgw realm = rdc1
rgw zonegroup = rdc1zg
rgw zone = rdc2z
rgw realm = rdc1
rgw zonegroup = rdc1zg
rgw zone = rdc2z
Copy to Clipboard Copied! Toggle word wrap Toggle overflow Restart the Ceph Object Gateway daemon:
Syntax
systemctl restart ceph-radosgw@rgw.$(hostname -s).rgw0.service
systemctl restart ceph-radosgw@rgw.$(hostname -s).rgw0.serviceCopy to Clipboard Copied! Toggle word wrap Toggle overflow Log in to the second data center and verify the synchronization status on the master realm:
Syntax
radosgw-admin sync status
radosgw-admin sync statusCopy to Clipboard Copied! Toggle word wrap Toggle overflow Example
radosgw-admin sync status
[root@rgw2 ~]# radosgw-admin sync status
          realm 59762f08-470c-46de-b2b1-d92c50986e67 (ldc2)
      zonegroup 7cf8daf8-d279-4d5c-b73e-c7fd2af65197 (ldc2zg)
           zone 034ae8d3-ae0c-4e35-8760-134782cb4196 (ldc2z)
  metadata sync no sync (zone is master)
Copy to Clipboard Copied! Toggle word wrap Toggle overflow Log in to the first data center and verify the synchronization status for the replication-synchronization realm:
Syntax
radosgw-admin sync status --rgw-realm RGW_REALM_NAME
radosgw-admin sync status --rgw-realm RGW_REALM_NAMECopy to Clipboard Copied! Toggle word wrap Toggle overflow Example
Copy to Clipboard Copied! Toggle word wrap Toggle overflow To store and access data in the local site, create the user for local realm:
Syntax
radosgw-admin user create --uid="LOCAL_USER" --display-name="Local user" --rgw-realm=_REALM_NAME --rgw-zonegroup=ZONE_GROUP_NAME --rgw-zone=ZONE_NAME
radosgw-admin user create --uid="LOCAL_USER" --display-name="Local user" --rgw-realm=_REALM_NAME --rgw-zonegroup=ZONE_GROUP_NAME --rgw-zone=ZONE_NAMECopy to Clipboard Copied! Toggle word wrap Toggle overflow Example
radosgw-admin user create --uid="local-user" --display-name="Local user" --rgw-realm=ldc1 --rgw-zonegroup=ldc1zg --rgw-zone=ldc1z
[root@rgw2 ~]# radosgw-admin user create --uid="local-user" --display-name="Local user" --rgw-realm=ldc1 --rgw-zonegroup=ldc1zg --rgw-zone=ldc1zCopy to Clipboard Copied! Toggle word wrap Toggle overflow
By default, users are created under the default realm. For the users to access data in the local realm, the radosgw-admin command requires the --rgw-realm argument.