Chapter 3. Placement Groups (PGs)
Placement Groups (PGs) are invisible to Ceph clients, but they play an important role in Ceph Storage Clusters.
A Ceph Storage Cluster might require many thousands of OSDs to reach an exabyte level of storage capacity. Ceph clients store objects in pools, which are a logical subset of the overall cluster. The number of objects stored in a pool might easily run into the millions and beyond. A system with millions of objects or more cannot realistically track placement on a per-object basis and still perform well. Ceph assigns objects to placement groups, and placement groups to OSDs to make re-balancing dynamic and efficient.
All problems in computer science can be solved by another level of indirection, except of course for the problem of too many indirections. | ||
| -- David Wheeler | ||
3.1. About Placement Groups
Tracking object placement on a per-object basis within a pool is computationally expensive at scale. To facilitate high performance at scale, Ceph subdivides a pool into placement groups, assigns each individual object to a placement group, and assigns the placement group to a primary OSD. If an OSD fails or the cluster re-balances, Ceph can move or replicate an entire placement group—that is, all of the objects in the placement groups—without having to address each object individually. This allows a Ceph cluster to re-balance or recover efficiently.

When CRUSH assigns a placement group to an OSD, it calculates a series of OSDs—the first being the primary. The osd_pool_default_size setting minus 1 for replicated pools, and the number of coding chunks M for erasure-coded pools determine the number of OSDs storing a placement group that can fail without losing data permanently. Primary OSDs use CRUSH to identify the secondary OSDs and copy the placement group’s contents to the secondary OSDs. For example, if CRUSH assigns an object to a placement group, and the placement group is assigned to OSD 5 as the primary OSD, if CRUSH calculates that OSD 1 and OSD 8 are secondary OSDs for the placement group, the primary OSD 5 will copy the data to OSDs 1 and 8. By copying data on behalf of clients, Ceph simplifies the client interface and reduces the client workload. The same process allows the Ceph cluster to recover and rebalance dynamically.

When the primary OSD fails and gets marked out of the cluster, CRUSH assigns the placement group to another OSD, which receives copies of objects in the placement group. Another OSD in the Up Set will assume the role of the primary OSD.
When you increase the number of object replicas or coding chunks, CRUSH will assign each placement group to additional OSDs as required.
PGs do not own OSDs. CRUSH assigns many placement groups to each OSD pseudo-randomly to ensure that data gets distributed evenly across the cluster.
3.2. Placement Groups states
When you check the storage cluster’s status with the ceph -s or ceph -w commands, Ceph reports on the status of the placement groups (PGs). A PG has one or more states. The optimum state for PGs in the PG map is an active + clean state.
- activating
- The PG is peered, but not yet active.
- active
- Ceph processes requests to the PG.
- backfill_toofull
- A backfill operation is waiting because the destination OSD is over the backfillfull ratio.
- backfill_unfound
- Backfill stopped due to unfound objects.
- backfill_wait
- The PG is waiting in line to start backfill.
- backfilling
- Ceph is scanning and synchronizing the entire contents of a PG instead of inferring what contents need to be synchronized from the logs of recent operations. Backfill is a special case of recovery.
- clean
- Ceph replicated all objects in the PG accurately.
- creating
- Ceph is still creating the PG.
- deep
- Ceph is checking the PG data against stored checksums.
- degraded
- Ceph has not replicated some objects in the PG accurately yet.
- down
-
A replica with necessary data is down, so the PG is offline. A PG with less than
min_sizereplicas is marked as down. Useceph health detailto understand the backing OSD state. - forced_backfill
- High backfill priority of that PG is enforced by user.
- forced_recovery
- High recovery priority of that PG is enforced by user.
- incomplete
-
Ceph detects that a PG is missing information about writes that might have occurred, or does not have any healthy copies. If you see this state, try to start any failed OSDs that might contain the needed information. In the case of an erasure coded pool, temporarily reducing
min_sizemight allow recovery. - inconsistent
- Ceph detects inconsistencies in one or more replicas of an object in the PG, such as objects are the wrong size, objects are missing from one replica after recovery finished.
- peering
- The PG is undergoing the peering process. A peering process should clear off without much delay, but if it stays and the number of PGs in a peering state does not reduce in number, the peering might be stuck.
- peered
-
The PG has peered, but cannot serve client IO due to not having enough copies to reach the pool’s configured
min_sizeparameter. Recovery might occur in this state, so the PG might heal up tomin_sizeeventually. - recovering
- Ceph is migrating or synchronizing objects and their replicas.
- recovery_toofull
- A recovery operation is waiting because the destination OSD is over its full ratio.
- recovery_unfound
- Recovery stopped due to unfound objects.
- recovery_wait
- The PG is waiting in line to start recovery.
- remapped
- The PG is temporarily mapped to a different set of OSDs from what CRUSH specified.
- repair
- Ceph is checking the PG and repairing any inconsistencies it finds, if possible.
- replay
- The PG is waiting for clients to replay operations after an OSD crashed.
- snaptrim
- Trimming snaps.
- snaptrim_error
- Error stopped trimming snaps.
- snaptrim_wait
- Queued to trim snaps.
- scrubbing
- Ceph is checking the PG metadata for inconsistencies.
- splitting
- Ceph is splitting the PG into multiple PGs.
- stale
- The PG is in an unknown state; the monitors have not received an update for it since the PG mapping changed.
- undersized
- The PG has fewer copies than the configured pool replication level.
- unknown
-
The
ceph-mgrhas not yet received any information about the PG’s state from an OSD since Ceph Manager started up.
Additional resources
- See the knowledge base What are the possible Placement Group states in an Ceph cluster for more information.
3.3. Placement Group Tradeoffs
Data durability and data distribution among all OSDs call for more placement groups but their number should be reduced to the minimum required for maximum performance to conserve CPU and memory resources.
3.3.1. Data Durability
Ceph strives to prevent the permanent loss of data. However, after an OSD fails, the risk of permanent data loss increases until the data it had is fully recovered. Permanent data loss, though rare, is still possible. The following scenario describes how Ceph could permanently lose data in a single placement group with three copies of the data:
- An OSD fails and all copies of the object it contains are lost. For all objects within a placement group stored on the OSD, the number of replicas suddenly drops from three to two.
- Ceph starts recovery for each placement group stored on the failed OSD by choosing a new OSD to re-create the third copy of all objects for each placement group.
- The second OSD containing a copy of the same placement group fails before the new OSD is fully populated with the third copy. Some objects will then only have one surviving copy.
- Ceph picks yet another OSD and keeps copying objects to restore the desired number of copies.
- The third OSD containing a copy of the same placement group fails before recovery is complete. If this OSD contained the only remaining copy of an object, the object is lost permanently.
Hardware failure isn’t an exception, but an expectation. To prevent the foregoing scenario, ideally the recovery process should be as fast as reasonably possible. The size of your cluster, your hardware configuration and the number of placement groups play an important role in total recovery time.
Small clusters don’t recover as quickly.
In a cluster containing 10 OSDs with 512 placement groups in a three replica pool, CRUSH will give each placement group three OSDs. Each OSD will end up hosting (512 * 3) / 10 = ~150 placement groups. When the first OSD fails, the cluster will start recovery for all 150 placement groups simultaneously.
It is likely that Ceph stored the remaining 150 placement groups randomly across the 9 remaining OSDs. Therefore, each remaining OSD is likely to send copies of objects to all other OSDs and also receive some new objects, because the remaining OSDs become responsible for some of the 150 placement groups now assigned to them.
The total recovery time depends upon the hardware supporting the pool. For example, in a 10 OSD cluster, if a host contains one OSD with a 1 TB SSD, and a 10 GB/s switch connects each of the 10 hosts, the recovery time will take M minutes. By contrast, if a host contains two SATA OSDs and a 1 GB/s switch connects the five hosts, recovery will take substantially longer. Interestingly, in a cluster of this size, the number of placement groups has almost no influence on data durability. The placement group count could be 128 or 8192 and the recovery would not be slower or faster.
However, growing the same Ceph cluster to 20 OSDs instead of 10 OSDs is likely to speed up recovery and therefore improve data durability significantly. Why? Each OSD now participates in only 75 placement groups instead of 150. The 20 OSD cluster will still require all 19 remaining OSDs to perform the same amount of copy operations in order to recover. In the 10 OSD cluster, each OSDs had to copy approximately 100 GB. In the 20 OSD cluster each OSD only has to copy 50 GB each. If the network was the bottleneck, recovery will happen twice as fast. In other words, recovery time decreases as the number of OSDs increases.
In large clusters, PG count is important!
If the exemplary cluster grows to 40 OSDs, each OSD will only host 35 placement groups. If an OSD dies, recovery time will decrease unless another bottleneck precludes improvement. However, if this cluster grows to 200 OSDs, each OSD will only host approximately 7 placement groups. If an OSD dies, recovery will happen between at most of 21 (7 * 3) OSDs in these placement groups: recovery will take longer than when there were 40 OSDs, meaning the number of placement groups should be increased!
No matter how short the recovery time, there is a chance for another OSD storing the placement group to fail while recovery is in progress.
In the 10 OSD cluster described above, if any OSD fails, then approximately 8 placement groups (that is 75 pgs / 9 osds being recovered) will only have one surviving copy. And if any of the 8 remaining OSDs fail, the last objects of one placement group are likely to be lost (that is 8 pgs / 8 osds with only one remaining copy being recovered). This is why starting with a somewhat larger cluster is preferred (for example, 50 OSDs).
When the size of the cluster grows to 20 OSDs, the number of placement groups damaged by the loss of three OSDs drops. The second OSD lost will degrade approximately 2 (that is 35 pgs / 19 osds being recovered) instead of 8 and the third OSD lost will only lose data if it is one of the two OSDs containing the surviving copy. In other words, if the probability of losing one OSD is 0.0001% during the recovery time frame, it goes from 8 * 0.0001% in the cluster with 10 OSDs to 2 * 0.0001% in the cluster with 20 OSDs. Having 512 or 4096 placement groups is roughly equivalent in a cluster with less than 50 OSDs as far as data durability is concerned.
In a nutshell, more OSDs means faster recovery and a lower risk of cascading failures leading to the permanent loss of a placement group and its objects.
When you add an OSD to the cluster, it might take a long time to populate the new OSD with placement groups and objects. However there is no degradation of any object and adding the OSD has no impact on data durability.
3.3.2. Data Distribution
Ceph seeks to avoid hot spots—that is, some OSDs receive substantially more traffic than other OSDs. Ideally, CRUSH assigns objects to placement groups evenly so that when the placement groups get assigned to OSDs (also pseudo randomly), the primary OSDs store objects such that they are evenly distributed across the cluster and hot spots and network over-subscription problems cannot develop because of data distribution.
Since CRUSH computes the placement group for each object, but does not actually know how much data is stored in each OSD within this placement group, the ratio between the number of placement groups and the number of OSDs might influence the distribution of the data significantly.
For instance, if there was only one placement group with ten OSDs in a three replica pool, Ceph would only use three OSDs to store data because CRUSH would have no other choice. When more placement groups are available, CRUSH is more likely to evenly spread objects across OSDs. CRUSH also evenly assigns placement groups to OSDs.
As long as there are one or two orders of magnitude more placement groups than OSDs, the distribution should be even. For instance, 256 placement groups for 3 OSDs, 512 or 1024 placement groups for 10 OSDs, and so forth.
The ratio between OSDs and placement groups usually solves the problem of uneven data distribution for Ceph clients that implement advanced features like object striping. For example, a 4 TB block device might get sharded up into 4 MB objects.
The ratio between OSDs and placement groups does not address uneven data distribution in other cases, because CRUSH does not take object size into account. Using the librados interface to store some relatively small objects and some very large objects can lead to uneven data distribution. For example, one million 4K objects totaling 4 GB are evenly spread among 1000 placement groups on 10 OSDs. They will use 4 GB / 10 = 400 MB on each OSD. If one 400 MB object is added to the pool, the three OSDs supporting the placement group in which the object has been placed will be filled with 400 MB + 400 MB = 800 MB while the seven others will remain occupied with only 400 MB.
3.3.3. Resource Usage
For each placement group, OSDs and Ceph monitors need memory, network and CPU at all times, and even more during recovery. Sharing this overhead by clustering objects within a placement group is one of the main reasons placement groups exist.
Minimizing the number of placement groups saves significant amounts of resources.
3.4. PG Count
The number of placement groups in a pool plays a significant role in how a cluster peers, distributes data and rebalances. Small clusters don’t see as many performance improvements compared to large clusters by increasing the number of placement groups. However, clusters that have many pools accessing the same OSDs might need to carefully consider PG count so that Ceph OSDs use resources efficiently.
Red Hat recommends 100 to 200 PGs per OSD.
3.4.1. PG Calculator
The PG calculator calculates the number of placement groups for you and addresses specific use cases. The PG calculator is especially helpful when using Ceph clients like the Ceph Object Gateway where there are many pools typically using the same rule (CRUSH hierarchy). You might still calculate PGs manually using the guidelines in PG Count for Small Clusters and Calculating PG Count. However, the PG calculator is the preferred method of calculating PGs.
See Ceph Placement Groups (PGs) per Pool Calculator on the Red Hat Customer Portal for details.
3.4.2. Configuring Default PG Counts
When you create a pool, you also create a number of placement groups for the pool. If you don’t specify the number of placement groups, Ceph will use the default value of 8, which is unacceptably low. You can increase the number of placement groups for a pool, but we recommend setting reasonable default values in your Ceph configuration file too.
osd pool default pg num = 100
osd pool default pgp num = 100
You need to set both the number of placement groups (total), and the number of placement groups used for objects (used in PG splitting). They should be equal.
3.4.3. PG Count for Small Clusters
Small clusters don’t benefit from large numbers of placement groups. As the number of OSDs increase, choosing the right value for pg_num and pgp_num becomes more important because it has a significant influence on the behavior of the cluster as well as the durability of the data when something goes wrong (that is the probability that a catastrophic event leads to data loss). It is important to use the PG calculator with small clusters.
3.4.4. Calculating PG Count
If you have more than 50 OSDs, we recommend approximately 50-100 placement groups per OSD to balance out resource usage, data durability and distribution. If you have less than 50 OSDs, choosing among the PG Count for Small Clusters is ideal. For a single pool of objects, you can use the following formula to get a baseline:
                (OSDs * 100)
   Total PGs =  ------------
                 pool size
Where pool size is either the number of replicas for replicated pools or the K+M sum for erasure coded pools (as returned by ceph osd erasure-code-profile get).
You should then check if the result makes sense with the way you designed your Ceph cluster to maximize data durability, data distribution and minimize resource usage.
The result should be rounded up to the nearest power of two. Rounding up is optional, but recommended for CRUSH to evenly balance the number of objects among placement groups.
For a cluster with 200 OSDs and a pool size of 3 replicas, you would estimate your number of PGs as follows:
   (200 * 100)
   ----------- = 6667. Nearest power of 2: 8192
        3
With 8192 placement groups distributed across 200 OSDs, that evaluates to approximately 41 placement groups per OSD. You also need to consider the number of pools you are likely to use in your cluster, since each pool will create placement groups too. Ensure that you have a reasonable maximum PG count.
3.4.5. Maximum PG Count
When using multiple data pools for storing objects, you need to ensure that you balance the number of placement groups per pool with the number of placement groups per OSD so that you arrive at a reasonable total number of placement groups. The aim is to achieve reasonably low variance per OSD without taxing system resources or making the peering process too slow.
In an exemplary Ceph Storage Cluster consisting of 10 pools, each pool with 512 placement groups on ten OSDs, there are a total of 5,120 placement groups spread over ten OSDs, or 512 placement groups per OSD. That might not use too many resources depending on your hardware configuration. By contrast, if you create 1,000 pools with 512 placement groups each, the OSDs will handle ~50,000 placement groups each and it would require significantly more resources. Operating with too many placement groups per OSD can significantly reduce performance, especially during rebalancing or recovery.
The Ceph Storage Cluster has a default maximum value of 300 placement groups per OSD. You can set a different maximum value in your Ceph configuration file.
mon pg warn max per osdCeph Object Gateways deploy with 10-15 pools, so you might consider using less than 100 PGs per OSD to arrive at a reasonable maximum number.
3.5. Auto-scaling placement groups
The number of placement groups (PGs) in a pool plays a significant role in how a cluster peers, distributes data, and rebalances.
Auto-scaling the number of PGs can make managing the cluster easier. The pg-autoscaling command provides recommendations for scaling PGs, or automatically scales PGs based on how the cluster is being used.
- To learn more about how auto-scaling works, see Section 3.5.1, “Placement group auto-scaling”.
- To enable, or disable auto-scaling, see Section 3.5.3, “Setting placement group auto-scaling modes”.
- To view placement group scaling recommendations, see Section 3.5.4, “Viewing placement group scaling recommendations”.
- To set placement group auto-scaling, see Section 3.5.5, “Setting placement group auto-scaling”.
-
To update the autoscaler globally, see Section 3.5.6, “Updating
noautoscaleflag” - To set target pool size see, Section 3.5.7, “Specifying target pool size”.
3.5.1. Placement group auto-scaling
How the auto-scaler works
The auto-scaler analyzes pools and adjusts on a per-subtree basis. Because each pool can map to a different CRUSH rule, and each rule can distribute data across different devices, Ceph considers utilization of each subtree of the hierarchy independently. For example, a pool that maps to OSDs of class ssd, and a pool that maps to OSDs of class hdd, will each have optimal PG counts that depend on the number of those respective device types.
3.5.2. Placement group splitting and merging
Splitting
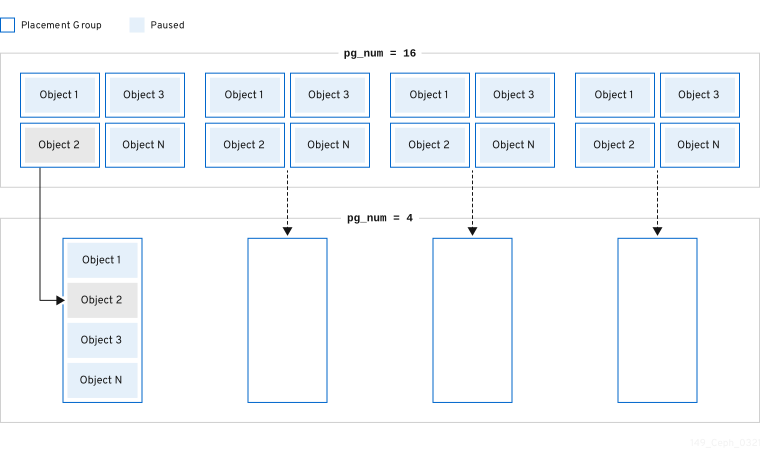
Red Hat Ceph Storage can split existing placement groups (PGs) into smaller PGs, which increases the total number of PGs for a given pool. Splitting existing placement groups (PGs) allows a small Red Hat Ceph Storage cluster to scale over time as storage requirements increase. The PG auto-scaling feature can increase the pg_num value, which causes the existing PGs to split as the storage cluster expands. If the PG auto-scaling feature is disabled, then you can manually increase the pg_num value, which triggers the PG split process to begin. For example, increasing the pg_num value from 4 to 16, will split into four pieces. Increasing the pg_num value will also increase the pgp_num value, but the pgp_num value increases at a gradual rate. This gradual increase is done to minimize the impact to a storage cluster’s performance and to a client’s workload, because migrating object data adds a significant load to the system. By default, Ceph queues and moves no more than 5% of the object data that is in a "misplaced" state. This default percentage can be adjusted with the target_max_misplaced_ratio option.

Merging
Red Hat Ceph Storage can also merge two existing PGs into a larger PG, which decreases the total number of PGs. Merging two PGs together can be useful, especially when the relative amount of objects in a pool decreases over time, or when the initial number of PGs chosen was too large. While merging PGs can be useful, it is also a complex and delicate process. When doing a merge, pausing I/O to the PG occurs, and only one PG is merged at a time to minimize the impact to a storage cluster’s performance. Ceph works slowly on merging the object data until the new pg_num value is reached.
3.5.3. Setting placement group auto-scaling modes
Each pool in the Red Hat Ceph Storage cluster has a pg_autoscale_mode property for PGs that you can set to off, on, or warn.
-
off: Disables auto-scaling for the pool. It is up to the administrator to choose an appropriate PG number for each pool. Refer to the PG count section for more information. -
on: Enables automated adjustments of the PG count for the given pool. -
warn: Raises health alerts when the PG count needs adjustment.
In Red Hat Ceph Storage 5.0 and later releases, pg_autoscale_mode is on by default. Upgraded storage clusters retain the existing pg_autoscale_mode setting. The pg_auto_scale mode is on for the newly created pools. PG count is automatically adjusted, and ceph status might display a recovering state during PG count adjustment.
The autoscaler uses the bulk flag to determine which pool should start with a full complement of PGs and only scales down when the usage ratio across the pool is not even. However, if the pool does not have the bulk flag, the pool starts with minimal PGs and only when there is more usage in the pool.
The autoscaler identifies any overlapping roots and prevents the pools with such roots from scaling because overlapping roots can cause problems with the scaling process.
Procedure
Enable auto-scaling on an existing pool:
Syntax
ceph osd pool set POOL_NAME pg_autoscale_mode onExample
[ceph: root@host01 /]# ceph osd pool set testpool pg_autoscale_mode onEnable auto-scaling on a newly created pool:
Syntax
ceph config set global osd_pool_default_pg_autoscale_mode MODEExample
[ceph: root@host01 /]# ceph config set global osd_pool_default_pg_autoscale_mode onCreate a pool with the
bulkflag:Syntax
ceph osd pool create POOL_NAME --bulkExample
[ceph: root@host01 /]# ceph osd pool create testpool --bulkSet or unset the
bulkflag for an existing pool:ImportantThe values must be written as
true,false,1, or0.1is equivalent totrueand0is equivalent tofalse. If written with different capitalization, or with other content, an error is emitted.The following is an example of the command written with the wrong syntax:
[ceph: root@host01 /]# ceph osd pool set ec_pool_overwrite bulk True
Error EINVAL: expecting value 'true', 'false', '0', or '1'
Syntax
ceph osd pool set POOL_NAME bulk true/false/1/0Example
[ceph: root@host01 /]# ceph osd pool set testpool bulk trueGet the
bulkflag of an existing pool:Syntax
ceph osd pool get POOL_NAME bulkExample
[ceph: root@host01 /]# ceph osd pool get testpool bulk
bulk: true
3.5.4. Viewing placement group scaling recommendations
You can view the pool, it’s relative utilization and any suggested changes to the PG count in the storage cluster.
Prerequisites
- A running Red Hat Ceph Storage cluster
- Root-level access to all the nodes.
Procedure
You can view each pool, its relative utilization, and any suggested changes to the PG count using:
[ceph: root@host01 /]# ceph osd pool autoscale-statusOutput will look similar to the following:
POOL                     SIZE  TARGET SIZE  RATE  RAW CAPACITY   RATIO  TARGET RATIO  EFFECTIVE RATIO  BIAS  PG_NUM  NEW PG_NUM  AUTOSCALE  BULK
device_health_metrics      0                 3.0        374.9G  0.0000                                  1.0       1              on         False
cephfs.cephfs.meta     24632                 3.0        374.9G  0.0000                                  4.0      32              on         False
cephfs.cephfs.data         0                 3.0        374.9G  0.0000                                  1.0      32              on         False
.rgw.root               1323                 3.0        374.9G  0.0000                                  1.0      32              on         False
default.rgw.log         3702                 3.0        374.9G  0.0000                                  1.0      32              on         False
default.rgw.control        0                 3.0        374.9G  0.0000                                  1.0      32              on         False
default.rgw.meta         382                 3.0        374.9G  0.0000                                  4.0       8              on         False
SIZE is the amount of data stored in the pool.
TARGET SIZE, if present, is the amount of data the administrator has specified they expect to eventually be stored in this pool. The system uses the larger of the two values for its calculation.
RATE is the multiplier for the pool that determines how much raw storage capacity the pool uses. For example, a 3 replica pool has a ratio of 3.0, while a k=4,m=2 erasure coded pool has a ratio of 1.5.
RAW CAPACITY is the total amount of raw storage capacity on the OSDs that are responsible for storing the pool’s data.
RATIO is the ratio of the total capacity that the pool is consuming, that is, ratio = size * rate / raw capacity.
TARGET RATIO, if present, is the ratio of storage the administrator has specified that they expect the pool to consume relative to other pools with target ratios set. If both target size bytes and ratio are specified, the ratio takes precedence. The default value of TARGET RATIO is 0 unless it was specified while creating the pool. The more the --target_ratio you give in a pool, the larger the PGs you are expecting the pool to have.
EFFECTIVE RATIO, is the target ratio after adjusting in two ways: 1. subtracting any capacity expected to be used by pools with target size set. 2. normalizing the target ratios among pools with target ratio set so they collectively target the rest of the space. For example, 4 pools with target ratio 1.0 would have an effective ratio of 0.25. The system uses the larger of the actual ratio and the effective ratio for its calculation.
BIAS, is used as a multiplier to manually adjust a pool’s PG based on prior information about how much PGs a specific pool is expected to have. By default, the value if 1.0 unless it was specified when creating a pool. The more --bias you give in a pool, the larger the PGs you are expecting the pool to have.
PG_NUM is the current number of PGs for the pool, or the current number of PGs that the pool is working towards, if a pg_num change is in progress. NEW PG_NUM, if present, is the suggested number of PGs (pg_num). It is always a power of 2, and is only present if the suggested value varies from the current value by more than a factor of 3.
AUTOSCALE, is the pool pg_autoscale_mode, and is either on, off, or warn.
BULK, is used to determine which pool should start out with a full complement of PGs. BULK only scales down when the usage ratio cross the pool is not even. If the pool does not have this flag the pool starts out with a minimal amount of PGs and only used when there is more usage in the pool.
The BULK values are true, false, 1, or 0, where 1 is equivalent to true and 0 is equivalent to false. The default value is false.
Set the BULK value either during or after pool creation.
For more information about using the bulk flag, see Create a pool and Setting placement group auto-scaling modes.
3.5.5. Setting placement group auto-scaling
Allowing the cluster to automatically scale PGs based on cluster usage is the simplest approach to scaling PGs. Red Hat Ceph Storage takes the total available storage and the target number of PGs for the whole system, compares how much data is stored in each pool, and apportions the PGs accordingly. The command only makes changes to a pool whose current number of PGs (pg_num) is more than three times off from the calculated or suggested PG number.
The target number of PGs per OSD is based on the mon_target_pg_per_osd configurable. The default value is set to 100.
Procedure
To adjust
mon_target_pg_per_osd:ceph config set global mon_target_pg_per_osd numberFor example:
$ ceph config set global mon_target_pg_per_osd 150
3.5.5.1. Setting minimum and maximum number of placement groups for pools
Specify the minimum and maximum value of placement groups (PGs) in order to limit the auto-scaling range.
If a minimum value is set, Ceph does not automatically reduce, or recommend to reduce, the number of PGs to a value below the set minimum value.
If a minimum value is set, Ceph does not automatically increase, or recommend to increase, the number of PGs to a value above the set maximum value.
The minimum and maximum values can be set together, or separately.
In addition to the this procedure, the ceph osd pool create command has two command-line options that can be used to specify the minimum or maximum PG count at the time of pool creation.
Syntax
ceph osd pool create --pg-num-min NUMBER
ceph osd pool create --pg-num-max NUMBER
Example
ceph osd pool create --pg-num-min 50
ceph osd pool create --pg-num-max 150
Prerequisites
- A running Red Hat Ceph Storage cluster.
- Root-level access to the node.
Procedure
Set the minimum number of PGs for a pool:
Syntax
ceph osd pool set POOL_NAME pg_num_min NUMBERExample
[ceph: root@host01 /]# ceph osd pool set testpool pg_num_min 50Set the maximum number of PGs for a pool:
Syntax
ceph osd pool set POOL_NAME pg_num_max NUMBERExample
[ceph: root@host01 /]# ceph osd pool set testpool pg_num_max 150
3.5.6. Updating noautoscale flag
If you want to enable or disable the autoscaler for all the pools at the same time, you can use the noautoscale global flag. This global flag is useful during upgradation of the storage cluster when some OSDs are bounced or when the cluster is under maintenance. You can set the flag before any activity and unset it once the activity is complete.
By default, the noautoscale flag is set to off. When this flag is set, then all the pools have pg_autoscale_mode as off and all the pools have the autoscaler disabled.
Prerequisites
- A running Red Hat Ceph Storage cluster
- Root-level access to all the nodes.
Procedure
Get the value of the
noautoscaleflag:Example
[ceph: root@host01 /]# ceph osd pool get noautoscaleSet the
noautoscaleflag before any activity:Example
[ceph: root@host01 /]# ceph osd pool set noautoscaleUnset the
noautoscaleflag on completion of the activity:Example
[ceph: root@host01 /]# ceph osd pool unset noautoscale
3.5.7. Specifying target pool size
A newly created pool consumes a small fraction of the total cluster capacity and appears to the system that it will need a small number of PGs. However, in most cases, cluster administrators know which pools are expected to consume most of the system capacity over time. If you provide this information, known as the target size to Red Hat Ceph Storage, such pools can use a more appropriate number of PGs (pg_num) from the beginning. This approach prevents subsequent changes in pg_num and the overhead associated with moving data around when making those adjustments.
You can specify target size of a pool in these ways:
3.5.7.1. Specifying target size using the absolute size of the pool
Procedure
Set the
target sizeusing the absolute size of the pool in bytes:ceph osd pool set pool-name target_size_bytes valueFor example, to instruct the system that
mypoolis expected to consume 100T of space:$ ceph osd pool set mypool target_size_bytes 100T
You can also set the target size of a pool at creation time by adding the optional --target-size-bytes <bytes> argument to the ceph osd pool create command.
3.5.7.2. Specifying target size using the total cluster capacity
Procedure
Set the
target sizeusing the ratio of the total cluster capacity:ceph osd pool set pool-name target_size_ratio ratioFor Example:
$ ceph osd pool set mypool target_size_ratio 1.0tells the system that the pool
mypoolis expected to consume 1.0 relative to the other pools withtarget_size_ratioset. Ifmypoolis the only pool in the cluster, this means an expected use of 100% of the total capacity. If there is a second pool withtarget_size_ratioas 1.0, both pools would expect to use 50% of the cluster capacity.
You can also set the target size of a pool at creation time by adding the optional --target-size-ratio <ratio> argument to the ceph osd pool create command.
If you specify impossible target size values, for example, a capacity larger than the total cluster, or ratios that sum to more than 1.0, the cluster raises a POOL_TARGET_SIZE_RATIO_OVERCOMMITTED or POOL_TARGET_SIZE_BYTES_OVERCOMMITTED health warning.
If you specify both target_size_ratio and target_size_bytes for a pool, the cluster considers only the ratio, and raises a POOL_HAS_TARGET_SIZE_BYTES_AND_RATIO health warning.
3.6. PG Command-Line Reference
The ceph CLI allows you to set and get the number of placement groups for a pool, view the PG map and retrieve PG statistics.
3.6.1. Set the Number of PGs
To set the number of placement groups in a pool, you must specify the number of placement groups at the time you create the pool. See Create a Pool for details. Once you set placement groups for a pool, you can increase or decrease the number of placement groups. To change the number of placement groups, use the following command:
Syntax
ceph osd pool set POOL_NAME pg_num PG_NUMBERExample
[ceph: root@host01 /]# ceph osd pool set pool1 pg_num 60
set pool 2 pg_num to 60
Once you increase or decrease the number of placement groups, you must also adjust the number of placement groups for placement (pgp_num) before your cluster will rebalance. The pgp_num should be equal to the pg_num.
Syntax
ceph osd pool set POOL_NAME pgp_num PGP_NUMBERExample
[ceph: root@host01 /]# ceph osd pool set pool1 pgp_num 60
set pool 2 pgp_num to 60
3.6.2. Get the Number of PGs
Get the number of placement groups in a pool:
Syntax
ceph osd pool get POOL_NAME pg_numExample
[ceph: root@host01 /]# ceph osd pool get pool1 pg_num
pg_num: 60
3.6.3. Get a Cluster PG Statistics
Get statistics for the placement groups:
Syntax
ceph pg dump [--format FORMAT]
Valid formats are plain (default) and json.
3.6.4. Get Statistics for Stuck PGs
Get the statistics for all placement groups stuck in a specified state:
Syntax
ceph pg dump_stuck {inactive|unclean|stale|undersized|degraded [inactive|unclean|stale|undersized|degraded...]} INTEGERInactive Placement groups cannot process reads or writes because they are waiting for an OSD with the most up-to-date data to come up and in.
Unclean Placement groups contain objects that are not replicated the desired number of times. They should be recovering.
Stale Placement groups are in an unknown state - the OSDs that host them have not reported to the monitor cluster in a while (configured by mon_osd_report_timeout).
Valid formats are plain (default) and json. The threshold defines the minimum number of seconds the placement group is stuck before including it in the returned statistics (default 300 seconds).
3.6.5. Get a PG Map
Get the placement group map for a particular placement group:
Syntax
ceph pg map PG_IDExample
[ceph: root@host01 /]# ceph pg map 1.6c
osdmap e13 pg 1.6c (1.6c) -> up [1,0] acting [1,0]
Ceph returns the placement group map, the placement group, and the OSD status.
3.6.6. Get a PGs Statistics
Retrieve statistics for a particular placement group:
Syntax
ceph pg PG_ID query3.6.7. Scrub a Placement Group
Scrub a placement group:
Syntax
ceph pg scrub PG_IDCeph checks the primary and any replica nodes, generates a catalog of all objects in the placement group, and compares them to ensure that no objects are missing or mismatched, and their contents are consistent. Assuming the replicas all match, a final semantic sweep ensures that all of the snapshot-related object metadata is consistent. Errors are reported via logs.
3.6.8. Revert Lost
If the cluster has lost one or more objects, and you have decided to abandon the search for the lost data, you must mark the unfound objects as lost.
If all possible locations have been queried and objects are still lost, you might have to give up on the lost objects. This is possible given unusual combinations of failures that allow the cluster to learn about writes that were performed before the writes themselves are recovered.
Ceph supports only "revert" option, which either rolls back to a pervious version of the object or forgets about it if it was a new object. To mark the "unfound" objects as "lost", use the following command:
Syntax
ceph pg PG_ID mark_unfound_lost revert|deleteUse this feature with caution, because it might confuse applications that expect the object(s) to exist.