2.4. PKI with Certificate System
The Certificate System is comprised of subsystems which each contribute different functions of a public key infrastructure. A PKI environment can be customized to fit individual needs by implementing different features and functions for the subsystems.
Note
A conventional PKI environment provides the basic framework to manage certificates stored in software databases. This is a non-TMS environment, since it does not manage certificates on smart cards. A TMS environment manages the certificates on smart cards.
At a minimum, a non-TMS requires only a CA, but a non-TMS environment can use OCSP responders and KRA instances as well.
2.4.1. Issuing Certificates
Copy linkLink copied to clipboard!
As stated, the Certificate Manager is the heart of the Certificate System. It manages certificates at every stage, from requests through enrollment (issuing), renewal, and revocation.
The Certificate System supports enrolling and issuing certificates and processing certificate requests from a variety of end entities, such as web browsers, servers, and virtual private network (VPN) clients. Issued certificates conform to X.509 version 3 standards. Certificate System must be configured to handle CMC requests only through the evaluated interface.
2.4.1.1. Enrollment Using the Command Line
Copy linkLink copied to clipboard!
This section describes the general workflows when enrolling certificates using the command line.
2.4.1.1.1. Enrolling with CMC
Copy linkLink copied to clipboard!
To enroll a certificate with CMC, proceed as follows:
- Generate a PKCS #10 or CRMF certificate signing request (CSR) using a utility, such as
certutil,openssl,PKCS10Client, orCRMFPopClient. For details, see the Creating Certificate Signing Requests section in the Red Hat Certificate System Administration Guide (Common Criteria Edition).Note
If key archival is enabled in the Key Recovery Agent (KRA), use theCRMFPopClientutility with the KRA's transport certificate in Privacy Enhanced Mail (PEM) format set in thekra.transportfile. - Use the
CMCRequestutility to convert the CSR into a CMC request. TheCMCRequestutility uses a configuration file as input. This file contains, for example, the path to the CSR and the CSR's format.For further details and examples, see the CMCRequest(1) man page. - Use the
HttpClientutility to send the CMC request to the CA.HttpClientuses a configuration file with settings, such as the path to the CMC request file and the servlet.If theHttpClientcommand succeeds, the utility receives a PKCS #7 chain with CMC status controls in a CMC response from the CA.For details about what parameters the utility provides, enter theHttpClientcommand without any parameters. - Use the
CMCResponseutility to check the issuance result of the CMC response file generated byHttpClient. If the request is successful,CMCResponsedisplays the certificate chain in a readable format along with status information.For further details, see the CMCResponse(1) man page. - Import the new certificate into the application. For details, follow the instructions of the application to which you want to import the certificate.
Note
The certificate retrieved byHttpClientis in CMC response format that contains PKCS #7. If the application supports only Base64-encoded certificates, use theBtoAutility to convert the certificate.Additionally, certain applications require a header and footer for certificates in Privacy Enhanced Mail (PEM) format. If these are required, add them manually to the PEM file after you converted the certificate.
2.4.1.1.2. CMC Enrollment without POP
Copy linkLink copied to clipboard!
In situations when Proof Of Possession (POP) is missing, the
HttpClient utility receives an EncryptedPOP CMC status, which is displayed by the CMCResponse command. In this case, enter the CMCRequest command again with different parameters in the configuration file.
For details, see the The CMC Enrollment Process section in the Red Hat Certificate System Administration Guide (Common Criteria Edition).
2.4.1.1.3. Signed CMC Requests
Copy linkLink copied to clipboard!
CMC requests can either be signed by a user or a CA agent:
- If an agent signs the request, set the authentication method in the profile to
CMCAuth. - If a user signs the request, set the authentication method in the profile to
CMCUserSignedAuth.
For details, see the CMC Authentication Plug-ins section in the Red Hat Certificate System Administration Guide (Common Criteria Edition).
2.4.1.1.4. Unsigned CMC Requests
Copy linkLink copied to clipboard!
When the
CMCUserSignedAuth authentication plug-in is configured in the profile, you must use an unsigned CMC request in combination with the Shared Secret authentication mechanism.
Note
Unsigned CMC requests are also called
self-signed CMC requests.
For details, see the CMC Authentication Plug-ins and The CMC Shared Secret Feature sections in the Red Hat Certificate System Administration Guide (Common Criteria Edition).
2.4.1.1.6. Simple CMC Requests
Copy linkLink copied to clipboard!
Certificate System allows simple CMC requests. However, this process does not support the same level of security requirements as full CMC requests and, therefore, must only be used in a secure environment.
When using simple CMC requests, set the following in the
Copy to Clipboard
Copied!
Toggle word wrap
Toggle overflow
HttpClient utility's configuration file:
servlet=/ca/ee/ca/profileSubmitCMCSimple?profileId=caECSimpleCMCUserCert
servlet=/ca/ee/ca/profileSubmitCMCSimple?profileId=caECSimpleCMCUserCert2.4.1.2. Certificate Profiles
Copy linkLink copied to clipboard!
The Certificate System uses certificate profiles to configure the content of the certificate, the constraints for issuing the certificate, the enrollment method used, and the input and output forms for that enrollment. A single certificate profile is associated with issuing a particular type of certificate.
A set of certificate profiles is included for the most common certificate types; the profile settings can be modified. Certificate profiles are configured by an administrator, and then sent to the agent services page for agent approval. Once a certificate profile is approved, it is enabled for use. In case of a UI-enrollment, a dynamically-generated HTML form for the certificate profile is used in the end-entities page for certificate enrollment, which calls on the certificate profile. In case of a command line-based enrollment, the certificate profile is called upon to perform the same processing, such as authentication, authorization, input, output, defaults, and constraints. The server verifies that the defaults and constraints set in the certificate profile are met before acting on the request and uses the certificate profile to determine the content of the issued certificate.
The Certificate Manager can issue certificates with any of the following characteristics, depending on the configuration in the profiles and the submitted certificate request:
- Certificates that are X.509 version 3-compliant
- Unicode support for the certificate subject name and issuer name
- Support for empty certificate subject names
- Support for customized subject name components
- Support for customized extensions
By default, the certificate enrollment profiles are stored in
<instance directory>/ca/profiles/ca with names in the format of <profile id>.cfg. LDAP-based profiles are possible with proper pkispawn configuration parameters.
2.4.1.3. Authentication for Certificate Enrollment
Copy linkLink copied to clipboard!
Certificate System provides authentication options for certificate enrollment. These include agent-approved enrollment, in which an agent processes the request, and automated enrollment, in which an authentication method is used to authenticate the end entity and then the CA automatically issues a certificate. CMC enrollment is also supported, which automatically processes a request approved by an agent.
2.4.1.4. Cross-Pair Certificates
Copy linkLink copied to clipboard!
It is possible to create a trusted relationship between two separate CAs by issuing and storing cross-signed certificates between these two CAs. By using cross-signed certificate pairs, certificates issued outside the organization's PKI can be trusted within the system.
2.4.2. Renewing Certificates
Copy linkLink copied to clipboard!
When certificates reach their expiration date, they can either be allowed to lapse, or they can be renewed.
Renewal regenerates a certificate request using the existing key pairs for that certificate, and then resubmits the request to Certificate Manager. The renewed certificate is identical to the original (since it was created from the same profile using the same key material) with one exception — it has a different, later expiration date.
Renewal can make managing certificates and relationships between users and servers much smoother, because the renewed certificate functions precisely as the old one. For user certificates, renewal allows encrypted data to be accessed without any loss.
2.4.3. Publishing Certificates and CRLs
Copy linkLink copied to clipboard!
Certificates can be published to files and an LDAP directory, and CRLs to files, an LDAP directory, and an OCSP responder. The publishing framework provides a robust set of tools to publish to all three places and to set rules to define with more detail which types of certificates or CRLs are published where.
2.4.4. Revoking Certificates and Checking Status
Copy linkLink copied to clipboard!
End entities can request that their own certificates be revoked. When an end entity makes the request, the certificate has to be presented to the CA. If the certificate and the keys are available, the request is processed and sent to the Certificate Manager, and the certificate is revoked. The Certificate Manager marks the certificate as revoked in its database and adds it to any applicable CRLs.
An agent can revoke any certificate issued by the Certificate Manager by searching for the certificate in the agent services interface and then marking it revoked. Once a certificate is revoked, it is marked revoked in the database and in the publishing directory, if the Certificate is set up for publishing.
If the internal OCSP service has been configured, the service determines the status of certificates by looking them up in the internal database.
Automated notifications can be set to send email messages to end entities when their certificates are revoked by enabling and configuring the certificate revoked notification message.
2.4.4.1. Revoking Certificates
Copy linkLink copied to clipboard!
Users can revoke their certificates using the
CMCRequest utility on the command line. For details, see the Performing a CMC Revocation section in the Red Hat Certificate System Administration Guide (Common Criteria Edition).
2.4.4.2. Certificate Status
Copy linkLink copied to clipboard!
2.4.4.2.1. CRLs
Copy linkLink copied to clipboard!
The Certificate System can create certificate revocation lists (CRLs) from a configurable framework which allows user-defined issuing points so a CRL can be created for each issuing point. Delta CRLs can also be created for any issuing point that is defined. CRLs can be issued for each type of certificate, for a specific subset of a type of certificate, or for certificates generated according to a profile or list of profiles. The extensions used and the frequency and intervals when CRLs are published can all be configured.
2.4.4.2.2. OCSP Services
Copy linkLink copied to clipboard!
The Certificate System CA supports the Online Certificate Status Protocol (OCSP) as defined in PKIX standard RFC 2560. The OCSP protocol enables OCSP-compliant applications to determine the state of a certificate, including the revocation status, without having to directly check a CRL published by a CA to the validation authority. The validation authority, which is also called an OCSP responder, checks for the application.
- A CA is set up to issue certificates that include the Authority Information Access extension, which identifies an OCSP responder that can be queried for the status of the certificate.
- The CA periodically publishes CRLs to an OCSP responder.
- The OCSP responder maintains the CRL it receives from the CA.
- An OCSP-compliant client sends requests containing all the information required to identify the certificate to the OCSP responder for verification. The applications determine the location of the OCSP responder from the value of the Authority Information Access extension in the certificate being validated.
- The OCSP responder determines if the request contains all the information required to process it. If it does not or if it is not enabled for the requested service, a rejection notice is sent. If it does have enough information, it processes the request and sends back a report stating the status of the certificate.
2.4.4.2.2.1. OCSP Response Signing
Copy linkLink copied to clipboard!
Every response that the client receives, including a rejection notification, is digitally signed by the responder; the client is expected to verify the signature to ensure that the response came from the responder to which it submitted the request. The key the responder uses to sign the message depends on how the OCSP responder is deployed in a PKI setup. RFC 2560 recommends that the key used to sign the response belong to one of the following:
- The CA that issued the certificate whose status is being checked.
- A responder with a public key trusted by the client. Such a responder is called a trusted responder.
- A responder that holds a specially marked certificate issued to it directly by the CA that revokes the certificates and publishes the CRL. Possession of this certificate by a responder indicates that the CA has authorized the responder to issue OCSP responses for certificates revoked by the CA. Such a responder is called a CA-designated responder or a CA-authorized responder.
The end-entities page of a Certificate Manager includes a form for manually requesting a certificate for the OCSP responder. The default enrollment form includes all the attributes that identify the certificate as an OCSP responder certificate. The required certificate extensions, such as OCSPNoCheck and Extended Key Usage, can be added to the certificate when the certificate request is submitted.
2.4.4.2.2.2. OCSP Responses
Copy linkLink copied to clipboard!
The OCSP response that the client receives indicates the current status of the certificate as determined by the OCSP responder. The response could be any of the following:
- Good or Verified . Specifies a positive response to the status inquiry, meaning the certificate has not been revoked. It does not necessarily mean that the certificate was issued or that it is within the certificate's validity interval. Response extensions may be used to convey additional information on assertions made by the responder regarding the status of the certificate.
- Revoked . Specifies that the certificate has been revoked, either permanently or temporarily.
Based on the status, the client decides whether to validate the certificate.
Note
The OCSP responder will never return a response of Unknown. The response will always be either Good or Revoked.
2.4.4.2.2.3. OCSP Services
Copy linkLink copied to clipboard!
There are two ways to set up OCSP services:
- The OCSP built into the Certificate Manager
- The Online Certificate Status Manager subsystem
In addition to the built-in OCSP service, the Certificate Manager can publish CRLs to an OCSP-compliant validation authority. CAs can be configured to publish CRLs to the Certificate System Online Certificate Status Manager. The Online Certificate Status Manager stores each Certificate Manager's CRL in its internal database and uses the appropriate CRL to verify the revocation status of a certificate when queried by an OCSP-compliant client.
The Certificate Manager can generate and publish CRLs whenever a certificate is revoked and at specified intervals. Because the purpose of an OCSP responder is to facilitate immediate verification of certificates, the Certificate Manager should publish the CRL to the Online Certificate Status Manager every time a certificate is revoked. Publishing only at intervals means that the OCSP service is checking an outdated CRL.
Note
If the CRL is large, the Certificate Manager can take a considerable amount of time to publish the CRL.
The Online Certificate Status Manager stores each Certificate Manager's CRL in its internal database and uses it as the CRL to verify certificates. The Online Certificate Status Manager can also use the CRL published to an LDAP directory, meaning the Certificate Manager does not have to update the CRLs directly to the Online Certificate Status Manager.
2.4.5. Archiving, Recovering, and Rotating Keys
Copy linkLink copied to clipboard!
To archive private encryption keys and recover them later, the PKI configuration must include the following elements:
- Clients that can generate keys and CSRs in CRMF format. For details, see the Creating Certificate Signing Requests section in the Red Hat Certificate System Administration Guide (Common Criteria Edition).
- Clients that can transform the CRMF request into CMC, such as the
CMCRequestutility. - Clients that can submit the CMC request with embedded CRMF request to the CA through a specified enrollment profile.
- An installed and configured KRA.
Only keys that are used exclusively for encrypting data should be archived; signing keys in particular should never be archived. Having two copies of a signing key makes it impossible to identify with certainty who used the key; a second archived copy could be used to impersonate the digital identity of the original key owner.
2.4.5.1. Archiving Keys
Copy linkLink copied to clipboard!
If an end entity loses a private encryption key or is unavailable to use the private key, the key must be recovered before any data that was encrypted with the corresponding public key can be read. Recovery is possible if the private key was archived when the key was generated.
There are some common situations when it is necessary to recover encryption keys:
- An employee loses the private encryption key and cannot read encrypted mail messages.
- An employee is on an extended leave, and someone needs to access an encrypted document.
- An employee leaves the company, and company officials need to perform an audit that requires gaining access to the employee's encrypted mail.
The KRA stores private encryption keys in a secure key repository in its internal database; each key is encrypted and stored as a key record and is given a unique key identifier.
The archived copy of the key remains wrapped with the KRA's storage key. It can be decrypted, or unwrapped, only by using the corresponding private key pair of the storage certificate. A combination of one or more key recovery (or KRA) agents' certificates authorizes the KRA to complete the key recovery to retrieve its private storage key and use it to decrypt/recover an archived private key.
The KRA indexes stored keys by key number, owner name, and a hash of the public key, allowing for highly efficient searching. The key recovery agents have the privilege to insert, delete, and search for key records.
- When the key recovery agents search by the key ID, only the key that corresponds to that ID is returned.
- When the agents search by user name, all stored keys belonging to that owner are returned.
- When the agents search by the public key in a certificate, only the corresponding private key is returned.
When a Certificate Manager receives a certificate request that contains the key archival option, it automatically forwards the request to the KRA to archive the encryption key. The private key is encrypted by the transport key, and the KRA receives the encrypted copy and stores the key in its key repository. To archive the key, the KRA uses two special key pairs:
- A transport key pair and corresponding certificate.
- A storage key pair.
Figure 2.2, “How the Key Archival Process Works” illustrates how the key archival process occurs when an end entity requests a certificate.
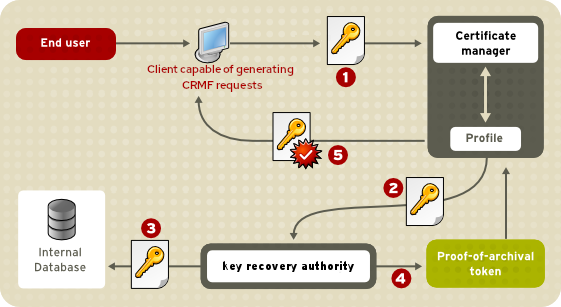
Figure 2.2. How the Key Archival Process Works
- The client generates a CRMF request and submits it through the CA’s enrollment portal.For more information on this procedure, see Example on Obtaining an Encryption-only certificate with Key Archival procedure in the Red Hat Certificate System Administration Guide (Common Criteria Edition).
- After approving the certificate request and issuing the certificate, the Certificate Manager sends it to the KRA for storage, along with the public key. The Certificate Manager waits for verification from the KRA that the private key has been received and stored and that it corresponds to the public encryption key.
- The KRA decrypts it with the private key. After confirming that the private encryption key corresponds to the public encryption key, the KRA encrypts it again with its public key pair of the storage key before storing it in its internal database.
- The Certificate Manager issues two certificates for the signing and encryption key pairs and returns them to the end entity.
Both subsystems subject the request to configured certificate profile constraints at appropriate stages. If the request fails to meet any of the profile constraints, the subsystem rejects the request.
2.4.5.2. Recovering Keys
Copy linkLink copied to clipboard!
The KRA supports agent-initiated key recovery. Agent-initiated recovery is when designated recovery agents use the key recovery form on the KRA agent services page to process and approve key recovery requests. With the approval of a specified number of agents, an organization can recover keys when the key's owner is unavailable or when keys have been lost.
Through the KRA agent services page, key recovery agents can collectively authorize and retrieve private encryption keys and associated certificates in a PKCS #12 package, which can then be imported into the client.
In key recovery authorization, one of the key recovery agents informs all required recovery agents about an impending key recovery. All recovery agents access the KRA key recovery page. One of the agents initiates the key recovery process. The KRA returns a notification to the agent includes a recovery authorization reference number identifying the particular key recovery request that the agent is required to authorize. Each agent uses the reference number and authorizes key recovery separately.
KRA supports Asynchronous recovery, meaning that each step of the recovery process — the initial request and each subsequent approval or rejection — is stored in the KRA's internal LDAP database, under the key entry. The status data for the recovery process can be retrieved even if the original browser session is closed or the KRA is shut down. Agents can search for the key to recover, without using a reference number.
This asynchronous recovery option is illustrated in Figure 2.3, “Asynchronous Recovery”.
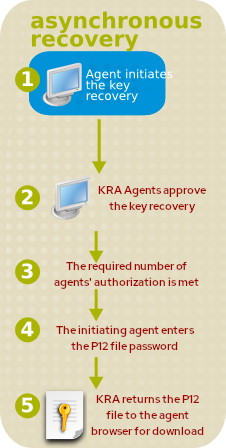
Figure 2.3. Asynchronous Recovery
The KRA informs the agent who initiated the key recovery process of the status of the authorizations.
When all of the authorizations are entered, the KRA checks the information. If the information presented is correct, it retrieves the requested key and returns it along with the corresponding certificate in the form of a PKCS #12 package to the agent who initiated the key recovery process.
Warning
The PKCS #12 package contains the private key. To minimize the risk of key compromise, the recovery agent must use a secure method to deliver the PKCS #12 package and password to the key recipient. The agent should use a good password to encrypt the PKCS #12 package and set up an appropriate delivery mechanism.
The key recovery agent scheme configures the KRA to recognize to which group the key recovery agents belong and specifies how many of these agents are required to authorize a key recovery request before the archived key is restored.
Certificate System uses an m-of-n ACL-based recovery scheme, rather than a secret-splitting-based recovery scheme. Its existing access control scheme ensures that recovery agents are appropriately authenticated over TLS and requires that the agent belong to a specific recovery agent group, by default the Key Recovery Authority Agents Group. The recovery request is executed only when m-of-n (a required number of) recovery agents have granted authorization to the request.
Important
The above information refers to using a web browser, such as Firefox. However, functionality critical to KRA usage is no longer included in Firefox version 31.6 that was released on Red Hat Enterprise Linux 7 platforms. In such cases, it is necessary to use the
pki utility to replicate this behavior. For more information, see the pki(1) and pki-key(1) man pages.
Apart from storing symmetric keys, KRA can also store secrets similar to symmetric keys, such as volume encryption secrets, or even passwords and passphrases. The
pki utility supports options that enable storing and retrieving these other types of secrets.
2.4.5.3. KRA Transport Key Rotation
Copy linkLink copied to clipboard!
KRA transport rotation allows for seamless transition between CA and KRA subsystem instances using a current and a new transport key. This allows KRA transport keys to be periodically rotated for enhanced security by allowing both old and new transport keys to operate during the time of the transition; individual subsystem instances take turns being configured while other clones continue to serve with no downtime.
In the KRA transport key rotation process, a new transport key pair is generated, a certificate request is submitted, and a new transport certificate is retrieved. The new transport key pair and certificate have to be included in the KRA configuration to provide support for the second transport key. Once KRA supports two transport keys, administrators can start transitioning CAs to the new transport key. KRA support for the old transport key can be removed once all CAs are moved to the new transport key.
To configure KRA transport key rotation:
- Generate a new KRA transport key and certificate
- Transfer the new transport key and certificate to KRA clones
- Update the CA configuration with the new KRA transport certificate
- Update the KRA configuration to use only the new transport key and certificate
After this, the rotation of KRA transport certificates is complete, and all the affected CAs and KRAs use the new KRA certificate only. For more information on how to perform the above steps, see the procedures below.
- Generating the new KRA transport key and certificate
- Request the KRA transport certificate.
- Stop the KRA:
systemctl stop pki-tomcatd@pki-kra.service
systemctl stop pki-tomcatd@pki-kra.serviceCopy to Clipboard Copied! Toggle word wrap Toggle overflow ORsystemctl stop pki-tomcatd-nuxwdog@pki-kra.service (if using the nuxwdog watchdog)
systemctl stop pki-tomcatd-nuxwdog@pki-kra.service (if using the nuxwdog watchdog)Copy to Clipboard Copied! Toggle word wrap Toggle overflow - Go to the KRA NSS database directory:
cd /etc/pki/pki-kra/alias
cd /etc/pki/pki-kra/aliasCopy to Clipboard Copied! Toggle word wrap Toggle overflow - Create a subdirectory and save all the NSS database files into it. For example:
mkdir nss_db_backup
cp *.db nss_db_backup
mkdir nss_db_backup
cp *.db nss_db_backup
Copy to Clipboard Copied! Toggle word wrap Toggle overflow - Create a new request by using the
PKCS10Clientutility. For example:PKCS10Client -p password -d '.' -o 'req.txt' -n 'CN=KRA Transport 2 Certificate,O=example.com Security Domain'
PKCS10Client -p password -d '.' -o 'req.txt' -n 'CN=KRA Transport 2 Certificate,O=example.com Security Domain'Copy to Clipboard Copied! Toggle word wrap Toggle overflow Alternatively, use thecertutilutility. For example:certutil -d . -R -k rsa -g 2048 -s 'CN=KRA Transport 2 Certificate,O=example.com Security Domain' -f password-file -a -o transport-certificate-request-file
certutil -d . -R -k rsa -g 2048 -s 'CN=KRA Transport 2 Certificate,O=example.com Security Domain' -f password-file -a -o transport-certificate-request-fileCopy to Clipboard Copied! Toggle word wrap Toggle overflow - Submit the transport certificate request on the Manual Data Recovery Manager Transport Certificate Enrollment page of the CA End-Entity page.
- Wait for the agent approval of the submitted request to retrieve the certificate by checking the request status on the End-Entity retrieval page.
- Approve the KRA transport certificate through the CA Agent Services interface.
- Retrieve the KRA transport certificate.
- Go to the KRA NSS database directory:
cd /etc/pki/pki-kra/alias
cd /etc/pki/pki-kra/aliasCopy to Clipboard Copied! Toggle word wrap Toggle overflow - Wait for the agent approval of the submitted request to retrieve the certificate by checking the request status on the End-Entity retrieval page.
- Once the new KRA transport certificate is available, paste its Base64-encoded value into a text file, for example a file named
cert-serial_number.txt. Do not include the header (-----BEGIN CERTIFICATE-----) or the footer (-----END CERTIFICATE-----).
- Import the KRA transport certificate.
- Go to the KRA NSS database directory:
cd /etc/pki/pki-kra/alias
cd /etc/pki/pki-kra/aliasCopy to Clipboard Copied! Toggle word wrap Toggle overflow - Import the transport certificate into the KRA NSS database:
certutil -d . -A -n 'transportCert-serial_number cert-pki-kra KRA' -t 'u,u,u' -a -i cert-serial_number.txt
certutil -d . -A -n 'transportCert-serial_number cert-pki-kra KRA' -t 'u,u,u' -a -i cert-serial_number.txtCopy to Clipboard Copied! Toggle word wrap Toggle overflow
- Update the KRA transport certificate configuration.
- Go to the KRA NSS database directory:
cd /etc/pki/pki-kra/alias
cd /etc/pki/pki-kra/aliasCopy to Clipboard Copied! Toggle word wrap Toggle overflow - Verify that the new KRA transport certificate is imported:
certutil -d . -L
certutil -d . -L -n 'transportCert-serial_number cert-pki-kra KRA'
certutil -d . -L
certutil -d . -L -n 'transportCert-serial_number cert-pki-kra KRA'
Copy to Clipboard Copied! Toggle word wrap Toggle overflow - Open the
/var/lib/pki/pki-kra/kra/conf/CS.cfgfile and add the following line:kra.transportUnit.newNickName=transportCert-serial_number cert-pki-kra KRA
kra.transportUnit.newNickName=transportCert-serial_number cert-pki-kra KRACopy to Clipboard Copied! Toggle word wrap Toggle overflow
- Propagating the new transport key and certificate to KRA clones
- Start the KRA:
systemctl start pki-tomcatd@pki-kra.service
systemctl start pki-tomcatd@pki-kra.serviceCopy to Clipboard Copied! Toggle word wrap Toggle overflow ORsystemctl start pki-tomcatd-nuxwdog@pki-kra.service (if using the nuxwdog watchdog)
systemctl start pki-tomcatd-nuxwdog@pki-kra.service (if using the nuxwdog watchdog)Copy to Clipboard Copied! Toggle word wrap Toggle overflow - Extract the new transport key and certificate for propagation to clones.
- Go to the KRA NSS database directory:
cd /etc/pki/pki-kra/alias
cd /etc/pki/pki-kra/aliasCopy to Clipboard Copied! Toggle word wrap Toggle overflow - Stop the KRA:
systemctl stop pki-tomcatd@pki-kra.service
systemctl stop pki-tomcatd@pki-kra.serviceCopy to Clipboard Copied! Toggle word wrap Toggle overflow ORsystemctl stop pki-tomcatd-nuxwdog@pki-kra.service (if using the nuxwdog watchdog)
systemctl stop pki-tomcatd-nuxwdog@pki-kra.service (if using the nuxwdog watchdog)Copy to Clipboard Copied! Toggle word wrap Toggle overflow - Verify that the new KRA transport certificate is present:
certutil -d . -L
certutil -d . -L -n 'transportCert-serial_number cert-pki-kra KRA'
certutil -d . -L
certutil -d . -L -n 'transportCert-serial_number cert-pki-kra KRA'
Copy to Clipboard Copied! Toggle word wrap Toggle overflow - Export the KRA new transport key and certificate:
pk12util -o transport.p12 -d . -n 'transportCert-serial_number cert-pki-kra KRA'
pk12util -o transport.p12 -d . -n 'transportCert-serial_number cert-pki-kra KRA'Copy to Clipboard Copied! Toggle word wrap Toggle overflow - Verify the exported KRA transport key and certificate:
pk12util -l transport.p12
pk12util -l transport.p12Copy to Clipboard Copied! Toggle word wrap Toggle overflow
- Perform these steps on each KRA clone:
- Copy the
transport.p12file, including the transport key and certificate, to the KRA clone location. - Go to the clone NSS database directory:
cd /etc/pki/pki-kra/alias
cd /etc/pki/pki-kra/aliasCopy to Clipboard Copied! Toggle word wrap Toggle overflow - Stop the KRA clone:
systemctl stop pki-tomcatd@pki-kra.service
systemctl stop pki-tomcatd@pki-kra.serviceCopy to Clipboard Copied! Toggle word wrap Toggle overflow ORsystemctl stop pki-tomcatd-nuxwdog@pki-kra.service (if using the nuxwdog watchdog)
systemctl stop pki-tomcatd-nuxwdog@pki-kra.service (if using the nuxwdog watchdog)Copy to Clipboard Copied! Toggle word wrap Toggle overflow - Check the content of the clone NSS database:
certutil -d . -L
certutil -d . -LCopy to Clipboard Copied! Toggle word wrap Toggle overflow - Import the new transport key and certificate of the clone:
pk12util -i transport.p12 -d .
pk12util -i transport.p12 -d .Copy to Clipboard Copied! Toggle word wrap Toggle overflow - Add the following line to the
/var/lib/pki/pki-kra/kra/conf/CS.cfgfile on the clone:kra.transportUnit.newNickName=transportCert-serial_number cert-pki-kra KRA
kra.transportUnit.newNickName=transportCert-serial_number cert-pki-kra KRACopy to Clipboard Copied! Toggle word wrap Toggle overflow - Start the KRA clone:
systemctl start pki-tomcatd@pki-kra.service
systemctl start pki-tomcatd@pki-kra.serviceCopy to Clipboard Copied! Toggle word wrap Toggle overflow ORsystemctl start pki-tomcatd-nuxwdog@pki-kra.service (if using the nuxwdog watchdog)
systemctl start pki-tomcatd-nuxwdog@pki-kra.service (if using the nuxwdog watchdog)Copy to Clipboard Copied! Toggle word wrap Toggle overflow
- Updating the CA configuration with the new KRA transport certificate
- Format the new KRA transport certificate for inclusion in the CA.
- Obtain the
cert-serial_number.txtKRA transport certificate file created when retrieving the KRA transport certificate in the previous procedure. - Convert the Base64-encoded certificate included in
cert-serial_number.txtto a single-line file:tr -d '\n' < cert-serial_number.txt > cert-one-line-serial_number.txt
tr -d '\n' < cert-serial_number.txt > cert-one-line-serial_number.txtCopy to Clipboard Copied! Toggle word wrap Toggle overflow
- Do the following for the CA and all its clones corresponding to the KRA above:
- Stop the CA:
systemctl stop pki-tomcatd@pki-ca.service
systemctl stop pki-tomcatd@pki-ca.serviceCopy to Clipboard Copied! Toggle word wrap Toggle overflow ORsystemctl stop pki-tomcatd-nuxwdog@pki-ca.service (if using the nuxwdog watchdog)
systemctl stop pki-tomcatd-nuxwdog@pki-ca.service (if using the nuxwdog watchdog)Copy to Clipboard Copied! Toggle word wrap Toggle overflow - In the
/var/lib/pki/pki-ca/ca/conf/CS.cfgfile, locate the certificate included in the following line:ca.connector.KRA.transportCert=certificate
ca.connector.KRA.transportCert=certificateCopy to Clipboard Copied! Toggle word wrap Toggle overflow Replace that certificate with the one contained incert-one-line-serial_number.txt. - Start the CA:
systemctl start pki-tomcatd@pki-ca.service
systemctl start pki-tomcatd@pki-ca.serviceCopy to Clipboard Copied! Toggle word wrap Toggle overflow ORsystemctl start pki-tomcatd-nuxwdog@pki-ca.service (if using the nuxwdog watchdog)
systemctl start pki-tomcatd-nuxwdog@pki-ca.service (if using the nuxwdog watchdog)Copy to Clipboard Copied! Toggle word wrap Toggle overflow
Note
While the CA and all its clones are being updated with the new KRA transport certificate, the CA instances that have completed the transition use the new KRA transport certificate, and the CA instances that have not yet been updated continue to use the old KRA transport certificate. Because the corresponding KRA and its clones have already been updated to use both transport certificates, no downtime occurs.- Updating the KRA configuration to use only the new transport key and certificate
- For the KRA and each of its clones, do the following:
- Go to the KRA NSS database directory:
cd /etc/pki/pki-kra/alias
cd /etc/pki/pki-kra/aliasCopy to Clipboard Copied! Toggle word wrap Toggle overflow - Stop the KRA:
systemctl stop pki-tomcatd@pki-kra.service
systemctl stop pki-tomcatd@pki-kra.serviceCopy to Clipboard Copied! Toggle word wrap Toggle overflow ORsystemctl stop pki-tomcatd-nuxwdog@pki-kra.service (if using the nuxwdog watchdog)
systemctl stop pki-tomcatd-nuxwdog@pki-kra.service (if using the nuxwdog watchdog)Copy to Clipboard Copied! Toggle word wrap Toggle overflow - Verify that the new KRA transport certificate is imported:
certutil -d . -L
certutil -d . -L -n 'transportCert-serial_number cert-pki-kra KRA'
certutil -d . -L
certutil -d . -L -n 'transportCert-serial_number cert-pki-kra KRA'
Copy to Clipboard Copied! Toggle word wrap Toggle overflow - Open the
/var/lib/pki/pki-kra/kra/conf/CS.cfgfile, and look for thenickNamevalue included in the following line:kra.transportUnit.nickName=transportCert cert-pki-kra KRA
kra.transportUnit.nickName=transportCert cert-pki-kra KRACopy to Clipboard Copied! Toggle word wrap Toggle overflow Replace thenickNamevalue with thenewNickNamevalue included in the following line:kra.transportUnit.newNickName=transportCert-serial_number cert-pki-kra KRA
kra.transportUnit.newNickName=transportCert-serial_number cert-pki-kra KRACopy to Clipboard Copied! Toggle word wrap Toggle overflow As a result, theCS.cfgfile includes this line:kra.transportUnit.nickName=transportCert-serial_number cert-pki-kra KRA
kra.transportUnit.nickName=transportCert-serial_number cert-pki-kra KRACopy to Clipboard Copied! Toggle word wrap Toggle overflow - Remove the following line from
/var/lib/pki/pki-kra/kra/conf/CS.cfg:kra.transportUnit.newNickName=transportCert-serial_number cert-pki-kra KRA
kra.transportUnit.newNickName=transportCert-serial_number cert-pki-kra KRACopy to Clipboard Copied! Toggle word wrap Toggle overflow - Start the KRA:
systemctl start pki-tomcatd@pki-kra.service
systemctl start pki-tomcatd@pki-kra.serviceCopy to Clipboard Copied! Toggle word wrap Toggle overflow ORsystemctl start pki-tomcatd-nuxwdog@pki-kra.service (if using the nuxwdog watchdog)
systemctl start pki-tomcatd-nuxwdog@pki-kra.service (if using the nuxwdog watchdog)Copy to Clipboard Copied! Toggle word wrap Toggle overflow