Chapter 4. Installing CodeReady Workspaces in restricted environments
To install CodeReady Workspaces in a restricted environment that has no direct connection to the Internet available, all requisite container images need to be downloaded prior to the deployment of the application and then used from a local container registry.
The installation of CodeReady Workspaces consists of the following three deployments:
- PostgreSQL (database)
- Red Hat Single Sign-On (Red Hat SSO)
- CodeReady Workspaces
Each of these deployments uses a container image in the container specification. Normally, the images are pulled from the Red Hat Container Catalog at Red Hat CodeReady Workspaces. When the OpenShift Container Platform cluster used for the CodeReady Workspaces deployment does not have access to the Internet, the installation fails. To allow the installation to proceed, override the default image specification to point to your local registry.
Prerequisites
- The CodeReady Workspaces deployment script. See Section 2.1, “Downloading the CodeReady Workspaces deployment script” for detailed instructions on how to obtain the script.
- A local (internal) container registry that can be accessed by the OpenShift instance where CodeReady Workspaces is to be deployed.
- Container images required for CodeReady Workspaces deployment imported to the local registry.
- The following images downloaded from the Red Hat Container Catalog at registry.access.redhat.com:
See Section 4.1, “Preparing CodeReady Workspaces deployment from a local registry” for detailed instructions.
4.1. Preparing CodeReady Workspaces deployment from a local registry
To install CodeReady Workspaces in a restricted environment without access to the Internet, the product deployment container images need to be imported from an external container registry into a local (internal) registry.
CodeReady Workspaces deployment requires the following images from the Red Hat Container Catalog at registry.access.redhat.com:
-
codeready-workspaces/server:1.1: CodeReady Workspaces server -
codeready-workspaces/server-operator:1.1: operator that installs and manages CodeReady Workspaces -
rhscl/postgresql-96-rhel7:1-25: PostgreSQL database for persisting data -
redhat-sso-7/sso72-openshift:1.2-8: Red Hat SSO for authentication -
rhel7-minimal:7.6-154: utility image used in preparing the PVCs (Persistant Volume Claims)
Prerequisites
To import container images (create image streams) in your OpenShift Container Platform cluster, you need:
-
cluster-adminrights
Procedure
- Import the required images from an external registry to a local registry that your OpenShift Container Platform cluster can reach. See Section 4.4, “Making CodeReady Workspaces images available from a local registry” for example instructions on how to do this.
Edit the
custom-resource.yamlconfiguration file to specify that the CodeReady Workspaces deployment script should use images from your internal registry. Add the following specification fields to the respective blocks. Use the address of your internal registry and the name of the OpenShift project into which you imported the images. For example:Copy to Clipboard Copied! Toggle word wrap Toggle overflow Important- Make sure to use correct indentation as shown above.
-
Substitute
172.0.0.30:5000for the actual address of your local registry. -
Substitute
openshiftfor the name of the OpenShift project into which you imported the images.
Additional resources
- See Section 4.4, “Making CodeReady Workspaces images available from a local registry” for example instructions on how to transfer container images required for CodeReady Workspaces deployment to a restricted environment.
-
See Section 2.5, “CodeReady Workspaces deployment script parameters” for an overview of all available configuration options in the
custom-resource.yamlconfiguration file.
4.2. Running the CodeReady Workspaces deployment script in a restricted environment
To deploy CodeReady Workspaces in a restricted environment with access to the Internet, it is necessary to use container images from a local (internal) registry. The deployment script (deploy.sh) allows to specify a custom image to be used for installation.
Specification fields from the custom-resource.yaml configuration file and arguments supplied to the deploy.sh script are passed to the operator. The operator then constructs the deployment of CodeReady Workspaces with the images in the container specification.
Prerequisites
- Imported container images required by CodeReady Workspaces to a local registry.
-
Local addresses of imported images specified in the
custom-resource.yamlfile.
See Section 4.1, “Preparing CodeReady Workspaces deployment from a local registry” for detailed instructions.
Procedure
To deploy CodeReady Workspaces from an internal registry, run the ./deploy.sh --deploy command and specify custom (locally available) server and operator images.
Use the
--server-imageand--versionparameters to specify the server image and the--operator-imageparameter to specify the operator image. For example:./deploy.sh --deploy \ --server-image=172.0.0.30:5000/openshift/server \ --version=1.1 \ --operator-image=172.0.0.30:5000/openshift/server-operator:1.1
$ ./deploy.sh --deploy \
  --server-image=172.0.0.30:5000/openshift/server \
  --version=1.1 \
  --operator-image=172.0.0.30:5000/openshift/server-operator:1.1
Copy to Clipboard Copied! Toggle word wrap Toggle overflow Important-
Substitute
172.0.0.30:5000for the actual address of your local registry. -
Substitute
openshiftfor the name of the OpenShift project into which you imported the images.
-
Substitute
Additional resources
-
See Section 2.2, “Running the CodeReady Workspaces deployment script” for instructions on how to run the
deploy.shscript in other situations.
4.3. Starting workspaces in restricted environments
Starting a workspace in CodeReady Workspaces implies creating a new deployment. Different stacks use different images. All of these stacks are from the Red Hat Container Catalog at Red Hat CodeReady Workspaces. For more information on stacks, see the Stacks chapter in this guide.
It is not possible to override stack images during the installation of CodeReady Workspaces. You need to manually edit preconfigured stacks. See Creating stacks.
Procedure
To start a workspace in a restricted environment:
Import at least one of the the following images to an internal registry:
-
registry.access.redhat.com/codeready-workspaces/stacks-java:latest -
registry.access.redhat.com/codeready-workspaces/stacks-node:latest -
registry.access.redhat.com/codeready-workspaces/stacks-php:latest -
registry.access.redhat.com/codeready-workspaces/stacks-python:latest -
registry.access.redhat.com/codeready-workspaces/stacks-dotnet:latest -
registry.access.redhat.com/codeready-workspaces/stacks-golang:latest -
registry.access.redhat.com/codeready-workspaces/stacks-java-rhel8:latest registry.access.redhat.com/codeready-workspaces/stacks-cpp:latestSee Section 4.4, “Making CodeReady Workspaces images available from a local registry” for example instructions on how to transfer container images required for CodeReady Workspaces deployment to a restricted environment.
-
Modify the preconfigured stacks:
-
Log in to CodeReady Workspaces as an administrator. (The default login credentials are username:
adminand password:admin.) - In the left pane, click Stacks.
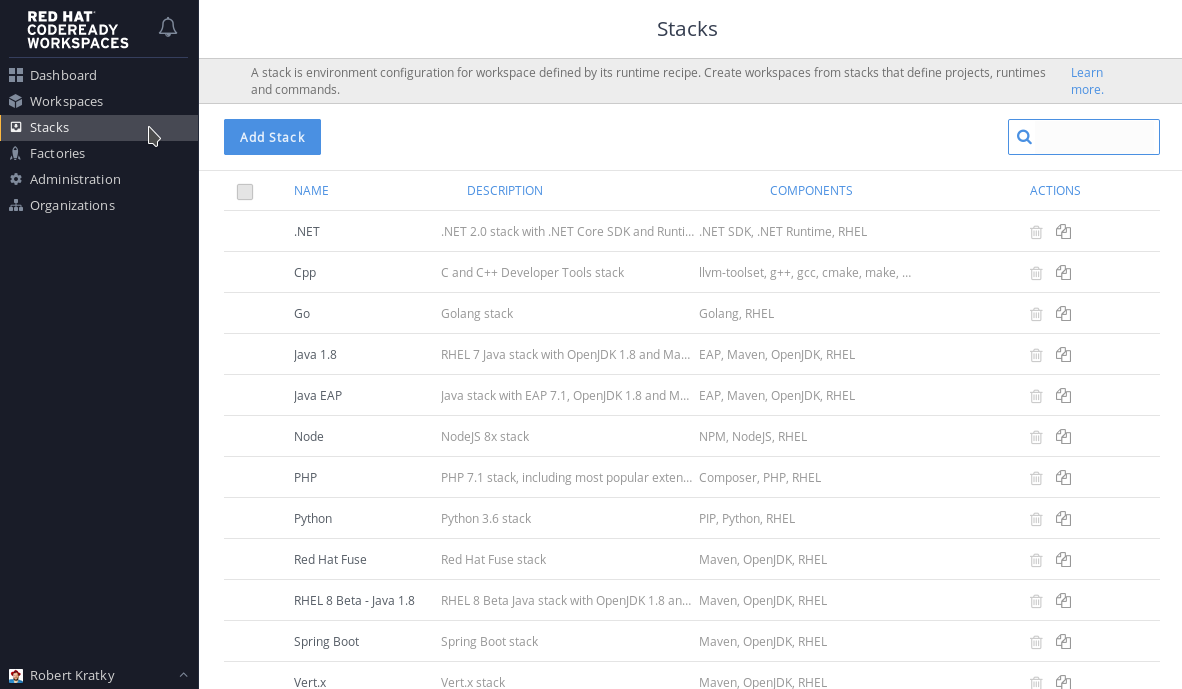
From the list of stacks, select a stack to edit.
Figure 4.1. Selecting a stack to edit
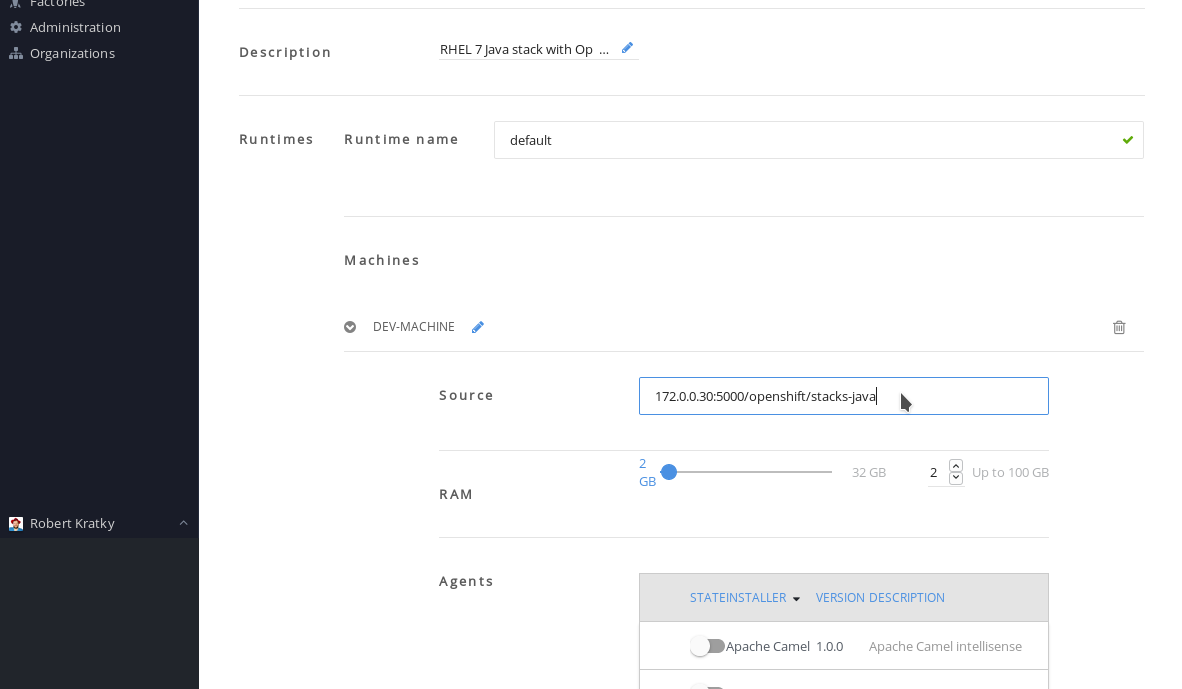
- Click and expand DEV-MACHINE.
In the Source field, replace the default Red Hat Container Catalog image with a local image that you pushed to an internal registry.
Figure 4.2. Editing a stack
Click Save.
Repeat step 2 for all the stacks that you want to use.
-
Log in to CodeReady Workspaces as an administrator. (The default login credentials are username:
By default, the CodeReady Workspaces server is configured to overwrite default stacks on application start. To ensure that the changes persist between restarts, edit the custom config map:
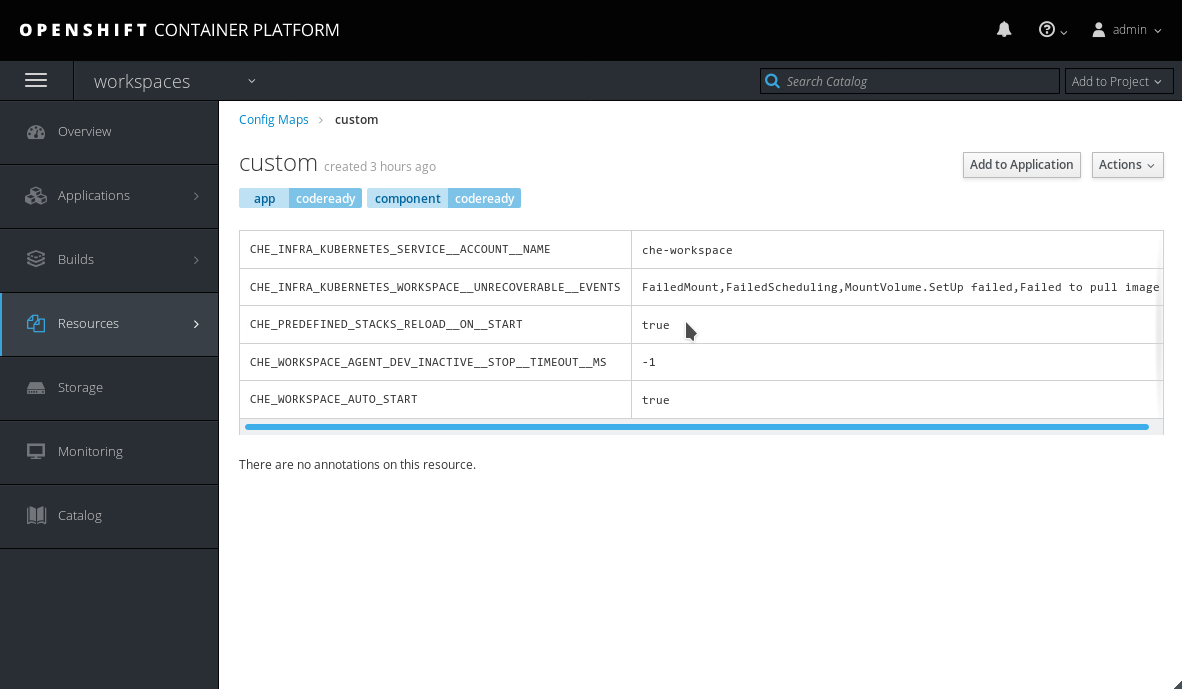
In the OpenShist Web Console, navigate to the Resources > Config Maps tab, and select the custom config map:
Figure 4.3. Navigate to the custom Config Map
- From the Actions drop-down menu in the top-right corner, select Edit.
Scroll to the
CHE_PREDEFINED_STACKS_RELOAD__ON__STARTkey, and enterfalse:Figure 4.4. Set the
CHE_PREDEFINED_STACKS_RELOAD__ON__STARTkey tofalse- Save the config map.
Forcibly start a new CodeReady Workspaces deployment, either by scaling the current deployment to
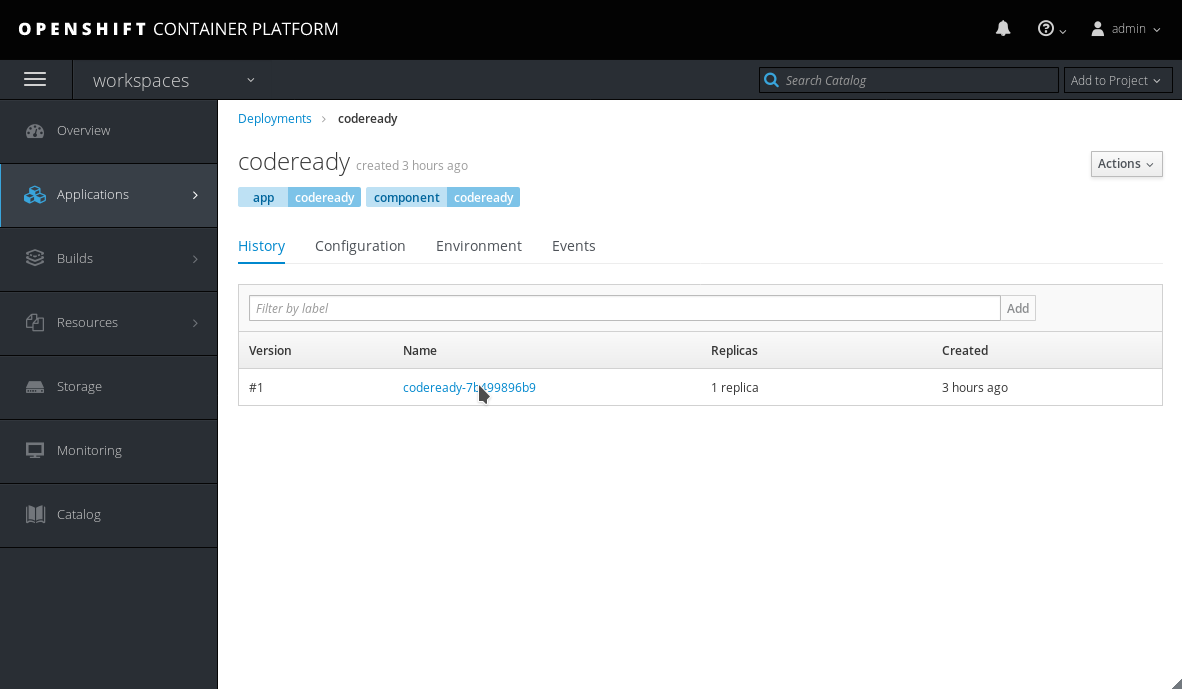
0and then back to1, or deleting the CodeReady Workspaces server pod:In the OpenShist Web Console, navigate to the Applications > Deployments tab, and select the codeready deployment:
Figure 4.5. Select the codeready deployment
- Click the name of the running codeready pod.
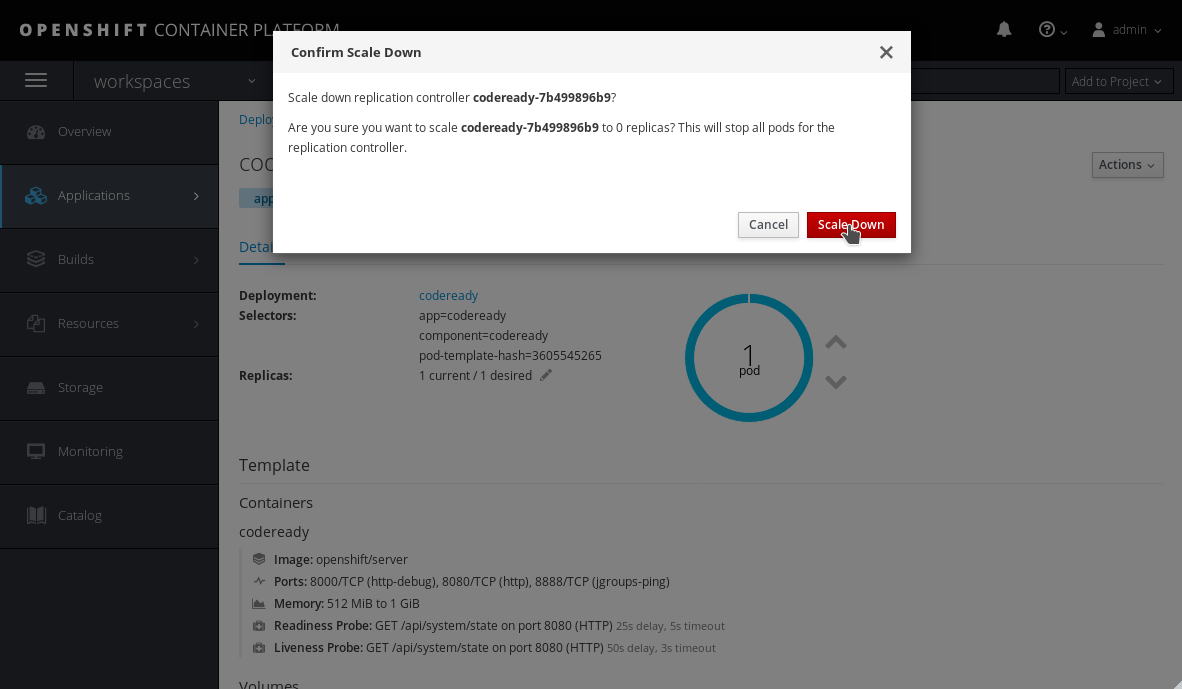
Click the down arrow next to the number of pods, and confirm by clicking the Scale Down button:
Figure 4.6. Scale down the codeready deployment
- Scale the deployment back up by clicking the up arrow.
4.4. Making CodeReady Workspaces images available from a local registry
This procedure is one of the possible ways for making CodeReady Workspaces container images that are required for deployment available from a local (internal) registry. First download the images using a machine connected to the Internet, then use some other method than network connection to transfer them to the restricted environment where you intend to deploy the application. Finally, upload (push) the images to the local registry that will be accessible during the deployment phase.
Prerequisites
- Machine with access to the Internet that can be used to pull and save container images from the Red Hat Container Catalog at registry.access.redhat.com.
- Means of transferring the downloaded images to the restricted environment where you intend to deploy CodeReady Workspaces.
- An account with the rights to push to a local registry within the restricted environment. The local registry must be accessible for the deployment.
At minimum, the following images need to be made locally available:
-
registry.access.redhat.com/codeready-workspaces/server:1.1 -
registry.access.redhat.com/codeready-workspaces/server-operator:1.1 -
registry.access.redhat.com/rhscl/postgresql-96-rhel7:1-25 -
registry.access.redhat.com/redhat-sso-7/sso72-openshift:1.2-8 -
registry.access.redhat.com/rhel7-minimal:7.6-154
You also need to follow the steps for image import for all stack images that you will want to use within CodeReady Workspaces.
Procedure
Use a tool for container management, such as Podman, to both download the container images and subsequently push them to a local registry within the restricted environment.
The podman tool is available from the podman package in Red Hat Enterprise Linux starting with version 7.6. On earlier versions of Red Hat Enterprise Linux, the docker tool can be used with the same command syntax as suggested below for podman.
Steps to perform on a machine with connection to the Internet
Pull the required images from the Red Hat Container Catalog. For example, for the
codeready-workspaces/serverimage, run:podman pull registry.access.redhat.com/codeready-workspaces/server:1.1
# podman pull registry.access.redhat.com/codeready-workspaces/server:1.1Copy to Clipboard Copied! Toggle word wrap Toggle overflow Repeat the command for all the images you need.
Save all the pulled images to a
tarfile in your current directory on the disk. For example, for thecodeready-workspaces/serverimage, run:podman save --output codeready-server.tar \ registry.access.redhat.com/codeready-workspaces/server:1.1
# podman save --output codeready-server.tar \
  registry.access.redhat.com/codeready-workspaces/server:1.1
Copy to Clipboard Copied! Toggle word wrap Toggle overflow Repeat the command for all the images you need.
Transfer the saved tar image files to a machine connected to the restricted environment.
Steps to perform on a machine within the restricted environment
Load all the required images to the local container repository from which they can uploaded to OpenShift. For example, for the
codeready-workspaces/serverimage, run:podman load --input codeready-server.tar
# podman load --input codeready-server.tarCopy to Clipboard Copied! Toggle word wrap Toggle overflow Repeat the command for all the images you need.
Optionally, check that the images have been successfully loaded to your local container repository. For example, to check for the
codereadyimages, run:podman images */codeready/* REPOSITORY TAG registry.access.redhat.com/codeready-workspaces/server 1.1 registry.access.redhat.com/codeready-workspaces/server-operator 1.1
# podman images */codeready/*
REPOSITORY                                                TAG
registry.access.redhat.com/codeready-workspaces/server    1.1
registry.access.redhat.com/codeready-workspaces/server-operator  1.1
Copy to Clipboard Copied! Toggle word wrap Toggle overflow Log in to the instance of OpenShift Container Platform where you intend to deploy CodeReady Workspaces as a user with the
cluster-adminrole. For example, to log in as the user admin, run:oc login --username <admin> --password <password>
$ oc login --username <admin> --password <password>Copy to Clipboard Copied! Toggle word wrap Toggle overflow In the above command, substitute
<admin>for the username of the account you intend to use to deploy CodeReady Workspaces and<password>for the associated password.Log in with
podmanto the local OpenShift registry that CodeReady Workspaces will be deployed from:podman login --username <admin> \ --password $(oc whoami --show-token) 172.0.0.30:5000
# podman login --username <admin> \
  --password $(oc whoami --show-token) 172.0.0.30:5000
Copy to Clipboard Copied! Toggle word wrap Toggle overflow In the above command:
-
Substitute
<admin>for the username of the account you used to log in to OpenShift. -
Substitute
172.0.0.30:5000for the URL of the local OpenShift registry to which you are logging in.
-
Substitute
Tag the required images to prepare them to be pushed to the local OpenShift registry. For example, for the
codeready-workspaces/serverimage, run:podman tag registry.access.redhat.com/codeready-workspaces/server:1.1 \ 172.0.0.30:5000/openshift/codeready-server:1.1
# podman tag registry.access.redhat.com/codeready-workspaces/server:1.1 \
  172.0.0.30:5000/openshift/codeready-server:1.1
Copy to Clipboard Copied! Toggle word wrap Toggle overflow Repeat the command for all the images you need.
In the above command, substitute
172.0.0.30:5000for the URL of the local OpenShift registry to which you will be pushing the images.Optionally, check that the images have been successfully tagged for pushing to the local OpenShift registry. For example, to check for the
codereadyimages, run:podman images */openshift/codeready-* REPOSITORY TAG 172.0.0.30:5000/openshift/codeready-operator 1.1 172.0.0.30:5000/openshift/codeready-server 1.1
# podman images */openshift/codeready-*
REPOSITORY                                    TAG
172.0.0.30:5000/openshift/codeready-operator  1.1
172.0.0.30:5000/openshift/codeready-server    1.1
Copy to Clipboard Copied! Toggle word wrap Toggle overflow Push the required images to the local OpenShift registry. For example, for the
codeready-workspaces/serverimage, run:podman push 172.0.0.30:5000/openshift/codeready-server:1.1
# podman push 172.0.0.30:5000/openshift/codeready-server:1.1Copy to Clipboard Copied! Toggle word wrap Toggle overflow Repeat the command for all the images you need.
In the above command, substitute
172.0.0.30:5000for the URL of the local OpenShift registry to which you will be pushing the images.Switch to the
openshiftproject:oc project openshift
$ oc project openshiftCopy to Clipboard Copied! Toggle word wrap Toggle overflow Optionally, check that the images have been successfully pushed to the local OpenShift registry. For example, to check for the
codereadyimages, run:oc get imagestream codeready-* NAME DOCKER REPO TAGS codeready-operator 172.0.0.30:5000/openshift/codeready-operator 1.1 codeready-server 172.0.0.30:5000/openshift/codeready-server 1.1
$ oc get imagestream codeready-*
NAME                DOCKER REPO                                   TAGS
codeready-operator  172.0.0.30:5000/openshift/codeready-operator  1.1
codeready-server    172.0.0.30:5000/openshift/codeready-server    1.1
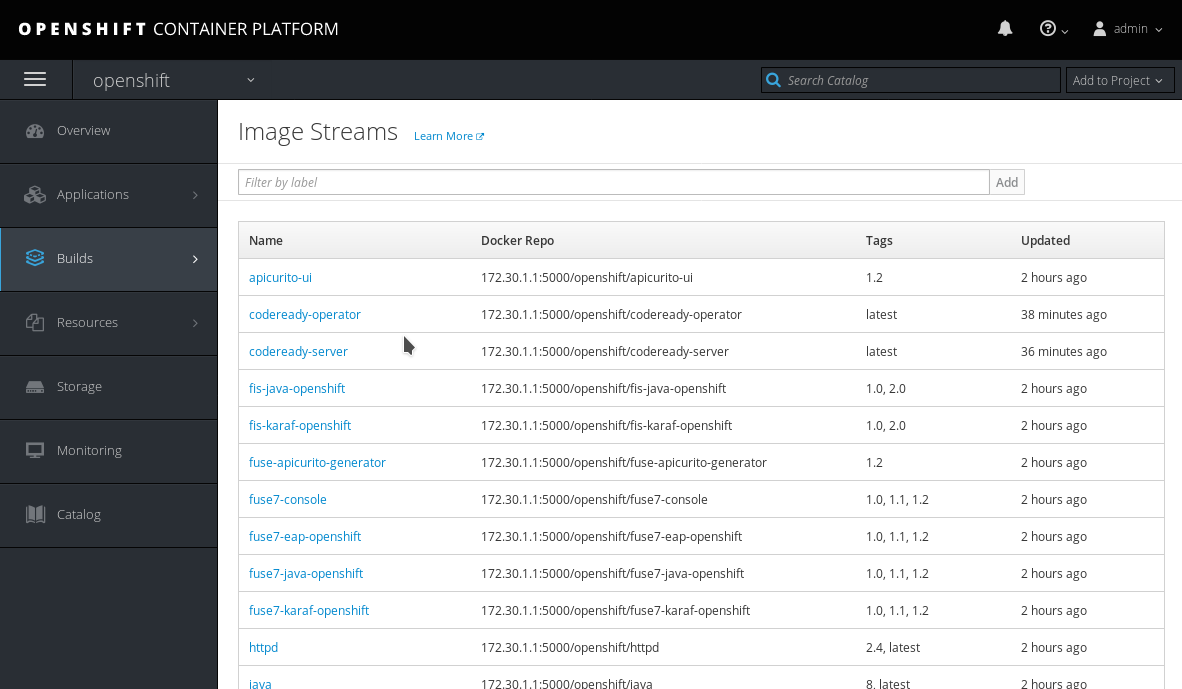
Copy to Clipboard Copied! Toggle word wrap Toggle overflow You can also verify that the images have been successfully pushed in the OpenShift Console. Navigate to the Builds > Images tab, and look for image streams available in the
openshiftproject:Figure 4.7. Confirming images have been pushed to the
openshiftproject
The required CodeReady Workspaces container images are now available for use in your restricted environment.
Additional resources
- Continue by Section 4.2, “Running the CodeReady Workspaces deployment script in a restricted environment”
- See Importing Tag and Image Metadata in the OpenShift Container Platform Developer Guide for detailed information about importing images.
