Getting Started Guide
Quick-start guide to using and developing with Red Hat Container Development Kit
Abstract
Chapter 1. Overview
This guide contains contains information about how the get started with Container Development Kit, explanations of Container Development Kit functionality, and examples of command usage.
Examples are taken from a Red Hat Enterprise Linux 7 desktop running the KVM hypervisor.
Starting minishift requires a Red Hat Enterprise Linux license.
This guide follows the Red Hat Container Development Kit 3.0 Installation Guide.
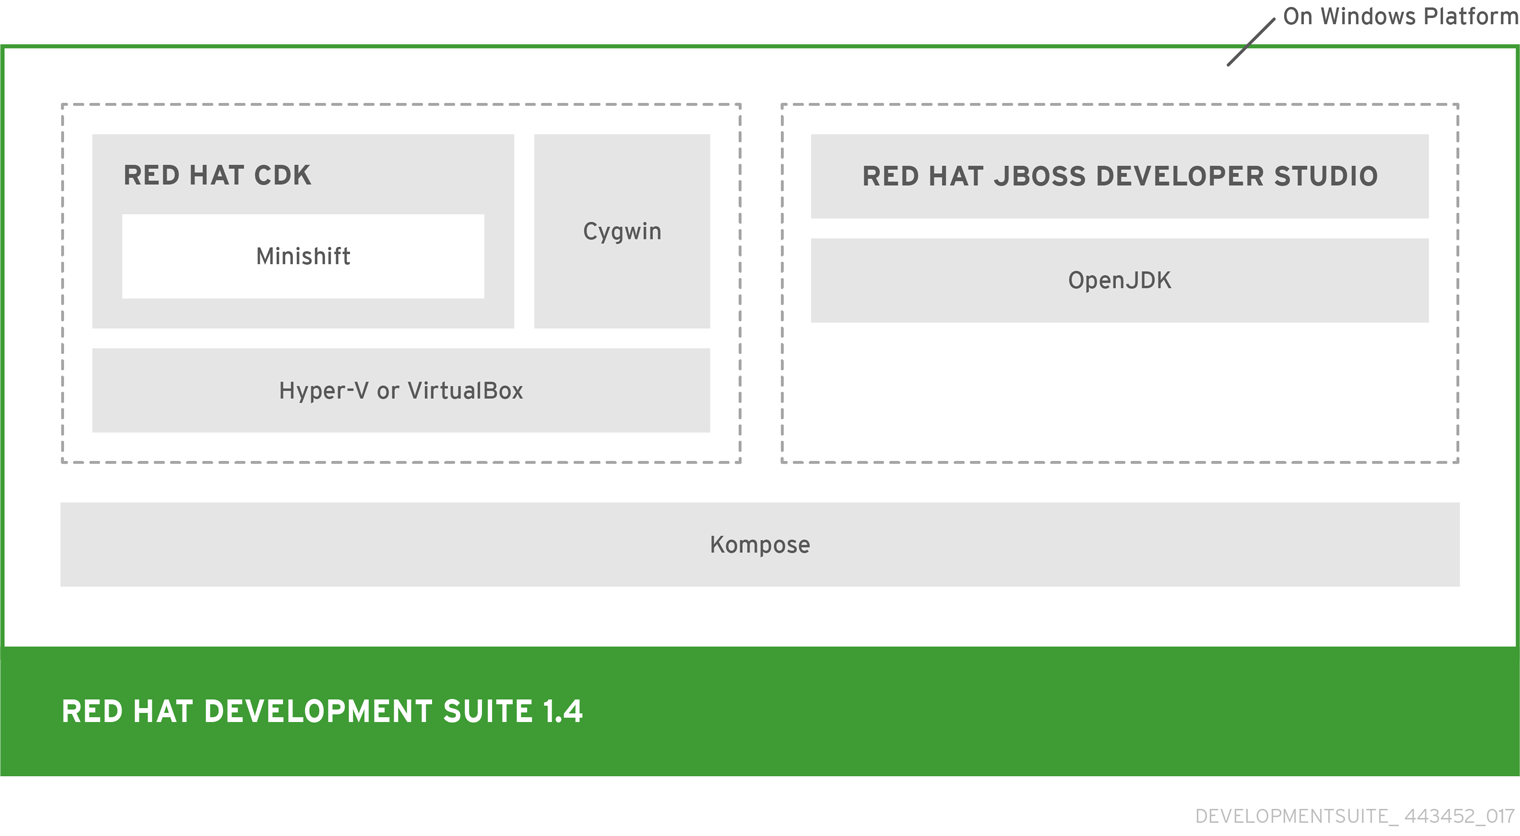
Red Hat Container Development Kit is one of several components that comprise Development Suite.
Chapter 2. Startup
Red Hat Container Development Kit for Red Hat Enterprise Linux includes a KVM virtual machine image running Red Hat Enterprise Linux, that is running an OpenShift cluster for local use. Container Development Kit primarily uses minishift and oc commands to manage the OpenShift cluster. Users can deploy applications to the local OpenShift cluster, like they would for any other OpenShift cluster. This simplifies application development on the desktop and deployment to production systems.
Before we can do anything else with the OpenShift cluster, we need to start it. Then we can work with Container Development Kit and the other examples.
Container Development Kit has several prequisites, that must be met at startup:
- A computer system with virtualization turned on in the hardware.
- A Red Hat Enterprise Linux, Microsoft Windows, or macOS desktop system installed on that hardware. The command line examples are all taken from a Red Hat Enterprise Linux desktop.
- A Red Hat Enterprise Linux license for the virtual machine running Red Hat Enterprise Linux. This is in addition to the Red Hat Enterprise Linux license for your desktop.
-
Container Development Kit installed on the desktop, with
minishiftandoccommands available.
Container Development Kit registers a Red Hat Enterprise Linux virtual machine by default during startup, on all operating systems.
2.1. Register the Container Development Kit Red Hat Enterprise Linux Virtual Machine
Starting Container Development Kit requires a valid Red Hat Enterprise Linux license, because Container Development Kit includes an KVM virtual machine image with Red Hat Enterprise Linux installed.
At startup, minishift registers the Red Hat Enterprise Linux license, and holds it until it is released at shutdown. The login information for that Red Hat Enterprise Linux license can be provided either on the command line or as environment variables.
To start Container Development Kit using environment variables, first set MINISHIFT_USERNAME and MINISHIFT_PASSWORD:
~]$ export MINISHIFT_USERNAME=<Red_Hat_username>
~]$ export MINISHIFT_PASSWORD=<Red_Hat_password>
Instead of the environment variables MINISHIFT_USERNAME and MINISHIFT_PASSWORD, you may also specify the username and password on the command line:
~]$ minishift --username=<Red_Hat_username> --password=<Red_Hat_password>2.2. Starting Container Development Kit
The minishift start command downloads any required OpenShift functionality, starts OpenShift services, and prints some helpful information about the command line and web interfaces.
At this point, you should be able to use the tools minishift and oc to manage your Container Development Kit cluster. Start by running the minishift start command.
~]$ minishift start
Starting local OpenShift cluster using 'kvm' hypervisor...
...
   OpenShift server started.
   The server is accessible via web console at:
       https://192.168.99.128:8443

   You are logged in as:
       User:     developer
       Password: developer

   To login as administrator:
oc login -u system:admin-
The IP is dynamically generated for each OpenShift cluster. To check the IP, run the
minishift ipcommand. -
By default, Minishift uses the driver most relevant to the host OS. To use a different driver, set the
--vm-driverflag inminishift start. For example, to use VirtualBox instead of KVM on GNU/Linux operating systems, runminishift start --vm-driver=virtualbox.
Use minishift oc-env to display the command you need to type into your shell in order to add the oc binary to your PATH. The output of oc-env may differ, depending on OS and shell type.
~]$ minishift oc-env
export PATH="/home/<username>/.minishift/cache/oc/v1.5.0:$PATH"
# Run this command to configure your shell:
# eval $(minishift oc-env)
For more information about interacting with OpenShift with the command-line interface and the web console, see the Chapter 7, Interacting with OpenShift section.
Chapter 3. Minishift
When you use Minishift, you interact with two components:
- a virtual machine (VM) created by Minishift
- the OpenShift cluster provisioned by Minishift within the VM
3.1. Minishift Commands
The following sections contain information about managing the Minishift VM. For details about using Minishift to manage your local OpenShift cluster, see the Chapter 7, Interacting with OpenShift section.
3.1.1. minishift start
The minishift start command creates and configures the Minishift VM and provisions a local, single-node OpenShift instance within the VM.
The command also copies the oc binary to your host so that you can interact with through the oc command line tool or through the Web console, which can be accessed through the URL provided in the output of the minishift start command.
3.1.2. minishift stop
The minishift stop command stops your OpenShift cluster and shuts down the Minishift VM, but preserves the OpenShift cluster state.
Starting Minishift again will restore the OpenShift cluster, allowing you to continue working from the last session. However, you must enter the same parameters that you used in the original start command.
3.1.3. minishift delete
The minishift delete command deletes the OpenShift cluster, and also shuts down and deletes the {mshift VM}. No data or state are preserved.
3.2. Runtime Options
The runtime behavior of Minishift can be controlled through flags, environment variables, and persistent configuration options.
The following precedence order is applied to control the behavior of Minishift. Each action in the following list takes precedence over the action below it:
- Use command-line flags as specified in the Section 3.2.1, “Flags” section.
- Set environment variables as described in the Section 3.2.2, “Environment Variables” section.
- Use persistent configuration options as described in the Section 3.2.3, “Persistent Configuration” section.
- Accept the default value as defined by Minishift.
3.2.1. Flags
You can use command line flags with Minishift to specify options and direct its behavior. This has the highest precedence. Almost all commands have flags, although different commands might have different flags. Some of the commonly used command line flags of the minishift start command are cpus, memory or vm-driver.
3.2.2. Environment Variables
Minishift allows you to specify command-line flags you commonly use through environment variables. To do so, apply the following rules to the flag you want to set as an environment variable.
-
Apply
MINISHIFT_as a prefix to the flag you want to set as an environment variable. For example, thevm-driverflag of theminishift startcommand becomesMINISHIFT_vm-driver. -
Use uppercase characters for the flag, so
MINISHIFT_vm-driverin the above example becomesMINISHIFT_VM-DRIVER. -
Replace
-with_, soMINISHIFT_VM-DRIVERbecomesMINISHIFT_VM_DRIVER.
Environment variables can be used to replace any option of any Minishift command. A common example is the URL of the ISO to be used. Usually, you specify it with the iso-url flag of the minishift start command. Applying the above rules, you can also specify this URL by setting the environment variable as MINISHIFT_ISO_URL.
By default, Minishift places all runtime state into ~/.minishift. You can also use the MINISHIFT_HOME environment variable, to choose a different home directory for Minishift. This environment variable is currently experimental and semantics might change in future releases.
3.2.3. Persistent Configuration
Using persistent configuration allows you to control the Minishift behavior without specifying actual command line flags, similar to the way you use Section 3.2.2, “Environment Variables”.
Minishift maintains a configuration file in $MINISHIFT_HOME/config/config.json. This file can be used to set commonly-used command-line flags persistently.
Persistent configuration can only be applied to the set of supported configuration options that are listed in the synopsis of the minishift config sub-command, unlike environment variables that can be used to replace any option of any command.
3.2.3.1. Setting Persistent Configuration Values
The easiest way to change a persistent configuration option is with the config set sub-command. For example:
# Set default memory 4096 MB
~]$ minishift config set memory 4096
To view all persistent configuration values, you can use the view sub-command:
~]$ minishift config view
- memory: 4096
Alternatively, you can display a single value with the get sub-command:
~]$ minishift config get memory
4096
3.2.3.2. Unsetting persistent configuration values
To remove a persistent configuration option, you can use the unset sub-command. For example:
~]$ minishift config unset memory3.2.4. Driver Specific Environment Variables
You can also specify driver specific environment variables. Each docker-machine driver supports its own set of options and variables. A good starting point is the official docker-machine driver documentation. xhyve and KVM documentation is available under their respective GitHub repository docker-machine-driver-xhyve and docker-machine-kvm.
To use driver specific options make sure to export the variable as defined in its driver documentation prior to running minishift start. For example, xhyve’s experimental NFS sharing can be enabled by executing:
~]$ export XHYVE_EXPERIMENTAL_NFS_SHARE=true
~]$ minishift start --vm-driver xhyve
Driver specific options might overlap with values specified using Minishift specific flags and environment variables. Examples are boot2docker URL, memory size, cpu count, etc. In this case driver specific environment variables will override Minishift specific settings.
3.3. Persistent Volumes
As part of provisioning with cluster up, the Section 7.2, “Using the OpenShift Client Binary (oc)” creates persistent volumes for your OpenShift cluster. This allows applications to make persistent volumes claims. The location of the persistent data is determined via the host-pv-dir flag of the start command and defaults to /var/lib/minishift/openshift.local.pv on the Minishift VM.
3.4. HTTP/HTTPS Proxies
If you are behind a HTTP/HTTPS proxy, you need to supply proxy options to allow Docker and OpenShift to work properly. To do this, pass the required flags during minishift start.
For example:
~]$ minishift start --http-proxy http://<YOURPROXY>:<PORT> --https-proxy https://<YOURPROXY>:<PORT>
In an authenticated proxy environment, the proxy_user and proxy_password must be a part of proxy URI.
~]$ minishift start --http-proxy http://<proxy_username>:<proxy_password>@<YOURPROXY>:<PORT> \ --https-proxy https://<proxy_username>:<proxy_password>@<YOURPROXY>:<PORT>
You can also use the --no-proxy flag to specify a comma-separated list of hosts that should not be proxied. For a list of all available options, see the synopsis of the start command.
Using the proxy options will transparently configure the Docker daemon and OpenShift to use the specified proxies.
Use the minishift start --ocp-tag flag to request a specific version of OpenShift Container Platform. You can list all Minishift-compatible OpenShift Container Platform versions with the minishift openshift version list command. By default, Red Hat Container Development Kit 3.0 uses OpenShift Container Platform v3.5.5.8.
3.5. Networking
The Minishift VM is exposed to the host system with a host-only IP address that can be obtained with the minishift ip command.
Chapter 4. Deploying an Application
Deploying an application through minishift requires a few steps. Those steps are covered here first as a simplified version of the process using a Node.js example, then a sample WildFly deployment. The section Section 9.3, “Deploying an Application with Docker” explains application deployment with Docker.
4.1. Prerequisites to Deploying an Application
- Your code needs to already be on the Internet, so upload it and make any pull requests so that it is available in a reachable repository. These examples use sample applications hosted on github.
-
You have already installed minishift, and have run
minishift start.
4.2. Simplified Explanation of Application Deployment
OpenShift provides various sample applications, such as templates, builder applications, and quickstarts. The following steps describe how to deploy a sample Node.js application from the command-line.
Create a Node.js example app.
~]$ oc new-app https://github.com/openshift/nodejs-ex -l name=myappTrack the build log until the app is built and deployed.
~]$ oc logs -f bc/nodejs-exExpose a route to the service.
~]$ oc expose svc/nodejs-exAccess the application.
~]$ minishift openshift service nodejs-ex -n myprojectTo stop Minishift, use the following command:
~]$ minishift stop
Stopping local OpenShift cluster...
Stopping "minishift"...
For more information about creating applications in OpenShift, see Creating New Applications in the OpenShift documentation.
4.3. WildFly Application Deployment
This step may not be needed if you just ran minishift start. Starting minishift automatically logs you in as the developer user.
Deploying a WildFly application requires a few steps, so here’s an example of deploying a new app:
If you haven’t already, login to your OpenShift account. This example uses the developer account in the OpenShift cluster, but you can login as any other valid user.
~]$ oc login https://192.168.42.189:8443 --username="developer" --password="developer"
Login successful.

You have access to the following projects and can switch between them with 'oc project <projectname>':

  * myproject

Using project "myproject".
You can use reuse an existing OpenShift project, or you can create a new project. You create a project with
oc new-app <project_name>.~]$ oc new-app proj-00 --display-name="Project 00 - initial" Now using project "project-00" on server "https://192.168.42.189:8443". You can add applications to this project with the 'new-app' command. For example, try: oc new-app centos/ruby-22-centos7~https://github.com/openshift/ruby-ex.git to build a new example application in Ruby.To verify that the correct project name was selected:
~]$ oc projects
You have access to the following projects and can switch between them with 'oc project <projectname>':

    myproject - My Project
  * project-00 - Project 00 - initial

Using project "project-00" on server "https://192.168.42.189:8443".
Download a copy of the
.jsonfile for the WildFly app. This should create a filewildfly.json:~]$ curl -o wildfly.json https://raw.githubusercontent.com/projectatomic/adb-utils/master/services/openshift/templates/adb/image-streams-centos7.json % Total % Received % Xferd Average Speed Time Time Time Current Dload Upload Total Spent Left Speed 100 35657 100 35657 0 0 79033 0 --:--:-- --:--:-- --:--:-- 78887Create an image stream for the WildFly application. An image stream is simply a set of docker container images, condensed into an image stream to assist deployment. An image stream for wildfly will help us in this example:
~]$ oc create -f wildfly.json -n openshift
imagestream "wildfly" created
Check the available image streams and verify that the WildFly image stream was created successfully. In this example, it’s the last image stream in the list:
~]$ oc get is -n openshift
NAME         DOCKER REPO                            TAGS                           UPDATED
jenkins      172.30.1.1:5000/openshift/jenkins      latest,1,2                     36 hours ago
mariadb      172.30.1.1:5000/openshift/mariadb      latest,10.1                    36 hours ago
mongodb      172.30.1.1:5000/openshift/mongodb      latest,3.2,2.6 + 1 more...     36 hours ago
mysql        172.30.1.1:5000/openshift/mysql        5.5,latest,5.7 + 1 more...     36 hours ago
nodejs       172.30.1.1:5000/openshift/nodejs       0.10,4,latest                  36 hours ago
perl         172.30.1.1:5000/openshift/perl         5.20,5.16,latest + 1 more...   36 hours ago
php          172.30.1.1:5000/openshift/php          5.6,5.5,latest + 1 more...     36 hours ago
postgresql   172.30.1.1:5000/openshift/postgresql   latest,9.5,9.4 + 1 more...     36 hours ago
python       172.30.1.1:5000/openshift/python       3.3,2.7,latest + 2 more...     36 hours ago
redis        172.30.1.1:5000/openshift/redis        latest,3.2                     36 hours ago
ruby         172.30.1.1:5000/openshift/ruby         2.0,latest,2.3 + 1 more...     36 hours ago
wildfly      172.30.1.1:5000/openshift/wildfly      latest,10.1,10.0 + 2 more...   2 hours ago
Create the application in OpenShift
~]$ oc new-app --name=myapp wildfly:latest~https://github.com/Preeticp/os-sample-java-web
--> Found image 24b6639 (2 weeks old) in image stream "openshift/wildfly" under tag "latest" for "wildfly:latest"

    WildFly 10.1.0.Final
    --------------------
    Platform for building and running JEE applications on WildFly 10.1.0.Final

    Tags: builder, wildfly, wildfly10

    * A source build using source code from https://github.com/Preeticp/os-sample-java-web will be created
      * The resulting image will be pushed to image stream "myapp:latest"
      * Use 'start-build' to trigger a new build
    * This image will be deployed in deployment config "myapp"
    * Port 8080/tcp will be load balanced by service "myapp"
      * Other containers can access this service through the hostname "myapp"

--> Creating resources ...
    imagestream "myapp" created
    buildconfig "myapp" created
    deploymentconfig "myapp" created
    service "myapp" created
--> Success
    Build scheduled, use 'oc logs -f bc/myapp' to track its progress.
    Run 'oc status' to view your app.
Monitor the application deployment by checking the output of
oc status:~]$ oc status -v In project Project 00 - initial (project-00) on server https://192.168.42.189:8443 svc/myapp - 172.30.38.38:8080 dc/myapp deploys istag/myapp:latest <- bc/myapp source builds https://github.com/Preeticp/os-sample-java-web on openshift/wildfly:latest deployment #1 deployed about a minute ago - 1 pod Info: * pod/myapp-1-build has no liveness probe to verify pods are still running. try: oc set probe pod/myapp-1-build --liveness ... * dc/myapp has no readiness probe to verify pods are ready to accept traffic or ensure deployment is successful. try: oc set probe dc/myapp --readiness ... * dc/myapp has no liveness probe to verify pods are still running. try: oc set probe dc/myapp --liveness ... View details with 'oc describe <resource>/<name>' or list everything with 'oc get all'.You can examine a detailed very of the application being deployed:
~]$ oc describe svc/myapp
Name:                   myapp
Namespace:              project-00
Labels:                 app=myapp
Selector:               app=myapp,deploymentconfig=myapp
Type:                   ClusterIP
IP:                     172.30.38.38
Port:                   8080-tcp        8080/TCP
Endpoints:              172.17.0.3:8080
Session Affinity:       None
No events.
Route service to the application. OpenShift starts a new internal service for each application was created with
oc newapp, as shown above in the section Section 4.3, “WildFly Application Deployment”. Communication with the applications happens with a map to an external domain name with a feature called routes. Routes are setup by exposing an application:$ oc expose svc myapp route "myapp" exposedRun the
oc statuscommand again to verify that the application is correctly deployed:~]$ oc status In project Project 00 - initial (project-00) on server https://192.168.42.189:8443 http://myapp-project-00.192.168.42.189.nip.io to pod port 8080-tcp (svc/myapp) dc/myapp deploys istag/myapp:latest <- bc/myapp source builds https://github.com/Preeticp/os-sample-java-web on openshift/wildfly:latest deployment #1 deployed 8 hours ago - 1 pod View details with 'oc describe <resource>/<name>' or list everything with 'oc get all'.-
Finally, check out the running application. The information on the third line of
oc statusoutput states the URI where users will access the running application, in this instancehttp://myapp-project-00.192.168.42.189.nip.ioYour address may vary from this, because OpenShift uses a different IP address for each exposed service.
Chapter 5. Add-ons
5.1. Add-ons Overview
This feature is still considered experimental and might change in future releases.
Minishift allows to configure the vanilla OpenShift setup provided by cluster up with an add-on mechanism.
Add-ons are directories that contain one or more text files with the addon extension. The directory can also have other resource files such as JSON template files. However, only one addon file is allowed.
Example: anyuid add-on definition file
This example shows the contents of the add-on text file, including the name and description of the add-on, additional metadata, and the actual commands to run.
# Name: anyuid                                                                          1
# Description: Allows authenticated users to run images under a non pre-allocated UID   2

oc adm policy add-scc-to-group anyuid system:authenticated                              3
- 1
- (Required) Name of the add-on.
- 2
- (Required) Description of the add-on.
- 3
- Actual add-on command. In this case, the command executes the oc binary. For the full list of the supported add-on commands, see the Section 5.1.1, “Add-on Commands” section.
Comment lines can be inserted at anywhere in the file. Comment lines must start with the '#' character.
Enabled add-ons are applied during minishift start, immediately after the initial cluster provisioning successfully completes.
5.1.1. Add-on Commands
This section describes the command types that an add-on file can contain and what the commands do. The following command types are available forming a sort of mini-DSL for add-ons:
- ssh
-
If the add-on command starts with ssh, you can run any command within the Minishift-managed VM. This is similar to running
minishift sshand then executing any command on the VM. - oc
If the add-on command starts with oc, it uses the oc binary that is cached on your host to execute the specified
occommand. This is similar to runningoc --as system:admin …from the command-line.NoteThe
occommand is executed as system:admin- openshift
-
If the add-on command starts with openshift, you can run the
openshiftbinary within the container that runs OpenShift. This means that any file parameters or other system-specific parameters must match the environment of the container instead of your host. - docker
-
If the add-on command starts with docker, it executes a
dockercommand against the Docker daemon within the Minishift VM. This is the same daemon on which the single-node OpenShift cluster is running as well. This is similar to runningeval $(minishift docker-env)on your host and then executing anydockercommand. - echo
- If the add-on command starts with echo, the arguments following the echo command are printed to the console. This can be used to provide additional feedback during add-on execution.
- sleep
-
If the add-on command starts with sleep, it waits for the specified number of seconds. This can be useful in cases where you know that a command such as
ocmight take a few seconds before a certain resource can be queried.
Trying to add a command that is not listed will cause an error when the add-on gets parsed.
5.1.2. Variable Interpolation
Minishift also allows the use of variables as part of the supported commands. Variables have the form #{<variable-name>}. Example: Usage of the routing suffix variable shows how the routing suffix can be interpolated into a openshift command to create a new certificate as part of securing the OpenShift registry.
Example: Usage of the routing suffix variable
~]$ openshift admin ca create-server-cert \ --signer-cert=/var/lib/origin/openshift.local.config/master/ca.crt \ --signer-key=/var/lib/origin/openshift.local.config/master/ca.key \ --signer-serial=/var/lib/origin/openshift.local.config/master/ca.serial.txt \ --hostnames='docker-registry-default.#{routing-suffix},docker-registry.default.svc.cluster.local,172.30.1.1' \ --cert=/etc/secrets/registry.crt \ --key=/etc/secrets/registry.key
Table 5.1, “Supported add-on variables” shows the currently supported variables which are available for interpolation.
| Variable | Description |
|---|---|
| ip | The IP of the Minishift VM |
| routing-suffix | The OpenShift routing suffix for application |
| addon-name | The name of the current add-on |
5.1.3. Default Add-ons
Minishift provides a set of built-in add-ons that offer some common OpenShift customization to assist with development. To install the default add-ons, run:
~]$ minishift addons install --defaults
This command extracts the default add-ons to the add-on installation directory ($MINISHIFT_HOME/addons). To view the list of installed add-ons, you can then run:
~]$ minishift addons list --verbose=trueThis command prints a list of installed add-ons. You should at least see the anyuid add-on listed. This is an important add-on that allows you to run images that do not use a pre-allocated UID. By default, this is not allowed in OpenShift.
5.2. Enabling and Disabling Add-ons
Add-ons are enabled with the minishift addons enable command and disabled with the minishift addons disable command.
The following examples show how to enable and disable the anyuid add-on.
Example: Enabling the anyuid add-on
~]$ minishift addons enable anyuid
Example: Disabling the anyuid add-on
~]$ minishift addons disable anyuid
5.2.1. Add-on Priorities
When you enable an add-on, you can also specify a priority as seen in Example: Enabling the registry add-on with priority.
Example: Enabling the registry add-on with priority
~]$ minishift addons enable registry --priority=5
The add-on priority attribute determines the order in which add-ons are applied. By default, an add-on has the priority 0. Add-ons with a lower priority value are applied first.
Example: List command output with explicit priorities
~]$ minishift addons list
- anyuid         : enabled    P(0)
- registry       : enabled    P(5)
- eap            : enabled    P(10)
In Example: List command output with explicit priorities, the anyuid, registry, and eap add-ons are enabled with the respective priorities of 0, 5 and 10. This means that anyuid gets applied first, followed by registry, and lastly the eap add-on.
If two add-ons have the same priority the order in which they are getting applied is not determined.
5.2.2. Writing Custom Add-ons
To write a custom add-on, you should create a directory and in it create at least one text file with the extension .addon, for example admin-role.addon.
This file needs to contain the Name and Description metadata as well as the commands that you want to execute as a part of the add-on. Example: Add-on definition for admin-role shows the the definition of an add-on that gives the developer user cluster-admin privileges.
Example: Add-on definition for admin-role
# Name: admin-role
# Description: Gives the developer user cluster-admin privileges

oc adm policy add-role-to-user cluster-admin developer
After you define the add-on, you can install it by running:
$ minishift addons install <ADDON_DIR_PATH>
You can also edit your add-on directly in the Minishift add-on install directory $MINISHIFT_HOME/addons. Be aware that if there is an error in the add-on, it will not show when you run any addons commands and it will not be applied during the minishift start process.
Chapter 6. Host Folders
6.1. Host Folders Overview
Host folders are directories on the host which are shared between the host and the Minishift VM. They allow for a two way file synchronization between host and VM. The following sections discuss the various types of host folders, driver provided host folders, as well as the Minishift hostfolder command.
6.2. Driver Provided Host Folders
Some drivers mount a default host folder into the VM in order to share files between the VM and the host. These folders are currently not configurable and differ for each driver and OS.
| Driver | OS | HostFolder | VM |
|---|---|---|---|
| Virtualbox | Linux | /home | /hosthome |
| Virtualbox | OSX | /Users | /Users |
| Virtualbox | Windows | C://Users | /c/Users |
| VMWare Fusion | OSX | /Users | /Users |
| Xhyve | OSX | /Users | /Users |
Host folder sharing is not implemented in the KVM and Hyper-V drivers. If you use one of these drivers, you need to use Minishift specific host folder options.
6.3. Minishift hostfolder Command
Minishift provides the hostfolder command to list, add, mount, unmount and remove host folders. In contrast to the driver provided host folders, the hostfolder command allows you to mount multiple shared folders onto custom specified mount points.
At the moment only CIFS is supported as host folder type. Support for SSHFS based host folders is in progress (see GitHub issue #317).
If you want to use SSHFS now, refer to Section 6.10, “SSHFS Host Folders” for manual instructions.
The following sections describe the prerequisite for using the hostfolder command, as well as the various sub-commands it provides.
6.4. Prerequisite
To use the hostfolder command, you need to be able to share directories using CIFS. On Windows CIFS is the default technology for sharing directories. For example, on Microsoft Windows 10 the C:\Users folder is shared by default and can be accessed by locally-authenticated users.
It is also possible to use CIFS on OS X and Linux. On the former you can enable CIFS based shares under System Preferences > Sharing. Refer to How to connect with File Sharing on your Mac for detailed setup instructions.
On Red Hat Enterprise Linux, install samba with yum:
~]$ yum install "samba-*"
6.5. Displaying Host Folders
The hostfolder list command gives you an overview of the defined host folders, their name, mount point, remote path and whether they are currently mounted. An example output could look like:
~]$ minishift hostfolder list
Name        Mountpoint            Remote path              Mounted
myshare     /mnt/sda1/myshare     //192.168.1.82/MYSHARE   N
In this example, there is a host folder with the name myshare which mounts //192.168.1.82/MYSHARE onto /mnt/sda1/myshare in the Minishift VM. The share is currently not mounted.
The remote path must be reachable from within the VM. In the example above 192.168.1.82 is the IP of host within the LAN which is one options one can use. You can use ifconfig (or Get-NetIPAddress | Format-Table on Windows) to determine a routable IP address.
6.6. Adding Host Folders
The hostfolder add command allows you to define a new host folder. This in an interactive process which queries the relevant details for a host folder based on CIFS.
Adding a CIFS based hostfolder
~]$ minishift hostfolder add myshare 1
UNC path: //192.168.99.1/MYSHARE   2
Mountpoint [/mnt/sda1/myshare]:    3
Username: john                     4
Password: [HIDDEN]                 5
Domain:                            6
Added: myshare
- 1
- (Required) Actual
hostfolder addcommand, specifying a hostfolder with a name of myshare. - 2
- (Required) The UNC path for the share.
- 3
- The mount point within the VM. The default is
/mnt/sda1/<host folder name>. - 4
- (Required) The username for the CIFS share.
- 5
- (Required) The password for the CIFS share.
- 6
- The domain of the share. Often this can be left blank, but for example on Windows, when your account is linked to a Microsoft account, you must use the Microsoft account email address as username as well as your machine name as displayed by $env:COMPUTERNAME as domain.
On Windows hosts the hostfolder add command also provides a users-share option. When specified no UNC path needs to be specified and the C:\Users is assumed.
When you use the Boot2Docker ISO along with the VirtualBox driver, VirtualBox guest additions are automatically enabled and occupy the /Users mountpoint.
6.6.1. Instance Specific Host Folders
Per default, host folder definitions are persistent, similar to options specified using the minishift config command explained in the the section Section 3.2.3, “Persistent Configuration”. This means that these host folder definitions will survive the deletion and subsequent re-creation of a Minishift VM.
In some cases you might want to define a host folder just for a specific Minishift instance. To do so you can use the instance-only flag of the hostfolder add command. Host folder definition created with the instance-only flag will be removed together with any other instance specific state during minishift delete.
6.7. Mounting Host Folders
Once you have added your host folder definitions, the hostfolder mount command allows you to mount a host folder by its name:
~]$ minishift hostfolder mount myshare
Mounting 'myshare': '//192.168.99.1/MYSHARE' as '/mnt/sda1/myshare' ... OK
You can verify that the host folder is mounted by running:
~]$ minishift hostfolder list
Name       Mountpoint          Remote path              Mounted
myshare    /mnt/sda1/myshare   //192.168.99.1/MYSHARE   Y
Alternatively, you can list the actual content of the mounted host folder:
~]$ minishift ssh "ls -al /mnt/sda1/myshare"6.7.1. Auto-mounting Host Folders
Host folders can also be mounted automatically on each minishift start. To achieve this you need to set the persistent configuration option hostfolders-automount:
~]$ minishift config set hostfolders-automount true
Once hostfolders-automount is set, Minishift will attempt to mount all defined host folders during minishift start.
6.8. Unmounting host folders
In contrast to the hostfolder add command, hostfolder umount can be used to unmount a host folder:
~]$ minishift hostfolder umount myshare
Unmounting 'myshare' ... OK

~]$ minishift hostfolder list
Name       Mountpoint          Remote path              Mounted
myshare    /mnt/sda1/myshare   //192.168.99.1/MYSHARE   N
6.9. Deleting Host Folders
The hostfolder remove command finally enabled you to remove a host folder definition:
~]$ minishift hostfolder list
Name        Mountpoint            Remote path              Mounted
myshare     /mnt/sda1/myshare     //192.168.1.82/MYSHARE   N

~]$ minishift hostfolder remove myshare
Removed: myshare

~]$ minishift hostfolder list
No host folders defined
6.10. SSHFS Host Folders
This host folder type is not supported by the hostfolder command for now. You need to manually configure it.
You can also use SSHFS-based host folders provided you have an SSH daemon running on your host. Normally, this prerequisite is met by default on Red Hat Enterprise Linux and macOS.
To use the SSH server on macOS, make sure that Remote Login is enabled in System Preferences > Sharing.
On Microsoft Windows you can install OpenSSH for Windows.
The following steps demonstrate how to mount host folders with SSHFS.
-
Run
ip address showon Red Hat Enterprise Linux,ifconfigon macOS,(orGet-NetIPAddresson Microsoft Windows) to determine the local IP address from the same network segment as your Minishift instance. Create a mountpoint and mount the shared folder.
~]$ minishift ssh "sudo mkdir -p /Users/<username>"
~]$ minishift ssh "sudo chown -R docker /Users"
~]$ minishift ssh
~]$ sshfs <username>@<IP>:/Users/<username>/ /Users
Verify the share mount.
~]$ minishift ssh "ls -al /Users/<username>"
Chapter 7. Interacting with OpenShift
7.1. OpenShift Interaction Overview
Minishift creates a virtual machine (VM) and provisions a local, single-node OpenShift cluster in this VM. The following sections describe how Minishift can assist you in interacting with and configuring your local OpenShift instance.
For details about managing the Minishift VM, see the Managing Minishift section.
7.2. Using the OpenShift Client Binary (oc)
The minishift start command creates an OpenShift instance using the cluster up approach.
For this purpose it copies the oc binary onto your host. You will find it under ~/.minishift/cache/oc/3.5/oc, provided you use Minishift’s default version of OpenShift.
You can add this binary to your PATH using minishift oc-env which displays the command you need to type into your shell. The output of oc-env will differ depending on OS and shell type.
~]$ minishift oc-env
export PATH="/Users/john/.minishift/cache/oc/v1.5.0:$PATH"
# Run this command to configure your shell:
# eval $(minishift oc-env)
Users who have already installed the executables minishift or oc need to ensure that the new executables that minishift provides do not conflict with those already installed. This is handled by default with oc-env, by putting the new Minishift executables in PATH first. To access the previous version, run which oc or which minishift and use the output to specify the absolute filename including directory.
As part of the minishift start command there is also a minishift oc context created. This context contains the configuration to communicate with your OpenShift cluster.
Minishift activates this context automatically, but if you need to switch back to it after for example, logging into another OpenShift instance, you can run:
~]$ oc config use-context minishift
For an introduction to oc usage, refer to the Get Started with the CLI topic in the OpenShift documentation.
7.3. Logging Into the Cluster
By default, cluster up uses AllowAllPasswordIdentityProvider to authenticate against the local cluster. This means any non-empty user name and password can be used to login to the local cluster. The recommended user name and password combination is developer/developer, because it already has a default project myproject and also can impersonate the administrator user. This allows to run administrator commands using the --as system:admin parameter.
To login as administrator, use the system account:
~]$ oc login -u system:admin
In this case, client certificates are used. The certificates are stored in ~/.kube/config. The cluster up command installs the appropriate certificates as a part of the bootstrap.
If you run the command oc login -u system -p admin, you will log in but not as an administrator. Instead, you will be logged in as an unprivileged user with no particular rights.
To view the currently available login contexts, run:
~]$ oc config view7.4. Accessing the Web Console
To access the OpenShift console, you can run this command in a shell after starting Minishift to get the URL of the Web console:
~]$ minishift console --urlAlternatively, after starting Minishift, you can use the following command to directly open the console in a browser:
~]$ minishift console7.5. Accessing OpenShift Services
To access a service exposed with a node port, run this command in a shell after starting Minishift to get the address:
~]$ minishift openshift service [-n <NAMESPACE>] [--url] <NAME>7.6. Viewing OpenShift Logs
To access OpenShift logs, run the logs command after starting Minishift:
~]$ minishift logs7.7. Updating OpenShift configuration
While OpenShift is running, you can view and change the master or the node configuration of your cluster.
To view the current OpenShift master configuration master-config.yaml, run the following command:
~]$ minishift openshift config view
To show the node configuration instead of the master configuration, specify the target flag.
After you update the OpenShift configuration, OpenShift will transparently restart.
7.8. Example: Configuring Cross-origin Resource Sharing
In this example, you configure cross-origin resource sharing (CORS) by updating the OpenShift master configuration to allow additional IP addresses to request resources.
By default, OpenShift only allows cross-origin resource requests from the IP address of the cluster or from localhost. This setting is stored in the corsAllowedOrigins property of the master configuration file master-config.yaml.
To change the property value and allow cross-origin requests from all domains, run the following command:
~]$ minishift openshift config set --patch '{"corsAllowedOrigins": ["."]}'*
If you get the error The specified patch need to be a valid JSON. when you run the above command, you need to modify the above command depending on your Operating System, your shell environment and its interpolation behavior.
For example, if you use PowerShell on Microsoft Windows 10 modify the above command to:
$ .\minishift.exe --% openshift config set --patch "{\"routingConfig\": {\"subdomain\": \"192.168.99.101.nip.io\"}}"If you use Command Prompt you may need to use:
$ .\minishift.exe openshift config set --patch "{\"routingConfig\": {\"subdomain\": \"192.168.99.101.nip.io\"}}"7.8.1. Example: Changing the OpenShift routing suffix
In this example, you change the OpenShift routing suffix in the master configuration.
If you use a static routing suffix, you can set the routing-suffix flag as part of the start command. By default, Minishift uses a dynamic routing prefix based on nip.io, in which the IP address of the VM is a part of the routing suffix, for example 192.168.99.103.nip.io.
If you experience issues with nip.io, you can use xip.io, which is based on the same principles.
To set the routing suffix to xip.io, run the following command:
~]$ minishift openshift config set --patch '{"routingConfig": {"subdomain": "<IP-ADDRESS>.xip.io"}}'
Make sure to replace <IP-ADDRESS> in the above example with the IP address of your Minishift VM. You can retrieve the IP address by running the ip command.
Chapter 8. Reusing the Minishift Docker Daemon
When running OpenShift in a single VM, you can reuse the Docker daemon managed by Minishift for other Docker use-cases as well. By using the same docker daemon as Minishift, you can speed up your local development.
In order to configure your console to reuse the Minishift Docker dameon, follow these steps:
- Make sure that you have the Docker client binary installed on your machine. For information about specific binary installations for your operating system, see the Docker installation site.
-
Start Minishift with the
minishift startcommand. Use
minishift docker-envto display the command you need to type into your shell in order to configure your Docker client. The command output will differ depending on OS and shell type.~]$ minishift docker-env export DOCKER_TLS_VERIFY="1" export DOCKER_HOST="tcp://192.168.99.101:2376" export DOCKER_CERT_PATH="/Users/john/.minishift/certs" export DOCKER_API_VERSION="1.24" # Run this command to configure your shell: # eval $(minishift docker-env)Test the connection, running the following command:
~]$ docker ps
If successful, the shell will print a list of running containers.
Chapter 9. Accessing the OpenShift Docker Registry
9.1. Docker Registry Overview
OpenShift provides an integrated Docker registry which can be used for development as well. Images present in the registry can directly be used for applications, speeding up the local development work-flow. Refer to Section 9.3, “Deploying an Application with Docker” to know more.
9.2. Registry Login
-
Start Minishift and add the
ocbinary to the PATH. Refer to the section Chapter 1, Overview for details. - Make sure your shell is configured to reuse the docker daemon.
- Login to the docker registry
~]$ docker login -u developer -p $(oc whoami -t) $(minishift openshift registry)9.3. Deploying an Application with Docker
The following example shows how to deploy an OpenShift application directly from a locally built docker image. In this example, the OpenShift project myproject is used, as it is automatically created by minishift start.
- Make sure your shell is configured to reuse the Minishift docker daemon.
- Build the docker image as usual.
Tag the image against the OpenShift registry.
~]$ docker tag my-app $(minishift openshift registry)/myproject/my-appPush the image to the registry to create an image stream with the same name as the application.
~]$ docker push $(minishift openshift registry)/myproject/my-appCreate an application from the image stream and expose the service.
~]$ oc new-app --image-stream=my-app --name=my-app
~]$ oc expose service my-app
Chapter 10. Troubleshooting Minishift
10.1. Troubleshooting Overview
This section contains solutions to common problems that you might encounter while using Minishift.
10.2. Special Characters Cause Passwords to Fail
Depending on your operating system and shell environment, certain special characters can trigger variable interpolation and therefore cause passwords to fail.
Workaround: When creating and entering passwords, wrap the string with single quotes in the following format: '<password>'
10.3. Undefining virsh Snapshots Fail
If you use virsh on KVM/libvirt to create snapshots in your development workflow, and then use minishift delete to delete the snapshots along with the VM, you might encounter the following error:
~]$ minishift delete
Deleting the Minishift VM...
Error deleting the VM:  [Code-55] [Domain-10] Requested operation is not valid: cannot delete inactive domain with 4 snapshots
Cause: The snapshots are stored in ~/.minishift/machines, but the definitions are stored in var/lib/libvirt/qemu/snapshot/minishift.
Workaround: To delete the snapshots you need to perform the following steps.
Delete the definitions.
~]$ sudo virsh snapshot-delete --metadata minishift <snapshot-name>Undefine the Minishift domain.
~]$ sudo virsh undefine minishiftDelete the VM and restart Minishift.
~]$ minishift delete
In case the above steps do not resolve the issue, you can also use the following command to delete the snapshots:
~]$ rm -rf ~/.minishift/machines
It is recommended to avoid using metadata when you create snapshots. To make sure of this, you can specify the --no-metadata flag. For example:
~]$ sudo virsh snapshot-create-as --domain vm1 overlay1 \
--diskspec vda,file=/export/overlay1.qcow2 \
--disk-only --atomic --no-metadata
10.4. KVM: Error creating new host: dial tcp: missing address
The problem is likely that the libvirtd service is not running. You can check this with the following command:
~]$ systemctl status libvirtd
If libvirtd is not running, start it and enable it to start on boot:
~]$ systemctl start libvirtd
~]$ systemctl enable libvirtd
10.5. KVM: Failed to connect socket to '/var/run/libvirt/virtlogd-sock'
The problem is likely that the virtlogd service is not running. You can check this with the following command:
~]$ systemctl status virtlogd
If virtlogd is not running, start it and enable it to start on boot:
~]$ systemctl start virtlogd
~]$ systemctl enable virtlogd
10.6. KVM: Domain 'minishift' already exists…
If you try minishift start and hit the above error, ensure that you use minishift delete to delete the VMs created earlier by you. However if this fails and you wish to completely clean up Minishift and start fresh do the following:
Check if any existing Minishift VM are running:
~]$ sudo virsh list --allIf any Minishift VM is running, stop it:
~]$ sudo virsh destroy minishiftDelete the VM:
~]$ sudo virsh undefine minishiftDelete the
.minishift/machinesdirectory using:~]$ rm -rf ~/.minishift/machines
In case all of this fails, you may want to uninstall Minishift and do a fresh install of Minishift.
10.7. xhyve: Could not create vmnet interface
The problem is likely that the xhyve driver is not able to clean up vmnet when a VM is removed. vmnet.framework determines the IP address based on the following files:
-
/var/db/dhcpd_leases -
/Library/Preferences/SystemConfiguration/com.apple.vmnet.plist
Reset the minishift IP database, make sure to remove the minishift entry section from the dhcpd_leases file, and reboot your system.
/var/db/dhcpd_leases section for minishift. The highlighted line identifies the section.
{
  ip_address=192.168.64.2
  hw_address=1,2:51:8:22:87:a6
  identifier=1,2:51:8:22:87:a6
  lease=0x585e6e70
  name=minishift
}
You can completely reset the IP database by removing the files manually but this is very risky.
10.8. VirtualBox: Error machine does not exist
If you use Microsoft Windows, make sure that you set the --vm-driver virtualbox flag in the minishift start command. Alternatively, the problem might be an outdated version of VirtualBox.
To avoid this issue, it is recommended to use VirtualBox 5.1.12 or later.
10.9. Hyper-V: Hyper-V commands must be run as an Administrator
If you run Minishift with Hyper-V on Microsoft Windows as a normal user or as a user with Administrator privileges, you will encounter the following error:
Error starting the VM: Error creating the VM. Error with pre-create check: "Hyper-V commands must be run as an Administrator".
Workaround: To overcome this error you can either add yourself to the Hyper-V Administrators group, which is recommended, or run the shell in an elevated mode.
If use PowerShell, you can add yourself to the Hyper-V Administrators group as follows:
As an administrator run the following command:
([adsi]”WinNT://./Hyper-V Administrators,group”).Add(“WinNT://$env:UserDomain/$env:Username,user”)
- Log off and log in for the change to take effect.
You can also use the GUI to add yourself to the Hyper-V Administrators group as follows:
- Click the Start button and choose Computer Management.
- In the Computer Management window, select Local Users And Groups and then double click on Groups.
- Double click on the Hyper-V Administrators group, the Hyper-V Administrators Properties dialog box is displayed.
- Add your account to the Hyper-V Administrators group and log off and log in for the change to take effect.
Now you can run the Hyper-V commands as a normal user.
For more options for Hyper-V see creating Hyper-V administrators local group.