Chapter 3. Using CDK
This section describes how to use the minishift CLI. It covers the basic commands as well as advanced features like profiles, image caching, add-ons and host folders.
For details about using the minishift and oc commands to manage your local OpenShift cluster, see the Interacting with OpenShift section.
3.1. Basic Usage
3.1.1. Overview
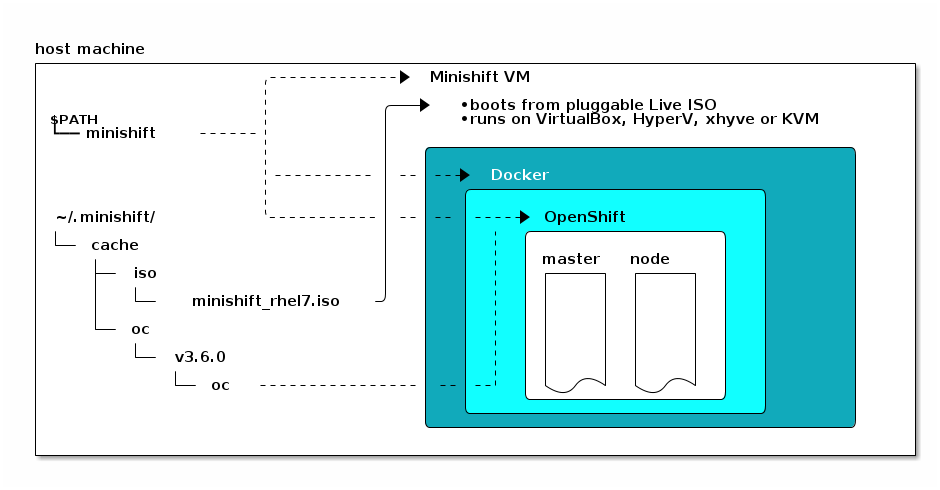
When you use CDK, you interact with the following components:
- the CDK virtual machine (VM)
- the Docker daemon running on the VM
- the OpenShift cluster running on the Docker daemon
The CDK architecture diagram outlines these components. The minishift binary, placed on the PATH for easy execution, is used to start, stop, and delete the CDK VM. The VM itself is bootstrapped off of a Red Hat Enterprise Linux Live ISO.
Some CDK commands, for example docker-env, interact with the Docker daemon, whilst others communicate with the OpenShift cluster, for example the openshift command.
Once the OpenShift cluster is up and running, you interact with it using the oc binary. CDK caches this binary under MINISHIFT_HOME (per default ~/.minishift). minishift oc-env is an easy way to add the oc binary to your PATH.
For more details about using CDK to manage your local OpenShift cluster, see the Interacting with OpenShift section.
Figure 3.1. : Minishift architecture
3.1.2. CDK Life-cycle
3.1.2.1. The minishift setup-cdk Command
The minishift setup-cdk command creates and configures the CDK VM and provisions a local, single-node OpenShift cluster within the CDK VM.
The command also copies the oc binary to your host so that you can interact with OpenShift through the oc command-line tool or through the Web console, which can be accessed through the URL provided in the output of the minishift start command.
3.1.2.2. CDK start Command
The minishift start command creates and configures the CDK VM and provisions a local, single-node OpenShift cluster within the CDK VM.
The command also copies the oc binary to your host so that you can interact with OpenShift through the oc command-line tool or through the Web console, which can be accessed through the URL provided in the output of the minishift start command.
3.1.2.3. CDK stop Command
The minishift stop command stops your OpenShift cluster and shuts down the CDK VM, but preserves the OpenShift cluster state.
Starting CDK again will restore the OpenShift cluster, allowing you to continue working from the last session. However, you must enter the same parameters that you used in the original start command.
Efforts to further refine this experience are in progress. For details, see the GitHub issue #179.
3.1.2.4. CDK delete Command
The minishift delete command deletes the OpenShift cluster, and also shuts down and deletes the CDK VM. No data or state are preserved.
3.1.3. Runtime Options
The runtime behavior of CDK can be controlled through flags, environment variables, and persistent configuration options.
The following precedence order is applied to control the behavior of CDK. Each action in the following list takes precedence over the action below it:
- Use command-line flags as specified in the Flags section.
- Set environment variables as described in the Environment Variables section.
- Use persistent configuration options as described in the Persistent Configuration section.
- Accept the default value as defined by CDK.
3.1.3.1. Flags
You can use command line flags with CDK to specify options and direct its behavior. This has the highest precedence. Almost all commands have flags, although different commands might have different flags. Some of the commonly-used command line flags of the minishift start command are cpus, memory or vm-driver.
3.1.3.2. Environment Variables
CDK allows you to specify command-line flags you commonly use through environment variables. To do so, apply the following rules to the flag you want to set as an environment variable.
-
Apply
MINISHIFT_as a prefix to the flag you want to set as an environment variable. For example, thevm-driverflag of theminishift startcommand becomesMINISHIFT_vm-driver. -
Use uppercase characters for the flag, so
MINISHIFT_vm-driverin the above example becomesMINISHIFT_VM-DRIVER. -
Replace
-with_, soMINISHIFT_VM-DRIVERbecomesMINISHIFT_VM_DRIVER.
Environment variables can be used to replace any option of any CDK command. A common example is the URL of the ISO to be used. Usually, you specify it with the iso-url flag of the minishift start command. Applying the above rules, you can also specify this URL by setting the environment variable as MINISHIFT_ISO_URL.
You can also use the MINISHIFT_HOME environment variable, to choose a different home directory for CDK. By default, the minishift command places all runtime state into ~/.minishift. This environment variable is currently experimental and semantics might change in future releases.
To use MINISHIFT_HOME, you should set the new home directory when you first set up CDK. For example, this sets the minishift home directory to ~/.mynewdir on a Linux system:
minishift setup-cdk --minishift-home ~/.mynewdir
export MINISHIFT_HOME=~/.mynewdir
echo 'export MINISHIFT_HOME=~/.mynewdir' >> ~/.bashrc
$ minishift setup-cdk --minishift-home ~/.mynewdir
$ export MINISHIFT_HOME=~/.mynewdir
$ echo 'export MINISHIFT_HOME=~/.mynewdir' >> ~/.bashrc3.1.3.3. Persistent Configuration
Using persistent configuration allows you to control the CDK behavior without specifying actual command line flags, similar to the way you use environment variables.
CDK maintains a configuration file in $MINISHIFT_HOME/config/config.json. This file can be used to set commonly-used command-line flags persistently.
Persistent configuration can only be applied to the set of supported configuration options that are listed in the synopsis of the minishift config sub-command. This is different from environment variables, which can be used to replace any option of any command.
3.1.3.3.1. Setting Persistent Configuration Values
The easiest way to change a persistent configuration option is with the minishift config set sub-command. For example:
# Set default memory 4096 MB
minishift config set memory 4096
# Set default memory 4096 MB
$ minishift config set memory 4096
Flags which can be used multiple times per command invocation, like docker-env or insecure-registry, need to be comma-separated when used with the config set command. For example, from the CLI, you can use insecure-registry like this:
minishift start --insecure-registry hub.foo.com --insecure-registry hub.bar.com
$ minishift start --insecure-registry hub.foo.com --insecure-registry hub.bar.comIf you want to configure the same registries in the persistent configuration, you would run:
minishift config set insecure-registry hub.foo.com,hub.bar.com
$ minishift config set insecure-registry hub.foo.com,hub.bar.com
To view all persistent configuration values, you can use the minishift config view sub-command:
minishift config view
- memory: 4096
$ minishift config view
- memory: 4096
Alternatively, you can display a single value with the minishift config get sub-command:
minishift config get memory
4096
$ minishift config get memory
40963.1.3.3.2. Unsetting Persistent Configuration Values
To remove a persistent configuration option, you can use the minishift config unset sub-command. For example:
minishift config unset memory
$ minishift config unset memory3.1.3.4. Driver-Specific Environment Variables
You can also set driver-specific environment variables. Each docker-machine driver supports its own set of options and variables. A good starting point is the official docker-machine driver documentation.
xhyve and KVM documentation is available under their respective GitHub repository docker-machine-driver-xhyve and docker-machine-kvm.
To use driver-specific options, make sure to export the variable as defined in its driver documentation before running minishift start. For example, the xhyve experimental NFS sharing can be enabled by executing:
export XHYVE_EXPERIMENTAL_NFS_SHARE=true
minishift start --vm-driver xhyve
$ export XHYVE_EXPERIMENTAL_NFS_SHARE=true
$ minishift start --vm-driver xhyveDriver-specific options might overlap with values specified using CDK-specific flags and environment variables. Examples are boot2docker URL, memory size, cpu count, and so on. In this case, driver-specific environment variables will override CDK-specific settings.
3.1.4. Persistent Volumes
As part of the OpenShift cluster provisioning, 100 persistent volumes are created for your OpenShift cluster. This allows applications to make persistent volumes claims. The location of the persistent data is determined in the host-pv-dir flag of the minishift start command and defaults to /var/lib/minishift/openshift.local.pv on the CDK VM.
3.1.5. HTTP/HTTPS Proxies
If you are behind an HTTP/HTTPS proxy, you need to supply proxy options to allow Docker and OpenShift to work properly. To do this, pass the required flags during minishift start.
For example:
minishift start --http-proxy http://YOURPROXY:PORT --https-proxy https://YOURPROXY:PORT
$ minishift start --http-proxy http://YOURPROXY:PORT --https-proxy https://YOURPROXY:PORT
In an authenticated proxy environment, the proxy_user and proxy_password must be a part of proxy URI.
minishift start --http-proxy http://<proxy_username>:<proxy_password>@YOURPROXY:PORT \
                   --https-proxy https://<proxy_username>:<proxy_password>@YOURPROXY:PORT
 $ minishift start --http-proxy http://<proxy_username>:<proxy_password>@YOURPROXY:PORT \
                   --https-proxy https://<proxy_username>:<proxy_password>@YOURPROXY:PORT
You can also use the --no-proxy flag to specify a comma-separated list of hosts that should not be proxied.
Using the proxy options will transparently configure the Docker daemon as well as OpenShift to use the specified proxies.
-
minishift starthonors the environment variablesHTTP_PROXY,HTTPS_PROXYandNO_PROXY. If these variables are set, they are implicitly used duringminishift startunless explicitly overridden by the corresponding command line flags. -
Use the
minishift start --ocp-tagflag to request a specific version of OpenShift Container Platform. You can list all CDK-compatible OpenShift Container Platform versions with theminishift openshift version listcommand.
3.1.6. Networking
The CDK VM is exposed to the host system with a host-only IP address that can be obtained with the minishift ip command.
3.1.7. Connecting to the CDK VM with SSH
You can use the minishift ssh command to interact with the CDK VM.
You can run minishift ssh without a sub-command to open an interactive shell and run commands on the CDK VM in the same way that you run commands interactively on any remote machine using SSH.
You can also run minishift ssh with a sub-command to send the sub-command directly to the CDK VM and return the result to your local shell. For example:
minishift ssh -- docker ps
CONTAINER    IMAGE                   COMMAND                CREATED        STATUS        NAMES
71fe8ff16548 openshift/origin:v1.5.1 "/usr/bin/openshift s" 4 minutes ago  Up 4 minutes  origin
$ minishift ssh -- docker ps
CONTAINER    IMAGE                   COMMAND                CREATED        STATUS        NAMES
71fe8ff16548 openshift/origin:v1.5.1 "/usr/bin/openshift s" 4 minutes ago Up 4 minutes origin3.2. CDK Profiles
3.2.1. Overview
You must run minishift setup-cdk before using profiles.
A profile is an instance of the Minishift VM along with all of its configuration and state. The profile feature allows you to create and manage these isolated instances of Minishift.
Each CDK profile is created with its own configuration (memory, CPU, disk size, add-ons, and so on) and completely independent of other profiles. Refer to the use of environment variables if you want to make sure that certain configuration settings, for example cpus or memory, get applied to all profiles.
The active profile is the profile against which all commands are executed, unless the global --profile flag is used. You can determine the active profile by using the minishift profile list command. You can execute single commands against a non-active profile by using the --profile flag, for example minishift --profile profile-demo console to open the OpenShift console for the specified profile-demo profile.
On top of the --profile flag, there are commands for listing, deleting and setting the active profile. These commands are described in the following sections.
3.2.2. Creating Profiles
There are two ways to create a new profile.
3.2.2.1. Using the --profile Flag
When you run any CDK command with the --profile flag the profile gets created if it does not exist, for example:
See also workflow for profile configuration.
A profile automatically becomes the active profile when a CDK instance is started successfully via minishift start.
3.2.2.2. Using the profile set Command
The other option to create a profile is to use the profile set command. If the specified profile does not exist, it is implicitly created:
minishift profile set demo
Profile 'demo' set as active profile
$ minishift profile set demo
Profile 'demo' set as active profileThe default profile is minishift. It will be present by default and it does not need to be created.
3.2.3. Listing Profiles
You can list all existing profiles with the minishift profile list command. You can also see the active profile highlighted in the output.
minishift profile list
- minishift     Running     	(Active)
- profile-demo  Does Not Exist
$ minishift profile list
- minishift     Running     	(Active)
- profile-demo Does Not Exist3.2.4. Switching Profiles
To switch between profiles use the minishift profile set command:
minishift profile set profile-demo
Profile 'profile-demo' set as active profile
$ minishift profile set profile-demo
Profile 'profile-demo' set as active profileOnly one profile can be active at any time.
3.2.5. Deleting Profiles
To delete a profile, run:
minishift profile delete profile-demo
You are deleting the active profile. It will remove the VM and all related artifacts. Do you want to continue [y/N]?: y
Deleted:  /Users/john/.minishift/profiles/profile-demo
Profile 'profile-demo' deleted successfully
Switching to default profile 'minishift' as the active profile.
$ minishift profile delete profile-demo
You are deleting the active profile. It will remove the VM and all related artifacts. Do you want to continue [y/N]?: y
Deleted:  /Users/john/.minishift/profiles/profile-demo
Profile 'profile-demo' deleted successfully
Switching to default profile 'minishift' as the active profile.The default profile minishift cannot be deleted.
3.2.6. Example Workflow for Profile Configuration
You have two options to create a new profile and configure its persistent configuration. The first option is to implicitly create the new profile by making it the active profile using the profile set command. Once the profile is active you can run any minishift config command. Lastly, start the instance:
minishift profile set profile-demo
minishift config set memory 8GB
minishift config set cpus 4
minishift addon enable anyuid
minishift start
$ minishift profile set profile-demo
$ minishift config set memory 8GB
$ minishift config set cpus 4
$ minishift addon enable anyuid
$ minishift start
The alternative is to execute a series of commands each specifying the targeted profile explicitly using the --profile flag:
minishift --profile profile-demo config set memory 8GB
minishift --profile profile-demo config set cpus 4
minishift --profile profile-demo addon enable anyuid
minishift --profile profile-demo minishift start
$ minishift --profile profile-demo config set memory 8GB
$ minishift --profile profile-demo config set cpus 4
$ minishift --profile profile-demo addon enable anyuid
$ minishift --profile profile-demo minishift start3.3. Image Caching
3.3.1. Overview
To speed up provisioning of the OpenShift cluster and to minimize network traffic, the core OpenShift images can be cached on the host. This feature is considered experimental and needs to be explicitly enabled.
3.3.2. Image Caching Configuration
To enable image caching you use the minishift config set command:
minishift config set image-caching true
$ minishift config set image-caching true
Once enabled, caching occurs transparently, in a background process, the first time you use the minishift start command. Once the images are cached under $MINISHIFT_HOME/cache/images, successive CDK VM creations will use these cached images.
Each time an image exporting background process runs, a log file is generated under $MINISHIFT_HOME/logs which can be used to verify the progress of the export.
You can disable the caching of the OpenShift images by setting image-caching to false or removing the setting altogether using minishift config unset:
minishift config unset image-caching
$ minishift config unset image-cachingImage caching is considered experimental and its semantics and API is subject to change. The aim is to allow caching of arbitrary images, as well as using a better format for storing the images on the host. You can track the progress on this feature on the GitHub issue #952.
3.4. Add-ons
3.4.1. Overview
This feature is still considered experimental and might change in future releases.
CDK allows you to extend the vanilla OpenShift setup provided by cluster up with an add-on mechanism.
Add-ons are directories that contain a text file with the .addon extension. The directory can also contain other resource files such as JSON template files. However, only one .addon file is allowed per add-on.
The following example shows the contents of an add-on file, including the name and description of the add-on, additional metadata, and the actual add-on commands to apply.
Example: anyuid add-on definition file
- 1
- (Required) Name of the add-on.
- 2
- (Required) Description of the add-on.
- 3
- (Optional) Comma separated list of required interpolation variables. See Variable Interpolation.
- 4
- (Optional) OpenShift version required to run a specific add-on. See OpenShift Version Semantics.
- 5
- Actual add-on command. In this case, the command executes the
ocbinary.
Comment lines, starting with the '#' character, can be inserted at anywhere in the file.
Enabled add-ons are applied during minishift start, immediately after the initial cluster provisioning is successfully completed.
3.4.2. OpenShift-Version Semantics
As part of the add-on metadata you can specify the OpenShift version which needs to be running in order to apply the add-on. To do so you can specify the optional OpenShift-Version metadata field. The semantics are as follow:
| >3.6.0 | OpenShift version higher than 3.6.0 needs to be running in order to apply the add-on. |
| >=3.6.0 | OpenShift version 3.6.0 or higher needs to be running in order to apply the add-on. |
| 3.6.0 | OpenShift version 3.6.0 needs to be running in order to apply the add-on. |
| >=3.5.0, <3.8.0 | OpenShift version should higher or equal to 3.5.0 but lower than 3.8.0. |
| >=3.5.0, <=3.8.0 | OpenShift version should higher or equal to 3.5.0 but lower or equal to 3.8.0. |
If the metadata field OpenShift-Version is not specified in the add-on header, the add-on is applied against any version of OpenShift.
OpenShift-Version supports only versions in the form of <major>.<minor>.<patch>.
3.4.3. Add-on Commands
This section describes the commands that an add-on file can contain. They are forming a mini-DSL for CDK add-ons:
- ssh
-
If the add-on command starts with
ssh, you can run any command within the minishift-managed VM. This is similar to runningminishift sshand then executing any command on the VM. For more information aboutminishift sshcommand usage, see Connecting to the CDK VM with SSH. - oc
If the add-on command starts with
oc, it uses the oc binary that is cached on your host to execute the specifiedoccommand. This is similar to runningoc --as system:admin …from the command-line.NoteThe
occommand is executed as system:admin.- openshift
-
If the add-on command starts with
openshift, you can run the openshift binary within the container that runs OpenShift. This means that any file parameters or other system-specific parameters must match the environment of the container instead of your host. - docker
-
If the add-on command starts with
docker, it executes adockercommand against the docker daemon within the CDK VM. This is the same daemon on which the single-node OpenShift cluster is running as well. This is similar to runningeval $(minishift docker-env)on your host and then executing anydockercommand. See alsominishift docker-env. - echo
-
If the add-on command starts with
echo, the arguments following theechocommand are printed to the console. This can be used to provide additional feedback during add-on execution. - sleep
-
If the add-on command starts with
sleep, it waits for the specified number of seconds. This can be useful in cases where you know that a command such asocmight take a few seconds before a certain resource can be queried.
Trying to use an undefined command will cause an error when the add-on gets parsed.
3.4.4. Variable Interpolation
CDK allows the use of variables within the add-on commands. Variables have the format #{<variable-name>}. The following example shows how the OpenShift routing suffix can be interpolated into an openshift command to create a new certificate as part of securing the OpenShift registry. The used variable #{routing-suffix} is part of the built-in add-on variables.
Example: Usage of the routing-suffix variable
3.4.4.1. Built-in Variables
There exist several built-in variables which are available for interpolation at all times. The following table shows these variables.
| Variable | Description |
|---|---|
| ip | IP of the CDK VM. |
| routing-suffix | OpenShift routing suffix for the application. |
| addon-name | Name of the current add-on. |
3.4.4.2. Dynamic Variables
The commands minishift start as well as minishift addons apply also provide an --addon-env flag which allows to dynamically pass variables for interpolation, for example:
minishift addons apply --addon-env PROJECT_USER=john acme
$ minishift addons apply --addon-env PROJECT_USER=john acme
The --addon-env flag can be specified multiple times to define more than one variables for interpolation.
Specifying dynamic variables also works in conjunction with setting persistent configuration values.
minishift config set addon-env PROJECT_USER=john
minishift addons apply acme
$ minishift config set addon-env PROJECT_USER=john
$ minishift addons apply acme
Multiple variables need to be comma separated when the minishift config set is used.
There is also the possibility to dynamically interpolate a variable with the value of an environment variable at the time the add-on gets applied. For this the variable value needs to be prefixed with env.
minishift config set addon-env PROJECT_USER=env.USER
minishift addons apply acme
$ minishift config set addon-env PROJECT_USER=env.USER
$ minishift addons apply acme - 1
- Using the env prefix ensures that instead of literally replacing '#{PROJECT_USER}' with 'env.USER', the value of the environment variable
USERis used. If the environment variable is not set not, interpolation does not occur. - 2
- When the add-on is applied, each occurrence of
#{PROJECT_USER}within an add-on command gets replaced with the value of the environment variableUSER.
As an add-on developer, you can enforce that a variable value is provided when the add-on gets applied by adding the variable name to the Required-Vars metadata header. Multiple variables need to be comma separated.
# Name: acme
# Description: ACME add-on
# Required-Vars: PROJECT_USER
# Name: acme
# Description: ACME add-on
# Required-Vars: PROJECT_USER3.4.5. Default Add-ons
CDK provides a set of built-in add-ons that offer some common OpenShift customization to assist with development. During minishift setup-cdk, minishift automatically installs and enables the xpaas, anyuid, and admin-user add-ons. To install the default add-ons, run:
minishift addons install --defaults
$ minishift addons install --defaultsThis command extracts the default add-ons to the add-on installation directory $MINISHIFT_HOME/addons. To view the list of installed add-ons, you can then run:
minishift addons list --verbose=true
$ minishift addons list --verbose=trueThis command prints a list of installed add-ons. You should at least see the anyuid add-on listed. This is an important add-on that allows you to run images that do not use a pre-allocated UID. By default, this is not allowed in OpenShift.
3.4.6. Enabling and Disabling Add-ons
Add-ons are enabled with the minishift addons enable command and disabled with the minishift addons disable command. Enabled add-ons automatically get executed during minishift start.
The following examples show how to enable and disable the anyuid add-on.
Example: Enabling the anyuid add-on
minishift addons enable anyuid
$ minishift addons enable anyuidExample: Disabling the anyuid add-on
minishift addons disable anyuid
$ minishift addons disable anyuid3.4.6.1. Add-on Priorities
When you enable an add-on, you can also specify a priority, which determines the order that the add-ons are applied.
The following example shows how to enable the registry add-on with a higher priority value.
Example: Enabling the registry add-on with priority
minishift addons enable registry --priority=5
$ minishift addons enable registry --priority=5The add-on priority attribute determines the order in which add-ons are applied. By default, an add-on has the priority 0. Add-ons with a lower priority value are applied first.
In the following example, the anyuid, registry, and eap add-ons are enabled with the respective priorities of 0, 5 and 10. This means that anyuid is applied first, followed by registry, and lastly the eap add-on.
Example: List command output with explicit priorities
minishift addons list
- anyuid         : enabled    P(0)
- registry       : enabled    P(5)
- eap            : enabled    P(10)
$ minishift addons list
- anyuid         : enabled    P(0)
- registry       : enabled    P(5)
- eap : enabled P(10)If two add-ons have the same priority the order in which they are getting applied is not determined.
3.4.7. Applying Add-ons
Add-ons can be explicitly executed with the minishift addons apply command. You can use the apply command for both enabled and disabled add-ons. To apply multiple add-ons with a single command, specify add-on names separated by space.
The following example shows how to explicitly apply the anyuid and the admin-user add-ons.
Example: Applying anyuid and admin-user add-ons
minishift addons apply anyuid admin-user
$ minishift addons apply anyuid admin-user3.4.8. Removing Add-ons
Add-ons can be removed with the minishift addons remove command. It is the mirror command to minishift addons apply and similarly can be used regardless of whether the add-on is enabled or not. Provided the specified add-on is installed and has a <addon_name>.addon.remove file, minishift addons remove will execute the commands specified in this file.
To remove multiple add-ons with a single command, specify the add-on names separated by a space. The following example shows how to explicitly remove the admin-user add-on.
Example: Removing admin-user add-on
minishift addons remove admin-user
-- Removing addon 'admin-user':.
admin user deleted
$ minishift addons remove admin-user
-- Removing addon 'admin-user':.
admin user deleted3.4.9. Uninstalling Add-ons
Add-ons can be uninstalled with the minishift addons uninstall command. It is the mirror command to minishift addons install and can be used regardless of whether the add-on is enabled or not. Provided the specified add-on is installed, minishift addons uninstall will delete the corresponding add-on directory from $MINISHIFT_HOME/addons.
The following example shows how to explicitly uninstall the admin-user add-on:
Example: Uninstalling admin-user add-on
minishift addons uninstall admin-user
Add-on 'admin-user' uninstalled
$ minishift addons uninstall admin-user
Add-on 'admin-user' uninstalled3.4.10. Writing Custom Add-ons
To write a custom add-on, you should create a directory and in it create one (and only one) text file with the extension .addon, for example admin-role.addon.
This file needs to contain the Name and Description metadata fields, as well as the commands that you want to execute as a part of the add-on.
The following example shows the definition of an add-on that gives the developer user cluster-admin privileges.
Example: Add-on definition for admin-role
# Name: admin-role
# Description: Gives the developer user cluster-admin privileges

oc adm policy add-role-to-user cluster-admin developer
# Name: admin-role
# Description: Gives the developer user cluster-admin privileges

oc adm policy add-role-to-user cluster-admin developerAfter you define the add-on, you can install it by running:
minishift addons install <ADDON_DIR_PATH>
$ minishift addons install <ADDON_DIR_PATH>
You can also edit your add-on directly in the minishift add-on install directory $MINISHIFT_HOME/addons. Be aware that if there is an error in the add-on, it will not show when you run any addons commands, and it will not be applied during the minishift start process.
3.5. Host Folders
3.5.1. Overview
Host folders are directories on the host which are shared between the host and the CDK VM. This allows for two way file synchronization between the host and the VM. The following sections discuss usage of the minishift hostfolder command.
3.5.2. The minishift hostfolder Command
CDK provides the minishift hostfolder command to list, add, mount, unmount and remove host folders. You can use the hostfolder command to mount multiple shared folders onto custom specified mount points.
Currently only CIFS is supported as a host folder type. Support for SSHFS-based host folders is in progress, as described in GitHub issue #317. If you want to manually set up SSHFS, see SSHFS Host Folders.
3.5.2.1. Prerequisites
To use the minishift hostfolder command, you need to be able to share directories using CIFS. On Windows, CIFS is the default technology for sharing directories. For example, on Windows 10 the C:\Users directory is shared by default and can be accessed by locally-authenticated users.
It is also possible to use CIFS on macOS and Linux. On macOS, you can enable CIFS-based shares under System Preferences > Sharing. See How to connect with File Sharing on your Mac for detailed setup instructions.
On Linux, follow your distribution-specific instructions to install Samba. Refer to Samba File and Print Server in RHEL to learn how to configure the Samba implementation of CIFS in Red Hat Enterprise Linux.
3.5.2.2. Displaying Host Folders
The minishift hostfolder list command gives you an overview of the defined host folders, their names, mount points, remote paths and whether they are currently mounted.
An example output could look like:
minishift hostfolder list
Name        Mountpoint            Remote path              Mounted
myshare     /mnt/sda1/myshare     //192.168.1.82/MYSHARE   N
$ minishift hostfolder list
Name        Mountpoint            Remote path              Mounted
myshare /mnt/sda1/myshare //192.168.1.82/MYSHARE NIn this example, there is a host folder with the name myshare which mounts //192.168.1.82/MYSHARE onto /mnt/sda1/myshare in the CDK VM. The share is currently not mounted.
The remote path must be reachable from within the VM. In the example above, 192.168.1.82 is the IP of the host within the LAN, which is one option you can use. You can use ifconfig (or Get-NetIPAddress | Format-Table on Windows) to determine a routable IP address.
3.5.2.3. Adding Host Folders
The minishift hostfolder add command allows you to define a new host folder. This is an interactive process that queries the relevant details for a host folder based on CIFS.
Adding a CIFS based hostfolder
- 1
- (Required) Actual
minishift hostfolder addcommand that specifies a host folder with the name of myshare. - 2
- (Required) The UNC path for the share.
- 3
- The mount point within the VM. The default is /mnt/sda1/<host folder name>.
- 4
- (Required) The user name for the CIFS share.
- 5
- (Required) The password for the CIFS share.
- 6
- The domain of the share. Often this can be left blank, but for example on Windows, when your account is linked to a Microsoft account, you must use the Microsoft account email address as user name as well as your machine name as displayed by
$env:COMPUTERNAMEas a domain.
On Windows hosts, the minishift hostfolder add command also provides a users-share option. When this option is specified, no UNC path needs to be specified and C:\Users is assumed.
3.5.2.3.1. Instance-Specific Host Folders
By default, host folder definitions are persistent, similar to other persistent configuration options. This means that these host folder definitions will survive the deletion and subsequent re-creation of a CDK VM.
In some cases you might want to define a host folder just for a specific CDK instance. To do so, you can use the --instance-only flag of the minishift hostfolder add command. Host folder definitions that are created with the --instance-only flag will be removed together with any other instance-specific state during minishift delete.
3.5.2.4. Mounting Host Folders
After you add host folders, you use the minishift hostfolder mount command to mount a host folder by its name:
minishift hostfolder mount myshare
Mounting 'myshare': '//192.168.99.1/MYSHARE' as '/mnt/sda1/myshare' ... OK
$ minishift hostfolder mount myshare
Mounting 'myshare': '//192.168.99.1/MYSHARE' as '/mnt/sda1/myshare' ... OKYou can verify that the host folder is mounted by running:
minishift hostfolder list
Name       Mountpoint          Remote path              Mounted
myshare    /mnt/sda1/myshare   //192.168.99.1/MYSHARE   Y
$ minishift hostfolder list
Name       Mountpoint          Remote path              Mounted
myshare /mnt/sda1/myshare //192.168.99.1/MYSHARE YAlternatively, you can list the actual content of the mounted host folder:
minishift ssh "ls -al /mnt/sda1/myshare"
$ minishift ssh "ls -al /mnt/sda1/myshare"3.5.2.4.1. Auto-Mounting Host Folders
Host folders can also be mounted automatically each time you run minishift start. To set auto-mounting, you need to set the hostfolders-automount option in the CDK configuration file.
minishift config set hostfolders-automount true
$ minishift config set hostfolders-automount true
After the hostfolders-automount option is set, CDK will attempt to mount all defined host folders during minishift start.
3.5.2.5. Unmounting Host Folders
You use the minishift hostfolder umount command to unmount a host folder.
3.5.2.6. Deleting Host Folders
You use the minishift hostfolder remove command to remove a host folder definition.
3.5.2.7. SSHFS Host Folders
This host folder type is not supported by the minishift hostfolder command and requires manual configuration.
You can use SSHFS-based host folders if you have an SSH daemon running on your host. Normally, this prerequisite is met by default on Linux and macOS.
Most Linux distributions have an SSH daemon installed. If not, follow the instructions for your specific distribution to install an SSH daemon.
macOS also has a built-in SSH server. To use it, make sure that Remote Login is enabled in System Preferences > Sharing.
On Windows, you can install OpenSSH for Windows.
The following steps demonstrate how to mount host folders with SSHFS.
-
Run
ifconfig(orGet-NetIPAddresson Windows) to determine the local IP address from the same network segment as your CDK instance. Create a mountpoint and mount the shared folder.
minishift ssh "sudo mkdir -p /Users/<username>"
minishift ssh "sudo chown -R docker /Users"
minishift ssh
sshfs <username>@<IP>:/Users/<username>/ /Users
$ minishift ssh "sudo mkdir -p /Users/<username>"
$ minishift ssh "sudo chown -R docker /Users"
$ minishift ssh
$ sshfs <username>@<IP>:/Users/<username>/ /Users
Copy to Clipboard Copied! Toggle word wrap Toggle overflow Verify the share mount.
minishift ssh "ls -al /Users/<username>"
$ minishift ssh "ls -al /Users/<username>"Copy to Clipboard Copied! Toggle word wrap Toggle overflow
3.6. CDK docker daemon
3.6.1. Reusing the docker Daemon
When running OpenShift in a single VM, you can reuse the docker daemon managed by CDK for other docker use-cases as well. By using the same docker daemon as the one used in CDK, you can speed up your local development.
In order to configure your console to reuse CDK docker daemon, follow these steps:
- Make sure that you have the docker client binary installed on your machine. For information about specific binary installations for your operating system, see the docker installation site. For a Red Hat Enterprise Linux system, install the docker package as described in Get Started with Docker-Formatted Container Images, but don’t start the docker service on the host.
-
Start CDK with the
minishift startcommand. Run the
minishift docker-envcommand to display the command you need to type into your shell in order to configure your Docker client. The command output will differ depending on OS and shell type.Copy to Clipboard Copied! Toggle word wrap Toggle overflow Test the connection by running the following command:
docker ps
$ docker psCopy to Clipboard Copied! Toggle word wrap Toggle overflow If successful, the shell will print a list of running containers.
3.7. Experimental Features
3.7.1. Overview
If you want to get early access to some upcoming features and experiment, you can set the environment variable MINISHIFT_ENABLE_EXPERIMENTAL, which makes additional features flags available:
export MINISHIFT_ENABLE_EXPERIMENTAL=y
$ export MINISHIFT_ENABLE_EXPERIMENTAL=yExperimental features are not officially supported, and might break or result in unexpected behavior. To share your feedback on these features, you are welcome to contact the CDK community.
3.7.2. Enabling experimental oc cluster up flags
By default, CDK does not expose all oc cluster up flags in the CDK CLI.
You can set the MINISHIFT_ENABLE_EXPERIMENTAL environment variable to enable the following options for the minishift start command:
service-catalog- Enables provisioning the OpenShift service catalog.
extra-clusterup-flags-
Enables passing flags that are not directly exposed in the CDK CLI directly to
oc cluster up.
3.7.3. Assign IP address to Hyper-V
Since the Internal Virtual Switch for Hyper-V does not provide a DHCP offer option, an IP address needs to be provided in a different way. For Hyper-V a functionality is provided to assign an IP address on startup using the Data Exchange Service.
To make this work you need to create a Virtual Switch using NAT
WinNAT is limited to one NAT network per host. For more details about capabilities, and limitations, please see the WinNAT capabilities and limitations blog.
The following command will attempt to assign an IP address for use on the Internal Virtual Switch 'MyInternal':
If you want to use the 'DockerNAT' network, the following commands are needed to setup the correct NAT networking and assigning an IP in the range expected:
- Be sure to specify a valid gateway and nameserver. Failing to do so will result in connectivity issues