Chapter 2. Managing directory entries using the web console
You can add, edit, rename, and delete LDAP entries using the web console.
2.1. Adding an LDAP entry using the web console
You can create the following entries using the web console:
- users
- groups
- roles
- organizational units (OUs)
- custom entries
For example, you want to create a POSIX user cn=John Smith,ou=people,dc=example,dc=com with a password.
Prerequisites
- You are logged into the Directory Server web console.
-
The parent entry exists. For example,
ou=people,dc=example,dc=com.
Procedure
- Open the menu to reveal the list of existing suffixes.
-
Using the Tree or Table view, expand the parent entry
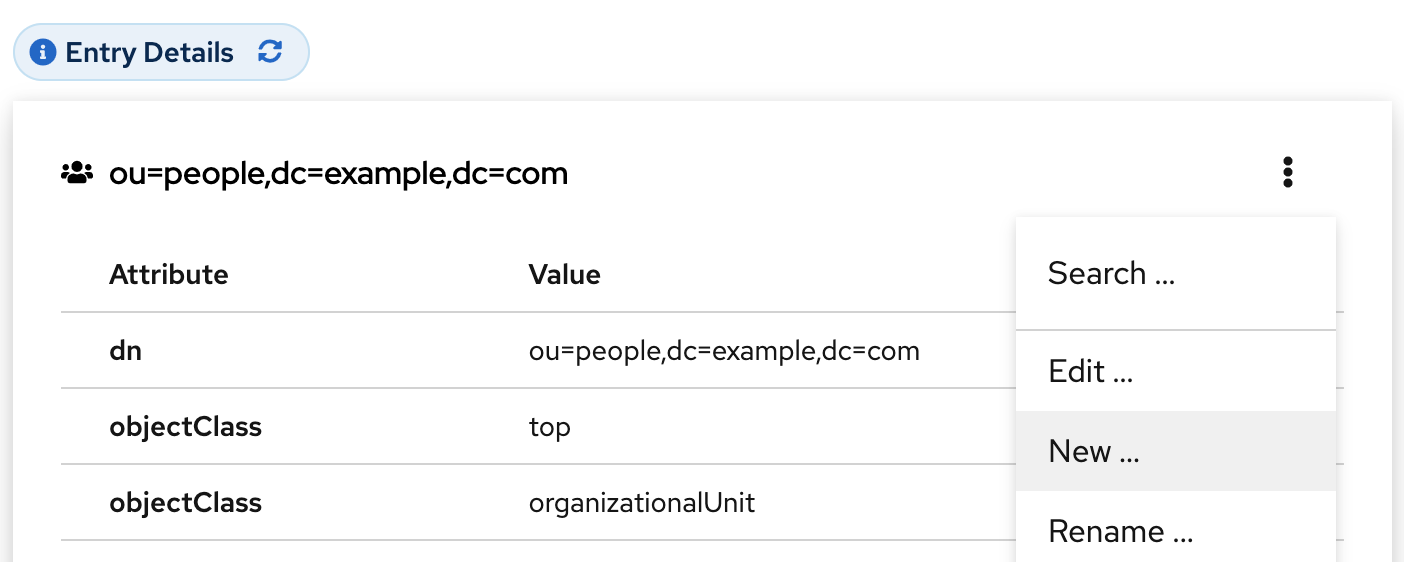
ou=people,dc=example,dc=comunder which you want to create a user. Click the Options menu (⫶) and select to open the wizard window.

- Select the Create a new User option and click .
- For the user entry, select Posix Account type and click .
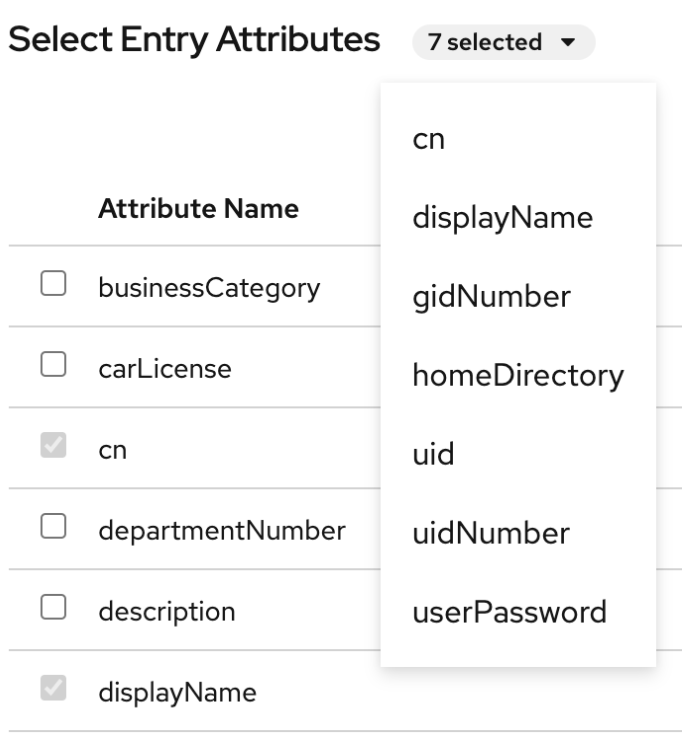
Optional: Select additional attributes, such as
userPassword, and click . You can view all selected attributes by expanding the drop-down list near the step name.
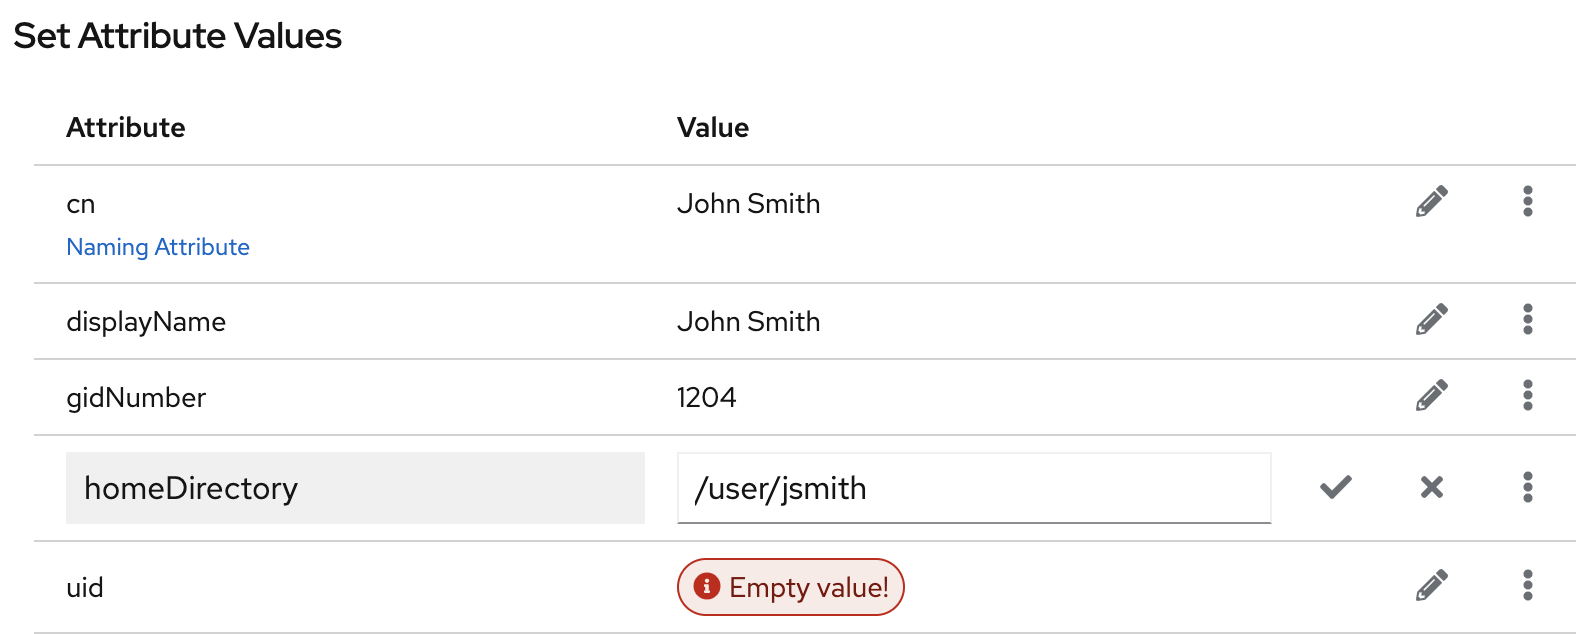
Set a value for each attribute:
Click on the pencil button of the attribute and add a value.

Note that a separate menu opens when you set the
userPasswordvalue. The value is filled with asterisks (*) to hide the plain text.- Click on the check button to save changes.
-
Optional: Set an additional attribute value by clicking the
. - After you have set all values, click .
- Verify that all entry details are correct and click . Directory Server creates the entry with mandatory attributes for a POSIX user and sets the password to it. You can click to modify entry settings, or click to cancel the entry creation.
- View the Result for Entry Creation and click .
Verification
-
Navigate to
. -
Select the database suffix that contains the entry, such as
dc=example,cd=com. -
Enter your search criteria in the field, such as
John, and press . - Find the entry you recently created in the list of entries.
2.2. Editing an LDAP entry using the web console
You can modify a directory entry using the web console. This example modifies a user entry cn=John Smith,ou=people,dc=example,dc=com by:
-
adding telephone numbers
556778987and556897445. -
adding email
jsmith@example.com. - changing the password.
Prerequisites
- You are logged into the Directory Server web console.
Procedure
- Open the menu.
-
Using the Tree or Table view, expand the entry you want to edit, such as
cn=John Smith,ou=people,dc=example,dc=com. - Click the Options menu (⫶) and select to open the wizard window.
- Optional: In the Select ObjectClasses step, add or delete object classes for the entry. Click .
In the Select Attributes step, add
telephoneNumberandmailattributes to the entry and click . If you do not see an attribute you want to add to the entry it means that you did not add corresponding object class in the previous step.NoteIn this step, you can not delete mandatory attributes of the selected object classes.
In the Edit Attribute Values step, set
telephoneNumberto556778987and556897445,mailtojsmith@example.comand changeuserPasswordvalue:- Click on the pencil button of the attribute and add or change a new value.
- Click on the check button to save changes.
-
Optional: Set an additional value to an attribute by clicking the
. The telephoneNumberattribute has two values in this example. When you set all values, click .
- Review your changes and click .
- To edit the entry, click . You can click to make other changes to the entry, or click to cancel the entry editing.
- View the Result for Entry Modification and click .
Verification
- Expand the entry details and view the new changes appear among the entry attributes.
Additional resources
2.3. Renaming and relocating an LDAP entry or subtree using the web console
You can rename or relocate a directory entry or a subtree using the web console. This example renames and relocates the entry cn=John Smith,ou=people,dc=example,dc=com to cn=Tom Smith,ou=clients,dc=example,dc=com.
Prerequisites
- You are logged into the Directory Server web console.
Procedure
- Open the menu.
-
Using the Tree or Table view, expand the entry you want to modify, such as
cn=John Smith,ou=people,dc=example,dc=com. - Click the Options menu (⫶) and select to open the wizard window.
In the Select The Naming Attribute And Value step:
-
Set a new value
Tom Smithfor the naming attributecnand click . - Optional: Select another naming attribute from the drop-down menu.
- Optional: In case you want to delete the old entry and create a new one using the new RDN, check the Delete the old RDN.
-
Set a new value
- In Select The Entry Location step, select the parent entry for the new location, and click .
- Review changes you made to the entry and click .
- If the entry details are correct, click . You can click to make other changes to the entry or click to cancel the entry modification.
- View Result for Entry Modification and click .
Verification
- Expand the entry details and review the updated entry.
2.4. Deleting an LDAP entry using the web console
You can delete a directory entry or a subtree using the web console. This example deletes the entry cn=Tom Smith,ou=clients,dc=example,dc=com.
Prerequisites
- You are logged into the Directory Server web console.
Procedure
- Open the menu.
-
Using the Tree or Table view, expand the entry you want to delete, such as
cn=Tom Smith,ou=people,dc=example,dc=com. - Click the Options menu (⫶) and select to open the wizard window.
- Click after you review the data about the entry you want to delete.
-
In the Deletion step, toggle the switch to the
Yes, I’m sureposition and click . You can click to cancel the entry deletion. - View the Result for Entry Deletion and click .
Verification
-
Navigate to
. -
Select the suffix where the entry previously existed, such as
dc=example,cd=com. -
Enter your search criteria in the field, such as
Tom, and press . - Verify that the deleted entry is no longer present.