Using the GNOME desktop environment
Use and customize the desktop environment provided with RHEL 10.
Abstract
Providing feedback on Red Hat documentation
We are committed to providing high-quality documentation and value your feedback. To help us improve, you can submit suggestions or report errors through the Red Hat Jira tracking system.
Procedure
Log in to the Jira website.
If you do not have an account, select the option to create one.
- Click Create in the top navigation bar.
- Enter a descriptive title in the Summary field.
- Enter your suggestion for improvement in the Description field. Include links to the relevant parts of the documentation.
- Click Create at the bottom of the window.
Chapter 1. Overview of GNOME interfaces
You can switch between several user interfaces in GNOME.
To work correctly, GNOME requires your system to support 3D acceleration. This includes bare-metal systems as well as hypervisor solutions such as VMWare.
If GNOME does not start or performs poorly on your VMWare virtual machine (VM), see Why does the GUI fail to start on my VMware virtual machine? (Red Hat Knowledgebase).
1.1. GNOME interfaces and display protocols
You can use one of the following GNOME user interfaces in RHEL 10 - GNOME Standard, which is the default option in RHEL 10, or GNOME Classic.
Both interfaces are provided by GNOME Shell, which is a Wayland display server. Applications communicate with GNOME shell by using the Wayland protocol. The combination of GNOME Shell and Wayland can be referred to as GNOME Shell on Wayland.
1.1.1. Input devices
RHEL 10 uses a unified input stack, libinput, which manages all common device types, such as mice, touchpads, touchscreens, tablets, trackballs and pointing sticks.
GNOME Shell on Wayland uses libinput directly for all devices, and no switchable driver support is available.
1.2. GNOME Standard
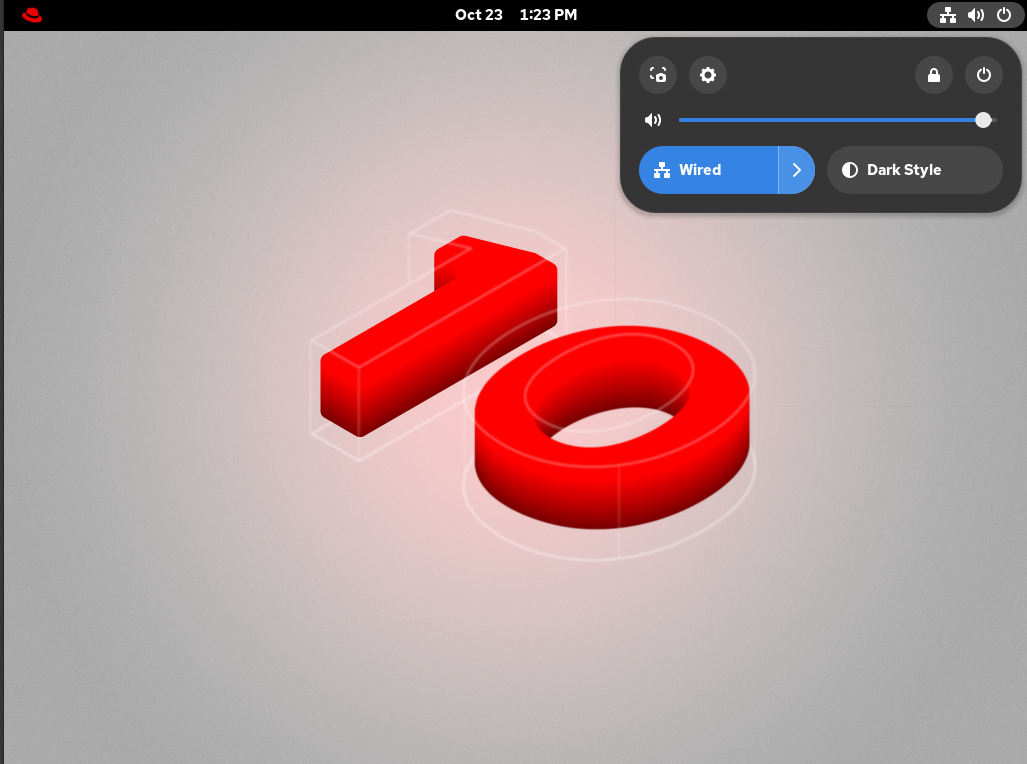
The GNOME Standard user interface includes several major components - top bar, Settings menu, activities overview, and the calendar popover.
- Top bar
- The horizontal bar at the top of the screen provides access to some of the basic functions of GNOME Standard, such as the Activities Overview, clock and calendar, system status icons, and the settings menu.
- Settings menu

Located in the upper-right corner, it provides the following functionalities:
- Opening the GNOME screenshot and screen recording tool
- Opening the Settings app
- Controlling the sound volume
- Accessing your network connections
- Turning off the computer, locking the computer, and switching user
- Activities Overview
Includes windows and applications views that let you run applications and windows and switch between them.
The search entry at the top allows for searching various items available on the desktop, including applications, documents, files, and configuration tools.
The horizontal bar on the bottom contains a list of favorite and running applications. You can add or remove applications from the default list of favorites.
- Calendar popover
- You can open it by clicking the date and time in the top bar. It includes recent notifications, a calendar, a calendar events list, world clocks, and weather.
Figure 1.1. The GNOME Standard desktop
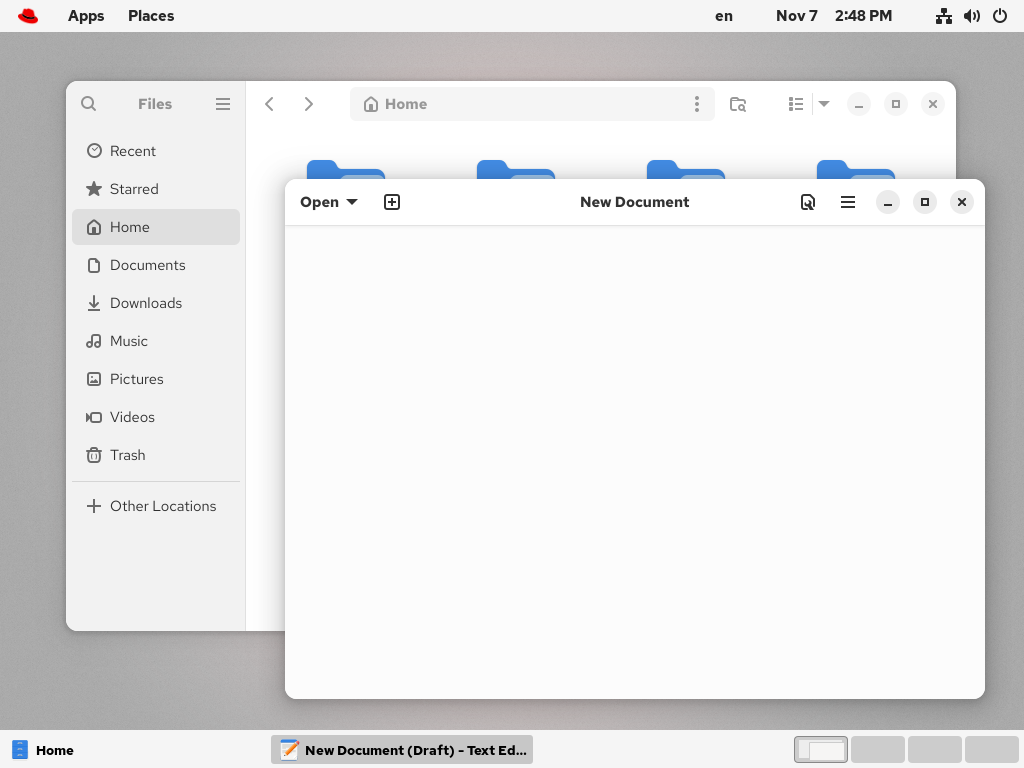
1.3. GNOME Classic
GNOME Classic is a mode suitable for users who prefer a more traditional desktop experience that is similar to the GNOME 2 environment used with RHEL 6. It is based on GNOME 3 technologies but includes multiple features similar to GNOME 2.
The GNOME Classic user interface consists of these major components:
- Applications and Places
The Apps menu is displayed at the upper-left corner of the screen. It gives you access to applications organized into categories.
The Places menu is displayed next to the Apps menu in the top bar. It gives you quick access to important folders, for example, Downloads or Pictures.
- Taskbar
- Displayed at the bottom of the screen. The taskbar includes a list of open windows and a workspace indicator. In the workspace indicator, you can see the current workspace and move between available workspaces.
- Four available workspaces
- In GNOME Classic, the number of available workspaces is set to four by default.
- Minimize and maximize buttons
- Window title bars in GNOME Classic feature the minimize and maximize buttons.
- A traditional Super+Tab window switcher
- In GNOME Classic, windows in the Super+Tab window switcher are not grouped by application.
- System menu
Located in the upper-right corner. Just as in the GNOME Standard session, you can perform the following actions with it:
- Opening the GNOME Screenshot and GNOME Screen Recording apps
- Opening the Settings app
- Controlling the sound volume
- Accessing your network connections
- Turning off the computer, locking the computer, and switching the user
Figure 1.2. The GNOME Classic desktop
1.4. Selecting a GNOME interface
The default desktop interface for RHEL 10 is the standard GNOME desktop. However, you can also switch from standard GNOME to GNOME Classic.
The change of GNOME interface is persistent across user logouts, and also when powering off or rebooting the computer.
Procedure
On the login screen, select a user, then click the gear button in the lower-right corner of the screen.
NoteYou cannot access this option from the lock screen. The login screen, also called GNOME Display Manager (GDM), appears when you first start RHEL or when you log out of your current session.
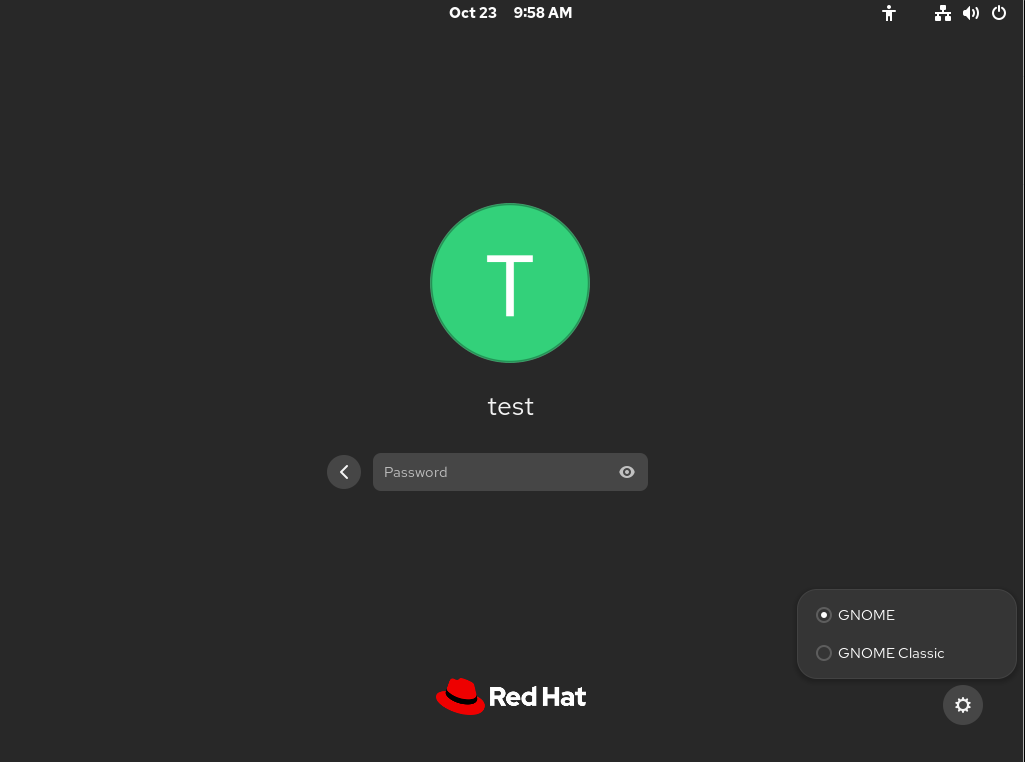
- From the drop-down menu that appears, select the option that you prefer.
Chapter 2. Registering the system for updates by using GNOME
In order to receive software updates for your system, you must register your system.
2.1. Prerequisites
- You have a valid Red Hat Customer Portal account.
- If you are registering the system with an activation key, you have the required activation keys.
- If you are registering the system by using a registration server, you have access to the registration server.
2.2. Registering a system by using an activation key on GNOME
If you do not want to enter your credentials, register your system with an activation key. Obtain the activation key from your organization administrator.Prerequisites
Activation key or keys.
See the Activation Keys page for creating new activation keys.
Procedure
Open the system menu, which is accessible from the upper-right screen corner, and click Settings.
- Go to → .
If you are not using the Red Hat server:
- In the Registration Server section, select Custom Address.
- Enter the server address in the URL field.
- In the Registration Type section, select Activation Keys.
Under Registration Details:
Enter your activation keys in the Activation Keys field.
Separate your keys by a comma (
,).- Enter the name or ID of your organization in the Organization field.
- Click .
2.3. Unregistering the system by using GNOME
Unregister your system from the GNOME interface. After unregistering, your system no longer receives software updates.
Procedure
Open the system menu, which is accessible from the upper-right screen corner, and click Settings.
Go to → .
The Registration Details screen is displayed.
Click .
A warning is displayed about the impact of unregistering the system.
- Click .
Chapter 3. Launching applications in GNOME
You can launch installed applications by using several different methods in the GNOME desktop environment.
3.1. Launching an application in the standard GNOME session
In the GNOME desktop environment, you can launch graphical applications that have been installed on your system.
Prerequisites
- You are using the standard GNOME session.
Procedure
Open the Activities Overview screen by using either of the following ways:
- Click the Red Hat logo in the top panel.
- Press the Super key, which is usually labeled with the Windows logo, ⌘, or 🔍.
Find the application by using either of the following ways:
Click the Show Apps icon in the bottom horizontal bar.

- Type the name of the required application in the search text field.
- Click the application in the displayed list.
3.2. Launching an application in GNOME Classic
In the GNOME Classic desktop environment, you can launch graphical applications that have been installed on your system.
Prerequisites
- You are using the GNOME Classic session.
Procedure
- Open the Apps menu in the top panel.
Choose the required application from the available categories, which can include:
- Favorites
- Accessories
- Graphics
- Internet
- Office
- Sound & Video
- System Tools
- Utilities
3.3. Launching an application in GNOME by using a command
Launch a graphical application in GNOME by entering a command.
Prerequisites
- You know the command that starts the application.
Procedure
Open a command prompt by using either of the following ways:
- Open a terminal.
Press the Alt+F2 shortcut to open the Run a Command screen.

- Type the application command in the command prompt.
- Confirm the command by pressing Enter.
Chapter 4. Configuring applications to start automatically on login
In the GNOME desktop environment, you can configure applications to launch automatically after you log in to your GNOME desktop session.
Prerequisites
- The application is installed on the system.
Procedure
-
Find the
.desktopfile for the application, for example, in/usr/share/applications. Copy the
.desktopfile to the~/.config/autostartdirectory. If the directory does not exist, create it.NoteYou can stop an application from launching automatically by deleting the application’s
.desktopfile from the~/.config/autostartdirectory.
Verification
- Log out and log back in. Verify that the application starts.
Chapter 5. Searching for files in GNOME
As a user in the GNOME environment, you can search for files by using the Files application.
5.1. Performing a basic file search
You can search for files in your home directory and all folders inside of it based on a file name.
Procedure
- Open the Files application.
- Press the Search button.
In the text field, type the file name or a part of the file name that you are searching for.

- The window now lists all files in your home directory that match the file name.
5.2. Performing an advanced file search
You can search for files in a specific location, based on a file name, a time of access, a time of modification, or a file type.
Procedure
- Open the Files application.
Navigate to the folder where you want to search for a file.
The search recursively descends into all folders contained in this location.
- Press the Search button.
Optional: Type the file name or a part of the file name that you are searching for in the text field.
If you do not provide a file name, the search lists all files that match the other criteria, regardless of their file names.
Click the Filter search results button next to the text field.
In this menu, you can select other search criteria.

To specify the access or modification time, click next to the When label. Enter a date or select a time point from the list.
Below the time list, you can switch between Last modified and Last used.
- To specify the file type, click next to the What label. Select a file type from the list.
To switch between a search based on file content or file names, use the and buttons.
NoteThe full-text search only works in indexed locations. You can configure the indexed locations in the Search section of the Settings application.
- Click the triangle button next to the text field to hide the menu.
- The window now lists all files in the specified directory that match your search criteria.
Chapter 6. Bookmarking files and locations
In GNOME, applications and dialogs that manage files list bookmarks in the left side bar. You can add, remove, and edit the bookmarks.
6.1. Adding a bookmark
You can save a reference to a folder by bookmarking it in the Files application.
Prerequisites
- Locate the folder in the Files application.
Procedure
Add the folder to bookmarks by using either of the following methods:
Dragging:
- Drag the folder to the left side bar.
- Drop it over the New bookmark item.
Keyboard shortcut:
- Open the folder.
- Press Ctrl+D.
Menu:
- Open the folder.
In the navigation bar at the top of the window, click the name of the folder.
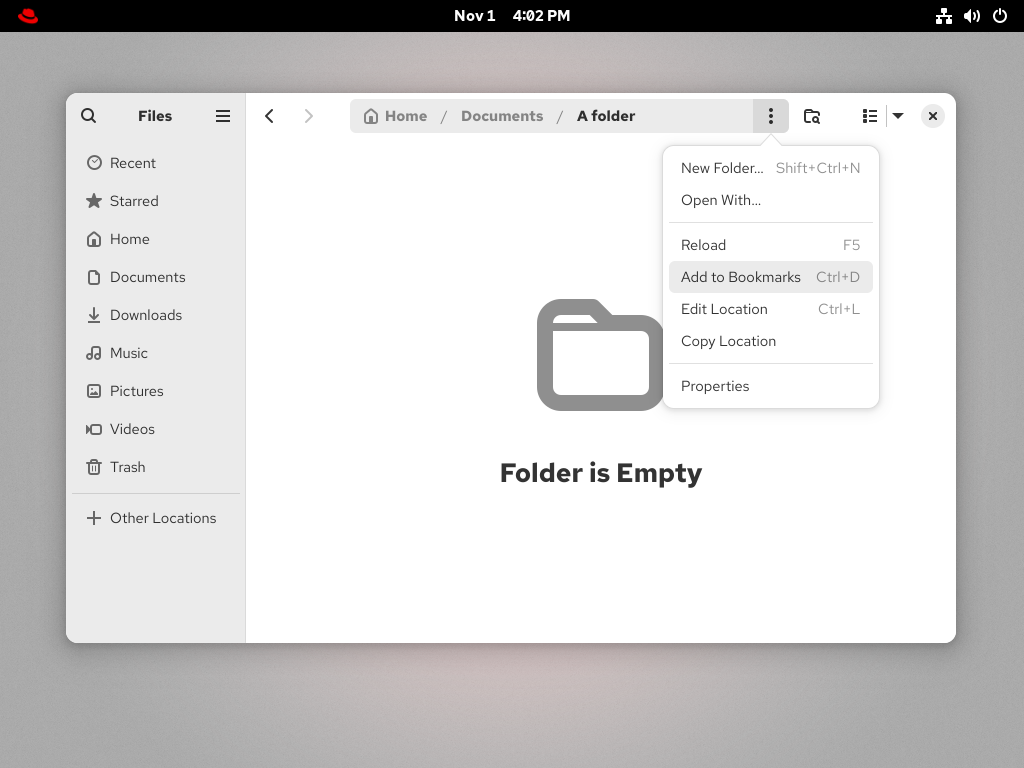
- Select Add to Bookmarks.
Verification
- Check that the bookmark now appears in the side bar.
6.2. Removing a bookmark
You can delete an existing bookmark in the Files application.
Procedure
- Right-click the bookmark in the side bar.
Select Remove from the menu.

Verification
- Check that the bookmark no longer appears in the side bar.
6.3. Renaming a bookmark
You can rename a bookmark to distinguish it from other bookmarks. If you have bookmarks to several folders that all share the same name, you can tell the bookmarks apart if you rename them.
Renaming the bookmark does not rename the folder.
Procedure
- Right-click the bookmark in the side bar.
Select Rename.

- In the Name field, enter the new name for the bookmark.
- Click .
Verification
- Check that the side bar lists the bookmark under the new name.
6.4. Adding a bookmark for all users
As a system administrator, you can set a bookmark for several users at once so that file shares are easily accessible to all the users.
Procedure
-
In the home directory of each existing user, edit the
~user/.config/gtk-3.0/bookmarksfile. In the file, add a Uniform Resource Identifiers (URI) line that identifies the bookmark.
For example, the following lines add bookmarks to the
/usr/share/doc/directory and to the GNOME FTP network share:file:///usr/share/doc/ ftp://ftp.gnome.org/Optional: To also add the bookmarks for every newly created user on the system:
-
Create the
/etc/skel/.config/gtk-3.0/bookmarksfile. - Enter the bookmark URI lines in the file.
-
Create the
Chapter 7. Recording your screen in GNOME
You can record your desktop or specific application activities with GNOME Screen Recording, which is a built-in feature in the GNOME desktop environment. The recordings are saved as video files in the WebM format.
Procedure
Open GNOME Screen Recording in one of the following ways:
- Pressing PrtScr and clicking the button with the camera icon.
-
Typing
Take a screenshotfrom the Activities Overview screen and clicking the button with the camera icon. - Pressing the Ctrl+Alt+Shift+R keyboard shortcut.
- Select whether to record the entire screen or an area by using the or button.
- If you want your pointer to be visible in the recording, click the button with the cursor icon.
Start the recording by pressing the round button or pressing Space.
After the recording begins, a red indicator appears in the upper-right corner of the screen. It shows the time of the recording.
To stop the recording, press the red indicator in the upper-right corner of the screen.
The indicator disappears, signaling the end of the recording.
Result
-
The recorded video files are saved in the
~/Videos/Screencastsdirectory. -
The file names of recorded videos start with
Screencast fromand include the date and time of the recording.
Chapter 8. Customizing the desktop environment
Customize the GNOME desktop environment in Red Hat Enterprise Linux 10 to personalize your individual workflow and visual preferences with an adaptable user interface.
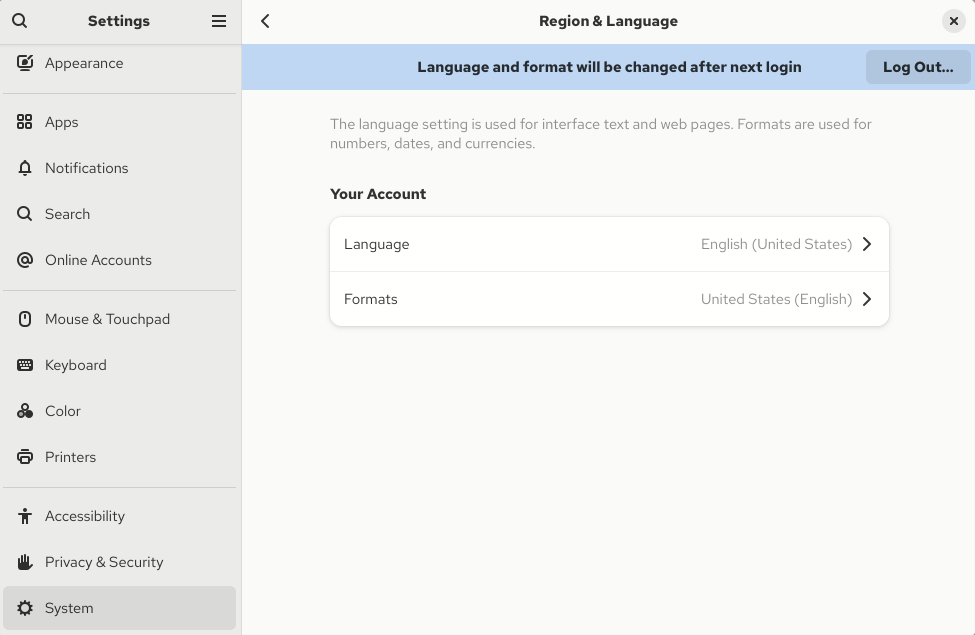
8.1. Change the language by using the desktop GUI
Use the Settings application to change the system language.
Prerequisites
- Required language packages are installed on your system.
Procedure
Open the Settings application from the system menu by clicking on its icon.
- In Settings, click Region & Language from the left vertical bar.
Click Language.

Select the required region and language from the menu.

- Click Select.
Click Log Out… for changes to take effect.
 Note
NoteSome applications do not support certain languages. The text of an application that cannot be translated into the selected language remains in US English.
8.2. Enabling Chinese, Japanese, or Korean text input
If you write with Chinese, Japanese, or Korean characters, you can configure RHEL to input text in your language.
8.2.1. Input methods
Certain scripts, such as Chinese, Japanese, or Korean, require keyboard input to go through an Input Method Engine (IME) to enter native text.
An input method is a set of conversion rules between the text input and the selected script. An IME is a software that performs the input conversion specified by the input method.
To input text in these scripts, you must set up an IME. If you installed the system in your native language and selected your language at the GNOME Initial Setup screen, the input method for your language is enabled by default.
The following input method engines (IMEs) are available on RHEL from the listed packages:
| Languages | Scripts | IME name | Package |
|---|---|---|---|
| Chinese | Simplified Chinese | Intelligent Pinyin |
|
| Chinese | Traditional Chinese | New Zhuyin |
|
| Japanese | Kanji, Hiragana, Katakana | Anthy |
|
| Korean | Hangul | Hangul |
|
| Other | Various | M17N |
|
8.2.2. Switching the input method in GNOME
Before you can switch to a different script, for example, Chinese, Japanese, or Korean scripts, you must configure the input method.
Prerequisites
-
The input method packages are installed. You can install all available input packages by entering the
dnf install @input-methodscommand.
Procedure
Click the settings (⚙️) button on the right to display a settings menu.
- Select the Keyboard section.
In the Input Sources list, review the currently enabled input methods.

If your input method is missing, click the Add Input Source button under the Input Sources list and select your language.
NoteIf you cannot find your language in the menu, expand the selection by clicking More () at the end of the list.
Select the input method that you want to use. A gear icon marks all input methods to distinguish them from simple keyboard layouts.

- Confirm your selection by clicking .
Switch the active input method in one of the following ways:
Click the input method indicator on the right side of the top panel and select your input method.
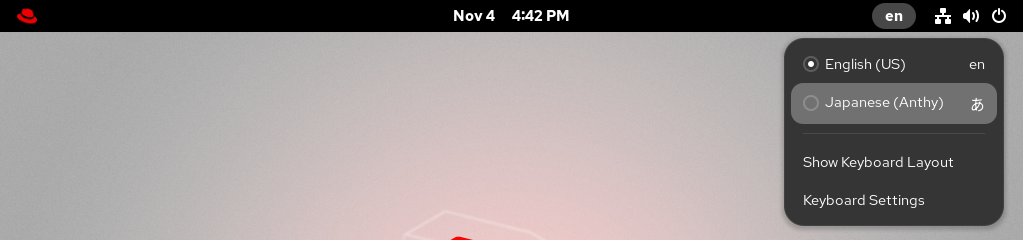
- Switch between the enabled input methods by using the Super+Space keyboard shortcut.
Verification
- Open a text editor.
- Type text in your language.
- Verify that the text appears in your native script.
8.3. Enabling desktop icons
You can enable the desktop icons functionality and move files to the desktop.
8.3.1. Desktop icons
Desktop icons are provided by the Desktop icons GNOME Shell extension, which is available from the gnome-shell-extension-desktop-icons package.
-
Desktop icons in GNOME Classic: The GNOME Classic environment includes the
gnome-shell-extension-desktop-iconspackage by default. Desktop icons are always on, and you cannot turn them off. Desktop icons in GNOME Standard: In GNOME Standard, desktop icons are disabled by default.
To enable desktop icons in the GNOME Standard environment, you must install the
gnome-shell-extension-desktop-iconspackage.
8.3.2. Enabling desktop icons in GNOME Standard
Enable the desktop icons functionality directly in the GNOME Standard environment.
Prerequisites
The Extensions application is installed on the system:
# dnf install gnome-shell-extension-desktop-icons
Procedure
- Open the Extensions application.
Enable the Desktop Icons extension.

8.3.3. Creating a desktop icon for a file
Creating a desktop icon for a file provides a quick and convenient shortcut to access that file directly from your desktop. Instead of navigating through folders, you can open the file directly, saving you time and streamlining your workflow.
Prerequisites
- The Desktop icons extension is enabled.
Procedure
Move the selected file into the
~/Desktop/directory.
Verification
- Verify the icon for the file is displayed on the desktop.
8.4. Using special characters in GNOME
In GNOME, you can use the compose key to type special characters from different languages and symbol sets, including those not available on your keyboard. You can enter and view special characters from different languages and symbol sets, making it easy to work with diverse character sets in GNOME.
To input these special characters, you can define one of the existing keys on your keyboard as a compose key. Once enabled, the compose key allows you to type special characters and symbols by pressing multiple keys in a specific sequence.
8.4.1. Enabling the compose key for an individual user
You can enable the compose key from the Settings menu while logged in as the user.
Procedure
- Click on the Activities button in the upper-left corner of the screen.
- Type Settings and click on the Settings icon to open the Settings application.
- In the Settings window, click on Keyboard in the left sidebar.
- Scroll down and select the Compose Key option.
- Toggle the slider to enable the Compose Key.
- Select the key you want to use as the compose key.
Once you have selected the compose key, close the Settings window.
The compose key is now enabled, and you can use it to input special characters and symbols by pressing the compose key, followed by the corresponding sequence of keys.
To see available multi-key sequences for composing special characters, use:
$ grep "<Multi_key>" /usr/share/X11/locale/en_US.UTF-8/Compose
Verification
-
Press the compose key, then type the sequence of keys for the special character you want to input. For example, to type
©, press the compose key, then press o and c.
8.4.2. Enabling the compose key for another user
Enable the compose key for another user with the gsettings utility.
Prerequisites
- Administrative access.
Procedure
Allow all clients to connect to the X server:
# xhost +Run the following command to set the compose key:
# su - <username> -c "gsettings set org.gnome.desktop.input-sources xkb-options \"['compose:<compose_key>']\""Replace
<username>with the username of the user for whom you want to enable the compose key. Replace<compose_key>with the key you want to use as the compose key. You can use theraltoption to select the right Alt key as the compose key.To see other compose key options that you can use to set up a compose key on your keyboard, use:
$ grep compose /usr/share/X11/xkb/rules/evdev.lstResets the access control:
# xhost -
Verification
To check the compose key settings for another user, use:
# su - <username> -c "gsettings get org.gnome.desktop.input-sources xkb-options"Replace
<username>with the username of the user for whom you want to check the compose key setting.
8.4.3. Enabling the compose key for all users
You can enable the compose key for all users by creating a dconf configuration file.
Prerequisites
- Administrative access.
Procedure
Create the
/etc/dconf/db/local.d/00-compose-keyconfiguration file with the following content:[org/gnome/desktop/input-sources] xkb-options=['compose:<compose_key>']Replace
<compose_key>with the key you want to use as the compose key. You can use theraltoption to select the right Alt key as the compose key.To see other compose key options that you can use to set up a compose key on your keyboard, use:
$ grep compose /usr/share/X11/xkb/rules/evdev.lstUpdate the
dconfdatabase with the new configuration:# dconf updateRestart your system or log out and log back in to your GNOME session for the changes to take effect.
The compose key is now enabled for all users on the system and they can use it to input special characters and symbols by pressing the compose key, followed by the corresponding sequence of keys.
Verification
-
Press the compose key, then type the sequence of keys for the special character you want to input. For example, to type
©, press the compose key, then press o and c.
8.4.4. Compose key sequences for special characters
The table showcases compose key sequences used to input special characters with diacritics or accents in GNOME. Each row displays a compose key sequence alongside its corresponding result
| Compose key sequence | Result |
|---|---|
| Compose+'+letter | Letter with acute accent (é, á, ñ) |
| Compose+`+letter | Letter with grave accent (è, ù, ò) |
| Compose+"+letter | Letter with umlaut or diaeresis (ë, ö, ü) |
| Compose+-+letter | Letter with macron (ā, ē, ō) |
| Compose+/+letter | Letter with stroke or diacritic (ø, ł, ǿ) |
| Compose+=+letter | Letter with double acute accent (ő, ű, ȁ) |
| Compose+.+letter | Letter with dot above (ȧ, ċ, ḋ) |
| Compose+,+letter | Letter with cedilla (ç, ş, ņ) |
| Compose+^+letter | Letter with circumflex accent (â, ê, î) |
| Compose+~+letter | Letter with tilde accent (ã, ñ, õ) |
Chapter 9. Enabling accessibility for visually impaired users
As a system administrator, you can configure the desktop environment to support users with a visual impairment.
9.1. Components that provide accessibility features
On the RHEL 10 desktop, the Orca screen reader helps ensure accessibility for users with a visual impairment. Orca is included in the default RHEL installation.
Orca reads information from the screen and communicates it to you using the following components:
- Speech Dispatcher
- Orca uses Speech Dispatcher to communicate with the speech synthesizer. Speech Dispatcher supports various speech synthesis backends and prevents messages from other applications from interrupting the messages from Orca.
- Speech synthesizer
- Provides a speech output. The default speech synthesizer is eSpeak-NG.
- Braille display
- Provides a tactile output. The BRLTTY service enables this functionality.
9.2. Enabling the Accessibility menu
You can enable the Accessibility menu icon in the top panel, which provides a menu with several accessibility options.
Procedure
- Open the Settings application.
- Select Accessibility.
Enable the Always Show Accessibility Menu item.

Verification
Check that the Accessibility menu icon is displayed on the top bar even when all options from this menu are switched off.

9.3. Enabling the screen reader
You can enable the Orca screen reader in your desktop environment. The screen reader then reads the text displayed on the screen to improve accessibility.
Procedure
Enable the screen reader using either of the following ways:
- Press the Super+Alt+S keyboard shortcut.
- If the top panel shows the Universal Access menu, select Screen Reader in the menu.
Verification
- Open an application with text content.
- Check that the screen reader reads the text in the application.
9.4. Enabling a Braille display device
The Braille display is a device that uses the brltty service to provide tactile output for visually impaired users.
In order for the Braille display to work correctly, perform the following procedures.
9.4.1. Supported types of Braille display device
The following types of Braille display devices are supported on RHEL 10.
| Braille device type | Syntax of the type | Note |
|---|---|---|
| Serial device |
|
Relative paths are at |
| USB device |
|
The brackets ( |
| Bluetooth device |
|
9.4.2. Enabling the brltty service
To enable the Braille display, enable the brltty service to start automatically on boot. By default, brltty is disabled.
Prerequisites
Ensure that the
brlttypackage is installed:# dnf install brlttyOptionally, you can install speech synthesis support for
brltty:# dnf install brltty-espeak-ng
Procedure
Enable the
brlttyservice to start on boot:# systemctl enable --now brltty
Verification
- Reboot the system.
Check that the
brlttyservice is running:# systemctl status brltty ● brltty.service - Braille display driver for Linux/Unix Loaded: loaded (/usr/lib/systemd/system/brltty.service; enabled; vendor pres> Active: active (running) since Tue 2019-09-10 14:13:02 CEST; 39s ago Process: 905 ExecStart=/usr/bin/brltty (code=exited, status=0/SUCCESS) Main PID: 914 (brltty) Tasks: 3 (limit: 11360) Memory: 4.6M CGroup: /system.slice/brltty.service └─914 /usr/bin/brltty
9.4.3. Authorizing users of a Braille display device
To use a Braille display device, you must set the users who are authorized to use the Braille display device.
Procedure
In the
/etc/brltty.conffile, ensure thatkeyfileis set to/etc/brlapi.key:api-parameters Auth=keyfile:/etc/brlapi.keyThis is the default value. Your organization might have overridden it.
Authorize the selected users by adding them to the
brlapigroup:# usermod --append -G brlapi user-name
9.4.4. Setting the driver for a Braille display device
The brltty service automatically chooses a driver for your Braille display device. If the automatic detection fails or takes too long, you can set the driver manually.
Prerequisites
- The automatic driver detection has failed or takes too long.
Procedure
-
Open the
/etc/brltty.confconfiguration file. -
Find the
braille-driverdirective, which specifies the driver for your Braille display device. Specify the identification code of the required driver in the
braille-driverdirective.Choose the identification code of required driver from the list provided in
/etc/brltty.conf. For example, to use the XWindow driver:# XWindow braille-driver xwTo set multiple drivers, list them separated by commas. Automatic detection then chooses from the listed drivers.
9.4.5. Connecting a Braille display device
The brltty service automatically connects to your Braille display device. If the automatic detection fails, you can set the connection method manually.
Prerequisites
- The Braille display device is physically connected to your system.
- The automatic connection has failed.
Procedure
If the device is connected by a serial-to-USB adapter, find the actual device name in the kernel messages on the device plug:
# journalctl --dmesg | fgrep ttyUSB-
Open the
/etc/brltty.confconfiguration file. -
Find the
braille-devicedirective. In the
braille-devicedirective, specify the connection.You can also set multiple devices, separated by commas, and each of them will be probed in turn.
- Example settings for the first serial device
braille-device serial:ttyS0- Example settings for the first USB device matching Braille driver
braille-device usb:- Example settings for a specific USB device by serial number
braille-device usb:nnnnn- Example settings for a serial-to-USB adapter
Use the device name that you found earlier in the kernel messages:
braille-device serial:ttyUSB0
Setting braille-device to usb: does not work for a serial-to-USB adapter.
- Example settings for a specific Bluetooth device by address
braille-device bluetooth:xx:xx:xx:xx:xx:xx9.4.6. Setting the text table
The brltty service automatically selects a text table based on your system language. If your system language does not match the language of a document that you want to read, you can set the text table manually.
Procedure
-
Edit the
/etc/brltty.conffile. Identify the code of your selected text table.
You can find all available text tables in the
/etc/brltty/Text/directory. The code is the file name of the text table without its file suffix.Specify the code of the selected text table in the
text-tabledirective.For example, to use the text table for American English:
text-table en_US # English (United States)
9.4.7. Setting the contraction table
You can select table to encode the abbreviations with a Braille display device. Relative paths to particular contraction tables are stored within the /etc/brltty/Contraction/ directory.
If no table is specified, the brltty service does not use a contraction table.
Procedure
Choose a contraction table from the list in the
/etc/brltty.conffile.For example, to use the contraction table for American English, grade 2:
contraction-table en-us-g2 # English (US, grade 2)
Chapter 11. Configuring file associations
You can configure RHEL to open or access files with different formats.
In GNOME, MIME (Multipurpose Internet Mail Extension) types help to identify the format of a file and applications to use to open these files.
11.1. Multipurpose Internet Mail Extension types
Multipurpose Internet Mail Extension (MIME) types are a two-part identifiers for file and content formats.
The GNOME desktop uses MIME types to:
- Determine which application should open a specific file format by default
- Register other applications that can open files of a specific format
- Set a string describing the type of a file, for example, in a file properties dialog of the files application
- Set an icon representing a specific file format, for example, in a file properties dialog of the files application
MIME type names follow a given format:
media-type/subtype-identifier
In the image/jpeg MIME type name, image is a media type and jpeg is the subtype identifier.
GNOME follows the Multipurpose Internet Mail Extension (MIME) info specification from the freedesktop.org project to determine the following information:
- The machine-wide and user-specific location to store all the MIME type specification files
- How to register a MIME type so that the desktop environment knows which application you can use to open a specific file format
- How users can change which applications should open with what file formats
11.1.1. MIME database
The MIME database is a collection of all the MIME type specification files that GNOME uses to store information about known MIME types.
The most important part of the MIME database from the system administrator’s point of view is the /usr/share/mime/packages/ directory, where the MIME type-related files specifying information about known MIME types are stored. One example of such a file is /usr/share/mime/packages/freedesktop.org.xml, specifying information about the standard MIME types available on the system, by default. The shared-mime-info package provides this file.
11.2. Adding a custom MIME type for all users
You can add a custom MIME type for all the users on the system and register a default application for that MIME type.
Procedure
Create the
/usr/share/mime/packages/application-x-newtype.xmlfile with following content:<?xml version="1.0" encoding="UTF-8"?> <mime-info xmlns="http://www.freedesktop.org/standards/shared-mime-info"> <mime-type type="application/x-newtype"> <comment>new mime type</comment> <glob pattern="*.xyz"/> </mime-type> </mime-info>The sample
application-x-newtype.xmlfile here defines a new MIME typeapplication/x-newtypeand assigns file names with the.xyzextension to that MIME type.Create a new
.desktopfile named, for example,myapplication1.desktopin the/usr/share/applications/with following content:[Desktop Entry] Type=Application MimeType=application/x-newtype Name=My Application 1 Exec=myapplication1 field_codeThe sample
myapplication1.desktopfile here associates theapplication/x-newtypeMIME type with an application namedMy Application 1. It is run by a commandmyapplication1.Based on how
myapplication1gets started, select one relevant field code from Desktop Entry Specification. For example, for an application capable of opening multiple files, use:Exec=myapplication1 %FAs a root user, update the MIME database for your changes to take effect.
# update-mime-database /usr/share/mimeAs a root user, update the application database.
# update-desktop-database /usr/share/applications
Verification
To verify that you have successfully associated
*.xyzfiles with theapplication/x-newtypeMIME type, first create an empty file, for example test.xyz and execute the following commands:$ touch test.xyz $ gvfs-info test.xyz | grep "standard::content-type" standard::content-type: application/x-newtypeTo verify
myapplication1.desktopis correctly set as the default registered application for theapplication/x-newtypeMIME type, execute following command:$ gio mime --query application/x-newtype Default application for 'application/x-newtype': myapplication1.desktop Registered applications: myapplication1.desktop Recommended applications: myapplication1.desktop
11.3. Adding a custom MIME type for individual users
You can add a custom MIME type for an individual user and register a default application for that MIME type.
Procedure
Create the
~/.local/share/mime/packages/application-x-newtype.xmlfile with following content:<?xml version="1.0" encoding="UTF-8"?> <mime-info xmlns="http://www.freedesktop.org/standards/shared-mime-info"> <mime-type type="application/x-newtype"> <comment>new mime type</comment> <glob pattern="*.xyz"/> </mime-type> </mime-info>The sample
application-x-newtype.xmlfile here defines a new MIME typeapplication/x-newtypeand assigns file names with the.xyzextension to that MIME type.Create a new .desktop file named, for example,
myapplication1.desktop, and place it in the~/.local/share/applications/directory with following content:[Desktop Entry] Type=Application MimeType=application/x-newtype Name=My Application 1 Exec=myapplication1 field_codeThe sample
myapplication1.desktopfile above associates theapplication/x-newtypeMIME type with an application named My Application 1. It is run by a commandmyapplication1.Based on how
myapplication1gets started, choose one respective field code from Desktop Entry Specification. For example, for an application capable of opening multiple files, use:Exec=myapplication1 %FUpdate the MIME database for your changes to take effect:
$ update-mime-database ~/.local/share/mimeUpdate the application database:
$ update-desktop-database ~/.local/share/applications
Verification
To verify that you have successfully associated
*.xyzfiles with theapplication/x-newtypeMIME type, first create an empty file, for example, test.xyz and execute the following commands:$ touch test.xyz $ gvfs-info test.xyz | grep "standard::content-type" standard::content-type: application/x-newtypeTo verify that
myapplication1.desktopis correctly set as the default registered application for theapplication/x-newtypeMIME type, execute following command:$ gio mime --query application/x-newtype Default application for 'application/x-newtype': myapplication1.desktop Registered applications: myapplication1.desktop Recommended applications: myapplication1.desktop
11.4. Options to override default MIME types
By default, the package-installed /usr/share/applications/mimeapps.list and /usr/share/applications/gnome-mimeapps.list files specify the application registered to open specific MIME types.
System administrators can create the /etc/xdg/mimeapps.list or /etc/xdg/gnome-mimeapps.list file with a list of MIME types they want to override with the default registered application.
Local users can create the ~/.local/share/applications/mimeapps.list or ~/.local/share/applications/gnome-mimeapps.list file with a list of MIME types for which they want to override the default registered application.
Configurations are applied in the following order:
-
/usr/share/applications/ -
/etc/xdg/ -
~/.local/share/application/
Within a particular location, the configurations are applied in the following order:
- mimeapps.list
- gnome-mimeapps.list
11.5. Overriding default registered application for all the users
As a system administrator, you can update the configuration of packages based on your requirements.
System administrator’s configuration takes precedence over default package configuration. Within each, the desktop-specific configuration takes precedence over the configuration that does not specify the desktop environment.
Procedure
Consult the
/usr/share/applications/mimeapps.listfile to determine the MIME types for which you want to change the default registered application. For example, the following sample of themimeapps.listfile specifies the default registered application for thetext/htmlandapplication/xhtml+xmlMIME types:[Default Applications] text/html=firefox.desktop application/xhtml+xml=firefox.desktopThis example above specifies default application (Mozilla Firefox) by specifying its corresponding
.desktopfile (firefox.desktop). You can find.desktopfiles for other applications in the/usr/share/applications/directory.Create the
/etc/xdg/mimeapps.listfile and specify the MIME types and their corresponding default registered applications in this file.[Default Applications] text/html=myapplication1.desktop application/xhtml+xml=myapplication2.desktopThis example above sets the default registered application for the
text/htmlMIME type tomyapplication1.desktopandapplication/xhtml+xmlMIME type tomyapplication2.desktop.
Verification
-
For these settings to function correctly, ensure that both the
myapplication1.desktopandmyapplication2.desktopfiles are placed in the/usr/share/applications/directory. Verify that the default registered application is set correctly:
$ gio mime text/html
Default application for 'text/html': myapplication1.desktop
Registered applications:
	myapplication1.desktop
	firefox.desktop
Recommended applications:
	myapplication1.desktop
	firefox.desktop
11.6. Overriding default registered application for individual users
Individual users can update the configuration based on their requirements.
This configuration takes precedence over the system administrator’s configuration, which takes precedence over the package configuration. Within each, the desktop-specific configuration takes precedence over the configuration that does not specify the desktop environment.
Procedure
Consult the
/usr/share/applications/mimeapps.listfile to determine the MIME types for which you want to change the default registered application. For example, the following sample of themimeapps.listfile specifies the default registered application for thetext/htmlandapplication/xhtml+xmlMIME types:[Default Applications] text/html=firefox.desktop application/xhtml+xml=firefox.desktopThis example above specifies default application (Mozilla Firefox) by specifying its corresponding
.desktopfile (firefox.desktop). You can find.desktopfiles for other applications in the/usr/share/applications/directory.Create the
~/.local/share/applications/mimeapps.listfile and specify the MIME types and their corresponding default registered applications in this file.[Default Applications] text/html=myapplication1.desktop application/xhtml+xml=myapplication2.desktopThis example above sets the default registered application for the
text/htmlMIME type tomyapplication1.desktopandapplication/xhtml+xmlMIME type tomyapplication2.desktop.
Verification
-
For these settings to function correctly, ensure that both the
myapplication1.desktopandmyapplication2.desktopfiles are placed in the/usr/share/applications/directory. Execute the
gio mime querycommand to verify that the default registered application is set correctly.$ gio mime text/html Default application for 'text/html': myapplication1.desktop Registered applications: myapplication1.desktop firefox.desktop Recommended applications: myapplication1.desktop firefox.desktop