3.3. LVM Logical Volumes
In LVM, a volume group is divided up into logical volumes. There are three types of LVM logical volumes: linear volumes, striped volumes, and mirrored volumes. These are described in the following sections.
3.3.1. Linear Volumes
Copy linkLink copied to clipboard!
A linear volume aggregates space from one or more physical volumes into one logical volume. For example, if you have two 60GB disks, you can create a 120GB logical volume. The physical storage is concatenated.
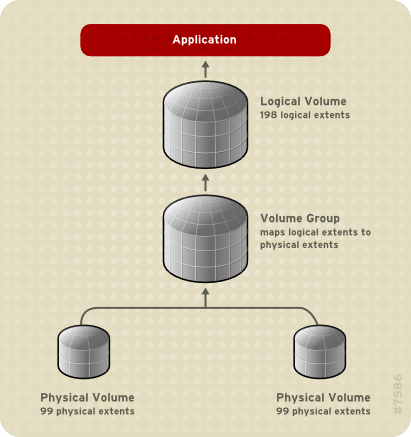
Creating a linear volume assigns a range of physical extents to an area of a logical volume in order. For example, as shown in Figure 3.2, “Extent Mapping” logical extents 1 to 99 could map to one physical volume and logical extents 100 to 198 could map to a second physical volume. From the point of view of the application, there is one device that is 198 extents in size.
Figure 3.2. Extent Mapping
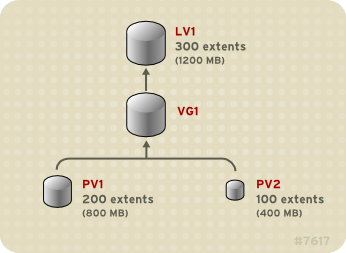
The physical volumes that make up a logical volume do not have to be the same size. Figure 3.3, “Linear Volume with Unequal Physical Volumes” shows volume group
VG1 with a physical extent size of 4MB. This volume group includes 2 physical volumes named PV1 and PV2. The physical volumes are divided into 4MB units, since that is the extent size. In this example, PV1 is 200 extents in size (800MB) and PV2 is 100 extents in size (400MB). You can create a linear volume any size between 1 and 300 extents (4MB to 1200MB). In this example, the linear volume named LV1 is 300 extents in size.
Figure 3.3. Linear Volume with Unequal Physical Volumes
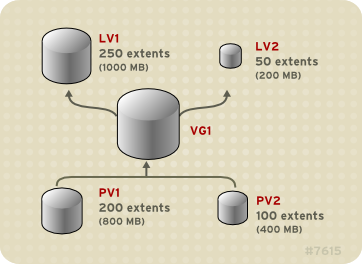
You can configure more than one linear logical volume of whatever size you require from the pool of physical extents. Figure 3.4, “Multiple Logical Volumes” shows the same volume group as in Figure 3.3, “Linear Volume with Unequal Physical Volumes”, but in this case two logical volumes have been carved out of the volume group:
LV1, which is 250 extents in size (1000MB) and LV2 which is 50 extents in size (200MB).
Figure 3.4. Multiple Logical Volumes
3.3.2. Striped Logical Volumes
Copy linkLink copied to clipboard!
When you write data to an LVM logical volume, the file system lays the data out across the underlying physical volumes. You can control the way the data is written to the physical volumes by creating a striped logical volume. For large sequential reads and writes, this can improve the efficiency of the data I/O.
Striping enhances performance by writing data to a predetermined number of physical volumes in round-robin fashion. With striping, I/O can be done in parallel. In some situations, this can result in near-linear performance gain for each additional physical volume in the stripe.
The following illustration shows data being striped across three physical volumes. In this figure:
- the first stripe of data is written to PV1
- the second stripe of data is written to PV2
- the third stripe of data is written to PV3
- the fourth stripe of data is written to PV1
In a striped logical volume, the size of the stripe cannot exceed the size of an extent.
Figure 3.5. Striping Data Across Three PVs
Striped logical volumes can be extended by concatenating another set of devices onto the end of the first set. In order to extend a striped logical volume, however, there must be enough free space on the underlying physical volumes that make up the volume group to support the stripe. For example, if you have a two-way stripe that uses up an entire volume group, adding a single physical volume to the volume group will not enable you to extend the stripe. Instead, you must add at least two physical volumes to the volume group. For more information on extending a striped volume, see Section 5.4.9, “Extending a Striped Volume”.
3.3.3. Mirrored Logical Volumes
Copy linkLink copied to clipboard!
A mirror maintains identical copies of data on different devices. When data is written to one device, it is written to a second device as well, mirroring the data. This provides protection for device failures. When one leg of a mirror fails, the logical volume becomes a linear volume and can still be accessed.
LVM supports mirrored volumes. When you create a mirrored logical volume, LVM ensures that data written to an underlying physical volume is mirrored onto a separate physical volume. With LVM, you can create mirrored logical volumes with multiple mirrors.
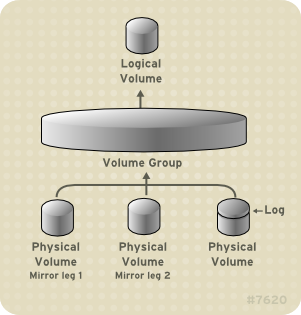
An LVM mirror divides the device being copied into regions that are typically 512KB in size. LVM maintains a small log which it uses to keep track of which regions are in sync with the mirror or mirrors. This log can be kept on disk, which will keep it persistent across reboots, or it can be maintained in memory.
Figure 3.6, “Mirrored Logical Volume” shows a mirrored logical volume with one mirror. In this configuration, the log is maintained on disk.
Figure 3.6. Mirrored Logical Volume
Note
As of the Red Hat Enterprise Linux 5.3 release, mirrored logical volumes are supported in a cluster.
For information on creating and modifying mirrors, see Section 5.4.1.3, “Creating Mirrored Volumes”.
3.3.4. Snapshot Volumes
Copy linkLink copied to clipboard!
The LVM snapshot feature provides the ability to create virtual images of a device at a particular instant without causing a service interruption. When a change is made to the original device (the origin) after a snapshot is taken, the snapshot feature makes a copy of the changed data area as it was prior to the change so that it can reconstruct the state of the device.
Note
LVM snapshots are not supported across the nodes in a cluster. You cannot create a snapshot volume in a clustered volume group.
Because a snapshot copies only the data areas that change after the snapshot is created, the snapshot feature requires a minimal amount of storage. For example, with a rarely updated origin, 3-5 % of the origin's capacity is sufficient to maintain the snapshot.
Note
Snapshot copies of a file system are virtual copies, not actual media backup for a file system. Snapshots do not provide a substitute for a backup procedure.
The size of the snapshot governs the amount of space set aside for storing the changes to the origin volume. For example, if you made a snapshot and then completely overwrote the origin the snapshot would have to be at least as big as the origin volume to hold the changes. You need to dimension a snapshot according to the expected level of change. So for example a short-lived snapshot of a read-mostly volume, such as
/usr, would need less space than a long-lived snapshot of a volume that sees a greater number of writes, such as /home.
If a snapshot runs full, the snapshot becomes invalid, since it can no longer track changes on the origin volumed. You should regularly monitor the size of the snapshot. Snapshots are fully resizeable, however, so if you have the storage capacity you can increase the size of the snapshot volume to prevent it from getting dropped. Conversely, if you find that the snapshot volume is larger than you need, you can reduce the size of the volume to free up space that is needed by other logical volumes.
When you create a snapshot file system, full read and write access to the origin stays possible. If a chunk on a snapshot is changed, that chunk is marked and never gets copied from the original volume.
There are several uses for the snapshot feature:
- Most typically, a snapshot is taken when you need to perform a backup on a logical volume without halting the live system that is continuously updating the data.
- You can execute the
fsckcommand on a snapshot file system to check the file system integrity and determine whether the original file system requires file system repair. - Because the snapshot is read/write, you can test applications against production data by taking a snapshot and running tests against the snapshot, leaving the real data untouched.
- You can create volumes for use with the Xen virtual machine monitor. You can use the snapshot feature to create a disk image, snapshot it, and modify the snapshot for a particular domU instance. You can then create another snapshot and modify it for another domU instance. Since the only storage used is chunks that were changed on the origin or snapshot, the majority of the volume is shared.


