Security Guide
Concepts and techniques to secure RHEL servers and workstations
Abstract
Chapter 1. Overview of Security Topics
Note
/lib directory. When using 64-bit systems, some of the files mentioned may instead be located in /lib64.
1.1. What is Computer Security?
1.1.1. Standardizing Security
- Confidentiality — Sensitive information must be available only to a set of pre-defined individuals. Unauthorized transmission and usage of information should be restricted. For example, confidentiality of information ensures that a customer's personal or financial information is not obtained by an unauthorized individual for malicious purposes such as identity theft or credit fraud.
- Integrity — Information should not be altered in ways that render it incomplete or incorrect. Unauthorized users should be restricted from the ability to modify or destroy sensitive information.
- Availability — Information should be accessible to authorized users any time that it is needed. Availability is a warranty that information can be obtained with an agreed-upon frequency and timeliness. This is often measured in terms of percentages and agreed to formally in Service Level Agreements (SLAs) used by network service providers and their enterprise clients.
1.1.2. Cryptographic Software and Certifications
1.2. Security Controls
- Physical
- Technical
- Administrative
1.2.1. Physical Controls
- Closed-circuit surveillance cameras
- Motion or thermal alarm systems
- Security guards
- Picture IDs
- Locked and dead-bolted steel doors
- Biometrics (includes fingerprint, voice, face, iris, handwriting, and other automated methods used to recognize individuals)
1.2.2. Technical Controls
- Encryption
- Smart cards
- Network authentication
- Access control lists (ACLs)
- File integrity auditing software
1.2.3. Administrative Controls
- Training and awareness
- Disaster preparedness and recovery plans
- Personnel recruitment and separation strategies
- Personnel registration and accounting
1.3. Vulnerability Assessment
- The expertise of the staff responsible for configuring, monitoring, and maintaining the technologies.
- The ability to patch and update services and kernels quickly and efficiently.
- The ability of those responsible to keep constant vigilance over the network.
1.3.1. Defining Assessment and Testing
Warning
- Creates proactive focus on information security.
- Finds potential exploits before crackers find them.
- Results in systems being kept up to date and patched.
- Promotes growth and aids in developing staff expertise.
- Abates financial loss and negative publicity.
1.3.2. Establishing a Methodology for Vulnerability Assessment
- https://www.owasp.org/ — The Open Web Application Security Project
1.3.3. Vulnerability Assessment Tools
README file or man page for the tools. Additionally, look to the Internet for more information, such as articles, step-by-step guides, or even mailing lists specific to the tools.
1.3.3.1. Scanning Hosts with Nmap
yum install nmap command as the root user.
1.3.3.1.1. Using Nmap
nmap command followed by the host name or IP address of the machine to scan:
nmap <hostname>foo.example.com, type the following at a shell prompt:
~]$ nmap foo.example.comInteresting ports on foo.example.com:
Not shown: 1710 filtered ports
PORT STATE SERVICE
22/tcp open ssh
53/tcp open domain
80/tcp open http
113/tcp closed auth
1.3.3.2. Nessus
Note
1.3.3.3. OpenVAS
1.3.3.4. Nikto
1.4. Security Threats
1.4.1. Threats to Network Security
Insecure Architectures
Broadcast Networks
Centralized Servers
1.4.2. Threats to Server Security
Unused Services and Open Ports
Unpatched Services
Inattentive Administration
Inherently Insecure Services
1.4.3. Threats to Workstation and Home PC Security
Bad Passwords
Vulnerable Client Applications
1.5. Common Exploits and Attacks
| Exploit | Description | Notes |
|---|---|---|
| Null or Default Passwords | Leaving administrative passwords blank or using a default password set by the product vendor. This is most common in hardware such as routers and firewalls, but some services that run on Linux can contain default administrator passwords as well (though Red Hat Enterprise Linux 7 does not ship with them). |
Commonly associated with networking hardware such as routers, firewalls, VPNs, and network attached storage (NAS) appliances.
Common in many legacy operating systems, especially those that bundle services (such as UNIX and Windows.)
Administrators sometimes create privileged user accounts in a rush and leave the password null, creating a perfect entry point for malicious users who discover the account.
|
| Default Shared Keys | Secure services sometimes package default security keys for development or evaluation testing purposes. If these keys are left unchanged and are placed in a production environment on the Internet, all users with the same default keys have access to that shared-key resource, and any sensitive information that it contains. |
Most common in wireless access points and preconfigured secure server appliances.
|
| IP Spoofing | A remote machine acts as a node on your local network, finds vulnerabilities with your servers, and installs a backdoor program or Trojan horse to gain control over your network resources. |
Spoofing is quite difficult as it involves the attacker predicting TCP/IP sequence numbers to coordinate a connection to target systems, but several tools are available to assist crackers in performing such a vulnerability.
Depends on target system running services (such as
rsh, telnet, FTP and others) that use source-based authentication techniques, which are not recommended when compared to PKI or other forms of encrypted authentication used in ssh or SSL/TLS.
|
| Eavesdropping | Collecting data that passes between two active nodes on a network by eavesdropping on the connection between the two nodes. |
This type of attack works mostly with plain text transmission protocols such as Telnet, FTP, and HTTP transfers.
Remote attacker must have access to a compromised system on a LAN in order to perform such an attack; usually the cracker has used an active attack (such as IP spoofing or man-in-the-middle) to compromise a system on the LAN.
Preventative measures include services with cryptographic key exchange, one-time passwords, or encrypted authentication to prevent password snooping; strong encryption during transmission is also advised.
|
| Service Vulnerabilities | An attacker finds a flaw or loophole in a service run over the Internet; through this vulnerability, the attacker compromises the entire system and any data that it may hold, and could possibly compromise other systems on the network. |
HTTP-based services such as CGI are vulnerable to remote command execution and even interactive shell access. Even if the HTTP service runs as a non-privileged user such as "nobody", information such as configuration files and network maps can be read, or the attacker can start a denial of service attack which drains system resources or renders it unavailable to other users.
Services sometimes can have vulnerabilities that go unnoticed during development and testing; these vulnerabilities (such as buffer overflows, where attackers crash a service using arbitrary values that fill the memory buffer of an application, giving the attacker an interactive command prompt from which they may execute arbitrary commands) can give complete administrative control to an attacker.
Administrators should make sure that services do not run as the root user, and should stay vigilant of patches and errata updates for applications from vendors or security organizations such as CERT and CVE.
|
| Application Vulnerabilities | Attackers find faults in desktop and workstation applications (such as email clients) and execute arbitrary code, implant Trojan horses for future compromise, or crash systems. Further exploitation can occur if the compromised workstation has administrative privileges on the rest of the network. |
Workstations and desktops are more prone to exploitation as workers do not have the expertise or experience to prevent or detect a compromise; it is imperative to inform individuals of the risks they are taking when they install unauthorized software or open unsolicited email attachments.
Safeguards can be implemented such that email client software does not automatically open or execute attachments. Additionally, the automatic update of workstation software using Red Hat Network; or other system management services can alleviate the burdens of multi-seat security deployments.
|
| Denial of Service (DoS) Attacks | Attacker or group of attackers coordinate against an organization's network or server resources by sending unauthorized packets to the target host (either server, router, or workstation). This forces the resource to become unavailable to legitimate users. |
The most reported DoS case in the US occurred in 2000. Several highly-trafficked commercial and government sites were rendered unavailable by a coordinated ping flood attack using several compromised systems with high bandwidth connections acting as zombies, or redirected broadcast nodes.
Source packets are usually forged (as well as rebroadcast), making investigation as to the true source of the attack difficult.
Advances in ingress filtering (IETF rfc2267) using
iptables and Network Intrusion Detection Systems such as snort assist administrators in tracking down and preventing distributed DoS attacks.
|
Chapter 2. Security Tips for Installation
2.1. Securing BIOS
2.1.1. BIOS Passwords
- Preventing Changes to BIOS Settings — If an intruder has access to the BIOS, they can set it to boot from a CD-ROM or a flash drive. This makes it possible for them to enter rescue mode or single user mode, which in turn allows them to start arbitrary processes on the system or copy sensitive data.
- Preventing System Booting — Some BIOSes allow password protection of the boot process. When activated, an attacker is forced to enter a password before the BIOS launches the boot loader.
2.1.1.1. Securing Non-BIOS-based Systems
2.2. Partitioning the Disk
/boot, /, /home, /tmp, and /var/tmp/ directories. The reasons for each are different, and we will address each partition.
/boot- This partition is the first partition that is read by the system during boot up. The boot loader and kernel images that are used to boot your system into Red Hat Enterprise Linux 7 are stored in this partition. This partition should not be encrypted. If this partition is included in / and that partition is encrypted or otherwise becomes unavailable then your system will not be able to boot.
/home- When user data (
/home) is stored in/instead of in a separate partition, the partition can fill up causing the operating system to become unstable. Also, when upgrading your system to the next version of Red Hat Enterprise Linux 7 it is a lot easier when you can keep your data in the/homepartition as it will not be overwritten during installation. If the root partition (/) becomes corrupt your data could be lost forever. By using a separate partition there is slightly more protection against data loss. You can also target this partition for frequent backups. /tmpand/var/tmp/- Both the
/tmpand/var/tmp/directories are used to store data that does not need to be stored for a long period of time. However, if a lot of data floods one of these directories it can consume all of your storage space. If this happens and these directories are stored within/then your system could become unstable and crash. For this reason, moving these directories into their own partitions is a good idea.
Note
2.3. Installing the Minimum Amount of Packages Required
Minimal install environment, see the Software Selection chapter of the Red Hat Enterprise Linux 7 Installation Guide. A minimal installation can also be performed by a Kickstart file using the --nobase option. For more information about Kickstart installations, see the Package Selection section from the Red Hat Enterprise Linux 7 Installation Guide.
2.4. Restricting Network Connectivity During the Installation Process
2.5. Post-installation Procedures
- Update your system. enter the following command as root:
~]# yum update - Even though the firewall service,
firewalld, is automatically enabled with the installation of Red Hat Enterprise Linux, there are scenarios where it might be explicitly disabled, for example in the kickstart configuration. In such a case, it is recommended to consider re-enabling the firewall.To startfirewalldenter the following commands as root:~]# systemctl start firewalld ~]# systemctl enable firewalld - To enhance security, disable services you do not need. For example, if there are no printers installed on your computer, disable the
cupsservice using the following command:~]# systemctl disable cupsTo review active services, enter the following command:~]$ systemctl list-units | grep service
2.6. Additional Resources
Chapter 3. Keeping Your System Up-to-Date
3.1. Maintaining Installed Software
3.1.1. Planning and Configuring Security Updates
3.1.1.1. Using the Security Features of Yum
root:
~]# yum check-update --security
Loaded plugins: langpacks, product-id, subscription-manager
rhel-7-workstation-rpms/x86_64                  | 3.4 kB  00:00:00
No packages needed for security; 0 packages available~]# yum update --securityupdateinfo subcommand to display or act upon information provided by repositories about available updates. The updateinfo subcommand itself accepts a number of commands, some of which pertain to security-related uses. See Table 3.1, “Security-related commands usable with yum updateinfo” for an overview of these commands.
| Command | Description | |
|---|---|---|
advisory [advisories] | Displays information about one or more advisories. Replace advisories with an advisory number or numbers. | |
cves | Displays the subset of information that pertains to CVE (Common Vulnerabilities and Exposures). | |
security or sec | Displays all security-related information. | |
severity [severity_level] or sev [severity_level] | Displays information about security-relevant packages of the supplied severity_level. |
3.1.2. Updating and Installing Packages
3.1.2.1. Verifying Signed Packages
gpgcheck configuration directive is set to 1 in the /etc/yum.conf configuration file.
rpmkeys --checksig package_file.rpm3.1.2.2. Installing Signed Packages
yum install command as the root user as follows:
yum install package_file.rpm.rpm packages in the current directory:
yum install *.rpmImportant
3.1.3. Applying Changes Introduced by Installed Updates
Note
- Applications
- User-space applications are any programs that can be initiated by the user. Typically, such applications are used only when the user, a script, or an automated task utility launch them.Once such a user-space application is updated, halt any instances of the application on the system, and launch the program again to use the updated version.
- Kernel
- The kernel is the core software component for the Red Hat Enterprise Linux 7 operating system. It manages access to memory, the processor, and peripherals, and it schedules all tasks.Because of its central role, the kernel cannot be restarted without also rebooting the computer. Therefore, an updated version of the kernel cannot be used until the system is rebooted.
- KVM
- When the qemu-kvm and libvirt packages are updated, it is necessary to stop all guest virtual machines, reload relevant virtualization modules (or reboot the host system), and restart the virtual machines.Use the
lsmodcommand to determine which modules from the following are loaded:kvm,kvm-intel, orkvm-amd. Then use themodprobe -rcommand to remove and subsequently themodprobe -acommand to reload the affected modules. Fox example:~]# lsmod | grep kvm kvm_intel 143031 0 kvm 460181 1 kvm_intel ~]# modprobe -r kvm-intel ~]# modprobe -r kvm ~]# modprobe -a kvm kvm-intel - Shared Libraries
- Shared libraries are units of code, such as
glibc, that are used by a number of applications and services. Applications utilizing a shared library typically load the shared code when the application is initialized, so any applications using an updated library must be halted and relaunched.To determine which running applications link against a particular library, use thelsofcommand:lsof libraryFor example, to determine which running applications link against thelibwrap.so.0library, type:~]# lsof /lib64/libwrap.so.0 COMMAND PID USER FD TYPE DEVICE SIZE/OFF NODE NAME pulseaudi 12363 test mem REG 253,0 42520 34121785 /usr/lib64/libwrap.so.0.7.6 gnome-set 12365 test mem REG 253,0 42520 34121785 /usr/lib64/libwrap.so.0.7.6 gnome-she 12454 test mem REG 253,0 42520 34121785 /usr/lib64/libwrap.so.0.7.6This command returns a list of all the running programs that useTCPwrappers for host-access control. Therefore, any program listed must be halted and relaunched when the tcp_wrappers package is updated. - systemd Services
- systemd services are persistent server programs usually launched during the boot process. Examples of systemd services include
sshdorvsftpd.Because these programs usually persist in memory as long as a machine is running, each updated systemd service must be halted and relaunched after its package is upgraded. This can be done as therootuser using thesystemctlcommand:systemctl restart service_nameReplace service_name with the name of the service you want to restart, such assshd. - Other Software
- Follow the instructions outlined by the resources linked below to correctly update the following applications.
- Red Hat Directory Server — See the Release Notes for the version of the Red Hat Directory Server in question at https://access.redhat.com/documentation/en-US/Red_Hat_Directory_Server/.
- Red Hat Enterprise Virtualization Manager — See the Installation Guide for the version of the Red Hat Enterprise Virtualization in question at https://access.redhat.com/documentation/en-US/Red_Hat_Enterprise_Virtualization/.
3.2. Using the Red Hat Customer Portal
3.2.1. Viewing Security Advisories on the Customer Portal
3.2.3. Understanding Issue Severity Classification
3.3. Additional Resources
Installed Documentation
- yum(8) — The manual page for the Yum package manager provides information about the way Yum can be used to install, update, and remove packages on your systems.
- rpmkeys(8) — The manual page for the
rpmkeysutility describes the way this program can be used to verify the authenticity of downloaded packages.
Online Documentation
- Red Hat Enterprise Linux 7 System Administrator's Guide — The System Administrator's Guide for Red Hat Enterprise Linux 7 documents the use of the
Yumandrpmcommands that are used to install, update, and remove packages on Red Hat Enterprise Linux 7 systems. - Red Hat Enterprise Linux 7 SELinux User's and Administrator's Guide — The SELinux User's and Administrator's Guide for Red Hat Enterprise Linux 7 documents the configuration of the SELinux mandatory access control mechanism.
Red Hat Customer Portal
- Red Hat Customer Portal, Security — The Security section of the Customer Portal contains links to the most important resources, including the Red Hat CVE database, and contacts for Red Hat Product Security.
- Red Hat Security Blog — Articles about latest security-related issues from Red Hat security professionals.
See Also
- Chapter 2, Security Tips for Installation describes how to configure your system securely from the beginning to make it easier to implement additional security settings later.
- Section 4.9.2, “Creating GPG Keys” describes how to create a set of personal GPG keys to authenticate your communications.
Chapter 4. Hardening Your System with Tools and Services
4.1. Desktop Security
4.1.1. Password Security
/etc/passwd file, which makes the system vulnerable to offline password cracking attacks. If an intruder can gain access to the machine as a regular user, he can copy the /etc/passwd file to his own machine and run any number of password cracking programs against it. If there is an insecure password in the file, it is only a matter of time before the password cracker discovers it.
/etc/shadow, which is readable only by the root user.
Note
4.1.1.1. Creating Strong Passwords
randomword1 randomword2 randomword3 randomword41!". Note that such a modification does not increase the security of the passphrase significantly.
/dev/urandom. The minimum number of bits you can specify is 56, which is enough for passwords on systems and services where brute force attacks are rare. 64 bits is adequate for applications where the attacker does not have direct access to the password hash file. For situations when the attacker might obtain the direct access to the password hash or the password is used as an encryption key, 80 to 128 bits should be used. If you specify an invalid number of entropy bits, pwmake will use the default of bits. To create a password of 128 bits, enter the following command:
pwmake 128- Using a single dictionary word, a word in a foreign language, an inverted word, or only numbers.
- Using less than 10 characters for a password or passphrase.
- Using a sequence of keys from the keyboard layout.
- Writing down your passwords.
- Using personal information in a password, such as birth dates, anniversaries, family member names, or pet names.
- Using the same passphrase or password on multiple machines.
4.1.1.2. Forcing Strong Passwords
passwd command-line utility, which is PAM-aware (Pluggable Authentication Modules) and checks to see if the password is too short or otherwise easy to crack. This checking is performed by the pam_pwquality.so PAM module.
Note
pam_pwquality PAM module replaced pam_cracklib, which was used in Red Hat Enterprise Linux 6 as a default module for password quality checking. It uses the same back end as pam_cracklib.
pam_pwquality module is used to check a password's strength against a set of rules. Its procedure consists of two steps: first it checks if the provided password is found in a dictionary. If not, it continues with a number of additional checks. pam_pwquality is stacked alongside other PAM modules in the password component of the /etc/pam.d/passwd file, and the custom set of rules is specified in the /etc/security/pwquality.conf configuration file. For a complete list of these checks, see the pwquality.conf (8) manual page.
Example 4.1. Configuring password strength-checking in pwquality.conf
pam_quality, add the following line to the password stack in the /etc/pam.d/passwd file:
password required pam_pwquality.so retry=3/etc/security/pwquality.conf file:
minlen = 8
minclass = 4/etc/security/pwquality.conf:
maxsequence = 3
maxrepeat = 3abcd, and more than 3 identical consecutive characters, such as 1111.
Note
4.1.1.3. Configuring Password Aging
chage command.
Important
-M option of the chage command specifies the maximum number of days the password is valid. For example, to set a user's password to expire in 90 days, use the following command:
chage -M 90 username-1 after the -M option.
chage command, see the table below.
| Option | Description |
|---|---|
-d days | Specifies the number of days since January 1, 1970 the password was changed. |
-E date | Specifies the date on which the account is locked, in the format YYYY-MM-DD. Instead of the date, the number of days since January 1, 1970 can also be used. |
-I days | Specifies the number of inactive days after the password expiration before locking the account. If the value is 0, the account is not locked after the password expires. |
-l | Lists current account aging settings. |
-m days | Specify the minimum number of days after which the user must change passwords. If the value is 0, the password does not expire. |
-M days | Specify the maximum number of days for which the password is valid. When the number of days specified by this option plus the number of days specified with the -d option is less than the current day, the user must change passwords before using the account. |
-W days | Specifies the number of days before the password expiration date to warn the user. |
chage command in interactive mode to modify multiple password aging and account details. Use the following command to enter interactive mode:
chage <username>~]# chage juan
Changing the aging information for juan
Enter the new value, or press ENTER for the default
Minimum Password Age [0]: 10
Maximum Password Age [99999]: 90
Last Password Change (YYYY-MM-DD) [2006-08-18]:
Password Expiration Warning [7]:
Password Inactive [-1]:
Account Expiration Date (YYYY-MM-DD) [1969-12-31]:- Set up an initial password. To assign a default password, enter the following command at a shell prompt as
root:passwd usernameWarning
Thepasswdutility has the option to set a null password. Using a null password, while convenient, is a highly insecure practice, as any third party can log in and access the system using the insecure user name. Avoid using null passwords wherever possible. If it is not possible, always make sure that the user is ready to log in before unlocking an account with a null password. - Force immediate password expiration by running the following command as
root:chage -d 0 usernameThis command sets the value for the date the password was last changed to the epoch (January 1, 1970). This value forces immediate password expiration no matter what password aging policy, if any, is in place.
4.1.2. Account Locking
pam_faillock PAM module allows system administrators to lock out user accounts after a specified number of failed attempts. Limiting user login attempts serves mainly as a security measure that aims to prevent possible brute force attacks targeted to obtain a user's account password.
pam_faillock module, failed login attempts are stored in a separate file for each user in the /var/run/faillock directory.
Note
root user account when the even_deny_root option is used.
- To lock out any non-root user after three unsuccessful attempts and unlock that user after 10 minutes, add two lines to the
authsection of the/etc/pam.d/system-authand/etc/pam.d/password-authfiles. After your edits, the entireauthsection in both files should look like this:1 auth required pam_env.so 2 auth required pam_faillock.so preauth silent audit deny=3 unlock_time=600 3 auth sufficient pam_unix.so nullok try_first_pass 4 auth [default=die] pam_faillock.so authfail audit deny=3 unlock_time=600 5 auth requisite pam_succeed_if.so uid >= 1000 quiet_success 6 auth required pam_deny.soLines number 2 and 4 have been added. - Add the following line to the
accountsection of both files specified in the previous step:account required pam_faillock.so - To apply account locking for the root user as well, add the
even_deny_rootoption to thepam_faillockentries in the/etc/pam.d/system-authand/etc/pam.d/password-authfiles:auth required pam_faillock.so preauth silent audit deny=3 even_deny_root unlock_time=600 auth sufficient pam_unix.so nullok try_first_pass auth [default=die] pam_faillock.so authfail audit deny=3 even_deny_root unlock_time=600 account required pam_faillock.so
john attempts to log in for the fourth time after failing to log in three times previously, his account is locked upon the fourth attempt:
~]$ su - john
Account locked due to 3 failed logins
su: incorrect passwordpam_faillock is called for the first time in both /etc/pam.d/system-auth and /etc/pam.d/password-auth. Also replace user1, user2, and user3 with the actual user names.
auth [success=1 default=ignore] pam_succeed_if.so user in user1:user2:user3root, the following command:
~]$ faillock
john:
When                Type  Source                                           Valid
2013-03-05 11:44:14 TTY pts/0 Vroot, the following command:
faillock --user <username> --reset
Important
cron jobs resets the failure counter of pam_faillock of that user that is running the cron job, and thus pam_faillock should not be configured for cron. See the Knowledge Centered Support (KCS) solution for more information.
Keeping Custom Settings with authconfig
system-auth and password-auth files are overwritten with the settings from the authconfig utility. This can be avoided by creating symbolic links in place of the configuration files, which authconfig recognizes and does not overwrite. In order to use custom settings in the configuration files and authconfig simultaneously, configure account locking using the following steps:
- Check whether the
system-authandpassword-authfiles are already symbolic links pointing tosystem-auth-acandpassword-auth-ac(this is the system default):~]# ls -l /etc/pam.d/{password,system}-authIf the output is similar to the following, the symbolic links are in place, and you can skip to step number 3:lrwxrwxrwx. 1 root root 16 24. Feb 09.29 /etc/pam.d/password-auth -> password-auth-ac lrwxrwxrwx. 1 root root 28 24. Feb 09.29 /etc/pam.d/system-auth -> system-auth-acIf thesystem-authandpassword-authfiles are not symbolic links, continue with the next step. - Rename the configuration files:
~]# mv /etc/pam.d/system-auth /etc/pam.d/system-auth-ac ~]# mv /etc/pam.d/password-auth /etc/pam.d/password-auth-ac - Create configuration files with your custom settings:
~]# vi /etc/pam.d/system-auth-localThe/etc/pam.d/system-auth-localfile should contain the following lines:auth required pam_faillock.so preauth silent audit deny=3 unlock_time=600 auth include system-auth-ac auth [default=die] pam_faillock.so authfail silent audit deny=3 unlock_time=600 account required pam_faillock.so account include system-auth-ac password include system-auth-ac session include system-auth-ac~]# vi /etc/pam.d/password-auth-localThe/etc/pam.d/password-auth-localfile should contain the following lines:auth required pam_faillock.so preauth silent audit deny=3 unlock_time=600 auth include password-auth-ac auth [default=die] pam_faillock.so authfail silent audit deny=3 unlock_time=600 account required pam_faillock.so account include password-auth-ac password include password-auth-ac session include password-auth-ac - Create the following symbolic links:
~]# ln -sf /etc/pam.d/system-auth-local /etc/pam.d/system-auth
~]# ln -sf /etc/pam.d/password-auth-local /etc/pam.d/password-auth
pam_faillock configuration options, see the pam_faillock(8) manual page.
Removing the nullok option
nullok option, which allows users to log in with a blank password if the password field in the /etc/shadow file is empty, is enabled by default. To disable the nullok option, remove the nullok string from configuration files in the /etc/pam.d/ directory, such as /etc/pam.d/system-auth or /etc/pam.d/password-auth.
nullok option allow users to login without entering a password? KCS solution for more information.
4.1.3. Session Locking
Note
4.1.3.1. Locking Virtual Consoles Using vlock
vlock utility. Install it by entering the following command as root:
~]# yum install kbdvlock command without any additional parameters. This locks the currently active virtual console session while still allowing access to the others. To prevent access to all virtual consoles on the workstation, execute the following:
vlock -avlock locks the currently active console and the -a option prevents switching to other virtual consoles.
vlock(1) man page for additional information.
4.1.4. Enforcing Read-Only Mounting of Removable Media
udev rule to detect removable media and configure them to be mounted read-only using the blockdev utility. This is sufficient for enforcing read-only mounting of physical media.
Using blockdev to Force Read-Only Mounting of Removable Media
udev configuration file named, for example, 80-readonly-removables.rules in the /etc/udev/rules.d/ directory with the following content:
SUBSYSTEM=="block",ATTRS{removable}=="1",RUN{program}="/sbin/blockdev --setro %N"udev rule ensures that any newly connected removable block (storage) device is automatically configured as read-only using the blockdev utility.
Applying New udev Settings
udev rules need to be applied. The udev service automatically detects changes to its configuration files, but new settings are not applied to already existing devices. Only newly connected devices are affected by the new settings. Therefore, you need to unmount and unplug all connected removable media to ensure that the new settings are applied to them when they are next plugged in.
udev to re-apply all rules to already existing devices, enter the following command as root:
~# udevadm triggerudev to re-apply all rules using the above command does not affect any storage devices that are already mounted.
udev to reload all rules (in case the new rules are not automatically detected for some reason), use the following command:
~# udevadm control --reload4.2. Controlling Root Access
root user or by acquiring effective root privileges using a setuid program, such as sudo or su. A setuid program is one that operates with the user ID (UID) of the program's owner rather than the user operating the program. Such programs are denoted by an s in the owner section of a long format listing, as in the following example:
~]$ ls -l /bin/su
-rwsr-xr-x. 1 root root 34904 Mar 10  2011 /bin/su
Note
s may be upper case or lower case. If it appears as upper case, it means that the underlying permission bit has not been set.
pam_console.so, some activities normally reserved only for the root user, such as rebooting and mounting removable media, are allowed for the first user that logs in at the physical console. However, other important system administration tasks, such as altering network settings, configuring a new mouse, or mounting network devices, are not possible without administrative privileges. As a result, system administrators must decide how much access the users on their network should receive.
4.2.1. Disallowing Root Access
root for these or other reasons, the root password should be kept secret, and access to runlevel one or single user mode should be disallowed through boot loader password protection (see Section 4.2.5, “Securing the Boot Loader” for more information on this topic.)
root logins are disallowed:
- Changing the root shell
- To prevent users from logging in directly as
root, the system administrator can set therootaccount's shell to/sbin/nologinin the/etc/passwdfile.Expand Table 4.2. Disabling the Root Shell Effects Does Not Affect Prevents access to arootshell and logs any such attempts. The following programs are prevented from accessing therootaccount:logingdmkdmxdmsusshscpsftp
Programs that do not require a shell, such as FTP clients, mail clients, and many setuid programs. The following programs are not prevented from accessing therootaccount:sudo- FTP clients
- Email clients
- Disabling root access using any console device (tty)
- To further limit access to the
rootaccount, administrators can disablerootlogins at the console by editing the/etc/securettyfile. This file lists all devices therootuser is allowed to log into. If the file does not exist at all, therootuser can log in through any communication device on the system, whether through the console or a raw network interface. This is dangerous, because a user can log in to their machine asrootusing Telnet, which transmits the password in plain text over the network.By default, Red Hat Enterprise Linux 7's/etc/securettyfile only allows therootuser to log in at the console physically attached to the machine. To prevent therootuser from logging in, remove the contents of this file by typing the following command at a shell prompt asroot:echo > /etc/securettyTo enablesecurettysupport in the KDM, GDM, and XDM login managers, add the following line:auth [user_unknown=ignore success=ok ignore=ignore default=bad] pam_securetty.soto the files listed below:/etc/pam.d/gdm/etc/pam.d/gdm-autologin/etc/pam.d/gdm-fingerprint/etc/pam.d/gdm-password/etc/pam.d/gdm-smartcard/etc/pam.d/kdm/etc/pam.d/kdm-np/etc/pam.d/xdm
Warning
A blank/etc/securettyfile does not prevent therootuser from logging in remotely using the OpenSSH suite of tools because the console is not opened until after authentication.Expand Table 4.3. Disabling Root Logins Effects Does Not Affect Prevents access to therootaccount using the console or the network. The following programs are prevented from accessing therootaccount:logingdmkdmxdm- Other network services that open a tty
Programs that do not log in asroot, but perform administrative tasks through setuid or other mechanisms. The following programs are not prevented from accessing therootaccount:susudosshscpsftp
- Disabling root SSH logins
- To prevent
rootlogins through the SSH protocol, edit the SSH daemon's configuration file,/etc/ssh/sshd_config, and change the line that reads:#PermitRootLogin yesto read as follows:PermitRootLogin noExpand Table 4.4. Disabling Root SSH Logins Effects Does Not Affect Preventsrootaccess using the OpenSSH suite of tools. The following programs are prevented from accessing therootaccount:sshscpsftp
Programs that are not part of the OpenSSH suite of tools. - Using PAM to limit root access to services
- PAM, through the
/lib/security/pam_listfile.somodule, allows great flexibility in denying specific accounts. The administrator can use this module to reference a list of users who are not allowed to log in. To limitrootaccess to a system service, edit the file for the target service in the/etc/pam.d/directory and make sure thepam_listfile.somodule is required for authentication.The following is an example of how the module is used for thevsftpdFTP server in the/etc/pam.d/vsftpdPAM configuration file (the\character at the end of the first line is not necessary if the directive is on a single line):auth required /lib/security/pam_listfile.so item=user \ sense=deny file=/etc/vsftpd.ftpusers onerr=succeedThis instructs PAM to consult the/etc/vsftpd.ftpusersfile and deny access to the service for any listed user. The administrator can change the name of this file, and can keep separate lists for each service or use one central list to deny access to multiple services.If the administrator wants to deny access to multiple services, a similar line can be added to the PAM configuration files, such as/etc/pam.d/popand/etc/pam.d/imapfor mail clients, or/etc/pam.d/sshfor SSH clients.For more information about PAM, see The Linux-PAM System Administrator's Guide, located in the/usr/share/doc/pam-<version>/html/directory.Expand Table 4.5. Disabling Root Using PAM Effects Does Not Affect Preventsrootaccess to network services that are PAM aware. The following services are prevented from accessing therootaccount:logingdmkdmxdmsshscpsftp- FTP clients
- Email clients
- Any PAM aware services
Programs and services that are not PAM aware.
4.2.2. Allowing Root Access
root access may not be an issue. Allowing root access by users means that minor activities, like adding devices or configuring network interfaces, can be handled by the individual users, leaving system administrators free to deal with network security and other important issues.
root access to individual users can lead to the following issues:
- Machine Misconfiguration — Users with
rootaccess can misconfigure their machines and require assistance to resolve issues. Even worse, they might open up security holes without knowing it. - Running Insecure Services — Users with
rootaccess might run insecure servers on their machine, such as FTP or Telnet, potentially putting usernames and passwords at risk. These services transmit this information over the network in plain text. - Running Email Attachments As Root — Although rare, email viruses that affect Linux do exist. A malicious program poses the greatest threat when run by the
rootuser. - Keeping the audit trail intact — Because the
rootaccount is often shared by multiple users, so that multiple system administrators can maintain the system, it is impossible to figure out which of those users wasrootat a given time. When using separate logins, the account a user logs in with, as well as a unique number for session tracking purposes, is put into the task structure, which is inherited by every process that the user starts. When using concurrent logins, the unique number can be used to trace actions to specific logins. When an action generates an audit event, it is recorded with the login account and the session associated with that unique number. Use theaulastcommand to view these logins and sessions. The--proofoption of theaulastcommand can be used suggest a specificausearchquery to isolate auditable events generated by a particular session. For more information about the Audit system, see Chapter 7, System Auditing.
4.2.3. Limiting Root Access
root user, the administrator may want to allow access only through setuid programs, such as su or sudo. For more information on su and sudo, see the Gaining Privileges chapter in Red Hat Enterprise Linux 7 System Administrator's Guide, and the su(1) and sudo(8) man pages.
4.2.4. Enabling Automatic Logouts
root, an unattended login session may pose a significant security risk. To reduce this risk, you can configure the system to automatically log out idle users after a fixed period of time.
- As
root, add the following line at the beginning of the/etc/profilefile to make sure the processing of this file cannot be interrupted:trap "" 1 2 3 15 - As
root, insert the following lines to the/etc/profilefile to automatically log out after 120 seconds:export TMOUT=120 readonly TMOUTTheTMOUTvariable terminates the shell if there is no activity for the specified number of seconds (set to120in the above example). You can change the limit according to the needs of the particular installation.
4.2.5. Securing the Boot Loader
- Preventing Access to Single User Mode — If attackers can boot the system into single user mode, they are logged in automatically as
rootwithout being prompted for therootpassword.Warning
Protecting access to single user mode with a password by editing theSINGLEparameter in the/etc/sysconfig/initfile is not recommended. An attacker can bypass the password by specifying a custom initial command (using theinit=parameter) on the kernel command line in GRUB 2. It is recommended to password-protect the GRUB 2 boot loader, as described in the Protecting GRUB 2 with a Password chapter in Red Hat Enterprise Linux 7 System Administrator's Guide. - Preventing Access to the GRUB 2 Console — If the machine uses GRUB 2 as its boot loader, an attacker can use the GRUB 2 editor interface to change its configuration or to gather information using the
catcommand. - Preventing Access to Insecure Operating Systems — If it is a dual-boot system, an attacker can select an operating system at boot time, for example DOS, which ignores access controls and file permissions.
4.2.5.1. Disabling Interactive Startup
root, disable the PROMPT parameter in the /etc/sysconfig/init file:
PROMPT=no4.2.6. Protecting Hard and Symbolic Links
- The user owns the file to which they link.
- The user already has read and write access to the file to which they link.
- The process following the symbolic link is the owner of the symbolic link.
- The owner of the directory is the same as the owner of the symbolic link.
/usr/lib/sysctl.d/50-default.conf file:
fs.protected_hardlinks = 1
fs.protected_symlinks = 151-no-protect-links.conf in the /etc/sysctl.d/ directory with the following content:
fs.protected_hardlinks = 0
fs.protected_symlinks = 0
Note
.conf extension, and it needs to be read after the default system file (the files are read in lexicographic order, therefore settings contained in a file with a higher number at the beginning of the file name take precedence).
sysctl mechanism.
4.3. Securing Services
4.3.1. Risks To Services
- Denial of Service Attacks (DoS) — By flooding a service with requests, a denial of service attack can render a system unusable as it tries to log and answer each request.
- Distributed Denial of Service Attack (DDoS) — A type of DoS attack which uses multiple compromised machines (often numbering in the thousands or more) to direct a coordinated attack on a service, flooding it with requests and making it unusable.
- Script Vulnerability Attacks — If a server is using scripts to execute server-side actions, as Web servers commonly do, an attacker can target improperly written scripts. These script vulnerability attacks can lead to a buffer overflow condition or allow the attacker to alter files on the system.
- Buffer Overflow Attacks — Services that want to listen on ports 1 through 1023 must start either with administrative privileges or the
CAP_NET_BIND_SERVICEcapability needs to be set for them. Once a process is bound to a port and is listening on it, the privileges or the capability are often dropped. If the privileges or the capability are not dropped, and the application has an exploitable buffer overflow, an attacker could gain access to the system as the user running the daemon. Because exploitable buffer overflows exist, crackers use automated tools to identify systems with vulnerabilities, and once they have gained access, they use automated rootkits to maintain their access to the system.
Note
Important
4.3.2. Identifying and Configuring Services
cups— The default print server for Red Hat Enterprise Linux 7.cups-lpd— An alternative print server.xinetd— A super server that controls connections to a range of subordinate servers, such asgssftpandtelnet.sshd— The OpenSSH server, which is a secure replacement for Telnet.
cups running. The same is true for portreserve. If you do not mount NFSv3 volumes or use NIS (the ypbind service), then rpcbind should be disabled. Checking which network services are available to start at boot time is not sufficient. It is recommended to also check which ports are open and listening. Refer to Section 4.4.2, “Verifying Which Ports Are Listening” for more information.
4.3.3. Insecure Services
- Transmit Usernames and Passwords Over a Network Unencrypted — Many older protocols, such as Telnet and FTP, do not encrypt the authentication session and should be avoided whenever possible.
- Transmit Sensitive Data Over a Network Unencrypted — Many protocols transmit data over the network unencrypted. These protocols include Telnet, FTP, HTTP, and SMTP. Many network file systems, such as NFS and SMB, also transmit information over the network unencrypted. It is the user's responsibility when using these protocols to limit what type of data is transmitted.
rlogin, rsh, telnet, and vsftpd.
rlogin, rsh, and telnet) should be avoided in favor of SSH. See Section 4.3.11, “Securing SSH” for more information about sshd.
FTP is not as inherently dangerous to the security of the system as remote shells, but FTP servers must be carefully configured and monitored to avoid problems. See Section 4.3.9, “Securing FTP” for more information about securing FTP servers.
authnfs-serversmbandnbm(Samba)yppasswddypservypxfrd
4.3.4. Securing rpcbind
rpcbind service is a dynamic port assignment daemon for RPC services such as NIS and NFS. It has weak authentication mechanisms and has the ability to assign a wide range of ports for the services it controls. For these reasons, it is difficult to secure.
Note
rpcbind only affects NFSv2 and NFSv3 implementations, since NFSv4 no longer requires it. If you plan to implement an NFSv2 or NFSv3 server, then rpcbind is required, and the following section applies.
4.3.4.1. Protect rpcbind With TCP Wrappers
rpcbind service since it has no built-in form of authentication.
4.3.4.2. Protect rpcbind With firewalld
rpcbind service, it is a good idea to add firewalld rules to the server and restrict access to specific networks.
firewalld rich language commands. The first allows TCP connections to the port 111 (used by the rpcbind service) from the 192.168.0.0/24 network. The second allows TCP connections to the same port from the localhost. All other packets are dropped.
~]# firewall-cmd --add-rich-rule='rule family="ipv4" port port="111" protocol="tcp" source address="192.168.0.0/24" invert="True" drop'
~]# firewall-cmd --add-rich-rule='rule family="ipv4" port port="111" protocol="tcp" source address="127.0.0.1" accept'~]# firewall-cmd --add-rich-rule='rule family="ipv4" port port="111" protocol="udp" source address="192.168.0.0/24" invert="True" drop'Note
--permanent to the firewalld rich language commands to make the settings permanent. See Chapter 5, Using Firewalls for more information about implementing firewalls.
4.3.5. Securing rpc.mountd
rpc.mountd daemon implements the server side of the NFS MOUNT protocol, a protocol used by NFS version 2 (RFC 1904) and NFS version 3 (RFC 1813).
4.3.5.1. Protect rpc.mountd With TCP Wrappers
rpc.mountd service since it has no built-in form of authentication.
IP addresses when limiting access to the service. Avoid using host names, as they can be forged by DNS poisoning and other methods.
4.3.5.2. Protect rpc.mountd With firewalld
rpc.mountd service, add firewalld rich language rules to the server and restrict access to specific networks.
firewalld rich language commands. The first allows mountd connections from the 192.168.0.0/24 network. The second allows mountd connections from the local host. All other packets are dropped.
~]# firewall-cmd --add-rich-rule 'rule family="ipv4" source NOT address="192.168.0.0/24" service name="mountd" drop'
~]# firewall-cmd --add-rich-rule 'rule family="ipv4" source address="127.0.0.1" service name="mountd" accept'
Note
--permanent to the firewalld rich language commands to make the settings permanent. See Chapter 5, Using Firewalls for more information about implementing firewalls.
4.3.6. Securing NIS
ypserv, which is used in conjunction with rpcbind and other related services to distribute maps of user names, passwords, and other sensitive information to any computer claiming to be within its domain.
/usr/sbin/rpc.yppasswdd— Also called theyppasswddservice, this daemon allows users to change their NIS passwords./usr/sbin/rpc.ypxfrd— Also called theypxfrdservice, this daemon is responsible for NIS map transfers over the network./usr/sbin/ypserv— This is the NIS server daemon.
rpcbind service as outlined in Section 4.3.4, “Securing rpcbind”, then address the following issues, such as network planning.
4.3.6.1. Carefully Plan the Network
4.3.6.2. Use a Password-like NIS Domain Name and Hostname
/etc/passwd map:
ypcat -d <NIS_domain> -h <DNS_hostname> passwd/etc/shadow file by typing the following command:
ypcat -d <NIS_domain> -h <DNS_hostname> shadowNote
/etc/shadow file is not stored within a NIS map.
o7hfawtgmhwg.domain.com. Similarly, create a different randomized NIS domain name. This makes it much more difficult for an attacker to access the NIS server.
4.3.6.3. Edit the /var/yp/securenets File
/var/yp/securenets file is blank or does not exist (as is the case after a default installation), NIS listens to all networks. One of the first things to do is to put netmask/network pairs in the file so that ypserv only responds to requests from the appropriate network.
/var/yp/securenets file:
255.255.255.0 192.168.0.0Warning
/var/yp/securenets file.
4.3.6.4. Assign Static Ports and Use Rich Language Rules
rpc.yppasswdd — the daemon that allows users to change their login passwords. Assigning ports to the other two NIS server daemons, rpc.ypxfrd and ypserv, allows for the creation of firewall rules to further protect the NIS server daemons from intruders.
/etc/sysconfig/network:
YPSERV_ARGS="-p 834"
YPXFRD_ARGS="-p 835"firewalld rules can then be used to enforce which network the server listens to for these ports:
~]# firewall-cmd --add-rich-rule='rule family="ipv4" source address="192.168.0.0/24" invert="True" port port="834-835" protocol="tcp" drop'
~]# firewall-cmd --add-rich-rule='rule family="ipv4" source address="192.168.0.0/24" invert="True" port port="834-835" protocol="udp" drop'192.168.0.0/24 network. The first rule is for TCP and the second for UDP.
Note
4.3.6.5. Use Kerberos Authentication
/etc/shadow map is sent over the network. If an intruder gains access to a NIS domain and sniffs network traffic, they can collect user names and password hashes. With enough time, a password cracking program can guess weak passwords, and an attacker can gain access to a valid account on the network.
4.3.7. Securing NFS
Important
RPCSEC_GSS kernel module. Information on rpcbind is still included, since Red Hat Enterprise Linux 7 supports NFSv3 which utilizes rpcbind.
4.3.7.1. Carefully Plan the Network
4.3.7.2. Securing NFS Mount Options
mount command in the /etc/fstab file is explained in the Using the mount Command chapter of the Red Hat Enterprise Linux 7 Storage Administration Guide. From a security administration point of view it is worthwhile to note that the NFS mount options can also be specified in /etc/nfsmount.conf, which can be used to set custom default options.
4.3.7.2.1. Review the NFS Server
Warning
exports(5) man page.
ro option to export the file system as read-only whenever possible to reduce the number of users able to write to the mounted file system. Only use the rw option when specifically required. See the man exports(5) page for more information. Allowing write access increases the risk from symlink attacks for example. This includes temporary directories such as /tmp and /usr/tmp.
rw option avoid making them world-writable whenever possible to reduce risk. Exporting home directories is also viewed as a risk as some applications store passwords in clear text or weakly encrypted. This risk is being reduced as application code is reviewed and improved. Some users do not set passwords on their SSH keys so this too means home directories present a risk. Enforcing the use of passwords or using Kerberos would mitigate that risk.
showmount -e command on an NFS server to review what the server is exporting. Do not export anything that is not specifically required.
no_root_squash option and review existing installations to make sure it is not used. See Section 4.3.7.4, “Do Not Use the no_root_squash Option” for more information.
secure option is the server-side export option used to restrict exports to “reserved” ports. By default, the server allows client communication only from “reserved” ports (ports numbered less than 1024), because traditionally clients have only allowed “trusted” code (such as in-kernel NFS clients) to use those ports. However, on many networks it is not difficult for anyone to become root on some client, so it is rarely safe for the server to assume that communication from a reserved port is privileged. Therefore the restriction to reserved ports is of limited value; it is better to rely on Kerberos, firewalls, and restriction of exports to particular clients.
4.3.7.2.2. Review the NFS Client
nosuid option to disallow the use of a setuid program. The nosuid option disables the set-user-identifier or set-group-identifier bits. This prevents remote users from gaining higher privileges by running a setuid program. Use this option on the client and the server side.
noexec option disables all executable files on the client. Use this to prevent users from inadvertently executing files placed in the file system being shared. The nosuid and noexec options are standard options for most, if not all, file systems.
nodev option to prevent “device-files” from being processed as a hardware device by the client.
resvport option is a client-side mount option and secure is the corresponding server-side export option (see explanation above). It restricts communication to a "reserved port". The reserved or "well known" ports are reserved for privileged users and processes such as the root user. Setting this option causes the client to use a reserved source port to communicate with the server.
sec=krb5.
krb5i for integrity and krb5p for privacy protection. These are used when mounting with sec=krb5, but need to be configured on the NFS server. See the man page on exports (man 5 exports) for more information.
man 5 nfs) has a “SECURITY CONSIDERATIONS” section which explains the security enhancements in NFSv4 and contains all the NFS specific mount options.
Important
4.3.7.3. Beware of Syntax Errors
/etc/exports file. Be careful not to add extraneous spaces when editing this file.
/etc/exports file shares the directory /tmp/nfs/ to the host bob.example.com with read/write permissions.
/tmp/nfs/ bob.example.com(rw)/etc/exports file, on the other hand, shares the same directory to the host bob.example.com with read-only permissions and shares it to the world with read/write permissions due to a single space character after the host name.
/tmp/nfs/ bob.example.com (rw)showmount command to verify what is being shared:
showmount -e <hostname>4.3.7.4. Do Not Use the no_root_squash Option
nfsnobody user, an unprivileged user account. This changes the owner of all root-created files to nfsnobody, which prevents uploading of programs with the setuid bit set.
no_root_squash is used, remote root users are able to change any file on the shared file system and leave applications infected by Trojans for other users to inadvertently execute.
4.3.7.5. NFS Firewall Configuration
Configuring Ports for NFSv3
rpcbind service, which might cause problems when creating firewall rules. To simplify this process, use the /etc/sysconfig/nfs file to specify which ports are to be used:
MOUNTD_PORT— TCP and UDP port for mountd (rpc.mountd)STATD_PORT— TCP and UDP port for status (rpc.statd)
/etc/modprobe.d/lockd.conf file:
nlm_tcpport— TCP port for nlockmgr (rpc.lockd)nlm_udpport— UDP port nlockmgr (rpc.lockd)
/etc/modprobe.d/lockd.conf for descriptions of additional customizable NFS lock manager parameters.
rpcinfo -p command on the NFS server to see which ports and RPC programs are being used.
4.3.7.6. Securing NFS with Red Hat Identity Management
4.3.8. Securing HTTP Servers
4.3.8.1. Securing the Apache HTTP Server
chown root <directory_name>chmod 755 <directory_name>/etc/httpd/conf/httpd.conf):
FollowSymLinks- This directive is enabled by default, so be sure to use caution when creating symbolic links to the document root of the Web server. For instance, it is a bad idea to provide a symbolic link to
/. Indexes- This directive is enabled by default, but may not be desirable. To prevent visitors from browsing files on the server, remove this directive.
UserDir- The
UserDirdirective is disabled by default because it can confirm the presence of a user account on the system. To enable user directory browsing on the server, use the following directives:UserDir enabled UserDir disabled rootThese directives activate user directory browsing for all user directories other than/root/. To add users to the list of disabled accounts, add a space-delimited list of users on theUserDir disabledline. ServerTokens- The
ServerTokensdirective controls the server response header field which is sent back to clients. It includes various information which can be customized using the following parameters:ServerTokens Full(default option) — provides all available information (OS type and used modules), for example:Apache/2.0.41 (Unix) PHP/4.2.2 MyMod/1.2ServerTokens ProdorServerTokens ProductOnly— provides the following information:ApacheServerTokens Major— provides the following information:Apache/2ServerTokens Minor— provides the following information:Apache/2.0ServerTokens MinorServerTokens Minimal— provides the following information:Apache/2.0.41ServerTokens OS— provides the following information:Apache/2.0.41 (Unix)
It is recommended to use theServerTokens Prodoption so that a possible attacker does not gain any valuable information about your system.
Important
IncludesNoExec directive. By default, the Server-Side Includes (SSI) module cannot execute commands. It is recommended that you do not change this setting unless absolutely necessary, as it could, potentially, enable an attacker to execute commands on the system.
Removing httpd Modules
httpd modules to limit the functionality of the HTTP Server. To do so, edit configuration files in the /etc/httpd/conf.modules.d directory. For example, to remove the proxy module:
echo '# All proxy modules disabled' > /etc/httpd/conf.modules.d/00-proxy.conf/etc/httpd/conf.d/ directory contains configuration files which are used to load modules as well.
httpd and SELinux
4.3.8.2. Securing NGINX
server section of your NGINX configuration files.
Disabling Version Strings
server_tokens off;nginx in all requests served by NGINX:
$ curl -sI http://localhost | grep Server
Server: nginx
Including Additional Security-related Headers
add_header X-Frame-Options SAMEORIGIN;— this option denies any page outside of your domain to frame any content served by NGINX, effectively mitigating clickjacking attacks.add_header X-Content-Type-Options nosniff;— this option prevents MIME-type sniffing in certain older browsers.add_header X-XSS-Protection "1; mode=block";— this option enables the Cross-Site Scripting (XSS) filtering, which prevents a browser from rendering potentially malicious content included in a response by NGINX.
Disabling Potentially Harmful HTTP Methods
# Allow GET, PUT, POST; return "405 Method Not Allowed" for all others.
if ( $request_method !~ ^(GET|PUT|POST)$ ) {
    return 405;
}
Configuring SSL
4.3.9. Securing FTP
- Red Hat Content Accelerator (
tux) — A kernel-space Web server with FTP capabilities. vsftpd— A standalone, security oriented implementation of the FTP service.
vsftpd FTP service.
4.3.9.1. FTP Greeting Banner
vsftpd, add the following directive to the /etc/vsftpd/vsftpd.conf file:
ftpd_banner=<insert_greeting_here>/etc/banners/. The banner file for FTP connections in this example is /etc/banners/ftp.msg. Below is an example of what such a file may look like:
######### Hello, all activity on ftp.example.com is logged. #########Note
220 as specified in Section 4.4.1, “Securing Services With TCP Wrappers and xinetd”.
vsftpd, add the following directive to the /etc/vsftpd/vsftpd.conf file:
banner_file=/etc/banners/ftp.msg4.3.9.2. Anonymous Access
/var/ftp/ directory activates the anonymous account.
vsftpd package. This package establishes a directory tree for anonymous users and configures the permissions on directories to read-only for anonymous users.
Warning
4.3.9.2.1. Anonymous Upload
/var/ftp/pub/. To do this, enter the following command as root:
~]# mkdir /var/ftp/pub/upload~]# chmod 730 /var/ftp/pub/upload~]# ls -ld /var/ftp/pub/upload
drwx-wx---. 2 root ftp 4096 Nov 14 22:57 /var/ftp/pub/uploadvsftpd, add the following line to the /etc/vsftpd/vsftpd.conf file:
anon_upload_enable=YES4.3.9.3. User Accounts
vsftpd, add the following directive to /etc/vsftpd/vsftpd.conf:
local_enable=NO4.3.9.3.1. Restricting User Accounts
sudo privileges, the easiest way is to use a PAM list file as described in Section 4.2.1, “Disallowing Root Access”. The PAM configuration file for vsftpd is /etc/pam.d/vsftpd.
vsftpd, add the user name to /etc/vsftpd/ftpusers
4.3.9.4. Use TCP Wrappers To Control Access
4.3.10. Securing Postfix
4.3.10.1. Limiting a Denial of Service Attack
/etc/postfix/main.cf file. You can change the value of the directives which are already there or you can add the directives you need with the value you want in the following format:
<directive> = <value>smtpd_client_connection_rate_limit— The maximum number of connection attempts any client is allowed to make to this service per time unit (described below). The default value is 0, which means a client can make as many connections per time unit as Postfix can accept. By default, clients in trusted networks are excluded.anvil_rate_time_unit— This time unit is used for rate limit calculations. The default value is 60 seconds.smtpd_client_event_limit_exceptions— Clients that are excluded from the connection and rate limit commands. By default, clients in trusted networks are excluded.smtpd_client_message_rate_limit— The maximum number of message deliveries a client is allowed to request per time unit (regardless of whether or not Postfix actually accepts those messages).default_process_limit— The default maximum number of Postfix child processes that provide a given service. This limit can be overruled for specific services in themaster.cffile. By default the value is 100.queue_minfree— The minimum amount of free space in bytes in the queue file system that is needed to receive mail. This is currently used by the Postfix SMTP server to decide if it will accept any mail at all. By default, the Postfix SMTP server rejectsMAIL FROMcommands when the amount of free space is less than 1.5 times the message_size_limit. To specify a higher minimum free space limit, specify a queue_minfree value that is at least 1.5 times the message_size_limit. By default the queue_minfree value is 0.header_size_limit— The maximum amount of memory in bytes for storing a message header. If a header is larger, the excess is discarded. By default the value is 102400.message_size_limit— The maximum size in bytes of a message, including envelope information. By default the value is 10240000.
4.3.10.2. NFS and Postfix
/var/spool/postfix/, on an NFS shared volume. Because NFSv2 and NFSv3 do not maintain control over user and group IDs, two or more users can have the same UID, and receive and read each other's mail.
Note
SECRPC_GSS kernel module does not utilize UID-based authentication. However, it is still considered good practice not to put the mail spool directory on NFS shared volumes.
4.3.10.3. Mail-only Users
/etc/passwd file should be set to /sbin/nologin (with the possible exception of the root user).
4.3.10.4. Disable Postfix Network Listening
/etc/postfix/main.cf.
/etc/postfix/main.cf to ensure that only the following inet_interfaces line appears:
inet_interfaces = localhostinet_interfaces = all setting can be used.
4.3.10.5. Configuring Postfix to Use SASL
SASL implementations for SMTP Authentication (or SMTP AUTH). SMTP Authentication is an extension of the Simple Mail Transfer Protocol. When enabled, SMTP clients are required to authenticate to the SMTP server using an authentication method supported and accepted by both the server and the client. This section describes how to configure Postfix to make use of the Dovecot SASL implementation.
POP/IMAP server, and thus make the Dovecot SASL implementation available on your system, issue the following command as the root user:
~]# yum install dovecotSMTP server can communicate with the Dovecot SASL implementation using either a UNIX-domain socket or a TCP socket. The latter method is only needed in case the Postfix and Dovecot applications are running on separate machines. This guide gives preference to the UNIX-domain socket method, which affords better privacy.
SASL implementation, a number of configuration changes need to be performed for both applications. Follow the procedures below to effect these changes.
Setting Up Dovecot
- Modify the main Dovecot configuration file,
/etc/dovecot/conf.d/10-master.conf, to include the following lines (the default configuration file already includes most of the relevant section, and the lines just need to be uncommented):service auth { unix_listener /var/spool/postfix/private/auth { mode = 0660 user = postfix group = postfix } }The above example assumes the use of UNIX-domain sockets for communication between Postfix and Dovecot. It also assumes default settings of the PostfixSMTPserver, which include the mail queue located in the/var/spool/postfix/directory, and the application running under thepostfixuser and group. In this way, read and write permissions are limited to thepostfixuser and group.Alternatively, you can use the following configuration to set up Dovecot to listen for Postfix authentication requests throughTCP:service auth { inet_listener { port = 12345 } }In the above example, replace12345with the number of the port you want to use. - Edit the
/etc/dovecot/conf.d/10-auth.confconfiguration file to instruct Dovecot to provide the PostfixSMTPserver with theplainandloginauthentication mechanisms:auth_mechanisms = plain login
Setting Up Postfix
/etc/postfix/main.cf, needs to be modified. Add or edit the following configuration directives:
- Enable SMTP Authentication in the Postfix
SMTPserver:smtpd_sasl_auth_enable = yes - Instruct Postfix to use the Dovecot
SASLimplementation for SMTP Authentication:smtpd_sasl_type = dovecot - Provide the authentication path relative to the Postfix queue directory (note that the use of a relative path ensures that the configuration works regardless of whether the Postfix server runs in a chroot or not):
smtpd_sasl_path = private/authThis step assumes that you want to use UNIX-domain sockets for communication between Postfix and Dovecot. To configure Postfix to look for Dovecot on a different machine in case you useTCPsockets for communication, use configuration values similar to the following:smtpd_sasl_path = inet:127.0.0.1:12345In the above example,127.0.0.1needs to be substituted by theIPaddress of the Dovecot machine and12345by the port specified in Dovecot's/etc/dovecot/conf.d/10-master.confconfiguration file. - Specify
SASLmechanisms that the PostfixSMTPserver makes available to clients. Note that different mechanisms can be specified for encrypted and unencrypted sessions.smtpd_sasl_security_options = noanonymous, noplaintext smtpd_sasl_tls_security_options = noanonymousThe above example specifies that during unencrypted sessions, no anonymous authentication is allowed and no mechanisms that transmit unencrypted user names or passwords are allowed. For encrypted sessions (usingTLS), only non-anonymous authentication mechanisms are allowed.See http://www.postfix.org/SASL_README.html#smtpd_sasl_security_options for a list of all supported policies for limiting allowedSASLmechanisms.
Additional Resources
SASL.
- http://wiki2.dovecot.org/HowTo/PostfixAndDovecotSASL — Contains information on how to set up Postfix to use the Dovecot
SASLimplementation for SMTP Authentication. - http://www.postfix.org/SASL_README.html#server_sasl — Contains information on how to set up Postfix to use either the Dovecot or Cyrus
SASLimplementations for SMTP Authentication.
4.3.11. Securing SSH
SSH are encrypted and protected from interception. See the OpenSSH chapter of the Red Hat Enterprise Linux 7 System Administrator's Guide for general information about the SSH protocol and about using the SSH service in Red Hat Enterprise Linux 7.
Important
SSH setup. By no means should this list of suggested measures be considered exhaustive or definitive. See sshd_config(5) for a description of all configuration directives available for modifying the behavior of the sshd daemon and to ssh(1) for an explanation of basic SSH concepts.
4.3.11.1. Cryptographic Login
SSH supports the use of cryptographic keys for logging in to computers. This is much more secure than using only a password. If you combine this method with other authentication methods, it can be considered a multi-factor authentication. See Section 4.3.11.2, “Multiple Authentication Methods” for more information about using multiple authentication methods.
PubkeyAuthentication configuration directive in the /etc/ssh/sshd_config file needs to be set to yes. Note that this is the default setting. Set the PasswordAuthentication directive to no to disable the possibility of using passwords for logging in.
SSH keys can be generated using the ssh-keygen command. If invoked without additional arguments, it creates a 2048-bit RSA key set. The keys are stored, by default, in the ~/.ssh/ directory. You can utilize the -b switch to modify the bit-strength of the key. Using 2048-bit keys is normally sufficient. The Configuring OpenSSH chapter in the Red Hat Enterprise Linux 7 System Administrator's Guide includes detailed information about generating key pairs.
~/.ssh/ directory. If you accepted the defaults when running the ssh-keygen command, then the generated files are named id_rsa and id_rsa.pub and contain the private and public key respectively. You should always protect the private key from exposure by making it unreadable by anyone else but the file's owner. The public key, however, needs to be transferred to the system you are going to log in to. You can use the ssh-copy-id command to transfer the key to the server:
~]$ ssh-copy-id -i [user@]server~/.ssh/authorized_keys file on the server. The sshd daemon will check this file when you attempt to log in to the server.
SSH keys regularly. When you do, make sure you remove any unused keys from the authorized_keys file.
4.3.11.2. Multiple Authentication Methods
AuthenticationMethods configuration directive in the /etc/ssh/sshd_config file to specify which authentication methods are to be utilized. Note that it is possible to define more than one list of required authentication methods using this directive. If that is the case, the user must complete every method in at least one of the lists. The lists need to be separated by blank spaces, and the individual authentication-method names within the lists must be comma-separated. For example:
AuthenticationMethods publickey,gssapi-with-mic publickey,keyboard-interactivesshd daemon configured using the above AuthenticationMethods directive only grants access if the user attempting to log in successfully completes either publickey authentication followed by gssapi-with-mic or by keyboard-interactive authentication. Note that each of the requested authentication methods needs to be explicitly enabled using a corresponding configuration directive (such as PubkeyAuthentication) in the /etc/ssh/sshd_config file. See the AUTHENTICATION section of ssh(1) for a general list of available authentication methods.
4.3.11.3. Other Ways of Securing SSH
Protocol Version
SSH protocol supplied with Red Hat Enterprise Linux 7 still supports both the SSH-1 and SSH-2 versions of the protocol for SSH clients, only the latter should be used whenever possible. The SSH-2 version contains a number of improvements over the older SSH-1, and the majority of advanced configuration options is only available when using SSH-2.
SSH protocol protects the authentication and communication for which it is used. The version or versions of the protocol supported by the sshd daemon can be specified using the Protocol configuration directive in the /etc/ssh/sshd_config file. The default setting is 2. Note that the SSH-2 version is the only version supported by the Red Hat Enterprise Linux 7 SSH server.
Key Types
ssh-keygen command generates a pair of SSH-2 RSA keys by default, using the -t option, it can be instructed to generate DSA or ECDSA keys as well. The ECDSA (Elliptic Curve Digital Signature Algorithm) offers better performance at the same equivalent symmetric key length. It also generates shorter keys.
Non-Default Port
sshd daemon listens on TCP port 22. Changing the port reduces the exposure of the system to attacks based on automated network scanning, thus increasing security through obscurity. The port can be specified using the Port directive in the /etc/ssh/sshd_config configuration file. Note also that the default SELinux policy must be changed to allow for the use of a non-default port. You can do this by modifying the ssh_port_t SELinux type by typing the following command as root:
~]# semanage -a -t ssh_port_t -p tcp port_numberPort directive.
No Root Login
root user, you should consider setting the PermitRootLogin configuration directive to no in the /etc/ssh/sshd_config file. By disabling the possibility of logging in as the root user, the administrator can audit which user runs what privileged command after they log in as regular users and then gain root rights.
Using the X Security extension
ForwardX11Trusted option in the /etc/ssh/ssh_config file is set to yes, and there is no difference between the ssh -X remote_machine (untrusted host) and ssh -Y remote_machine (trusted host) command.
Warning
4.3.12. Securing PostgreSQL
postgresql-server package provides PostgreSQL. If it is not installed, enter the following command as the root user to install it:
~]# yum install postgresql-server-D option. For example:
~]$ initdb -D /home/postgresql/db1initdb command will attempt to create the directory you specify if it does not already exist. We use the name /home/postgresql/db1 in this example. The /home/postgresql/db1 directory contains all the data stored in the database and also the client authentication configuration file:
~]$ cat pg_hba.conf
# PostgreSQL Client Authentication Configuration File
# This file controls: which hosts are allowed to connect, how clients
# are authenticated, which PostgreSQL user names they can use, which
# databases they can access.  Records take one of these forms:
#
# local      DATABASE  USER  METHOD  [OPTIONS]
# host       DATABASE  USER  ADDRESS  METHOD  [OPTIONS]
# hostssl    DATABASE  USER  ADDRESS  METHOD  [OPTIONS]
# hostnossl DATABASE USER ADDRESS METHOD [OPTIONS]pg_hba.conf file allows any authenticated local users to access any databases with their user names:
local all all trustpg_hba.conf file.
4.3.13. Securing Docker
4.3.14. Securing memcached against DDoS Attacks
memcached Vulnerabilities
Hardening memcached
- Configure a firewall in your LAN. If your memcached server should be accessible only from within your local network, do not allow external traffic to ports used by memcached. For example, remove the port 11211, which is used by memcached by default, from the list of allowed ports:See Section 5.8, “Using Zones to Manage Incoming Traffic Depending on Source” for
~]# firewall-cmd --remove-port=11211/udp ~]# firewall-cmd --runtime-to-permanentfirewalldcommands that allow specific IP ranges to use the port 11211. - Disable UDP by adding the
-U 0 -p 11211value to theOPTIONSvariable in the/etc/sysconfig/memcachedfile unless your clients really need this protocol:OPTIONS="-U 0 -p 11211" - If you use just a single memcached server on the same machine as your application, set up memcached to listen to localhost traffic only. Add the
-l 127.0.0.1,::1value toOPTIONSin/etc/sysconfig/memcached:OPTIONS="-l 127.0.0.1,::1" - If changing the authentication is possible, enable SASL (Simple Authentication and Security Layer) authentication:
- Modify or add in the
/etc/sasl2/memcached.conffile:sasldb_path: /path.to/memcached.sasldb - Add an account in the SASL database:
~]# saslpasswd2 -a memcached -c cacheuser -f /path.to/memcached.sasldb - Ensure the database is accessible for the memcached user and group.
~]# chown memcached:memcached /path.to/memcached.sasldb - Enable SASL support in memcached by adding the
-Svalue toOPTIONSto/etc/sysconfig/memcached:OPTIONS="-S" - Restart the memcached server to apply the changes.
- Add the user name and password created in the SASL database to the memcached client configuration of your application.
- Encrypt communication between memcached clients and servers with stunnel. Since memcached does not support TLS, a workaround is to use a proxy, such as stunnel, which provides TLS on top of the memcached protocol.You could either configure stunnel to use PSK (Pre Shared Keys) or even better to use user certificates. When using certificates, only authenticated users can reach your memcached servers and your traffic is encrypted.
Important
If you use a tunnel to access memcached, ensure that the service is either listening only on localhost or a firewall prevents access from the network to the memcached port.See Section 4.8, “Using stunnel” for more information.
4.4. Securing Network Access
4.4.1. Securing Services With TCP Wrappers and xinetd
4.4.1.1. TCP Wrappers and Connection Banners
banner option.
vsftpd. To begin, create a banner file. It can be anywhere on the system, but it must have same name as the daemon. For this example, the file is called /etc/banners/vsftpd and contains the following lines:
220-Hello, %c
220-All activity on ftp.example.com is logged.
220-Inappropriate use will result in your access privileges being removed.%c token supplies a variety of client information, such as the user name and host name, or the user name and IP address to make the connection even more intimidating.
/etc/hosts.allow file:
vsftpd : ALL : banners /etc/banners/4.4.1.2. TCP Wrappers and Attack Warnings
spawn directive.
/etc/hosts.deny file to deny any connection attempts from that network, and to log the attempts to a special file:
ALL : 206.182.68.0 : spawn /bin/echo `date` %c %d >> /var/log/intruder_alert%d token supplies the name of the service that the attacker was trying to access.
spawn directive in the /etc/hosts.allow file.
Note
spawn directive executes any shell command, it is a good idea to create a special script to notify the administrator or execute a chain of commands in the event that a particular client attempts to connect to the server.
4.4.1.3. TCP Wrappers and Enhanced Logging
severity option.
emerg flag in the log files instead of the default flag, info, and deny the connection.
/etc/hosts.deny:
in.telnetd : ALL : severity emergauthpriv logging facility, but elevates the priority from the default value of info to emerg, which posts log messages directly to the console.
4.4.2. Verifying Which Ports Are Listening
Using netstat for Open Ports Scan
root to determine which ports are listening for connections from the network:
~]# netstat -pan -A inet,inet6 | grep -v ESTABLISHED
Active Internet connections (servers and established)
Proto Recv-Q Send-Q Local Address       Foreign Address    State     PID/Program name
Active Internet connections (servers and established)
Proto Recv-Q Send-Q Local Address           Foreign Address         State       PID/Program name
tcp        0      0 0.0.0.0:111             0.0.0.0:*               LISTEN      1/systemd
tcp        0      0 192.168.124.1:53        0.0.0.0:*               LISTEN      1829/dnsmasq
tcp        0      0 0.0.0.0:22              0.0.0.0:*               LISTEN      1176/sshd
tcp        0      0 127.0.0.1:631           0.0.0.0:*               LISTEN      1177/cupsd
tcp6       0      0 :::111                  :::*                    LISTEN      1/systemd
tcp6       0      0 ::1:25                  :::*                    LISTEN      1664/master
sctp              0.0.0.0:2500                                      LISTEN   20985/sctp_darn
udp        0      0 192.168.124.1:53        0.0.0.0:*                           1829/dnsmasq
udp        0      0 0.0.0.0:67              0.0.0.0:*                           977/dhclient
...-l option of the netstat command to display only listening server sockets:
~]# netstat -tlnw
Active Internet connections (only servers)
Proto Recv-Q Send-Q Local Address           Foreign Address         State
tcp        0      0 0.0.0.0:111             0.0.0.0:*               LISTEN
tcp        0      0 192.168.124.1:53        0.0.0.0:*               LISTEN
tcp        0      0 0.0.0.0:22              0.0.0.0:*               LISTEN
tcp        0      0 127.0.0.1:631           0.0.0.0:*               LISTEN
tcp        0      0 127.0.0.1:25            0.0.0.0:*               LISTEN
tcp6       0      0 :::111                  :::*                    LISTEN
tcp6       0      0 :::22                   :::*                    LISTEN
tcp6       0      0 ::1:631                 :::*                    LISTEN
tcp6       0      0 ::1:25                  :::*                    LISTEN
raw6       0      0 :::58                   :::*                    7
Using ss for Open Ports Scan
~]# ss -tlw
etid State      Recv-Q Send-Q     Local Address:Port                      Peer Address:Port
udp   UNCONN     0      0                     :::ipv6-icmp                           :::*
tcp   LISTEN     0      128                    *:sunrpc                               *:*
tcp   LISTEN     0      5          192.168.124.1:domain                               *:*
tcp   LISTEN     0      128                    *:ssh                                  *:*
tcp   LISTEN     0      128            127.0.0.1:ipp                                  *:*
tcp   LISTEN     0      100            127.0.0.1:smtp                                 *:*
tcp   LISTEN     0      128                   :::sunrpc                              :::*
tcp   LISTEN     0      128                   :::ssh                                 :::*
tcp   LISTEN     0      128                  ::1:ipp                                 :::*
tcp   LISTEN     0      100                  ::1:smtp                                :::*
~]# ss -plno -A tcp,udp,sctp
Netid State Recv-Q Send-Q Local Address:Port Peer Address:Port
udp UNCONN 0 0 192.168.124.1:53 *:* users:(("dnsmasq",pid=1829,fd=5))
udp UNCONN 0 0 *%virbr0:67 *:* users:(("dnsmasq",pid=1829,fd=3))
udp UNCONN 0 0 *:68 *:* users:(("dhclient",pid=977,fd=6))
...
tcp LISTEN 0 5 192.168.124.1:53 *:* users:(("dnsmasq",pid=1829,fd=6))
tcp LISTEN 0 128 *:22 *:* users:(("sshd",pid=1176,fd=3))
tcp LISTEN 0 128 127.0.0.1:631 *:* users:(("cupsd",pid=1177,fd=12))
tcp LISTEN 0 100 127.0.0.1:25 *:* users:(("master",pid=1664,fd=13))
...
sctp LISTEN 0 5 *:2500 *:* users:(("sctp_darn",pid=20985,fd=3))
UNCONN state shows the ports in UDP listening mode.
-6 option for scanning an IPv6 address.
~]# nmap -sT -O 192.168.122.65
    Starting Nmap 6.40 ( http://nmap.org ) at 2017-03-27 09:30 CEST
    Nmap scan report for 192.168.122.65
    Host is up (0.00032s latency).
    Not shown: 998 closed ports
    PORT    STATE SERVICE
    22/tcp  open  ssh
    111/tcp open  rpcbind
    Device type: general purpose
    Running: Linux 3.X
    OS CPE: cpe:/o:linux:linux_kernel:3
    OS details: Linux 3.7 - 3.9
    Network Distance: 0 hops

    OS detection performed. Please report any incorrect results at http://nmap.org/submit/ .
Nmap done: 1 IP address (1 host up) scanned in 1.79 seconds(-sT) is the default TCP scan type when the TCP SYN scan (-sS) is not an option. The -O option detects the operating system of the host.
Using netstat and ss to Scan for Open SCTP Ports
root:
~]# netstat -plnS
Active Internet connections (only servers)
Proto Recv-Q Send-Q Local Address   Foreign Address  State    PID/Program name
sctp                127.0.0.1:250                    LISTEN   4125/sctp_darn
sctp       0      0 127.0.0.1:260   127.0.0.1:250    CLOSE    4250/sctp_darn
sctp       0      0 127.0.0.1:250   127.0.0.1:260    LISTEN   4125/sctp_darn
~]# netstat -nl -A inet,inet6 | grep 2500
sctp 0.0.0.0:2500 LISTEN~]# ss -an | grep 2500
sctp LISTEN 0 5 *:2500 *:*4.4.3. Disabling Source Routing
accept_source_route option causes network interfaces to accept packets with the Strict Source Routing (SSR) or Loose Source Routing (LSR) option set. The acceptance of source routed packets is controlled by sysctl settings. Issue the following command as root to drop packets with the SSR or LSR option set:
~]# /sbin/sysctl -w net.ipv4.conf.all.accept_source_route=0~]# /sbin/sysctl -w net.ipv4.conf.all.forwarding=0~]# /sbin/sysctl -w net.ipv6.conf.all.forwarding=0~]# /sbin/sysctl -w net.ipv4.conf.all.mc_forwarding=0~]# /sbin/sysctl -w net.ipv6.conf.all.mc_forwarding=0~]# /sbin/sysctl -w net.ipv4.conf.all.accept_redirects=0~]# /sbin/sysctl -w net.ipv6.conf.all.accept_redirects=0~]# /sbin/sysctl -w net.ipv4.conf.all.secure_redirects=0~]# /sbin/sysctl -w net.ipv4.conf.all.send_redirects=0Important
0 value for every interface. To automatically disable sending of ICMP requests whenever you add a new interface, enter the following command:
~]# /sbin/sysctl -w net.ipv4.conf.default.send_redirects=0Note
/etc/sysctl.conf file. For example, to disable acceptance of all IPv4 ICMP redirected packets on all interfaces, open the /etc/sysctl.conf file with an editor running as the root user and add a line as follows: net.ipv4.conf.all.send_redirects=0sysctl(8), for more information. See RFC791 for an explanation of the Internet options related to source based routing and its variants.
Warning
4.4.3.1. Reverse Path Forwarding
IP addresses from local subnets and reduces the opportunity for DDoS attacks.
Note
Warning
-
rp_filter - Reverse Path Forwarding is enabled by means of the
rp_filterdirective. Thesysctlutility can be used to make changes to the running system, and permanent changes can be made by adding lines to the/etc/sysctl.conffile. Therp_filteroption is used to direct the kernel to select from one of three modes.To make a temporary global change, enter the following commands asroot:sysctl -w net.ipv4.conf.default.rp_filter=integer sysctl -w net.ipv4.conf.all.rp_filter=integerwhere integer is one of the following:0— No source validation.1— Strict mode as defined in RFC 3704.2— Loose mode as defined in RFC 3704.
The setting can be overridden per network interface using thenet.ipv4.conf.interface.rp_filtercommand as follows:sysctl -w net.ipv4.conf.interface.rp_filter=integerNote
To make these settings persistent across reboots, modify the/etc/sysctl.conffile. For example, to change the mode for all interfaces, open the/etc/sysctl.conffile with an editor running as therootuser and add a line as follows:net.ipv4.conf.all.rp_filter=2 -
IPv6_rpfilter - In case of the
IPv6protocol the firewalld daemon applies to Reverse Path Forwarding by default. The setting can be checked in the/etc/firewalld/firewalld.conffile. You can change the firewalld behavior by setting theIPv6_rpfilteroption.If you need a custom configuration of Reverse Path Forwarding, you can perform it without the firewalld daemon by using theip6tablescommand as follows:This rule should be inserted near the beginning of the raw/PREROUTING chain, so that it applies to all traffic, in particular before the stateful matching rules. For more information about theip6tables -t raw -I PREROUTING -m rpfilter --invert -j DROPiptablesandip6tablesservices, see Section 5.13, “Setting and Controlling IP sets usingiptables”.
Enabling Packet Forwarding
root and change the line which reads net.ipv4.ip_forward = 0 in the /etc/sysctl.conf file to the following:
net.ipv4.ip_forward = 1/etc/sysctl.conf file, enter the following command:
/sbin/sysctl -proot:
/sbin/sysctl net.ipv4.ip_forward1, then IP forwarding is enabled. If it returns a 0, then you can turn it on manually using the following command:
/sbin/sysctl -w net.ipv4.ip_forward=14.4.3.2. Additional Resources
- Installed Documentation
/usr/share/doc/kernel-doc-version/Documentation/networking/ip-sysctl.txt- This file contains a complete list of files and options available in the directory. Before accessing the kernel documentation for the first time, enter the following command asroot:~]# yum install kernel-doc - Online DocumentationSee RFC 3704 for an explanation of Ingress Filtering for Multihomed Networks.
4.5. Securing DNS Traffic with DNSSEC
4.5.1. Introduction to DNSSEC
DNS client to authenticate and check the integrity of responses from a DNS nameserver in order to verify their origin and to determine if they have been tampered with in transit.
4.5.2. Understanding DNSSEC
HTTPS. However, before connecting to an HTTPS webserver, a DNS lookup must be performed, unless you enter the IP address directly. These DNS lookups are done insecurely and are subject to man-in-the-middle attacks due to lack of authentication. In other words, a DNS client cannot have confidence that the replies that appear to come from a given DNS nameserver are authentic and have not been tampered with. More importantly, a recursive nameserver cannot be sure that the records it obtains from other nameservers are genuine. The DNS protocol did not provide a mechanism for the client to ensure it was not subject to a man-in-the-middle attack. DNSSEC was introduced to address the lack of authentication and integrity checks when resolving domain names using DNS. It does not address the problem of confidentiality.
DNS resource records as well as distributing public keys in such a way as to enable DNS resolvers to build a hierarchical chain of trust. Digital signatures for all DNS resource records are generated and added to the zone as digital signature resource records (RRSIG). The public key of a zone is added as a DNSKEY resource record. To build the hierarchical chain, hashes of the DNSKEY are published in the parent zone as Delegation of Signing (DS) resource records. To facilitate proof of non-existence, the NextSECure (NSEC) and NSEC3 resource records are used. In a DNSSEC signed zone, each resource record set (RRset) has a corresponding RRSIG resource record. Note that records used for delegation to a child zone (NS and glue records) are not signed; these records appear in the child zone and are signed there.
.com. The root zone also serves NS and glue records for the .com name servers. The resolver follows this delegation and queries for the DNSKEY record of .com using these delegated name servers. The hash of the DNSKEY record obtained should match the DS record in the root zone. If so, the resolver will trust the obtained DNSKEY for .com. In the .com zone, the RRSIG records are created by the .com DNSKEY. This process is repeated similarly for delegations within .com, such as redhat.com. Using this method, a validating DNS resolver only needs to be configured with one root key while it collects many DNSKEYs from around the world during its normal operation. If a cryptographic check fails, the resolver will return SERVFAIL to the application.
DNS answers. DNSSEC protects the integrity of the data between DNS servers (authoritative and recursive), it does not provide security between the application and the resolver. Therefore, it is important that the applications are given a secure transport to their resolver. The easiest way to accomplish that is to run a DNSSEC capable resolver on localhost and use 127.0.0.1 in /etc/resolv.conf. Alternatively a VPN connection to a remote DNS server could be used.
Understanding the Hotspot Problem
DNS in order to redirect users to a page where they are required to authenticate (or pay) for the Wi-Fi service. Users connecting to a VPN often need to use an “internal only” DNS server in order to locate resources that do not exist outside the corporate network. This requires additional handling by software. For example, dnssec-trigger can be used to detect if a Hotspot is hijacking the DNS queries and unbound can act as a proxy nameserver to handle the DNSSEC queries.
Choosing a DNSSEC Capable Recursive Resolver
unbound can be used. Both enable DNSSEC by default and are configured with the DNSSEC root key. To enable DNSSEC on a server, either will work however the use of unbound is preferred on mobile devices, such as notebooks, as it allows the local user to dynamically reconfigure the DNSSEC overrides required for Hotspots when using dnssec-trigger, and for VPNs when using Libreswan. The unbound daemon further supports the deployment of DNSSEC exceptions listed in the etc/unbound/*.d/ directories which can be useful to both servers and mobile devices.
4.5.3. Understanding Dnssec-trigger
unbound is installed and configured in /etc/resolv.conf, all DNS queries from applications are processed by unbound. dnssec-trigger only reconfigures the unbound resolver when triggered to do so. This mostly applies to roaming client machines, such as laptops, that connect to different Wi-Fi networks. The process is as follows:
- NetworkManager “triggers” dnssec-trigger when a new
DNSserver is obtained throughDHCP. - Dnssec-trigger then performs a number of tests against the server and decides whether or not it properly supports DNSSEC.
- If it does, then dnssec-trigger reconfigures
unboundto use thatDNSserver as a forwarder for all queries. - If the tests fail, dnssec-trigger will ignore the new
DNSserver and try a few available fall-back methods. - If it determines that an unrestricted port 53 (
UDPandTCP) is available, it will tellunboundto become a full recursiveDNSserver without using any forwarder. - If this is not possible, for example because port 53 is blocked by a firewall for everything except reaching the network's
DNSserver itself, it will try to useDNSto port 80, orTLSencapsulatedDNSto port 443. Servers runningDNSon port 80 and 443 can be configured in/etc/dnssec-trigger/dnssec-trigger.conf. Commented out examples should be available in the default configuration file. - If these fall-back methods also fail, dnssec-trigger offers to either operate insecurely, which would bypass DNSSEC completely, or run in “cache only” mode where it will not attempt new
DNSqueries but will answer for everything it already has in the cache.
dnssec-trigger daemon continues to probe for DNSSEC resolvers every ten seconds. See Section 4.5.8, “Using Dnssec-trigger” for information on using the dnssec-trigger graphical utility.
4.5.4. VPN Supplied Domains and Name Servers
unbound, dnssec-trigger, and NetworkManager can properly support domains and name servers provided by VPN software. Once the VPN tunnel comes up, the local unbound cache is flushed for all entries of the domain name received, so that queries for names within the domain name are fetched fresh from the internal name servers reached using the VPN. When the VPN tunnel is terminated, the unbound cache is flushed again to ensure any queries for the domain will return the public IP addresses, and not the previously obtained private IP addresses. See Section 4.5.11, “Configuring DNSSEC Validation for Connection Supplied Domains”.
4.5.5. Recommended Naming Practices
DNS, such as host.example.com.
.yourcompany) to the public register. Therefore, Red Hat strongly recommends that you do not use a domain name that is not delegated to you, even on a private network, as this can result in a domain name that resolves differently depending on network configuration. As a result, network resources can become unavailable. Using domain names that are not delegated to you also makes DNSSEC more difficult to deploy and maintain, as domain name collisions require manual configuration to enable DNSSEC validation. See the ICANN FAQ on domain name collision for more information on this issue.
4.5.6. Understanding Trust Anchors
DNS name and public key (or hash of the public key) associated with that name. It is expressed as a base 64 encoded key. It is similar to a certificate in that it is a means of exchanging information, including a public key, which can be used to verify and authenticate DNS records. RFC 4033 defines a trust anchor as a configured DNSKEY RR or DS RR hash of a DNSKEY RR. A validating security-aware resolver uses this public key or hash as a starting point for building the authentication chain to a signed DNS response. In general, a validating resolver will have to obtain the initial values of its trust anchors through some secure or trusted means outside the DNS protocol. Presence of a trust anchor also implies that the resolver should expect the zone to which the trust anchor points to be signed.
4.5.7. Installing DNSSEC
4.5.7.1. Installing unbound
DNS using DNSSEC locally on a machine, it is necessary to install the DNS resolver unbound (or bind ). It is only necessary to install dnssec-trigger on mobile devices. For servers, unbound should be sufficient although a forwarding configuration for the local domain might be required depending on where the server is located (LAN or Internet). dnssec-trigger will currently only help with the global public DNS zone. NetworkManager, dhclient, and VPN applications can often gather the domain list (and nameserver list as well) automatically, but not dnssec-trigger nor unbound.
unbound enter the following command as the root user:
~]# yum install unbound4.5.7.2. Checking if unbound is Running
unbound daemon is running, enter the following command:
~]$ systemctl status unbound
 unbound.service - Unbound recursive Domain Name Server
	  Loaded: loaded (/usr/lib/systemd/system/unbound.service; disabled)
Active: active (running) since Wed 2013-03-13 01:19:30 CET; 6h agosystemctl status command will report unbound as Active: inactive (dead) if the unbound service is not running.
4.5.7.3. Starting unbound
unbound daemon for the current session, enter the following command as the root user:
~]# systemctl start unboundsystemctl enable command to ensure that unbound starts up every time the system boots:
~]# systemctl enable unboundunbound daemon allows configuration of local data or overrides using the following directories:
- The
/etc/unbound/conf.ddirectory is used to add configurations for a specific domain name. This is used to redirect queries for a domain name to a specificDNSserver. This is often used for sub-domains that only exist within a corporate WAN. - The
/etc/unbound/keys.ddirectory is used to add trust anchors for a specific domain name. This is required when an internal-only name is DNSSEC signed, but there is no publicly existing DS record to build a path of trust. Another use case is when an internal version of a domain is signed using a different DNSKEY than the publicly available name outside the corporate WAN. - The
/etc/unbound/local.ddirectory is used to add specificDNSdata as a local override. This can be used to build blacklists or create manual overrides. This data will be returned to clients byunbound, but it will not be marked as DNSSEC signed.
unbound.conf(5) man page.
4.5.7.4. Installing Dnssec-trigger
dnssec-triggerd. To install dnssec-trigger enter the following command as the root user:
~]# yum install dnssec-trigger4.5.7.5. Checking if the Dnssec-trigger Daemon is Running
dnssec-triggerd is running, enter the following command:
~]$ systemctl status dnssec-triggerd
systemctl status dnssec-triggerd.service
dnssec-triggerd.service - Reconfigure local DNS(SEC) resolver on network change
	  Loaded: loaded (/usr/lib/systemd/system/dnssec-triggerd.service; enabled)
Active: active (running) since Wed 2013-03-13 06:10:44 CET; 1h 41min agosystemctl status command will report dnssec-triggerd as Active: inactive (dead) if the dnssec-triggerd daemon is not running. To start it for the current session enter the following command as the root user:
~]# systemctl start dnssec-triggerdsystemctl enable command to ensure that dnssec-triggerd starts up every time the system boots:
~]# systemctl enable dnssec-triggerd4.5.8. Using Dnssec-trigger
DNSSEC and then press Enter. An icon resembling a ships anchor is added to the message tray at the bottom of the screen. Press the round blue notification icon in the bottom right of the screen to reveal it. Right click the anchor icon to display a pop-up menu.
resolv.conf points to 127.0.0.1. When you click on the Hotspot Sign-On panel this is changed. The DNS servers are queried from NetworkManager and put in resolv.conf. Now you can authenticate on the Hotspot's sign-on page. The anchor icon shows a big red exclamation mark to warn you that DNS queries are being made insecurely. When authenticated, dnssec-trigger should automatically detect this and switch back to secure mode, although in some cases it cannot and the user has to do this manually by selecting Reprobe.
unbound about changes to the resolv.conf file.
4.5.9. Using dig With DNSSEC
DNS utilities nslookup and host are obsolete and should not be used.
+dnssec is added to the command, for example:
~]$ dig +dnssec whitehouse.gov
; <<>> DiG 9.9.3-rl.13207.22-P2-RedHat-9.9.3-4.P2.el7 <<>> +dnssec whitehouse.gov
;; global options: +cmd
;; Got answer:
;; ->>HEADER<<- opcode: QUERY, status: NOERROR, id: 21388
;; flags: qr rd ra ad; QUERY: 1, ANSWER: 2, AUTHORITY: 0, ADDITIONAL: 1

;; OPT PSEUDOSECTION:
; EDNS: version: 0, flags: do; udp: 4096
;; QUESTION SECTION:
;whitehouse.gov.			IN	A

;; ANSWER SECTION:
whitehouse.gov.		20	IN	A	72.246.36.110
whitehouse.gov.		20	IN	RRSIG	A 7 2 20 20130825124016 20130822114016 8399 whitehouse.gov. BB8VHWEkIaKpaLprt3hq1GkjDROvkmjYTBxiGhuki/BJn3PoIGyrftxR HH0377I0Lsybj/uZv5hL4UwWd/lw6Gn8GPikqhztAkgMxddMQ2IARP6p wbMOKbSUuV6NGUT1WWwpbi+LelFMqQcAq3Se66iyH0Jem7HtgPEUE1Zc 3oI=

;; Query time: 227 msec
;; SERVER: 127.0.0.1#53(127.0.0.1)
;; WHEN: Thu Aug 22 22:01:52 EDT 2013
;; MSG SIZE rcvd: 233unbound server indicated that the data was DNSSEC authenticated by returning the ad bit in the flags: section at the top.
dig command would return a SERVFAIL error:
~]$ dig badsign-a.test.dnssec-tools.org
; <<>> DiG 9.9.3-rl.156.01-P1-RedHat-9.9.3-3.P1.el7 <<>> badsign-a.test.dnssec-tools.org
;; global options: +cmd
;; Got answer:
;; ->>HEADER<<- opcode: QUERY, status: SERVFAIL, id: 1010
;; flags: qr rd ra; QUERY: 1, ANSWER: 0, AUTHORITY: 0, ADDITIONAL: 1

;; OPT PSEUDOSECTION:
; EDNS: version: 0, flags:; udp: 4096
;; QUESTION SECTION:
;badsign-a.test.dnssec-tools.org. IN	A

;; Query time: 1284 msec
;; SERVER: 127.0.0.1#53(127.0.0.1)
;; WHEN: Thu Aug 22 22:04:52 EDT 2013
;; MSG SIZE rcvd: 60]+cd option to the dig command:
~]$ dig +cd +dnssec badsign-a.test.dnssec-tools.org
; <<>> DiG 9.9.3-rl.156.01-P1-RedHat-9.9.3-3.P1.el7 <<>> +cd +dnssec badsign-a.test.dnssec-tools.org
;; global options: +cmd
;; Got answer:
;; ->>HEADER<<- opcode: QUERY, status: NOERROR, id: 26065
;; flags: qr rd ra cd; QUERY: 1, ANSWER: 2, AUTHORITY: 0, ADDITIONAL: 1

;; OPT PSEUDOSECTION:
; EDNS: version: 0, flags: do; udp: 4096
;; QUESTION SECTION:
;badsign-a.test.dnssec-tools.org. IN	A

;; ANSWER SECTION:
badsign-a.test.dnssec-tools.org. 49 IN	A	75.119.216.33
badsign-a.test.dnssec-tools.org. 49 IN	RRSIG	A 5 4 86400 20130919183720 20130820173720 19442 test.dnssec-tools.org. E572dLKMvYB4cgTRyAHIKKEvdOP7tockQb7hXFNZKVbfXbZJOIDREJrr zCgAfJ2hykfY0yJHAlnuQvM0s6xOnNBSvc2xLIybJdfTaN6kSR0YFdYZ n2NpPctn2kUBn5UR1BJRin3Gqy20LZlZx2KD7cZBtieMsU/IunyhCSc0 kYw=

;; Query time: 1 msec
;; SERVER: 127.0.0.1#53(127.0.0.1)
;; WHEN: Thu Aug 22 22:06:31 EDT 2013
;; MSG SIZE rcvd: 257systemctl status unbound and the unbound daemon logs these errors to syslog as follows: Aug 22 22:04:52 laptop unbound: [3065:0] info: validation failure badsign-a.test.dnssec-tools.org. A INunbound-host:
~]$ unbound-host -C /etc/unbound/unbound.conf -v whitehouse.gov
whitehouse.gov has address 184.25.196.110 (secure)
whitehouse.gov has IPv6 address 2600:1417:11:2:8800::fc4 (secure)
whitehouse.gov has IPv6 address 2600:1417:11:2:8000::fc4 (secure)
whitehouse.gov mail is handled by 105 mail1.eop.gov. (secure)
whitehouse.gov mail is handled by 110 mail5.eop.gov. (secure)
whitehouse.gov mail is handled by 105 mail4.eop.gov. (secure)
whitehouse.gov mail is handled by 110 mail6.eop.gov. (secure)
whitehouse.gov mail is handled by 105 mail2.eop.gov. (secure)
whitehouse.gov mail is handled by 105 mail3.eop.gov. (secure)
4.5.10. Setting up Hotspot Detection Infrastructure for Dnssec-trigger
- Set up a web server on some machine that is publicly reachable on the Internet. See the Web Servers chapter in the Red Hat Enterprise Linux 7 System Administrator's Guide.
- Once you have the server running, publish a static page with known content on it. The page does not need to be a valid HTML page. For example, you could use a plain-text file named
hotspot.txtthat contains only the stringOK. Assuming your server is located atexample.comand you published yourhotspot.txtfile in the web serverdocument_root/static/sub-directory, then the address to your static web page would beexample.com/static/hotspot.txt. See theDocumentRootdirective in the Web Servers chapter in the Red Hat Enterprise Linux 7 System Administrator's Guide. - Add the following line to the
/etc/dnssec-trigger/dnssec-trigger.conffile:This command adds a URL that is probed usingurl: "http://example.com/static/hotspot.txt OK"HTTP(port 80). The first part is the URL that will be resolved and the page that will be downloaded. The second part of the command is the text string that the downloaded webpage is expected to contain.
dnssec-trigger.conf(8).
4.5.11. Configuring DNSSEC Validation for Connection Supplied Domains
unbound by dnssec-trigger for every domain provided by any connection, except Wi-Fi connections through NetworkManager. By default, all forward zones added into unbound are DNSSEC validated.
validate_connection_provided_zones variable in the dnssec-trigger configuration file /etc/dnssec.conf. As root user, open and edit the line as follows: validate_connection_provided_zones=no4.5.11.1. Configuring DNSSEC Validation for Wi-Fi Supplied Domains
add_wifi_provided_zones variable in the dnssec-trigger configuration file, /etc/dnssec.conf. As root user, open and edit the line as follows: add_wifi_provided_zones=yesWarning
unbound may have security implications such as:
- A Wi-Fi access point can intentionally provide you a domain through
DHCPfor which it does not have authority and route all yourDNSqueries to itsDNSservers. - If you have the DNSSEC validation of forward zones turned off, the Wi-Fi provided
DNSservers can spoof theIPaddress for domain names from the provided domain without you knowing it.
4.5.12. Additional Resources
4.5.12.1. Installed Documentation
dnssec-trigger(8)man page — Describes command options fordnssec-triggerd, dnssec-trigger-control and dnssec-trigger-panel.dnssec-trigger.conf(8)man page — Describes the configuration options fordnssec-triggerd.unbound(8)man page — Describes the command options forunbound, theDNSvalidating resolver.unbound.conf(5)man page — Contains information on how to configureunbound.resolv.conf(5)man page — Contains information that is read by the resolver routines.
4.5.12.2. Online Documentation
- http://tools.ietf.org/html/rfc4033
- RFC 4033 DNS Security Introduction and Requirements.
- http://www.dnssec.net/
- A website with links to many DNSSEC resources.
- http://www.dnssec-deployment.org/
- The DNSSEC Deployment Initiative, sponsored by the Department for Homeland Security, contains a lot of DNSSEC information and has a mailing list to discuss DNSSEC deployment issues.
- http://www.internetsociety.org/deploy360/dnssec/community/
- The Internet Society's “Deploy 360” initiative to stimulate and coordinate DNSSEC deployment is a good resource for finding communities and DNSSEC activities worldwide.
- http://www.unbound.net/
- This document contains general information about the
unboundDNSservice. - http://www.nlnetlabs.nl/projects/dnssec-trigger/
- This document contains general information about dnssec-trigger.
4.6. Securing Virtual Private Networks (VPNs) Using Libreswan
IPsec protocol which is supported by the Libreswan application. Libreswan is a continuation of the Openswan application and many examples from the Openswan documentation are interchangeable with Libreswan. The NetworkManager IPsec plug-in is called NetworkManager-libreswan. Users of GNOME Shell should install the NetworkManager-libreswan-gnome package, which has NetworkManager-libreswan as a dependency. Note that the NetworkManager-libreswan-gnome package is only available from the Optional channel. See Enabling Supplementary and Optional Repositories.
IPsec protocol for VPN is itself configured using the Internet Key Exchange (IKE) protocol. The terms IPsec and IKE are used interchangeably. An IPsec VPN is also called an IKE VPN, IKEv2 VPN, XAUTH VPN, Cisco VPN or IKE/IPsec VPN. A variant of an IPsec VPN that also uses the Level 2 Tunneling Protocol (L2TP) is usually called an L2TP/IPsec VPN, which requires the Optional channel xl2tpd application.
IKE implementation available in Red Hat Enterprise Linux 7. IKE version 1 and 2 are implemented as a user-level daemon. The IKE protocol itself is also encrypted. The IPsec protocol is implemented by the Linux kernel and Libreswan configures the kernel to add and remove VPN tunnel configurations.
IKE protocol uses UDP port 500 and 4500. The IPsec protocol consists of two different protocols, Encapsulated Security Payload (ESP) which has protocol number 50, and Authenticated Header (AH) which as protocol number 51. The AH protocol is not recommended for use. Users of AH are recommended to migrate to ESP with null encryption.
IPsec protocol has two different modes of operation, Tunnel Mode (the default) and Transport Mode. It is possible to configure the kernel with IPsec without IKE. This is called Manual Keying. It is possible to configure manual keying using the ip xfrm commands, however, this is strongly discouraged for security reasons. Libreswan interfaces with the Linux kernel using netlink. Packet encryption and decryption happen in the Linux kernel.
Important
IKE/IPsec VPNs, implemented by Libreswan and the Linux kernel, is the only VPN technology recommended for use in Red Hat Enterprise Linux 7. Do not use any other VPN technology without understanding the risks of doing so.
4.6.1. Installing Libreswan
root:
~]# yum install libreswan~]$ yum info libreswan~]# systemctl stop ipsec
~]# rm /etc/ipsec.d/*dbroot:
~]# ipsec initnss
Initializing NSS database~]# certutil -N -d sql:/etc/ipsec.d
Enter a password which will be used to encrypt your keys.
The password should be at least 8 characters long,
and should contain at least one non-alphabetic character.
Enter new password:
Re-enter password:ipsec daemon provided by Libreswan, issue the following command as root:
~]# systemctl start ipsec~]$ systemctl status ipsec
* ipsec.service - Internet Key Exchange (IKE) Protocol Daemon for IPsec
Loaded: loaded (/usr/lib/systemd/system/ipsec.service; disabled; vendor preset: disabled)
Active: active (running) since Sun 2018-03-18 18:44:43 EDT; 3s ago
Docs: man:ipsec(8)
man:pluto(8)
man:ipsec.conf(5)
Process: 20358 ExecStopPost=/usr/sbin/ipsec --stopnflog (code=exited, status=0/SUCCESS)
Process: 20355 ExecStopPost=/sbin/ip xfrm state flush (code=exited, status=0/SUCCESS)
Process: 20352 ExecStopPost=/sbin/ip xfrm policy flush (code=exited, status=0/SUCCESS)
Process: 20347 ExecStop=/usr/libexec/ipsec/whack --shutdown (code=exited, status=0/SUCCESS)
Process: 20634 ExecStartPre=/usr/sbin/ipsec --checknflog (code=exited, status=0/SUCCESS)
Process: 20631 ExecStartPre=/usr/sbin/ipsec --checknss (code=exited, status=0/SUCCESS)
Process: 20369 ExecStartPre=/usr/libexec/ipsec/_stackmanager start (code=exited, status=0/SUCCESS)
Process: 20366 ExecStartPre=/usr/libexec/ipsec/addconn --config /etc/ipsec.conf --checkconfig (code=exited, status=0/SUCCESS)
Main PID: 20646 (pluto)
Status: "Startup completed."
CGroup: /system.slice/ipsec.service
└─20646 /usr/libexec/ipsec/pluto --leak-detective --config /etc/ipsec.conf --noforkroot:
~]# systemctl enable ipsecipsec service. See Chapter 5, Using Firewalls for information on firewalls and allowing specific services to pass through. Libreswan requires the firewall to allow the following packets:
UDPport 500 and 4500 for theInternet Key Exchange(IKE) protocol- Protocol 50 for
Encapsulated Security Payload(ESP)IPsecpackets - Protocol 51 for
Authenticated Header(AH)IPsecpackets (uncommon)
IPsec VPN. The first example is for connecting two hosts together so that they may communicate securely. The second example is connecting two sites together to form one network. The third example is supporting remote users, known as road warriors in this context.
4.6.2. Creating VPN Configurations Using Libreswan
- Pre-Shared Keys (PSK) is the simplest authentication method. PSKs should consist of random characters and have a length of at least 20 characters. In FIPS mode, PSKs need to comply to a minimum strength requirement depending on the integrity algorithm used. It is recommended not to use PSKs shorter than 64 random characters.
- Raw RSA keys are commonly used for static host-to-host or subnet-to-subnet
IPsecconfigurations. The hosts are manually configured with each other's public RSA key. This method does not scale well when dozens or more hosts all need to setupIPsectunnels to each other. - X.509 certificates are commonly used for large-scale deployments where there are many hosts that need to connect to a common
IPsecgateway. A central certificate authority (CA) is used to sign RSA certificates for hosts or users. This central CA is responsible for relaying trust, including the revocations of individual hosts or users. - NULL Authentication is used to gain mesh encryption without authentication. It protects against passive attacks but does not protect against active attacks. However, since
IKEv2allows asymmetrical authentication methods, NULL Authentication can also be used for internet scale Opportunistic IPsec, where clients authenticate the server, but servers do not authenticate the client. This model is similar to secure websites usingTLS(also known as https:// websites).
4.6.3. Creating Host-To-Host VPN Using Libreswan
IPsec VPN, between two hosts referred to as “left” and “right”, enter the following commands as root on both of the hosts (“left” and “right”) to create new raw RSA key pairs:
~]# ipsec newhostkey --output /etc/ipsec.d/hostkey.secrets
Generated RSA key pair with CKAID 14936e48e756eb107fa1438e25a345b46d80433f was stored in the NSS databaseroot on the host where the new hostkey was added, using the CKAID returned by the “newhostkey” command:
~]# ipsec showhostkey --left --ckaid 14936e48e756eb107fa1438e25a345b46d80433f
	# rsakey AQPFKElpV
	leftrsasigkey=0sAQPFKElpV2GdCF0Ux9Kqhcap53Kaa+uCgduoT2I3x6LkRK8N+GiVGkRH4Xg+WMrzRb94kDDD8m/BO/Md+A30u0NjDk724jWuUU215rnpwvbdAob8pxYc4ReSgjQ/DkqQvsemoeF4kimMU1OBPNU7lBw4hTBFzu+iVUYMELwQSXpremLXHBNIamUbe5R1+ibgxO19l/PAbZwxyGX/ueBMBvSQ+H0UqdGKbq7UgSEQTFa4/gqdYZDDzx55tpZk2Z3es+EWdURwJOgGiiiIFuBagasHFpeu9Teb1VzRyytnyNiJCBVhWVqsB4h6eaQ9RpAMmqBdBeNHfXwb6/hg+JIKJgjidXvGtgWBYNDpG40fEFh9USaFlSdiHO+dmGyZQ74Rg9sWLtiVdlH1YEBUtQb8f8FVry9wSn6AZqPlpGgUdtkTYUCaaifsYH4hoIA0nku4Fy/Ugej89ZdrSN7Lt+igns4FysMmBOl9Wi9+LWnfl+dm4Nc6UNgLE8kZc+8vMJGkLi4SYjk2/MFYgqGX/COxSCPBFUZFiNK7Wda0kWea/FqE1heem7rvKAPIiqMymjSmytZI9hhkCD16pCdgrO3fJXsfAUChYYSPyPQClkavvBL/wNK9zlaOwssTaKTj4Xn90SrZaxTEjpqUeQ==
~]# ipsec showhostkey --list
< 1 > RSA keyid: AQPFKElpV ckaid: 14936e48e756eb107fa1438e25a345b46d80433f/etc/ipsec.d/*.db.
leftrsasigkey= and rightrsasigkey= from above are added to a custom configuration file placed in the /etc/ipsec.d/ directory.
root, create a file with a suitable name in the following format:
/etc/ipsec.d/my_host-to-host.confconn mytunnel
leftid=@west.example.com
left=192.1.2.23
leftrsasigkey=0sAQOrlo+hOafUZDlCQmXFrje/oZm [...] W2n417C/4urYHQkCvuIQ==
rightid=@east.example.com
right=192.1.2.45
rightrsasigkey=0sAQO3fwC6nSSGgt64DWiYZzuHbc4 [...] D/v8t5YTQ==
authby=rsasig
# load and initiate automatically
auto=startIP address is not known in advance, then on the mobile client use %defaultroute as its IP address. This will pick up the dynamic IP address automatically. On the static server host that accepts connections from incoming mobile hosts, specify the mobile host using %any for its IP address.
leftrsasigkey value is obtained from the “left” host and the rightrsasigkey value is obtained from the “right” host. The same applies when using leftckaid and rightckaid.
ipsec to ensure it reads the new configuration and if configured to start on boot, to confirm that the tunnels establish:
~]# systemctl restart ipsecauto=start option, the IPsec tunnel should be established within a few seconds. You can manually load and start the tunnel by entering the following commands as root:
~]# ipsec auto --add mytunnel
~]# ipsec auto --up mytunnel
4.6.3.1. Verifying Host-To-Host VPN Using Libreswan
IKE negotiation takes place on UDP ports 500 and 4500. IPsec packets show up as Encapsulated Security Payload (ESP) packets. The ESP protocol has no ports. When the VPN connection needs to pass through a NAT router, the ESP packets are encapsulated in UDP packets on port 4500.
root in the following format:
~]# tcpdump -n -i interface esp or udp port 500 or udp port 4500
00:32:32.632165 IP 192.1.2.45 > 192.1.2.23: ESP(spi=0x63ad7e17,seq=0x1a), length 132
00:32:32.632592 IP 192.1.2.23 > 192.1.2.45: ESP(spi=0x4841b647,seq=0x1a), length 132
00:32:32.632592 IP 192.0.2.254 > 192.0.1.254: ICMP echo reply, id 2489, seq 7, length 64
00:32:33.632221 IP 192.1.2.45 > 192.1.2.23: ESP(spi=0x63ad7e17,seq=0x1b), length 132
00:32:33.632731 IP 192.1.2.23 > 192.1.2.45: ESP(spi=0x4841b647,seq=0x1b), length 132
00:32:33.632731 IP 192.0.2.254 > 192.0.1.254: ICMP echo reply, id 2489, seq 8, length 64
00:32:34.632183 IP 192.1.2.45 > 192.1.2.23: ESP(spi=0x63ad7e17,seq=0x1c), length 132
00:32:34.632607 IP 192.1.2.23 > 192.1.2.45: ESP(spi=0x4841b647,seq=0x1c), length 132
00:32:34.632607 IP 192.0.2.254 > 192.0.1.254: ICMP echo reply, id 2489, seq 9, length 64
00:32:35.632233 IP 192.1.2.45 > 192.1.2.23: ESP(spi=0x63ad7e17,seq=0x1d), length 132
00:32:35.632685 IP 192.1.2.23 > 192.1.2.45: ESP(spi=0x4841b647,seq=0x1d), length 132
00:32:35.632685 IP 192.0.2.254 > 192.0.1.254: ICMP echo reply, id 2489, seq 10, length 64Note
IPsec. It only sees the outgoing encrypted packet, not the outgoing plaintext packet. It does see the encrypted incoming packet, as well as the decrypted incoming packet. If possible, run tcpdump on a router between the two machines and not on one of the endpoints itself. When using the Virtual Tunnel Interface (VTI), tcpdump on the physical interface shows ESP packets, while tcpdump on the VTI interface shows the cleartext traffic.
root:
~]# ipsec whack --trafficstatus
006 #2: "mytunnel", type=ESP, add_time=1234567890, inBytes=336, outBytes=336, id='@east'
4.6.4. Configuring Site-to-Site VPN Using Libreswan
IPsec VPN, joining together two networks, an IPsec tunnel is created between two hosts, endpoints, which are configured to permit traffic from one or more subnets to pass through. They can therefore be thought of as gateways to the remote portion of the network. The configuration of the site-to-site VPN only differs from the host-to-host VPN in that one or more networks or subnets must be specified in the configuration file.
IPsec VPN, first configure a host-to-host IPsec VPN as described in Section 4.6.3, “Creating Host-To-Host VPN Using Libreswan” and then copy or move the file to a file with a suitable name, such as /etc/ipsec.d/my_site-to-site.conf. Using an editor running as root, edit the custom configuration file /etc/ipsec.d/my_site-to-site.conf as follows:
conn mysubnet
    also=mytunnel
    leftsubnet=192.0.1.0/24
    rightsubnet=192.0.2.0/24
    auto=start

conn mysubnet6
    also=mytunnel
    connaddrfamily=ipv6
    leftsubnet=2001:db8:0:1::/64
    rightsubnet=2001:db8:0:2::/64
    auto=start

conn mytunnel
    leftid=@west.example.com
    left=192.1.2.23
    leftrsasigkey=0sAQOrlo+hOafUZDlCQmXFrje/oZm [...] W2n417C/4urYHQkCvuIQ==
    rightid=@east.example.com
    right=192.1.2.45
    rightrsasigkey=0sAQO3fwC6nSSGgt64DWiYZzuHbc4 [...] D/v8t5YTQ==
authby=rsasigroot:
~]# ipsec auto --add mysubnet~]# ipsec auto --add mysubnet6~]# ipsec auto --up mysubnet
104 "mysubnet" #1: STATE_MAIN_I1: initiate
003 "mysubnet" #1: received Vendor ID payload [Dead Peer Detection]
003 "mytunnel" #1: received Vendor ID payload [FRAGMENTATION]
106 "mysubnet" #1: STATE_MAIN_I2: sent MI2, expecting MR2
108 "mysubnet" #1: STATE_MAIN_I3: sent MI3, expecting MR3
003 "mysubnet" #1: received Vendor ID payload [CAN-IKEv2]
004 "mysubnet" #1: STATE_MAIN_I4: ISAKMP SA established {auth=OAKLEY_RSA_SIG cipher=aes_128 prf=oakley_sha group=modp2048}
117 "mysubnet" #2: STATE_QUICK_I1: initiate
004 "mysubnet" #2: STATE_QUICK_I2: sent QI2, IPsec SA established tunnel mode {ESP=>0x9414a615 <0x1a8eb4ef xfrm=AES_128-HMAC_SHA1 NATOA=none NATD=none DPD=none}~]# ipsec auto --up mysubnet6
003 "mytunnel" #1: received Vendor ID payload [FRAGMENTATION]
117 "mysubnet" #2: STATE_QUICK_I1: initiate
004 "mysubnet" #2: STATE_QUICK_I2: sent QI2, IPsec SA established tunnel mode {ESP=>0x06fe2099 <0x75eaa862 xfrm=AES_128-HMAC_SHA1 NATOA=none NATD=none DPD=none}4.6.4.1. Verifying Site-to-Site VPN Using Libreswan
4.6.5. Configuring Site-to-Site Single Tunnel VPN Using Libreswan
IP addresses instead of their public IP addresses. This can be accomplished using a single tunnel. If the left host, with host name west, has internal IP address 192.0.1.254 and the right host, with host name east, has internal IP address 192.0.2.254, store the following configuration using a single tunnel to the /etc/ipsec.d/myvpn.conf file on both servers:
conn mysubnet
    leftid=@west.example.com
    leftrsasigkey=0sAQOrlo+hOafUZDlCQmXFrje/oZm [...] W2n417C/4urYHQkCvuIQ==
    left=192.1.2.23
    leftsourceip=192.0.1.254
    leftsubnet=192.0.1.0/24
    rightid=@east.example.com
    rightrsasigkey=0sAQO3fwC6nSSGgt64DWiYZzuHbc4 [...] D/v8t5YTQ==
    right=192.1.2.45
    rightsourceip=192.0.2.254
    rightsubnet=192.0.2.0/24
    auto=start
    authby=rsasig
4.6.6. Configuring Subnet Extrusion Using Libreswan
IPsec is often deployed in a hub-and-spoke architecture. Each leaf node has an IP range that is part of a larger range. Leaves communicate with each other through the hub. This is called subnet extrusion.
Example 4.2. Configuring Simple Subnet Extrusion Setup
10.0.0.0/8 and two branches that use a smaller /24 subnet.
conn branch1
    left=1.2.3.4
    leftid=@headoffice
    leftsubnet=0.0.0.0/0
    leftrsasigkey=0sA[...]
    #
    right=5.6.7.8
    rightid=@branch1
    rightsubnet=10.0.1.0/24
    rightrsasigkey=0sAXXXX[...]
    #
    auto=start
    authby=rsasig

conn branch2
    left=1.2.3.4
    leftid=@headoffice
    leftsubnet=0.0.0.0/0
    leftrsasigkey=0sA[...]
    #
    right=10.11.12.13
    rightid=@branch2
    rightsubnet=10.0.2.0/24
    rightrsasigkey=0sAYYYY[...]
    #
    auto=start
authby=rsasigconn branch1
left=1.2.3.4
leftid=@headoffice
leftsubnet=0.0.0.0/0
leftrsasigkey=0sA[...]
#
right=10.11.12.13
rightid=@branch2
rightsubnet=10.0.1.0/24
rightrsasigkey=0sAYYYY[...]
#
auto=start
authby=rsasig
conn passthrough
left=1.2.3.4
right=0.0.0.0
leftsubnet=10.0.1.0/24
rightsubnet=10.0.1.0/24
authby=never
type=passthrough
auto=route4.6.7. Configuring IKEv2 Remote Access VPN Libreswan
IP address, such as laptops. These are authenticated using certificates. To avoid needing to use the old IKEv1 XAUTH protocol, IKEv2 is used in the following example:
conn roadwarriors
    ikev2=insist
    # Support (roaming) MOBIKE clients (RFC 4555)
    mobike=yes
    fragmentation=yes
    left=1.2.3.4
    # if access to the LAN is given, enable this, otherwise use 0.0.0.0/0
    # leftsubnet=10.10.0.0/16
    leftsubnet=0.0.0.0/0
    leftcert=vpn-server.example.com
    leftid=%fromcert
    leftxauthserver=yes
    leftmodecfgserver=yes
    right=%any
    # trust our own Certificate Agency
    rightca=%same
    # pick an IP address pool to assign to remote users
    # 100.64.0.0/16 prevents RFC1918 clashes when remote users are behind NAT
    rightaddresspool=100.64.13.100-100.64.13.254
    # if you want remote clients to use some local DNS zones and servers
    modecfgdns="1.2.3.4, 5.6.7.8"
    modecfgdomains="internal.company.com, corp"
    rightxauthclient=yes
    rightmodecfgclient=yes
    authby=rsasig
    # optionally, run the client X.509 ID through pam to allow/deny client
    # pam-authorize=yes
    # load connection, don't initiate
    auto=add
    # kill vanished roadwarriors
    dpddelay=1m
    dpdtimeout=5m
dpdaction=%clearleft=1.2.3.4- The 1.2.3.4 value specifies the actual IP address or host name of your server.
leftcert=vpn-server.example.com- This option specifies a certificate referring to its friendly name or nickname that has been used to import the certificate. Usually, the name is generated as a part of a PKCS #12 certificate bundle in the form of a
.p12file. See thepkcs12(1)andpk12util(1)man pages for more information.
conn to-vpn-server
    ikev2=insist
    # pick up our dynamic IP
    left=%defaultroute
    leftsubnet=0.0.0.0/0
    leftcert=myname.example.com
    leftid=%fromcert
    leftmodecfgclient=yes
    # right can also be a DNS hostname
    right=1.2.3.4
    # if access to the remote LAN is required, enable this, otherwise use 0.0.0.0/0
    # rightsubnet=10.10.0.0/16
    rightsubnet=0.0.0.0/0
    # trust our own Certificate Agency
    rightca=%same
    authby=rsasig
    # allow narrowing to the server’s suggested assigned IP and remote subnet
    narrowing=yes
    # Support (roaming) MOBIKE clients (RFC 4555)
    mobike=yes
    # Initiate connection
auto=startauto=start- This option enables the user to connect to the VPN whenever the
ipsecsystem service is started. Replace it with theauto=addif you want to establish the connection later.
4.6.8. Configuring IKEv1 Remote Access VPN Libreswan and XAUTH with X.509
IP address and DNS information to roaming VPN clients as the connection is established by using the XAUTH IPsec extension. Extended authentication (XAUTH) can be deployed using PSK or X.509 certificates. Deploying using X.509 is more secure. Client certificates can be revoked by a certificate revocation list or by Online Certificate Status Protocol (OCSP). With X.509 certificates, individual clients cannot impersonate the server. With a PSK, also called Group Password, this is theoretically possible.
xauthby=pam- This uses the configuration in
/etc/pam.d/plutoto authenticate the user. Pluggable Authentication Modules (PAM) can be configured to use various back ends by itself. It can use the system account user-password scheme, an LDAP directory, a RADIUS server or a custom password authentication module. See the Using Pluggable Authentication Modules (PAM) chapter for more information. xauthby=file- This uses the
/etc/ipsec.d/passwdconfiguration file (it should not be confused with the/etc/ipsec.d/nsspasswordfile). The format of this file is similar to the Apache.htpasswdfile and the Apachehtpasswdcommand can be used to create entries in this file. However, after the user name and password, a third column is required with the connection name of theIPsecconnection used, for example when using aconn remoteusersto offer VPN to remove users, a password file entry should look as follows:user1:$apr1$MIwQ3DHb$1I69LzTnZhnCT2DPQmAOK.:remoteusersNote
When using thehtpasswdcommand, the connection name has to be manually added after the user:password part on each line. xauthby=alwaysok- The server always pretends the XAUTH user and password combination is correct. The client still has to specify a user name and a password, although the server ignores these. This should only be used when users are already identified by X.509 certificates, or when testing the VPN without needing an XAUTH back end.
conn xauth-rsa
    ikev2=never
    auto=add
    authby=rsasig
    pfs=no
    rekey=no
    left=ServerIP
    leftcert=vpn.example.com
    #leftid=%fromcert
    leftid=vpn.example.com
    leftsendcert=always
    leftsubnet=0.0.0.0/0
    rightaddresspool=10.234.123.2-10.234.123.254
    right=%any
    rightrsasigkey=%cert
    modecfgdns="1.2.3.4,8.8.8.8"
    modecfgdomains=example.com
    modecfgbanner="Authorized access is allowed"
    leftxauthserver=yes
    rightxauthclient=yes
    leftmodecfgserver=yes
    rightmodecfgclient=yes
    modecfgpull=yes
    xauthby=pam
    dpddelay=30
    dpdtimeout=120
    dpdaction=clear
    ike_frag=yes
    # for walled-garden on xauth failure
    # xauthfail=soft
# leftupdown=/custom/_updownxauthfail is set to soft, instead of hard, authentication failures are ignored, and the VPN is setup as if the user authenticated properly. A custom updown script can be used to check for the environment variable XAUTH_FAILED. Such users can then be redirected, for example, using iptables DNAT, to a “walled garden” where they can contact the administrator or renew a paid subscription to the service.
modecfgdomain value and the DNS entries to redirect queries for the specified domain to these specified nameservers. This allows roaming users to access internal-only resources using the internal DNS names. Note while IKEv2 supports a comma-separated list of domain names and nameserver IP addresses using modecfgdomains and modecfgdns, the IKEv1 protocol only supports one domain name, and libreswan only supports up to two nameserver IP addresses. Optionally, to send a banner text to VPN cliens, use the modecfgbanner option.
leftsubnet is not 0.0.0.0/0, split tunneling configuration requests are sent automatically to the client. For example, when using leftsubnet=10.0.0.0/8, the VPN client would only send traffic for 10.0.0.0/8 through the VPN.
xauthby=file- The administrator generated the password and stored it in the
/etc/ipsec.d/passwdfile. xauthby=pam- The password is obtained at the location specified in the PAM configuration in the
/etc/pam.d/plutofile. xauthby=alwaysok- The password is not checked and always accepted. Use this option for testing purposes or if you want to ensure compatibility for xauth-only clients.
Additional Resources
4.6.9. Using the Protection against Quantum Computers
ppk=yes to the connection definition. To require PPK, add ppk=insist. Then, each client can be given a PPK ID with a secret value that is communicated out-of-band (and preferably quantum safe). The PPK's should be very strong in randomness and not be based on dictionary words. The PPK ID and PPK data itself are stored in ipsec.secrets, for example:
@west @east : PPKS "user1" "thestringismeanttobearandomstr"
PPKS option refers to static PPKs. There is an experimental function to use one-time-pad based Dynamic PPKs. Upon each connection, a new part of a onetime pad is used as the PPK. When used, that part of the dynamic PPK inside the file is overwritten with zeroes to prevent re-use. If there is no more one time pad material left, the connection fails. See the ipsec.secrets(5) man page for more information.
Warning
4.6.10. Additional Resources
ipsec daemon.
4.6.10.1. Installed Documentation
ipsec(8)man page — Describes command options foripsec.ipsec.conf(5)man page — Contains information on configuringipsec.ipsec.secrets(5)man page — Describes the format of theipsec.secretsfile.ipsec_auto(8)man page — Describes the use of the auto command line client for manipulating LibreswanIPsecconnections established using automatic exchanges of keys.ipsec_rsasigkey(8)man page — Describes the tool used to generate RSA signature keys./usr/share/doc/libreswan-version/
4.6.10.2. Online Documentation
- https://libreswan.org
- The website of the upstream project.
- https://libreswan.org/wiki
- The Libreswan Project Wiki.
- https://libreswan.org/man/
- All Libreswan man pages.
- NIST Special Publication 800-77: Guide to IPsec VPNs
- Practical guidance to organizations on implementing security services based on IPsec.
4.7. Using OpenSSL
list-standard-commands, list-message-digest-commands, and list-cipher-commands output a list of all standard commands, message digest commands, or cipher commands, respectively, that are available in the present openssl utility.
list-cipher-algorithms and list-message-digest-algorithms list all cipher and message digest names. The pseudo-command list-public-key-algorithms lists all supported public key algorithms. For example, to list the supported public key algorithms, issue the following command:
~]$ openssl list-public-key-algorithms4.7.1. Creating and Managing Encryption Keys
~]$ openssl genpkey -algorithm RSA -out privkey.pemrsa_keygen_bits:numbits— The number of bits in the generated key. If not specified1024is used.rsa_keygen_pubexp:value— The RSA public exponent value. This can be a large decimal value, or a hexadecimal value if preceded by0x. The default value is65537.
3 as the public exponent, issue the following command:
~]$ openssl genpkey -algorithm RSA -out privkey.pem -pkeyopt rsa_keygen_bits:2048 \ -pkeyopt rsa_keygen_pubexp:3~]$ openssl genpkey -algorithm RSA -out privkey.pem -aes-128-cbc -pass pass:hello4.7.2. Generating Certificates
4.7.2.1. Creating a Certificate Signing Request
~]$ openssl req -new -key privkey.pem -out cert.csrcert.csr encoded in the default privacy-enhanced electronic mail (PEM) format. The name PEM is derived from “Privacy Enhancement for Internet Electronic Mail” described in RFC 1424. To generate a certificate file in the alternative DER format, use the -outform DER- The two letter country code for your country
- The full name of your state or province
- City or Town
- The name of your organization
- The name of the unit within your organization
- Your name or the host name of the system
- Your email address
/etc/pki/tls/openssl.cnf file. See man openssl.cnf(5) for more information.
4.7.2.2. Creating a Self-signed Certificate
366 days, issue a command in the following format:
~]$ openssl req -new -x509 -key privkey.pem -out selfcert.pem -days 3664.7.2.3. Creating a Certificate Using a Makefile
/etc/pki/tls/certs/ directory contains a Makefile which can be used to create certificates using the make command. To view the usage instructions, issue a command as follows:
~]$ make -f /etc/pki/tls/certs/Makefilemake command as follows:
~]$ cd /etc/pki/tls/certs/
~]$ make4.7.3. Verifying Certificates
~]$ openssl verify cert1.pem cert2.pemcert.pem and the intermediate certificates which you do not trust must be directly concatenated in untrusted.pem. The trusted root CA certificate must be either among the default CA listed in /etc/pki/tls/certs/ca-bundle.crt or in a cacert.pem file. Then, to verify the chain, issue a command in the following format:
~]$ openssl verify -untrusted untrusted.pem -CAfile cacert.pem cert.pemImportant
4.7.4. Encrypting and Decrypting a File
pkeyutl or enc built-in commands can be used. With pkeyutl, RSA keys are used to perform the encrypting and decrypting, whereas with enc, symmetric algorithms are used.
Using RSA Keys
plaintext, issue a command as follows:
~]$ openssl pkeyutl -in plaintext -out cyphertext -inkey privkey.pem-keyform DER option to specify the DER key format.
-engine option as follows:
~]$ openssl pkeyutl -in plaintext -out cyphertext -inkey privkey.pem -engine id~]$ openssl engine -t~]$ openssl pkeyutl -sign -in plaintext -out sigtext -inkey privkey.pem~]$ openssl pkeyutl -verifyrecover -in sig -inkey key.pem~]$ openssl pkeyutl -verify -in file -sigfile sig -inkey key.pemUsing Symmetric Algorithms
enc command with an unsupported option, such as -l:
~]$ openssl enc -laes-128-cbc algorithm, use the following syntax:
openssl enc -aes-128-cbcplaintext using the aes-128-cbc algorithm, enter the following command:
~]$ openssl enc -aes-128-cbc -in plaintext -out plaintext.aes-128-cbc-d option as in the following example:
~]$ openssl enc -aes-128-cbc -d -in plaintext.aes-128-cbc -out plaintextImportant
enc command does not properly support AEAD ciphers, and the ecb mode is not considered secure. For best results, do not use other modes than cbc, cfb, ofb, or ctr.
4.7.5. Generating Message Digests
dgst command produces the message digest of a supplied file or files in hexadecimal form. The command can also be used for digital signing and verification. The message digest command takes the following form:
openssl dgst algorithm -out filename -sign private-keymd5|md4|md2|sha1|sha|mdc2|ripemd160|dss1. At time of writing, the SHA1 algorithm is preferred. If you need to sign or verify using DSA, then the dss1 option must be used together with a file containing random data specified by the -rand option.
~]$ openssl dgst sha1 -out digest-file~]$ openssl dgst sha1 -out digest-file -sign privkey.pem4.7.6. Generating Password Hashes
passwd command computes the hash of a password. To compute the hash of a password on the command line, issue a command as follows:
~]$ openssl passwd password-crypt algorithm is used by default.
1, issue a command as follows:
~]$ openssl passwd -1 password-apr1 option specifies the Apache variant of the BSD algorithm.
Note
openssl passwd -1 password command only with FIPS mode disabled. Otherwise, the command does not work.
xx, issue a command as follows:
~]$ openssl passwd -salt xx -in password-file-out option to specify an output file. The -table will generate a table of password hashes with their corresponding clear text password.
4.7.7. Generating Random Data
~]$ openssl rand -out rand-file -rand seed-file:, as a list separator.
4.7.8. Benchmarking Your System
~]$ openssl speed algorithmopenssl speed and then press tab.
4.7.9. Configuring OpenSSL
/etc/pki/tls/openssl.cnf, referred to as the master configuration file, which is read by the OpenSSL library. It is also possible to have individual configuration files for each application. The configuration file contains a number of sections with section names as follows: [ section_name ]. Note the first part of the file, up until the first [ section_name ], is referred to as the default section. When OpenSSL is searching for names in the configuration file the named sections are searched first. All OpenSSL commands use the master OpenSSL configuration file unless an option is used in the command to specify an alternative configuration file. The configuration file is explained in detail in the config(5) man page.
4.8. Using stunnel
4.8.1. Installing stunnel
root:
~]# yum install stunnel4.8.2. Configuring stunnel as a TLS Wrapper
- You need a valid certificate for stunnel regardless of what service you use it with. If you do not have a suitable certificate, you can apply to a Certificate Authority to obtain one, or you can create a self-signed certificate.
Warning
Always use certificates signed by a Certificate Authority for servers running in a production environment. Self-signed certificates are only appropriate for testing purposes or private networks.See Section 4.7.2.1, “Creating a Certificate Signing Request” for more information about certificates granted by a Certificate Authority. On the other hand, to create a self-signed certificate for stunnel, enter the/etc/pki/tls/certs/directory and type the following command asroot:certs]# make stunnel.pemAnswer all of the questions to complete the process. - When you have a certificate, create a configuration file for stunnel. It is a text file in which every line specifies an option or the beginning of a service definition. You can also keep comments and empty lines in the file to improve its legibility, where comments start with a semicolon.The stunnel RPM package contains the
/etc/stunnel/directory, in which you can store the configuration file. Although stunnel does not require any special format of the file name or its extension, use/etc/stunnel/stunnel.conf. The following content configures stunnel as a TLS wrapper:cert = /etc/pki/tls/certs/stunnel.pem ; Allow only TLS, thus avoiding SSL sslVersion = TLSv1 chroot = /var/run/stunnel setuid = nobody setgid = nobody pid = /stunnel.pid socket = l:TCP_NODELAY=1 socket = r:TCP_NODELAY=1 [service_name] accept = port connect = port TIMEOUTclose = 0Alternatively, you can avoid SSL by replacing the line containingsslVersion = TLSv1with the following lines:options = NO_SSLv2 options = NO_SSLv3The purpose of the options is as follows:cert— the path to your certificatesslVersion— the version of SSL; note that you can useTLShere even though SSL and TLS are two independent cryptographic protocolschroot— the changed root directory in which the stunnel process runs, for greater securitysetuid,setgid— the user and group that the stunnel process runs as;nobodyis a restricted system accountpid— the file in which stunnel saves its process ID, relative tochrootsocket— local and remote socket options; in this case, disable Nagle's algorithm to improve network latency[service_name]— the beginning of the service definition; the options used below this line apply to the given service only, whereas the options above affect stunnel globallyaccept— the port to listen onconnect— the port to connect to; this must be the port that the service you are securing usesTIMEOUTclose— how many seconds to wait for the close_notify alert from the client;0instructs stunnel not to wait at alloptions— OpenSSL library options
Example 4.3. Securing CUPS
To configure stunnel as a TLS wrapper for CUPS, use the following values:[cups] accept = 632 connect = 631Instead of632, you can use any free port that you prefer.631is the port that CUPS normally uses. - Create the
chrootdirectory and give the user specified by thesetuidoption write access to it. To do so, enter the following commands asroot:~]# mkdir /var/run/stunnel ~]# chown nobody:nobody /var/run/stunnelThis allows stunnel to create the PID file. - If your system is using firewall settings that disallow access to the new port, change them accordingly. See Section 5.6.7, “Opening Ports using GUI” for details.
- When you have created the configuration file and the
chrootdirectory, and when you are sure that the specified port is accessible, you are ready to start using stunnel.
4.8.3. Starting, Stopping, and Restarting stunnel
root:
~]# stunnel /etc/stunnel/stunnel.conf/var/log/secure to log its output.
root:
~]# kill `cat /var/run/stunnel/stunnel.pid`4.9. Encryption
4.9.1. Using LUKS Disk Encryption
Overview of LUKS
- What LUKS does
- LUKS encrypts entire block devices and is therefore well-suited for protecting the contents of mobile devices such as removable storage media or laptop disk drives.
- The underlying contents of the encrypted block device are arbitrary. This makes it useful for encrypting
swapdevices. This can also be useful with certain databases that use specially formatted block devices for data storage. - LUKS uses the existing device mapper kernel subsystem.
- LUKS provides passphrase strengthening which protects against dictionary attacks.
- LUKS devices contain multiple key slots, allowing users to add backup keys or passphrases.
- What LUKS does not do:
- LUKS is not well-suited for scenarios requiring many (more than eight) users to have distinct access keys to the same device.
- LUKS is not well-suited for applications requiring file-level encryption.
Important
4.9.1.1. LUKS Implementation in Red Hat Enterprise Linux
cryptsetup --help) is aes-cbc-essiv:sha256 (ESSIV - Encrypted Salt-Sector Initialization Vector). Note that the installation program, Anaconda, uses by default XTS mode (aes-xts-plain64). The default key size for LUKS is 256 bits. The default key size for LUKS with Anaconda (XTS mode) is 512 bits. Ciphers that are available are:
- AES - Advanced Encryption Standard - FIPS PUB 197
- Twofish (a 128-bit block cipher)
- Serpent
- cast5 - RFC 2144
- cast6 - RFC 2612
4.9.1.2. Manually Encrypting Directories
Warning
- Enter runlevel 1 by typing the following at a shell prompt as root:
telinit 1 - Unmount your existing
/home:umount /home - If the command in the previous step fails, use
fuserto find processes hogging/homeand kill them:fuser -mvk /home - Verify
/homeis no longer mounted:grep home /proc/mounts - Fill your partition with random data:
shred -v --iterations=1 /dev/VG00/LV_homeThis command proceeds at the sequential write speed of your device and may take some time to complete. It is an important step to ensure no unencrypted data is left on a used device, and to obfuscate the parts of the device that contain encrypted data as opposed to just random data. - Initialize your partition:
cryptsetup --verbose --verify-passphrase luksFormat /dev/VG00/LV_home - Open the newly encrypted device:
cryptsetup luksOpen /dev/VG00/LV_home home - Make sure the device is present:
ls -l /dev/mapper | grep home - Create a file system:
mkfs.ext3 /dev/mapper/home - Mount the file system:
mount /dev/mapper/home /home - Make sure the file system is visible:
df -h | grep home - Add the following to the
/etc/crypttabfile:home /dev/VG00/LV_home none - Edit the
/etc/fstabfile, removing the old entry for/homeand adding the following line:/dev/mapper/home /home ext3 defaults 1 2 - Restore default SELinux security contexts:
/sbin/restorecon -v -R /home - Reboot the machine:
shutdown -r now - The entry in the
/etc/crypttabmakes your computer ask yourlukspassphrase on boot. - Log in as root and restore your backup.
4.9.1.3. Add a New Passphrase to an Existing Device
cryptsetup luksAddKey device4.9.1.4. Remove a Passphrase from an Existing Device
cryptsetup luksRemoveKey device4.9.1.5. Creating Encrypted Block Devices in Anaconda
Note
Note
kickstart to set a separate passphrase for each new encrypted block device.
4.9.1.6. Additional Resources
4.9.2. Creating GPG Keys
4.9.2.1. Creating GPG Keys in GNOME
- Install the Seahorse utility, which makes GPG key management easier:
~]# yum install seahorse - To create a key, from the → menu select , which starts the application Seahorse.
- From the menu select and then PGP Key. Then click .
- Type your full name, email address, and an optional comment describing who you are (for example: John C. Smith,
jsmith@example.com, Software Engineer). Click . A dialog is displayed asking for a passphrase for the key. Choose a strong passphrase but also easy to remember. Click and the key is created.
Warning
0x to the key ID, as in 0x6789ABCD. You should make a backup of your private key and store it somewhere secure.
4.9.2.2. Creating GPG Keys in KDE
- Start the KGpg program from the main menu by selecting → → . If you have never used KGpg before, the program walks you through the process of creating your own GPG keypair.
- A dialog box appears prompting you to create a new key pair. Enter your name, email address, and an optional comment. You can also choose an expiration time for your key, as well as the key strength (number of bits) and algorithms.
- Enter your passphrase in the next dialog box. At this point, your key appears in the main KGpg window.
Warning
0x to the key ID, as in 0x6789ABCD. You should make a backup of your private key and store it somewhere secure.
4.9.2.3. Creating GPG Keys Using the Command Line
- Use the following shell command:
~]$ gpg2 --gen-keyThis command generates a key pair that consists of a public and a private key. Other people use your public key to authenticate and decrypt your communications. Distribute your public key as widely as possible, especially to people who you know will want to receive authentic communications from you, such as a mailing list. - A series of prompts directs you through the process. Press the Enter key to assign a default value if desired. The first prompt asks you to select what kind of key you prefer:
Please select what kind of key you want:
(1) RSA and RSA (default)
(2) DSA and Elgamal
(3) DSA (sign only)
(4) RSA (sign only)
Your selection?
In almost all cases, the default is the correct choice. An RSA/RSA key allows you not only to sign communications, but also to encrypt files. - Choose the key size:
RSA keys may be between 1024 and 4096 bits long.
What keysize do you want? (2048)
Again, the default, 2048, is sufficient for almost all users, and represents an extremely strong level of security. - Choose when the key will expire. It is a good idea to choose an expiration date instead of using the default, which is
none. If, for example, the email address on the key becomes invalid, an expiration date will remind others to stop using that public key.Please specify how long the key should be valid. 0 = key does not expire d = key expires in n days w = key expires in n weeks m = key expires in n months y = key expires in n years key is valid for? (0)Entering a value of 1y, for example, makes the key valid for one year. (You may change this expiration date after the key is generated, if you change your mind.) - Before the gpg2 application asks for signature information, the following prompt appears:
Is this correct (y/N)?Enteryto finish the process. - Enter your name and email address for your GPG key. Remember this process is about authenticating you as a real individual. For this reason, include your real name. If you choose a bogus email address, it will be more difficult for others to find your public key. This makes authenticating your communications difficult. If you are using this GPG key for self-introduction on a mailing list, for example, enter the email address you use on that list.Use the comment field to include aliases or other information. (Some people use different keys for different purposes and identify each key with a comment, such as "Office" or "Open Source Projects.")
- At the confirmation prompt, enter the letter
Oto continue if all entries are correct, or use the other options to fix any problems. Finally, enter a passphrase for your secret key. The gpg2 program asks you to enter your passphrase twice to ensure you made no typing errors. - Finally, gpg2 generates random data to make your key as unique as possible. Move your mouse, type random keys, or perform other tasks on the system during this step to speed up the process. Once this step is finished, your keys are complete and ready to use:
pub 1024D/1B2AFA1C 2005-03-31 John Q. Doe <jqdoe@example.com> Key fingerprint = 117C FE83 22EA B843 3E86 6486 4320 545E 1B2A FA1C sub 1024g/CEA4B22E 2005-03-31 [expires: 2006-03-31] - The key fingerprint is a shorthand "signature" for your key. It allows you to confirm to others that they have received your actual public key without any tampering. You do not need to write this fingerprint down. To display the fingerprint at any time, use this command, substituting your email address:
~]$ gpg2 --fingerprint jqdoe@example.comYour "GPG key ID" consists of 8 hex digits identifying the public key. In the example above, the GPG key ID is1B2AFA1C. In most cases, if you are asked for the key ID, prepend0xto the key ID, as in0x6789ABCD.
Warning
4.9.2.4. About Public Key Encryption
4.9.3. Using openCryptoki for Public-Key Cryptography
4.9.3.1. Installing openCryptoki and Starting the Service
root:
~]# yum install opencryptokipkcsslotd daemon. Start the daemon for the current session by executing the following command as root:
~]# systemctl start pkcsslotd~]# systemctl enable pkcsslotd4.9.3.2. Configuring and Using openCryptoki
pkcsslotd daemon reads the /etc/opencryptoki/opencryptoki.conf configuration file, which it uses to collect information about the tokens configured to work with the system and about their slots.
pkcsslotd daemon at run time, use the pkcsconf utility. This tool allows you to show and configure the state of the daemon, as well as to list and modify the currently configured slots and tokens. For example, to display information about tokens, issue the following command (note that all non-root users that need to communicate with the pkcsslotd daemon must be a part of the pkcs11 system group):
~]$ pkcsconf -tpkcsconf tool.
Warning
pkcs11 group, as all members of this group have the right to block other users of the openCryptoki service from accessing configured PKCS#11 tokens. All members of this group can also execute arbitrary code with the privileges of any other users of openCryptoki.
4.9.4. Using Smart Cards to Supply Credentials to OpenSSH
~/.ssh/authorized_keys file. Install the PKCS#11 library provided by the opensc package on the client. PKCS#11 is a Public-Key Cryptography Standard that defines an application programming interface (API) to cryptographic devices called tokens. Enter the following command as root:
~]# yum install opensc4.9.4.1. Retrieving a Public Key from a Card
ssh-keygen command. Specify the shared library (OpenSC in the following example) with the -D directive.
~]$ ssh-keygen -D /usr/lib64/pkcs11/opensc-pkcs11.so
ssh-rsa AAAAB3NzaC1yc[...]+g4Mb9
4.9.4.2. Storing a Public Key on a Server
smartcard.pub in the following example) and using the ssh-copy-id command:
~]$ ssh-copy-id -f -i smartcard.pub user@hostname
user@hostname's password:

Number of key(s) added: 1

Now try logging into the machine, with:   "ssh user@hostname"
and check to make sure that only the key(s) you wanted were added.SSH_COPY_ID_LEGACY=1 environment variable or the -f option.
4.9.4.3. Authenticating to a Server with a Key on a Smart Card
[localhost ~]$ ssh -I /usr/lib64/pkcs11/opensc-pkcs11.so hostname
Enter PIN for 'Test (UserPIN)':
[hostname ~]$PKCS#11 library in your ~/.ssh/config file:
Host hostname
PKCS11Provider /usr/lib64/pkcs11/opensc-pkcs11.sossh command without any additional options:
[localhost ~]$ ssh hostname
Enter PIN for 'Test (UserPIN)':
[hostname ~]$
4.9.4.4. Using ssh-agent to Automate PIN Logging In
ssh-agent. You can skip this step in most cases because ssh-agent is already running in a typical session. Use the following command to check whether you can connect to your authentication agent:
~]$ ssh-add -l
Could not open a connection to your authentication agent.
~]$ eval `ssh-agent`~]$ ssh-add -s /usr/lib64/pkcs11/opensc-pkcs11.so
Enter PIN for 'Test (UserPIN)':
Card added: /usr/lib64/pkcs11/opensc-pkcs11.sossh-agent, use the following command:
~]$ ssh-add -e /usr/lib64/pkcs11/opensc-pkcs11.so
Card removed: /usr/lib64/pkcs11/opensc-pkcs11.so
Note
pin_cache_ignore_user_consent = true; option in the /etc/opensc-x86_64.conf.
4.9.4.5. Additional Resources
PKCS#11 security tokens, see the pkcs11-tool(1) man page.
4.9.5. Trusted and Encrypted Keys
RSA key called the storage root key (SRK).
AES encryption, which makes them faster than trusted keys. Encrypted keys are created using kernel-generated random numbers and encrypted by a master key when they are exported into user-space blobs. This master key can be either a trusted key or a user key, which is their main disadvantage — if the master key is not a trusted key, the encrypted key is only as secure as the user key used to encrypt it.
4.9.5.1. Working with keys
- For RHEL kernels with the
x86_64architecture, the TRUSTED_KEYS and ENCRYPTED_KEYS code is built in as a part of the core kernel code. As a result, thex86_64system users can use these keys without loading the trusted and encrypted-keys modules. - For all other architectures, it is necessary to load the trusted and encrypted-keys kernel modules before performing any operations with the keys. To load the kernel modules, execute the following command:
~]# modprobe trusted encrypted-keys
Note
tpm_setactive command from the tpm-tools package of utilities. Also, the TrouSers application needs to be installed (the trousers package), and the tcsd daemon, which is a part of the TrouSers suite, running to communicate with the TPM.
keyctl command with the following syntax:
~]$ keyctl add trusted name "new keylength [options]" keyring~]$ keyctl add trusted kmk "new 32" @u
642500861kmk with the length of 32 bytes (256 bits) and places it in the user keyring (@u). The keys may have a length of 32 to 128 bytes (256 to 1024 bits). Use the show subcommand to list the current structure of the kernel keyrings:
~]$ keyctl show
Session Keyring
       -3 --alswrv    500   500  keyring: _ses
 97833714 --alswrv    500    -1   \_ keyring: _uid.1000
642500861 --alswrv 500 500 \_ trusted: kmkprint subcommand outputs the encrypted key to the standard output. To export the key to a user-space blob, use the pipe subcommand as follows:
~]$ keyctl pipe 642500861 > kmk.blobadd command again with the blob as an argument:
~]$ keyctl add trusted kmk "load `cat kmk.blob`" @u
268728824~]$ keyctl add encrypted name "new [format] key-type:master-key-name keylength" keyring~]$ keyctl add encrypted encr-key "new trusted:kmk 32" @u
159771175~]$ keyctl add user kmk-user "`dd if=/dev/urandom bs=1 count=32 2>/dev/null`" @u
427069434~]$ keyctl add encrypted encr-key "new user:kmk-user 32" @u
1012412758list subcommand can be used to list all keys in the specified kernel keyring:
~]$ keyctl list @u
2 keys in keyring:
427069434: --alswrv  1000  1000 user: kmk-user
1012412758: --alswrv  1000  1000 encrypted: encr-key
Important
4.9.5.2. Additional Resources
Installed Documentation
- keyctl(1) — Describes the use of the keyctl utility and its subcommands.
Online Documentation
- Red Hat Enterprise Linux 7 SELinux User's and Administrator's Guide — The SELinux User's and Administrator's Guide for Red Hat Enterprise Linux 7 describes the basic principles of SELinux and documents in detail how to configure and use SELinux with various services, such as the Apache HTTP Server.
- https://www.kernel.org/doc/Documentation/security/keys-trusted-encrypted.txt — The official documentation about the trusted and encrypted keys feature of the Linux kernel.
See Also
- Section A.1.1, “Advanced Encryption Standard — AES” provides a concise description of the
Advanced Encryption Standard. - Section A.2, “Public-key Encryption” describes the public-key cryptographic approach and the various cryptographic protocols it uses.
4.9.6. Using the Random Number Generator
rngd daemon, which is a part of the rng-tools package, is capable of using both environmental noise and hardware random number generators for extracting entropy. The daemon checks whether the data supplied by the source of randomness is sufficiently random and then stores it in the random-number entropy pool of the kernel. The random numbers it generates are made available through the /dev/random and /dev/urandom character devices.
/dev/random and /dev/urandom is that the former is a blocking device, which means it stops supplying numbers when it determines that the amount of entropy is insufficient for generating a properly random output. Conversely, /dev/urandom is a non-blocking source, which reuses the entropy pool of the kernel and is thus able to provide an unlimited supply of pseudo-random numbers, albeit with less entropy. As such, /dev/urandom should not be used for creating long-term cryptographic keys.
root user:
~]# yum install rng-toolsrngd daemon, execute the following command as root:
~]# systemctl start rngd~]# systemctl status rngdrngd daemon with optional parameters, execute it directly. For example, to specify an alternative source of random-number input (other than /dev/hwrandom), use the following command:
~]# rngd --rng-device=/dev/hwrngrngd daemon with /dev/hwrng as the device from which random numbers are read. Similarly, you can use the -o (or --random-device) option to choose the kernel device for random-number output (other than the default /dev/random). See the rngd(8) manual page for a list of all available options.
root:
~]# rngd -vf
Unable to open file: /dev/tpm0
Available entropy sources:
	DRNG
Note
rngd -v command, the according process continues running in background. The -b, --background option (become a daemon) is applied by default.
~]$ cat /proc/cpuinfo | grep rdrandNote
/dev/random, use the rngtest tool as follows:
~]$ cat /dev/random | rngtest -c 1000
rngtest 5
Copyright (c) 2004 by Henrique de Moraes Holschuh
This is free software; see the source for copying conditions. There is NO warranty; not even for MERCHANTABILITY or FITNESS FOR A PARTICULAR PURPOSE.

rngtest: starting FIPS tests...
rngtest: bits received from input: 20000032
rngtest: FIPS 140-2 successes: 998
rngtest: FIPS 140-2 failures: 2
rngtest: FIPS 140-2(2001-10-10) Monobit: 0
rngtest: FIPS 140-2(2001-10-10) Poker: 0
rngtest: FIPS 140-2(2001-10-10) Runs: 0
rngtest: FIPS 140-2(2001-10-10) Long run: 2
rngtest: FIPS 140-2(2001-10-10) Continuous run: 0
rngtest: input channel speed: (min=1.171; avg=8.453; max=11.374)Mibits/s
rngtest: FIPS tests speed: (min=15.545; avg=143.126; max=157.632)Mibits/s
rngtest: Program run time: 2390520 microseconds/dev/random), and QEMU will use /dev/random as the source for entropy requested by guests.
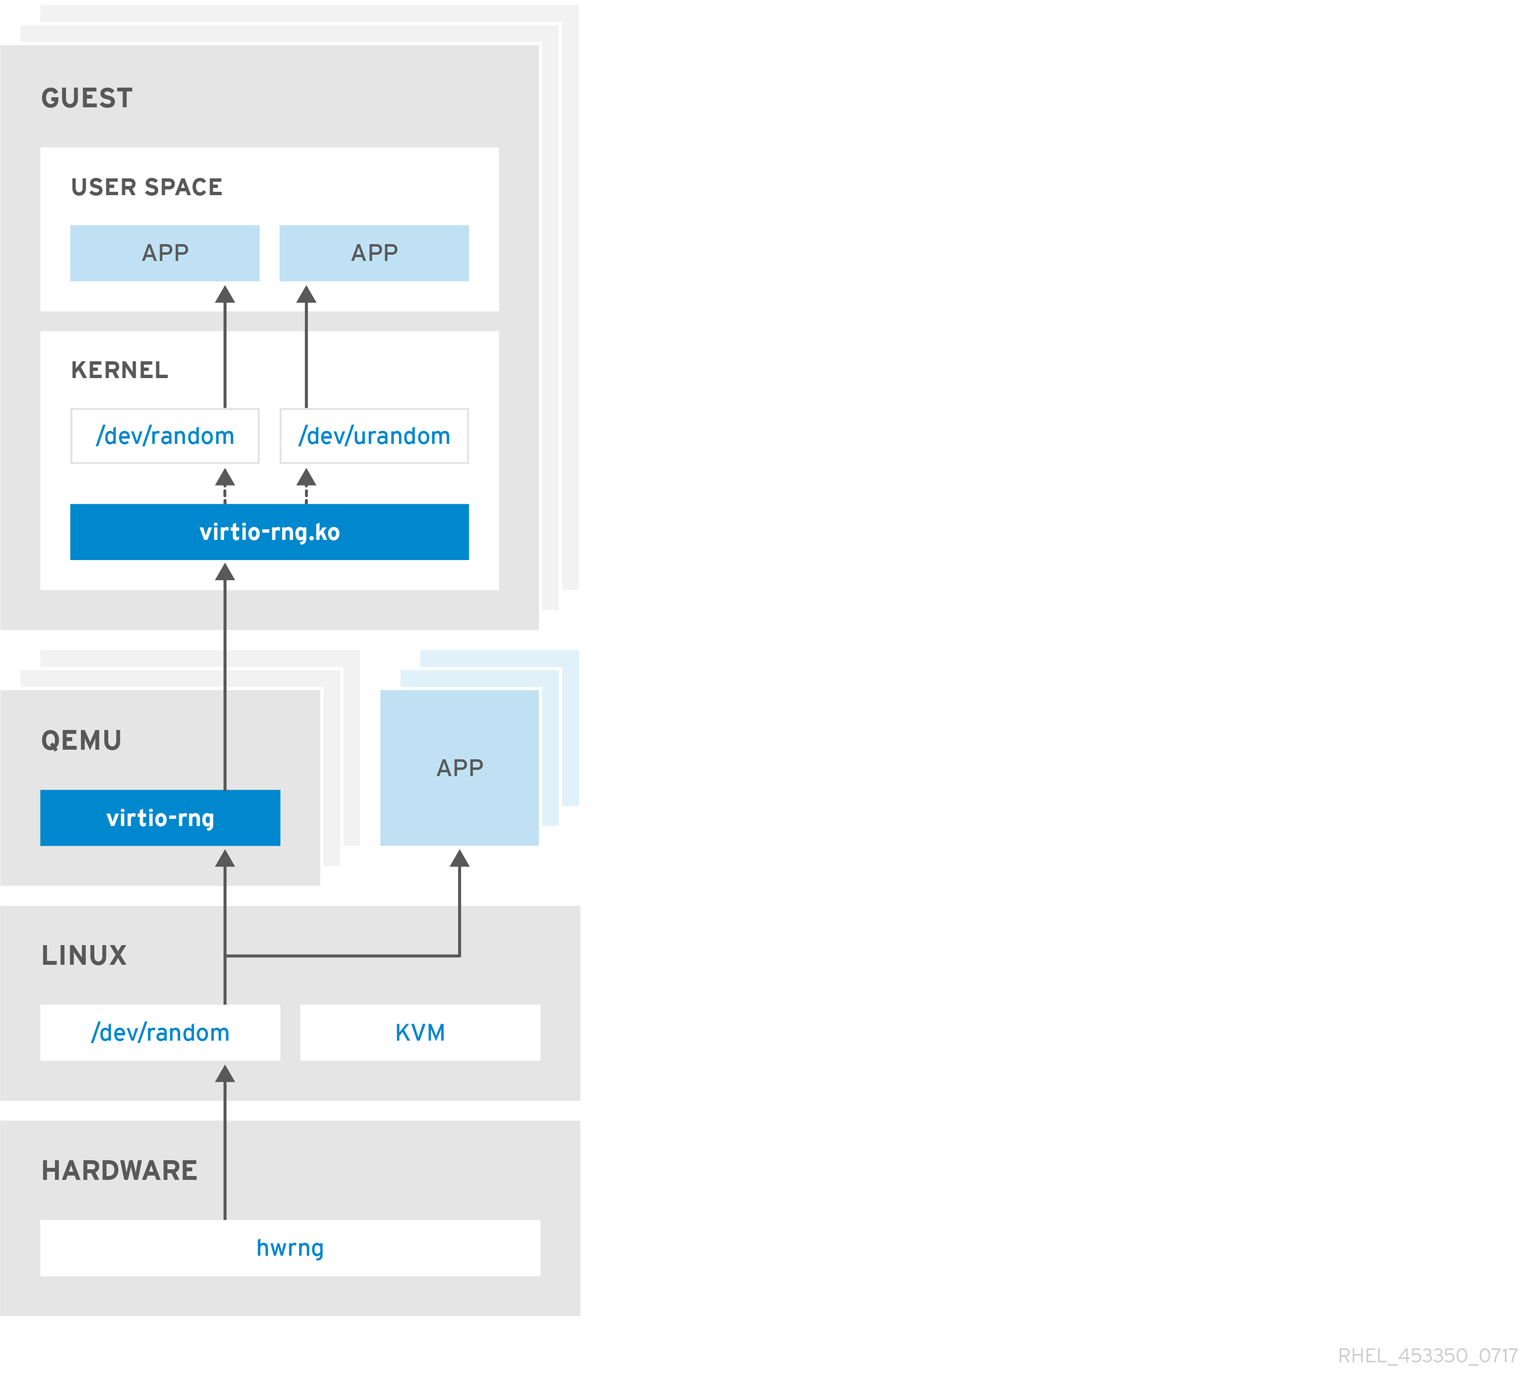
Figure 4.1. The virtio RNG device
Important
4.10. Configuring Automated Unlocking of Encrypted Volumes using Policy-Based Decryption
4.10.1. Network-Bound Disk Encryption
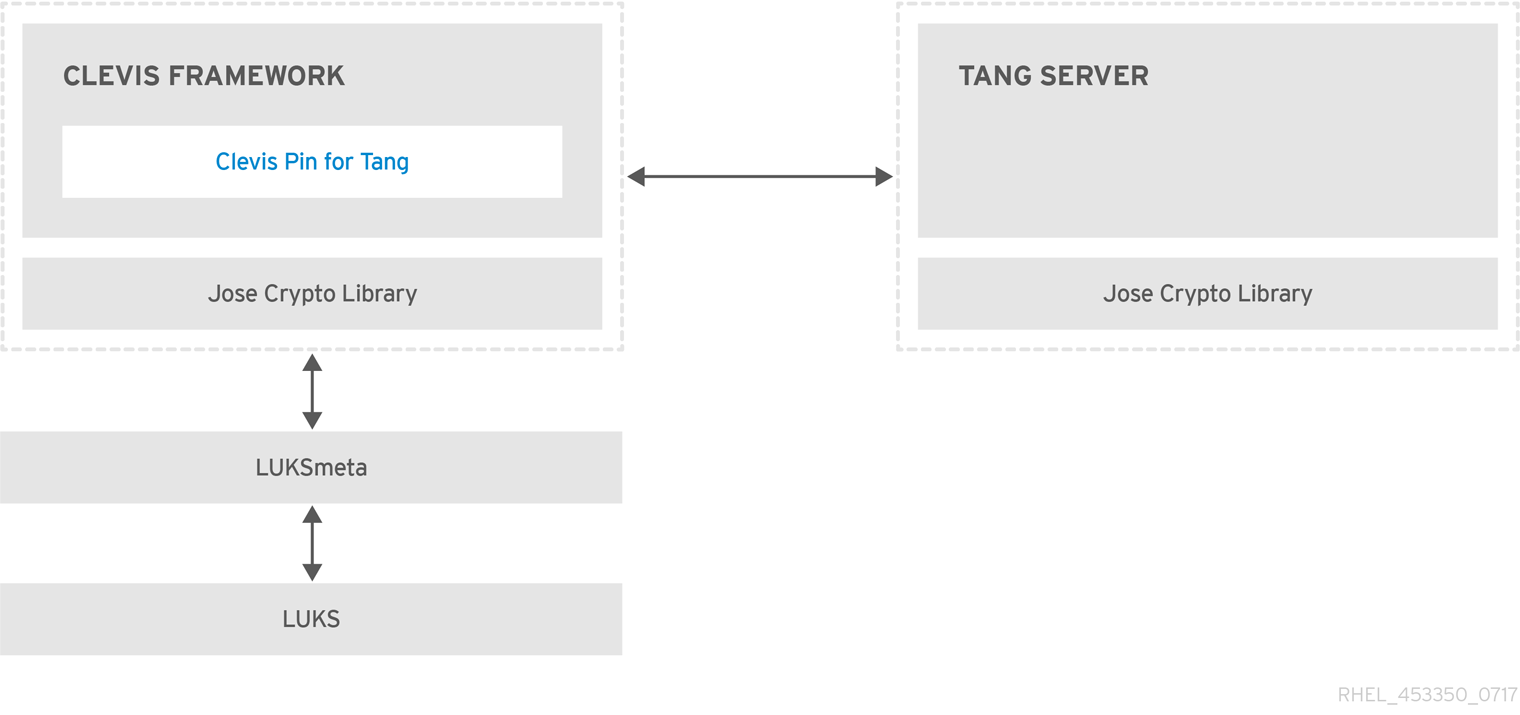
Figure 4.2. The Network-Bound Disk Encryption using Clevis and Tang
/tmp, /var, and /usr/local/ directories, that contain a file system requiring to start before the network connection is established are considered to be root volumes. Additionally, all mount points that are used by services run before the network is up, such as /var/log/, var/log/audit/, or /opt, also require to be mounted early after switching to a root device. You can also identify a root volume by not having the _netdev option in the /etc/fstab file.
4.10.2. Installing an Encryption Client - Clevis
root:
~]# yum install clevisclevis decrypt command and provide the cipher text (JWE):
~]$ clevis decrypt < JWE > PLAINTEXT~]$ clevis
Usage: clevis COMMAND [OPTIONS]
clevis decrypt Decrypts using the policy defined at encryption time
clevis encrypt http Encrypts using a REST HTTP escrow server policy
clevis encrypt sss Encrypts using a Shamir's Secret Sharing policy
clevis encrypt tang Encrypts using a Tang binding server policy
clevis encrypt tpm2 Encrypts using a TPM2.0 chip binding policy
~]$ clevis decrypt
Usage: clevis decrypt < JWE > PLAINTEXT
Decrypts using the policy defined at encryption time
~]$ clevis encrypt tang
Usage: clevis encrypt tang CONFIG < PLAINTEXT > JWE
Encrypts using a Tang binding server policy
This command uses the following configuration properties:
url: <string> The base URL of the Tang server (REQUIRED)
thp: <string> The thumbprint of a trusted signing key
adv: <string> A filename containing a trusted advertisement
adv: <object> A trusted advertisement (raw JSON)
Obtaining the thumbprint of a trusted signing key is easy. If you
have access to the Tang server's database directory, simply do:
$ jose jwk thp -i $DBDIR/$SIG.jwk
Alternatively, if you have certainty that your network connection
is not compromised (not likely), you can download the advertisement
yourself using:
$ curl -f $URL/adv > adv.jws4.10.3. Deploying a Tang Server with SELinux in Enforcing Mode
tangd_port_t SELinux type, and a Tang server can be deployed as a confined service in SELinux enforcing mode.
Prerequisites
- The policycoreutils-python-utils package and its dependencies are installed.
Procedure
- To install the tang package and its dependencies, enter the following command as
root:~]# yum install tang - Pick an unoccupied port, for example, 7500/tcp, and allow the tangd service to bind to that port:
~]# semanage port -a -t tangd_port_t -p tcp 7500Note that a port can be used only by one service at a time, and thus an attempt to use an already occupied port implies theValueError: Port already definederror message. - Open the port in the firewall:
~]# firewall-cmd --add-port=7500/tcp ~]# firewall-cmd --runtime-to-permanent - Enable the
tangdservice using systemd:~]# systemctl enable tangd.socket Created symlink from /etc/systemd/system/multi-user.target.wants/tangd.socket to /usr/lib/systemd/system/tangd.socket. - Create an override file:
~]# systemctl edit tangd.socket - In the following editor screen, which opens an empty
override.conffile located in the/etc/systemd/system/tangd.socket.d/directory, change the default port for the Tang server from 80 to the previously picked number by adding the following lines:[Socket] ListenStream= ListenStream=7500Save the file and exit the editor. - Reload the changed configuration and start the
tangdservice:~]# systemctl daemon-reload - Check that your configuration is working:
~]# systemctl show tangd.socket -p Listen Listen=[::]:7500 (Stream) - Start the
tangdservice:~]# systemctl start tangd.socket
tangd uses the systemd socket activation mechanism, the server starts as soon as the first connection comes in. A new set of cryptographic keys is automatically generated at the first start.
jose utility. Enter the jose -h command or see the jose(1) man pages for more information.
Example 4.4. Rotating Tang Keys
/var/db/tang. For example, you can create new signature and exchange keys with the following commands:
~]# DB=/var/db/tang
~]# jose jwk gen -i '{"alg":"ES512"}' -o $DB/new_sig.jwk
~]# jose jwk gen -i '{"alg":"ECMR"}' -o $DB/new_exc.jwk. to hide them from advertisement. Note that the file names in the following example differs from real and unique file names in the key database directory.
~]# mv $DB/old_sig.jwk $DB/.old_sig.jwk
~]# mv $DB/old_exc.jwk $DB/.old_exc.jwkWarning
4.10.3.1. Deploying High-Availability Systems
- Client Redundancy (Recommended)Clients should be configured with the ability to bind to multiple Tang servers. In this setup, each Tang server has its own keys and clients are able to decrypt by contacting a subset of these servers. Clevis already supports this workflow through its
sssplug-in.For more information about this setup, see the following man pages:tang(8), section High Availabilityclevis(1), section Shamir's Secret Sharingclevis-encrypt-sss(1)
Red Hat recommends this method for a high-availability deployment. - Key SharingFor redundancy purposes, more than one instance of Tang can be deployed. To set up a second or any subsequent instance, install the tang packages and copy the key directory to the new host using
rsyncover SSH. Note that Red Hat does not recommend this method because sharing keys increases the risk of key compromise and requires additional automation infrastructure.
4.10.4. Deploying an Encryption Client for an NBDE system with Tang
Prerequisites
- The Clevis framework is installed. See Section 4.10.2, “Installing an Encryption Client - Clevis”
- A Tang server or its downloaded advertisement is available. See Section 4.10.3, “Deploying a Tang Server with SELinux in Enforcing Mode”
Procedure
clevis encrypt tang sub-command:
~]$ clevis encrypt tang '{"url":"http://tang.srv"}' < PLAINTEXT > JWE
The advertisement contains the following signing keys:

_OsIk0T-E2l6qjfdDiwVmidoZjA

Do you wish to trust these keys? [ynYN] yclevis decrypt command and provide the cipher text (JWE):
~]$ clevis decrypt < JWE > PLAINTEXTclevis-encrypt-tang(1) man page or use the built-in CLI help:
~]$ clevis
Usage: clevis COMMAND [OPTIONS]

  clevis decrypt      Decrypts using the policy defined at encryption time
  clevis encrypt http Encrypts using a REST HTTP escrow server policy
  clevis encrypt sss  Encrypts using a Shamir's Secret Sharing policy
  clevis encrypt tang Encrypts using a Tang binding server policy
  clevis luks bind    Binds a LUKSv1 device using the specified policy
  clevis luks unlock  Unlocks a LUKSv1 volume

~]$ clevis decrypt
Usage: clevis decrypt < JWE > PLAINTEXT

Decrypts using the policy defined at encryption time

~]$ clevis encrypt tang
Usage: clevis encrypt tang CONFIG < PLAINTEXT > JWE

Encrypts using a Tang binding server policy

This command uses the following configuration properties:

  url: <string>   The base URL of the Tang server (REQUIRED)

  thp: <string>   The thumbprint of a trusted signing key

  adv: <string>   A filename containing a trusted advertisement
  adv: <object>   A trusted advertisement (raw JSON)

Obtaining the thumbprint of a trusted signing key is easy. If you
have access to the Tang server's database directory, simply do:

    $ jose jwk thp -i $DBDIR/$SIG.jwk

Alternatively, if you have certainty that your network connection
is not compromised (not likely), you can download the advertisement
yourself using:

    $ curl -f $URL/adv > adv.jws
4.10.5. Deploying an Encryption Client with a TPM 2.0 Policy
clevis encrypt tpm2 sub-command with the only argument in form of the JSON configuration object:
~]$ clevis encrypt tpm2 '{}' < PLAINTEXT > JWE~]$ clevis encrypt tpm2 '{"hash":"sha1","key":"rsa"}' < PLAINTEXT > JWE~]$ clevis decrypt < JWE > PLAINTEXT~]$ clevis encrypt tpm2 '{"pcr_bank":"sha1","pcr_ids":"0,1"}' < PLAINTEXT > JWEclevis-encrypt-tpm2(1) man page.
4.10.6. Configuring Manual Enrollment of Root Volumes
clevis luks bind command:
~]# yum install clevis-luks~]# clevis luks bind -d /dev/sda tang '{"url":"http://tang.srv"}'
The advertisement contains the following signing keys:
_OsIk0T-E2l6qjfdDiwVmidoZjA
Do you wish to trust these keys? [ynYN] y
You are about to initialize a LUKS device for metadata storage.
Attempting to initialize it may result in data loss if data was
already written into the LUKS header gap in a different format.
A backup is advised before initialization is performed.
Do you wish to initialize /dev/sda? [yn] y
Enter existing LUKS password:- Creates a new key with the same entropy as the LUKS master key.
- Encrypts the new key with Clevis.
- Stores the Clevis JWE object in the LUKS header with LUKSMeta.
- Enables the new key for use with LUKS.
clevis-luks-bind(1) man page.
Note
clevis luks bind command takes one of the slots.
luksmeta show command:
~]# luksmeta show -d /dev/sda
0   active empty
1   active cb6e8904-81ff-40da-a84a-07ab9ab5715e
2 inactive empty
3 inactive empty
4 inactive empty
5 inactive empty
6 inactive empty
7 inactive empty~]# yum install clevis-dracut
~]# dracut -f --regenerate-allImportant
~]# dracut -f --regenerate-all --kernel-cmdline "ip=192.0.2.10 netmask=255.255.255.0 gateway=192.0.2.1 nameserver=192.0.2.45"/etc/dracut.conf.d/ directory with the static network information. For example:
~]# cat /etc/dracut.conf.d/static_ip.conf
kernel_cmdline="ip=10.0.0.103 netmask=255.255.252.0 gateway=10.0.0.1 nameserver=10.0.0.1"~]# dracut -f --regenerate-alldracut.cmdline(7) man page for more information.
4.10.7. Configuring Automated Enrollment Using Kickstart
- Instruct Kickstart to partition the disk such that LUKS encryption has enabled for all mount points, other than
/boot, with a temporary password. The password is temporary for this step of the enrollment process.part /boot --fstype="xfs" --ondisk=vda --size=256 part / --fstype="xfs" --ondisk=vda --grow --encrypted --passphrase=temppassNote that OSPP-complaint systems require a more complex configuration, for example:part /boot --fstype="xfs" --ondisk=vda --size=256 part / --fstype="xfs" --ondisk=vda --size=2048 --encrypted --passphrase=temppass part /var --fstype="xfs" --ondisk=vda --size=1024 --encrypted --passphrase=temppass part /tmp --fstype="xfs" --ondisk=vda --size=1024 --encrypted --passphrase=temppass part /home --fstype="xfs" --ondisk=vda --size=2048 --grow --encrypted --passphrase=temppass part /var/log --fstype="xfs" --ondisk=vda --size=1024 --encrypted --passphrase=temppass part /var/log/audit --fstype="xfs" --ondisk=vda --size=1024 --encrypted --passphrase=temppass - Install the related Clevis packages by listing them in the
%packagessection:%packages clevis-dracut %end - Call
clevis luks bindto perform binding in the%postsection. Afterward, remove the temporary password:%post clevis luks bind -f -k- -d /dev/vda2 \ tang '{"url":"http://tang.srv","thp":"_OsIk0T-E2l6qjfdDiwVmidoZjA"}' \ <<< "temppass" cryptsetup luksRemoveKey /dev/vda2 <<< "temppass" %endIn the above example, note that we specify the thumbprint that we trust on the Tang server as part of our binding configuration, enabling binding to be completely non-interactive.You can use an analogous procedure when using a TPM 2.0 policy instead of a Tang server.
4.10.8. Configuring Automated Unlocking of Removable Storage Devices
~]# yum install clevis-udisks2clevis luks bind command as described in Section 4.10.6, “Configuring Manual Enrollment of Root Volumes”, for example:
~]# clevis luks bind -d /dev/sdb1 tang '{"url":"http://tang.srv"}'clevis luks unlock command:
~]# clevis luks unlock -d /dev/sdb14.10.9. Configuring Automated Unlocking of Non-root Volumes at Boot Time
- Install the clevis-systemd package:
~]# yum install clevis-systemd - Enable the Clevis unlocker service:
~]# systemctl enable clevis-luks-askpass.path Created symlink from /etc/systemd/system/remote-fs.target.wants/clevis-luks-askpass.path to /usr/lib/systemd/system/clevis-luks-askpass.path. - Perform the binding step using the
clevis luks bindcommand as described in Section 4.10.6, “Configuring Manual Enrollment of Root Volumes”. - To set up the encrypted block device during system boot, add the corresponding line with the
_netdevoption to the/etc/crypttabconfiguration file. See thecrypttab(5)man page for more information. - Add the volume to the list of accessible filesystems in the
/etc/fstabfile. Use the_netdevoption in this configuration file, too. See thefstab(5)man page for more information.
4.10.10. Deploying Virtual Machines in a NBDE Network
clevis luks bind command does not change the LUKS master key. This implies that if you create a LUKS-encrypted image for use in a virtual machine or cloud environment, all the instances that run this image will share a master key. This is extremely insecure and should be avoided at all times.
4.10.11. Building Automatically-enrollable VM Images for Cloud Environments using NBDE
Important
4.10.12. Additional Resources
tang(8)clevis(1)jose(1)clevis-luks-unlockers(1)tang-nagios(1)
4.11. Checking Integrity with AIDE
4.11.1. Installing AIDE
root:
~]# yum install aideroot:
~]# aide --init

AIDE, version 0.15.1

### AIDE database at /var/lib/aide/aide.db.new.gz initialized.
Note
aide --init command checks just a set of directories and files defined in the /etc/aide.conf file. To include additional directories or files in the AIDE database, and to change their watched parameters, edit /etc/aide.conf accordingly.
.new substring from the initial database file name:
~]# mv /var/lib/aide/aide.db.new.gz /var/lib/aide/aide.db.gz/etc/aide.conf file and modify the DBDIR value. For additional security, store the database, configuration, and the /usr/sbin/aide binary file in a secure location such as a read-only media.
Important
4.11.2. Performing Integrity Checks
root:
~]# aide --check
AIDE 0.15.1 found differences between database and filesystem!!
Start timestamp: 2017-03-30 14:12:56

Summary:
  Total number of files:	147173
  Added files:			1
  Removed files:		0
  Changed files:		2
...cron (see the Automating System Tasks chapter in the System Administrator's Guide), add the following line to /etc/crontab:
05 4 * * * root /usr/sbin/aide --check4.11.3. Updating an AIDE Database
~]# aide --updateaide --update command creates the /var/lib/aide/aide.db.new.gz database file. To start using it for integrity checks, remove the .new substring from the file name.
4.11.4. Additional Resources
aide(1)man pageaide.conf(5)man page
4.12. Using USBGuard
- The daemon component with an inter-process communication (IPC) interface for dynamic interaction and policy enforcement.
- The command-line interface to interact with a running USBGuard instance.
- The rule language for writing USB device authorization policies.
- The C++ API for interacting with the daemon component implemented in a shared library.
4.12.1. Installing USBGuard
root:
~]# yum install usbguardroot:
~]# usbguard generate-policy > /etc/usbguard/rules.confNote
/etc/usbguard/rules.conf file. See the usbguard-rules.conf(5) man page for more information. Additionally, see Section 4.12.3, “Using the Rule Language to Create Your Own Policy” for examples.
root:
~]# systemctl start usbguard.service
~]# systemctl status usbguard
● usbguard.service - USBGuard daemon
   Loaded: loaded (/usr/lib/systemd/system/usbguard.service; disabled; vendor preset: disabled)
   Active: active (running) since Tue 2017-06-06 13:29:31 CEST; 9s ago
     Docs: man:usbguard-daemon(8)
 Main PID: 4984 (usbguard-daemon)
   CGroup: /system.slice/usbguard.service
└─4984 /usr/sbin/usbguard-daemon -k -c /etc/usbguard/usbguard-daem...root:
~]# systemctl enable usbguard.service
Created symlink from /etc/systemd/system/basic.target.wants/usbguard.service to /usr/lib/systemd/system/usbguard.service.root:
~]# usbguard list-devices
1: allow id 1d6b:0002 serial "0000:00:06.7" name "EHCI Host Controller" hash "JDOb0BiktYs2ct3mSQKopnOOV2h9MGYADwhT+oUtF2s=" parent-hash "4PHGcaDKWtPjKDwYpIRG722cB9SlGz9l9Iea93+Gt9c=" via-port "usb1" with-interface 09:00:00
...
6: block id 1b1c:1ab1 serial "000024937962" name "Voyager" hash "CrXgiaWIf2bZAU+5WkzOE7y0rdSO82XMzubn7HDb95Q=" parent-hash "JDOb0BiktYs2ct3mSQKopnOOV2h9MGYADwhT+oUtF2s=" via-port "1-3" with-interface 08:06:50allow-device option:
~]# usbguard allow-device 6reject-device option. To just deauthorize a device, use the usbguard command with the block-device option:
~]# usbguard block-device 6- block - do not talk to this device for now
- reject - ignore this device as if did not exist
usbguard command, enter it with the --help directive:
~]$ usbguard --help4.12.2. Creating a White List and a Black List
usbguard-daemon.conf file is loaded by the usbguard daemon after it parses its command-line options and is used to configure runtime parameters of the daemon. To override the default configuration file (/etc/usbguard/usbguard-daemon.conf), use the -c command-line option. See the usbguard-daemon(8) man page for further details.
usbguard-daemon.conf file and use the following options:
USBGuard configuration file
RuleFile=<path>- The
usbguarddaemon use this file to load the policy rule set from it and to write new rules received through the IPC interface. IPCAllowedUsers=<username> [<username> ...]- A space-delimited list of user names that the daemon will accept IPC connections from.
IPCAllowedGroups=<groupname> [<groupname> ...]- A space-delimited list of group names that the daemon will accept IPC connections from.
IPCAccessControlFiles=<path>- Path to a directory holding the IPC access control files.
ImplicitPolicyTarget=<target>- How to treat devices that do not match any rule in the policy. Accepted values: allow, block, reject.
PresentDevicePolicy=<policy>- How to treat devices that are already connected when the daemon starts:
- allow - authorize every present device
- block - deauthorize every present device
- reject - remove every present device
- keep - just sync the internal state and leave it
- apply-policy - evaluate the ruleset for every present device
PresentControllerPolicy=<policy>- How to treat USB controllers that are already connected when the daemon starts:
- allow - authorize every present device
- block - deauthorize every present device
- reject - remove every present device
- keep - just sync the internal state and leave it
- apply-policy - evaluate the ruleset for every present device
Example 4.5. USBGuard configuration
usbguard daemon to load rules from the /etc/usbguard/rules.conf file and it allows only users from the usbguard group to use the IPC interface:
RuleFile=/etc/usbguard/rules.conf
IPCAccessControlFiles=/etc/usbguard/IPCAccessControl.d/usbguard add-user or usbguard remove-user commands. See the usbguard(1) for more details. In this example, to allow users from the usbguard group to modify USB device authorization state, list USB devices, listen to exception events, and list USB authorization policy, enter the following command as root:
~]# usbguard add-user -g usbguard --devices=modify,list,listen --policy=list --exceptions=listenImportant
root user only. Consider setting either the IPCAccessControlFiles option (recommended) or the IPCAllowedUsers and IPCAllowedGroups options to limit access to the IPC interface. Do not leave the ACL unconfigured as this exposes the IPC interface to all local users and it allows them to manipulate the authorization state of USB devices and modify the USBGuard policy.
usbguard-daemon.conf(5) man page.
4.12.3. Using the Rule Language to Create Your Own Policy
usbguard daemon decides whether to authorize a USB device based on a policy defined by a set of rules. When a USB device is inserted into the system, the daemon scans the existing rules sequentially and when a matching rule is found, it either authorizes (allows), deauthorizes (blocks) or removes (rejects) the device, based on the rule target. If no matching rule is found, the decision is based on an implicit default target. This implicit default is to block the device until a decision is made by the user.
rule ::= target device_id device_attributes conditions.

target ::= "allow" | "block" | "reject".

device_id ::= "*:*" | vendor_id ":*" | vendor_id ":" product_id.

device_attributes ::= device_attributes | attribute.
device_attributes ::= .

conditions ::= conditions | condition.
conditions ::= .usbguard-rules.conf(5) man page.
Example 4.6. USBguard example policies
- Allow USB mass storage devices and block everything else
- This policy blocks any device that is not just a mass storage device. Devices with a hidden keyboard interface in a USB flash disk are blocked. Only devices with a single mass storage interface are allowed to interact with the operating system. The policy consists of a single rule:
allow with-interface equals { 08:*:* }The blocking is implicit because there is no block rule. Implicit blocking is useful to desktop users because a desktop applet listening to USBGuard events can ask the user for a decision if an implicit target was selected for a device. - Allow a specific Yubikey device to be connected through a specific port
- Reject everything else on that port.
allow 1050:0011 name "Yubico Yubikey II" serial "0001234567" via-port "1-2" hash "044b5e168d40ee0245478416caf3d998" reject via-port "1-2" - Reject devices with suspicious combination of interfaces
- A USB flash disk which implements a keyboard or a network interface is very suspicious. The following set of rules forms a policy which allows USB flash disks and explicitly rejects devices with an additional and suspicious interface.
allow with-interface equals { 08:*:* }
reject with-interface all-of { 08:*:* 03:00:* }
reject with-interface all-of { 08:*:* 03:01:* }
reject with-interface all-of { 08:*:* e0:*:* }
reject with-interface all-of { 08:*:* 02:*:* }
Note
Blacklisting is the wrong approach and you should not just blacklist a set of devices and allow the rest. The policy above assumes that blocking is the implicit default. Rejecting a set of devices considered as "bad" is a good approach how to limit the exposure of the system to such devices as much as possible. - Allow a keyboard-only USB device
- The following rule allows a keyboard-only USB device only if there is not a USB device with a keyboard interface already allowed.
allow with-interface one-of { 03:00:01 03:01:01 } if !allowed-matches(with-interface one-of { 03:00:01 03:01:01 })
usbguard generate-policy command, edit the /etc/usbguard/rules.conf to customize the USBGuard policy rules.
~]$ usbguard generate-policy > rules.conf
~]$ vim rules.conf~]# install -m 0600 -o root -g root rules.conf /etc/usbguard/rules.conf4.12.4. Additional Resources
usbguard(1)man pageusbguard-rules.conf(5)man pageusbguard-daemon(8)man pageusbguard-daemon.conf(5)man page
4.13. Hardening TLS Configuration
TLS (Transport Layer Security) is a cryptographic protocol used to secure network communications. When hardening system security settings by configuring preferred key-exchange protocols, authentication methods, and encryption algorithms, it is necessary to bear in mind that the broader the range of supported clients, the lower the resulting security. Conversely, strict security settings lead to limited compatibility with clients, which can result in some users being locked out of the system. Be sure to target the strictest available configuration and only relax it when it is required for compatibility reasons.
TLS implementations use secure algorithms where possible while not preventing connections from or to legacy clients or servers. Apply the hardened settings described in this section in environments with strict security requirements where legacy clients or servers that do not support secure algorithms or protocols are not expected or allowed to connect.
4.13.1. Choosing Algorithms to Enable
Protocol Versions
TLS provides the best security mechanism. Unless you have a compelling reason to include support for older versions of TLS (or even SSL), allow your systems to negotiate connections using only the latest version of TLS.
SSL version 2 or 3. Both of those versions have serious security vulnerabilities. Only allow negotiation using TLS version 1.0 or higher. The current version of TLS, 1.2, should always be preferred.
Note
TLS depends on the use of TLS extensions, specific ciphers (see below), and other workarounds. All TLS connection peers need to implement secure renegotiation indication (RFC 5746), must not support compression, and must implement mitigating measures for timing attacks against CBC-mode ciphers (the Lucky Thirteen attack). TLS 1.0 clients need to additionally implement record splitting (a workaround against the BEAST attack). TLS 1.2 supports Authenticated Encryption with Associated Data (AEAD) mode ciphers like AES-GCM, AES-CCM, or Camellia-GCM, which have no known issues. All the mentioned mitigations are implemented in cryptographic libraries included in Red Hat Enterprise Linux.
| Protocol Version | Usage Recommendation |
|---|---|
SSL v2 |
Do not use. Has serious security vulnerabilities.
|
SSL v3 |
Do not use. Has serious security vulnerabilities.
|
TLS 1.0 |
Use for interoperability purposes where needed. Has known issues that cannot be mitigated in a way that guarantees interoperability, and thus mitigations are not enabled by default. Does not support modern cipher suites.
|
TLS 1.1 |
Use for interoperability purposes where needed. Has no known issues but relies on protocol fixes that are included in all the
TLS implementations in Red Hat Enterprise Linux. Does not support modern cipher suites.
|
TLS 1.2 |
Recommended version. Supports the modern
AEAD cipher suites.
|
TLS 1.0 even though they provide support for TLS 1.1 or even 1.2. This is motivated by an attempt to achieve the highest level of interoperability with external services that may not support the latest versions of TLS. Depending on your interoperability requirements, enable the highest available version of TLS.
Important
SSL v3 is not recommended for use. However, if, despite the fact that it is considered insecure and unsuitable for general use, you absolutely must leave SSL v3 enabled, see Section 4.8, “Using stunnel” for instructions on how to use stunnel to securely encrypt communications even when using services that do not support encryption or are only capable of using obsolete and insecure modes of encryption.
Cipher Suites
RC4 or HMAC-MD5, which have serious shortcomings, should also be disabled. The same applies to the so-called export cipher suites, which have been intentionally made weaker, and thus are easy to break.
3DES ciphers advertise the use of 168 bits, they actually offer 112 bits of security.
RSA key exchange, but allows for the use of ECDHE and DHE. Of the two, ECDHE is the faster and therefore the preferred choice.
AEAD ciphers, such as AES-GCM, before CBC-mode ciphers as they are not vulnerable to padding oracle attacks. Additionally, in many cases, AES-GCM is faster than AES in CBC mode, especially when the hardware has cryptographic accelerators for AES.
ECDHE key exchange with ECDSA certificates, the transaction is even faster than pure RSA key exchange. To provide support for legacy clients, you can install two pairs of certificates and keys on a server: one with ECDSA keys (for new clients) and one with RSA keys (for legacy ones).
Public Key Length
RSA keys, always prefer key lengths of at least 3072 bits signed by at least SHA-256, which is sufficiently large for true 128 bits of security.
Warning
4.13.2. Using Implementations of TLS
TLS. In this section, the configuration of OpenSSL and GnuTLS is described. See Section 4.13.3, “Configuring Specific Applications” for instructions on how to configure TLS support in individual applications.
TLS implementations offer support for various cipher suites that define all the elements that come together when establishing and using TLS-secured communications.
Important
TLS implementation you use or the applications that utilize that implementation. New versions may introduce new cipher suites that you do not want to have enabled and that your current configuration does not disable.
4.13.2.1. Working with Cipher Suites in OpenSSL
SSL and TLS protocols. On Red Hat Enterprise Linux 7, a configuration file is provided at /etc/pki/tls/openssl.cnf. The format of this configuration file is described in config(1). See also Section 4.7.9, “Configuring OpenSSL”.
openssl command with the ciphers subcommand as follows:
~]$ openssl ciphers -v 'ALL:COMPLEMENTOFALL'ciphers subcommand to narrow the output. Special keywords can be used to only list suites that satisfy a certain condition. For example, to only list suites that are defined as belonging to the HIGH group, use the following command:
~]$ openssl ciphers -v 'HIGH'~]$ openssl ciphers -v 'kEECDH+aECDSA+AES:kEECDH+AES+aRSA:kEDH+aRSA+AES' | column -t
ECDHE-ECDSA-AES256-GCM-SHA384 TLSv1.2 Kx=ECDH Au=ECDSA Enc=AESGCM(256) Mac=AEAD
ECDHE-ECDSA-AES256-SHA384 TLSv1.2 Kx=ECDH Au=ECDSA Enc=AES(256) Mac=SHA384
ECDHE-ECDSA-AES256-SHA SSLv3 Kx=ECDH Au=ECDSA Enc=AES(256) Mac=SHA1
ECDHE-ECDSA-AES128-GCM-SHA256 TLSv1.2 Kx=ECDH Au=ECDSA Enc=AESGCM(128) Mac=AEAD
ECDHE-ECDSA-AES128-SHA256 TLSv1.2 Kx=ECDH Au=ECDSA Enc=AES(128) Mac=SHA256
ECDHE-ECDSA-AES128-SHA SSLv3 Kx=ECDH Au=ECDSA Enc=AES(128) Mac=SHA1
ECDHE-RSA-AES256-GCM-SHA384 TLSv1.2 Kx=ECDH Au=RSA Enc=AESGCM(256) Mac=AEAD
ECDHE-RSA-AES256-SHA384 TLSv1.2 Kx=ECDH Au=RSA Enc=AES(256) Mac=SHA384
ECDHE-RSA-AES256-SHA SSLv3 Kx=ECDH Au=RSA Enc=AES(256) Mac=SHA1
ECDHE-RSA-AES128-GCM-SHA256 TLSv1.2 Kx=ECDH Au=RSA Enc=AESGCM(128) Mac=AEAD
ECDHE-RSA-AES128-SHA256 TLSv1.2 Kx=ECDH Au=RSA Enc=AES(128) Mac=SHA256
ECDHE-RSA-AES128-SHA SSLv3 Kx=ECDH Au=RSA Enc=AES(128) Mac=SHA1
DHE-RSA-AES256-GCM-SHA384 TLSv1.2 Kx=DH Au=RSA Enc=AESGCM(256) Mac=AEAD
DHE-RSA-AES256-SHA256 TLSv1.2 Kx=DH Au=RSA Enc=AES(256) Mac=SHA256
DHE-RSA-AES256-SHA SSLv3 Kx=DH Au=RSA Enc=AES(256) Mac=SHA1
DHE-RSA-AES128-GCM-SHA256 TLSv1.2 Kx=DH Au=RSA Enc=AESGCM(128) Mac=AEAD
DHE-RSA-AES128-SHA256 TLSv1.2 Kx=DH Au=RSA Enc=AES(128) Mac=SHA256
DHE-RSA-AES128-SHA SSLv3 Kx=DH Au=RSA Enc=AES(128) Mac=SHA1ephemeral elliptic curve Diffie-Hellman key exchange and ECDSA ciphers, and omits RSA key exchange (thus ensuring perfect forward secrecy).
4.13.2.2. Working with Cipher Suites in GnuTLS
SSL and TLS protocols and related technologies.
Note
gnutls-cli command with the -l (or --list) option to list all supported cipher suites:
~]$ gnutls-cli -l-l option, pass one or more parameters (referred to as priority strings and keywords in GnuTLS documentation) to the --priority option. See the GnuTLS documentation at http://www.gnutls.org/manual/gnutls.html#Priority-Strings for a list of all available priority strings. For example, issue the following command to get a list of cipher suites that offer at least 128 bits of security:
~]$ gnutls-cli --priority SECURE128 -l~]$ gnutls-cli --priority SECURE256:+SECURE128:-VERS-TLS-ALL:+VERS-TLS1.2:-RSA:-DHE-DSS:-CAMELLIA-128-CBC:-CAMELLIA-256-CBC -l
Cipher suites for SECURE256:+SECURE128:-VERS-TLS-ALL:+VERS-TLS1.2:-RSA:-DHE-DSS:-CAMELLIA-128-CBC:-CAMELLIA-256-CBC
TLS_ECDHE_ECDSA_AES_256_GCM_SHA384 0xc0, 0x2c TLS1.2
TLS_ECDHE_ECDSA_AES_256_CBC_SHA384 0xc0, 0x24 TLS1.2
TLS_ECDHE_ECDSA_AES_256_CBC_SHA1 0xc0, 0x0a SSL3.0
TLS_ECDHE_ECDSA_AES_128_GCM_SHA256 0xc0, 0x2b TLS1.2
TLS_ECDHE_ECDSA_AES_128_CBC_SHA256 0xc0, 0x23 TLS1.2
TLS_ECDHE_ECDSA_AES_128_CBC_SHA1 0xc0, 0x09 SSL3.0
TLS_ECDHE_RSA_AES_256_GCM_SHA384 0xc0, 0x30 TLS1.2
TLS_ECDHE_RSA_AES_256_CBC_SHA1 0xc0, 0x14 SSL3.0
TLS_ECDHE_RSA_AES_128_GCM_SHA256 0xc0, 0x2f TLS1.2
TLS_ECDHE_RSA_AES_128_CBC_SHA256 0xc0, 0x27 TLS1.2
TLS_ECDHE_RSA_AES_128_CBC_SHA1 0xc0, 0x13 SSL3.0
TLS_DHE_RSA_AES_256_CBC_SHA256 0x00, 0x6b TLS1.2
TLS_DHE_RSA_AES_256_CBC_SHA1 0x00, 0x39 SSL3.0
TLS_DHE_RSA_AES_128_GCM_SHA256 0x00, 0x9e TLS1.2
TLS_DHE_RSA_AES_128_CBC_SHA256 0x00, 0x67 TLS1.2
TLS_DHE_RSA_AES_128_CBC_SHA1 0x00, 0x33 SSL3.0
Certificate types: CTYPE-X.509
Protocols: VERS-TLS1.2
Compression: COMP-NULL
Elliptic curves: CURVE-SECP384R1, CURVE-SECP521R1, CURVE-SECP256R1
PK-signatures: SIGN-RSA-SHA384, SIGN-ECDSA-SHA384, SIGN-RSA-SHA512, SIGN-ECDSA-SHA512, SIGN-RSA-SHA256, SIGN-DSA-SHA256, SIGN-ECDSA-SHA256RSA key exchange and DSS authentication.
4.13.3. Configuring Specific Applications
TLS. This section describes the TLS-related configuration files employed by the most commonly used server applications and offers examples of typical configurations.
4.13.3.1. Configuring the Apache HTTP Server
TLS needs. Depending on your choice of the TLS library, you need to install either the mod_ssl or the mod_nss module (provided by eponymous packages). For example, to install the package that provides the OpenSSL mod_ssl module, issue the following command as root:
~]# yum install mod_ssl/etc/httpd/conf.d/ssl.conf configuration file, which can be used to modify the TLS-related settings of the Apache HTTP Server. Similarly, the mod_nss package installs the /etc/httpd/conf.d/nss.conf configuration file.
TLS configuration. The directives available in the /etc/httpd/conf.d/ssl.conf configuration file are described in detail in /usr/share/httpd/manual/mod/mod_ssl.html. Examples of various settings are in /usr/share/httpd/manual/ssl/ssl_howto.html.
/etc/httpd/conf.d/ssl.conf configuration file, be sure to consider the following three directives at the minimum:
-
SSLProtocol - Use this directive to specify the version of
TLS(orSSL) you want to allow. -
SSLCipherSuite - Use this directive to specify your preferred cipher suite or disable the ones you want to disallow.
-
SSLHonorCipherOrder - Uncomment and set this directive to
onto ensure that the connecting clients adhere to the order of ciphers you specified.
SSLProtocol all -SSLv2 -SSLv3
SSLCipherSuite HIGH:!aNULL:!MD5
SSLHonorCipherOrder on/etc/httpd/conf.d/nss.conf configuration file. The mod_nss module is derived from mod_ssl, and as such it shares many features with it, not least the structure of the configuration file, and the directives that are available. Note that the mod_nss directives have a prefix of NSS instead of SSL. See https://git.fedorahosted.org/cgit/mod_nss.git/plain/docs/mod_nss.html for an overview of information about mod_nss, including a list of mod_ssl configuration directives that are not applicable to mod_nss.
4.13.3.2. Configuring the Dovecot Mail Server
TLS, modify the /etc/dovecot/conf.d/10-ssl.conf configuration file. You can find an explanation of some of the basic configuration directives available in that file in /usr/share/doc/dovecot-2.2.10/wiki/SSL.DovecotConfiguration.txt (this help file is installed along with the standard installation of Dovecot).
/etc/dovecot/conf.d/10-ssl.conf configuration file, be sure to consider the following three directives at the minimum:
-
ssl_protocols - Use this directive to specify the version of
TLS(orSSL) you want to allow. -
ssl_cipher_list - Use this directive to specify your preferred cipher suites or disable the ones you want to disallow.
-
ssl_prefer_server_ciphers - Uncomment and set this directive to
yesto ensure that the connecting clients adhere to the order of ciphers you specified.
ssl_protocols = !SSLv2 !SSLv3
ssl_cipher_list = HIGH:!aNULL:!MD5
ssl_prefer_server_ciphers = yes4.13.4. Additional Information
Installed Documentation
- config(1) — Describes the format of the
/etc/ssl/openssl.confconfiguration file. - ciphers(1) — Includes a list of available OpenSSL keywords and cipher strings.
/usr/share/httpd/manual/mod/mod_ssl.html— Contains detailed descriptions of the directives available in the/etc/httpd/conf.d/ssl.confconfiguration file used by the mod_ssl module for the Apache HTTP Server./usr/share/httpd/manual/ssl/ssl_howto.html— Contains practical examples of real-world settings in the/etc/httpd/conf.d/ssl.confconfiguration file used by the mod_ssl module for the Apache HTTP Server./usr/share/doc/dovecot-2.2.10/wiki/SSL.DovecotConfiguration.txt— Explains some of the basic configuration directives available in the/etc/dovecot/conf.d/10-ssl.confconfiguration file used by the Dovecot mail server.
Online Documentation
- Red Hat Enterprise Linux 7 SELinux User's and Administrator's Guide — The SELinux User's and Administrator's Guide for Red Hat Enterprise Linux 7 describes the basic principles of SELinux and documents in detail how to configure and use SELinux with various services, such as the Apache HTTP Server.
- http://tools.ietf.org/html/draft-ietf-uta-tls-bcp-00 — Recommendations for secure use of
TLSandDTLS.
See Also
- Section 4.7, “Using OpenSSL” describes, among other things, how to use OpenSSL to create and manage keys, generate certificates, and encrypt and decrypt files.
4.15. Using MACsec
Media Access Control Security (MACsec, IEEE 802.1AE) encrypts and authenticates all traffic in LANs with the GCM-AES-128 algorithm. MACsec can protect not only IP but also Address Resolution Protocol (ARP), Neighbor Discovery (ND), or DHCP. While IPsec operates on the network layer (layer 3) and SSL or TLS on the application layer (layer 7), MACsec operates in the data link layer (layer 2). Combine MACsec with security protocols for other networking layers to take advantage of different security features that these standards provide.
MACsec network, use case scenarios, and configuration examples.
4.16. Removing Data Securely Using scrub
scrub command, install the scrub package:
~]# yum install scrub-
Character or Block Device - The special file corresponding to a whole disk is scrubbed and all data on it, is destroyed. This is the most effective method.
scrub [OPTIONS] special file -
File - A regular file is scrubbed and only the data in the file is destroyed.
scrub [OPTIONS] file -
Directory - With the
-Xoption, a directory is created and filled with files until the file system is full. Then, the files are scrubbed as in file mode.scrub -X [OPTIONS] directory
Example 4.7. Scrubbing a Raw Device
~]# scrub /dev/sdf1
scrub: using NNSA NAP-14.1-C patterns
scrub: please verify that device size below is correct!
scrub: scrubbing /dev/sdf1 1995650048 bytes (~1GB)
scrub: random  |................................................|
scrub: random  |................................................|
scrub: 0x00    |................................................|
scrub: verify  |................................................|
Example 4.8. Scrubbing a File
- Create a 1MB file:
~]$ base64 /dev/urandom | head -c $[ 1024*1024 ] > file.txt - Show the file size:
~]$ ls -lh total 1.0M -rw-rw-r--. 1 username username 1.0M Sep 8 15:23 file.txt - Show the contents of the file:
~]$ head -1 file.txt JnNpaTEveB/IYsbM9lhuJdw+0jKhwCIBUsxLXLAyB8uItotUlNHKKUeS/7bCRKDogEP+yJm8VQkL - Scrub the file:
~]$ scrub file.txt scrub: using NNSA NAP-14.1-C patterns scrub: scrubbing file.txt 1048576 bytes (~1024KB) scrub: random |................................................| scrub: random |................................................| scrub: 0x00 |................................................| scrub: verify |................................................| - Verify that the file contents have been scrubbed:
~]$ cat file.txt SCRUBBED! - Verify that the file size remains the same:
~]$ ls -lh
total 1.0M
-rw-rw-r--. 1 username username 1.0M Sep  8 15:24 file.txt
scrub modes, options, methods, and caveats, see the scrub(1) man page.
Chapter 5. Using Firewalls
5.1. Getting Started with firewalld
firewalld is a firewall service daemon that provides a dynamic customizable host-based firewall with a D-Bus interface. Being dynamic, it enables creating, changing, and deleting the rules without the necessity to restart the firewall daemon each time the rules are changed.
firewalld uses the concepts of zones and services, that simplify the traffic management. Zones are predefined sets of rules. Network interfaces and sources can be assigned to a zone. The traffic allowed depends on the network your computer is connected to and the security level this network is assigned. Firewall services are predefined rules that cover all necessary settings to allow incoming traffic for a specific service and they apply within a zone.
firewalld blocks all traffic on ports that are not explicitly set as open. Some zones, such as trusted, allow all traffic by default.
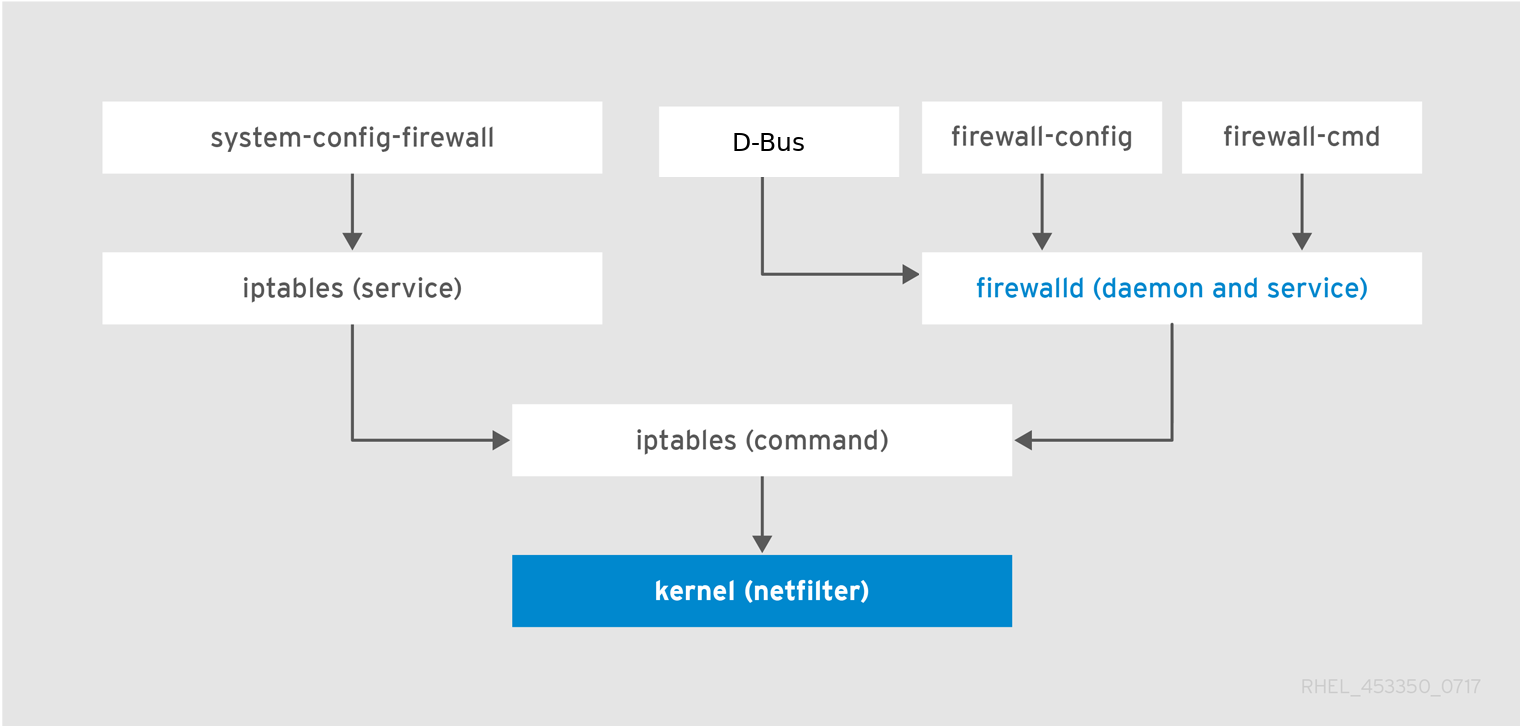
Figure 5.1. The Firewall Stack
5.1.1. Zones
firewalld can be used to separate networks into different zones according to the level of trust that the user has decided to place on the interfaces and traffic within that network. A connection can only be part of one zone, but a zone can be used for many network connections.
firewalld of the zone of an interface. You can assign zones to interfaces with NetworkManager, with the firewall-config tool, or the firewall-cmd command-line tool. The latter two only edit the appropriate NetworkManager configuration files. If you change the zone of the interface using firewall-cmd or firewall-config, the request is forwarded to NetworkManager and is not handled by firewalld.
/usr/lib/firewalld/zones/ directory and can be instantly applied to any available network interface. These files are copied to the /etc/firewalld/zones/ directory only after they are modified. The following table describes the default settings of the predefined zones:
block- Any incoming network connections are rejected with an icmp-host-prohibited message for
IPv4and icmp6-adm-prohibited forIPv6. Only network connections initiated from within the system are possible. dmz- For computers in your demilitarized zone that are publicly-accessible with limited access to your internal network. Only selected incoming connections are accepted.
-
drop - Any incoming network packets are dropped without any notification. Only outgoing network connections are possible.
external- For use on external networks with masquerading enabled, especially for routers. You do not trust the other computers on the network to not harm your computer. Only selected incoming connections are accepted.
home- For use at home when you mostly trust the other computers on the network. Only selected incoming connections are accepted.
internal- For use on internal networks when you mostly trust the other computers on the network. Only selected incoming connections are accepted.
public- For use in public areas where you do not trust other computers on the network. Only selected incoming connections are accepted.
trusted- All network connections are accepted.
work- For use at work where you mostly trust the other computers on the network. Only selected incoming connections are accepted.
firewalld is set to be the public zone. The default zone can be changed.
Note
5.1.2. Predefined Services
firewalld.service(5) man page. The services are specified by means of individual XML configuration files, which are named in the following format: service-name.xml. Protocol names are preferred over service or application names in firewalld.
5.1.3. Runtime and Permanent Settings
firewalld is running. When firewalld is restarted, the settings revert to their permanent values.
--permanent option. Alternatively, to make changes persistent while firewalld is running, use the --runtime-to-permanent firewall-cmd option.
firewalld is running using only the --permanent option, they do not become effective before firewalld is restarted. However, restarting firewalld closes all open ports and stops the networking traffic.
5.1.4. Modifying Settings in Runtime and Permanent Configuration using CLI
--permanent option with the firewall-cmd command.
~]# firewall-cmd --permanent <other options>- Change runtime settings and then make them permanent as follows:
~]# firewall-cmd <other options> ~]# firewall-cmd --runtime-to-permanent - Set permanent settings and reload the settings into runtime mode:
~]# firewall-cmd --permanent <other options>
~]# firewall-cmd --reload
Note
--timeout option. After a specified amount of time, any change reverts to its previous state. Using this options excludes the --permanent option.
SSH service for 15 minutes:
~]# firewall-cmd --add-service=ssh --timeout 15m5.2. Installing the firewall-config GUI configuration tool
root:
~]# yum install firewall-configSoftware to launch the Software Sources application. Type firewall to the search box, which appears after selecting the search button in the top-right corner. Select the item from the search results, and click on the button.
firewall-config command or press the Super key to enter the , type firewall, and press Enter.
5.3. Viewing the Current Status and Settings of firewalld
5.3.1. Viewing the Current Status of firewalld
firewalld, is installed on the system by default. Use the firewalld CLI interface to check that the service is running.
~]# firewall-cmd --statesystemctl status sub-command:
~]# systemctl status firewalld
firewalld.service - firewalld - dynamic firewall daemon
   Loaded: loaded (/usr/lib/systemd/system/firewalld.service; enabled; vendor pr
   Active: active (running) since Mon 2017-12-18 16:05:15 CET; 50min ago
     Docs: man:firewalld(1)
 Main PID: 705 (firewalld)
    Tasks: 2 (limit: 4915)
   CGroup: /system.slice/firewalld.service
└─705 /usr/bin/python3 -Es /usr/sbin/firewalld --nofork --nopidfirewalld is set up and which rules are in force before you try to edit the settings. To display the firewall settings, see Section 5.3.2, “Viewing Current firewalld Settings”
5.3.2. Viewing Current firewalld Settings
5.3.2.1. Viewing Allowed Services using GUI
firewall, and press Enter. The firewall-config tool appears. You can now view the list of services under the tab.
~]$ firewall-config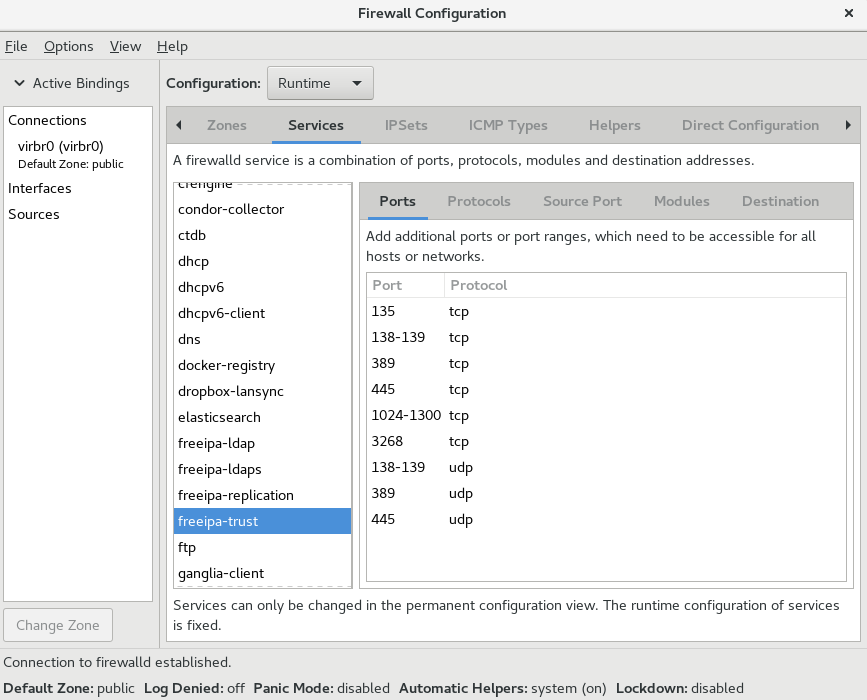
Figure 5.2. The Services tab in firewall-config
5.3.2.2. Viewing firewalld Settings using CLI
--list-all option shows a complete overview of the firewalld settings.
firewalld uses zones to manage the traffic. If a zone is not specified by the --zone option, the command is effective in the default zone assigned to the active network interface and connection.
~]# firewall-cmd --list-all
public
  target: default
  icmp-block-inversion: no
  interfaces:
  sources:
  services: ssh dhcpv6-client
  ports:
  protocols:
  masquerade: no
  forward-ports:
  source-ports:
  icmp-blocks:
  rich rules:
Note
--zone=zone-name argument to the firewall-cmd --list-all command, for example:
~]# firewall-cmd --list-all --zone=home
home
  target: default
  icmp-block-inversion: no
  interfaces:
  sources:
  services: ssh mdns samba-client dhcpv6-client
... [output truncated]
firewalld manual pages or get a list of the options using the command help:
~]# firewall-cmd --help

Usage: firewall-cmd [OPTIONS...]

General Options
  -h, --help           Prints a short help text and exists
  -V, --version        Print the version string of firewalld
  -q, --quiet          Do not print status messages

Status Options
  --state              Return and print firewalld state
  --reload             Reload firewall and keep state information
... [output truncated]~]# firewall-cmd --list-services
ssh dhcpv6-clientSSH service and firewalld opens the necessary port (22) for the service. Later, if you list the allowed services, the list shows the SSH service, but if you list open ports, it does not show any. Therefore, it is recommended to use the --list-all option to make sure you receive a complete information.
5.4. Starting firewalld
firewalld, enter the following command as root:
~]# systemctl unmask firewalld
~]# systemctl start firewalldfirewalld starts automatically at system start, enter the following command as root:
~]# systemctl enable firewalld5.5. Stopping firewalld
firewalld, enter the following command as root:
~]# systemctl stop firewalldfirewalld from starting automatically at system start, enter the following command as root:
~]# systemctl disable firewalldfirewalld D-Bus interface and also if other services require firewalld, enter the following command as root:
~]# systemctl mask firewalld5.6. Controlling Traffic
5.6.1. Predefined Services
firewall-cmd, and firewall-offline-cmd.
/etc/firewalld/services/ directory. If a service is not added or changed by the user, then no corresponding XML file is found in /etc/firewalld/services/. The files in the /usr/lib/firewalld/services/ directory can be used as templates if you want to add or change a service.
5.6.2. Disabling All Traffic in Case of Emergency using CLI
~]# firewall-cmd --panic-on~]# firewall-cmd --panic-off~]# firewall-cmd --query-panic5.6.3. Controlling Traffic with Predefined Services using CLI
firewalld. This opens all necessary ports and modifies other settings according to the service definition file.
- Check that the service is not already allowed:
~]# firewall-cmd --list-services ssh dhcpv6-client - List all predefined services:
~]# firewall-cmd --get-services RH-Satellite-6 amanda-client amanda-k5-client bacula bacula-client bitcoin bitcoin-rpc bitcoin-testnet bitcoin-testnet-rpc ceph ceph-mon cfengine condor-collector ctdb dhcp dhcpv6 dhcpv6-client dns docker-registry ... [output truncated] - Add the service to the allowed services:
~]# firewall-cmd --add-service=<service-name> - Make the new settings persistent:
~]# firewall-cmd --runtime-to-permanent
5.6.4. Controlling Traffic with Predefined Services using GUI
IPv4 or IPv6).
Note
5.6.5. Adding New Services
firewall-cmd, and firewall-offline-cmd. Alternatively, you can edit the XML files in /etc/firewalld/services/. If a service is not added or changed by the user, then no corresponding XML file are found in /etc/firewalld/services/. The files /usr/lib/firewalld/services/ can be used as templates if you want to add or change a service.
firewall-cmd, or firewall-offline-cmd in case of not active firewalld. enter the following command to add a new and empty service:
~]$ firewall-cmd --new-service=service-name~]$ firewall-cmd --new-service-from-file=service-name.xml--name=service-name option.
/etc/firewalld/services/.
root, you can enter the following command to copy a service manually:
~]# cp /usr/lib/firewalld/services/service-name.xml /etc/firewalld/services/service-name.xmlfirewalld loads files from /usr/lib/firewalld/services in the first place. If files are placed in /etc/firewalld/services and they are valid, then these will override the matching files from /usr/lib/firewalld/services. The overriden files in /usr/lib/firewalld/services are used as soon as the matching files in /etc/firewalld/services have been removed or if firewalld has been asked to load the defaults of the services. This applies to the permanent environment only. A reload is needed to get these fallbacks also in the runtime environment.
5.6.6. Controlling Ports using CLI
httpd daemon, for example, listens on port 80. However, system administrators by default configure daemons to listen on different ports to enhance security or for other reasons.
Opening a Port
- List all allowed ports:
~]# firewall-cmd --list-ports - Add a port to the allowed ports to open it for incoming traffic:
~]# firewall-cmd --add-port=port-number/port-type - Make the new settings persistent:
~]# firewall-cmd --runtime-to-permanent
tcp, udp, sctp, or dccp. The type must match the type of network communication.
Closing a Port
firewalld. It is highly recommended to close all unnecessary ports as soon as they are not used because leaving a port open represents a security risk.
- List all allowed ports:
~]# firewall-cmd --list-ports [WARNING] ==== This command will only give you a list of ports that have been opened as ports. You will not be able to see any open ports that have been opened as a service. Therefore, you should consider using the --list-all option instead of --list-ports. ==== - Remove the port from the allowed ports to close it for the incoming traffic:
~]# firewall-cmd --remove-port=port-number/port-type - Make the new settings persistent:
~]# firewall-cmd --runtime-to-permanent
5.6.7. Opening Ports using GUI
5.6.8. Controlling Traffic with Protocols using GUI
5.6.9. Opening Source Ports using GUI
5.7. Working with Zones
5.7.1. Listing Zones
~]# firewall-cmd --get-zonesfirewall-cmd --get-zones command displays all zones that are available on the system, but it does not show any details for particular zones.
~]# firewall-cmd --list-all-zones~]# firewall-cmd --zone=zone-name --list-all5.7.2. Modifying firewalld Settings for a Certain Zone
--zone=zone-name option. For example, to allow the SSH service in the zone public:
~]# firewall-cmd --add-service=ssh --zone=public5.7.3. Changing the Default Zone
firewalld service, firewalld loads the settings for the default zone and makes it active.
- Display the current default zone:
~]# firewall-cmd --get-default-zone - Set the new default zone:
~]# firewall-cmd --set-default-zone zone-name
Note
--permanent option.
5.7.4. Assigning a Network Interface to a Zone
- List the active zones and the interfaces assigned to them:
~]# firewall-cmd --get-active-zones - Assign the interface to a different zone:
~]# firewall-cmd --zone=zone-name --change-interface=<interface-name>
Note
--permanent option to make the setting persistent across restarts. If you set a new default zone, the setting becomes permanent.
5.7.5. Assigning a Default Zone to a Network Connection
/etc/sysconfig/network-scripts/ifcfg-connection-name file and add a line that assigns a zone to this connection:
ZONE=zone-name5.7.6. Creating a New Zone
Note
--permanent option, otherwise the command does not work.
- Create a new zone:
~]# firewall-cmd --permanent --new-zone=zone-name - Reload the new zone:
~]# firewall-cmd --reload - Check if the new zone is added to your permanent settings:
~]# firewall-cmd --get-zones - Make the new settings persistent:
~]# firewall-cmd --runtime-to-permanent
5.7.7. Creating a New Zone using a Configuration File
firewalld zone configuration file contains the information for a zone. These are the zone description, services, ports, protocols, icmp-blocks, masquerade, forward-ports and rich language rules in an XML file format. The file name has to be zone-name.xml where the length of zone-name is currently limited to 17 chars. The zone configuration files are located in the /usr/lib/firewalld/zones/ and /etc/firewalld/zones/ directories.
SSH) and one port range, for both the TCP and UDP protocols.:
<?xml version="1.0" encoding="utf-8"?>
<zone>
  <short>My zone</short>
  <description>Here you can describe the characteristic features of the zone.</description>
  <service name="ssh"/>
  <port port="1025-65535" protocol="tcp"/>
  <port port="1025-65535" protocol="udp"/>
</zone>firewalld.zone manual pages.
5.7.8. Using Zone Targets to Set Default Behavior for Incoming Traffic
default, ACCEPT, REJECT, and DROP. By setting the target to ACCEPT, you accept all incoming packets except those disabled by a specific rule. If you set the target to REJECT or DROP, you disable all incoming packets except those that you have allowed in specific rules. When packets are rejected, the source machine is informed about the rejection, while there is no information sent when the packets are dropped.
- List the information for the specific zone to see the default target:
~]$ firewall-cmd --zone=zone-name --list-all - Set a new target in the zone:
~]# firewall-cmd --zone=zone-name --set-target=<default|ACCEPT|REJECT|DROP>
5.8. Using Zones to Manage Incoming Traffic Depending on Source
5.8.1. Adding a Source
- To set the source in the current zone:
~]# firewall-cmd --add-source=<source> - To set the source IP address for a specific zone:
~]# firewall-cmd --zone=zone-name --add-source=<source>
trusted zone:
- List all available zones:
~]# firewall-cmd --get-zones - Add the source IP to the trusted zone in the permanent mode:
~]# firewall-cmd --zone=trusted --add-source=192.168.2.15 - Make the new settings persistent:
~]# firewall-cmd --runtime-to-permanent
5.8.2. Removing a Source
- List allowed sources for the required zone:
~]# firewall-cmd --zone=zone-name --list-sources - Remove the source from the zone permanently:
~]# firewall-cmd --zone=zone-name --remove-source=<source> - Make the new settings persistent:
~]# firewall-cmd --runtime-to-permanent
5.8.3. Adding a Source Port
--add-source-port option. You can also combine this with the --add-source option to limit the traffic to a certain IP address or IP range.
~]# firewall-cmd --zone=zone-name --add-source-port=<port-name>/<tcp|udp|sctp|dccp>5.8.4. Removing a Source Port
~]# firewall-cmd --zone=zone-name --remove-source-port=<port-name>/<tcp|udp|sctp|dccp>5.8.5. Using Zones and Sources to Allow a Service for Only a Specific Domain
192.0.2.0/24 network while any other traffic is blocked.
Warning
default target. Using a zone that has the target set to ACCEPT is a security risk, because for traffic from 192.0.2.0/24, all network connections would be accepted.
- List all available zones:
~]# firewall-cmd --get-zones block dmz drop external home internal public trusted work - Add the IP range to the
internalzone to route the traffic originating from the source through the zone:~]# firewall-cmd --zone=internal --add-source=192.0.2.0/24 - Add the http service to the
internalzone:~]# firewall-cmd --zone=internal --add-service=http - Make the new settings persistent:
~]# firewall-cmd --runtime-to-permanent - Check that the
internalzone is active and that the service is allowed in it:~]# firewall-cmd --zone=internal --list-all internal (active) target: default icmp-block-inversion: no interfaces: sources: 192.0.2.0/24 services: dhcpv6-client mdns samba-client ssh http ...
5.8.6. Configuring Traffic Accepted by a Zone Based on Protocol
Adding a Protocol to a Zone
~]# firewall-cmd --zone=zone-name --add-protocol=port-name/tcp|udp|sctp|dccp|igmpNote
igmp value with the --add-protocol option.
Removing a Protocol from a Zone
~]# firewall-cmd --zone=zone-name --remove-protocol=port-name/tcp|udp|sctp|dccp|igmp5.9. Port Forwarding
firewalld, you can set up ports redirection so that any incoming traffic that reaches a certain port on your system is delivered to another internal port of your choice or to an external port on another machine.
5.9.1. Adding a Port to Redirect
~]# firewall-cmd --add-forward-port=port=port-number:proto=tcp|udp|sctp|dccp:toport=port-number- Add the port to be forwarded:
~]# firewall-cmd --add-forward-port=port=port-number:proto=tcp|udp:toport=port-number:toaddr=IP - Enable masquerade:
~]# firewall-cmd --add-masquerade
Example 5.1. Redirecting TCP Port 80 to Port 88 on the Same Machine
- Redirect the port 80 to port 88 for TCP traffic:
~]# firewall-cmd --add-forward-port=port=80:proto=tcp:toport=88 - Make the new settings persistent:
~]# firewall-cmd --runtime-to-permanent - Check that the port is redirected:
~]# firewall-cmd --list-all
5.9.2. Removing a Redirected Port
~]# firewall-cmd --remove-forward-port=port=port-number:proto=<tcp|udp>:toport=port-number:toaddr=<IP>- Remove the forwarded port:
~]# firewall-cmd --remove-forward-port=port=port-number:proto=<tcp|udp>:toport=port-number:toaddr=<IP> - Disable masquerade:
~]# firewall-cmd --remove-masquerade
Note
Example 5.2. Removing TCP Port 80 forwarded to Port 88 on the Same Machine
- List redirected ports:
~]# firewall-cmd --list-forward-ports port=80:proto=tcp:toport=88:toaddr= - Remove the redirected port from the firewall::
~]# firewall-cmd --remove-forward-port=port=80:proto=tcp:toport=88:toaddr= - Make the new settings persistent:
~]# firewall-cmd --runtime-to-permanent
5.10. Configuring IP Address Masquerading
external zone), enter the following command as root:
~]# firewall-cmd --zone=external --query-masqueradeyes with exit status 0 if enabled. It prints no with exit status 1 otherwise. If zone is omitted, the default zone will be used.
root:
~]# firewall-cmd --zone=external --add-masquerade--permanent option.
root:
~]# firewall-cmd --zone=external --remove-masquerade--permanent option.
5.11. Managing ICMP Requests
Internet Control Message Protocol (ICMP) is a supporting protocol that is used by various network devices to send error messages and operational information indicating a connection problem, for example, that a requested service is not available. ICMP differs from transport protocols such as TCP and UDP because it is not used to exchange data between systems.
ICMP messages, especially echo-request and echo-reply, to reveal information about your network and misuse such information for various kinds of fraudulent activities. Therefore, firewalld enables blocking the ICMP requests to protect your network information.
5.11.1. Listing ICMP Requests
ICMP requests are described in individual XML files that are located in the /usr/lib/firewalld/icmptypes/ directory. You can read these files to see a description of the request. The firewall-cmd command controls the ICMP requests manipulation.
ICMP types:
~]# firewall-cmd --get-icmptypesICMP request can be used by IPv4, IPv6, or by both protocols. To see for which protocol the ICMP request is used:
~]# firewall-cmd --info-icmptype=<icmptype>ICMP request shows yes if the request is currently blocked or no if it is not. To see if an ICMP request is currently blocked:
~]# firewall-cmd --query-icmp-block=<icmptype>5.11.2. Blocking or Unblocking ICMP Requests
ICMP requests, it does not provide the information that it normally would. However, that does not mean that no information is given at all. The clients receive information that the particular ICMP request is being blocked (rejected). Blocking the ICMP requests should be considered carefully, because it can cause communication problems, especially with IPv6 traffic.
ICMP request is currently blocked:
~]# firewall-cmd --query-icmp-block=<icmptype>ICMP request:
~]# firewall-cmd --add-icmp-block=<icmptype>ICMP request:
~]# firewall-cmd --remove-icmp-block=<icmptype>5.11.3. Blocking ICMP Requests without Providing any Information at All
ICMP requests, clients know that you are blocking it. So, a potential attacker who is sniffing for live IP addresses is still able to see that your IP address is online. To hide this information completely, you have to drop all ICMP requests.
ICMP requests:
- Set the target of your zone to
DROP:~]# firewall-cmd --set-target=DROP - Make the new settings persistent:
~]# firewall-cmd --runtime-to-permanent
ICMP requests, is dropped, except traffic which you have explicitly allowed.
ICMP requests and allow others:
- Set the target of your zone to
DROP:~]# firewall-cmd --set-target=DROP - Add the ICMP block inversion to block all
ICMPrequests at once:~]# firewall-cmd --add-icmp-block-inversion - Add the ICMP block for those
ICMPrequests that you want to allow:~]# firewall-cmd --add-icmp-block=<icmptype> - Make the new settings persistent:
~]# firewall-cmd --runtime-to-permanent
ICMP requests blocks, so all requests, that were not previously blocked, are blocked. Those that were blocked are not blocked. Which means that if you need to unblock a request, you must use the blocking command.
- Set the target of your zone to
defaultorACCEPT:~]# firewall-cmd --set-target=default - Remove all added blocks for
ICMPrequests:~]# firewall-cmd --remove-icmp-block=<icmptype> - Remove the
ICMPblock inversion:~]# firewall-cmd --remove-icmp-block-inversion - Make the new settings persistent:
~]# firewall-cmd --runtime-to-permanent
5.11.4. Configuring the ICMP Filter using GUI
ICMP filter, start the firewall-config tool and select the network zone whose messages are to be filtered. Select the ICMP Filter tab and select the check box for each type of ICMP message you want to filter. Clear the check box to disable a filter. This setting is per direction and the default allows everything.
ICMP types are now accepted, all other are rejected. In a zone using the DROP target, they are dropped.
5.12. Setting and Controlling IP sets using firewalld
firewalld, enter the following command as root.
~]# firewall-cmd --get-ipset-types
hash:ip hash:ip,mark hash:ip,port hash:ip,port,ip hash:ip,port,net hash:mac hash:net hash:net,iface hash:net,net hash:net,port hash:net,port,net
5.12.1. Configuring IP Set Options with the Command-Line Client
firewalld zones as sources and also as sources in rich rules. In Red Hat Enterprise Linux 7, the preferred method is to use the IP sets created with firewalld in a direct rule.
firewalld in the permanent environment, use the following command as root:
~]# firewall-cmd --permanent --get-ipsetsroot:
~]# firewall-cmd --permanent --new-ipset=test --type=hash:net
successhash:net type for IPv4. To create an IP set for use with IPv6, add the --option=family=inet6 option. To make the new setting effective in the runtime environment, reload firewalld. List the new IP set with the following command as root:
~]# firewall-cmd --permanent --get-ipsets
test
root:
~]# firewall-cmd --permanent --info-ipset=test
test
type: hash:net
options:
entries:root:
~]# firewall-cmd --permanent --ipset=test --add-entry=192.168.0.1
successroot:
~]# firewall-cmd --permanent --ipset=test --get-entries
192.168.0.1
~]# cat > iplist.txt <<EOL
192.168.0.2
192.168.0.3
192.168.1.0/24
192.168.2.254
EOLroot:
~]# firewall-cmd --permanent --ipset=test --add-entries-from-file=iplist.txt
successroot:
~]# firewall-cmd --permanent --ipset=test --get-entries
192.168.0.1
192.168.0.2
192.168.0.3
192.168.1.0/24
192.168.2.254
root:
~]# firewall-cmd --permanent --ipset=test --remove-entries-from-file=iplist.txt
success
~]# firewall-cmd --permanent --ipset=test --get-entries
192.168.0.1
root:
~]# firewall-cmd --permanent --zone=drop --add-source=ipset:test
successipset: prefix in the source shows firewalld that the source is an IP set and not an IP address or an address range.
--permanent option.
5.12.2. Configuring a Custom Service for an IP Set
firewalld starts:
- Using an editor running as
root, create a file as follows:~]# vi /etc/systemd/system/ipset_name.service [Unit] Description=ipset_name Before=firewalld.service [Service] Type=oneshot RemainAfterExit=yes ExecStart=/usr/local/bin/ipset_name.sh start ExecStop=/usr/local/bin/ipset_name.sh stop [Install] WantedBy=basic.target - Use the IP set permanently in firewalld:
~]# vi /etc/firewalld/direct.xml <?xml version="1.0" encoding="utf-8"?> <direct> <rule ipv="ipv4" table="filter" chain="INPUT" priority="0">-m set --match-set <replaceable>ipset_name</replaceable> src -j DROP</rule> </direct> - A
firewalldreload is required to activate the changes:This reloads the firewall without losing state information (TCP sessions will not be terminated), but service disruption is possible during the reload.~]# firewall-cmd --reload
Warning
firewalld. To use such IP sets, a permanent direct rule is required to reference the set, and a custom service must be added to create these IP sets. This service needs to be started before firewalld starts, otherwise firewalld is not able to add the direct rules using these sets. You can add permanent direct rules with the /etc/firewalld/direct.xml file.
5.13. Setting and Controlling IP sets using iptables
firewalld and the iptables (and ip6tables) services are:
- The iptables service stores configuration in
/etc/sysconfig/iptablesand/etc/sysconfig/ip6tables, whilefirewalldstores it in various XML files in/usr/lib/firewalld/and/etc/firewalld/. Note that the/etc/sysconfig/iptablesfile does not exist asfirewalldis installed by default on Red Hat Enterprise Linux. - With the iptables service, every single change means flushing all the old rules and reading all the new rules from
/etc/sysconfig/iptables, while withfirewalldthere is no recreating of all the rules. Only the differences are applied. Consequently,firewalldcan change the settings during runtime without existing connections being lost.
iptables and ip6tables services instead of firewalld, first disable firewalld by running the following command as root:
~]# systemctl disable firewalld
~]# systemctl stop firewalldroot:
~]# yum install iptables-servicesiptables service and the ip6tables service.
iptables and ip6tables services, enter the following commands as root:
~]# systemctl start iptables
~]# systemctl start ip6tables~]# systemctl enable iptables
~]# systemctl enable ip6tables~]# iptables -A INPUT -s 10.0.0.0/8 -j DROP
~]# iptables -A INPUT -s 172.16.0.0/12 -j DROP
~]# iptables -A INPUT -s 192.168.0.0/16 -j DROP~]# ipset create my-block-set hash:net
~]# ipset add my-block-set 10.0.0.0/8
~]# ipset add my-block-set 172.16.0.0/12
~]# ipset add my-block-set 192.168.0.0/16~]# iptables -A INPUT -m set --set my-block-set src -j DROP5.14. Using the Direct Interface
--direct option with the firewall-cmd tool. A few examples are presented here. See the firewall-cmd(1) man page for more information.
--permanent option using the firewall-cmd --permanent --direct command or by modifying /etc/firewalld/direct.xml. See man firewalld.direct(5) for information on the /etc/firewalld/direct.xml file.
5.14.1. Adding a Rule using the Direct Interface
root:
~]# firewall-cmd --direct --add-rule ipv4 filter IN_public_allow \
0 -m tcp -p tcp --dport 666 -j ACCEPT--permanent option to make the setting persistent.
5.14.2. Removing a Rule using the Direct Interface
root:
~]# firewall-cmd --direct --remove-rule ipv4 filter IN_public_allow \
0 -m tcp -p tcp --dport 666 -j ACCEPT--permanent option to make the setting persistent.
5.14.3. Listing Rules using the Direct Interface
root:
~]# firewall-cmd --direct --get-rules ipv4 filter IN_public_allow--get-rules option) only lists rules previously added using the --add-rule option. It does not list existing iptables rules added by other means.
5.15. Configuring Complex Firewall Rules with the "Rich Language" Syntax
5.15.1. Formatting of the Rich Language Commands
root. The format of the command to add a rule is as follows:
firewall-cmd [--zone=zone] --add-rich-rule='rule' [--timeout=timeval]s (seconds), m (minutes), or h (hours) to specify the unit of time. The default is seconds.
firewall-cmd [--zone=zone] --remove-rich-rule='rule'firewall-cmd [--zone=zone] --query-rich-rule='rule'yes with exit status 0 if enabled. It prints no with exit status 1 otherwise. If the zone is omitted, the default zone is used.
5.15.2. Understanding the Rich Rule Structure
rule [family="rule family"]
    [ source [NOT] [address="address"] [mac="mac-address"] [ipset="ipset"] ]
    [ destination [NOT] address="address" ]
    [ element ]
    [ log [prefix="prefix text"] [level="log level"] [limit value="rate/duration"] ]
    [ audit ]
    [ action ]
Note
NOT keyword to invert the sense of the source and destination address commands, but the command line uses the invert="true" option.
5.15.3. Understanding the Rich Rule Command Options
family- If the rule family is provided, either
ipv4oripv6, it limits the rule toIPv4orIPv6, respectively. If the rule family is not provided, the rule is added for bothIPv4andIPv6. If source or destination addresses are used in a rule, then the rule family needs to be provided. This is also the case for port forwarding.
Source and Destination Addresses
source- By specifying the source address, the origin of a connection attempt can be limited to the source address. A source address or address range is either an IP address or a network IP address with a mask for
IPv4orIPv6. ForIPv4, the mask can be a network mask or a plain number. ForIPv6, the mask is a plain number. The use of host names is not supported. It is possible to invert the sense of the source address command by adding theNOTkeyword; all but the supplied address matches.A MAC address and also an IP set with type can be added forIPv4andIPv6if nofamilyis specified for the rule. Other IP sets need to match thefamilysetting of the rule. destination- By specifying the destination address, the target can be limited to the destination address. The destination address uses the same syntax as the source address for IP address or address ranges. The use of source and destination addresses is optional, and the use of a destination addresses is not possible with all elements. This depends on the use of destination addresses, for example, in service entries. You can combine
destinationandaction.
Elements
service, port, protocol, masquerade, icmp-block, forward-port, and source-port.
service- The
serviceelement is one of the firewalld provided services. To get a list of the predefined services, enter the following command:If a service provides a destination address, it will conflict with a destination address in the rule and will result in an error. The services using destination addresses internally are mostly services using multicast. The command takes the following form:~]$ firewall-cmd --get-servicesservice name=service_name port- The
portelement can either be a single port number or a port range, for example,5060-5062, followed by the protocol, either astcporudp. The command takes the following form:port port=number_or_range protocol=protocol protocol- The
protocolvalue can be either a protocol ID number or a protocol name. For allowedprotocolentries, see/etc/protocols. The command takes the following form:protocol value=protocol_name_or_ID icmp-block- Use this command to block one or more
ICMPtypes. TheICMPtype is one of theICMPtypes firewalld supports. To get a listing of supportedICMPtypes, enter the following command:Specifying an action is not allowed here.~]$ firewall-cmd --get-icmptypesicmp-blockuses the actionrejectinternally. The command takes the following form:icmp-block name=icmptype_name masquerade- Turns on IP masquerading in the rule. A source address can be provided to limit masquerading to this area, but not a destination address. Specifying an action is not allowed here.
forward-port- Forward packets from a local port with protocol specified as
tcporudpto either another port locally, to another machine, or to another port on another machine. Theportandto-portcan either be a single port number or a port range. The destination address is a simple IP address. Specifying an action is not allowed here. Theforward-portcommand uses the actionacceptinternally. The command takes the following form:forward-port port=number_or_range protocol=protocol / to-port=number_or_range to-addr=address source-port- Matches the source port of the packet - the port that is used on the origin of a connection attempt. To match a port on current machine, use the
portelement. Thesource-portelement can either be a single port number or a port range (for example, 5060-5062) followed by the protocol astcporudp. The command takes the following form:source-port port=number_or_range protocol=protocol
Logging
log- Log new connection attempts to the rule with kernel logging, for example, in syslog. You can define a prefix text that will be added to the log message as a prefix. Log level can be one of
emerg,alert,crit,error,warning,notice,info, ordebug. The use of log is optional. It is possible to limit logging as follows:The rate is a natural positive number [1, ..], with the duration oflog [prefix=prefix text] [level=log level] limit value=rate/durations,m,h,d.smeans seconds,mmeans minutes,hmeans hours, andddays. The maximum limit value is1/d, which means at maximum one log entry per day. audit- Audit provides an alternative way for logging using audit records sent to the service
auditd. The audit type can be one ofACCEPT,REJECT, orDROP, but it is not specified after the commandauditas the audit type will be automatically gathered from the rule action. Audit does not have its own parameters, but limit can be added optionally. The use of audit is optional.
Action
accept|reject|drop|mark- An action can be one of
accept,reject,drop, ormark. The rule can only contain an element or a source. If the rule contains an element, then new connections matching the element will be handled with the action. If the rule contains a source, then everything from the source address will be handled with the action specified.Withaccept | reject [type=reject type] | drop | mark set="mark[/mask]"accept, all new connection attempts will be granted. Withreject, they will be rejected and their source will get a reject message. The reject type can be set to use another value. Withdrop, all packets will be dropped immediately and no information is sent to the source. Withmarkall packets will be marked with the given mark and the optional mask.
5.15.4. Using the Rich Rule Log Command
deny chain to have the proper ordering. The rules or parts of them are placed in separate chains, according to the action of the rule, as follows:
zone_log
			zone_deny
zone_allowreject and drop rules will be placed in the “zone_deny” chain, which will be parsed after the log chain. All accept rules will be placed in the “zone_allow” chain, which will be parsed after the deny chain. If a rule contains log and also deny or allow actions, the parts of the rule that specify these actions are placed in the matching chains.
5.15.4.1. Using the Rich Rule Log Command Example 1
IPv4 and IPv6 connections for authentication header protocol AH:
rule protocol value="ah" accept5.15.4.2. Using the Rich Rule Log Command Example 2
IPv4 and IPv6 connections for protocol FTP and log 1 per minute using audit:
rule service name="ftp" log limit value="1/m" audit accept5.15.4.3. Using the Rich Rule Log Command Example 3
IPv4 connections from address 192.168.0.0/24 for protocol TFTP and log 1 per minute using syslog:
rule family="ipv4" source address="192.168.0.0/24" service name="tftp" log prefix="tftp" level="info" limit value="1/m" accept5.15.4.4. Using the Rich Rule Log Command Example 4
IPv6 connections from 1:2:3:4:6:: for protocol RADIUS are all rejected and logged at a rate of 3 per minute. New IPv6 connections from other sources are accepted:
rule family="ipv6" source address="1:2:3:4:6::" service name="radius" log prefix="dns" level="info" limit value="3/m" reject
rule family="ipv6" service name="radius" accept
5.15.4.5. Using the Rich Rule Log Command Example 5
IPv6 packets received from 1:2:3:4:6:: on port 4011 with protocol TCP to 1::2:3:4:7 on port 4012.
rule family="ipv6" source address="1:2:3:4:6::" forward-port to-addr="1::2:3:4:7" to-port="4012" protocol="tcp" port="4011"5.15.4.6. Using the Rich Rule Log Command Example 6
rule family="ipv4" source address="192.168.2.2" acceptfirewalld.richlanguage(5) man page for more examples.
5.16. Configuring Firewall Lockdown
root (for example, libvirt). With this feature, the administrator can lock the firewall configuration so that either no applications or only applications that are added to the lockdown whitelist are able to request firewall changes. The lockdown settings default to disabled. If enabled, the user can be sure that there are no unwanted configuration changes made to the firewall by local applications or services.
5.16.1. Configuring Lockdown with the Command-Line Client
root:
~]# firewall-cmd --query-lockdownyes with exit status 0 if lockdown is enabled. It prints no with exit status 1 otherwise.
root:
~]# firewall-cmd --lockdown-onroot:
~]# firewall-cmd --lockdown-off5.16.2. Configuring Lockdown Whitelist Options with the Command-Line Client
~]$ ps -e --context~]$ ps -e --context | grep example_programroot:
~]# firewall-cmd --list-lockdown-whitelist-commandsroot:
~]# firewall-cmd --add-lockdown-whitelist-command='/usr/bin/python -Es /usr/bin/command'root:
~]# firewall-cmd --remove-lockdown-whitelist-command='/usr/bin/python -Es /usr/bin/command'root:
~]# firewall-cmd --query-lockdown-whitelist-command='/usr/bin/python -Es /usr/bin/command'yes with exit status 0 if true. It prints no with exit status 1 otherwise.
root:
~]# firewall-cmd --list-lockdown-whitelist-contextsroot:
~]# firewall-cmd --add-lockdown-whitelist-context=contextroot:
~]# firewall-cmd --remove-lockdown-whitelist-context=contextroot:
~]# firewall-cmd --query-lockdown-whitelist-context=contextyes with exit status 0, if true, prints no with exit status 1 otherwise.
root:
~]# firewall-cmd --list-lockdown-whitelist-uidsroot:
~]# firewall-cmd --add-lockdown-whitelist-uid=uidroot:
~]# firewall-cmd --remove-lockdown-whitelist-uid=uid~]$ firewall-cmd --query-lockdown-whitelist-uid=uidyes with exit status 0, if true, prints no with exit status 1 otherwise.
root:
~]# firewall-cmd --list-lockdown-whitelist-usersroot:
~]# firewall-cmd --add-lockdown-whitelist-user=userroot:
~]# firewall-cmd --remove-lockdown-whitelist-user=user~]$ firewall-cmd --query-lockdown-whitelist-user=useryes with exit status 0, if true, prints no with exit status 1 otherwise.
5.16.3. Configuring Lockdown Whitelist Options with Configuration Files
<?xml version="1.0" encoding="utf-8"?>
	<whitelist>
	  <selinux context="system_u:system_r:NetworkManager_t:s0"/>
	  <selinux context="system_u:system_r:virtd_t:s0-s0:c0.c1023"/>
	  <user id="0"/>
</whitelist>firewall-cmd utility, for a user called user whose user ID is 815:
<?xml version="1.0" encoding="utf-8"?>
	<whitelist>
	  <command name="/usr/bin/python -Es /bin/firewall-cmd*"/>
	  <selinux context="system_u:system_r:NetworkManager_t:s0"/>
	  <user id="815"/>
	  <user name="user"/>
</whitelist>user id and user name, but only one option is required. Python is the interpreter and is prepended to the command line. You can also use a specific command, for example: /usr/bin/python /bin/firewall-cmd --lockdown-on--lockdown-on command is allowed.
Note
/usr/bin/ directory and the /bin/ directory is sym-linked to the /usr/bin/ directory. In other words, although the path for firewall-cmd when run as root might resolve to /bin/firewall-cmd, /usr/bin/firewall-cmd can now be used. All new scripts should use the new location. But be aware that if scripts that run as root have been written to use the /bin/firewall-cmd path, then that command path must be whitelisted in addition to the /usr/bin/firewall-cmd path traditionally used only for non-root users.
5.17. Configuring Logging for Denied Packets
LogDenied option in the firewalld, it is possible to add a simple logging mechanism for denied packets. These are the packets that are rejected or dropped. To change the setting of the logging, edit the /etc/firewalld/firewalld.conf file or use the command-line or GUI configuration tool.
LogDenied is enabled, logging rules are added right before the reject and drop rules in the INPUT, FORWARD and OUTPUT chains for the default rules and also the final reject and drop rules in zones. The possible values for this setting are: all, unicast, broadcast, multicast, and off. The default setting is off. With the unicast, broadcast, and multicast setting, the pkttype match is used to match the link-layer packet type. With all, all packets are logged.
LogDenied setting with firewall-cmd, use the following command as root:
~]# firewall-cmd --get-log-denied
offLogDenied setting, use the following command as root:
~]# firewall-cmd --set-log-denied=all
successLogDenied setting with the firewalld GUI configuration tool, start firewall-config, click the Options menu and select . The LogDenied window appears. Select the new LogDenied setting from the menu and click OK.
5.18. Additional Resources
firewalld.
5.18.1. Installed Documentation
firewalld(1)man page — Describes command options forfirewalld.firewalld.conf(5)man page — Contains information to configurefirewalld.firewall-cmd(1)man page — Describes command options for thefirewalldcommand-line client.firewall-config(1)man page — Describes settings for the firewall-config tool.firewall-offline-cmd(1)man page — Describes command options for thefirewalldoffline command-line client.firewalld.icmptype(5)man page — Describes XML configuration files forICMPfiltering.firewalld.ipset(5)man page — Describes XML configuration files for thefirewalldIPsets.firewalld.service(5)man page — Describes XML configuration files for firewalld service.firewalld.zone(5)man page — Describes XML configuration files forfirewalldzone configuration.firewalld.direct(5)man page — Describes thefirewallddirect interface configuration file.firewalld.lockdown-whitelist(5)man page — Describes thefirewalldlockdown whitelist configuration file.firewalld.richlanguage(5)man page — Describes thefirewalldrich language rule syntax.firewalld.zones(5)man page — General description of what zones are and how to configure them.firewalld.dbus(5)man page — Describes theD-Businterface offirewalld.
5.18.2. Online Documentation
- http://www.firewalld.org/ —
firewalldhome page.
Chapter 6. Getting Started with nftables
nftables framework provides packet classification facilities and it is the designated successor to the iptables, ip6tables, arptables, ebtables, and ipset tools. It offers numerous improvements in convenience, features, and performance over previous packet-filtering tools, most notably:
- built-in lookup tables instead of linear processing
- a single framework for both the
IPv4andIPv6protocols - rules all applied atomically instead of fetching, updating, and storing a complete rule set
- support for debugging and tracing in the rule set (
nftrace) and monitoring trace events (in thenfttool) - more consistent and compact syntax, no protocol-specific extensions
- a Netlink API for third-party applications
iptables, nftables use tables for storing chains. The chains contain individual rules for performing actions. The nft tool replaces all tools from the previous packet-filtering frameworks. The libnftnl library can be used for low-level interaction with nftables Netlink API over the libmnl library.
nft list ruleset command. Since these tools add tables, chains, rules, sets, and other objects to the nftables rule set, be aware that nftables rule-set operations, such as the nft flush ruleset command, might affect rule sets installed using the formerly separate legacy commands.
When to use firewalld or nftables
firewalld: Use thefirewalldutility for simplefirewalluse cases. The utility is easy to use and covers the typical use cases for these scenarios.nftables: Use thenftablesutility to set up complex and performance critical firewalls, such as for a whole network.
Important
6.1. Writing and executing nftables scripts
nftables framework provides a native scripting environment that brings a major benefit over using shell scripts to maintain firewall rules: the execution of scripts is atomic. This means that the system either applies the whole script or prevents the execution if an error occurs. This guarantees that the firewall is always in a consistent state.
nftables script environment enables administrators to:
- add comments
- define variables
- include other rule set files
nftables scripts.
*.nft scripts in the /etc/nftables/ directory. These scripts contain commands that create tables and empty chains for different purposes.
6.1.1. Supported nftables script formats
nftables scripting environment supports scripts in the following formats:
- You can write a script in the same format as the
nft list rulesetcommand displays the rule set:#!/usr/sbin/nft -f # Flush the rule set flush ruleset table inet example_table { chain example_chain { # Chain for incoming packets that drops all packets that # are not explicitly allowed by any rule in this chain type filter hook input priority 0; policy drop; # Accept connections to port 22 (ssh) tcp dport ssh accept } } - You can use the same syntax for commands as in
nftcommands:#!/usr/sbin/nft -f # Flush the rule set flush ruleset # Create a table add table inet example_table # Create a chain for incoming packets that drops all packets # that are not explicitly allowed by any rule in this chain add chain inet example_table example_chain { type filter hook input priority 0 ; policy drop ; } # Add a rule that accepts connections to port 22 (ssh) add rule inet example_table example_chain tcp dport ssh accept
6.1.2. Running nftables scripts
nftables script either by passing it to the nft utility or execute the script directly.
Prerequisites
- The procedure of this section assumes that you stored an
nftablesscript in the/etc/nftables/example_firewall.nftfile.
Procedure 6.1. Running nftables scripts using the nft utility
- To run an
nftablesscript by passing it to thenftutility, enter:# nft -f /etc/nftables/example_firewall.nft
Procedure 6.2. Running the nftables script directly:
- Steps that are required only once:
- Ensure that the script starts with the following shebang sequence:
#!/usr/sbin/nft -fImportant
If you omit the-fparameter, thenftutility does not read the script and displays: Error: syntax error, unexpected newline, expecting string. - Optional: Set the owner of the script to
root:# chown root /etc/nftables/example_firewall.nft - Make the script executable for the owner:
# chmod u+x /etc/nftables/example_firewall.nft
- Run the script:
# /etc/nftables/example_firewall.nftIf no output is displayed, the system executed the script successfully.
Important
nft executes the script successfully, incorrectly placed rules, missing parameters, or other problems in the script can cause that the firewall behaves not as expected.
Additional resources
- For details about setting the owner of a file, see the
chown(1)man page. - For details about setting permissions of a file, see the
chmod(1)man page. - For more information about loading
nftablesrules with system boot, see Section 6.1.6, “Automatically loading nftables rules when the system boots”
6.1.3. Using comments in nftables scripts
nftables scripting environment interprets everything to the right of a # character as a comment.
Example 6.1. Comments in an nftables script
...
# Flush the rule set
flush ruleset

add table inet example_table  # Create a table
...
6.1.4. Using variables in an nftables script
nftables script, use the define keyword. You can store single values and anonymous sets in a variable. For more complex scenarios, use named sets or verdict maps.
Variables with a single value
INET_DEV with the value enp1s0:
define INET_DEV = enp1s0$ sign followed by the variable name:
...
add rule inet example_table example_chain iifname $INET_DEV tcp dport ssh accept
...
Variables that contain an anonymous set
define DNS_SERVERS = { 192.0.2.1, 192.0.2.2 }$ sign followed by the variable name:
add rule inet example_table example_chain ip daddr $DNS_SERVERS acceptNote
Additional resources
- For more information about sets, see Section 6.4, “Using sets in nftables commands”.
- For more information about verdict maps, see Section 6.5, “Using verdict maps in nftables commands”.
6.1.5. Including files in an nftables script
nftables scripting environment enables administrators to include other scripts by using the include statement.
nftables includes files from the default search path, which is set to /etc on Red Hat Enterprise Linux.
Example 6.2. Including files from the default search directory
include "example.nft"Example 6.3. Including all *.nft files from a directory
*.nft that are stored in the /etc/nftables/rulesets/ directory:
include "/etc/nftables/rulesets/*.nft"include statement does not match files beginning with a dot.
Additional resources
- For further details, see the
Include filessection in thenft(8)man page.
6.1.6. Automatically loading nftables rules when the system boots
nftables systemd service loads firewall scripts that are included in the /etc/sysconfig/nftables.conf file. This section explains how to load firewall rules when the system boots.
Prerequisites
- The
nftablesscripts are stored in the/etc/nftables/directory.
Procedure 6.3. Automatically loading nftables rules when the system boots
- Edit the
/etc/sysconfig/nftables.conffile.- If you enhance
*.nftscripts created in/etc/nftables/when you installed the nftables package, uncomment the include statement for these scripts. - If you write scripts from scratch, add include statements to include these scripts. For example, to load the
/etc/nftables/example.nftscript when thenftablesservice starts, add:include "/etc/nftables/example.nft"
- Optionally, start the
nftablesservice to load the firewall rules without rebooting the system:# systemctl start nftables - Enable the nftables service.
# systemctl enable nftables
Additional resources
- For more information, see Section 6.1.1, “Supported nftables script formats”
6.2. Creating and managing nftables tables, chains, and rules
nftables rule set, and how to manage it.
6.2.1. Displaying the nftables rule set
nftables contains tables, chains, and rules. This section explains how to display this rule set.
# nft list ruleset
table inet example_table {
  chain example_chain {
    type filter hook input priority filter; policy accept;
    tcp dport http accept
    tcp dport ssh accept
  }
}
Note
nftables does not pre-create tables. As a consequence, displaying the rule set on a host without any tables, the nft list ruleset command shows no output.
6.2.2. Creating an nftables table
nftables is a name space that contains a collection of chains, rules, sets, and other objects. This section explains how to create a table.
ip: Matches only IPv4 packets. This is the default if you do not specify an address family.ip6: Matches only IPv6 packets.inet: Matches both IPv4 and IPv6 packets.arp: Matches IPv4 address resolution protocol (ARP) packets.bridge: Matches packets that traverse a bridge device.netdev: Matches packets from ingress.
Procedure 6.4. Creating an nftables table
- Use the
nft add tablecommand to create a new table. For example, to create a table named example_table that processesIPv4andIPv6packets:# nft add table inet example_table - Optionally, list all tables in the rule set:
# nft list tables
table inet example_table
Additional resources
- For further details about address families, see the
Address familiessection in thenft(8)man page. - For details on other actions you can run on tables, see the
Tablessection in thenft(8)man page.
6.2.3. Creating an nftables chain
- Base chain: You can use base chains as an entry point for packets from the networking stack.
- Regular chain: You can use regular chains as a
jumptarget and to better organize rules.
Prerequisites
- The table to which you want to add the new chain exists.
Procedure 6.5. Creating an nftables chain
- Use the
nft add chaincommand to create a new chain. For example, to create a chain named example_chain in example_table:# nft add chain inet example_table example_chain '{ type filter hook input priority 0 ; policy accept ; }'Important
To avoid that the shell interprets the semicolons as the end of the command, you must escape the semicolons with a backslash. Moreover, some shells interpret the curly braces as well, so quote the curly braces and anything inside them with ticks (').This chain filters incoming packets. Thepriorityparameter specifies the order in whichnftablesprocesses chains with the same hook value. A lower priority value has precedence over higher ones. Thepolicyparameter sets the default action for rules in this chain. Note that if you are logged in to the server remotely and you set the default policy todrop, you are disconnected immediately if no other rule allows the remote access. - Optionally, display all chains:
# nft list chains
table inet example_table {
  chain example_chain {
    type filter hook input priority filter; policy accept;
  }
}
Additional resources
- For further details about address families, see the
Address familiessection in thenft(8)man page. - For details on other actions you can run on chains, see the
Chainssection in thenft(8)man page.
6.2.4. Appending a rule to the end of an nftables chain
Prerequisites
- The chain to which you want to add the rule exists.
Procedure 6.6. Appending a rule to the end of an nftables chain
- To add a new rule, use the
nft add rulecommand. For example, to add a rule to the example_chain in the example_table that allows TCP traffic on port 22:# nft add rule inet example_table example_chain tcp dport 22 acceptYou can alternatively specify the name of the service instead of the port number. In the example, you could usesshinstead of the port number22. Note that a service name is resolved to a port number based on its entry in the/etc/servicesfile. - Optionally, display all chains and their rules in example_table:
# nft list table inet example_table
table inet example_table {
  chain example_chain {
    type filter hook input priority filter; policy accept;
    ...
    tcp dport ssh accept
  }
}
Additional resources
- For further details about address families, see the
Address familiessection in thenft(8)man page. - For details on other actions you can run on chains, see the
Rulessection in thenft(8)man page.
6.2.5. Inserting a rule at the beginning of an nftables chain
nftables chain.
Prerequisites
- The chain to which you want to add the rule exists.
Procedure 6.7. Inserting a rule at the beginning of an nftables chain
- To insert a new rule, use the
nft insert rulecommand. For example, to insert a rule to the example_chain in the example_table that allows TCP traffic on port22:# nft insert rule inet example_table example_chain tcp dport 22 acceptYou can alternatively specify the name of the service instead of the port number. In the example, you could usesshinstead of the port number22. Note that a service name is resolved to a port number based on its entry in the/etc/servicesfile. - Optionally, display all chains and their rules in example_table:
# nft list table inet example_table
table inet example_table {
  chain example_chain {
    type filter hook input priority filter; policy accept;
    tcp dport ssh accept
    ...
  }
}
Additional resources
- For further details about address families, see the
Address familiessection in thenft(8)man page. - For details on other actions you can run on chains, see the
Rulessection in thenft(8)man page.
6.2.6. Inserting a rule at a specific position of an nftables chain
nftables chain. This way you can place new rules at the right position.
Prerequisites
- The chain to which you want to add the rule exists.
Procedure 6.8. Inserting a rule at a specific position of an nftables chain
- Use the
nft -a list rulesetcommand to display all chains and their rules in the example_table including their handle:# nft -a list table inet example_table table inet example_table { # handle 1 chain example_chain { # handle 1 type filter hook input priority filter; policy accept; tcp dport 22 accept # handle 2 tcp dport 443 accept # handle 3 tcp dport 389 accept # handle 4 } }Using the-adisplays the handles. You require this information to position the new rules in the next steps. - Insert the new rules to the example_chain chain in the example_table:
- To insert a rule that allows TCP traffic on port 636 before handle 3, enter:
# nft insert rule inet example_table example_chain position 3 tcp dport 636 accept - To add a rule that allows TCP traffic on port 80 after handle 3, enter:
# nft add rule inet example_table example_chain position 3 tcp dport 80 accept
- Optionally, display all chains and their rules in example_table:
# nft -a list table inet example_table
table inet example_table { # handle 1
  chain example_chain { # handle 1
    type filter hook input priority filter; policy accept;
    tcp dport 22 accept # handle 2
    tcp dport 636 accept # handle 5
    tcp dport 443 accept # handle 3
    tcp dport 80 accept # handle 6
    tcp dport 389 accept # handle 4
  }
}
Additional resources
- For further details about address families, see the
Address familiessection in thenft(8)man page. - For details on other actions you can run on chains, see the
Rulessection in thenft(8)man page.
6.3. Configuring NAT using nftables
nftables, you can configure the following network address translation (NAT) types:
- Masquerading
- Source NAT (
SNAT) - Destination NAT (
DNAT) - Redirect
6.3.1. The different NAT types: masquerading, source NAT, destination NAT, and redirect
NAT) types:
Masquerading and source NAT (SNAT)
NAT types to change the source IP address of packets. For example, Internet Service Providers do not route private IP ranges, such as 10.0.0.0/8. If you use private IP ranges in your network and users should be able to reach servers on the Internet, map the source IP address of packets from these ranges to a public IP address.
SNAT are very similar. The differences are:
- Masquerading automatically uses the IP address of the outgoing interface. Therefore, use masquerading if the outgoing interface uses a dynamic IP address.
SNATsets the source IP address of packets to a specified IP and does not dynamically look up the IP of the outgoing interface. Therefore,SNATis faster than masquerading. UseSNATif the outgoing interface uses a fixed IP address.
Destination NAT (DNAT)
NAT type to route incoming traffic to a different host. For example, if your web server uses an IP address from a reserved IP range and is, therefore, not directly accessible from the Internet, you can set a DNAT rule on the router to redirect incoming traffic to this server.
Redirect
6.3.2. Configuring masquerading using nftables
nftables automatically uses the new IP when replacing the source IP.
ens3 interface to the IP set on ens3.
Procedure 6.9. Configuring masquerading using nftables
- Create a table:
# nft add table nat - Add the
preroutingandpostroutingchains to the table:# nft -- add chain nat prerouting { type nat hook prerouting priority -100 \; } # nft add chain nat postrouting { type nat hook postrouting priority 100 \; }Important
Even if you do not add a rule to thepreroutingchain, thenftablesframework requires this chain to match incoming packet replies.Note that you must pass the--option to thenftcommand to avoid that the shell interprets the negative priority value as an option of thenftcommand. - Add a rule to the
postroutingchain that matches outgoing packets on theens3interface:# nft add rule nat postrouting oifname "ens3" masquerade
6.3.3. Configuring source NAT using nftables
SNAT) enables you to change the IP of packets sent through an interface to a specific IP address.
ens3 interface to 192.0.2.1.
Procedure 6.10. Configuring source NAT using nftables
- Create a table:
# nft add table nat - Add the
preroutingandpostroutingchains to the table:# nft -- add chain nat prerouting { type nat hook prerouting priority -100 \; } # nft add chain nat postrouting { type nat hook postrouting priority 100 \; }Important
Even if you do not add a rule to thepreroutingchain, thenftablesframework requires this chain to match outgoing packet replies.Note that you must pass the--option to thenftcommand to avoid that the shell interprets the negative priority value as an option of thenftcommand. - Add a rule to the
postroutingchain that replaces the source IP of outgoing packets throughens3with192.0.2.1:# nft add rule nat postrouting oifname "ens3" snat to 192.0.2.1
Additional resources
- For more information, see Section 6.6.2, “Forwarding incoming packets on a specific local port to a different host”
6.3.4. Configuring destination NAT using nftables
NAT enables you to redirect traffic on a router to a host that is not directly accessible from the Internet.
80 and 443 of the router to the host with the 192.0.2.1 IP address.
Procedure 6.11. Configuring destination NAT using nftables
- Create a table:
# nft add table nat - Add the
preroutingandpostroutingchains to the table:# nft -- add chain nat prerouting { type nat hook prerouting priority -100 \; } # nft add chain nat postrouting { type nat hook postrouting priority 100 \; }Important
Even if you do not add a rule to the postrouting chain, thenftablesframework requires this chain to match outgoing packet replies.Note that you must pass the--option to thenftcommand to avoid that the shell interprets the negative priority value as an option of thenftcommand. - Add a rule to the prerouting chain that redirects incoming traffic on the
ens3interface sent to port 80 and 443 to the host with the 192.0.2.1 IP:# nft add rule nat prerouting iifname ens3 tcp dport { 80, 443 } dnat to 192.0.2.1 - Depending on your environment, add either a SNAT or masquerading rule to change the source address:
- If the
ens3interface used dynamic IP addresses, add a masquerading rule:# nft add rule nat postrouting oifname "ens3" masquerade - If the
ens3interface uses a static IP address, add aSNATrule. For example, if theens3uses the 198.51.100.1 IP address:# nft add rule nat postrouting oifname "ens3" snat to 198.51.100.1
Additional resources
- For more information, see Section 6.3.1, “The different NAT types: masquerading, source NAT, destination NAT, and redirect”
6.3.5. Configuring a redirect using nftables
redirect feature is a special case of destination network address translation (DNAT) that redirects packets to the local machine depending on the chain hook.
Procedure 6.12. Configuring a redirect using nftables
- Create a table:
# nft add table nat - Add the prerouting chain to the table:
# nft -- add chain nat prerouting { type nat hook prerouting priority -100 \; }Note that you must pass the--option to thenftcommand to avoid that the shell interprets the negative priority value as an option of thenftcommand. - Add a rule to the prerouting chain that redirects incoming traffic on port 22 to port 2222:
# nft add rule nat prerouting tcp dport 22 redirect to 2222
Additional resources
- For more information, see Section 6.3.1, “The different NAT types: masquerading, source NAT, destination NAT, and redirect”
6.4. Using sets in nftables commands
nftables framework natively supports sets. You can use sets, for example, if a rule should match multiple IP addresses, port numbers, interfaces, or any other match criteria.
6.4.1. Using anonymous sets in nftables
{ 22, 80, 443 }, that you use directly in a rule. You can also use anonymous sets also for IP addresses or any other match criteria.
Prerequisites
- The example_chain chain and the example_table table in the
inetfamily exists.
Procedure 6.13. Using anonymous sets in nftables
- For example, to add a rule to example_chain in example_table that allows incoming traffic to port
22,80, and443:# nft add rule inet example_table example_chain tcp dport { 22, 80, 443 } accept - Optionally, display all chains and their rules in example_table:
# nft list table inet example_table
table inet example_table {
  chain example_chain {
    type filter hook input priority filter; policy accept;
    tcp dport { ssh, http, https } accept
  }
}
6.4.2. Using named sets in nftables
nftables framework supports mutable named sets. A named set is a list or range of elements that you can use in multiple rules within a table. Another benefit over anonymous sets is that you can update a named set without replacing the rules that use the set.
ipv4_addrfor a set that contains IPv4 addresses or ranges, such as192.0.2.1or192.0.2.0/24.ipv6_addrfor a set that containsIPv6addresses or ranges, such as2001:db8:1::1or2001:db8:1::1/64.ether_addrfor a set that contains a list of media access control (MAC) addresses, such as52:54:00:6b:66:42.inet_protofor a set that contains a list of Internet protocol types, such astcp.inet_servicefor a set that contains a list of Internet services, such asssh.markfor a set that contains a list of packet marks. Packet marks can be any positive 32-bit integer value (0to2147483647).
Prerequisites
- The example_chain chain and the example_table table exists.
Procedure 6.14. Using named sets in nftables
Create an empty set. The following examples create a set for
IPv4addresses:- To create a set that can store multiple individual
IPv4addresses:# nft add set inet example_table example_set { type ipv4_addr \; } - To create a set that can store
IPv4address ranges:# nft add set inet example_table example_set { type ipv4_addr \; flags interval \; }
Important
To avoid that the shell interprets the semicolons as the end of the command, you must escape the semicolons with a backslash.- Optionally, create rules that use the set. For example, the following command adds a rule to the example_chain in the example_table that will drop all packets from
IPv4addresses in example_set.# nft add rule inet example_table example_chain ip saddr @example_set dropBecause example_set is still empty, the rule has currently no effect. Add IPv4 addresses to example_set:
- If you create a set that stores individual
IPv4addresses, enter:# nft add element inet example_table example_set { 192.0.2.1, 192.0.2.2 } - If you create a set that stores
IPv4ranges, enter:# nft add element inet example_table example_set { 192.0.2.0-192.0.2.255 }
When you specify an IP address range, you can alternatively use the Classless Inter-Domain Routing (CIDR) notation, such as192.0.2.0/24in the above example.
6.4.3. Related information
Sets section in the nft(8) man page.
6.5. Using verdict maps in nftables commands
nft to perform an action based on packet information by mapping match criteria to an action.
6.5.1. Using anonymous maps in nftables
{ match_criteria : action } statement that you use directly in a rule. The statement can contain multiple comma-separated mappings.
Procedure 6.15. Using anonymous maps in nftables
- Create the example_table:
# nft add table inet example_table - Create the
tcp_packetschain in example_table:# nft add chain inet example_table tcp_packets - Add a rule to
tcp_packetsthat counts the traffic in this chain:# nft add rule inet example_table tcp_packets counter - Create the
udp_packetschain in example_table:# nft add chain inet example_table udp_packets - Add a rule to
udp_packetsthat counts the traffic in this chain:# nft add rule inet example_table udp_packets counter - Create a chain for incoming traffic. For example, to create a chain named
incoming_trafficin example_table that filters incoming traffic:# nft add chain inet example_table incoming_traffic { type filter hook input priority 0 \; } - Add a rule with an anonymous map to
incoming_traffic:# nft add rule inet example_table incoming_traffic ip protocol vmap { tcp : jump tcp_packets, udp : jump udp_packets }The anonymous map distinguishes the packets and sends them to the different counter chains based on their protocol. - To list the traffic counters, display example_table:
# nft list table inet example_table
table inet example_table {
  chain tcp_packets {
    counter packets 36379 bytes 2103816
  }

  chain udp_packets {
    counter packets 10 bytes 1559
  }

  chain incoming_traffic {
    type filter hook input priority filter; policy accept;
    ip protocol vmap { tcp : jump tcp_packets, udp : jump udp_packets }
  }
}
The counters in thetcp_packetsandudp_packetschain display both the number of received packets and bytes.
6.5.2. Using named maps in nftables
nftables framework supports named maps. You can use these maps in multiple rules within a table. Another benefit over anonymous maps is that you can update a named map without replacing the rules that use it.
ipv4_addrfor a map whose match part contains anIPv4address, such as192.0.2.1.ipv6_addrfor a map whose match part contains anIPv6address, such as2001:db8:1::1.ether_addrfor a map whose match part contains a media access control (MAC) address, such as52:54:00:6b:66:42.inet_protofor a map whose match part contains an Internet protocol type, such astcp.inet_servicefor a map whose match part contains an Internet services name port number, such assshor22.markfor a map whose match part contains a packet mark. A packet mark can be any positive 32-bit integer value (0to2147483647).counterfor a map whose match part contains a counter value. The counter value can be any positive 64-bit integer value.quotafor a map whose match part contains a quota value. The quota value can be any positive 64-bit integer value.
Procedure 6.16. Using named maps in nftables
- Create a table. For example, to create a table named example_table that processes
IPv4packets:# nft add table ip example_table - Create a chain. For example, to create a chain named example_chain in example_table:
# nft add chain ip example_table example_chain { type filter hook input priority 0 \; }Important
To avoid that the shell interprets the semicolons as the end of the command, you must escape the semicolons with a backslash. - Create an empty map. For example, to create a map for
IPv4addresses:# nft add map ip example_table example_map { type ipv4_addr : verdict \; } - Create rules that use the map. For example, the following command adds a rule to example_chain in example_table that applies actions to
IPv4addresses which are both defined in example_map:# nft add rule example_table example_chain ip saddr vmap @example_map - Add
IPv4addresses and corresponding actions to example_map:# nft add element ip example_table example_map { 192.0.2.1 : accept, 192.0.2.2 : drop }This example defines the mappings ofIPv4addresses to actions. In combination with the rule created above, the firewall accepts packet from192.0.2.1and drops packets from192.0.2.2. - Optionally, enhance the map by adding another IP address and action statement:
# nft add element ip example_table example_map { 192.0.2.3 : accept } - Optionally, remove an entry from the map:
# nft delete element ip example_table example_map { 192.0.2.1 } - Optionally, display the rule set:
# nft list ruleset
table ip example_table {
  map example_map {
    type ipv4_addr : verdict
    elements = { 192.0.2.2 : drop, 192.0.2.3 : accept }
  }

  chain example_chain {
    type filter hook input priority filter; policy accept;
    ip saddr vmap @example_map
  }
}
6.5.3. Related information
Maps section in the nft(8) man page.
6.6. Configuring port forwarding using nftables
80 and 443 on the firewall to the web server. With this firewall rule, users on the internet can access the web server using the IP or host name of the firewall.
6.6.1. Forwarding incoming packets to a different local port
8022 to port 22 on the local system.
Procedure 6.17. Forwarding incoming packets to a different local port
- Create a table named
natwith the ip address family:# nft add table ip nat - Add the
preroutingandpostroutingchains to the table:# nft -- add chain ip nat prerouting { type nat hook prerouting priority -100 \; }Note
Pass the--option to thenftcommand to avoid that the shell interprets the negative priority value as an option of thenftcommand. - Add a rule to the
preroutingchain that redirects incoming packets on port8022to the local port22:# nft add rule ip nat prerouting tcp dport 8022 redirect to :22
6.6.2. Forwarding incoming packets on a specific local port to a different host
443 to the same port number on the remote system with the 192.0.2.1 IP address.
Prerequisite
- You are logged in as the
rootuser on the system that should forward the packets.
Procedure 6.18. Forwarding incoming packets on a specific local port to a different host
- Create a table named
natwith the ip address family:# nft add table ip nat - Add the
preroutingandpostroutingchains to the table:# nft -- add chain ip nat prerouting { type nat hook prerouting priority -100 \; } # nft add chain ip nat postrouting { type nat hook postrouting priority 100 \; }Note
Pass the--option to thenftcommand to avoid that the shell interprets the negative priority value as an option of thenftcommand. - Add a rule to the
preroutingchain that redirects incoming packets on port443to the same port on192.0.2.1:# nft add rule ip nat prerouting tcp dport 443 dnat to 192.0.2.1 - Add a rule to the
postroutingchain to masquerade outgoing traffic:# nft add rule ip nat postrouting ip daddr 192.0.2.1 masquerade - Enable packet forwarding:
# echo "net.ipv4.ip_forward=1" > /etc/sysctl.d/95-IPv4-forwarding.conf # sysctl -p /etc/sysctl.d/95-IPv4-forwarding.conf
6.7. Using nftables to limit the amount of connections
nftables to limit the number of connections or to block IP addresses that attempt to establish a given amount of connections to prevent them from using too many system resources.
6.7.1. Limiting the number of connections using nftables
ct count parameter of the nft utility enables administrators to limit the number of connections. The procedure describes a basic example of how to limit incoming connections.
Prerequisites
- The base example_chain in example_table exists.
Procedure 6.19. Limiting the number of connections using nftables
- Add a rule that allows only two simultaneous connections to the
SSHport (22) from an IPv4 address and rejects all further connections from the same IP:# nft add rule ip example_table example_chain tcp dport ssh meter example_meter { ip saddr ct count over 2 } counter reject - Optionally, display the meter created in the previous step:
# nft list meter ip example_table example_meter table ip example_table { meter example_meter { type ipv4_addr size 65535 elements = { 192.0.2.1 : ct count over 2 , 192.0.2.2 : ct count over 2 } } }Theelementsentry displays addresses that currently match the rule. In this example,elementslists IP addresses that have active connections to the SSH port. Note that the output does not display the number of active connections or if connections were rejected.
6.7.2. Blocking IP addresses that attempt more than ten new incoming TCP connections within one minute
nftables framework enables administrators to dynamically update sets. This section explains how you use this feature to temporarily block hosts that are establishing more than ten IPv4 TCP connections within one minute. After five minutes, nftables automatically removes the IP address from the deny list.
Procedure 6.20. Blocking IP addresses that attempt more than ten new incoming TCP connections within one minute
- Create the filter table with the ip address family:
# nft add table ip filter - Add the input chain to the filter table:
# nft add chain ip filter input { type filter hook input priority 0 \; } - Add a set named denylist to the filter table:
# nft add set ip filter denylist { type ipv4_addr \; flags dynamic, timeout \; timeout 5m \; }This command creates a dynamic set for IPv4 addresses. Thetimeout 5mparameter defines thatnftablesautomatically removes entries after 5 minutes from the set. - Add a rule that automatically adds the source IP address of hosts that attempt to establish more than ten new TCP connections within one minute to the
denylistset:# nft add rule ip filter input ip protocol tcp ct state new, untracked limit rate over 10/minute add @denylist { ip saddr } - Add a rule that drops all connections from IP addresses in the
denylistset:# nft add rule ip filter input ip saddr @denylist drop
6.7.3. Additional resources
- For more information, see Section 6.4.2, “Using named sets in nftables”
6.8. Debugging nftables rules
nftables framework provides different options for administrators to debug rules and if packets match them. This section describes these options.
6.8.1. Creating a rule with a counter
Prerequisites
- The chain to which you want to add the rule exists.
Procedure 6.21. Creating a rule with a counter
- Add a new rule with the
counterparameter to the chain. The following example adds a rule with a counter that allows TCP traffic on port 22 and counts the packets and traffic that match this rule:# nft add rule inet example_table example_chain tcp dport 22 counter accept - To display the counter values:
# nft list ruleset table inet example_table { chain example_chain { type filter hook input priority filter; policy accept; tcp dport ssh counter packets 6872 bytes 105448565 accept } }
6.8.2. Adding a counter to an existing rule
Prerequisites
- The rule to which you want to add the counter exists.
Procedure 6.22. Adding a counter to an existing rule
- Display the rules in the chain including their handles:
# nft --handle list chain inet example_table example_chain table inet example_table { chain example_chain { # handle 1 type filter hook input priority filter; policy accept; tcp dport ssh accept # handle 4 } } - Add the counter by replacing the rule but with the
counterparameter. The following example replaces the rule displayed in the previous step and adds a counter:# nft replace rule inet example_table example_chain handle 4 tcp dport 22 counter accept - To display the counter values:
# nft list ruleset table inet example_table { chain example_chain { type filter hook input priority filter; policy accept; tcp dport ssh counter packets 6872 bytes 105448565 accept } }
6.8.3. Monitoring packets that match an existing rule
nftables in combination with the nft monitor command enables administrators to display packets that match a rule. The procedure describes how to enable tracing for a rule as well as monitoring packets that match this rule.
Prerequisites
- The rule to which you want to add the counter exists.
Procedure 6.23. Monitoring packets that match an existing rule
- Display the rules in the chain including their handles:
# nft --handle list chain inet example_table example_chain table inet example_table { chain example_chain { # handle 1 type filter hook input priority filter; policy accept; tcp dport ssh accept # handle 4 } } - Add the tracing feature by replacing the rule but with the
metanftraceset1parameters. The following example replaces the rule displayed in the previous step and enables tracing:# nft replace rule inet example_table example_chain handle 4 tcp dport 22 meta nftrace set 1 accept - Use the
nft monitorcommand to display the tracing. The following example filters the output of the command to display only entries that containinet example_table example_chain:# nft monitor | grep "inet example_table example_chain" trace id 3c5eb15e inet example_table example_chain packet: iif "enp1s0" ether saddr 52:54:00:17:ff:e4 ether daddr 52:54:00:72:2f:6e ip saddr 192.0.2.1 ip daddr 192.0.2.2 ip dscp cs0 ip ecn not-ect ip ttl 64 ip id 49710 ip protocol tcp ip length 60 tcp sport 56728 tcp dport ssh tcp flags == syn tcp window 64240 trace id 3c5eb15e inet example_table example_chain rule tcp dport ssh nftrace set 1 accept (verdict accept) ...Warning
Depending on the number of rules with tracing enabled and the amount of matching traffic, thenft monitorcommand can display a lot of output. Use grep or other utilities to filter the output.
Chapter 7. System Auditing
- Date and time, type, and outcome of an event.
- Sensitivity labels of subjects and objects.
- Association of an event with the identity of the user who triggered the event.
- All modifications to Audit configuration and attempts to access Audit log files.
- All uses of authentication mechanisms, such as SSH, Kerberos, and others.
- Changes to any trusted database, such as
/etc/passwd. - Attempts to import or export information into or from the system.
- Include or exclude events based on user identity, subject and object labels, and other attributes.
- Controlled Access Protection Profile (CAPP)
- Labeled Security Protection Profile (LSPP)
- Rule Set Base Access Control (RSBAC)
- National Industrial Security Program Operating Manual (NISPOM)
- Federal Information Security Management Act (FISMA)
- Payment Card Industry — Data Security Standard (PCI-DSS)
- Security Technical Implementation Guides (STIG)
- Evaluated by National Information Assurance Partnership (NIAP) and Best Security Industries (BSI).
- Certified to LSPP/CAPP/RSBAC/EAL4+ on Red Hat Enterprise Linux 5.
- Certified to Operating System Protection Profile / Evaluation Assurance Level 4+ (OSPP/EAL4+) on Red Hat Enterprise Linux 6.
Use Cases
- Watching file access
- Audit can track whether a file or a directory has been accessed, modified, executed, or the file's attributes have been changed. This is useful, for example, to detect access to important files and have an Audit trail available in case one of these files is corrupted.
- Monitoring system calls
- Audit can be configured to generate a log entry every time a particular system call is used. This can be used, for example, to track changes to the system time by monitoring the
settimeofday,clock_adjtime, and other time-related system calls. - Recording commands run by a user
- Audit can track whether a file has been executed, so rules can be defined to record every execution of a particular command. For example, a rule can be defined for every executable in the
/bindirectory. The resulting log entries can then be searched by user ID to generate an audit trail of executed commands per user. - Recording execution of system pathnames
- Aside from watching file access which translates a path to an inode at rule invocation, Audit can now watch the execution of a path even if it does not exist at rule invocation, or if the file is replaced after rule invocation. This allows rules to continue to work after upgrading a program executable or before it is even installed.
- Recording security events
- The
pam_faillockauthentication module is capable of recording failed login attempts. Audit can be set up to record failed login attempts as well, and provides additional information about the user who attempted to log in. - Searching for events
- Audit provides the ausearch utility, which can be used to filter the log entries and provide a complete audit trail based on a number of conditions.
- Running summary reports
- The aureport utility can be used to generate, among other things, daily reports of recorded events. A system administrator can then analyze these reports and investigate suspicious activity further.
- Monitoring network access
- The iptables and ebtables utilities can be configured to trigger Audit events, allowing system administrators to monitor network access.
Note
7.1. Audit System Architecture
- audisp — the Audit dispatcher daemon interacts with the Audit daemon and sends events to other applications for further processing. The purpose of this daemon is to provide a plug-in mechanism so that real-time analytical programs can interact with Audit events.
- auditctl — the Audit control utility interacts with the kernel Audit component to manage rules and to control a number of settings and parameters of the event generation process.
- The remaining Audit utilities take the contents of the Audit log files as input and generate output based on user's requirements. For example, the aureport utility generates a report of all recorded events.
7.2. Installing the audit Packages
~]# yum install audit7.3. Configuring the audit Service
/etc/audit/auditd.conf file. This file consists of configuration parameters that modify the behavior of the Audit daemon. Empty lines and text following a hash sign (#) are ignored. For further details, see the auditd.conf(5) man page.
7.3.1. Configuring auditd for a Secure Environment
auditd configuration should be suitable for most environments. However, if your environment must meet strict security policies, the following settings are suggested for the Audit daemon configuration in the /etc/audit/auditd.conf file:
- log_file
- The directory that holds the Audit log files (usually
/var/log/audit/) should reside on a separate mount point. This prevents other processes from consuming space in this directory and provides accurate detection of the remaining space for the Audit daemon. - max_log_file
- Specifies the maximum size of a single Audit log file, which must be set to make full use of the available space on the partition that holds the Audit log files.The
max_log_fileparameter specifies the maximum file size in megabytes. The value given must be numeric. - max_log_file_action
- Decides what action is taken once the limit set in
max_log_fileis reached, should be set tokeep_logsto prevent Audit log files from being overwritten. - space_left
- Specifies the amount of free space left on the disk for which an action that is set in the
space_left_actionparameter is triggered. Must be set to a number that gives the administrator enough time to respond and free up disk space. Thespace_leftvalue depends on the rate at which the Audit log files are generated.If the value ofspace_leftis specified as a whole number, it is interpreted as an absolute size in megabytes (MiB). If the value is specified as a number between 1 and 99 followed by a percentage sign (for example, 5%), the audit daemon calculates the absolute size in megabytes based on the size of the file system containinglog_file. - space_left_action
- It is recommended to set the
space_left_actionparameter toemailorexecwith an appropriate notification method. - admin_space_left
- Specifies the absolute minimum amount of free space for which an action that is set in the
admin_space_left_actionparameter is triggered, which must be set to a value that leaves enough space to log actions performed by the administrator.The numeric value for this parameter should be lower than the number forspace_left. You can also append a percent sign (for example, 1%) to the number to have the audit daemon calculate the number based on the disk partition size. - admin_space_left_action
- Should be set to
singleto put the system into single-user mode and allow the administrator to free up some disk space. - disk_full_action
- Specifies an action that is triggered when no free space is available on the partition that holds the Audit log files, must be set to
haltorsingle. This ensures that the system is either shut down or operating in single-user mode when Audit can no longer log events. - disk_error_action
- Specifies an action that is triggered in case an error is detected on the partition that holds the Audit log files, must be set to
syslog,single, orhalt, depending on your local security policies regarding the handling of hardware malfunctions. - flush
- Should be set to
incremental_async. It works in combination with thefreqparameter, which determines how many records can be sent to the disk before forcing a hard synchronization with the hard drive. Thefreqparameter should be set to100. These parameters assure that Audit event data is synchronized with the log files on the disk while keeping good performance for bursts of activity.
7.4. Starting the audit Service
auditd is configured, start the service to collect Audit information and store it in the log files. Use the following command as the root user to start auditd:
~]# service auditd startNote
service command is the only way to correctly interact with the auditd daemon. You need to use the service command so that the auid value is properly recorded. You can use the systemctl command only for two actions: enable and status.
auditd to start at boot time:
~]# systemctl enable auditdauditd using the service auditd action command, where action can be one of the following:
stop- Stops
auditd. restart- Restarts
auditd. reloadorforce-reload- Reloads the configuration of auditd from the
/etc/audit/auditd.conffile. rotate- Rotates the log files in the
/var/log/audit/directory. resume- Resumes logging of Audit events after it has been previously suspended, for example, when there is not enough free space on the disk partition that holds the Audit log files.
condrestartortry-restart- Restarts auditd only if it is already running.
status- Displays the running status of auditd.
7.5. Defining Audit Rules
- Control rules
- Allow the Audit system's behavior and some of its configuration to be modified.
- File system rules
- Also known as file watches, allow the auditing of access to a particular file or a directory.
- System call rules
- Allow logging of system calls that any specified program makes.
- on the command line using the auditctl utility. Note that these rules are not persistent across reboots. For details, see Section 7.5.1, “Defining Audit Rules with auditctl”
- in the
/etc/audit/audit.rulesfile. For details, see Section 7.5.3, “Defining Persistent Audit Rules and Controls in the/etc/audit/audit.rulesFile”
7.5.1. Defining Audit Rules with auditctl
auditctl command allows you to control the basic functionality of the Audit system and to define rules that decide which Audit events are logged.
Note
CAP_AUDIT_CONTROL capability is required to set up audit services and the CAP_AUDIT_WRITE capabilityis required to log user messages.
Defining Control Rules
-b- sets the maximum amount of existing Audit buffers in the kernel, for example:
~]# auditctl -b 8192 -f- sets the action that is performed when a critical error is detected, for example:
~]# auditctl -f 2The above configuration triggers a kernel panic in case of a critical error. -e- enables and disables the Audit system or locks its configuration, for example:
~]# auditctl -e 2The above command locks the Audit configuration. -r- sets the rate of generated messages per second, for example:
~]# auditctl -r 0The above configuration sets no rate limit on generated messages. -s- reports the status of the Audit system, for example:
~]# auditctl -s AUDIT_STATUS: enabled=1 flag=2 pid=0 rate_limit=0 backlog_limit=8192 lost=259 backlog=0 -l- lists all currently loaded Audit rules, for example:
~]# auditctl -l -w /etc/passwd -p wa -k passwd_changes -w /etc/selinux -p wa -k selinux_changes -w /sbin/insmod -p x -k module_insertion ⋮ -D- deletes all currently loaded Audit rules, for example:
~]# auditctl -D No rules
Defining File System Rules
auditctl -w path_to_file -p permissions -k key_name- path_to_file is the file or directory that is audited.
- permissions are the permissions that are logged:
r— read access to a file or a directory.w— write access to a file or a directory.x— execute access to a file or a directory.a— change in the file's or directory's attribute.
- key_name is an optional string that helps you identify which rule or a set of rules generated a particular log entry.
Example 7.1. File System Rules
/etc/passwd file, execute the following command:
~]# auditctl -w /etc/passwd -p wa -k passwd_changes-k option is arbitrary.
/etc/selinux/ directory, execute the following command:
~]# auditctl -w /etc/selinux/ -p wa -k selinux_changes/sbin/insmod command, which inserts a module into the Linux kernel, execute the following command:
~]# auditctl -w /sbin/insmod -p x -k module_insertionDefining System Call Rules
auditctl -a action,filter -S system_call -F field=value -k key_name- action and filter specify when a certain event is logged. action can be either
alwaysornever. filter specifies which kernel rule-matching filter is applied to the event. The rule-matching filter can be one of the following:task,exit,user, andexclude. For more information about these filters, see the beginning of Section 7.1, “Audit System Architecture”. - system_call specifies the system call by its name. A list of all system calls can be found in the
/usr/include/asm/unistd_64.hfile. Several system calls can be grouped into one rule, each specified after its own-Soption. - field=value specifies additional options that further modify the rule to match events based on a specified architecture, group ID, process ID, and others. For a full listing of all available field types and their values, see the auditctl(8) man page.
- key_name is an optional string that helps you identify which rule or a set of rules generated a particular log entry.
Example 7.2. System Call Rules
adjtimex or settimeofday system calls are used by a program, and the system uses the 64-bit architecture, use the following command:
~]# auditctl -a always,exit -F arch=b64 -S adjtimex -S settimeofday -k time_change~]# auditctl -a always,exit -S unlink -S unlinkat -S rename -S renameat -F auid>=1000 -F auid!=4294967295 -k delete-F auid!=4294967295 option is used to exclude users whose login UID is not set.
-w /etc/shadow -p wa file system rule:
~]# auditctl -a always,exit -F path=/etc/shadow -F perm=wa7.5.2. Defining Executable File Rules
auditctl -a action,filter [ -F arch=cpu -S system_call] -F exe=path_to_executable_file -k key_name- action and filter specify when a certain event is logged. action can be either
alwaysornever. filter specifies which kernel rule-matching filter is applied to the event. The rule-matching filter can be one of the following:task,exit,user, andexclude. For more information about these filters, see the beginning of Section 7.1, “Audit System Architecture”. - system_call specifies the system call by its name. A list of all system calls can be found in the
/usr/include/asm/unistd_64.hfile. Several system calls can be grouped into one rule, each specified after its own-Soption. - path_to_executable_file is the absolute path to the executable file that is audited.
- key_name is an optional string that helps you identify which rule or a set of rules generated a particular log entry.
Example 7.3. Executable File Rules
/bin/id program, execute the following command:
~]# auditctl -a always,exit -F exe=/bin/id -F arch=b64 -S execve -k execution_bin_id7.5.3. Defining Persistent Audit Rules and Controls in the /etc/audit/audit.rules File
/etc/audit/audit.rules file or use the augenrules program that reads rules located in the /etc/audit/rules.d/ directory. The /etc/audit/audit.rules file uses the same auditctl command line syntax to specify the rules. Empty lines and text following a hash sign (#) are ignored.
auditctl command can also be used to read rules from a specified file using the -R option, for example:
~]# auditctl -R /usr/share/doc/audit/rules/30-stig.rulesDefining Control Rules
-b, -D, -e, -f, -r, --loginuid-immutable, and --backlog_wait_time. For more information on these options, see the section called “Defining Control Rules”.
Example 7.4. Control Rules in audit.rules
# Delete all previous rules
-D
# Set buffer size
-b 8192
# Make the configuration immutable -- reboot is required to change audit rules
-e 2
# Panic when a failure occurs
-f 2
# Generate at most 100 audit messages per second
-r 100
# Make login UID immutable once it is set (may break containers)
--loginuid-immutable 1
Defining File System and System Call Rules
auditctl syntax. The examples in Section 7.5.1, “Defining Audit Rules with auditctl” can be represented with the following rules file:
Example 7.5. File System and System Call Rules in audit.rules
-w /etc/passwd -p wa -k passwd_changes
-w /etc/selinux/ -p wa -k selinux_changes
-w /sbin/insmod -p x -k module_insertion
-a always,exit -F arch=b64 -S adjtimex -S settimeofday -k time_change
-a always,exit -S unlink -S unlinkat -S rename -S renameat -F auid>=1000 -F auid!=4294967295 -k delete
Preconfigured Rules Files
/usr/share/doc/audit/rules/ directory, the audit package provides a set of pre-configured rules files according to various certification standards:
30-nispom.rules— Audit rule configuration that meets the requirements specified in the Information System Security chapter of the National Industrial Security Program Operating Manual.30-pci-dss-v31.rules— Audit rule configuration that meets the requirements set by Payment Card Industry Data Security Standard (PCI DSS) v3.1.30-stig.rules— Audit rule configuration that meets the requirements set by Security Technical Implementation Guides (STIG).
/etc/audit/audit.rules file and copy the configuration file of your choice over the /etc/audit/audit.rules file:
~]# cp /etc/audit/audit.rules /etc/audit/audit.rules_backup
~]# cp /usr/share/doc/audit/rules/30-stig.rules /etc/audit/audit.rulesNote
/usr/share/doc/audit/rules/README-rules file.
Using augenrules to Define Persistent Rules
/etc/audit/rules.d/ directory and compiles them into an audit.rules file. This script processes all files that ends in .rules in a specific order based on their natural sort order. The files in this directory are organized into groups with following meanings:
- 10 - Kernel and auditctl configuration
- 20 - Rules that could match general rules but you want a different match
- 30 - Main rules
- 40 - Optional rules
- 50 - Server-specific rules
- 70 - System local rules
- 90 - Finalize (immutable)
/etc/audit/rules.d/. For example, to set a system up in the STIG configuration, copy rules 10-base-config, 30-stig, 31-privileged, and 99-finalize.
/etc/audit/rules.d/ directory, load them by running the augenrules script with the --load directive:
~]# augenrules --load
augenrules --load No rules
enabled 1
failure 1
pid 634
rate_limit 0
backlog_limit 8192
lost 0
backlog 0
enabled 1
failure 1
pid 634
rate_limit 0
backlog_limit 8192
lost 0
backlog 1audit.rules(8) and augenrules(8) man pages.
7.6. Understanding Audit Log Files
/var/log/audit/audit.log file; if log rotation is enabled, rotated audit.log files are stored in the same directory.
/etc/ssh/sshd_config file:
-w /etc/ssh/sshd_config -p warx -k sshd_configauditd daemon is running, for example, using the following command creates a new event in the Audit log file:
~]$ cat /etc/ssh/sshd_configaudit.log file looks as follows:
type=SYSCALL msg=audit(1364481363.243:24287): arch=c000003e syscall=2 success=no exit=-13 a0=7fffd19c5592 a1=0 a2=7fffd19c4b50 a3=a items=1 ppid=2686 pid=3538 auid=1000 uid=1000 gid=1000 euid=1000 suid=1000 fsuid=1000 egid=1000 sgid=1000 fsgid=1000 tty=pts0 ses=1 comm="cat" exe="/bin/cat" subj=unconfined_u:unconfined_r:unconfined_t:s0-s0:c0.c1023 key="sshd_config"
type=CWD msg=audit(1364481363.243:24287): cwd="/home/shadowman"
type=PATH msg=audit(1364481363.243:24287): item=0 name="/etc/ssh/sshd_config" inode=409248 dev=fd:00 mode=0100600 ouid=0 ogid=0 rdev=00:00 obj=system_u:object_r:etc_t:s0 objtype=NORMAL cap_fp=none cap_fi=none cap_fe=0 cap_fver=0
type=PROCTITLE msg=audit(1364481363.243:24287) : proctitle=636174002F6574632F7373682F737368645F636F6E666967
type= keyword. Each record consists of several name=value pairs separated by a white space or a comma. A detailed analysis of the above event follows:
First Record
type=SYSCALL- The
typefield contains the type of the record. In this example, theSYSCALLvalue specifies that this record was triggered by a system call to the kernel.For a list of all possible type values and their explanations, see Audit Record Types. msg=audit(1364481363.243:24287):- The
msgfield records:- a time stamp and a unique ID of the record in the form
audit(time_stamp:ID). Multiple records can share the same time stamp and ID if they were generated as part of the same Audit event. The time stamp is using the Unix time format - seconds since 00:00:00 UTC on 1 January 1970. - various event-specific
name=valuepairs provided by the kernel or user space applications.
arch=c000003e- The
archfield contains information about the CPU architecture of the system. The value,c000003e, is encoded in hexadecimal notation. When searching Audit records with theausearchcommand, use the-ior--interpretoption to automatically convert hexadecimal values into their human-readable equivalents. Thec000003evalue is interpreted asx86_64. syscall=2- The
syscallfield records the type of the system call that was sent to the kernel. The value,2, can be matched with its human-readable equivalent in the/usr/include/asm/unistd_64.hfile. In this case,2is theopensystem call. Note that the ausyscall utility allows you to convert system call numbers to their human-readable equivalents. Use theausyscall --dumpcommand to display a listing of all system calls along with their numbers. For more information, see the ausyscall(8) man page. success=no- The
successfield records whether the system call recorded in that particular event succeeded or failed. In this case, the call did not succeed. exit=-13- The
exitfield contains a value that specifies the exit code returned by the system call. This value varies for different system call. You can interpret the value to its human-readable equivalent with the following command:~]# ausearch --interpret --exit -13Note that the previous example assumes that your Audit log contains an event that failed with exit code-13. a0=7fffd19c5592,a1=0,a2=7fffd19c5592,a3=a- The
a0toa3fields record the first four arguments, encoded in hexadecimal notation, of the system call in this event. These arguments depend on the system call that is used; they can be interpreted by the ausearch utility. items=1- The
itemsfield contains the number of PATH auxiliary records that follow the syscall record. ppid=2686- The
ppidfield records the Parent Process ID (PPID). In this case,2686was the PPID of the parent process such asbash. pid=3538- The
pidfield records the Process ID (PID). In this case,3538was the PID of thecatprocess. auid=1000- The
auidfield records the Audit user ID, that is the loginuid. This ID is assigned to a user upon login and is inherited by every process even when the user's identity changes, for example, by switching user accounts with thesu - johncommand. uid=1000- The
uidfield records the user ID of the user who started the analyzed process. The user ID can be interpreted into user names with the following command:ausearch -i --uid UID. gid=1000- The
gidfield records the group ID of the user who started the analyzed process. euid=1000- The
euidfield records the effective user ID of the user who started the analyzed process. suid=1000- The
suidfield records the set user ID of the user who started the analyzed process. fsuid=1000- The
fsuidfield records the file system user ID of the user who started the analyzed process. egid=1000- The
egidfield records the effective group ID of the user who started the analyzed process. sgid=1000- The
sgidfield records the set group ID of the user who started the analyzed process. fsgid=1000- The
fsgidfield records the file system group ID of the user who started the analyzed process. tty=pts0- The
ttyfield records the terminal from which the analyzed process was invoked. ses=1- The
sesfield records the session ID of the session from which the analyzed process was invoked. comm="cat"- The
commfield records the command-line name of the command that was used to invoke the analyzed process. In this case, thecatcommand was used to trigger this Audit event. exe="/bin/cat"- The
exefield records the path to the executable that was used to invoke the analyzed process. subj=unconfined_u:unconfined_r:unconfined_t:s0-s0:c0.c1023- The
subjfield records the SELinux context with which the analyzed process was labeled at the time of execution. key="sshd_config"- The
keyfield records the administrator-defined string associated with the rule that generated this event in the Audit log.
Second Record
type=CWD- In the second record, the
typefield value isCWD— current working directory. This type is used to record the working directory from which the process that invoked the system call specified in the first record was executed.The purpose of this record is to record the current process's location in case a relative path winds up being captured in the associated PATH record. This way the absolute path can be reconstructed. msg=audit(1364481363.243:24287)- The
msgfield holds the same time stamp and ID value as the value in the first record. The time stamp is using the Unix time format - seconds since 00:00:00 UTC on 1 January 1970. cwd="/home/user_name"- The
cwdfield contains the path to the directory in which the system call was invoked.
Third Record
type=PATH- In the third record, the
typefield value isPATH. An Audit event contains aPATH-type record for every path that is passed to the system call as an argument. In this Audit event, only one path (/etc/ssh/sshd_config) was used as an argument. msg=audit(1364481363.243:24287):- The
msgfield holds the same time stamp and ID value as the value in the first and second record. item=0- The
itemfield indicates which item, of the total number of items referenced in theSYSCALLtype record, the current record is. This number is zero-based; a value of0means it is the first item. name="/etc/ssh/sshd_config"- The
namefield records the path of the file or directory that was passed to the system call as an argument. In this case, it was the/etc/ssh/sshd_configfile. inode=409248- The
inodefield contains the inode number associated with the file or directory recorded in this event. The following command displays the file or directory that is associated with the409248inode number:~]# find / -inum 409248 -print /etc/ssh/sshd_config dev=fd:00- The
devfield specifies the minor and major ID of the device that contains the file or directory recorded in this event. In this case, the value represents the/dev/fd/0device. mode=0100600- The
modefield records the file or directory permissions, encoded in numerical notation as returned by thestatcommand in thest_modefield. See thestat(2)man page for more information. In this case,0100600can be interpreted as-rw-------, meaning that only the root user has read and write permissions to the/etc/ssh/sshd_configfile. ouid=0- The
ouidfield records the object owner's user ID. ogid=0- The
ogidfield records the object owner's group ID. rdev=00:00- The
rdevfield contains a recorded device identifier for special files only. In this case, it is not used as the recorded file is a regular file. obj=system_u:object_r:etc_t:s0- The
objfield records the SELinux context with which the recorded file or directory was labeled at the time of execution. objtype=NORMAL- The
objtypefield records the intent of each path record's operation in the context of a given syscall. cap_fp=none- The
cap_fpfield records data related to the setting of a permitted file system-based capability of the file or directory object. cap_fi=none- The
cap_fifield records data related to the setting of an inherited file system-based capability of the file or directory object. cap_fe=0- The
cap_fefield records the setting of the effective bit of the file system-based capability of the file or directory object. cap_fver=0- The
cap_fverfield records the version of the file system-based capability of the file or directory object.
Fourth Record
type=PROCTITLE- The
typefield contains the type of the record. In this example, thePROCTITLEvalue specifies that this record gives the full command-line that triggered this Audit event, triggered by a system call to the kernel. proctitle=636174002F6574632F7373682F737368645F636F6E666967- The
proctitlefield records the full command-line of the command that was used to invoke the analyzed process. The field is encoded in hexadecimal notation to not allow the user to influence the Audit log parser. The text decodes to the command that triggered this Audit event. When searching Audit records with theausearchcommand, use the-ior--interpretoption to automatically convert hexadecimal values into their human-readable equivalents. The636174002F6574632F7373682F737368645F636F6E666967value is interpreted ascat /etc/ssh/sshd_config.
Example 7.6. Additional audit.log Events
auditd daemon. The ver field shows the version of the Audit daemon that was started.
type=DAEMON_START msg=audit(1363713609.192:5426): auditd start, ver=2.2 format=raw kernel=2.6.32-358.2.1.el6.x86_64 auid=1000 pid=4979 subj=unconfined_u:system_r:auditd_t:s0 res=success
type=USER_AUTH msg=audit(1364475353.159:24270): user pid=3280 uid=1000 auid=1000 ses=1 subj=unconfined_u:unconfined_r:unconfined_t:s0-s0:c0.c1023 msg='op=PAM:authentication acct="root" exe="/bin/su" hostname=? addr=? terminal=pts/0 res=failed'
7.7. Searching the Audit Log Files
/var/log/audit/audit.log file. You can specify a different file using the ausearch options -if file_name command. Supplying multiple options in one ausearch command is equivalent to using the AND operator between field types and the OR operator between multiple instances of the same field type.
Example 7.7. Using ausearch to Search Audit Log Files
/var/log/audit/audit.log file for failed login attempts, use the following command:
~]# ausearch --message USER_LOGIN --success no --interpret~]# ausearch -m ADD_USER -m DEL_USER -m ADD_GROUP -m USER_CHAUTHTOK -m DEL_GROUP -m CHGRP_ID -m ROLE_ASSIGN -m ROLE_REMOVE -iauid), use the following command:
~]# ausearch -ua 1000 -i~]# ausearch --start yesterday --end now -m SYSCALL -sv no -iausearch options, see the ausearch(8) man page.
7.8. Creating Audit Reports
audit.log files in the /var/log/audit/ directory are queried to create the report. You can specify a different file to run the report against using the aureport options -if file_name command.
Example 7.8. Using aureport to Generate Audit Reports
~]# aureport --start 04/08/2013 00:00:00 --end 04/11/2013 00:00:00~]# aureport -x~]# aureport -x --summary~]# aureport -u --failed --summary -i~]# aureport --login --summary -iausearch query that searches all file access events for user ID 1000, use the following command:
~]# ausearch --start today --loginuid 1000 --raw | aureport -f --summary~]# aureport -taureport options, see the aureport(8) man page.
7.9. Additional Resources
Online Sources
- RHEL Audit System Refence: https://access.redhat.com/articles/4409591.
- The Linux Audit Documentation Project page: https://github.com/linux-audit/audit-documentation/wiki.
Installed Documentation
/usr/share/doc/audit/ directory.
Manual Pages
- audispd.conf(5)
- auditd.conf(5)
- ausearch-expression(5)
- audit.rules(7)
- audispd(8)
- auditctl(8)
- auditd(8)
- aulast(8)
- aulastlog(8)
- aureport(8)
- ausearch(8)
- ausyscall(8)
- autrace(8)
- auvirt(8)
Chapter 8. Scanning the System for Configuration Compliance and Vulnerabilities
8.1. Configuration Compliance Tools in RHEL
- SCAP Workbench - The scap-workbench graphical utility is designed to perform configuration and vulnerability scans on a single local or remote system. You can also use it to generate security reports based on these scans and evaluations.
- OpenSCAP - The OpenSCAP library, with the accompanying oscap command-line utility, is designed to perform configuration and vulnerability scans on a local system, to validate configuration compliance content, and to generate reports and guides based on these scans and evaluations.
- SCAP Security Guide (SSG) - The scap-security-guide package provides the latest collection of security policies for Linux systems. The guidance consists of a catalog of practical hardening advice, linked to government requirements where applicable. The project bridges the gap between generalized policy requirements and specific implementation guidelines.
- Script Check Engine (SCE) - SCE is an extension to the SCAP protocol that enables administrators to write their security content using a scripting language, such as Bash, Python, and Ruby. The SCE extension is provided in the openscap-engine-sce package. The SCE itself is not part of the SCAP environment.
Additional Resources
oscap(8)- The manual page for the oscap command-line utility provides a complete list of available options and explanations of their usage.- Red Hat Security Demos: Creating Customized Security Policy Content to Automate Security Compliance - A hands-on lab to get initial experience in automating security compliance using the tools that are included in Red Hat Enterprise Linux to comply with both industry standard security policies and custom security policies. If you want training or access to these lab exercises for your team, contact your Red Hat account team for additional details. .
- Red Hat Security Demos: Defend Yourself with RHEL Security Technologies - A hands-on lab to learn how to implement security at all levels of your RHEL system, using the key security technologies available to you in Red Hat Enterprise Linux, including OpenSCAP. If you want training or access to these lab exercises for your team, contact your Red Hat account team for additional details.
scap-workbench(8)- The manual page for the SCAP Workbench application provides basic information about the application and links to potential sources of SCAP content.scap-security-guide(8)- The manual page for the scap-security-guide project provides further documentation about the various available SCAP security profiles. It also contains examples for using the provided benchmarks using the OpenSCAP utility.- Security Compliance Management in the Administering Red Hat Satellite Guide provides more details about using OpenSCAP with Red Hat Satellite.
8.2. Vulnerability Scanning
8.2.1. Red Hat Security Advisories OVAL Feed
Note
8.2.2. Scanning the System for Vulnerabilities
Procedure
- Install the openscap-scanner and the bzip2 packages:
~]# yum install openscap-scanner bzip2 - Download the latest RHSA OVAL definitions for your system, for example:
~]# wget -O - https://www.redhat.com/security/data/oval/v2/RHEL7/rhel-7.oval.xml.bz2 | bzip2 --decompress > rhel-7.oval.xml - Scan the system for vulnerabilities and save results to the vulnerability.html file:
~]# oscap oval eval --report vulnerability.html rhel-7.oval.xml
Verification
- Check the results in a browser of your choice, for example:
~]$ firefox vulnerability.html &
Note
Additional Resources
- The
oscap(8)man page. - The Red Hat OVAL definitions list.
8.2.3. Scanning Remote Systems for Vulnerabilities
oscap-ssh tool over the SSH protocol.
Prerequisites
- The openscap-scanner package is installed on the remote systems.
- The SSH server is running on the remote systems.
Procedure
- Install the openscap-utils and bzip2 packages:
~]# yum install openscap-utils bzip2 - Download the latest RHSA OVAL definitions for your system:
~]# wget -O - https://www.redhat.com/security/data/oval/v2/RHEL7/rhel-7.oval.xml.bz2 | bzip2 --decompress > rhel-7.oval.xml - Scan a remote system with the machine1 host name, SSH running on port 22, and the joesec user name for vulnerabilities and save results to the remote-vulnerability.html file:
~]# oscap-ssh joesec@machine1 22 oval eval --report remote-vulnerability.html rhel-7.oval.xml
Additional Resources
- The
oscap-ssh(8)man page. - The Red Hat OVAL definitions list.
8.3. Configuration Compliance Scanning
8.3.1. Configuration Compliance in RHEL 7
Important
Structure of Compliance Scanning Resources
Data stream
├── xccdf
| ├── benchmark
| ├── profile
| ├──rule
| ├── xccdf
| ├── oval reference
├── oval ├── ocil reference
├── ocil ├── cpe reference
└── cpe └── remediation
Note
8.3.2. Possible results of an OpenSCAP scan
| Result | Explanation |
|---|---|
| Pass | The scan did not find any conflicts with this rule. |
| Fail | The scan found a conflict with this rule. |
| Not checked | OpenSCAP does not perform an automatic evaluation of this rule. Check whether your system conforms to this rule manually. |
| Not applicable | This rule does not apply to the current configuration. |
| Not selected | This rule is not part of the profile. OpenSCAP does not evaluate this rule and does not display these rules in the results. |
| Error | The scan encountered an error. For additional information, you can enter the oscap-scanner command with the --verbose DEVEL option. Consider opening a bug report. |
| Unknown | The scan encountered an unexpected situation. For additional information, you can enter the oscap-scanner command with the --verbose DEVEL option. Consider opening a bug report. |
8.3.3. Viewing Profiles for Configuration Compliance
oscap info sub-command.
Prerequisites
- The openscap-scanner and scap-security-guide packages are installed.
Procedure
- List all available files with configuration compliance profiles provided by the SCAP Security Guide project:
~]$ ls /usr/share/xml/scap/ssg/content/ ssg-firefox-cpe-dictionary.xml ssg-rhel6-ocil.xml ssg-firefox-cpe-oval.xml ssg-rhel6-oval.xml ... ssg-rhel6-ds-1.2.xml ssg-rhel8-xccdf.xml ssg-rhel6-ds.xml ... - Display detailed information about a selected data stream using the
oscap infosub-command. XML files containing data streams are indicated by the-dsstring in their names. In theProfilessection, you can find a list of available profiles and their IDs:~]$ oscap info /usr/share/xml/scap/ssg/content/ssg-rhel7-ds.xml ... Profiles: Title: PCI-DSS v3.2.1 Control Baseline for Red Hat Enterprise Linux 7 Id: xccdf_org.ssgproject.content_profile_pci-dss Title: OSPP - Protection Profile for General Purpose Operating Systems v. 4.2.1 Id: xccdf_org.ssgproject.content_profile_ospp ... - Select a profile from the data stream file and display additional details about the selected profile. To do so, use
oscap infowith the--profileoption followed by the suffix of the ID displayed in the output of the previous command. For example, the ID of the PCI-DSS profile is:xccdf_org.ssgproject.content_profile_pci-dss, and the value for the--profileoption can be_pci-dss:~]$ oscap info --profile _pci-dss /usr/share/xml/scap/ssg/content/ssg-rhel7-ds.xml ... Profile Title: PCI-DSS v3.2.1 Control Baseline for Red Hat Enterprise Linux 7 Id: xccdf_org.ssgproject.content_profile_pci-dss Description: Ensures PCI-DSS v3.2.1 related security configuration settings are applied. ... - Alternatively, when using GUI, install the scap-security-guide-doc package and open the
file:///usr/share/doc/scap-security-guide-doc-0.1.46/ssg-rhel7-guide-index.htmlfile in a web browser. Select the required profile in the upper right field of the Guide to the Secure Configuration of Red Hat Enterprise Linux 7 document, and you can see the ID already included in the relevant command for the subsequent evaluation.
Additional Resources
- The
scap-security-guide(8)man page also contains the list of profiles.
8.3.4. Assessing Configuration Compliance with a Specific Baseline
Prerequisites
- The openscap-scanner and scap-security-guide packages are installed.
- You know the ID of the profile within the baseline with which the system should comply. To find the ID, see Section 8.3.3, “Viewing Profiles for Configuration Compliance”.
Procedure
- Evaluate the compliance of the system with the selected profile and save the scan results in the report.html HTML file, for example:
~]$ sudo oscap xccdf eval --report report.html --profile ospp /usr/share/xml/scap/ssg/content/ssg-rhel7-ds.xml - Optional: Scan a remote system with the machine1 host name, SSH running on port 22, and the joesec user name for vulnerabilities and save results to the remote-report.html file:
~]$ oscap-ssh joesec@machine1 22 xccdf eval --report remote_report.html --profile ospp /usr/share/xml/scap/ssg/content/ssg-rhel7-ds.xml
Additional Resources
scap-security-guide(8)man page- The
SCAP Security Guidedocumentation installed in thefile:///usr/share/doc/scap-security-guide-doc-0.1.46/directory. - The
file:///usr/share/doc/scap-security-guide-doc-0.1.46/ssg-rhel7-guide-index.html"Guide to the Secure Configuration of Red Hat Enterprise Linux 7 installed with the scap-security-guide-doc package.
8.4. Remediating the System to Align with a Specific Baseline
Warning
Remediate option enabled might render the system non-functional. Red Hat does not provide any automated method to revert changes made by security-hardening remediations. Remediations are supported on RHEL systems in the default configuration. If your system has been altered after the installation, running remediation might not make it compliant with the required security profile.
Prerequisites
- The scap-security-guide package is installed on your RHEL 7 system.
Procedure
- Use the
oscapcommand with the--remediateoption:~]$ sudo oscap xccdf eval --profile ospp --remediate /usr/share/xml/scap/ssg/content/ssg-rhel7-ds.xml - Restart your system.
Verification
- Evaluate compliance of the system with the OSPP profile, and save scan results in the
ospp_report.htmlfile:~]$ oscap xccdf eval --report ospp_report.html --profile ospp /usr/share/xml/scap/ssg/content/ssg-rhel7-ds.xml
Additional Resources
scap-security-guide(8)andoscap(8)man pages
8.5. Remediating the System to Align with a Specific Baseline Using the SSG Ansible Playbook
SCAP Security Guide project. This example uses the Protection Profile for General Purpose Operating Systems (OSPP).
Warning
Remediate option enabled might render the system non-functional. Red Hat does not provide any automated method to revert changes made by security-hardening remediations. Remediations are supported on RHEL systems in the default configuration. If your system has been altered after the installation, running remediation might not make it compliant with the required security profile.
Prerequisites
- The scap-security-guide package is installed on your RHEL 7 system.
- The ansible package is installed. See the Ansible Installation Guide for more information.
Procedure
- Remediate your system to align with OSPP using Ansible:
~]# ansible-playbook -i localhost, -c local /usr/share/scap-security-guide/ansible/ssg-rhel7-role-ospp.yml - Restart the system.
Verification
- Evaluate compliance of the system with the OSPP profile, and save scan results in the
ospp_report.htmlfile:~]# oscap xccdf eval --profile ospp --report ospp_report.html /usr/share/xml/scap/ssg/content/ssg-rhel7-ds.xml
Additional Resources
scap-security-guide(8)andoscap(8)man pages
8.6. Creating a Remediation Ansible Playbook to Align the System with a Specific Baseline
Prerequisites
- The scap-security-guide package is installed on your system.
Procedure
- Scan the system and save the results:
~]# oscap xccdf eval --profile ospp --results ospp-results.xml /usr/share/xml/scap/ssg/content/ssg-rhel7-ds.xml - Generate an Ansible playbook based on the file generated in the previous step:
~]# oscap xccdf generate fix --fix-type ansible --profile ospp --output ospp-remediations.yml ospp-results.xml - The
ospp-remediations.ymlfile contains Ansible remediations for rules that failed during the scan performed in step 1. After you review this generated file, you can apply it with theansible-playbook ospp-remediations.ymlcommand.
Verification
- In a text editor of your choice, review that the
ospp-remediations.ymlfile contains rules that failed in the scan performed in step 1.
Additional Resources
scap-security-guide(8)andoscap(8)man pages
8.7. Scanning the System with a Customized Profile Using SCAP Workbench
8.7.1. Using SCAP Workbench to Scan and Remediate the System
Prerequisites
- The scap-workbench package is installed on your system.
Procedure
- To run SCAP Workbench from the GNOME Classic desktop environment, press the
Superkey to enter theActivities Overview, typescap-workbench, and then press Enter. Alternatively, use:~]$ scap-workbench & - Select a security policy by using any of the following options:
Load Contentbutton on the starting windowOpen content from SCAP Security GuideOpen Other Contentin theFilemenu, and search the respective XCCDF, SCAP RPM, or data stream file.
- You can enable automatic correction of the system configuration by selecting the check box. With this option enabled, SCAP Workbench attempts to change the system configuration in accordance with the security rules applied by the policy. This process attempts to fix the related checks that fail during the system scan.
Warning
If not used carefully, running the system evaluation with theRemediateoption enabled might render the system non-functional. Red Hat does not provide any automated method to revert changes made by security-hardening remediations. Remediations are supported on RHEL systems in the default configuration. If your system has been altered after the installation, running remediation might not make it compliant with the required security profile. - Scan your system with the selected profile by clicking the button.
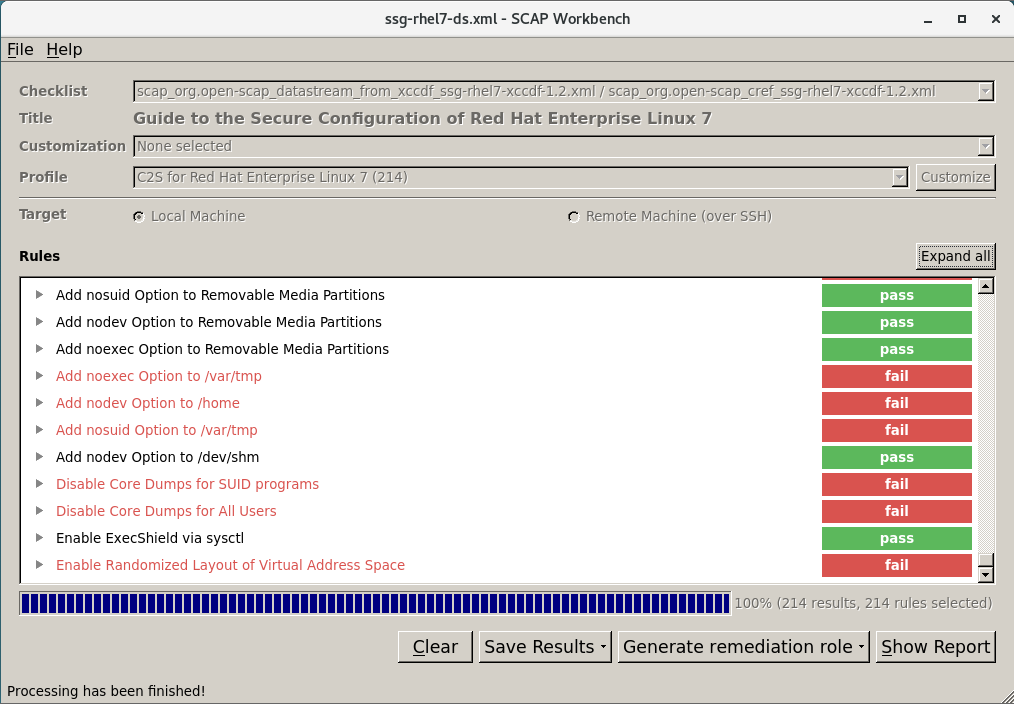
- To store the scan results in form of an XCCDF, ARF, or HTML file, click the combo box. Choose the
HTML Reportoption to generate the scan report in a human-readable format. The XCCDF and ARF (data stream) formats are suitable for further automatic processing. You can repeatedly choose all three options. - To export results-based remediations to a file, use the pop-up menu.
8.7.2. Customizing a Security Profile with SCAP Workbench
Procedure
- Run SCAP Workbench, and select the profile you want to customize by using either
Open content from SCAP Security GuideorOpen Other Contentin theFilemenu. - To adjust the selected security profile according to your needs, click the button.This opens the new Customization window that enables you to modify the currently selected XCCDF profile without changing the original XCCDF file. Choose a new profile ID.
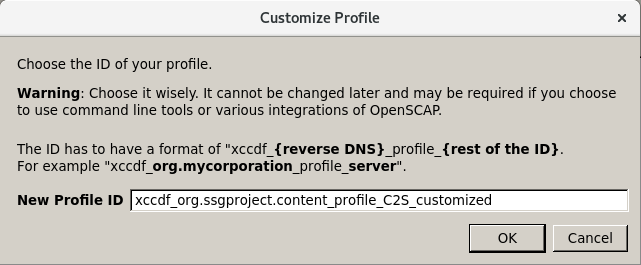
- Find a rule to modify using either the tree structure with rules organized into logical groups or the
Searchfield. - Include or exclude rules using check boxes in the tree structure, or modify values in rules where applicable.
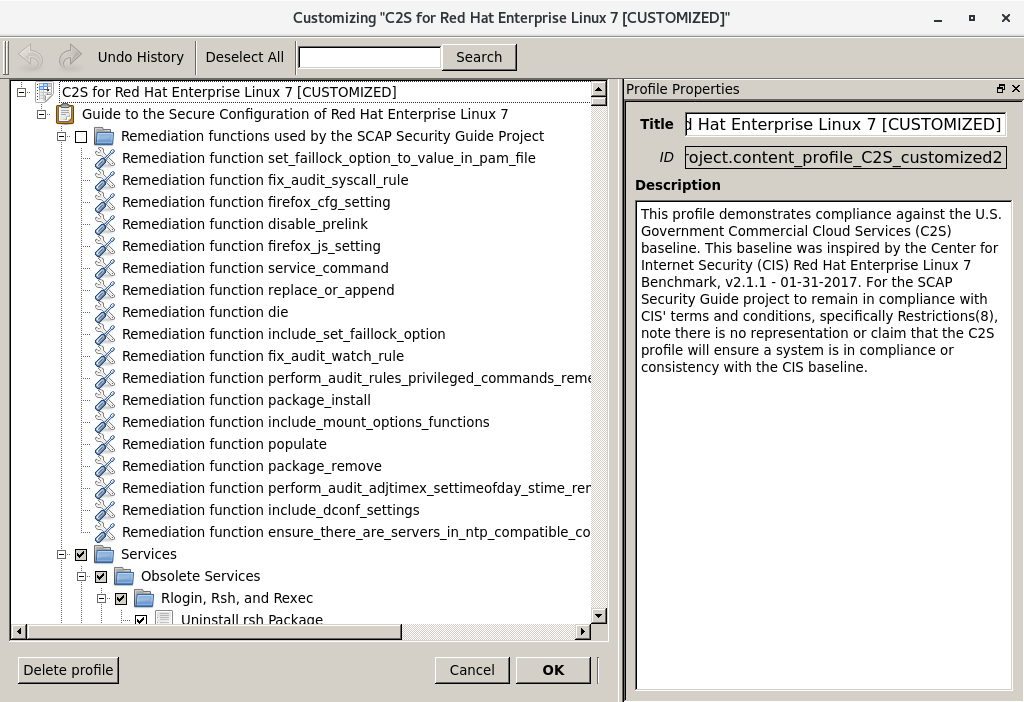
- Confirm the changes by clicking the button.
- To store your changes permanently, use one of the following options:
- Save a customization file separately by using
Save Customization Onlyin theFilemenu. - Save all security content at once using
Save Allin theFilemenu.If you select theInto a directoryoption, SCAP Workbench saves both the XCCDF or data stream file and the customization file to the specified location. You can use this as a backup solution.By selecting theAs RPMoption, you can instruct SCAP Workbench to create an RPM package containing the data stream file and the customization file. This is useful for distributing the security content to systems that cannot be scanned remotely, and for delivering the content for further processing.
Note
8.8. Deploying Systems That Are Compliant with a Security Profile Immediately after an Installation
8.8.1. Deploying Baseline-Compliant RHEL Systems Using the Graphical Installation
Prerequisites
- You have booted into the
graphicalinstallation program. Note that the OSCAP Anaconda Add-on does not support text-only installation. - You have accessed the
Installation Summarywindow.
Procedure
- From the
Installation Summarywindow, clickSoftware Selection. TheSoftware Selectionwindow opens. - From the
Base Environmentpane, select theServerenvironment. You can select only one base environment. - Click
Doneto apply the setting and return to theInstallation Summarywindow. - Click
Security Policy. TheSecurity Policywindow opens. - To enable security policies on the system, toggle the
Apply security policyswitch toON. - Select
Protection Profile for General Purpose Operating Systemsfrom the profile pane. - Click
Select Profileto confirm the selection. - Confirm the changes in the
Changes that were done or need to be donepane that is displayed at the bottom of the window. Complete any remaining manual changes. - Because OSPP has strict partitioning requirements that must be met, create separate partitions for
/boot,/home,/var,/var/log,/var/tmp, and/var/log/audit. - Complete the graphical installation process.
Note
The graphical installation program automatically creates a corresponding Kickstart file after a successful installation. You can use the/root/anaconda-ks.cfgfile to automatically install OSPP-compliant systems.
Verification
- To check the current status of the system after installation is complete, reboot the system and start a new scan:
~]# oscap xccdf eval --profile ospp --report eval_postinstall_report.html /usr/share/xml/scap/ssg/content/ssg-rhel7-ds.xml
Additional Resources
- For more details on partitioning, see Configuring manual partitioning.
8.8.2. Deploying Baseline-Compliant RHEL Systems Using Kickstart
Prerequisites
- The scap-security-guide package is installed on your system.
Procedure
- Open the
/usr/share/scap-security-guide/kickstart/ssg-rhel7-ospp-ks.cfgKickstart file in an editor of your choice. - Update the partitioning scheme to fit your configuration requirements. For OSPP compliance, the separate partitions for
/boot,/home,/var,/var/log,/var/tmp, and/var/log/auditmust be preserved, although you can change the sizes of these partitions.Warning
Because theOSCAP Anaconda Add-ondoes not support text-only installation, do not use thetextoption in your Kickstart file. For more information, see RHBZ#1674001. - Start a Kickstart installation as described in Performing an automated installation using Kickstart.
Important
Verification
- To check the current status of the system after installation is complete, reboot the system and start a new scan:
~]# oscap xccdf eval --profile ospp --report eval_postinstall_report.html /usr/share/xml/scap/ssg/content/ssg-rhel7-ds.xml
Additional Resources
- For more details, see the OSCAP Anaconda Add-on project page.
8.9. Scanning Containers and Container Images for Vulnerabilities
oscap-docker command-line utility or the atomic scan command-line utility to find security vulnerabilities in a container or a container image.
oscap-docker, you can use the oscap program to scan container images and containers.
atomic scan, you can use OpenSCAP scanning capabilities to scan container images and containers on the system. You can scan for known CVE vulnerabilities and for configuration compliance. Additionally, you can remediate container images to the specified policy.
8.9.1. Scanning Container Images and Containers for Vulnerabilities Using oscap-docker
oscap-docker utility.
Note
oscap-docker command requires root privileges and the ID of a container is the second argument.
Prerequisites
- The openscap-containers package is installed.
Procedure
- Find the ID of a container or a container image, for example:
~]# docker images REPOSITORY TAG IMAGE ID CREATED SIZE registry.access.redhat.com/ubi7/ubi latest 096cae65a207 7 weeks ago 239 MB - Scan the container or the container image for vulnerabilities and save results to the vulnerability.html file:
~]# oscap-docker image-cve 096cae65a207 --report vulnerability.htmlImportant
To scan a container, replace theimage-cveargument withcontainer-cve.
Verification
- Inspect the results in a browser of your choice, for example:
~]$ firefox vulnerability.html &
Additional Resources
- For more information, see the
oscap-docker(8)andoscap(8)man pages.
8.9.2. Scanning Container Images and Containers for Vulnerabilities Using atomic scan
atomic scan utility, you can scan containers and container images for known security vulnerabilities as defined in the CVE OVAL definitions released by Red Hat. The atomic scan command has the following form:
~]# atomic scan [OPTIONS] [ID]Warning
atomic scan functionality is deprecated, and the OpenSCAP container image is no longer updated for new vulnerabilities. Therefore, prefer the oscap-docker utility for vulnerability scanning purposes.
Use cases
- To scan all container images, use the
--imagesdirective. - To scan all containers, use the
--containersdirective. - To scan both types, use the
--alldirective. - To list all available command-line options, use the
atomic scan--helpcommand.
atomic scan command is CVE scan. Use it for checking a target for known security vulnerabilities as defined in the CVE OVAL definitions released by Red Hat.
Prerequisites
- You have downloaded and installed the OpenSCAP container image from Red Hat Container Catalog (RHCC) using the
atomic install rhel7/openscapcommand.
Procedure
- Verify you have the latest OpenSCAP container image to ensure the definitions are up to date:
~]# atomic help registry.access.redhat.com/rhel7/openscap | grep version - Scan a RHEL 7.2 container image with several known security vulnerabilities:
~]# atomic scan registry.access.redhat.com/rhel7:7.2 docker run -t --rm -v /etc/localtime:/etc/localtime -v /run/atomic/2017-11-01-14-49-36-614281:/scanin -v /var/lib/atomic/openscap/2017-11-01-14-49-36-614281:/scanout:rw,Z -v /etc/oscapd:/etc/oscapd:ro registry.access.redhat.com/rhel7/openscap oscapd-evaluate scan --no-standard-compliance --targets chroots-in-dir:///scanin --output /scanout registry.access.redhat.com/rhel7:7.2 (98a88a8b722a718) The following issues were found: RHSA-2017:2832: nss security update (Important) Severity: Important RHSA URL: https://access.redhat.com/errata/RHSA-2017:2832 RHSA ID: RHSA-2017:2832-01 Associated CVEs: CVE ID: CVE-2017-7805 CVE URL: https://access.redhat.com/security/cve/CVE-2017-7805 ...
Additional Resources
- Product Documentation for Red Hat Enterprise Linux Atomic Host contains a detailed description of the
atomiccommand usage and containers. - The Red Hat Customer Portal provides a guide to the Atomic command-line interface (CLI).
8.10. Assessing Configuration Compliance of a Container or a Container Image with a Specific Baseline
Prerequisites
- The openscap-utils and scap-security-guide packages are installed.
Procedure
- Find the ID of a container or a container image, for example:
~]# docker images REPOSITORY TAG IMAGE ID CREATED SIZE registry.access.redhat.com/ubi7/ubi latest 096cae65a207 7 weeks ago 239 MB - Evaluate the compliance of the container image with the OSPP profile and save scan results in the report.html HTML file.
~]$ sudo oscap-docker 096cae65a207 xccdf eval --report report.html --profile ospp /usr/share/xml/scap/ssg/content/ssg-rhel7-ds.xmlReplace 096cae65a207 with the ID of your container image and the ospp value with pci-dss if you assess configuration compliance with the PCI-DSS baseline.
Verification
- Check the results in a browser of your choice, for example:
~]$ firefox report.html &
Note
Additional Resources
- For more information, see the
oscap-docker(8)andscap-security-guide(8)man pages. - The
SCAP Security Guidedocumentation installed in thefile:///usr/share/doc/scap-security-guide-doc-0.1.46/directory.
8.11. Scanning and Remediating Configuration Compliance of Container Images and Containers Using atomic scan
8.11.1. Scanning for Configuration Compliance of Container Images and Containers Using atomic scan
Warning
atomic scan functionality is deprecated, and the OpenSCAP container image is no longer updated with the new security compliance content. Therefore, prefer the oscap-docker utility for security compliance scanning purposes.
Note
atomic command and containers, see the Product Documentation for Red Hat Enterprise Linux Atomic Host 7. The Red Hat Customer Portal also provides a guide to the atomic command-line interface (CLI).
Prerequisites
- You have downloaded and installed the OpenSCAP container image from Red Hat Container Catalog (RHCC) using the
atomic install rhel7/openscapcommand.
Procedure
- List SCAP content provided by the OpenSCAP image for the configuration_compliance scan:
~]# atomic help registry.access.redhat.com/rhel7/openscapVerify compliance of the latest Red Hat Enterprise Linux 7 container image with the Defense Information Systems Agency Security Technical Implementation Guide (DISA STIG) policy and generate an HTML report from the scan:~]# atomic scan --scan_type configuration_compliance --scanner_args xccdf-id=scap_org.open-scap_cref_ssg-rhel7-xccdf-1.2.xml,profile=xccdf_org.ssgproject.content_profile_stig-rhel7-disa,report registry.access.redhat.com/rhel7:latestThe output of the previous command contains the information about files associated with the scan at the end:............ Files associated with this scan are in /var/lib/atomic/openscap/2017-11-03-13-35-34-296606. ~]# tree /var/lib/atomic/openscap/2017-11-03-13-35-34-296606 /var/lib/atomic/openscap/2017-11-03-13-35-34-296606 ├── db7a70a0414e589d7c8c162712b329d4fc670fa47ddde721250fb9fcdbed9cc2 │ ├── arf.xml │ ├── fix.sh │ ├── json │ └── report.html └── environment.json 1 directory, 5 filesTheatomic scangenerates a subdirectory with all the results and reports from a scan in the /var/lib/atomic/openscap/ directory. The arf.xml file with results is generated on every scanning for configuration compliance. To generate a human-readable HTML report file, add thereportsuboption to the--scanner_argsoption. - Optional: To generate XCCDF results readable by DISA STIG Viewer, add the
stig-viewersuboption to the--scanner_argsoption. The results are placed in stig.xml.
Note
xccdf-id suboption of the --scanner_args option is omitted, the scanner searches for a profile in the first XCCDF component of the selected data stream file. For more details about data stream files, see Section 8.3.1, “Configuration Compliance in RHEL 7”.
8.11.2. Remediating Configuration Compliance of Container Images and Containers Using atomic scan
Important
Warning
atomic scan functionality is deprecated, and the OpenSCAP container image is no longer updated with the new security compliance content. Therefore, prefer the oscap-docker utility for security compliance scanning purposes.
Prerequisites
- You have downloaded and installed the OpenSCAP container image from Red Hat Container Catalog (RHCC) using the
atomic install rhel7/openscapcommand.
Procedure
- List SCAP content provided by the OpenSCAP image for the configuration_compliance scan:
~]# atomic help registry.access.redhat.com/rhel7/openscap - To remediate container images to the specified policy, add the
--remediateoption to theatomic scancommand when scanning for configuration compliance. The following command builds a new remediated container image compliant with the DISA STIG policy from the Red Hat Enterprise Linux 7 container image:~]# atomic scan --remediate --scan_type configuration_compliance --scanner_args profile=xccdf_org.ssgproject.content_profile_stig-rhel7-disa,report registry.access.redhat.com/rhel7:latest registry.access.redhat.com/rhel7:latest (db7a70a0414e589) The following issues were found: ............ Configure Time Service Maxpoll Interval Severity: Low XCCDF result: fail Configure LDAP Client to Use TLS For All Transactions Severity: Moderate XCCDF result: fail ............ Remediating rule 43/44: 'xccdf_org.ssgproject.content_rule_chronyd_or_ntpd_set_maxpoll' Remediating rule 44/44: 'xccdf_org.ssgproject.content_rule_ldap_client_start_tls' Successfully built 9bbc7083760e Successfully built remediated image 9bbc7083760e from db7a70a0414e589d7c8c162712b329d4fc670fa47ddde721250fb9fcdbed9cc2. Files associated with this scan are in /var/lib/atomic/openscap/2017-11-06-13-01-42-785000. - Optional: The output of the
atomic scancommand reports a remediated image ID. To make the image easier to remember, tag it with some name, for example:~]# docker tag 9bbc7083760e rhel7_disa_stig
8.12. SCAP Security Guide profiles supported in RHEL 7
| Profile name | Profile ID | Policy version |
|---|---|---|
| CIS Red Hat Enterprise Linux 7 Benchmark for Level 2 - Server | xccdf_org.ssgproject.content_profile_cis |
RHEL 7.9.9 and earlier:2.2.0
RHEL 7.9.10 to RHEL 7.9.29:3.1.1
RHEL 7.9.30 and later:4.0.0
|
| CIS Red Hat Enterprise Linux 7 Benchmark for Level 1 - Server | xccdf_org.ssgproject.content_profile_cis_server_l1 |
RHEL 7.9.10 to RHEL 7.9.29:3.1.1
RHEL 7.9.30 and later:4.0.0
|
| CIS Red Hat Enterprise Linux 7 Benchmark for Level 1 - Workstation | xccdf_org.ssgproject.content_profile_cis_workstation_l1 |
RHEL 7.9.10 to RHEL 7.9.29:3.1.1
RHEL 7.9.30 and later:4.0.0
|
| CIS Red Hat Enterprise Linux 7 Benchmark for Level 2 - Workstation | xccdf_org.ssgproject.content_profile_cis_workstation_l2 |
RHEL 7.9.10 to RHEL 7.9.29:3.1.1
RHEL 7.9.30 and later:4.0.0
|
| French National Agency for the Security of Information Systems (ANSSI) BP-028 Enhanced Level | xccdf_org.ssgproject.content_profile_anssi_nt28_enhanced |
RHEL 7.9.4 and earlier:draft
RHEL 7.9.5 to RHEL 7.9.24:1.2
RHEL 7.9.25 and later:2.0
|
| French National Agency for the Security of Information Systems (ANSSI) BP-028 High Level | xccdf_org.ssgproject.content_profile_anssi_nt28_high |
RHEL 7.9.6 and earlier:draft
RHEL 7.9.7 to RHEL 7.9.24:1.2
RHEL 7.9.25 and later:2.0
|
| French National Agency for the Security of Information Systems (ANSSI) BP-028 Intermediary Level | xccdf_org.ssgproject.content_profile_anssi_nt28_intermediary |
RHEL 7.9.4 and earlier: draft
RHEL 7.9.5 to RHEL 7.9.24:1.2
RHEL 7.9.25 and later:2.0
|
| French National Agency for the Security of Information Systems (ANSSI) BP-028 Minimal Level | xccdf_org.ssgproject.content_profile_anssi_nt28_minimal |
RHEL 7.9.4 and earlier:draft
RHEL 7.9.5 to RHEL 7.9.24:1.2
RHEL 7.9.25 and later:2.0
|
| C2S for Red Hat Enterprise Linux 7 | xccdf_org.ssgproject.content_profile_C2S | not versioned |
| Criminal Justice Information Services (CJIS) Security Policy | xccdf_org.ssgproject.content_profile_cjis | 5.4 |
| Unclassified Information in Non-federal Information Systems and Organizations (NIST 800-171) | xccdf_org.ssgproject.content_profile_cui | r1 |
| Australian Cyber Security Centre (ACSC) Essential Eight | xccdf_org.ssgproject.content_profile_e8 | not versioned |
| Health Insurance Portability and Accountability Act (HIPAA) | xccdf_org.ssgproject.content_profile_hipaa | not versioned |
| NIST National Checklist Program Security Guide | xccdf_org.ssgproject.content_profile_ncp | not versioned |
| OSPP - Protection Profile for General Purpose Operating Systems v4.2.1 | xccdf_org.ssgproject.content_profile_ospp | 4.2.1 |
| PCI-DSS v3.2.1 Control Baseline for Red Hat Enterprise Linux 7 | xccdf_org.ssgproject.content_profile_pci-dss_centric |
RHEL 7.9.12 and earlier: 3.2.1
Removed in 7.9.13 and later versions. For more information, see RHBZ#2038165
|
| PCI-DSS v3.2.1 Control Baseline for Red Hat Enterprise Linux 7 | xccdf_org.ssgproject.content_profile_pci-dss |
RHEL 7.9.0 to RHEL 7.9.29:3.2.1
RHEL 7.9.30 and later:4.0
|
| [DRAFT] DISA STIG for Red Hat Enterprise Linux Virtualization Host (RHELH) | xccdf_org.ssgproject.content_profile_rhelh-stig | draft |
| VPP - Protection Profile for Virtualization v. 1.0 for Red Hat Enterprise Linux Hypervisor (RHELH) | xccdf_org.ssgproject.content_profile_rhelh-vpp | 1.0 |
| Red Hat Corporate Profile for Certified Cloud Providers (RH CCP) | xccdf_org.ssgproject.content_profile_rht-ccp | not versioned |
| Standard System Security Profile for Red Hat Enterprise Linux 7 | xccdf_org.ssgproject.content_profile_standard | not versioned |
| DISA STIG for Red Hat Enterprise Linux 7 | xccdf_org.ssgproject.content_profile_stig |
RHEL 7.9.0 and 7.9.1: 1.4
RHEL 7.9.2 to 7.9.4: V3R1
RHEL 7.9.5 and 7.9.6:V3R2
RHEL 7.9.7 to RHEL 7.9.9:V3R3
RHEL 7.9.10 and RHEL 7.9.11:V3R5
RHEL 7.9.12 and RHEL 7.9.13:V3R6
RHEL 7.9.14 to RHEL 7.9.16:V3R7
RHEL 7.9.17 to RHEL 7.9.20:V3R8
RHEL 7.9.21 to RHEL 7.9.24:V3R10
RHEL 7.9.25 to RHEL 7.9.29:V3R12
RHEL 7.9.30 and later:V3R14
|
| DISA STIG with GUI for Red Hat Enterprise Linux 7 | xccdf_org.ssgproject.content_profile_stig_gui |
RHEL 7.9.7 to RHEL 7.9.9:V3R3
RHEL 7.9.10 and RHEL 7.9.11:V3R5
RHEL 7.9.12 and RHEL 7.9.13:V3R6
RHEL 7.9.14 to RHEL 7.9.16:V3R7
RHEL 7.9.17 to RHEL 7.9.20:V3R8
RHEL 7.9.21 to RHEL 7.9.24:V3R10
RHEL 7.9.25 to RHEL 7.9.29:V3R12
RHEL 7.9.30 and later:V3R14
|
| Profile name | Profile ID | Policy version |
|---|---|---|
| DRAFT - ANSSI DAT-NT28 (enhanced) | xccdf_org.ssgproject.content_profile_anssi_nt28_enhanced | draft |
| DRAFT - ANSSI DAT-NT28 (high) | xccdf_org.ssgproject.content_profile_anssi_nt28_high | draft |
| DRAFT - ANSSI DAT-NT28 (intermediary) | xccdf_org.ssgproject.content_profile_anssi_nt28_intermediary | draft |
| DRAFT - ANSSI DAT-NT28 (minimal) | xccdf_org.ssgproject.content_profile_anssi_nt28_minimal | draft |
| C2S for Red Hat Enterprise Linux 7 | xccdf_org.ssgproject.content_profile_C2S | not versioned |
| Criminal Justice Information Services (CJIS) Security Policy | xccdf_org.ssgproject.content_profile_cjis | 5.4 |
| Unclassified Information in Non-federal Information Systems and Organizations (NIST 800-171) | xccdf_org.ssgproject.content_profile_cui | r1 |
| Australian Cyber Security Centre (ACSC) Essential Eight | xccdf_org.ssgproject.content_profile_e8 | not versioned |
| Health Insurance Portability and Accountability Act (HIPAA) | xccdf_org.ssgproject.content_profile_hipaa | not versioned |
| NIST National Checklist Program Security Guide | xccdf_org.ssgproject.content_profile_ncp | not versioned |
| OSPP - Protection Profile for General Purpose Operating Systems v4.2.1 | xccdf_org.ssgproject.content_profile_ospp | 4.2.1 |
| PCI-DSS v3.2.1 Control Baseline for Red Hat Enterprise Linux 7 | xccdf_org.ssgproject.content_profile_pci-dss_centric | 3.2.1 |
| PCI-DSS v3.2.1 Control Baseline for Red Hat Enterprise Linux 7 | xccdf_org.ssgproject.content_profile_pci-dss | 3.2.1 |
| [DRAFT] DISA STIG for Red Hat Enterprise Linux Virtualization Host (RHELH) | xccdf_org.ssgproject.content_profile_rhelh-stig | draft |
| VPP - Protection Profile for Virtualization v. 1.0 for Red Hat Enterprise Linux Hypervisor (RHELH) | xccdf_org.ssgproject.content_profile_rhelh-vpp | 1.0 |
| Red Hat Corporate Profile for Certified Cloud Providers (RH CCP) | xccdf_org.ssgproject.content_profile_rht-ccp | not versioned |
| Standard System Security Profile for Red Hat Enterprise Linux 7 | xccdf_org.ssgproject.content_profile_standard | not versioned |
| DISA STIG for Red Hat Enterprise Linux 7 | xccdf_org.ssgproject.content_profile_stig | 1.4 |
| Profile name | Profile ID | Policy version |
|---|---|---|
| C2S for Red Hat Enterprise Linux 7 | xccdf_org.ssgproject.content_profile_C2S | not versioned |
| Criminal Justice Information Services (CJIS) Security Policy | xccdf_org.ssgproject.content_profile_cjis | 5.4 |
| Health Insurance Portability and Accountability Act (HIPAA) | xccdf_org.ssgproject.content_profile_hipaa | not versioned |
| Unclassified Information in Non-federal Information Systems and Organizations (NIST 800-171) | xccdf_org.ssgproject.content_profile_nist-800-171-cui | r1 |
| OSPP - Protection Profile for General Purpose Operating Systems v. 4.2 | xccdf_org.ssgproject.content_profile_ospp42 | 4.2 |
| United States Government Configuration Baseline | xccdf_org.ssgproject.content_profile_ospp | 3.9 |
| PCI-DSS v3.2.1 Control Baseline for Red Hat Enterprise Linux 7 | xccdf_org.ssgproject.content_profile_pci-dss_centric | 3.2.1 |
| PCI-DSS v3.2.1 Control Baseline for Red Hat Enterprise Linux 7 | xccdf_org.ssgproject.content_profile_pci-dss | 3.2.1 |
| VPP - Protection Profile for Virtualization v. 1.0 for Red Hat Enterprise Linux Hypervisor (RHELH) | xccdf_org.ssgproject.content_profile_rhelh-vpp | 1.0 |
| Red Hat Corporate Profile for Certified Cloud Providers (RH CCP) | xccdf_org.ssgproject.content_profile_rht-ccp | not versioned |
| Standard System Security Profile for Red Hat Enterprise Linux 7 | xccdf_org.ssgproject.content_profile_standard | not versioned |
| DISA STIG for Red Hat Enterprise Linux 7 | xccdf_org.ssgproject.content_profile_stig-rhel7-disa | 1.4 |
| Profile name | Profile ID | Policy version |
|---|---|---|
| C2S for Red Hat Enterprise Linux 7 | xccdf_org.ssgproject.content_profile_C2S | not versioned |
| Criminal Justice Information Services (CJIS) Security Policy | xccdf_org.ssgproject.content_profile_cjis | 5.4 |
| Health Insurance Portability and Accountability Act (HIPAA) | xccdf_org.ssgproject.content_profile_hipaa | not versioned |
| Unclassified Information in Non-federal Information Systems and Organizations (NIST 800-171) | xccdf_org.ssgproject.content_profile_nist-800-171-cui | r1 |
| OSPP - Protection Profile for General Purpose Operating Systems v. 4.2 | xccdf_org.ssgproject.content_profile_ospp42 | 4.2 |
| United States Government Configuration Baseline | xccdf_org.ssgproject.content_profile_ospp | 3.9 |
| PCI-DSS v3 Control Baseline for Red Hat Enterprise Linux 7 | xccdf_org.ssgproject.content_profile_pci-dss_centric | 3.1 |
| PCI-DSS v3 Control Baseline for Red Hat Enterprise Linux 7 | xccdf_org.ssgproject.content_profile_pci-dss | 3.1 |
| Red Hat Corporate Profile for Certified Cloud Providers (RH CCP) | xccdf_org.ssgproject.content_profile_rht-ccp | not versioned |
| Standard System Security Profile for Red Hat Enterprise Linux 7 | xccdf_org.ssgproject.content_profile_standard | not versioned |
| DISA STIG for Red Hat Enterprise Linux 7 | xccdf_org.ssgproject.content_profile_stig-rhel7-disa | 1.4 |
| Profile name | Profile ID | Policy version |
|---|---|---|
| C2S for Red Hat Enterprise Linux | xccdf_org.ssgproject.content_profile_C2S | not versioned |
| Criminal Justice Information Services (CJIS) Security Policy | xccdf_org.ssgproject.content_profile_cjis-rhel7-server | 5.4 |
| Common Profile for General-Purpose Systems | xccdf_org.ssgproject.content_profile_common | not versioned |
| Standard Docker Host Security Profile | xccdf_org.ssgproject.content_profile_docker-host | not versioned |
| Unclassified Information in Non-federal Information Systems and Organizations (NIST 800-171) | xccdf_org.ssgproject.content_profile_nist-800-171-cui | r1 |
| United States Government Configuration Baseline (USGCB / STIG) - DRAFT | xccdf_org.ssgproject.content_profile_ospp-rhel7 | 3.9 |
| PCI-DSS v3 Control Baseline for Red Hat Enterprise Linux 7 | xccdf_org.ssgproject.content_profile_pci-dss_centric | 3.1 |
| PCI-DSS v3 Control Baseline for Red Hat Enterprise Linux 7 | xccdf_org.ssgproject.content_profile_pci-dss | 3.1 |
| Red Hat Corporate Profile for Certified Cloud Providers (RH CCP) | xccdf_org.ssgproject.content_profile_rht-ccp | not versioned |
| Standard System Security Profile | xccdf_org.ssgproject.content_profile_standard | not versioned |
| DISA STIG for Red Hat Enterprise Linux 7 | xccdf_org.ssgproject.content_profile_stig-rhel7-disa | 1.4 |
| STIG for Red Hat Virtualization Hypervisor | xccdf_org.ssgproject.content_profile_stig-rhevh-upstream | 1.4 |
| Profile name | Profile ID | Policy version |
|---|---|---|
| C2S for Red Hat Enterprise Linux 7 | xccdf_org.ssgproject.content_profile_C2S | not versioned |
| Criminal Justice Information Services (CJIS) Security Policy | xccdf_org.ssgproject.content_profile_cjis-rhel7-server | 5.4 |
| Common Profile for General-Purpose Systems | xccdf_org.ssgproject.content_profile_common | not versioned |
| Standard Docker Host Security Profile | xccdf_org.ssgproject.content_profile_docker-host | not versioned |
| Unclassified Information in Non-federal Information Systems and Organizations (NIST 800-171) | xccdf_org.ssgproject.content_profile_nist-800-171-cui | r1 |
| United States Government Configuration Baseline (USGCB / STIG) - DRAFT | xccdf_org.ssgproject.content_profile_ospp-rhel7 | 3.9 |
| PCI-DSS v3 Control Baseline for Red Hat Enterprise Linux 7 | xccdf_org.ssgproject.content_profile_pci-dss_centric | 3.1 |
| PCI-DSS v3 Control Baseline for Red Hat Enterprise Linux 7 | xccdf_org.ssgproject.content_profile_pci-dss | 3.1 |
| Red Hat Corporate Profile for Certified Cloud Providers (RH CCP) | xccdf_org.ssgproject.content_profile_rht-ccp | not versioned |
| Standard System Security Profile | xccdf_org.ssgproject.content_profile_standard | not versioned |
| DISA STIG for Red Hat Enterprise Linux 7 | xccdf_org.ssgproject.content_profile_stig-rhel7-disa | 1.4 |
| STIG for Red Hat Virtualization Hypervisor | xccdf_org.ssgproject.content_profile_stig-rhevh-upstream |
| Profile name | Profile ID | Policy version |
|---|---|---|
| C2S for Red Hat Enterprise Linux 7 | xccdf_org.ssgproject.content_profile_C2S | not versioned |
| Criminal Justice Information Services (CJIS) Security Policy | xccdf_org.ssgproject.content_profile_cjis-rhel7-server | 5.4 |
| Common Profile for General-Purpose Systems | xccdf_org.ssgproject.content_profile_common | not versioned |
| CNSSI 1253 Low/Low/Low Control Baseline for Red Hat Enterprise Linux 7 | xccdf_org.ssgproject.content_profile_nist-cl-il-al | not versioned |
| United States Government Configuration Baseline (USGCB / STIG) | xccdf_org.ssgproject.content_profile_ospp-rhel7-server | not versioned |
| PCI-DSS v3 Control Baseline for Red Hat Enterprise Linux 7 | xccdf_org.ssgproject.content_profile_pci-dss | 3.1 |
| Red Hat Corporate Profile for Certified Cloud Providers (RH CCP) | xccdf_org.ssgproject.content_profile_rht-ccp | not versioned |
| Standard System Security Profile | xccdf_org.ssgproject.content_profile_standard | not versioned |
| STIG for Red Hat Enterprise Linux 7 Server Running GUIs | xccdf_org.ssgproject.content_profile_stig-rhel7-server-gui-upstream | 1.4 |
| STIG for Red Hat Enterprise Linux 7 Server | xccdf_org.ssgproject.content_profile_stig-rhel7-server-upstream | 1.4 |
| STIG for Red Hat Enterprise Linux 7 Workstation | xccdf_org.ssgproject.content_profile_stig-rhel7-workstation-upstream | 1.4 |
| Profile name | Profile ID | Policy version |
|---|---|---|
| Common Profile for General-Purpose Systems | xccdf_org.ssgproject.content_profile_common | not versioned |
| Draft PCI-DSS v3 Control Baseline for Red Hat Enterprise Linux 7 | xccdf_org.ssgproject.content_profile_pci-dss | draft |
| Red Hat Corporate Profile for Certified Cloud Providers (RH CCP) | xccdf_org.ssgproject.content_profile_rht-ccp | not versioned |
| Standard System Security Profile | xccdf_org.ssgproject.content_profile_standard | not versioned |
| Pre-release Draft STIG for Red Hat Enterprise Linux 7 Server | xccdf_org.ssgproject.content_profile_stig-rhel7-server-upstream | draft |
| Profile name | Profile ID | Policy version |
|---|---|---|
| Red Hat Corporate Profile for Certified Cloud Providers (RH CCP) | xccdf_org.ssgproject.content_profile_rht-ccp | not versioned |
Additional Resources
- For information about profiles in RHEL 8, see SCAP Security Guide profiles supported in RHEL 8
Chapter 9. Federal Standards and Regulations
9.1. Federal Information Processing Standard (FIPS)
9.1.1. Enabling FIPS Mode
During the System Installation
fips=1 kernel option to the kernel command line during system installation. With this option, all keys' generations are done with FIPS-approved algorithms and continuous monitoring tests in place. After the installation, the system is configured to boot into FIPS mode automatically.
Important
After the System Installation
- Install the dracut-fips package:
~]# yum install dracut-fipsFor CPUs with the AES New Instructions (AES-NI) support, install the dracut-fips-aesni package as well:~]# yum install dracut-fips-aesni - Regenerate the
initramfsfile:~]# dracut -v -fTo enable the in-module integrity verification and to have all required modules present during the kernel boot, theinitramfsfile has to be regenerated.Warning
This operation will overwrite the existinginitramfsfile. - Modify boot loader configuration.To boot into FIPS mode, add the
fips=1option to the kernel command line of the boot loader. If your/bootpartition resides on a separate partition, add theboot=<partition>(where <partition> stands for/boot) parameter to the kernel command line as well.To identify the boot partition, enter the following command:~]$ df /boot Filesystem 1K-blocks Used Available Use% Mounted on /dev/sda1 495844 53780 416464 12% /bootTo ensure that theboot=configuration option works even if the device naming changes between boots, identify the universally unique identifier (UUID) of the partition by running the following command:~]$ blkid /dev/sda1 /dev/sda1: UUID="05c000f1-f899-467b-a4d9-d5ca4424c797" TYPE="ext4"Append the UUID to the kernel command line:boot=UUID=05c000f1-f899-467b-a4d9-d5ca4424c797Depending on your boot loader, make the following changes:- GRUB 2Add the
fips=1andboot=<partition of /boot>options to theGRUB_CMDLINE_LINUXkey in the/etc/default/grubfile. To apply the changes to/etc/default/grub, rebuild thegrub.cfgfile as follows:- On BIOS-based machines, enter the following command as
root:~]# grub2-mkconfig -o /etc/grub2.cfg - On UEFI-based machines, enter the following command as
root:~]# grub2-mkconfig -o /etc/grub2-efi.cfg
- zipl (on the IBM Z Systems architecture only)Add the
fips=1andboot=<partition of /boot>options to the/etc/zipl.confto the kernel command line and apply the changes by entering:~]# zipl
- Make sure prelinking is disabled.For proper operation of the in-module integrity verification, prelinking of libraries and binaries has to be disabled. Prelinking is done by the prelink package, which is not installed by default. Unless prelink has been installed, this step is not needed. To disable prelinking, set the
PRELINKING=nooption in the/etc/sysconfig/prelinkconfiguration file. To disable existing prelinking on all system files, use theprelink -u -acommand. - Reboot your system.
Enabling FIPS Mode in a Container
- The dracut-fips package is installed in the container.
- The
/etc/system-fipsfile is mounted on the container from the host.
9.2. National Industrial Security Program Operating Manual (NISPOM)
9.3. Payment Card Industry Data Security Standard (PCI DSS)
9.4. Security Technical Implementation Guide
Appendix A. Encryption Standards
A.1. Synchronous Encryption
A.1.1. Advanced Encryption Standard — AES
A.1.1.1. AES History
A.1.2. Data Encryption Standard — DES
A.1.2.1. DES History
A.2. Public-key Encryption
A.2.1. Diffie-Hellman
A.2.1.1. Diffie-Hellman History
A.2.2. RSA
A.2.3. DSA
A.2.4. SSL/TLS
A.2.5. Cramer-Shoup Cryptosystem
A.2.6. ElGamal Encryption
Appendix B. Revision History
| Revision History | |||
|---|---|---|---|
| Revision 1-43 | Fri Feb 7 2020 | ||
| |||
| Revision 1-42 | Fri Aug 9 2019 | ||
| |||
| Revision 1-41 | Sat Oct 20 2018 | ||
| |||
| Revision 1-32 | Wed Apr 4 2018 | ||
| |||
| Revision 1-30 | Thu Jul 27 2017 | ||
| |||
| Revision 1-24 | Mon Feb 6 2017 | ||
| |||
| Revision 1-23 | Tue Nov 1 2016 | ||
| |||
| Revision 1-19 | Mon Jul 18 2016 | ||
| |||
| Revision 1-18 | Mon Jun 27 2016 | ||
| |||
| Revision 1-17 | Fri Jun 3 2016 | ||
| |||
| Revision 1-16 | Tue Jan 5 2016 | ||
| |||
| Revision 1-15 | Tue Nov 10 2015 | ||
| |||
| Revision 1-14.18 | Mon Nov 09 2015 | ||
| |||
| Revision 1-14.17 | Wed Feb 18 2015 | ||
| |||
| Revision 1-14.15 | Fri Dec 06 2014 | ||
| |||
| Revision 1-14.13 | Thu Nov 27 2014 | ||
| |||
| Revision 1-14.12 | Tue Jun 03 2014 | ||
| |||