Storage Administration Guide
Deploying and configuring single-node storage in RHEL 7
Abstract
Chapter 1. Overview
1.1. New Features and Enhancements in Red Hat Enterprise Linux 7
eCryptfs not included
System Storage Manager
XFS Is the Default File System
File System Restructure
/bin, /sbin, /lib, and /lib64 are now nested under /usr.
Snapper
Btrfs (Technology Preview)
Note
NFSv2 No Longer Supported
Part I. File Systems
Note
Chapter 2. File System Structure and Maintenance
- Shareable and unsharable files
- Shareable files can be accessed locally and by remote hosts. Unsharable files are only available locally.
- Variable and static files
- Variable files, such as documents, can be changed at any time. Static files, such as binaries, do not change without an action from the system administrator.
2.1. Overview of Filesystem Hierarchy Standard (FHS)
- Compatibility with other FHS-compliant systems
- The ability to mount a
/usr/partition as read-only. This is crucial, since/usr/contains common executables and should not be changed by users. In addition, since/usr/is mounted as read-only, it should be mountable from the CD-ROM drive or from another machine via a read-only NFS mount.
2.1.1. FHS Organization
Note
2.1.1.1. Gathering File System Information
df Command
df command reports the system's disk space usage. Its output looks similar to the following:
Example 2.1. df Command Output
df shows the partition size in 1 kilobyte blocks and the amount of used and available disk space in kilobytes. To view the information in megabytes and gigabytes, use the command df -h. The -h argument stands for "human-readable" format. The output for df -h looks similar to the following:
Example 2.2. df -h Command Output
Note
/dev/shm represents the system's virtual memory file system.
du Command
du command displays the estimated amount of space being used by files in a directory, displaying the disk usage of each subdirectory. The last line in the output of du shows the total disk usage of the directory. To see only the total disk usage of a directory in human-readable format, use du -hs. For more options, see man du.
Gnome System Monitor
gnome-system-monitor. Select the File Systems tab to view the system's partitions. The following figure illustrates the File Systems tab.
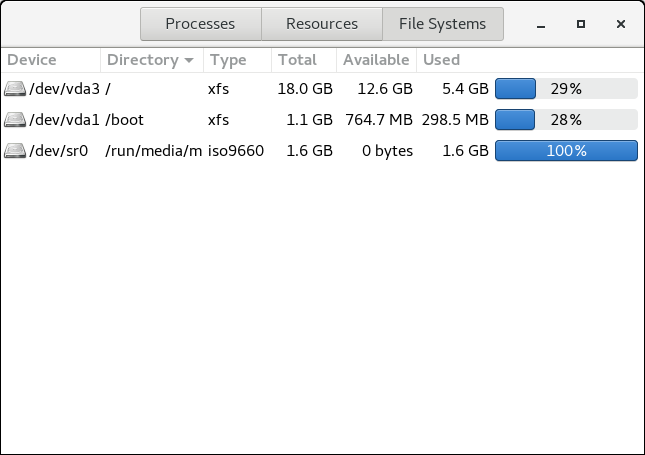
Figure 2.1. File Systems Tab in GNOME System Monitor
2.1.1.2. The /boot/ Directory
/boot/ directory contains static files required to boot the system, for example, the Linux kernel. These files are essential for the system to boot properly.
Warning
/boot/ directory. Doing so renders the system unbootable.
2.1.1.3. The /dev/ Directory
/dev/ directory contains device nodes that represent the following device types:
- devices attached to the system;
- virtual devices provided by the kernel.
udevd daemon creates and removes device nodes in /dev/ as needed.
/dev/ directory and subdirectories are defined as either character (providing only a serial stream of input and output, for example, mouse or keyboard) or block (accessible randomly, such as a hard drive or a floppy drive). If GNOME or KDE is installed, some storage devices are automatically detected when connected (such as with USB) or inserted (such as a CD or DVD drive), and a pop-up window displaying the contents appears.
| File | Description |
|---|---|
/dev/hda | The master device on the primary IDE channel. |
/dev/hdb | The slave device on the primary IDE channel. |
/dev/tty0 | The first virtual console. |
/dev/tty1 | The second virtual console. |
/dev/sda | The first device on the primary SCSI or SATA channel. |
/dev/lp0 | The first parallel port. |
- Mapped device
- A logical volume in a volume group, for example,
/dev/mapper/VolGroup00-LogVol02. - Static device
- A traditional storage volume, for example,
/dev/sdbX, where sdb is a storage device name and X is the partition number./dev/sdbXcan also be/dev/disk/by-id/WWID, or/dev/disk/by-uuid/UUID. For more information, see Section 25.8, “Persistent Naming”.
2.1.1.4. The /etc/ Directory
/etc/ directory is reserved for configuration files that are local to the machine. It should not contain any binaries; if there are any binaries, move them to /usr/bin/ or /usr/sbin/.
/etc/skel/ directory stores "skeleton" user files, which are used to populate a home directory when a user is first created. Applications also store their configuration files in this directory and may reference them when executed. The /etc/exports file controls which file systems export to remote hosts.
2.1.1.5. The /mnt/ Directory
/mnt/ directory is reserved for temporarily mounted file systems, such as NFS file system mounts. For all removable storage media, use the /var/run/media/user directory.
Important
/mnt directory must not be used by installation programs.
2.1.1.6. The /opt/ Directory
/opt/ directory is normally reserved for software and add-on packages that are not part of the default installation. A package that installs to /opt/ creates a directory bearing its name, for example, /opt/packagename/. In most cases, such packages follow a predictable subdirectory structure; most store their binaries in /opt/packagename/bin/ and their man pages in /opt/packagename/man/.
2.1.1.7. The /proc/ Directory
/proc/ directory contains special files that either extract information from the kernel or send information to it. Examples of such information include system memory, CPU information, and hardware configuration. For more information about /proc/, see Section 2.3, “The /proc Virtual File System”.
2.1.1.8. The /srv/ Directory
/srv/ directory contains site-specific data served by a Red Hat Enterprise Linux system. This directory gives users the location of data files for a particular service, such as FTP, WWW, or CVS. Data that only pertains to a specific user should go in the /home/ directory.
2.1.1.9. The /sys/ Directory
/sys/ directory utilizes the new sysfs virtual file system specific to the kernel. With the increased support for hot plug hardware devices in the kernel, the /sys/ directory contains information similar to that held by /proc/, but displays a hierarchical view of device information specific to hot plug devices.
2.1.1.10. The /usr/ Directory
/usr/ directory is for files that can be shared across multiple machines. The /usr/ directory is often on its own partition and is mounted read-only. At a minimum, /usr/ should contain the following subdirectories:
/usr/bin- This directory is used for binaries.
/usr/etc- This directory is used for system-wide configuration files.
/usr/games- This directory stores games.
/usr/include- This directory is used for C header files.
/usr/kerberos- This directory is used for Kerberos-related binaries and files.
/usr/lib- This directory is used for object files and libraries that are not designed to be directly utilized by shell scripts or users.As of Red Hat Enterprise Linux 7.0, the
/lib/directory has been merged with/usr/lib. Now it also contains libraries needed to execute the binaries in/usr/bin/and/usr/sbin/. These shared library images are used to boot the system or execute commands within the root file system. /usr/libexec- This directory contains small helper programs called by other programs.
/usr/sbin- As of Red Hat Enterprise Linux 7.0,
/sbinhas been moved to/usr/sbin. This means that it contains all system administration binaries, including those essential for booting, restoring, recovering, or repairing the system. The binaries in/usr/sbin/require root privileges to use. /usr/share- This directory stores files that are not architecture-specific.
/usr/src- This directory stores source code.
/usr/tmplinked to/var/tmp- This directory stores temporary files.
/usr/ directory should also contain a /local/ subdirectory. As per the FHS, this subdirectory is used by the system administrator when installing software locally, and should be safe from being overwritten during system updates. The /usr/local directory has a structure similar to /usr/, and contains the following subdirectories:
/usr/local/bin/usr/local/etc/usr/local/games/usr/local/include/usr/local/lib/usr/local/libexec/usr/local/sbin/usr/local/share/usr/local/src
/usr/local/ differs slightly from the FHS. The FHS states that /usr/local/ should be used to store software that should remain safe from system software upgrades. Since the RPM Package Manager can perform software upgrades safely, it is not necessary to protect files by storing them in /usr/local/.
/usr/local/ for software local to the machine. For instance, if the /usr/ directory is mounted as a read-only NFS share from a remote host, it is still possible to install a package or program under the /usr/local/ directory.
2.1.1.11. The /var/ Directory
/usr/ as read-only, any programs that write log files or need spool/ or lock/ directories should write them to the /var/ directory. The FHS states /var/ is for variable data, which includes spool directories and files, logging data, transient and temporary files.
/var/ directory:
/var/account//var/arpwatch//var/cache//var/crash//var/db//var/empty//var/ftp//var/gdm//var/kerberos//var/lib//var/local//var/lock//var/log//var/maillinked to/var/spool/mail//var/mailman//var/named//var/nis//var/opt//var/preserve//var/run//var/spool//var/tmp//var/tux//var/www//var/yp/
Important
/var/run/media/user directory contains subdirectories used as mount points for removable media such as USB storage media, DVDs, CD-ROMs, and Zip disks. Note that previously, the /media/ directory was used for this purpose.
messages and lastlog, go in the /var/log/ directory. The /var/lib/rpm/ directory contains RPM system databases. Lock files go in the /var/lock/ directory, usually in directories for the program using the file. The /var/spool/ directory has subdirectories that store data files for some programs. These subdirectories include:
/var/spool/at//var/spool/clientmqueue//var/spool/cron//var/spool/cups//var/spool/exim//var/spool/lpd//var/spool/mail//var/spool/mailman//var/spool/mqueue//var/spool/news//var/spool/postfix//var/spool/repackage//var/spool/rwho//var/spool/samba//var/spool/squid//var/spool/squirrelmail//var/spool/up2date//var/spool/uucp//var/spool/uucppublic//var/spool/vbox/
2.2. Special Red Hat Enterprise Linux File Locations
/var/lib/rpm/ directory. For more information on RPM, see man rpm.
/var/cache/yum/ directory contains files used by the Package Updater, including RPM header information for the system. This location may also be used to temporarily store RPMs downloaded while updating the system. For more information about the Red Hat Network, see https://rhn.redhat.com/.
/etc/sysconfig/ directory. This directory stores a variety of configuration information. Many scripts that run at boot time use the files in this directory.
2.3. The /proc Virtual File System
/proc contains neither text nor binary files. Because it houses virtual files, the /proc is referred to as a virtual file system. These virtual files are typically zero bytes in size, even if they contain a large amount of information.
/proc file system is not used for storage. Its main purpose is to provide a file-based interface to hardware, memory, running processes, and other system components. Real-time information can be retrieved on many system components by viewing the corresponding /proc file. Some of the files within /proc can also be manipulated (by both users and applications) to configure the kernel.
/proc files are relevant in managing and monitoring system storage:
- /proc/devices
- Displays various character and block devices that are currently configured.
- /proc/filesystems
- Lists all file system types currently supported by the kernel.
- /proc/mdstat
- Contains current information on multiple-disk or RAID configurations on the system, if they exist.
- /proc/mounts
- Lists all mounts currently used by the system.
- /proc/partitions
- Contains partition block allocation information.
/proc file system, see the Red Hat Enterprise Linux 7 Deployment Guide.
2.4. Discard Unused Blocks
- Batch discard operations are run explicitly by the user with the
fstrimcommand. This command discards all unused blocks in a file system that match the user's criteria. - Online discard operations are specified at mount time, either with the
-o discardoption as part of amountcommand or with thediscardoption in the/etc/fstabfile. They run in real time without user intervention. Online discard operations only discard blocks that are transitioning from used to free.
/sys/block/device/queue/discard_max_bytes file is not zero.
fstrim command on:
- a device that does not support discard operations, or
- a logical device (LVM or MD) comprised of multiple devices, where any one of the device does not support discard operations
fstrim -v /mnt/non_discard fstrim: /mnt/non_discard: the discard operation is not supported
fstrim -v /mnt/non_discard
fstrim: /mnt/non_discard: the discard operation is not supported
Note
mount command allows you to mount a device that does not support discard operations with the -o discard option.
Chapter 3. The XFS File System
- Main Features of XFS
- XFS supports metadata journaling, which facilitates quicker crash recovery.
- The XFS file system can be defragmented and enlarged while mounted and active.
- In addition, Red Hat Enterprise Linux 7 supports backup and restore utilities specific to XFS.
- Allocation Features
- XFS features the following allocation schemes:
- Extent-based allocation
- Stripe-aware allocation policies
- Delayed allocation
- Space pre-allocation
Delayed allocation and other performance optimizations affect XFS the same way that they do ext4. Namely, a program's writes to an XFS file system are not guaranteed to be on-disk unless the program issues anfsync()call afterwards.For more information on the implications of delayed allocation on a file system (ext4 and XFS), see Allocation Features in Chapter 5, The ext4 File System.Note
Creating or expanding files occasionally fails with an unexpected ENOSPC write failure even though the disk space appears to be sufficient. This is due to XFS's performance-oriented design. In practice, it does not become a problem since it only occurs if remaining space is only a few blocks. - Other XFS Features
- The XFS file system also supports the following:
- Extended attributes (
xattr) - This allows the system to associate several additional name/value pairs per file. It is enabled by default.
- Quota journaling
- This avoids the need for lengthy quota consistency checks after a crash.
- Project/directory quotas
- This allows quota restrictions over a directory tree.
- Subsecond timestamps
- This allows timestamps to go to the subsecond.
- Extended attributes (
- Default
atimebehavior isrelatime Relatimeis on by default for XFS. It has almost no overhead compared tonoatimewhile still maintaining saneatimevalues.
3.1. Creating an XFS File System
- To create an XFS file system, use the following command:
mkfs.xfs block_device
# mkfs.xfs block_deviceCopy to Clipboard Copied! Toggle word wrap Toggle overflow - Replace block_device with the path to a block device. For example,
/dev/sdb1,/dev/disk/by-uuid/05e99ec8-def1-4a5e-8a9d-5945339ceb2a, or/dev/my-volgroup/my-lv. - In general, the default options are optimal for common use.
- When using
mkfs.xfson a block device containing an existing file system, add the-foption to overwrite that file system.
Example 3.1. mkfs.xfs Command Output
mkfs.xfs command:
Note
xfs_growfs command. For more information, see Section 3.4, “Increasing the Size of an XFS File System”).
Striped Block Devices
mkfs.xfs chooses an optimal geometry. This may also be true on some hardware RAIDs that export geometry information to the operating system.
mkfs utility (for ext3, ext4, and xfs) will automatically use this geometry. If stripe geometry is not detected by the mkfs utility and even though the storage does, in fact, have stripe geometry, it is possible to manually specify it when creating the file system using the following options:
- su=value
- Specifies a stripe unit or RAID chunk size. The
valuemust be specified in bytes, with an optionalk,m, orgsuffix. - sw=value
- Specifies the number of data disks in a RAID device, or the number of stripe units in the stripe.
mkfs.xfs -d su=64k,sw=4 /dev/block_device
# mkfs.xfs -d su=64k,sw=4 /dev/block_deviceAdditional Resources
- The mkfs.xfs(8) man page
3.2. Mounting an XFS File System
mount /dev/device /mount/point
# mount /dev/device /mount/pointNote
mke2fs, mkfs.xfs does not utilize a configuration file; they are all specified on the command line.
Write Barriers
nobarrier option:
mount -o nobarrier /dev/device /mount/point
# mount -o nobarrier /dev/device /mount/pointDirect Access Technology Preview
Direct Access (DAX) is available as a Technology Preview on the ext4 and XFS file systems. It is a means for an application to directly map persistent memory into its address space. To use DAX, a system must have some form of persistent memory available, usually in the form of one or more Non-Volatile Dual Inline Memory Modules (NVDIMMs), and a file system that supports DAX must be created on the NVDIMM(s). Also, the file system must be mounted with the dax mount option. Then, an mmap of a file on the dax-mounted file system results in a direct mapping of storage into the application's address space.
3.3. XFS Quota Management
noenforce; this allows usage reporting without enforcing any limits. Valid quota mount options are:
uquota/uqnoenforce: User quotasgquota/gqnoenforce: Group quotaspquota/pqnoenforce: Project quota
xfs_quota tool can be used to set limits and report on disk usage. By default, xfs_quota is run interactively, and in basic mode. Basic mode subcommands simply report usage, and are available to all users. Basic xfs_quota subcommands include:
quota username/userID- Show usage and limits for the given
usernameor numericuserID df- Shows free and used counts for blocks and inodes.
xfs_quota also has an expert mode. The subcommands of this mode allow actual configuration of limits, and are available only to users with elevated privileges. To use expert mode subcommands interactively, use the following command:
xfs_quota -x
# xfs_quota -xreport /path- Reports quota information for a specific file system.
limit- Modify quota limits.
help.
-c option, with -x for expert subcommands.
Example 3.2. Display a Sample Quota Report
/home (on /dev/blockdevice), use the command xfs_quota -x -c 'report -h' /home. This displays output similar to the following:
john, whose home directory is /home/john, use the following command:
xfs_quota -x -c 'limit isoft=500 ihard=700 john' /home/
# xfs_quota -x -c 'limit isoft=500 ihard=700 john' /home/limit subcommand recognizes targets as users. When configuring the limits for a group, use the -g option (as in the previous example). Similarly, use -p for projects.
bsoft or bhard instead of isoft or ihard.
Example 3.3. Set a Soft and Hard Block Limit
accounting on the /target/path file system, use the following command:
xfs_quota -x -c 'limit -g bsoft=1000m bhard=1200m accounting' /target/path
# xfs_quota -x -c 'limit -g bsoft=1000m bhard=1200m accounting' /target/pathNote
bsoft and bhard count by the byte.
Important
rtbhard/rtbsoft) are described in man xfs_quota as valid units when setting quotas, the real-time sub-volume is not enabled in this release. As such, the rtbhard and rtbsoft options are not applicable.
Setting Project Limits
- Add the project-controlled directories to
/etc/projects. For example, the following adds the/var/logpath with a unique ID of 11 to/etc/projects. Your project ID can be any numerical value mapped to your project.echo 11:/var/log >> /etc/projects
# echo 11:/var/log >> /etc/projectsCopy to Clipboard Copied! Toggle word wrap Toggle overflow - Add project names to
/etc/projidto map project IDs to project names. For example, the following associates a project called logfiles with the project ID of 11 as defined in the previous step.echo logfiles:11 >> /etc/projid
# echo logfiles:11 >> /etc/projidCopy to Clipboard Copied! Toggle word wrap Toggle overflow - Initialize the project directory. For example, the following initializes the project directory
/var:xfs_quota -x -c 'project -s logfiles' /var
# xfs_quota -x -c 'project -s logfiles' /varCopy to Clipboard Copied! Toggle word wrap Toggle overflow - Configure quotas for projects with initialized directories:
xfs_quota -x -c 'limit -p bhard=lg logfiles' /var
# xfs_quota -x -c 'limit -p bhard=lg logfiles' /varCopy to Clipboard Copied! Toggle word wrap Toggle overflow
quota, repquota, and edquota for example) may also be used to manipulate XFS quotas. However, these tools cannot be used with XFS project quotas.
Important
xfs_quota over all other available tools.
man xfs_quota, man projid(5), and man projects(5).
3.4. Increasing the Size of an XFS File System
xfs_growfs command:
xfs_growfs /mount/point -D size
# xfs_growfs /mount/point -D size-D size option grows the file system to the specified size (expressed in file system blocks). Without the -D size option, xfs_growfs will grow the file system to the maximum size supported by the device.
-D size, ensure that the underlying block device is of an appropriate size to hold the file system later. Use the appropriate resizing methods for the affected block device.
Note
man xfs_growfs.
3.5. Repairing an XFS File System
xfs_repair:
xfs_repair /dev/device
# xfs_repair /dev/devicexfs_repair utility is highly scalable and is designed to repair even very large file systems with many inodes efficiently. Unlike other Linux file systems, xfs_repair does not run at boot time, even when an XFS file system was not cleanly unmounted. In the event of an unclean unmount, xfs_repair simply replays the log at mount time, ensuring a consistent file system.
Warning
xfs_repair utility cannot repair an XFS file system with a dirty log. To clear the log, mount and unmount the XFS file system. If the log is corrupt and cannot be replayed, use the -L option ("force log zeroing") to clear the log, that is, xfs_repair -L /dev/device. Be aware that this may result in further corruption or data loss.
man xfs_repair.
3.6. Suspending an XFS File System
xfs_freeze mount-point
# xfs_freeze mount-pointNote
xfs_freeze utility is provided by the xfsprogs package, which is only available on x86_64.
xfs_freeze -f /mount/point
# xfs_freeze -f /mount/pointxfs_freeze -u /mount/point
# xfs_freeze -u /mount/pointxfs_freeze to suspend the file system first. Rather, the LVM management tools will automatically suspend the XFS file system before taking the snapshot.
man xfs_freeze.
3.7. Backing Up and Restoring XFS File Systems
- xfsdump for creating the backup
- xfsrestore for restoring from backup
3.7.1. Features of XFS Backup and Restoration
Backup
xfsdump utility to:
- Perform backups to regular file images.Only one backup can be written to a regular file.
- Perform backups to tape drives.The
xfsdumputility also allows you to write multiple backups to the same tape. A backup can span multiple tapes.To back up multiple file systems to a single tape device, simply write the backup to a tape that already contains an XFS backup. This appends the new backup to the previous one. By default,xfsdumpnever overwrites existing backups. - Create incremental backups.The
xfsdumputility uses dump levels to determine a base backup to which other backups are relative. Numbers from0to9refer to increasing dump levels. An incremental backup only backs up files that have changed since the last dump of a lower level:- To perform a full backup, perform a level 0 dump on the file system.
- A level 1 dump is the first incremental backup after a full backup. The next incremental backup would be level 2, which only backs up files that have changed since the last level 1 dump; and so on, to a maximum of level 9.
- Exclude files from a backup using size, subtree, or inode flags to filter them.
Restoration
xfsrestore interactive mode. The interactive mode provides a set of commands to manipulate the backup files.
3.7.2. Backing Up an XFS File System
Procedure 3.1. Backing Up an XFS File System
- Use the following command to back up an XFS file system:
xfsdump -l level [-L label] -f backup-destination path-to-xfs-filesystem
# xfsdump -l level [-L label] -f backup-destination path-to-xfs-filesystemCopy to Clipboard Copied! Toggle word wrap Toggle overflow - Replace level with the dump level of your backup. Use
0to perform a full backup or1to9to perform consequent incremental backups. - Replace backup-destination with the path where you want to store your backup. The destination can be a regular file, a tape drive, or a remote tape device. For example,
/backup-files/Data.xfsdumpfor a file or/dev/st0for a tape drive. - Replace path-to-xfs-filesystem with the mount point of the XFS file system you want to back up. For example,
/mnt/data/. The file system must be mounted. - When backing up multiple file systems and saving them on a single tape device, add a session label to each backup using the
-L labeloption so that it is easier to identify them when restoring. Replace label with any name for your backup: for example,backup_data.
Example 3.4. Backing up Multiple XFS File Systems
- To back up the content of XFS file systems mounted on the
/boot/and/data/directories and save them as files in the/backup-files/directory:xfsdump -l 0 -f /backup-files/boot.xfsdump /boot xfsdump -l 0 -f /backup-files/data.xfsdump /data
# xfsdump -l 0 -f /backup-files/boot.xfsdump /boot # xfsdump -l 0 -f /backup-files/data.xfsdump /dataCopy to Clipboard Copied! Toggle word wrap Toggle overflow - To back up multiple file systems on a single tape device, add a session label to each backup using the
-L labeloption:xfsdump -l 0 -L "backup_boot" -f /dev/st0 /boot xfsdump -l 0 -L "backup_data" -f /dev/st0 /data
# xfsdump -l 0 -L "backup_boot" -f /dev/st0 /boot # xfsdump -l 0 -L "backup_data" -f /dev/st0 /dataCopy to Clipboard Copied! Toggle word wrap Toggle overflow
Additional Resources
- For more information about backing up XFS file systems, see the xfsdump(8) man page.
3.7.3. Restoring an XFS File System from Backup
Prerequisites
- You need a file or tape backup of XFS file systems, as described in Section 3.7.2, “Backing Up an XFS File System”.
Procedure 3.2. Restoring an XFS File System from Backup
- The command to restore the backup varies depending on whether you are restoring from a full backup or an incremental one, or are restoring multiple backups from a single tape device:
xfsrestore [-r] [-S session-id] [-L session-label] [-i] -f backup-location restoration-path# xfsrestore [-r] [-S session-id] [-L session-label] [-i] -f backup-location restoration-pathCopy to Clipboard Copied! Toggle word wrap Toggle overflow - Replace backup-location with the location of the backup. This can be a regular file, a tape drive, or a remote tape device. For example,
/backup-files/Data.xfsdumpfor a file or/dev/st0for a tape drive. - Replace restoration-path with the path to the directory where you want to restore the file system. For example,
/mnt/data/. - To restore a file system from an incremental (level 1 to level 9) backup, add the
-roption. - To restore a backup from a tape device that contains multiple backups, specify the backup using the
-Sor-Loptions.The-Slets you choose a backup by its session ID, while the-Llets you choose by the session label. To obtain the session ID and session labels, use thexfsrestore -Icommand.Replace session-id with the session ID of the backup. For example,b74a3586-e52e-4a4a-8775-c3334fa8ea2c. Replace session-label with the session label of the backup. For example,my_backup_session_label. - To use
xfsrestoreinteractively, use the-ioption.The interactive dialog begins afterxfsrestorefinishes reading the specified device. Available commands in the interactivexfsrestoreshell includecd,ls,add,delete, andextract; for a complete list of commands, use thehelpcommand.
Example 3.5. Restoring Multiple XFS File Systems
/mnt/:
xfsrestore -f /backup-files/boot.xfsdump /mnt/boot/ xfsrestore -f /backup-files/data.xfsdump /mnt/data/
# xfsrestore -f /backup-files/boot.xfsdump /mnt/boot/
# xfsrestore -f /backup-files/data.xfsdump /mnt/data/xfsrestore -f /dev/st0 -L "backup_boot" /mnt/boot/ xfsrestore -f /dev/st0 -S "45e9af35-efd2-4244-87bc-4762e476cbab" /mnt/data/
# xfsrestore -f /dev/st0 -L "backup_boot" /mnt/boot/
# xfsrestore -f /dev/st0 -S "45e9af35-efd2-4244-87bc-4762e476cbab" /mnt/data/Informational Messages When Restoring a Backup from a Tape
xfsrestore utility might issue messages. The messages inform you whether a match of the requested backup has been found when xfsrestore examines each backup on the tape in sequential order. For example:
Additional Resources
- For more information about restoring XFS file systems, see the xfsrestore(8) man page.
3.8. Configuring Error Behavior
- Continue retries until either:
- the I/O operation succeeds, or
- an I/O operation retry count or time limit is exceeded.
- Consider the error permanent and halt the system.
EIO: Error while trying to write to the deviceENOSPC: No space left on the deviceENODEV: Device cannot be found
3.8.1. Configuration Files for Specific and Undefined Conditions
/sys/fs/xfs/device/error/ directory.
/sys/fs/xfs/device/error/metadata/ directory contains subdirectories for each specific error condition:
/sys/fs/xfs/device/error/metadata/EIO/for theEIOerror condition/sys/fs/xfs/device/error/metadata/ENODEV/for theENODEVerror condition/sys/fs/xfs/device/error/metadata/ENOSPC/for theENOSPCerror condition
/sys/fs/xfs/device/error/metadata/condition/max_retries: controls the maximum number of times that XFS retries the operation./sys/fs/xfs/device/error/metadata/condition/retry_timeout_seconds: the time limit in seconds after which XFS will stop retrying the operation
/sys/fs/xfs/device/error/metadata/default/max_retries: controls the maximum number of retries/sys/fs/xfs/device/error/metadata/default/retry_timeout_seconds: controls the time limit for retrying
3.8.2. Setting File System Behavior for Specific and Undefined Conditions
max_retries file.
- For specific conditions:
echo value > /sys/fs/xfs/device/error/metadata/condition/max_retries
# echo value > /sys/fs/xfs/device/error/metadata/condition/max_retriesCopy to Clipboard Copied! Toggle word wrap Toggle overflow - For undefined conditions:
echo value > /sys/fs/xfs/device/error/metadata/default/max_retries
# echo value > /sys/fs/xfs/device/error/metadata/default/max_retriesCopy to Clipboard Copied! Toggle word wrap Toggle overflow
-1 and the maximum possible value of int, the C signed integer type. This is 2147483647 on 64-bit Linux.
retry_timeout_seconds file.
- For specific conditions:
echo value > /sys/fs/xfs/device/error/metadata/condition/retry_timeout_seconds
# echo value > /sys/fs/xfs/device/error/metadata/condition/retry_timeout_secondsCopy to Clipboard Copied! Toggle word wrap Toggle overflow - For undefined conditions:
echo value > /sys/fs/xfs/device/error/metadata/default/retry_timeout_seconds
# echo value > /sys/fs/xfs/device/error/metadata/default/retry_timeout_secondsCopy to Clipboard Copied! Toggle word wrap Toggle overflow
-1 and 86400, which is the number of seconds in a day.
max_retries and retry_timeout_seconds options, -1 means to retry forever and 0 to stop immediately.
/dev/ directory; for example, sda.
Note
ENODEV, are considered to be fatal and unrecoverable, regardless of the retry count, so their default value is 0.
3.8.3. Setting Unmount Behavior
fail_at_unmount option is set, the file system overrides all other error configurations during unmount, and immediately umnounts the file system without retrying the I/O operation. This allows the unmount operation to succeed even in case of persistent errors.
echo value > /sys/fs/xfs/device/error/fail_at_unmount
# echo value > /sys/fs/xfs/device/error/fail_at_unmount1 or 0:
1means to cancel retrying immediately if an error is found.0means to respect themax_retriesandretry_timeout_secondsoptions.
/dev/ directory; for example, sda.
Important
fail_at_unmount option has to be set as desired before attempting to unmount the file system. After an unmount operation has started, the configuration files and directories may be unavailable.
3.9. Other XFS File System Utilities
- xfs_fsr
- Used to defragment mounted XFS file systems. When invoked with no arguments,
xfs_fsrdefragments all regular files in all mounted XFS file systems. This utility also allows users to suspend a defragmentation at a specified time and resume from where it left off later.In addition,xfs_fsralso allows the defragmentation of only one file, as inxfs_fsr /path/to/file. Red Hat advises not to periodically defrag an entire file system because XFS avoids fragmentation by default. System wide defragmentation could cause the side effect of fragmentation in free space. - xfs_bmap
- Prints the map of disk blocks used by files in an XFS filesystem. This map lists each extent used by a specified file, as well as regions in the file with no corresponding blocks (that is, holes).
- xfs_info
- Prints XFS file system information.
- xfs_admin
- Changes the parameters of an XFS file system. The
xfs_adminutility can only modify parameters of unmounted devices or file systems. - xfs_copy
- Copies the contents of an entire XFS file system to one or more targets in parallel.
- xfs_metadump
- Copies XFS file system metadata to a file. Red Hat only supports using the
xfs_metadumputility to copy unmounted file systems or read-only mounted file systems; otherwise, generated dumps could be corrupted or inconsistent. - xfs_mdrestore
- Restores an XFS metadump image (generated using
xfs_metadump) to a file system image. - xfs_db
- Debugs an XFS file system.
man pages.
3.10. Migrating from ext4 to XFS
3.10.1. Differences Between Ext3/4 and XFS
- File system repair
- Ext3/4 runs
e2fsckin userspace at boot time to recover the journal as needed. XFS, by comparison, performs journal recovery in kernelspace at mount time. Anfsck.xfsshell script is provided but does not perform any useful action as it is only there to satisfy initscript requirements.When an XFS file system repair or check is requested, use thexfs_repaircommand. Use the-noption for a read-only check.Thexfs_repaircommand will not operate on a file system with a dirty log. To repair such a file systemmountandunmountmust first be performed to replay the log. If the log is corrupt and cannot be replayed, the-Loption can be used to zero out in the log.For more information on file system repair of XFS file systems, see Section 12.2.2, “XFS” - Metadata error behavior
- The ext3/4 file system has configurable behavior when metadata errors are encountered, with the default being to simply continue. When XFS encounters a metadata error that is not recoverable it will shut down the file system and return a
EFSCORRUPTEDerror. The system logs will contain details of the error encountered and will recommend runningxfs_repairif necessary. - Quotas
- XFS quotas are not a remountable option. The
-o quotaoption must be specified on the initial mount for quotas to be in effect.While the standard tools in the quota package can perform basic quota administrative tasks (tools such as setquota and repquota), the xfs_quota tool can be used for XFS-specific features, such as Project Quota administration.Thequotacheckcommand has no effect on an XFS file system. The first time quota accounting is turned on XFS does an automaticquotacheckinternally. Because XFS quota metadata is a first-class, journaled metadata object, the quota system will always be consistent until quotas are manually turned off. - File system resize
- The XFS file system has no utility to shrink a file system. XFS file systems can be grown online via the
xfs_growfscommand. - Inode numbers
- For file systems larger than 1 TB with 256-byte inodes, or larger than 2 TB with 512-byte inodes, XFS inode numbers might exceed 2^32. Such large inode numbers cause 32-bit stat calls to fail with the EOVERFLOW return value. The described problem might occur when using the default Red Hat Enterprise Linux 7 configuration: non-striped with four allocation groups. A custom configuration, for example file system extension or changing XFS file system parameters, might lead to a different behavior.Applications usually handle such larger inode numbers correctly. If needed, mount the XFS file system with the
-o inode32parameter to enforce inode numbers below 2^32. Note that usinginode32does not affect inodes that are already allocated with 64-bit numbers.Important
Do not use theinode32option unless it is required by a specific environment. Theinode32option changes allocation behavior. As a consequence, the ENOSPC error might occur if no space is available to allocate inodes in the lower disk blocks. - Speculative preallocation
- XFS uses speculative preallocation to allocate blocks past EOF as files are written. This avoids file fragmentation due to concurrent streaming write workloads on NFS servers. By default, this preallocation increases with the size of the file and will be apparent in "du" output. If a file with speculative preallocation is not dirtied for five minutes the preallocation will be discarded. If the inode is cycled out of cache before that time, then the preallocation will be discarded when the inode is reclaimed.If premature ENOSPC problems are seen due to speculative preallocation, a fixed preallocation amount may be specified with the
-o allocsize=amountmount option. - Fragmentation-related tools
- Fragmentation is rarely a significant issue on XFS file systems due to heuristics and behaviors, such as delayed allocation and speculative preallocation. However, tools exist for measuring file system fragmentation as well as defragmenting file systems. Their use is not encouraged.The
xfs_db fragcommand attempts to distill all file system allocations into a single fragmentation number, expressed as a percentage. The output of the command requires significant expertise to understand its meaning. For example, a fragmentation factor of 75% means only an average of 4 extents per file. For this reason the output of xfs_db's frag is not considered useful and more careful analysis of any fragmentation problems is recommended.Warning
Thexfs_fsrcommand may be used to defragment individual files, or all files on a file system. The later is especially not recommended as it may destroy locality of files and may fragment free space.
Commands Used with ext3 and ext4 Compared to XFS
| Task | ext3/4 | XFS |
|---|---|---|
| Create a file system | mkfs.ext4 or mkfs.ext3 | mkfs.xfs |
| File system check | e2fsck | xfs_repair |
| Resizing a file system | resize2fs | xfs_growfs |
| Save an image of a file system | e2image | xfs_metadump and xfs_mdrestore |
| Label or tune a file system | tune2fs | xfs_admin |
| Backup a file system | dump and restore | xfsdump and xfsrestore |
| Task | ext4 | XFS |
|---|---|---|
| Quota | quota | xfs_quota |
| File mapping | filefrag | xfs_bmap |
Chapter 4. The ext3 File System
- Availability
- After an unexpected power failure or system crash (also called an unclean system shutdown), each mounted ext2 file system on the machine must be checked for consistency by the
e2fsckprogram. This is a time-consuming process that can delay system boot time significantly, especially with large volumes containing a large number of files. During this time, any data on the volumes is unreachable.It is possible to runfsck -non a live filesystem. However, it will not make any changes and may give misleading results if partially written metadata is encountered.If LVM is used in the stack, another option is to take an LVM snapshot of the filesystem and runfsckon it instead.Finally, there is the option to remount the filesystem as read only. All pending metadata updates (and writes) are then forced to the disk prior to the remount. This ensures the filesystem is in a consistent state, provided there is no previous corruption. It is now possible to runfsck -n.The journaling provided by the ext3 file system means that this sort of file system check is no longer necessary after an unclean system shutdown. The only time a consistency check occurs using ext3 is in certain rare hardware failure cases, such as hard drive failures. The time to recover an ext3 file system after an unclean system shutdown does not depend on the size of the file system or the number of files; rather, it depends on the size of the journal used to maintain consistency. The default journal size takes about a second to recover, depending on the speed of the hardware.Note
The only journaling mode in ext3 supported by Red Hat isdata=ordered(default). - Data Integrity
- The ext3 file system prevents loss of data integrity in the event that an unclean system shutdown occurs. The ext3 file system allows you to choose the type and level of protection that your data receives. With regard to the state of the file system, ext3 volumes are configured to keep a high level of data consistency by default.
- Speed
- Despite writing some data more than once, ext3 has a higher throughput in most cases than ext2 because ext3's journaling optimizes hard drive head motion. You can choose from three journaling modes to optimize speed, but doing so means trade-offs in regards to data integrity if the system was to fail.
Note
The only journaling mode in ext3 supported by Red Hat isdata=ordered(default). - Easy Transition
- It is easy to migrate from ext2 to ext3 and gain the benefits of a robust journaling file system without reformatting. For more information on performing this task, see Section 4.2, “Converting to an ext3 File System” .
Note
ext4.ko for these on-disk formats. This means that kernel messages will always refer to ext4 regardless of the ext file system used.
4.1. Creating an ext3 File System
- Format the partition or LVM volume with the ext3 file system using the
mkfs.ext3utility:mkfs.ext3 block_device
# mkfs.ext3 block_deviceCopy to Clipboard Copied! Toggle word wrap Toggle overflow - Replace block_device with the path to a block device. For example,
/dev/sdb1,/dev/disk/by-uuid/05e99ec8-def1-4a5e-8a9d-5945339ceb2a, or/dev/my-volgroup/my-lv.
- Label the file system using the
e2labelutility:e2label block_device volume_label
# e2label block_device volume_labelCopy to Clipboard Copied! Toggle word wrap Toggle overflow
Configuring UUID
-U option:
mkfs.ext3 -U UUID device
# mkfs.ext3 -U UUID device- Replace UUID with the UUID you want to set: for example,
7cd65de3-e0be-41d9-b66d-96d749c02da7. - Replace device with the path to an ext3 file system to have the UUID added to it: for example,
/dev/sda8.
Additional Resources
- The mkfs.ext3(8) man page
- The e2label(8) man page
4.2. Converting to an ext3 File System
tune2fs command converts an ext2 file system to ext3.
Note
e2fsck utility to check your file system before and after using tune2fs. Before trying to convert ext2 to ext3, back up all file systems in case any errors occur.
ext2 file system to ext3, log in as root and type the following command in a terminal:
tune2fs -j block_device
# tune2fs -j block_devicedf command to display mounted file systems.
4.3. Reverting to an Ext2 File System
/dev/mapper/VolGroup00-LogVol02
Procedure 4.1. Revert from ext3 to ext2
- Unmount the partition by logging in as root and typing:
umount /dev/mapper/VolGroup00-LogVol02
# umount /dev/mapper/VolGroup00-LogVol02Copy to Clipboard Copied! Toggle word wrap Toggle overflow - Change the file system type to ext2 by typing the following command:
tune2fs -O ^has_journal /dev/mapper/VolGroup00-LogVol02
# tune2fs -O ^has_journal /dev/mapper/VolGroup00-LogVol02Copy to Clipboard Copied! Toggle word wrap Toggle overflow - Check the partition for errors by typing the following command:
e2fsck -y /dev/mapper/VolGroup00-LogVol02
# e2fsck -y /dev/mapper/VolGroup00-LogVol02Copy to Clipboard Copied! Toggle word wrap Toggle overflow - Then mount the partition again as ext2 file system by typing:
mount -t ext2 /dev/mapper/VolGroup00-LogVol02 /mount/point
# mount -t ext2 /dev/mapper/VolGroup00-LogVol02 /mount/pointCopy to Clipboard Copied! Toggle word wrap Toggle overflow Replace /mount/point with the mount point of the partition.Note
If a.journalfile exists at the root level of the partition, delete it.
/etc/fstab file, otherwise it will revert back after booting.
Chapter 5. The ext4 File System
Note
fsck. For more information, see Chapter 4, The ext3 File System.
- Main Features
- The ext4 file system uses extents (as opposed to the traditional block mapping scheme used by ext2 and ext3), which improves performance when using large files and reduces metadata overhead for large files. In addition, ext4 also labels unallocated block groups and inode table sections accordingly, which allows them to be skipped during a file system check. This makes for quicker file system checks, which becomes more beneficial as the file system grows in size.
- Allocation Features
- The ext4 file system features the following allocation schemes:
- Persistent pre-allocation
- Delayed allocation
- Multi-block allocation
- Stripe-aware allocation
Because of delayed allocation and other performance optimizations, ext4's behavior of writing files to disk is different from ext3. In ext4, when a program writes to the file system, it is not guaranteed to be on-disk unless the program issues anfsync()call afterwards.By default, ext3 automatically forces newly created files to disk almost immediately even withoutfsync(). This behavior hid bugs in programs that did not usefsync()to ensure that written data was on-disk. The ext4 file system, on the other hand, often waits several seconds to write out changes to disk, allowing it to combine and reorder writes for better disk performance than ext3.Warning
Unlike ext3, the ext4 file system does not force data to disk on transaction commit. As such, it takes longer for buffered writes to be flushed to disk. As with any file system, use data integrity calls such asfsync()to ensure that data is written to permanent storage. - Other ext4 Features
- The ext4 file system also supports the following:
- Extended attributes (
xattr) — This allows the system to associate several additional name and value pairs per file. - Quota journaling — This avoids the need for lengthy quota consistency checks after a crash.
Note
The only supported journaling mode in ext4 isdata=ordered(default). - Subsecond timestamps — This gives timestamps to the subsecond.
5.1. Creating an ext4 File System
- To create an ext4 file system, use the following command:
mkfs.ext4 block_device
# mkfs.ext4 block_deviceCopy to Clipboard Copied! Toggle word wrap Toggle overflow - Replace block_device with the path to a block device. For example,
/dev/sdb1,/dev/disk/by-uuid/05e99ec8-def1-4a5e-8a9d-5945339ceb2a, or/dev/my-volgroup/my-lv. - In general, the default options are optimal for most usage scenarios.
Example 5.1. mkfs.ext4 Command Output
Important
tune2fs to enable certain ext4 features on ext3 file systems. However, using tune2fs in this way has not been fully tested and is therefore not supported in Red Hat Enterprise Linux 7. As a result, Red Hat cannot guarantee consistent performance and predictable behavior for ext3 file systems converted or mounted by using tune2fs.
Striped Block Devices
mkfs.ext4 chooses an optimal geometry. This may also be true on some hardware RAIDs which export geometry information to the operating system.
-E option of mkfs.ext4 (that is, extended file system options) with the following sub-options:
- stride=value
- Specifies the RAID chunk size.
- stripe-width=value
- Specifies the number of data disks in a RAID device, or the number of stripe units in the stripe.
value must be specified in file system block units. For example, to create a file system with a 64k stride (that is, 16 x 4096) on a 4k-block file system, use the following command:
mkfs.ext4 -E stride=16,stripe-width=64 /dev/block_device
# mkfs.ext4 -E stride=16,stripe-width=64 /dev/block_deviceConfiguring UUID
-U option:
mkfs.ext4 -U UUID device
# mkfs.ext4 -U UUID device- Replace UUID with the UUID you want to set: for example,
7cd65de3-e0be-41d9-b66d-96d749c02da7. - Replace device with the path to an ext4 file system to have the UUID added to it: for example,
/dev/sda8.
Additional Resources
- The mkfs.ext4(8) man page
5.2. Mounting an ext4 File System
mount /dev/device /mount/point
# mount /dev/device /mount/pointacl parameter enables access control lists, while the user_xattr parameter enables user extended attributes. To enable both options, use their respective parameters with -o, as in:
mount -o acl,user_xattr /dev/device /mount/point
# mount -o acl,user_xattr /dev/device /mount/pointdata_err=abort can be used to abort the journal if an error occurs in file data.
mount -o data_err=abort /dev/device /mount/point
# mount -o data_err=abort /dev/device /mount/pointtune2fs utility also allows administrators to set default mount options in the file system superblock. For more information on this, refer to man tune2fs.
Write Barriers
nobarrier option, as in:
mount -o nobarrier /dev/device /mount/point
# mount -o nobarrier /dev/device /mount/pointDirect Access Technology Preview
Direct Access (DAX) provides, as a Technology Preview on the ext4 and XFS file systems, a means for an application to directly map persistent memory into its address space. To use DAX, a system must have some form of persistent memory available, usually in the form of one or more Non-Volatile Dual In-line Memory Modules (NVDIMMs), and a file system that supports DAX must be created on the NVDIMM(s). Also, the file system must be mounted with the dax mount option. Then, an mmap of a file on the dax-mounted file system results in a direct mapping of storage into the application's address space.
5.3. Resizing an ext4 File System
resize2fs command:
resize2fs /mount/device size
# resize2fs /mount/device sizeresize2fs command can also decrease the size of an unmounted ext4 file system:
resize2fs /dev/device size
# resize2fs /dev/device sizeresize2fs utility reads the size in units of file system block size, unless a suffix indicating a specific unit is used. The following suffixes indicate specific units:
s— 512 byte sectorsK— kilobytesM— megabytesG— gigabytes
Note
resize2fs automatically expands to fill all available space of the container, usually a logical volume or partition.
man resize2fs.
5.4. Backing up ext2, ext3, or ext4 File Systems
Prerequisites
- If the system has been running for a long time, run the
e2fsckutility on the partitions before backup:e2fsck /dev/device
# e2fsck /dev/deviceCopy to Clipboard Copied! Toggle word wrap Toggle overflow
Procedure 5.1. Backing up ext2, ext3, or ext4 File Systems
- Back up configuration information, including the content of the
/etc/fstabfile and the output of thefdisk -lcommand. This is useful for restoring the partitions.To capture this information, run thesosreportorsysreportutilities. For more information aboutsosreport, see the What is a sosreport and how to create one in Red Hat Enterprise Linux 4.6 and later? Kdowledgebase article. - Depending on the role of the partition:
- If the partition you are backing up is an operating system partition, boot your system into the rescue mode. See the Booting to Rescue Mode section of the System Administrator's Guide.
- When backing up a regular, data partition, unmount it.Although it is possible to back up a data partition while it is mounted, the results of backing up a mounted data partition can be unpredictable.If you need to back up a mounted file system using the
dumputility, do so when the file system is not under a heavy load. The more activity is happening on the file system when backing up, the higher the risk of backup corruption is.
- Use the
dumputility to back up the content of the partitions:dump -0uf backup-file /dev/device
# dump -0uf backup-file /dev/deviceCopy to Clipboard Copied! Toggle word wrap Toggle overflow Replace backup-file with a path to a file where you want the to store the backup. Replace device with the name of the ext4 partition you want to back up. Make sure that you are saving the backup to a directory mounted on a different partition than the partition you are backing up.Example 5.2. Backing up Multiple ext4 Partitions
To back up the content of the/dev/sda1,/dev/sda2, and/dev/sda3partitions into backup files stored in the/backup-files/directory, use the following commands:dump -0uf /backup-files/sda1.dump /dev/sda1 dump -0uf /backup-files/sda2.dump /dev/sda2 dump -0uf /backup-files/sda3.dump /dev/sda3
# dump -0uf /backup-files/sda1.dump /dev/sda1 # dump -0uf /backup-files/sda2.dump /dev/sda2 # dump -0uf /backup-files/sda3.dump /dev/sda3Copy to Clipboard Copied! Toggle word wrap Toggle overflow To do a remote backup, use thesshutility or configure a password-lesssshlogin. For more information onsshand password-less login, see the Using the ssh Utility and Using Key-based Authentication sections of the System Administrator's Guide.For example, when usingssh:Example 5.3. Performing a Remote Backup Using
sshdump -0u -f - /dev/device | ssh root@remoteserver.example.com dd of=backup-file
# dump -0u -f - /dev/device | ssh root@remoteserver.example.com dd of=backup-fileCopy to Clipboard Copied! Toggle word wrap Toggle overflow Note that if using standard redirection, you must pass the-foption separately.
Additional Resources
- For more information, see the dump(8) man page.
5.5. Restoring ext2, ext3, or ext4 File Systems
Prerequisites
- You need a backup of partitions and their metadata, as described in Section 5.4, “Backing up ext2, ext3, or ext4 File Systems”.
Procedure 5.2. Restoring ext2, ext3, or ext4 File Systems
- If you are restoring an operating system partition, boot your system into Rescue Mode. See the Booting to Rescue Mode section of the System Administrator's Guide.This step is not required for ordinary data partitions.
- Rebuild the partitions you want to restore by using the
fdiskorpartedutilites.If the partitions no longer exist, recreate them. The new partitions must be large enough to contain the restored data. It is important to get the start and end numbers right; these are the starting and ending sector numbers of the partitions obtained from thefdiskutility when backing up.For more information on modifying partitions, see Chapter 13, Partitions - Use the
mkfsutility to format the destination partition:mkfs.ext4 /dev/device
# mkfs.ext4 /dev/deviceCopy to Clipboard Copied! Toggle word wrap Toggle overflow Important
Do not format the partition that stores your backup files. - If you created new partitions, re-label all the partitions so they match their entries in the
/etc/fstabfile:e2label /dev/device label
# e2label /dev/device labelCopy to Clipboard Copied! Toggle word wrap Toggle overflow - Create temporary mount points and mount the partitions on them:
mkdir /mnt/device mount -t ext4 /dev/device /mnt/device
# mkdir /mnt/device # mount -t ext4 /dev/device /mnt/deviceCopy to Clipboard Copied! Toggle word wrap Toggle overflow - Restore the data from backup on the mounted partition:
cd /mnt/device restore -rf device-backup-file
# cd /mnt/device # restore -rf device-backup-fileCopy to Clipboard Copied! Toggle word wrap Toggle overflow If you want to restore on a remote machine or restore from a backup file that is stored on a remote host, you can use thesshutility. For more information onssh, see the Using the ssh Utility section of the System Administrator's Guide.Note that you need to configure a password-less login for the following commands. For more information on setting up a password-lesssshlogin, see the Using Key-based Authentication section of the System Administrator's Guide.- To restore a partition on a remote machine from a backup file stored on the same machine:
ssh remote-address "cd /mnt/device && cat backup-file | /usr/sbin/restore -r -f -"
# ssh remote-address "cd /mnt/device && cat backup-file | /usr/sbin/restore -r -f -"Copy to Clipboard Copied! Toggle word wrap Toggle overflow - To restore a partition on a remote machine from a backup file stored on a different remote machine:
ssh remote-machine-1 "cd /mnt/device && RSH=/usr/bin/ssh /usr/sbin/restore -rf remote-machine-2:backup-file"
# ssh remote-machine-1 "cd /mnt/device && RSH=/usr/bin/ssh /usr/sbin/restore -rf remote-machine-2:backup-file"Copy to Clipboard Copied! Toggle word wrap Toggle overflow
- Reboot:
systemctl reboot
# systemctl rebootCopy to Clipboard Copied! Toggle word wrap Toggle overflow
Example 5.4. Restoring Multiple ext4 Partitions
/dev/sda1, /dev/sda2, and /dev/sda3 partitions from Example 5.2, “Backing up Multiple ext4 Partitions”:
- Rebuild partitions you want to restore by using the
fdiskcommand. - Format the destination partitions:
mkfs.ext4 /dev/sda1 mkfs.ext4 /dev/sda2 mkfs.ext4 /dev/sda3
# mkfs.ext4 /dev/sda1 # mkfs.ext4 /dev/sda2 # mkfs.ext4 /dev/sda3Copy to Clipboard Copied! Toggle word wrap Toggle overflow - Re-label all the partitions so they match the
/etc/fstabfile:e2label /dev/sda1 Boot1 e2label /dev/sda2 Root e2label /dev/sda3 Data
# e2label /dev/sda1 Boot1 # e2label /dev/sda2 Root # e2label /dev/sda3 DataCopy to Clipboard Copied! Toggle word wrap Toggle overflow - Prepare the working directories.Mount the new partitions:
Copy to Clipboard Copied! Toggle word wrap Toggle overflow Mount the partition that contains backup files:mkdir /backup-files mount -t ext4 /dev/sda6 /backup-files
# mkdir /backup-files # mount -t ext4 /dev/sda6 /backup-filesCopy to Clipboard Copied! Toggle word wrap Toggle overflow - Restore the data from backup to the mounted partitions:
Copy to Clipboard Copied! Toggle word wrap Toggle overflow - Reboot:
systemctl reboot
# systemctl rebootCopy to Clipboard Copied! Toggle word wrap Toggle overflow
Additional Resources
- For more information, see the restore(8) man page.
5.6. Other ext4 File System Utilities
- e2fsck
- Used to repair an ext4 file system. This tool checks and repairs an ext4 file system more efficiently than ext3, thanks to updates in the ext4 disk structure.
- e2label
- Changes the label on an ext4 file system. This tool also works on ext2 and ext3 file systems.
- quota
- Controls and reports on disk space (blocks) and file (inode) usage by users and groups on an ext4 file system. For more information on using
quota, refer toman quotaand Section 17.1, “Configuring Disk Quotas”. - fsfreeze
- To suspend access to a file system, use the command
# fsfreeze -f mount-pointto freeze it and# fsfreeze -u mount-pointto unfreeze it. This halts access to the file system and creates a stable image on disk.Note
It is unnecessary to usefsfreezefor device-mapper drives.For more information see thefsfreeze(8)manpage.
tune2fs utility can also adjust configurable file system parameters for ext2, ext3, and ext4 file systems. In addition, the following tools are also useful in debugging and analyzing ext4 file systems:
- debugfs
- Debugs ext2, ext3, or ext4 file systems.
- e2image
- Saves critical ext2, ext3, or ext4 file system metadata to a file.
man pages.
Chapter 6. Btrfs (Technology Preview)
Note
6.1. Creating a btrfs File System
mkfs.btrfs /dev/device
# mkfs.btrfs /dev/device6.2. Mounting a btrfs file system
mount /dev/device /mount-point
# mount /dev/device /mount-point- device=/dev/name
- Appending this option to the mount command tells btrfs to scan the named device for a btrfs volume. This is used to ensure the mount will succeed as attempting to mount devices that are not btrfs will cause the mount to fail.
Note
This does not mean all devices will be added to the file system, it only scans them. - max_inline=number
- Use this option to set the maximum amount of space (in bytes) that can be used to inline data within a metadata B-tree leaf. The default is 8192 bytes. For 4k pages it is limited to 3900 bytes due to additional headers that need to fit into the leaf.
- alloc_start=number
- Use this option to set where in the disk allocations start.
- thread_pool=number
- Use this option to assign the number of worker threads allocated.
- discard
- Use this option to enable discard/TRIM on freed blocks.
- noacl
- Use this option to disable the use of ACL's.
- space_cache
- Use this option to store the free space data on disk to make caching a block group faster. This is a persistent change and is safe to boot into old kernels.
- nospace_cache
- Use this option to disable the above
space_cache. - clear_cache
- Use this option to clear all the free space caches during mount. This is a safe option but will trigger the space cache to be rebuilt. As such, leave the file system mounted in order to let the rebuild process finish. This mount option is intended to be used once and only after problems are apparent with the free space.
- enospc_debug
- This option is used to debug problems with "no space left".
- recovery
- Use this option to enable autorecovery upon mount.
6.3. Resizing a btrfs File System
Note
G or g for GiB.
t for terabytes or p for petabytes. It only accepts k, m, and g.
Enlarging a btrfs File System
btrfs filesystem resize amount /mount-point
# btrfs filesystem resize amount /mount-pointbtrfs filesystem resize +200M /btrfssingle Resize '/btrfssingle' of '+200M'
# btrfs filesystem resize +200M /btrfssingle
Resize '/btrfssingle' of '+200M'btrfs filesystem show /mount-point
# btrfs filesystem show /mount-pointdevid of the device to be enlarged, use the following command:
btrfs filesystem resize devid:amount /mount-point
# btrfs filesystem resize devid:amount /mount-pointbtrfs filesystem resize 2:+200M /btrfstest Resize '/btrfstest/' of '2:+200M'
# btrfs filesystem resize 2:+200M /btrfstest
Resize '/btrfstest/' of '2:+200M'
Note
max instead of a specified amount. This will use all remaining free space on the device.
Shrinking a btrfs File System
btrfs filesystem resize amount /mount-point
# btrfs filesystem resize amount /mount-pointbtrfs filesystem resize -200M /btrfssingle Resize '/btrfssingle' of '-200M'
# btrfs filesystem resize -200M /btrfssingle
Resize '/btrfssingle' of '-200M'btrfs filesystem show /mount-point
# btrfs filesystem show /mount-pointdevid of the device to be shrunk, use the following command:
btrfs filesystem resize devid:amount /mount-point
# btrfs filesystem resize devid:amount /mount-pointbtrfs filesystem resize 2:-200M /btrfstest Resize '/btrfstest' of '2:-200M'
# btrfs filesystem resize 2:-200M /btrfstest
Resize '/btrfstest' of '2:-200M'
Set the File System Size
btrfs filesystem resize amount /mount-point
# btrfs filesystem resize amount /mount-pointbtrfs filesystem resize 700M /btrfssingle Resize '/btrfssingle' of '700M'
# btrfs filesystem resize 700M /btrfssingle
Resize '/btrfssingle' of '700M'btrfs filesystem show /mount-point
# btrfs filesystem show /mount-pointdevid of the device to be changed, use the following command:
btrfs filesystem resize devid:amount /mount-point
# btrfs filesystem resize devid:amount /mount-pointbtrfs filesystem resize 2:300M /btrfstest Resize '/btrfstest' of '2:300M'
# btrfs filesystem resize 2:300M /btrfstest
Resize '/btrfstest' of '2:300M'
6.4. Integrated Volume Management of Multiple Devices
6.4.1. Creating a File System with Multiple Devices
mkfs.btrfs command, as detailed in Section 6.1, “Creating a btrfs File System”, accepts the options -d for data, and -m for metadata. Valid specifications are:
raid0raid1raid10dupsingle
-m single option instructs that no duplication of metadata is done. This may be desired when using hardware raid.
Note
Example 6.1. Creating a RAID 10 btrfs File System
mkfs.btrfs /dev/device1 /dev/device2 /dev/device3 /dev/device4
# mkfs.btrfs /dev/device1 /dev/device2 /dev/device3 /dev/device4mkfs.btrfs -m raid0 /dev/device1 /dev/device2
# mkfs.btrfs -m raid0 /dev/device1 /dev/device2mkfs.btrfs -m raid10 -d raid10 /dev/device1 /dev/device2 /dev/device3 /dev/device4
# mkfs.btrfs -m raid10 -d raid10 /dev/device1 /dev/device2 /dev/device3 /dev/device4mkfs.btrfs -m single /dev/device
# mkfs.btrfs -m single /dev/devicesingle option to use the full capacity of each drive when the drives are different sizes.
mkfs.btrfs -d single /dev/device1 /dev/device2 /dev/device3
# mkfs.btrfs -d single /dev/device1 /dev/device2 /dev/device3btrfs device add /dev/device1 /mount-point
# btrfs device add /dev/device1 /mount-pointbtrfs device scan command to discover all multi-device file systems. See Section 6.4.2, “Scanning for btrfs Devices” for more information.
6.4.2. Scanning for btrfs Devices
btrfs device scan to scan all block devices under /dev and probe for btrfs volumes. This must be performed after loading the btrfs module if running with more than one device in a file system.
btrfs device scan
# btrfs device scanbtrfs device scan /dev/device
# btrfs device scan /dev/device6.4.3. Adding New Devices to a btrfs File System
btrfs filesystem show command to list all the btrfs file systems and which devices they include.
btrfs device add command is used to add new devices to a mounted file system.
btrfs filesystem balance command balances (restripes) the allocated extents across all existing devices.
Example 6.2. Add a New Device to a btrfs File System
mkfs.btrfs /dev/device1 mount /dev/device1
# mkfs.btrfs /dev/device1
# mount /dev/device1btrfs device add /dev/device2 /mount-point
# btrfs device add /dev/device2 /mount-point/dev/device1. It must now be balanced to spread across all devices.
btrfs filesystem balance /mount-point
# btrfs filesystem balance /mount-point6.4.4. Converting a btrfs File System
Example 6.3. Converting a btrfs File System
/dev/sdb1 in this case, into a two device, raid1 system in order to protect against a single disk failure, use the following commands:
mount /dev/sdb1 /mnt btrfs device add /dev/sdc1 /mnt btrfs balance start -dconvert=raid1 -mconvert=raid1 /mnt
# mount /dev/sdb1 /mnt
# btrfs device add /dev/sdc1 /mnt
# btrfs balance start -dconvert=raid1 -mconvert=raid1 /mntImportant
6.4.5. Removing btrfs Devices
btrfs device delete command to remove an online device. It redistributes any extents in use to other devices in the file system in order to be safely removed.
Example 6.4. Removing a Device on a btrfs File System
mkfs.btrfs /dev/sdb /dev/sdc /dev/sdd /dev/sde mount /dev/sdb /mnt
# mkfs.btrfs /dev/sdb /dev/sdc /dev/sdd /dev/sde
# mount /dev/sdb /mnt
btrfs device delete /dev/sdc /mnt
# btrfs device delete /dev/sdc /mnt6.4.6. Replacing Failed Devices on a btrfs File System
btrfs device delete missing removes the first device that is described by the file system metadata but not present when the file system was mounted.
Important
- mount in degraded mode,
- add a new device,
- and, remove the missing device.
6.4.7. Registering a btrfs File System in /etc/fstab
initrd or it does not perform a btrfs device scan, it is possible to mount a multi-volume btrfs file system by passing all the devices in the file system explicitly to the mount command.
Example 6.5. Example /etc/fstab Entry
/etc/fstab entry would be:
/dev/sdb /mnt btrfs device=/dev/sdb,device=/dev/sdc,device=/dev/sdd,device=/dev/sde 0
/dev/sdb /mnt btrfs device=/dev/sdb,device=/dev/sdc,device=/dev/sdd,device=/dev/sde 06.5. SSD Optimization
mkfs.btrfs turns off metadata duplication on a single device when /sys/block/device/queue/rotational is zero for the single specified device. This is equivalent to specifying -m single on the command line. It can be overridden and duplicate metadata forced by providing the -m dup option. Duplication is not required due to SSD firmware potentially losing both copies. This wastes space and is a performance cost.
ssd, nossd, and ssd_spread.
ssd option does several things:
- It allows larger metadata cluster allocation.
- It allocates data more sequentially where possible.
- It disables btree leaf rewriting to match key and block order.
- It commits log fragments without batching multiple processes.
Note
ssd mount option only enables the ssd option. Use the nossd option to disable it.
mount -o ssd will find groupings of blocks where there are several free blocks that might have allocated blocks mixed in. The command mount -o ssd_spread ensures there are no allocated blocks mixed in. This improves performance on lower end SSDs.
Note
ssd_spread option enables both the ssd and the ssd_spread options. Use the nossd to disable both these options.
ssd_spread option is never automatically set if none of the ssd options are provided and any of the devices are non-rotational.
6.6. btrfs References
btrfs(8) covers all important management commands. In particular this includes:
- All the subvolume commands for managing snapshots.
- The
devicecommands for managing devices. - The
scrub,balance, anddefragmentcommands.
mkfs.btrfs(8) contains information on creating a btrfs file system including all the options regarding it.
btrfsck(8) for information regarding fsck on btrfs systems.
Chapter 7. Global File System 2
fsck command on a very large file system can take a long time and consume a large amount of memory. Additionally, in the event of a disk or disk-subsystem failure, recovery time is limited by the speed of backup media.
clvmd, and running in a Red Hat Cluster Suite cluster. The daemon makes it possible to use LVM2 to manage logical volumes across a cluster, allowing all nodes in the cluster to share the logical volumes. For information on the Logical Volume Manager, see Red Hat's Logical Volume Manager Administration guide.
gfs2.ko kernel module implements the GFS2 file system and is loaded on GFS2 cluster nodes.
Chapter 8. Network File System (NFS)
8.1. Introduction to NFS
- NFS version 3 (NFSv3) supports safe asynchronous writes and is more robust at error handling than the previous NFSv2. It also supports 64-bit file sizes and offsets, allowing clients to access more than 2 GB of file data.
- NFS version 4 (NFSv4) works through firewalls and on the Internet, no longer requires an
rpcbindservice, supports ACLs, and utilizes stateful operations.
- Sparse Files: It verifies space efficiency of a file and allows placeholder to improve storage efficiency. It is a file having one or more holes; holes are unallocated or uninitialized data blocks consisting only of zeroes.
lseek()operation in NFSv4.2, supportsseek_hole()andseek_data(), which allows application to map out the location of holes in the sparse file. - Space Reservation: It permits storage servers to reserve free space, which prohibits servers to run out of space. NFSv4.2 supports
allocate()operation to reserve space,deallocate()operation to unreserve space, andfallocate()operation to preallocate or deallocate space in a file. - Labeled NFS: It enforces data access rights and enables SELinux labels between a client and a server for individual files on an NFS file system.
- Layout Enhancements: NFSv4.2 provides new operation,
layoutstats(), which the client can use to notify the metadata server about its communication with the layout.
- Enhances performance and security of network, and also includes client-side support for Parallel NFS (pNFS).
- No longer requires a separate TCP connection for callbacks, which allows an NFS server to grant delegations even when it cannot contact the client. For example, when NAT or a firewall interferes.
- It provides exactly once semantics (except for reboot operations), preventing a previous issue whereby certain operations could return an inaccurate result if a reply was lost and the operation was sent twice.
Note
rpcbind [1], lockd, and rpc.statd daemons. The rpc.mountd daemon is still required on the NFS server to set up the exports, but is not involved in any over-the-wire operations.
Note
'-p' command line option that can set the port, making firewall configuration easier.
/etc/exports configuration file to determine whether the client is allowed to access any exported file systems. Once verified, all file and directory operations are available to the user.
Important
rpc.nfsd process now allow binding to any specified port during system start up. However, this can be error-prone if the port is unavailable, or if it conflicts with another daemon.
8.1.1. Required Services
rpcbind service. To share or mount NFS file systems, the following services work together depending on which version of NFS is implemented:
Note
portmap service was used to map RPC program numbers to IP address port number combinations in earlier versions of Red Hat Enterprise Linux. This service is now replaced by rpcbind in Red Hat Enterprise Linux 7 to enable IPv6 support.
- nfs
systemctl start nfsstarts the NFS server and the appropriate RPC processes to service requests for shared NFS file systems.- nfslock
systemctl start nfs-lockactivates a mandatory service that starts the appropriate RPC processes allowing NFS clients to lock files on the server.- rpcbind
rpcbindaccepts port reservations from local RPC services. These ports are then made available (or advertised) so the corresponding remote RPC services can access them.rpcbindresponds to requests for RPC services and sets up connections to the requested RPC service. This is not used with NFSv4.
- rpc.mountd
- This process is used by an NFS server to process
MOUNTrequests from NFSv3 clients. It checks that the requested NFS share is currently exported by the NFS server, and that the client is allowed to access it. If the mount request is allowed, the rpc.mountd server replies with aSuccessstatus and provides theFile-Handlefor this NFS share back to the NFS client. - rpc.nfsd
rpc.nfsdallows explicit NFS versions and protocols the server advertises to be defined. It works with the Linux kernel to meet the dynamic demands of NFS clients, such as providing server threads each time an NFS client connects. This process corresponds to thenfsservice.- lockd
lockdis a kernel thread which runs on both clients and servers. It implements the Network Lock Manager (NLM) protocol, which allows NFSv3 clients to lock files on the server. It is started automatically whenever the NFS server is run and whenever an NFS file system is mounted.- rpc.statd
- This process implements the Network Status Monitor (NSM) RPC protocol, which notifies NFS clients when an NFS server is restarted without being gracefully brought down.
rpc.statdis started automatically by thenfslockservice, and does not require user configuration. This is not used with NFSv4. - rpc.rquotad
- This process provides user quota information for remote users.
rpc.rquotadis started automatically by thenfsservice and does not require user configuration. - rpc.idmapd
rpc.idmapdprovides NFSv4 client and server upcalls, which map between on-the-wire NFSv4 names (strings in the form ofuser@domain) and local UIDs and GIDs. Foridmapdto function with NFSv4, the/etc/idmapd.conffile must be configured. At a minimum, the "Domain" parameter should be specified, which defines the NFSv4 mapping domain. If the NFSv4 mapping domain is the same as the DNS domain name, this parameter can be skipped. The client and server must agree on the NFSv4 mapping domain for ID mapping to function properly.Note
In Red Hat Enterprise Linux 7, only the NFSv4 server usesrpc.idmapd. The NFSv4 client uses the keyring-based idmappernfsidmap.nfsidmapis a stand-alone program that is called by the kernel on-demand to perform ID mapping; it is not a daemon. If there is a problem withnfsidmapdoes the client fall back to usingrpc.idmapd. More information regardingnfsidmapcan be found on the nfsidmap man page.
8.2. Configuring NFS Client
mount command mounts NFS shares on the client side. Its format is as follows:
mount -t nfs -o options server:/remote/export /local/directory
# mount -t nfs -o options server:/remote/export /local/directory- options
- A comma-delimited list of mount options; for more information on valid NFS mount options, see Section 8.4, “Common NFS Mount Options”.
- server
- The hostname, IP address, or fully qualified domain name of the server exporting the file system you wish to mount
- /remote/export
- The file system or directory being exported from the server, that is, the directory you wish to mount
- /local/directory
- The client location where /remote/export is mounted
mount options nfsvers or vers. By default, mount uses NFSv4 with mount -t nfs. If the server does not support NFSv4, the client automatically steps down to a version supported by the server. If the nfsvers/vers option is used to pass a particular version not supported by the server, the mount fails. The file system type nfs4 is also available for legacy reasons; this is equivalent to running mount -t nfs -o nfsvers=4 host:/remote/export /local/directory.
man mount.
/etc/fstab file and the autofs service. For more information, see Section 8.2.1, “Mounting NFS File Systems Using /etc/fstab” and Section 8.3, “autofs”.
8.2.1. Mounting NFS File Systems Using /etc/fstab
/etc/fstab file. The line must state the hostname of the NFS server, the directory on the server being exported, and the directory on the local machine where the NFS share is to be mounted. You must be root to modify the /etc/fstab file.
Example 8.1. Syntax Example
/etc/fstab is as follows:
server:/usr/local/pub /pub nfs defaults 0 0
server:/usr/local/pub /pub nfs defaults 0 0/pub must exist on the client machine before this command can be executed. After adding this line to /etc/fstab on the client system, use the command mount /pub, and the mount point /pub is mounted from the server.
/etc/fstab entry to mount an NFS export should contain the following information:
server:/remote/export /local/directory nfs options 0 0
server:/remote/export /local/directory nfs options 0 0Note
/etc/fstab is read. Otherwise, the mount fails.
/etc/fstab, regenerate mount units so that your system registers the new configuration:
systemctl daemon-reload
# systemctl daemon-reloadAdditional Resources
- For more information about
/etc/fstab, refer toman fstab.
8.3. autofs
/etc/fstab is that, regardless of how infrequently a user accesses the NFS mounted file system, the system must dedicate resources to keep the mounted file system in place. This is not a problem with one or two mounts, but when the system is maintaining mounts to many systems at one time, overall system performance can be affected. An alternative to /etc/fstab is to use the kernel-based automount utility. An automounter consists of two components:
- a kernel module that implements a file system, and
- a user-space daemon that performs all of the other functions.
automount utility can mount and unmount NFS file systems automatically (on-demand mounting), therefore saving system resources. It can be used to mount other file systems including AFS, SMBFS, CIFS, and local file systems.
Important
autofs uses /etc/auto.master (master map) as its default primary configuration file. This can be changed to use another supported network source and name using the autofs configuration (in /etc/sysconfig/autofs) in conjunction with the Name Service Switch (NSS) mechanism. An instance of the autofs version 4 daemon was run for each mount point configured in the master map and so it could be run manually from the command line for any given mount point. This is not possible with autofs version 5, because it uses a single daemon to manage all configured mount points; as such, all automounts must be configured in the master map. This is in line with the usual requirements of other industry standard automounters. Mount point, hostname, exported directory, and options can all be specified in a set of files (or other supported network sources) rather than configuring them manually for each host.
8.3.1. Improvements in autofs Version 5 over Version 4
autofs version 5 features the following enhancements over version 4:
- Direct map support
- Direct maps in
autofsprovide a mechanism to automatically mount file systems at arbitrary points in the file system hierarchy. A direct map is denoted by a mount point of/-in the master map. Entries in a direct map contain an absolute path name as a key (instead of the relative path names used in indirect maps). - Lazy mount and unmount support
- Multi-mount map entries describe a hierarchy of mount points under a single key. A good example of this is the
-hostsmap, commonly used for automounting all exports from a host under/net/hostas a multi-mount map entry. When using the-hostsmap, anlsof/net/hostwill mount autofs trigger mounts for each export from host. These will then mount and expire them as they are accessed. This can greatly reduce the number of active mounts needed when accessing a server with a large number of exports. - Enhanced LDAP support
- The
autofsconfiguration file (/etc/sysconfig/autofs) provides a mechanism to specify theautofsschema that a site implements, thus precluding the need to determine this via trial and error in the application itself. In addition, authenticated binds to the LDAP server are now supported, using most mechanisms supported by the common LDAP server implementations. A new configuration file has been added for this support:/etc/autofs_ldap_auth.conf. The default configuration file is self-documenting, and uses an XML format. - Proper use of the Name Service Switch (
nsswitch) configuration. - The Name Service Switch configuration file exists to provide a means of determining from where specific configuration data comes. The reason for this configuration is to allow administrators the flexibility of using the back-end database of choice, while maintaining a uniform software interface to access the data. While the version 4 automounter is becoming increasingly better at handling the NSS configuration, it is still not complete. Autofs version 5, on the other hand, is a complete implementation.For more information on the supported syntax of this file, see
man nsswitch.conf. Not all NSS databases are valid map sources and the parser will reject ones that are invalid. Valid sources are files,yp,nis,nisplus,ldap, andhesiod. - Multiple master map entries per autofs mount point
- One thing that is frequently used but not yet mentioned is the handling of multiple master map entries for the direct mount point
/-. The map keys for each entry are merged and behave as one map.Example 8.2. Multiple Master Map Entries per autofs Mount Point
Following is an example in the connectathon test maps for the direct mounts:/- /tmp/auto_dcthon /- /tmp/auto_test3_direct /- /tmp/auto_test4_direct
/- /tmp/auto_dcthon /- /tmp/auto_test3_direct /- /tmp/auto_test4_directCopy to Clipboard Copied! Toggle word wrap Toggle overflow
8.3.2. Configuring autofs
/etc/auto.master, also referred to as the master map which may be changed as described in the Section 8.3.1, “Improvements in autofs Version 5 over Version 4”. The master map lists autofs-controlled mount points on the system, and their corresponding configuration files or network sources known as automount maps. The format of the master map is as follows:
mount-point map-name options
mount-point map-name options- mount-point
- The
autofsmount point,/home, for example. - map-name
- The name of a map source which contains a list of mount points, and the file system location from which those mount points should be mounted.
- options
- If supplied, these applies to all entries in the given map provided they do not themselves have options specified. This behavior is different from
autofsversion 4 where options were cumulative. This has been changed to implement mixed environment compatibility.
Example 8.3. /etc/auto.master File
/etc/auto.master file (displayed with cat /etc/auto.master):
/home /etc/auto.misc
/home /etc/auto.miscmount-point [options] location
mount-point [options] location- mount-point
- This refers to the
autofsmount point. This can be a single directory name for an indirect mount or the full path of the mount point for direct mounts. Each direct and indirect map entry key (mount-point) may be followed by a space separated list of offset directories (subdirectory names each beginning with a/) making them what is known as a multi-mount entry. - options
- Whenever supplied, these are the mount options for the map entries that do not specify their own options.
- location
- This refers to the file system location such as a local file system path (preceded with the Sun map format escape character ":" for map names beginning with
/), an NFS file system or other valid file system location.
/etc/auto.misc):
payroll -fstype=nfs personnel:/dev/hda3 sales -fstype=ext3 :/dev/hda4
payroll -fstype=nfs personnel:/dev/hda3
sales -fstype=ext3 :/dev/hda4autofs mount point (sales and payroll from the server called personnel). The second column indicates the options for the autofs mount while the third column indicates the source of the mount. Following the given configuration, the autofs mount points will be /home/payroll and /home/sales. The -fstype= option is often omitted and is generally not needed for correct operation.
systemctl start autofs
# systemctl start autofssystemctl restart autofs
# systemctl restart autofsautofs unmounted directory such as /home/payroll/2006/July.sxc, the automount daemon automatically mounts the directory. If a timeout is specified, the directory is automatically unmounted if the directory is not accessed for the timeout period.
systemctl status autofs
# systemctl status autofs8.3.3. Overriding or Augmenting Site Configuration Files
- Automounter maps are stored in NIS and the
/etc/nsswitch.conffile has the following directive:automount: files nis
automount: files nisCopy to Clipboard Copied! Toggle word wrap Toggle overflow - The
auto.masterfile contains:+auto.master
+auto.masterCopy to Clipboard Copied! Toggle word wrap Toggle overflow - The NIS
auto.mastermap file contains:/home auto.home
/home auto.homeCopy to Clipboard Copied! Toggle word wrap Toggle overflow - The NIS
auto.homemap contains:beth fileserver.example.com:/export/home/beth joe fileserver.example.com:/export/home/joe * fileserver.example.com:/export/home/&
beth fileserver.example.com:/export/home/beth joe fileserver.example.com:/export/home/joe * fileserver.example.com:/export/home/&Copy to Clipboard Copied! Toggle word wrap Toggle overflow - The file map
/etc/auto.homedoes not exist.
auto.home and mount home directories from a different server. In this case, the client needs to use the following /etc/auto.master map:
/home /etc/auto.home +auto.master
/home /etc/auto.home
+auto.master/etc/auto.home map contains the entry:
* labserver.example.com:/export/home/&
* labserver.example.com:/export/home/&/home contain the contents of /etc/auto.home instead of the NIS auto.home map.
auto.home map with just a few entries, create an /etc/auto.home file map, and in it put the new entries. At the end, include the NIS auto.home map. Then the /etc/auto.home file map looks similar to:
mydir someserver:/export/mydir +auto.home
mydir someserver:/export/mydir
+auto.homeauto.home map conditions, the ls /home command outputs:
beth joe mydir
beth joe mydirautofs does not include the contents of a file map of the same name as the one it is reading. As such, autofs moves on to the next map source in the nsswitch configuration.
8.3.4. Using LDAP to Store Automounter Maps
openldap package should be installed automatically as a dependency of the automounter. To configure LDAP access, modify /etc/openldap/ldap.conf. Ensure that BASE, URI, and schema are set appropriately for your site.
rfc2307bis. To use this schema it is necessary to set it in the autofs configuration (/etc/sysconfig/autofs) by removing the comment characters from the schema definition. For example:
Example 8.4. Setting autofs Configuration
DEFAULT_MAP_OBJECT_CLASS="automountMap" DEFAULT_ENTRY_OBJECT_CLASS="automount" DEFAULT_MAP_ATTRIBUTE="automountMapName" DEFAULT_ENTRY_ATTRIBUTE="automountKey" DEFAULT_VALUE_ATTRIBUTE="automountInformation"
DEFAULT_MAP_OBJECT_CLASS="automountMap"
DEFAULT_ENTRY_OBJECT_CLASS="automount"
DEFAULT_MAP_ATTRIBUTE="automountMapName"
DEFAULT_ENTRY_ATTRIBUTE="automountKey"
DEFAULT_VALUE_ATTRIBUTE="automountInformation"automountKey replaces the cn attribute in the rfc2307bis schema. Following is an example of an LDAP Data Interchange Format (LDIF) configuration:
Example 8.5. LDF Configuration
8.4. Common NFS Mount Options
mount commands, /etc/fstab settings, and autofs.
- lookupcache=mode
- Specifies how the kernel should manage its cache of directory entries for a given mount point. Valid arguments for mode are
all,none, orpos/positive. - nfsvers=version
- Specifies which version of the NFS protocol to use, where version is 3 or 4. This is useful for hosts that run multiple NFS servers. If no version is specified, NFS uses the highest version supported by the kernel and
mountcommand.The optionversis identical tonfsvers, and is included in this release for compatibility reasons. - noacl
- Turns off all ACL processing. This may be needed when interfacing with older versions of Red Hat Enterprise Linux, Red Hat Linux, or Solaris, since the most recent ACL technology is not compatible with older systems.
- nolock
- Disables file locking. This setting is sometimes required when connecting to very old NFS servers.
- noexec
- Prevents execution of binaries on mounted file systems. This is useful if the system is mounting a non-Linux file system containing incompatible binaries.
- nosuid
- Disables
set-user-identifierorset-group-identifierbits. This prevents remote users from gaining higher privileges by running asetuidprogram. - port=num
- Specifies the numeric value of the NFS server port. If
numis0(the default value), thenmountqueries the remote host'srpcbindservice for the port number to use. If the remote host's NFS daemon is not registered with itsrpcbindservice, the standard NFS port number of TCP 2049 is used instead. - rsize=num and wsize=num
- These options set the maximum number of bytes to be transfered in a single NFS read or write operation.There is no fixed default value for
rsizeandwsize. By default, NFS uses the largest possible value that both the server and the client support. In Red Hat Enterprise Linux 7, the client and server maximum is 1,048,576 bytes. For more details, see the What are the default and maximum values for rsize and wsize with NFS mounts? KBase article. - sec=flavors
- Security flavors to use for accessing files on the mounted export. The flavors value is a colon-separated list of one or more security flavors.By default, the client attempts to find a security flavor that both the client and the server support. If the server does not support any of the selected flavors, the mount operation fails.
sec=sysuses local UNIX UIDs and GIDs. These useAUTH_SYSto authenticate NFS operations.sec=krb5uses Kerberos V5 instead of local UNIX UIDs and GIDs to authenticate users.sec=krb5iuses Kerberos V5 for user authentication and performs integrity checking of NFS operations using secure checksums to prevent data tampering.sec=krb5puses Kerberos V5 for user authentication, integrity checking, and encrypts NFS traffic to prevent traffic sniffing. This is the most secure setting, but it also involves the most performance overhead. - tcp
- Instructs the NFS mount to use the TCP protocol.
- udp
- Instructs the NFS mount to use the UDP protocol.
man mount and man nfs.
8.5. Starting and Stopping the NFS Server
Prerequisites
- For servers that support NFSv2 or NFSv3 connections, the
rpcbind[1] service must be running. To verify thatrpcbindis active, use the following command:systemctl status rpcbind
$ systemctl status rpcbindCopy to Clipboard Copied! Toggle word wrap Toggle overflow To configure an NFSv4-only server, which does not requirerpcbind, see Section 8.6.7, “Configuring an NFSv4-only Server”. - On Red Hat Enterprise Linux 7.0, if your NFS server exports NFSv3 and is enabled to start at boot, you need to manually start and enable the
nfs-lockservice:systemctl start nfs-lock systemctl enable nfs-lock
# systemctl start nfs-lock # systemctl enable nfs-lockCopy to Clipboard Copied! Toggle word wrap Toggle overflow On Red Hat Enterprise Linux 7.1 and later,nfs-lockstarts automatically if needed, and an attempt to enable it manually fails.
Procedures
- To start an NFS server, use the following command:
systemctl start nfs
# systemctl start nfsCopy to Clipboard Copied! Toggle word wrap Toggle overflow - To enable NFS to start at boot, use the following command:
systemctl enable nfs
# systemctl enable nfsCopy to Clipboard Copied! Toggle word wrap Toggle overflow - To stop the server, use:
systemctl stop nfs
# systemctl stop nfsCopy to Clipboard Copied! Toggle word wrap Toggle overflow - The
restartoption is a shorthand way of stopping and then starting NFS. This is the most efficient way to make configuration changes take effect after editing the configuration file for NFS. To restart the server type:systemctl restart nfs
# systemctl restart nfsCopy to Clipboard Copied! Toggle word wrap Toggle overflow - After you edit the
/etc/sysconfig/nfsfile, restart the nfs-config service by running the following command for the new values to take effect:systemctl restart nfs-config
# systemctl restart nfs-configCopy to Clipboard Copied! Toggle word wrap Toggle overflow - The
try-restartcommand only startsnfsif it is currently running. This command is the equivalent ofcondrestart(conditional restart) in Red Hat init scripts and is useful because it does not start the daemon if NFS is not running.To conditionally restart the server, type:systemctl try-restart nfs
# systemctl try-restart nfsCopy to Clipboard Copied! Toggle word wrap Toggle overflow - To reload the NFS server configuration file without restarting the service type:
systemctl reload nfs
# systemctl reload nfsCopy to Clipboard Copied! Toggle word wrap Toggle overflow
8.6. Configuring the NFS Server
- Manually editing the NFS configuration file, that is,
/etc/exports, and - Through the command line, that is, by using the command
exportfs
8.6.1. The /etc/exports Configuration File
/etc/exports file controls which file systems are exported to remote hosts and specifies options. It follows the following syntax rules:
- Blank lines are ignored.
- To add a comment, start a line with the hash mark (
#). - You can wrap long lines with a backslash (
\). - Each exported file system should be on its own individual line.
- Any lists of authorized hosts placed after an exported file system must be separated by space characters.
- Options for each of the hosts must be placed in parentheses directly after the host identifier, without any spaces separating the host and the first parenthesis.
export host(options)
export host(options)- export
- The directory being exported
- host
- The host or network to which the export is being shared
- options
- The options to be used for host
export host1(options1) host2(options2) host3(options3)
export host1(options1) host2(options2) host3(options3)/etc/exports file only specifies the exported directory and the hosts permitted to access it, as in the following example:
Example 8.6. The /etc/exports File
/exported/directory bob.example.com
/exported/directory bob.example.combob.example.com can mount /exported/directory/ from the NFS server. Because no options are specified in this example, NFS uses default settings.
- ro
- The exported file system is read-only. Remote hosts cannot change the data shared on the file system. To allow hosts to make changes to the file system (that is, read and write), specify the
rwoption. - sync
- The NFS server will not reply to requests before changes made by previous requests are written to disk. To enable asynchronous writes instead, specify the option
async. - wdelay
- The NFS server will delay writing to the disk if it suspects another write request is imminent. This can improve performance as it reduces the number of times the disk must be accessed by separate write commands, thereby reducing write overhead. To disable this, specify the
no_wdelay.no_wdelayis only available if the defaultsyncoption is also specified. - root_squash
- This prevents root users connected remotely (as opposed to locally) from having root privileges; instead, the NFS server assigns them the user ID
nfsnobody. This effectively "squashes" the power of the remote root user to the lowest local user, preventing possible unauthorized writes on the remote server. To disable root squashing, specifyno_root_squash.
all_squash. To specify the user and group IDs that the NFS server should assign to remote users from a particular host, use the anonuid and anongid options, respectively, as in:
export host(anonuid=uid,anongid=gid)
export host(anonuid=uid,anongid=gid)anonuid and anongid options allow you to create a special user and group account for remote NFS users to share.
no_acl option when exporting the file system.
rw option is not specified, then the exported file system is shared as read-only. The following is a sample line from /etc/exports which overrides two default options:
/another/exported/directory 192.168.0.3(rw,async)
192.168.0.3 can mount /another/exported/directory/ read and write and all writes to disk are asynchronous. For more information on exporting options, see man exportfs.
man exports.
Important
/etc/exports file is very precise, particularly in regards to use of the space character. Remember to always separate exported file systems from hosts and hosts from one another with a space character. However, there should be no other space characters in the file except on comment lines.
/home bob.example.com(rw) /home bob.example.com (rw)
/home bob.example.com(rw)
/home bob.example.com (rw)bob.example.com read and write access to the /home directory. The second line allows users from bob.example.com to mount the directory as read-only (the default), while the rest of the world can mount it read/write.
8.6.2. The exportfs Command
/etc/exports file. When the nfs service starts, the /usr/sbin/exportfs command launches and reads this file, passes control to rpc.mountd (if NFSv3) for the actual mounting process, then to rpc.nfsd where the file systems are then available to remote users.
/usr/sbin/exportfs command allows the root user to selectively export or unexport directories without restarting the NFS service. When given the proper options, the /usr/sbin/exportfs command writes the exported file systems to /var/lib/nfs/xtab. Since rpc.mountd refers to the xtab file when deciding access privileges to a file system, changes to the list of exported file systems take effect immediately.
/usr/sbin/exportfs:
- -r
- Causes all directories listed in
/etc/exportsto be exported by constructing a new export list in/var/lib/nfs/etab. This option effectively refreshes the export list with any changes made to/etc/exports. - -a
- Causes all directories to be exported or unexported, depending on what other options are passed to
/usr/sbin/exportfs. If no other options are specified,/usr/sbin/exportfsexports all file systems specified in/etc/exports. - -o file-systems
- Specifies directories to be exported that are not listed in
/etc/exports. Replace file-systems with additional file systems to be exported. These file systems must be formatted in the same way they are specified in/etc/exports. This option is often used to test an exported file system before adding it permanently to the list of file systems to be exported. For more information on/etc/exportssyntax, see Section 8.6.1, “The/etc/exportsConfiguration File”. - -i
- Ignores
/etc/exports; only options given from the command line are used to define exported file systems. - -u
- Unexports all shared directories. The command
/usr/sbin/exportfs -uasuspends NFS file sharing while keeping all NFS daemons up. To re-enable NFS sharing, useexportfs -r. - -v
- Verbose operation, where the file systems being exported or unexported are displayed in greater detail when the
exportfscommand is executed.
exportfs command, it displays a list of currently exported file systems. For more information about the exportfs command, see man exportfs.
8.6.2.1. Using exportfs with NFSv4
RPCNFSDARGS= -N 4 in /etc/sysconfig/nfs.
8.6.3. Running NFS Behind a Firewall
rpcbind, which dynamically assigns ports for RPC services and can cause issues for configuring firewall rules. To allow clients to access NFS shares behind a firewall, edit the /etc/sysconfig/nfs file to set which ports the RPC services run on. To allow clients to access RPC Quota through a firewall, see Section 8.6.4, “Accessing RPC Quota through a Firewall”.
/etc/sysconfig/nfs file does not exist by default on all systems. If /etc/sysconfig/nfs does not exist, create it and specify the following:
- RPCMOUNTDOPTS="-p port"
- This adds "-p port" to the rpc.mount command line:
rpc.mount -p port.
nlockmgr service, set the port number for the nlm_tcpport and nlm_udpport options in the /etc/modprobe.d/lockd.conf file.
/var/log/messages. Commonly, NFS fails to start if you specify a port number that is already in use. After editing /etc/sysconfig/nfs, you need to restart the nfs-config service for the new values to take effect in Red Hat Enterprise Linux 7.2 and prior by running:
systemctl restart nfs-config
# systemctl restart nfs-configsystemctl restart nfs-server
# systemctl restart nfs-serverrpcinfo -p to confirm the changes have taken effect.
Note
/proc/sys/fs/nfs/nfs_callback_tcpport and allow the server to connect to that port on the client.
mountd, statd, and lockd are not required in a pure NFSv4 environment.
8.6.3.1. Discovering NFS exports
- On any server that supports NFSv3, use the
showmountcommand:showmount -e myserver Export list for mysever /exports/foo /exports/bar
$ showmount -e myserver Export list for mysever /exports/foo /exports/barCopy to Clipboard Copied! Toggle word wrap Toggle overflow - On any server that supports NFSv4,
mountthe root directory and look around.Copy to Clipboard Copied! Toggle word wrap Toggle overflow
Note
8.6.4. Accessing RPC Quota through a Firewall
Procedure 8.1. Making RPC Quota Accessible Behind a Firewall
- To enable the
rpc-rquotadservice, use the following command:systemctl enable rpc-rquotad
# systemctl enable rpc-rquotadCopy to Clipboard Copied! Toggle word wrap Toggle overflow - To start the
rpc-rquotadservice, use the following command:Note thatsystemctl start rpc-rquotad
# systemctl start rpc-rquotadCopy to Clipboard Copied! Toggle word wrap Toggle overflow rpc-rquotadis, if enabled, started automatically after starting thenfs-serverservice. - To make the quota RPC service accessible behind a firewall, UDP or TCP port
875need to be open. The default port number is defined in the/etc/servicesfile.You can override the default port number by appending-p port-numberto theRPCRQUOTADOPTSvariable in the/etc/sysconfig/rpc-rquotadfile. - Restart
rpc-rquotadfor changes in the/etc/sysconfig/rpc-rquotadfile to take effect:systemctl restart rpc-rquotad
# systemctl restart rpc-rquotadCopy to Clipboard Copied! Toggle word wrap Toggle overflow
Setting Quotas from Remote Hosts
-S option to the RPCRQUOTADOPTS variable in the /etc/sysconfig/rpc-rquotad file.
rpc-rquotad for changes in the /etc/sysconfig/rpc-rquotad file to take effect:
systemctl restart rpc-rquotad
# systemctl restart rpc-rquotad8.6.5. Hostname Formats
- Single machine
- A fully-qualified domain name (that can be resolved by the server), hostname (that can be resolved by the server), or an IP address.
- Series of machines specified with wildcards
- Use the
*or?character to specify a string match. Wildcards are not to be used with IP addresses; however, they may accidentally work if reverse DNS lookups fail. When specifying wildcards in fully qualified domain names, dots (.) are not included in the wildcard. For example,*.example.comincludesone.example.combut does notinclude one.two.example.com. - IP networks
- Use a.b.c.d/z, where a.b.c.d is the network and z is the number of bits in the netmask (for example 192.168.0.0/24). Another acceptable format is a.b.c.d/netmask, where a.b.c.d is the network and netmask is the netmask (for example, 192.168.100.8/255.255.255.0).
- Netgroups
- Use the format @group-name, where group-name is the NIS netgroup name.
8.6.6. Enabling NFS over RDMA (NFSoRDMA)
- Install the rdma and rdma-core packages.The
/etc/rdma/rdma.conffile contains a line that setsXPRTRDMA_LOAD=yesby default, which requests therdmaservice to load the NFSoRDMA client module. - To enable automatic loading of NFSoRDMA server modules, add
SVCRDMA_LOAD=yeson a new line in/etc/rdma/rdma.conf.RPCNFSDARGS="--rdma=20049"in the/etc/sysconfig/nfsfile specifies the port number on which the NFSoRDMA service listens for clients. RFC 5667 specifies that servers must listen on port20049when providing NFSv4 services over RDMA. - Restart the
nfsservice after editing the/etc/rdma/rdma.conffile:systemctl restart nfs
# systemctl restart nfsCopy to Clipboard Copied! Toggle word wrap Toggle overflow Note that with earlier kernel versions, a system reboot is needed after editing/etc/rdma/rdma.conffor the changes to take effect.
8.6.7. Configuring an NFSv4-only Server
rpcbind service to listen on the network.
Requested NFS version or transport protocol is not supported.
Requested NFS version or transport protocol is not supported.
Procedure 8.2. Configuring an NFSv4-only Server
- Disable NFSv2, NFSv3, and UDP by adding the following line to the
/etc/sysconfig/nfsconfiguration file:RPCNFSDARGS="-N 2 -N 3 -U"
RPCNFSDARGS="-N 2 -N 3 -U"Copy to Clipboard Copied! Toggle word wrap Toggle overflow - Optionally, disable listening for the
RPCBIND,MOUNT, andNSMprotocol calls, which are not necessary in the NFSv4-only case.The effects of disabling these options are:- Clients that attempt to mount shares from your server using NFSv2 or NFSv3 become unresponsive.
- The NFS server itself is unable to mount NFSv2 and NFSv3 file systems.
To disable these options:- Add the following to the
/etc/sysconfig/nfsfile:RPCMOUNTDOPTS="-N 2 -N 3"
RPCMOUNTDOPTS="-N 2 -N 3"Copy to Clipboard Copied! Toggle word wrap Toggle overflow - Disable related services:
systemctl mask --now rpc-statd.service rpcbind.service rpcbind.socket
# systemctl mask --now rpc-statd.service rpcbind.service rpcbind.socketCopy to Clipboard Copied! Toggle word wrap Toggle overflow
- Restart the NFS server:
systemctl restart nfs
# systemctl restart nfsCopy to Clipboard Copied! Toggle word wrap Toggle overflow The changes take effect as soon as you start or restart the NFS server.
Verifying the NFSv4-only Configuration
netstat utility.
- The following is an example
netstatoutput on an NFSv4-only server; listening forRPCBIND,MOUNT, andNSMis also disabled. Here,nfsis the only listening NFS service:Copy to Clipboard Copied! Toggle word wrap Toggle overflow - In comparison, the
netstatoutput before configuring an NFSv4-only server includes thesunrpcandmountdservices:Copy to Clipboard Copied! Toggle word wrap Toggle overflow
8.7. Securing NFS
8.7.1. NFS Security with AUTH_SYS and Export Controls
AUTH_SYS (also called AUTH_UNIX) which relies on the client to state the UID and GID's of the user. Be aware that this means a malicious or misconfigured client can easily get this wrong and allow a user access to files that it should not.
rpcbind[1] service with TCP wrappers. Creating rules with iptables can also limit access to ports used by rpcbind, rpc.mountd, and rpc.nfsd.
rpcbind, refer to man iptables.
8.7.2. NFS Security with AUTH_GSS
Configuring Kerberos
Procedure 8.3. Configuring an NFS Server and Client for IdM to Use RPCSEC_GSS
- Create the
nfs/hostname.domain@REALMprincipal on the NFS server side. - Create the
host/hostname.domain@REALMprincipal on both the server and the client side.Note
The hostname must be identical to the NFS server hostname. - Add the corresponding keys to keytabs for the client and server.
For instructions, see the Adding and Editing Service Entries and Keytabs and Setting up a Kerberos-aware NFS Server sections in the Red Hat Enterprise Linux 7 Linux Domain Identity, Authentication, and Policy Guide.- On the server side, use the
sec=option to enable the wanted security flavors. To enable all security flavors as well as non-cryptographic mounts:/export *(sec=sys:krb5:krb5i:krb5p)
/export *(sec=sys:krb5:krb5i:krb5p)Copy to Clipboard Copied! Toggle word wrap Toggle overflow Valid security flavors to use with thesec=option are:sys: no cryptographic protection, the defaultkrb5: authentication onlykrb5i: integrity protectionkrb5p: privacy protection
- On the client side, add
sec=krb5(orsec=krb5i, orsec=krb5p, depending on the setup) to the mount options:mount -o sec=krb5 server:/export /mnt
# mount -o sec=krb5 server:/export /mntCopy to Clipboard Copied! Toggle word wrap Toggle overflow For information on how to configure a NFS client, see the Setting up a Kerberos-aware NFS Client section in the Red Hat Enterprise Linux 7 Linux Domain Identity, Authentication, and Policy Guide.
Additional Resources
- Although Red Hat recommends using IdM, Active Directory (AD) Kerberos servers are also supported. For details, see the following Red Hat Knowledgebase article: How to set up NFS using Kerberos authentication on RHEL 7 using SSSD and Active Directory.
- If you need to write files as root on the Kerberos-secured NFS share and keep root ownership on these files, see https://access.redhat.com/articles/4040141. Note that this configuration is not recommended.
- For more information on NFS client configuration, see the exports(5) and nfs(5) manual pages, and Section 8.4, “Common NFS Mount Options”.
- For further information on the
RPCSEC_GSSframework, including howgssproxyandrpc.gssdinter-operate, see the GSSD flow description.
8.7.2.1. NFS Security with NFSv4
MOUNT protocol for mounting file systems. The MOUNT protocol presented a security risk because of the way the protocol processed file handles.
8.7.3. File Permissions
su - command to access any files with the NFS share.
nobody. Root squashing is controlled by the default option root_squash; for more information about this option, refer to Section 8.6.1, “The /etc/exports Configuration File”. If possible, never disable root squashing.
all_squash option. This option makes every user accessing the exported file system take the user ID of the nfsnobody user.
8.8. NFS and rpcbind
Note
rpcbind service for backward compatibility.
rpcbind, see Section 8.6.7, “Configuring an NFSv4-only Server”.
rpcbind[1] utility maps RPC services to the ports on which they listen. RPC processes notify rpcbind when they start, registering the ports they are listening on and the RPC program numbers they expect to serve. The client system then contacts rpcbind on the server with a particular RPC program number. The rpcbind service redirects the client to the proper port number so it can communicate with the requested service.
rpcbind to make all connections with incoming client requests, rpcbind must be available before any of these services start.
rpcbind service uses TCP wrappers for access control, and access control rules for rpcbind affect all RPC-based services. Alternatively, it is possible to specify access control rules for each of the NFS RPC daemons. The man pages for rpc.mountd and rpc.statd contain information regarding the precise syntax for these rules.
8.8.1. Troubleshooting NFS and rpcbind
rpcbind[1] provides coordination between RPC services and the port numbers used to communicate with them, it is useful to view the status of current RPC services using rpcbind when troubleshooting. The rpcinfo command shows each RPC-based service with port numbers, an RPC program number, a version number, and an IP protocol type (TCP or UDP).
rpcbind, use the following command:
rpcinfo -p
# rpcinfo -pExample 8.7. rpcinfo -p command output
rpcbind will be unable to map RPC requests from clients for that service to the correct port. In many cases, if NFS is not present in rpcinfo output, restarting NFS causes the service to correctly register with rpcbind and begin working.
rpcinfo, see its man page.
8.9. pNFS
Note
pNFS Flex Files
Mounting pNFS Shares
- To enable pNFS functionality, mount shares from a pNFS-enabled server with NFS version 4.1 or later:
mount -t nfs -o v4.1 server:/remote-export /local-directory
# mount -t nfs -o v4.1 server:/remote-export /local-directoryCopy to Clipboard Copied! Toggle word wrap Toggle overflow After the server is pNFS-enabled, thenfs_layout_nfsv41_fileskernel is automatically loaded on the first mount. The mount entry in the output should containminorversion=1. Use the following command to verify the module was loaded:lsmod | grep nfs_layout_nfsv41_files
$ lsmod | grep nfs_layout_nfsv41_filesCopy to Clipboard Copied! Toggle word wrap Toggle overflow - To mount an NFS share with the Flex Files feature from a server that supports Flex Files, use NFS version 4.2 or later:
mount -t nfs -o v4.2 server:/remote-export /local-directory
# mount -t nfs -o v4.2 server:/remote-export /local-directoryCopy to Clipboard Copied! Toggle word wrap Toggle overflow Verify that thenfs_layout_flexfilesmodule has been loaded:lsmod | grep nfs_layout_flexfiles
$ lsmod | grep nfs_layout_flexfilesCopy to Clipboard Copied! Toggle word wrap Toggle overflow
Additional Resources
8.10. Enabling pNFS SCSI Layouts in NFS
Prerequisites
- Both the client and the server must be able to send SCSI commands to the same block device. That is, the block device must be on a shared SCSI bus.
- The block device must contain an XFS file system.
- The SCSI device must support SCSI Persistent Reservations as described in the SCSI-3 Primary Commands specification.
8.10.1. pNFS SCSI Layouts
Operations Between the Client and the Server
LAYOUTGET operation. The server responds with the location of the file on the SCSI device. The client might need to perform an additional operation of GETDEVICEINFO to determine which SCSI device to use. If these operations work correctly, the client can issue I/O requests directly to the SCSI device instead of sending READ and WRITE operations to the server.
READ and WRITE operations to the server instead of sending I/O requests directly to the SCSI device.
Device Reservations
8.10.2. Checking for a SCSI Device Compatible with pNFS
Prerequisites
- Install the sg3_utils package:
yum install sg3_utils
# yum install sg3_utilsCopy to Clipboard Copied! Toggle word wrap Toggle overflow
Procedure 8.4. Checking for a SCSI Device Compatible with pNFS
- On both the server and client, check for the proper SCSI device support:
sg_persist --in --report-capabilities --verbose path-to-scsi-device
# sg_persist --in --report-capabilities --verbose path-to-scsi-deviceCopy to Clipboard Copied! Toggle word wrap Toggle overflow Ensure that the Persist Through Power Loss Active (PTPL_A) bit is set.Example 8.8. A SCSI device that supports pNFS SCSI
The following is an example ofsg_persistoutput for a SCSI device that supports pNFS SCSI. ThePTPL_Abit reports1.Copy to Clipboard Copied! Toggle word wrap Toggle overflow
Additional Resources
- The sg_persist(8) man page
8.10.3. Setting up pNFS SCSI on the Server
Procedure 8.5. Setting up pNFS SCSI on the Server
- On the server, mount the XFS file system created on the SCSI device.
- Configure the NFS server to export NFS version 4.1 or higher. Set the following option in the
[nfsd]section of the/etc/nfs.conffile:[nfsd] vers4.1=y
[nfsd] vers4.1=yCopy to Clipboard Copied! Toggle word wrap Toggle overflow - Configure the NFS server to export the XFS file system over NFS with the
pnfsoption:Example 8.9. An Entry in /etc/exports to Export pNFS SCSI
The following entry in the/etc/exportsconfiguration file exports the file system mounted at/exported/directory/to theallowed.example.comclient as a pNFS SCSI layout:/exported/directory allowed.example.com(pnfs)
/exported/directory allowed.example.com(pnfs)Copy to Clipboard Copied! Toggle word wrap Toggle overflow
Additional Resources
- For more information on configuring an NFS server, see Section 8.6, “Configuring the NFS Server”.
8.10.4. Setting up pNFS SCSI on the Client
Prerequisites
- The NFS server is configured to export an XFS file system over pNFS SCSI. See Section 8.10.3, “Setting up pNFS SCSI on the Server”.
Procedure 8.6. Setting up pNFS SCSI on the Client
- On the client, mount the exported XFS file system using NFS version 4.1 or higher:
mount -t nfs -o nfsvers=4.1 host:/remote/export /local/directory
# mount -t nfs -o nfsvers=4.1 host:/remote/export /local/directoryCopy to Clipboard Copied! Toggle word wrap Toggle overflow Do not mount the XFS file system directly without NFS.
Additional Resources
- For more information on mounting NFS shares, see Section 8.2, “Configuring NFS Client”.
8.10.5. Releasing the pNFS SCSI Reservation on the Server
Prerequisites
- Install the sg3_utils package:
yum install sg3_utils
# yum install sg3_utilsCopy to Clipboard Copied! Toggle word wrap Toggle overflow
Procedure 8.7. Releasing the pNFS SCSI Reservation on the Server
- Query an existing reservation on the server:
sg_persist --read-reservation path-to-scsi-device
# sg_persist --read-reservation path-to-scsi-deviceCopy to Clipboard Copied! Toggle word wrap Toggle overflow Example 8.10. Querying a Reservation on /dev/sda
Copy to Clipboard Copied! Toggle word wrap Toggle overflow - Remove the existing registration on the server:
sg_persist --out \ --release \ --param-rk=reservation-key \ --prout-type=6 \ path-to-scsi-device# sg_persist --out \ --release \ --param-rk=reservation-key \ --prout-type=6 \ path-to-scsi-deviceCopy to Clipboard Copied! Toggle word wrap Toggle overflow Example 8.11. Removing a Reservation on /dev/sda
Copy to Clipboard Copied! Toggle word wrap Toggle overflow
Additional Resources
- The sg_persist(8) man page
8.10.6. Monitoring pNFS SCSI Layouts Functionality
Prerequisites
- A pNFS SCSI client and server are configured.
8.10.6.1. Checking pNFS SCSI Operations from the Server Using nfsstat
nfsstat utility to monitor pNFS SCSI operations from the server.
Procedure 8.8. Checking pNFS SCSI Operations from the Server Using nfsstat
- Monitor the operations serviced from the server:
Copy to Clipboard Copied! Toggle word wrap Toggle overflow - The client and server use pNFS SCSI operations when:
- The
layoutget,layoutreturn, andlayoutcommitcounters increment. This means that the server is serving layouts. - The server
readandwritecounters do not increment. This means that the clients are performing I/O requests directly to the SCSI devices.
8.10.6.2. Checking pNFS SCSI Operations from the Client Using mountstats
/proc/self/mountstats file to monitor pNFS SCSI operations from the client.
Procedure 8.9. Checking pNFS SCSI Operations from the Client Using mountstats
- List the per-mount operation counters:
Copy to Clipboard Copied! Toggle word wrap Toggle overflow - In the results:
- The
LAYOUTstatistics indicate requests where the client and server use pNFS SCSI operations. - The
READandWRITEstatistics indicate requests where the client and server fall back to NFS operations.
8.11. NFS References
Installed Documentation
man mount— Contains a comprehensive look at mount options for both NFS server and client configurations.man fstab— Provides detail for the format of the/etc/fstabfile used to mount file systems at boot-time.man nfs— Provides details on NFS-specific file system export and mount options.man exports— Shows common options used in the/etc/exportsfile when exporting NFS file systems.
Useful Websites
- http://linux-nfs.org — The current site for developers where project status updates can be viewed.
- http://nfs.sourceforge.net/ — The old home for developers which still contains a lot of useful information.
- http://www.citi.umich.edu/projects/nfsv4/linux/ — An NFSv4 for Linux 2.6 kernel resource.
- http://citeseer.ist.psu.edu/viewdoc/summary?doi=10.1.1.111.4086 — An excellent whitepaper on the features and enhancements of the NFS Version 4 protocol.
rpcbind service replaces portmap, which was used in previous versions of Red Hat Enterprise Linux to map RPC program numbers to IP address port number combinations. For more information, refer to Section 8.1.1, “Required Services”.
Chapter 9. Server Message Block (SMB)
cifs-utils utility to mount SMB shares from a remote server.
Note
cifs.
Chapter 10. FS-Cache

Figure 10.1. FS-Cache Overview
cachefs on Solaris, FS-Cache allows a file system on a server to interact directly with a client's local cache without creating an overmounted file system. With NFS, a mount option instructs the client to mount the NFS share with FS-cache enabled.
cachefiles). In this case, FS-Cache requires a mounted block-based file system that supports bmap and extended attributes (e.g. ext3) as its cache back end.
Note
10.1. Performance Guarantee
10.2. Setting up a Cache
cachefiles caching back end. The cachefilesd daemon initiates and manages cachefiles. The /etc/cachefilesd.conf file controls how cachefiles provides caching services.
dir /path/to/cache
$ dir /path/to/cache/etc/cachefilesd.conf as /var/cache/fscache, as in:
dir /var/cache/fscache
$ dir /var/cache/fscache/var/cache/fscache:
semanage fcontext -a -e /var/cache/fscache /path/to/cache restorecon -Rv /path/to/cache
# semanage fcontext -a -e /var/cache/fscache /path/to/cache
# restorecon -Rv /path/to/cacheNote
semanage permissive -a cachefilesd_t semanage permissive -a cachefiles_kernel_t
# semanage permissive -a cachefilesd_t
# semanage permissive -a cachefiles_kernel_t/path/to/cache. On a laptop, it is advisable to use the root file system (/) as the host file system, but for a desktop machine it would be more prudent to mount a disk partition specifically for the cache.
- ext3 (with extended attributes enabled)
- ext4
- Btrfs
- XFS
device), use:
tune2fs -o user_xattr /dev/device
# tune2fs -o user_xattr /dev/devicemount /dev/device /path/to/cache -o user_xattr
# mount /dev/device /path/to/cache -o user_xattrcachefilesd service:
systemctl start cachefilesd
# systemctl start cachefilesdcachefilesd to start at boot time, execute the following command as root:
systemctl enable cachefilesd
# systemctl enable cachefilesd10.3. Using the Cache with NFS
-o fsc option to the mount command:
mount nfs-share:/ /mount/point -o fsc
# mount nfs-share:/ /mount/point -o fsc/mount/point will go through the cache, unless the file is opened for direct I/O or writing. For more information, see Section 10.3.2, “Cache Limitations with NFS”. NFS indexes cache contents using NFS file handle, not the file name, which means hard-linked files share the cache correctly.
10.3.1. Cache Sharing
- Level 1: Server details
- Level 2: Some mount options; security type; FSID; uniquifier
- Level 3: File Handle
- Level 4: Page number in file
Example 10.1. Cache Sharing
mount commands:
mount home0:/disk0/fred /home/fred -o fsc
mount home0:/disk0/jim /home/jim -o fsc
/home/fred and /home/jim likely share the superblock as they have the same options, especially if they come from the same volume/partition on the NFS server (home0). Now, consider the next two subsequent mount commands:
mount home0:/disk0/fred /home/fred -o fsc,rsize=230
mount home0:/disk0/jim /home/jim -o fsc,rsize=231
/home/fred and /home/jim will not share the superblock as they have different network access parameters, which are part of the Level 2 key. The same goes for the following mount sequence:
mount home0:/disk0/fred /home/fred1 -o fsc,rsize=230
mount home0:/disk0/fred /home/fred2 -o fsc,rsize=231
/home/fred1 and /home/fred2) will be cached twice.
nosharecache parameter. Using the same example:
mount home0:/disk0/fred /home/fred -o nosharecache,fsc
mount home0:/disk0/jim /home/jim -o nosharecache,fsc
home0:/disk0/fred and home0:/disk0/jim. To address this, add a unique identifier on at least one of the mounts, i.e. fsc=unique-identifier. For example:
mount home0:/disk0/fred /home/fred -o nosharecache,fsc
mount home0:/disk0/jim /home/jim -o nosharecache,fsc=jim
jim is added to the Level 2 key used in the cache for /home/jim.
10.3.2. Cache Limitations with NFS
- Opening a file from a shared file system for direct I/O automatically bypasses the cache. This is because this type of access must be direct to the server.
- Opening a file from a shared file system for writing will not work on NFS version 2 and 3. The protocols of these versions do not provide sufficient coherency management information for the client to detect a concurrent write to the same file from another client.
- Opening a file from a shared file system for either direct I/O or writing flushes the cached copy of the file. FS-Cache will not cache the file again until it is no longer opened for direct I/O or writing.
- Furthermore, this release of FS-Cache only caches regular NFS files. FS-Cache will not cache directories, symlinks, device files, FIFOs and sockets.
10.4. Setting Cache Cull Limits
cachefilesd daemon works by caching remote data from shared file systems to free space on the disk. This could potentially consume all available free space, which could be bad if the disk also housed the root partition. To control this, cachefilesd tries to maintain a certain amount of free space by discarding old objects (i.e. accessed less recently) from the cache. This behavior is known as cache culling.
/etc/cachefilesd.conf:
- brun N% (percentage of blocks) , frun N% (percentage of files)
- If the amount of free space and the number of available files in the cache rises above both these limits, then culling is turned off.
- bcull N% (percentage of blocks), fcull N% (percentage of files)
- If the amount of available space or the number of files in the cache falls below either of these limits, then culling is started.
- bstop N% (percentage of blocks), fstop N% (percentage of files)
- If the amount of available space or the number of available files in the cache falls below either of these limits, then no further allocation of disk space or files is permitted until culling has raised things above these limits again.
N for each setting is as follows:
brun/frun- 10%bcull/fcull- 7%bstop/fstop- 3%
- 0 ≤
bstop<bcull<brun< 100 - 0 ≤
fstop<fcull<frun< 100
df program.
Important
10.5. Statistical Information
cat /proc/fs/fscache/stats
# cat /proc/fs/fscache/stats/usr/share/doc/kernel-doc-version/Documentation/filesystems/caching/fscache.txt
10.6. FS-Cache References
cachefilesd and how to configure it, see man cachefilesd and man cachefilesd.conf. The following kernel documents also provide additional information:
/usr/share/doc/cachefilesd-version-number/README/usr/share/man/man5/cachefilesd.conf.5.gz/usr/share/man/man8/cachefilesd.8.gz
/usr/share/doc/kernel-doc-version/Documentation/filesystems/caching/fscache.txt
Part II. Storage Administration
Chapter 11. Storage Considerations During Installation
11.1. Special Considerations
Separate Partitions for /home, /opt, /usr/local
/home, /opt, and /usr/local on a separate device. This allows you to reformat the devices or file systems containing the operating system while preserving your user and application data.
DASD and zFCP Devices on IBM System Z
DASD= parameter at the boot command line or in a CMS configuration file.
FCP_x= lines on the boot command line (or in a CMS configuration file) allow you to specify this information for the installer.
Encrypting Block Devices Using LUKS
dm-crypt destroys any existing formatting on that device. As such, you should decide which devices to encrypt (if any) before the new system's storage configuration is activated as part of the installation process.
Stale BIOS RAID Metadata
Warning
Note
dmraid, which is now deprecated, use the dmraid utility to delete it:
dmraid -r -E /device/
# dmraid -r -E /device/man dmraid and Chapter 18, Redundant Array of Independent Disks (RAID).
iSCSI Detection and Configuration
FCoE Detection and Configuration
DASD
Block Devices with DIF/DIX Enabled
mmap(2)-based I/O will not work reliably, as there are no interlocks in the buffered write path to prevent buffered data from being overwritten after the DIF/DIX checksum has been calculated.
mmap(2) I/O, so it is not possible to work around these errors caused by overwrites.
O_DIRECT. Such applications should use the raw block device. Alternatively, it is also safe to use the XFS file system on a DIF/DIX enabled block device, as long as only O_DIRECT I/O is issued through the file system. XFS is the only file system that does not fall back to buffered I/O when doing certain allocation operations.
O_DIRECT I/O and DIF/DIX hardware should use DIF/DIX.
Chapter 12. File System Check
fsck tools, where fsck is a shortened version of file system check.
Note
/etc/fstab at boot-time. For journaling file systems, this is usually a very short operation, because the file system's metadata journaling ensures consistency even after a crash.
Important
/etc/fstab to 0.
12.1. Best Practices for fsck
- Dry run
- Most file system checkers have a mode of operation which checks but does not repair the file system. In this mode, the checker prints any errors that it finds and actions that it would have taken, without actually modifying the file system.
Note
Later phases of consistency checking may print extra errors as it discovers inconsistencies which would have been fixed in early phases if it were running in repair mode. - Operate first on a file system image
- Most file systems support the creation of a metadata image, a sparse copy of the file system which contains only metadata. Because file system checkers operate only on metadata, such an image can be used to perform a dry run of an actual file system repair, to evaluate what changes would actually be made. If the changes are acceptable, the repair can then be performed on the file system itself.
Note
Severely damaged file systems may cause problems with metadata image creation. - Save a file system image for support investigations
- A pre-repair file system metadata image can often be useful for support investigations if there is a possibility that the corruption was due to a software bug. Patterns of corruption present in the pre-repair image may aid in root-cause analysis.
- Operate only on unmounted file systems
- A file system repair must be run only on unmounted file systems. The tool must have sole access to the file system or further damage may result. Most file system tools enforce this requirement in repair mode, although some only support check-only mode on a mounted file system. If check-only mode is run on a mounted file system, it may find spurious errors that would not be found when run on an unmounted file system.
- Disk errors
- File system check tools cannot repair hardware problems. A file system must be fully readable and writable if repair is to operate successfully. If a file system was corrupted due to a hardware error, the file system must first be moved to a good disk, for example with the
dd(8)utility.
12.2. File System-Specific Information for fsck
12.2.1. ext2, ext3, and ext4
e2fsck binary to perform file system checks and repairs. The file names fsck.ext2, fsck.ext3, and fsck.ext4 are hardlinks to this same binary. These binaries are run automatically at boot time and their behavior differs based on the file system being checked and the state of the file system.
e2fsck finds that a file system is marked with such an error, e2fsck performs a full check after replaying the journal (if present).
e2fsck may ask for user input during the run if the -p option is not specified. The -p option tells e2fsck to automatically do all repairs that may be done safely. If user intervention is required, e2fsck indicates the unfixed problem in its output and reflect this status in the exit code.
e2fsck run-time options include:
-n- No-modify mode. Check-only operation.
-bsuperblock- Specify block number of an alternate suprerblock if the primary one is damaged.
-f- Force full check even if the superblock has no recorded errors.
-jjournal-dev- Specify the external journal device, if any.
-p- Automatically repair or "preen" the file system with no user input.
-y- Assume an answer of "yes" to all questions.
e2fsck are specified in the e2fsck(8) manual page.
e2fsck while running:
- Inode, block, and size checks.
- Directory structure checks.
- Directory connectivity checks.
- Reference count checks.
- Group summary info checks.
e2image(8) utility can be used to create a metadata image prior to repair for diagnostic or testing purposes. The -r option should be used for testing purposes in order to create a sparse file of the same size as the file system itself. e2fsck can then operate directly on the resulting file. The -Q option should be specified if the image is to be archived or provided for diagnostic. This creates a more compact file format suitable for transfer.
12.2.2. XFS
xfs_repair tool.
Note
fsck.xfs binary is present in the xfsprogs package, this is present only to satisfy initscripts that look for an fsck.file system binary at boot time. fsck.xfs immediately exits with an exit code of 0.
xfs_check tool. This tool is very slow and does not scale well for large file systems. As such, it has been deprecated in favor of xfs_repair -n.
xfs_repair to operate. If the file system was not cleanly unmounted, it should be mounted and unmounted prior to using xfs_repair. If the log is corrupt and cannot be replayed, the -L option may be used to zero the log.
Important
-L option must only be used if the log cannot be replayed. The option discards all metadata updates in the log and results in further inconsistencies.
xfs_repair in a dry run, check-only mode by using the -n option. No changes will be made to the file system when this option is specified.
xfs_repair takes very few options. Commonly used options include:
-n- No modify mode. Check-only operation.
-L- Zero metadata log. Use only if log cannot be replayed with mount.
-mmaxmem- Limit memory used during run to maxmem MB. 0 can be specified to obtain a rough estimate of the minimum memory required.
-llogdev- Specify the external log device, if present.
xfs_repair are specified in the xfs_repair(8) manual page.
xfs_repair while running:
- Inode and inode blockmap (addressing) checks.
- Inode allocation map checks.
- Inode size checks.
- Directory checks.
- Pathname checks.
- Link count checks.
- Freemap checks.
- Super block checks.
xfs_repair(8) manual page.
xfs_repair is not interactive. All operations are performed automatically with no input from the user.
xfs_metadump(8) and xfs_mdrestore(8) utilities may be used.
12.2.3. Btrfs
Note
btrfsck tool is used to check and repair btrfs file systems. This tool is still in early development and may not detect or repair all types of file system corruption.
btrfsck does not make changes to the file system; that is, it runs check-only mode by default. If repairs are desired the --repair option must be specified.
btrfsck while running:
- Extent checks.
- File system root checks.
- Root reference count checks.
btrfs-image(8) utility can be used to create a metadata image prior to repair for diagnostic or testing purposes.
Chapter 13. Partitions
Note
- View the existing partition table.
- Change the size of existing partitions.
- Add partitions from free space or additional hard drives.
parted /dev/sda
# parted /dev/sdaManipulating Partitions on Devices in Use
Modifying the Partition Table
partx --update --nr partition-number disk
# partx --update --nr partition-number disk- Boot the system in rescue mode if the partitions on the disk are impossible to unmount, for example in the case of a system disk.
- When prompted to mount the file system, select .
umount command and turn off all the swap space on the hard drive with the swapoff command.
parted Commands”.
Important
| Command | Description |
|---|---|
help | Display list of available commands |
mklabel label | Create a disk label for the partition table |
mkpart part-type [fs-type] start-mb end-mb | Make a partition without creating a new file system |
name minor-num name | Name the partition for Mac and PC98 disklabels only |
print | Display the partition table |
quit | Quit parted |
rescue start-mb end-mb | Rescue a lost partition from start-mb to end-mb |
rm minor-num | Remove the partition |
select device | Select a different device to configure |
set minor-num flag state | Set the flag on a partition; state is either on or off |
toggle [NUMBER [FLAG] | Toggle the state of FLAG on partition NUMBER |
unit UNIT | Set the default unit to UNIT |
13.1. Viewing the Partition Table
- Start parted.
- Use the following command to view the partition table:
(parted) print
(parted) printCopy to Clipboard Copied! Toggle word wrap Toggle overflow
Example 13.1. Partition Table
- Model: ATA ST3160812AS (scsi): explains the disk type, manufacturer, model number, and interface.
- Disk /dev/sda: 160GB: displays the file path to the block device and the storage capacity.
- Partition Table: msdos: displays the disk label type.
- In the partition table,
Numberis the partition number. For example, the partition with minor number 1 corresponds to/dev/sda1. TheStartandEndvalues are in megabytes. ValidTypesare metadata, free, primary, extended, or logical. TheFile systemis the file system type. The Flags column lists the flags set for the partition. Available flags are boot, root, swap, hidden, raid, lvm, or lba.
File system in the partition table can be any of the following:
- ext2
- ext3
- fat16
- fat32
- hfs
- jfs
- linux-swap
- ntfs
- reiserfs
- hp-ufs
- sun-ufs
- xfs
File system of a device shows no value, this means that its file system type is unknown.
Note
parted, use the following command and replace /dev/sda with the device you want to select:
(parted) select /dev/sda
(parted) select /dev/sda13.2. Creating a Partition
Warning
Procedure 13.1. Creating a Partition
- Before creating a partition, boot into rescue mode, or unmount any partitions on the device and turn off any swap space on the device.
- Start
parted:parted /dev/sda
# parted /dev/sdaCopy to Clipboard Copied! Toggle word wrap Toggle overflow Replace /dev/sda with the device name on which you want to create the partition. - View the current partition table to determine if there is enough free space:
(parted) print
(parted) printCopy to Clipboard Copied! Toggle word wrap Toggle overflow If there is not enough free space, you can resize an existing partition. For more information, see Section 13.5, “Resizing a Partition with fdisk”.From the partition table, determine the start and end points of the new partition and what partition type it should be. You can only have four primary partitions, with no extended partition, on a device. If you need more than four partitions, you can have three primary partitions, one extended partition, and multiple logical partitions within the extended. For an overview of disk partitions, see the appendix An Introduction to Disk Partitions in the Red Hat Enterprise Linux 7 Installation Guide. - To create partition:
(parted) mkpart part-type name fs-type start end
(parted) mkpart part-type name fs-type start endCopy to Clipboard Copied! Toggle word wrap Toggle overflow Replace part-type with with primary, logical, or extended as per your requirement.Replace name with partition-name; name is required for GPT partition tables.Replace fs-type with any one of btrfs, ext2, ext3, ext4, fat16, fat32, hfs, hfs+, linux-swap, ntfs, reiserfs, or xfs; fs-type is optional.Replace start end with the size in megabytes as per your requirement.For example, to create a primary partition with an ext3 file system from 1024 megabytes until 2048 megabytes on a hard drive, type the following command:(parted) mkpart primary 1024 2048
(parted) mkpart primary 1024 2048Copy to Clipboard Copied! Toggle word wrap Toggle overflow Note
If you use themkpartfscommand instead, the file system is created after the partition is created. However,parteddoes not support creating an ext3 file system. Thus, if you wish to create an ext3 file system, usemkpartand create the file system with themkfscommand as described later.The changes start taking place as soon as you press Enter, so review the command before executing to it. - View the partition table to confirm that the created partition is in the partition table with the correct partition type, file system type, and size using the following command:
(parted) print
(parted) printCopy to Clipboard Copied! Toggle word wrap Toggle overflow Also remember the minor number of the new partition so that you can label any file systems on it. - Exit the parted shell:
(parted) quit
(parted) quitCopy to Clipboard Copied! Toggle word wrap Toggle overflow - Use the following command after parted is closed to make sure the kernel recognizes the new partition:
cat /proc/partitions
# cat /proc/partitionsCopy to Clipboard Copied! Toggle word wrap Toggle overflow
13.2.1. Formatting and Labeling the Partition
Procedure 13.2. Format and Label the Partition
- The partition does not have a file system. To create the
ext4file system, use:mkfs.ext4 /dev/sda6
# mkfs.ext4 /dev/sda6Copy to Clipboard Copied! Toggle word wrap Toggle overflow Warning
Formatting the partition permanently destroys any data that currently exists on the partition. - Label the file system on the partition. For example, if the file system on the new partition is
/dev/sda6and you want to label itWork, use:e2label /dev/sda6 "Work"
# e2label /dev/sda6 "Work"Copy to Clipboard Copied! Toggle word wrap Toggle overflow By default, the installation program uses the mount point of the partition as the label to make sure the label is unique. You can use any label you want. - Create a mount point (e.g.
/work) as root.
13.2.2. Add the Partition to /etc/fstab
- As root, edit the
/etc/fstabfile to include the new partition using the partition's UUID.Use the commandblkid -o listfor a complete list of the partition's UUID, orblkid devicefor individual device details.In/etc/fstab:- The first column should contain
UUID=followed by the file system's UUID. - The second column should contain the mount point for the new partition.
- The third column should be the file system type: for example,
ext4orswap. - The fourth column lists mount options for the file system. The word
defaultshere means that the partition is mounted at boot time with default options. - The fifth and sixth field specify backup and check options. Example values for a non-root partition are
0 2.
- Regenerate mount units so that your system registers the new configuration:
systemctl daemon-reload
# systemctl daemon-reloadCopy to Clipboard Copied! Toggle word wrap Toggle overflow - Try mounting the file system to verify that the configuration works:
mount /work
# mount /workCopy to Clipboard Copied! Toggle word wrap Toggle overflow
Additional Information
- If you need more information about the format of
/etc/fstab, see the fstab(5) man page.
13.3. Removing a Partition
Warning
Procedure 13.3. Remove a Partition
- Before removing a partition, do one of the following:
- Boot into rescue mode, or
- Unmount any partitions on the device and turn off any swap space on the device.
- Start the
partedutility:parted device
# parted deviceCopy to Clipboard Copied! Toggle word wrap Toggle overflow Replace device with the device on which to remove the partition: for example,/dev/sda. - View the current partition table to determine the minor number of the partition to remove:
(parted) print
(parted) printCopy to Clipboard Copied! Toggle word wrap Toggle overflow - Remove the partition with the command
rm. For example, to remove the partition with minor number 3:(parted) rm 3
(parted) rm 3Copy to Clipboard Copied! Toggle word wrap Toggle overflow The changes start taking place as soon as you press Enter, so review the command before committing to it. - After removing the partition, use the
printcommand to confirm that it is removed from the partition table:(parted) print
(parted) printCopy to Clipboard Copied! Toggle word wrap Toggle overflow - Exit from the
partedshell:(parted) quit
(parted) quitCopy to Clipboard Copied! Toggle word wrap Toggle overflow - Examine the content of the
/proc/partitionsfile to make sure the kernel knows the partition is removed:cat /proc/partitions
# cat /proc/partitionsCopy to Clipboard Copied! Toggle word wrap Toggle overflow - Remove the partition from the
/etc/fstabfile. Find the line that declares the removed partition, and remove it from the file. - Regenerate mount units so that your system registers the new
/etc/fstabconfiguration:systemctl daemon-reload
# systemctl daemon-reloadCopy to Clipboard Copied! Toggle word wrap Toggle overflow
13.4. Setting a Partition Type
systemd-gpt-auto-generator, which use the partition type to, for example, automatically identify and mount devices.
fdisk utility and use the t command to set the partition type. The following example shows how to change the partition type of the first partition to 0x83, default on Linux:
parted utility provides some control of partition types by trying to map the partition type to 'flags', which is not convenient for end users. The parted utility can handle only certain partition types, for example LVM or RAID. To remove, for example, the lvm flag from the first partition with parted, use:
parted /dev/sdc 'set 1 lvm off'
# parted /dev/sdc 'set 1 lvm off'13.5. Resizing a Partition with fdisk
fdisk utility allows you to create and manipulate GPT, MBR, Sun, SGI, and BSD partition tables. On disks with a GUID Partition Table (GPT), using the parted utility is recommended, as fdisk GPT support is in an experimental phase.
fdisk is by deleting and recreating the partition.
Important
Procedure 13.4. Resizing a Partition
fdisk:
- Unmount the device:
umount /dev/vda
# umount /dev/vdaCopy to Clipboard Copied! Toggle word wrap Toggle overflow - Run
fdisk disk_name. For example:Copy to Clipboard Copied! Toggle word wrap Toggle overflow - Use the
poption to determine the line number of the partition to be deleted.Copy to Clipboard Copied! Toggle word wrap Toggle overflow - Use the
doption to delete a partition. If there is more than one partition available,fdiskprompts you to provide a number of the partition to delete:Command (m for help): d Partition number (1,2, default 2): 2 Partition 2 is deleted
Command (m for help): d Partition number (1,2, default 2): 2 Partition 2 is deletedCopy to Clipboard Copied! Toggle word wrap Toggle overflow - Use the
noption to create a partition and follow the prompts. Allow enough space for any future resizing. Thefdiskdefault behavior (pressEnter) is to use all space on the device. You can specify the end of the partition by sectors, or specify a human-readable size by using+<size><suffix>, for example +500M, or +10G.Red Hat recommends using the human-readable size specification if you do not want to use all free space, asfdiskaligns the end of the partition with the physical sectors. If you specify the size by providing an exact number (in sectors),fdiskdoes not align the end of the partition.Copy to Clipboard Copied! Toggle word wrap Toggle overflow - Set the partition type to LVM:
Command (m for help): t Partition number (1,2, default 2): *Enter* Hex code (type L to list all codes): 8e Changed type of partition 'Linux' to 'Linux LVM'
Command (m for help): t Partition number (1,2, default 2): *Enter* Hex code (type L to list all codes): 8e Changed type of partition 'Linux' to 'Linux LVM'Copy to Clipboard Copied! Toggle word wrap Toggle overflow - Write the changes with the
woption when you are sure the changes are correct, as errors can cause instability with the selected partition. - Run
e2fsckon the device to check for consistency:Copy to Clipboard Copied! Toggle word wrap Toggle overflow - Mount the device:
mount /dev/vda
# mount /dev/vdaCopy to Clipboard Copied! Toggle word wrap Toggle overflow
Chapter 14. Creating and Maintaining Snapshots with Snapper
14.1. Creating Initial Snapper Configuration
Warning
sudo infrastructure instead.
Note
Procedure 14.1. Creating a Snapper Configuration File
- Create or choose either:
- A thinly-provisioned logical volume with a Red Hat supported file system on top of it, or
- A Btrfs subvolume.
- Mount the file system.
- Create the configuration file that defines this volume.For LVM2:
snapper -c config_name create-config -f "lvm(fs_type)" /mount-point
# snapper -c config_name create-config -f "lvm(fs_type)" /mount-pointCopy to Clipboard Copied! Toggle word wrap Toggle overflow For example, to create a configuration file called lvm_config on an LVM2 subvolume with an ext4 file system, mounted at /lvm_mount, use:snapper -c lvm_config create-config -f "lvm(ext4)" /lvm_mount
# snapper -c lvm_config create-config -f "lvm(ext4)" /lvm_mountCopy to Clipboard Copied! Toggle word wrap Toggle overflow For Btrfs:snapper -c config_name create-config -f btrfs /mount-point
# snapper -c config_name create-config -f btrfs /mount-pointCopy to Clipboard Copied! Toggle word wrap Toggle overflow - The
-c config_nameoption specifies the name of the configuration file. - The
create-configtells snapper to create a configuration file. - The
-f file_systemtells snapper what file system to use; if this is omitted snapper will attempt to detect the file system. - The
/mount-pointis where the subvolume or thinly-provisioned LVM2 file system is mounted.
Alternatively, to create a configuration file calledbtrfs_config, on a Btrfs subvolume that is mounted at/btrfs_mount, use:snapper -c btrfs_config create-config -f btrfs /btrfs_mount
# snapper -c btrfs_config create-config -f btrfs /btrfs_mountCopy to Clipboard Copied! Toggle word wrap Toggle overflow
/etc/snapper/configs/ directory.
14.2. Creating a Snapper Snapshot
- Pre Snapshot
- A pre snapshot serves as a point of origin for a post snapshot. The two are closely tied and designed to track file system modification between the two points. The pre snapshot must be created before the post snapshot.
- Post Snapshot
- A post snapshot serves as the end point to the pre snapshot. The coupled pre and post snapshots define a range for comparison. By default, every new snapper volume is configured to create a background comparison after a related post snapshot is created successfully.
- Single Snapshot
- A single snapshot is a standalone snapshot created at a specific moment. These can be used to track a timeline of modifications and have a general point to return to later.
14.2.1. Creating a Pre and Post Snapshot Pair
14.2.1.1. Creating a Pre Snapshot with Snapper
snapper -c config_name create -t pre
# snapper -c config_name create -t pre-c config_name option creates a snapshot according to the specifications in the named configuration file. If the configuration file does not yet exist, see Section 14.1, “Creating Initial Snapper Configuration”.
create -t option specifies what type of snapshot to create. Accepted entries are pre, post, or single.
lvm_config configuration file, as created in Section 14.1, “Creating Initial Snapper Configuration”, use:
snapper -c SnapperExample create -t pre -p 1
# snapper -c SnapperExample create -t pre -p
1
-p option prints the number of the created snapshot and is optional.
14.2.1.2. Creating a Post Snapshot with Snapper
Procedure 14.2. Creating a Post Snapshot
- Determine the number of the pre snapshot:
snapper -c config_name list
# snapper -c config_name listCopy to Clipboard Copied! Toggle word wrap Toggle overflow For example, to display the list of snapshots created using the configuration filelvm_config, use the following:Copy to Clipboard Copied! Toggle word wrap Toggle overflow This output shows that the pre snapshot is number 1. - Create a post snapshot that is linked to a previously created pre snapshot:
snapper -c config_file create -t post --pre-num pre_snapshot_number
# snapper -c config_file create -t post --pre-num pre_snapshot_numberCopy to Clipboard Copied! Toggle word wrap Toggle overflow - The
-t postoption specifies the creation of the post snapshot type. - The
--pre-numoption specifies the corresponding pre snapshot.
For example, to create a post snapshot using thelvm_configconfiguration file and is linked to pre snapshot number 1, use:snapper -c lvm_config create -t post --pre-num 1 -p 2
# snapper -c lvm_config create -t post --pre-num 1 -p 2Copy to Clipboard Copied! Toggle word wrap Toggle overflow The-poption prints the number of the created snapshot and is optional. - The pre and post snapshots 1 and 2 are now created and paired. Verify this with the
listcommand:Copy to Clipboard Copied! Toggle word wrap Toggle overflow
14.2.1.3. Wrapping a Command in Pre and Post Snapshots
- Running the
snapper create pre snapshotcommand. - Running a command or a list of commands to perform actions with a possible impact on the file system content.
- Running the
snapper create post snapshotcommand.
Procedure 14.3. Wrapping a Command in Pre and Post Snapshots
- To wrap a command in pre and post snapshots:
snapper -c lvm_config create --command "command_to_be_tracked"
# snapper -c lvm_config create --command "command_to_be_tracked"Copy to Clipboard Copied! Toggle word wrap Toggle overflow For example, to track the creation of the/lvm_mount/hello_filefile:snapper -c lvm_config create --command "echo Hello > /lvm_mount/hello_file"
# snapper -c lvm_config create --command "echo Hello > /lvm_mount/hello_file"Copy to Clipboard Copied! Toggle word wrap Toggle overflow - To verify this, use the
statuscommand:snapper -c config_file status first_snapshot_number..second_snapshot_number
# snapper -c config_file status first_snapshot_number..second_snapshot_numberCopy to Clipboard Copied! Toggle word wrap Toggle overflow For example, to track the changes made in the first step:snapper -c lvm_config status 3..4 +..... /lvm_mount/hello_file
# snapper -c lvm_config status 3..4 +..... /lvm_mount/hello_fileCopy to Clipboard Copied! Toggle word wrap Toggle overflow Use thelistcommand to verify the number of the snapshot if needed.For more information on thestatuscommand, see Section 14.3, “Tracking Changes Between Snapper Snapshots”.
14.2.2. Creating a Single Snapper Snapshot
-t option specifies single. The single snapshot is used to create a single snapshot in time without having it relate to any others. However, if you are interested in a straightforward way to create snapshots of LVM2 thin volumes without the need to automatically generate comparisons or list additional information, Red Hat recommends using the System Storage Manager instead of Snapper for this purpose, as described in Section 16.2.6, “Snapshot”.
snapper -c config_name create -t single
# snapper -c config_name create -t singlelvm_config configuration file.
snapper -c lvm_config create -t single
# snapper -c lvm_config create -t singlesnapper diff, xadiff, and status commands to compare any two snapshots. For more information on these commands, see Section 14.3, “Tracking Changes Between Snapper Snapshots”.
14.2.3. Configuring Snapper to Take Automated Snapshots
- 10 hourly snapshots, and the final hourly snapshot is saved as a “daily” snapshot.
- 10 daily snapshots, and the final daily snapshot for a month is saved as a “monthly” snapshot.
- 10 monthly snapshots, and the final monthly snapshot is saved as a “yearly” snapshot.
- 10 yearly snapshots.
/etc/snapper/config-templates/default file. When you use the snapper create-config command to create a configuration, any unspecified values are set based on the default configuration. You can edit the configuration for any defined volume in the /etc/snapper/configs/config_name file.
14.3. Tracking Changes Between Snapper Snapshots
status, diff, and xadiff commands to track the changes made to a subvolume between snapshots:
- status
- The
statuscommand shows a list of files and directories that have been created, modified, or deleted between two snapshots, that is a comprehensive list of changes between two snapshots. You can use this command to get an overview of the changes without excessive details.For more information, see Section 14.3.1, “Comparing Changes with thestatusCommand”. - diff
- The
diffcommand shows a diff of modified files and directories between two snapshots as received from thestatuscommand if there is at least one modification detected.For more information, see Section 14.3.2, “Comparing Changes with thediffCommand”. - xadiff
- The
xadiffcommand compares how the extended attributes of a file or directory have changed between two snapshots.For more information, see Section 14.3.3, “Comparing Changes with thexadiffCommand”.
14.3.1. Comparing Changes with the status Command
status command shows a list of files and directories that have been created, modified, or deleted between two snapshots.
snapper -c config_file status first_snapshot_number..second_snapshot_number
# snapper -c config_file status first_snapshot_number..second_snapshot_numberlist command to determine snapshot numbers if needed.
lvm_config.
+..... /lvm_mount/file3 |||||| 123456
+..... /lvm_mount/file3
||||||
123456
| Output | Meaning |
|---|---|
| . | Nothing has changed. |
| + | File created. |
| - | File deleted. |
| c | Content changed. |
| t | The type of directory entry has changed. For example, a former symbolic link has changed to a regular file with the same file name. |
| Output | Meaning |
|---|---|
| . | No permissions changed. |
| p | Permissions changed. |
| Output | Meaning |
|---|---|
| . | No user ownership changed. |
| u | User ownership has changed. |
| Output | Meaning |
|---|---|
| . | No group ownership changed. |
| g | Group ownership has changed. |
| Output | Meaning |
|---|---|
| . | No extended attributes changed. |
| x | Extended attributes changed. |
| Output | Meaning |
|---|---|
| . | No ACLs changed. |
| a | ACLs modified. |
14.3.2. Comparing Changes with the diff Command
diff command shows the changes of modified files and directories between two snapshots.
snapper -c config_name diff first_snapshot_number..second_snapshot_number
# snapper -c config_name diff first_snapshot_number..second_snapshot_numberlist command to determine the number of the snapshot if needed.
lvm_config configuration file, use:
file4 had been modified to add "words" into the file.
14.3.3. Comparing Changes with the xadiff Command
xadiff command compares how the extended attributes of a file or directory have changed between two snapshots:
snapper -c config_name xadiff first_snapshot_number..second_snapshot_number
# snapper -c config_name xadiff first_snapshot_number..second_snapshot_numberlist command to determine the number of the snapshot if needed.
lvm_config configuration file, use:
snapper -c lvm_config xadiff 1..2
# snapper -c lvm_config xadiff 1..214.4. Reversing Changes in Between Snapshots
undochange command in the following format, where 1 is the first snapshot and 2 is the second snapshot:
snapper -c config_name undochange 1..2
snapper -c config_name undochange 1..2Important
undochange command does not revert the Snapper volume back to its original state and does not provide data consistency. Any file modification that occurs outside of the specified range, for example after snapshot 2, will remain unchanged after reverting back, for example to the state of snapshot 1. For example, if undochange is run to undo the creation of a user, any files owned by that user can still remain.
undochange command is used.
undochange command with the root file system, as doing so is likely to lead to a failure.
undochange command works:

Figure 14.1. Snapper Status over Time
snapshot_1 is created, file_a is created, then file_b deleted. Snapshot_2 is then created, after which file_a is edited and file_c is created. This is now the current state of the system. The current system has an edited version of file_a, no file_b, and a newly created file_c.
undochange command is called, Snapper generates a list of modified files between the first listed snapshot and the second. In the diagram, if you use the snapper -c SnapperExample undochange 1..2 command, Snapper creates a list of modified files (that is, file_a is created; file_b is deleted) and applies them to the current system. Therefore:
- the current system will not have
file_a, as it has yet to be created whensnapshot_1was created. file_bwill exist, copied fromsnapshot_1into the current system.file_cwill exist, as its creation was outside the specified time.
file_b and file_c conflict, the system can become corrupted.
snapper -c SnapperExample undochange 2..1 command. In this case, the current system replaces the edited version of file_a with one copied from snapshot_1, which undoes edits of that file made after snapshot_2 was created.
Using the mount and unmount Commands to Reverse Changes
undochange command is not always the best way to revert modifications. With the status and diff command, you can make a qualified decision, and use the mount and unmount commands instead of Snapper. The mount and unmount commands are only useful if you want to mount snapshots and browse their content independently of Snapper workflow.
mount command activates respective LVM Snapper snapshot before mounting. Use the mount and unmount commands if you are, for example, interested in mounting snapshots and extracting older version of several files manually. To revert files manually, copy them from a mounted snapshot to the current file system. The current file system, snapshot 0, is the live file system created in Procedure 14.1, “Creating a Snapper Configuration File”. Copy the files to the subtree of the original /mount-point.
mount and unmount commands for explicit client-side requests. The /etc/snapper/configs/config_name file contains the ALLOW_USERS= and ALLOW_GROUPS= variables where you can add users and groups. Then, snapperd allows you to perform mount operations for the added users and groups.
14.5. Deleting a Snapper Snapshot
snapper -c config_name delete snapshot_number
# snapper -c config_name delete snapshot_numberlist command to verify that the snapshot was successfully deleted.
Chapter 15. Swap Space
| Amount of RAM in the system | Recommended swap space | Recommended swap space if allowing for hibernation |
|---|---|---|
| ⩽ 2 GB | 2 times the amount of RAM | 3 times the amount of RAM |
| > 2 GB – 8 GB | Equal to the amount of RAM | 2 times the amount of RAM |
| > 8 GB – 64 GB | At least 4 GB | 1.5 times the amount of RAM |
| > 64 GB | At least 4 GB | Hibernation not recommended |
Note
Important
free and cat /proc/swaps commands to verify how much and where swap is in use.
rescue mode, see Booting Your Computer in Rescue Mode in the Red Hat Enterprise Linux 7 Installation Guide. When prompted to mount the file system, select .
15.1. Adding Swap Space
15.1.1. Extending Swap on an LVM2 Logical Volume
/dev/VolGroup00/LogVol01 is the volume you want to extend by 2 GB):
Procedure 15.1. Extending Swap on an LVM2 Logical Volume
- Disable swapping for the associated logical volume:
swapoff -v /dev/VolGroup00/LogVol01
# swapoff -v /dev/VolGroup00/LogVol01Copy to Clipboard Copied! Toggle word wrap Toggle overflow - Resize the LVM2 logical volume by 2 GB:
lvresize /dev/VolGroup00/LogVol01 -L +2G
# lvresize /dev/VolGroup00/LogVol01 -L +2GCopy to Clipboard Copied! Toggle word wrap Toggle overflow - Format the new swap space:
mkswap /dev/VolGroup00/LogVol01
# mkswap /dev/VolGroup00/LogVol01Copy to Clipboard Copied! Toggle word wrap Toggle overflow - Enable the extended logical volume:
swapon -v /dev/VolGroup00/LogVol01
# swapon -v /dev/VolGroup00/LogVol01Copy to Clipboard Copied! Toggle word wrap Toggle overflow - To test if the swap logical volume was successfully extended and activated, inspect active swap space:
cat /proc/swaps $ free -h
$ cat /proc/swaps $ free -hCopy to Clipboard Copied! Toggle word wrap Toggle overflow
15.1.2. Creating an LVM2 Logical Volume for Swap
/dev/VolGroup00/LogVol02 is the swap volume you want to add:
- Create the LVM2 logical volume of size 2 GB:
lvcreate VolGroup00 -n LogVol02 -L 2G
# lvcreate VolGroup00 -n LogVol02 -L 2GCopy to Clipboard Copied! Toggle word wrap Toggle overflow - Format the new swap space:
mkswap /dev/VolGroup00/LogVol02
# mkswap /dev/VolGroup00/LogVol02Copy to Clipboard Copied! Toggle word wrap Toggle overflow - Add the following entry to the
/etc/fstabfile:/dev/VolGroup00/LogVol02 swap swap defaults 0 0
/dev/VolGroup00/LogVol02 swap swap defaults 0 0Copy to Clipboard Copied! Toggle word wrap Toggle overflow - Regenerate mount units so that your system registers the new configuration:
systemctl daemon-reload
# systemctl daemon-reloadCopy to Clipboard Copied! Toggle word wrap Toggle overflow - Activate swap on the logical volume:
swapon -v /dev/VolGroup00/LogVol02
# swapon -v /dev/VolGroup00/LogVol02Copy to Clipboard Copied! Toggle word wrap Toggle overflow - To test if the swap logical volume was successfully created and activated, inspect active swap space:
cat /proc/swaps $ free -h
$ cat /proc/swaps $ free -hCopy to Clipboard Copied! Toggle word wrap Toggle overflow
15.1.3. Creating a Swap File
Procedure 15.2. Add a Swap File
- Determine the size of the new swap file in megabytes and multiply by 1024 to determine the number of blocks. For example, the block size of a 64 MB swap file is 65536.
- Create an empty file:
dd if=/dev/zero of=/swapfile bs=1024 count=65536
# dd if=/dev/zero of=/swapfile bs=1024 count=65536Copy to Clipboard Copied! Toggle word wrap Toggle overflow Replace count with the value equal to the desired block size. - Set up the swap file with the command:
mkswap /swapfile
# mkswap /swapfileCopy to Clipboard Copied! Toggle word wrap Toggle overflow - Change the security of the swap file so it is not world readable.
chmod 0600 /swapfile
# chmod 0600 /swapfileCopy to Clipboard Copied! Toggle word wrap Toggle overflow - To enable the swap file at boot time, edit
/etc/fstabas root to include the following entry:/swapfile swap swap defaults 0 0
/swapfile swap swap defaults 0 0Copy to Clipboard Copied! Toggle word wrap Toggle overflow The next time the system boots, it activates the new swap file. - Regenerate mount units so that your system registers the new
/etc/fstabconfiguration:systemctl daemon-reload
# systemctl daemon-reloadCopy to Clipboard Copied! Toggle word wrap Toggle overflow - To activate the swap file immediately:
swapon /swapfile
# swapon /swapfileCopy to Clipboard Copied! Toggle word wrap Toggle overflow - To test if the new swap file was successfully created and activated, inspect active swap space:
cat /proc/swaps $ free -h
$ cat /proc/swaps $ free -hCopy to Clipboard Copied! Toggle word wrap Toggle overflow
15.2. Removing Swap Space
15.2.1. Reducing Swap on an LVM2 Logical Volume
/dev/VolGroup00/LogVol01 is the volume you want to reduce):
Procedure 15.3. Reducing an LVM2 Swap Logical Volume
- Disable swapping for the associated logical volume:
swapoff -v /dev/VolGroup00/LogVol01
# swapoff -v /dev/VolGroup00/LogVol01Copy to Clipboard Copied! Toggle word wrap Toggle overflow - Reduce the LVM2 logical volume by 512 MB:
lvreduce /dev/VolGroup00/LogVol01 -L -512M
# lvreduce /dev/VolGroup00/LogVol01 -L -512MCopy to Clipboard Copied! Toggle word wrap Toggle overflow - Format the new swap space:
mkswap /dev/VolGroup00/LogVol01
# mkswap /dev/VolGroup00/LogVol01Copy to Clipboard Copied! Toggle word wrap Toggle overflow - Activate swap on the logical volume:
swapon -v /dev/VolGroup00/LogVol01
# swapon -v /dev/VolGroup00/LogVol01Copy to Clipboard Copied! Toggle word wrap Toggle overflow - To test if the swap logical volume was successfully reduced, inspect active swap space:
cat /proc/swaps $ free -h
$ cat /proc/swaps $ free -hCopy to Clipboard Copied! Toggle word wrap Toggle overflow
15.2.2. Removing an LVM2 Logical Volume for Swap
/dev/VolGroup00/LogVol02 is the swap volume you want to remove):
Procedure 15.4. Remove a Swap Volume Group
- Disable swapping for the associated logical volume:
swapoff -v /dev/VolGroup00/LogVol02
# swapoff -v /dev/VolGroup00/LogVol02Copy to Clipboard Copied! Toggle word wrap Toggle overflow - Remove the LVM2 logical volume:
lvremove /dev/VolGroup00/LogVol02
# lvremove /dev/VolGroup00/LogVol02Copy to Clipboard Copied! Toggle word wrap Toggle overflow - Remove the following associated entry from the
/etc/fstabfile:/dev/VolGroup00/LogVol02 swap swap defaults 0 0
/dev/VolGroup00/LogVol02 swap swap defaults 0 0Copy to Clipboard Copied! Toggle word wrap Toggle overflow - Regenerate mount units so that your system registers the new configuration:
systemctl daemon-reload
# systemctl daemon-reloadCopy to Clipboard Copied! Toggle word wrap Toggle overflow - Remove all references to the removed swap storage from the
/etc/default/grubfile:vi /etc/default/grub
# vi /etc/default/grubCopy to Clipboard Copied! Toggle word wrap Toggle overflow - Rebuild the grub configuration:
- on BIOS-based machines, run:
grub2-mkconfig -o /boot/grub2/grub.cfg
# grub2-mkconfig -o /boot/grub2/grub.cfgCopy to Clipboard Copied! Toggle word wrap Toggle overflow - on UEFI-based machines, run:
grub2-mkconfig -o /boot/efi/EFI/redhat/grub.cfg
# grub2-mkconfig -o /boot/efi/EFI/redhat/grub.cfgCopy to Clipboard Copied! Toggle word wrap Toggle overflow
- To test if the logical volume was successfully removed, inspect active swap space:
cat /proc/swaps $ free -h
$ cat /proc/swaps $ free -hCopy to Clipboard Copied! Toggle word wrap Toggle overflow
15.2.3. Removing a Swap File
Procedure 15.5. Remove a Swap File
- At a shell prompt, execute the following command to disable the swap file (where
/swapfileis the swap file):swapoff -v /swapfile
# swapoff -v /swapfileCopy to Clipboard Copied! Toggle word wrap Toggle overflow - Remove its entry from the
/etc/fstabfile. - Regenerate mount units so that your system registers the new configuration:
systemctl daemon-reload
# systemctl daemon-reloadCopy to Clipboard Copied! Toggle word wrap Toggle overflow - Remove the actual file:
rm /swapfile
# rm /swapfileCopy to Clipboard Copied! Toggle word wrap Toggle overflow
15.3. Moving Swap Space
- Removing swap space Section 15.2, “Removing Swap Space”.
- Adding swap space Section 15.1, “Adding Swap Space”.
Chapter 16. System Storage Manager (SSM)
16.1. SSM Back Ends
ssmlib/main.py which complies with the device, pool, and volume abstraction, ignoring the specifics of the underlying technology. Back ends can be registered in ssmlib/main.py to handle specific storage technology methods, such as create, snapshot, or to remove volumes and pools.
16.1.1. Btrfs Back End
Note
16.1.1.1. Btrfs Pool
btrfs_pool.
btrfs_device_base_name.
16.1.1.2. Btrfs Volume
/dev/lvm_pool/lvol001. Every object in this path must exist in order for the volume to be created. Volumes can also be referenced with its mount point.
16.1.1.3. Btrfs Snapshot
16.1.1.4. Btrfs Device
16.1.2. LVM Back End
16.1.2.1. LVM Pool
lvm_pool.
16.1.2.2. LVM Volume
16.1.2.3. LVM Snapshot
snapshot volume is created which can then be handled just like any other LVM volume. Unlike Btrfs, LVM is able to distinguish snapshots from regular volumes so there is no need for a snapshot name to match a particular pattern.
16.1.2.4. LVM Device
16.1.3. Crypt Back End
cryptsetup and dm-crypt target to manage encrypted volumes. Crypt back ends can be used as a regular back end for creating encrypted volumes on top of regular block devices (or on other volumes such as LVM or MD volumes), or to create encrypted LVM volumes in a single steps.
16.1.3.1. Crypt Volume
dm-crypt and represent the data on the original encrypted device in an unencrypted form. It does not support RAID or any device concatenation.
man cryptsetup.
16.1.3.2. Crypt Snapshot
cryptsetup.
16.1.4. Multiple Devices (MD) Back End
16.2. Common SSM Tasks
16.2.1. Installing SSM
yum install system-storage-manager
# yum install system-storage-manager- The LVM back end requires the
lvm2package. - The Btrfs back end requires the
btrfs-progspackage. - The Crypt back end requires the
device-mapperandcryptsetuppackages.
16.2.2. Displaying Information about All Detected Devices
list command. The ssm list command with no options display the following output:
ssm list --help command.
Note
- Running the
devicesordevargument omits some devices. CDRoms and DM/MD devices, for example, are intentionally hidden as they are listed as volumes. - Some back ends do not support snapshots and cannot distinguish between a snapshot and a regular volume. Running the
snapshotargument on one of these back ends cause SSM to attempt to recognize the volume name in order to identify a snapshot. If the SSM regular expression does not match the snapshot pattern then the snapshot is not be recognized. - With the exception of the main Btrfs volume (the file system itself), any unmounted Btrfs volumes are not shown.
16.2.3. Creating a New Pool, Logical Volume, and File System
/dev/vdb and /dev/vdc, a logical volume of 1G, and an XFS file system.
ssm create --fs xfs -s 1G /dev/vdb /dev/vdc. The following options are used:
- The
--fsoption specifies the required file system type. Current supported file system types are:- ext3
- ext4
- xfs
- btrfs
- The
-sspecifies the size of the logical volume. The following suffixes are supported to define units:Korkfor kilobytesMormfor megabytesGorgfor gigabytesTortfor terabytesPorpfor petabytesEorefor exabytes
- Additionaly, with the
-soption, the new size can be specified as a percentage. Look at the examples:10%for 10 percent of the total pool size10%FREEfor 10 percent of the free pool space10%USEDfor 10 percent of the used pool space
/dev/vdb and /dev/vdc, are the two devices you wish to create.
ssm command that may be useful. The first is the -p pool command. This specifies the pool the volume is to be created on. If it does not yet exist, then SSM creates it. This was omitted in the given example which caused SSM to use the default name lvm_pool. However, to use a specific name to fit in with any existing naming conventions, the -p option should be used.
-n name command. This names the newly created logical volume. As with the -p, this is needed in order to use a specific name to fit in with any existing naming conventions.
ssm create --fs xfs -p new_pool -n XFS_Volume /dev/vdd Volume group "new_pool" successfully created Logical volume "XFS_Volume" created
# ssm create --fs xfs -p new_pool -n XFS_Volume /dev/vdd
Volume group "new_pool" successfully created
Logical volume "XFS_Volume" created
16.2.4. Checking a File System's Consistency
ssm check command checks the file system consistency on the volume. It is possible to specify multiple volumes to check. If there is no file system on the volume, then the volume is skipped.
lvol001, run the command ssm check /dev/lvm_pool/lvol001.
16.2.5. Increasing a Volume's Size
ssm resize command changes the size of the specified volume and file system. If there is no file system then only the volume itself will be resized.
/dev/vdb that is 900MB called lvol001.
ssm list command.
Note
- instead of a +. For example, to decrease the size of an LVM volume by 50M the command would be:
+ or -, the value is taken as absolute.
16.2.6. Snapshot
ssm snapshot command.
Note
lvol001, use the following command:
ssm snapshot /dev/lvm_pool/lvol001 Logical volume "snap20150519T130900" created
# ssm snapshot /dev/lvm_pool/lvol001
Logical volume "snap20150519T130900" created
ssm list, and note the extra snapshot section.
16.2.7. Removing an Item
ssm remove is used to remove an item, either a device, pool, or volume.
Note
-f argument.
-f argument.
lvm_pool and everything within it use the following command:
16.3. SSM Resources
- The
man ssmpage provides good descriptions and examples, as well as details on all of the commands and options too specific to be documented here. - Local documentation for SSM is stored in the
doc/directory. - The SSM wiki can be accessed at http://storagemanager.sourceforge.net/index.html.
- The mailing list can be subscribed from https://lists.sourceforge.net/lists/listinfo/storagemanager-devel and mailing list archives from http://sourceforge.net/mailarchive/forum.php?forum_name=storagemanager-devel. The mailing list is where developers communicate. There is currently no user mailing list so feel free to post questions there as well.
Chapter 17. Disk Quotas
quota RPM must be installed to implement disk quotas.
Note
17.1. Configuring Disk Quotas
- Enable quotas per file system by modifying the
/etc/fstabfile. - Remount the file system(s).
- Create the quota database files and generate the disk usage table.
- Assign quota policies.
17.1.1. Enabling Quotas
Procedure 17.1. Enabling Quotas
- Log in as root.
- Edit the
/etc/fstabfile. - Add either the
usrquotaorgrpquotaor both options to the file systems that require quotas.
Example 17.1. Edit /etc/fstab
vim type the following:
vim /etc/fstab
# vim /etc/fstabExample 17.2. Add Quotas
/home file system has both user and group quotas enabled.
Note
/home partition was created during the installation of Red Hat Enterprise Linux. The root (/) partition can be used for setting quota policies in the /etc/fstab file.
17.1.2. Remounting the File Systems
usrquota or grpquota or both options, remount each file system whose fstab entry has been modified. If the file system is not in use by any process, use one of the following methods:
- Run the
umountcommand followed by themountcommand to remount the file system. See themanpage for bothumountandmountfor the specific syntax for mounting and unmounting various file system types. - Run the
mount -o remount file-systemcommand (wherefile-systemis the name of the file system) to remount the file system. For example, to remount the/homefile system, run themount -o remount /homecommand.
17.1.3. Creating the Quota Database Files
quotacheck command.
quotacheck command examines quota-enabled file systems and builds a table of the current disk usage per file system. The table is then used to update the operating system's copy of disk usage. In addition, the file system's disk quota files are updated.
Note
quotacheck command has no effect on XFS as the table of disk usage is completed automatically at mount time. See the man page xfs_quota(8) for more information.
Procedure 17.2. Creating the Quota Database Files
- Create the quota files on the file system using the following command:
quotacheck -cug /file system
# quotacheck -cug /file systemCopy to Clipboard Copied! Toggle word wrap Toggle overflow - Generate the table of current disk usage per file system using the following command:
quotacheck -avug
# quotacheck -avugCopy to Clipboard Copied! Toggle word wrap Toggle overflow
- c
- Specifies that the quota files should be created for each file system with quotas enable.
- u
- Checks for user quotas.
- g
- Checks for group quotas. If only
-gis specified, only the group quota file is created.
-u or -g options are specified, only the user quota file is created.
- a
- Check all quota-enabled, locally-mounted file systems
- v
- Display verbose status information as the quota check proceeds
- u
- Check user disk quota information
- g
- Check group disk quota information
quotacheck has finished running, the quota files corresponding to the enabled quotas (either user or group or both) are populated with data for each quota-enabled locally-mounted file system such as /home.
17.1.4. Assigning Quotas per User
edquota command.
- User must exist prior to setting the user quota.
Procedure 17.3. Assigning Quotas per User
- To assign the quota for a user, use the following command:
edquota username
# edquota usernameCopy to Clipboard Copied! Toggle word wrap Toggle overflow Replace username with the user to which you want to assign the quotas. - To verify that the quota for the user has been set, use the following command:
quota username
# quota usernameCopy to Clipboard Copied! Toggle word wrap Toggle overflow
Example 17.3. Assigning Quotas to a user
/etc/fstab for the /home partition (/dev/VolGroup00/LogVol02 in the following example) and the command edquota testuser is executed, the following is shown in the editor configured as the default for the system:
Disk quotas for user testuser (uid 501): Filesystem blocks soft hard inodes soft hard /dev/VolGroup00/LogVol02 440436 0 0 37418 0 0
Disk quotas for user testuser (uid 501):
Filesystem blocks soft hard inodes soft hard
/dev/VolGroup00/LogVol02 440436 0 0 37418 0 0Note
EDITOR environment variable is used by edquota. To change the editor, set the EDITOR environment variable in your ~/.bash_profile file to the full path of the editor of your choice.
inodes column shows how many inodes the user is currently using. The last two columns are used to set the soft and hard inode limits for the user on the file system.
Example 17.4. Change Desired Limits
Disk quotas for user testuser (uid 501): Filesystem blocks soft hard inodes soft hard /dev/VolGroup00/LogVol02 440436 500000 550000 37418 0 0
Disk quotas for user testuser (uid 501):
Filesystem blocks soft hard inodes soft hard
/dev/VolGroup00/LogVol02 440436 500000 550000 37418 0 0quota testuser
Disk quotas for user username (uid 501):
Filesystem blocks quota limit grace files quota limit grace
/dev/sdb 1000* 1000 1000 0 0 0
# quota testuser
Disk quotas for user username (uid 501):
Filesystem blocks quota limit grace files quota limit grace
/dev/sdb 1000* 1000 1000 0 0 0
17.1.5. Assigning Quotas per Group
- Group must exist prior to setting the group quota.
Procedure 17.4. Assigning Quotas per Group
- To set a group quota, use the following command:
edquota -g groupname
# edquota -g groupnameCopy to Clipboard Copied! Toggle word wrap Toggle overflow - To verify that the group quota is set, use the following command:
quota -g groupname
# quota -g groupnameCopy to Clipboard Copied! Toggle word wrap Toggle overflow
Example 17.5. Assigning quotas to group
devel group, use the command:
edquota -g devel
# edquota -g develDisk quotas for group devel (gid 505): Filesystem blocks soft hard inodes soft hard /dev/VolGroup00/LogVol02 440400 0 0 37418 0 0
Disk quotas for group devel (gid 505):
Filesystem blocks soft hard inodes soft hard
/dev/VolGroup00/LogVol02 440400 0 0 37418 0 0quota -g devel
# quota -g devel17.1.6. Setting the Grace Period for Soft Limits
edquota -t
# edquota -tImportant
edquota commands operate on quotas for a particular user or group, the -t option operates on every file system with quotas enabled.
17.2. Managing Disk Quotas
17.2.1. Enabling and Disabling
quotaoff -vaug
# quotaoff -vaug-u or -g options are specified, only the user quotas are disabled. If only -g is specified, only group quotas are disabled. The -v switch causes verbose status information to display as the command executes.
quotaon
# quotaonquotaon -vaug
# quotaon -vaug-u or -g options are specified, only the user quotas are enabled. If only -g is specified, only group quotas are enabled.
/home, use the following command:
quotaon -vug /home
# quotaon -vug /homeNote
quotaon command is not always needed for XFS because it is performed automatically at mount time. Refer to the man page quotaon(8) for more information.
17.2.2. Reporting on Disk Quotas
repquota utility.
Example 17.6. Output of the repquota Command
repquota /home produces this output:
-a) quota-enabled file systems, use the command:
repquota -a
# repquota -a-- displayed after each user is a quick way to determine whether the block or inode limits have been exceeded. If either soft limit is exceeded, a + appears in place of the corresponding -; the first - represents the block limit, and the second represents the inode limit.
grace columns are normally blank. If a soft limit has been exceeded, the column contains a time specification equal to the amount of time remaining on the grace period. If the grace period has expired, none appears in its place.
17.2.3. Keeping Quotas Accurate
quotacheck
# quotacheckquotacheck can be run on a regular basis, even if the system has not crashed. Safe methods for periodically running quotacheck include:
- Ensuring quotacheck runs on next reboot
Note
This method works best for (busy) multiuser systems which are periodically rebooted.Save a shell script into the/etc/cron.daily/or/etc/cron.weekly/directory or schedule one using the following command:crontab -e
# crontab -eCopy to Clipboard Copied! Toggle word wrap Toggle overflow Thecrontab -ecommand contains thetouch /forcequotacheckcommand. This creates an emptyforcequotacheckfile in the root directory, which the system init script looks for at boot time. If it is found, the init script runsquotacheck. Afterward, the init script removes the/forcequotacheckfile; thus, scheduling this file to be created periodically withcronensures thatquotacheckis run during the next reboot.For more information aboutcron, seeman cron.- Running quotacheck in single user mode
- An alternative way to safely run
quotacheckis to boot the system into single-user mode to prevent the possibility of data corruption in quota files and run the following commands:quotaoff -vug /file_system
# quotaoff -vug /file_systemCopy to Clipboard Copied! Toggle word wrap Toggle overflow quotacheck -vug /file_system
# quotacheck -vug /file_systemCopy to Clipboard Copied! Toggle word wrap Toggle overflow quotaon -vug /file_system
# quotaon -vug /file_systemCopy to Clipboard Copied! Toggle word wrap Toggle overflow - Running quotacheck on a running system
- If necessary, it is possible to run
quotacheckon a machine during a time when no users are logged in, and thus have no open files on the file system being checked. Run the commandquotacheck -vug file_system; this command will fail ifquotacheckcannot remount the given file_system as read-only. Note that, following the check, the file system will be remounted read-write.Warning
Runningquotacheckon a live file system mounted read-write is not recommended due to the possibility of quota file corruption.
man cron for more information about configuring cron.
17.3. Disk Quota References
man pages of the following commands:
quotacheckedquotarepquotaquotaquotaonquotaoff
Chapter 18. Redundant Array of Independent Disks (RAID)
- Enhances speed
- Increases storage capacity using a single virtual disk
- Minimizes data loss from disk failure
18.1. RAID Types
Firmware RAID
Hardware RAID
Software RAID
- Multithreaded design
- Portability of arrays between Linux machines without reconstruction
- Backgrounded array reconstruction using idle system resources
- Hot-swappable drive support
- Automatic CPU detection to take advantage of certain CPU features such as streaming SIMD support
- Automatic correction of bad sectors on disks in an array
- Regular consistency checks of RAID data to ensure the health of the array
- Proactive monitoring of arrays with email alerts sent to a designated email address on important events
- Write-intent bitmaps which drastically increase the speed of resync events by allowing the kernel to know precisely which portions of a disk need to be resynced instead of having to resync the entire array
- Resync checkpointing so that if you reboot your computer during a resync, at startup the resync will pick up where it left off and not start all over again
- The ability to change parameters of the array after installation. For example, you can grow a 4-disk RAID5 array to a 5-disk RAID5 array when you have a new disk to add. This grow operation is done live and does not require you to reinstall on the new array.
18.2. RAID Levels and Linear Support
- Level 0
- RAID level 0, often called "striping," is a performance-oriented striped data mapping technique. This means the data being written to the array is broken down into strips and written across the member disks of the array, allowing high I/O performance at low inherent cost but provides no redundancy.Many RAID level 0 implementations will only stripe the data across the member devices up to the size of the smallest device in the array. This means that if you have multiple devices with slightly different sizes, each device will get treated as though it is the same size as the smallest drive. Therefore, the common storage capacity of a level 0 array is equal to the capacity of the smallest member disk in a Hardware RAID or the capacity of smallest member partition in a Software RAID multiplied by the number of disks or partitions in the array.
- Level 1
- RAID level 1, or "mirroring," has been used longer than any other form of RAID. Level 1 provides redundancy by writing identical data to each member disk of the array, leaving a "mirrored" copy on each disk. Mirroring remains popular due to its simplicity and high level of data availability. Level 1 operates with two or more disks, and provides very good data reliability and improves performance for read-intensive applications but at a relatively high cost. [3]The storage capacity of the level 1 array is equal to the capacity of the smallest mirrored hard disk in a Hardware RAID or the smallest mirrored partition in a Software RAID. Level 1 redundancy is the highest possible among all RAID types, with the array being able to operate with only a single disk present.
- Level 4
- Level 4 uses parity [4] concentrated on a single disk drive to protect data. Because the dedicated parity disk represents an inherent bottleneck on all write transactions to the RAID array, level 4 is seldom used without accompanying technologies such as write-back caching, or in specific circumstances where the system administrator is intentionally designing the software RAID device with this bottleneck in mind (such as an array that will have little to no write transactions once the array is populated with data). RAID level 4 is so rarely used that it is not available as an option in Anaconda. However, it could be created manually by the user if truly needed.The storage capacity of Hardware RAID level 4 is equal to the capacity of the smallest member partition multiplied by the number of partitions minus one. Performance of a RAID level 4 array will always be asymmetrical, meaning reads will outperform writes. This is because writes consume extra CPU and main memory bandwidth when generating parity, and then also consume extra bus bandwidth when writing the actual data to disks because you are writing not only the data, but also the parity. Reads need only read the data and not the parity unless the array is in a degraded state. As a result, reads generate less traffic to the drives and across the busses of the computer for the same amount of data transfer under normal operating conditions.
- Level 5
- This is the most common type of RAID. By distributing parity across all of an array's member disk drives, RAID level 5 eliminates the write bottleneck inherent in level 4. The only performance bottleneck is the parity calculation process itself. With modern CPUs and Software RAID, that is usually not a bottleneck at all since modern CPUs can generate parity very fast. However, if you have a sufficiently large number of member devices in a software RAID5 array such that the combined aggregate data transfer speed across all devices is high enough, then this bottleneck can start to come into play.As with level 4, level 5 has asymmetrical performance, with reads substantially outperforming writes. The storage capacity of RAID level 5 is calculated the same way as with level 4.
- Level 6
- This is a common level of RAID when data redundancy and preservation, and not performance, are the paramount concerns, but where the space inefficiency of level 1 is not acceptable. Level 6 uses a complex parity scheme to be able to recover from the loss of any two drives in the array. This complex parity scheme creates a significantly higher CPU burden on software RAID devices and also imposes an increased burden during write transactions. As such, level 6 is considerably more asymmetrical in performance than levels 4 and 5.The total capacity of a RAID level 6 array is calculated similarly to RAID level 5 and 4, except that you must subtract 2 devices (instead of 1) from the device count for the extra parity storage space.
- Level 10
- This RAID level attempts to combine the performance advantages of level 0 with the redundancy of level 1. It also helps to alleviate some of the space wasted in level 1 arrays with more than 2 devices. With level 10, it is possible to create a 3-drive array configured to store only 2 copies of each piece of data, which then allows the overall array size to be 1.5 times the size of the smallest devices instead of only equal to the smallest device (like it would be with a 3-device, level 1 array).The number of options available when creating level 10 arrays as well as the complexity of selecting the right options for a specific use case make it impractical to create during installation. It is possible to create one manually using the command line
mdadmtool. For more information on the options and their respective performance trade-offs, seeman md. - Linear RAID
- Linear RAID is a grouping of drives to create a larger virtual drive. In linear RAID, the chunks are allocated sequentially from one member drive, going to the next drive only when the first is completely filled. This grouping provides no performance benefit, as it is unlikely that any I/O operations split between member drives. Linear RAID also offers no redundancy and decreases reliability; if any one member drive fails, the entire array cannot be used. The capacity is the total of all member disks.
18.3. Linux RAID Subsystems
Linux Hardware RAID Controller Drivers
mdraid
mdraid subsystem was designed as a software RAID solution for Linux; it is also the preferred solution for software RAID under Linux. This subsystem uses its own metadata format, generally referred to as native mdraid metadata.
mdraid also supports other metadata formats, known as external metadata. Red Hat Enterprise Linux 7 uses mdraid with external metadata to access ISW / IMSM (Intel firmware RAID) sets. mdraid sets are configured and controlled through the mdadm utility.
dmraid
dmraid tool is used on a wide variety of firmware RAID implementations. dmraid also supports Intel firmware RAID, although Red Hat Enterprise Linux 7 uses mdraid to access Intel firmware RAID sets.
Note
dmraid has been deprecated since the Red Hat Enterprise Linux 7.5 release. It will be removed in a future major release of Red Hat Enterprise Linux. For more information, see Deprecated Functionality in the Red Hat Enterprise Linux 7.5 Release Notes.
18.4. RAID Support in the Anaconda Installer
mdraid, and can recognize existing mdraid sets.
initrd which RAID set(s) to activate before searching for the root file system.
18.5. Converting Root Disk to RAID1 after Installation
- Copy the contents of the PowerPC Reference Platform (PReP) boot partition from
/dev/sda1to/dev/sdb1:dd if=/dev/sda1 of=/dev/sdb1
# dd if=/dev/sda1 of=/dev/sdb1Copy to Clipboard Copied! Toggle word wrap Toggle overflow - Update the Prep and boot flag on the first partition on both disks:
parted /dev/sda set 1 prep on parted /dev/sda set 1 boot on parted /dev/sdb set 1 prep on parted /dev/sdb set 1 boot on
$ parted /dev/sda set 1 prep on $ parted /dev/sda set 1 boot on $ parted /dev/sdb set 1 prep on $ parted /dev/sdb set 1 boot onCopy to Clipboard Copied! Toggle word wrap Toggle overflow
Note
grub2-install /dev/sda command does not work on a PowerPC machine and returns an error, but the system boots as expected.
18.6. Configuring RAID Sets
mdadm
mdadm command-line tool is used to manage software RAID in Linux, i.e. mdraid. For information on the different mdadm modes and options, see man mdadm. The man page also contains useful examples for common operations like creating, monitoring, and assembling software RAID arrays.
dmraid
dmraid is used to manage device-mapper RAID sets. The dmraid tool finds ATARAID devices using multiple metadata format handlers, each supporting various formats. For a complete list of supported formats, run dmraid -l.
dmraid tool cannot configure RAID sets after creation. For more information about using dmraid, see man dmraid.
18.7. Creating Advanced RAID Devices
/boot or root file system arrays on a complex RAID device; in such cases, you may need to use array options that are not supported by Anaconda. To work around this, perform the following procedure:
Procedure 18.1. Creating Advanced RAID Devices
- Insert the install disk.
- During the initial boot up, select instead of or . When the system fully boots into Rescue mode, the user will be presented with a command line terminal.
- From this terminal, use
partedto create RAID partitions on the target hard drives. Then, usemdadmto manually create raid arrays from those partitions using any and all settings and options available. For more information on how to do these, see Chapter 13, Partitions,man parted, andman mdadm. - Once the arrays are created, you can optionally create file systems on the arrays as well.
- Reboot the computer and this time select or to install as normal. As Anaconda searches the disks in the system, it will find the pre-existing RAID devices.
- When asked about how to use the disks in the system, select and click . In the device listing, the pre-existing MD RAID devices will be listed.
- Select a RAID device, click and configure its mount point and (optionally) the type of file system it should use (if you did not create one earlier) then click . Anaconda will perform the install to this pre-existing RAID device, preserving the custom options you selected when you created it in Rescue Mode.
Note
man pages. Both the man mdadm and man md contain useful information for creating custom RAID arrays, and may be needed throughout the workaround. As such, it can be helpful to either have access to a machine with these man pages present, or to print them out prior to booting into Rescue Mode and creating your custom arrays.
Chapter 19. Using the mount Command
mount or umount command respectively. This chapter describes the basic use of these commands, as well as some advanced topics, such as moving a mount point or creating shared subtrees.
19.1. Listing Currently Mounted File Systems
mount
$ mountdevice on directory type type (options)
findmnt utility, which allows users to list mounted file systems in a tree-like form, is also available from Red Hat Enterprise Linux 6.1. To display all currently attached file systems, run the findmnt command with no additional arguments:
findmnt
$ findmnt19.1.1. Specifying the File System Type
mount command includes various virtual file systems such as sysfs and tmpfs. To display only the devices with a certain file system type, provide the -t option:
mount -t type
$ mount -t typefindmnt command:
findmnt -t type
$ findmnt -t typeext4 File Systems”.
Example 19.1. Listing Currently Mounted ext4 File Systems
/ and /boot partitions are formatted to use ext4. To display only the mount points that use this file system, use the following command:
mount -t ext4 /dev/sda2 on / type ext4 (rw) /dev/sda1 on /boot type ext4 (rw)
$ mount -t ext4
/dev/sda2 on / type ext4 (rw)
/dev/sda1 on /boot type ext4 (rw)
findmnt command, type:
findmnt -t ext4 TARGET SOURCE FSTYPE OPTIONS / /dev/sda2 ext4 rw,realtime,seclabel,barrier=1,data=ordered /boot /dev/sda1 ext4 rw,realtime,seclabel,barrier=1,data=ordered
$ findmnt -t ext4
TARGET SOURCE FSTYPE OPTIONS
/ /dev/sda2 ext4 rw,realtime,seclabel,barrier=1,data=ordered
/boot /dev/sda1 ext4 rw,realtime,seclabel,barrier=1,data=ordered
19.2. Mounting a File System
mount command in the following form:
mount [option…] device directory
$ mount [option…] device directory- a full path to a block device: for example,
/dev/sda3 - a universally unique identifier (UUID): for example,
UUID=34795a28-ca6d-4fd8-a347-73671d0c19cb - a volume label: for example,
LABEL=home
Important
findmnt utility with the directory as its argument and verify the exit code:
findmnt directory; echo $?
findmnt directory; echo $?1.
mount command without all required information, that is without the device name, the target directory, or the file system type, the mount reads the contents of the /etc/fstab file to check if the given file system is listed. The /etc/fstab file contains a list of device names and the directories in which the selected file systems are set to be mounted as well as the file system type and mount options. Therefore, when mounting a file system that is specified in /etc/fstab, you can choose one of the following options:
mount [option…] directory mount [option…] device
mount [option…] directory
mount [option…] deviceroot (see Section 19.2.2, “Specifying the Mount Options”).
Note
blkid command in the following form:
blkid device
blkid device/dev/sda3:
blkid /dev/sda3 /dev/sda3: LABEL="home" UUID="34795a28-ca6d-4fd8-a347-73671d0c19cb" TYPE="ext3"
# blkid /dev/sda3
/dev/sda3: LABEL="home" UUID="34795a28-ca6d-4fd8-a347-73671d0c19cb" TYPE="ext3"
19.2.1. Specifying the File System Type
mount detects the file system automatically. However, there are certain file systems, such as NFS (Network File System) or CIFS (Common Internet File System), that are not recognized, and need to be specified manually. To specify the file system type, use the mount command in the following form:
mount -t type device directory
$ mount -t type device directorymount command. For a complete list of all available file system types, see the section called “Manual Page Documentation”.
| Type | Description |
|---|---|
ext2 | The ext2 file system. |
ext3 | The ext3 file system. |
ext4 | The ext4 file system. |
btrfs | The btrfs file system. |
xfs | The xfs file system. |
iso9660 | The ISO 9660 file system. It is commonly used by optical media, typically CDs. |
nfs | The NFS file system. It is commonly used to access files over the network. |
nfs4 | The NFSv4 file system. It is commonly used to access files over the network. |
udf | The UDF file system. It is commonly used by optical media, typically DVDs. |
vfat | The FAT file system. It is commonly used on machines that are running the Windows operating system, and on certain digital media such as USB flash drives or floppy disks. |
Example 19.2. Mounting a USB Flash Drive
/dev/sdc1 device and that the /media/flashdisk/ directory exists, mount it to this directory by typing the following at a shell prompt as root:
mount -t vfat /dev/sdc1 /media/flashdisk
~]# mount -t vfat /dev/sdc1 /media/flashdisk19.2.2. Specifying the Mount Options
mount -o options device directory
mount -o options device directorymount interprets incorrectly the values following spaces as additional parameters.
| Option | Description |
|---|---|
async | Allows the asynchronous input/output operations on the file system. |
auto | Allows the file system to be mounted automatically using the mount -a command. |
defaults | Provides an alias for async,auto,dev,exec,nouser,rw,suid. |
exec | Allows the execution of binary files on the particular file system. |
loop | Mounts an image as a loop device. |
noauto | Default behavior disallows the automatic mount of the file system using the mount -a command. |
noexec | Disallows the execution of binary files on the particular file system. |
nouser | Disallows an ordinary user (that is, other than root) to mount and unmount the file system. |
remount | Remounts the file system in case it is already mounted. |
ro | Mounts the file system for reading only. |
rw | Mounts the file system for both reading and writing. |
user | Allows an ordinary user (that is, other than root) to mount and unmount the file system. |
Example 19.3. Mounting an ISO Image
/media/cdrom/ directory exists, mount the image to this directory by running the following command:
mount -o ro,loop Fedora-14-x86_64-Live-Desktop.iso /media/cdrom
# mount -o ro,loop Fedora-14-x86_64-Live-Desktop.iso /media/cdrom19.2.3. Sharing Mounts
mount command implements the --bind option that provides a means for duplicating certain mounts. Its usage is as follows:
mount --bind old_directory new_directory
$ mount --bind old_directory new_directorymount --rbind old_directory new_directory
$ mount --rbind old_directory new_directory- Shared Mount
- A shared mount allows the creation of an exact replica of a given mount point. When a mount point is marked as a shared mount, any mount within the original mount point is reflected in it, and vice versa. To change the type of a mount point to a shared mount, type the following at a shell prompt:
mount --make-shared mount_point
$ mount --make-shared mount_pointCopy to Clipboard Copied! Toggle word wrap Toggle overflow Alternatively, to change the mount type for the selected mount point and all mount points under it:mount --make-rshared mount_point
$ mount --make-rshared mount_pointCopy to Clipboard Copied! Toggle word wrap Toggle overflow See Example 19.4, “Creating a Shared Mount Point” for an example usage. - Slave Mount
- A slave mount allows the creation of a limited duplicate of a given mount point. When a mount point is marked as a slave mount, any mount within the original mount point is reflected in it, but no mount within a slave mount is reflected in its original. To change the type of a mount point to a slave mount, type the following at a shell prompt:
mount --make-slave mount_point
mount --make-slave mount_pointCopy to Clipboard Copied! Toggle word wrap Toggle overflow Alternatively, it is possible to change the mount type for the selected mount point and all mount points under it by typing:mount --make-rslave mount_point
mount --make-rslave mount_pointCopy to Clipboard Copied! Toggle word wrap Toggle overflow See Example 19.5, “Creating a Slave Mount Point” for an example usage.Example 19.5. Creating a Slave Mount Point
This example shows how to get the content of the/media/directory to appear in/mnt/as well, but without any mounts in the/mnt/directory to be reflected in/media/. Asroot, first mark the/media/directory as shared:mount --bind /media /media mount --make-shared /media
~]# mount --bind /media /media ~]# mount --make-shared /mediaCopy to Clipboard Copied! Toggle word wrap Toggle overflow Then create its duplicate in/mnt/, but mark it as "slave":mount --bind /media /mnt mount --make-slave /mnt
~]# mount --bind /media /mnt ~]# mount --make-slave /mntCopy to Clipboard Copied! Toggle word wrap Toggle overflow Now verify that a mount within/media/also appears in/mnt/. For example, if the CD-ROM drive contains non-empty media and the/media/cdrom/directory exists, run the following commands:Copy to Clipboard Copied! Toggle word wrap Toggle overflow Also verify that file systems mounted in the/mnt/directory are not reflected in/media/. For instance, if a non-empty USB flash drive that uses the/dev/sdc1device is plugged in and the/mnt/flashdisk/directory is present, type:mount /dev/sdc1 /mnt/flashdisk ls /media/flashdisk ls /mnt/flashdisk en-US publican.cfg
~]# mount /dev/sdc1 /mnt/flashdisk ~]# ls /media/flashdisk ~]# ls /mnt/flashdisk en-US publican.cfgCopy to Clipboard Copied! Toggle word wrap Toggle overflow - Private Mount
- A private mount is the default type of mount, and unlike a shared or slave mount, it does not receive or forward any propagation events. To explicitly mark a mount point as a private mount, type the following at a shell prompt:
mount --make-private mount_point
mount --make-private mount_pointCopy to Clipboard Copied! Toggle word wrap Toggle overflow Alternatively, it is possible to change the mount type for the selected mount point and all mount points under it:mount --make-rprivate mount_point
mount --make-rprivate mount_pointCopy to Clipboard Copied! Toggle word wrap Toggle overflow See Example 19.6, “Creating a Private Mount Point” for an example usage.Example 19.6. Creating a Private Mount Point
Taking into account the scenario in Example 19.4, “Creating a Shared Mount Point”, assume that a shared mount point has been previously created by using the following commands asroot:mount --bind /media /media mount --make-shared /media mount --bind /media /mnt
~]# mount --bind /media /media ~]# mount --make-shared /media ~]# mount --bind /media /mntCopy to Clipboard Copied! Toggle word wrap Toggle overflow To mark the/mnt/directory as private, type:mount --make-private /mnt
~]# mount --make-private /mntCopy to Clipboard Copied! Toggle word wrap Toggle overflow It is now possible to verify that none of the mounts within/media/appears in/mnt/. For example, if the CD-ROM drives contains non-empty media and the/media/cdrom/directory exists, run the following commands:Copy to Clipboard Copied! Toggle word wrap Toggle overflow It is also possible to verify that file systems mounted in the/mnt/directory are not reflected in/media/. For instance, if a non-empty USB flash drive that uses the/dev/sdc1device is plugged in and the/mnt/flashdisk/directory is present, type:mount /dev/sdc1 /mnt/flashdisk ls /media/flashdisk ls /mnt/flashdisk en-US publican.cfg
~]# mount /dev/sdc1 /mnt/flashdisk ~]# ls /media/flashdisk ~]# ls /mnt/flashdisk en-US publican.cfgCopy to Clipboard Copied! Toggle word wrap Toggle overflow - Unbindable Mount
- In order to prevent a given mount point from being duplicated whatsoever, an unbindable mount is used. To change the type of a mount point to an unbindable mount, type the following at a shell prompt:
mount --make-unbindable mount_point
mount --make-unbindable mount_pointCopy to Clipboard Copied! Toggle word wrap Toggle overflow Alternatively, it is possible to change the mount type for the selected mount point and all mount points under it:mount --make-runbindable mount_point
mount --make-runbindable mount_pointCopy to Clipboard Copied! Toggle word wrap Toggle overflow See Example 19.7, “Creating an Unbindable Mount Point” for an example usage.Example 19.7. Creating an Unbindable Mount Point
To prevent the/media/directory from being shared, asroot:mount --bind /media /media mount --make-unbindable /media
# mount --bind /media /media # mount --make-unbindable /mediaCopy to Clipboard Copied! Toggle word wrap Toggle overflow This way, any subsequent attempt to make a duplicate of this mount fails with an error:Copy to Clipboard Copied! Toggle word wrap Toggle overflow
19.2.4. Moving a Mount Point
mount --move old_directory new_directory
# mount --move old_directory new_directoryExample 19.8. Moving an Existing NFS Mount Point
/mnt/userdirs/. As root, move this mount point to /home by using the following command:
mount --move /mnt/userdirs /home
# mount --move /mnt/userdirs /homels /mnt/userdirs ls /home jill joe
# ls /mnt/userdirs
# ls /home
jill joe
19.2.5. Setting Read-only Permissions for root
19.2.5.1. Configuring root to Mount with Read-only Permissions on Boot
- In the
/etc/sysconfig/readonly-rootfile, changeREADONLYtoyes:# Set to 'yes' to mount the file systems as read-only. READONLY=yes [output truncated]
# Set to 'yes' to mount the file systems as read-only. READONLY=yes [output truncated]Copy to Clipboard Copied! Toggle word wrap Toggle overflow - Change
defaultstoroin the root entry (/) in the/etc/fstabfile:/dev/mapper/luks-c376919e... / ext4 ro,x-systemd.device-timeout=0 1 1
/dev/mapper/luks-c376919e... / ext4 ro,x-systemd.device-timeout=0 1 1Copy to Clipboard Copied! Toggle word wrap Toggle overflow - Add
roto theGRUB_CMDLINE_LINUXdirective in the/etc/default/grubfile and ensure that it does not containrw:GRUB_CMDLINE_LINUX="crashkernel=auto rd.lvm.lv=rhel/root rd.lvm.lv=rhel/swap rhgb quiet ro"
GRUB_CMDLINE_LINUX="crashkernel=auto rd.lvm.lv=rhel/root rd.lvm.lv=rhel/swap rhgb quiet ro"Copy to Clipboard Copied! Toggle word wrap Toggle overflow - Recreate the GRUB2 configuration file:
grub2-mkconfig -o /boot/grub2/grub.cfg
# grub2-mkconfig -o /boot/grub2/grub.cfgCopy to Clipboard Copied! Toggle word wrap Toggle overflow - If you need to add files and directories to be mounted with write permissions in the
tmpfsfile system, create a text file in the/etc/rwtab.d/directory and put the configuration there. For example, to mount/etc/example/filewith write permissions, add this line to the/etc/rwtab.d/examplefile:files /etc/example/file
files /etc/example/fileCopy to Clipboard Copied! Toggle word wrap Toggle overflow Important
Changes made to files and directories intmpfsdo not persist across boots.See Section 19.2.5.3, “Files and Directories That Retain Write Permissions” for more information on this step. - Reboot the system.
19.2.5.2. Remounting root Instantly
/) was mounted with read-only permissions on system boot, you can remount it with write permissions:
mount -o remount,rw /
# mount -o remount,rw // is incorrectly mounted with read-only permissions.
/ with read-only permissions again, run:
mount -o remount,ro /
# mount -o remount,ro /Note
/ with read-only permissions. A better approach is to retain write permissions for certain files and directories by copying them into RAM, as described in Section 19.2.5.1, “Configuring root to Mount with Read-only Permissions on Boot”.
19.2.5.3. Files and Directories That Retain Write Permissions
tmpfs temporary file system. The default set of such files and directories is read from the /etc/rwtab file, which contains:
/etc/rwtab file follow this format:
how the file or directory is copied to tmpfs path to the file or directory
how the file or directory is copied to tmpfs path to the file or directorytmpfs in the following three ways:
empty path: An empty path is copied totmpfs. Example:empty /tmpdirs path: A directory tree is copied totmpfs, empty. Example:dirs /var/runfiles path: A file or a directory tree is copied totmpfsintact. Example:files /etc/resolv.conf
/etc/rwtab.d/.
19.3. Unmounting a File System
umount command:
umount directory umount device
$ umount directory
$ umount deviceroot, the correct permissions must be available to unmount the file system. For more information, see Section 19.2.2, “Specifying the Mount Options”. See Example 19.9, “Unmounting a CD” for an example usage.
Important
umount command fails with an error. To determine which processes are accessing the file system, use the fuser command in the following form:
fuser -m directory
$ fuser -m directory/media/cdrom/ directory:
fuser -m /media/cdrom /media/cdrom: 1793 2013 2022 2435 10532c 10672c
$ fuser -m /media/cdrom
/media/cdrom: 1793 2013 2022 2435 10532c 10672c
Example 19.9. Unmounting a CD
/media/cdrom/ directory, use the following command:
umount /media/cdrom
$ umount /media/cdrom19.4. mount Command References
Manual Page Documentation
man 8 mount: The manual page for themountcommand that provides a full documentation on its usage.man 8 umount: The manual page for theumountcommand that provides a full documentation on its usage.man 8 findmnt: The manual page for thefindmntcommand that provides a full documentation on its usage.man 5 fstab: The manual page providing a thorough description of the/etc/fstabfile format.
Useful Websites
- Shared subtrees — An LWN article covering the concept of shared subtrees.
Chapter 20. The volume_key Function
volume_key. libvolume_key is a library for manipulating storage volume encryption keys and storing them separately from volumes. volume_key is an associated command line tool used to extract keys and passphrases in order to restore access to an encrypted hard drive.
volume_key to back up the encryption keys before handing over the computer to the end user.
volume_key only supports the LUKS volume encryption format.
Note
volume_key is not included in a standard install of Red Hat Enterprise Linux 7 server. For information on installing it, refer to http://fedoraproject.org/wiki/Disk_encryption_key_escrow_use_cases.
20.1. volume_key Commands
volume_key is:
volume_key [OPTION]... OPERAND
volume_key [OPTION]... OPERANDvolume_key are determined by specifying one of the following options:
--save- This command expects the operand volume [packet]. If a packet is provided then
volume_keywill extract the keys and passphrases from it. If packet is not provided, thenvolume_keywill extract the keys and passphrases from the volume, prompting the user where necessary. These keys and passphrases will then be stored in one or more output packets. --restore- This command expects the operands volume packet. It then opens the volume and uses the keys and passphrases in the packet to make the volume accessible again, prompting the user where necessary, such as allowing the user to enter a new passphrase, for example.
--setup-volume- This command expects the operands volume packet name. It then opens the volume and uses the keys and passphrases in the packet to set up the volume for use of the decrypted data as name.Name is the name of a dm-crypt volume. This operation makes the decrypted volume available as
/dev/mapper/name.This operation does not permanently alter the volume by adding a new passphrase, for example. The user can access and modify the decrypted volume, modifying volume in the process. --reencrypt,--secrets, and--dump- These three commands perform similar functions with varying output methods. They each require the operand packet, and each opens the packet, decrypting it where necessary.
--reencryptthen stores the information in one or more new output packets.--secretsoutputs the keys and passphrases contained in the packet.--dumpoutputs the content of the packet, though the keys and passphrases are not output by default. This can be changed by appending--with-secretsto the command. It is also possible to only dump the unencrypted parts of the packet, if any, by using the--unencryptedcommand. This does not require any passphrase or private key access.
-o,--output packet- This command writes the default key or passphrase to the packet. The default key or passphrase depends on the volume format. Ensure it is one that is unlikely to expire, and will allow
--restoreto restore access to the volume. --output-format format- This command uses the specified format for all output packets. Currently, format can be one of the following:
asymmetric: uses CMS to encrypt the whole packet, and requires a certificateasymmetric_wrap_secret_only: wraps only the secret, or keys and passphrases, and requires a certificatepassphrase: uses GPG to encrypt the whole packet, and requires a passphrase
--create-random-passphrase packet- This command generates a random alphanumeric passphrase, adds it to the volume (without affecting other passphrases), and then stores this random passphrase into the packet.
20.2. Using volume_key as an Individual User
volume_key can be used to save encryption keys by using the following procedure.
Note
/path/to/volume is a LUKS device, not the plaintext device contained within. blkid -s type /path/to/volume should report type="crypto_LUKS".
Procedure 20.1. Using volume_key Stand-alone
- Run:A prompt will then appear requiring an escrow packet passphrase to protect the key.
volume_key --save /path/to/volume -o escrow-packet
volume_key --save /path/to/volume -o escrow-packetCopy to Clipboard Copied! Toggle word wrap Toggle overflow - Save the generated
escrow-packetfile, ensuring that the passphrase is not forgotten.
Procedure 20.2. Restore Access to Data with Escrow Packet
- Boot the system in an environment where
volume_keycan be run and the escrow packet is available (a rescue mode, for example). - Run:A prompt will appear for the escrow packet passphrase that was used when creating the escrow packet, and for the new passphrase for the volume.
volume_key --restore /path/to/volume escrow-packet
volume_key --restore /path/to/volume escrow-packetCopy to Clipboard Copied! Toggle word wrap Toggle overflow - Mount the volume using the chosen passphrase.
cryptsetup luksKillSlot.
20.3. Using volume_key in a Larger Organization
volume_key can use asymmetric cryptography to minimize the number of people who know the password required to access encrypted data on any computer.
20.3.1. Preparation for Saving Encryption Keys
Procedure 20.3. Preparation
- Create an X509 certificate/private pair.
- Designate trusted users who are trusted not to compromise the private key. These users will be able to decrypt the escrow packets.
- Choose which systems will be used to decrypt the escrow packets. On these systems, set up an NSS database that contains the private key.If the private key was not created in an NSS database, follow these steps:
- Store the certificate and private key in an
PKCS#12file. - Run:
certutil -d /the/nss/directory -N
certutil -d /the/nss/directory -NCopy to Clipboard Copied! Toggle word wrap Toggle overflow At this point it is possible to choose an NSS database password. Each NSS database can have a different password so the designated users do not need to share a single password if a separate NSS database is used by each user. - Run:
pk12util -d /the/nss/directory -i the-pkcs12-file
pk12util -d /the/nss/directory -i the-pkcs12-fileCopy to Clipboard Copied! Toggle word wrap Toggle overflow
- Distribute the certificate to anyone installing systems or saving keys on existing systems.
- For saved private keys, prepare storage that allows them to be looked up by machine and volume. For example, this can be a simple directory with one subdirectory per machine, or a database used for other system management tasks as well.
20.3.2. Saving Encryption Keys
Note
/path/to/volume is a LUKS device, not the plaintext device contained within; blkid -s type /path/to/volume should report type="crypto_LUKS".
Procedure 20.4. Saving Encryption Keys
- Run:
volume_key --save /path/to/volume -c /path/to/cert escrow-packet
volume_key --save /path/to/volume -c /path/to/cert escrow-packetCopy to Clipboard Copied! Toggle word wrap Toggle overflow - Save the generated
escrow-packetfile in the prepared storage, associating it with the system and the volume.
20.3.3. Restoring Access to a Volume
Procedure 20.5. Restoring Access to a Volume
- Get the escrow packet for the volume from the packet storage and send it to one of the designated users for decryption.
- The designated user runs:
volume_key --reencrypt -d /the/nss/directory escrow-packet-in -o escrow-packet-out
volume_key --reencrypt -d /the/nss/directory escrow-packet-in -o escrow-packet-outCopy to Clipboard Copied! Toggle word wrap Toggle overflow After providing the NSS database password, the designated user chooses a passphrase for encryptingescrow-packet-out. This passphrase can be different every time and only protects the encryption keys while they are moved from the designated user to the target system. - Obtain the
escrow-packet-outfile and the passphrase from the designated user. - Boot the target system in an environment that can run
volume_keyand have theescrow-packet-outfile available, such as in a rescue mode. - Run:
volume_key --restore /path/to/volume escrow-packet-out
volume_key --restore /path/to/volume escrow-packet-outCopy to Clipboard Copied! Toggle word wrap Toggle overflow A prompt will appear for the packet passphrase chosen by the designated user, and for a new passphrase for the volume. - Mount the volume using the chosen volume passphrase.
cryptsetup luksKillSlot, for example, to free up the passphrase slot in the LUKS header of the encrypted volume. This is done with the command cryptsetup luksKillSlot device key-slot. For more information and examples see cryptsetup --help.
20.3.4. Setting up Emergency Passphrases
volume_key can work with passphrases as well as encryption keys.
volume_key --save /path/to/volume -c /path/to/ert --create-random-passphrase passphrase-packet
volume_key --save /path/to/volume -c /path/to/ert --create-random-passphrase passphrase-packetpassphrase-packet. It is also possible to combine the --create-random-passphrase and -o options to generate both packets at the same time.
volume_key --secrets -d /your/nss/directory passphrase-packet
volume_key --secrets -d /your/nss/directory passphrase-packet20.4. volume_key References
volume_key can be found:
- in the readme file located at
/usr/share/doc/volume_key-*/README - on
volume_key's manpage usingman volume_key
Chapter 21. Solid-State Disk Deployment Guidelines
TRIM command for ATA, and WRITE SAME with UNMAP set, or UNMAP command for SCSI).
discard support is most useful when the following points are true:
- Free space is still available on the file system.
- Most logical blocks on the underlying storage device have already been written to.
UNMAP, see the section 4.7.3.4 of the SCSI Block Commands 3 T10 Specification.
Note
discard support. To determine if your solid-state device has discard support, check for /sys/block/sda/queue/discard_granularity, which is the size of internal allocation unit of device.
Deployment Considerations
TRIM mechanism:
- Non-deterministic
TRIM - Deterministic
TRIM(DRAT) - Deterministic Read Zero after
TRIM(RZAT)
TRIM mechanism can cause data leakage as the read command to the LBA after a TRIM returns different or same data. RZAT returns zero after the read command and Red Hat recommends this TRIM mechanism to avoid data leakage. It is affected only in SSD. Choose the disk which supports RZAT mechanism.
TRIM mechanism used depends on hardware implementation. To find the type of TRIM mechanism on ATA, use the hdparm command. See the following example to find the type of TRIM mechanism:
hdparm -I /dev/sda | grep TRIM Data Set Management TRIM supported (limit 8 block) Deterministic read data after TRIM
# hdparm -I /dev/sda | grep TRIM
Data Set Management TRIM supported (limit 8 block)
Deterministic read data after TRIM
man hdparm.
discard correctly. You can set discard in the raid456.conf file, or in the GRUB2 configuration. For instructions, see the following procedures.
Procedure 21.1. Setting discard in raid456.conf
devices_handle_discard_safely module parameter is set in the raid456 module. To enable discard in the raid456.conf file:
- Verify that your hardware supports discards:
cat /sys/block/disk-name/queue/discard_zeroes_data
# cat /sys/block/disk-name/queue/discard_zeroes_dataCopy to Clipboard Copied! Toggle word wrap Toggle overflow If the returned value is1, discards are supported. If the command returns0, the RAID code has to zero the disk out, which takes more time. - Create the
/etc/modprobe.d/raid456.conffile, and include the following line:options raid456 devices_handle_discard_safely=Y
options raid456 devices_handle_discard_safely=YCopy to Clipboard Copied! Toggle word wrap Toggle overflow - Use the
dracut -fcommand to rebuild the initial ramdisk (initrd). - Reboot the system for the changes to take effect.
Procedure 21.2. Setting discard in the GRUB2 Configuration
devices_handle_discard_safely module parameter is set in the raid456 module. To enable discard in the GRUB2 configuration:
- Verify that your hardware supports discards:
cat /sys/block/disk-name/queue/discard_zeroes_data
# cat /sys/block/disk-name/queue/discard_zeroes_dataCopy to Clipboard Copied! Toggle word wrap Toggle overflow If the returned value is1, discards are supported. If the command returns0, the RAID code has to zero the disk out, which takes more time. - Add the following line to the
/etc/default/grubfile:raid456.devices_handle_discard_safely=Y
raid456.devices_handle_discard_safely=YCopy to Clipboard Copied! Toggle word wrap Toggle overflow - The location of the GRUB2 configuration file is different on systems with the BIOS firmware and on systems with UEFI. Use one of the following commands to recreate the GRUB2 configuration file.
- On a system with the BIOS firmware, use:
grub2-mkconfig -o /boot/grub2/grub.cfg
# grub2-mkconfig -o /boot/grub2/grub.cfgCopy to Clipboard Copied! Toggle word wrap Toggle overflow - On a system with the UEFI firmware, use:
grub2-mkconfig -o /boot/efi/EFI/redhat/grub.cfg
# grub2-mkconfig -o /boot/efi/EFI/redhat/grub.cfgCopy to Clipboard Copied! Toggle word wrap Toggle overflow
- Reboot the system for the changes to take effect.
Note
discard option of the mount command. For example, to mount /dev/sda2 to /mnt with discard enabled, use:
mount -t ext4 -o discard /dev/sda2 /mnt
# mount -t ext4 -o discard /dev/sda2 /mntdiscard command to, primarily, avoid problems on devices which might not properly implement discard. The Linux swap code issues discard commands to discard-enabled devices, and there is no option to control this behavior.
Performance Tuning Considerations
Chapter 22. Write Barriers
fsync() is persistent throughout a power loss.
fsync() heavily or create and delete many small files will likely run much slower.
22.1. Importance of Write Barriers
- The file system sends the body of the transaction to the storage device.
- The file system sends a commit block.
- If the transaction and its corresponding commit block are written to disk, the file system assumes that the transaction will survive any power failure.
How Write Barriers Work
- The disk contains all the data.
- No re-ordering has occurred.
fsync() call also issues a storage cache flush. This guarantees that file data is persistent on disk even if power loss occurs shortly after fsync() returns.
22.2. Enabling and Disabling Write Barriers
Note
-o nobarrier option for mount. However, some devices do not support write barriers; such devices log an error message to /var/log/messages. For more information, see Table 22.1, “Write Barrier Error Messages per File System”.
| File System | Error Message |
|---|---|
| ext3/ext4 | JBD: barrier-based sync failed on device - disabling barriers |
| XFS | Filesystem device - Disabling barriers, trial barrier write failed |
| btrfs | btrfs: disabling barriers on dev device |
22.3. Write Barrier Considerations
Disabling Write Caches
hdparm -W0 /device/
# hdparm -W0 /device/Battery-Backed Write Caches
MegaCli64 tool to manage target drives. To show the state of all back-end drives for LSI Megaraid SAS, use:
MegaCli64 -LDGetProp -DskCache -LAll -aALL
# MegaCli64 -LDGetProp -DskCache -LAll -aALLMegaCli64 -LDSetProp -DisDskCache -Lall -aALL
# MegaCli64 -LDSetProp -DisDskCache -Lall -aALLNote
High-End Arrays
NFS
Chapter 23. Storage I/O Alignment and Size
parted, lvm, mkfs.*, and the like) to optimize data placement and access. If a legacy device does not export I/O alignment and size data, then storage management tools in Red Hat Enterprise Linux 7 will conservatively align I/O on a 4k (or larger power of 2) boundary. This will ensure that 4k-sector devices operate correctly even if they do not indicate any required/preferred I/O alignment and size.
23.1. Parameters for Storage Access
- physical_block_size
- Smallest internal unit on which the device can operate
- logical_block_size
- Used externally to address a location on the device
- alignment_offset
- The number of bytes that the beginning of the Linux block device (partition/MD/LVM device) is offset from the underlying physical alignment
- minimum_io_size
- The device’s preferred minimum unit for random I/O
- optimal_io_size
- The device’s preferred unit for streaming I/O
physical_block_size internally but expose a more granular 512-byte logical_block_size to Linux. This discrepancy introduces potential for misaligned I/O. To address this, the Red Hat Enterprise Linux 7 I/O stack will attempt to start all data areas on a naturally-aligned boundary (physical_block_size) by making sure it accounts for any alignment_offset if the beginning of the block device is offset from the underlying physical alignment.
minimum_io_size) and streaming I/O (optimal_io_size) of a device. For example, minimum_io_size and optimal_io_size may correspond to a RAID device's chunk size and stripe size respectively.
23.2. Userspace Access
logical_block_size boundary, and in multiples of the logical_block_size.
logical_block_size is 4K) it is now critical that applications perform direct I/O in multiples of the device's logical_block_size. This means that applications will fail with native 4k devices that perform 512-byte aligned I/O rather than 4k-aligned I/O.
sysfs and block device ioctl interfaces.
man libblkid. This man page is provided by the libblkid-devel package.
sysfs Interface
- /sys/block/
disk/alignment_offsetor/sys/block/disk/partition/alignment_offsetNote
The file location depends on whether the disk is a physical disk (be that a local disk, local RAID, or a multipath LUN) or a virtual disk. The first file location is applicable to physical disks while the second file location is applicable to virtual disks. The reason for this is because virtio-blk will always report an alignment value for the partition. Physical disks may or may not report an alignment value. - /sys/block/
disk/queue/physical_block_size - /sys/block/
disk/queue/logical_block_size - /sys/block/
disk/queue/minimum_io_size - /sys/block/
disk/queue/optimal_io_size
sysfs attributes for "legacy" devices that do not provide I/O parameters information, for example:
Example 23.1. sysfs Interface
alignment_offset: 0 physical_block_size: 512 logical_block_size: 512 minimum_io_size: 512 optimal_io_size: 0
alignment_offset: 0
physical_block_size: 512
logical_block_size: 512
minimum_io_size: 512
optimal_io_size: 0Block Device ioctls
BLKALIGNOFF:alignment_offsetBLKPBSZGET:physical_block_sizeBLKSSZGET:logical_block_sizeBLKIOMIN:minimum_io_sizeBLKIOOPT:optimal_io_size
23.3. I/O Standards
ATA
IDENTIFY DEVICE command. ATA devices only report I/O parameters for physical_block_size, logical_block_size, and alignment_offset. The additional I/O hints are outside the scope of the ATA Command Set.
SCSI
BLOCK LIMITS VPD page) and READ CAPACITY(16) command to devices which claim compliance with SPC-3.
READ CAPACITY(16) command provides the block sizes and alignment offset:
LOGICAL BLOCK LENGTH IN BYTESis used to derive/sys/block/disk/queue/physical_block_sizeLOGICAL BLOCKS PER PHYSICAL BLOCK EXPONENTis used to derive/sys/block/disk/queue/logical_block_sizeLOWEST ALIGNED LOGICAL BLOCK ADDRESSis used to derive:/sys/block/disk/alignment_offset/sys/block/disk/partition/alignment_offset
BLOCK LIMITS VPD page (0xb0) provides the I/O hints. It also uses OPTIMAL TRANSFER LENGTH GRANULARITY and OPTIMAL TRANSFER LENGTH to derive:
/sys/block/disk/queue/minimum_io_size/sys/block/disk/queue/optimal_io_size
sg3_utils package provides the sg_inq utility, which can be used to access the BLOCK LIMITS VPD page. To do so, run:
sg_inq -p 0xb0 disk
# sg_inq -p 0xb0 disk23.4. Stacking I/O Parameters
- Only one layer in the I/O stack should adjust for a non-zero
alignment_offset; once a layer adjusts accordingly, it will export a device with analignment_offsetof zero. - A striped Device Mapper (DM) device created with LVM must export a
minimum_io_sizeandoptimal_io_sizerelative to the stripe count (number of disks) and user-provided chunk size.
logical_block_size of 4K. File systems layered on such a hybrid device assume that 4K will be written atomically, but in reality it will span 8 logical block addresses when issued to the 512-byte device. Using a 4K logical_block_size for the higher-level DM device increases potential for a partial write to the 512-byte device if there is a system crash.
23.5. Logical Volume Manager
alignment_offset associated with any device managed by LVM. This means logical volumes will be properly aligned (alignment_offset=0).
alignment_offset, but this behavior can be disabled by setting data_alignment_offset_detection to 0 in /etc/lvm/lvm.conf. Disabling this is not recommended.
minimum_io_size or optimal_io_size exposed in sysfs. LVM will use the minimum_io_size if optimal_io_size is undefined (i.e. 0).
data_alignment_detection to 0 in /etc/lvm/lvm.conf. Disabling this is not recommended.
23.6. Partition and File System Tools
util-linux-ng's libblkid and fdisk
libblkid library provided with the util-linux-ng package includes a programmatic API to access a device's I/O parameters. libblkid allows applications, especially those that use Direct I/O, to properly size their I/O requests. The fdisk utility from util-linux-ng uses libblkid to determine the I/O parameters of a device for optimal placement of all partitions. The fdisk utility will align all partitions on a 1MB boundary.
parted and libparted
libparted library from parted also uses the I/O parameters API of libblkid. Anaconda, the Red Hat Enterprise Linux 7 installer, uses libparted, which means that all partitions created by either the installer or parted will be properly aligned. For all partitions created on a device that does not appear to provide I/O parameters, the default alignment will be 1MB.
parted uses are as follows:
- Always use the reported
alignment_offsetas the offset for the start of the first primary partition. - If
optimal_io_sizeis defined (i.e. not0), align all partitions on anoptimal_io_sizeboundary. - If
optimal_io_sizeis undefined (i.e.0),alignment_offsetis0, andminimum_io_sizeis a power of 2, use a 1MB default alignment.This is the catch-all for "legacy" devices which don't appear to provide I/O hints. As such, by default all partitions will be aligned on a 1MB boundary.Note
Red Hat Enterprise Linux 7 cannot distinguish between devices that don't provide I/O hints and those that do so withalignment_offset=0andoptimal_io_size=0. Such a device might be a single SAS 4K device; as such, at worst 1MB of space is lost at the start of the disk.
File System Tools
mkfs.filesystem utilities have also been enhanced to consume a device's I/O parameters. These utilities will not allow a file system to be formatted to use a block size smaller than the logical_block_size of the underlying storage device.
mkfs.gfs2, all other mkfs.filesystem utilities also use the I/O hints to layout on-disk data structure and data areas relative to the minimum_io_size and optimal_io_size of the underlying storage device. This allows file systems to be optimally formatted for various RAID (striped) layouts.
Chapter 24. Setting up a Remote Diskless System
tftp-serverxinetddhcpsyslinuxdracut-networkNote
After installing thedracut-networkpackage, add the following line to/etc/dracut.conf:add_dracutmodules+=" nfs"
add_dracutmodules+=" nfs"Copy to Clipboard Copied! Toggle word wrap Toggle overflow
tftp service (provided by tftp-server) and a DHCP service (provided by dhcp). The tftp service is used to retrieve kernel image and initrd over the network via the PXE loader.
Note
/etc/sysconfig/nfs by adding the line:
RPCNFSDARGS="-V 4.2"
/var/lib/tftpboot/pxelinux.cfg/default, change root=nfs:server-ip:/exported/root/directory to root=nfs:server-ip:/exported/root/directory,vers=4.2.
Important
setcap and getcap). However, NFS does not currently support these so attempting to install or update any packages that use file capabilities will fail.
24.1. Configuring a tftp Service for Diskless Clients
Prerequisites
- Install the necessary packages. See Chapter 24, Setting up a Remote Diskless System
Procedure
tftp, perform the following steps:
Procedure 24.1. To Configure tftp
- Enable PXE booting over the network:
systemctl enable --now tftp
# systemctl enable --now tftpCopy to Clipboard Copied! Toggle word wrap Toggle overflow - The
tftproot directory (chroot) is located in/var/lib/tftpboot. Copy/usr/share/syslinux/pxelinux.0to/var/lib/tftpboot/:cp /usr/share/syslinux/pxelinux.0 /var/lib/tftpboot/
# cp /usr/share/syslinux/pxelinux.0 /var/lib/tftpboot/Copy to Clipboard Copied! Toggle word wrap Toggle overflow - Create a
pxelinux.cfgdirectory inside thetftproot directory:mkdir -p /var/lib/tftpboot/pxelinux.cfg/
# mkdir -p /var/lib/tftpboot/pxelinux.cfg/Copy to Clipboard Copied! Toggle word wrap Toggle overflow - Configure firewall rules to allow
tftptraffic.Astftpsupports TCP wrappers, you can configure host access totftpin the/etc/hosts.allowconfiguration file. For more information on configuring TCP wrappers and the/etc/hosts.allowconfiguration file, see the Red Hat Enterprise Linux 7 Security Guide. The hosts_access(5) also provides information about/etc/hosts.allow.
Next Steps
tftp for diskless clients, configure DHCP, NFS, and the exported file system accordingly. For instructions on configuring the DHCP, NFS, and the exported file system, see Section 24.2, “Configuring DHCP for Diskless Clients” and Section 24.3, “Configuring an Exported File System for Diskless Clients”.
24.2. Configuring DHCP for Diskless Clients
Prerequisites
- Install the necessary packages. See Chapter 24, Setting up a Remote Diskless System
- Configure the
tftpservice. See Section 24.1, “Configuring a tftp Service for Diskless Clients”.
Procedure
- After configuring a
tftpserver, you need to set up a DHCP service on the same host machine. For instructions on setting up a DHCP server, see the Configuring a DHCP Server. - Enable PXE booting on the DHCP server by adding the following configuration to
/etc/dhcp/dhcpd.conf:Copy to Clipboard Copied! Toggle word wrap Toggle overflow - Replace
server-ipwith the IP address of the host machine on which thetftpand DHCP services reside.
Note
Whenlibvirtvirtual machines are used as the diskless client,libvirtprovides the DHCP service and the stand alone DHCP server is not used. In this situation, network booting must be enabled with thebootp file='filename'option in thelibvirtnetwork configuration,virsh net-edit.
Next Steps
tftp and DHCP are configured, configure NFS and the exported file system. For instructions, see the Section 24.3, “Configuring an Exported File System for Diskless Clients”.
24.3. Configuring an Exported File System for Diskless Clients
Prerequisites
- Install the necessary packages. See Chapter 24, Setting up a Remote Diskless System
- Configure the
tftpservice. See Section 24.1, “Configuring a tftp Service for Diskless Clients”. - Configure DHCP. See Section 24.2, “Configuring DHCP for Diskless Clients”.
Procedure
- The root directory of the exported file system (used by diskless clients in the network) is shared via NFS. Configure the NFS service to export the root directory by adding it to
/etc/exports. For instructions on how to do so, see the Section 8.6.1, “The/etc/exportsConfiguration File”. - To accommodate completely diskless clients, the root directory should contain a complete Red Hat Enterprise Linux installation. You can either clone an existing installation or install a new base system:
- To synchronize with a running system, use the
rsyncutility:rsync -a -e ssh --exclude='/proc/*' --exclude='/sys/*' \ hostname.com:/exported-root-directory# rsync -a -e ssh --exclude='/proc/*' --exclude='/sys/*' \ hostname.com:/exported-root-directoryCopy to Clipboard Copied! Toggle word wrap Toggle overflow - Replace hostname.com with the hostname of the running system with which to synchronize via
rsync. - Replace exported-root-directory with the path to the exported file system.
- To install Red Hat Enterprise Linux to the exported location, use the
yumutility with the--installrootoption:yum install @Base kernel dracut-network nfs-utils \ --installroot=exported-root-directory --releasever=/# yum install @Base kernel dracut-network nfs-utils \ --installroot=exported-root-directory --releasever=/Copy to Clipboard Copied! Toggle word wrap Toggle overflow
Procedure 24.2. Configure File System
- Select the kernel that diskless clients should use (
vmlinuz-kernel-version) and copy it to thetftpboot directory:cp /boot/vmlinuz-kernel-version /var/lib/tftpboot/
# cp /boot/vmlinuz-kernel-version /var/lib/tftpboot/Copy to Clipboard Copied! Toggle word wrap Toggle overflow - Create the
initrd(that is,initramfs-kernel-version.img) with NFS support:dracut --add nfs initramfs-kernel-version.img kernel-version
# dracut --add nfs initramfs-kernel-version.img kernel-versionCopy to Clipboard Copied! Toggle word wrap Toggle overflow - Change the initrd's file permissions to 644 using the following command:
chmod 644 initramfs-kernel-version.img
# chmod 644 initramfs-kernel-version.imgCopy to Clipboard Copied! Toggle word wrap Toggle overflow Warning
If the initrd's file permissions are not changed, thepxelinux.0boot loader will fail with a "file not found" error. - Copy the resulting
initramfs-kernel-version.imginto thetftpboot directory as well. - Edit the default boot configuration to use the
initrdand kernel in the/var/lib/tftpboot/directory. This configuration should instruct the diskless client's root to mount the exported file system (/exported/root/directory) as read-write. Add the following configuration in the/var/lib/tftpboot/pxelinux.cfg/defaultfile:default rhel7 label rhel7 kernel vmlinuz-kernel-version append initrd=initramfs-kernel-version.img root=nfs:server-ip:/exported/root/directory rw
default rhel7 label rhel7 kernel vmlinuz-kernel-version append initrd=initramfs-kernel-version.img root=nfs:server-ip:/exported/root/directory rwCopy to Clipboard Copied! Toggle word wrap Toggle overflow Replaceserver-ipwith the IP address of the host machine on which thetftpand DHCP services reside.
Chapter 25. Online Storage Management
sysfs objects. Red Hat advises that the sysfs object names and directory structure are subject to change in major Red Hat Enterprise Linux releases. This is because the upstream Linux kernel does not provide a stable internal API. For guidelines on how to reference sysfs objects in a transportable way, refer to the document /usr/share/doc/kernel-doc-version/Documentation/sysfs-rules.txt in the kernel source tree for guidelines.
Warning
25.1. Target Setup
targetcli shell as a front end for viewing, editing, and saving the configuration of the Linux-IO Target without the need to manipulate the kernel target's configuration files directly. The targetcli tool is a command-line interface that allows an administrator to export local storage resources, which are backed by either files, volumes, local SCSI devices, or RAM disks, to remote systems. The targetcli tool has a tree-based layout, includes built-in tab completion, and provides full auto-complete support and inline documentation.
targetcli does not always match the kernel interface exactly because targetcli is simplified where possible.
Important
targetcli are persistent, start and enable the target service:
systemctl start target systemctl enable target
# systemctl start target
# systemctl enable target25.1.1. Installing and Running targetcli
targetcli, use:
yum install targetcli
# yum install targetclitarget service:
systemctl start target
# systemctl start targettarget to start at boot time:
systemctl enable target
# systemctl enable target3260 in the firewall and reload the firewall configuration:
firewall-cmd --permanent --add-port=3260/tcp Success firewall-cmd --reload Success
# firewall-cmd --permanent --add-port=3260/tcp
Success
# firewall-cmd --reload
Success
targetcli command, and then use the ls command for the layout of the tree interface:
Note
targetcli command from Bash, for example, targetcli iscsi/ create, does not work and does not return an error. Starting with Red Hat Enterprise Linux 7.1, an error status code is provided to make using targetcli with shell scripts more useful.
25.1.2. Creating a Backstore
Note
- FILEIO (Linux file-backed storage)
- FILEIO storage objects can support either
write_backorwrite_thruoperation. Thewrite_backenables the local file system cache. This improves performance but increases the risk of data loss. It is recommended to usewrite_back=falseto disablewrite_backin favor ofwrite_thru.To create a fileio storage object, run the command/backstores/fileio create file_name file_location file_size write_back=false. For example:/> /backstores/fileio create file1 /tmp/disk1.img 200M write_back=false Created fileio file1 with size 209715200
/> /backstores/fileio create file1 /tmp/disk1.img 200M write_back=false Created fileio file1 with size 209715200Copy to Clipboard Copied! Toggle word wrap Toggle overflow - BLOCK (Linux BLOCK devices)
- The block driver allows the use of any block device that appears in the
/sys/blockto be used with LIO. This includes physical devices (for example, HDDs, SSDs, CDs, DVDs) and logical devices (for example, software or hardware RAID volumes, or LVM volumes).Note
BLOCK backstores usually provide the best performance.To create a BLOCK backstore using any block device, use the following command:Copy to Clipboard Copied! Toggle word wrap Toggle overflow /> /backstores/block create name=block_backend dev=/dev/vdb Generating a wwn serial. Created block storage object block_backend using /dev/vdb.
/> /backstores/block create name=block_backend dev=/dev/vdb Generating a wwn serial. Created block storage object block_backend using /dev/vdb.Copy to Clipboard Copied! Toggle word wrap Toggle overflow Note
You can also create a BLOCK backstore on a logical volume. - PSCSI (Linux pass-through SCSI devices)
- Any storage object that supports direct pass-through of SCSI commands without SCSI emulation, and with an underlying SCSI device that appears with lsscsi in
/proc/scsi/scsi(such as a SAS hard drive) can be configured as a backstore. SCSI-3 and higher is supported with this subsystem.Warning
PSCSI should only be used by advanced users. Advanced SCSI commands such as for Aysmmetric Logical Unit Assignment (ALUAs) or Persistent Reservations (for example, those used by VMware ESX, and vSphere) are usually not implemented in the device firmware and can cause malfunctions or crashes. When in doubt, use BLOCK for production setups instead.To create a PSCSI backstore for a physical SCSI device, aTYPE_ROMdevice using/dev/sr0in this example, use:/> backstores/pscsi/ create name=pscsi_backend dev=/dev/sr0 Generating a wwn serial. Created pscsi storage object pscsi_backend using /dev/sr0
/> backstores/pscsi/ create name=pscsi_backend dev=/dev/sr0 Generating a wwn serial. Created pscsi storage object pscsi_backend using /dev/sr0Copy to Clipboard Copied! Toggle word wrap Toggle overflow - Memory Copy RAM disk (Linux RAMDISK_MCP)
- Memory Copy RAM disks (
ramdisk) provide RAM disks with full SCSI emulation and separate memory mappings using memory copy for initiators. This provides capability for multi-sessions and is particularly useful for fast, volatile mass storage for production purposes.To create a 1GB RAM disk backstore, use the following command:/> backstores/ramdisk/ create name=rd_backend size=1GB Generating a wwn serial. Created rd_mcp ramdisk rd_backend with size 1GB.
/> backstores/ramdisk/ create name=rd_backend size=1GB Generating a wwn serial. Created rd_mcp ramdisk rd_backend with size 1GB.Copy to Clipboard Copied! Toggle word wrap Toggle overflow
25.1.3. Creating an iSCSI Target
Procedure 25.1. Creating an iSCSI target
- Run
targetcli. - Move into the iSCSI configuration path:
/> iscsi/
/> iscsi/Copy to Clipboard Copied! Toggle word wrap Toggle overflow Note
Thecdcommand is also accepted to change directories, as well as simply listing the path to move into. - Create an iSCSI target using a default target name.
/iscsi> create Created target iqn.2003-01.org.linux-iscsi.hostname.x8664:sn.78b473f296ff Created TPG1
/iscsi> create Created target iqn.2003-01.org.linux-iscsi.hostname.x8664:sn.78b473f296ff Created TPG1Copy to Clipboard Copied! Toggle word wrap Toggle overflow Or create an iSCSI target using a specified name./iscsi > create iqn.2006-04.com.example:444 Created target iqn.2006-04.com.example:444 Created TPG1
/iscsi > create iqn.2006-04.com.example:444 Created target iqn.2006-04.com.example:444 Created TPG1Copy to Clipboard Copied! Toggle word wrap Toggle overflow - Verify that the newly created target is visible when targets are listed with
ls.Copy to Clipboard Copied! Toggle word wrap Toggle overflow
Note
25.1.4. Configuring an iSCSI Portal
Note
/iscsi/iqn-name/tpg1/portals delete ip_address=0.0.0.0 ip_port=3260 then create a new portal with the required information.
Procedure 25.2. Creating an iSCSI Portal
- Move into the TPG.
/iscsi> iqn.2006-04.example:444/tpg1/
/iscsi> iqn.2006-04.example:444/tpg1/Copy to Clipboard Copied! Toggle word wrap Toggle overflow - There are two ways to create a portal: create a default portal, or create a portal specifying what IP address to listen to.Creating a default portal uses the default iSCSI port 3260 and allows the target to listen on all IP addresses on that port.
/iscsi/iqn.20...mple:444/tpg1> portals/ create Using default IP port 3260 Binding to INADDR_Any (0.0.0.0) Created network portal 0.0.0.0:3260
/iscsi/iqn.20...mple:444/tpg1> portals/ create Using default IP port 3260 Binding to INADDR_Any (0.0.0.0) Created network portal 0.0.0.0:3260Copy to Clipboard Copied! Toggle word wrap Toggle overflow To create a portal specifying what IP address to listen to, use the following command./iscsi/iqn.20...mple:444/tpg1> portals/ create 192.168.122.137 Using default IP port 3260 Created network portal 192.168.122.137:3260
/iscsi/iqn.20...mple:444/tpg1> portals/ create 192.168.122.137 Using default IP port 3260 Created network portal 192.168.122.137:3260Copy to Clipboard Copied! Toggle word wrap Toggle overflow - Verify that the newly created portal is visible with the
lscommand.Copy to Clipboard Copied! Toggle word wrap Toggle overflow
25.1.5. Configuring LUNs
Procedure 25.3. Configuring LUNs
- Create LUNs of already created storage objects.
Copy to Clipboard Copied! Toggle word wrap Toggle overflow - Show the changes.
Copy to Clipboard Copied! Toggle word wrap Toggle overflow Note
Be aware that the default LUN name starts at 0, as opposed to 1 as was the case when usingtgtdin Red Hat Enterprise Linux 6. - Configure ACLs. For more information, see Section 25.1.6, “Configuring ACLs”.
Important
Procedure 25.4. Create a Read-only LUN
- To create a LUN with read-only permissions, first use the following command:
/> set global auto_add_mapped_luns=false Parameter auto_add_mapped_luns is now 'false'.
/> set global auto_add_mapped_luns=false Parameter auto_add_mapped_luns is now 'false'.Copy to Clipboard Copied! Toggle word wrap Toggle overflow This prevents the auto mapping of LUNs to existing ACLs allowing the manual mapping of LUNs. - Next, manually create the LUN with the command
iscsi/target_iqn_name/tpg1/acls/initiator_iqn_name/ create mapped_lun=next_sequential_LUN_number tpg_lun_or_backstore=backstore write_protect=1.Copy to Clipboard Copied! Toggle word wrap Toggle overflow The mapped_lun1 line now has (ro) at the end (unlike mapped_lun0's (rw)) stating that it is read-only. - Configure ACLs. For more information, see Section 25.1.6, “Configuring ACLs”.
25.1.6. Configuring ACLs
/etc/iscsi/initiatorname.iscsi.
Procedure 25.5. Configuring ACLs
- Move into the acls directory.
/iscsi/iqn.20...mple:444/tpg1> acls/
/iscsi/iqn.20...mple:444/tpg1> acls/Copy to Clipboard Copied! Toggle word wrap Toggle overflow - Create an ACL. Either use the initiator name found in
/etc/iscsi/initiatorname.iscsion the initiator, or if using a name that is easier to remember, refer to Section 25.2, “Creating an iSCSI Initiator” to ensure ACL matches the initiator. For example:Copy to Clipboard Copied! Toggle word wrap Toggle overflow Note
The given example's behavior depends on the setting used. In this case, the global settingauto_add_mapped_lunsis used. This automatically maps LUNs to any created ACL.You can set user-created ACLs within the TPG node on the target server:/iscsi/iqn.20...scsi:444/tpg1> set attribute generate_node_acls=1
/iscsi/iqn.20...scsi:444/tpg1> set attribute generate_node_acls=1Copy to Clipboard Copied! Toggle word wrap Toggle overflow - Show the changes.
Copy to Clipboard Copied! Toggle word wrap Toggle overflow
25.1.7. Configuring Fibre Channel over Ethernet (FCoE) Target
targetcli.
Important
fcoeadm -i displays configured FCoE interfaces.
Procedure 25.6. Configure FCoE target
- Setting up an FCoE target requires the installation of the
targetclipackage, along with its dependencies. Refer to Section 25.1, “Target Setup” for more information ontargetclibasics and set up. - Create an FCoE target instance on an FCoE interface.
/> tcm_fc/ create 00:11:22:33:44:55:66:77
/> tcm_fc/ create 00:11:22:33:44:55:66:77Copy to Clipboard Copied! Toggle word wrap Toggle overflow If FCoE interfaces are present on the system, tab-completing aftercreatewill list available interfaces. If not, ensurefcoeadm -ishows active interfaces. - Map a backstore to the target instance.
Example 25.1. Example of Mapping a Backstore to the Target Instance
/> tcm_fc/00:11:22:33:44:55:66:77
/> tcm_fc/00:11:22:33:44:55:66:77Copy to Clipboard Copied! Toggle word wrap Toggle overflow /> luns/ create /backstores/fileio/example2
/> luns/ create /backstores/fileio/example2Copy to Clipboard Copied! Toggle word wrap Toggle overflow - Allow access to the LUN from an FCoE initiator.
/> acls/ create 00:99:88:77:66:55:44:33
/> acls/ create 00:99:88:77:66:55:44:33Copy to Clipboard Copied! Toggle word wrap Toggle overflow The LUN should now be accessible to that initiator. - To make the changes persistent across reboots, use the
saveconfigcommand and typeyeswhen prompted. If this is not done the configuration will be lost after rebooting. - Exit
targetcliby typingexitor entering ctrl+D.
25.1.8. Removing Objects with targetcli
/> /backstores/backstore-type/backstore-name
/> /backstores/backstore-type/backstore-name/> /iscsi/iqn-name/tpg/acls/ delete iqn-name
/> /iscsi/iqn-name/tpg/acls/ delete iqn-name/> /iscsi delete iqn-name
/> /iscsi delete iqn-name25.1.9. targetcli References
targetcli, refer to the following resources:
man targetcli- The
targetcliman page. It includes an example walk through. - Screencast by Andy Grover
Note
This was uploaded on February 28, 2012. As such, the service name has changed fromtargetclitotarget.
25.2. Creating an iSCSI Initiator
iscsiadm command.
Procedure 25.7. Creating an iSCSI Initiator
- Install
iscsi-initiator-utils:yum install iscsi-initiator-utils -y
# yum install iscsi-initiator-utils -yCopy to Clipboard Copied! Toggle word wrap Toggle overflow - If the ACL was given a custom name in Section 25.1.6, “Configuring ACLs”, modify the
/etc/iscsi/initiatorname.iscsifile accordingly. For example:cat /etc/iscsi/initiatorname.iscsi InitiatorName=iqn.2006-04.com.example.node1 vi /etc/iscsi/initiatorname.iscsi
# cat /etc/iscsi/initiatorname.iscsi InitiatorName=iqn.2006-04.com.example.node1 # vi /etc/iscsi/initiatorname.iscsiCopy to Clipboard Copied! Toggle word wrap Toggle overflow - Discover the target:
iscsiadm -m discovery -t st -p target-ip-address 10.64.24.179:3260,1 iqn.2006-04.com.example:3260
# iscsiadm -m discovery -t st -p target-ip-address 10.64.24.179:3260,1 iqn.2006-04.com.example:3260Copy to Clipboard Copied! Toggle word wrap Toggle overflow - Log in to the target with the target IQN you discovered in step 3:
iscsiadm -m node -T iqn.2006-04.com.example:3260 -l Logging in to [iface: default, target: iqn.2006-04.com.example:3260, portal: 10.64.24.179,3260] (multiple) Login to [iface: default, target: iqn.2006-04.com.example:3260, portal: 10.64.24.179,3260] successful.
# iscsiadm -m node -T iqn.2006-04.com.example:3260 -l Logging in to [iface: default, target: iqn.2006-04.com.example:3260, portal: 10.64.24.179,3260] (multiple) Login to [iface: default, target: iqn.2006-04.com.example:3260, portal: 10.64.24.179,3260] successful.Copy to Clipboard Copied! Toggle word wrap Toggle overflow This procedure can be followed for any number of initators connected to the same LUN so long as their specific initiator names are added to the ACL as described in Section 25.1.6, “Configuring ACLs”. - Find the iSCSI disk name and create a file system on this iSCSI disk:
grep "Attached SCSI" /var/log/messages mkfs.ext4 /dev/disk_name
# grep "Attached SCSI" /var/log/messages # mkfs.ext4 /dev/disk_nameCopy to Clipboard Copied! Toggle word wrap Toggle overflow Replace disk_name with the iSCSI disk name displayed in/var/log/messages. - Mount the file system:
mkdir /mount/point mount /dev/disk_name /mount/point
# mkdir /mount/point # mount /dev/disk_name /mount/pointCopy to Clipboard Copied! Toggle word wrap Toggle overflow Replace /mount/point with the mount point of the partition. - Edit the
/etc/fstabto mount the file system automatically when the system boots:vim /etc/fstab /dev/disk_name /mount/point ext4 _netdev 0 0
# vim /etc/fstab /dev/disk_name /mount/point ext4 _netdev 0 0Copy to Clipboard Copied! Toggle word wrap Toggle overflow Replace disk_name with the iSCSI disk name. - Log off from the target:
iscsiadm -m node -T iqn.2006-04.com.example:3260 -u
# iscsiadm -m node -T iqn.2006-04.com.example:3260 -uCopy to Clipboard Copied! Toggle word wrap Toggle overflow
25.3. Setting up the Challenge-Handshake Authentication Protocol
Procedure 25.8. Setting up the CHAP for target
- Set attribute authentication:
/iscsi/iqn.20...mple:444/tpg1> set attribute authentication=1 Parameter authentication is now '1'.
/iscsi/iqn.20...mple:444/tpg1> set attribute authentication=1 Parameter authentication is now '1'.Copy to Clipboard Copied! Toggle word wrap Toggle overflow - Set userid and password:
Copy to Clipboard Copied! Toggle word wrap Toggle overflow
Procedure 25.9. Setting up the CHAP for initiator
- Edit the
iscsid.conffile:- Enable the CHAP authentication in the
iscsid.conffile:vi /etc/iscsi/iscsid.conf node.session.auth.authmethod = CHAP
# vi /etc/iscsi/iscsid.conf node.session.auth.authmethod = CHAPCopy to Clipboard Copied! Toggle word wrap Toggle overflow By default, thenode.session.auth.authmethodoption is set toNone. - Add target user name and password in the
iscsid.conffile:node.session.auth.username = redhat node.session.auth.password = redhat_passwd
node.session.auth.username = redhat node.session.auth.password = redhat_passwdCopy to Clipboard Copied! Toggle word wrap Toggle overflow
- Restart the
iscsidservice:systemctl restart iscsid.service
# systemctl restart iscsid.serviceCopy to Clipboard Copied! Toggle word wrap Toggle overflow
targetcli and iscsiadm man pages.
25.4. Fibre Channel
25.4.1. Fibre Channel API
/sys/class/ directories that contain files used to provide the userspace API. In each item, host numbers are designated by H, bus numbers are B, targets are T, logical unit numbers (LUNs) are L, and remote port numbers are R.
Important
- Transport:
/sys/class/fc_transport/targetH:B:T/ port_id— 24-bit port ID/addressnode_name— 64-bit node nameport_name— 64-bit port name
- Remote Port:
/sys/class/fc_remote_ports/rport-H:B-R/ port_idnode_nameport_namedev_loss_tmo: controls when the scsi device gets removed from the system. Afterdev_loss_tmotriggers, the scsi device is removed.Inmultipath.conf, you can setdev_loss_tmotoinfinity, which sets its value to 2,147,483,647 seconds, or 68 years, and is the maximumdev_loss_tmovalue.In Red Hat Enterprise Linux 7, if you do not set thefast_io_fail_tmooption,dev_loss_tmois capped to 600 seconds. By default,fast_io_fail_tmois set to 5 seconds in Red Hat Enterprise Linux 7 if themultipathdservice is running; otherwise, it is set tooff.fast_io_fail_tmo: specifies the number of seconds to wait before it marks a link as "bad". Once a link is marked bad, existing running I/O or any new I/O on its corresponding path fails.If I/O is in a blocked queue, it will not be failed untildev_loss_tmoexpires and the queue is unblocked.Iffast_io_fail_tmois set to any value exceptoff,dev_loss_tmois uncapped. Iffast_io_fail_tmois set tooff, no I/O fails until the device is removed from the system. Iffast_io_fail_tmois set to a number, I/O fails immediately when thefast_io_fail_tmotimeout triggers.
- Host:
/sys/class/fc_host/hostH/ port_idissue_lip: instructs the driver to rediscover remote ports.
25.4.2. Native Fibre Channel Drivers and Capabilities
lpfcqla2xxxzfcpbfa
Important
qlini_mode module parameter.
/usr/lib/modprobe.d/qla2xxx.conf qla2xxx module configuration file:
options qla2xxx qlini_mode=disabled
options qla2xxx qlini_mode=disabled
dracut -f command to rebuild the initial ramdisk (initrd), and reboot the system for the changes to take effect.
lpfc | qla2xxx | zfcp | bfa | |
|---|---|---|---|---|
Transport port_id | X | X | X | X |
Transport node_name | X | X | X | X |
Transport port_name | X | X | X | X |
Remote Port dev_loss_tmo | X | X | X | X |
Remote Port fast_io_fail_tmo | X | X [a] | X [b] | X |
Host port_id | X | X | X | X |
Host issue_lip | X | X | X | |
[a]
Supported as of Red Hat Enterprise Linux 5.4
[b]
Supported as of Red Hat Enterprise Linux 6.0
| ||||
25.5. Configuring a Fibre Channel over Ethernet Interface
fcoe-utilslldpad
Procedure 25.10. Configuring an Ethernet Interface to Use FCoE
- To configure a new VLAN, make a copy of an existing network script, for example
/etc/fcoe/cfg-eth0, and change the name to the Ethernet device that supports FCoE. This provides you with a default file to configure. Given that the FCoE device isethX, run:cp /etc/fcoe/cfg-ethx /etc/fcoe/cfg-ethX
# cp /etc/fcoe/cfg-ethx /etc/fcoe/cfg-ethXCopy to Clipboard Copied! Toggle word wrap Toggle overflow Modify the contents ofcfg-ethXas needed. Notably, setDCB_REQUIREDtonofor networking interfaces that implement a hardware Data Center Bridging Exchange (DCBX) protocol client. - If you want the device to automatically load during boot time, set
ONBOOT=yesin the corresponding/etc/sysconfig/network-scripts/ifcfg-ethXfile. For example, if the FCoE device is eth2, edit/etc/sysconfig/network-scripts/ifcfg-eth2accordingly. - Start the data center bridging daemon (
dcbd) by running:systemctl start lldpad
# systemctl start lldpadCopy to Clipboard Copied! Toggle word wrap Toggle overflow - For networking interfaces that implement a hardware DCBX client, skip this step.For interfaces that require a software DCBX client, enable data center bridging on the Ethernet interface by running:
dcbtool sc ethX dcb on
# dcbtool sc ethX dcb onCopy to Clipboard Copied! Toggle word wrap Toggle overflow Then, enable FCoE on the Ethernet interface by running:dcbtool sc ethX app:fcoe e:1
# dcbtool sc ethX app:fcoe e:1Copy to Clipboard Copied! Toggle word wrap Toggle overflow Note that these commands only work if thedcbdsettings for the Ethernet interface were not changed. - Load the FCoE device now using:
ip link set dev ethX up
# ip link set dev ethX upCopy to Clipboard Copied! Toggle word wrap Toggle overflow - Start FCoE using:
systemctl start fcoe
# systemctl start fcoeCopy to Clipboard Copied! Toggle word wrap Toggle overflow The FCoE device appears soon if all other settings on the fabric are correct. To view configured FCoE devices, run:fcoeadm -i
# fcoeadm -iCopy to Clipboard Copied! Toggle word wrap Toggle overflow
lldpad service to run at startup. To do so, use the systemctl utility:
systemctl enable lldpad
# systemctl enable lldpadsystemctl enable fcoe
# systemctl enable fcoeNote
# systemctl stop fcoe command stops the daemon, but does not reset the configuration of FCoE interfaces. To do so, run the # systemctl -s SIGHUP kill fcoe command.
25.6. Configuring an FCoE Interface to Automatically Mount at Boot
Note
/usr/share/doc/fcoe-utils-version/README as of Red Hat Enterprise Linux 6.1. Refer to that document for any possible changes throughout minor releases.
udev rules, autofs, and other similar methods. Sometimes, however, a specific service might require the FCoE disk to be mounted at boot-time. In such cases, the FCoE disk should be mounted as soon as the fcoe service runs and before the initiation of any service that requires the FCoE disk.
fcoe service. The fcoe startup script is /lib/systemd/system/fcoe.service.
Example 25.2. FCoE Mounting Code
/etc/fstab:
mount_fcoe_disks_from_fstab function should be invoked after the fcoe service script starts the fcoemon daemon. This will mount FCoE disks specified by the following paths in /etc/fstab:
/dev/disk/by-path/fc-0xXX:0xXX /mnt/fcoe-disk1 ext3 defaults,_netdev 0 0 /dev/disk/by-path/fc-0xYY:0xYY /mnt/fcoe-disk2 ext3 defaults,_netdev 0 0
/dev/disk/by-path/fc-0xXX:0xXX /mnt/fcoe-disk1 ext3 defaults,_netdev 0 0
/dev/disk/by-path/fc-0xYY:0xYY /mnt/fcoe-disk2 ext3 defaults,_netdev 0 0fc- and _netdev sub-strings enable the mount_fcoe_disks_from_fstab function to identify FCoE disk mount entries. For more information on /etc/fstab entries, refer to man 5 fstab.
Note
fcoe service does not implement a timeout for FCoE disk discovery. As such, the FCoE mounting code should implement its own timeout period.
25.7. iSCSI
iscsiadm utility. Before using the iscsiadm utility, install the iscsi-initiator-utils package first by running yum install iscsi-initiator-utils.
node.startup = automatic then the iSCSI service will not start until an iscsiadm command is run that requires iscsid or the iscsi kernel modules to be started. For example, running the discovery command iscsiadm -m discovery -t st -p ip:port will cause iscsiadm to start the iSCSI service.
systemctl start iscsid.service.
25.7.1. iSCSI API
iscsiadm -m session -P 3
# iscsiadm -m session -P 3iscsiadm -m session -P 0
# iscsiadm -m session -P 0iscsiadm -m session
# iscsiadm -m sessiondriver [sid] target_ip:port,target_portal_group_tag proper_target_name
driver [sid] target_ip:port,target_portal_group_tag proper_target_nameExample 25.3. Output of the iscsisadm -m session Command
iscsiadm -m session tcp [2] 10.15.84.19:3260,2 iqn.1992-08.com.netapp:sn.33615311 tcp [3] 10.15.85.19:3260,3 iqn.1992-08.com.netapp:sn.33615311
# iscsiadm -m session
tcp [2] 10.15.84.19:3260,2 iqn.1992-08.com.netapp:sn.33615311
tcp [3] 10.15.85.19:3260,3 iqn.1992-08.com.netapp:sn.33615311
/usr/share/doc/iscsi-initiator-utils-version/README.
25.8. Persistent Naming
25.8.1. Major and Minor Numbers of Storage Devices
sd driver are identified internally by a collection of major device numbers and their associated minor numbers. The major device numbers used for this purpose are not in a contiguous range. Each storage device is represented by a major number and a range of minor numbers, which are used to identify either the entire device or a partition within the device. There is a direct association between the major and minor numbers allocated to a device and numbers in the form of sd<letter(s)>[number(s)]. Whenever the sd driver detects a new device, an available major number and minor number range is allocated. Whenever a device is removed from the operating system, the major number and minor number range is freed for later reuse.
sd names are allocated for each device when it is detected. This means that the association between the major and minor number range and associated sd names can change if the order of device detection changes. Although this is unusual with some hardware configurations (for example, with an internal SCSI controller and disks that have their SCSI target ID assigned by their physical location within a chassis), it can nevertheless occur. Examples of situations where this can happen are as follows:
- A disk may fail to power up or respond to the SCSI controller. This will result in it not being detected by the normal device probe. The disk will not be accessible to the system and subsequent devices will have their major and minor number range, including the associated
sdnames shifted down. For example, if a disk normally referred to assdbis not detected, a disk that is normally referred to assdcwould instead appear assdb. - A SCSI controller (host bus adapter, or HBA) may fail to initialize, causing all disks connected to that HBA to not be detected. Any disks connected to subsequently probed HBAs would be assigned different major and minor number ranges, and different associated
sdnames. - The order of driver initialization could change if different types of HBAs are present in the system. This would cause the disks connected to those HBAs to be detected in a different order. This can also occur if HBAs are moved to different PCI slots on the system.
- Disks connected to the system with Fibre Channel, iSCSI, or FCoE adapters might be inaccessible at the time the storage devices are probed, due to a storage array or intervening switch being powered off, for example. This could occur when a system reboots after a power failure, if the storage array takes longer to come online than the system take to boot. Although some Fibre Channel drivers support a mechanism to specify a persistent SCSI target ID to WWPN mapping, this will not cause the major and minor number ranges, and the associated
sdnames to be reserved, it will only provide consistent SCSI target ID numbers.
sd names when referring to devices, such as in the /etc/fstab file. There is the possibility that the wrong device will be mounted and data corruption could result.
sd names even when another mechanism is used (such as when errors are reported by a device). This is because the Linux kernel uses sd names (and also SCSI host/channel/target/LUN tuples) in kernel messages regarding the device.
25.8.2. World Wide Identifier (WWID)
0x83) or Unit Serial Number (page 0x80). The mappings from these WWIDs to the current /dev/sd names can be seen in the symlinks maintained in the /dev/disk/by-id/ directory.
Example 25.4. WWID
0x83 identifier would have:
scsi-3600508b400105e210000900000490000 -> ../../sda
scsi-3600508b400105e210000900000490000 -> ../../sda0x80 identifier would have:
scsi-SSEAGATE_ST373453LW_3HW1RHM6 -> ../../sda
scsi-SSEAGATE_ST373453LW_3HW1RHM6 -> ../../sda/dev/sd name on that system. Applications can use the /dev/disk/by-id/ name to reference the data on the disk, even if the path to the device changes, and even when accessing the device from different systems.
/dev/mapper/wwid directory, such as /dev/mapper/3600508b400105df70000e00000ac0000.
multipath -l shows the mapping to the non-persistent identifiers: Host:Channel:Target:LUN, /dev/sd name, and the major:minor number.
/dev/sd name on the system. These names are persistent across path changes, and they are consistent when accessing the device from different systems.
user_friendly_names feature (of DM Multipath) is used, the WWID is mapped to a name of the form /dev/mapper/mpathn. By default, this mapping is maintained in the file /etc/multipath/bindings. These mpathn names are persistent as long as that file is maintained.
Important
user_friendly_names, then additional steps are required to obtain consistent names in a cluster. Refer to the Consistent Multipath Device Names in a Cluster section in the DM Multipath book.
udev rules to implement persistent names of your own, mapped to the WWID of the storage.
25.8.3. Device Names Managed by the udev Mechanism in /dev/disk/by-*
udev mechanism consists of three major components:
- The kernel
- Generates events that are sent to user space when devices are added, removed, or changed.
- The
udevdservice - Receives the events.
- The
udevrules - Specifies the action to take when the
udevservice receives the kernel events.
udev rules that create symbolic links in the /dev/disk/ directory allowing storage devices to be referred to by their contents, a unique identifier, their serial number, or the hardware path used to access the device.
/dev/disk/by-label/- Entries in this directory provide a symbolic name that refers to the storage device by a label in the contents (that is, the data) stored on the device. The blkid utility is used to read data from the device and determine a name (that is, a label) for the device. For example:
/dev/disk/by-label/Boot
/dev/disk/by-label/BootCopy to Clipboard Copied! Toggle word wrap Toggle overflow Note
The information is obtained from the contents (that is, the data) on the device so if the contents are copied to another device, the label will remain the same.The label can also be used to refer to the device in/etc/fstabusing the following syntax:LABEL=Boot
LABEL=BootCopy to Clipboard Copied! Toggle word wrap Toggle overflow /dev/disk/by-uuid/- Entries in this directory provide a symbolic name that refers to the storage device by a unique identifier in the contents (that is, the data) stored on the device. The blkid utility is used to read data from the device and obtain a unique identifier (that is, the UUID) for the device. For example:
UUID=3e6be9de-8139-11d1-9106-a43f08d823a6
UUID=3e6be9de-8139-11d1-9106-a43f08d823a6Copy to Clipboard Copied! Toggle word wrap Toggle overflow /dev/disk/by-id/- Entries in this directory provide a symbolic name that refers to the storage device by a unique identifier (different from all other storage devices). The identifier is a property of the device but is not stored in the contents (that is, the data) on the devices. For example:
/dev/disk/by-id/scsi-3600508e000000000ce506dc50ab0ad05
/dev/disk/by-id/scsi-3600508e000000000ce506dc50ab0ad05Copy to Clipboard Copied! Toggle word wrap Toggle overflow /dev/disk/by-id/wwn-0x600508e000000000ce506dc50ab0ad05
/dev/disk/by-id/wwn-0x600508e000000000ce506dc50ab0ad05Copy to Clipboard Copied! Toggle word wrap Toggle overflow The id is obtained from the world-wide ID of the device, or the device serial number. The/dev/disk/by-id/entries may also include a partition number. For example:/dev/disk/by-id/scsi-3600508e000000000ce506dc50ab0ad05-part1
/dev/disk/by-id/scsi-3600508e000000000ce506dc50ab0ad05-part1Copy to Clipboard Copied! Toggle word wrap Toggle overflow /dev/disk/by-id/wwn-0x600508e000000000ce506dc50ab0ad05-part1
/dev/disk/by-id/wwn-0x600508e000000000ce506dc50ab0ad05-part1Copy to Clipboard Copied! Toggle word wrap Toggle overflow /dev/disk/by-path/- Entries in this directory provide a symbolic name that refers to the storage device by the hardware path used to access the device, beginning with a reference to the storage controller in the PCI hierarchy, and including the SCSI host, channel, target, and LUN numbers and, optionally, the partition number. Although these names are preferable to using major and minor numbers or
sdnames, caution must be used to ensure that the target numbers do not change in a Fibre Channel SAN environment (for example, through the use of persistent binding) and that the use of the names is updated if a host adapter is moved to a different PCI slot. In addition, there is the possibility that the SCSI host numbers could change if a HBA fails to probe, if drivers are loaded in a different order, or if a new HBA is installed on the system. An example of by-path listing is:/dev/disk/by-path/pci-0000:03:00.0-scsi-0:1:0:0
/dev/disk/by-path/pci-0000:03:00.0-scsi-0:1:0:0Copy to Clipboard Copied! Toggle word wrap Toggle overflow The/dev/disk/by-path/entries may also include a partition number, such as:/dev/disk/by-path/pci-0000:03:00.0-scsi-0:1:0:0-part1
/dev/disk/by-path/pci-0000:03:00.0-scsi-0:1:0:0-part1Copy to Clipboard Copied! Toggle word wrap Toggle overflow
25.8.3.1. Limitations of the udev Device Naming Convention
udev naming convention.
- It is possible that the device may not be accessible at the time the query is performed because the
udevmechanism may rely on the ability to query the storage device when theudevrules are processed for audevevent. This is more likely to occur with Fibre Channel, iSCSI or FCoE storage devices when the device is not located in the server chassis. - The kernel may also send
udevevents at any time, causing the rules to be processed and possibly causing the/dev/disk/by-*/links to be removed if the device is not accessible. - There can be a delay between when the
udevevent is generated and when it is processed, such as when a large number of devices are detected and the user-spaceudevdservice takes some amount of time to process the rules for each one). This could cause a delay between when the kernel detects the device and when the/dev/disk/by-*/names are available. - External programs such as blkid invoked by the rules may open the device for a brief period of time, making the device inaccessible for other uses.
25.8.3.2. Modifying Persistent Naming Attributes
udev naming attributes are persistent, in that they do not change on their own across system reboots, some are also configurable. You can set custom values for the following persistent naming attributes:
UUID: file system UUIDLABEL: file system label
UUID and LABEL attributes are related to the file system, the tool you need to use depends on the file system on that partition.
- To change the
UUIDorLABELattributes of an XFS file system, unmount the file system and then use the xfs_admin utility to change the attribute:umount /dev/device xfs_admin [-U new_uuid] [-L new_label] /dev/device udevadm settle
# umount /dev/device # xfs_admin [-U new_uuid] [-L new_label] /dev/device # udevadm settleCopy to Clipboard Copied! Toggle word wrap Toggle overflow - To change the
UUIDorLABELattributes of an ext4, ext3, or ext2 file system, use the tune2fs utility:tune2fs [-U new_uuid] [-L new_label] /dev/device udevadm settle
# tune2fs [-U new_uuid] [-L new_label] /dev/device # udevadm settleCopy to Clipboard Copied! Toggle word wrap Toggle overflow
1cdfbc07-1c90-4984-b5ec-f61943f5ea50. Replace new_label with a label; for example, backup_data.
Note
udev attributes happens in the background and might take a long time. The udevadm settle command waits until the change is fully registered, which ensures that your next command will be able to utilize the new attribute correctly.
PARTUUID or PARTLABEL attribute, or after creating a new file system.
25.9. Removing a Storage Device
vmstat 1 100; device removal is not recommended if:
- Free memory is less than 5% of the total memory in more than 10 samples per 100 (the command
freecan also be used to display the total memory). - Swapping is active (non-zero
siandsocolumns in thevmstatoutput).
Procedure 25.11. Ensuring a Clean Device Removal
- Close all users of the device and backup device data as needed.
- Use
umountto unmount any file systems that mounted the device. - Remove the device from any
mdand LVM volume using it. If the device is a member of an LVM Volume group, then it may be necessary to move data off the device using thepvmovecommand, then use thevgreducecommand to remove the physical volume, and (optionally)pvremoveto remove the LVM metadata from the disk. - Run
multipath -lcommand to find the list of devices which are configured asmultipathdevice. If the device is configured as a multipath device, runmultipath -f devicecommand to flush any outstanding I/O and to remove the multipath device. - Flush any outstanding I/O to the used paths. This is important for raw devices, where there is no
umountorvgreduceoperation to cause an I/O flush. You need to do this step only if:- the device is not configured as a multipath device, or
- the device is configured as a multipath device and I/O has been issued directly to its individual paths at some point in the past.
Use the following command to flush any outstanding I/O:blockdev --flushbufs device
# blockdev --flushbufs deviceCopy to Clipboard Copied! Toggle word wrap Toggle overflow - Remove any reference to the device's path-based name, like
/dev/sd,/dev/disk/by-pathor themajor:minornumber, in applications, scripts, or utilities on the system. This is important in ensuring that different devices added in the future will not be mistaken for the current device. - Finally, remove each path to the device from the SCSI subsystem. To do so, use the command
echo 1 > /sys/block/device-name/device/deletewheredevice-namemay besde, for example.Another variation of this operation isecho 1 > /sys/class/scsi_device/h:c:t:l/device/delete, wherehis the HBA number,cis the channel on the HBA,tis the SCSI target ID, andlis the LUN.Note
The older form of these commands,echo "scsi remove-single-device 0 0 0 0" > /proc/scsi/scsi, is deprecated.
device-name, HBA number, HBA channel, SCSI target ID and LUN for a device from various commands, such as lsscsi, scsi_id, multipath -l, and ls -l /dev/disk/by-*.
25.10. Removing a Path to a Storage Device
Procedure 25.12. Removing a Path to a Storage Device
- Remove any reference to the device's path-based name, like
/dev/sdor/dev/disk/by-pathor themajor:minornumber, in applications, scripts, or utilities on the system. This is important in ensuring that different devices added in the future will not be mistaken for the current device. - Take the path offline using
echo offline > /sys/block/sda/device/state.This will cause any subsequent I/O sent to the device on this path to be failed immediately. Device-mapper-multipath will continue to use the remaining paths to the device. - Remove the path from the SCSI subsystem. To do so, use the command
echo 1 > /sys/block/device-name/device/deletewheredevice-namemay besde, for example (as described in Procedure 25.11, “Ensuring a Clean Device Removal”).
25.11. Adding a Storage Device or Path
/dev/sd name, major:minor number, and /dev/disk/by-path name, for example) the system assigns to the new device may have been previously in use by a device that has since been removed. As such, ensure that all old references to the path-based device name have been removed. Otherwise, the new device may be mistaken for the old device.
Procedure 25.13. Add a Storage Device or Path
- The first step in adding a storage device or path is to physically enable access to the new storage device, or a new path to an existing device. This is done using vendor-specific commands at the Fibre Channel or iSCSI storage server. When doing so, note the LUN value for the new storage that will be presented to your host. If the storage server is Fibre Channel, also take note of the World Wide Node Name (WWNN) of the storage server, and determine whether there is a single WWNN for all ports on the storage server. If this is not the case, note the World Wide Port Name (WWPN) for each port that will be used to access the new LUN.
- Next, make the operating system aware of the new storage device, or path to an existing device. The recommended command to use is:
echo "c t l" > /sys/class/scsi_host/hosth/scan
$ echo "c t l" > /sys/class/scsi_host/hosth/scanCopy to Clipboard Copied! Toggle word wrap Toggle overflow In the previous command,his the HBA number,cis the channel on the HBA,tis the SCSI target ID, andlis the LUN.Note
The older form of this command,echo "scsi add-single-device 0 0 0 0" > /proc/scsi/scsi, is deprecated.- In some Fibre Channel hardware, a newly created LUN on the RAID array may not be visible to the operating system until a Loop Initialization Protocol (LIP) operation is performed. Refer to Section 25.12, “Scanning Storage Interconnects” for instructions on how to do this.
Important
It will be necessary to stop I/O while this operation is executed if an LIP is required. - If a new LUN has been added on the RAID array but is still not being configured by the operating system, confirm the list of LUNs being exported by the array using the
sg_lunscommand, part of the sg3_utils package. This will issue theSCSI REPORT LUNScommand to the RAID array and return a list of LUNs that are present.
For Fibre Channel storage servers that implement a single WWNN for all ports, you can determine the correcth,c,andtvalues (i.e. HBA number, HBA channel, and SCSI target ID) by searching for the WWNN insysfs.Example 25.5. Determine Correct
h,c, andtValuesFor example, if the WWNN of the storage server is0x5006016090203181, use:grep 5006016090203181 /sys/class/fc_transport/*/node_name
$ grep 5006016090203181 /sys/class/fc_transport/*/node_nameCopy to Clipboard Copied! Toggle word wrap Toggle overflow This should display output similar to the following:/sys/class/fc_transport/target5:0:2/node_name:0x5006016090203181 /sys/class/fc_transport/target5:0:3/node_name:0x5006016090203181 /sys/class/fc_transport/target6:0:2/node_name:0x5006016090203181 /sys/class/fc_transport/target6:0:3/node_name:0x5006016090203181
/sys/class/fc_transport/target5:0:2/node_name:0x5006016090203181 /sys/class/fc_transport/target5:0:3/node_name:0x5006016090203181 /sys/class/fc_transport/target6:0:2/node_name:0x5006016090203181 /sys/class/fc_transport/target6:0:3/node_name:0x5006016090203181Copy to Clipboard Copied! Toggle word wrap Toggle overflow This indicates there are four Fibre Channel routes to this target (two single-channel HBAs, each leading to two storage ports). Assuming a LUN value is56, then the following command will configure the first path:echo "0 2 56" > /sys/class/scsi_host/host5/scan
$ echo "0 2 56" > /sys/class/scsi_host/host5/scanCopy to Clipboard Copied! Toggle word wrap Toggle overflow This must be done for each path to the new device.For Fibre Channel storage servers that do not implement a single WWNN for all ports, you can determine the correct HBA number, HBA channel, and SCSI target ID by searching for each of the WWPNs insysfs.Another way to determine the HBA number, HBA channel, and SCSI target ID is to refer to another device that is already configured on the same path as the new device. This can be done with various commands, such aslsscsi,scsi_id,multipath -l, andls -l /dev/disk/by-*. This information, plus the LUN number of the new device, can be used as shown above to probe and configure that path to the new device. - After adding all the SCSI paths to the device, execute the
multipathcommand, and check to see that the device has been properly configured. At this point, the device can be added tomd, LVM,mkfs, ormount, for example.
25.12. Scanning Storage Interconnects
- All I/O on the effected interconnects must be paused and flushed before executing the procedure, and the results of the scan checked before I/O is resumed.
- As with removing a device, interconnect scanning is not recommended when the system is under memory pressure. To determine the level of memory pressure, run the
vmstat 1 100command. Interconnect scanning is not recommended if free memory is less than 5% of the total memory in more than 10 samples per 100. Also, interconnect scanning is not recommended if swapping is active (non-zerosiandsocolumns in thevmstatoutput). Thefreecommand can also display the total memory.
echo "1" > /sys/class/fc_host/hostN/issue_lip- (Replace N with the host number.)This operation performs a Loop Initialization Protocol (LIP), scans the interconnect, and causes the SCSI layer to be updated to reflect the devices currently on the bus. Essentially, an LIP is a bus reset, and causes device addition and removal. This procedure is necessary to configure a new SCSI target on a Fibre Channel interconnect.Note that
issue_lipis an asynchronous operation. The command can complete before the entire scan has completed. You must monitor/var/log/messagesto determine whenissue_lipfinishes.Thelpfc,qla2xxx, andbnx2fcdrivers supportissue_lip. For more information about the API capabilities supported by each driver in Red Hat Enterprise Linux, see Table 25.1, “Fibre Channel API Capabilities”. /usr/bin/rescan-scsi-bus.sh- The
/usr/bin/rescan-scsi-bus.shscript was introduced in Red Hat Enterprise Linux 5.4. By default, this script scans all the SCSI buses on the system, and updates the SCSI layer to reflect new devices on the bus. The script provides additional options to allow device removal, and the issuing of LIPs. For more information about this script, including known issues, see Section 25.18, “Adding/Removing a Logical Unit Through rescan-scsi-bus.sh”. echo "- - -" > /sys/class/scsi_host/hosth/scan- This is the same command as described in Section 25.11, “Adding a Storage Device or Path” to add a storage device or path. In this case, however, the channel number, SCSI target ID, and LUN values are replaced by wildcards. Any combination of identifiers and wildcards is allowed, so you can make the command as specific or broad as needed. This procedure adds LUNs, but does not remove them.
modprobe --remove driver-name,modprobe driver-name- Running the
modprobe --remove driver-namecommand followed by themodprobe driver-namecommand completely re-initializes the state of all interconnects controlled by the driver. Despite being rather extreme, using the described commands can be appropriate in certain situations. The commands can be used, for example, to restart the driver with a different module parameter value.
25.13. iSCSI Discovery Configuration
/etc/iscsi/iscsid.conf. This file contains iSCSI settings used by iscsid and iscsiadm.
iscsiadm tool uses the settings in /etc/iscsi/iscsid.conf to create two types of records:
- Node records in
/var/lib/iscsi/nodes - When logging into a target,
iscsiadmuses the settings in this file. - Discovery records in
/var/lib/iscsi/discovery_type - When performing discovery to the same destination,
iscsiadmuses the settings in this file.
/var/lib/iscsi/discovery_type) first. To do this, use the following command: [5]
iscsiadm -m discovery -t discovery_type -p target_IP:port -o delete
# iscsiadm -m discovery -t discovery_type -p target_IP:port -o deletesendtargets, isns, or fw.
- Edit the
/etc/iscsi/iscsid.conffile directly prior to performing a discovery. Discovery settings use the prefixdiscovery; to view them, run:iscsiadm -m discovery -t discovery_type -p target_IP:port
# iscsiadm -m discovery -t discovery_type -p target_IP:portCopy to Clipboard Copied! Toggle word wrap Toggle overflow - Alternatively,
iscsiadmcan also be used to directly change discovery record settings, as in:iscsiadm -m discovery -t discovery_type -p target_IP:port -o update -n setting -v %value
# iscsiadm -m discovery -t discovery_type -p target_IP:port -o update -n setting -v %valueCopy to Clipboard Copied! Toggle word wrap Toggle overflow Refer to the iscsiadm(8) man page for more information on available setting options and valid value options for each.
man pages of iscsiadm and iscsid. The /etc/iscsi/iscsid.conf file also contains examples on proper configuration syntax.
25.14. Configuring iSCSI Offload and Interface Binding
ping -I ethX target_IP
$ ping -I ethX target_IPping fails, then you will not be able to bind a session to a NIC. If this is the case, check the network settings first.
25.14.1. Viewing Available iface Configurations
- Software iSCSI
- This stack allocates an iSCSI host instance (that is,
scsi_host) per session, with a single connection per session. As a result,/sys/class_scsi_hostand/proc/scsiwill report ascsi_hostfor each connection/session you are logged into. - Offload iSCSI
- This stack allocates a
scsi_hostfor each PCI device. As such, each port on a host bus adapter will show up as a different PCI device, with a differentscsi_hostper HBA port.
iscsiadm uses the iface structure. With this structure, an iface configuration must be entered in /var/lib/iscsi/ifaces for each HBA port, software iSCSI, or network device (ethX) used to bind sessions.
iface configurations, run iscsiadm -m iface. This will display iface information in the following format:
iface_name transport_name,hardware_address,ip_address,net_ifacename,initiator_name
iface_name transport_name,hardware_address,ip_address,net_ifacename,initiator_name| Setting | Description |
|---|---|
iface_name | iface configuration name. |
transport_name | Name of driver |
hardware_address | MAC address |
ip_address | IP address to use for this port |
net_iface_name | Name used for the vlan or alias binding of a software iSCSI session. For iSCSI offloads, net_iface_name will be <empty> because this value is not persistent across reboots. |
initiator_name | This setting is used to override a default name for the initiator, which is defined in /etc/iscsi/initiatorname.iscsi |
Example 25.6. Sample Output of the iscsiadm -m iface Command
iscsiadm -m iface command:
iface0 qla4xxx,00:c0:dd:08:63:e8,20.15.0.7,default,iqn.2005-06.com.redhat:madmax iface1 qla4xxx,00:c0:dd:08:63:ea,20.15.0.9,default,iqn.2005-06.com.redhat:madmax
iface0 qla4xxx,00:c0:dd:08:63:e8,20.15.0.7,default,iqn.2005-06.com.redhat:madmax
iface1 qla4xxx,00:c0:dd:08:63:ea,20.15.0.9,default,iqn.2005-06.com.redhat:madmaxiface configuration must have a unique name (with less than 65 characters). The iface_name for network devices that support offloading appears in the format transport_name.hardware_name.
Example 25.7. iscsiadm -m iface Output with a Chelsio Network Card
iscsiadm -m iface on a system using a Chelsio network card might appear as:
default tcp,<empty>,<empty>,<empty>,<empty> iser iser,<empty>,<empty>,<empty>,<empty> cxgb3i.00:07:43:05:97:07 cxgb3i,00:07:43:05:97:07,<empty>,<empty>,<empty>
default tcp,<empty>,<empty>,<empty>,<empty>
iser iser,<empty>,<empty>,<empty>,<empty>
cxgb3i.00:07:43:05:97:07 cxgb3i,00:07:43:05:97:07,<empty>,<empty>,<empty>iface configuration in a more friendly way. To do so, use the option -I iface_name. This will display the settings in the following format:
iface.setting = value
iface.setting = valueExample 25.8. Using iface Settings with a Chelsio Converged Network Adapter
iface settings of the same Chelsio converged network adapter (i.e. iscsiadm -m iface -I cxgb3i.00:07:43:05:97:07) would appear as:
25.14.2. Configuring an iface for Software iSCSI
iface configuration is required for each network object that will be used to bind a session.
iface configuration for software iSCSI, run the following command:
iscsiadm -m iface -I iface_name --op=new
# iscsiadm -m iface -I iface_name --op=new
iface configuration with a specified iface_name. If an existing iface configuration already has the same iface_name, then it will be overwritten with a new, empty one.
iface configuration, use the following command:
iscsiadm -m iface -I iface_name --op=update -n iface.setting -v hw_address
# iscsiadm -m iface -I iface_name --op=update -n iface.setting -v hw_addressExample 25.9. Set MAC Address of iface0
hardware_address) of iface0 to 00:0F:1F:92:6B:BF, run:
iscsiadm -m iface -I iface0 --op=update -n iface.hwaddress -v 00:0F:1F:92:6B:BF
# iscsiadm -m iface -I iface0 --op=update -n iface.hwaddress -v 00:0F:1F:92:6B:BF
Warning
default or iser as iface names. Both strings are special values used by iscsiadm for backward compatibility. Any manually-created iface configurations named default or iser will disable backwards compatibility.
25.14.3. Configuring an iface for iSCSI Offload
iscsiadm creates an iface configuration for each port. To view available iface configurations, use the same command for doing so in software iSCSI: iscsiadm -m iface.
iface of a network card for iSCSI offload, first set the iface.ipaddress value of the offload interface to the initiator IP address that the interface should use:
- For devices that use the
be2iscsidriver, the IP address is configured in the BIOS setup screen. - For all other devices, to configure the IP address of the
iface, use:iscsiadm -m iface -I iface_name -o update -n iface.ipaddress -v initiator_ip_address
# iscsiadm -m iface -I iface_name -o update -n iface.ipaddress -v initiator_ip_addressCopy to Clipboard Copied! Toggle word wrap Toggle overflow
Example 25.10. Set the iface IP Address of a Chelsio Card
iface IP address to 20.15.0.66 when using a card with the iface name of cxgb3i.00:07:43:05:97:07, use:
iscsiadm -m iface -I cxgb3i.00:07:43:05:97:07 -o update -n iface.ipaddress -v 20.15.0.66
# iscsiadm -m iface -I cxgb3i.00:07:43:05:97:07 -o update -n iface.ipaddress -v 20.15.0.66
25.14.4. Binding/Unbinding an iface to a Portal
iscsiadm is used to scan for interconnects, it will first check the iface.transport settings of each iface configuration in /var/lib/iscsi/ifaces. The iscsiadm utility will then bind discovered portals to any iface whose iface.transport is tcp.
-I iface_name to specify which portal to bind to an iface, as in:
iscsiadm -m discovery -t st -p target_IP:port -I iface_name -P 1 [5]
# iscsiadm -m discovery -t st -p target_IP:port -I iface_name -P 1
[5]
iscsiadm utility will not automatically bind any portals to iface configurations that use offloading. This is because such iface configurations will not have iface.transport set to tcp. As such, the iface configurations need to be manually bound to discovered portals.
iface. To do so, use default as the iface_name, as in:
iscsiadm -m discovery -t st -p IP:port -I default -P 1
# iscsiadm -m discovery -t st -p IP:port -I default -P 1
iface, use:
iscsiadm -m node -targetname proper_target_name -I iface0 --op=delete[6]
# iscsiadm -m node -targetname proper_target_name -I iface0 --op=delete[6]iface, use:
iscsiadm -m node -I iface_name --op=delete
# iscsiadm -m node -I iface_name --op=delete
iscsiadm -m node -p IP:port -I iface_name --op=delete
# iscsiadm -m node -p IP:port -I iface_name --op=delete
Note
iface configurations defined in /var/lib/iscsi/iface and the -I option is not used, iscsiadm will allow the network subsystem to decide which device a specific portal should use.
25.15. Scanning iSCSI Interconnects
iscsiadm utility. Before doing so, however, you need to first retrieve the proper --targetname and the --portal values. If your device model supports only a single logical unit and portal per target, use iscsiadm to issue a sendtargets command to the host, as in:
iscsiadm -m discovery -t sendtargets -p target_IP:port [5]
# iscsiadm -m discovery -t sendtargets -p target_IP:port
[5]
target_IP:port,target_portal_group_tag proper_target_name
target_IP:port,target_portal_group_tag proper_target_nameExample 25.11. Using iscsiadm to issue a sendtargets Command
proper_target_name of iqn.1992-08.com.netapp:sn.33615311 and a target_IP:port of 10.15.85.19:3260, the output may appear as:
10.15.84.19:3260,2 iqn.1992-08.com.netapp:sn.33615311 10.15.85.19:3260,3 iqn.1992-08.com.netapp:sn.33615311
10.15.84.19:3260,2 iqn.1992-08.com.netapp:sn.33615311
10.15.85.19:3260,3 iqn.1992-08.com.netapp:sn.33615311
target_ip:ports of 10.15.84.19:3260 and 10.15.85.19:3260.
iface configuration will be used for each session, add the -P 1 option. This option will print also session information in tree format, as in:
Target: proper_target_name
Portal: target_IP:port,target_portal_group_tag
Iface Name: iface_name
Target: proper_target_name
Portal: target_IP:port,target_portal_group_tag
Iface Name: iface_nameExample 25.12. View iface Configuration
iscsiadm -m discovery -t sendtargets -p 10.15.85.19:3260 -P 1, the output may appear as:
iqn.1992-08.com.netapp:sn.33615311 will use iface2 as its iface configuration.
sendtargets command to the host first to find new portals on the target. Then, rescan the existing sessions using:
iscsiadm -m session --rescan
# iscsiadm -m session --rescan
SID value, as in:
iscsiadm -m session -r SID --rescan[7]
# iscsiadm -m session -r SID --rescan[7]sendtargets command to the hosts to find new portals for each target. Rescan existing sessions to discover new logical units on existing sessions using the --rescan option.
Important
sendtargets command used to retrieve --targetname and --portal values overwrites the contents of the /var/lib/iscsi/nodes database. This database will then be repopulated using the settings in /etc/iscsi/iscsid.conf. However, this will not occur if a session is currently logged in and in use.
-o new or -o delete options, respectively. For example, to add new targets/portals without overwriting /var/lib/iscsi/nodes, use the following command:
iscsiadm -m discovery -t st -p target_IP -o new
iscsiadm -m discovery -t st -p target_IP -o new
/var/lib/iscsi/nodes entries that the target did not display during discovery, use:
iscsiadm -m discovery -t st -p target_IP -o delete
iscsiadm -m discovery -t st -p target_IP -o delete
iscsiadm -m discovery -t st -p target_IP -o delete -o new
iscsiadm -m discovery -t st -p target_IP -o delete -o new
sendtargets command will yield the following output:
ip:port,target_portal_group_tag proper_target_name
ip:port,target_portal_group_tag proper_target_nameExample 25.13. Output of the sendtargets Command
equallogic-iscsi1 as your target_name, the output should appear similar to the following:
10.16.41.155:3260,0 iqn.2001-05.com.equallogic:6-8a0900-ac3fe0101-63aff113e344a4a2-dl585-03-1
10.16.41.155:3260,0 iqn.2001-05.com.equallogic:6-8a0900-ac3fe0101-63aff113e344a4a2-dl585-03-1
proper_target_name and ip:port,target_portal_group_tag are identical to the values of the same name in Section 25.7.1, “iSCSI API”.
--targetname and --portal values needed to manually scan for iSCSI devices. To do so, run the following command:
iscsiadm --mode node --targetname proper_target_name --portal ip:port,target_portal_group_tag \ --login [8]
# iscsiadm --mode node --targetname proper_target_name --portal ip:port,target_portal_group_tag \ --login
[8]Example 25.14. Full iscsiadm Command
proper_target_name is equallogic-iscsi1), the full command would be:
iscsiadm --mode node --targetname \ iqn.2001-05.com.equallogic:6-8a0900-ac3fe0101-63aff113e344a4a2-dl585-03-1 \ --portal 10.16.41.155:3260,0 --login[8]
# iscsiadm --mode node --targetname \ iqn.2001-05.com.equallogic:6-8a0900-ac3fe0101-63aff113e344a4a2-dl585-03-1 \ --portal 10.16.41.155:3260,0 --login[8]25.16. Logging in to an iSCSI Target
systemctl start iscsi
# systemctl start iscsiinit scripts will automatically log into targets where the node.startup setting is configured as automatic. This is the default value of node.startup for all targets.
node.startup to manual. To do this, run the following command:
iscsiadm -m node --targetname proper_target_name -p target_IP:port -o update -n node.startup -v manual
# iscsiadm -m node --targetname proper_target_name -p target_IP:port -o update -n node.startup -v manual
iscsiadm -m node --targetname proper_target_name -p target_IP:port -o delete
# iscsiadm -m node --targetname proper_target_name -p target_IP:port -o delete
/etc/fstab with the _netdev option. For example, to automatically mount the iSCSI device sdb to /mount/iscsi during startup, add the following line to /etc/fstab:
/dev/sdb /mnt/iscsi ext3 _netdev 0 0
/dev/sdb /mnt/iscsi ext3 _netdev 0 0iscsiadm -m node --targetname proper_target_name -p target_IP:port -l
# iscsiadm -m node --targetname proper_target_name -p target_IP:port -l
Note
proper_target_name and target_IP:port refer to the full name and IP address/port combination of a target. For more information, refer to Section 25.7.1, “iSCSI API” and Section 25.15, “Scanning iSCSI Interconnects”.
25.17. Resizing an Online Logical Unit
Note
25.17.1. Resizing Fibre Channel Logical Units
echo 1 > /sys/block/sdX/device/rescan
$ echo 1 > /sys/block/sdX/device/rescan
Important
sd1, sd2, and so on) that represents a path for the multipathed logical unit. To determine which devices are paths for a multipath logical unit, use multipath -ll; then, find the entry that matches the logical unit being resized. It is advisable that you refer to the WWID of each entry to make it easier to find which one matches the logical unit being resized.
25.17.2. Resizing an iSCSI Logical Unit
iscsiadm -m node --targetname target_name -R [5]
# iscsiadm -m node --targetname target_name -R
[5]target_name with the name of the target where the device is located.
Note
iscsiadm -m node -R -I interface
# iscsiadm -m node -R -I interfaceinterface with the corresponding interface name of the resized logical unit (for example, iface0). This command performs two operations:
- It scans for new devices in the same way that the command
echo "- - -" > /sys/class/scsi_host/host/scandoes (refer to Section 25.15, “Scanning iSCSI Interconnects”). - It re-scans for new/modified logical units the same way that the command
echo 1 > /sys/block/sdX/device/rescandoes. Note that this command is the same one used for re-scanning Fibre Channel logical units.
25.17.3. Updating the Size of Your Multipath Device
multipathd. To do so, first ensure that multipathd is running using service multipathd status. Once you've verified that multipathd is operational, run the following command:
multipathd -k"resize map multipath_device"
# multipathd -k"resize map multipath_device"multipath_device variable is the corresponding multipath entry of your device in /dev/mapper. Depending on how multipathing is set up on your system, multipath_device can be either of two formats:
mpathX, whereXis the corresponding entry of your device (for example,mpath0)- a WWID; for example,
3600508b400105e210000900000490000
multipath -ll. This displays a list of all existing multipath entries in the system, along with the major and minor numbers of their corresponding devices.
Important
multipathd -k"resize map multipath_device" if there are any commands queued to multipath_device. That is, do not use this command when the no_path_retry parameter (in /etc/multipath.conf) is set to "queue", and there are no active paths to the device.
25.17.4. Changing the Read/Write State of an Online Logical Unit
blockdev --getro /dev/sdXYZ
# blockdev --getro /dev/sdXYZcat /sys/block/sdXYZ/ro 1 = read-only 0 = read-write
# cat /sys/block/sdXYZ/ro 1 = read-only 0 = read-writemultipath -ll command. For example:
Procedure 25.14. Change the R/W State
- To move the device from RO to R/W, see step 2.To move the device from R/W to RO, ensure no further writes will be issued. Do this by stopping the application, or through the use of an appropriate, application-specific action.Ensure that all outstanding write I/Os are complete with the following command:
blockdev --flushbufs /dev/device
# blockdev --flushbufs /dev/deviceCopy to Clipboard Copied! Toggle word wrap Toggle overflow Replace device with the desired designator; for a device mapper multipath, this is the entry for your device indev/mapper. For example,/dev/mapper/mpath3. - Use the management interface of the storage device to change the state of the logical unit from R/W to RO, or from RO to R/W. The procedure for this differs with each array. Consult applicable storage array vendor documentation for more information.
- Perform a re-scan of the device to update the operating system's view of the R/W state of the device. If using a device mapper multipath, perform this re-scan for each path to the device before issuing the command telling multipath to reload its device maps.This process is explained in further detail in Section 25.17.4.1, “Rescanning Logical Units”.
25.17.4.1. Rescanning Logical Units
echo 1 > /sys/block/sdX/device/rescan
# echo 1 > /sys/block/sdX/device/rescanmultipath -11, then find the entry that matches the logical unit to be changed.
Example 25.15. Use of the multipath -11 Command
multipath -11 above shows the path for the LUN with WWID 36001438005deb4710000500000640000. In this case, enter:
echo 1 > /sys/block/sdax/device/rescan echo 1 > /sys/block/sday/device/rescan echo 1 > /sys/block/sdaz/device/rescan echo 1 > /sys/block/sdba/device/rescan
# echo 1 > /sys/block/sdax/device/rescan
# echo 1 > /sys/block/sday/device/rescan
# echo 1 > /sys/block/sdaz/device/rescan
# echo 1 > /sys/block/sdba/device/rescan25.17.4.2. Updating the R/W State of a Multipath Device
multipath -r
# multipath -rmultipath -11 command can then be used to confirm the change.
25.17.4.3. Documentation
25.18. Adding/Removing a Logical Unit Through rescan-scsi-bus.sh
sg3_utils package provides the rescan-scsi-bus.sh script, which can automatically update the logical unit configuration of the host as needed (after a device has been added to the system). The rescan-scsi-bus.sh script can also perform an issue_lip on supported devices. For more information about how to use this script, refer to rescan-scsi-bus.sh --help.
sg3_utils package, run yum install sg3_utils.
Known Issues with rescan-scsi-bus.sh
rescan-scsi-bus.sh script, take note of the following known issues:
- In order for
rescan-scsi-bus.shto work properly,LUN0must be the first mapped logical unit. Therescan-scsi-bus.shcan only detect the first mapped logical unit if it isLUN0. Therescan-scsi-bus.shwill not be able to scan any other logical unit unless it detects the first mapped logical unit even if you use the--nooptscanoption. - A race condition requires that
rescan-scsi-bus.shbe run twice if logical units are mapped for the first time. During the first scan,rescan-scsi-bus.shonly addsLUN0; all other logical units are added in the second scan. - A bug in the
rescan-scsi-bus.shscript incorrectly executes the functionality for recognizing a change in logical unit size when the--removeoption is used. - The
rescan-scsi-bus.shscript does not recognize ISCSI logical unit removals.
25.19. Modifying Link Loss Behavior
25.19.1. Fibre Channel
dev_loss_tmo callback, access attempts to a device through a link will be blocked when a transport problem is detected. To verify if a device is blocked, run the following command:
cat /sys/block/device/device/state
$ cat /sys/block/device/device/stateblocked if the device is blocked. If the device is operating normally, this command will return running.
Procedure 25.15. Determining the State of a Remote Port
- To determine the state of a remote port, run the following command:
cat /sys/class/fc_remote_port/rport-H:B:R/port_state
$ cat /sys/class/fc_remote_port/rport-H:B:R/port_stateCopy to Clipboard Copied! Toggle word wrap Toggle overflow - This command will return
Blockedwhen the remote port (along with devices accessed through it) are blocked. If the remote port is operating normally, the command will returnOnline. - If the problem is not resolved within
dev_loss_tmoseconds, the rport and devices will be unblocked and all I/O running on that device (along with any new I/O sent to that device) will be failed.
Procedure 25.16. Changing dev_loss_tmo
- To change the
dev_loss_tmovalue,echoin the desired value to the file. For example, to setdev_loss_tmoto 30 seconds, run:echo 30 > /sys/class/fc_remote_port/rport-H:B:R/dev_loss_tmo
$ echo 30 > /sys/class/fc_remote_port/rport-H:B:R/dev_loss_tmoCopy to Clipboard Copied! Toggle word wrap Toggle overflow
dev_loss_tmo, refer to Section 25.4.1, “Fibre Channel API”.
dev_loss_tmo, the scsi_device and sdN devices are removed. Typically, the Fibre Channel class will leave the device as is; i.e. /dev/sdx will remain /dev/sdx. This is because the target binding is saved by the Fibre Channel driver so when the target port returns, the SCSI addresses are recreated faithfully. However, this cannot be guaranteed; the sdx will be restored only if no additional change on in-storage box configuration of LUNs is made.
25.19.2. iSCSI Settings with dm-multipath
dm-multipath is implemented, it is advisable to set iSCSI timers to immediately defer commands to the multipath layer. To configure this, nest the following line under device { in /etc/multipath.conf:
features "1 queue_if_no_path"
features "1 queue_if_no_path"
dm-multipath layer.
replacement_timeout, which are discussed in the following sections.
25.19.2.1. NOP-Out Interval/Timeout
dm-multipath is being used, the SCSI layer will fail those running commands and defer them to the multipath layer. The multipath layer then retries those commands on another path. If dm-multipath is not being used, those commands are retried five times before failing altogether.
5 seconds by default. To adjust this, open /etc/iscsi/iscsid.conf and edit the following line:
node.conn[0].timeo.noop_out_interval = [interval value]
node.conn[0].timeo.noop_out_interval = [interval value]5 seconds[9]. To adjust this, open /etc/iscsi/iscsid.conf and edit the following line:
node.conn[0].timeo.noop_out_timeout = [timeout value]
node.conn[0].timeo.noop_out_timeout = [timeout value]SCSI Error Handler
replacement_timeout seconds. For more information about replacement_timeout, refer to Section 25.19.2.2, “replacement_timeout”.
iscsiadm -m session -P 3
# iscsiadm -m session -P 325.19.2.2. replacement_timeout
replacement_timeout controls how long the iSCSI layer should wait for a timed-out path/session to reestablish itself before failing any commands on it. The default replacement_timeout value is 120 seconds.
replacement_timeout, open /etc/iscsi/iscsid.conf and edit the following line:
node.session.timeo.replacement_timeout = [replacement_timeout]
node.session.timeo.replacement_timeout = [replacement_timeout]1 queue_if_no_path option in /etc/multipath.conf sets iSCSI timers to immediately defer commands to the multipath layer (refer to Section 25.19.2, “iSCSI Settings with dm-multipath”). This setting prevents I/O errors from propagating to the application; because of this, you can set replacement_timeout to 15-20 seconds.
replacement_timeout, I/O is quickly sent to a new path and executed (in the event of a NOP-Out timeout) while the iSCSI layer attempts to re-establish the failed path/session. If all paths time out, then the multipath and device mapper layer will internally queue I/O based on the settings in /etc/multipath.conf instead of /etc/iscsi/iscsid.conf.
Important
replacement_timeout will depend on other factors. These factors include the network, target, and system workload. As such, it is recommended that you thoroughly test any new configurations to replacements_timeout before applying it to a mission-critical system.
iSCSI and DM Multipath overrides
recovery_tmo sysfs option controls the timeout for a particular iSCSI device. The following options globally override recovery_tmo values:
- The
replacement_timeoutconfiguration option globally overrides therecovery_tmovalue for all iSCSI devices. - For all iSCSI devices that are managed by DM Multipath, the
fast_io_fail_tmooption in DM Multipath globally overrides therecovery_tmovalue. Thefast_io_fail_tmooption in DM Multipath also overrides thefast_io_fail_tmooption in Fibre Channel devices.The DM Multipathfast_io_fail_tmooption takes precedence overreplacement_timeout. Red Hat does not recommend usingreplacement_timeoutto overriderecovery_tmoin devices managed by DM Multipath because DM Multipath always resetsrecovery_tmowhen themultipathdservice reloads.
25.19.3. iSCSI Root
dm-multipath is implemented.
/etc/iscsi/iscsid.conf and edit as follows:
node.conn[0].timeo.noop_out_interval = 0 node.conn[0].timeo.noop_out_timeout = 0
node.conn[0].timeo.noop_out_interval = 0
node.conn[0].timeo.noop_out_timeout = 0
replacement_timeout should be set to a high number. This will instruct the system to wait a long time for a path/session to reestablish itself. To adjust replacement_timeout, open /etc/iscsi/iscsid.conf and edit the following line:
node.session.timeo.replacement_timeout = replacement_timeout
node.session.timeo.replacement_timeout = replacement_timeout/etc/iscsi/iscsid.conf, you must perform a re-discovery of the affected storage. This will allow the system to load and use any new values in /etc/iscsi/iscsid.conf. For more information on how to discover iSCSI devices, refer to Section 25.15, “Scanning iSCSI Interconnects”.
Configuring Timeouts for a Specific Session
/etc/iscsi/iscsid.conf). To do so, run the following command (replace the variables accordingly):
iscsiadm -m node -T target_name -p target_IP:port -o update -n node.session.timeo.replacement_timeout -v $timeout_value
# iscsiadm -m node -T target_name -p target_IP:port -o update -n node.session.timeo.replacement_timeout -v $timeout_valueImportant
dm-multipath), refer to Section 25.19.2, “iSCSI Settings with dm-multipath”.
25.20. Controlling the SCSI Command Timer and Device Status
- Abort the command.
- Reset the device.
- Reset the bus.
- Reset the host.
offline state. When this occurs, all I/O to that device will be failed, until the problem is corrected and the user sets the device to running.
rport is blocked. In such cases, the drivers wait for several seconds for the rport to become online again before activating the error handler. This prevents devices from becoming offline due to temporary transport problems.
Device States
cat /sys/block/device-name/device/state
$ cat /sys/block/device-name/device/staterunning state, use:
echo running > /sys/block/device-name/device/state
# echo running > /sys/block/device-name/device/stateCommand Timer
/sys/block/device-name/device/timeout file:
echo value > /sys/block/device-name/device/timeout
# echo value > /sys/block/device-name/device/timeout
value in the command with the timeout value, in seconds, that you want to implement.
25.21. Troubleshooting Online Storage Configuration
- Logical unit removal status is not reflected on the host.
- When a logical unit is deleted on a configured filer, the change is not reflected on the host. In such cases,
lvmcommands will hang indefinitely whendm-multipathis used, as the logical unit has now become stale.To work around this, perform the following procedure:Procedure 25.17. Working Around Stale Logical Units
- Determine which
mpathlink entries in/etc/lvm/cache/.cacheare specific to the stale logical unit. To do this, run the following command:ls -l /dev/mpath | grep stale-logical-unit
$ ls -l /dev/mpath | grep stale-logical-unitCopy to Clipboard Copied! Toggle word wrap Toggle overflow Example 25.16. Determine Specific
mpathLink EntriesFor example, ifstale-logical-unitis 3600d0230003414f30000203a7bc41a00, the following results may appear:lrwxrwxrwx 1 root root 7 Aug 2 10:33 /3600d0230003414f30000203a7bc41a00 -> ../dm-4 lrwxrwxrwx 1 root root 7 Aug 2 10:33 /3600d0230003414f30000203a7bc41a00p1 -> ../dm-5
lrwxrwxrwx 1 root root 7 Aug 2 10:33 /3600d0230003414f30000203a7bc41a00 -> ../dm-4 lrwxrwxrwx 1 root root 7 Aug 2 10:33 /3600d0230003414f30000203a7bc41a00p1 -> ../dm-5Copy to Clipboard Copied! Toggle word wrap Toggle overflow This means that 3600d0230003414f30000203a7bc41a00 is mapped to twompathlinks:dm-4anddm-5. - Next, open
/etc/lvm/cache/.cache. Delete all lines containingstale-logical-unitand thempathlinks thatstale-logical-unitmaps to.Example 25.17. Delete Relevant Lines
Using the same example in the previous step, the lines you need to delete are:Copy to Clipboard Copied! Toggle word wrap Toggle overflow
25.22. Configuring Maximum Time for Error Recovery with eh_deadline
Important
eh_deadline parameter. Using the eh_deadline parameter can be useful in certain specific scenarios, for example if a link loss occurs between a Fibre Channel switch and a target port, and the Host Bus Adapter (HBA) does not receive Registered State Change Notifications (RSCNs). In such a case, I/O requests and error recovery commands all time out rather than encounter an error. Setting eh_deadline in this environment puts an upper limit on the recovery time, which enables the failed I/O to be retried on another available path by multipath.
eh_deadline functionality provides no additional benefit, as the I/O and error recovery commands fail immediately, which allows multipath to retry.
eh_deadline parameter enables you to configure the maximum amount of time that the SCSI error handling mechanism attempts to perform error recovery before stopping and resetting the entire HBA.
eh_deadline is specified in seconds. The default setting is off, which disables the time limit and allows all of the error recovery to take place. In addition to using sysfs, a default value can be set for all SCSI HBAs by using the scsi_mod.eh_deadline kernel parameter.
eh_deadline expires, the HBA is reset, which affects all target paths on that HBA, not only the failing one. As a consequence, I/O errors can occur if some of the redundant paths are not available for other reasons. Enable eh_deadline only if you have a fully redundant multipath configuration on all targets.
Chapter 26. Device Mapper Multipathing (DM Multipath) and Storage for Virtual Machines
26.1. Storage for Virtual Machines
- Fibre Channel
- iSCSI
- NFS
- GFS2
libvirt to manage virtual instances. The libvirt utility uses the concept of storage pools to manage storage for virtualized guests. A storage pool is a storage that can be divided into smaller volumes or allocated directly to a guest. Volumes of a storage pool can be allocated to virtualized guests. Following are the categories of available storage pools:
- Local storage pools
- Local storage includes storage devices, files or directories directly attached to a host, local directories, directly attached disks, and LVM Volume Groups.
- Networked (shared) storage pools
- Networked storage covers storage devices shared over a network using standard protocols. It includes shared storage devices using Fibre Channel, iSCSI, NFS, GFS2, and SCSI RDMA protocols, and is a requirement for migrating virtualized guests between hosts.
26.2. DM Multipath
- Redundancy
- DM Multipath can provide failover in an active/passive configuration. In an active/passive configuration, only half the paths are used at any time for I/O. If any element of an I/O path fails, DM Multipath switches to an alternate path.
- Improved Performance
- DM Multipath can be configured in active/active mode, where I/O is spread over the paths in a round-robin fashion. In some configurations, DM Multipath can detect loading on the I/O paths and dynamically rebalance the load.
Chapter 27. External Array Management (libStorageMgmt)
libStorageMgmt.
27.1. Introduction to libStorageMgmt
libStorageMgmt library is a storage array independent Application Programming Interface (API). As a developer, you can use this API to manage different storage arrays and leverage the hardware accelerated features.
libStorageMgmt library, you can perform the following operations:
- List storage pools, volumes, access groups, or file systems.
- Create and delete volumes, access groups, file systems, or NFS exports.
- Grant and remove access to volumes, access groups, or initiators.
- Replicate volumes with snapshots, clones, and copies.
- Create and delete access groups and edit members of a group.
- A stable C and Python API for client application and plug-in developers.
- A command-line interface that utilizes the library (
lsmcli). - A daemon that executes the plug-in (
lsmd). - A simulator plug-in that allows the testing of client applications (
sim). - Plug-in architecture for interfacing with arrays.
Warning
libStorageMgmt library in Red Hat Enterprise Linux 7 adds a default udev rule to handle the REPORTED LUNS DATA HAS CHANGED unit attention.
sysfs.
/lib/udev/rules.d/90-scsi-ua.rules contains example rules to enumerate other events that the kernel can generate.
libStorageMgmt library uses a plug-in architecture to accommodate differences in storage arrays. For more information on libStorageMgmt plug-ins and how to write them, see the Red Hat Developer Guide.
27.2. libStorageMgmt Terminology
- Storage array
- Any storage system that provides block access (FC, FCoE, iSCSI) or file access through Network Attached Storage (NAS).
- Volume
- Storage Area Network (SAN) Storage Arrays can expose a volume to the Host Bus Adapter (HBA) over different transports, such as FC, iSCSI, or FCoE. The host OS treats it as block devices. One volume can be exposed to many disks if
multipath[2]is enabled).This is also known as the Logical Unit Number (LUN), StorageVolume with SNIA terminology, or virtual disk. - Pool
- A group of storage spaces. File systems or volumes can be created from a pool. Pools can be created from disks, volumes, and other pools. A pool may also hold RAID settings or thin provisioning settings.This is also known as a StoragePool with SNIA Terminology.
- Snapshot
- A point in time, read only, space efficient copy of data.This is also known as a read only snapshot.
- Clone
- A point in time, read writeable, space efficient copy of data.This is also known as a read writeable snapshot.
- Copy
- A full bitwise copy of the data. It occupies the full space.
- Mirror
- A continuously updated copy (synchronous and asynchronous).
- Access group
- Collections of iSCSI, FC, and FCoE initiators which are granted access to one or more storage volumes. This ensures that only storage volumes are accessible by the specified initiators.This is also known as an initiator group.
- Access Grant
- Exposing a volume to a specified access group or initiator. The
libStorageMgmtlibrary currently does not support LUN mapping with the ability to choose a specific logical unit number. ThelibStorageMgmtlibrary allows the storage array to select the next available LUN for assignment. If configuring a boot from SAN or masking more than 256 volumes be sure to read the OS, Storage Array, or HBA documents.Access grant is also known as LUN Masking. - System
- Represents a storage array or a direct attached storage RAID.
- File system
- A Network Attached Storage (NAS) storage array can expose a file system to host an OS through an IP network, using either NFS or CIFS protocol. The host OS treats it as a mount point or a folder containing files depending on the client operating system.
- Disk
- The physical disk holding the data. This is normally used when creating a pool with RAID settings.This is also known as a DiskDrive using SNIA Terminology.
- Initiator
- In Fibre Channel (FC) or Fibre Channel over Ethernet (FCoE), the initiator is the World Wide Port Name (WWPN) or World Wide Node Name (WWNN). In iSCSI, the initiator is the iSCSI Qualified Name (IQN). In NFS or CIFS, the initiator is the host name or the IP address of the host.
- Child dependency
- Some arrays have an implicit relationship between the origin (parent volume or file system) and the child (such as a snapshot or a clone). For example, it is impossible to delete the parent if it has one or more depend children. The API provides methods to determine if any such relationship exists and a method to remove the dependency by replicating the required blocks.
27.3. Installing libStorageMgmt
libStorageMgmt for use of the command line, required run-time libraries and simulator plug-ins, use the following command:
yum install libstoragemgmt libstoragemgmt-python
# yum install libstoragemgmt libstoragemgmt-pythonyum install libstoragemgmt-devel
# yum install libstoragemgmt-devellibStorageMgmt for use with hardware arrays, select one or more of the appropriate plug-in packages with the following command:
yum install libstoragemgmt-name-plugin
# yum install libstoragemgmt-name-plugin- libstoragemgmt-smis-plugin
- Generic SMI-S array support.
- libstoragemgmt-netapp-plugin
- Specific support for NetApp files.
- libstoragemgmt-nstor-plugin
- Specific support for NexentaStor.
- libstoragemgmt-targetd-plugin
- Specific support for targetd.
lsmd) behaves like any standard service for the system.
systemctl status libstoragemgmt
# systemctl status libstoragemgmtsystemctl stop libstoragemgmt
# systemctl stop libstoragemgmtsystemctl start libstoragemgmt
# systemctl start libstoragemgmt27.4. Using libStorageMgmt
libStorageMgmt interactively, use the lsmcli tool.
- A Uniform Resource Identifier (URI) which is used to identify the plug-in to connect to the array and any configurable options the array requires.
- A valid user name and password for the array.
plugin+optional-transport://user-name@host:port/?query-string-parameters
Example 27.1. Examples of Different Plug-in Requirements
sim://
ontap+ssl://root@filer.company.com/
smis+ssl://admin@provider.com:5989/?namespace=root/emc
- Pass the URI as part of the command.
lsmcli -u sim://
$ lsmcli -u sim://Copy to Clipboard Copied! Toggle word wrap Toggle overflow - Store the URI in an environmental variable.
export LSMCLI_URI=sim://
$ export LSMCLI_URI=sim://Copy to Clipboard Copied! Toggle word wrap Toggle overflow - Place the URI in the file
~/.lsmcli, which contains name-value pairs separated by "=". The only currently supported configuration is 'uri'.
-P option on the command line or by placing it in an environmental variable LSMCLI_PASSWORD.
Example 27.2. Example of lsmcli
lsmcli list --type SYSTEMS ID | Name | Status -------+-------------------------------+-------- sim-01 | LSM simulated storage plug-in | OK
$ lsmcli list --type SYSTEMS
ID | Name | Status
-------+-------------------------------+--------
sim-01 | LSM simulated storage plug-in | OK
lsmcli volume-create --name volume_name --size 20G --pool POO1 -H ID | Name | vpd83 | bs | #blocks | status | ... -----+-------------+----------------------------------+-----+----------+--------+---- Vol1 | volume_name | F7DDF7CA945C66238F593BC38137BD2F | 512 | 41943040 | OK | ...
$ lsmcli volume-create --name volume_name --size 20G --pool POO1 -H
ID | Name | vpd83 | bs | #blocks | status | ...
-----+-------------+----------------------------------+-----+----------+--------+----
Vol1 | volume_name | F7DDF7CA945C66238F593BC38137BD2F | 512 | 41943040 | OK | ...
lsmcli --create-access-group example_ag --id iqn.1994-05.com.domain:01.89bd01 --type ISCSI --system sim-01 ID | Name | Initiator ID |SystemID ---------------------------------+------------+----------------------------------+-------- 782d00c8ac63819d6cca7069282e03a0 | example_ag | iqn.1994-05.com.domain:01.89bd01 |sim-01
$ lsmcli --create-access-group example_ag --id iqn.1994-05.com.domain:01.89bd01 --type ISCSI --system sim-01
ID | Name | Initiator ID |SystemID
---------------------------------+------------+----------------------------------+--------
782d00c8ac63819d6cca7069282e03a0 | example_ag | iqn.1994-05.com.domain:01.89bd01 |sim-01
lsmcli access-group-create --name example_ag --init iqn.1994-05.com.domain:01.89bd01 --init-type ISCSI --sys sim-01 ID | Name | Initiator IDs | System ID ---------------------------------+------------+----------------------------------+----------- 782d00c8ac63819d6cca7069282e03a0 | example_ag | iqn.1994-05.com.domain:01.89bd01 | sim-01
$ lsmcli access-group-create --name example_ag --init iqn.1994-05.com.domain:01.89bd01 --init-type ISCSI --sys sim-01
ID | Name | Initiator IDs | System ID
---------------------------------+------------+----------------------------------+-----------
782d00c8ac63819d6cca7069282e03a0 | example_ag | iqn.1994-05.com.domain:01.89bd01 | sim-01lsmcli access-group-grant --ag 782d00c8ac63819d6cca7069282e03a0 --vol Vol1 --access RW
$ lsmcli access-group-grant --ag 782d00c8ac63819d6cca7069282e03a0 --vol Vol1 --access RW-b option on the command line. If the exit code is 0 the command is completed. If the exit code is 7 the command is in progress and a job identifier is written to standard output. The user or script can then take the job ID and query the status of the command as needed by using lsmcli --jobstatus JobID. If the job is now completed, the exit value will be 0 and the results printed to standard output. If the command is still in progress, the return value will be 7 and the percentage complete will be printed to the standard output.
Example 27.3. An Asynchronous Example
-b option so that the command returns immediately.
lsmcli volume-create --name async_created --size 20G --pool POO1 -b JOB_3
$ lsmcli volume-create --name async_created --size 20G --pool POO1 -b JOB_3echo $? 7
$ echo $?
7lsmcli job-status --job JOB_3 33
$ lsmcli job-status --job JOB_3
33echo $? 7
$ echo $?
7lsmcli job-status --job JOB_3 ID | Name | vpd83 | Block Size | ... -----+---------------+----------------------------------+-------------+----- Vol2 | async_created | 855C9BA51991B0CC122A3791996F6B15 | 512 | ...
$ lsmcli job-status --job JOB_3
ID | Name | vpd83 | Block Size | ...
-----+---------------+----------------------------------+-------------+-----
Vol2 | async_created | 855C9BA51991B0CC122A3791996F6B15 | 512 | ...
-t SeparatorCharacters option. This will make it easier to parse the output.
Example 27.4. Scripting Examples
lsmcli list --type volumes -t# Vol1#volume_name#049167B5D09EC0A173E92A63F6C3EA2A#512#41943040#21474836480#OK#sim-01#POO1 Vol2#async_created#3E771A2E807F68A32FA5E15C235B60CC#512#41943040#21474836480#OK#sim-01#POO1
$ lsmcli list --type volumes -t#
Vol1#volume_name#049167B5D09EC0A173E92A63F6C3EA2A#512#41943040#21474836480#OK#sim-01#POO1
Vol2#async_created#3E771A2E807F68A32FA5E15C235B60CC#512#41943040#21474836480#OK#sim-01#POO1
lsmcli list --type volumes -t " | " Vol1 | volume_name | 049167B5D09EC0A173E92A63F6C3EA2A | 512 | 41943040 | 21474836480 | OK | 21474836480 | sim-01 | POO1 Vol2 | async_created | 3E771A2E807F68A32FA5E15C235B60CC | 512 | 41943040 | 21474836480 | OK | sim-01 | POO1
$ lsmcli list --type volumes -t " | "
Vol1 | volume_name | 049167B5D09EC0A173E92A63F6C3EA2A | 512 | 41943040 | 21474836480 | OK | 21474836480 | sim-01 | POO1
Vol2 | async_created | 3E771A2E807F68A32FA5E15C235B60CC | 512 | 41943040 | 21474836480 | OK | sim-01 | POO1
lsmcli man page or lsmcli --help.
Chapter 28. Persistent Memory: NVDIMMs
pmem), also called as storage class memory, is a combination of memory and storage. pmem combines the durability of storage with the low access latency and the high bandwidth of dynamic RAM (DRAM):
- Persistent memory is byte-addressable, so it can be accessed by using CPU load and store instructions. In addition to
read()orwrite()system calls that are required for accessing traditional block-based storage,pmemalso supports direct load and store programming model. - The performance characteristics of persistent memory are similar to DRAM with very low access latency, typically in the tens to hundreds of nanoseconds.
- Contents of persistent memory are preserved when the power is off, like with storage.
Using persistent memory is beneficial for use cases like:
- Rapid start: data set is already in memory.
- Rapid start is also called the warm cache effect. A file server has none of the file contents in memory after starting. As clients connect and read and write data, that data is cached in the page cache. Eventually, the cache contains mostly hot data. After a reboot, the system must start the process again.Persistent memory allows an application to keep the warm cache across reboots if the application is designed properly. In this instance, there would be no page cache involved: the application would cache data directly in the persistent memory.
- Fast write-cache
- File servers often do not acknowledge a client's write request until the data is on durable media. Using persistent memory as a fast write cache enables a file server to acknowledge the write request quickly thanks to the low latency of
pmem.
NVDIMMs Interleaving
- Like DRAM, NVDIMMs benefit from increased performance when they are configured into interleave sets.
- It can be used to combine multiple smaller NVDIMMs into one larger logical device.
- If your NVDIMMs support labels, the region device can be further subdivided into namespaces.
- If your NVDIMMs do not support labels, the region devices can only contain a single namespace. In this case, the kernel creates a default namespace which covers the entire region.
Persistent Memory Access Modes
sector, fsdax, devdax (device direct access) or raw mode:
sectormode- It presents the storage as a fast block device. Using sector mode is useful for legacy applications that have not been modified to use persistent memory, or for applications that make use of the full I/O stack, including the Device Mapper.
fsdaxmode- It enables persistent memory devices to support direct access programming as described in the Storage Networking Industry Association (SNIA) Non-Volatile Memory (NVM) Programming Model specification. In this mode, I/O bypasses the storage stack of the kernel, and many Device Mapper drivers therefore cannot be used.
devdaxmode- The
devdax(device DAX) mode provides raw access to persistent memory by using a DAX character device node. Data on adevdaxdevice can be made durable using CPU cache flushing and fencing instructions. Certain databases and virtual machine hypervisors might benefit from thedevdaxmode. File systems cannot be created on devicedevdaxinstances. rawmode- The raw mode namespaces have several limitations and should not be used.
28.1. Configuring Persistent Memory with ndctl
yum install ndctl
# yum install ndctlProcedure 28.1. Configuring Persistent Memory for a device that does not support labels
- List the available
pmemregions on your system. In the following example, the command lists an NVDIMM-N device that does not support labels:Copy to Clipboard Copied! Toggle word wrap Toggle overflow Red Hat Enterprise Linux creates a default namespace for each region because the NVDIMM-N device here does not support labels. Hence, the available size is 0 bytes. - List all the inactive namespaces on your system:
Copy to Clipboard Copied! Toggle word wrap Toggle overflow - Reconfigure the inactive namespaces in order to make use of this space. For example, to use namespace0.0 for a file system that supports DAX, use the following command:
Copy to Clipboard Copied! Toggle word wrap Toggle overflow
Procedure 28.2. Configuring Persistent Memory for a device that supports labels
- List the available
pmemregions on your system. In the following example, the command lists an NVDIMM-N device that supports labels:Copy to Clipboard Copied! Toggle word wrap Toggle overflow - If the NVDIMM device supports labels, default namespaces are not created, and you can allocate one or more namespaces from a region without using the
--forceor--reconfigureflags:Copy to Clipboard Copied! Toggle word wrap Toggle overflow Now, you can create another namespace from the same region:Copy to Clipboard Copied! Toggle word wrap Toggle overflow You can also create namespaces of different types from the same region, using the following command:Copy to Clipboard Copied! Toggle word wrap Toggle overflow
man ndctl.
28.2. Configuring Persistent Memory for Use as a Block Device (Legacy Mode)
namespace1.0 is reconfigured to sector mode. Note that the block device name changed from pmem1 to pmem1s. This device can be used in the same way as any other block device on the system. For example, the device can be partitioned, you can create a file system on the device, the device can be configured as part of a software RAID set, and the device can be the cache device for dm-cache.
28.3. Configuring Persistent Memory for File System Direct Access
fsdax mode. This mode allows for the direct access programming model. When a device is configured in the fsdax mode, a file system can be created on top of it, and then mounted with the -o fsdax mount option. Then, any application that performs an mmap() operation on a file on this file system gets direct access to its storage. See the following example:
namespace0.0 is converted to namespace fsdax mode. With the --map=mem argument, ndctl puts operating system data structures used for Direct Memory Access (DMA) in system DRAM.
--map=mem parameter.
--map=dev parameter to store the data structures in the persistent memory itself is preferable in such cases.
fsdax mode, the namespace is ready for a file system. Starting with Red Hat Enterprise Linux 7.3, both the Ext4 and XFS file system enable using persistent memory as a Technology Preview. File system creation requires no special arguments. To get the DAX functionality, mount the file system with the dax mount option. For example:
mkfs -t xfs /dev/pmem0 mount -o dax /dev/pmem0 /mnt/pmem/
# mkfs -t xfs /dev/pmem0
# mount -o dax /dev/pmem0 /mnt/pmem//mnt/pmem/ directory, open the files, and use the mmap operation to map the files for direct access.
pmem device to be used for direct access, partitions must be aligned on page boundaries. On the Intel 64 and AMD64 architecture, at least 4KiB alignment for the start and end of the partition, but 2MiB is the preferred alignment. By default, the parted tool aligns partitions on 1MiB boundaries. For the first partition, specify 2MiB as the start of the partition. If the size of the partition is a multiple of 2MiB, all other partitions are also aligned.
28.4. Configuring Persistent Memory for use in Device DAX mode
devdax) provides a means for applications to directly access storage, without the involvement of a file system. The benefit of device DAX is that it provides a guaranteed fault granularity, which can be configured using the --align option with the ndctl utility:
ndctl create-namespace --force --reconfig=namespace0.0 --mode=devdax --align=2M
# ndctl create-namespace --force --reconfig=namespace0.0 --mode=devdax --align=2M- 4KiB
- 2MiB
- 1GiB
/dev/daxN.M) only supports the following system call:
open()close()mmap()fallocate()
read() and write() variants are not supported because the use case is tied to persistent memory programming.
28.5. Troubleshooting NVDIMM
28.5.1. Monitoring NVDIMM Health Using S.M.A.R.T.
Prerequisites
- On some systems, the acpi_ipmi driver must be loaded to retrieve health information using the following command:
modprobe acpi_ipmi
# modprobe acpi_ipmiCopy to Clipboard Copied! Toggle word wrap Toggle overflow
Procedure
- To access the health information, use the following command:
Copy to Clipboard Copied! Toggle word wrap Toggle overflow
28.5.2. Detecting and Replacing a Broken NVDIMM
- Detect which NVDIMM device is failing,
- Back up data stored on it, and
- Physically replace the device.
Procedure 28.3. Detecting and Replacing a Broken NVDIMM
- To detect the broken DIMM, use the following command:
ndctl list --dimms --regions --health --media-errors --human
# ndctl list --dimms --regions --health --media-errors --humanCopy to Clipboard Copied! Toggle word wrap Toggle overflow Thebadblocksfield shows which NVDIMM is broken. Note its name in thedevfield. In the following example, the NVDIMM namednmem0is broken:Example 28.1. Health Status of NVDIMM Devices
Copy to Clipboard Copied! Toggle word wrap Toggle overflow - Use the following command to find the
phys_idattribute of the broken NVDIMM:ndctl list --dimms --human
# ndctl list --dimms --humanCopy to Clipboard Copied! Toggle word wrap Toggle overflow From the previous example, you know thatnmem0is the broken NVDIMM. Therefore, find thephys_idattribute ofnmem0. In the following example, thephys_idis0x10:Example 28.2. The phys_id Attributes of NVDIMMs
Copy to Clipboard Copied! Toggle word wrap Toggle overflow - Use the following command to find the memory slot of the broken NVDIMM:
dmidecode
# dmidecodeCopy to Clipboard Copied! Toggle word wrap Toggle overflow In the output, find the entry where theHandleidentifier matches thephys_idattribute of the broken NVDIMM. TheLocatorfield lists the memory slot used by the broken NVDIMM. In the following example, thenmem0device matches the0x0010identifier and uses theDIMM-XXX-YYYYmemory slot:Example 28.3. NVDIMM Memory Slot Listing
Copy to Clipboard Copied! Toggle word wrap Toggle overflow - Back up all data in the namespaces on the NVDIMM. If you do not back up the data before replacing the NVDIMM, the data will be lost when you remove the NVDIMM from your system.
Warning
In some cases, such as when the NVDIMM is completely broken, the backup might fail.To prevent this, regularly monitor your NVDIMM devices using S.M.A.R.T. as described in Section 28.5.1, “Monitoring NVDIMM Health Using S.M.A.R.T.” and replace failing NVDIMMs before they break.Use the following command to list the namespaces on the NVDIMM:ndctl list --namespaces --dimm=DIMM-ID-number
# ndctl list --namespaces --dimm=DIMM-ID-numberCopy to Clipboard Copied! Toggle word wrap Toggle overflow In the following example, thenmem0device contains thenamespace0.0andnamespace0.2namespaces, which you need to back up:Example 28.4. NVDIMM Namespaces Listing
Copy to Clipboard Copied! Toggle word wrap Toggle overflow - Replace the broken NVDIMM physically.
Chapter 29. Overview of NVMe over fabric devices
NVMe over fabric devices:
- NVMe over fabrics using Remote Direct Memory Access (RDMA). For information on how to configure NVMe/RDMA, see Section 29.1, “NVMe over fabrics using RDMA”.
- NVMe over fabrics using Fibre Channel (FC). For information on how to configure FC-NVMe, see Section 29.2, “NVMe over fabrics using FC”.
29.1. NVMe over fabrics using RDMA
29.1.1. Configuring an NVMe over RDMA client
nvme-cli).
- Install the
nvme-clipackage:yum install nvme-cli
# yum install nvme-cliCopy to Clipboard Copied! Toggle word wrap Toggle overflow - Load the
nvme-rdmamodule if it is not loaded:modprobe nvme-rdma
# modprobe nvme-rdmaCopy to Clipboard Copied! Toggle word wrap Toggle overflow - Discover available subsystems on the NVMe target:
Copy to Clipboard Copied! Toggle word wrap Toggle overflow - Connect to the discovered subsystems:
Copy to Clipboard Copied! Toggle word wrap Toggle overflow Replace testnqn with the NVMe subsystem name.Replace 172.31.0.202 with the target IP address.Replace 4420 with the port number. - List the NVMe devices that are currently connected:
nvme list
# nvme listCopy to Clipboard Copied! Toggle word wrap Toggle overflow - Optional: Disconnect from the target:
Copy to Clipboard Copied! Toggle word wrap Toggle overflow
Additional resources
- For more information, see the
nvmeman page and the NVMe-cli Github repository.
29.2. NVMe over fabrics using FC
29.2.1. Configuring the NVMe initiator for Broadcom adapters
nvme-cli) tool.
- Install the
nvme-clitool:yum install nvme-cli
# yum install nvme-cliCopy to Clipboard Copied! Toggle word wrap Toggle overflow This creates thehostnqnfile in the/etc/nvme/directory. Thehostnqnfile identifies the NVMe host. To generate a newhostnqn:nvme gen-hostnqn
# nvme gen-hostnqnCopy to Clipboard Copied! Toggle word wrap Toggle overflow - Create a
/etc/modprobe.d/lpfc.conffile with the following content:options lpfc lpfc_enable_fc4_type=3
options lpfc lpfc_enable_fc4_type=3Copy to Clipboard Copied! Toggle word wrap Toggle overflow - Rebuild the
initramfsimage:dracut --force
# dracut --forceCopy to Clipboard Copied! Toggle word wrap Toggle overflow - Reboot the host system to reconfigure the
lpfcdriver:systemctl reboot
# systemctl rebootCopy to Clipboard Copied! Toggle word wrap Toggle overflow - Find the WWNN and WWPN of the local and remote ports and use the output to find the subsystem NQN:
Copy to Clipboard Copied! Toggle word wrap Toggle overflow Copy to Clipboard Copied! Toggle word wrap Toggle overflow Replace nn-0x204600a098cbcac6:pn-0x204700a098cbcac6 with thetraddr.Replace nn-0x20000090fae0b5f5:pn-0x10000090fae0b5f5 with thehost_traddr. - Connect to the NVMe target using the
nvme-cli:nvme connect --transport fc --traddr nn-0x204600a098cbcac6:pn-0x204700a098cbcac6 --host-traddr nn-0x20000090fae0b5f5:pn-0x10000090fae0b5f5 -n nqn.1992-08.com.netapp:sn.e18bfca87d5e11e98c0800a098cbcac6:subsystem.st14_nvme_ss_1_1
# nvme connect --transport fc --traddr nn-0x204600a098cbcac6:pn-0x204700a098cbcac6 --host-traddr nn-0x20000090fae0b5f5:pn-0x10000090fae0b5f5 -n nqn.1992-08.com.netapp:sn.e18bfca87d5e11e98c0800a098cbcac6:subsystem.st14_nvme_ss_1_1Copy to Clipboard Copied! Toggle word wrap Toggle overflow Replace nn-0x204600a098cbcac6:pn-0x204700a098cbcac6 with thetraddr.Replace nn-0x20000090fae0b5f5:pn-0x10000090fae0b5f5 with thehost_traddr.Replace nqn.1992-08.com.netapp:sn.e18bfca87d5e11e98c0800a098cbcac6:subsystem.st14_nvme_ss_1_1 with thesubnqn. - Verify the NVMe devices are currently connected:
Copy to Clipboard Copied! Toggle word wrap Toggle overflow
Additional resources
- For more information, see the
nvmeman page and the NVMe-cli Github repository.
29.2.2. Configuring the NVMe initiator for QLogic adapters
(nvme-cli) tool.
- Install the
nvme-clitool:yum install nvme-cli
# yum install nvme-cliCopy to Clipboard Copied! Toggle word wrap Toggle overflow This creates thehostnqnfile in the/etc/nvme/directory. Thehostnqnfile identifies the NVMe host. To generate a newhostnqn:nvme gen-hostnqn
# nvme gen-hostnqnCopy to Clipboard Copied! Toggle word wrap Toggle overflow - Remove and reload the
qla2xxxmodule:rmmod qla2xxx modprobe qla2xxx
# rmmod qla2xxx # modprobe qla2xxxCopy to Clipboard Copied! Toggle word wrap Toggle overflow - Find the WWNN and WWPN of the local and remote ports:
dmesg |grep traddr [ 6.139862] qla2xxx [0000:04:00.0]-ffff:0: register_localport: host-traddr=nn-0x20000024ff19bb62:pn-0x21000024ff19bb62 on portID:10700 [ 6.241762] qla2xxx [0000:04:00.0]-2102:0: qla_nvme_register_remote: traddr=nn-0x203b00a098cbcac6:pn-0x203d00a098cbcac6 PortID:01050d# dmesg |grep traddr [ 6.139862] qla2xxx [0000:04:00.0]-ffff:0: register_localport: host-traddr=nn-0x20000024ff19bb62:pn-0x21000024ff19bb62 on portID:10700 [ 6.241762] qla2xxx [0000:04:00.0]-2102:0: qla_nvme_register_remote: traddr=nn-0x203b00a098cbcac6:pn-0x203d00a098cbcac6 PortID:01050dCopy to Clipboard Copied! Toggle word wrap Toggle overflow Using thishost-traddrandtraddr, find the subsystem NQN:Copy to Clipboard Copied! Toggle word wrap Toggle overflow Replace nn-0x203b00a098cbcac6:pn-0x203d00a098cbcac6 with thetraddr.Replace nn-0x20000024ff19bb62:pn-0x21000024ff19bb62 with thehost_traddr. - Connect to the NVMe target using the
nvme-clitool:nvme connect --transport fc --traddr nn-0x203b00a098cbcac6:pn-0x203d00a098cbcac6 --host_traddr nn-0x20000024ff19bb62:pn-0x21000024ff19bb62 -n nqn.1992-08.com.netapp:sn.c9ecc9187b1111e98c0800a098cbcac6:subsystem.vs_nvme_multipath_1_subsystem_468
# nvme connect --transport fc --traddr nn-0x203b00a098cbcac6:pn-0x203d00a098cbcac6 --host_traddr nn-0x20000024ff19bb62:pn-0x21000024ff19bb62 -n nqn.1992-08.com.netapp:sn.c9ecc9187b1111e98c0800a098cbcac6:subsystem.vs_nvme_multipath_1_subsystem_468Copy to Clipboard Copied! Toggle word wrap Toggle overflow Replace nn-0x203b00a098cbcac6:pn-0x203d00a098cbcac6 with thetraddr.Replace nn-0x20000024ff19bb62:pn-0x21000024ff19bb62 with thehost_traddr.Replace nqn.1992-08.com.netapp:sn.c9ecc9187b1111e98c0800a098cbcac6:subsystem.vs_nvme_multipath_1_subsystem_468 with thesubnqn. - Verify the NVMe devices are currently connected:
Copy to Clipboard Copied! Toggle word wrap Toggle overflow
Additional resources
- For more information, see the
nvmeman page and the NVMe-cli Github repository.
Part III. Data Deduplication and Compression with VDO
Chapter 30. VDO Integration
30.1. Theoretical Overview of VDO
- Deduplication is a technique for reducing the consumption of storage resources by eliminating multiple copies of duplicate blocks.Instead of writing the same data more than once, VDO detects each duplicate block and records it as a reference to the original block. VDO maintains a mapping from logical block addresses, which are used by the storage layer above VDO, to physical block addresses, which are used by the storage layer under VDO.After deduplication, multiple logical block addresses may be mapped to the same physical block address; these are called shared blocks. Block sharing is invisible to users of the storage, who read and write blocks as they would if VDO were not present. When a shared block is overwritten, a new physical block is allocated for storing the new block data to ensure that other logical block addresses that are mapped to the shared physical block are not modified.
- Compression is a data-reduction technique that works well with file formats that do not necessarily exhibit block-level redundancy, such as log files and databases. See Section 30.4.8, “Using Compression” for more detail.
kvdo- A kernel module that loads into the Linux Device Mapper layer to provide a deduplicated, compressed, and thinly provisioned block storage volume
uds- A kernel module that communicates with the Universal Deduplication Service (UDS) index on the volume and analyzes data for duplicates.
- Command line tools
- For configuring and managing optimized storage.
30.1.1. The UDS Kernel Module (uds)
uds kernel module.
30.1.2. The VDO Kernel Module (kvdo)
kvdo Linux kernel module provides block-layer deduplication services within the Linux Device Mapper layer. In the Linux kernel, Device Mapper serves as a generic framework for managing pools of block storage, allowing the insertion of block-processing modules into the storage stack between the kernel's block interface and the actual storage device drivers.
kvdo module is exposed as a block device that can be accessed directly for block storage or presented through one of the many available Linux file systems, such as XFS or ext4. When kvdo receives a request to read a (logical) block of data from a VDO volume, it maps the requested logical block to the underlying physical block and then reads and returns the requested data.
kvdo receives a request to write a block of data to a VDO volume, it first checks whether it is a DISCARD or TRIM request or whether the data is uniformly zero. If either of these conditions holds, kvdo updates its block map and acknowledges the request. Otherwise, a physical block is allocated for use by the request.
Overview of VDO Write Policies
kvdo module is operating in synchronous mode:
- It temporarily writes the data in the request to the allocated block and then acknowledges the request.
- Once the acknowledgment is complete, an attempt is made to deduplicate the block by computing a MurmurHash-3 signature of the block data, which is sent to the VDO index.
- If the VDO index contains an entry for a block with the same signature,
kvdoreads the indicated block and does a byte-by-byte comparison of the two blocks to verify that they are identical. - If they are indeed identical, then
kvdoupdates its block map so that the logical block points to the corresponding physical block and releases the allocated physical block. - If the VDO index did not contain an entry for the signature of the block being written, or the indicated block does not actually contain the same data,
kvdoupdates its block map to make the temporary physical block permanent.
kvdo is operating in asynchronous mode:
- Instead of writing the data, it will immediately acknowledge the request.
- It will then attempt to deduplicate the block in same manner as described above.
- If the block turns out to be a duplicate,
kvdowill update its block map and release the allocated block. Otherwise, it will write the data in the request to the allocated block and update the block map to make the physical block permanent.
30.1.3. VDO Volume

Figure 30.1. VDO Disk Organization
Slabs
| Physical Volume Size | Recommended Slab Size |
|---|---|
| 10–99 GB | 1 GB |
| 100 GB – 1 TB | 2 GB |
| 2–256 TB | 32 GB |
--vdoSlabSize=megabytes
option to the vdo create command.
Physical Size and Available Physical Size
- Physical size is the same size as the underlying block device. VDO uses this storage for:
- User data, which might be deduplicated and compressed
- VDO metadata, such as the UDS index
- Available physical size is the portion of the physical size that VDO is able to use for user data.It is equivalent to the physical size minus the size of the metadata, minus the remainder after dividing the volume into slabs by the given slab size.
Logical Size
--vdoLogicalSize option is not specified, the logical volume size defaults to the available physical volume size. Note that, in Figure 30.1, “VDO Disk Organization”, the VDO deduplicated storage target sits completely on top of the block device, meaning the physical size of the VDO volume is the same size as the underlying block device.
30.1.4. Command Line Tools
30.2. System Requirements
Processor Architectures
RAM
- The VDO module requires 370 MB plus an additional 268 MB per each 1 TB of physical storage managed.
- The Universal Deduplication Service (UDS) index requires a minimum of 250 MB of DRAM, which is also the default amount that deduplication uses. For details on the memory usage of UDS, see Section 30.2.1, “UDS Index Memory Requirements”.
Storage
Additional System Software
- LVM
- Python 2.7
yum package manager will install all necessary software dependencies automatically.
Placement of VDO in the Storage Stack
- Under VDO: DM-Multipath, DM-Crypt, and software RAID (LVM or
mdraid). - On top of VDO: LVM cache, LVM snapshots, and LVM Thin Provisioning.
- VDO on top of VDO volumes: storage → VDO → LVM → VDO
- VDO on top of LVM Snapshots
- VDO on top of LVM Cache
- VDO on top of the loopback device
- VDO on top of LVM Thin Provisioning
- Encrypted volumes on top of VDO: storage → VDO → DM-Crypt
- Partitions on a VDO volume:
fdisk,parted, and similar partitions - RAID (LVM, MD, or any other type) on top of a VDO volume
Important
sync and async. When VDO is in sync mode, writes to the VDO device are acknowledged when the underlying storage has written the data permanently. When VDO is in async mode, writes are acknowledged before being written to persistent storage.
auto option, which selects the appropriate policy automatically.
30.2.1. UDS Index Memory Requirements
- A compact representation is used in memory that contains at most one entry per unique block.
- An on-disk component which records the associated block names presented to the index as they occur, in order.
- For a dense index, UDS will provide a deduplication window of 1 TB per 1 GB of RAM. A 1 GB index is generally sufficient for storage systems of up to 4 TB.
- For a sparse index, UDS will provide a deduplication window of 10 TB per 1 GB of RAM. A 1 GB sparse index is generally sufficient for up to 40 TB of physical storage.
30.2.2. VDO Storage Space Requirements
- VDO writes two types of metadata to its underlying physical storage:
- The first type scales with the physical size of the VDO volume and uses approximately 1 MB for each 4 GB of physical storage plus an additional 1 MB per slab.
- The second type scales with the logical size of the VDO volume and consumes approximately 1.25 MB for each 1 GB of logical storage, rounded up to the nearest slab.
See Section 30.1.3, “VDO Volume” for a description of slabs. - The UDS index is stored within the VDO volume group and is managed by the associated VDO instance. The amount of storage required depends on the type of index and the amount of RAM allocated to the index. For each 1 GB of RAM, a dense UDS index will use 17 GB of storage, and a sparse UDS index will use 170 GB of storage.
30.2.3. Examples of VDO System Requirements by Physical Volume Size
Primary Storage Deployment
| Physical Volume Size | 10 GB – 1–TB | 2–10 TB | 11–50 TB | 51–100 TB | 101–256 TB |
|---|---|---|---|---|---|
| RAM Usage | 250 MB |
Dense: 1 GB
Sparse: 250 MB
| 2 GB | 3 GB | 12 GB |
| Disk Usage | 2.5 GB |
Dense: 10 GB
Sparse: 22 GB
| 170 GB | 255 GB | 1020 GB |
| Index Type | Dense | Dense or Sparse | Sparse | Sparse | Sparse |
Backup Storage Deployment
| Physical Volume Size | 10 GB – 1 TB | 2–10 TB | 11–50 TB | 51–100 TB | 101–256 TB |
|---|---|---|---|---|---|
| RAM Usage | 250 MB | 2 GB | 10 GB | 20 GB | 26 GB |
| Disk Usage | 2.5 GB | 170 GB | 850 GB | 1700 GB | 3400 GB |
| Index Type | Dense | Sparse | Sparse | Sparse | Sparse |
30.3. Getting Started with VDO
30.3.1. Introduction
- When hosting active VMs or containers, Red Hat recommends provisioning storage at a 10:1 logical to physical ratio: that is, if you are utilizing 1 TB of physical storage, you would present it as 10 TB of logical storage.
- For object storage, such as the type provided by Ceph, Red Hat recommends using a 3:1 logical to physical ratio: that is, 1 TB of physical storage would present as 3 TB logical storage.
- the direct-attached use case for virtualization servers, such as those built using Red Hat Virtualization, and
- the cloud storage use case for object-based distributed storage clusters, such as those built using Ceph Storage.
Note
VDO deployment with Ceph is currently not supported.
30.3.2. Installing VDO
- vdo
- kmod-kvdo
yum install vdo kmod-kvdo
# yum install vdo kmod-kvdo30.3.3. Creating a VDO Volume
Important
vdo1.
- Create the VDO volume using the VDO Manager:
vdo create \ --name=vdo_name \ --device=block_device \ --vdoLogicalSize=logical_size \ [--vdoSlabSize=slab_size]# vdo create \ --name=vdo_name \ --device=block_device \ --vdoLogicalSize=logical_size \ [--vdoSlabSize=slab_size]Copy to Clipboard Copied! Toggle word wrap Toggle overflow - Replace block_device with the persistent name of the block device where you want to create the VDO volume. For example,
/dev/disk/by-id/scsi-3600508b1001c264ad2af21e903ad031f.Important
Use a persistent device name. If you use a non-persistent device name, then VDO might fail to start properly in the future if the device name changes.For more information on persistent names, see Section 25.8, “Persistent Naming”. - Replace logical_size with the amount of logical storage that the VDO volume should present:
- For active VMs or container storage, use logical size that is ten times the physical size of your block device. For example, if your block device is 1 TB in size, use
10There. - For object storage, use logical size that is three times the physical size of your block device. For example, if your block device is 1 TB in size, use
3There.
- If the block device is larger than 16 TiB, add the
--vdoSlabSize=32Gto increase the slab size on the volume to 32 GiB.Using the default slab size of 2 GiB on block devices larger than 16 TiB results in thevdo createcommand failing with the following error:vdo: ERROR - vdoformat: formatVDO failed on '/dev/device': VDO Status: Exceeds maximum number of slabs supported
vdo: ERROR - vdoformat: formatVDO failed on '/dev/device': VDO Status: Exceeds maximum number of slabs supportedCopy to Clipboard Copied! Toggle word wrap Toggle overflow For more information, see Section 30.1.3, “VDO Volume”.
Example 30.1. Creating VDO for Container Storage
For example, to create a VDO volume for container storage on a 1 TB block device, you might use:vdo create \ --name=vdo1 \ --device=/dev/disk/by-id/scsi-3600508b1001c264ad2af21e903ad031f \ --vdoLogicalSize=10T# vdo create \ --name=vdo1 \ --device=/dev/disk/by-id/scsi-3600508b1001c264ad2af21e903ad031f \ --vdoLogicalSize=10TCopy to Clipboard Copied! Toggle word wrap Toggle overflow When a VDO volume is created, VDO adds an entry to the/etc/vdoconf.ymlconfiguration file. Thevdo.servicesystemd unit then uses the entry to start the volume by default.Important
If a failure occurs when creating the VDO volume, remove the volume to clean up. See Section 30.4.3.1, “Removing an Unsuccessfully Created Volume” for details. - Create a file system:
- For the XFS file system:
mkfs.xfs -K /dev/mapper/vdo_name
# mkfs.xfs -K /dev/mapper/vdo_nameCopy to Clipboard Copied! Toggle word wrap Toggle overflow - For the ext4 file system:
mkfs.ext4 -E nodiscard /dev/mapper/vdo_name
# mkfs.ext4 -E nodiscard /dev/mapper/vdo_nameCopy to Clipboard Copied! Toggle word wrap Toggle overflow
- Mount the file system:
mkdir -m 1777 /mnt/vdo_name mount /dev/mapper/vdo_name /mnt/vdo_name
# mkdir -m 1777 /mnt/vdo_name # mount /dev/mapper/vdo_name /mnt/vdo_nameCopy to Clipboard Copied! Toggle word wrap Toggle overflow - To configure the file system to mount automatically, use either the
/etc/fstabfile or a systemd mount unit:- If you decide to use the
/etc/fstabconfiguration file, add one of the following lines to the file:- For the XFS file system:
/dev/mapper/vdo_name /mnt/vdo_name xfs defaults,_netdev,x-systemd.device-timeout=0,x-systemd.requires=vdo.service 0 0
/dev/mapper/vdo_name /mnt/vdo_name xfs defaults,_netdev,x-systemd.device-timeout=0,x-systemd.requires=vdo.service 0 0Copy to Clipboard Copied! Toggle word wrap Toggle overflow - For the ext4 file system:
/dev/mapper/vdo_name /mnt/vdo_name ext4 defaults,_netdev,x-systemd.device-timeout=0,x-systemd.requires=vdo.service 0 0
/dev/mapper/vdo_name /mnt/vdo_name ext4 defaults,_netdev,x-systemd.device-timeout=0,x-systemd.requires=vdo.service 0 0Copy to Clipboard Copied! Toggle word wrap Toggle overflow
- Alternatively, if you decide to use a systemd unit, create a systemd mount unit file with the appropriate filename. For the mount point of your VDO volume, create the
/etc/systemd/system/mnt-vdo_name.mountfile with the following content:Copy to Clipboard Copied! Toggle word wrap Toggle overflow An example systemd unit file is also installed at/usr/share/doc/vdo/examples/systemd/VDO.mount.example.
- Enable the
discardfeature for the file system on your VDO device. Both batch and online operations work with VDO.For information on how to set up thediscardfeature, see Section 2.4, “Discard Unused Blocks”.
30.3.4. Monitoring VDO
Important
30.3.5. Deployment Examples
VDO Deployment with KVM
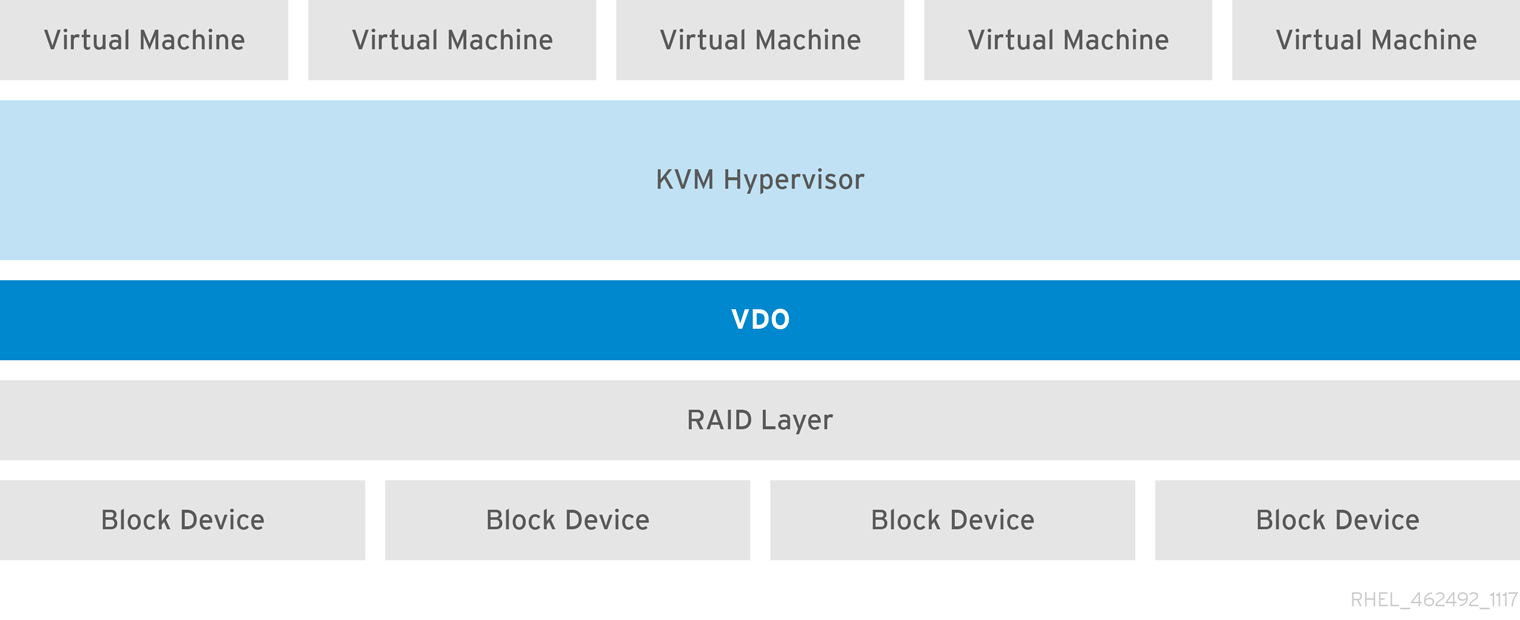
Figure 30.2. VDO Deployment with KVM
More Deployment Scenarios
30.4. Administering VDO
30.4.1. Starting or Stopping VDO
vdo start --name=my_vdo vdo start --all
# vdo start --name=my_vdo
# vdo start --allvdo start --all command at system startup to bring up all activated VDO volumes. See Section 30.4.6, “Automatically Starting VDO Volumes at System Boot” for more information.
vdo stop --name=my_vdo vdo stop --all
# vdo stop --name=my_vdo
# vdo stop --all- The volume always writes around 1GiB for every 1GiB of the UDS index.
- With a sparse UDS index, the volume additionally writes the amount of data equal to the block map cache size plus up to 8MiB per slab.
- In synchronous mode, all writes that were acknowledged by VDO prior to the shutdown will be rebuilt.
- In asynchronous mode, all writes that were acknowledged prior to the last acknowledged flush request will be rebuilt.
30.4.2. Selecting VDO Write Modes
sync, async, and auto:
- When VDO is in
syncmode, the layers above it assume that a write command writes data to persistent storage. As a result, it is not necessary for the file system or application, for example, to issue FLUSH or Force Unit Access (FUA) requests to cause the data to become persistent at critical points.VDO must be set tosyncmode only when the underlying storage guarantees that data is written to persistent storage when the write command completes. That is, the storage must either have no volatile write cache, or have a write through cache. - When VDO is in
asyncmode, the data is not guaranteed to be written to persistent storage when a write command is acknowledged. The file system or application must issue FLUSH or FUA requests to ensure data persistence at critical points in each transaction.VDO must be set toasyncmode if the underlying storage does not guarantee that data is written to persistent storage when the write command completes; that is, when the storage has a volatile write back cache.For information on how to find out if a device uses volatile cache or not, see the section called “Checking for a Volatile Cache”.Warning
When VDO is running inasyncmode, it is not compliant with Atomicity, Consistency, Isolation, Durability (ACID). When there is an application or a file system that assumes ACID compliance on top of the VDO volume,asyncmode might cause unexpected data loss. - The
automode automatically selectssyncorasyncbased on the characteristics of each device. This is the default option.
--writePolicy option. This can be specified either when creating a VDO volume as in Section 30.3.3, “Creating a VDO Volume” or when modifying an existing VDO volume with the changeWritePolicy subcommand:
vdo changeWritePolicy --writePolicy=sync|async|auto --name=vdo_name
# vdo changeWritePolicy --writePolicy=sync|async|auto --name=vdo_nameImportant
Checking for a Volatile Cache
/sys/block/block_device/device/scsi_disk/identifier/cache_type sysfs file. For example:
- Device
sdaindicates that it has a writeback cache:cat '/sys/block/sda/device/scsi_disk/7:0:0:0/cache_type' write back
$ cat '/sys/block/sda/device/scsi_disk/7:0:0:0/cache_type' write backCopy to Clipboard Copied! Toggle word wrap Toggle overflow - Device
sdbindicates that it does not have a writeback cache:cat '/sys/block/sdb/device/scsi_disk/1:2:0:0/cache_type' None
$ cat '/sys/block/sdb/device/scsi_disk/1:2:0:0/cache_type' NoneCopy to Clipboard Copied! Toggle word wrap Toggle overflow
sd 7:0:0:0: [sda] Write cache: enabled, read cache: enabled, doesn't support DPO or FUA sd 1:2:0:0: [sdb] Write cache: disabled, read cache: disabled, supports DPO and FUA
sd 7:0:0:0: [sda] Write cache: enabled, read cache: enabled, doesn't support DPO or FUA
sd 1:2:0:0: [sdb] Write cache: disabled, read cache: disabled, supports DPO and FUA
asyncmode for thesdadevicesyncmode for thesdbdevice
Note
sync write policy if the cache_type value is none or write through.
30.4.3. Removing VDO Volumes
vdo remove --name=my_vdo
# vdo remove --name=my_vdovdo remove command removes the VDO volume and its associated UDS index, as well as logical volumes where they reside.
30.4.3.1. Removing an Unsuccessfully Created Volume
vdo utility is creating a VDO volume, the volume is left in an intermediate state. This might happen when, for example, the system crashes, power fails, or the administrator interrupts a running vdo create command.
--force option:
vdo remove --force --name=my_vdo
# vdo remove --force --name=my_vdo--force option is required because the administrator might have caused a conflict by changing the system configuration since the volume was unsuccessfully created. Without the --force option, the vdo remove command fails with the following message:
30.4.4. Configuring the UDS Index
--indexMem=size option. The amount of disk space to use will then be determined automatically.
--sparseIndex=enabled --indexMem=0.25 options to the vdo create command. This configuration results in a deduplication window of 2.5 TB (meaning it will remember a history of 2.5 TB). For most use cases, a deduplication window of 2.5 TB is appropriate for deduplicating storage pools that are up to 10 TB in size.
30.4.5. Recovering a VDO Volume After an Unclean Shutdown
- If VDO was running on synchronous storage and write policy was set to
sync, then all data written to the volume will be fully recovered. - If the write policy was
async, then some writes may not be recovered if they were not made durable by sending VDO aFLUSHcommand, or a write I/O tagged with theFUAflag (force unit access). This is accomplished from user mode by invoking a data integrity operation likefsync,fdatasync,sync, orumount.
30.4.5.1. Online Recovery
blocks in use and blocks free. These statistics will become available once the rebuild is complete.
30.4.5.2. Forcing a Rebuild
operating mode attribute of vdostats indicates whether a VDO volume is in read-only mode.)
vdo stop --name=my_vdo
# vdo stop --name=my_vdo--forceRebuild option:
vdo start --name=my_vdo --forceRebuild
# vdo start --name=my_vdo --forceRebuild30.4.6. Automatically Starting VDO Volumes at System Boot
vdo systemd unit automatically starts all VDO devices that are configured as activated.
- To deactivate a specific volume:
vdo deactivate --name=my_vdo
# vdo deactivate --name=my_vdoCopy to Clipboard Copied! Toggle word wrap Toggle overflow - To deactivate all volumes:
vdo deactivate --all
# vdo deactivate --allCopy to Clipboard Copied! Toggle word wrap Toggle overflow
- To activate a specific volume:
vdo activate --name=my_vdo
# vdo activate --name=my_vdoCopy to Clipboard Copied! Toggle word wrap Toggle overflow - To activate all volumes:
vdo activate --all
# vdo activate --allCopy to Clipboard Copied! Toggle word wrap Toggle overflow
--activate=disabled option to the vdo create command.
- The lower layer of LVM must be started first (in most systems, starting this layer is configured automatically when the LVM2 package is installed).
- The
vdosystemd unit must then be started. - Finally, additional scripts must be run in order to start LVM volumes or other services on top of the now running VDO volumes.
30.4.7. Disabling and Re-enabling Deduplication
- To stop deduplication on a VDO volume, use the following command:
vdo disableDeduplication --name=my_vdo
# vdo disableDeduplication --name=my_vdoCopy to Clipboard Copied! Toggle word wrap Toggle overflow This stops the associated UDS index and informs the VDO volume that deduplication is no longer active. - To restart deduplication on a VDO volume, use the following command:
vdo enableDeduplication --name=my_vdo
# vdo enableDeduplication --name=my_vdoCopy to Clipboard Copied! Toggle word wrap Toggle overflow This restarts the associated UDS index and informs the VDO volume that deduplication is active again.
--deduplication=disabled option to the vdo create command.
30.4.8. Using Compression
30.4.8.1. Introduction
30.4.8.2. Enabling and Disabling Compression
--compression=disabled option to the vdo create command.
- To stop compression on a VDO volume, use the following command:
vdo disableCompression --name=my_vdo
# vdo disableCompression --name=my_vdoCopy to Clipboard Copied! Toggle word wrap Toggle overflow - To start it again, use the following command:
vdo enableCompression --name=my_vdo
# vdo enableCompression --name=my_vdoCopy to Clipboard Copied! Toggle word wrap Toggle overflow
30.4.9. Managing Free Space
vdostats utility; see Section 30.7.2, “vdostats” for details. The default output of this utility lists information for all running VDO volumes in a format similar to the Linux df utility. For example:
Device 1K-blocks Used Available Use% /dev/mapper/my_vdo 211812352 105906176 105906176 50%
Device 1K-blocks Used Available Use%
/dev/mapper/my_vdo 211812352 105906176 105906176 50%
Important
Reclaiming Space on File Systems
DISCARD, TRIM, or UNMAP commands. For file systems that do not use DISCARD, TRIM, or UNMAP, free space may be manually reclaimed by storing a file consisting of binary zeros and then deleting that file.
DISCARD requests in one of two ways:
- Realtime discard (also online discard or inline discard)
- When realtime discard is enabled, file systems send
REQ_DISCARDrequests to the block layer whenever a user deletes a file and frees space. VDO recieves these requests and returns space to its free pool, assuming the block was not shared.For file systems that support online discard, you can enable it by setting thediscardoption at mount time. - Batch discard
- Batch discard is a user-initiated operation that causes the file system to notify the block layer (VDO) of any unused blocks. This is accomplished by sending the file system an
ioctlrequest calledFITRIM.You can use thefstrimutility (for example fromcron) to send thisioctlto the file system.
discard feature, see Section 2.4, “Discard Unused Blocks”.
Reclaiming Space Without a File System
blkdiscard command can be used in order to free the space previously used by that logical volume. LVM supports the REQ_DISCARD command and will forward the requests to VDO at the appropriate logical block addresses in order to free the space. If other volume managers are being used, they would also need to support REQ_DISCARD, or equivalently, UNMAP for SCSI devices or TRIM for ATA devices.
Reclaiming Space on Fibre Channel or Ethernet Network
UNMAP command to free space on thinly provisioned storage targets, but the SCSI target framework will need to be configured to advertise support for this command. This is typically done by enabling thin provisioning on these volumes. Support for UNMAP can be verified on Linux-based SCSI initiators by running the following command:
sg_vpd --page=0xb0 /dev/device
# sg_vpd --page=0xb0 /dev/device30.4.10. Increasing Logical Volume Size
vdo growLogical subcommand. Once the volume has been grown, the management should inform any devices or file systems on top of the VDO volume of its new size. The volume may be grown as follows:
vdo growLogical --name=my_vdo --vdoLogicalSize=new_logical_size
# vdo growLogical --name=my_vdo --vdoLogicalSize=new_logical_size30.4.11. Increasing Physical Volume Size
- Increase the size of the underlying device.The exact procedure depends on the type of the device. For example, to resize an MBR partition, use the
fdiskutility as described in Section 13.5, “Resizing a Partition with fdisk”. - Use the
growPhysicaloption to add the new physical storage space to the VDO volume:vdo growPhysical --name=my_vdo
# vdo growPhysical --name=my_vdoCopy to Clipboard Copied! Toggle word wrap Toggle overflow
30.4.12. Automating VDO with Ansible
- Ansible documentation: https://docs.ansible.com/
- VDO Ansible module documentation: https://docs.ansible.com/ansible/latest/modules/vdo_module.html
30.5. Deployment Scenarios
30.5.1. iSCSI Target
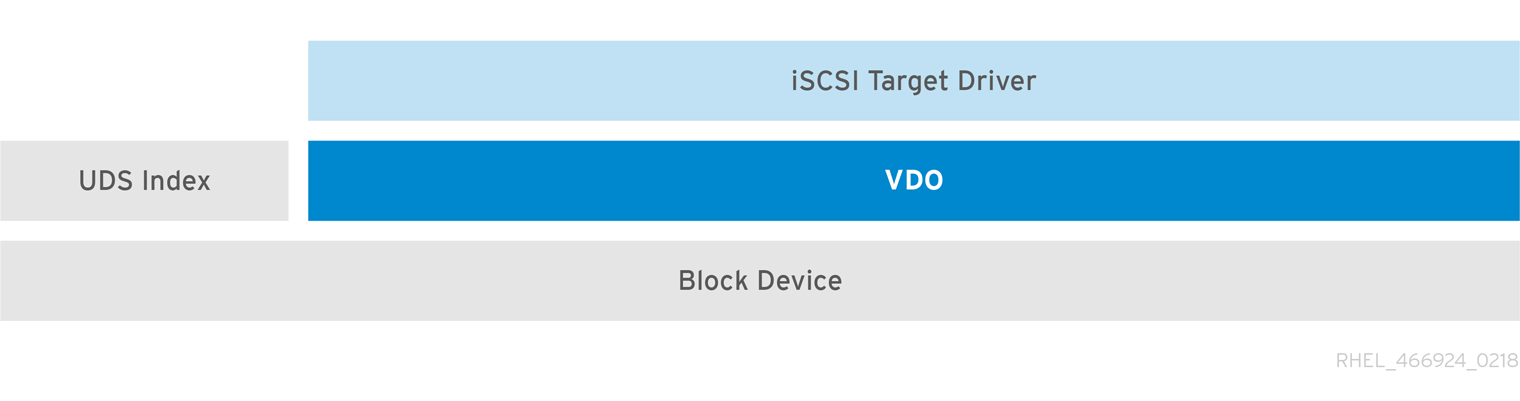
Figure 30.3. Deduplicated Block Storage Target
30.5.2. File Systems
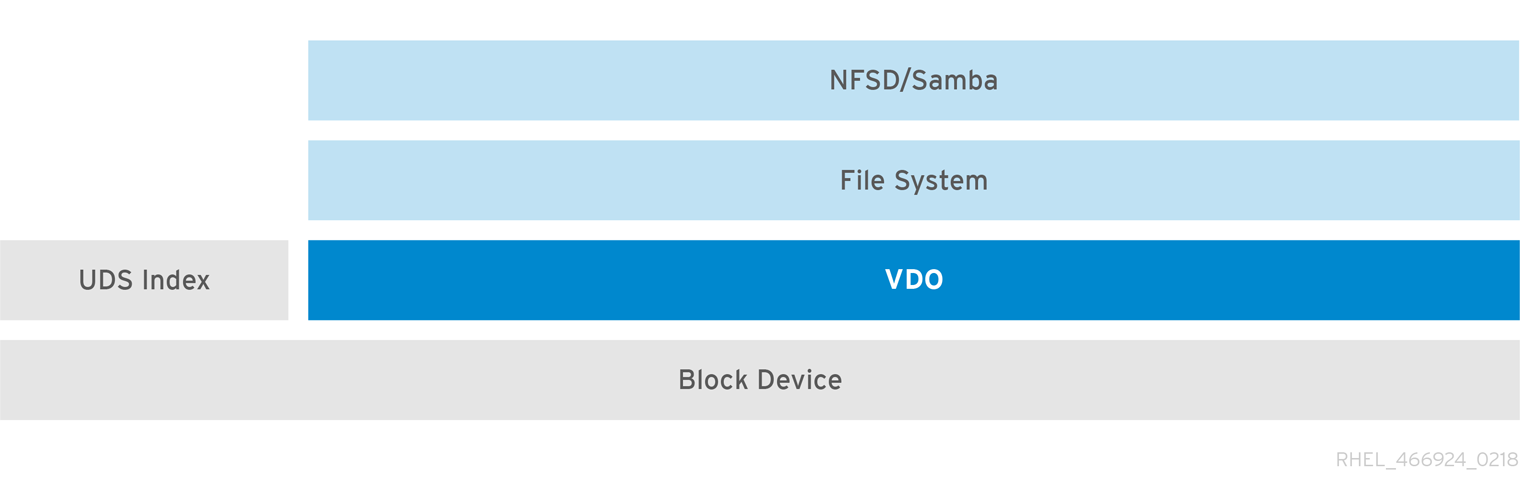
Figure 30.4. Deduplicated NAS
30.5.3. LVM
LV1 to LV4) are created out of the deduplicated storage pool. In this way, VDO can support multiprotocol unified block/file access to the underlying deduplicated storage pool.
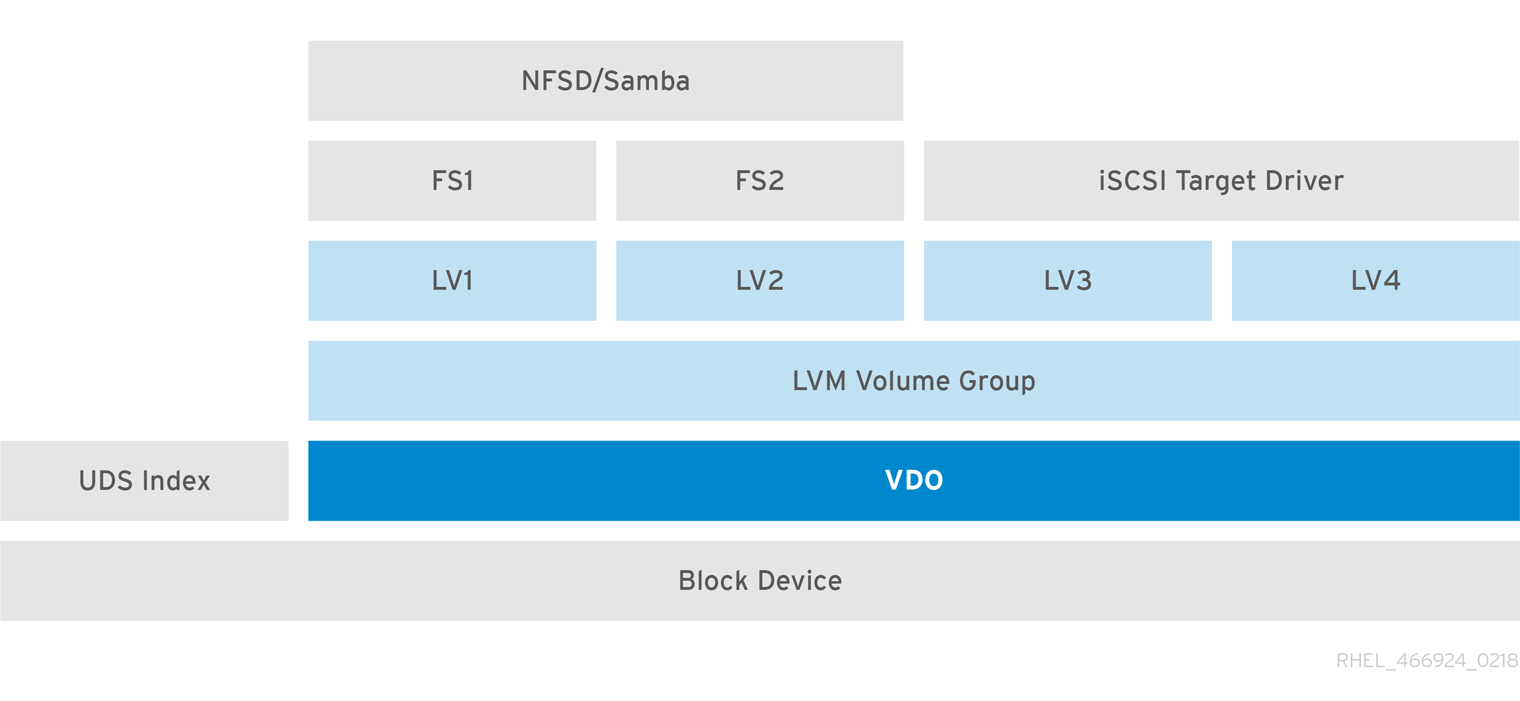
Figure 30.5. Deduplicated Unified Storage
30.5.4. Encryption
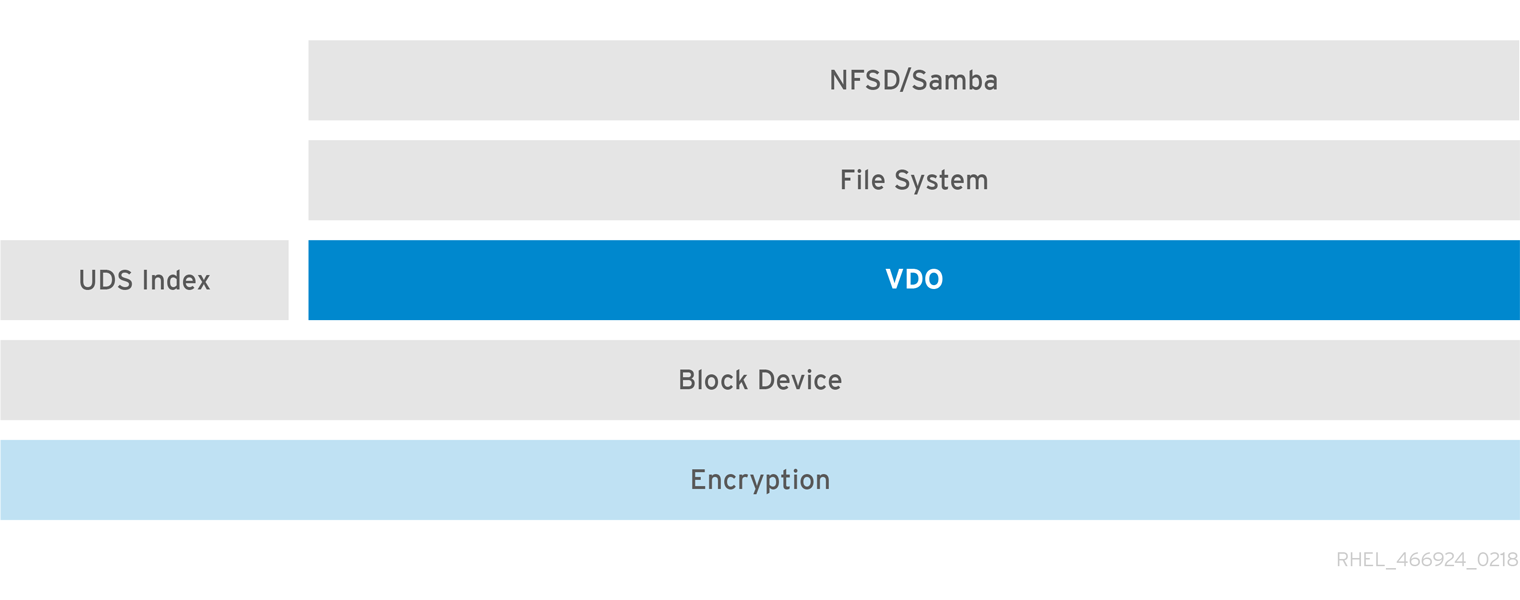
Figure 30.6. Using VDO with Encryption
30.6. Tuning VDO
30.6.1. Introduction to VDO Tuning
30.6.2. Background on VDO Architecture
- Logical zone threads
- The logical threads, with process names including the string
kvdo:logQ, maintain the mapping between the logical block numbers (LBNs) presented to the user of the VDO device and the physical block numbers (PBNs) in the underlying storage system. They also implement locking such that two I/O operations attempting to write to the same block will not be processed concurrently. Logical zone threads are active during both read and write operations.LBNs are divided into chunks (a block map page contains a bit over 3 MB of LBNs) and these chunks are grouped into zones that are divided up among the threads.Processing should be distributed fairly evenly across the threads, though some unlucky access patterns may occasionally concentrate work in one thread or another. For example, frequent access to LBNs within a given block map page will cause one of the logical threads to process all of those operations.The number of logical zone threads can be controlled using the--vdoLogicalThreads=thread countoption of thevdocommand - Physical zone threads
- Physical, or
kvdo:physQ, threads manage data block allocation and maintain reference counts. They are active during write operations.Like LBNs, PBNs are divided into chunks called slabs, which are further divided into zones and assigned to worker threads that distribute the processing load.The number of physical zone threads can be controlled using the--vdoPhysicalThreads=thread countoption of thevdocommand. - I/O submission threads
kvdo:bioQthreads submit block I/O (bio) operations from VDO to the storage system. They take I/O requests enqueued by other VDO threads and pass them to the underlying device driver. These threads may communicate with and update data structures associated with the device, or set up requests for the device driver's kernel threads to process. Submitting I/O requests can block if the underlying device's request queue is full, so this work is done by dedicated threads to avoid processing delays.If these threads are frequently shown inDstate bypsortoputilities, then VDO is frequently keeping the storage system busy with I/O requests. This is generally good if the storage system can service multiple requests in parallel, as some SSDs can, or if the request processing is pipelined. If thread CPU utilization is very low during these periods, it may be possible to reduce the number of I/O submission threads.CPU usage and memory contention are dependent on the device driver(s) beneath VDO. If CPU utilization per I/O request increases as more threads are added then check for CPU, memory, or lock contention in those device drivers.The number of I/O submission threads can be controlled using the--vdoBioThreads=thread countoption of thevdocommand.- CPU-processing threads
kvdo:cpuQthreads exist to perform any CPU-intensive work such as computing hash values or compressing data blocks that do not block or require exclusive access to data structures associated with other thread types.The number of CPU-processing threads can be controlled using the--vdoCpuThreads=thread countoption of thevdocommand.- I/O acknowledgement threads
- The
kvdo:ackQthreads issue the callbacks to whatever sits atop VDO (for example, the kernel page cache, or application program threads doing direct I/O) to report completion of an I/O request. CPU time requirements and memory contention will be dependent on this other kernel-level code.The number of acknowledgement threads can be controlled using the--vdoAckThreads=thread countoption of thevdocommand. - Non-scalable VDO kernel threads:
- Deduplication thread
- The
kvdo:dedupeQthread takes queued I/O requests and contacts UDS. Since the socket buffer can fill up if the server cannot process requests quickly enough or if kernel memory is constrained by other system activity, this work is done by a separate thread so if a thread should block, other VDO processing can continue. There is also a timeout mechanism in place to skip an I/O request after a long delay (several seconds). - Journal thread
- The
kvdo:journalQthread updates the recovery journal and schedules journal blocks for writing. A VDO device uses only one journal, so this work cannot be split across threads. - Packer thread
- The
kvdo:packerQthread, active in the write path when compression is enabled, collects data blocks compressed by thekvdo:cpuQthreads to minimize wasted space. There is one packer data structure, and thus one packer thread, per VDO device.
30.6.3. Values to tune
30.6.3.1. CPU/memory
30.6.3.1.1. Logical, physical, cpu, ack thread counts
30.6.3.1.2. CPU Affinity and NUMA
top can not distinguish between CPU cycles that do work and cycles that are stalled. These tools interpret cache contention and slow memory accesses as actual work. As a result, moving a thread between nodes may appear to reduce the thread's apparent CPU utilization while increasing the number of operations it performs per second.
taskset utility. If other VDO-related work can also be run on the same node, that may further reduce contention. In that case, if one node lacks the CPU power to keep up with processing demands then memory contention must be considered when choosing threads to move onto other nodes. For example, if a storage device's driver has a significant number of data structures to maintain, it may help to move both the device's interrupt handling and VDO's I/O submissions (the bio threads that call the device's driver code) to another node. Keeping I/O acknowledgment (ack threads) and higher-level I/O submission threads (user-mode threads doing direct I/O, or the kernel's page cache flush thread) paired is also good practice.
30.6.3.1.3. Frequency throttling
performance to the /sys/devices/system/cpu/cpu*/cpufreq/scaling_governor files if they exist might produce better results. If these sysfs nodes do not exist, Linux or the system's BIOS may provide other options for configuring CPU frequency management.
30.6.3.2. Caching
30.6.3.2.1. Block Map Cache
--blockMapCacheSize=megabytes
option of the vdo command. Using a larger cache may produce significant benefits for random-access workloads.
30.6.3.2.2. Read Cache
vdo command's
--readCache={enabled | disabled}
option controls whether a read cache is used. If enabled, the cache has a minimum size of 8 MB, but it can be increased with the
--readCacheSize=megabytes
option. Managing the read cache incurs a slight overhead, so it may not increase performance if the storage system is fast enough. The read cache is disabled by default.
30.6.3.3. Storage System I/O
30.6.3.3.1. Bio Threads
30.6.3.3.2. IRQ Handling
%hi indicator in the header of the top display). In that case it may help to assign IRQ handling to certain cores and adjust the CPU affinity of VDO kernel threads not to run on those cores.
30.6.3.4. Maximum Discard Sectors
/sys/kvdo/max_discard_sectors, based on system usage. The default is 8 sectors (that is, one 4 KB block). Larger sizes may be specified, though VDO will still process them in a loop, one block at a time, ensuring that metadata updates for one discarded block are written to the journal and flushed to disk before starting on the next block.
30.6.4. Identifying Bottlenecks
top or ps, generally implies that too much work is being concentrated in one thread or on one CPU. However, in some cases it could mean that a VDO thread was scheduled to run on the CPU but no work actually happened; this scenario could occur with excessive hardware interrupt handler processing, memory contention between cores or NUMA nodes, or contention for a spin lock.
top utility to examine system performance, Red Hat suggests running top -H to show all process threads separately and then entering the 1 f j keys, followed by the Enter/Return key; the top command then displays the load on individual CPU cores and identifies the CPU on which each process or thread last ran. This information can provide the following insights:
- If a core has low
%id(idle) and%wa(waiting-for-I/O) values, it is being kept busy with work of some kind. - If the
%hivalue for a core is very low, that core is doing normal processing work, which is being load-balanced by the kernel scheduler. Adding more cores to that set may reduce the load as long as it does not introduce NUMA contention. - If the
%hifor a core is more than a few percent and only one thread is assigned to that core, and%idand%waare zero, the core is over-committed and the scheduler is not addressing the situation. In this case the kernel thread or the device interrupt handling should be reassigned to keep them on separate cores.
perf utility can examine the performance counters of many CPUs. Red Hat suggests using the perf top subcommand as a starting point to examine the work a thread or processor is doing. If, for example, the bioQ threads are spending many cycles trying to acquire spin locks, there may be too much contention in the device driver below VDO, and reducing the number of bioQ threads might alleviate the situation. High CPU use (in acquiring spin locks or elsewhere) could also indicate contention between NUMA nodes if, for example, the bioQ threads and the device interrupt handler are running on different nodes. If the processor supports them, counters such as stalled-cycles-backend, cache-misses, and node-load-misses may be of interest.
sar utility can provide periodic reports on multiple system statistics. The sar -d 1 command reports block device utilization levels (percentage of the time they have at least one I/O operation in progress) and queue lengths (number of I/O requests waiting) once per second. However, not all block device drivers can report such information, so the sar usefulness might depend on the device drivers in use.
30.7. VDO Commands
30.7.1. vdo
vdo utility manages both the kvdo and UDS components of VDO.
Synopsis
vdo { activate | changeWritePolicy | create | deactivate | disableCompression | disableDeduplication | enableCompression | enableDeduplication | growLogical | growPhysical | list | modify | printConfigFile | remove | start | status | stop }
[ options... ]
vdo { activate | changeWritePolicy | create | deactivate | disableCompression | disableDeduplication | enableCompression | enableDeduplication | growLogical | growPhysical | list | modify | printConfigFile | remove | start | status | stop }
[ options... ]
Sub-Commands
| Sub-Command | Description |
|---|---|
create
|
Creates a VDO volume and its associated index and makes it available. If
−−activate=disabled is specified the VDO volume is created but not made available. Will not overwrite an existing file system or formatted VDO volume unless −−force is given. This command must be run with root privileges. Applicable options include:
|
remove
|
Removes one or more stopped VDO volumes and associated indexes. This command must be run with root privileges. Applicable options include:
|
start
|
Starts one or more stopped, activated VDO volumes and associated services. This command must be run with root privileges. Applicable options include:
|
stop
|
Stops one or more running VDO volumes and associated services. This command must be run with root privileges. Applicable options include:
|
activate
|
Activates one or more VDO volumes. Activated volumes can be started using the
start
|
deactivate
|
Deactivates one or more VDO volumes. Deactivated volumes cannot be started by the
start
|
status
|
Reports VDO system and volume status in YAML format. This command does not require root privileges though information will be incomplete if run without. Applicable options include:
|
list
|
Displays a list of started VDO volumes. If
−−all is specified it displays both started and non‐started volumes. This command must be run with root privileges. Applicable options include:
|
modify
|
Modifies configuration parameters of one or all VDO volumes. Changes take effect the next time the VDO device is started; already‐running devices are not affected. Applicable options include:
|
changeWritePolicy
|
Modifies the write policy of one or all running VDO volumes. This command must be run with root privileges.
|
enableDeduplication
|
Enables deduplication on one or more VDO volumes. This command must be run with root privileges. Applicable options include:
|
disableDeduplication
|
Disables deduplication on one or more VDO volumes. This command must be run with root privileges. Applicable options include:
|
enableCompression
|
Enables compression on one or more VDO volumes. If the VDO volume is running, takes effect immediately. If the VDO volume is not running compression will be enabled the next time the VDO volume is started. This command must be run with root privileges. Applicable options include:
|
disableCompression
|
Disables compression on one or more VDO volumes. If the VDO volume is running, takes effect immediately. If the VDO volume is not running compression will be disabled the next time the VDO volume is started. This command must be run with root privileges. Applicable options include:
|
growLogical
|
Adds logical space to a VDO volume. The volume must exist and must be running. This command must be run with root privileges. Applicable options include:
|
growPhysical
|
Adds physical space to a VDO volume. The volume must exist and must be running. This command must be run with root privileges. Applicable options include:
|
printConfigFile
|
Prints the configuration file to
stdout. This command require root privileges. Applicable options include:
|
Options
| Option | Description |
|---|---|
--indexMem=gigabytes
| Specifies the amount of UDS server memory in gigabytes; the default size is 1 GB. The special decimal values 0.25, 0.5, 0.75 can be used, as can any positive integer. |
--sparseIndex={enabled | disabled}
| Enables or disables sparse indexing. The default is disabled. |
--all
| Indicates that the command should be applied to all configured VDO volumes. May not be used with --name. |
--blockMapCacheSize=megabytes
| Specifies the amount of memory allocated for caching block map pages; the value must be a multiple of 4096. Using a value with a B(ytes), K(ilobytes), M(egabytes), G(igabytes), T(erabytes), P(etabytes) or E(xabytes) suffix is optional. If no suffix is supplied, the value will be interpreted as megabytes. The default is 128M; the value must be at least 128M and less than 16T. Note that there is a memory overhead of 15%. |
--blockMapPeriod=period
| A value between 1 and 16380 which determines the number of block map updates which may accumulate before cached pages are flushed to disk. Higher values decrease recovery time after a crash at the expense of decreased performance during normal operation. The default value is 16380. Speak with your Red Hat representative before tuning this parameter. |
--compression={enabled | disabled}
| Enables or disables compression within the VDO device. The default is enabled. Compression may be disabled if necessary to maximize performance or to speed processing of data that is unlikely to compress. |
--confFile=file
| Specifies an alternate configuration file. The default is /etc/vdoconf.yml. |
--deduplication={enabled | disabled}
| Enables or disables deduplication within the VDO device. The default is enabled. Deduplication may be disabled in instances where data is not expected to have good deduplication rates but compression is still desired. |
--emulate512={enabled | disabled}
| Enables 512-byte block device emulation mode. The default is disabled. |
--force
| Unmounts mounted file systems before stopping a VDO volume. |
--forceRebuild
| Forces an offline rebuild before starting a read-only VDO volume so that it may be brought back online and made available. This option may result in data loss or corruption. |
--help
| Displays documentation for the vdo utility. |
--logfile=pathname
| Specify the file to which this script's log messages are directed. Warning and error messages are always logged to syslog as well. |
--name=volume
| Operates on the specified VDO volume. May not be used with --all. |
--device=device
| Specifies the absolute path of the device to use for VDO storage. |
--activate={enabled | disabled}
| The argument disabled indicates that the VDO volume should only be created. The volume will not be started or enabled. The default is enabled. |
--vdoAckThreads=thread count
| Specifies the number of threads to use for acknowledging completion of requested VDO I/O operations. The default is 1; the value must be at least 0 and less than or equal to 100. |
--vdoBioRotationInterval=I/O count
| Specifies the number of I/O operations to enqueue for each bio-submission thread before directing work to the next. The default is 64; the value must be at least 1 and less than or equal to 1024. |
--vdoBioThreads=thread count
| Specifies the number of threads to use for submitting I/O operations to the storage device. Minimum is 1; maximum is 100. The default is 4; the value must be at least 1 and less than or equal to 100. |
--vdoCpuThreads=thread count
| Specifies the number of threads to use for CPU- intensive work such as hashing or compression. The default is 2; the value must be at least 1 and less than or equal to 100. |
--vdoHashZoneThreads=thread count
| Specifies the number of threads across which to subdivide parts of the VDO processing based on the hash value computed from the block data. The default is 1; the value must be at least 0 and less than or equal to 100. vdoHashZoneThreads, vdoLogicalThreads and vdoPhysicalThreads must be either all zero or all non-zero. |
--vdoLogicalThreads=thread count
| Specifies the number of threads across which to subdivide parts of the VDO processing based on the hash value computed from the block data. The value must be at least 0 and less than or equal to 100. A logical thread count of 9 or more will require explicitly specifying a sufficiently large block map cache size, as well. vdoHashZoneThreads, vdoLogicalThreads, and vdoPhysicalThreads must be either all zero or all non‐zero. The default is 1. |
--vdoLogLevel=level
| Specifies the VDO driver log level: critical, error, warning, notice, info, or debug. Levels are case sensitive; the default is info. |
--vdoLogicalSize=megabytes
| Specifies the logical VDO volume size in megabytes. Using a value with a S(ectors), B(ytes), K(ilobytes), M(egabytes), G(igabytes), T(erabytes), P(etabytes) or E(xabytes) suffix is optional. Used for over- provisioning volumes. This defaults to the size of the storage device. |
--vdoPhysicalThreads=thread count
| Specifies the number of threads across which to subdivide parts of the VDO processing based on physical block addresses. The value must be at least 0 and less than or equal to 16. Each additional thread after the first will use an additional 10 MB of RAM. vdoPhysicalThreads, vdoHashZoneThreads, and vdoLogicalThreads must be either all zero or all non‐zero. The default is 1. |
--readCache={enabled | disabled}
| Enables or disables the read cache within the VDO device. The default is disabled. The cache should be enabled if write workloads are expected to have high levels of deduplication, or for read intensive workloads of highly compressible data. |
--readCacheSize=megabytes
| Specifies the extra VDO device read cache size in megabytes. This space is in addition to a system- defined minimum. Using a value with a B(ytes), K(ilobytes), M(egabytes), G(igabytes), T(erabytes), P(etabytes) or E(xabytes) suffix is optional. The default is 0M. 1.12 MB of memory will be used per MB of read cache specified, per bio thread. |
--vdoSlabSize=megabytes
| Specifies the size of the increment by which a VDO is grown. Using a smaller size constrains the total maximum physical size that can be accommodated. Must be a power of two between 128M and 32G; the default is 2G. Using a value with a S(ectors), B(ytes), K(ilobytes), M(egabytes), G(igabytes), T(erabytes), P(etabytes) or E(xabytes) suffix is optional. If no suffix is used, the value will be interpreted as megabytes. |
--verbose
| Prints commands before executing them. |
--writePolicy={ auto | sync | async }
| Specifies the write policy:
|
status
subcommand returns the following information in YAML format, divided into keys as follows:
| Key | Description | |
|---|---|---|
| VDO Status | Information in this key covers the name of the host and date and time at which the status inquiry is being made. Parameters reported in this area include: | |
| Node | The host name of the system on which VDO is running. | |
| Date | The date and time at which the vdo status command is run. | |
| Kernel Module | Information in this key covers the configured kernel. | |
| Loaded | Whether or not the kernel module is loaded (True or False). | |
| Version Information | Information on the version of kvdo that is configured. | |
| Configuration | Information in this key covers the location and status of the VDO configuration file. | |
| File | Location of the VDO configuration file. | |
| Last modified | The last-modified date of the VDO configuration file. | |
| VDOs | Provides configuration information for all VDO volumes. Parameters reported for each VDO volume include: | |
| Block size | The block size of the VDO volume, in bytes. | |
| 512 byte emulation | Indicates whether the volume is running in 512-byte emulation mode. | |
| Enable deduplication | Whether deduplication is enabled for the volume. | |
| Logical size | The logical size of the VDO volume. | |
| Physical size | The size of a VDO volume's underlying physical storage. | |
| Write policy | The configured value of the write policy (sync or async). | |
| VDO Statistics | Output of the vdostats utility. | |
30.7.2. vdostats
vdostats utility displays statistics for each configured (or specified) device in a format similar to the Linux df utility.
vdostats utility may be incomplete if it is not run with root privileges.
Synopsis
vdostats [ --verbose | --human-readable | --si | --all ] [ --version ] [ device ...]
vdostats [ --verbose | --human-readable | --si | --all ] [ --version ] [ device ...]
Options
| Option | Description |
|---|---|
--verbose
|
Displays the utilization and block I/O (bios) statistics for one (or more) VDO devices. See Table 30.9, “vdostats --verbose Output” for details.
|
--human-readable
| Displays block values in readable form (Base 2: 1 KB = 210 bytes = 1024 bytes). |
--si
| The --si option modifies the output of the --human-readable option to use SI units (Base 10: 1 KB = 103 bytes = 1000 bytes). If the --human-readable option is not supplied, the --si option has no effect. |
--all
| This option is only for backwards compatibility. It is now equivalent to the --verbose option. |
--version
| Displays the vdostats version. |
device ...
| Specifies one or more specific volumes to report on. If this argument is omitted, vdostats will report on all devices. |
Output
Device 1K-blocks Used Available Use% Space Saving% /dev/mapper/my_vdo 1932562432 427698104 1504864328 22% 21%
Device 1K-blocks Used Available Use% Space Saving%
/dev/mapper/my_vdo 1932562432 427698104 1504864328 22% 21%
| Item | Description |
|---|---|
| Device | The path to the VDO volume. |
| 1K-blocks | The total number of 1K blocks allocated for a VDO volume (= physical volume size * block size / 1024) |
| Used | The total number of 1K blocks used on a VDO volume (= physical blocks used * block size / 1024) |
| Available | The total number of 1K blocks available on a VDO volume (= physical blocks free * block size / 1024) |
| Use% | The percentage of physical blocks used on a VDO volume (= used blocks / allocated blocks * 100) |
| Space Saving% | The percentage of physical blocks saved on a VDO volume (= [logical blocks used - physical blocks used] / logical blocks used) |
--human-readable option converts block counts into conventional units (1 KB = 1024 bytes):
Device Size Used Available Use% Space Saving% /dev/mapper/my_vdo 1.8T 407.9G 1.4T 22% 21%
Device Size Used Available Use% Space Saving%
/dev/mapper/my_vdo 1.8T 407.9G 1.4T 22% 21%
--human-readable and --si options convert block counts into SI units (1 KB = 1000 bytes):
Device Size Used Available Use% Space Saving% /dev/mapper/my_vdo 2.0T 438G 1.5T 22% 21%
Device Size Used Available Use% Space Saving%
/dev/mapper/my_vdo 2.0T 438G 1.5T 22% 21%
--verbose (Table 30.9, “vdostats --verbose Output”) option displays VDO device statistics in YAML format for one (or all) VDO devices.
| Item | Description |
|---|---|
| Version | The version of these statistics. |
| Release version | The release version of the VDO. |
| Data blocks used | The number of physical blocks currently in use by a VDO volume to store data. |
| Overhead blocks used | The number of physical blocks currently in use by a VDO volume to store VDO metadata. |
| Logical blocks used | The number of logical blocks currently mapped. |
| Physical blocks | The total number of physical blocks allocated for a VDO volume. |
| Logical blocks | The maximum number of logical blocks that can be mapped by a VDO volume. |
| 1K-blocks | The total number of 1K blocks allocated for a VDO volume (= physical volume size * block size / 1024) |
| 1K-blocks used | The total number of 1K blocks used on a VDO volume (= physical blocks used * block size / 1024) |
| 1K-blocks available | The total number of 1K blocks available on a VDO volume (= physical blocks free * block size / 1024) |
| Used percent | The percentage of physical blocks used on a VDO volume (= used blocks / allocated blocks * 100) |
| Saving percent | The percentage of physical blocks saved on a VDO volume (= [logical blocks used - physical blocks used] / logical blocks used) |
| Block map cache size | The size of the block map cache, in bytes. |
| Write policy | The active write policy (sync or async). This is configured via vdo changeWritePolicy --writePolicy=auto|sync|async. |
| Block size | The block size of a VDO volume, in bytes. |
| Completed recovery count | The number of times a VDO volume has recovered from an unclean shutdown. |
| Read-only recovery count | The number of times a VDO volume has been recovered from read-only mode (via vdo start --forceRebuild). |
| Operating mode | Indicates whether a VDO volume is operating normally, is in recovery mode, or is in read-only mode. |
| Recovery progress (%) | Indicates online recovery progress, or N/A if the volume is not in recovery mode. |
| Compressed fragments written | The number of compressed fragments that have been written since the VDO volume was last restarted. |
| Compressed blocks written | The number of physical blocks of compressed data that have been written since the VDO volume was last restarted. |
| Compressed fragments in packer | The number of compressed fragments being processed that have not yet been written. |
| Slab count | The total number of slabs. |
| Slabs opened | The total number of slabs from which blocks have ever been allocated. |
| Slabs reopened | The number of times slabs have been re-opened since the VDO was started. |
| Journal disk full count | The number of times a request could not make a recovery journal entry because the recovery journal was full. |
| Journal commits requested count | The number of times the recovery journal requested slab journal commits. |
| Journal entries batching | The number of journal entry writes started minus the number of journal entries written. |
| Journal entries started | The number of journal entries which have been made in memory. |
| Journal entries writing | The number of journal entries in submitted writes minus the number of journal entries committed to storage. |
| Journal entries written | The total number of journal entries for which a write has been issued. |
| Journal entries committed | The number of journal entries written to storage. |
| Journal blocks batching | The number of journal block writes started minus the number of journal blocks written. |
| Journal blocks started | The number of journal blocks which have been touched in memory. |
| Journal blocks writing | The number of journal blocks written (with metadatata in active memory) minus the number of journal blocks committed. |
| Journal entries written | The total number of journal blocks for which a write has been issued. |
| Journal blocks committed | The number of journal blocks written to storage. |
| Slab journal disk full count | The number of times an on-disk slab journal was full. |
| Slab journal flush count | The number of times an entry was added to a slab journal that was over the flush threshold. |
| Slab journal blocked count | The number of times an entry was added to a slab journal that was over the blocking threshold. |
| Slab journal blocks written | The number of slab journal block writes issued. |
| Slab journal tail busy count | The number of times write requests blocked waiting for a slab journal write. |
| Slab summary blocks written | The number of slab summary block writes issued. |
| Reference blocks written | The number of reference block writes issued. |
| Block map dirty pages | The number of dirty pages in the block map cache. |
| Block map clean pages | The number of clean pages in the block map cache. |
| Block map free pages | The number of free pages in the block map cache. |
| Block map failed pages | The number of block map cache pages that have write errors. |
| Block map incoming pages | The number of block map cache pages that are being read into the cache. |
| Block map outgoing pages | The number of block map cache pages that are being written. |
| Block map cache pressure | The number of times a free page was not available when needed. |
| Block map read count | The total number of block map page reads. |
| Block map write count | The total number of block map page writes. |
| Block map failed reads | The total number of block map read errors. |
| Block map failed writes | The total number of block map write errors. |
| Block map reclaimed | The total number of block map pages that were reclaimed. |
| Block map read outgoing | The total number of block map reads for pages that were being written. |
| Block map found in cache | The total number of block map cache hits. |
| Block map discard required | The total number of block map requests that required a page to be discarded. |
| Block map wait for page | The total number of requests that had to wait for a page. |
| Block map fetch required | The total number of requests that required a page fetch. |
| Block map pages loaded | The total number of page fetches. |
| Block map pages saved | The total number of page saves. |
| Block map flush count | The total number of flushes issued by the block map. |
| Invalid advice PBN count | The number of times the index returned invalid advice |
| No space error count. | The number of write requests which failed due to the VDO volume being out of space. |
| Read only error count | The number of write requests which failed due to the VDO volume being in read-only mode. |
| Instance | The VDO instance. |
| 512 byte emulation | Indicates whether 512 byte emulation is on or off for the volume. |
| Current VDO IO requests in progress. | The number of I/O requests the VDO is current processing. |
| Maximum VDO IO requests in progress | The maximum number of simultaneous I/O requests the VDO has processed. |
| Current dedupe queries | The number of deduplication queries currently in flight. |
| Maximum dedupe queries | The maximum number of in-flight deduplication queries. |
| Dedupe advice valid | The number of times deduplication advice was correct. |
| Dedupe advice stale | The number of times deduplication advice was incorrect. |
| Dedupe advice timeouts | The number of times deduplication queries timed out. |
| Flush out | The number of flush requests submitted by VDO to the underlying storage. |
| Bios in... Bios in partial... Bios out... Bios meta... Bios journal... Bios page cache... Bios out completed... Bio meta completed... Bios journal completed... Bios page cache completed... Bios acknowledged... Bios acknowledged partial... Bios in progress... |
These statistics count the number of bios in each category with a given flag. The categories are:
There are three types of flags:
|
| Read cache accesses | The number of times VDO searched the read cache. |
| Read cache hits | The number of read cache hits. |
30.8. Statistics Files in /sys
/sys/kvdo/volume_name/statistics directory, where volume_name is the name of thhe VDO volume. This provides an alternate interface to the data produced by the vdostats utility suitable for access by shell scripts and management software.
statistics directory in addition to the ones listed in the table below. These additional statistics files are not guaranteed to be supported in future releases.
| File | Description |
|---|---|
dataBlocksUsed | The number of physical blocks currently in use by a VDO volume to store data. |
logicalBlocksUsed | The number of logical blocks currently mapped. |
physicalBlocks | The total number of physical blocks allocated for a VDO volume. |
logicalBlocks | The maximum number of logical blocks that can be mapped by a VDO volume. |
mode | Indicates whether a VDO volume is operating normally, is in recovery mode, or is in read-only mode. |
Chapter 31. VDO Evaluation
31.1. Introduction
- VDO-specific configurable properties (performance tuning end-user applications)
- Impact of being a native 4 KB block device
- Response to access patterns and distributions of deduplication and compression
- Performance in high-load environments (very important)
- Analyze cost vs. capacity vs. performance, based on application
31.1.1. Expectations and Deliverables
- Help engineers identify configuration settings that elicit optimal responses from the test device
- Provide an understanding of basic tuning parameters to help avoid product misconfigurations
- Create a performance results portfolio as a reference to compare against "real" application results
- Identify how different workloads affect performance and data efficiency
- Expedite time-to-market with VDO implementations
31.2. Test Environment Preparations
31.2.1. System Configuration
- Number and type of CPU cores available. This can be controlled by using the
tasksetutility. - Available memory and total installed memory.
- Configuration of storage devices.
- Linux kernel version. Note that Red Hat Enterprise Linux 7 provides only one Linux kernel version.
- Packages installed.
31.2.2. VDO Configuration
- Partitioning scheme
- File system(s) used on VDO volumes
- Size of the physical storage assigned to a VDO volume
- Size of the logical VDO volume created
- Sparse or dense indexing
- UDS Index in memory size
- VDO's thread configuration
31.2.3. Workloads
- Types of tools used to generate test data
- Number of concurrent clients
- The quantity of duplicate 4 KB blocks in the written data
- Read and write patterns
- The working set size
31.2.4. Supported System Configurations
- Flexible I/O Tester version 2.08 or higher; available from the fio package
sysstatversion 8.1.2-2 or higher; available from the sysstat package
31.2.5. Pre-Test System Preparations
- System Configuration
- Ensure that your CPU is running at its highest performance setting.
- Disable frequency scaling if possible using the BIOS configuration or the Linux
cpupowerutility. - Enable Turbo mode if possible to achieve maximum throughput. Turbo mode introduces some variability in test results, but performance will meet or exceed that of testing without Turbo.
- Linux Configuration
- For disk-based solutions, Linux offers several I/O scheduler algorithms to handle multiple read/write requests as they are queued. By default, Red Hat Enterprise Linux uses the CFQ (completely fair queuing) scheduler, which arranges requests in a way that improves rotational disk (hard disk) access in many situations. We instead suggest using the Deadline scheduler for rotational disks, having found that it provides better throughput and latency in Red Hat lab testing. Change the device settings as follows:
echo "deadline" > /sys/block/device/queue/scheduler
# echo "deadline" > /sys/block/device/queue/schedulerCopy to Clipboard Copied! Toggle word wrap Toggle overflow - For flash-based solutions, the
noopscheduler demonstrates superior random access throughput and latency in Red Hat lab testing. Change the device settings as follows:echo "noop" > /sys/block/device/queue/scheduler
# echo "noop" > /sys/block/device/queue/schedulerCopy to Clipboard Copied! Toggle word wrap Toggle overflow
- Storage device configurationFile systems (ext4, XFS, etc.) may have unique impacts on performance; they often skew performance measurements, making it harder to isolate VDO's impact on the results. If reasonable, we recommend measuring performance on the raw block device. If this is not possible, format the device using the file system that would be used in the target implementation.
31.2.6. VDO Internal Structures
31.2.7. VDO Optimizations
High Load
Synchronous vs. Asynchronous Write Policy
vdo status --name=my_vdo
# vdo status --name=my_vdoMetadata Caching
VDO Multithreading Configuration
Data Content
31.2.8. Special Considerations for Testing Read Performance
- If a 4 KB block has never been written, VDO will not perform I/O to the storage and will immediately respond with a zero block.
- If a 4 KB block has been written but contains all zeros, VDO will not perform I/O to the storage and will immediately respond with a zero block.
31.2.9. Cross Talk
31.3. Data Efficiency Testing Procedures
Test Environment
- One or more Linux physical block devices are available.
- The target block device (for example,
/dev/sdb) is larger than 512 GB. - Flexible I/O Tester (
fio) version 2.1.1 or later is installed. - VDO is installed.
- The Linux build used, including the kernel build number.
- A complete list of installed packages, as obtained from the
rpm -qacommand. - Complete system specifications:
- CPU type and quantity (available in
/proc/cpuinfo). - Installed memory and the amount available after the base OS is running (available in
/proc/meminfo). - Type(s) of drive controller(s) used.
- Type(s) and quantity of disk(s) used.
- A complete list of running processes (from
ps auxor a similar listing). - Name of the Physical Volume and the Volume Group created for use with VDO (
pvsandvgslistings). - File system used when formatting the VDO volume (if any).
- Permissions on the mounted directory.
- Contents of
/etc/vdoconf.yaml. - Location of the VDO files.
sosreport.
Workloads
fio, are recommended for use during testing.
fio. Understanding the arguments is critical to a successful evaluation:
| Argument | Description | Value |
|---|---|---|
--size | The quantity of data fio will send to the target per job (see numjobs below). | 100 GB |
--bs | The block size of each read/write request produced by fio. Red Hat recommends a 4 KB block size to match VDO's 4 KB default | 4k |
--numjobs |
The number of jobs that fio will create to run the benchmark.
Each job sends the amount of data specified by the
--size parameter.
The first job sends data to the device at the offset specified by the
--offset parameter. Subsequent jobs write the same region of the disk (overwriting) unless the --offset_increment parameter is provided, which will offset each job from where the previous job began by that value. To achieve peak performance on flash at least two jobs are recommended. One job is typically enough to saturate rotational disk (HDD) throughput.
|
1 (HDD)
2 (SSD)
|
--thread | Instructs fio jobs to be run in threads rather than being forked, which may provide better performance by limiting context switching. | <N/A> |
--ioengine |
There are several I/O engines available in Linux that are able to be tested using fio. Red Hat testing uses the asynchronous unbuffered engine (
libaio). If you are interested in another engine, discuss that with your Red Hat Sales Engineer.
The Linux
libaio engine is used to evaluate workloads in which one or more processes are making random requests simultaneously. libaio allows multiple requests to be made asynchronously from a single thread before any data has been retrieved, which limits the number of context switches that would be required if the requests were provided by manythreads via a synchronous engine.
| libaio |
--direct |
When set, direct allows requests to be submitted to the device bypassing the Linux Kernel's page cache.
Libaio Engine:
libaio must be used with direct enabled (=1) or the kernel may resort to the sync API for all I/O requests.
| 1 (libaio) |
--iodepth |
The number of I/O buffers in flight at any time.
A high
iodepth will usually increase performance, particularly for random reads or writes. High depths ensure that the controller always has requests to batch. However, setting iodepth too high (greater than 1K, typically) may cause undesirable latency. While Red Hat recommends an iodepth between 128 and 512, the final value is a trade-off and depends on how your application tolerates latency.
| 128 (minimum) |
--iodepth_batch_submit | The number of I/Os to create when the iodepth buffer pool begins to empty. This parameter limits task switching from I/O to buffer creation during the test. | 16 |
--iodepth_batch_complete | The number of I/Os to complete before submitting a batch (iodepth_batch_complete). This parameter limits task switching from I/O to buffer creation during the test. | 16 |
--gtod_reduce | Disables time-of-day calls to calculate latency. This setting will lower throughput if enabled (=0), so it should be enabled (=1) unless latency measurement is necessary. | 1 |
31.3.1. Configuring a VDO Test Volume
1. Create a VDO Volume with a Logical Size of 1 TB on a 512 GB Physical Volume
- Create a VDO volume.
- To test the VDO
asyncmode on top of synchronous storage, create an asynchronous volume using the--writePolicy=asyncoption:vdo create --name=vdo0 --device=/dev/sdb \ --vdoLogicalSize=1T --writePolicy=async --verbose# vdo create --name=vdo0 --device=/dev/sdb \ --vdoLogicalSize=1T --writePolicy=async --verboseCopy to Clipboard Copied! Toggle word wrap Toggle overflow - To test the VDO
syncmode on top of synchronous storage, create a synchronous volume using the--writePolicy=syncoption:vdo create --name=vdo0 --device=/dev/sdb \ --vdoLogicalSize=1T --writePolicy=sync --verbose# vdo create --name=vdo0 --device=/dev/sdb \ --vdoLogicalSize=1T --writePolicy=sync --verboseCopy to Clipboard Copied! Toggle word wrap Toggle overflow
- Format the new device with an XFS or ext4 file system.
- For XFS:
mkfs.xfs -K /dev/mapper/vdo0
# mkfs.xfs -K /dev/mapper/vdo0Copy to Clipboard Copied! Toggle word wrap Toggle overflow - For ext4:
mkfs.ext4 -E nodiscard /dev/mapper/vdo0
# mkfs.ext4 -E nodiscard /dev/mapper/vdo0Copy to Clipboard Copied! Toggle word wrap Toggle overflow
- Mount the formatted device:
mkdir /mnt/VDOVolume mount /dev/mapper/vdo0 /mnt/VDOVolume && \ chmod a+rwx /mnt/VDOVolume
# mkdir /mnt/VDOVolume # mount /dev/mapper/vdo0 /mnt/VDOVolume && \ chmod a+rwx /mnt/VDOVolumeCopy to Clipboard Copied! Toggle word wrap Toggle overflow
31.3.2. Testing VDO Efficiency
2. Test Reading and Writing to the VDO Volume
- Write 32 GB of random data to the VDO volume:
dd if=/dev/urandom of=/mnt/VDOVolume/testfile bs=4096 count=8388608
$ dd if=/dev/urandom of=/mnt/VDOVolume/testfile bs=4096 count=8388608Copy to Clipboard Copied! Toggle word wrap Toggle overflow - Read the data from the VDO volume and write it to another location not on the VDO volume:
dd if=/mnt/VDOVolume/testfile of=/home/user/testfile bs=4096
$ dd if=/mnt/VDOVolume/testfile of=/home/user/testfile bs=4096Copy to Clipboard Copied! Toggle word wrap Toggle overflow - Compare the two files using
diff, which should report that the files are the same:diff -s /mnt/VDOVolume/testfile /home/user/testfile
$ diff -s /mnt/VDOVolume/testfile /home/user/testfileCopy to Clipboard Copied! Toggle word wrap Toggle overflow - Copy the file to a second location on the VDO volume:
dd if=/home/user/testfile of=/mnt/VDOVolume/testfile2 bs=4096
$ dd if=/home/user/testfile of=/mnt/VDOVolume/testfile2 bs=4096Copy to Clipboard Copied! Toggle word wrap Toggle overflow - Compare the third file to the second file. This should report that the files are the same:
diff -s /mnt/VDOVolume/testfile2 /home/user/testfile
$ diff -s /mnt/VDOVolume/testfile2 /home/user/testfileCopy to Clipboard Copied! Toggle word wrap Toggle overflow
3. Remove the VDO Volume
- Unmount the file system created on the VDO volume:
umount /mnt/VDOVolume
# umount /mnt/VDOVolumeCopy to Clipboard Copied! Toggle word wrap Toggle overflow - Run the command to remove the VDO volume
vdo0from the system:vdo remove --name=vdo0
# vdo remove --name=vdo0Copy to Clipboard Copied! Toggle word wrap Toggle overflow - Verify that the volume has been removed. There should be no listing in
vdo listfor the VDO partition:vdo list --all | grep vdo
# vdo list --all | grep vdoCopy to Clipboard Copied! Toggle word wrap Toggle overflow
4. Measure Deduplication
- Create and mount a VDO volume following Section 31.3.1, “Configuring a VDO Test Volume”.
- Create 10 directories on the VDO volume named
vdo1throughvdo10to hold 10 copies of the test data set:mkdir /mnt/VDOVolume/vdo{01..10}$ mkdir /mnt/VDOVolume/vdo{01..10}Copy to Clipboard Copied! Toggle word wrap Toggle overflow - Examine the amount of disk space used according to the file system:
df -h /mnt/VDOVolume Filesystem Size Used Avail Use% Mounted on /dev/mapper/vdo0 1.5T 198M 1.4T 1% /mnt/VDOVolume
$ df -h /mnt/VDOVolume Filesystem Size Used Avail Use% Mounted on /dev/mapper/vdo0 1.5T 198M 1.4T 1% /mnt/VDOVolumeCopy to Clipboard Copied! Toggle word wrap Toggle overflow Consider tabulating the results in a table:Expand Statistic Bare File System After Seed After 10 Copies File System Used Size 198 MB VDO Data Used VDO Logical Used - Run the following command and record the values. "Data blocks used" is the number of blocks used by user data on the physical device running under VDO. "Logical blocks used" is the number of blocks used before optimization. It will be used as the starting point for measurements
Copy to Clipboard Copied! Toggle word wrap Toggle overflow - Create a data source file in the top level of the VDO volume
dd if=/dev/urandom of=/mnt/VDOVolume/sourcefile bs=4096 count=1048576 4294967296 bytes (4.3 GB) copied, 540.538 s, 7.9 MB/s
$ dd if=/dev/urandom of=/mnt/VDOVolume/sourcefile bs=4096 count=1048576 4294967296 bytes (4.3 GB) copied, 540.538 s, 7.9 MB/sCopy to Clipboard Copied! Toggle word wrap Toggle overflow - Re-examine the amount of used physical disk space in use. This should show an increase in the number of blocks used corresponding to the file just written:
df -h /mnt/VDOVolume Filesystem Size Used Avail Use% Mounted on /dev/mapper/vdo0 1.5T 4.2G 1.4T 1% /mnt/VDOVolume
$ df -h /mnt/VDOVolume Filesystem Size Used Avail Use% Mounted on /dev/mapper/vdo0 1.5T 4.2G 1.4T 1% /mnt/VDOVolumeCopy to Clipboard Copied! Toggle word wrap Toggle overflow Copy to Clipboard Copied! Toggle word wrap Toggle overflow - Copy the file to each of the 10 subdirectories:
for i in {01..10}; do cp /mnt/VDOVolume/sourcefile /mnt/VDOVolume/vdo$i done$ for i in {01..10}; do cp /mnt/VDOVolume/sourcefile /mnt/VDOVolume/vdo$i doneCopy to Clipboard Copied! Toggle word wrap Toggle overflow - Once again, check the amount of physical disk space used (data blocks used). This number should be similar to the result of step 6 above, with only a slight increase due to file system journaling and metadata:
df -h /mnt/VDOVolume Filesystem Size Used Avail Use% Mounted on /dev/mapper/vdo0 1.5T 45G 1.3T 4% /mnt/VDOVolume
$ df -h /mnt/VDOVolume Filesystem Size Used Avail Use% Mounted on /dev/mapper/vdo0 1.5T 45G 1.3T 4% /mnt/VDOVolumeCopy to Clipboard Copied! Toggle word wrap Toggle overflow Copy to Clipboard Copied! Toggle word wrap Toggle overflow - Subtract this new value of the space used by the file system from the value found before writing the test data. This is the amount of space consumed by this test from the file system's perspective.
- Observe the space savings in your recorded statistics:Note:In the following table, values have been converted to MB/GB. vdostats "blocks" are 4,096 B.
Expand Statistic Bare File System After Seed After 10 Copies File System Used Size 198 MB 4.2 GB 45 GB VDO Data Used 4 MB 4.1 GB 4.1 GB VDO Logical Used 23.6 GB* 27.8 GB 68.7 GB * File system overhead for 1.6 TB formatted drive
5. Measure Compression
- Create a VDO volume of at least 10 GB of physical and logical size. Add options to disable deduplication and enable compression:
vdo create --name=vdo0 --device=/dev/sdb \ --vdoLogicalSize=10G --verbose \ --deduplication=disabled --compression=enabled# vdo create --name=vdo0 --device=/dev/sdb \ --vdoLogicalSize=10G --verbose \ --deduplication=disabled --compression=enabledCopy to Clipboard Copied! Toggle word wrap Toggle overflow - Inspect VDO statistics before transfer; make note of data blocks used and logical blocks used (both should be zero):
vdostats --verbose | grep "blocks used"
# vdostats --verbose | grep "blocks used"Copy to Clipboard Copied! Toggle word wrap Toggle overflow - Format the new device with an XFS or ext4 file system.
- For XFS:
mkfs.xfs -K /dev/mapper/vdo0
# mkfs.xfs -K /dev/mapper/vdo0Copy to Clipboard Copied! Toggle word wrap Toggle overflow - For ext4:
mkfs.ext4 -E nodiscard /dev/mapper/vdo0
# mkfs.ext4 -E nodiscard /dev/mapper/vdo0Copy to Clipboard Copied! Toggle word wrap Toggle overflow
- Mount the formatted device:
mkdir /mnt/VDOVolume mount /dev/mapper/vdo0 /mnt/VDOVolume && \ chmod a+rwx /mnt/VDOVolume
# mkdir /mnt/VDOVolume # mount /dev/mapper/vdo0 /mnt/VDOVolume && \ chmod a+rwx /mnt/VDOVolumeCopy to Clipboard Copied! Toggle word wrap Toggle overflow - Synchronize the VDO volume to complete any unfinished compression:
sync && dmsetup message vdo0 0 sync-dedupe
# sync && dmsetup message vdo0 0 sync-dedupeCopy to Clipboard Copied! Toggle word wrap Toggle overflow - Inspect VDO statistics again. Logical blocks used — data blocks used is the number of 4 KB blocks saved by compression for the file system alone. VDO optimizes file system overhead as well as actual user data:
vdostats --verbose | grep "blocks used"
# vdostats --verbose | grep "blocks used"Copy to Clipboard Copied! Toggle word wrap Toggle overflow - Copy the contents of
/libto the VDO volume. Record the total size:Copy to Clipboard Copied! Toggle word wrap Toggle overflow - Synchronize Linux caches and the VDO volume:
sync && dmsetup message vdo0 0 sync-dedupe
# sync && dmsetup message vdo0 0 sync-dedupeCopy to Clipboard Copied! Toggle word wrap Toggle overflow - Inspect VDO statistics once again. Observe the logical and data blocks used:
vdostats --verbose | grep "blocks used"
# vdostats --verbose | grep "blocks used"Copy to Clipboard Copied! Toggle word wrap Toggle overflow - Logical blocks used - data blocks used represents the amount of space used (in units of 4 KB blocks) for the copy of your
/libfiles. - The total size (from the table in the section called “4. Measure Deduplication”) - (logical blocks used-data blocks used * 4096) = bytes saved by compression.
- Remove the VDO volume:
umount /mnt/VDOVolume && vdo remove --name=vdo0
# umount /mnt/VDOVolume && vdo remove --name=vdo0Copy to Clipboard Copied! Toggle word wrap Toggle overflow
6. Test VDO Compression Efficiency
- Create and mount a VDO volume following Section 31.3.1, “Configuring a VDO Test Volume”.
- Repeat the experiments in the section called “4. Measure Deduplication” and the section called “5. Measure Compression” without removing the volume. Observe changes to space savings in
vdostats. - Experiment with your own datasets.
7. Understanding TRIM and DISCARD
TRIM or DISCARD commands to inform the storage system when a logical block is no longer required. These commands can be sent whenever a block is deleted using the discard mount option, or these commands can be sent in a controlled manner by running utilities such as fstrim that tell the file system to detect which logical blocks are unused and send the information to the storage system in the form of a TRIM or DISCARD command.
Important
- Create and mount a new VDO logical volume following Section 31.3.1, “Configuring a VDO Test Volume”.
- Trim the file system to remove any unneeded blocks (this may take a long time):
fstrim /mnt/VDOVolume
# fstrim /mnt/VDOVolumeCopy to Clipboard Copied! Toggle word wrap Toggle overflow - Record the initial state in following table below by entering:
df -m /mnt/VDOVolume
$ df -m /mnt/VDOVolumeCopy to Clipboard Copied! Toggle word wrap Toggle overflow to see how much capacity is used in the file system, and run vdostats to see how many physical and logical data blocks are being used. - Create a 1 GB file with non-duplicate data in the file system running on top of VDO:
dd if=/dev/urandom of=/mnt/VDOVolume/file bs=1M count=1K
$ dd if=/dev/urandom of=/mnt/VDOVolume/file bs=1M count=1KCopy to Clipboard Copied! Toggle word wrap Toggle overflow and then collect the same data. The file system should have used an additional 1 GB, and the data blocks used and logical blocks used have increased similarly. - Run
fstrim /mnt/VDOVolumeand confirm that this has no impact after creating a new file. - Delete the 1 GB file:
rm /mnt/VDOVolume/file
$ rm /mnt/VDOVolume/fileCopy to Clipboard Copied! Toggle word wrap Toggle overflow Check and record the parameters. The file system is aware that a file has been deleted, but there has been no change to the number of physical or logical blocks because the file deletion has not been communicated to the underlying storage. - Run
fstrim /mnt/VDOVolumeand record the same parameters.fstrimlooks for free blocks in the file system and sends a TRIM command to the VDO volume for unused addresses, which releases the associated logical blocks, and VDO processes the TRIM to release the underlying physical blocks.Expand Step File Space Used (MB) Data Blocks Used Logical Blocks Used Initial Add 1 GB File Run fstrimDelete 1 GB File Run fstrim
fstrim is a command line tool that analyzes many blocks at once for greater efficiency. An alternative method is to use the file system discard option when mounting. The discard option will update the underlying storage after each file system block is deleted, which can slow throughput but provides for great utilization awareness. It is also important to understand that the need to TRIM or DISCARD unused blocks is not unique to VDO; any thin-provisioned storage system has the same challenge
31.4. Performance Testing Procedures
31.4.1. Phase 1: Effects of I/O Depth, Fixed 4 KB Blocks
- Perform four-corner testing at 4 KB I/O, and I/O depth of 1, 8, 16, 32, 64, 128, 256, 512, 1024:
- Sequential 100% reads, at fixed 4 KB *
- Sequential 100% write, at fixed 4 KB
- Random 100% reads, at fixed 4 KB *
- Random 100% write, at fixed 4 KB **
* Prefill any areas that may be read during the read test by performing a write fio job first** Re-create the VDO volume after 4 KB random write I/O runsExample shell test input stimulus (write):Copy to Clipboard Copied! Toggle word wrap Toggle overflow - Record throughput and latency at each data point, and then graph.
- Repeat test to complete four-corner testing:
--rw=randwrite,--rw=read, and--rw=randread.
- This particular appliance does not benefit from sequential 4 KB I/O depth > X. Beyond that depth, there are diminishing bandwidth bandwidth gains, and average request latency will increase 1:1 for each additional I/O request.
- This particular appliance does not benefit from random 4 KB I/O depth > Z. Beyond that depth, there are diminishing bandwidth gains, and average request latency will increase 1:1 for each additional I/O request.
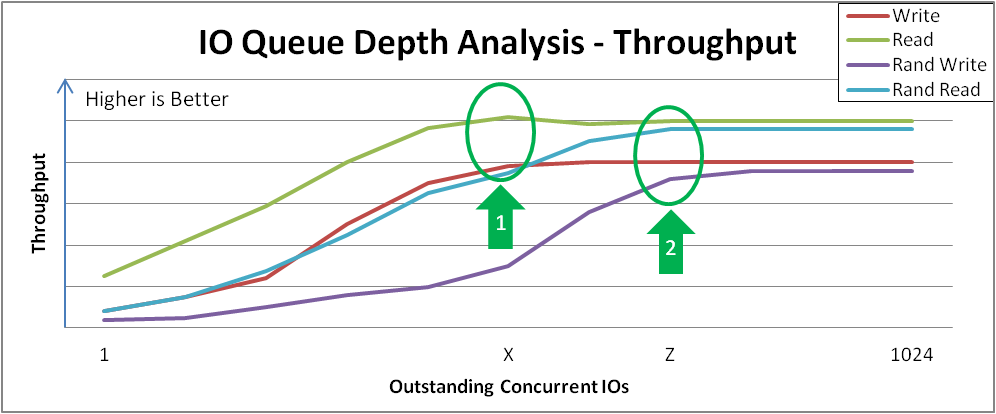
Figure 31.1. I/O Depth Analysis
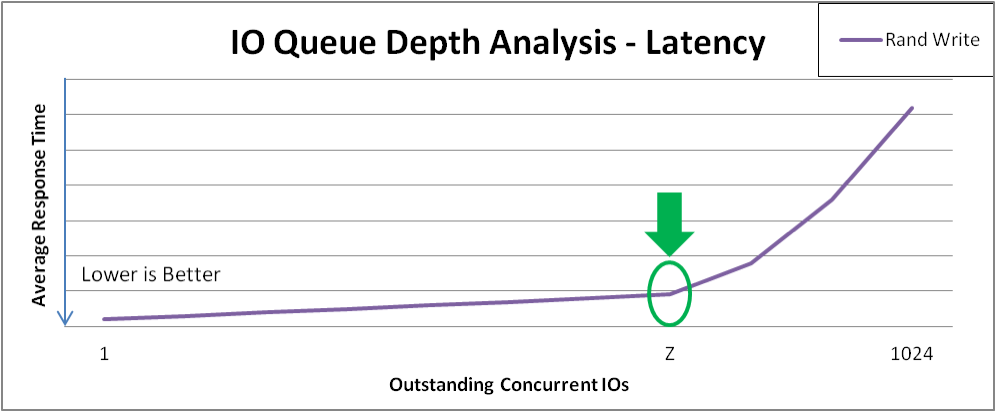
Figure 31.2. Latency Response of Increasing I/O for Random Writes
31.4.2. Phase 2: Effects of I/O Request Size
- Perform four-corner testing at fixed I/O depth, with varied block size (powers of 2) over the range 8 KB to 1 MB. Remember to prefill any areas to be read and to recreate volumes between tests.
- Set the I/O Depth to the value determined in Section 31.4.1, “Phase 1: Effects of I/O Depth, Fixed 4 KB Blocks”.Example test input stimulus (write):
Copy to Clipboard Copied! Toggle word wrap Toggle overflow - Record throughput and latency at each data point, and then graph.
- Repeat test to complete four-corner testing:
--rw=randwrite,--rw=read, and--rw=randread.
- Sequential writes reach a peak throughput at request size Y. This curve demonstrates how applications that are configurable or naturally dominated by certain request sizes may perceive performance. Larger request sizes often provide more throughput because 4 KB I/Os may benefit from merging.
- Sequential reads reach a similar peak throughput at point Z. Remember that after these peaks, overall latency before the I/O completes will increase with no additional throughput. It would be wise to tune the device to not accept I/Os larger than this size.
- Random reads achieve peak throughput at point X. Some devices may achieve near-sequential throughput rates at large request size random accesses, while others suffer more penalty when varying from purely sequential access.
- Random writes achieve peak throughput at point Y. Random writes involve the most interaction of a deduplication device, and VDO achieves high performance especially when request sizes and/or I/O depths are large.

Figure 31.3. Request Size vs. Throughput Analysis and Key Inflection Points
31.4.3. Phase 3: Effects of Mixing Read & Write I/Os
- Perform four-corner testing at fixed I/O depth, varied block size (powers of 2) over the 8 KB to 256 KB range, and set read percentage at 10% increments, beginning with 0%. Remember to prefill any areas to be read and to recreate volumes between tests.
- Set the I/O Depth to the value determined in Section 31.4.1, “Phase 1: Effects of I/O Depth, Fixed 4 KB Blocks”.Example test input stimulus (read/write mix):
Copy to Clipboard Copied! Toggle word wrap Toggle overflow - Record throughput and latency at each data point, and then graph.

Figure 31.4. Performance Is Consistent across Varying Read/Write Mixes
31.4.4. Phase 4: Application Environments
Figure 31.5. Mixed Environment Performance
31.5. Issue Reporting
- A detailed description of the test environment; see the section called “Test Environment” for specifics
- The VDO configuration
- The use case that generated the issue
- The actions that were being performed at the time of the error
- The text of any error messages on the console or terminal
- The kernel log files
- Kernel crash dumps, if available
- The result of
sosreport, which will capture data describing the entire Linux environment
31.6. Conclusion
Appendix A. Red Hat Customer Portal Labs Relevant to Storage Administration
SCSI decoder
/log/* files or log file snippets, as these error messages can be hard to understand for the user.
File System Layout Calculator
root to create the required file system.
LVM RAID Calculator
root to create the required LVMs.
iSCSI Helper
Samba Configuration Helper
- Click to specify basic server settings.
- Click to add the directories that you want to share
- Click to add attached printers individually.
Multipath Helper
multipath.conf file for a review. When you achieve the required configuration, download the installation script to run on your server.
NFS Helper
Multipath Configuration Visualizer
- Hosts components including Host Bus Adapters (HBAs), local devices, and iSCSI devices on the server side
- Storage components on the storage side
- Fabric or Ethernet components between the server and the storage
- Paths to all mentioned components
RHEL Backup and Restore Assistant
dump and restore: for backing up the ext2, ext3, and ext4 file systems.tar and cpio: for archiving or restoring files and folders, especially when backing up the tape drives.rsync: for performing back-up operations and synchronizing files and directories between locations.dd: for copying files from a source to a destination block by block independently of the file systems or operating systems involved.
- Disaster recovery
- Hardware migration
- Partition table backup
- Important folder backup
- Incremental backup
- Differential backup
Appendix B. Revision History
| Revision History | |||
|---|---|---|---|
| Revision 4-10 | Mon Aug 10 2020 | ||
| |||
| Revision 4-09 | Mon Jan 7 2019 | ||
| |||
| Revision 4-08 | Mon Oct 23 2018 | ||
| |||
| Revision 4-07 | Thu Sep 13 2018 | ||
| |||
| Revision 4-00 | Fri Apr 6 2018 | ||
| |||
| Revision 3-95 | Thu Apr 5 2018 | ||
| |||
| Revision 3-93 | Mon Mar 5 2018 | ||
| |||
| Revision 3-92 | Fri Feb 9 2018 | ||
| |||
| Revision 3-90 | Wed Dec 6 2017 | ||
| |||
| Revision 3-86 | Mon Nov 6 2017 | ||
| |||
| Revision 3-80 | Thu Jul 27 2017 | ||
| |||
| Revision 3-77 | Wed May 24 2017 | ||
| |||
| Revision 3-68 | Fri Oct 21 2016 | ||
| |||
| Revision 3-67 | Fri Jun 17 2016 | ||
| |||
| Revision 3-64 | Wed Nov 11 2015 | ||
| |||
| Revision 3-33 | Wed Feb 18 2015 | ||
| |||
| Revision 3-26 | Wed Jan 21 2015 | ||
| |||
| Revision 3-22 | Thu Dec 4 2014 | ||
| |||
| Revision 3-4 | Thu Jul 17 2014 | ||
| |||
| Revision 3-1 | Tue Jun 3 2014 | ||
| |||
Index
Symbols
- /boot/ directory, The /boot/ Directory
- /dev/shm, df Command
- /etc/fstab, Converting to an ext3 File System, Mounting NFS File Systems Using /etc/fstab, Mounting a File System
- /etc/fstab file
- enabling disk quotas with, Enabling Quotas
- /local/directory (client configuration, mounting)
- /proc
- /proc/devices, The /proc Virtual File System
- /proc/filesystems, The /proc Virtual File System
- /proc/mdstat, The /proc Virtual File System
- /proc/mounts, The /proc Virtual File System
- /proc/mounts/, The /proc Virtual File System
- /proc/partitions, The /proc Virtual File System
- /proc/devices
- virtual file system (/proc), The /proc Virtual File System
- /proc/filesystems
- virtual file system (/proc), The /proc Virtual File System
- /proc/mdstat
- virtual file system (/proc), The /proc Virtual File System
- /proc/mounts
- virtual file system (/proc), The /proc Virtual File System
- /proc/mounts/
- virtual file system (/proc), The /proc Virtual File System
- /proc/partitions
- virtual file system (/proc), The /proc Virtual File System
- /remote/export (client configuration, mounting)
A
- adding paths to a storage device, Adding a Storage Device or Path
- adding/removing
- LUN (logical unit number), Adding/Removing a Logical Unit Through rescan-scsi-bus.sh
- advanced RAID device creation
- allocation features
- ext4, The ext4 File System
- XFS, The XFS File System
- Anaconda support
- API, Fibre Channel, Fibre Channel API
- API, iSCSI, iSCSI API
- ATA standards
- I/O alignment and size, ATA
- autofs , autofs, Configuring autofs
- (see also NFS)
- autofs version 5
B
- backup/restoration
- battery-backed write caches
- write barriers, Battery-Backed Write Caches
- bcull (cache cull limits settings)
- FS-Cache, Setting Cache Cull Limits
- binding/unbinding an iface to a portal
- offload and interface binding
- block device ioctls (userspace access)
- I/O alignment and size, Block Device ioctls
- blocked device, verifying
- Fibre Channel
- modifying link loss behavior, Fibre Channel
- brun (cache cull limits settings)
- FS-Cache, Setting Cache Cull Limits
- bstop (cache cull limits settings)
- FS-Cache, Setting Cache Cull Limits
- Btrfs
- File System, Btrfs (Technology Preview)
C
- cache back end
- FS-Cache, FS-Cache
- cache cull limits
- FS-Cache, Setting Cache Cull Limits
- cache limitations with NFS
- FS-Cache, Cache Limitations with NFS
- cache setup
- FS-Cache, Setting up a Cache
- cache sharing
- FS-Cache, Cache Sharing
- cachefiles
- FS-Cache, FS-Cache
- cachefilesd
- FS-Cache, Setting up a Cache
- CCW, channel command word
- storage considerations during installation, DASD and zFCP Devices on IBM System Z
- changing dev_loss_tmo
- Fibre Channel
- modifying link loss behavior, Fibre Channel
- Changing the read/write state
- Online logical units, Changing the Read/Write State of an Online Logical Unit
- channel command word (CCW)
- storage considerations during installation, DASD and zFCP Devices on IBM System Z
- coherency data
- FS-Cache, FS-Cache
- command timer (SCSI)
- Linux SCSI layer, Command Timer
- commands
- volume_key, volume_key Commands
- configuration
- discovery
- configuring a tftp service for diskless clients
- diskless systems, Configuring a tftp Service for Diskless Clients
- configuring an Ethernet interface to use FCoE
- configuring DHCP for diskless clients
- diskless systems, Configuring DHCP for Diskless Clients
- configuring RAID sets
- RAID, Configuring RAID Sets
- controlling SCSI command timer and device status
- Linux SCSI layer, Controlling the SCSI Command Timer and Device Status
- creating
- cumulative mode (xfsrestore)
- XFS, Restoration
D
- DASD and zFCP devices on IBM System z
- storage considerations during installation, DASD and zFCP Devices on IBM System Z
- debugfs (other ext4 file system utilities)
- deployment
- solid-state disks, Solid-State Disk Deployment Guidelines
- deployment guidelines
- solid-state disks, Solid-State Disk Deployment Guidelines
- determining remote port states
- Fibre Channel
- modifying link loss behavior, Fibre Channel
- dev directory, The /dev/ Directory
- device status
- Linux SCSI layer, Device States
- device-mapper multipathing, DM Multipath
- devices, removing, Removing a Storage Device
- dev_loss_tmo
- Fibre Channel
- modifying link loss behavior, Fibre Channel
- dev_loss_tmo, changing
- Fibre Channel
- modifying link loss behavior, Fibre Channel
- df, df Command
- DHCP, configuring
- diskless systems, Configuring DHCP for Diskless Clients
- DIF/DIX-enabled block devices
- storage considerations during installation, Block Devices with DIF/DIX Enabled
- direct map support (autofs version 5)
- directories
- /boot/, The /boot/ Directory
- /dev/, The /dev/ Directory
- /etc/, The /etc/ Directory
- /mnt/, The /mnt/ Directory
- /opt/, The /opt/ Directory
- /proc/, The /proc/ Directory
- /srv/, The /srv/ Directory
- /sys/, The /sys/ Directory
- /usr/, The /usr/ Directory
- /var/, The /var/ Directory
- dirty logs (repairing XFS file systems)
- disabling NOP-Outs
- iSCSI configuration, iSCSI Root
- disabling write caches
- write barriers, Disabling Write Caches
- discovery
- disk quotas, Disk Quotas
- additional resources, Disk Quota References
- assigning per file system, Setting the Grace Period for Soft Limits
- assigning per group, Assigning Quotas per Group
- assigning per user, Assigning Quotas per User
- disabling, Enabling and Disabling
- enabling, Configuring Disk Quotas, Enabling and Disabling
- /etc/fstab, modifying, Enabling Quotas
- creating quota files, Creating the Quota Database Files
- quotacheck, running, Creating the Quota Database Files
- grace period, Assigning Quotas per User
- hard limit, Assigning Quotas per User
- management of, Managing Disk Quotas
- quotacheck command, using to check, Keeping Quotas Accurate
- reporting, Reporting on Disk Quotas
- soft limit, Assigning Quotas per User
- disk storage (see disk quotas)
- parted (see parted)
- diskless systems
- DHCP, configuring, Configuring DHCP for Diskless Clients
- exported file systems, Configuring an Exported File System for Diskless Clients
- network booting service, Setting up a Remote Diskless System
- remote diskless systems, Setting up a Remote Diskless System
- required packages, Setting up a Remote Diskless System
- tftp service, configuring, Configuring a tftp Service for Diskless Clients
- dm-multipath
- iSCSI configuration, iSCSI Settings with dm-multipath
- dmraid
- RAID, dmraid
- dmraid (configuring RAID sets)
- RAID, dmraid
- drivers (native), Fibre Channel, Native Fibre Channel Drivers and Capabilities
- du, du Command
- dump levels
- XFS, Backup
E
- e2fsck, Reverting to an Ext2 File System
- e2image (other ext4 file system utilities)
- e2label
- e2label (other ext4 file system utilities)
- enablind/disabling
- write barriers, Enabling and Disabling Write Barriers
- enhanced LDAP support (autofs version 5)
- error messages
- write barriers, Enabling and Disabling Write Barriers
- etc directory, The /etc/ Directory
- expert mode (xfs_quota)
- XFS, XFS Quota Management
- exported file systems
- diskless systems, Configuring an Exported File System for Diskless Clients
- ext2
- reverting from ext3, Reverting to an Ext2 File System
- ext3
- converting from ext2, Converting to an ext3 File System
- creating, Creating an ext3 File System
- features, The ext3 File System
- ext4
- allocation features, The ext4 File System
- creating, Creating an ext4 File System
- debugfs (other ext4 file system utilities), Other ext4 File System Utilities
- e2image (other ext4 file system utilities), Other ext4 File System Utilities
- e2label, Other ext4 File System Utilities
- e2label (other ext4 file system utilities), Other ext4 File System Utilities
- file system types, The ext4 File System
- fsync(), The ext4 File System
- main features, The ext4 File System
- mkfs.ext4, Creating an ext4 File System
- mounting, Mounting an ext4 File System
- nobarrier mount option, Mounting an ext4 File System
- other file system utilities, Other ext4 File System Utilities
- quota (other ext4 file system utilities), Other ext4 File System Utilities
- resize2fs (resizing ext4), Resizing an ext4 File System
- resizing, Resizing an ext4 File System
- stride (specifying stripe geometry), Creating an ext4 File System
- stripe geometry, Creating an ext4 File System
- stripe-width (specifying stripe geometry), Creating an ext4 File System
- tune2fs (mounting), Mounting an ext4 File System
- write barriers, Mounting an ext4 File System
F
- FCoE
- configuring an Ethernet interface to use FCoE, Configuring a Fibre Channel over Ethernet Interface
- Fibre Channel over Ethernet, Configuring a Fibre Channel over Ethernet Interface
- required packages, Configuring a Fibre Channel over Ethernet Interface
- FHS, Overview of Filesystem Hierarchy Standard (FHS), FHS Organization
- (see also file system)
- Fibre Channel
- online storage, Fibre Channel
- Fibre Channel API, Fibre Channel API
- Fibre Channel drivers (native), Native Fibre Channel Drivers and Capabilities
- Fibre Channel over Ethernet
- file system
- FHS standard, FHS Organization
- hierarchy, Overview of Filesystem Hierarchy Standard (FHS)
- organization, FHS Organization
- structure, File System Structure and Maintenance
- File System
- Btrfs, Btrfs (Technology Preview)
- file system types
- ext4, The ext4 File System
- GFS2, Global File System 2
- XFS, The XFS File System
- file systems, Gathering File System Information
- ext2 (see ext2)
- ext3 (see ext3)
- findmnt (command)
- listing mounts, Listing Currently Mounted File Systems
- FS-Cache
- bcull (cache cull limits settings), Setting Cache Cull Limits
- brun (cache cull limits settings), Setting Cache Cull Limits
- bstop (cache cull limits settings), Setting Cache Cull Limits
- cache back end, FS-Cache
- cache cull limits, Setting Cache Cull Limits
- cache sharing, Cache Sharing
- cachefiles, FS-Cache
- cachefilesd, Setting up a Cache
- coherency data, FS-Cache
- indexing keys, FS-Cache
- NFS (cache limitations with), Cache Limitations with NFS
- NFS (using with), Using the Cache with NFS
- performance guarantee, Performance Guarantee
- setting up a cache, Setting up a Cache
- statistical information (tracking), Statistical Information
- tune2fs (setting up a cache), Setting up a Cache
- fsync()
- ext4, The ext4 File System
- XFS, The XFS File System
G
- GFS2
- file system types, Global File System 2
- gfs2.ko, Global File System 2
- maximum size, Global File System 2
- GFS2 file system maximum size, Global File System 2
- gfs2.ko
- GFS2, Global File System 2
- Global File System 2
- file system types, Global File System 2
- gfs2.ko, Global File System 2
- maximum size, Global File System 2
- gquota/gqnoenforce
- XFS, XFS Quota Management
H
- Hardware RAID (see RAID)
- hardware RAID controller drivers
- hierarchy, file system, Overview of Filesystem Hierarchy Standard (FHS)
- high-end arrays
- write barriers, High-End Arrays
- host
- Fibre Channel API, Fibre Channel API
- how write barriers work
- write barriers, How Write Barriers Work
I
- I/O alignment and size, Storage I/O Alignment and Size
- ATA standards, ATA
- block device ioctls (userspace access), Block Device ioctls
- Linux I/O stack, Storage I/O Alignment and Size
- logical_block_size, Userspace Access
- LVM, Logical Volume Manager
- READ CAPACITY(16), SCSI
- SCSI standards, SCSI
- stacking I/O parameters, Stacking I/O Parameters
- storage access parameters, Parameters for Storage Access
- sysfs interface (userspace access), sysfs Interface
- tools (for partitioning and other file system functions), Partition and File System Tools
- userspace access, Userspace Access
- I/O parameters stacking
- I/O alignment and size, Stacking I/O Parameters
- iface (configuring for iSCSI offload)
- offload and interface binding
- iface binding/unbinding
- offload and interface binding
- iface configurations, viewing
- offload and interface binding
- iface for software iSCSI
- offload and interface binding
- iface settings
- offload and interface binding
- importance of write barriers
- write barriers, Importance of Write Barriers
- increasing file system size
- indexing keys
- FS-Cache, FS-Cache
- individual user
- volume_key, Using volume_key as an Individual User
- initiator implementations
- offload and interface binding
- installation storage configurations
- channel command word (CCW), DASD and zFCP Devices on IBM System Z
- DASD and zFCP devices on IBM System z, DASD and zFCP Devices on IBM System Z
- DIF/DIX-enabled block devices, Block Devices with DIF/DIX Enabled
- iSCSI detection and configuration, iSCSI Detection and Configuration
- LUKS/dm-crypt, encrypting block devices using, Encrypting Block Devices Using LUKS
- separate partitions (for /home, /opt, /usr/local), Separate Partitions for /home, /opt, /usr/local
- stale BIOS RAID metadata, Stale BIOS RAID Metadata
- updates, Storage Considerations During Installation
- what's new, Storage Considerations During Installation
- installer support
- interactive operation (xfsrestore)
- XFS, Restoration
- interconnects (scanning)
- iSCSI, Scanning iSCSI Interconnects
- introduction, Overview
- iSCSI
- discovery, iSCSI Discovery Configuration
- configuration, iSCSI Discovery Configuration
- record types, iSCSI Discovery Configuration
- offload and interface binding, Configuring iSCSI Offload and Interface Binding
- binding/unbinding an iface to a portal, Binding/Unbinding an iface to a Portal
- iface (configuring for iSCSI offload), Configuring an iface for iSCSI Offload
- iface configurations, viewing, Viewing Available iface Configurations
- iface for software iSCSI, Configuring an iface for Software iSCSI
- iface settings, Viewing Available iface Configurations
- initiator implementations, Viewing Available iface Configurations
- software iSCSI, Configuring an iface for Software iSCSI
- viewing available iface configurations, Viewing Available iface Configurations
- scanning interconnects, Scanning iSCSI Interconnects
- software iSCSI, Configuring an iface for Software iSCSI
- targets, Logging in to an iSCSI Target
- logging in, Logging in to an iSCSI Target
- iSCSI API, iSCSI API
- iSCSI detection and configuration
- storage considerations during installation, iSCSI Detection and Configuration
- iSCSI logical unit, resizing, Resizing an iSCSI Logical Unit
- iSCSI root
- iSCSI configuration, iSCSI Root
K
- known issues
- adding/removing
- LUN (logical unit number), Known Issues with rescan-scsi-bus.sh
L
- lazy mount/unmount support (autofs version 5)
- levels
- limit (xfs_quota expert mode)
- XFS, XFS Quota Management
- linear RAID
- Linux I/O stack
- I/O alignment and size, Storage I/O Alignment and Size
- logging in
- iSCSI targets, Logging in to an iSCSI Target
- logical_block_size
- I/O alignment and size, Userspace Access
- LUKS/dm-crypt, encrypting block devices using
- storage considerations during installation, Encrypting Block Devices Using LUKS
- LUN (logical unit number)
- adding/removing, Adding/Removing a Logical Unit Through rescan-scsi-bus.sh
- known issues, Known Issues with rescan-scsi-bus.sh
- required packages, Adding/Removing a Logical Unit Through rescan-scsi-bus.sh
- rescan-scsi-bus.sh, Adding/Removing a Logical Unit Through rescan-scsi-bus.sh
- LVM
- I/O alignment and size, Logical Volume Manager
M
- main features
- ext4, The ext4 File System
- XFS, The XFS File System
- maximum size
- GFS2, Global File System 2
- maximum size, GFS2 file system, Global File System 2
- mdadm (configuring RAID sets)
- RAID, mdadm
- mdraid
- RAID, mdraid
- mirroring
- mkfs , Formatting and Labeling the Partition
- mkfs.ext4
- mkfs.xfs
- mnt directory, The /mnt/ Directory
- modifying link loss behavior, Modifying Link Loss Behavior
- Fibre Channel, Fibre Channel
- mount (client configuration)
- mount (command), Using the mount Command
- listing mounts, Listing Currently Mounted File Systems
- mounting a file system, Mounting a File System
- moving a mount point, Moving a Mount Point
- options, Specifying the Mount Options
- shared subtrees, Sharing Mounts
- private mount, Sharing Mounts
- shared mount, Sharing Mounts
- slave mount, Sharing Mounts
- unbindable mount, Sharing Mounts
- mounting, Mounting a File System
- moving a mount point, Moving a Mount Point
- multiple master map entries per autofs mount point (autofs version 5)
N
- native Fibre Channel drivers, Native Fibre Channel Drivers and Capabilities
- network booting service
- diskless systems, Setting up a Remote Diskless System
- Network File System (see NFS)
- NFS
- /etc/fstab , Mounting NFS File Systems Using /etc/fstab
- /local/directory (client configuration, mounting), Configuring NFS Client
- /remote/export (client configuration, mounting), Configuring NFS Client
- additional resources, NFS References
- installed documentation, Installed Documentation
- related books, Related Books
- useful websites, Useful Websites
- autofs
- augmenting, Overriding or Augmenting Site Configuration Files
- configuration, Configuring autofs
- LDAP, Using LDAP to Store Automounter Maps
- autofs version 5, Improvements in autofs Version 5 over Version 4
- client
- autofs , autofs
- configuration, Configuring NFS Client
- mount options, Common NFS Mount Options
- condrestart, Starting and Stopping the NFS Server
- configuration with firewall, Running NFS Behind a Firewall
- direct map support (autofs version 5), Improvements in autofs Version 5 over Version 4
- enhanced LDAP support (autofs version 5), Improvements in autofs Version 5 over Version 4
- FS-Cache, Using the Cache with NFS
- hostname formats, Hostname Formats
- how it works, Introduction to NFS
- introducing, Network File System (NFS)
- lazy mount/unmount support (autofs version 5), Improvements in autofs Version 5 over Version 4
- mount (client configuration), Configuring NFS Client
- multiple master map entries per autofs mount point (autofs version 5), Improvements in autofs Version 5 over Version 4
- options (client configuration, mounting), Configuring NFS Client
- overriding/augmenting site configuration files (autofs), Configuring autofs
- proper nsswitch configuration (autofs version 5), use of, Improvements in autofs Version 5 over Version 4
- RDMA, Enabling NFS over RDMA (NFSoRDMA)
- reloading, Starting and Stopping the NFS Server
- required services, Required Services
- restarting, Starting and Stopping the NFS Server
- rfc2307bis (autofs), Using LDAP to Store Automounter Maps
- rpcbind , NFS and rpcbind
- security, Securing NFS
- file permissions, File Permissions
- NFSv3 host access, NFS Security with AUTH_SYS and Export Controls
- NFSv4 host access, NFS Security with AUTH_GSS
- server (client configuration, mounting), Configuring NFS Client
- server configuration, Configuring the NFS Server
- /etc/exports , The /etc/exports Configuration File
- exportfs command, The exportfs Command
- exportfs command with NFSv4, Using exportfs with NFSv4
- starting, Starting and Stopping the NFS Server
- status, Starting and Stopping the NFS Server
- stopping, Starting and Stopping the NFS Server
- storing automounter maps, using LDAP to store (autofs), Overriding or Augmenting Site Configuration Files
- TCP, Introduction to NFS
- troubleshooting NFS and rpcbind, Troubleshooting NFS and rpcbind
- UDP, Introduction to NFS
- write barriers, NFS
- NFS (cache limitations with)
- FS-Cache, Cache Limitations with NFS
- NFS (using with)
- FS-Cache, Using the Cache with NFS
- nobarrier mount option
- ext4, Mounting an ext4 File System
- XFS, Write Barriers
- NOP-Out requests
- modifying link loss
- iSCSI configuration, NOP-Out Interval/Timeout
- NOP-Outs (disabling)
- iSCSI configuration, iSCSI Root
O
- offline status
- Linux SCSI layer, Controlling the SCSI Command Timer and Device Status
- offload and interface binding
- Online logical units
- Changing the read/write state, Changing the Read/Write State of an Online Logical Unit
- online storage
- Fibre Channel, Fibre Channel
- overview, Online Storage Management
- sysfs, Online Storage Management
- troubleshooting, Troubleshooting Online Storage Configuration
- opt directory, The /opt/ Directory
- options (client configuration, mounting)
- other file system utilities
- overriding/augmenting site configuration files (autofs)
- NFS, Configuring autofs
- overview, Overview
- online storage, Online Storage Management
P
- Parallel NFS
- pNFS, pNFS
- parameters for storage access
- I/O alignment and size, Parameters for Storage Access
- parity
- parted , Partitions
- creating partitions, Creating a Partition
- overview, Partitions
- removing partitions, Removing a Partition
- resizing partitions, Resizing a Partition with fdisk
- selecting device, Viewing the Partition Table
- table of commands, Partitions
- viewing partition table, Viewing the Partition Table
- partition table
- viewing, Viewing the Partition Table
- partitions
- creating, Creating a Partition
- formatting
- removing, Removing a Partition
- resizing, Resizing a Partition with fdisk
- viewing list, Viewing the Partition Table
- path to storage devices, adding, Adding a Storage Device or Path
- path to storage devices, removing, Removing a Path to a Storage Device
- performance guarantee
- FS-Cache, Performance Guarantee
- persistent naming, Persistent Naming
- pNFS
- Parallel NFS, pNFS
- port states (remote), determining
- Fibre Channel
- modifying link loss behavior, Fibre Channel
- pquota/pqnoenforce
- XFS, XFS Quota Management
- private mount, Sharing Mounts
- proc directory, The /proc/ Directory
- project limits (setting)
- proper nsswitch configuration (autofs version 5), use of
Q
- queue_if_no_path
- iSCSI configuration, iSCSI Settings with dm-multipath
- modifying link loss
- iSCSI configuration, replacement_timeout
- quota (other ext4 file system utilities)
- quota management
- XFS, XFS Quota Management
- quotacheck , Creating the Quota Database Files
- quotacheck command
- checking quota accuracy with, Keeping Quotas Accurate
- quotaoff , Enabling and Disabling
- quotaon , Enabling and Disabling
R
- RAID
- advanced RAID device creation, Creating Advanced RAID Devices
- Anaconda support, RAID Support in the Anaconda Installer
- configuring RAID sets, Configuring RAID Sets
- dmraid, dmraid
- dmraid (configuring RAID sets), dmraid
- Hardware RAID, RAID Types
- hardware RAID controller drivers, Linux Hardware RAID Controller Drivers
- installer support, RAID Support in the Anaconda Installer
- level 0, RAID Levels and Linear Support
- level 1, RAID Levels and Linear Support
- level 4, RAID Levels and Linear Support
- level 5, RAID Levels and Linear Support
- levels, RAID Levels and Linear Support
- linear RAID, RAID Levels and Linear Support
- mdadm (configuring RAID sets), mdadm
- mdraid, mdraid
- mirroring, RAID Levels and Linear Support
- parity, RAID Levels and Linear Support
- reasons to use, Redundant Array of Independent Disks (RAID)
- Software RAID, RAID Types
- striping, RAID Levels and Linear Support
- subsystems of RAID, Linux RAID Subsystems
- RDMA
- READ CAPACITY(16)
- I/O alignment and size, SCSI
- record types
- discovery
- Red Hat Enterprise Linux-specific file locations
- /etc/sysconfig/, Special Red Hat Enterprise Linux File Locations
- (see also sysconfig directory)
- /var/cache/yum, Special Red Hat Enterprise Linux File Locations
- /var/lib/rpm/, Special Red Hat Enterprise Linux File Locations
- remote diskless systems
- diskless systems, Setting up a Remote Diskless System
- remote port
- Fibre Channel API, Fibre Channel API
- remote port states, determining
- Fibre Channel
- modifying link loss behavior, Fibre Channel
- removing devices, Removing a Storage Device
- removing paths to a storage device, Removing a Path to a Storage Device
- repairing file system
- repairing XFS file systems with dirty logs
- replacement_timeout
- modifying link loss
- iSCSI configuration, SCSI Error Handler, replacement_timeout
- replacement_timeoutM
- iSCSI configuration, iSCSI Root
- report (xfs_quota expert mode)
- XFS, XFS Quota Management
- required packages
- adding/removing
- LUN (logical unit number), Adding/Removing a Logical Unit Through rescan-scsi-bus.sh
- diskless systems, Setting up a Remote Diskless System
- FCoE, Configuring a Fibre Channel over Ethernet Interface
- rescan-scsi-bus.sh
- adding/removing
- LUN (logical unit number), Adding/Removing a Logical Unit Through rescan-scsi-bus.sh
- resize2fs, Reverting to an Ext2 File System
- resize2fs (resizing ext4)
- resized logical units, resizing, Resizing an Online Logical Unit
- resizing
- resizing an iSCSI logical unit, Resizing an iSCSI Logical Unit
- resizing resized logical units, Resizing an Online Logical Unit
- restoring a backup
- XFS, Restoration
- rfc2307bis (autofs)
- rpcbind , NFS and rpcbind
- (see also NFS)
- NFS, Troubleshooting NFS and rpcbind
- rpcinfo , Troubleshooting NFS and rpcbind
- status, Starting and Stopping the NFS Server
- rpcinfo , Troubleshooting NFS and rpcbind
- running sessions, retrieving information about
- iSCSI API, iSCSI API
- running status
- Linux SCSI layer, Controlling the SCSI Command Timer and Device Status
S
- scanning interconnects
- iSCSI, Scanning iSCSI Interconnects
- scanning storage interconnects, Scanning Storage Interconnects
- SCSI command timer
- Linux SCSI layer, Command Timer
- SCSI Error Handler
- modifying link loss
- iSCSI configuration, SCSI Error Handler
- SCSI standards
- I/O alignment and size, SCSI
- separate partitions (for /home, /opt, /usr/local)
- storage considerations during installation, Separate Partitions for /home, /opt, /usr/local
- server (client configuration, mounting)
- setting up a cache
- FS-Cache, Setting up a Cache
- shared mount, Sharing Mounts
- shared subtrees, Sharing Mounts
- private mount, Sharing Mounts
- shared mount, Sharing Mounts
- slave mount, Sharing Mounts
- unbindable mount, Sharing Mounts
- simple mode (xfsrestore)
- XFS, Restoration
- slave mount, Sharing Mounts
- SMB (see SMB)
- software iSCSI
- iSCSI, Configuring an iface for Software iSCSI
- offload and interface binding
- Software RAID (see RAID)
- solid-state disks
- deployment, Solid-State Disk Deployment Guidelines
- deployment guidelines, Solid-State Disk Deployment Guidelines
- SSD, Solid-State Disk Deployment Guidelines
- throughput classes, Solid-State Disk Deployment Guidelines
- TRIM command, Solid-State Disk Deployment Guidelines
- specific session timeouts, configuring
- iSCSI configuration, Configuring Timeouts for a Specific Session
- srv directory, The /srv/ Directory
- SSD
- solid-state disks, Solid-State Disk Deployment Guidelines
- SSM
- System Storage Manager, System Storage Manager (SSM)
- Back Ends, SSM Back Ends
- Installation, Installing SSM
- list command, Displaying Information about All Detected Devices
- resize command, Increasing a Volume's Size
- snapshot command, Snapshot
- stacking I/O parameters
- I/O alignment and size, Stacking I/O Parameters
- stale BIOS RAID metadata
- storage considerations during installation, Stale BIOS RAID Metadata
- statistical information (tracking)
- FS-Cache, Statistical Information
- storage access parameters
- I/O alignment and size, Parameters for Storage Access
- storage considerations during installation
- channel command word (CCW), DASD and zFCP Devices on IBM System Z
- DASD and zFCP devices on IBM System z, DASD and zFCP Devices on IBM System Z
- DIF/DIX-enabled block devices, Block Devices with DIF/DIX Enabled
- iSCSI detection and configuration, iSCSI Detection and Configuration
- LUKS/dm-crypt, encrypting block devices using, Encrypting Block Devices Using LUKS
- separate partitions (for /home, /opt, /usr/local), Separate Partitions for /home, /opt, /usr/local
- stale BIOS RAID metadata, Stale BIOS RAID Metadata
- updates, Storage Considerations During Installation
- what's new, Storage Considerations During Installation
- Storage for Virtual Machines, Storage for Virtual Machines
- storage interconnects, scanning, Scanning Storage Interconnects
- storing automounter maps, using LDAP to store (autofs)
- stride (specifying stripe geometry)
- stripe geometry
- stripe-width (specifying stripe geometry)
- striping
- RAID, RAID Levels and Linear Support
- RAID fundamentals, Redundant Array of Independent Disks (RAID)
- su (mkfs.xfs sub-options)
- subsystems of RAID
- RAID, Linux RAID Subsystems
- suspending
- sw (mkfs.xfs sub-options)
- swap space, Swap Space
- creating, Adding Swap Space
- expanding, Adding Swap Space
- file
- creating, Creating a Swap File, Removing a Swap File
- LVM2
- creating, Creating an LVM2 Logical Volume for Swap
- extending, Extending Swap on an LVM2 Logical Volume
- reducing, Reducing Swap on an LVM2 Logical Volume
- removing, Removing an LVM2 Logical Volume for Swap
- moving, Moving Swap Space
- recommended size, Swap Space
- removing, Removing Swap Space
- sys directory, The /sys/ Directory
- sysconfig directory, Special Red Hat Enterprise Linux File Locations
- sysfs
- overview
- online storage, Online Storage Management
- sysfs interface (userspace access)
- I/O alignment and size, sysfs Interface
- system information
- file systems, Gathering File System Information
- /dev/shm, df Command
- System Storage Manager
- SSM, System Storage Manager (SSM)
- Back Ends, SSM Back Ends
- Installation, Installing SSM
- list command, Displaying Information about All Detected Devices
- resize command, Increasing a Volume's Size
- snapshot command, Snapshot
T
- targets
- tftp service, configuring
- diskless systems, Configuring a tftp Service for Diskless Clients
- throughput classes
- solid-state disks, Solid-State Disk Deployment Guidelines
- timeouts for a specific session, configuring
- iSCSI configuration, Configuring Timeouts for a Specific Session
- tools (for partitioning and other file system functions)
- I/O alignment and size, Partition and File System Tools
- tracking statistical information
- FS-Cache, Statistical Information
- transport
- Fibre Channel API, Fibre Channel API
- TRIM command
- solid-state disks, Solid-State Disk Deployment Guidelines
- troubleshooting
- online storage, Troubleshooting Online Storage Configuration
- troubleshooting NFS and rpcbind
- tune2fs
- converting to ext3 with, Converting to an ext3 File System
- reverting to ext2 with, Reverting to an Ext2 File System
- tune2fs (mounting)
- tune2fs (setting up a cache)
- FS-Cache, Setting up a Cache
U
- udev rule (timeout)
- command timer (SCSI), Command Timer
- umount, Unmounting a File System
- unbindable mount, Sharing Mounts
- unmounting, Unmounting a File System
- updates
- storage considerations during installation, Storage Considerations During Installation
- uquota/uqnoenforce
- XFS, XFS Quota Management
- userspace access
- I/O alignment and size, Userspace Access
- userspace API files
- Fibre Channel API, Fibre Channel API
- usr directory, The /usr/ Directory
V
- var directory, The /var/ Directory
- var/lib/rpm/ directory, Special Red Hat Enterprise Linux File Locations
- var/spool/up2date/ directory, Special Red Hat Enterprise Linux File Locations
- verifying if a device is blocked
- Fibre Channel
- modifying link loss behavior, Fibre Channel
- version
- what is new
- viewing available iface configurations
- offload and interface binding
- virtual file system (/proc)
- /proc/devices, The /proc Virtual File System
- /proc/filesystems, The /proc Virtual File System
- /proc/mdstat, The /proc Virtual File System
- /proc/mounts, The /proc Virtual File System
- /proc/mounts/, The /proc Virtual File System
- /proc/partitions, The /proc Virtual File System
- volume_key
- commands, volume_key Commands
- individual user, Using volume_key as an Individual User
W
- what's new
- storage considerations during installation, Storage Considerations During Installation
- World Wide Identifier (WWID)
- persistent naming, World Wide Identifier (WWID)
- write barriers
- battery-backed write caches, Battery-Backed Write Caches
- definition, Write Barriers
- disabling write caches, Disabling Write Caches
- enablind/disabling, Enabling and Disabling Write Barriers
- error messages, Enabling and Disabling Write Barriers
- ext4, Mounting an ext4 File System
- high-end arrays, High-End Arrays
- how write barriers work, How Write Barriers Work
- importance of write barriers, Importance of Write Barriers
- NFS, NFS
- XFS, Write Barriers
- write caches, disabling
- write barriers, Disabling Write Caches
- WWID
- persistent naming, World Wide Identifier (WWID)
X
- XFS
- allocation features, The XFS File System
- backup/restoration, Backing Up and Restoring XFS File Systems
- creating, Creating an XFS File System
- cumulative mode (xfsrestore), Restoration
- dump levels, Backup
- expert mode (xfs_quota), XFS Quota Management
- file system types, The XFS File System
- fsync(), The XFS File System
- gquota/gqnoenforce, XFS Quota Management
- increasing file system size, Increasing the Size of an XFS File System
- interactive operation (xfsrestore), Restoration
- limit (xfs_quota expert mode), XFS Quota Management
- main features, The XFS File System
- mkfs.xfs, Creating an XFS File System
- mounting, Mounting an XFS File System
- nobarrier mount option, Write Barriers
- pquota/pqnoenforce, XFS Quota Management
- project limits (setting), Setting Project Limits
- quota management, XFS Quota Management
- repairing file system, Repairing an XFS File System
- repairing XFS file systems with dirty logs, Repairing an XFS File System
- report (xfs_quota expert mode), XFS Quota Management
- simple mode (xfsrestore), Restoration
- su (mkfs.xfs sub-options), Creating an XFS File System
- suspending, Suspending an XFS File System
- sw (mkfs.xfs sub-options), Creating an XFS File System
- uquota/uqnoenforce, XFS Quota Management
- write barriers, Write Barriers
- xfsdump, Backup
- xfsprogs, Suspending an XFS File System
- xfsrestore, Restoration
- xfs_admin, Other XFS File System Utilities
- xfs_bmap, Other XFS File System Utilities
- xfs_copy, Other XFS File System Utilities
- xfs_db, Other XFS File System Utilities
- xfs_freeze, Suspending an XFS File System
- xfs_fsr, Other XFS File System Utilities
- xfs_growfs, Increasing the Size of an XFS File System
- xfs_info, Other XFS File System Utilities
- xfs_mdrestore, Other XFS File System Utilities
- xfs_metadump, Other XFS File System Utilities
- xfs_quota, XFS Quota Management
- xfs_repair, Repairing an XFS File System
- xfsdump
- XFS, Backup
- xfsprogs
- xfsrestore
- XFS, Restoration
- xfs_admin
- xfs_bmap
- xfs_copy
- xfs_db
- xfs_freeze
- xfs_fsr
- xfs_growfs
- xfs_info
- xfs_mdrestore
- xfs_metadump
- xfs_quota
- XFS, XFS Quota Management
- xfs_repair