Configuring basic system settings
Set up the essential functions of your system and customize your system environment
Abstract
Providing feedback on Red Hat documentation
We are committed to providing high-quality documentation and value your feedback. To help us improve, you can submit suggestions or report errors through the Red Hat Jira tracking system.
Procedure
Log in to the Jira website.
If you do not have an account, select the option to create one.
- Click Create in the top navigation bar.
- Enter a descriptive title in the Summary field.
- Enter your suggestion for improvement in the Description field. Include links to the relevant parts of the documentation.
- Click Create at the bottom of the dialogue.
Chapter 1. Configuring and managing basic network access
NetworkManager creates a connection profile for each Ethernet adapter that is installed in a host. By default, this profile uses DHCP for both IPv4 and IPv6 connections. Modify this automatically-created profile or add a new one in the following cases:
- The network requires custom settings, such as a static IP address configuration.
- You require multiple profiles because the host roams among different networks.
Red Hat Enterprise Linux provides administrators different options to configure Ethernet connections. For example:
- Use nmcli to configure connections on the command line.
- Use nmtui to configure connections in a text-based user interface.
- Use the GNOME Settings menu or nm-connection-editor application to configure connections in a graphical interface.
- Use nmstatectl to configure connections through the Nmstate API.
- Use RHEL system roles to automate the configuration of connections on one or multiple hosts.
1.1. Configuring the network and host name in the graphical installation mode
Follow the steps in this procedure to configure your network and host name.
Procedure
- From the Installation Summary window, click .
- From the list in the left-hand pane, select an interface. The details are displayed in the right-hand pane.
Toggle the switch to enable or disable the selected interface.
You cannot add or remove interfaces manually.
- Click to add a virtual network interface, which can be either: Team, Bond, Bridge, or VLAN.
- Click to remove a virtual interface.
- Click to change settings such as IP addresses, DNS servers, or routing configuration for an existing interface (both virtual and physical).
Type a host name for your system in the Host Name field.
The host name can either be a fully qualified domain name (FQDN) in the format
hostname.domainname, or a short host name without the domain. Many networks have a Dynamic Host Configuration Protocol (DHCP) service that automatically supplies connected systems with a domain name. To allow the DHCP service to assign the domain name to this system, specify only the short host name.Host names can only contain alphanumeric characters and
-or.. Host name should be equal to or less than 64 characters. Host names cannot start or end with-and.. To be compliant with DNS, each part of a FQDN should be equal to or less than 63 characters and the FQDN total length, including dots, should not exceed 255 characters.The value
localhostmeans that no specific static host name for the target system is configured, and the actual host name of the installed system is configured during the processing of the network configuration, for example, by NetworkManager using DHCP or DNS.When using static IP and host name configuration, it depends on the planned system use case whether to use a short name or FQDN. Red Hat Identity Management configures FQDN during provisioning but some 3rd party software products may require a short name. In either case, to ensure availability of both forms in all situations, add an entry for the host in
/etc/hostsin the formatIP FQDN short-alias.- Click to apply the host name to the installer environment.
- Alternatively, in the Network and Hostname window, you can choose the Wireless option. Click in the right-hand pane to select your wifi connection, enter the password if required, and click .
1.2. Configuring an Ethernet connection by using nmcli
If you connect a host to the network over Ethernet, you can manage the connection’s settings on the command line by using the nmcli utility.
Prerequisites
- A physical or virtual Ethernet Network Interface Controller (NIC) exists in the server’s configuration.
Procedure
List the NetworkManager connection profiles:
# nmcli connection show
NAME                UUID                                  TYPE      DEVICE
Wired connection 1  a5eb6490-cc20-3668-81f8-0314a27f3f75  ethernet  enp1s0
By default, NetworkManager creates a profile for each NIC in the host. If you plan to connect this NIC only to a specific network, adapt the automatically-created profile. If you plan to connect this NIC to networks with different settings, create individual profiles for each network.
If you want to create an additional connection profile, enter:
# nmcli connection add con-name <connection-name> ifname <device-name> type ethernetSkip this step to modify an existing profile.
Optional: Rename the connection profile:
# nmcli connection modify "Wired connection 1" connection.id "Internal-LAN"On hosts with multiple profiles, a meaningful name makes it easier to identify the purpose of a profile.
Display the current settings of the connection profile:
# nmcli connection show Internal-LAN
...
connection.interface-name:     enp1s0
connection.autoconnect:        yes
ipv4.method:                   auto
ipv6.method:                   auto
...
Configure the IPv4 settings:
To use DHCP, enter:
# nmcli connection modify Internal-LAN ipv4.method autoSkip this step if
ipv4.methodis already set toauto(default).To set a static IPv4 address, network mask, default gateway, DNS servers, and search domain, enter:
# nmcli connection modify Internal-LAN ipv4.method manual ipv4.addresses 192.0.2.1/24 ipv4.gateway 192.0.2.254 ipv4.dns 192.0.2.200 ipv4.dns-search example.com
Configure the IPv6 settings:
To use stateless address autoconfiguration (SLAAC), enter:
# nmcli connection modify Internal-LAN ipv6.method autoSkip this step if
ipv6.methodis already set toauto(default).To set a static IPv6 address, network mask, default gateway, DNS servers, and search domain, enter:
# nmcli connection modify Internal-LAN ipv6.method manual ipv6.addresses 2001:db8:1::fffe/64 ipv6.gateway 2001:db8:1::fffe ipv6.dns 2001:db8:1::ffbb ipv6.dns-search example.com
To customize other settings in the profile, use the following command:
# nmcli connection modify <connection-name> <setting> <value>Enclose values with spaces or semicolons in quotes.
Activate the profile:
# nmcli connection up Internal-LAN
Verification
Display the IP settings of the NIC:
# ip address show enp1s0
2: enp1s0: <BROADCAST,MULTICAST,UP,LOWER_UP> mtu 1500 qdisc fq_codel state UP group default qlen 1000
    link/ether 52:54:00:17:b8:b6 brd ff:ff:ff:ff:ff:ff
    inet 192.0.2.1/24 brd 192.0.2.255 scope global noprefixroute enp1s0
       valid_lft forever preferred_lft forever
    inet6 2001:db8:1::fffe/64 scope global noprefixroute
       valid_lft forever preferred_lft forever
Display the IPv4 default gateway:
# ip route show default
default via 192.0.2.254 dev enp1s0 proto static metric 102
Display the IPv6 default gateway:
# ip -6 route show default
default via 2001:db8:1::fffe dev enp1s0 proto static metric 102 pref medium
Display the DNS settings:
# cat /etc/resolv.conf
search example.com
nameserver 192.0.2.200
nameserver 2001:db8:1::ffbb
If multiple connection profiles are active at the same time, the order of
nameserverentries depend on the DNS priority values in these profiles and the connection types.Use the
pingutility to verify that this host can send packets to other hosts:# ping <host-name-or-IP-address>
Troubleshooting
- Verify that the network cable is plugged-in to the host and a switch.
- Check whether the link failure exists only on this host or also on other hosts connected to the same switch.
- Verify that the network cable and the network interface are working as expected. Perform hardware diagnosis steps and replace defective cables and network interface cards.
- If the configuration on the disk does not match the configuration on the device, starting or restarting NetworkManager creates an in-memory connection that reflects the configuration of the device. For further details and how to avoid this problem, see the Red Hat Knowledgebase solution NetworkManager duplicates a connection after restart of NetworkManager service.
1.3. Configuring an Ethernet connection by using nmtui
If you connect a host to an Ethernet network, you can manage the connection’s settings in a text-based user interface. Use the nmtui application to create new profiles and to update existing ones on a host without a graphical interface.
In nmtui:
- Navigate by using the cursor keys.
- Press a button by selecting it and hitting Enter.
- Select and clear checkboxes by using Space.
- To return to the previous screen, use ESC.
Prerequisites
- A physical or virtual Ethernet Network Interface Controller (NIC) exists in the server’s configuration.
Procedure
If you do not know the network device name you want to use in the connection, display the available devices:
# nmcli device status
DEVICE     TYPE      STATE                   CONNECTION
enp1s0     ethernet  unavailable             --
...
Start
nmtui:# nmtui- Select Edit a connection, and press Enter.
Choose whether to add a new connection profile or to modify an existing one:
To create a new profile:
- Press Add.
- Select Ethernet from the list of network types, and press Enter.
- To modify an existing profile, select the profile from the list, and press Enter.
Optional: Update the name of the connection profile.
On hosts with multiple profiles, a meaningful name makes it easier to identify the purpose of a profile.
- If you create a new connection profile, enter the network device name into the Device field.
Depending on your environment, configure the IP address settings in the
IPv4 configurationandIPv6 configurationareas accordingly. For this, press the button next to these areas, and select:- Disabled, if this connection does not require an IP address.
- Automatic, if a DHCP server dynamically assigns an IP address to this NIC.
Manual, if the network requires static IP address settings. In this case, you must fill further fields:
- Press Show next to the protocol you want to configure to display additional fields.
Press Add next to Addresses, and enter the IP address and the subnet mask in Classless Inter-Domain Routing (CIDR) format.
If you do not specify a subnet mask, NetworkManager sets a
/32subnet mask for IPv4 addresses and/64for IPv6 addresses.- Enter the address of the default gateway.
- Press Add next to DNS servers, and enter the DNS server address.
- Press Add next to Search domains, and enter the DNS search domain.
Figure 1.1. Example of an Ethernet connection with static IP address settings
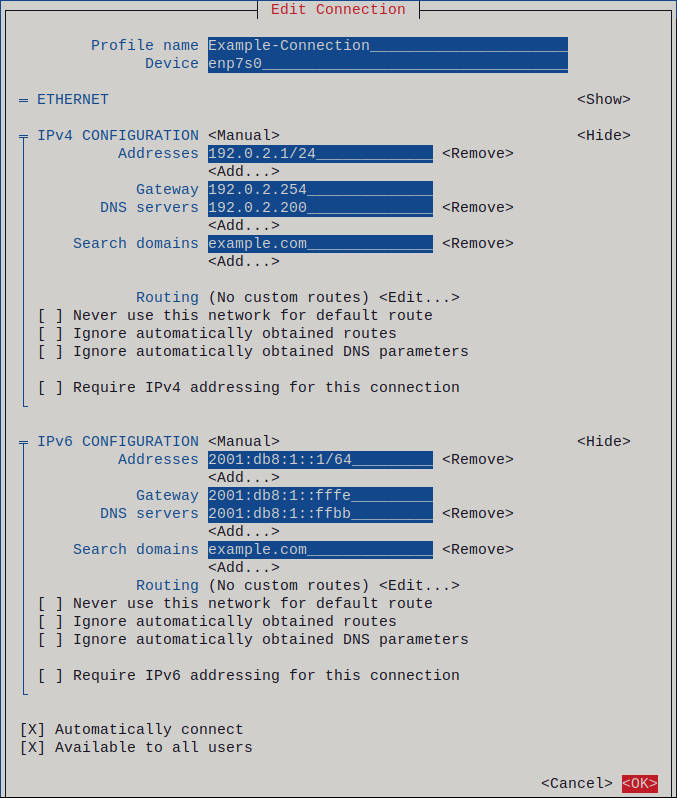
- Press OK to create and automatically activate the new connection.
- Press Back to return to the main menu.
-
Select Quit, and press Enter to close the
nmtuiapplication.
Verification
Display the IP settings of the NIC:
# ip address show enp1s0
2: enp1s0: <BROADCAST,MULTICAST,UP,LOWER_UP> mtu 1500 qdisc fq_codel state UP group default qlen 1000
    link/ether 52:54:00:17:b8:b6 brd ff:ff:ff:ff:ff:ff
    inet 192.0.2.1/24 brd 192.0.2.255 scope global noprefixroute enp1s0
       valid_lft forever preferred_lft forever
    inet6 2001:db8:1::fffe/64 scope global noprefixroute
       valid_lft forever preferred_lft forever
Display the IPv4 default gateway:
# ip route show default
default via 192.0.2.254 dev enp1s0 proto static metric 102
Display the IPv6 default gateway:
# ip -6 route show default
default via 2001:db8:1::fffe dev enp1s0 proto static metric 102 pref medium
Display the DNS settings:
# cat /etc/resolv.conf
search example.com
nameserver 192.0.2.200
nameserver 2001:db8:1::ffbb
If multiple connection profiles are active at the same time, the order of
nameserverentries depend on the DNS priority values in these profiles and the connection types.Use the
pingutility to verify that this host can send packets to other hosts:# ping <host-name-or-IP-address>
Troubleshooting
- Verify that the network cable is plugged-in to the host and a switch.
- Check whether the link failure exists only on this host or also on other hosts connected to the same switch.
- Verify that the network cable and the network interface are working as expected. Perform hardware diagnosis steps and replace defective cables and network interface cards.
- If the configuration on the disk does not match the configuration on the device, starting or restarting NetworkManager creates an in-memory connection that reflects the configuration of the device. For further details and how to avoid this problem, see the Red Hat Knowledgebase solution NetworkManager duplicates a connection after restart of NetworkManager service.
1.4. Configuring an Ethernet connection with a dynamic IP address by using the network RHEL system role with an interface name
You can use the network RHEL system role to configure an Ethernet connection that retrieves its IP addresses, gateways, and DNS settings from a DHCP server and IPv6 stateless address autoconfiguration (SLAAC). With this role you can assign the connection profile to the specified interface name.
To connect a Red Hat Enterprise Linux host to an Ethernet network, create a NetworkManager connection profile for the network device. By using Ansible and the network RHEL system role, you can automate this process and remotely configure connection profiles on the hosts defined in a playbook.
Prerequisites
- You have prepared the control node and the managed nodes.
-
The account you use to connect to the managed nodes has
sudopermissions for these nodes. - A physical or virtual Ethernet device exists in the servers' configuration.
- A DHCP server and SLAAC are available in the network.
- The managed nodes use the NetworkManager service to configure the network.
Procedure
Create a playbook file, for example,
~/playbook.yml, with the following content:--- - name: Configure the network hosts: managed-node-01.example.com tasks: - name: Ethernet connection profile with dynamic IP address settings ansible.builtin.include_role: name: redhat.rhel_system_roles.network vars: network_connections: - name: enp1s0 interface_name: enp1s0 type: ethernet autoconnect: yes ip: dhcp4: yes auto6: yes state: upThe settings specified in the example playbook include the following:
dhcp4: yes- Enables automatic IPv4 address assignment from DHCP, PPP, or similar services.
auto6: yes-
Enables IPv6 auto-configuration. By default, NetworkManager uses Router Advertisements. If the router announces the
managedflag, NetworkManager requests an IPv6 address and prefix from a DHCPv6 server.
For details about all variables used in the playbook, see the
/usr/share/ansible/roles/rhel-system-roles.network/README.mdfile on the control node.Validate the playbook syntax:
$ ansible-playbook --syntax-check ~/playbook.ymlNote that this command only validates the syntax and does not protect against a wrong but valid configuration.
Run the playbook:
$ ansible-playbook ~/playbook.yml
Verification
Query the Ansible facts of the managed node and verify that the interface received IP addresses and DNS settings:
# ansible managed-node-01.example.com -m ansible.builtin.setup
...
        "ansible_default_ipv4": {
            "address": "192.0.2.1",
            "alias": "enp1s0",
            "broadcast": "192.0.2.255",
            "gateway": "192.0.2.254",
            "interface": "enp1s0",
            "macaddress": "52:54:00:17:b8:b6",
            "mtu": 1500,
            "netmask": "255.255.255.0",
            "network": "192.0.2.0",
            "prefix": "24",
            "type": "ether"
        },
        "ansible_default_ipv6": {
            "address": "2001:db8:1::1",
            "gateway": "2001:db8:1::fffe",
            "interface": "enp1s0",
            "macaddress": "52:54:00:17:b8:b6",
            "mtu": 1500,
            "prefix": "64",
            "scope": "global",
            "type": "ether"
        },
        ...
        "ansible_dns": {
            "nameservers": [
                "192.0.2.1",
                "2001:db8:1::ffbb"
            ],
            "search": [
                "example.com"
            ]
        },
...
Chapter 2. Registering the system and managing subscriptions
Subscriptions cover products installed on Red Hat Enterprise Linux, including the operating system itself. If you have not registered the system, you have no access to the RHEL repositories. You cannot install software updates such as security, bug fixes. Even if you have a self-support subscription, it grants access to the knowledge base while more resources remain unavailable in the lack of subscriptions. By purchasing subscriptions and using Red Hat Content Delivery Network (CDN), you can track:
- Registered systems
- Products installed on registered systems
- Subscriptions attached to the installed products
2.1. Registering a system by using the command line
Subscriptions cover products installed on Red Hat Enterprise Linux, including the operating system itself. If you have not registered the system, you have no access to the RHEL repositories. You cannot install software updates such as security, bug fixes. Even if you have a self-support subscription, it grants access to the knowledge base while more resources remain unavailable in the lack of subscriptions. You need register the system to activate and manage Red Hat Enterprise Linux subscription for your Red Hat account.
To register the system with Red Hat Lightspeed, you can use the rhc connect utility. For details, see Setting up remote host configuration.
Prerequisites
- You have an active subscription of the Red Hat Enterprise Linux system.
Procedure
Register and subscribe the system:
# subscription-manager register
Registering to:                      subscription.rhsm.redhat.com:443/subscription
Username: <example_username>
Password: <example_password>
The system has been registered with ID: 37to907c-ece6-49ea-9174-20b87ajk9ee7
The registered system name is:          client1.example.com
The command prompts you to enter username and password of Red Hat Customer Portal account.
If the registration process fails, you can register the system with a specific pool. For details, proceed with the following steps:
Determine the pool ID of a subscription:
# subscription-manager list --available --allThis command displays all available subscriptions for your Red Hat account. For every subscription, various characteristics are displayed, including the pool ID.
Attach the appropriate subscription to your system by replacing <example_pool_id> with the pool ID determined in the previous step:
# subscription-manager attach --pool=<example_pool_id>
Verification
- Verify the system under → in the Hybrid Cloud Console.
2.2. Registering a system by using the web console
Subscriptions cover products installed on Red Hat Enterprise Linux, including the operating system itself. If you have not registered the system, you have no access to the RHEL repositories. You cannot install software updates such as security, bug fixes. Even if you have a self-support subscription, it grants access to the Red Hat Knowledgebase portal while more resources remain unavailable in the lack of subscriptions. You can register a newly installed Red Hat Enterprise Linux with your account credentials in the Red Hat Enterprise Linux web console.
Prerequisites
- You have an active subscription of the RHEL system.
- You have installed the RHEL 8 web console.
- You have enabled the cockpit service.
Your user account is allowed to log in to the web console.
For instructions, see Installing and enabling the web console.
Procedure
Log in to the RHEL 8 web console.
For details, see Logging in to the web console.
- In the Health field on the Overview page, click the Not registered warning, or click Subscriptions in the main menu to move to page with your subscription information.
- In the Overview field, click .
In the Register system dialog, select the registration method.
Optional: Enter your organization’s name or ID. If your account belongs to more than one organization on the Red Hat Customer Portal, you must add the organization name or ID. To get the organization ID, check with your Technical Account Manager at Red Hat.
- If you do not want to connect your system to Red Hat Red Hat Lightspeed, clear the Insights checkbox.
- Click .
Verification
- Check details of your subscription in the Hybrid Cloud Console.
2.3. Registering a system in the GNOME desktop environment
Subscriptions cover products installed on Red Hat Enterprise Linux, including the operating system itself. If you have not registered the system, you have no access to the RHEL repositories. You cannot install software updates such as security, bug fixes. Even if you have a self-support subscription, it grants access to the knowledge base while more resources remain unavailable in the lack of subscriptions. Follow the steps in this procedure to enroll the system with your Red Hat account.
Prerequisites
- You have created a Red Hat account.
- You are a root user and logged in to the GNOME desktop environment. For details, see Register and subscribe RHEL system to Red Hat Subscription Manager.
Procedure
Open the system menu, which is accessible from the upper-right screen corner, and click the Settings icon.

- In the → section, click .
- Select Registration Server.
- If you are not using the Red Hat server, enter the server address in the URL field.
- In the Registration Type menu, select Red Hat Account.
Under Registration Details:
- Enter your Red Hat account user name in the Login field.
- Enter your Red Hat account password in the Password field.
- Enter the name of your organization in the Organization field.
- Click .
2.4. Registering RHEL 8 using the installer GUI
You can register a Red Hat Enterprise Linux 8 by using the RHEL installer GUI.
Prerequisites
- You have a valid user account on the Red Hat Customer Portal. See the Create a Red Hat Login page.
- You have a valid Activation Key and Organization id.
Procedure
- From the Installation Summary screen, under Software, click Connect to Red Hat.
- Authenticate your Red Hat account using the Account or Activation Key option.
Optional: In the Set System Purpose field select the Role, SLA, and Usage attribute that you want to set from the drop-down menu.
At this point, your Red Hat Enterprise Linux 8 system has been successfully registered.
Chapter 3. Accessing the Red Hat Support
If you require help with troubleshooting a problem, you can contact Red Hat Support.
Procedure
Log in to the Red Hat Support web site and choose one of the following options:
- Open a new support case.
- Initiate a live chat with a Red Hat expert.
- Contact a Red Hat expert by making a call or sending an email.
3.1. Using the sosreport utility to collect daignostic information about a system to attach it to a support ticket
The sosreport command collects configuration details, system information and diagnostic information from a Red Hat Enterprise Linux system.
The following section describes how to use the sosreport command to produce reports for your support cases.
Prerequisites
- A valid user account on the Red Hat Customer Portal. See Create a Red Hat Login.
- An active subscription for the RHEL system.
- A support-case number.
Procedure
Install the
sospackage:# yum install sosGenerate a report:
# sosreportOptionally, pass the
--uploadoption to the command to automatically upload and attach the report to a support case. This requires internet access and your Customer Portal credentials.Optional: Manually attach the report to your support case.
See the Red Hat Knowledgebase solution How can I attach a file to a Red Hat support case? for more information.
Chapter 4. Changing basic environment settings
Configuration of basic environment settings is a part of the installation process. The following sections guide you when you change them later. The basic configuration of the environment includes:
- Date and time
- System locales
- Keyboard layout
- Language
4.1. Configuring the date and time
Accurate timekeeping is important for several reasons. In Red Hat Enterprise Linux, timekeeping is ensured by the NTP protocol, which is implemented by a daemon running in user space. The user-space daemon updates the system clock running in the kernel. The system clock can keep time by using various clock sources.
Red Hat Enterprise Linux 8 uses the chronyd daemon to implement NTP. chronyd is available from the chrony package. For more information, see Using the chrony suite to configure NTP.
4.1.1. Manually configuring the date, time, and timezone settings
To display the current date and time, use either of these steps.
Procedure
Optional: List the timezones:
# timedatectl list-timezones

  Europe/Berlin
Set the time zone:
# timedatectl set-timezone <time_zone>Set the date and time:
# timedatectl set-time <YYYY-mm-dd HH:MM:SS>
Verification
Display the date, time, and timezone:
# date
Mon Mar 30 16:02:59 CEST 2020
To see more details, use the timedatectl command:
# timedatectl

Local time: Mon 2020-03-30 16:04:42 CEST
Universal time: Mon 2020-03-30 14:04:42 UTC
RTC time: Mon 2020-03-30 14:04:41
Time zone: Europe/Prague (CEST, +0200)
System clock synchronized: yes
NTP service: active
RTC in local TZ: no
4.2. Configuring time settings by using the web console
You can set a time zone and synchronize the system time with a Network Time Protocol (NTP) server in the RHEL web console.
Prerequisites
- You have installed the RHEL 8 web console.
- You have enabled the cockpit service.
Your user account is allowed to log in to the web console.
For instructions, see Installing and enabling the web console.
Procedure
Log in to the RHEL 8 web console.
For details, see Logging in to the web console.
- Click the current system time in Overview.
- Click System time.
- In the Change System Time dialog box, change the time zone if necessary.
In the Set Time drop-down menu, select one of the following:
- Manually
- Use this option if you need to set the time manually, without an NTP server.
- Automatically using NTP server
- This is a default option, which synchronizes time automatically with the preset NTP servers.
- Automatically using specific NTP servers
- Use this option only if you need to synchronize the system with a specific NTP server. Specify the DNS name or the IP address of the server.
- Click Change.
Verification
- Check the system time displayed in the System tab.
4.3. Configuring the system locale
System-wide locale settings are stored in the /etc/locale.conf file that is read at early boot by the systemd daemon. Every service or user inherits the locale settings configured in /etc/locale.conf, unless individual programs or individual users override them.
Procedure
Optional: Display the current system locales settings:
# localectl status
System Locale: LANG=en_US.UTF-8
	VC Keymap: de-nodeadkeys
   X11 Layout: de
  X11 Variant: nodeadkeys
List available system locale settings:
$ localectl list-locales C.UTF-8 ... en_US.UTF-8 en_ZA.UTF-8 en_ZW.UTF-8 ...- Update the syste locale setting:
For example:
+
# localectl set-locale LANG=en_US.UTF-8The GNOME Terminal does not support non-UTF8 system locales. For more information, see the Red Hat Knowledgebase solution The gnome-terminal application fails to start when the system locale is set to non-UTF8.
4.4. Configuring the keyboard layout
The keyboard layout settings control the layout used on the text console and graphical user interfaces.
Procedure
To list available keymaps:
$ localectl list-keymaps
ANSI-dvorak
al
al-plisi
amiga-de
amiga-us
...
To display the current status of keymaps settings:
$ localectl status
...
VC Keymap: us
...
To set or change the default system keymap. For example:
# localectl set-keymap us
4.5. Changing the font size in text console mode
You can change the font size in the virtual console.
Procedure
Display the currently-used font file:
# cat /etc/vconsole.conf

FONT="eurlatgr"
List the available font files:
# ls -1 /usr/lib/kbd/consolefonts/*.psfu.gz

/usr/lib/kbd/consolefonts/eurlatgr.psfu.gz
/usr/lib/kbd/consolefonts/LatArCyrHeb-08.psfu.gz
/usr/lib/kbd/consolefonts/LatArCyrHeb-14.psfu.gz
/usr/lib/kbd/consolefonts/LatArCyrHeb-16.psfu.gz
/usr/lib/kbd/consolefonts/LatArCyrHeb-16+.psfu.gz
/usr/lib/kbd/consolefonts/LatArCyrHeb-19.psfu.gz
Select a font file that supports your character set and code page.
Optional: To test a font file, load it temporarily:
# setfont LatArCyrHeb-16.psfu.gzThe
setfontutility applies the font file immediately and terminals use the new and font size until you reboot or apply a different font file.-
To return to the font file defined in
/etc/vconsole.conf, entersetfontwithout any parameters. Edit the
/etc/vconsole.conffile and set theFONTvariable to the font file RHEL should load at boot time, for example:FONT=LatArCyrHeb-16Reboot the host
# reboot
Chapter 5. Using secure communications between two systems with OpenSSH
SSH (Secure Shell) is a protocol which provides secure communications between two systems using a client-server architecture and allows users to log in to server host systems remotely. Unlike other remote communication protocols, such as FTP or Telnet, SSH encrypts the login session, which prevents intruders from collecting unencrypted passwords from the connection.
5.1. Generating SSH key pairs
You can log in to an OpenSSH server without entering a password by generating an SSH key pair on a local system and copying the generated public key to the OpenSSH server. Each user who wants to create a key must run this procedure.
To preserve previously generated key pairs after you reinstall the system, back up the ~/.ssh/ directory before you create new keys. After reinstalling, copy it back to your home directory. You can do this for all users on your system, including root.
Prerequisites
- You are logged in as a user who wants to connect to the OpenSSH server by using keys.
- The OpenSSH server is configured to allow key-based authentication.
Procedure
Generate an ECDSA key pair:
$ ssh-keygen -t ecdsa
Generating public/private ecdsa key pair.
Enter file in which to save the key (/home/<username>/.ssh/id_ecdsa):
Enter passphrase (empty for no passphrase): <password>
Enter same passphrase again: <password>
Your identification has been saved in /home/<username>/.ssh/id_ecdsa.
Your public key has been saved in /home/<username>/.ssh/id_ecdsa.pub.
The key fingerprint is:
SHA256:Q/x+qms4j7PCQ0qFd09iZEFHA+SqwBKRNaU72oZfaCI <username>@<localhost.example.com>
The key's randomart image is:
+---[ECDSA 256]---+
|.oo..o=++        |
|.. o .oo .       |
|. .. o. o        |
|....o.+...       |
|o.oo.o +S .      |
|.=.+.   .o       |
|E.*+.  .  . .    |
|.=..+ +..  o     |
|  .  oo*+o.      |
+----[SHA256]-----+
You can also generate an RSA key pair by using the
ssh-keygencommand without any parameter or an Ed25519 key pair by entering thessh-keygen -t ed25519command. Note that the Ed25519 algorithm is not FIPS-140-compliant, and OpenSSH does not work with Ed25519 keys in FIPS mode.Copy the public key to a remote machine:
$ ssh-copy-id <username>@<ssh-server-example.com>
/usr/bin/ssh-copy-id: INFO: attempting to log in with the new key(s), to filter out any that are already installed
<username>@<ssh-server-example.com>'s password:
…
Number of key(s) added: 1

Now try logging into the machine, with: "ssh '<username>@<ssh-server-example.com>'" and check to make sure that only the key(s) you wanted were added.
Replace
<username>@<ssh-server-example.com>with your credentials.If you do not use the
ssh-agentprogram in your session, the previous command copies the most recently modified~/.ssh/id*.pubpublic key if it is not yet installed. To specify another public-key file or to prioritize keys in files over keys cached in memory byssh-agent, use thessh-copy-idcommand with the-ioption.
Verification
Log in to the OpenSSH server by using the key file:
$ ssh -o PreferredAuthentications=publickey <username>@<ssh-server-example.com>
5.2. Setting key-based authentication as the only method on an OpenSSH server
To improve system security, enforce key-based authentication by disabling password authentication on your OpenSSH server.
Prerequisites
-
The
openssh-serverpackage is installed. -
The
sshddaemon is running on the server. You can already connect to the OpenSSH server by using a key.
See the Generating SSH key pairs section for details.
Procedure
Open the
/etc/ssh/sshd_configconfiguration in a text editor, for example:# vi /etc/ssh/sshd_configChange the
PasswordAuthenticationoption tono:PasswordAuthentication no-
On a system other than a new default installation, check that the
PubkeyAuthenticationparameter is either not set or set toyes. Set the
ChallengeResponseAuthenticationdirective tono.Note that the corresponding entry is commented out in the configuration file and the default value is
yes.To use key-based authentication with NFS-mounted home directories, enable the
use_nfs_home_dirsSELinux boolean:# setsebool -P use_nfs_home_dirs 1- If you are connected remotely, not using console or out-of-band access, test the key-based login process before disabling password authentication.
Reload the
sshddaemon to apply the changes:# systemctl reload sshd
5.3. Caching your SSH credentials by using ssh-agent
To avoid entering a passphrase each time you initiate an SSH connection, you can use the ssh-agent utility to cache the private SSH key for a login session. If the agent is running and your keys are unlocked, you can log in to SSH servers by using these keys but without having to enter the key’s password again. The private key and the passphrase remain secure.
Prerequisites
- You have a remote host with the SSH daemon running and reachable through the network.
- You know the IP address or hostname and credentials to log in to the remote host.
You have generated an SSH key pair with a passphrase and transferred the public key to the remote machine.
See the Generating SSH key pairs section for details.
Procedure
Add the command for automatically starting
ssh-agentin your session to the~/.bashrcfile:Open
~/.bashrcin a text editor of your choice, for example:$ vi ~/.bashrcAdd the following line to the file:
eval $(ssh-agent)- Save the changes, and quit the editor.
Add the following line to the
~/.ssh/configfile:AddKeysToAgent yesWith this option and
ssh-agentstarted in your session, the agent prompts for a password only for the first time when you connect to a host.
Verification
Log in to a host which uses the corresponding public key of the cached private key in the agent, for example:
$ ssh <example.user>@<ssh-server@example.com>Note that you did not have to enter the passphrase.
5.4. Authenticating by SSH keys stored on a smart card
You can create and store ECDSA and RSA keys on a smart card and authenticate by the smart card on an OpenSSH client. Smart-card authentication replaces the default password authentication.
Prerequisites
-
On the client side, the
openscpackage is installed and thepcscdservice is running.
Procedure
List all keys provided by the OpenSC PKCS #11 module including their PKCS #11 URIs and save the output to the
keys.pubfile:$ ssh-keygen -D pkcs11: > keys.pubTransfer the public key to the remote server. Use the
ssh-copy-idcommand with thekeys.pubfile created in the previous step:$ ssh-copy-id -f -i keys.pub <username@ssh-server-example.com>Connect to <ssh-server-example.com> by using the ECDSA key. You can use just a subset of the URI, which uniquely references your key, for example:
$ ssh -i "pkcs11:id=%01?module-path=/usr/lib64/pkcs11/opensc-pkcs11.so" <ssh-server-example.com>
Enter PIN for 'SSH key':
[ssh-server-example.com] $
Because OpenSSH uses the
p11-kit-proxywrapper and the OpenSC PKCS #11 module is registered to thep11-kittool, you can simplify the previous command:$ ssh -i "pkcs11:id=%01" <ssh-server-example.com> Enter PIN for 'SSH key': [ssh-server-example.com] $If you skip the
id=part of a PKCS #11 URI, OpenSSH loads all keys that are available in the proxy module. This can reduce the amount of typing required:$ ssh -i pkcs11: <ssh-server-example.com> Enter PIN for 'SSH key': [ssh-server-example.com] $Optional: You can use the same URI string in the
~/.ssh/configfile to make the configuration permanent:$ cat ~/.ssh/config IdentityFile "pkcs11:id=%01?module-path=/usr/lib64/pkcs11/opensc-pkcs11.so" $ ssh <ssh-server-example.com> Enter PIN for 'SSH key': [ssh-server-example.com] $The
sshclient utility now automatically uses this URI and the key from the smart card.
Chapter 6. Configuring logging
Most services in Red Hat Enterprise Linux log status messages, warnings, and errors. You can use the rsyslogd service to log these entries to local files or to a remote logging server.
6.1. Configuring a remote logging solution
To ensure that logs from various machines in your environment are recorded centrally on a logging server, you can configure the Rsyslog application to record logs that fit specific criteria from the client system to the server.
6.1.1. The Rsyslog logging service
The Rsyslog application, in combination with the systemd-journald service, provides local and remote logging support in Red Hat Enterprise Linux. The rsyslogd daemon continuously reads syslog messages received by the systemd-journald service from the Journal. rsyslogd then filters and processes these syslog events and records them to rsyslog log files or forwards them to other services according to its configuration.
The rsyslogd daemon also provides extended filtering, encryption protected relaying of messages, input and output modules, and support for transportation using the TCP and UDP protocols.
In /etc/rsyslog.conf, which is the main configuration file for rsyslog, you can specify the rules according to which rsyslogd handles the messages. Generally, you can classify messages by their source and topic (facility) and urgency (priority), and then assign an action that should be performed when a message fits these criteria.
In /etc/rsyslog.conf, you can also see a list of log files maintained by rsyslogd. Most log files are located in the /var/log/ directory. Some applications, such as httpd and samba, store their log files in a subdirectory within /var/log/.
6.1.2. Installing Rsyslog documentation
The Rsyslog application has extensive online documentation that is available at https://www.rsyslog.com/doc/, but you can also install the rsyslog-doc documentation package locally.
Prerequisites
-
You have activated the
AppStreamrepository on your system. -
You are authorized to install new packages using
sudo.
Procedure
Install the
rsyslog-docpackage:# yum install rsyslog-doc
Verification
Open the
/usr/share/doc/rsyslog/html/index.htmlfile in a browser of your choice, for example:$ firefox /usr/share/doc/rsyslog/html/index.html &
6.1.3. Configuring a server for remote logging over TCP
The Rsyslog application enables you to both run a logging server and configure individual systems to send their log files to the logging server. To use remote logging through TCP, configure both the server and the client. The server collects and analyzes the logs sent by one or more client systems.
With the Rsyslog application, you can maintain a centralized logging system where log messages are forwarded to a server over the network. To avoid message loss when the server is not available, you can configure an action queue for the forwarding action. This way, messages that failed to be sent are stored locally until the server is reachable again. Note that such queues cannot be configured for connections using the UDP protocol.
The omfwd plug-in provides forwarding over UDP or TCP. The default protocol is UDP. Because the plug-in is built in, it does not have to be loaded.
By default, rsyslog uses TCP on port 514.
Prerequisites
- Rsyslog is installed on the server system.
-
You are logged in as
rooton the server. -
The
policycoreutils-python-utilspackage is installed for the optional step using thesemanagecommand. -
The
firewalldservice is running.
Procedure
Optional: To use a different port for
rsyslogtraffic, add thesyslogd_port_tSELinux type to port. For example, enable port30514:# semanage port -a -t syslogd_port_t -p tcp 30514Optional: To use a different port for
rsyslogtraffic, configurefirewalldto allow incomingrsyslogtraffic on that port. For example, allow TCP traffic on port30514:# firewall-cmd --zone=<zone-name> --permanent --add-port=30514/tcp success # firewall-cmd --reloadCreate a new file in the
/etc/rsyslog.d/directory named, for example,remotelog.conf, and insert the following content:# Define templates before the rules that use them # Per-Host templates for remote systems template(name="TmplAuthpriv" type="list") { constant(value="/var/log/remote/auth/") property(name="hostname") constant(value="/") property(name="programname" SecurePath="replace") constant(value=".log") } template(name="TmplMsg" type="list") { constant(value="/var/log/remote/msg/") property(name="hostname") constant(value="/") property(name="programname" SecurePath="replace") constant(value=".log") } # Provides TCP syslog reception module(load="imtcp") # Adding this ruleset to process remote messages ruleset(name="remote1"){ authpriv.* action(type="omfile" DynaFile="TmplAuthpriv") *.info;mail.none;authpriv.none;cron.none action(type="omfile" DynaFile="TmplMsg") } input(type="imtcp" port="30514" ruleset="remote1")-
Save the changes to the
/etc/rsyslog.d/remotelog.conffile. Test the syntax of the
/etc/rsyslog.conffile:# rsyslogd -N 1 rsyslogd: version 8.1911.0-2.el8, config validation run... rsyslogd: End of config validation run. Bye.Make sure the
rsyslogservice is running and enabled on the logging server:# systemctl status rsyslogRestart the
rsyslogservice.# systemctl restart rsyslogOptional: If
rsyslogis not enabled, ensure thersyslogservice starts automatically after reboot:# systemctl enable rsyslog
Your log server is now configured to receive and store log files from the other systems in your environment.
6.1.4. Configuring remote logging to a server over TCP
You can configure a system for forwarding log messages to a server over the TCP protocol. The omfwd plug-in provides forwarding over UDP or TCP. The default protocol is UDP. Because the plug-in is built in, you do not have to load it.
Prerequisites
-
The
rsyslogpackage is installed on the client systems that should report to the server. - You have configured the server for remote logging.
- The specified port is permitted in SELinux and open in firewall.
-
The system contains the
policycoreutils-python-utilspackage, which provides thesemanagecommand for adding a non-standard port to the SELinux configuration.
Procedure
Create a new file in the
/etc/rsyslog.d/directory named, for example,10-remotelog.conf, and insert the following content:*.* action(type="omfwd" queue.type="linkedlist" queue.filename="example_fwd" action.resumeRetryCount="-1" queue.saveOnShutdown="on" target="example.com" port="30514" protocol="tcp" )Where:
-
The
queue.type="linkedlist"setting enables a LinkedList in-memory queue, -
The
queue.filenamesetting defines a disk storage. The backup files are created with theexample_fwdprefix in the working directory specified by the preceding globalworkDirectorydirective. -
The
action.resumeRetryCount -1setting preventsrsyslogfrom dropping messages when retrying to connect if server is not responding, -
The
queue.saveOnShutdown="on"setting saves in-memory data ifrsyslogshuts down. The last line forwards all received messages to the logging server. Port specification is optional.
With this configuration,
rsyslogsends messages to the server but keeps messages in memory if the remote server is not reachable. A file on disk is created only ifrsyslogruns out of the configured memory queue space or needs to shut down, which benefits the system performance.
NoteRsyslog processes configuration files
/etc/rsyslog.d/in the lexical order.-
The
Restart the
rsyslogservice.# systemctl restart rsyslog
Verification
To verify that the client system sends messages to the server, follow these steps:
On the client system, send a test message:
# logger testOn the server system, view the
/var/log/messageslog, for example:# cat /var/log/remote/msg/hostname/root.log Feb 25 03:53:17 hostname root[6064]: testWhere hostname is the host name of the client system. Note that the log contains the user name of the user that entered the
loggercommand, in this caseroot.
6.1.5. Configuring TLS-encrypted remote logging
By default, Rsyslog sends remote-logging communication in the plain text format. If your scenario requires to secure this communication channel, you can encrypt it using TLS.
To use encrypted transport through TLS, configure both the server and the client. The server collects and analyzes the logs sent by one or more client systems.
You can use either the ossl network stream driver (OpenSSL) or the gtls stream driver (GnuTLS).
If you have a separate system with higher security, for example, a system that is not connected to any network or has stricter authorizations, use the separate system as the certifying authority (CA).
You can customize your connection settings with stream drivers on the server side on the global, module, and input levels, and on the client side on the global and action levels. The more specific configuration overrides the more general configuration. This means, for example, that you can use ossl in global settings for most connections and gtls on the input and action settings only for specific connections.
Prerequisites
-
You have
rootaccess to both the client and server systems. The following packages are installed on the server and the client systems:
-
The
rsyslogpackage. -
For the
osslnetwork stream driver, thersyslog-opensslpackage. -
For the
gtlsnetwork stream driver, thersyslog-gnutlspackage. -
For generating certificates by using the
certtoolcommand, thegnutls-utilspackage.
-
The
On your logging server, the following certificates are in the
/etc/pki/ca-trust/source/anchors/directory and your system configuration is updated by using theupdate-ca-trustcommand:-
ca-cert.pem- a CA certificate that can verify keys and certificates on logging servers and clients. -
server-cert.pem- a public key of the logging server. -
server-key.pem- a private key of the logging server.
-
On your logging clients, the following certificates are in the
/etc/pki/ca-trust/source/anchors/directory and your system configuration is updated by usingupdate-ca-trust:-
ca-cert.pem- a CA certificate that can verify keys and certificates on logging servers and clients. -
client-cert.pem- a public key of a client. -
client-key.pem- a private key of a client.
-
Procedure
Configure the server for receiving encrypted logs from your client systems:
-
Create a new file in the
/etc/rsyslog.d/directory named, for example,securelogser.conf. To encrypt the communication, the configuration file must contain paths to certificate files on your server, a selected authentication method, and a stream driver that supports TLS encryption. Add the following lines to the
/etc/rsyslog.d/securelogser.conffile:# Set certificate files global( DefaultNetstreamDriverCAFile="/etc/pki/ca-trust/source/anchors/ca-cert.pem" DefaultNetstreamDriverCertFile="/etc/pki/ca-trust/source/anchors/server-cert.pem" DefaultNetstreamDriverKeyFile="/etc/pki/ca-trust/source/anchors/server-key.pem" ) # TCP listener module( load="imtcp" PermittedPeer=["client1.example.com", "client2.example.com"] StreamDriver.AuthMode="x509/name" StreamDriver.Mode="1" StreamDriver.Name="ossl" ) # Start up listener at port 514 input( type="imtcp" port="514" )NoteIf you prefer the GnuTLS driver, use the
StreamDriver.Name="gtls"configuration option. See the documentation installed with thersyslog-docpackage for more information about less strict authentication modes thanx509/name.-
Save the changes to the
/etc/rsyslog.d/securelogser.conffile. Verify the syntax of the
/etc/rsyslog.conffile and any files in the/etc/rsyslog.d/directory:# rsyslogd -N 1 rsyslogd: version 8.1911.0-2.el8, config validation run (level 1)... rsyslogd: End of config validation run. Bye.Make sure the
rsyslogservice is running and enabled on the logging server:# systemctl status rsyslogRestart the
rsyslogservice:# systemctl restart rsyslogOptional: If Rsyslog is not enabled, ensure the
rsyslogservice starts automatically after reboot:# systemctl enable rsyslog
-
Create a new file in the
Configure clients for sending encrypted logs to the server:
-
On a client system, create a new file in the
/etc/rsyslog.d/directory named, for example,securelogcli.conf. Add the following lines to the
/etc/rsyslog.d/securelogcli.conffile:# Set certificate files global( DefaultNetstreamDriverCAFile="/etc/pki/ca-trust/source/anchors/ca-cert.pem" DefaultNetstreamDriverCertFile="/etc/pki/ca-trust/source/anchors/client-cert.pem" DefaultNetstreamDriverKeyFile="/etc/pki/ca-trust/source/anchors/client-key.pem" ) # Set up the action for all messages *.* action( type="omfwd" StreamDriver="ossl" StreamDriverMode="1" StreamDriverPermittedPeers="server.example.com" StreamDriverAuthMode="x509/name" target="server.example.com" port="514" protocol="tcp" )NoteIf you prefer the GnuTLS driver, use the
StreamDriver.Name="gtls"configuration option.-
Save the changes to the
/etc/rsyslog.d/securelogcli.conffile. Verify the syntax of the
/etc/rsyslog.conffile and other files in the/etc/rsyslog.d/directory:# rsyslogd -N 1 rsyslogd: version 8.1911.0-2.el8, config validation run (level 1)... rsyslogd: End of config validation run. Bye.Make sure the
rsyslogservice is running and enabled on the logging server:# systemctl status rsyslogRestart the
rsyslogservice:# systemctl restart rsyslogOptional: If Rsyslog is not enabled, ensure the
rsyslogservice starts automatically after reboot:# systemctl enable rsyslog
-
On a client system, create a new file in the
Verification
To verify that the client system sends messages to the server, follow these steps:
On the client system, send a test message:
# logger testOn the server system, view the
/var/log/messageslog, for example:# cat /var/log/remote/msg/<hostname>/root.log Feb 25 03:53:17 <hostname> root[6064]: testWhere
<hostname>is the hostname of the client system. Note that the log contains the user name of the user that entered the logger command, in this caseroot.
6.1.6. Configuring a server for receiving remote logging information over UDP
The Rsyslog application enables you to configure a system to receive logging information from remote systems. To use remote logging through UDP, configure both the server and the client. The receiving server collects and analyzes the logs sent by one or more client systems. By default, rsyslog uses UDP on port 514 to receive log information from remote systems.
Follow this procedure to configure a server for collecting and analyzing logs sent by one or more client systems over the UDP protocol.
Prerequisites
- Rsyslog is installed on the server system.
-
You are logged in as
rooton the server. -
The
policycoreutils-python-utilspackage is installed for the optional step using thesemanagecommand. -
The
firewalldservice is running.
Procedure
Optional: To use a different port for
rsyslogtraffic than the default port514:Add the
syslogd_port_tSELinux type to the SELinux policy configuration, replacingportnowith the port number you wantrsyslogto use:# semanage port -a -t syslogd_port_t -p udp portnoConfigure
firewalldto allow incomingrsyslogtraffic, replacingportnowith the port number andzonewith the zone you wantrsyslogto use:# firewall-cmd --zone=zone --permanent --add-port=portno/udp success # firewall-cmd --reloadReload the firewall rules:
# firewall-cmd --reload
Create a new
.conffile in the/etc/rsyslog.d/directory, for example,remotelogserv.conf, and insert the following content:# Define templates before the rules that use them # Per-Host templates for remote systems template(name="TmplAuthpriv" type="list") { constant(value="/var/log/remote/auth/") property(name="hostname") constant(value="/") property(name="programname" SecurePath="replace") constant(value=".log") } template(name="TmplMsg" type="list") { constant(value="/var/log/remote/msg/") property(name="hostname") constant(value="/") property(name="programname" SecurePath="replace") constant(value=".log") } # Provides UDP syslog reception module(load="imudp") # This ruleset processes remote messages ruleset(name="remote1"){ authpriv.* action(type="omfile" DynaFile="TmplAuthpriv") *.info;mail.none;authpriv.none;cron.none action(type="omfile" DynaFile="TmplMsg") } input(type="imudp" port="514" ruleset="remote1")Where
514is the port numberrsysloguses by default. You can specify a different port instead.Verify the syntax of the
/etc/rsyslog.conffile and all.conffiles in the/etc/rsyslog.d/directory:# rsyslogd -N 1 rsyslogd: version 8.1911.0-2.el8, config validation run...Restart the
rsyslogservice.# systemctl restart rsyslogOptional: If
rsyslogis not enabled, ensure thersyslogservice starts automatically after reboot:# systemctl enable rsyslog
6.1.7. Configuring remote logging to a server over UDP
You can configure a system for forwarding log messages to a server over the UDP protocol. The omfwd plug-in provides forwarding over UDP or TCP. The default protocol is UDP. Because the plug-in is built in, you do not have to load it.
Prerequisites
-
The
rsyslogpackage is installed on the client systems that should report to the server. - You have configured the server for remote logging as described in Configuring a server for receiving remote logging information over UDP.
Procedure
Create a new
.conffile in the/etc/rsyslog.d/directory, for example,10-remotelogcli.conf, and insert the following content:*.* action(type="omfwd" queue.type="linkedlist" queue.filename="example_fwd" action.resumeRetryCount="-1" queue.saveOnShutdown="on" target="example.com" port="portno" protocol="udp" )Where:
-
The
queue.type="linkedlist"setting enables a LinkedList in-memory queue. -
The
queue.filenamesetting defines a disk storage. The backup files are created with theexample_fwdprefix in the working directory specified by the preceding globalworkDirectorydirective. -
The
action.resumeRetryCount -1setting preventsrsyslogfrom dropping messages when retrying to connect if the server is not responding. -
The
enabled queue.saveOnShutdown="on"setting saves in-memory data ifrsyslogshuts down. -
The
portnovalue is the port number you wantrsyslogto use. The default value is514. The last line forwards all received messages to the logging server, port specification is optional.
With this configuration,
rsyslogsends messages to the server but keeps messages in memory if the remote server is not reachable. A file on disk is created only ifrsyslogruns out of the configured memory queue space or needs to shut down, which benefits the system performance.
NoteRsyslog processes configuration files
/etc/rsyslog.d/in the lexical order.-
The
Restart the
rsyslogservice.# systemctl restart rsyslogOptional: If
rsyslogis not enabled, ensure thersyslogservice starts automatically after reboot:# systemctl enable rsyslog
Verification
To verify that the client system sends messages to the server, follow these steps:
On the client system, send a test message:
# logger testOn the server system, view the
/var/log/remote/msg/hostname/root.loglog, for example:# cat /var/log/remote/msg/hostname/root.log Feb 25 03:53:17 hostname root[6064]: testWhere
hostnameis the host name of the client system. Note that the log contains the user name of the user that entered the logger command, in this caseroot.
6.1.8. Load balancing helper in Rsyslog
When used in a cluster, you can improve Rsyslog load balancing by modifying the RebindInterval setting.
RebindInterval specifies an interval at which the current connection is broken and is re-established. This setting applies to TCP, UDP, and RELP traffic. The load balancers perceive it as a new connection and forward the messages to another physical target system.
RebindInterval is helpful in scenarios when a target system has changed its IP address. The Rsyslog application caches the IP address when the connection is established, therefore, the messages are sent to the same server. If the IP address changes, the UDP packets are lost until the Rsyslog service restarts. Re-establishing the connection ensures the IP is resolved by DNS again.
Example usage of RebindInterval for TCP, UDP, and RELP traffic
action(type="omfwd" protocol="tcp" RebindInterval="250" target="example.com" port="514" …)

action(type="omfwd" protocol="udp" RebindInterval="250" target="example.com" port="514" …)

action(type="omrelp" RebindInterval="250" target="example.com" port="6514" …)
6.1.9. Configuring reliable remote logging
With the Reliable Event Logging Protocol (RELP), you can send and receive syslog messages over TCP with a much reduced risk of message loss. RELP provides reliable delivery of event messages, which makes it useful in environments where message loss is not acceptable. To use RELP, configure the imrelp input module, which runs on the server and receives the logs, and the omrelp output module, which runs on the client and sends logs to the logging server.
Prerequisites
-
You have installed the
rsyslog,librelp, andrsyslog-relppackages on the server and the client systems. - The specified port is permitted in SELinux and open in the firewall.
Procedure
Configure the client system for reliable remote logging:
On the client system, create a new
.conffile in the/etc/rsyslog.d/directory named, for example,relpclient.conf, and insert the following content:module(load="omrelp") *.* action(type="omrelp" target="_target_IP_" port="_target_port_")Where:
-
target_IPis the IP address of the logging server. -
target_portis the port of the logging server.
-
-
Save the changes to the
/etc/rsyslog.d/relpclient.conffile. Restart the
rsyslogservice.# systemctl restart rsyslogOptional: If
rsyslogis not enabled, ensure thersyslogservice starts automatically after reboot:# systemctl enable rsyslog
Configure the server system for reliable remote logging:
On the server system, create a new
.conffile in the/etc/rsyslog.d/directory named, for example,relpserv.conf, and insert the following content:ruleset(name="relp"){ *.* action(type="omfile" file="_log_path_") } module(load="imrelp") input(type="imrelp" port="_target_port_" ruleset="relp")Where:
-
log_pathspecifies the path for storing messages. -
target_portis the port of the logging server. Use the same value as in the client configuration file.
-
-
Save the changes to the
/etc/rsyslog.d/relpserv.conffile. Restart the
rsyslogservice.# systemctl restart rsyslogOptional: If
rsyslogis not enabled, ensure thersyslogservice starts automatically after reboot:# systemctl enable rsyslog
Verification
To verify that the client system sends messages to the server, follow these steps:
On the client system, send a test message:
# logger testOn the server system, view the log at the specified
log_path, for example:# cat /var/log/remote/msg/hostname/root.log Feb 25 03:53:17 hostname root[6064]: testWhere
hostnameis the host name of the client system. Note that the log contains the user name of the user that entered the logger command, in this caseroot.
6.1.10. Supported Rsyslog modules
To expand the functionality of the Rsyslog application, you can use specific modules. Modules provide additional inputs (Input Modules), outputs (Output Modules), and other functionalities. A module can also provide additional configuration directives that become available after you load the module.
You can list the input and output modules installed on your system by entering the following command:
# ls /usr/lib64/rsyslog/{i,o}m*
You can view the list of all available rsyslog modules in the /usr/share/doc/rsyslog/html/configuration/modules/idx_output.html file after you install the rsyslog-doc package.
6.1.11. Configuring the netconsole service to log kernel messages to a remote host
When logging to disk or using a serial console is not possible, you can use the netconsole kernel module and the same-named service to log kernel messages over a network to a remote rsyslog service.
Prerequisites
-
A system log service, such as
rsyslogis installed on the remote host. - The remote system log service is configured to receive incoming log entries from this host.
Procedure
Install the
netconsole-servicepackage:# yum install netconsole-serviceEdit the
/etc/sysconfig/netconsolefile and set theSYSLOGADDRparameter to the IP address of the remote host:# SYSLOGADDR=192.0.2.1Enable and start the
netconsoleservice:# systemctl enable --now netconsole
Verification
-
Display the
/var/log/messagesfile on the remote system log server.
6.2. Using the logging system role
As a system administrator, you can use the logging system role to configure a Red Hat Enterprise Linux host as a logging server to collect logs from many client systems.
6.2.1. Filtering local log messages by using the logging RHEL system role
You can use the property-based filter of the logging RHEL system role to filter your local log messages based on various conditions.
You can achieve, for example:
- Log clarity: In a high-traffic environment, logs can grow rapidly. The focus on specific messages, like errors, can help to identify problems faster.
- Optimized system performance: Excessive amount of logs is usually connected with system performance degradation. Selective logging for only the important events can prevent resource depletion, which enables your systems to run more efficiently.
- Enhanced security: Efficient filtering through security messages, like system errors and failed logins, helps to capture only the relevant logs. This is important for detecting breaches and meeting compliance standards.
Prerequisites
- You have prepared the control node and the managed nodes.
-
The account you use to connect to the managed nodes has
sudopermissions for these nodes.
Procedure
Create a playbook file, for example,
~/playbook.yml, with the following content:--- - name: Deploy the logging solution hosts: managed-node-01.example.com tasks: - name: Filter logs based on a specific value they contain ansible.builtin.include_role: name: redhat.rhel_system_roles.logging vars: logging_inputs: - name: files_input type: basics logging_outputs: - name: files_output0 type: files property: msg property_op: contains property_value: error path: /var/log/errors.log - name: files_output1 type: files property: msg property_op: "!contains" property_value: error path: /var/log/others.log logging_flows: - name: flow0 inputs: [files_input] outputs: [files_output0, files_output1]The settings specified in the example playbook include the following:
logging_inputs-
Defines a list of logging input dictionaries. The
type: basicsoption covers inputs fromsystemdjournal or Unix socket. logging_outputs-
Defines a list of logging output dictionaries. The
type: filesoption supports storing logs in the local files, usually in the/var/log/directory. Theproperty: msg;property: contains; andproperty_value: erroroptions specify that all logs that contain theerrorstring are stored in the/var/log/errors.logfile. Theproperty: msg;property: !contains; andproperty_value: erroroptions specify that all other logs are put in the/var/log/others.logfile. You can replace theerrorvalue with the string by which you want to filter. logging_flows-
Defines a list of logging flow dictionaries to specify relationships between
logging_inputsandlogging_outputs. Theinputs: [files_input]option specifies a list of inputs, from which processing of logs starts. Theoutputs: [files_output0, files_output1]option specifies a list of outputs, to which the logs are sent.
For details about all variables used in the playbook, see the
/usr/share/ansible/roles/rhel-system-roles.logging/README.mdfile on the control node.Validate the playbook syntax:
$ ansible-playbook --syntax-check ~/playbook.ymlNote that this command only validates the syntax and does not protect against a wrong but valid configuration.
Run the playbook:
$ ansible-playbook ~/playbook.yml
Verification
On the managed node, test the syntax of the
/etc/rsyslog.conffile:# rsyslogd -N 1 rsyslogd: version 8.1911.0-6.el8, config validation run... rsyslogd: End of config validation run. Bye.On the managed node, verify that the system sends messages that contain the
errorstring to the log:Send a test message:
# logger errorView the
/var/log/errors.loglog, for example:# cat /var/log/errors.log Aug 5 13:48:31 hostname root[6778]: errorWhere
hostnameis the host name of the client system. Note that the log contains the user name of the user that entered the logger command, in this caseroot.
6.2.2. Applying a remote logging solution by using the logging RHEL system role
You can use the logging RHEL system role to configure centralized log management across multiple systems. The server receives remote input from the remote_rsyslog and remote_files configurations, and outputs the logs to local files in directories named by remote host names.
As a result, you can cover use cases where you need for example:
- Centralized log management: Collecting, accessing, and managing log messages of multiple machines from a single storage point simplifies day-to-day monitoring and troubleshooting tasks. Also, this use case reduces the need to log in to individual machines to check the log messages.
- Enhanced security: Storing log messages in one central place increases chances they are in a secure and tamper-proof environment. Such an environment makes it easier to detect and respond to security incidents more effectively and to meet audit requirements.
- Improved efficiency in log analysis: Correlating log messages from multiple systems is important for fast troubleshooting of complex problems that span multiple machines or services. That way you can quickly analyze and cross-reference events from different sources.
- Define the ports in the SELinux policy of the server or client system and open the firewall for those ports. The default SELinux policy includes ports 601, 514, 6514, 10514, and 20514. To use a different port, see modify the SELinux policy on the client and server systems.
Prerequisites
- You have prepared the control node and the managed nodes.
-
The account you use to connect to the managed nodes has
sudopermissions for these nodes.
Procedure
Create a playbook file, for example,
~/playbook.yml, with the following content:--- - name: Deploy the logging solution hosts: managed-node-01.example.com tasks: - name: Configure the server to receive remote input ansible.builtin.include_role: name: redhat.rhel_system_roles.logging vars: logging_inputs: - name: remote_udp_input type: remote udp_ports: [ 601 ] - name: remote_tcp_input type: remote tcp_ports: [ 601 ] logging_outputs: - name: remote_files_output type: remote_files logging_flows: - name: flow_0 inputs: [remote_udp_input, remote_tcp_input] outputs: [remote_files_output] - name: Deploy the logging solution hosts: managed-node-02.example.com tasks: - name: Configure the server to output the logs to local files in directories named by remote host names ansible.builtin.include_role: name: redhat.rhel_system_roles.logging vars: logging_inputs: - name: basic_input type: basics logging_outputs: - name: forward_output0 type: forwards severity: info target: <host1.example.com> udp_port: 601 - name: forward_output1 type: forwards facility: mail target: <host1.example.com> tcp_port: 601 logging_flows: - name: flows0 inputs: [basic_input] outputs: [forward_output0, forward_output1]The settings specified in the first play of the example playbook include the following:
logging_inputs-
Defines a list of logging input dictionaries. The
type: remoteoption covers remote inputs from the other logging system over the network. Theudp_ports: [ 601 ]option defines a list of UDP port numbers to monitor. Thetcp_ports: [ 601 ]option defines a list of TCP port numbers to monitor. If bothudp_portsandtcp_portsare set,udp_portsis used andtcp_portsis dropped. logging_outputs-
Defines a list of logging output dictionaries. The
type: remote_filesoption makes output store logs to the local files per remote host and program name originated the logs. logging_flows-
Defines a list of logging flow dictionaries to specify relationships between
logging_inputsandlogging_outputs. Theinputs: [remote_udp_input, remote_tcp_input]option specifies a list of inputs, from which processing of logs starts. Theoutputs: [remote_files_output]option specifies a list of outputs, to which the logs are sent.
The settings specified in the second play of the example playbook include the following:
logging_inputs-
Defines a list of logging input dictionaries. The
type: basicsoption covers inputs fromsystemdjournal or Unix socket. logging_outputs-
Defines a list of logging output dictionaries. The
type: forwardsoption supports sending logs to the remote logging server over the network. Theseverity: infooption refers to log messages of informative importance. Thefacility: mailoption refers to the type of system program that is generating the log message. Thetarget: <host1.example.com>option specifies the hostname of the remote logging server. Theudp_port: 601/tcp_port: 601options define the UDP/TCP ports on which the remote logging server listens. logging_flows-
Defines a list of logging flow dictionaries to specify relationships between
logging_inputsandlogging_outputs. Theinputs: [basic_input]option specifies a list of inputs, from which processing of logs starts. Theoutputs: [forward_output0, forward_output1]option specifies a list of outputs, to which the logs are sent.
For details about all variables used in the playbook, see the
/usr/share/ansible/roles/rhel-system-roles.logging/README.mdfile on the control node.Validate the playbook syntax:
$ ansible-playbook --syntax-check ~/playbook.ymlNote that this command only validates the syntax and does not protect against a wrong but valid configuration.
Run the playbook:
$ ansible-playbook ~/playbook.yml
Verification
On both the client and the server system, test the syntax of the
/etc/rsyslog.conffile:# rsyslogd -N 1 rsyslogd: version 8.1911.0-6.el8, config validation run (level 1), master config /etc/rsyslog.conf rsyslogd: End of config validation run. Bye.Verify that the client system sends messages to the server:
On the client system, send a test message:
# logger testOn the server system, view the
/var/log/<host2.example.com>/messageslog, for example:# cat /var/log/<host2.example.com>/messages Aug 5 13:48:31 <host2.example.com> root[6778]: testWhere
<host2.example.com>is the host name of the client system. Note that the log contains the user name of the user that entered the logger command, in this caseroot.
6.2.3. Using the logging RHEL system role with TLS
You can use the logging RHEL system role to configure a secure transfer of log messages, where one or more clients take logs from the systemd-journal service and transfer them to a remote server while using TLS.
Typically, TLS for transferring logs in a remote logging solution is used when sending sensitive data over less trusted or public networks, such as the Internet. Also, by using certificates in TLS you can ensure that the client is forwarding logs to the correct and trusted server. This prevents attacks like "man-in-the-middle".
6.2.3.1. Configuring client logging with TLS
You can use the logging RHEL system role to configure logging on RHEL clients and transfer logs to a remote logging system using TLS encryption.
The role creates a private key and a certificate. Next, it configures TLS on all hosts in the clients group in the Ansible inventory. The TLS protocol encrypts the message transmission for secure transfer of logs over the network.
You do not have to call the certificate RHEL system role in the playbook to create the certificate. The logging RHEL system role calls it automatically when the logging_certificates variable is set.
In order for the CA to be able to sign the created certificate, the managed nodes must be enrolled in an IdM domain.
Prerequisites
- You have prepared the control node and the managed nodes.
-
The account you use to connect to the managed nodes has
sudopermissions for these nodes. - The managed nodes are enrolled in an IdM domain.
Procedure
Create a playbook file, for example,
~/playbook.yml, with the following content:--- - name: Configure remote logging solution using TLS for secure transfer of logs hosts: managed-node-01.example.com tasks: - name: Deploying files input and forwards output with certs ansible.builtin.include_role: name: redhat.rhel_system_roles.logging vars: logging_certificates: - name: logging_cert dns: ['www.example.com'] ca: ipa principal: "logging/{{ inventory_hostname }}@IDM.EXAMPLE.COM" logging_pki_files: - ca_cert: /local/path/to/ca_cert.pem cert: /local/path/to/logging_cert.pem private_key: /local/path/to/logging_cert.pem logging_inputs: - name: input_name type: files input_log_path: /var/log/containers/*.log logging_outputs: - name: output_name type: forwards target: your_target_host tcp_port: 514 tls: true pki_authmode: x509/name permitted_server: 'server.example.com' logging_flows: - name: flow_name inputs: [input_name] outputs: [output_name]The settings specified in the example playbook include the following:
logging_certificates-
The value of this parameter is passed on to
certificate_requestsin thecertificateRHEL system role and used to create a private key and certificate. logging_pki_filesUsing this parameter, you can configure the paths and other settings that logging uses to find the CA, certificate, and key files used for TLS, specified with one or more of the following sub-parameters:
ca_cert,ca_cert_src,cert,cert_src,private_key,private_key_src, andtls.NoteIf you are using
logging_certificatesto create the files on the managed node, do not useca_cert_src,cert_src, andprivate_key_src, which are used to copy files not created bylogging_certificates.ca_cert-
Represents the path to the CA certificate file on the managed node. The default path is
/etc/pki/tls/certs/ca.pemand the file name is set by the user. cert-
Represents the path to the certificate file on the managed node. The default path is
/etc/pki/tls/certs/server-cert.pemand the file name is set by the user. private_key-
Represents the path to the private key file on the managed node. The default path is
/etc/pki/tls/private/server-key.pemand the file name is set by the user. ca_cert_src-
Represents the path to the CA certificate file on the control node which is copied to the target host to the location specified by
ca_cert. Do not use this if usinglogging_certificates. cert_src-
Represents the path to a certificate file on the control node which is copied to the target host to the location specified by
cert. Do not use this if usinglogging_certificates. private_key_src-
Represents the path to a private key file on the control node which is copied to the target host to the location specified by
private_key. Do not use this if usinglogging_certificates. tls-
Setting this parameter to
trueensures secure transfer of logs over the network. If you do not want a secure wrapper, you can settls: false.
For details about all variables used in the playbook, see the
/usr/share/ansible/roles/rhel-system-roles.logging/README.mdfile on the control node.Validate the playbook syntax:
$ ansible-playbook --syntax-check ~/playbook.ymlNote that this command only validates the syntax and does not protect against a wrong but valid configuration.
Run the playbook:
$ ansible-playbook ~/playbook.yml
Additional resources
6.2.3.2. Configuring server logging with TLS
You can use the logging RHEL system role to configure logging on RHEL servers and set them to receive logs from a remote logging system using TLS encryption.
The role creates a private key and a certificate. Next, it configures TLS on all hosts in the server group in the Ansible inventory.
You do not have to call the certificate RHEL system role in the playbook to create the certificate. The logging RHEL system role calls it automatically.
In order for the CA to be able to sign the created certificate, the managed nodes must be enrolled in an IdM domain.
Prerequisites
- You have prepared the control node and the managed nodes.
-
The account you use to connect to the managed nodes has
sudopermissions for these nodes. - The managed nodes are enrolled in an IdM domain.
Procedure
Create a playbook file, for example,
~/playbook.yml, with the following content:--- - name: Configure remote logging solution using TLS for secure transfer of logs hosts: managed-node-01.example.com tasks: - name: Deploying remote input and remote_files output with certs ansible.builtin.include_role: name: redhat.rhel_system_roles.logging vars: logging_certificates: - name: logging_cert dns: ['www.example.com'] ca: ipa principal: "logging/{{ inventory_hostname }}@IDM.EXAMPLE.COM" logging_pki_files: - ca_cert: /local/path/to/ca_cert.pem cert: /local/path/to/logging_cert.pem private_key: /local/path/to/logging_cert.pem logging_inputs: - name: input_name type: remote tcp_ports: [514] tls: true permitted_clients: ['clients.example.com'] logging_outputs: - name: output_name type: remote_files remote_log_path: /var/log/remote/%FROMHOST%/%PROGRAMNAME:::secpath-replace%.log async_writing: true client_count: 20 io_buffer_size: 8192 logging_flows: - name: flow_name inputs: [input_name] outputs: [output_name]The settings specified in the example playbook include the following:
logging_certificates-
The value of this parameter is passed on to
certificate_requestsin thecertificateRHEL system role and used to create a private key and certificate. logging_pki_filesUsing this parameter, you can configure the paths and other settings that logging uses to find the CA, certificate, and key files used for TLS, specified with one or more of the following sub-parameters:
ca_cert,ca_cert_src,cert,cert_src,private_key,private_key_src, andtls.NoteIf you are using
logging_certificatesto create the files on the managed node, do not useca_cert_src,cert_src, andprivate_key_src, which are used to copy files not created bylogging_certificates.ca_cert-
Represents the path to the CA certificate file on the managed node. The default path is
/etc/pki/tls/certs/ca.pemand the file name is set by the user. cert-
Represents the path to the certificate file on the managed node. The default path is
/etc/pki/tls/certs/server-cert.pemand the file name is set by the user. private_key-
Represents the path to the private key file on the managed node. The default path is
/etc/pki/tls/private/server-key.pemand the file name is set by the user. ca_cert_src-
Represents the path to the CA certificate file on the control node which is copied to the target host to the location specified by
ca_cert. Do not use this if usinglogging_certificates. cert_src-
Represents the path to a certificate file on the control node which is copied to the target host to the location specified by
cert. Do not use this if usinglogging_certificates. private_key_src-
Represents the path to a private key file on the control node which is copied to the target host to the location specified by
private_key. Do not use this if usinglogging_certificates. tls-
Setting this parameter to
trueensures secure transfer of logs over the network. If you do not want a secure wrapper, you can settls: false.
For details about all variables used in the playbook, see the
/usr/share/ansible/roles/rhel-system-roles.logging/README.mdfile on the control node.Validate the playbook syntax:
$ ansible-playbook --syntax-check ~/playbook.ymlNote that this command only validates the syntax and does not protect against a wrong but valid configuration.
Run the playbook:
$ ansible-playbook ~/playbook.yml
6.2.4. Using the logging RHEL system roles with RELP
You can use the logging RHEL system role to configure Reliable Event Logging Protocol (RELP) between a RELP client and RELP server.
RELP is a networking protocol for data and message logging over the TCP network. It ensures reliable delivery of event messages and you can use it in environments that do not tolerate any message loss.
The RELP sender transfers log entries in the form of commands and the receiver acknowledges them once they are processed. To ensure consistency, RELP stores the transaction number to each transferred command for any kind of message recovery.
6.2.4.1. Configuring client logging with RELP
You can use the logging RHEL system role to configure a transfer of log messages stored locally to the remote logging system with RELP.
The RELP configuration uses Transport Layer Security (TLS) to encrypt the message transmission for secure transfer of logs over the network.
Prerequisites
- You have prepared the control node and the managed nodes.
-
The account you use to connect to the managed nodes has
sudopermissions for these nodes.
Procedure
Create a playbook file, for example,
~/playbook.yml, with the following content:--- - name: Configure client-side of the remote logging solution using RELP hosts: managed-node-01.example.com tasks: - name: Deploy basic input and RELP output ansible.builtin.include_role: name: redhat.rhel_system_roles.logging vars: logging_inputs: - name: basic_input type: basics logging_outputs: - name: relp_client type: relp target: logging.server.com port: 20514 tls: true ca_cert: /etc/pki/tls/certs/ca.pem cert: /etc/pki/tls/certs/client-cert.pem private_key: /etc/pki/tls/private/client-key.pem pki_authmode: name permitted_servers: - '*.server.example.com' logging_flows: - name: example_flow inputs: [basic_input] outputs: [relp_client]The settings specified in the example playbook include the following:
target- This is a required parameter that specifies the host name where the remote logging system is running.
port- Port number the remote logging system is listening.
tlsEnsures secure transfer of logs over the network. If you do not want a secure wrapper you can set the
tlsvariable tofalse. By defaulttlsparameter is set to true while working with RELP and requires key/certificates and triplets {ca_cert,cert,private_key} and/or {ca_cert_src,cert_src,private_key_src}.-
If the {
ca_cert_src,cert_src,private_key_src} triplet is set, the default locations/etc/pki/tls/certsand/etc/pki/tls/privateare used as the destination on the managed node to transfer files from control node. In this case, the file names are identical to the original ones in the triplet -
If the {
ca_cert,cert,private_key} triplet is set, files are expected to be on the default path before the logging configuration. - If both triplets are set, files are transferred from the local path on the control node to the specific path of the managed node.
-
If the {
ca_cert-
Represents the path to CA certificate. The default path is
/etc/pki/tls/certs/ca.pemand the file name is set by the user. cert-
Represents the path to certificate. The default path is
/etc/pki/tls/certs/server-cert.pemand the file name is set by the user. private_key-
Represents the path to the private key. The default path is
/etc/pki/tls/private/server-key.pemand the file name is set by the user. ca_cert_src-
Represents local CA certificate file path which is copied to the managed node. If
ca_certis specified, it is copied to the location. cert_src-
Represents the local certificate file path which is copied to the managed node. If
certis specified, it is copied to the location. private_key_src-
Represents the local key file path which is copied to the managed node. If
private_keyis specified, it is copied to the location. pki_authmode-
Accepts the authentication mode as
nameorfingerprint. permitted_servers- List of servers that will be allowed by the logging client to connect and send logs over TLS.
inputs- List of logging input dictionary.
outputs- List of logging output dictionary.
For details about all variables used in the playbook, see the
/usr/share/ansible/roles/rhel-system-roles.logging/README.mdfile on the control node.Validate the playbook syntax:
$ ansible-playbook --syntax-check ~/playbook.ymlNote that this command only validates the syntax and does not protect against a wrong but valid configuration.
Run the playbook:
$ ansible-playbook ~/playbook.yml
6.2.4.2. Configuring server logging with RELP
You can use the logging RHEL system role to configure a server for receiving log messages from the remote logging system with RELP.
The RELP configuration uses TLS to encrypt the message transmission for secure transfer of logs over the network.
Prerequisites
- You have prepared the control node and the managed nodes.
-
The account you use to connect to the managed nodes has
sudopermissions for these nodes.
Procedure
Create a playbook file, for example,
~/playbook.yml, with the following content:--- - name: Configure server-side of the remote logging solution using RELP hosts: managed-node-01.example.com tasks: - name: Deploying remote input and remote_files output ansible.builtin.include_role: name: redhat.rhel_system_roles.logging vars: logging_inputs: - name: relp_server type: relp port: 20514 tls: true ca_cert: /etc/pki/tls/certs/ca.pem cert: /etc/pki/tls/certs/server-cert.pem private_key: /etc/pki/tls/private/server-key.pem pki_authmode: name permitted_clients: - '*client.example.com' logging_outputs: - name: remote_files_output type: remote_files logging_flows: - name: example_flow inputs: [relp_server] outputs: [remote_files_output]The settings specified in the example playbook include the following:
port- Port number the remote logging system is listening.
tlsEnsures secure transfer of logs over the network. If you do not want a secure wrapper you can set the
tlsvariable tofalse. By defaulttlsparameter is set to true while working with RELP and requires key/certificates and triplets {ca_cert,cert,private_key} and/or {ca_cert_src,cert_src,private_key_src}.-
If the {
ca_cert_src,cert_src,private_key_src} triplet is set, the default locations/etc/pki/tls/certsand/etc/pki/tls/privateare used as the destination on the managed node to transfer files from control node. In this case, the file names are identical to the original ones in the triplet -
If the {
ca_cert,cert,private_key} triplet is set, files are expected to be on the default path before the logging configuration. - If both triplets are set, files are transferred from the local path on the control node to the specific path of the managed node.
-
If the {
ca_cert-
Represents the path to CA certificate. The default path is
/etc/pki/tls/certs/ca.pemand the file name is set by the user. cert-
Represents the path to the certificate. The default path is
/etc/pki/tls/certs/server-cert.pemand the file name is set by the user. private_key-
Represents the path to the private key. The default path is
/etc/pki/tls/private/server-key.pemand the file name is set by the user. ca_cert_src-
Represents local CA certificate file path which is copied to the managed node. If
ca_certis specified, it is copied to the location. cert_src-
Represents the local certificate file path which is copied to the managed node. If
certis specified, it is copied to the location. private_key_src-
Represents the local key file path which is copied to the managed node. If
private_keyis specified, it is copied to the location. pki_authmode-
Accepts the authentication mode as
nameorfingerprint. permitted_clients- List of clients that will be allowed by the logging server to connect and send logs over TLS.
inputs- List of logging input dictionary.
outputs- List of logging output dictionary.
For details about all variables used in the playbook, see the
/usr/share/ansible/roles/rhel-system-roles.logging/README.mdfile on the control node.Validate the playbook syntax:
$ ansible-playbook --syntax-check ~/playbook.ymlNote that this command only validates the syntax and does not protect against a wrong but valid configuration.
Run the playbook:
$ ansible-playbook ~/playbook.yml
Chapter 7. Troubleshooting problems by using log files
Log files contain messages about the system, including the kernel, services, and applications running on it. These contain information that helps troubleshoot issues or monitor system functions. The logging system in Red Hat Enterprise Linux is based on the built-in syslog protocol. Particular programs use this system to record events and organize them into log files, which are useful when auditing the operating system and troubleshooting various problems.
7.1. Services handling syslog messages
The following two services handle syslog messages:
-
The
systemd-journalddaemon
The systemd-journald daemon collects messages from various sources and forwards them to Rsyslog for further processing. The systemd-journald daemon collects messages from the following sources:
- Kernel
- Early stages of the boot process
- Standard and error output of daemons as they start up and run
-
Syslog -
The
Rsyslogservice
The Rsyslog service sorts the syslog messages by type and priority and writes them to the files in the /var/log directory. The /var/log directory persistently stores the log messages.
7.2. Log files storing syslog messages
The following log files under the /var/log directory store syslog messages.
-
/var/log/messages- allsyslogmessages except the following -
/var/log/secure- security and authentication-related messages and errors -
/var/log/maillog- mail server-related messages and errors -
/var/log/cron- log files related to periodically executed tasks -
/var/log/boot.log- log files related to system startup
The above mentioned list contains only some files and the actual list of files in the /var/log/ directory depends on which services and applications log in to this directory.
7.3. Viewing logs using the command line
The Journal is a component of systemd that helps to view and manage log files. It addresses problems connected with traditional logging, closely integrated with the rest of the system, and supports various logging technologies and access management for log entries.
You can use the journalctl command to view messages in the system journal using the command line.
| Command | Description |
|---|---|
|
| Shows all collected journal entries. |
|
|
Shows logs related to a specific file. For example, the |
|
| Shows logs for the current boot. |
|
| Shows kernel logs for the current boot. |
| Command | Description |
|---|---|
|
|
Filters log to show entries matching the |
|
|
Combines matches. For example, this command shows logs for |
|
|
The plus sign (+) separator combines two expressions in a logical OR. For example, this command shows all messages from the |
|
|
This command shows all entries matching either expression, referring to the same field. Here, this command shows logs matching a systemd-unit |
| Command | Description |
|---|---|
|
| Shows a tabular list of boot numbers, their IDs, and the timestamps of the first and last message pertaining to the boot. You can use the ID in the next command to view detailed information. |
|
| Shows information about the specified boot ID. |
7.4. Reviewing logs in the web console
Learn how to access, review and filter logs in the RHEL web console.
7.4.1. Reviewing logs in the web console
The RHEL web console Logs section is a UI for the journalctl utility. You can access system logs in the web console interface.
Prerequisites
- You have installed the RHEL 8 web console.
- You have enabled the cockpit service.
Your user account is allowed to log in to the web console.
For instructions, see Installing and enabling the web console.
Procedure
Log in to the RHEL 8 web console.
For details, see Logging in to the web console.
- Click Logs.
- Open log entry details by clicking on your selected log entry in the list.
Next steps
- After clicking to expand the menu, you can use the button to pause new log entries from appearing in the log view. After you resume new log entries, the web console loads all log entries that were reported after you used the button.
- You can filter the logs by time, priority, or identifier. For more information, see Filtering logs in the web console.
7.4.2. Filtering logs in the web console
You can filter log entries in the RHEL web console.
Prerequisites
- You have installed the RHEL 8 web console.
- You have enabled the cockpit service.
Your user account is allowed to log in to the web console.
For instructions, see Installing and enabling the web console.
Procedure
Log in to the RHEL 8 web console.
For details, see Logging in to the web console.
- Click Logs.
- By default, web console shows the latest log entries. To filter by a specific time range, click the Time drop-down menu and choose a preferred option.
- By default, the web console displays logs list with Error and above severity. To filter by a different priority, click the Error and above drop-down menu and choose your preferred priority.
- By default, the web console shows logs for all identifiers. To filter logs for a specific identifier, click the All drop-down menu and select an identifier.
- View details about a log entry by clicking the selected log entry.
7.4.3. Text search options for filtering logs in the web console
The text search option functionality provides a wide variety of options for filtering logs. You can use the predefined options in three drop-down menus or directly type the search expression.
Drop-down menus
You can use three drop-down menus that you can use to specify the main parameters of your search:
- Time: This drop-down menu contains predefined searches for different time ranges of your search.
-
Priority: This drop-down menu provides options for different priority levels. It corresponds to the
journalctl --priorityoption. The default priority value is Error and above. It is set every time you do not specify any other priority. -
Identifier: In this drop-down menu, you can select an identifier that you want to filter. Corresponds to the
journalctl --identifieroption.
Quantifiers
You can specify six quantifiers in your search. See the Options for filtering logs section for more information.
Log fields
To search for specific log entries, specify both the field name and the value you want to find.
Free-form text search in logs messages
You can filter any text string of your choice in the logs messages. The string can also be in the form of a regular expressions.
Example 7.1. Advanced logs filtering I
Filter all log messages identified by systemd since October 22, 2020 midnight and journal field 'JOB_TYPE' is either start or restart.
-
Type
identifier:systemd since:2020-10-22 JOB_TYPE=start,restartto the Text field. Check the results.

Example 7.2. Advanced logs filtering II
Filter log messages from the cockpit.service systemd unit during the previous boot that contains error or fail.
-
Type
service:cockpit boot:-1 error|failto the Text field. - Check the results.
7.4.4. Using a text search box to filter logs in the web console
You can filter logs according to different parameters by using the text search box in the web console. The search combines usage of the filtering drop-down menus, quantifiers, log fields, and free-form string search.
Prerequisites
- You have installed the RHEL 8 web console.
- You have enabled the cockpit service.
Your user account is allowed to log in to the web console.
For instructions, see Installing and enabling the web console.
Procedure
Log in to the RHEL 8 web console.
For details, see Logging in to the web console.
- Click Logs.
Use the drop-down menus to specify the three main quantifiers - time range, priority, and identifier(s) - you want to filter.
The Priority quantifier always has to have a value. If you do not specify it, it automatically filters the Error and above priority. Notice that the options you set reflect in the text search box.
Specify the log field you want to filter.
You can add several log fields.
- You can use a free-form string to search for anything else. The search box also accepts regular expressions.
7.4.5. Options for logs filtering
You can use the web console log filtering capabilities, which are based on journalctl command-line options. Many of these filtering options are available through the drop-down menus in the web console interface, providing a graphical alternative to command-line log filtering.
| Option name | Usage | Notes |
|---|---|---|
|
| Filter output by message priorities. Takes a single numeric or textual log level. The log levels are the usual syslog log levels. If a single log level is specified, all messages with this log level or a lower (therefore more important) log level are shown. | Covered in the Priority drop-down menu. |
|
| Show messages for the specified syslog identifier SYSLOG_IDENTIFIER. Can be specified multiple times. | Covered in the Identifier drop-down menu. |
|
| Shows only the most recent journal entries, and continuously prints new entries as they are appended to the journal. | Not covered in a drop-down. |
|
|
Show messages for the specified |
Is not covered in a drop-down. Corresponds to the |
|
| Show messages from a specific boot. A positive integer looks up the boots starting from the beginning of the journal, and an equal-or-less-than zero integer looks up boots starting from the end of the journal. Therefore, 1 means the first boot found in the journal in chronological order, 2 the second and so on; while -0 is the last boot, -1 the boot before last, and so on. | Covered only as Current boot or Previous boot in the Time drop-down menu. Other options must be written manually. |
|
| Start showing entries on or newer than the specified date, or on or older than the specified date. Date specifications should be of the format "2012-10-30 18:17:16". If the time part is omitted, "00:00:00" is assumed. If only the seconds component is omitted, ":00" is assumed. If the date component is omitted, the current day is assumed. Alternatively the strings "yesterday", "today", "tomorrow" are understood, which refer to 00:00:00 of the day before the current day, the current day, or the day after the current day. "now" refers to the current time. Finally, you can specify relative times, prefixed with "-" or "+", referring to times before or after the current time. | Not covered in a drop-down. |
Chapter 8. Managing users and groups
Preventing unauthorized access to files and processes requires accurate user and group management. If you do not manage accounts centrally or you require a user account or group only on a specific system, you can create them locally on a host.
8.1. Introduction to managing user and group accounts
The control of users and groups is a core element of Red Hat Enterprise Linux (RHEL) system administration. Each RHEL user has distinct login credentials and can be assigned to various groups to customize their system privileges.
8.1.1. Introduction to users and groups
A user who creates a file is the owner of that file and the group owner of that file. The file is assigned separate read, write, and execute permissions for the owner, the group, and those outside that group. The file owner can be changed only by the root user. Access permissions to the file can be changed by both the root user and the file owner. A regular user can change group ownership of a file they own to a group of which they are a member of.
Each user is associated with a unique numerical identification number called user ID (UID). Each group is associated with a group ID (GID). Users within a group share the same permissions to read, write, and execute files owned by that group.
8.1.2. Configuring reserved user and group IDs
By default, RHEL reserves user and group IDs below 1000 for system users and groups. You can find the reserved user and group IDs in the setup package. The UID’s and GID’s of users and groups created before you changed the UID_MIN and GID_MIN values do not change. The reserved user and group IDs are documented in the:
/usr/share/doc/setup/uidgidTo assign IDs to the new users and groups starting at 5000, as the reserved range can increase in the future.
Modify the UID_MIN and GID_MIN parameters in the /etc/login.defs file to define a start ID other than the defaults (1000).
Do not raise IDs reserved by the system above 1000 by changing SYS_UID_MAX to avoid conflict with systems that retain the 1000 limit.
Procedure
-
Open the
/etc/login.defsfile in an editor. Set the
UID_MINvariable, for example:# Min/max values for automatic uid selection in useradd # UID_MIN 5000Set the
GID_MINvariable, for example:# Min/max values for automatic gid selection in groupadd # GID_MIN 5000The dynamically assigned UIDs and GIDs for the regular users now start at 5000.
8.1.3. User private groups
RHEL uses the user private group (UPG) system configuration, which makes Linux groups easier to manage. A user private group is created whenever a new user is added to the system. The user private group has the same name as the user for which it was created and that user is the only member of the user private group.
UPGs simplify the collaboration on a project between multiple users. In addition, UPG system configuration makes it safe to set default permissions for a newly created file or directory, as it allows both the user, and the group this user is a part of, to make modifications to the file or directory.
A list of all local groups is stored in the /etc/group configuration file.
8.2. Getting started with managing user accounts
Red Hat Enterprise Linux is a multi-user operating system, which enables multiple users on different computers to access a single system installed on one machine. Every user operates under its own account, and managing user accounts thus represents a core element of Red Hat Enterprise Linux system administration.
The following are the different types of user accounts:
Normal user accounts:
Normal accounts are created for users of a particular system. Such accounts can be added, removed, and modified during normal system administration.
System user accounts:
System user accounts represent a particular applications identifier on a system. Such accounts are generally added or manipulated only at software installation time, and they are not modified later.
WarningSystem accounts are presumed to be available locally on a system. If these accounts are configured and provided remotely, such as in the instance of an LDAP configuration, system breakage and service start failures can occur.
For system accounts, user IDs below 1000 are reserved. For normal accounts, you can use IDs starting at 1000. To define the min/max IDs for users and groups, system users and system groups, see the
/etc/login.defsfile.Group:
A group is an entity which ties together multiple user accounts for a common purpose, such as granting access to particular files.
8.2.1. Managing accounts and groups using command line tools
Use the following basic command-line tools to manage user accounts and groups.
Procedure
Create a new user account:
# useradd example.userAssign a new password to a user account belonging to example.user:
# passwd example.userAdd a user to a group:
# usermod -a -G example.group example.user
8.3. Managing users from the command line
You can manage users and groups using the command-line interface (CLI). This enables you to add, remove, and modify users and user groups in Red Hat Enterprise Linux environment.
8.3.1. Adding a new user from the command line
You can use the useradd utility to add a new user.
Prerequisites
-
You have
Rootaccess
Procedure
Add a new user, use:
# useradd <options> <username>Replace options with the command-line options for the
useraddcommand, and replace username with the name of the user.Example 8.1. Adding a new user
To add the user
sarahwith user ID5000, use:# useradd -u 5000 sarah
Verification
To verify the new user is added, use the
idutility.# id sarahThe command returns:
uid=5000(sarah) gid=5000(sarah) groups=5000(sarah)
8.3.2. Adding a new group from the command line
You can use the groupadd utility to add a new group.
Prerequisites
-
You have
Rootaccess
Procedure
To add a new group, use:
# groupadd options group-nameReplace options with the command-line options for the
groupaddcommand, and replace group-name with the name of the group.Example 8.2. Adding a new group
To add the group
sysadminswith group ID5000, use:# groupadd -g 5000 sysadmins
Verification
To verify the new group is added, use the
tailutility.# getent group sysadminThe command returns:
sysadmins:x:5000:
8.3.3. Adding a user to a supplementary group from the command line
You can add a user to a supplementary group to manage permissions or enable access to certain files or devices.
Prerequisites
-
You have
rootaccess
Procedure
To add a group to the supplementary groups of the user, use:
# usermod --append -G <group_name> <username>
Verification
To verify the new groups is added to the supplementary groups of the user
sysadmin, use:# groups <username>
8.3.4. Creating a group directory
Under the UPG system configuration, you can apply the set-group identification permission (setgid bit) to a directory. The setgid bit makes managing group projects that share a directory simpler. When you apply the setgid bit to a directory, files created within that directory are automatically assigned to a group that owns the directory. Any user that has the permission to write and execute within this group can now create, modify, and delete files in the directory.
Prerequisites
-
You have
Rootaccess
Procedure
Create a directory:
# mkdir <directory-name>Create a group:
# groupadd <group-name>Add users to the group:
# usermod --append -G <group_name> <username>Associate the user and group ownership of the directory with the group-name group:
# chgrp <group_name> <directory>Set the write permissions to allow the users to create and modify files and directories and set the
setgidbit to make this permission be applied within the directory:# chmod g+rwxs <directory>
Verification
To verify the correctness of set permissions, use:
# ls -ld <directory>The command returns:
*drwx__rws__r-x.* 2 root _group-name_ 6 Nov 25 08:45 _directory-name_
8.3.5. Removing a user on the command line
You can remove a user account by using the command line. In addition, below mentioned are the commands to remove the user account, and optionally remove the user data and metadata, such as their home directory and configuration files.
-
You have
rootaccess. - The user currently exists.
Ensure that the user is logged out:
# loginctl terminate-user user-nameTo only remove the user account, and not the user data:
# userdel user-nameTo remove the user, the data, and the metadata:
Remove the user, their home directory, their mail spool, and their SELinux user mapping:
# userdel --remove --selinux-user user-nameRemove additional user metadata:
# rm -rf /var/lib/AccountsService/users/user-nameThis directory stores information that the system needs about the user before the home directory is available. Depending on the system configuration, the home directory might not be available until the user authenticates at the login screen.
ImportantIf you do not remove this directory and you later recreate the same user, the recreated user will still use certain settings inherited from the removed user.
8.4. Managing user accounts in the web console
The RHEL web console provides a graphical interface for adding, editing, and removing system user accounts.
You can also set password expiration and terminate user sessions in the web console.
8.4.1. Adding new accounts by using the web console
You can add user accounts to the system and set administration rights to the accounts through the RHEL web console.
Prerequisites
- You have installed the RHEL 8 web console.
- You have enabled the cockpit service.
Your user account is allowed to log in to the web console.
For instructions, see Installing and enabling the web console.
Procedure
Log in to the RHEL 8 web console.
For details, see Logging in to the web console.
- Click .
- Click .
In the Full Name field, enter the full name of the user.
The web console automatically suggests a user name from the full name and fills it in the User Name field. If you do not want to use the original naming convention, which consists of the first letter of the first name and the entire surname, update the suggestion.
In the Password/Confirm fields, enter the password and retype it for verification that your password is correct.
The color bar below the fields indicates the security level of the entered password, which prevents you from creating a user with a weak password.
- Click to save the settings and close the dialog box.
- Select the newly created account.
- In the Groups drop-down menu, select the groups that you want to add to the new account.
Verification
- You can view the new account in the Accounts settings and use its credentials to connect to the system.
8.4.2. Enforcing password expiration in the web console
By default, user accounts have set passwords to never expire. You can set system passwords to expire after a defined number of days. When the password expires, the user must change its password at the next login attempt before the user can access the system.
Prerequisites
- You have installed the RHEL 8 web console.
- You have enabled the cockpit service.
Your user account is allowed to log in to the web console.
For instructions, see Installing and enabling the web console.
Procedure
- Log in to the RHEL 8 web console.
- Click .
- Select the user account for which you want to enforce password expiration.
Click on the Password line.

- In the Password expiration dialog box, select Require password change every … days and enter a positive whole number representing the number of days after which the password expires.
Click .
The web console immediately shows the date of the future password change request on the Password line.
8.5. Editing user groups using the command line
A user belongs to a certain set of groups that allow a logical collection of users with a similar access to files and folders. You can edit the primary and supplementary user groups from the command line to change the user’s permissions.
8.5.1. Primary and supplementary user groups
A group is an entity which ties together multiple user accounts for a common purpose, such as granting access to particular files.
On RHEL, user groups can act as primary or supplementary. Primary and supplementary groups have the following properties:
- Primary group
- Every user has just one primary group at all times.
- You can change the user’s primary group.
- Supplementary groups
- You can add an existing user to an existing supplementary group to manage users with the same security and access privileges within the group.
- Users can be members of zero, one, or multiple supplementary groups.
8.5.2. Listing the primary and supplementary groups of a user
You can list the groups of users to see which primary and supplementary groups they belong to.
Procedure
Display the names of the primary and any supplementary group of a user:
$ groups user-nameIf you do not provide a user name, the command displays the group membership for the current user. The first group is the primary group followed by the optional supplementary groups.
Example 8.3. Listing of groups for user sarah:
$ groups sarahThe output displays:
sarah : sarah wheel developerUser
sarahhas a primary groupsarahand is a member of supplementary groupswheelanddeveloper.
8.5.3. Changing the primary group of a user
You can change the primary group of an existing user to a new group.
Prerequisites
-
rootaccess - The new group must exist
Procedure
Change the primary group of a user:
# usermod -g <group-name> <user-name>NoteWhen you change a user’s primary group, the command also automatically changes the group ownership of all files in the user’s home directory to the new primary group. You must fix the group ownership of files outside of the user’s home directory manually.
Verify that you changed the primary group of the user:
$ groups <username>
8.5.4. Adding a user to a supplementary group from the command line
You can add a user to a supplementary group to manage permissions or enable access to certain files or devices.
Prerequisites
-
You have
rootaccess
Procedure
To add a group to the supplementary groups of the user, use:
# usermod --append -G <group_name> <username>
Verification
To verify the new groups is added to the supplementary groups of the user
sysadmin, use:# groups <username>
8.5.5. Removing a user from a supplementary group
You can remove an existing user from a supplementary group to limit their permissions or access to files and devices.
Prerequisites
-
You have
rootaccess
Procedure
Remove a user from a supplementary group:
# gpasswd -d <user-name> <group-name>
Verification
Verify that you removed the user sarah from the secondary group developers:
$ groups <username>
8.5.6. Changing all of the supplementary groups of a user
You can overwrite the list of supplementary groups that you want the user to remain a member of.
Prerequisites
-
You have
rootaccess. - The supplementary groups must exist.
Procedure
Overwrite a list of user’s supplementary groups:
# usermod -G <group-names> <username>To add the user to several supplementary groups at once, separate the group names using commas and no intervening spaces. For example:
wheel,developer.ImportantIf the user is currently a member of a group that you do not specify, the command removes the user from the group.
Verification
Verify that you set the list of the supplementary groups correct:
# groups <username>
8.6. Changing and resetting the root password
If the existing root password is no longer satisfactory, you can change it both as the root user and a non-root user.
8.6.1. Changing the root password as the root user
You can use the passwd command to change the root password as the root user.
Prerequisites
-
You have
Rootaccess
Procedure
To change the
rootpassword, use:# passwdYou are prompted to enter your current password before you can change it.
8.6.2. Changing or resetting the forgotten root password as a non-root user
You can use the passwd command to change or reset the forgotten root password as a non-root user.
Prerequisites
- You are able to log in as a non-root user.
-
You have permissions to execute commands as root by using
sudo.
Procedure
To change or reset the
rootpassword as a non-root user that belongs to thewheelgroup, use:$ sudo passwd rootYou are prompted to enter your current non-root password before you can change the
rootpassword.
8.6.3. Resetting the root password
If you are unable to log in as root user and have no non-root user with sudo permissions, you can reset the root password or do not belong to the administrative wheel group, you can reset the root password by booting the system into the special mode. In this mode, the boot process stops before the system hands over the control from the initramfs to the actual system.
Procedure
Reboot the system and, on the GRUB boot screen, press the key to interrupt the boot process.
The kernel boot parameters appear.
load_video set gfx_payload=keep insmod gzio linux ($root)/vmlinuz-4.18.0-80.e18.x86_64 root=/dev/mapper/rhel-root ro crash\ kernel=auto resume=/dev/mapper/rhel-swap rd.lvm.lv/swap rhgb quiet initrd ($root)/initramfs-4.18.0-80.e18.x86_64.img $tuned_initrd- Set the cursor to the end of the line that starts with linux.
-
Append
rd.breakto the end of the line that starts withlinux. Press to start the system with the changed parameters.
The
switch_rootprompt appears.Remount the file system as writable:
# mount -o remount,rw /sysrootBy default, the file system is mounted as read-only in the
/sysrootdirectory. Remounting the file system as writable allows you to change the password.Enter the
chrootenvironment:# chroot /sysrootReset the
rootpassword:# passwdFollow the instructions displayed by the command line to finalize the change of the
rootpassword.Enable the SELinux relabeling process on the next system boot:
# touch /.autorelabelExit the
chrootenvironment:# exitExit the
switch_rootprompt, to reboot the system:exit- Wait until the SELinux relabeling process is finished. Note that relabeling a large disk can take a long time. The system reboots automatically when the process is complete.
Verification
-
Log in as the
rootuser by using the new root password. Optional: Display the user name associated with the current effective user ID:
# whoami
Chapter 9. Managing sudo access
System administrators can grant sudo access to allow non-root users to execute administrative commands that are normally reserved for the root user.
9.1. User authorizations in sudoers
The /etc/sudoers file and, by default, drop-in files in the /etc/sudoers.d/ directory specify which users can use the sudo command to execute commands as other user. The rules can apply to individual users and user groups. You can also define rules for groups of hosts, commands, and even users more easily by using aliases.
When a user enters a command with sudo for which the user does not have authorization, the system records a message that contains the string <username> : user NOT in sudoers to the journal log.
The default /etc/sudoers file provides information and examples of authorizations. You can activate a specific example rule by uncommenting the corresponding line. The section with user authorizations is marked with the following introduction:
## Next comes the main part: which users can run what software on
## which machines  (the sudoers file can be shared between multiple
## systems).
You can create new sudoers authorizations and modify existing authorizations by using the following format:
<username> <hostname.example.com>=(<run_as_user>:<run_as_group>) <path/to/command>Where:
-
<username>is the user that enters the command, for example,user1. If the value starts with%, it defines a group, for example,%group1. -
<hostname.example.com>is the name of the host on which the rule applies. -
The section
(<run_as_user>:<run_as_group>)defines the user or group as which the command is executed. If you omit this section,<username>can execute the command as root. -
<path/to/command>is the complete absolute path to the command. You can also limit the user to only performing a command with specific options and arguments by adding those options after the command path. If you do not specify any options, the user can use the command with all options.
You can apply the rule to all users, hosts, or commands by replacing any of these variables with ALL.
By using ALL in some or multiple segments of a rule, can cause serious security risks.
You can negate the arguments by using the ! operator. For example, !root specifies all users except root. Note that allowing specific users, groups, and commands is more secure than disallowing specific users, groups, and commands. This is because allow rules also block new unauthorized users or groups.
Avoid using negative rules for commands because users can overcome such rules by renaming commands with the alias command.
The system reads the /etc/sudoers file from beginning to end. Therefore, if the file contains multiple entries for a user, the entries are applied in order. In case of conflicting values, the system uses the last match, even if it is not the most specific match.
To preserve the rules during system updates and for easier fixing of errors, enter new rules by creating new files in the /etc/sudoers.d/ directory instead of entering rules directly to the /etc/sudoers file. The system reads the files in the /etc/sudoers.d directory when it reaches the following line in the /etc/sudoers file:
#includedir /etc/sudoers.d
Note that the number sign (#) at the beginning of this line is part of the syntax and does not mean the line is a comment. The names of files in that directory must not contain a period and must not end with a tilde (~).
9.2. Adding a sudo rule to allow members of a group to execute commands as root
System administrators can allow non-root users to execute administrative commands by granting them sudo access. The sudo command provides users with administrative access without using the password of the root user.
When users need to perform an administrative command, they can precede that command with sudo. If the user has authorization for the command, the command is executed as if they were root.
Be aware of the following limitations:
-
Only users listed in the sudoers configuration file can use the
sudocommand. -
The command is executed in the shell of the user, not in the root shell. However, there are some exceptions such as when full
sudoprivileges are granted to any user. In such cases, users can switch to and run the commands in root shell. For example: -
sudo -i -
sudo su -
Prerequisites
- You have root access to the system.
Procedure
As root, open the
/etc/sudoersfile.# visudoThe
/etc/sudoersfile defines the policies applied by thesudocommand.In the
/etc/sudoersfile, find the lines that grantsudoaccess to users in the administrativewheelgroup.## Allows people in group wheel to run all commands %wheel ALL=(ALL) ALL-
Make sure the line that starts with
%wheelis not commented out with the number sign (#). - Save any changes, and exit the editor.
Add users you want to grant
sudoaccess to into the administrativewheelgroup.# usermod --append -G wheel <username>Replace
<username>with the name of the user.
Verification
Log in as a member of the
wheelgroup and run:# sudo whoami root
9.3. Enabling unprivileged users to run certain commands
As an administrator, you can allow unprivileged users to enter certain commands on specific workstations by configuring a policy in the /etc/sudoers.d/ directory. This is more secure than granting full sudo access to a user or giving someone the root password for the following reasons:
- More granular control over privileged actions. You can allow a user to perform certain actions on specific hosts instead of giving them full administrative access.
-
Better logging. When a user performs an action through
sudo, the action is logged with their user name and not just root. -
Transparent control. You can set email notifications for every time the user attempts to use
sudoprivileges.
Prerequisites
- You have root access to the system.
Procedure
Create a new file in the
/etc/sudoers.ddirectory:# visudo -f /etc/sudoers.d/<filename>The file opens automatically in an editor.
Add the following line to the
/etc/sudoers.d/<filename>file:<username> <hostname.example.com> = (<run_as_user>:<run_as_group>) <path/to/command>-
Replace
<username>with the name of the user. -
Replace
<hostname.example.com>with the URL of the host. -
Replace
(<run_as_user>:<run_as_group>)with the user or group as to which the command can be executed. If you omit this section,<username>can execute the command as root. -
Replace
<path/to/command>with the complete absolute path to the command. You can also limit the user to only performing a command with specific options and arguments by adding those options after the command path. If you do not specify any options, the user can use the command with all options. - To allow two and more commands on the same host on one line, you can list them separated by a comma followed by a space.
-
Replace
For example, to allow user1 to execute the dnf and reboot commands on host1.example.com, enter:
user1 host1.example.com = /bin/dnf, /sbin/rebootOptional: To receive email notifications every time a user attempts to use
sudoprivileges, add the following lines to the file:Defaults mail_always Defaults mailto="<email@example.com>"- Save the changes, and exit the editor.
Verification
To verify if a user can run a command with
sudoprivileges, switch the account:# su <username> -As the user, enter the command with the
sudocommand:$ sudo whoami [sudo] password for <username>:Enter the user’s
sudopassword.If the privileges are configured correctly, sudo executes the command as the configured user. For example, with the
dnfcommand, it shows the following output:... usage: dnf [options] COMMAND ...If the system returns the following error message, the user is not allowed to run commands with sudo.
<username> is not in the sudoers file. This incident will be reported.+ If the system returns the following error message, the configuration was not completed correctly.
<username> is not allowed to run sudo on <host.example.com>.+ If the system returns the following error message, the command is not correctly defined in the rule for the user.
`Sorry, user _<username>_ is not allowed to execute '_<path/to/command>_' as root on _<host.example.com>_.`Chapter 10. Managing file system permissions
File system permissions control the ability of user and group accounts to read, modify, and execute the contents of the files and to enter directories. Set permissions carefully to protect your data against unauthorized access.
10.1. Managing file permissions
Every file or directory has three levels of ownership:
- User owner (u).
- Group owner (g).
- Others (o).
Each level of ownership can be assigned the following permissions:
- Read (r).
- Write (w).
- Execute (x).
Note that the execute permission for a file allows you to execute that file. The execute permission for a directory allows you to access the contents of the directory, but not execute it.
When a new file or directory is created, the default set of permissions are automatically assigned to it. The default permissions for a file or directory are based on two factors:
- Base permission.
- The user file-creation mode mask (umask).
10.1.1. Base file permissions
Whenever a new file or directory is created, a base permission is automatically assigned to it. Base permissions for a file or directory can be expressed in symbolic or octal values.
| Permission | Symbolic value | Octal value |
| No permission | --- | 0 |
| Execute | --x | 1 |
| Write | -w- | 2 |
| Write and execute | -wx | 3 |
| Read | r-- | 4 |
| Read and execute | r-x | 5 |
| Read and write | rw- | 6 |
| Read, write, execute | rwx | 7 |
The base permission for a directory is 777 (drwxrwxrwx), which grants everyone the permissions to read, write, and execute. This means that the directory owner, the group, and others can list the contents of the directory, create, delete, and edit items within the directory, and descend into it.
Note that individual files within a directory can have their own permission that might prevent you from editing them, despite having unrestricted access to the directory.
The base permission for a file is 666 (-rw-rw-rw-), which grants everyone the permissions to read and write. This means that the file owner, the group, and others can read and edit the file.
Example 10.1. Permissions for a file
If a file has the following permissions:
$ ls -l
-rwxrw----. 1 sysadmins sysadmins 2 Mar 2 08:43 file
-
-indicates it is a file. -
rwxindicates that the file owner has permissions to read, write, and execute the file. -
rw-indicates that the group has permissions to read and write, but not execute the file. -
---indicates that other users have no permission to read, write, or execute the file. -
.indicates that the SELinux security context is set for the file.
Example 10.2. Permissions for a directory
If a directory has the following permissions:
$ ls -dl directory
drwxr-----. 1 sysadmins sysadmins 2 Mar 2 08:43 directory-
dindicates it is a directory. rwxindicates that the directory owner has the permissions to read, write, and access the contents of the directory.As a directory owner, you can list the items (files, subdirectories) within the directory, access the content of those items, and modify them.
-
r-xindicates that the group has permissions to read the content of the directory, but not write - create new entries or delete files. Thexpermission means that you can also access the directory using thecdcommand. ---indicates that other users have no permission to read, write, or access the contents of the directory.As someone who is not a user owner, or as a group, you cannot list the items within the directory, access information about those items, or modify them.
-
.indicates that the SELinux security context is set for the directory.
The base permission that is automatically assigned to a file or directory is not the default permission the file or directory ends up with. When you create a file or directory, the base permission is altered by the umask. The combination of the base permission and the umask creates the default permission for files and directories.
10.1.2. User file-creation mode mask
The user file-creation mode mask (umask) is variable that controls how file permissions are set for newly created files and directories. The umask automatically removes permissions from the base permission value to increase the overall security of a Linux system. The umask can be expressed in symbolic or octal values.
| Permission | Symbolic value | Octal value |
| Read, write, and execute | rwx | 0 |
| Read and write | rw- | 1 |
| Read and execute | r-x | 2 |
| Read | r-- | 3 |
| Write and execute | -wx | 4 |
| Write | -w- | 5 |
| Execute | --x | 6 |
| No permissions | --- | 7 |
The default umask for a standard user is 0002. The default umask for a root user is 0022.
The first digit of the umask represents special permissions (sticky bit, ). The last three digits of the umask represent the permissions that are removed from the user owner (u), group owner (g), and others (o) respectively.
Example 10.3. Applying the umask when creating a file
The following example illustrates how the umask with an octal value of 0137 is applied to the file with the base permission of 777, to create the file with the default permission of 640.
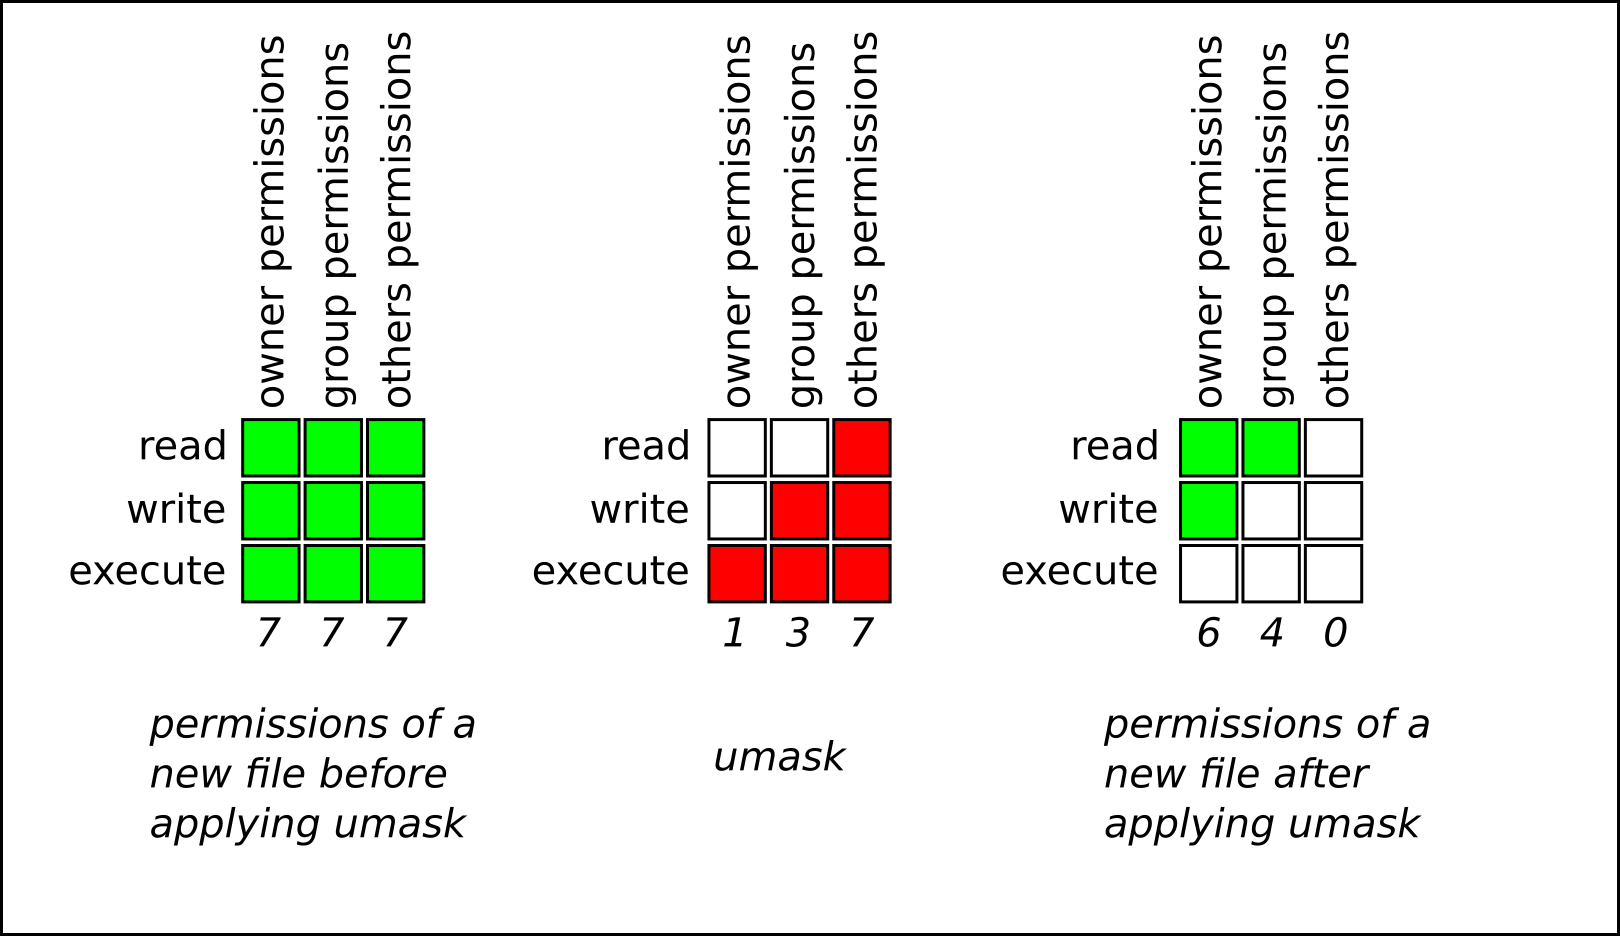
10.1.3. Default file permissions
The default permissions are set automatically for all newly created files and directories. The value of the default permissions is determined by applying the umask to the base permission.
Example 10.4. Default permissions for a directory created by a standard user
When a standard user creates a new directory, the umask is set to 002 (rwxrwxr-x), and the base permissions for a directory are set to 777 (rwxrwxrwx). This brings the default permissions to 775 (drwxrwxr-x).
| Symbolic value | Octal value | |
| Base permission | rwxrwxrwx | 777 |
| Umask | rwxrwxr-x | 002 |
| Default permission | rwxrwxr-x | 775 |
This means that the directory owner and the group can list the contents of the directory, create, delete, and edit items within the directory, and descend into it. Other users can only list the contents of the directory and descend into it.
Example 10.5. Default permissions for a file created by a standard user
When a standard user creates a new file, the umask is set to 002 (rwxrwxr-x), and the base permissions for a file are set to 666 (rw-rw-rw-). This brings the default permissions to 664 (-rw-rw-r--).
| Symbolic value | Octal value | |
| Base permission | rw-rw-rw- | 666 |
| Umask | rwxrwxr-x | 002 |
| Default permission | rw-rw-r-- | 664 |
This means that the file owner and the group can read and edit the file, while other users can only read the file.
Example 10.6. Default permissions for a directory created by the root user
When a root user creates a new directory, the umask is set to 022 (rwxr-xr-x), and the base permissions for a directory are set to 777 (rwxrwxrwx). This brings the default permissions to 755 (rwxr-xr-x).
| Symbolic value | Octal value | |
| Base permission | rwxrwxrwx | 777 |
| Umask | rwxr-xr-x | 022 |
| Default permission | rwxr-xr-x | 755 |
This means that the directory owner can list the contents of the directory, create, delete, and edit items within the directory, and descend into it. The group and others can only list the contents of the directory and descend into it.
Example 10.7. Default permissions for a file created by the root user
When a root user creates a new file, the umask is set to 022 (rwxr-xr-x), and the base permissions for a file are set to 666 (rw-rw-rw-). This brings the default permissions to 644 (-rw-r—r--).
| Symbolic value | Octal value | |
| Base permission | rw-rw-rw- | 666 |
| Umask | rwxr-xr-x | 022 |
| Default permission | rw-r—r-- | 644 |
This means that the file owner can read and edit the file, while the group and others can only read the file.
For security reasons, regular files cannot have execute permissions by default, even if the umask is set to 000 (rwxrwxrwx). However, directories can be created with execute permissions.
10.1.4. Changing file permissions using symbolic values
You can use the chmod utility with symbolic values (a combination of letters and signs) to change file permissions for a file or directory.
You can assign the following permissions:
- Read (r)
- Write (w)
- Execute (x)
Permissions can be assigned to the following levels of ownership:
- User owner (u)
- Group owner (g)
- Other (o)
- All (a)
To add or remove permissions you can use the following signs:
-
+to add the permissions on top of the existing permissions -
-to remove the permissions from the existing permission -
=to remove the existing permissions and explicitly define the new ones
Procedure
To change the permissions for a file or directory, use:
$ chmod <level><operation><permission> file-nameReplace
<level>with the level of ownership you want to set the permissions for. Replace<operation>with one of the signs. Replace<permission>with the permissions you want to assign. Replace file-name with the name of the file or directory. For example, to grant everyone the permissions to read, write, and execute (rwx)my-script.sh, use thechmod a=rwx my-script.shcommand.See Base file permissions for more details.
Verification
To see the permissions for a particular file, use:
$ ls -l file-nameReplace file-name with the name of the file.
To see the permissions for a particular directory, use:
$ ls -dl directory-nameReplace directory-name with the name of the directory.
To see the permissions for all the files within a particular directory, use:
$ ls -l directory-nameReplace directory-name with the name of the directory.
Example 10.8. Changing permissions for files and directories
To change file permissions for
my-file.txtfrom-rw-rw-r--to-rw------, use:Display the current permissions for
my-file.txt:$ ls -l my-file.txt -rw-rw-r--. 1 username username 0 Feb 24 17:56 my-file.txtRemove the permissions to read, write, and execute (
rwx) the file from group owner (g) and others (o):$ chmod go= my-file.txtNote that any permission that is not specified after the equals sign (
=) is automatically prohibited.Verify that the permissions for
my-file.txtwere set correctly:$ ls -l my-file.txt -rw-------. 1 username username 0 Feb 24 17:56 my-file.txt
To change file permissions for
my-directoryfromdrwxrwx---todrwxrwxr-x, use:Display the current permissions for
my-directory:$ ls -dl my-directory drwxrwx---. 2 username username 4096 Feb 24 18:12 my-directoryAdd the read and execute (
r-x) access for all users (a):$ chmod o+rx my-directoryVerify that the permissions for
my-directoryand its content were set correctly:$ ls -dl my-directory drwxrwxr-x. 2 username username 4096 Feb 24 18:12 my-directory
10.1.5. Changing file permissions using octal values
You can use the chmod utility with octal values (numbers) to change file permissions for a file or directory.
Procedure
To change the file permissions for an existing file or directory, use:
$ chmod octal_value file-nameReplace file-name with the name of the file or directory. Replace octal_value with an octal value. See Base file permissions for more details.
10.2. Managing the Access Control List
Each file and directory can only have one user owner and one group owner at a time. If you want to grant a user permissions to access specific files or directories that belong to a different user or group while keeping other files and directories private, you can utilize Linux Access Control Lists (ACLs).
10.2.1. Setting the Access Control List
You can use the setfacl utility to set the ACL for a file or directory.
Prerequisites
-
You have the
rootaccess.
Procedure
To display the current ACL for a particular file or directory, run:
$ getfacl file-nameReplace file-name with the name of the file or directory.
- To set the ACL for a file or directory, use:
# setfacl -m u:username:symbolic_value file-name
Replace username with the name of the user, symbolic_value with a symbolic value, and file-name with the name of the file or directory. For more information see the setfacl man page on your system.
Example 10.9. Modifying permissions for a group project
The following example describes how to modify permissions for the group-project file owned by the root user that belongs to the root group so that this file is:
- Not executable by anyone.
-
The user
andrewhas therw-permissions. -
The user
susanhas the---permissions. -
Other users have the
r--permissions.
Procedure
# setfacl -m u:andrew:rw- group-project
# setfacl -m u:susan:--- group-project
Verification
To verify that the user
andrewhas therw-permission, the usersusanhas the---permission, and other users have ther--permission, use:$ getfacl group-projectThe output returns:
# file: group-project
# owner: root
# group: root
user:andrew:rw-
user:susan:---
group::r--
mask::rw-
other::r--
10.2.2. Interaction between ACLs and standard file permissions
When you configure an Access Control List (ACL) on a file, the behavior of standard file permission tools, such as ls and chmod, changes to accommodate the ACL entries. Understanding this mapping is critical to avoid misinterpreting file permissions or unintentionally restricting access.
10.2.2.1. The ACL mask and the ls command
When a file has an ACL defined, the ls -l command changes its output in two specific ways:
-
The plus sign (): A `` character appears at the end of the permission string (for example,
-rw-rwxr--+). This indicates that the file has extended security information (an ACL) associated with it. The group permissions mapping: The meaning of the middle triplet of permission bits (traditionally the "group" permissions) depends on whether an ACL mask entry exists.
- If an ACL mask entry exists, the group bits correspond to the mask permissions.
- If no mask entry exists, the group bits correspond to the permissions of the owning group.
The ACL mask defines the maximum effective permissions for:
- The owning group.
- All named user entries.
- All named group entries.
This means that when you view a file with ls -l, the "group" column shows the upper limit of permissions granted to any user or group other than the file owner and "other".
10.2.2.2. The behavior of chmod on ACL-enabled files
The behavior of the chmod command mirrors the mapping used by ls -l:
-
If no ACL mask exists:
chmodmodifies the permissions of the owning group, as it does on standard files. -
If an ACL mask exists:
chmodmodifies the mask permissions, not the owning group permissions.
This has a cascading effect:
-
If you lower the permissions of the mask using
chmod, you restrict the effective permissions of all named users and groups that rely on that mask. -
Even if a specific user is granted
rwxin the ACL, if the mask is set tor--viachmod, that user effectively only has read access.
Do not assume that chmod g-w only affects the owning group of the file. On a file with an ACL, this command tightens the mask, potentially blocking write access for specific users you previously authorized with setfacl.
The effect of the ACL mask on permissions
The following example demonstrates how adding an ACL changes the ls -l output and how chmod affects the mask.
Initial state: A file named
file1exists with standard permissions.$ ls -l file1-rw-rw-r--. 1 root root 0 Jul 3 10:00 file1Adding a user: You grant user
johnfull access (rwx) to the file.$ setfacl -m u:john:rwx file1NoteBy default,
setfaclautomatically creates or updates the mask entry to be the union of all permissions affected by the mask. In this case, the mask is set torwxto accommodate the new permissions granted tojohn. You can prevent this automatic recalculation by using the-n(no mask) option.Observing the change: The
ls -loutput now shows a+sign, and the group permission column showsrwx. Thisrwxreflects the new mask (created automatically to accommodatejohn), not the owning group’s permissions.$ ls -l file1-rw-rwxr--+ 1 root root 0 Jul 3 10:05 file1Verifying with
getfacl: Thegetfaclcommand confirms thatjohnhasrwx, the owning group still hasrw-, and the mask isrwx.$ getfacl --omit-header file1user::rw- user:john:rwx group::rw- mask::rwx other::r--Modifying permissions with chmod: You decide to remove write access for the group using standard
chmod.$ chmod g-w file1The Result: This action updates the mask. Consequently,
john’s effective permissions are reduced, even though his specific ACL entry remains `rwx.$ ls -l file1-rw-r-xr--+ 1 root root 0 Jul 3 10:10 file1$ *getfacl --omit-header file1*user::rw- user:john:rwx #effective:r-x group::rw- #effective:r– mask::r-x other::r--Note that the
#effectivecomments indicate the actual permissions enforced by the system.
10.3. Managing the umask
You can use the umask utility to display, set, or change the current or default value of the umask.
10.3.1. Displaying the current value of the umask
You can use the umask utility to display the current value of the umask in symbolic or octal mode.
Procedure
To display the current value of the umask in symbolic mode, use:
$ umask -STo display the current value of the umask in the octal mode, use:
$ umaskNoteWhen displaying the umask in octal mode, you may notice it displayed as a four digit number (
0002or0022). The first digit of the umask represents a special bit (sticky bit, SGID bit, or SUID bit). If the first digit is set to0, the special bit is not set.
10.3.2. Setting the umask using symbolic values
You can use the umask utility with symbolic values (a combination letters and signs) to set the umask for the current shell session
You can assign the following permissions:
- Read (r)
- Write (w)
- Execute (x)
Permissions can be assigned to the following levels of ownership:
- User owner (u)
- Group owner (g)
- Other (o)
- All (a)
To add or remove permissions you can use the following signs:
-
+to add the permissions on top of the existing permissions -
-to remove the permissions from the existing permission =to remove the existing permissions and explicitly define the new onesNoteAny permission that is not specified after the equals sign (
=) is automatically prohibited.
Procedure
To set the umask for the current shell session, use:
$ umask -S <level><operation><permission>Replace
<level>with the level of ownership you want to set the umask for. Replace<operation>with one of the signs. Replace<permission>with the permissions you want to assign. For example, to set the umask tou=rwx,g=rwx,o=rwx, useumask -S a=rwx.See User file-creation mode for more details.
NoteThe umask is only valid for the current shell session.
10.3.3. Setting the umask using octal values
You can use the umask utility with octal values (numbers) to set the umask for the current shell session.
Procedure
To set the umask for the current shell session, use:
$ umask octal_valueReplace octal_value with an octal value. See User file-creation mode mask for more details.
NoteThe umask is only valid for the current shell session.
10.3.4. Changing the default umask for the non-login shell
You can change the default bash umask for standard users by modifying the /etc/bashrc file.
Prerequisites
-
You have the
rootaccess.
Procedure
-
Open the
/etc/bashrcfile in the editor. Modify the following sections to set a new default
bashumask:if [ $UID -gt 199 ] && [ “id -gn" = “id -un” ]; then umask 002 else umask 022 fiChanging the
UID -gt 199, will apply the new umask for allIDs >= 199and impact services and security.
Replace the default octal value of the umask (002) with another octal value. See User file-creation mode mask for more details.
- Save the changes and exit the editor.
10.3.5. Changing the default umask for the login shell
You can change the default bash umask for the root user by modifying the /etc/profile file.
Prerequisites
-
rootaccess
Procedure
-
As
root, open the/etc/profilefile in the editor. Modify the following sections to set a new default
bashumask:if [ $UID -gt 199 ] && [ “/usr/bin/id -gn” = “/usr/bin/id -un” ]; then umask 002 else umask 022 fiReplace the default octal value of the umask (
022) with another octal value. See User file-creation mode mask for more details.- Save the changes and exit the editor.
10.3.6. Changing the default umask for a specific user
You can change the default umask for a specific user by modifying the .bashrc for that user.
Procedure
Append the line that specifies the octal value of the umask into the
.bashrcfile for the particular user.$ echo 'umask octal_value' >> /home/username/.bashrcReplace octal_value with an octal value and replace username with the name of the user. See User file-creation mode mask for more details.
10.3.7. Setting default permissions for newly created home directories
You can change the permission modes for home directories of newly created users by modifying the /etc/login.defs file.
Procedure
-
As
root, open the/etc/login.defsfile in the editor. Modify the following section to set a new default HOME_MODE:
# HOME_MODE is used by useradd(8) and newusers(8) to set the mode for new
# home directories.
# If HOME_MODE is not set, the value of UMASK is used to create the mode.
HOME_MODE       0700
Replace the default octal value (
0700) with another octal value. The selected mode will be used to create the permissions for the home directory.- If HOME_MODE is set, save the changes and exit the editor.
If HOME_MODE is not set, modify the UMASK to set the mode for the newly created home directories:
# Default initial "umask" value used by login(1) on non-PAM enabled systems.
# Default "umask" value for pam_umask(8) on PAM enabled systems.
# UMASK is also used by useradd(8) and newusers(8) to set the mode for new
# home directories if HOME_MODE is not set.
# 022 is the default value, but 027, or even 077, could be considered
# for increased privacy. There is no One True Answer here: each sysadmin
# must make up their mind.

UMASK           022
Replace the default octal value (
022) with another octal value. See User file-creation mode mask for more details.- Save the changes and exit the editor.
Chapter 11. Managing systemd
As a system administrator, you can manage critical aspects of your system with systemd. Serving as a system and service manager for Linux operating systems, the systemd software suite provides tools and services for controlling, reporting, and system initialization. Key features of systemd include:
- Parallel start of system services during boot
- On-demand activation of daemons
- Dependency-based service control logic
The basic object that systemd manages is a systemd unit, a representation of system resources and services. A systemd unit consists of a name, type and a configuration file that defines and manages a particular task. You can use unit files to configure system behavior. See the following examples of various systemd unit types:
- Service
- Controls and manages individual system services.
- Target
- Represents a group of units that define system states.
- Device
- Manages hardware devices and their availability.
- Mount
- Handles file system mounting.
- Timer
- Schedules tasks to run at specific intervals.
11.1. Systemd unit files locations
You can find the unit configuration files in one of the following directories:
| Directory | Description |
|---|---|
|
|
|
|
|
|
|
|
|
The default configuration of systemd is defined during the compilation and you can find the configuration in the /etc/systemd/system.conf file. By editing this file, you can modify the default configuration by overriding values for systemd units globally.
For example, to override the default value of the timeout limit, which is set to 90 seconds, use the DefaultTimeoutStartSec parameter to input the required value in seconds.
DefaultTimeoutStartSec=required value11.2. Managing system services with systemctl
As a system administrator, you can manage system services by using the systemctl utility. You can perform various tasks, such as starting, stopping, restarting running services, enabling and disabling services to start at boot, listing available services, and displaying system services statuses.
11.2.1. Listing system services
You can list all currently loaded service units and display the status of all available service units.
Procedure
Use the systemctl command to perform any of the following tasks:
List all currently loaded service units:
$ systemctl list-units --type service
UNIT                     LOAD   ACTIVE SUB     DESCRIPTION
abrt-ccpp.service        loaded active exited  Install ABRT coredump hook
abrt-oops.service        loaded active running ABRT kernel log watcher
abrtd.service            loaded active running ABRT Automated Bug Reporting Tool
...
systemd-vconsole-setup.service loaded active exited  Setup Virtual Console
tog-pegasus.service            loaded active running OpenPegasus CIM Server

LOAD   = Reflects whether the unit definition was properly loaded.
ACTIVE = The high-level unit activation state, or a generalization of SUB.
SUB    = The low-level unit activation state, values depend on unit type.

46 loaded units listed. Pass --all to see loaded but inactive units, too.
To show all installed unit files use 'systemctl list-unit-files'
By default, the
systemctl list-unitscommand displays only active units. For each service unit file, the command provides an overview of the following parameters:UNIT- The full name of the service unit
LOAD- The load state of the configuration file
ACTIVEorSUB- The current high-level and low-level unit file activation state
DESCRIPTION- A short description of the unit’s purpose and functionality
List all loaded units regardless of their state, by using the following command with the
--allor-acommand line option:$ systemctl list-units --type service --allList the status (enabled or disabled) of all available service units:
$ systemctl list-unit-files --type service
UNIT FILE                               STATE
abrt-ccpp.service                       enabled
abrt-oops.service                       enabled
abrtd.service                           enabled
...
wpa_supplicant.service                  disabled
ypbind.service                          disabled

208 unit files listed.
For each service unit, this command displays:
UNIT FILE- The full name of the service unit
STATE- The information whether the service unit is enabled or disabled to start automatically during boot
11.2.2. Displaying system service status
You can inspect any service unit to get detailed information and verify the state of the service, whether it is enabled to start during boot or currently running. You can also view services that are ordered to start after or before a particular service unit.
Procedure
Display detailed information about a service unit that corresponds to a system service:
$ systemctl status <name>.serviceReplace
<name>with the name of the service unit you want to inspect (for example,gdm).This command displays the following information:
- The name of the selected service unit followed by a short description
- One or more fields described in Available service unit information
-
The execution of the service unit: if the unit is executed by the
rootuser The most recent log entries
Expand Table 11.2. Available service unit information Field Description LoadedInformation whether the service unit has been loaded, the absolute path to the unit file, and a note whether the unit is enabled to start during boot.
ActiveInformation whether the service unit is running followed by a time stamp.
Main PIDThe process ID and the name of the corresponding system service.
StatusAdditional information about the corresponding system service.
ProcessAdditional information about related processes.
CGroupAdditional information about related control groups (
cgroups).
Verify that a particular service unit is running:
$ systemctl is-active <name>.serviceDetermine whether a particular service unit is enabled to start during boot:
$ systemctl is-enabled <name>.serviceNoteBoth
systemctl is-activeandsystemctl is-enabledcommands return an exit status of0if the specified service unit is running or enabled.Check what services
systemdorders to start before the specified service unit# systemctl list-dependencies --after <name>.serviceFor example, to view the list of services ordered to start before
gdm, enter:# systemctl list-dependencies --after gdm.service gdm.service ├─dbus.socket ├─getty@tty1.service ├─livesys.service ├─plymouth-quit.service ├─system.slice ├─systemd-journald.socket ├─systemd-user-sessions.service └─basic.target [output truncated]Check what services
systemdorders to start after the specified service unit:# systemctl list-dependencies --before <name>.serviceFor example, to view the list of services
systemdorders to start aftergdm, enter:# systemctl list-dependencies --before gdm.service gdm.service ├─dracut-shutdown.service ├─graphical.target │ ├─systemd-readahead-done.service │ ├─systemd-readahead-done.timer │ └─systemd-update-utmp-runlevel.service └─shutdown.target ├─systemd-reboot.service └─final.target └─systemd-reboot.service
11.2.3. Starting and stopping a systemd unit
You can start system service in the current session by using the systemctl start command.
Prerequisites
- You have the Root access.
Procedure
Start a system service in the current session:
# *systemctl start <systemd_unit> *Replace
<systemd_unit>with the name of the service unit you want to start (for example,httpd.service).NoteIn
systemd, positive and negative dependencies between services exist. Starting a particular service may require starting one or more other services (positive dependency) or stopping one or more services (negative dependency).When you attempt to start a new service,
systemdresolves all dependencies automatically, without explicit notification to the user. This means that if you are already running a service, and you attempt to start another service with a negative dependency, the first service is automatically stopped.For example, if you are running the
sendmailservice, and you attempt to start thepostfixservice,systemdfirst automatically stopssendmail, because these two services are conflicting and cannot run on the same port.
11.2.4. Stopping a system service
If you want to stop a system service in the current session, use the systemctl stop command.
Prerequisites
- Root access
Procedure
Stop a system service:
# systemctl stop <name>.serviceReplace
<name>with the name of the service unit you want to stop (for example,bluetooth).
11.2.5. Restarting and Reload a system service
You can restart system service in the current session using the restart command to perform the following actions:
- Stop the selected service unit in the current session and immediately start it again.
- Restart a service unit only if the corresponding service is already running.
- Reload configuration of a system service without interrupting its execution.
Prerequisites
- You have the Root access.
Procedure
Restart a system service:
# systemctl restart <name>.serviceReplace
<name>with the name of the service unit you want to restart (for example,httpd).If the selected service unit is not running, this command starts it.
Restart a service unit only if the corresponding service is already running:
# systemctl try-restart <name>.serviceReload the configuration without interrupting service execution:
# systemctl reload <name>.serviceNoteSystem services that do not support this feature, ignore this command. To restart such services, use the
reload-or-restartandreload-or-try-restartcommands instead.
11.2.6. Enabling a system service to start at boot
You can enable a service to start automatically at boot, these changes apply with the next reboot.
Prerequisites
- You have Root access.
Procedure
Verify whether the unit is masked:
# systemctl status <systemd_unit>If the unit is masked, unmask it first:
# systemctl unmask <systemd_unit>Enable a service to start at boot time:
# systemctl enable <systemd_unit>Replace
<systemd_unit>with the name of the service unit you want to enable (for example,httpd).
Optionally, pass the --now option to the command to also start the unit right now.
11.2.7. Disabling a system service to start at boot
You can prevent a service unit from starting automatically at boot time. If you disable a service, it will not start at boot, but you can start it manually. You can also mask a service, so that it cannot be started manually. Masking is a way of disabling a service that makes the service permanently unusable until it is unmasked again.
Prerequisites
- You have Root access.
Procedure
Disable a service to start at boot:
# systemctl disable <name>.serviceReplace
<name>with the name of the service unit you want to disable (for example,bluetooth). Optionally, pass the--nowcommand to also stop the service if it is currently running.Optional: To prevent that the unit can be accidentally started by an administrator or as a dependency of other units, mask the service:
# systemctl mask <name>.service
11.3. Booting into a target system state
As a system administrator, you can control the boot process of your system, and define the state you want your system to boot into. This is called a systemd target, and it is a set of systemd units that your system starts to reach a certain level of functionality. While working with systemd targets, you can view the default target, select a target at runtime, change the default boot target, boot into emergency or rescue target.
11.3.1. Target unit files
Targets in systemd are groups of related units that act as synchronization points during the start of your system. Target unit files, which end with the .target file extension, represent the systemd targets. The purpose of target units is to group together various systemd units through a chain of dependencies.
Consider the following example:
-
Similarly, the
multi-user.targetunit starts other essential system services such as NetworkManager (NetworkManager.service) or D-Bus (dbus.service) and activates another target unit namedbasic.target.
You can set the following systemd targets as default or current targets:
| rescue | unit target that pulls in the base system and spawns a rescue shell |
|---|---|
| multi-user | unit target for setting up a multi-user system |
| graphical | unit target for setting up a graphical login screen |
| emergency | unit target that starts an emergency shell on the main console |
11.3.2. Changing the default target to boot into
The default.target symbolic link refers to the systemd target that the system should boot into. When the system starts, systemd resolves this link and boots into the defined target. You can find the currently selected default target unit in the /etc/systemd/system/default.target file. Each target represents a certain level of functionality and is used for grouping other units. Additionally, target units serve as synchronization points during boot. You can change the default target your system boots into. When you set a default target unit, the current target remains unchanged until the next reboot.
Prerequisites
- You have Root access.
Procedure
Determine the current default target unit
systemduses to start the system:# systemctl get-default graphical.targetList the currently loaded targets:
# systemctl list-units --type targetConfigure the system to use a different target unit by default:
# systemctl set-default <name>.targetReplace
<name>with the name of the target unit you want to use by default.Example: # systemctl set-default multi-user.target Removed /etc/systemd/system/default.target Created symlink /etc/systemd/system/default.target -> /usr/lib/systemd/system/multi-user.targetVerify the default target unit:
# systemctl get-default
multi-user.target
Optional: Switch to the new default target:
# systemctl isolate default.targetAlternatively, reboot the system.
11.3.3. Changing the current target
On a running system, you can change the target unit in the current boot without reboot. If you switch to a different target, systemd starts all services and their dependencies that this target requires, and stops all services that the new target does not enable. Manually switching to a different target is only a temporary operation. When you reboot the host, systemd boots again into the default target.
Procedure
Optional: Display the list of targets you can select:
# systemctl list-units --type targetNoteYou can only isolate targets that have the
AllowIsolate=yesoption set in the unit files.Change to a different target unit in the current boot:
# systemctl isolate <name>.targetReplace <name> with the name of the target unit you want to use in the current boot.
Example:
# systemctl isolate multi-user.target
This command starts the target unit named
multi-userand all dependent units, and immediately stops all other unit.
11.3.4. Booting to rescue mode
You can boot to the rescue mode that provides a single-user environment for troubleshooting or repair if the system cannot get to a later target, and the regular booting process fails. In rescue mode, the system attempts to mount all local file systems and start certain important system services, but it does not activate network interfaces.
Prerequisites
- Root access
Procedure
To enter the rescue mode, change the current target in the current session:
# systemctl rescue Broadcast message from root@localhost on pts/0 (Fri 2023-03-24 18:23:15 CEST): The system is going down to rescue mode NOW!NoteThis command is similar to
systemctl isolate rescue.target, but it also sends an informative message to all users that are currently logged into the system.To prevent
systemdfrom sending a message, enter the following command with the--no-wallcommand-line option:# systemctl --no-wall rescue
Troubleshooting
If your system is not able to enter the rescue mode, you can boot to emergency mode, which provides the most minimal environment possible. In emergency mode, the system mounts the root file system only for reading, does not attempt to mount any other local file systems, does not activate network interfaces, and only starts a few essential services.
11.3.5. Troubleshooting the boot process
As a system administrator, you can select a non-default target at boot time to troubleshoot the boot process. Changing the target at boot time affects only a single boot. You can boot to emergency mode, which provides the most minimal environment possible.
Procedure
- Reboot the system, and interrupt the boot loader menu countdown by pressing any key except the Enter key, which would initiate a normal boot.
- Move the cursor to the kernel entry that you want to start.
- Press the E key to edit the current entry.
Move to the end of the line that starts with
linuxand press Ctrl+E to jump to the end of the line:linux ($root)/vmlinuz-5.14.0-70.22.1.e19_0.x86_64 root=/dev/mapper/rhel-root ro crash\ kernel=auto resume=/dev/mapper/rhel-swap rd.lvm.lv/swap rhgb quietTo choose an alternate boot target, append the
systemd.unit=parameter to the end of the line that starts withlinux:linux ($root)/vmlinuz-5.14.0-70.22.1.e19_0.x86_64 root=/dev/mapper/rhel-root ro crash\ kernel=auto resume=/dev/mapper/rhel-swap rd.lvm.lv/swap rhgb quiet systemd.unit=<name>.targetReplace
<name>with the name of the target unit you want to use. For example,systemd.unit=emergency.target- Press Ctrl+X to boot with these settings.
11.4. Shutting down, suspending, and hibernating the system
As a system administrator, you can use different power management options to manage power consumption, perform a proper shutdown to ensure that all data is saved, or restart the system to apply changes and updates.
11.4.1. System shutdown
To shut down the system, you can either use the systemctl utility directly, or call this utility through the shutdown command.
Using the shutdown utility has the following advantages:
-
In RHEL 8, you can schedule a shutdown by using the
timeargument. This also gives users warning that a system shutdown has been scheduled.
11.4.2. Scheduling a system shutdown
As a system administrator, you can schedule a delayed shutdown to give users time to save their work and log off the system. Use the shutdown command to perform the following operations:
Shut down the system and power off the machine at a certain time:
# shutdown --poweroff hh:mmWhere
hh:mmis the time in the 24-hour time notation. To prevent new logins, the/run/nologinfile is created 5 minutes before system shutdown.When you use the time argument, you can notify users logged in to the system of the planned shutdown by specifying an optional wall message, for example
shutdown --poweroff 13:59 "Attention. The system will shut down at 13:59".Shut down and halt the system after a delay, without powering off the machine:
# shutdown --halt +mWhere
+mis the delay time in minutes. You can use thenowkeyword as an alias for+0.Cancel a pending shutdown
# shutdown -c
11.4.3. Shutting down the system using the systemctl command
As a system administrator, you can shut down the system and power off the machine or shut down and halt the system without powering off the machine by using the systemctl command.
Prerequisites
- Root access
Procedure
Use the systemctl command to perform any of the following tasks:
Shut down the system and power off the machine:
# systemctl poweroffShut down and halt the system without powering off the machine:
# systemctl halt
By default, running either of these commands causes systemd to send an informative message to all users that are currently logged into the system. To prevent systemd from sending this message, run the selected command with the --no-wall command line option.
11.4.4. Restarting the system
When you restart the system, systemd stops all running programs and services, the system shuts down, and then immediately starts again.
Prerequisites
- You have Root access.
Procedure
Restart the system:
# systemctl reboot
By default, when you use this command, systemd sends an informative message to all users that are currently logged into the system. To prevent systemd from sending this message, run this command with the --no-wall option.
11.4.5. Optimizing power consumption by suspending and hibernating the system
As a system administrator, you can manage power consumption, save energy on your systems, and preserve the current state of your system. To do so, apply one of the following modes:
- Suspend
- Hibernate
- Hybrid Sleep
- Suspend-then-hibernate
Prerequisites
- You have Root access.
Procedure
Choose the appropriate method for power saving:
SuspendSuspending saves the system state in RAM and with the exception of the RAM module, powers off most of the devices in the machine. When you turn the machine back on, the system then restores its state from RAM without having to boot again. Because the system state is saved in RAM and not on the hard disk, restoring the system from suspend mode is significantly faster than from hibernation. However, the suspended system state is also vulnerable to power outages. To suspend the system, run:# systemctl suspendHibernateHibernating saves the system state on the hard disk drive and powers off the machine. When you turn the machine back on, the system then restores its state from the saved data without having to boot again. Because the system state is saved on the hard disk and not in RAM, the machine does not have to maintain electrical power to the RAM module. However, as a consequence, restoring the system from hibernation is significantly slower than restoring it from suspend mode. To hibernate the system, run:# systemctl hibernateHybrid sleepThis combines elements of both hibernation and suspending. The system first saves the current state on the the hard disk drive, and enters a low-power state similar to suspending, which allows the system to resume more quickly. The benefit of hybrid sleep is that if the system loses power during the sleep state, it can still recover the previous state from the saved image on the hard disk, similar to hibernation. To hibernate and suspend the system, run:# systemctl hybrid-sleepSuspend-then-hibernateThis mode first suspends the system, which results in saving the current system state to RAM and putting the system in a low-power mode. The system hibernates if it remains suspended for a specific period of time that you can define in theHibernateDelaySecparameter. Hibernation saves the system state to the hard disk drive and shuts down the system completely. The suspend-then-hibernate mode provides the benefit of conserving battery power while you are still able to quickly resume work. Additionally, this mode ensures that your data is saved in case of a power failure. Suspend and then hibernate the system:# systemctl suspend-then-hibernate
11.4.6. Changing the power button behavior
When you press the power button on your computer, it suspends or shuts down the system by default. You can customize this behavior according to your preferences.
11.4.6.1. Changing the behavior of the power button when pressing the button and GNOME is not running
When you press the power button in a non-graphical systemd target, it shuts down the system by default. You can customize this behavior according to your preferences.
Prerequisites
- You must have administrative access in your system.
Procedure
Edit the
/etc/systemd/logind.confconfiguration file and set theHandlePowerKey=poweroffvariable to one of the following options:poweroff- Shut down the computer.
reboot- Reboot the system.
halt- Initiate a system halt.
kexec-
Initiate a
kexecreboot. suspend- Suspend the system.
hibernate- Initiate system hibernation.
ignore- Do nothing.
For example, to reboot the system upon pressing the power button, use this setting:
HandlePowerKey=rebootRestart the
systemd-logindservice to apply the changes:# systemctl reload systemd-logind
11.4.6.2. Changing the behavior of the power button when pressing the button and GNOME is running
On the graphical login screen or in the graphical user session, pressing the power button suspends the machine by default. This happens both in cases when the user presses the power button physically or when pressing a virtual power button from a remote console. You can select a different power button behavior.
Procedure
Create a local database for system-wide settings in the
/etc/dconf/db/local.d/01-powerfile with the following content:[org/gnome/settings-daemon/plugins/power] power-button-action=<value>Replace
<value>with one of the following power button actions:nothing- Does nothing .
suspend- Suspends the system.
hibernate- Hibernates the system.
interactiveShows a pop-up query asking the user what to do.
With interactive mode, the system powers off automatically after 60 seconds when pressing the power button. However, you can choose a different behavior from the pop-up query.
Optional: Override the user’s setting, and prevent the user from changing it. Enter the following configuration in the
/etc/dconf/db/local.d/locks/01-powerfile:/org/gnome/settings-daemon/plugins/power/power-button-actionUpdate the system databases:
# dconf update- Log out and back in again for the system-wide settings to take effect.
Chapter 12. Configuring time synchronization
Accurate timekeeping in an IT environment is important. A consistent time across all network devices improves the traceability of log files and certain protocols rely on synchronized clocks. For example, Kerberos uses time stamps to prevent replay attacks. The user space daemon updates the system clock running in the kernel. Starting with Red Hat Enterprise Linux 8, the NTP protocol is implemented by the chronyd daemon, available from the repositories in the chrony package.
12.1. Introduction to chrony suite
The implementation of the Network Time Protocol (NTP) is chrony. You can use chrony:
-
To synchronize the system clock with
NTPservers - To synchronize the system clock with a reference clock, for example a GPS receiver
- To synchronize the system clock with a manual time input
-
As an
NTPv4(RFC 5905)server or peer to provide a time service to other computers in the network
chrony performs well in a wide range of conditions:
- including intermittent network connections
- heavily congested networks
- changing temperatures (ordinary computer clocks are sensitive to temperature)
- systems that do not run continuously, or run on a virtual machine.
Typical accuracy between two machines synchronized over the Internet is within a few milliseconds, and for machines on a LAN within tens of microseconds. Hardware timestamping or a hardware reference clock may improve accuracy between two machines synchronized to a sub-microsecond level.
chrony consists of chronyd, a daemon that runs in user space, and chronyc, a command line program which can be used to monitor the performance of chronyd and to change various operating parameters when it is running.
The chronyd daemon can be monitored and controlled by the command line utility chronyc. This utility provides a command prompt which allows entering a number of commands to query the current state of chronyd and make changes to its configuration. By default, chronyd accepts only commands from a local instance of chronyc, but it can be configured to accept monitoring commands also from remote hosts. The remote access should be restricted.
12.2. Using chronyc to control chronyd
You can control chronyd by using the chronyc command line utility.
Procedure
To make changes to the local instance of
chronydusing the command line utility chronyc in interactive mode, enter the following command asroot:# chronycchronyc must run as
rootif some of the restricted commands are to be used.The chronyc command prompt will be displayed as follows:
chronyc>-
To list all of the commands, type
help. Alternatively, the utility can also be invoked in non-interactive command mode if called together with a command as follows:
chronyc command
Changes made using chronyc are not permanent, they will be lost after a chronyd restart. For permanent changes, modify /etc/chrony.conf.
12.3. Migrating to chrony
In Red Hat Enterprise Linux 7, users could choose between ntp and chrony to ensure accurate timekeeping. For differences between ntp and chrony, ntpd and chronyd, see Differences between ntpd and chronyd.
Starting with Red Hat Enterprise Linux 8, ntp is no longer supported. chrony is enabled by default. For this reason, you might need to migrate from ntp to chrony.
Migrating from ntp to chrony is straightforward in most cases. The corresponding names of the programs, configuration files and services are:
| ntp name | chrony name |
|---|---|
| /etc/ntp.conf | /etc/chrony.conf |
| /etc/ntp/keys | /etc/chrony.keys |
| ntpd | chronyd |
| ntpq | chronyc |
| ntpd.service | chronyd.service |
| ntp-wait.service | chrony-wait.service |
The ntpdate and sntp utilities, which are included in the ntp distribution, can be replaced with chronyd using the -q option or the -t option. The configuration can be specified on the command line to avoid reading /etc/chrony.conf. For example, instead of running ntpdate ntp.example.com, chronyd could be started as:
# chronyd -q 'server ntp.example.com iburst'
2018-05-18T12:37:43Z chronyd version 3.3 starting (+CMDMON +NTP +REFCLOCK +RTC +PRIVDROP +SCFILTER +SIGND +ASYNCDNS +SECHASH +IPV6 +DEBUG)
2018-05-18T12:37:43Z Initial frequency -2.630 ppm
2018-05-18T12:37:48Z System clock wrong by 0.003159 seconds (step)
2018-05-18T12:37:48Z chronyd exiting
The ntpstat utility, which was previously included in the ntp package and supported only ntpd, now supports both ntpd and chronyd. It is available in the ntpstat package.
12.3.1. Migration script
A Python script called ntp2chrony.py is included in the documentation of the chrony package (/usr/share/doc/chrony). The script automatically converts an existing ntp configuration to chrony. It supports the most common directives and options in the ntp.conf file. Any lines that are ignored in the conversion are included as comments in the generated chrony.conf file for review. Keys that are specified in the ntp key file, but are not marked as trusted keys in ntp.conf are included in the generated chrony.keys file as comments.
By default, the script does not overwrite any files. If /etc/chrony.conf or /etc/chrony.keys already exist, the -b option can be used to rename the file as a backup. The script supports other options. The --help option prints all supported options.
An example of an invocation of the script with the default ntp.conf provided in the ntp package is:
# python3 /usr/share/doc/chrony/ntp2chrony.py -b -v
Reading /etc/ntp.conf
Reading /etc/ntp/crypto/pw
Reading /etc/ntp/keys
Writing /etc/chrony.conf
Writing /etc/chrony.keys
The only directive ignored in this case is disable monitor, which has a chrony equivalent in the noclientlog directive, but it was included in the default ntp.conf only to mitigate an amplification attack.
The generated chrony.conf file typically includes a number of allow directives corresponding to the restrict lines in ntp.conf. If you do not want to run chronyd as an NTP server, remove all allow directives from chrony.conf.
12.4. Using Chrony
The following sections describe how to start, and stop chronyd, and how to check if chrony is synchronized. Sections also describe how to manually adjust System Clock.
12.4.1. Managing chrony
You can start, stop, and check the status of chronyd.
The chrony suite is installed by default on Red Hat Enterprise Linux. To ensure that it is, run the following command as
root:# yum install chronyThe default location for the chrony daemon is
/usr/sbin/chronyd. The command line utility will be installed to/usr/bin/chronyc.To check the status of
chronyd, issue the following command:$ systemctl status chronyd chronyd.service - NTP client/server Loaded: loaded (/usr/lib/systemd/system/chronyd.service; enabled) Active: active (running) since Wed 2013-06-12 22:23:16 CEST; 11h agoTo start
chronyd, issue the following command asroot:# systemctl start chronydTo ensure
chronydstarts automatically at system start, issue the following command asroot:# systemctl enable chronydTo stop
chronyd, issue the following command asroot:# systemctl stop chronydTo prevent
chronydfrom starting automatically at system start, issue the following command asroot:# systemctl disable chronyd
12.4.2. Checking if chrony is synchronized
You can check if chrony is synchronized with the use of the tracking, sources, and sourcestats commands.
Procedure
To check chrony tracking, enter:
$  chronyc tracking
Reference ID    : CB00710F (ntp-server.example.net)
Stratum         : 3
Ref time (UTC)  : Fri Jan 27 09:49:17 2017
System time     :  0.000006523 seconds slow of NTP time
Last offset     : -0.000006747 seconds
RMS offset      : 0.000035822 seconds
Frequency       : 3.225 ppm slow
Residual freq   : 0.000 ppm
Skew            : 0.129 ppm
Root delay      : 0.013639022 seconds
Root dispersion : 0.001100737 seconds
Update interval : 64.2 seconds
Leap status     : Normal
The
chronycsources command displays information about the current time sources thatchronydis accessing.$ chronyc sources 210 Number of sources = 3 MS Name/IP address Stratum Poll Reach LastRx Last sample =============================================================================== #* GPS0 0 4 377 11 -479ns[ -621ns] /- 134ns ^? a.b.c 2 6 377 23 -923us[ -924us] +/- 43ms ^ d.e.f 1 6 377 21 -2629us[-2619us] +/- 86msYou can specify the optional
-vargument to print more verbose information. In this case, extra caption lines are shown as a reminder of the meanings of the columns.The
sourcestatscommand displays information about the drift rate and offset estimation process for each of the sources currently being examined bychronyd. To check chrony source statistics, issue the following command:$ chronyc sourcestats 210 Number of sources = 1 Name/IP Address NP NR Span Frequency Freq Skew Offset Std Dev =============================================================================== abc.def.ghi 11 5 46m -0.001 0.045 1us 25usThe optional argument
-vcan be specified, meaning verbose. In this case, extra caption lines are shown as a reminder of the meanings of the columns.
12.4.3. Manually adjusting the System Clock
You can manually adjust the System Clock.
Procedure
To step the system clock immediately, bypassing any adjustments in progress by slewing, enter:
# chronyc makestep
If the rtcfile directive is used, the real-time clock should not be manually adjusted. Random adjustments would interfere with chrony's need to measure the rate at which the real-time clock drifts.
12.4.4. Disabling a chrony dispatcher script
The chrony dispatcher script manages the online and offline state of the NTP servers. As a system administrator, you can disable the dispatcher script to keep chronyd polling the servers constantly.
The NetworkManager executes the chrony dispatcher script during interface reconfiguration, stop or start operations. However, if you configure certain interfaces or routes outside of NetworkManager, you can encounter the following situation:
- The dispatcher script might run when no route to the NTP servers exists, causing the NTP servers to switch to the offline state.
- If you establish the route later, the script does not run again by default, and the NTP servers remain in the offline state.
To ensure that chronyd can synchronize with your NTP servers, which have separately managed interfaces, disable the dispatcher script.
Procedure
To disable the
chronydispatcher script, edit the/etc/NetworkManager/dispatcher.d/20-chrony-onofflinefile as follows:#!/bin/sh exit 0NoteWhen you upgrade or reinstall the
chronypackage, the packaged version of the dispatcher script replaces your modified dispatcher script.
12.4.5. Setting up chrony in an isolated network
For a network that is never connected to the Internet, one computer is selected to be the primary timeserver. The other computers are either direct clients of the server, or clients of clients. On the server, the drift file must be manually set with the average rate of drift of the system clock. If the server is rebooted, it will obtain the time from surrounding systems and calculate an average to set its system clock. Thereafter it resumes applying adjustments based on the drift file. The drift file will be updated automatically when the settime command is used.
To set up chrony for a system in an isolated network, follow the steps mentioned below:
Procedure
On the system selected to be the server, edit
/etc/chrony.confas follows:driftfile /var/lib/chrony/drift commandkey 1 keyfile /etc/chrony.keys initstepslew 10 client1 client3 client6 local stratum 8 manual allow <subnet>Where
<subnet>is the network from which the clients are allowed to connect. Use Classless Inter-Domain Routing (CIDR) notation to specify the subnet.On the systems selected to be direct clients of the server, edit the
/etc/chrony.confas follows:server <server_fqdn> driftfile /var/lib/chrony/drift logdir /var/log/chrony log measurements statistics tracking keyfile /etc/chrony.keys commandkey 24 local stratum 10 initstepslew 20 ntp1.example.net allow <server_ip_address>Where
<server_fqdn>is the host name of the server, and<server_ip_address>is the address of the server . Clients with this configuration will resynchronize with the server if it restarts.
On the client systems which are not to be direct clients of the server, the /etc/chrony.conf file should be the same except that the local and allow directives should be omitted.
In an isolated network, you can also use the local directive that enables a local reference mode, which allows chronyd operating as an NTP server to appear synchronized to real time, even when it was never synchronized or the last update of the clock happened a long time ago.
To allow multiple servers in the network to use the same local configuration and to be synchronized to one another, without confusing clients that poll more than one server, use the orphan option of the local directive which enables the orphan mode. Each server needs to be configured to poll all other servers with local. This ensures that only the server with the smallest reference ID has the local reference active and other servers are synchronized to it. When the server fails, another one will take over.
12.4.6. Configuring remote monitoring access
The chronyc utility can access chronyd by using the following methods:
- IPv4 or IPv6.
-
A domain socket, which is accessible locally by the
rootandchronyuser.
By default, chronyc connects to the Unix domain socket. The default path is /var/run/chrony/chronyd.sock. If this connection fails, chronyc tries to connect to 127.0.0.1 and then ::1.
Only the following monitoring commands, which do not affect the behavior of chronyd, are allowed from the network:
- activity
- manual list
- rtcdata
- smoothing
- sources
- sourcestats
- tracking
- waitsync
The set of hosts from which chronyd accepts these commands can be configured by using the following methods:
-
You can use the
cmdallowdirective in the configuration file ofchronyd. -
Run the
cmdallowcommand in chronyc.
By default, the commands are accepted only from localhost (127.0.0.1 or ::1).
All other commands are allowed only through the Unix domain socket. When sent over the network, chronyd responds with a Not authorised error, even if it is from localhost.
The following procedure describes how to access chronyd remotely with chronyc.
Procedure
Configure
chronyto listen on local interface by adding the following to the/etc/chrony.conffile:bindcmdaddress 0.0.0.0and
bindcmdaddress ::Allow commands from remote IP addresses, networks, and subnet:
Add the following content to the
/etc/chrony.conffile:cmdallow 192.168.1.0/24cmdallow 2001:db8::/64Open port 323 in the firewall to allow connections from remote systems:
# firewall-cmd --permanent --add-port=323/udpReload the firewall configuration:
# firewall-cmd --reload
12.4.7. Monitoring NTP clients
Display the list of clients that accessed the chronyd Network Time Protocol (NTP) server. This information is useful for verifying which clients are actively synchronizing and checking their connection history.
Prerequisites
-
The
chronydservice is running. -
chronydis configured to allow NTP clients. For example, add theallowdirective to/etc/chrony.conf.
Procedure
Display a list of clients by using the
chronyc clientscommand:# chronyc clientsReview the command output:
Hostname                          NTP  Drop  Int  IntL  Last  Cmd  Drop  Int  Last
====================================================================================
client1.example.net 			   10 	  0    6 	 - 	 10s 	0 	  0    6   12s
client2.example.net 			    8 	  0	   6 	 - 	 25s 	0 	  0    6   28s
desktop-192-0-2-100.example.net 	3 	   	   6 	 - 	  9s 	0 	  0    6   11s
The output fields include:
- Hostname: The hostname or IP address of the client.
- NTP: The number of NTP packets received from the client.
-
Drop: The number of packets dropped by
chronyd, typically due to rate-limiting. - Int: The client’s polling interval in seconds (as a log base 2 value, e.g., 6 = $2^6$ = 64s).
-
IntL: The average inter-poll interval (in seconds) for the client when rate limiting is active. This field shows
'-'if rate limiting is not currently active for the client. - Last: The elapsed time since the last NTP packet was received from this client. Use this value to determine which clients are synchronized or recently synchronized.
Cmd: The number of
chronyc(monitoring) command packets received from the client.NoteIf you have a number of clients and the command is slow to return, it might be due to performing DNS lookups. Use the
-noption to disable hostname resolution and display IP addresses instead:+
# chronyc -n clientsImportantBy default,
chronydmonitors up to 4,096 clients. If you have more clients than this, you can increase the memory limit withclientloglimitin/etc/chrony.conffile. For example:clientloglimit 10000000
12.4.8. Managing time synchronization using RHEL system roles
You can manage time synchronization on multiple target machines using the timesync role. The timesync role installs and configures an NTP or PTP implementation to operate as an NTP or PTP client to synchronize the system clock.
Note that using the timesync role also facilitates migration to chrony, because you can use the same playbook on all versions of Red Hat Enterprise Linux starting with RHEL 6 regardless of whether the system uses ntp or chrony to implement the NTP protocol.
The timesync role replaces the configuration of the given or detected provider service on the managed host. Previous settings are lost, even if they are not specified in the role variables. The only preserved setting is the choice of provider if the timesync_ntp_provider variable is not defined.
The following example shows how to apply the timesync role in a situation with just one pool of servers.
Example 12.1. An example playbook applying the timesync role for a single pool of servers
---
- hosts: timesync-test
  vars:
    timesync_ntp_servers:
      - hostname: 2.rhel.pool.ntp.org
        pool: yes
        iburst: yes
  roles:
    - rhel-system-roles.timesync
For a detailed reference on timesync role variables, install the rhel-system-roles package, and see the README.md or README.html files in the /usr/share/doc/rhel-system-roles/timesync directory.
12.5. Chrony with HW timestamping
Hardware timestamping (HW) in some Network Interface Controller (NICs) provides accurate timestamping of incoming and outgoing packets. NTP timestamps are usually created by the kernel and chronyd with the use of the system clock. However, when HW timestamping is enabled, the NIC uses its own clock to generate the timestamps when packets are entering or leaving the link layer or the physical layer. When used with NTP, hardware timestamping can significantly improve the accuracy of synchronization. For best accuracy, both NTP servers and NTP clients need to use hardware timestamping. Under ideal conditions, a sub-microsecond accuracy may be possible.
Another protocol for time synchronization that uses hardware timestamping is PTP.
Unlike NTP, PTP relies on assistance in network switches and routers. If you want to achieve the best accuracy of synchronization, use PTP on networks that have switches and routers with PTP support, and prefer NTP on networks that do not have such switches and routers.
12.5.1. Verifying support for hardware timestamping
To verify that hardware timestamping with NTP is supported by an interface, use the ethtool -T command. An interface can be used for hardware timestamping with NTP if ethtool lists the SOF_TIMESTAMPING_TX_HARDWARE and SOF_TIMESTAMPING_TX_SOFTWARE capabilities and also the HWTSTAMP_FILTER_ALL filter mode.
Procedure
- Display a device’s time stamping capabilities and associated PTP hardware clock:
# ethtool -T enp1s012.5.2. Enabling hardware timestamping
You can enable hardware timestamping on one or multiple interfaces by using the hwtimestamp directive in the /etc/chrony.conf file. The directive can either specify a single interface, or a wildcard character can be used to enable hardware timestamping on all interfaces that support it.
Procedure
Edit the
/etc/chrony.conffile and make the following changes:Add the
hwtimestampsetting for interfaces which support hardware timestamping. For example:hwtimestamp enp1s0 hwtimestamp eno*You can use the * wildcard if no other application, such as
ptp4luses hardware timestamping.Configure a short client polling interval by appending the
minpollandmaxpolloptions to the server setting, for example:server ntp.example.comlocal minpoll 0 maxpoll 0For hardware timestamping, you must configure a shorter polling interval than the default range (64-1024 seconds) to minimize the offset of the system clock.
Enable the NTP interleaved mode by appending the
xleaveoption to the server setting:server ntp.example.comlocal minpoll 0 maxpoll 0 xleaveWith this setting, chrony gets the hardware transmit timestamp only after sending a packet. This behavior prevents the serever from saving the timestamp in packets to which it responds. With the
xleaveoption, chrony can receive transmit timestamps that were generated after the transmission.Optional: Increase the maximum size of memory allocated for logging of client’s access on the server, for example:
clientloglimit 100000000The default server configuration allows a few thousands of clients to use the interleaved mode concurrently. By increasing the value of the
clientloglimitsetting, you can configure the server for a large number of clients.
Restart the chronyd service:
# systemctrl restart chronyd
Verification
Optional: Verify in the
/var/log/messageslog file that hardware timesamping is enabled:chronyd[4081]: Enabled HW timestamping on enp1s0 chronyd[4081]: Enabled HW timestamping on eno1If chronyd is configured as an NTP client or peer, display the transmit and receive timestamping modes and the interleaved mode:
# chronyc ntpdata

Output:

[literal,subs="+quotes,verbatim,normal"]


Remote address  : 203.0.113.15 (CB00710F)
Remote port     : 123
Local address   : 203.0.113.74 (CB00714A)
Leap status     : Normal
Version         : 4
Mode            : Server
Stratum         : 1
Poll interval   : 0 (1 seconds)
Precision       : -24 (0.000000060 seconds)
Root delay      : 0.000015 seconds
Root dispersion : 0.000015 seconds
Reference ID    : 47505300 (GPS)
Reference time  : Wed May 03 13:47:45 2017
Offset          : -0.000000134 seconds
Peer delay      : 0.000005396 seconds
Peer dispersion : 0.000002329 seconds
Response time   : 0.000152073 seconds
Jitter asymmetry: +0.00
NTP tests       : 111 111 1111
Interleaved     : Yes
Authenticated   : No
TX timestamping : Hardware
RX timestamping : Hardware
Total TX        : 27
Total RX        : 27
Total valid RX  : 27
Report the stability of NTP measurements:
# chronyc sourcestats

Output:

[literal,subs="+quotes,verbatim,normal"]
....

210 Number of sources = 1
Name/IP Address            NP  NR  Span  Frequency  Freq Skew  Offset  Std Dev
ntp.local                  12   7    11     +0.000      0.019     +0ns    49ns
....
This stability is reported in the Std Dev column. With hardware timestamping enabled, stability of NTP measurements should be in tens or hundreds of nanoseconds, under normal load.
12.5.3. Configuring PTP-NTP bridge
If a highly accurate Precision Time Protocol (PTP) primary timeserver is available in a network that does not have switches or routers with PTP support, a computer may be dedicated to operate as a PTP client and a stratum-1 NTP server. Such a computer needs to have two or more network interfaces, and be close to the primary timeserver or have a direct connection to it. This will ensure highly accurate synchronization in the network.
Procedure
-
Configure the ptp4l and phc2sys programs from the
linuxptppackages to use one interface to synchronize the system clock usingPTP.
Configure
chronydto provide the system time using the other interface:bindaddress 203.0.113.74 hwtimestamp enp1s0 local stratum 1Restart the chronyd service:
# systemctrl restart chronyd
12.6. Achieving some settings previously supported by NTP in chrony
Some settings that were in previous major version of Red Hat Enterprise Linux supported by ntp, are not supported by chrony. The following sections list such settings, and describe ways to achieve them on a system with chrony.
12.6.1. Monitoring by ntpq and ntpdc
chronyd cannot be monitored by the ntpq and ntpdc utilities from the ntp distribution, because chrony does not support the NTP modes 6 and 7. It supports a different protocol and chronyc is the client implementation. For more information, see the chronyc(1) man page on your system.
To monitor the status of the system clock sychronized by chronyd, you can:
- Use the tracking command
-
Use the ntpstat utility, which supports chrony and provides a similar output as it used to with
ntpd
Example 12.2. Using the tracking command
$ chronyc -n tracking
Reference ID    : 0A051B0A (10.5.27.10)
Stratum         : 2
Ref time (UTC)  : Thu Mar 08 15:46:20 2018
System time     : 0.000000338 seconds slow of NTP time
Last offset     : +0.000339408 seconds
RMS offset      : 0.000339408 seconds
Frequency       : 2.968 ppm slow
Residual freq   : +0.001 ppm
Skew            : 3.336 ppm
Root delay      : 0.157559142 seconds
Root dispersion : 0.001339232 seconds
Update interval : 64.5 seconds
Leap status     : Normal
Example 12.3. Using the ntpstat utility
$ ntpstat
synchronised to NTP server (10.5.27.10) at stratum 2
   time correct to within 80 ms
   polling server every 64 s
12.6.2. Using authentication mechanism based on public key cryptography
In Red Hat Enterprise Linux 7, ntp supported Autokey, which is an authentication mechanism based on public key cryptography.
In Red Hat Enterprise Linux 8, chronyd supports Network Time Security (NTS), a modern secure authentication mechanism, instead of Autokey. For more information, see Overview of Network Time Security (NTS) in chrony.
12.6.3. Using ephemeral symmetric associations
In Red Hat Enterprise Linux 7, ntpd supported ephemeral symmetric associations, which can be mobilized by packets from peers which are not specified in the ntp.conf configuration file. In Red Hat Enterprise Linux 8, chronyd needs all peers to be specified in chrony.conf. Ephemeral symmetric associations are not supported.
Note that using the client/server mode enabled by the server or pool directive is more secure compared to the symmetric mode enabled by the peer directive.
12.6.4. multicast/broadcast client
Red Hat Enterprise Linux 7 supported the broadcast/multicast NTP mode, which simplifies configuration of clients. With this mode, clients can be configured to just listen for packets sent to a multicast/broadcast address instead of listening for specific names or addresses of individual servers, which may change over time.
In Red Hat Enterprise Linux 8, chronyd does not support the broadcast/multicast mode. The main reason is that it is less accurate and less secure than the ordinary client/server and symmetric modes.
There are several options of migration from an NTP broadcast/multicast setup:
Configure DNS to translate a single name, such as ntp.example.com, to multiple addresses of different servers
Clients can have a static configuration using only a single pool directive to synchronize with multiple servers. If a server from the pool becomes unreacheable, or otherwise unsuitable for synchronization, the clients automatically replace it with another server from the pool.
Distribute the list of
NTPservers over DHCPWhen NetworkManager gets a list of
NTPservers from the DHCP server,chronydis automatically configured to use them. This feature can be disabled by addingPEERNTP=noto the/etc/sysconfig/networkfile.Use the
Precision Time Protocol (PTP)This option is suitable mainly for environments where servers change frequently, or if a larger group of clients needs to be able to synchronize to each other without having a designated server.
PTPwas designed for multicast messaging and works similarly to theNTPbroadcast mode. APTPimplementation is available in thelinuxptppackage.PTPnormally requires hardware timestamping and support in network switches to perform well. However,PTPis expected to work better thanNTPin the broadcast mode even with software timestamping and no support in network switches.In networks with very large number of
PTPclients in one communication path, it is recommended to configure thePTPclients with thehybrid_e2eoption to reduce the amount of network traffic generated by the clients. You can configure a computer runningchronydas anNTPclient, and possiblyNTPserver, to operate also as a primaryPTPtimeserver to distribute synchronized time to a large number of computers using multicast messaging.
12.7. Overview of Network Time Security (NTS) in chrony
Network Time Security (NTS) is an authentication mechanism for Network Time Protocol (NTP), designed to scale substantial clients. It verifies that the packets received from the server machines are unaltered while moving to the client machine. Network Time Security (NTS) includes a Key Establishment (NTS-KE) protocol that automatically creates the encryption keys used between the server and its clients.
NTS is not compatible with the FIPS and OSPP profile. When you enable the FIPS and OSPP profile, chronyd that is configured with NTS can abort with a fatal message. You can disable the OSPP profile and FIPS mode for chronyd service by adding the GNUTLS_FORCE_FIPS_MODE=0 setting to the /etc/sysconfig/chronyd file.
12.7.1. Enabling Network Time Security (NTS) on a client
By default, Network Time Security (NTS) is not enabled. You can enable NTS in the /etc/chrony.conf. For that, perform the following steps:
Prerequisites
- The time server supports NTS.
Procedure
Edit the /etc/crony.conf file, and make the following changes:
Specify the server with the
ntsoption in addition to the recommendediburstoption.For example: server time.example.com iburst nts server nts.netnod.se iburst nts server ptbtime1.ptb.de iburst ntsAdd the following setting to avoid repeating the Network Time Security-Key Establishment (NTS-KE) session during system boot:
ntsdumpdir /var/lib/chronyAdd the following line to
/etc/sysconfig/networkto disable synchronization with Network Time Protocol (NTP) servers provided byDHCP:PEERNTP=noRestart the
chronydservice:systemctl restart chronyd
Verification
Verify if the
NTSkeys were successfully established:# chronyc -N authdata Name/IP address Mode KeyID Type KLen Last Atmp NAK Cook CLen ================================================================ time.example.com NTS 1 15 256 33m 0 0 8 100 nts.netnod.se NTS 1 15 256 33m 0 0 8 100 ptbtime1.ptb.de NTS 1 15 256 33m 0 0 8 100The
KeyID,Type, andKLenshould have non-zero values. If the value is zero, check the system log for error messages fromchronyd.Verify the client is making NTP measurements:
# chronyc -N sources

MS Name/IP address Stratum Poll Reach LastRx Last sample
=========================================================
time.example.com   3        6   377    45   +355us[ +375us] +/-   11ms
nts.netnod.se   1        6   377    44   +237us[ +237us] +/-   23ms
ptbtime1.ptb.de    1        6   377    44   -170us[ -170us] +/-   22ms
The
Reachcolumn should have a non-zero value; ideally 377. If the value rarely gets 377 or never gets to 377, it indicates that NTP requests or responses are getting lost in the network.
12.7.2. Enabling Network Time Security (NTS) on a time server
If you run your own Network Time Protocol (NTP) server, you can enable the server Network Time Security (NTS) support to facilitate its clients to synchronize securely.
If the NTP server is a client of other servers, that is, it is not a Stratum 1 server, it should use NTS or symmetric key for its synchronization.
Prerequisites
-
Server private key in
PEMformat -
Server certificate with required intermediate certificates in
PEMformat
Procedure
Edit the
/etc/chrony.conffile, and make the following changes:ntsserverkey /etc/pki/tls/private/<ntp-server.example.net>.key ntsservercert /etc/pki/tls/certs/<ntp-server.example.net>.crtSet permissions on both the private key and the certificate file that allow the chrony user to read the files, for example
# chown root:chrony /etc/pki/tls/private/<ntp-server.example.net>.key /etc/pki/tls/certs/<ntp-server.example.net>.crt # chmod 644 /etc/pki/tls/private/<ntp-server.example.net>.key /etc/pki/tls/certs/<ntp-server.example.net>.crt-
Ensure that the
ntsdumpdir /var/lib/chronysetting is present. Open the required ports in firewalld:
# firewall-cmd --permanent --add-port={323/udp,4460/tcp}
# firewall-cmd --reload
Restart the
chronydservice:# systemctl restart chronyd
Verification
Perform a test from a client machine:
$ chronyd -Q -t 3 'server

ntp-server.example.net iburst nts maxsamples 1'
2021-09-15T13:45:26Z chronyd version 4.1 starting (+CMDMON +NTP +REFCLOCK +RTC +PRIVDROP +SCFILTER +SIGND +ASYNCDNS +NTS +SECHASH +IPV6 +DEBUG)
2021-09-15T13:45:26Z Disabled control of system clock
2021-09-15T13:45:28Z System clock wrong by 0.002205 seconds (ignored)
2021-09-15T13:45:28Z chronyd exiting
The
System clock wrongmessage indicates the NTP server is accepting NTS-KE connections and responding with NTS-protected NTP messages.Verify the NTS-KE connections and authenticated NTP packets observed on the server:
# chronyc serverstats

NTP packets received       : 7
NTP packets dropped        : 0
Command packets received   : 22
Command packets dropped    : 0
Client log records dropped : 0
NTS-KE connections accepted: 1
NTS-KE connections dropped : 0
Authenticated NTP packets: 7
If the value of the
NTS-KE connections acceptedandAuthenticated NTP packetsfield is a non-zero value, it means that at least one client was able to connect to the NTS-KE port and send an authenticated NTP request.
Chapter 13. Using langpacks
Langpacks are meta-packages which install extra add-on packages containing translations, dictionaries and locales for every package installed on the system.
On a Red Hat Enterprise Linux 8 system, langpacks installation is based on the langpacks-<langcode> language meta-packages and RPM weak dependencies (Supplements tag).
There are two prerequisites to be able to use langpacks for a selected language. If these prerequisites are fulfilled, the language meta-packages pull their langpack for the selected language automatically in the transaction set.
Prerequisites
The
langpacks-<langcode>language meta-package for the selected language has been installed on the system.On Red Hat Enterprise Linux 8, the langpacks meta packages are installed automatically with the initial installation of the operating system using the Anaconda installer, because these packages are available in the in Application Stream repository.
For more information, see Checking languages that provide langpacks.
- The base package, for which you want to search the locale packages, has already been installed on the system.
13.1. Checking languages that provide langpacks
Folow this procedure to check which languages provide langpacks.
Procedure
Execute the following command:
# yum list langpacks-*
13.2. Working with RPM weak dependency-based langpacks
This section describes multiple actions that you may want to perform when querying RPM weak dependency-based langpacks, installing or removing language support.
13.2.1. Listing already installed language support
To list the already installed language support, use this procedure.
Procedure
Execute the following command:
# yum list installed langpacks*
13.2.2. Checking the availability of language support
To check if language support is available for any language, use the following procedure.
Procedure
- Execute the following command:
# yum list available langpacks*13.2.3. Listing packages installed for a language
To list what packages get installed for any language, use the following procedure:
Procedure
Execute the following command:
# yum repoquery --whatsupplements langpacks-<locale_code>
13.2.4. Installing language support
To add new a language support, use the following procedure.
Procedure
Execute the following command:
# yum install langpacks-<locale_code>
13.2.5. Removing language support
To remove any installed language support, use the following procedure.
Procedure
Execute the following command:
# yum remove langpacks-<locale_code>
13.3. Saving disk space by using glibc-langpack-
Currently, all locales are stored in the /usr/lib/locale/locale-archive file, which requires a lot of disk space.
On systems where disk space is a critical issue, such as containers and cloud images, or only a few locales are needed, you can use the glibc locale langpack packages (glibc-langpack-<locale_code>).
To install locales individually, and thus gain a smaller package installation footprint, use the following procedure.
Procedure
Execute the following command:
# yum install glibc-langpack-<locale_code>
When installing the operating system with Anaconda, glibc-langpack-<locale_code> is installed for the language you used during the installation and also for the languages you selected as additional languages. Note that glibc-all-langpacks, which contains all locales, is installed by default, so some locales are duplicated. If you installed glibc-langpack-<locale_code> for one or more selected languages, you can delete glibc-all-langpacks after the installation to save the disk space.
Note that installing only selected glibc-langpack-<locale_code> packages instead of glibc-all-langpacks has impact on run time performance.
If disk space is not an issue, keep all locales installed by using the glibc-all-langpacks package.
Chapter 14. Dumping a crashed kernel for later analysis
To analyze why a system crashed, use the kdump service to save the contents of the system’s memory for later analysis. Configure kdump using the RHEL web console or the corresponding RHEL system role.
14.1. What is kdump
kdump provides a crash dumping mechanism that generates a vmcore file containing system memory contents for analysis. It uses kexec to boot into a reserved second kernel without a reboot. The crashed kernel’s memory is captured accurately, as a result.
A kernel crash dump can be the only information available if a system failure occur. Therefore, operational kdump is important in mission-critical environments. Red Hat advises to regularly update and test kexec-tools in your normal kernel update cycle. This is important when you install new kernel features.
If you have multiple kernels on a machine, you can enable kdump for all installed kernels or for specified kernels only. When you install kdump, the system creates a default /etc/kdump.conf file. /etc/kdump.conf includes the default minimum kdump configuration, which you can edit to customize the kdump configuration.
14.2. Configuring kdump memory usage and target location in web console
You can configure the memory reserve for the kdump kernel and also specify the target location to capture the vmcore dump file with the RHEL web console interface.
Prerequisites
- The web console must be installed and accessible. For details, see Installing the web console.
Procedure
-
In the web console, open the tab and start the
kdumpservice by setting the Kernel crash dump switch to on. Configure the
kdumpmemory usage in the terminal, for example:$ sudo grubby --update-kernel ALL --args crashkernel=512MRestart the system to apply the changes.
- In the Kernel dump tab, click Edit at the end of the Crash dump location field.
Specify the target directory for saving the
vmcoredump file:- For a local filesystem, select Local Filesystem from the drop-down menu.
For a remote system by using the SSH protocol, select Remote over SSH from the drop-down menu and specify the following fields:
- In the Server field, enter the remote server address.
- In the SSH key field, enter the SSH key location.
- In the Directory field, enter the target directory.
For a remote system by using the NFS protocol, select Remote over NFS from the drop-down menu and specify the following fields:
- In the Server field, enter the remote server address.
- In the Export field, enter the location of the shared folder of an NFS server.
In the Directory field, enter the target directory.
NoteYou can reduce the size of the
vmcorefile by selecting the Compression checkbox.
Optional: Display the automation script by clicking View automation script.
A window with the generated script opens. You can browse a shell script and an Ansible Playbook generation options tab.
Optional: Copy the script by clicking Copy to clipboard.
You can use this script to apply the same configuration on multiple machines.
Verification
- Click .
Click Crash system under Test kdump settings.
WarningWhen you start the system crash, the kernel operation stops and results in a system crash with data loss.
14.3. kdump using RHEL system roles
RHEL system roles is a collection of Ansible roles and modules that provide a consistent configuration interface to remotely manage multiple RHEL systems. With the kdump role, you can set the basic kernel dump parameters on multiple systems.
The kdump role replaces the kdump configuration of the managed hosts entirely by replacing the /etc/kdump.conf file. Additionally, if the kdump role is applied, all previous kdump settings are also replaced, even if they are not specified by the role variables, by replacing the /etc/sysconfig/kdump file.
The following example playbook shows how to apply the kdump system role to set the location of the crash dump files:
---
- hosts: kdump-test
  vars:
    kdump_path: /var/crash
  roles:
    - rhel-system-roles.kdump
For a detailed reference on kdump role variables, install the rhel-system-roles package, and see the README.md or README.html files in the /usr/share/doc/rhel-system-roles/kdump directory.
Chapter 15. Recovering and restoring a system
To back up and restore your system, Red Hat Enterprise Linux provides the Relax-and-Recover (ReaR) utility.
You can use ReaR as a disaster recovery solution and also for system migration.
By using ReaR, you can perform the following tasks:
- Produce a system backup and a bootable image, and use the image to restore the system from an existing backup.
- Replicate the original storage layout.
- Restore user and system files.
- Restore the system to different hardware.
Additionally, for disaster recovery, you can also integrate certain backup software with ReaR.
15.1. Setting up ReaR and manually creating a backup
To create a rescue system, first install the packages for the Relax-and-Recover (ReaR) utility, adjust ReaR settings, and manually generate a system backup. This prepares your system for potential disaster recovery operations.
Prerequisites
The necessary configurations based on your backup restore plan are ready.
NoteThe following steps use the
NETFSbackup method in example configurations. This method is fully-integrated and built-in with ReaR, and produces a backup in a location specified by theBACKUP_URLconfiguration setting. By default it uses the systemtarutility to create a backup archive namedbackup.tar.gz.You are using the Intel 64 or AMD64 (x86-64) hardware architecture, or the IBM POWER little-endian (ppc64le) architecture.
If you are using the IBM Z architecture, see Using a ReaR rescue image on the 64-bit IBM Z architecture.
ReaR currently does not support the 64-bit ARM architecture.
Procedure
Install the ReaR utility:
# yum install rearModify the ReaR configuration file in an editor of your choice, for example:
# vi /etc/rear/local.confAdd the backup setting details to
/etc/rear/local.conf. For example, in the case of theNETFSbackup method, add the following lines:BACKUP=NETFS OUTPUT=ISO BACKUP_URL=<data-backup-location> OUTPUT_URL=<rescue-image-location>Replace <data-backup-location> with the location for the
tardata backup, and <rescue-image-location> with the location for the rescue systemISOimage. For example:BACKUP=NETFS OUTPUT=ISO # Backup is stored on an external drive BACKUP_URL=file:///run/media/user/external_drive/server_backups/ # The ISO is stored on a dedicated NFS share OUTPUT_URL=nfs://backup-server.local/exports/rear/For further information on the syntax of the
/etc/rear/local.conffile and for supported formats ofBACKUP_URLandOUTPUT_URL, see therear(8)man page.For a list of configuration variables that you can use in
/etc/rear/local.conf, as well as their default values, see the/usr/share/rear/conf/default.conffile.To configure ReaR to keep the previous backup archive when the new one is created, also add the following line to the configuration file:
NETFS_KEEP_OLD_BACKUP_COPY=yTo make the backups incremental, meaning that only the changed files are backed up on each run, add the following line:
BACKUP_TYPE=incrementalIf you are planning to boot the ReaR rescue system on UEFI firmware, add the following line to ensure the boot does not fail:
SECURE_BOOT_BOOTLOADER=/boot/efi/EFI/redhat/shimx64.efi
Create a rescue system and data backup based on your restore plan. For example, when using the
NETFSbackup method, run the following command:# rear mkbackup-
If you need to create only the rescue system, use the
rear mkrescuecommand instead -
If you need to create only the data backup, use the
rear mkbackuponlycommand instead.
-
If you need to create only the rescue system, use the
Optional: Schedule regular automatic ReaR backup. You can use a variety of backup methods, based on your use case. For example:
Adjust the
/etc/cron.d/rearcrontab file to regularly perform therear mkbackupcommand:30 1 * * * /usr/sbin/rear mkbackupNoteBy default setting in the
/etc/cron.d/rearfile runs therear mkrescuecommand automatically at 1:30 AM every day to create a rescue system. However, the default setting does not create a backup of the data.- If you use an external backup method, schedule an external backup. The details depend on the backup method that you are using in ReaR.
Verification
Burn the ISO image of the rescue system to a DVD, and attempt to use the DVD to boot.
If this displays a Relax-and-Recover interface after booting, the rescue DVD works correctly.
- Use the ReaR interface to restore the system, and test that the restored system works.
15.2. Using a ReaR rescue image on the 64-bit IBM Z architecture
To quickly recover and restore systems running on the IBM Z architecture, you can use the Relax-and-Recover (ReaR) rescue image.
ReaR provides basic functionality on the 64-bit IBM Z architecture and is fully supported in RHEL 8.8 and later. You can create a ReaR rescue image on IBM Z only in the z/VM environment. Backing up and recovering logical partitions (LPARs) is not supported.
ReaR on the 64-bit IBM Z architecture is supported only with the rear package version 2.6-9.el8 or later. Earlier versions are available as a Technology Preview feature only. For more information about the support scope of Red Hat Technology Preview features, see https://access.redhat.com/support/offerings/techpreview.
The only output method currently available is Initial Program Load (IPL). IPL produces a kernel and an initial RAM disk (initrd) that can be used with the zIPL boot loader.
Procedure
Install ReaR:
# yum install rearAdd the following variables to the
/etc/rear/local.conffile to configure ReaR for producing a rescue image on the 64-bit IBM Z architecture:-
To configure the
IPLoutput method, add the`OUTPUT=IPL` line to the configuration. To configure the backup method and destination, add
BACKUPandBACKUP_URLvariables. For example:BACKUP=NETFS BACKUP_URL=nfs://<nfsserver name>/<share path>ImportantLocal backup storage is currently not supported on the 64-bit IBM Z architecture.
-
Optional: You can also configure the
OUTPUT_URLvariable to save the kernel andinitrdfiles. By default, theOUTPUT_URLis aligned withBACKUP_URL.
-
To configure the
To perform backup and rescue image creation:
# rear mkbackupThis creates the kernel and initrd files at the location specified by the
BACKUP_URLorOUTPUT_URL(if set) variable, and a backup using the specified backup method.-
To recover the system, use the ReaR kernel and initrd files created in the previous step, and boot from a Direct Attached Storage Device (DASD) or a Fibre Channel Protocol (FCP)-attached SCSI device prepared with the
ziplboot loader, kernel, andinitrd. For more information, see Booting the RHEL installation by using a prepared DASD. -
When the rescue kernel and
initrdare booted, the ReaR rescue environment starts. Proceed with the system recovery.
Next steps
15.3. Recovering your system by using ReaR
To recover your RHEL system on new hardware after a failure of the current hardware, use the Relax-and-Recover (ReaR) utility.
Prerequisites
- You have set up ReaR and created a backup. For instructions, see Setting up ReaR and manually creating a backup.
- You have a set of working hardware on which you want to run the system after you recover it.
The hard disk on which you plan to recover your system does not contain any critical data.
ImportantRecovering a system on a hard disk by using ReaR erases all data currently stored on the disk.
Procedure
- Boot the rescue system on the new hardware. For example, you can burn the ISO image of the rescue system to a DVD, and boot from the DVD.
- In the Relax-and-Recover boot menu, select the option to boot to the recovery environment.
In the
RESCUEprompt, run therear recovercommand.The rescue system recreates the partition layout and file systems.
Restore user and system files from the data backup into the
/mnt/local/directory.For example, if you used the
NETFSmethod to create the backup, ReaR automatically performs the restoration process. However, based on your backup settings, ReaR might still require your confirmation in certain points of the restoration.
15.4. Modifying the content of the ReaR backup
When creating a rescue system and data backup by using the Relax-and-Recover (ReaR) utility, certain files and storage components are not included in the backups. To adjust what data and devices are excluded from the backups, modify ReaR configuration.
When creating the rescue image, ReaR creates the /var/lib/rear/layout/disklayout.conf layout file, and embeds the file in the rescue image.
During the recovery process, ReaR uses the layout file to recreate the storage layout of the original system, where the rescue image has been produced, on the disks of the recovered system. The storage layout includes partitions, volume groups, logical volumes, file systems, and other storage components.
Prerequisites
- You have set up ReaR on your system. For instructions, see Setting up ReaR and manually creating a backup.
Procedure
Generate the current layout file.
# rear savelayoutOpen the layout file to examine its configuration. For example:
# vi /var/lib/rear/layout/disklayout.confTo exclude specific files or storage devices from the backup, you can configure ReaR to ignore them when creating the rescue image.
Open the ReaR local configuration file for editing. For example:
# vi /etc/rear/local.confAdjust which storage devices will be excluded from the layout file. You can use a variety of
excludevariables in the/etc/rear/local.conffile, including the following:-
AUTOEXCLUDE_DISKS -
AUTOEXCLUDE_MULTIPATH -
AUTOEXCLUDE_PATH -
EXCLUDE_RECREATE
For information on the functions and syntax of these variables, as well as of the layout file, see the
Layout configurationchapter in the ReaR user guide. This guide is installed with therearpackage, and is available at/usr/share/doc/rear/relax-and-recover-user-guide.html.-
By default, when a local disk-based file system is included in the layout file, all files on that file system are backed up when you use the
rear mkbackuporrear mkbackuponlycommands.To configure specific files or a directory tree to be excluded from the backup, use the
BACKUP_PROG_EXCLUDEvariable.The value of
BACKUP_PROG_EXCLUDEmust be an array of glob(3)-style wildcard patterns that tar or rsync uses. Note that you must quote the patterns in order to prevent their expansion by the shell when it reads the configuration file.The default value of this variable is set in the
/usr/share/rear/conf/default.conffile. The default value contains, for example, the/tmp/*pattern that excludes all the files and directories under the/tmpdirectory, but not the/tmpdirectory itself.If you need to exclude other files and directories, append further patterns to the variable. To ensure that the default values are preserved, do not override the variable.
For example, to exclude all files and directories under the directory
/data/temp, use:BACKUP_PROG_EXCLUDE+=( '/data/temp/*' )NoteWhen you exclude all files and directories in a single mounted file system this way, ReaR recreates the file system during recovery, but it will be empty. You can use this for file systems that contain temporary data and do not require preserving, or for data that is backed up by using methods independent of ReaR.
Verification
To ensure that the layout file includes only the required storage components, do the following:
Re-generate the layout file.
# rear savelayoutOpen the new layout file and make sure that your configuration changes had the intended effect.
# vi /var/lib/rear/layout/disklayout.conf
To ensure that the backup excludes specific files, use the
rear mkbackupcommand. This lists the backup exclude patterns in the log.You can find the log file in the
/var/log/reardirectory. Use this to verify the exclude rules before performing a full system recovery. For example, the log can contain the following entries:2025-04-29 10:17:41.312431050 Making backup (using backup method NETFS) 2025-04-29 10:17:41.314369109 Backup include list (backup-include.txt contents): 2025-04-29 10:17:41.316197323 / 2025-04-29 10:17:41.318052001 Backup exclude list (backup-exclude.txt contents): 2025-04-29 10:17:41.319857125 /tmp/* 2025-04-29 10:17:41.321644442 /dev/shm/* 2025-04-29 10:17:41.323436363 /var/lib/rear/output/*In this example, the entire root file system is included in the backup, with the exception of all files and directories under the
/tmp,/dev/shmand/var/lib/rear/outputdirectories.
Chapter 16. Installing and using dynamic programming languages
For developing and running applications, Red Hat provides runtime languages such as Python, PHP, and Tcl/Tk.
16.1. Introduction to Python
Python is a high-level programming language that supports multiple programming paradigms, such as object-oriented, imperative, functional, and procedural paradigms. Python has dynamic semantics and can be used for general-purpose programming.
With Red Hat Enterprise Linux, many packages that are installed on the system, such as packages providing system tools, tools for data analysis, or web applications, are written in Python. To use these packages, you must have the python* packages installed.
16.1.1. Python versions
Two incompatible versions of Python are widely used, Python 2.x and Python 3.x. RHEL 8 provides the following versions of Python.
| Version | Package to install | Command examples | Available since | Life cycle |
|---|---|---|---|---|
| Python 3.11 |
|
| RHEL 8.8 | shorter |
| Python 3.12 |
|
| RHEL 8.10 | shorter |
For details about the length of support, see Red Hat Enterprise Linux Life Cycle and Red Hat Enterprise Linux Application Streams Life Cycle.
Python 3.11 and Python 3.12 are distributed as suites of non-modular RPM packages, including the python3.11 and python3.12 packages.
You can install multiple Python versions in parallel on the same RHEL 8 system.
Always specify the version of Python when installing it, invoking it, or otherwise interacting with it. For example, use python3 instead of python in package and command names. All Python-related commands must also include the version, for example, pip3, pip2, pip3.11, or pip3.12.
The unversioned python command (/usr/bin/python) is not available by default in RHEL 8. You can configure it using the alternatives command; for instructions, see Configuring the unversioned Python
Any manual changes to /usr/bin/python, except changes made using the alternatives command, might be overwritten upon an update.
As a system administrator, use Python 3 for the following reasons:
- Python 3 represents the main development direction of the Python project.
- Support for Python 2 in the upstream community ended in 2020.
- Popular Python libraries are discontinuing Python 2 support in upstream.
-
Python 2 in Red Hat Enterprise Linux 8 will have a shorter life cycle and aims to facilitate a smoother transition to
Python 3for customers.
For developers, Python 3 has the following advantages over Python 2:
- Python 3 enables you to write expressive, maintainable, and correct code more easily.
- Code written in Python 3 will have greater longevity.
-
Python 3 has new features, including
asyncio, f-strings, advanced unpacking, keyword-only arguments, and chained exceptions.
However, legacy software might require /usr/bin/python to be configured to Python 2. For this reason, no default python package is distributed with Red Hat Enterprise Linux 8, and you can choose between using Python 2 and 3 as /usr/bin/python, as described in Configuring the unversioned Python.
System tools in Red Hat Enterprise Linux 8 use Python version 3.6 provided by the internal platform-python package, which is not intended to be used directly by customers. Use the python3.11 command from the python3.11 package.
Do not remove the platform-python package from RHEL 8 because other packages require it.
16.1.2. Notable differences between Python versions
Python 3.6, 3.11, and 3.12 in RHEL 8 differ in system bindings and in how virtual environments are created. Use the python36 module when you need full compatibility with system tools; use venv rather than virtualenv for Python 3.11 and 3.12.
- Python bindings
-
The
python3.11andpython3.12package suites do not include the same bindings to system tools (RPM, DNF, SELinux, and others) that are provided for thepython36module. Therefore, usepython36in instances where the highest compatibility with the base operating system or binary compatibility is necessary. In unique instances where system bindings are necessary together with later versions of various Python modules, use thepython36module in combination with third-party upstream Python modules installed throughpipinto Python’svenvorvirtualenvenvironments. - Python 3.11 and Python 3.12 virtual environments must be created using
venvinstead ofvirtualenv -
The
virtualenvutility in RHEL 8, provided by thepython3-virtualenvpackage, is not compatible with Python 3.11 and Python 3.12. An attempt to create a virtual environment by usingvirtualenvwill fail with an error message, for example:
$ virtualenv -p python3.11 venv3.11
Running virtualenv with interpreter /usr/bin/python3.11
ERROR: Virtual environments created by virtualenv < 20 are not compatible with Python 3.11.
ERROR: Use python3.11 -m venv instead.
To create Python 3.11 or Python 3.12 virtual environments, use the python3.11 -m venv or python3.12 -m venv commands instead, which use the venv module from the standard library.
16.2. Installing and using Python
In Red Hat Enterprise Linux 8, Python 3 is distributed in python3.11 and python3.12 package suites in the AppStream repository.
Using the unversioned python command to install or run Python does not work by default due to ambiguity. Always specify the version of Python, or configure the system default version by using the alternatives command.
16.2.1. Installing Python 3
You can install the python3.11 and python3.12 package suites in parallel.
You can install Python 3.11 and Python 3.12, including packages built for each version, in parallel on the same system, with the exception of the mod_wsgi module. Due to a limitation of the Apache HTTP Server, only one of the python3.11-mod_wsgi or python3.12-mod_wsgi packages can be installed on a system.
Procedure
To install Python 3.11 from the
python3.11RPM package, use:# yum install python3.11To install Python 3.12 from the
python3.12RPM package, use:# yum install python3.12
Verification
To verify the Python version installed on your system, use the
--versionoption with thepythoncommand specific for your required version of Python.For Python 3.11:
$ python3.11 --versionFor Python 3.12:
$ python3.12 --version
16.2.2. Installing additional Python 3 packages
Packages with add-on modules for Python 3.11 include the python3.11- prefix, and packages for Python 3.12 include the python3.12- prefix. Always include the prefix when installing additional Python packages, as shown in the examples below.
Procedure
To install the
pippackage installer from Python 3.11, use:# yum install python3.11-pipTo install the
pippackage installer from Python 3.12, use:# yum install python3.12-pip
16.2.3. Installing additional Python 3 tools for developers
Additional Python tools for developers are distributed mostly through the CodeReady Linux Builder (CRB) repository in the python3.11-* or python3.12-* packages.
The CRB repository provides:
The
python3.11-*packages, which include:-
python3.11-pytestand its dependencies -
python3.11-idle -
python3.11-debug -
python3.11-Cython
-
-
The
python3.12-*packages, which include a similar set of packages aspython3.11-*.
The content in the CodeReady Linux Builder repository is unsupported by Red Hat.
Not all upstream Python-related packages are available in RHEL.
To install the python3*-pytest package, use the following procedure.
Procedure
Enable the CodeReady Linux Builder repository:
# subscription-manager repos --enable codeready-builder-for-rhel-8-x86_64-rpmsInstall the
python3*-pytestpackage:For Python 3.11:
# yum install python3.11-pytestFor Python 3.12:
# yum install python3.12-pytest
16.2.4. Migrating from Python 2 to Python 3
As a developer, you may want to migrate your former code that is written in Python 2 to Python 3.
For more information about how to migrate large code bases to Python 3, see The Conservative Python 3 Porting Guide.
Note that after this migration, the original Python 2 code becomes interpretable by the Python 3 interpreter and stays interpretable for the Python 2 interpreter as well.
16.2.5. Using Python
When running the Python interpreter or Python-related commands, always specify the version.
Prerequisites
- Ensure that the required version of Python is installed.
If you want to download and install third-party applications for Python 3.11 or Python 3.12, install the
python3.11-piporpython3.12-pippackage.WarningInstalling Python packages with
pipas the root user places files in system locations. This can override RHEL libraries and might cause system instability or conflicts with supported packages. Red Hat does not support software installed by usingpipat the system level. To avoid these issues, usepipwithin a virtual environment or install packages as a non-root user with the--useroption.
Procedure
To run the Python 3.11 interpreter or related commands, use, for example:
$ python3.11
$ python3.11 -m venv --help
$ python3.11 -m pip install package
$ pip3.11 install package
To run the Python 3.12 interpreter or related commands, use, for example:
$ python3.12
$ python3.12 -m venv --help
$ python3.12 -m pip install package
$ pip3.12 install package
16.3. Configuring the unversioned Python
System administrators can configure the unversioned python command, located at /usr/bin/python, by using the alternatives command. Note that the required package, python3, python38, python39, python3.11, python3.12, must be installed before configuring the unversioned command to the respective version.
The /usr/bin/python executable is controlled by the alternatives system. Any manual changes may be overwritten upon an update.
Additional Python-related commands, such as pip3, do not have configurable unversioned variants.
16.3.1. Configuring the unversioned python command directly
You can configure the unversioned python command directly to a selected version of Python.
Prerequisites
- Ensure that the required version of Python is installed.
Procedure
To configure the unversioned
pythoncommand to Python 3.11, use:# alternatives --set python /usr/bin/python3.11To configure the unversioned
pythoncommand to Python 3.12, use:# alternatives --set python /usr/bin/python3.12
16.3.2. Configuring the unversioned python command to the required Python version interactively
You can configure the unversioned python command to the required Python version interactively.
Prerequisites
- Ensure that the required version of Python is installed.
Procedure
To configure the unversioned
pythoncommand interactively, use:# alternatives --config python- Select the required version from the provided list.
To reset this configuration and remove the unversioned
pythoncommand, use:# alternatives --auto python
16.4. Packaging Python 3 RPMs
Most Python projects use Setuptools for packaging, and define package information in the setup.py file. For more information about Setuptools packaging, see the Setuptools documentation.
You can also package your Python project into an RPM package, which provides the following advantages compared to Setuptools packaging:
- Specification of dependencies of a package on other RPMs (even non-Python)
Cryptographic signing
With cryptographic signing, content of RPM packages can be verified, integrated, and tested with the rest of the operating system.
16.4.1. The spec file description for a Python package
A spec file contains instructions that the rpmbuild utility uses to build an RPM. The instructions are included in a series of sections. A spec file has two main parts in which the sections are defined:
- Preamble (contains a series of metadata items that are used in the Body)
- Body (contains the main part of the instructions)
An RPM SPEC file for Python projects has some specifics compared to non-Python RPM SPEC files. Most notably, a name of any RPM package of a Python library must always include the prefix determining the version, for example, python3.11 for Python 3.11, or python3.12 for Python 3.12.
Other specifics are shown in the following spec file example for the python3-detox package. For description of such specifics, see the notes below the example.
%global modname detox
Name: python3-detox
Version:        0.12
Release:        4%{?dist}
Summary:        Distributing activities of the tox tool
License:        MIT
URL:            https://pypi.io/project/detox
Source0:        https://pypi.io/packages/source/d/%{modname}/%{modname}-%{version}.tar.gz

BuildArch:      noarch

BuildRequires:  python36-devel
BuildRequires:  python3-setuptools
BuildRequires:  python36-rpm-macros
BuildRequires:  python3-six
BuildRequires:  python3-tox
BuildRequires:  python3-py
BuildRequires:  python3-eventlet

%?python_enable_dependency_generator
%description

Detox is the distributed version of the tox python testing tool. It makes efficient use of multiple CPUs by running all possible activities in parallel.
Detox has the same options and configuration that tox has, so after installation you can run it in the same way and with the same options that you use for tox.

    $ detox

%prep
%autosetup -n %{modname}-%{version}

%build
%py3_build
%install
%py3_install

%check
%{__python3} setup.py test
%files -n python3-%{modname}
%doc CHANGELOG
%license LICENSE
%{_bindir}/detox
%{python3_sitelib}/%{modname}/
%{python3_sitelib}/%{modname}-%{version}*

%changelog
...- 1
- The modname macro contains the name of the Python project. In this example it is
detox. - 2
- When packaging a Python project into RPM, the
python3prefix always needs to be added to the original name of the project. The original name here isdetoxand the name of the RPM ispython3-detox. - 3
- BuildRequires specifies what packages are required to build and test this package. In BuildRequires, always include items providing tools necessary for building Python packages:
python36-develandpython3-setuptools. Thepython36-rpm-macrospackage is required so that files with/usr/bin/python3interpreter directives are automatically changed to/usr/bin/python3.6. - 4
- Every Python package requires some other packages to work correctly. Such packages need to be specified in the
specfile as well. To specify the dependencies, you can use the %python_enable_dependency_generator macro to automatically use dependencies defined in thesetup.pyfile. If a package has dependencies that are not specified using Setuptools, specify them within additionalRequiresdirectives. - 5
- The %py3_build and %py3_install macros run the
setup.py buildandsetup.py installcommands, respectively, with additional arguments to specify installation locations, the interpreter to use, and other details. - 6
- The check section provides a macro that runs the correct version of Python. The %{__python3} macro contains a path for the Python 3 interpreter, for example
/usr/bin/python3. We recommend to always use the macro rather than a literal path.
16.4.2. Common macros for Python 3 RPMs
In a spec file, always use the macros that are described in the following Macros for Python 3 RPMs table rather than hardcoding their values.
In macro names, always use python3 instead of unversioned python. Configure the particular Python 3 version in the BuildRequires section of the SPEC file to python36-rpm-macros, python38-rpm-macros, python39-rpm-macros, python3.11-rpm-macros, or python3.12-rpm-macros.
| Macro | Normal Definition | Description |
|---|---|---|
| %{__python3} | /usr/bin/python3 | Python 3 interpreter |
| %{python3_version} | 3.6 | The full version of the Python 3 interpreter. |
| %{python3_sitelib} | /usr/lib/python3.6/site-packages | Where pure-Python modules are installed. |
| %{python3_sitearch} | /usr/lib64/python3.6/site-packages | Where modules containing architecture-specific extensions are installed. |
| %py3_build |
Runs the | |
| %py3_install |
Runs the |
16.4.3. Automatic provides for Python RPMs
When packaging a Python project, make sure that the following directories are included in the resulting RPM if these directories are present:
-
.dist-info -
.egg-info -
.egg-link
From these directories, the RPM build process automatically generates virtual pythonX.Ydist provides, for example, python3.6dist(detox). These virtual provides are used by packages that are specified by the %python_enable_dependency_generator macro.
16.5. Handling interpreter directives in Python scripts
In Red Hat Enterprise Linux 8, executable Python scripts are expected to use interpreter directives (also known as hashbangs or shebangs) that explicitly specify at a minimum the major Python version. For example:
#!/usr/bin/python3
#!/usr/bin/python3.6
#!/usr/bin/python3.8
#!/usr/bin/python3.9
#!/usr/bin/python3.11
#!/usr/bin/python3.12
The /usr/lib/rpm/redhat/brp-mangle-shebangs buildroot policy (BRP) script is run automatically when building any RPM package, and attempts to correct interpreter directives in all executable files.
The BRP script generates errors when encountering a Python script with an ambiguous interpreter directive, such as:
#!/usr/bin/pythonor
#!/usr/bin/env python16.5.1. Modifying interpreter directives in Python scripts
Modify interpreter directives in the Python scripts that cause the build errors at RPM build time.
Prerequisites
- Some of the interpreter directives in your Python scripts cause a build error.
Procedure
To modify interpreter directives, complete one of the following tasks:
Apply the
pathfix.pyscript from theplatform-python-develpackage:# pathfix.py -pn -i %{__python3} PATH …Note that multiple
PATHscan be specified. If aPATHis a directory,pathfix.pyrecursively scans for any Python scripts matching the pattern^[a-zA-Z0-9_]+\.py$, not only those with an ambiguous interpreter directive. Add this command to the%prepsection or at the end of the%installsection.-
Modify the packaged Python scripts so that they conform to the expected format. For this purpose,
pathfix.pycan be used outside the RPM build process, too. When runningpathfix.pyoutside an RPM build, replace%{__python3}from the example above with a path for the interpreter directive, such as/usr/bin/python3.
If the packaged Python scripts require a version other than Python 3.11, adjust the preceding commands to include the required version.
16.5.2. Changing /usr/bin/python3 interpreter directives in your custom packages
By default, interpreter directives in the form of /usr/bin/python3 are replaced with interpreter directives pointing to Python from the platform-python package, which is used for system tools with Red Hat Enterprise Linux. You can change the /usr/bin/python3 interpreter directives in your custom packages to point to a specific version of Python that you have installed from the AppStream repository.
Procedure
To build your package for a specific version of Python, add the
python*-rpm-macrossubpackage of the respectivepythonpackage to the BuildRequires section of thespecfile. For example, for Python 3.11, include the following line:BuildRequires: python311-rpm-macrosAs a result, the
/usr/bin/python3interpreter directives in your custom package are automatically converted to/usr/bin/python3.11.
To prevent the BRP script from checking and modifying interpreter directives, use the following RPM directive:
%undefine __brp_mangle_shebangs16.6. Using the PHP scripting language
Hypertext Preprocessor (PHP) is a general-purpose scripting language mainly used for server-side scripting, which enables you to run the PHP code using a web server.
In RHEL 8, the PHP scripting language is provided by the php module, which is available in multiple streams (versions).
Depending on your use case, you can install a specific profile of the selected module stream:
-
common- The default profile for server-side scripting using a web server. It includes several widely used extensions. -
minimal- This profile installs only the command line for scripting with PHP without using a web server. -
devel- This profile includes packages from thecommonprofile and additional packages for development purposes.
16.6.1. Installing the PHP scripting language
You can install a selected version of the php module.
Procedure
To install a
phpmodule stream with the default profile, use:# yum module install php:streamReplace stream with the version of PHP you wish to install.
For example, to install PHP 8.0:
# yum module install php:8.0The default
commonprofile installs also thephp-fpmpackage, and preconfigures PHP for use with theApache HTTP Serverornginx.To install a specific profile of a
phpmodule stream, use:# yum module install php:stream/profileReplace stream with the desired version and profile with the name of the profile you wish to install.
For example, to install PHP 8.0 for use without a web server:
# yum module install php:8.0/minimal
16.6.2. Using the PHP scripting language with a web server
16.6.2.1. Using PHP with the Apache HTTP Server
In Red Hat Enterprise Linux 8, the Apache HTTP Server runs PHP by using FastCGI Process Manager (FPM) by default. Install and configure Apache with PHP.
Prerequisites
The PHP scripting language is installed on your system.
Procedure
Install the
httpdmodule:# yum module install httpd:2.4Start the
Apache HTTP Server:# systemctl start httpd-
Or, if the
Apache HTTP Serveris already running on your system, restart thehttpdservice after installing PHP:
-
Or, if the
# systemctl restart httpdStart the
php-fpmservice:# systemctl start php-fpmOptional: Enable both services to start at boot time:
# systemctl enable php-fpm httpdTo obtain information about your PHP settings, create the
index.phpfile with the following content in the/var/www/html/directory:# echo '<?php phpinfo(); ?>' > /var/www/html/index.phpTo run the
index.phpfile, point the browser to:http://<hostname>/Optional: Adjust configuration if you have specific requirements:
-
/etc/httpd/conf/httpd.conf- generichttpdconfiguration -
/etc/httpd/conf.d/php.conf- PHP-specific configuration forhttpd -
/usr/lib/systemd/system/httpd.service.d/php-fpm.conf- by default, thephp-fpmservice is started withhttpd -
/etc/php-fpm.conf- FPM main configuration -
/etc/php-fpm.d/www.conf- defaultwwwpool configuration
-
Example 16.1. Running a "Hello, World!" PHP script using the Apache HTTP Server
Create a
hellodirectory for your project in the/var/www/html/directory:# mkdir helloCreate a
hello.phpfile in the/var/www/html/hello/directory with the following content:# <!DOCTYPE html> <html> <head> <title>Hello, World! Page</title> </head> <body> <?php echo 'Hello, World!'; ?> </body> </html>Start the
Apache HTTP Server:# systemctl start httpdTo run the
hello.phpfile, point the browser to:http://<hostname>/hello/hello.php
As a result, a web page with the “Hello, World!" text is displayed.
16.6.2.2. Using PHP with the nginx web server
You can run PHP code through the nginx web server. The steps below show how to install and configure nginx with PHP.
Prerequisites
The PHP scripting language is installed on your system.
Procedure
Install an
nginxmodule stream. Replace stream with the version ofnginxyou wish to install (for example, 1.18):# yum module install nginx:stream# yum module install nginx:1.18Start the
nginxserver, or if it is already running, restart thenginxservice after installing PHP:# systemctl start nginx# systemctl restart nginxStart the
php-fpmservice:# systemctl start php-fpmOptional: Enable both services to start at boot time:
# systemctl enable php-fpm nginxTo obtain information about your PHP settings, create the
index.phpfile with the following content in the/usr/share/nginx/html/directory:# echo '<?php phpinfo(); ?>' > /usr/share/nginx/html/index.phpTo run the
index.phpfile, point the browser to:http://<hostname>/Optional: Adjust configuration if you have specific requirements:
-
/etc/nginx/nginx.conf-nginxmain configuration -
/etc/nginx/conf.d/php-fpm.conf- FPM configuration fornginx -
/etc/php-fpm.conf- FPM main configuration -
/etc/php-fpm.d/www.conf- defaultwwwpool configuration
-
Example — Running a "Hello, World!" PHP script: Create a
hellodirectory for your project in the/usr/share/nginx/html/directory:# mkdir helloCreate a
hello.phpfile in the/usr/share/nginx/html/hello/directory with the following content:# <!DOCTYPE html> <html> <head> <title>Hello, World! Page</title> </head> <body> <?php echo 'Hello, World!'; ?> </body> </html>Start the
nginxserver:# systemctl start nginxTo run the
hello.phpfile, point the browser to:http://<hostname>/hello/hello.phpAs a result, a web page with the “Hello, World!" text is displayed.
16.6.3. Running a PHP script using the command line
Run a PHP script from the command line to automate tasks or test code without using a web server.
If you want to run php scripts using only command-line, install the minimal profile of a php module stream.
See Installing the PHP scripting language.
Prerequisites
The PHP scripting language is installed on your system.
Procedure
In a text editor, create a
filename.phpfileReplace filename with the name of your file.
Execute the created
filename.phpfile from the command line:# php filename.phpExample — Running a "Hello, World!" PHP script: Create a
hello.phpfile with the following content using a text editor:<?php echo 'Hello, World!'; ?>Execute the
hello.phpfile from the command line. "Hello, World!" is printed:# php hello.php
16.7. Getting started with Tcl/Tk
16.7.1. Introduction to Tcl/Tk
Tool command language (Tcl) is a dynamic programming language. The interpreter for this language, together with the C library, is provided by the tcl package.
Using Tcl paired with Tk (Tcl/Tk) enables creating cross-platform GUI applications. Tk is provided by the tk package.
Note that Tk can refer to any of the following:
- A programming toolkit for multiple languages
- A Tk C library bindings available for multiple languages, such as C, Ruby, Perl and Python
- A wish interpreter that instantiates a Tk console
- A Tk extension that adds a number of new commands to a particular Tcl interpreter
For more information about Tcl/Tk, see the Tcl/Tk manual or Tcl/Tk documentation web page.
16.7.2. Notable changes in Tcl/Tk 8.6
Red Hat Enterprise Linux 7 used Tcl/Tk 8.5. With Red Hat Enterprise Linux 8, Tcl/Tk version 8.6 is provided in the Base OS repository.
Major changes in Tcl/Tk 8.6 compared to Tcl/Tk 8.5 are:
- Object-oriented programming support
- Stackless evaluation implementation
- Enhanced exceptions handling
- Collection of third-party packages built and installed with Tcl
- Multi-thread operations enabled
- SQL database-powered scripts support
- IPv6 networking support
- Built-in Zlib compression
List processing
Two new commands,
lmapanddict mapare available, which allow the expression of transformations over Tcl containers.Stacked channels by script
Two new commands,
chan pushandchan popare available, which allow to add or remove transformations to or from I/O channels.
Major changes in Tk include:
- Built-in PNG image support
Busy windows
A new command,
tk busyis available, which disables user interaction for a window or a widget and shows the busy cursor.- New font selection dialog interface
- Angled text support
- Moving things on a canvas support
For the detailed list of changes between Tcl 8.5 and Tcl 8.6, see Changes in Tcl/Tk 8.6.
16.7.3. Migrating to Tcl/Tk 8.6
Red Hat Enterprise Linux 7 used Tcl/Tk 8.5. With Red Hat Enterprise Linux 8, Tcl/Tk version 8.6 is provided in the Base OS repository.
This section describes migration path to Tcl/Tk 8.6 for:
- Developers writing Tcl extensions or embedding Tcl interpreter into their applications
- Users scripting tasks with Tcl/Tk
16.7.3.1. Migration path for developers of Tcl extensions
To make your code compatible with Tcl 8.6, use the following procedure.
Procedure
Rewrite the code to use the
interpstructure. For example, if your code readsinterp→errorLine, rewrite it to use the following function:Tcl_GetErrorLine(interp)This is necessary because Tcl 8.6 limits direct access to members of the
interpstructure.To make your code compatible with both Tcl 8.5 and Tcl 8.6, use the following code snippet in a header file of your C or C++ application or extension that includes the Tcl library:
# include <tcl.h>
# if !defined(Tcl_GetErrorLine)
# define Tcl_GetErrorLine(interp) (interp→errorLine)
# endif
16.7.3.2. Migration path for users scripting their tasks with Tcl/Tk
In Tcl 8.6, most scripts work the same way as with the previous version of Tcl.
To migrate you code into Tcl 8.6, use this procedure.
Procedure
When writing a portable code, make sure to not use the commands that are no longer supported in Tk 8.6:
tkIconList_Arrange
tkIconList_AutoScan
tkIconList_Btn1
tkIconList_Config
tkIconList_Create
tkIconList_CtrlBtn1
tkIconList_Curselection
tkIconList_DeleteAll
tkIconList_Double1
tkIconList_DrawSelection
tkIconList_FocusIn
tkIconList_FocusOut
tkIconList_Get
tkIconList_Goto
tkIconList_Index
tkIconList_Invoke
tkIconList_KeyPress
tkIconList_Leave1
tkIconList_LeftRight
tkIconList_Motion1
tkIconList_Reset
tkIconList_ReturnKey
tkIconList_See
tkIconList_Select
tkIconList_Selection
tkIconList_ShiftBtn1
tkIconList_UpDown
Note that you can check the list of unsupported commands also in the
/usr/share/tk8.6/unsupported.tclfile.