Chapter 10. Deploying the same SELinux configuration on multiple systems
You can deploy your verified SELinux configuration on multiple systems by using one of the following methods:
- Using RHEL system roles and Ansible
- Using the RHEL web console
-
Using
semanageexport and import commands in your scripts
10.1. Restoring the SELinux context on directories by using the selinux RHEL system role
To remotely reset the SELinux context on directories, you can use the selinux RHEL system role. With an incorrect SELinux context, applications can fail to access the files.
Prerequisites
- You have prepared the control node and the managed nodes.
-
The account you use to connect to the managed nodes has
sudopermissions for these nodes.
Procedure
Create a playbook file, for example,
~/playbook.yml, with the following content:--- - name: Managing SELinux hosts: managed-node-01.example.com tasks: - name: Restore SELinux context ansible.builtin.include_role: name: redhat.rhel_system_roles.selinux vars: selinux_restore_dirs: - /var/www/ - /etc/The settings specified in the example playbook include the following:
selinux_restore_dirs: <list>- Defines the list of directories on which the role should reset the SELinux context.
For details about all variables used in the playbook, see the
/usr/share/ansible/roles/rhel-system-roles.selinux/README.mdfile on the control node.Validate the playbook syntax:
$ ansible-playbook --syntax-check ~/playbook.ymlNote that this command only validates the syntax and does not protect against a wrong but valid configuration.
Run the playbook:
$ ansible-playbook ~/playbook.yml
Verification
Display the SELinux context for files or directories for which you have reset the context. For example, to display the context on the
/var/www/directory, enter:# ansible rhel9.example.com -m command -a 'ls -ldZ /var/www/' drwxr-xr-x. 4 root root system_u:object_r:httpd_sys_content_t:s0 33 Feb 28 13:20 /var/www/
10.2. Managing SELinux network port labels by using the selinux RHEL system role
If you want to run a service on a non-standard port, you must set the corresponding SELinux type label on this port to prevent SELinux denying permission to the service. By using the selinux RHEL system role, you can automate this task and remotely assign a type label on ports.
Prerequisites
- You have prepared the control node and the managed nodes.
-
The account you use to connect to the managed nodes has
sudopermissions for these nodes.
Procedure
Create a playbook file, for example,
~/playbook.yml, with the following content:--- - name: Managing SELinux hosts: managed-node-01.example.com tasks: - name: Set http_port_t label on network port ansible.builtin.include_role: name: redhat.rhel_system_roles.selinux vars: selinux_ports: - ports: <port_number> proto: tcp setype: http_port_t state: presentThe settings specified in the example playbook include the following:
ports: <port_number>- Defines the port numbers to which you want to assign the SELinux label. Separate multiple values by comma.
setype: <type_label>- Defines the SELinux type label.
For details about all variables used in the playbook, see the
/usr/share/ansible/roles/rhel-system-roles.selinux/README.mdfile on the control node.Validate the playbook syntax:
$ ansible-playbook --syntax-check ~/playbook.ymlNote that this command only validates the syntax and does not protect against a wrong but valid configuration.
Run the playbook:
$ ansible-playbook ~/playbook.yml
Verification
Display the port numbers that have the
http_port_tlabel assigned:# ansible managed-node-01.example.com -m shell -a 'semanage port --list | grep http_port_t' http_port_t tcp 80, 81, 443, <port_number>, 488, 8008, 8009, 8443, 9000
10.3. Deploying an SELinux module by using the selinux RHEL system role
If the default SELinux policies do not meet your requirements, you can create custom modules to allow your application to access the required resources. By using the selinux RHEL system role, you can automate this process and remotely deploy SELinux modules.
Prerequisites
- You have prepared the control node and the managed nodes.
-
The account you use to connect to the managed nodes has
sudopermissions for these nodes. - The SELinux module you want to deploy is stored in the same directory as the playbook.
The SELinux module is available in the Common Intermediate Language (CIL) or policy package (PP) format.
If you are using a PP module, ensure that
policydbversion on the managed nodes is the same or later than the version used to build the PP module.
Procedure
Create a playbook file, for example,
~/playbook.yml, with the following content:--- - name: Managing SELinux hosts: managed-node-01.example.com tasks: - name: Deploying a SELinux module ansible.builtin.include_role: name: redhat.rhel_system_roles.selinux vars: selinux_modules: - path: <module_file> priority: <value> state: enabledThe settings specified in the example playbook include the following:
path: <module_file>- Sets the path to the module file on the control node.
priority: <value>-
Sets the SELinux module priority.
400is the default. state: <value>Defines the state of the module:
-
enabled: Install or enable the module. -
disabled: Disable a module. -
absent: Remove a module.
-
For details about all variables used in the playbook, see the
/usr/share/ansible/roles/rhel-system-roles.selinux/README.mdfile on the control node.Validate the playbook syntax:
$ ansible-playbook --syntax-check ~/playbook.ymlNote that this command only validates the syntax and does not protect against a wrong but valid configuration.
Run the playbook:
$ ansible-playbook ~/playbook.yml
Verification
Remotely display the list of SELinux modules and filter for the one you used in the playbook:
# ansible managed-node-01.example.com -m shell -a 'semodule -l | grep <module>'If the module is listed, it is installed and enabled.
10.4. Creating an SELinux configuration Ansible playbook in the web console
In the web console, you can generate a shell script or an Ansible playbook of your SELinux configuration. In case of the Ansible playbook, you can conveniently apply the configuration on multiple systems.
Prerequisites
- You have installed the RHEL 8 web console.
- You have enabled the cockpit service.
Your user account is allowed to log in to the web console.
For instructions, see Installing and enabling the web console.
Procedure
Log in to the RHEL 8 web console.
For details, see Logging in to the web console.
- Click SELinux.
Click .
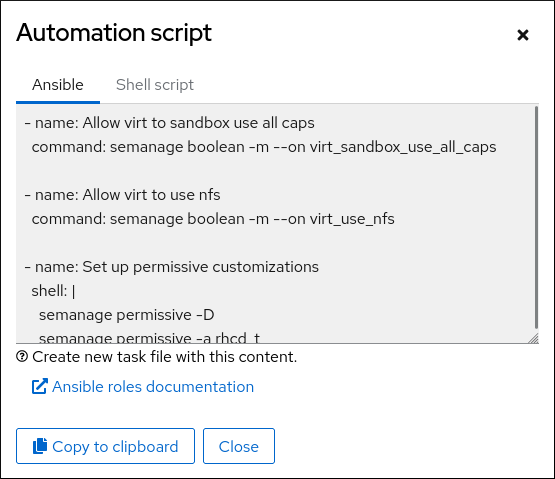
A window with the generated script opens. You can navigate between a shell script and an Ansible playbook generation options tab.
- Click the button to select the script or playbook and apply it.
As a result, you have an automation script that you can apply to more machines.
10.5. Transferring SELinux settings to another system with semanage
Use the following steps for transferring your custom and verified SELinux settings between RHEL 8-based systems.
Prerequisites
-
The
policycoreutils-python-utilspackage is installed on your system.
Procedure
Export your verified SELinux settings:
# semanage export -f ./my-selinux-settings.modCopy the file with the settings to the new system:
# scp ./my-selinux-settings.mod new-system-hostname:Log in on the new system:
$ ssh root@new-system-hostnameImport the settings on the new system:
new-system-hostname# semanage import -f ./my-selinux-settings.mod