Chapter 1. Getting started with GNOME
1.1. What GNOME 3 is
Red Hat Enterprise Linux 8 is shipped with the default desktop environment GNOME 3.
GNOME 3 represents a presentation layer that provides a graphical user interface as well as the focused working environment, which enables you to access all your work from one place.
To function properly, GNOME requires your system to support 3D acceleration. This includes bare metal systems, as well as hypervisor solutions such as VMWare.
If GNOME does not start or performs poorly on your VMWare virtual machine (VM), see Why does the GUI fail to start on my VMware virtual machine? (Red Hat Knowledgebase)
1.2. GNOME environments, back ends, and display protocols
GNOME 3 provides two user environments:
- GNOME Standard
- GNOME Classic
Both environments can use two different protocols as their graphical back ends:
- The X11 protocol, which uses X.Org as the display server.
The Wayland protocol, which uses GNOME Shell as the Wayland compositor and display server.
This solution of display server is further referred as GNOME Shell on Wayland.
The default combination in RHEL 8 is GNOME Standard environment using GNOME Shell on Wayland as the display server. However, due to certain Wayland limitations, you might want to switch the graphics protocol stack to X11. You may also want to switch from GNOME Standard to GNOME Classic.
1.3. Launching applications in GNOME
This section describes various approaches that you can use to launch available applications in GNOME 3.
1.3.1. Launching an application in GNOME Standard
This procedure launches a graphical application in the GNOME Standard user environment.
Prerequisites
- You are using the GNOME Standard environment.
Procedure
- Go to the Activities Overview screen by moving the cursor to the area of the upper-left corner and push the cursor to the screen corner. The Activities Overview menu opens automatically.
Find the application using either of the following ways:
Click the Show Applications icon in the vertical bar on the left side.
Optionally, you can choose between displaying all or just the frequent applications by using the Frequent or All switch at the bottom of the screen.
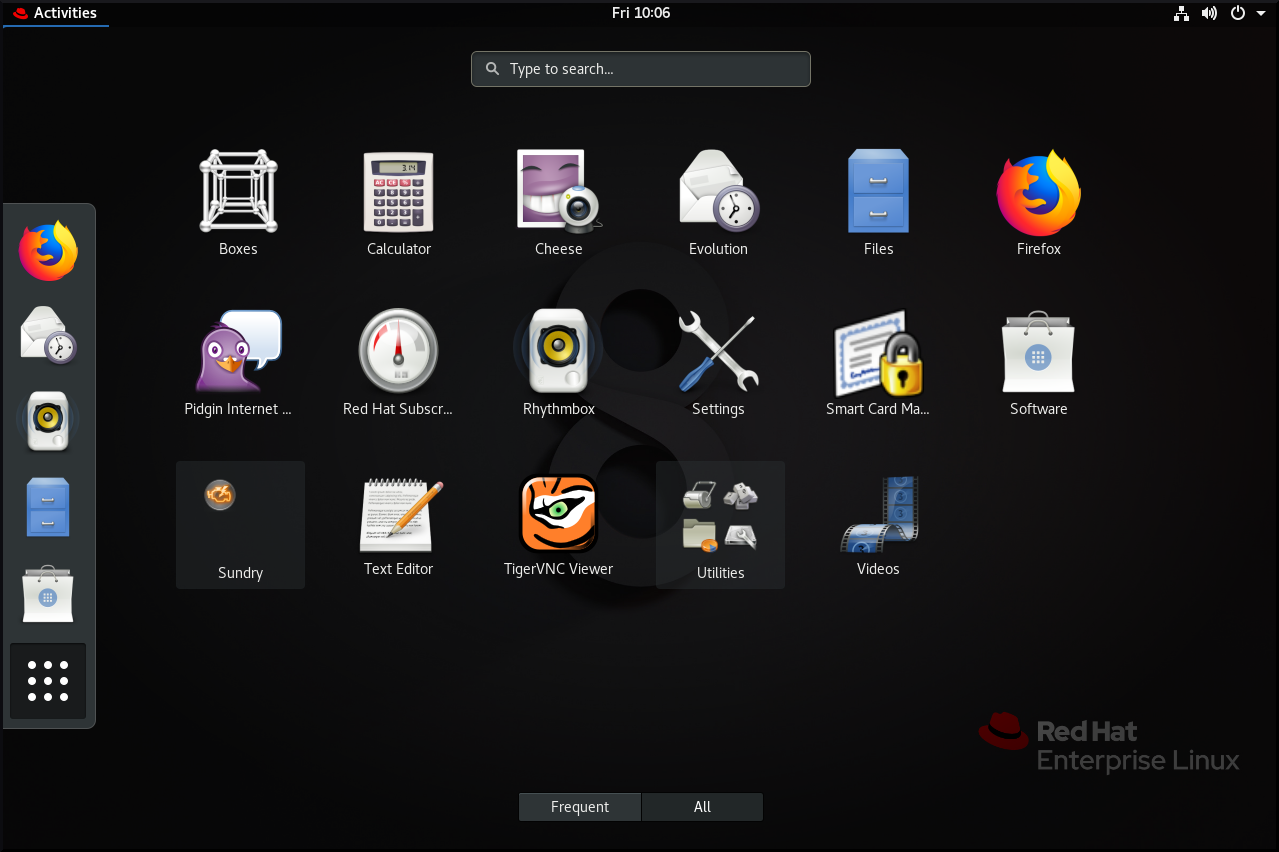
- Start typing the name of the required application in the search entry.
- Click an application from the displayed list.
1.3.2. Launching an application in GNOME Classic
This procedure launches a graphical application in the GNOME Classic user environment.
Prerequisites
- You are using the GNOME Classic environment.
Procedure
- Go to the Applications menu.
Choose the required application from the available categories, which include:
- Favorites
- Accessories
- Internet
- Office
- Sound & Video
- Sundry
- System Tools
- Utilities
1.3.3. Launching an application in GNOME using a command
This procedure launches a graphical application in GNOME by entering a command.
Prerequisites
- You know the command that starts the application.
Procedure
Open a command prompt using either of the following ways:
- Open a terminal.
Press the Alt+F2 shortcut to open the Enter a Command screen.
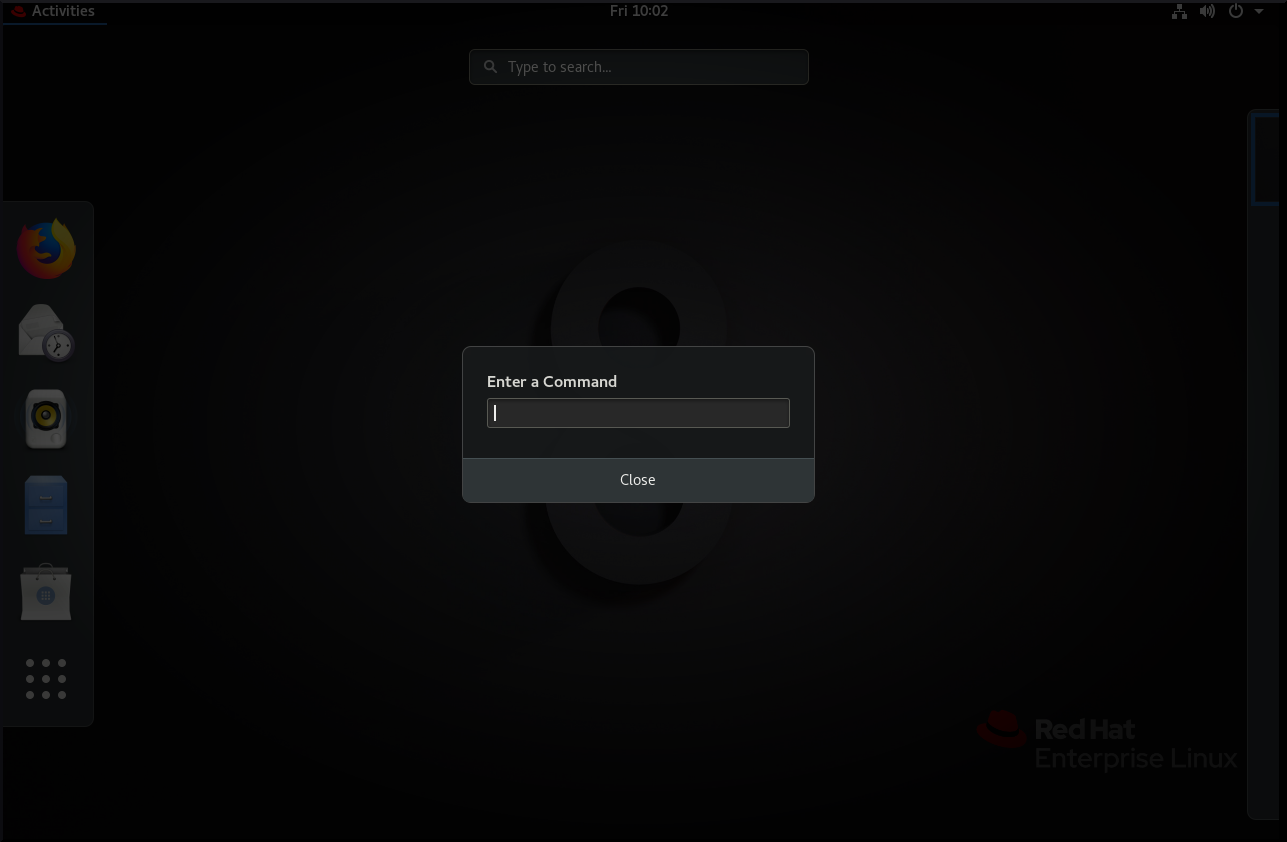
- Write the command in the command prompt.
- Confirm the command by pressing Enter.
1.4. Managing desktop icons
You can enable the desktop icons functionality and move files to the desktop.
1.4.1. Desktop icons in RHEL 8
In RHEL 8, the Files application no longer provides the desktop icons functionality. Instead, desktop icons are provided by the Desktop icons GNOME Shell extension, which is available from the gnome-shell-extension-desktop-icons package.
Desktop icons in GNOME Classic
The GNOME Classic environment includes the gnome-shell-extension-desktop-icons package by default. Desktop icons are always on, and you cannot turn them off.
Desktop icons in GNOME Standard
In GNOME Standard, desktop icons are disabled by default.
If you have only the GNOME Standard environment available, and not GNOME Classic, you must install the gnome-shell-extension-desktop-icons package.
1.4.2. Enabling desktop icons in GNOME Standard
This procedure enables the desktop icons functionality in the GNOME Standard environment.
Procedure
- Open the Tweaks application.
Select
, and enable the extension. 
1.4.3. Creating a desktop icon for a file
This procedure creates a desktop icon for an existing file.
Prerequisites
- The Desktop icons extension is enabled.
Procedure
-
Move the selected file into the
~/Desktop/directory.
Verification
- Check that the icon for the file appears on the desktop.
1.5. Disabling the hot corner functionality on GNOME Shell
The GNOME environment provides the hot corner functionality, which is enabled by default. This means that when you move the cursor to the area of the upper-left corner and push the cursor to the screen corner, the Activities Overview menu opens automatically.
However, you may want to disable this feature to not open Activities Overview unintentionally.
To do so, you can use the following tools:
- The dconf Editor application
- The gsettings command-line utility
- The No topleft hot corner extension
The selection of the tool might depend on whether you want to disable the hot corner functionality for a single user or for all users on the system. By using dconf Editor or gsettings, you can disable hot corner only for a single user. To disable hot corner system-wide, use the No topleft hot corner extension.
1.5.1. Disabling the hot corner functionality for a single user
To disable the hot corner functionality for a single user, you can use either the dconf Editor application or the gsettings command-line utility.
1.5.1.1. Disabling hot corner using dconf Editor
To disable the hot corner functionality using the dconf Editor application, follow this procedure.
This procedure disables the hot corner functionality for a single user.
Prerequisites
The dconf Editor application is installed on the system:
# yum install dconf-editor
Procedure
- Open the dconf Editor application.
-
Choose the
org.gnome.desktop.interfacemenu. Find the
enable-hot-cornersoption.This option is by default set to
On.Default settings of enable-hot-corners
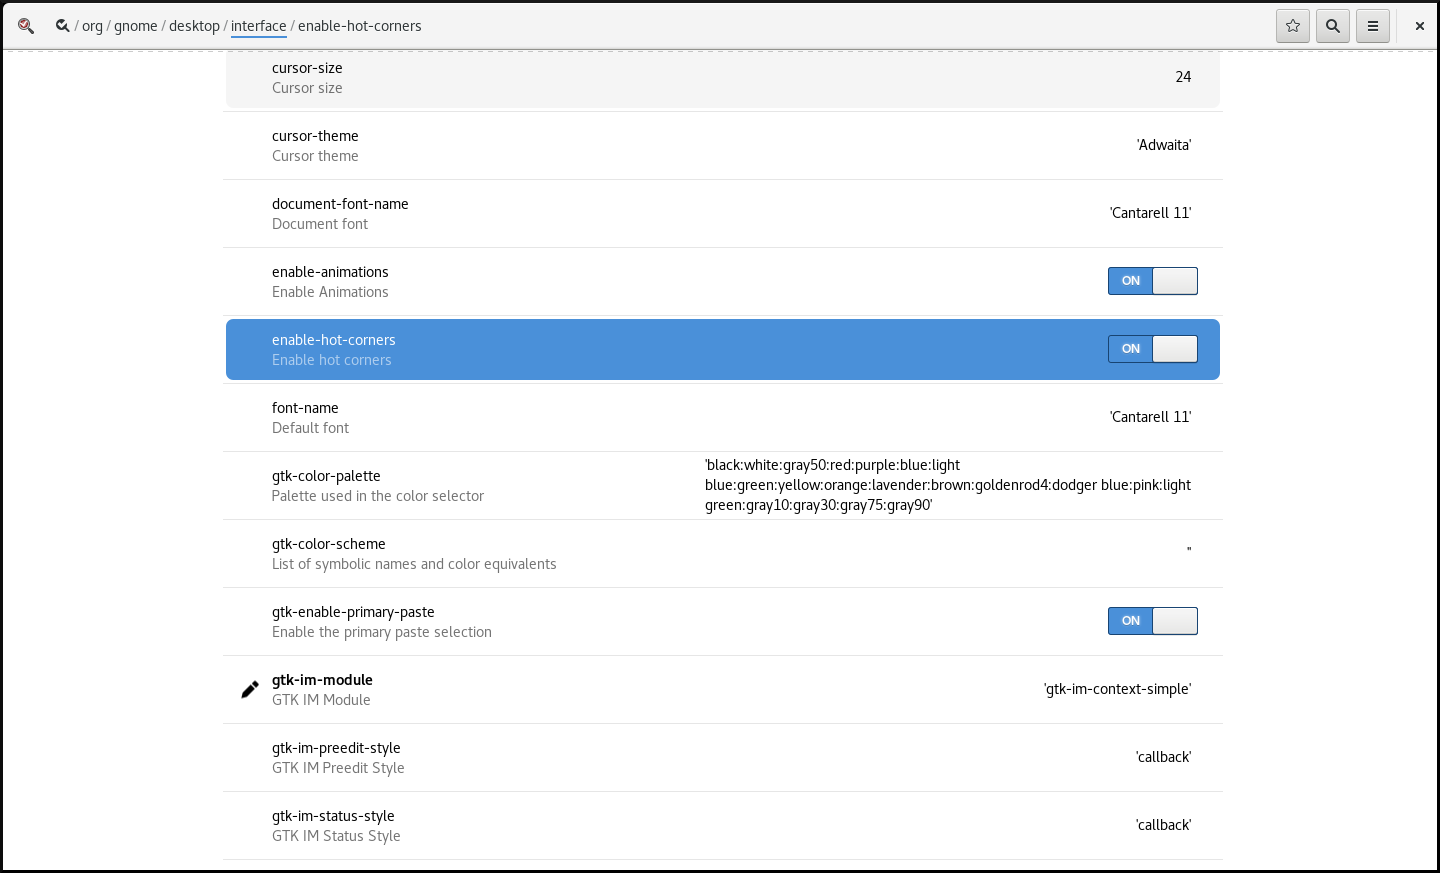
Set
enable-hot-cornerstoOff.You can do this either by:
-
Setting
enable-hot-cornerstoOffin the same window. Clicking the line with
enable-hot-corners, and proceeding to a new window.In the new window, you can switch the hot corner feature off.
Switching the hot corner functionality off
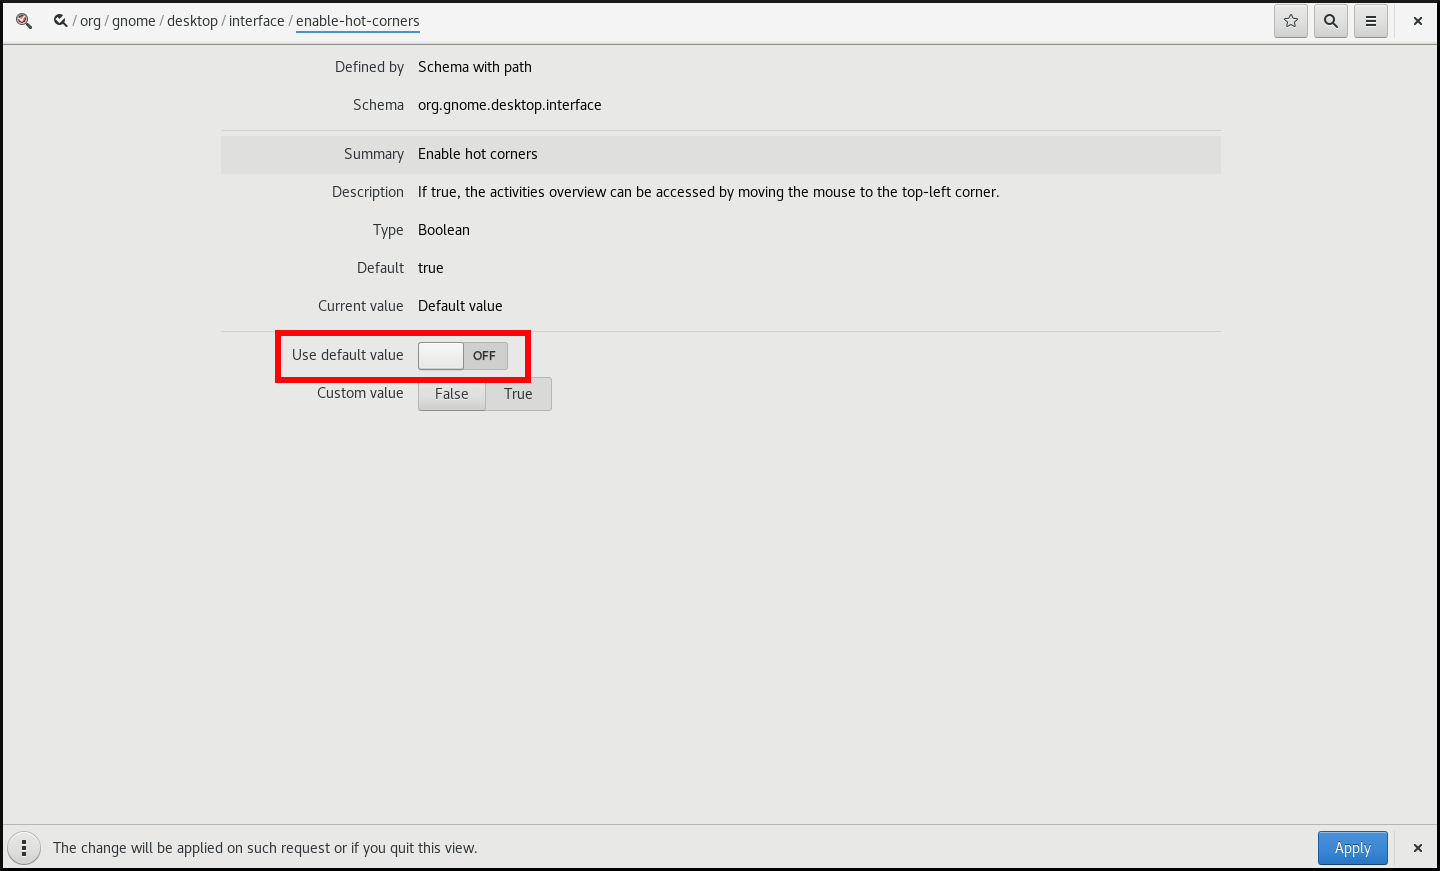
-
Setting
1.5.1.2. Disabling hot corner using gsettings
To disable the hot corner functionality using the gsettings command-line utility, follow this procedure.
This procedure disables the hot corner functionality for a single user.
Procedure
Disable the hot corner feature:
$ gsettings set org.gnome.desktop.interface enable-hot-corners false
Verification
Optionally, verify that the hot corner feature is disabled:
$ gsettings get org.gnome.desktop.interface enable-hot-corners

false
1.5.2. Disabling the hot corner functionality for all users
With the GNOME Shell extension called No topleft hot corner provided by the gnome-shell-extension-no-hot-corner package, you can disable the hot corner feature system-wide.
Prerequisites
The
gnome-shell-extension-no-hot-cornerpackage is installed on the system:# yum install gnome-shell-extension-no-hot-corner
Procedure
Enable the No topleft hot corner extension by switching it on in the Tweaks tool.
For more information about how to use Tweaks, see Section 1.10, “Customizing GNOME Shell environment with the Tweaks tool”.
- Log out, and restart the user session so that the extension can take effect.
1.6. Configuring sound in GNOME
You can configure sound volume and other sound options in GNOME.
1.6.1. Sound configuration tools in GNOME
In RHEL 8, the PulseAudio sound server handles sound output and input. PulseAudio lets programs output the audio using the pulseaudio daemon.
To configure sound, you can use one of the following graphical applications in GNOME:
System menu
The system menu is located in the top-right screen corner. It enables you only to set the intensity of the sound output or sound input through the sound bar. The sound bar for input sound is available only if you are running an application that is using an internal microphone (built-in audio), such as some teleconference tools.

GNOME Control Center
The GNOME Control Center (Settings) application provides other general options to configure sound.
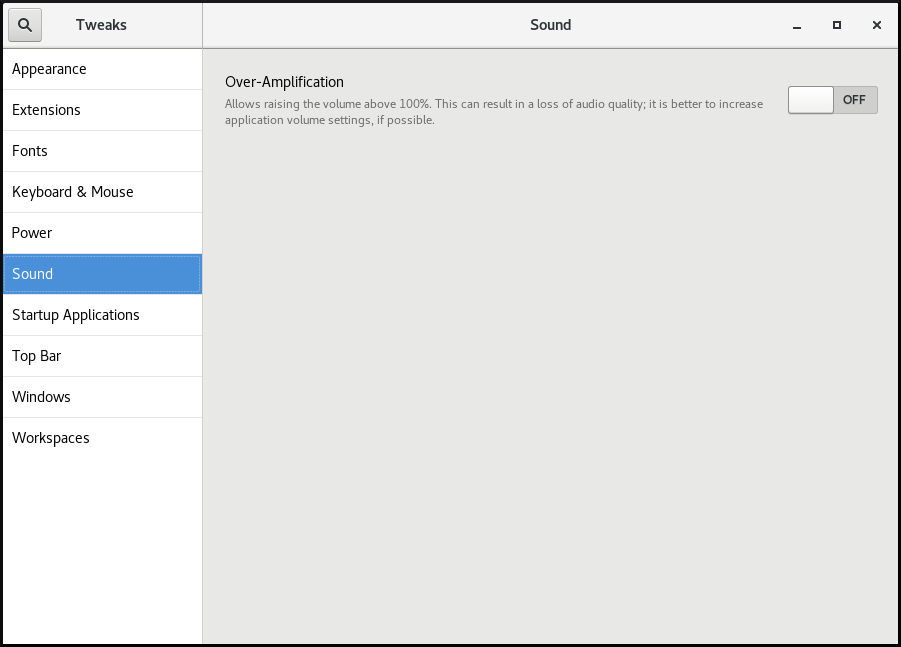
Tweaks
The Tweaks application enables you to configure only volume over-amplification.
1.6.2. Accessing sound configuration in GNOME Control Center
This procedure opens the sound configuration screen in the GNOME Control Center application.
Procedure
Launch GNOME Control Center.
You can use one of the approaches described in Section 1.3, “Launching applications in GNOME”. Alternatively, you can also launch it from the system menu by clicking on its icon.
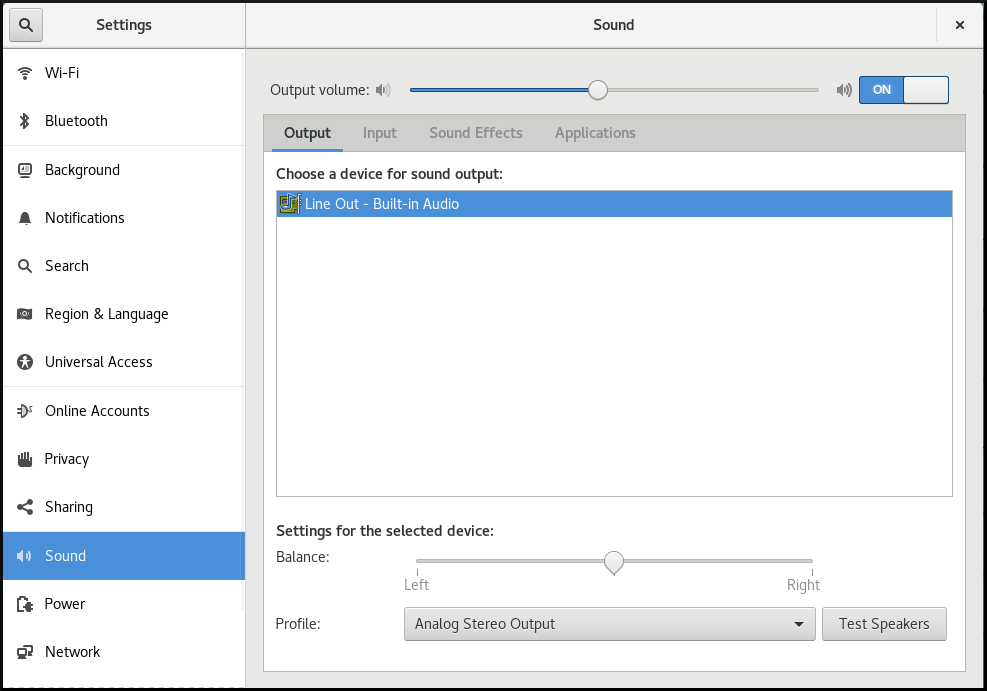
- In GNOME Control Center, choose Sound from the left vertical bar.
1.6.3. Sound options in GNOME Control Center
Through the Sound menu in GNOME Control Center, you can configure the following sound options:
- Output and Input
The Output and Input menus show only the built-in audio devices unless you connect any external device that can handle sound.
The Output menu enables you to select the required profile from available analog or digital profiles that are displayed depending on available output devices.
- Sound Effects
- The Sound Effects menu sets the volume and theme of system audio alerts.
- Applications
- The Applications menu shows all currently running applications that can process sound, and allows you to amplify or lower the sound of a particular application.
The Output tab on the sound configuration screen
1.7. Handling graphics and photos
GNOME provides multiple tools to handle graphics and photography.
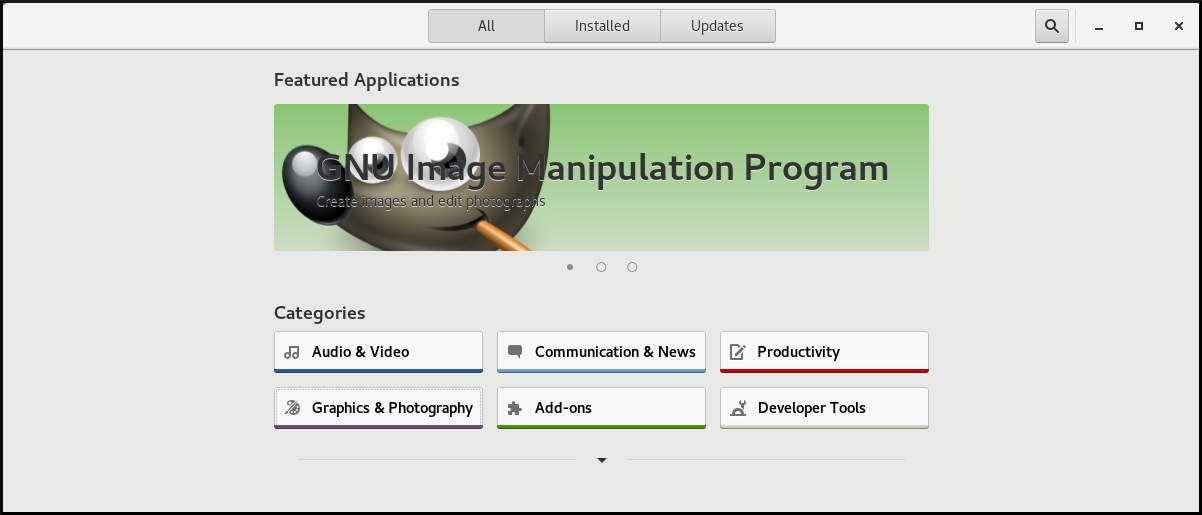
You can check the available tools under the Graphics & Photography menu in GNOME Software.
Procedure
Open GNOME Software.
-
Go to Graphics & Photography.

Browse the available tools, such as the following:
- Photos
- For accessing, organizing and sharing your photos.
- GNU Image Manipulation Program
- For creating images and editing photographs.
- Inkspace
- For creating and editing scalable vector graphics images.
- XSane
- For scanning images with a scanner.
- LibreOffice Draw
- For create and editing drawings, flow charts, and logos.
1.8. Handling printing
In GNOME, you can set up printing using the Settings application.
1.8.1. Starting the Settings application for setting up printing
Procedure
Use one of the approaches described in Section 1.3, “Launching applications in GNOME” to start the Settings application.
Moreover, you can also start the Settings application from the system menu in the top right corner by clicking on the "Settings" icon.
When the Settings application appears, go to
. Figure 1.1. Settings configuration tool
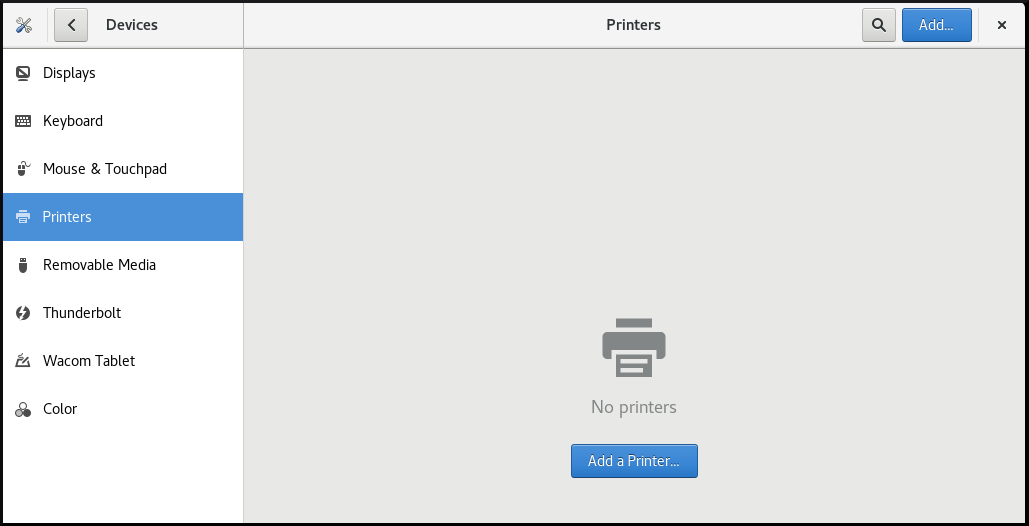
1.8.2. Adding a new printer in Settings
You can add a new printer using the Settings application.
Prerequisites
Click the button, which appears near the upper-right corner of the Printers screen, and authenticate as one of the following users:
- Superuser
-
Any user with the administrative access provided by
sudo(users listed within/etc/sudoers) -
Any user belonging to the
printadmingroup in/etc/group

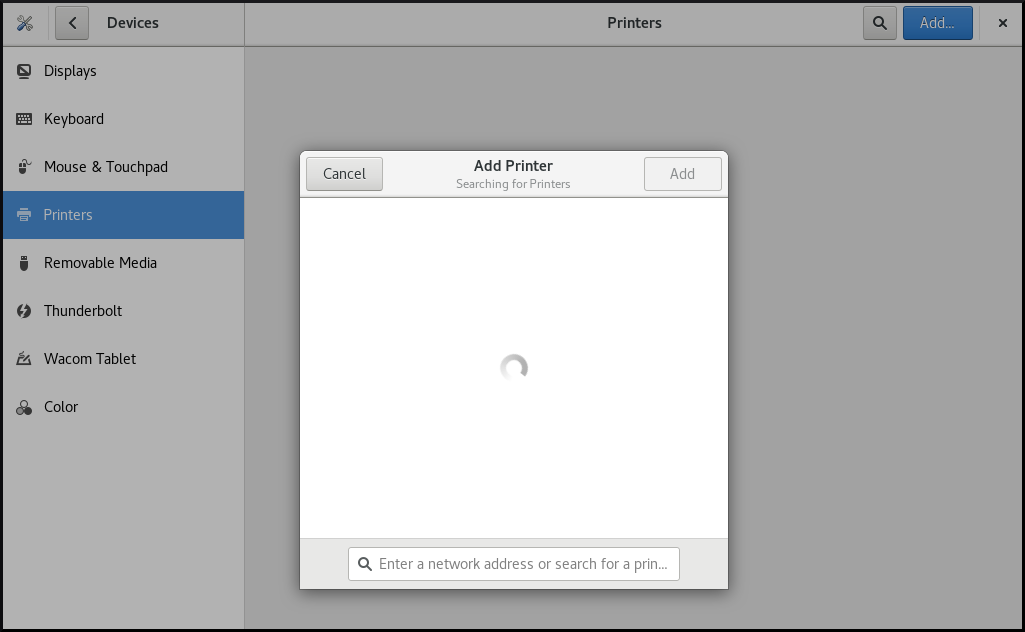
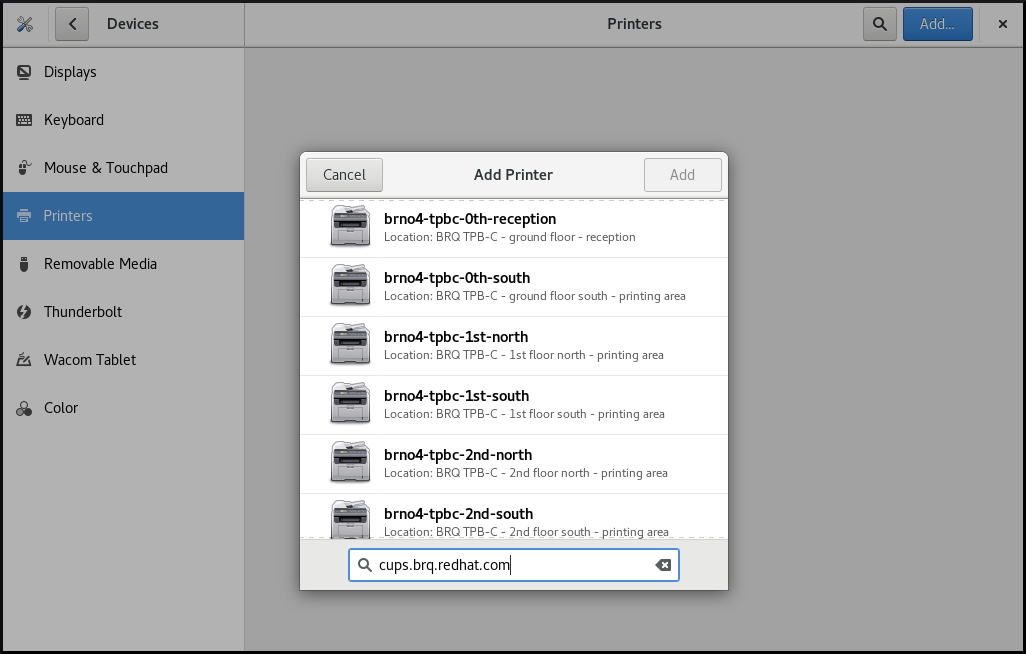
Procedure
Open the Add Printer dialog.
Select one of the available printers (including also network printers), or enter printer IP address or the host name of a printer server.
1.8.3. Configuring a printer in the Settings application
You can configure a new printer and maintain a configuration of a printer using the Settings application.
Displaying printer’s settings menu
Procedure
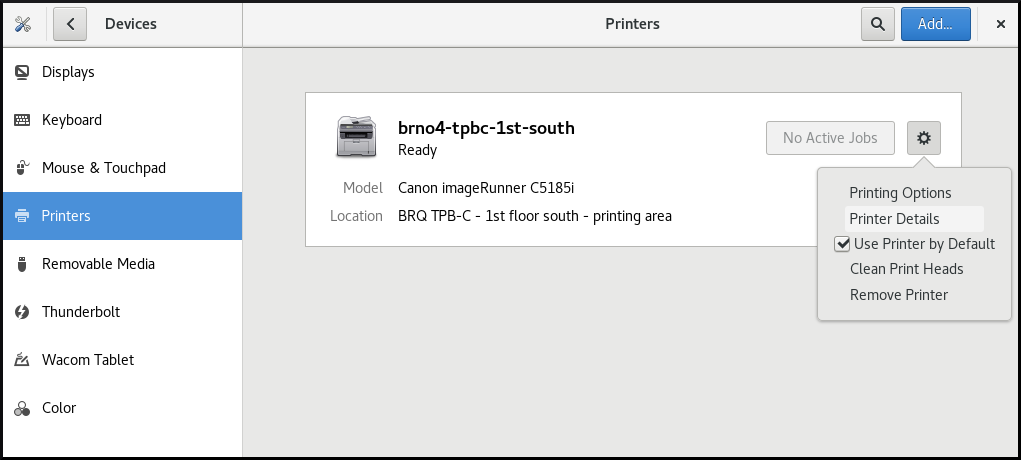
Click the settings (⚙️) button on the right to display a settings menu for the selected printer:
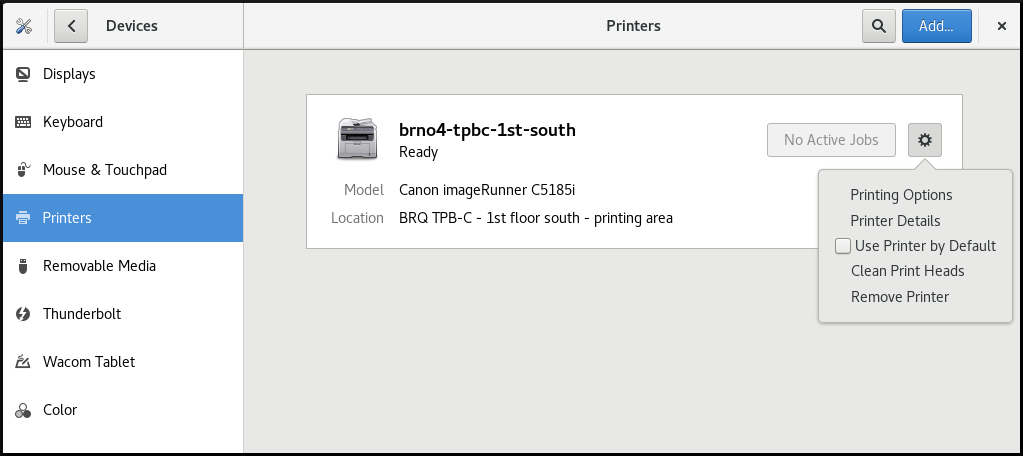
Displaying and modifying printer’s details
Procedure
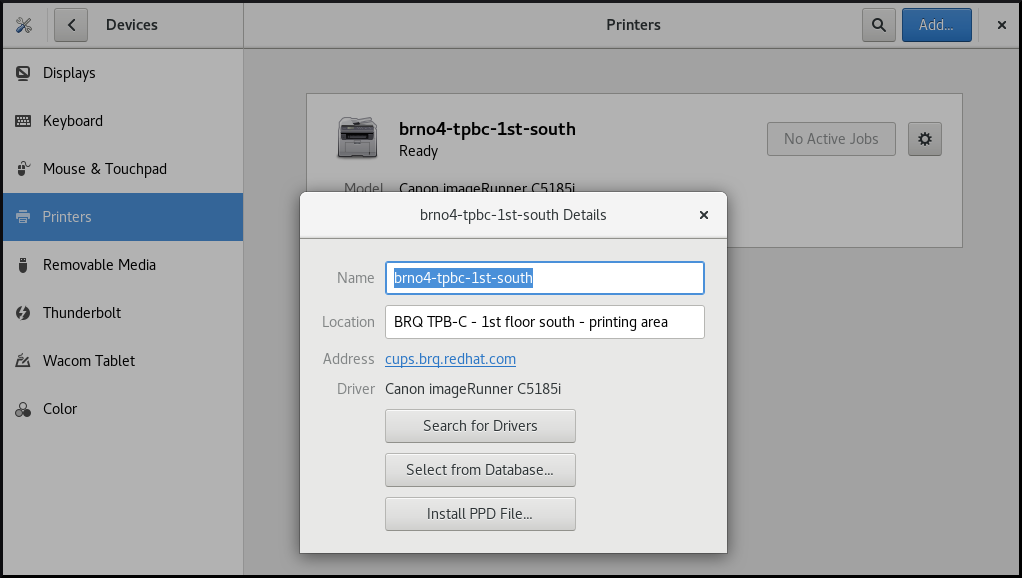
Click Printer Details to display and modify selected printer’s settings:
In this menu, you can select the following actions:
- Search for Drivers
- GNOME Control Center communicates with PackageKit that searches for a suitable driver suitable in available repositories.
- Select from Database
- This option enables you to select a suitable driver from databases that have already been installed on the system.
- Install PPD File
- This option enables you to select from a list of available postscript printer description (PPD) files that can be used as a driver for your printer.
Setting the default printer
Procedure
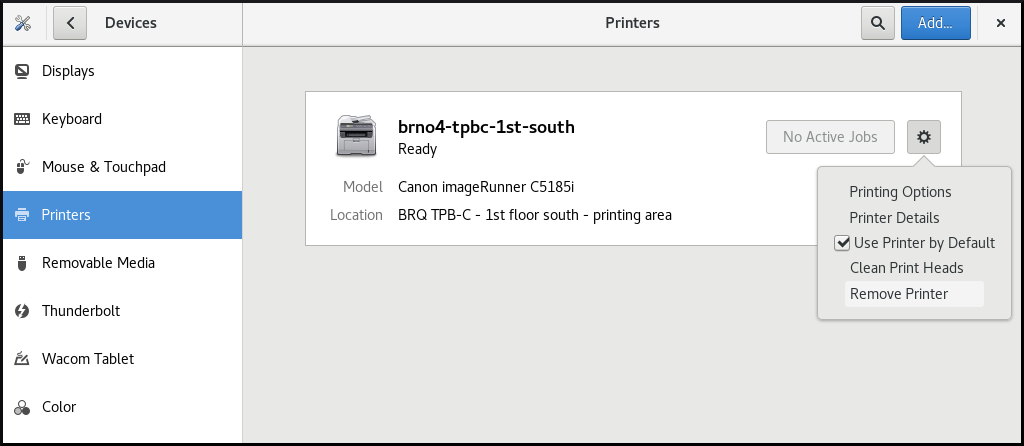
Click Use Printer by Default to set the selected printer as the default printer:

Removing a printer
Procedure
Click Remove Printer to remove the selected printer:
1.8.4. Printing a test page in the Setting application
You can print a test page to make sure that the printer functions properly.
You might want to print a test page if one of the below prerequisites is met.
Prerequisites
- A printer has been set up.
- A printer configuration has been changed.
Procedure
Click the settings (⚙️) button on the right to display a settings menu for the selected printer:
-
Click
.
1.8.5. Setting print options using the Settings application
You can set print options using the Settings application.
Procedure
Click the settings (⚙️) button on the right to display a settings menu for the selected printer:
- Click Printing Options.
1.9. Sharing media between applications
Red Hat Enterprise Linux 8 includes the PipeWire media server, which ensures access to multimedia devices and media sharing between applications.
When running a remote desktop session on GNOME Shell on Wayland, PipeWire and the VNC server is used. The functionality of remote desktop session is provided by the gnome-remote-desktop and pipewire packages.
On X.Org, just VNC is needed to run a remote desktop session. This functionality on X.Org is provided by the vino package.
PipeWire is used also with teleconference tools such as BlueJeans when running on GNOME Shell on Wayland. In such case, the pipewire service is activated automatically when you start sharing your screen within the teleconference tool.
To check the status of the pipewire service, run:
~]$ systemctl --user status pipewire1.10. Customizing GNOME Shell environment with the Tweaks tool
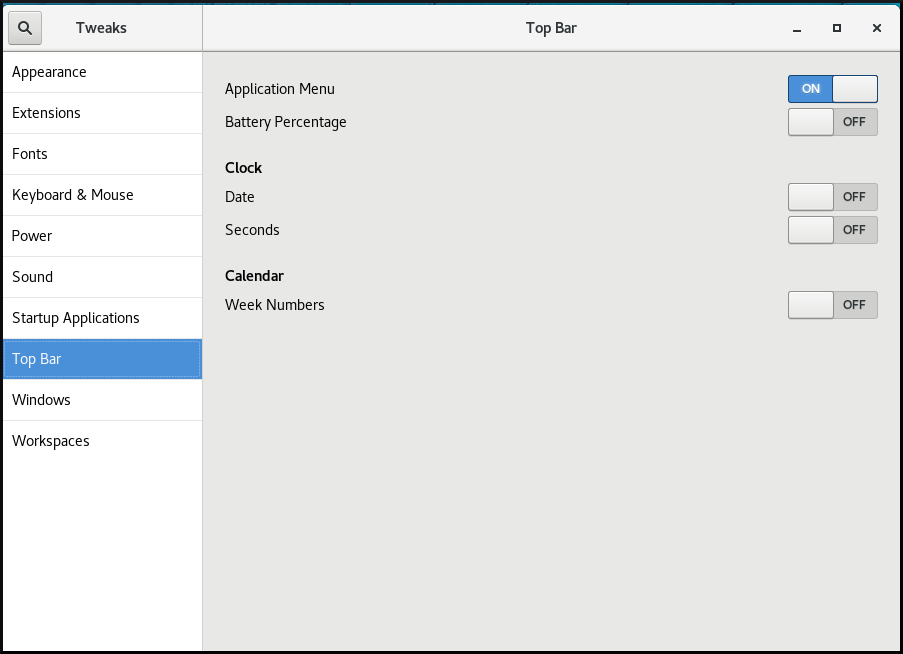
You can customize the GNOME Shell environment for a particular user by using the Tweaks tool.
Procedure
Open Tweaks.
The Tweaks tool
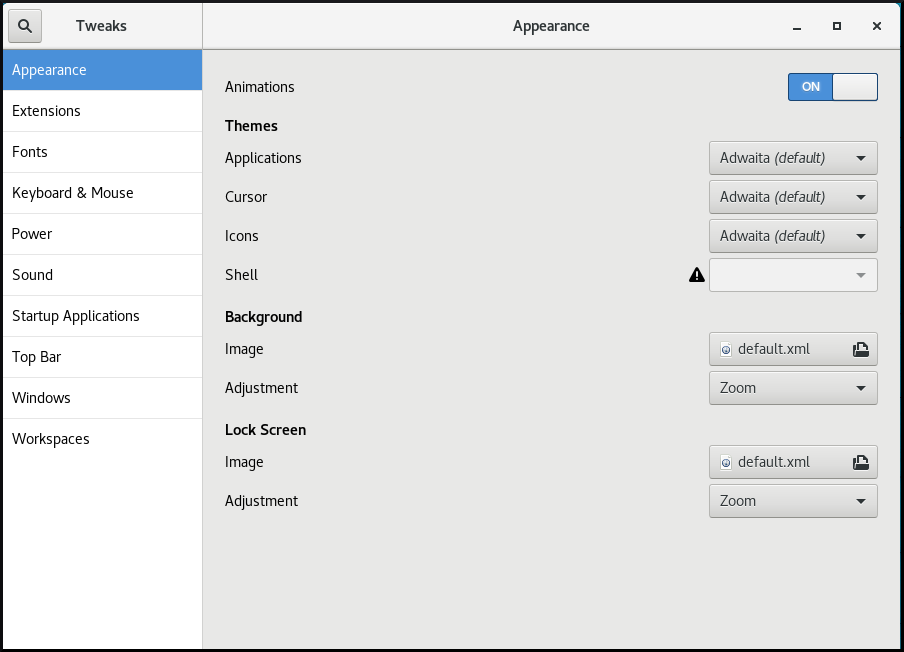
Select the item that you want to customize in the left side bar.
For example, you can set applications to start automatically when you log in by using the Startup Applications menu, or you can customize your top bar appearance by using the Top Bar menu.
Customizing startup applications in Tweaks

Customizing the appearance of your top bar in Tweaks