Managing, monitoring, and updating the kernel
A guide to managing the Linux kernel on Red Hat Enterprise Linux 9
Abstract
Providing feedback on Red Hat documentation
We are committed to providing high-quality documentation and value your feedback. To help us improve, you can submit suggestions or report errors through the Red Hat Jira tracking system.
Procedure
Log in to the Jira website.
If you do not have an account, select the option to create one.
- Click Create in the top navigation bar.
- Enter a descriptive title in the Summary field.
- Enter your suggestion for improvement in the Description field. Include links to the relevant parts of the documentation.
- Click Create at the bottom of the dialogue.
Chapter 1. The Linux kernel
Learn about the Linux kernel and the Linux kernel RPM package provided and maintained by Red Hat (Red Hat kernel). Keep the Red Hat kernel updated, which ensures the operating system has all the latest bug fixes, performance enhancements, and patches, and is compatible with new hardware.
1.1. What the kernel is
The kernel is a core part of a Linux operating system that manages the system resources and provides interface between hardware and software applications.
The Red Hat kernel is a custom-built kernel based on the upstream Linux mainline kernel that Red Hat engineers further develop and harden with a focus on stability and compatibility with the latest technologies and hardware.
Before Red Hat releases a new kernel version, the kernel needs to pass a set of rigorous quality assurance tests.
The Red Hat kernels are packaged in the RPM format so that they are easily upgraded and verified by the DNF package manager.
Kernels that are not compiled by Red Hat are not supported by Red Hat.
1.2. RPM packages
An RPM package consists of an archive of files and metadata used to install and erase these files. Specifically, the RPM package contains the following parts:
- GPG signature
- The GPG signature is used to verify the integrity of the package.
- Header (package metadata)
- The RPM package manager uses this metadata to determine package dependencies, where to install files, and other information.
- Payload
-
The payload is a
cpioarchive that contains files to install to the system.
There are two types of RPM packages. Both types share the file format and tooling, but have different contents and serve different purposes:
Source RPM (SRPM)
An SRPM contains source code and a
specfile, which describes how to build the source code into a binary RPM. Optionally, the SRPM can contain patches to source code.Binary RPM
A binary RPM contains the binaries built from the sources and patches.
1.3. The Linux kernel RPM package overview
The kernel RPM is a meta package that ensures required subpackages are properly installed, including kernel-core and kernel-modules for the Linux kernel binary and modules.
kernel-core-
Provides the binary image of the Linux kernel (
vmlinuz). kernel-modules-core- Provides the basic kernel modules to ensure core functionality. This includes the modules essential for the proper functioning of the most commonly used hardware.
kernel-modules-
Provides the remaining kernel modules that are not present in
kernel-core.
The kernel-core and kernel-modules-core subpackages together can be used in virtualized and cloud environments to provide a RHEL 9 kernel with a quick boot time and a small disk size footprint. kernel-modules subpackage is usually unnecessary for such deployments.
Optional kernel packages are for example:
kernel-modules-extra- Provides kernel modules for rare hardware. Loading of the module is disabled by default.
kernel-debug- Provides a kernel with many debugging options enabled for kernel diagnosis, at the expense of reduced performance.
kernel-tools- Provides tools for manipulating the Linux kernel and supporting documentation.
kernel-devel-
Provides the kernel headers and makefiles that are enough to build modules against the
kernelpackage. kernel-abi-stablelists-
Provides information pertaining to the RHEL kernel ABI, including a list of kernel symbols required by external Linux kernel modules and a
dnfplug-in to aid enforcement. kernel-headers- Includes the C header files that specify the interface between the Linux kernel and user-space libraries and programs. The header files define structures and constants required for building most standard programs.
kernel-uki-virtContains the Unified Kernel Image (UKI) of the RHEL kernel.
UKI combines the Linux kernel,
initramfs, and the kernel command line into a single signed binary which can be booted directly from the UEFI firmware.kernel-uki-virtcontains the required kernel modules to run in virtualized and cloud environments and can be used instead of thekernel-coresubpackage.
1.4. Displaying contents of a kernel package
By querying the repository, you can see if a kernel package provides a specific file, such as a module. It is not necessary to download or install the package to display the file list.
Use the dnf utility to query the file list, for example, of the kernel-core, kernel-modules-core, or kernel-modules package. Note that the kernel package is a meta package that does not contain any files.
Procedure
List the available versions of a package:
$ dnf repoquery <package_name>Display the list of files in a package:
$ dnf repoquery -l <package_name>
1.5. Installing specific kernel versions
Install new kernels using the dnf package manager.
Procedure
To install a specific kernel version, enter the following command:
# dnf install kernel-5.14.0
1.6. Updating the kernel
Update the kernel using the dnf package manager.
Procedure
To update the kernel, enter the following command:
# dnf update kernelThis command updates the kernel along with all dependencies to the latest available version.
- Reboot your system for the changes to take effect.
1.7. Setting a kernel as default
Set a specific kernel as default by using the grubby command-line tool and GRUB.
Procedure
Setting the kernel as default by using the
grubbytool.Enter the following command to set the kernel as default using the
grubbytool:# grubby --set-default $kernel_pathThe command uses a machine ID without the
.confsuffix as an argument.NoteThe machine ID is located in the
/boot/loader/entries/directory.
Setting the kernel as default by using the
idargument.List the boot entries using the
idargument:# grubby --info ALL | grep idSet an intended kernel as default:
# grubby --set-default /boot/vmlinuz-<version>.<architecture>NoteTo list the boot entries using the
titleargument, execute the# grubby --info=ALL | grep titlecommand.
Setting the default kernel for only the next boot.
Execute the following command to set the default kernel for only the next reboot using the
grub2-rebootcommand:# grub2-reboot <index|title|id>WarningSet the default kernel for only the next boot with care. Installing new kernel RPMs, self-built kernels, and manually adding the entries to the
/boot/loader/entries/directory might change the index values.
Chapter 2. The 64k page size kernel
The kernel-64k package offers a 64k page size option for 64-bit ARM architectures, complementing the standard 4k kernel. Select kernel-64k for workloads requiring large, contiguous memory sets, or stick to 4k pages for memory efficiency in smaller environments.
The 4k pages kernel and kernel-64k do not differ in the user experience as the user space is the same. You can choose the variant that addresses your situation the best.
- 4k pages kernel
Use 4k pages for more efficient memory usage in smaller environments, such as those in Edge and lower-cost, small cloud instances. In these environments, increasing the physical system memory amounts is not practical due to space, power, and cost constraints. Also, not all 64-bit ARM architecture processors support a 64k page size.
The 4k pages kernel supports graphical installation using Anaconda, system or cloud image-based installations, as well as advanced installations using Kickstart.
kernel-64kThe 64k page size kernel is a useful option for large datasets on ARM platforms.
kernel-64kis suitable for memory-intensive workloads as it has significant gains in overall system performance, namely in large database, HPC, and high network performance.You must choose page size on 64-bit ARM architecture systems at the time of installation. You can install
kernel-64konly by Kickstart by adding thekernel-64kpackage to the package list in theKickstartfile.
Chapter 3. Managing kernel modules
Learn about kernel modules, how to display their information, and how to perform basic administrative tasks with kernel modules.
3.1. Introduction to kernel modules
Extend the Red Hat Enterprise Linux kernel functionality without rebooting by using kernel modules. These compressed object files add support for hardware drivers, file systems, and system calls. Manage them dynamically to load or unload features as required.
The most common functionality enabled by kernel modules are:
- Device driver which adds support for new hardware
- Support for a file system such as GFS2 or NFS
- System calls
On modern systems, kernel modules are automatically loaded when needed. However, in some cases it is necessary to load or unload modules manually.
Similarly to the kernel, modules accept parameters that customize their behavior.
You can use the kernel tools to perform the following actions on modules:
- Inspect modules that are currently running.
- Inspect modules that are available to load into the kernel.
- Inspect parameters that a module accepts.
- Enable a mechanism to load and unload kernel modules into the running kernel.
3.2. Kernel module dependencies
Certain kernel modules sometimes depend on one or more other kernel modules. The /lib/modules/<KERNEL_VERSION>/modules.dep file contains a complete list of kernel module dependencies for the corresponding kernel version.
depmod
The dependency file is generated by the depmod program, included in the kmod package. Many utilities provided by kmod consider module dependencies when performing operations. Therefore, manual dependency-tracking is rarely necessary.
The code of kernel modules executes in kernel-space in the unrestricted mode. Be mindful of what modules you are loading.
weak-modules
In addition to depmod, Red Hat Enterprise Linux provides the weak-modules script, which is a part of the kmod package. weak-modules determines the modules that are kABI-compatible with installed kernels. While checking modules kernel compatibility, weak-modules processes modules symbol dependencies from higher to lower release of kernel for which they were built. It processes each module independently of the kernel release.
3.3. Listing installed kernel modules
The grubby --info=ALL command displays an indexed list of installed kernels on !BLS and BLS installs.
Procedure
List the installed kernels using the following command:
# grubby --info=ALL | grep titleThe list of all installed kernels is displayed as follows:
title="Red Hat Enterprise Linux (5.14.0-1.el9.x86_64) 9.0 (Plow)"
title="Red Hat Enterprise Linux (0-rescue-0d772916a9724907a5d1350bcd39ac92) 9.0 (Plow)"
This is the list of installed kernels of grubby-8.40-17 from the GRUB menu.
3.4. Listing currently loaded kernel modules
View the currently loaded kernel modules.
Prerequisites
-
The
kmodpackage is installed.
Procedure
To list all currently loaded kernel modules, enter:
$ lsmod Module Size Used by fuse 126976 3 uinput 20480 1 xt_CHECKSUM 16384 1 ipt_MASQUERADE 16384 1 xt_conntrack 16384 1 ipt_REJECT 16384 1 nft_counter 16384 16 nf_nat_tftp 16384 0 nf_conntrack_tftp 16384 1 nf_nat_tftp tun 49152 1 bridge 192512 0 stp 16384 1 bridge llc 16384 2 bridge,stp nf_tables_set 32768 5 nft_fib_inet 16384 1 …In the example above:
-
The
Modulecolumn provides the names of currently loaded modules. -
The
Sizecolumn displays the amount of memory per module in kilobytes. -
The
Used bycolumn shows the number, and optionally the names of modules that are dependent on a particular module.
-
The
3.5. Displaying information about kernel modules
Use the modinfo command to display some detailed information about the specified kernel module.
Prerequisites
-
The
kmodpackage is installed.
Procedure
To display information about any kernel module, enter:
$ modinfo <KERNEL_MODULE_NAME>For example:
$ modinfo virtio_net filename: /lib/modules/5.14.0-1.el9.x86_64/kernel/drivers/net/virtio_net.ko.xz license: GPL description: Virtio network driver rhelversion: 9.0 srcversion: 8809CDDBE7202A1B00B9F1C alias: virtio:d00000001v* depends: net_failover retpoline: Y intree: Y name: virtio_net vermagic: 5.14.0-1.el9.x86_64 SMP mod_unload modversions … parm: napi_weight:int parm: csum:bool parm: gso:bool parm: napi_tx:boolYou can query information about all available modules, regardless of whether they are loaded. The
parmentries show parameters the user is able to set for the module, and what type of value they expect.NoteWhen entering the name of a kernel module, do not append the
.ko.xzextension to the end of the name. Kernel module names do not have extensions; their corresponding files do.
3.6. Loading kernel modules at system runtime
The optimal way to expand the functionality of the Linux kernel is by loading kernel modules. Use the modprobe command to find and load a kernel module into the currently running kernel.
The changes described in this procedure will not persist after rebooting the system. For information about how to load kernel modules to persist across system reboots, see Loading kernel modules automatically at system boot time.
Prerequisites
- Root permissions
-
The
kmodpackage is installed. - The kernel module is not loaded. To ensure this is the case, list the Listing currently loaded kernel modules.
Procedure
Select a kernel module you want to load.
The modules are located in the
/lib/modules/$(uname -r)/kernel/<SUBSYSTEM>/directory.Load the relevant kernel module:
# modprobe <MODULE_NAME>NoteWhen entering the name of a kernel module, do not append the
.ko.xzextension to the end of the name. Kernel module names do not have extensions; their corresponding files do.
Verification
Optionally, verify the relevant module was loaded:
$ lsmod | grep <MODULE_NAME>If the module was loaded correctly, this command displays the relevant kernel module. For example:
$ lsmod | grep serio_raw
serio_raw              16384  0
3.7. Unloading kernel modules at system runtime
To unload certain kernel modules from the running kernel, use the modprobe command to find and unload a kernel module at system runtime from the currently loaded kernel.
You must not unload the kernel modules that are used by the running system because it can lead to an unstable or non-operational system.
After finishing the unloading of inactive kernel modules, the modules that are defined to be automatically loaded on boot, will not remain unloaded after rebooting the system. For information about how to prevent this outcome, see Preventing kernel modules from being automatically loaded at system boot time.
Prerequisites
- You have root permissions.
-
The
kmodpackage is installed.
Procedure
List all the loaded kernel modules:
# lsmodSelect the kernel module you want to unload.
If a kernel module has dependencies, unload those prior to unloading the kernel module. For details on identifying modules with dependencies, see Listing currently loaded kernel modules and Kernel module dependencies.
Unload the relevant kernel module:
# modprobe -r <MODULE_NAME>When entering the name of a kernel module, do not append the
.ko.xzextension to the end of the name. Kernel module names do not have extensions; their corresponding files do.
Verification
Optionally, verify the relevant module was unloaded:
$ lsmod | grep <MODULE_NAME>If the module is unloaded successfully, this command does not display any output.
3.8. Unloading kernel modules at early stages of the boot process
Unload a kernel module early in the boot process if it causes system unresponsiveness preventing normal access. Use the boot loader to temporarily block specific modules, allowing you to reach a state where permanent changes can be made.
The changes described in this procedure will not persist after the next reboot. For information about how to add a kernel module to a denylist so that it will not be automatically loaded during the boot process, see Preventing kernel modules from being automatically loaded at system boot time.
Prerequisites
- You have a loadable kernel module that you want to prevent from loading for some reason.
Procedure
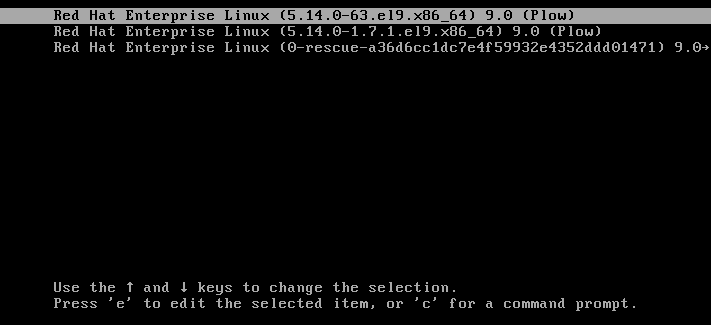
- Boot the system into the boot loader.
- Use the cursor keys to highlight the relevant boot loader entry.
Press the e key to edit the entry.
Figure 3.1. Kernel boot menu
- Use the cursor keys to navigate to the line that starts with linux.
Append
modprobe.blacklist=module_nameto the end of the line.Figure 3.2. Kernel boot entry
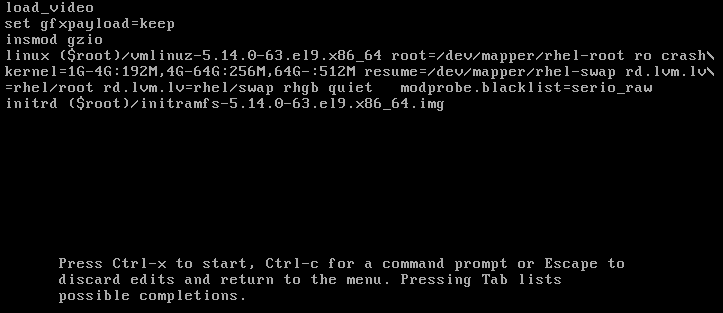
The
serio_rawkernel module illustrates a rogue module to be unloaded early in the boot process.- Press Ctrl+X to boot using the modified configuration.
Verification
After the system boots, verify that the relevant kernel module is not loaded:
# lsmod | grep serio_raw
3.9. Loading kernel modules automatically at system boot time
Configure a kernel module to load it automatically during the boot process.
Prerequisites
- Root permissions
-
The
kmodpackage is installed.
Procedure
Select a kernel module you want to load during the boot process.
The modules are located in the
/lib/modules/$(uname -r)/kernel/<SUBSYSTEM>/directory.Create a configuration file for the module:
# echo <MODULE_NAME> > /etc/modules-load.d/<MODULE_NAME>.confNoteWhen entering the name of a kernel module, do not append the
.ko.xzextension to the end of the name. Kernel module names do not have extensions; their corresponding files do.
Verification
After reboot, verify the relevant module is loaded:
$ lsmod | grep <MODULE_NAME>
The changes described in this procedure will persist after rebooting the system.
3.10. Preventing kernel modules from being automatically loaded at system boot time
Prevent the system from loading a kernel module automatically during boot by listing the module in the modprobe configuration file with a corresponding command.
Prerequisites
-
The commands in this procedure require root privileges. Either use
su -to switch to the root user or preface the commands withsudo. -
The
kmodpackage is installed. - Ensure that your current system configuration does not require a kernel module you plan to deny.
Procedure
List modules loaded to the currently running kernel by using the
lsmodcommand:$ lsmodModule Size Used by tls 131072 0 uinput 20480 1 snd_seq_dummy 16384 0 snd_hrtimer 16384 1 …In the output, identify the module you want to prevent from getting loaded.
Alternatively, identify an unloaded kernel module you want to prevent from potentially loading in the
/lib/modules/<KERNEL-VERSION>/kernel/<SUBSYSTEM>/directory, for example:$ ls /lib/modules/4.18.0-477.20.1.el8_8.x86_64/kernel/crypto/ansi_cprng.ko.xz chacha20poly1305.ko.xz md4.ko.xz serpent_generic.ko.xz anubis.ko.xz cmac.ko.xz…
Create a configuration file serving as a denylist:
# touch /etc/modprobe.d/denylist.confIn a text editor of your choice, combine the names of modules you want to exclude from automatic loading to the kernel with the
blacklistconfiguration command, for example:# Prevents <KERNEL-MODULE-1> from being loaded blacklist <MODULE-NAME-1> install <MODULE-NAME-1> /bin/false # Prevents <KERNEL-MODULE-2> from being loaded blacklist <MODULE-NAME-2> install <MODULE-NAME-2> /bin/false …Because the
blacklistcommand does not prevent the module from getting loaded as a dependency for another kernel module that is not in a denylist, you must also define theinstallline. In this case, the system runs/bin/falseinstead of installing the module. The lines starting with a hash sign are comments you can use to make the file more readable.NoteWhen entering the name of a kernel module, do not append the
.ko.xzextension to the end of the name. Kernel module names do not have extensions; their corresponding files do.Create a backup copy of the current initial RAM disk image before rebuilding:
# cp /boot/initramfs-$(uname -r).img /boot/initramfs-$(uname -r).bak.$(date +%m-%d-%H%M%S).imgAlternatively, create a backup copy of an initial RAM disk image which corresponds to the kernel version for which you want to prevent kernel modules from automatic loading:
# cp /boot/initramfs-<VERSION>.img /boot/initramfs-<VERSION>.img.bak.$(date +%m-%d-%H%M%S)
Generate a new initial RAM disk image to apply the changes:
# dracut -f -vIf you build an initial RAM disk image for a different kernel version than your system currently uses, specify both target
initramfsand kernel version:# dracut -f -v /boot/initramfs-<TARGET-VERSION>.img <CORRESPONDING-TARGET-KERNEL-VERSION>
Restart the system:
$ reboot
The changes described in this procedure will take effect and persist after rebooting the system. If you incorrectly list a key kernel module in the denylist, you can switch the system to an unstable or non-operational state.
3.11. Compiling custom kernel modules
You can build a sampling kernel module as requested by various configurations at hardware and software level.
Prerequisites
You installed the
kernel-devel,gcc, andelfutils-libelf-develpackages.# dnf install kernel-devel-$(uname -r) gcc elfutils-libelf-devel- You have root permissions.
-
You created the
/root/testmodule/directory where you compile the custom kernel module.
Procedure
Create the
/root/testmodule/test.cfile with the following content.#include <linux/module.h> #include <linux/kernel.h> int init_module(void) { printk("Hello World\n This is a test\n"); return 0; } void cleanup_module(void) { printk("Good Bye World"); } MODULE_LICENSE("GPL");The
test.cfile is a source file that provides the main functionality to the kernel module. The file has been created in a dedicated/root/testmodule/directory for organizational purposes. After the module compilation, the/root/testmodule/directory will contain multiple files.The
test.cfile includes from the system libraries:-
The
linux/kernel.hheader file is necessary for theprintk()function in the example code. -
The
linux/module.hfile contains function declarations and macro definitions that are shared across several source files written in C programming language.
-
The
-
Follow the
init_module()andcleanup_module()functions to start and end the kernel logging functionprintk(), which prints text. Create the
/root/testmodule/Makefilefile with the following content.obj-m := test.oThe Makefile contains instructions for the compiler to produce an object file named
test.o. Theobj-mdirective specifies that the resultingtest.kofile is going to be compiled as a loadable kernel module. Alternatively, theobj-ydirective can instruct to buildtest.koas a built-in kernel module.Compile the kernel module.
# make -C /lib/modules/$(uname -r)/build M=/root/testmodule modules
make: Entering directory '/usr/src/kernels/5.14.0-70.17.1.el9_0.x86_64'
  CC [M]  /root/testmodule/test.o
  MODPOST /root/testmodule/Module.symvers
  CC [M]  /root/testmodule/test.mod.o
  LD [M]  /root/testmodule/test.ko
  BTF [M] /root/testmodule/test.ko
Skipping BTF generation for /root/testmodule/test.ko due to unavailability of vmlinux
make: Leaving directory '/usr/src/kernels/5.14.0-70.17.1.el9_0.x86_64'
The compiler creates an object file (
test.o) for each source file (test.c) as an intermediate step before linking them together into the final kernel module (test.ko).After a successful compilation,
/root/testmodule/contains additional files that relate to the compiled custom kernel module. The compiled module itself is represented by thetest.kofile.
Verification
Optional: check the contents of the
/root/testmodule/directory:# ls -l /root/testmodule/ total 152 -rw-r—r--. 1 root root 16 Jul 26 08:19 Makefile -rw-r—r--. 1 root root 25 Jul 26 08:20 modules.order -rw-r—r--. 1 root root 0 Jul 26 08:20 Module.symvers -rw-r—r--. 1 root root 224 Jul 26 08:18 test.c -rw-r—r--. 1 root root 62176 Jul 26 08:20 test.ko -rw-r—r--. 1 root root 25 Jul 26 08:20 test.mod -rw-r—r--. 1 root root 849 Jul 26 08:20 test.mod.c -rw-r—r--. 1 root root 50936 Jul 26 08:20 test.mod.o -rw-r—r--. 1 root root 12912 Jul 26 08:20 test.oCopy the kernel module to the
/lib/modules/$(uname -r)/directory:# cp /root/testmodule/test.ko /lib/modules/$(uname -r)/Update the modular dependency list:
# depmod -aLoad the kernel module:
# modprobe -v test
insmod /lib/modules/5.14.0-1.el9.x86_64/test.ko
Verify that the kernel module was successfully loaded:
# lsmod | grep test
test                   16384  0
Read the latest messages from the kernel ring buffer:
# dmesg
[74422.545004] Hello World
                This is a test
Chapter 4. Configuring kernel command-line parameters
With kernel command-line parameters, you can change the behavior of certain aspects of the Red Hat Enterprise Linux kernel at boot time. As a system administrator, you control which options get set at boot. Note that certain kernel behaviors can only be set at boot time.
Changing the behavior of the system by modifying kernel command-line parameters can have negative effects on your system. Always test changes before deploying them in production. For further guidance, contact Red Hat Support.
4.1. What are kernel command-line parameters
With kernel command-line parameters, you can overwrite default values and set specific hardware settings. At boot time, you can configure the following features:
- The Red Hat Enterprise Linux kernel
- The initial RAM disk
- The user space features
By default, the kernel command-line parameters for systems using the GRUB boot loader are defined in the boot entry configuration file for each kernel boot entry.
You can manipulate boot loader configuration files by using the grubby utility. With grubby, you can perform these actions:
- Change the default boot entry.
- Add or remove arguments from a GRUB menu entry.
4.2. Understanding boot entries
A boot entry is a collection of options stored in a configuration file and tied to a particular kernel version. In practice, you have at least as many boot entries as your system has installed kernels. The boot entry configuration file is located in the /boot/loader/entries/ directory:
d8712ab6d4f14683c5625e87b52b6b6e-5.14.0-1.el9.x86_64.conf
The file name above consists of a machine ID stored in the /etc/machine-id file, and a kernel version.
The boot entry configuration file contains information about the kernel version, the initial ramdisk image, and the kernel command-line parameters. The example contents of a boot entry config can be seen below:
title Red Hat Enterprise Linux (5.14.0-1.el9.x86_64) 9.0 (Plow)
version 5.14.0-1.el9.x86_64
linux /vmlinuz-5.14.0-1.el9.x86_64
initrd /initramfs-5.14.0-1.el9.x86_64.img
options root=/dev/mapper/rhel_kvm--02--guest08-root ro crashkernel=1G-4G:192M,4G-64G:256M,64G-:512M resume=/dev/mapper/rhel_kvm--02--guest08-swap rd.lvm.lv=rhel_kvm-02-guest08/root rd.lvm.lv=rhel_kvm-02-guest08/swap console=ttyS0,115200
grub_users $grub_users
grub_arg --unrestricted
grub_class kernel
4.3. Changing kernel command-line parameters for all boot entries
Change kernel command-line parameters for all boot entries on your system.
When installing a newer version of the kernel in RHEL 9 systems, the grubby tool passes the kernel command-line arguments from the previous kernel version.
However, this does not apply to RHEL version 9.0 in which newly installed kernels lose previous command-line options. You must run the grub2-mkconfig command on the newly installed kernel to pass the parameters to your new kernel. For more information about this known issue, see Boot loader.
Prerequisites
-
grubbyutility is installed on your system. -
ziplutility is installed on your IBM Z system.
Procedure
To add a parameter:
# grubby --update-kernel=ALL --args="<NEW_PARAMETER>"For systems that use the GRUB boot loader and, on IBM Z that use the zIPL boot loader, the command adds a new kernel parameter to each
/boot/loader/entries/<ENTRY>.conffile.On IBM Z, update the boot menu:
# zipl
To remove a parameter:
# grubby --update-kernel=ALL --remove-args="<PARAMETER_TO_REMOVE>"On IBM Z, update the boot menu:
# zipl
4.4. Changing kernel command-line parameters for a single boot entry
Make changes in kernel command-line parameters for a single boot entry on your system.
Prerequisites
-
grubbyandziplutilities are installed on your system.
Procedure
To add a parameter:
# grubby --update-kernel=/boot/vmlinuz-$(uname -r) --args="<NEW_PARAMETER>"On IBM Z, update the boot menu:
# grubby --args="<NEW_PARAMETER> --update-kernel=ALL --zipl
To remove a parameter:
# grubby --update-kernel=/boot/vmlinuz-$(uname -r) --remove-args="<PARAMETER_TO_REMOVE>"On IBM Z, update the boot menu:
# grubby --args="<PARAMETER_TO_REMOVE> --update-kernel=ALL --zipl
-
grubbymodifies and stores the kernel command-line parameters of an individual kernel boot entry in the/boot/loader/entries/<ENTRY>.conffile.
4.5. Changing kernel command-line parameters temporarily at boot time
Make temporary changes to a Kernel Menu Entry by changing the kernel parameters only during a single boot process.
This procedure applies only for a single boot and does not persistently make the changes.
Procedure
- Boot into the GRUB boot menu.
- Select the kernel you want to start.
- Press the e key to edit the kernel parameters.
-
Find the kernel command line by moving the cursor down. The kernel command line starts with
linuxon 64-Bit IBM Power Series and x86-64 BIOS-based systems, orlinuxefion UEFI systems. Move the cursor to the end of the line.
NotePress Ctrl+a to jump to the start of the line and Ctrl+e to jump to the end of the line. On some systems, Home and End keys might also work.
Edit the kernel parameters as required. For example, to run the system in emergency mode, add the
emergencyparameter at the end of thelinuxline:linux ($root)/vmlinuz-5.14.0-63.el9.x86_64 root=/dev/mapper/rhel-root ro crashkernel=1G-4G:192M,4G-64G:256M,64G-:512M resume=/dev/mapper/rhel-swap rd.lvm.lv=rhel/root rd.lvm.lv=rhel/swap rhgb quiet emergencyTo enable the system messages, remove the
rhgbandquietparameters.- Press Ctrl+x to boot with the selected kernel and the modified command line parameters.
If you press the Esc key to leave command line editing, it will drop all the user made changes.
4.6. Configuring GRUB settings to enable serial console connection
The serial console is beneficial when you need to connect to a headless server or an embedded system and the network is down. Or when you need to avoid security rules and obtain login access on a different system.
You need to configure some default GRUB settings to use the serial console connection.
Prerequisites
- You have root permissions.
Procedure
Add the following two lines to the
/etc/default/grubfile:GRUB_TERMINAL="serial" GRUB_SERIAL_COMMAND="serial --speed=9600 --unit=0 --word=8 --parity=no --stop=1"The first line disables the graphical terminal. The
GRUB_TERMINALkey overrides values ofGRUB_TERMINAL_INPUTandGRUB_TERMINAL_OUTPUTkeys.The second line adjusts the baud rate (
--speed), parity and other values to fit your environment and hardware. Note that a much higher baud rate, for example 115200, is preferable for tasks such as following log files.Update the GRUB configuration file.
On BIOS-based machines:
# grub2-mkconfig -o /boot/grub2/grub.cfgOn UEFI-based machines:
# grub2-mkconfig -o /boot/grub2/grub.cfg
- Reboot the system for the changes to take effect.
4.7. Changing boot entries with the GRUB configuration file
Change boot entries by modifying the GRUB_CMDLINE_LINUX key in /etc/default/grub, which lists kernel command-line arguments for Linux kernel boot entries.
The /etc/default/grub GRUB configuration file contains the GRUB_CMDLINE_LINUX key, which lists kernel command-line arguments to add to boot entries for the Linux kernel. For example:
GRUB_CMDLINE_LINUX="crashkernel=1G-4G:192M,4G-64G:256M,64G-:512M resume=/dev/mapper/rhel-swap rd.lvm.lv=rhel/root rd.lvm.lv=rhel/swap"
To change the boot entries, overwrite Boot Loader Specification (BLS) snippets with the contents of the GRUB_CMDLINE_LINUX values.
Prerequisites
- A fresh RHEL 9 installation.
Procedure
Add or remove a kernel parameter for individual kernels in a post installation script with
grubby:# grubby --update-kernel <PATH_TO_KERNEL> --args "<NEW_ARGUMENTS>"For example, add the
noapicparameter to the chosen kernel:# grubby --update-kernel /boot/vmlinuz-5.14.0-362.8.1.el9_3.x86_64 --args "noapic"The parameter is propagated into the BLS snippets, but not into the
/etc/default/grubfile.Overwrite BLS snippets with the contents of the
GRUB_CMDLINE_LINUXvalues present in the/etc/default/grubfile:# grub2-mkconfig -o /boot/grub2/grub.cfg --update-bls-cmdlineGenerating grub configuration file ... Adding boot menu entry for UEFI Firmware Settings ... doneNoteOther changes, such as changes made to
GRUB_TIMEOUTkey (also included in the/etc/default/grubGRUB configuration file), do get propagated to the newgrub.cfgby default.
Verification
- Reboot your operating system.
Verify that the parameters are included in the
/proc/cmdlinefile.For example,
/proc/cmdlinecontains thenoapickernel parameter:BOOT_IMAGE=(hd0,gpt2)/vmlinuz-4.18.0-425.3.1.el8.x86_64 root=/dev/mapper/RHELCSB-Root ro vconsole.keymap=us crashkernel=auto rd.lvm.lv=RHELCSB/Root rd.luks.uuid=luks-d8a28c4c-96aa-4319-be26-96896272151d rhgb quiet noapic rd.luks.key=d8a28c4c-96aa-4319-be26-96896272151d=/keyfile:UUID=c47d962e-4be8-41d6-8216-8cf7a0d3b911 ipv6.disable=1
Chapter 5. Configuring kernel parameters at runtime
As a system administrator, you can modify many facets of the Red Hat Enterprise Linux kernel’s behavior at runtime. Configure kernel parameters at runtime by using the sysctl command and by modifying the configuration files in the /etc/sysctl.d/ and /proc/sys/ directories.
Configuring kernel parameters on a production system requires careful planning. Unplanned changes can render the kernel unstable, requiring a system reboot. Verify that you are using valid options before changing any kernel values.
For more information about tuning kernel on IBM DB2, see Tuning Red Hat Enterprise Linux for IBM DB2.
5.1. What are kernel parameters
Kernel parameters are tunable values that you can adjust while the system is running. Note that for changes to take effect, you do not need to reboot the system or recompile the kernel.
It is possible to address the kernel parameters through:
-
The
sysctlcommand -
The virtual file system mounted at the
/proc/sys/directory -
The configuration files in the
/etc/sysctl.d/directory
Tunables are divided into classes by the kernel subsystem. Red Hat Enterprise Linux has the following tunable classes:
| Tunable class | Subsystem |
|---|---|
|
| Execution domains and personalities |
|
| Cryptographic interfaces |
|
| Kernel debugging interfaces |
|
| Device-specific information |
|
| Global and specific file system tunables |
|
| Global kernel tunables |
|
| Network tunables |
|
| Sun Remote Procedure Call (NFS) |
|
| User Namespace limits |
|
| Tuning and management of memory, buffers, and cache |
5.2. Configuring kernel parameters temporarily with sysctl
Use the sysctl command to temporarily set kernel parameters at runtime. The command is also useful for listing and filtering tunables.
Prerequisites
- Root permissions
Procedure
List all parameters and their values.
# sysctl -aNoteThe
# sysctl -acommand displays kernel parameters, which can be adjusted at runtime and at boot time.To configure a parameter temporarily, enter:
# sysctl <TUNABLE_CLASS>.<PARAMETER>=<TARGET_VALUE>The sample command above changes the parameter value while the system is running. The changes take effect immediately, without a need for restart.
NoteThe changes return back to default after your system reboots.
5.3. Configuring kernel parameters permanently with sysctl
Use the sysctl command to permanently set kernel parameters.
Prerequisites
- Root permissions
Procedure
List all parameters.
# sysctl -aThe command displays all kernel parameters that can be configured at runtime.
Configure a parameter permanently:
# sysctl -w <TUNABLE_CLASS>.<PARAMETER>=<TARGET_VALUE> >> /etc/sysctl.confThe sample command changes the tunable value and writes it to the
/etc/sysctl.conffile, which overrides the default values of kernel parameters. The changes take effect immediately and persistently, without a need for restart.
To permanently modify kernel parameters, you can also make manual changes to the configuration files in the /etc/sysctl.d/ directory.
5.4. Using configuration files in /etc/sysctl.d/ to adjust kernel parameters
You must modify the configuration files in the /etc/sysctl.d/ directory manually to permanently set kernel parameters.
Prerequisites
- You have root permissions.
Procedure
Create a new configuration file in
/etc/sysctl.d/:# vim /etc/sysctl.d/<some_file.conf>Include kernel parameters, one per line:
<TUNABLE_CLASS>.<PARAMETER>=<TARGET_VALUE> <TUNABLE_CLASS>.<PARAMETER>=<TARGET_VALUE>- Save the configuration file.
Reboot the machine for the changes to take effect.
Alternatively, apply changes without rebooting:
# sysctl -p /etc/sysctl.d/<some_file.conf>The command enables you to read values from the configuration file, which you created earlier.
5.5. Configuring kernel parameters temporarily through /proc/sys/
Set kernel parameters temporarily through the files in the /proc/sys/ virtual file system directory.
Prerequisites
- Root permissions
Procedure
Identify a kernel parameter you want to configure.
# ls -l /proc/sys/<TUNABLE_CLASS>/The writable files returned by the command can be used to configure the kernel. The files with read-only permissions provide feedback on the current settings.
Assign a target value to the kernel parameter.
# echo <TARGET_VALUE> > /proc/sys/<TUNABLE_CLASS>/<PARAMETER>The configuration changes applied by using a command are not permanent and will disappear once the system is restarted.
Verification
Verify the value of the newly set kernel parameter.
# cat /proc/sys/<TUNABLE_CLASS>/<PARAMETER>
Chapter 6. Configuring kernel parameters permanently by using RHEL system roles
You can use the kernel_settings RHEL system role to configure kernel parameters on multiple clients simultaneously.
Simultaneous configuration has the following advantages:
- Provides a friendly interface with efficient input setting.
- Keeps all intended kernel parameters in one place.
After you run the kernel_settings role from the control machine, the kernel parameters are applied to the managed systems immediately and persist across reboots.
Note that RHEL system roles delivered over RHEL channels are available to RHEL customers as an RPM package in the default AppStream repository. RHEL system roles are also available as a collection to customers with Ansible subscriptions over Ansible Automation Hub.
6.1. Applying selected kernel parameters by using the kernel_settings RHEL system role
You can use the kernel_settings RHEL system role to remotely configure various kernel parameters across multiple managed operating systems with persistent effects.
For example, by using the kernel_settings role, you can configure:
- Transparent hugepages to increase performance by reducing the overhead of managing smaller pages.
- The largest packet sizes to be transmitted over the network with the loopback interface.
- Limits on files to be opened simultaneously.
Prerequisites
- You have prepared the control node and the managed nodes.
-
The account you use to connect to the managed nodes has
sudopermissions for these nodes.
Procedure
Create a playbook file, for example,
~/playbook.yml, with the following content:--- - name: Configuring kernel settings hosts: managed-node-01.example.com tasks: - name: Configure hugepages, packet size for loopback device, and limits on simultaneously open files. ansible.builtin.include_role: name: redhat.rhel_system_roles.kernel_settings vars: kernel_settings_sysctl: - name: fs.file-max value: 400000 - name: kernel.threads-max value: 65536 kernel_settings_sysfs: - name: /sys/class/net/lo/mtu value: 65000 kernel_settings_transparent_hugepages: madvise kernel_settings_reboot_ok: trueThe settings specified in the example playbook include the following:
kernel_settings_sysfs: <list_of_sysctl_settings>-
A YAML list of
sysctlsettings and the values you want to assign to these settings. kernel_settings_transparent_hugepages: <value>-
Controls the memory subsystem Transparent Huge Pages (THP) setting. You can disable THP support (
never), enable it system wide (always) or insideMAD_HUGEPAGEregions (madvise). kernel_settings_reboot_ok: <true|false>-
The default is
false. If set totrue, the system role will determine if a reboot of the managed host is necessary for the requested changes to take effect and reboot it. If set tofalse, the role will return the variablekernel_settings_reboot_requiredwith a value oftrue, indicating that a reboot is required. In this case, a user must reboot the managed node manually.
For details about all variables used in the playbook, see the
/usr/share/ansible/roles/rhel-system-roles.kdump/README.mdfile on the control node.Validate the playbook syntax:
$ ansible-playbook --syntax-check ~/playbook.ymlNote that this command only validates the syntax and does not protect against a wrong but valid configuration.
Run the playbook:
$ ansible-playbook ~/playbook.yml
Verification
Verify the affected kernel parameters:
# ansible managed-node-01.example.com -m command -a 'sysctl fs.file-max kernel.threads-max net.ipv6.conf.lo.mtu'
# ansible managed-node-01.example.com -m command -a 'cat /sys/kernel/mm/transparent_hugepage/enabled'
Chapter 7. Managing kernel command-line parameters with UKI
Unified Kernel Image (UKI) combines the kernel, initial RAM disk (initrd), and boot command line into a single executable binary.
7.1. Understanding kernel command-line parameters with UKI
With UKI, systemd-boot, specifically systemd-stub, handles the kernel command-line parameters. The UKI delivered by Red Hat includes the basic kernel command-line parameter console=tty0 console=ttyS0.
You can add additional kernel command-line parameters by using UKI add-ons. Alternatively, you can generate your own UKI to contain any arguments you require.
Secure Boot revokes improperly signed UKIs and add-ons. These signatures can also alter PCR measurements of TPM which can potentially affect boot sequence.
7.2. Understanding boot entries
You manage boot entries directly in UEFI NVRAM. This means they are no longer stored on disk. You can use tools such as kernel-bootcfg or efibootmgr to alter boot entries directly.
The following is an example of a boot entry:
Boot0001* redhat HD(1,GPT,9192a707-8768-4c9f-bb11-fdd7c7e307e7,0x800,0x100000)/\EFI\redhat\shimx64.efi\EFI\Linux\ffffffffffffffffffffffffffffffff-6.12.0-174.el10.x86_64.efi7.3. Acquire UKI add-ons to add kernel command-line parameters
To add kernel command-line parameters, you can acquire officially signed add-ons delivered by Red Hat in the kernel-uki-virt-addons packages. These add-ons are signed by the same certificates as their associated UKIs. The default installation path is /lib/modules/$(uname -r)/vmlinuz-virt.efi.extra.d/.
You must copy these add-ons to the appropriate locations for them to take effect.
If you need add-ons other than these or prefer signing them on your own, you can create them with tools such as systemd-ukify or dracut.
Procedure
Create a new add-on:
# ukify build --cmdline "emergency" --output emergency.unsigned.addon.efi
7.4. Changing kernel command-line parameters for all boot entries
To change kernel command-line parameters for all boot entries, add the UKI add-ons to the global add-ons directory /boot/efi/loader/addons/.
Prerequisites
- You have root permissions on the system.
-
You have
.addon.efifile.
Procedure
Copy the add-on file to the
/boot/efi/loader/addons/directory:# cp <my-addon>.addon.efi /boot/efi/loader/addons/Reboot the system:
# reboot
Verification
Verify the new parameter depends on the type of the added add-on. For example, check the kernel command line:
# cat /proc/cmdline
7.5. Changing kernel command-line parameters for a single UKI
To change kernel command-line parameters for a single UKI, manage the add-ons on a per-UKI basis. The revocation mechanism applies to UKI and its associated add-ons locally.
By default, UKIs are located at the following path:
/boot/efi/EFI/Linux/<machine_id>-<kernel_version>.efi
The effective add-ons designated to this UKI are located at the following path:
/boot/efi/EFI/Linux/<machine_id>-<kernel_version>.efi.extra.d/
Prerequisites
- You have root permissions on the system.
-
You have
.addon.efifile.
Procedure
Identify the running kernel version and machine ID:
# uname -r
# cat /etc/machine-id
Copy the add-on file to the specific directory associated with the UKI:
# cp <my-addon>.addon.efi /boot/efi/EFI/Linux/<machine_id>-<kernel_version>.efi.extra.d/Reboot the system:
# reboot
Verification
Verify the new parameter depends on the type of the added add-on. For example, check the kernel command line:
# cat /proc/cmdline
When you update the kernel-uki-virt package, the system installs a new UKI version. The update also copies the currently effective add-ons to the directory for the new UKI, provided that the kernel-uki-virt-addons package is installed at the same time. This happens automatically, for example, when you run dnf update.
7.6. Creating UKI to contain customized kernel command-line parameters
To customize the Linux kernel, initial RAM disk, or initrd, and kernel command-line parameters, you can create your own UKI by using tools such as systemd-ukify or dracut.
Procedure
For example, to create a custom UKI by using
systemd-ukify:# ukify build --initrd /boot/initramfs-$(uname -r).img --linux /lib/modules/$(uname -r)/vmlinuz --uname $(uname -r) --cmdline "console=tty0 console=ttyS0 emergency" --output uki.unsigned.efi
Chapter 8. Configuring the GRUB boot loader by using RHEL system roles
By using the bootloader RHEL system role, you can automate the configuration and management tasks related to the GRUB2 boot loader.
This role currently supports configuring the GRUB2 boot loader, which runs on the following CPU architectures:
- AMD and Intel 64-bit architectures (x86-64)
- The 64-bit ARM architecture (ARMv8.0)
- IBM Power Systems, Little Endian (POWER9)
8.1. Updating the existing boot loader entries by using the bootloader RHEL system role
You can use the bootloader RHEL system role to update the existing entries in the GRUB boot menu in an automated fashion. This way you can efficiently pass specific kernel command-line parameters that can optimize the performance or behavior of your systems.
For example, if you leverage systems, where detailed boot messages from the kernel and init system are not necessary, use bootloader to apply the quiet parameter to your existing boot loader entries on your managed nodes to achieve a cleaner, less cluttered, and more user-friendly booting experience.
Prerequisites
- You have prepared the control node and the managed nodes.
-
The account you use to connect to the managed nodes has
sudopermissions for these nodes. - You identified the kernel that corresponds to the boot loader entry you want to update.
Procedure
Create a playbook file, for example,
~/playbook.yml, with the following content:--- - name: Configuration and management of GRUB boot loader hosts: managed-node-01.example.com tasks: - name: Update existing boot loader entries ansible.builtin.include_role: name: redhat.rhel_system_roles.bootloader vars: bootloader_settings: - kernel: path: /boot/vmlinuz-5.14.0-362.24.1.el9_3.aarch64 options: - name: quiet state: present bootloader_reboot_ok: trueThe settings specified in the example playbook include the following:
kernel- Specifies the kernel connected with the boot loader entry that you want to update.
options- Specifies the kernel command-line parameters to update for your chosen boot loader entry (kernel).
bootloader_reboot_ok: true- The role detects that a reboot is required for the changes to take effect and performs a restart of the managed node.
For details about all variables used in the playbook, see the
/usr/share/ansible/roles/rhel-system-roles.bootloader/README.mdfile on the control node.Validate the playbook syntax:
$ ansible-playbook --syntax-check ~/playbook.ymlNote that this command only validates the syntax and does not protect against a wrong but valid configuration.
Run the playbook:
$ ansible-playbook ~/playbook.yml
Verification
Check that your specified boot loader entry has updated kernel command-line parameters:
# ansible managed-node-01.example.com -m ansible.builtin.command -a 'grubby --info=ALL'
managed-node-01.example.com | CHANGED | rc=0 >>
...
index=1
kernel="/boot/vmlinuz-5.14.0-362.24.1.el9_3.aarch64"
args="ro crashkernel=1G-4G:256M,4G-64G:320M,64G-:576M rd.lvm.lv=rhel/root rd.lvm.lv=rhel/swap $tuned_params quiet"
root="/dev/mapper/rhel-root"
initrd="/boot/initramfs-5.14.0-362.24.1.el9_3.aarch64.img $tuned_initrd"
title="Red Hat Enterprise Linux (5.14.0-362.24.1.el9_3.aarch64) 9.4 (Plow)"
id="2c9ec787230141a9b087f774955795ab-5.14.0-362.24.1.el9_3.aarch64"
...
8.4. Collecting the boot loader configuration information by using the bootloader RHEL system role
You can use the bootloader RHEL system role to gather information about the GRUB boot loader entries in an automated fashion. You can use this information to verify the correct configuration of system boot parameters, such as kernel and initial RAM disk image paths.
As a result, you can for example:
- Prevent boot failures.
- Revert to a known good state when troubleshooting.
- Be sure that security-related kernel command-line parameters are correctly configured.
Prerequisites
- You have prepared the control node and the managed nodes.
-
The account you use to connect to the managed nodes has
sudopermissions for these nodes.
Procedure
Create a playbook file, for example,
~/playbook.yml, with the following content:--- - name: Configuration and management of GRUB boot loader hosts: managed-node-01.example.com tasks: - name: Gather information about the boot loader configuration ansible.builtin.include_role: name: redhat.rhel_system_roles.bootloader vars: bootloader_gather_facts: true - name: Display the collected boot loader configuration information debug: var: bootloader_factsFor details about all variables used in the playbook, see the
/usr/share/ansible/roles/rhel-system-roles.bootloader/README.mdfile on the control node.Validate the playbook syntax:
$ ansible-playbook --syntax-check ~/playbook.ymlNote that this command only validates the syntax and does not protect against a wrong but valid configuration.
Run the playbook:
$ ansible-playbook ~/playbook.yml
Verification
After you run the preceding playbook on the control node, you will see a similar command-line output as in the following example:
...
    "bootloader_facts": [
        {
            "args": "ro crashkernel=1G-4G:256M,4G-64G:320M,64G-:576M rd.lvm.lv=rhel/root rd.lvm.lv=rhel/swap $tuned_params quiet",
            "default": true,
            "id": "2c9ec787230141a9b087f774955795ab-5.14.0-362.24.1.el9_3.aarch64",
            "index": "1",
            "initrd": "/boot/initramfs-5.14.0-362.24.1.el9_3.aarch64.img $tuned_initrd",
            "kernel": "/boot/vmlinuz-5.14.0-362.24.1.el9_3.aarch64",
            "root": "/dev/mapper/rhel-root",
            "title": "Red Hat Enterprise Linux (5.14.0-362.24.1.el9_3.aarch64) 9.4 (Plow)"
        }
    ]
...
The command-line output shows the following notable configuration information about the boot entry:
args- Command-line parameters passed to the kernel by the GRUB2 boot loader during the boot process. They configure various settings and behaviors of the kernel, initramfs, and other boot-time components.
id- Unique identifier assigned to each boot entry in a boot loader menu. It consists of machine ID and the kernel version.
root- The root filesystem for the kernel to mount and use as the primary filesystem during the boot.
Chapter 9. Applying patches with kernel live patching
You can use the Red Hat Enterprise Linux kernel live patching solution to patch a running kernel without rebooting or restarting any processes.
With this solution, system administrators:
- Can immediately apply critical security patches to the kernel.
- Do not have to wait for long-running tasks to complete, for users to log off, or for scheduled downtime.
- Control the system’s uptime more and do not sacrifice security or stability.
By using the kernel live patching, you can reduce the number of reboots required for security patches. However, note that you cannot address all critical or important CVEs. For more details about the scope of live patching, see the Red Hat Knowledgebase solution Is live kernel patch (kpatch) supported in Red Hat Enterprise Linux?.
Some incompatibilities exist between kernel live patching and other kernel subcomponents. Read the Limitations of kpatch carefully before using kernel live patching.
For details about the support cadence of kernel live patching updates, see:
9.1. Limitations of kpatch
-
By using the
kpatchfeature, you can apply simple security and bug fix updates that do not require an immediate system reboot. -
You must not use the
SystemTaporkprobetool during or after loading a patch. The patch might not take effect until the probes are removed. - Not all kernels receive live patches. Live patch availability follows the published cadence and life cycles. Automatic subscription applies only to kernels within the supported cadence.
- When a system boots into a kernel outside the supported cadence, live patches are unavailable until you update to a supported kernel release.
9.2. Support for third-party live patching
The kpatch utility is the only kernel live patching utility supported by Red Hat with the RPM modules provided by Red Hat repositories. Red Hat does not support live patches provided by a third party.
For more information about third-party software support policies, see As a customer how does Red Hat support me when I use third party components?
9.3. Access to kernel live patches
A kernel module (kmod) implements kernel live patching capability and is provided as an RPM package.
All customers have access to kernel live patches, which are delivered through the usual channels. However, customers who do not subscribe to an extended support offering will lose access to new patches for the current minor release once the next minor release becomes available. For example, customers with standard subscriptions will only be able to live patch RHEL 9.1 kernel until the RHEL 9.2 kernel is released.
The components of kernel live patching are as follows:
- Kernel patch module
- The delivery mechanism for kernel live patches.
- A kernel module built specifically for the kernel being patched.
- The patch module contains the code of the required fixes for the kernel.
-
Patch modules register with the
livepatchkernel subsystem and specify the original functions to replace, along with pointers to the replacement functions. Kernel patch modules are delivered as RPMs. -
The naming convention is
kpatch_<kernel version>_<kpatch version>_<kpatch release>. The "kernel version" part of the name has dots replaced with underscores.
- The
kpatchutility - A command-line utility for managing patch modules.
- The
kpatchservice -
A systemd service required by
multiuser.target. This target loads the kernel patch module at boot time. - The
kpatch-dnfpackage - A DNF plugin delivered in the form of an RPM package. This plugin manages automatic subscription to kernel live patches.
9.4. The process of live patching kernels
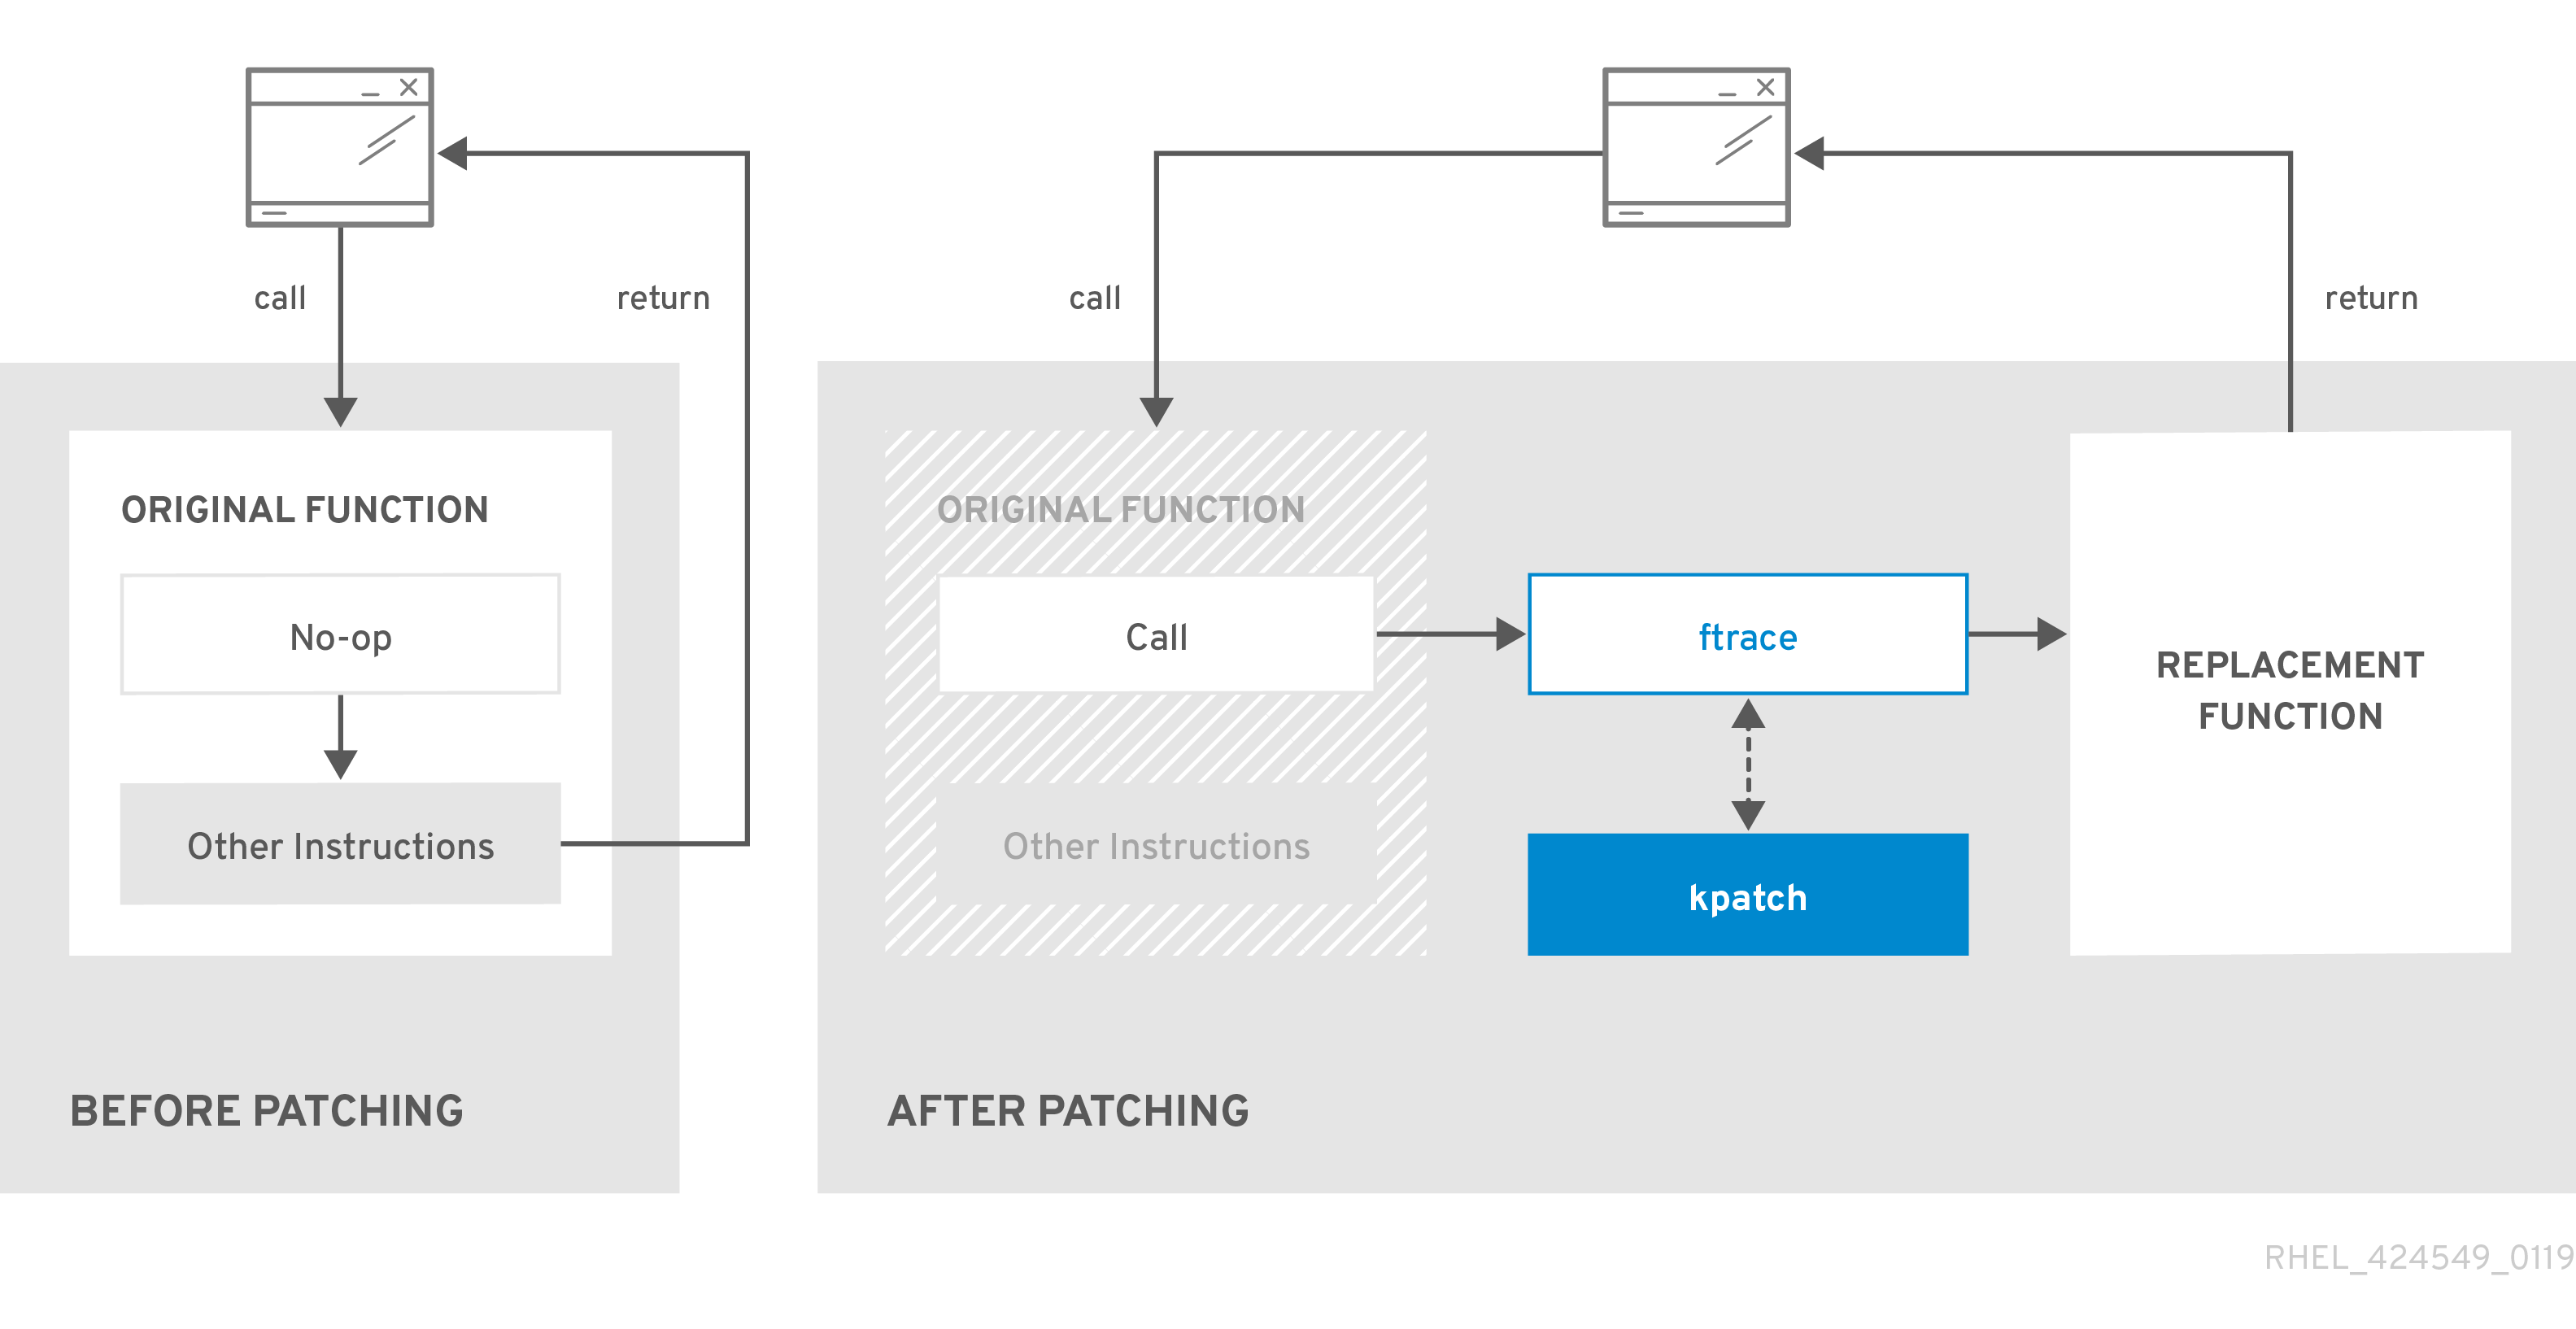
The kpatch kernel patching solution uses the livepatch kernel subsystem to redirect outdated functions to updated ones. Applying a live kernel patch to a system triggers the following processes:
-
The kernel patch module is copied to the
/var/lib/kpatch/directory and registered for re-application to the kernel by systemd on next boot. -
The
kpatchmodule loads into the running kernel and the new functions are registered to theftracemechanism with a pointer to the location in memory of the new code.
When the kernel accesses the patched function, the ftrace mechanism redirects it, bypassing the original functions and leading the kernel to the patched version of the function.
Figure 9.1. How kernel live patching works
9.5. Applying patches with kernel live patching in the web console
You can configure the kpatch framework, which applies kernel security patches without forcing system restarts, in the RHEL web console.
Prerequisites
- You have installed the RHEL 9 web console.
- You have enabled the cockpit service.
Your user account is allowed to log in to the web console.
For instructions, see Installing and enabling the web console.
Procedure
Log in to the RHEL 9 web console.
For details, see Logging in to the web console.
- Click Software Updates.
Check the status of your kernel patching settings.
- If the patching is not installed, click .
To enable kernel patching, click .

- Select the checkbox for applying kernel patches.
- Select whether you want to apply patches for current and future kernels or the current kernel only. If you decide to subscribe to applying patches for future kernels, the system also applies patches for the upcoming kernel releases.
- Click .
Verification
- Check that the kernel patching is now Enabled in the Settings table of the Software updates section.
9.6. Subscribing the currently installed kernels to the live patching stream
A kernel patch module is delivered in an RPM package, specific to the version of the kernel being patched. Each RPM package will be cumulatively updated over time.
The following procedure explains how to subscribe to all future cumulative live patching updates for a given kernel. Because live patches are cumulative, you cannot select which individual patches are deployed for a given kernel.
Red Hat does not support any third party live patches applied to a Red Hat supported system.
Prerequisites
- You have root permissions.
Procedure
Optional: Check your kernel version:
# uname -r
5.14.0-1.el9.x86_64
Search for a live patching package that corresponds to the version of your kernel:
# dnf search $(uname -r)Install the live patching package:
# dnf install "kpatch-patch = $(uname -r)"The command above installs and applies the latest cumulative live patches for that specific kernel only.
If the version of a live patching package is 1-1 or higher, the package will contain a patch module. In that case the kernel will be automatically patched during the installation of the live patching package.
The kernel patch module is also installed into the
/var/lib/kpatch/directory to be loaded by the systemd system and service manager during the future reboots.NoteAn empty live patching package will be installed when no live patches are available for a given kernel. An empty live patching package will have a kpatch_version-kpatch_release of 0-0, for example
kpatch-patch-5_14_0-1-0-0.x86_64.rpm. The installation of the empty RPM subscribes the system to all future live patches for the given kernel.
Verification
Verify that all installed kernels have been patched:
# kpatch list Loaded patch modules: kpatch_5_14_0_1_0_1 [enabled] Installed patch modules: kpatch_5_14_0_1_0_1 (5.14.0-1.el9.x86_64) …The output shows that the kernel patch module has been loaded into the kernel that is now patched with the latest fixes from the
kpatch-patch-5_14_0-1-0-1.el9.x86_64.rpmpackage.NoteEntering the
kpatch listcommand does not return an empty live patching package. Use therpm -qa | grep kpatchcommand instead.# rpm -qa | grep kpatch kpatch-dnf-0.4-3.el9.noarch kpatch-0.9.7-2.el9.noarch kpatch-patch-5_14_0-284_25_1-0-0.el9_2.x86_64
9.7. Automatically subscribing any future kernel to the live patching stream
Use the kpatch-dnf DNF plugin to automatically subscribe your system to kernel live patches for kernels that are within the supported live patch cadence. Future kernels that are not in the supported cadence will not receive live patches.
For supported patch versions, see Kernel Live Patch Support Cadence and Kernel Live Patch life cycles.
Prerequisites
- You have root permissions.
Procedure
Optional: Check all installed kernels and the kernel you are currently running:
# dnf list installed | grep kernel
Updating Subscription Management repositories.
Installed Packages
...
kernel-core.x86_64            5.14.0-1.el9              @beaker-BaseOS
kernel-core.x86_64            5.14.0-2.el9              @@commandline
...

# uname -r
5.14.0-2.el9.x86_64
Install the
kpatch-dnfplugin:# dnf install kpatch-dnfEnable automatic subscription to kernel live patches:
# dnf kpatch auto Updating Subscription Management repositories. Last metadata expiration check: 1:38:21 ago on Fri 17 Sep 2021 07:29:53 AM EDT. Dependencies resolved. ================================================== Package Architecture ================================================== Installing: kpatch-patch-5_14_0-1 x86_64 kpatch-patch-5_14_0-2 x86_64 Transaction Summary =================================================== Install 2 Packages …This command subscribes all currently installed kernels to receiving kernel live patches. The command also installs and applies the latest cumulative live patches, if any, for all installed kernels.
When you update the kernel, live patches are installed automatically during the new kernel installation process.
The kernel patch module is also installed into the
/var/lib/kpatch/directory to be loaded by the systemd system and service manager during future reboots.NoteAn empty live patching package will be installed when no live patches are available for a given kernel. An empty live patching package will have a kpatch_version-kpatch_release of 0-0, for example
kpatch-patch-5_14_0-1-0-0.el9.x86_64.rpm. The installation of the empty RPM subscribes the system to all future live patches for the given kernel.
Verification
Verify that all installed kernels are patched:
# kpatch list
Loaded patch modules:
kpatch_5_14_0_2_0_1 [enabled]

Installed patch modules:
kpatch_5_14_0_1_0_1 (5.14.0-1.el9.x86_64)
kpatch_5_14_0_2_0_1 (5.14.0-2.el9.x86_64)
The output shows that the running kernel is patched with fixes from
kpatch-patch-5_14_0-1-0-1.el9.x86_64.rpmand the other installed kernel is patched with fixes fromkpatch-patch-5_14_0-2-0-1.el9.x86_64.rpm.NoteEntering the
kpatch listcommand does not return an empty live patching package. Use therpm -qa | grep kpatchcommand instead.# rpm -qa | grep kpatch kpatch-dnf-0.4-3.el9.noarch kpatch-0.9.7-2.el9.noarch kpatch-patch-5_14_0-284_25_1-0-0.el9_2.x86_64
9.8. Enabling package filtering to show only kpatch-supported kernels
To avoid installing or displaying unsupported kernel builds, enable package filtering with the kpatch-dnf plugin. Filtering hides kernel versions that do not have a corresponding kpatch-patch package.
Prerequisites
- You have root permissions on your system.
-
You installed the
kpatch-dnfplugin.
Procedure
Enable package filtering:
# dnf kpatch filter enable
Verification
Verify update and filter settings:
# dnf kpatch statusKpatch update setting: auto Kpatch filter setting: filterDNF lists and updates only kernels that have matching
kpatch-patchpackages, and automatically subscribes these kernels to live patches.NoteIf no live patches exist for a supported kernel, DNF installs an “empty”
kpatch-patchpackage (version 0-0) to maintain subscription for future cumulative patches.
9.9. Disabling automatic subscription to the live patching stream
To disable the automatic installation of kpatch-patch packages, disable the automatic subscription feature.
Prerequisites
- You have root permissions.
Procedure
Optional: Check all installed kernels and the kernel you are currently running:
# dnf list installed | grep kernel
Updating Subscription Management repositories.
Installed Packages
...
kernel-core.x86_64            5.14.0-1.el9              @beaker-BaseOS
kernel-core.x86_64            5.14.0-2.el9              @@commandline
...

# uname -r
5.14.0-2.el9.x86_64
Disable automatic subscription to kernel live patches:
# dnf kpatch manual
Updating Subscription Management repositories.
Verification
You can check for the successful outcome:
# yum kpatch status
...
Updating Subscription Management repositories.
Last metadata expiration check: 0:30:41 ago on Tue Jun 14 15:59:26 2022.
Kpatch update setting: manual
9.10. Updating kernel patch modules
The kernel patch modules are delivered and applied through RPM packages. The process of updating a cumulative kernel patch module is similar to updating any other RPM package.
If filtering is enabled, DNF updates only kpatch-supported kernels.
Prerequisites
- The system is subscribed to the live patching stream, as described in Subscribing the currently installed kernels to the live patching stream.
Procedure
Update to a new cumulative version for the current kernel:
# dnf update "kpatch-patch = $(uname -r)"The command above automatically installs and applies any updates that are available for the currently running kernel. Including any future released cumulative live patches.
Alternatively, update all installed kernel patch modules:
# dnf update "kpatch-patch"
When the system reboots into the same kernel, the kernel is automatically live patched again by the kpatch.service systemd service.
9.11. Removing the live patching package
Disable the Red Hat Enterprise Linux kernel live patching solution by removing the live patching package.
Prerequisites
- Root permissions
- The live patching package is installed.
Procedure
Select the live patching package.
# dnf list installed | grep kpatch-patch kpatch-patch-5_14_0-1.x86_64 0-1.el9 @@commandline …The example output lists live patching packages that you installed.
Remove the live patching package.
# dnf remove kpatch-patch-5_14_0-1.x86_64When a live patching package is removed, the kernel remains patched until the next reboot, but the kernel patch module is removed from disk. On future reboot, the corresponding kernel will no longer be patched.
- Reboot your system.
Verify the live patching package is removed:
# dnf list installed | grep kpatch-patchThe command displays no output if the package has been successfully removed.
Verification
Verify the kernel live patching solution is disabled:
# kpatch list
Loaded patch modules:
The example output shows that the kernel is not patched and the live patching solution is not active because no patch modules are currently loaded.
Currently, Red Hat does not support reverting live patches without rebooting your system. In case of any issues, contact our support team.
9.12. Uninstalling the kernel patch module
Prevent the Red Hat Enterprise Linux kernel live patching solution from applying a kernel patch module on subsequent boots.
Prerequisites
- Root permissions
- A live patching package is installed.
- A kernel patch module is installed and loaded.
Procedure
Select a kernel patch module:
# kpatch list Loaded patch modules: kpatch_5_14_0_1_0_1 [enabled] Installed patch modules: kpatch_5_14_0_1_0_1 (5.14.0-1.el9.x86_64) …Uninstall the selected kernel patch module.
# kpatch uninstall kpatch_5_14_0_1_0_1
uninstalling kpatch_5_14_0_1_0_1 (5.14.0-1.el9.x86_64)
Note that the uninstalled kernel patch module is still loaded:
# kpatch list
Loaded patch modules:
kpatch_5_14_0_1_0_1 [enabled]

Installed patch modules:
<NO_RESULT>
When the selected module is uninstalled, the kernel remains patched until the next reboot, but the kernel patch module is removed from disk.
- Reboot your system.
Verification
Verify that the kernel patch module is uninstalled:
# kpatch list Loaded patch modules: …This example output shows no loaded or installed kernel patch modules, therefore the kernel is not patched and the kernel live patching solution is not active.
9.13. Disabling kpatch.service
Prevent the Red Hat Enterprise Linux kernel live patching solution from applying all kernel patch modules globally on subsequent boots.
Prerequisites
- Root permissions
- A live patching package is installed.
- A kernel patch module is installed and loaded.
Procedure
Verify
kpatch.serviceis enabled.# systemctl is-enabled kpatch.service enabledDisable
kpatch.service:# systemctl disable kpatch.service Removed /etc/systemd/system/multi-user.target.wants/kpatch.service.Note that the applied kernel patch module is still loaded:
# kpatch list
Loaded patch modules:
kpatch_5_14_0_1_0_1 [enabled]

Installed patch modules:
kpatch_5_14_0_1_0_1 (5.14.0-1.el9.x86_64)
- Reboot your system.
Optional: Verify the status of
kpatch.service.# systemctl status kpatch.service ● kpatch.service - "Apply kpatch kernel patches" Loaded: loaded (/usr/lib/systemd/system/kpatch.service; disabled; vendor preset: disabled) Active: inactive (dead)The example output testifies that
kpatch.serviceis disabled. Thereby, the kernel live patching solution is not active.Verify that the kernel patch module has been unloaded.
# kpatch list
Loaded patch modules:

Installed patch modules:
kpatch_5_14_0_1_0_1 (5.14.0-1.el9.x86_64)
The example output above shows that a kernel patch module is still installed but the kernel is not patched.
Currently, Red Hat does not support reverting live patches without rebooting your system. In case of any issues, contact our support team.
Chapter 10. Keeping kernel panic parameters disabled in virtualized environments
When configuring a Virtual Machine in RHEL 9, do not enable the softlockup_panic and nmi_watchdog kernel parameters, because the Virtual Machine might suffer from a spurious soft lockup. And that should not require a kernel panic.
Find the reasons behind this advice in the following sections.
10.1. What is a soft lockup
A soft lockup occurs when a task executes in kernel space without rescheduling, preventing other tasks from running on that CPU. This issue, often caused by a bug, triggers a warning on the system console to alert users.
10.2. Parameters controlling kernel panic
The following kernel parameters can be set to control a system’s behavior when a soft lockup is detected.
softlockup_panicControls whether or not the kernel will panic when a soft lockup is detected.
Expand Type Value Effect Integer
0
kernel does not panic on soft lockup
Integer
1
kernel panics on soft lockup
By default, on RHEL 8, this value is 0.
The system needs to detect a hard lockup first to be able to panic. The detection is controlled by the
nmi_watchdogparameter.nmi_watchdogControls whether lockup detection mechanisms (
watchdogs) are active or not. This parameter is of integer type.Expand Value Effect 0
disables lockup detector
1
enables lockup detector
The hard lockup detector monitors each CPU for its ability to respond to interrupts.
watchdog_threshControls frequency of watchdog
hrtimer, NMI events, and soft or hard lockup thresholds.Expand Default threshold Soft lockup threshold 10 seconds
2 *
watchdog_threshSetting this parameter to zero disables lockup detection altogether.
10.3. Spurious soft lockups in virtualized environments
Soft lockup warnings on guest operating systems can be false alarms caused by host workload or resource contention. Unlike physical hosts where these indicate bugs, virtualized environments might trigger false warnings when the host schedules out the guest CPU for extended periods.
Heavy workload on a host or high contention over some specific resource, such as memory, can cause a spurious soft lockup firing because the host might schedule out the guest CPU for a period longer than 20 seconds. When the guest CPU is again scheduled to run on the host, it experiences a time jump that triggers the due timers. The timers also include the hrtimer watchdog that can report a soft lockup on the guest CPU.
Soft lockup in a virtualized environment can be false. You must not enable the kernel parameters that trigger a system panic when a soft lockup reports to a guest CPU.
To understand soft lockups in guests, it is essential to know that the host schedules the guest as a task, and the guest then schedules its own tasks.
Chapter 11. Adjusting kernel parameters for database servers
To ensure efficient operation of database servers and databases, you must configure the required sets of kernel parameters.
11.1. Introduction to database servers
A database server is a service that provides features of a database management system (DBMS). DBMS provides utilities for database administration and interacts with end users, applications, and databases.
Red Hat Enterprise Linux 9 provides the following database management systems:
- MariaDB 10.5
- MariaDB 10.11 - available since RHEL 9.4
- MySQL 8.0
- PostgreSQL 13
- PostgreSQL 15 - available since RHEL 9.2
- PostgreSQL 16 - available since RHEL 9.4
- Redis 6
11.2. Parameters affecting performance of database applications
The following kernel parameters affect performance of database applications.
- fs.aio-max-nr
Defines the maximum number of asynchronous I/O operations the system can handle on the server.
NoteRaising the
fs.aio-max-nrparameter produces no additional changes beyond increasing the aio limit.- fs.file-max
Defines the maximum number of file handles (temporary file names or IDs assigned to open files) the system supports at any instance.
The kernel dynamically allocates file handles whenever a file handle is requested by an application. However, the kernel does not free these file handles when they are released by the application. It recycles these file handles instead. The total number of allocated file handles will increase over time even though the number of currently used file handles might be low.
kernel.shmall-
Defines the total number of shared memory pages that can be used system-wide. To use the entire main memory, the value of the
kernel.shmallparameter should be ≤ total main memory size. kernel.shmmax- Defines the maximum size in bytes of a single shared memory segment that a Linux process can allocate in its virtual address space.
kernel.shmmni- Defines the maximum number of shared memory segments the database server is able to handle.
net.ipv4.ip_local_port_range- The system uses this port range for programs that connect to a database server without specifying a port number.
net.core.rmem_default- Defines the default receive socket memory through Transmission Control Protocol (TCP).
net.core.rmem_max- Defines the maximum receive socket memory through Transmission Control Protocol (TCP).
net.core.wmem_default- Defines the default send socket memory through Transmission Control Protocol (TCP).
net.core.wmem_max- Defines the maximum send socket memory through Transmission Control Protocol (TCP).
vm.dirty_bytes/vm.dirty_ratio-
Defines a threshold in bytes / in percentage of dirty-able memory at which a process generating dirty data is started in the
write()function.
Either vm.dirty_bytes or vm.dirty_ratio can be specified at a time.
vm.dirty_background_bytes/vm.dirty_background_ratio- Defines a threshold in bytes / in percentage of dirty-able memory at which the kernel tries to actively write dirty data to hard-disk.
Either vm.dirty_background_bytes or vm.dirty_background_ratio can be specified at a time.
vm.dirty_writeback_centisecsDefines a time interval between periodic wake-ups of the kernel threads responsible for writing dirty data to hard-disk.
This kernel parameters measures in 100th’s of a second.
vm.dirty_expire_centisecsDefines the time of dirty data that becomes old to be written to hard-disk.
This kernel parameters measures in 100th’s of a second.
Chapter 12. Getting started with kernel logging
Log files provide messages about the system, including the kernel, services, and applications running on it. The syslog service provides native support for logging in Red Hat Enterprise Linux. Various utilities use this system to record events and organize them into log files. These files are useful when auditing the operating system or troubleshooting problems.
12.1. What is the kernel ring buffer
Capture early boot and kernel messages by using the kernel ring buffer, preventing data loss during startup. This cyclic buffer stores the printk() output, which you can view with the dmesg command or save to permanent logs by using the syslog service.
The ring buffer is a cyclic data structure that has a fixed size, and is hard-coded into the kernel. Users can display data stored in the kernel ring buffer through the dmesg command or the /var/log/boot.log file. When the ring buffer is full, the new data overwrites the old.
12.2. Role of printk on log-levels and kernel logging
The kernel assigns a log-level to every message to indicate its importance. While the ring buffer collects all messages, the kernel.printk parameter determines which messages appear on the console, which effectively filters output based on severity.
The log-level values break down in this order:
- 0
- Kernel emergency. The system is unusable.
- 1
- Kernel alert. Action must be taken immediately.
- 2
- Condition of the kernel is considered critical.
- 3
- General kernel error condition.
- 4
- General kernel warning condition.
- 5
- Kernel notice of a normal but significant condition.
- 6
- Kernel informational message.
- 7
- Kernel debug-level messages.
By default, kernel.printk in RHEL 9 has the following values:
# sysctl kernel.printk
kernel.printk = 7	4	1	7
The four values define the following, in order:
- Console log-level, defines the lowest priority of messages printed to the console.
- Default log-level for messages without an explicit log-level attached to them.
- Sets the lowest possible log-level configuration for the console log-level.
Sets default value for the console log-level at boot time.
Each of these values defines a different rule for handling error messages.
The default 7 4 1 7 printk value allows for better debugging of kernel activity. However, when coupled with a serial console, this printk setting might cause intense I/O bursts that might lead to a RHEL system becoming temporarily unresponsive. To avoid these situations, setting a printk value of 4 4 1 7 typically works, but at the expense of losing the extra debugging information.
Also note that certain kernel command line parameters, such as quiet or debug, change the default kernel.printk values.
Chapter 13. Reinstalling GRUB
You can reinstall the GRUB boot loader to fix certain problems, usually caused by an incorrect installation of GRUB, missing files, or a broken system. You can resolve these issues by restoring the missing files and updating the boot information.
Reasons to reinstall GRUB:
- Upgrading the GRUB boot loader packages.
- Adding the boot information to another drive.
- The user requires the GRUB boot loader to control installed operating systems. However, some operating systems are installed with their own boot loaders and reinstalling GRUB returns control to the desired operating system.
GRUB restores files only if they are not corrupted.
13.1. Reinstalling GRUB on BIOS-based machines
You can reinstall the GRUB boot loader on your BIOS-based system. Always reinstall GRUB after updating the GRUB packages.
This overwrites the existing GRUB to install the new GRUB. Ensure that the system does not cause data corruption or boot crash during the installation.
Procedure
Reinstall GRUB on the device where it is installed. For example, if
sdais your device:# grub2-install /dev/sdaReboot your system for the changes to take effect:
# reboot
13.2. Reinstalling GRUB on UEFI-based machines
You can reinstall the GRUB boot loader on your UEFI-based system.
Ensure that the system does not cause data corruption or boot crash during the installation.
Procedure
Reinstall the
grub2-efiandshimboot loader files:# yum reinstall grub2-efi shimReboot your system for the changes to take effect:
# reboot
13.3. Reinstalling GRUB on IBM Power machines
Reinstall the GRUB boot loader on the Power PC Reference Platform (PReP) boot partition of your IBM Power system. Always reinstall GRUB after updating the GRUB packages.
This overwrites the existing GRUB to install the new GRUB. Ensure that the system does not cause data corruption or boot crash during the installation.
Procedure
Determine the disk partition that stores GRUB:
# bootlist -m normal -osda1Reinstall GRUB on the disk partition:
# grub2-install partitionReplace
partitionwith the identified GRUB partition, such as/dev/sda1.Reboot your system for the changes to take effect:
# reboot
13.4. Resetting GRUB
Resetting GRUB removes all GRUB configuration files and system settings. It reinstalls the boot loader and restores all configuration settings to their default values. This process fixes failures caused by corrupted files and invalid configuration.
The following procedure will remove all the customization made by the user.
Procedure
Remove the configuration files:
# rm /etc/grub.d/*
# rm /etc/sysconfig/grub
Reinstall packages.
On BIOS-based machines:
# yum reinstall grub2-toolsOn UEFI-based machines:
# yum reinstall grub2-efi shim grub2-tools grub2-common
Rebuild the
grub.cfgfile for the changes to take effect.On BIOS-based machines:
# grub2-mkconfig -o /boot/grub2/grub.cfgOn UEFI-based machines:
# grub2-mkconfig -o /boot/grub2/grub.cfgWarningThe path to rebuild
grub.cfgis same for both BIOS and UEFI based machines. Actualgrub.cfgis present at BIOS path only. The UEFI path has a stub file that must not be modified or recreated usinggrub2-mkconfigcommand.
-
Follow Reinstalling GRUB procedure to restore GRUB on the
/boot/partition.
Chapter 14. Installing kdump
The kdump service is installed and activated by default on the new versions of RHEL 9 installations.
14.1. What is kdump
kdump provides a crash dumping mechanism that generates a vmcore file containing system memory contents for analysis. It uses kexec to boot into a reserved second kernel without a reboot. The crashed kernel’s memory is captured accurately, as a result.
A kernel crash dump can be the only information available if a system failure occur. Therefore, operational kdump is important in mission-critical environments. Red Hat advises to regularly update and test kexec-tools in your normal kernel update cycle. This is important when you install new kernel features.
If you have multiple kernels on a machine, you can enable kdump for all installed kernels or for specified kernels only. When you install kdump, the system creates a default /etc/kdump.conf file. /etc/kdump.conf includes the default minimum kdump configuration, which you can edit to customize the kdump configuration.
14.2. Installing kdump using Anaconda
The Anaconda installer provides a graphical interface screen for kdump configuration during an interactive installation. You can enable kdump and reserve the required amount of memory.
Procedure
-
On the Anaconda installer, click KDUMP and enable
kdump: - In Kdump Memory Reservation, select Manual` if you must customize the memory reserve.
In KDUMP > Memory To Be Reserved (MB), set the required memory reserve for
kdump.= Installing kdump on the command line
Installation options such as custom Kickstart installations, in some cases does not install or enable kdump by default. The following procedure helps you enable kdump in this case.
Prerequisites
- An active RHEL subscription.
-
A repository containing the
kexec-toolspackage for your system CPU architecture. -
Fulfilled requirements for
kdumpconfigurations and targets. For details, see Supported kdump configurations and targets.
Procedure
Check if
kdumpis installed on your system:# rpm -q kexec-toolsOutput if the package is installed:
# kexec-tools-2.0.22-13.el9.x86_64Output if the package is not installed:
package kexec-tools is not installedInstall
kdumpand other necessary packages:# dnf install kexec-tools
Chapter 15. Configuring kdump on the command line
The memory for kdump is reserved during the system boot. You can configure the memory size in the system’s Grand Unified Bootloader (GRUB) configuration file. The memory size depends on the crashkernel= value specified in the configuration file and the size of the physical memory of system.
15.1. Estimating the kdump size
When planning and building your kdump environment, it is important to know the space required by the crash dump file.
The makedumpfile --mem-usage command estimates the space required by the crash dump file. It generates a memory usage report. The report helps you decide the dump level and the pages that are safe to exclude.
Procedure
Enter the following command to generate a memory usage report:
# makedumpfile --mem-usage /proc/kcore


TYPE        PAGES    EXCLUDABLE    DESCRIPTION
-------------------------------------------------------------
ZERO          501635      yes        Pages filled with zero
CACHE         51657       yes        Cache pages
CACHE_PRIVATE 5442        yes        Cache pages + private
USER          16301       yes        User process pages
FREE          77738211    yes        Free pages
KERN_DATA     1333192     no         Dumpable kernel data
The makedumpfile --mem-usage command reports required memory in pages. This means that you must calculate the size of memory in use against the kernel page size.
By default the RHEL kernel uses 4 KB sized pages on AMD64 and Intel 64 CPU architectures, and 64 KB sized pages on IBM POWER architectures.
15.2. Configuring kdump memory usage on RHEL 9
The kexec-tools package maintains default crashkernel= memory reservation values. The kdump service uses these defaults to reserve memory for each kernel. You can use these values as a baseline for manual configuration. Note that minimum requirements vary by hardware.
The automatic memory allocation for kdump also varies based on the system hardware architecture and available memory size. For example, on AMD64 and Intel 64-bit architectures, the default value for the crashkernel= parameter will work only when the available memory is more than 1 GB. The kexec-tools utility configures the following default memory reserves on AMD64 and Intel 64-bit architecture:
crashkernel=1G-4G:192M,4G-64G:256M,64G:512M
You can also run kdumpctl estimate to get an approximate value without triggering a crash. The estimated crashkernel= value might not be an exact one but can serve as a reference to set an appropriate crashkernel= value.
The crashkernel=auto option in the boot command line is no longer supported on RHEL 9 and later releases.
Prerequisites
- You have root permissions on the system.
-
You have fulfilled
kdumprequirements for configurations and targets. For details, see Supported kdump configurations and targets. -
You have installed the
ziplutility if it is the IBM Z system.
Procedure
Configure the default value for crash kernel:
# kdumpctl reset-crashkernel --kernel=ALLWhen configuring the
crashkernel=value, test the configuration by rebooting the system withkdumpenabled. If thekdumpkernel fails to boot, increase the memory size gradually to set an acceptable value.To use a custom
crashkernel=value:Configure the required memory reserve.
crashkernel=192MOptionally, you can set the amount of reserved memory to a variable depending on the total amount of installed memory by using the syntax
crashkernel=<range1>:<size1>,<range2>:<size2>. For example:crashkernel=1G-4G:192M,2G-64G:256MThe example reserves 192 MB of memory if the total amount of system memory is 1 GB or higher and lower than 4 GB. If the total amount of memory is more than 4 GB, 256 MB is reserved for
kdump.Optional: Offset the reserved memory.
Some systems require to reserve memory with a certain fixed offset since
crashkernelreservation is very early, and it wants to reserve some area for special usage. If the offset is set, the reserved memory begins there. To offset the reserved memory, use the following syntax:crashkernel=192M@16MThe example reserves 192 MB of memory starting at 16 MB (physical address 0x01000000). If you offset to 0 or do not specify a value,
kdumpoffsets the reserved memory automatically. You can also offset memory when setting a variable memory reservation by specifying the offset as the last value. For example,crashkernel=1G-4G:192M,2G-64G:256M@16M.Update the boot loader configuration:
# grubby --update-kernel ALL --args "crashkernel=<custom-value>"The
<custom-value>must contain the customcrashkernel=value that you have configured for the crash kernel.
Reboot for changes to take effect:
# reboot
The commands to test kdump configuration will cause the kernel to crash with data loss. Follow the instructions with care. You must not use an active production system to test the kdump configuration.
Cause the kernel to crash by activating the sysrq key. The address-YYYY-MM-DD-HH:MM:SS/vmcore file is saved to the target location as specified in the /etc/kdump.conf file. If you select the default target location, the vmcore file is saved in the partition mounted under /var/crash/.
Activate the
sysrqkey to boot into thekdumpkernel:# echo c > /proc/sysrq-triggerThe command causes kernel to crash and reboots the kernel if required.
-
Display the
/etc/kdump.conffile and check if thevmcorefile is saved in the target destination.
15.3. Configuring the kdump target
Configure kdump to store crash dumps locally or send them over a network using Network File System (NFS) or Secure Shell (SSH). While the default location is /var/crash/, you can customize the target to write directly to a device or a remote server, ensuring only one preservation option is active at a time.
Prerequisites
- You have root permissions on the system.
-
Fulfilled requirements for
kdumpconfigurations and targets. For details, see Supported kdump configurations and targets.
Procedure
To store the crash dump file in
/var/crash/directory of the local file system, edit the/etc/kdump.conffile and specify the path:path /var/crashThe option
path /var/crashrepresents the path to the file system in whichkdumpsaves the crash dump file.Note-
When you specify a dump target in the
/etc/kdump.conffile, then the path is relative to the specified dump target. -
When you do not specify a dump target in the
/etc/kdump.conffile, then the path represents the absolute path from the root directory.
Depending on the file system mounted in the current system, the dump target and the adjusted dump path are configured automatically.
-
When you specify a dump target in the
To secure the crash dump file and the accompanying files produced by
kdump, you should set up proper attributes for the target destination directory, such as user permissions and SELinux contexts. Additionally, you can define a script, for examplekdump_post.shin thekdump.conffile as follows:kdump_post <path_to_kdump_post.sh>The
kdump_postdirective specifies a shell script or a command that executes afterkdumphas completed capturing and saving a crash dump to the specified destination. You can use this mechanism to extend the functionality ofkdumpto perform actions including the adjustments in file permissions.-
The
kdumptarget configuration
# *grep -v ^# /etc/kdump.conf | grep -v ^$*
ext4 /dev/mapper/vg00-varcrashvol
path /var/crash
core_collector makedumpfile -c --message-level 1 -d 31
The dump target is specified (ext4 /dev/mapper/vg00-varcrashvol), and, therefore, it is mounted at /var/crash. The path option is also set to /var/crash. Therefore, the kdump saves the vmcore file in the /var/crash/var/crash directory.
To change the local directory for saving the crash dump, edit the
/etc/kdump.confconfiguration file as arootuser:-
Remove the hash sign (
#) from the beginning of the#path /var/crashline. Replace the value with the intended directory path. For example:
path /usr/local/coresImportantIn RHEL 9, the directory defined as the
kdumptarget using thepathdirective must exist when thekdumpsystemd service starts to avoid failures. Unlike in earlier versions of RHEL, the directory is no longer created automatically if it does not exist when the service starts.
-
Remove the hash sign (
To write the file to a different partition, edit the
/etc/kdump.confconfiguration file:Remove the hash sign (
#) from the beginning of the#ext4line, depending on your choice.-
device name (the
#ext4 /dev/vg/lv_kdumpline) -
file system label (the
#ext4 LABEL=/bootline) -
UUID (the
#ext4 UUID=03138356-5e61-4ab3-b58e-27507ac41937line)
-
device name (the
Change the file system type and the device name, label or UUID, to the required values. The correct syntax for specifying UUID values is both
UUID="correct-uuid"andUUID=correct-uuid. For example:ext4 UUID=03138356-5e61-4ab3-b58e-27507ac41937ImportantIt is recommended to specify storage devices by using a
LABEL=orUUID=. Disk device names such as/dev/sda3are not guaranteed to be consistent across reboot.When you use Direct Access Storage Device (DASD) on IBM Z hardware, ensure the dump devices are correctly specified in
/etc/dasd.confbefore proceeding withkdump.
To write the crash dump directly to a device, edit the
/etc/kdump.confconfiguration file:-
Remove the hash sign (
#) from the beginning of the#raw /dev/vg/lv_kdumpline. Replace the value with the intended device name. For example:
raw /dev/sdb1
-
Remove the hash sign (
To store the crash dump to a remote machine by using the
NFSprotocol:-
Remove the hash sign (
#) from the beginning of the#nfs my.server.com:/export/tmpline. Replace the value with a valid hostname and directory path. For example:
nfs penguin.example.com:/export/coresRestart the
kdumpservice for the changes to take effect:sudo systemctl restart kdump.serviceNoteWhile using the NFS directive to specify the NFS target,
kdump.serviceautomatically attempts to mount the NFS target to check the disk space. There is no need to mount the NFS target in advance. To preventkdump.servicefrom mounting the target, use thedracut_args --mountdirective inkdump.conf. This enableskdump.serviceto call thedracututility with the--mountargument to specify the NFS target.
-
Remove the hash sign (
To store the crash dump to a remote machine by using the SSH protocol:
-
Remove the hash sign (
#) from the beginning of the#ssh user@my.server.comline. - Replace the value with a valid username and hostname.
Include your SSH key in the configuration.
-
Remove the hash sign from the beginning of the
#sshkey /root/.ssh/kdump_id_rsaline. Change the value to the location of a key valid on the server you are trying to dump to. For example:
ssh john@penguin.example.com
sshkey /root/.ssh/mykey
-
Remove the hash sign from the beginning of the
-
Remove the hash sign (
15.4. Configuring the kdump core collector
The kdump service uses a core_collector program to capture the crash dump image. In RHEL, the makedumpfile utility is the default core collector. It helps shrink the dump file by:
- Compressing the size of a crash dump file and copying only necessary pages by using various dump levels.
- Excluding unnecessary crash dump pages.
- Filtering the page types to be included in the crash dump.
Crash dump file compression is enabled by default in the RHEL 7 and above.
If you need to customize the crash dump file compression, follow this procedure.
Syntax
core_collector makedumpfile -l --message-level 1 -d 31Options
-
-c,-lor-p: specify compress dump file format by each page using either,zlibfor-coption,lzofor-loption orsnappyfor-poption. -
-d(dump_level): excludes pages so that they are not copied to the dump file. -
--message-level: specify the message types. You can restrict outputs printed by specifyingmessage_levelwith this option. For example, specifying 7 asmessage_levelprints common messages and error messages. The maximum value ofmessage_levelis 31.
Prerequisites
- You have root permissions on the system.
-
Fulfilled requirements for
kdumpconfigurations and targets. For details, see Supported kdump configurations and targets.
Procedure
-
As a
root, edit the/etc/kdump.confconfiguration file and remove the hash sign ("#") from the beginning of the#core_collector makedumpfile -l --message-level 1 -d 31. - Enter the following command to enable crash dump file compression:
core_collector makedumpfile -l --message-level 1 -d 31
The -l option specifies the dump compressed file format. The -d option specifies dump level as 31. The --message-level option specifies message level as 1.
Also, consider following examples with the -c and -p options:
To compress a crash dump file by using
-c:core_collector makedumpfile -c -d 31 --message-level 1To compress a crash dump file by using
-p:core_collector makedumpfile -p -d 31 --message-level 1
15.5. Configuring the kdump default failure responses
Configure kdump to handle crash dump failures by defining specific response actions. Instead of the default reboot and data loss, you can choose to halt, power off, or start a shell session to preserve the core dump when the primary target fails.
dump_to_rootfs-
Saves the core dump to the
rootfile system. reboot- Reboots the system, losing the core dump in the process.
halt- Stops the system, losing the core dump in the process.
poweroff- Power the system off, losing the core dump in the process.
shell-
Runs a shell session from within the
initramfs, you can record the core dump manually. final_action-
Enables additional operations such as
reboot,halt, andpoweroffafter a successfulkdumpor when shell ordump_to_rootfsfailure action completes. The default isreboot. failure_action-
Specifies the action to perform when a dump might fail in a kernel crash. The default is
reboot.
Prerequisites
- Root permissions.
-
Fulfilled requirements for
kdumpconfigurations and targets. For details, see Supported kdump configurations and targets.
Procedure
-
As a
rootuser, remove the hash sign (#) from the beginning of the#failure_actionline in the/etc/kdump.confconfiguration file. Replace the value with a required action.
failure_action poweroff
15.6. Configuration file for kdump
The /etc/sysconfig/kdump file controls kdump kernel command-line parameters. While default settings usually suffice, you can modify variables like KDUMP_COMMANDLINE_APPEND or KDUMP_COMMANDLINE_REMOVE to customize kernel behavior for specific debugging needs.
KDUMP_COMMANDLINE_REMOVEThis option removes arguments from the current
kdumpcommand line. It removes parameters that can causekdumperrors orkdumpkernel boot failures. These parameters might have been parsed from the previousKDUMP_COMMANDLINEprocess or inherited from the/proc/cmdlinefile.When this variable is not configured, it inherits all values from the
/proc/cmdlinefile. Configuring this option also provides information that is helpful in debugging an issue.To remove certain arguments, add them to
KDUMP_COMMANDLINE_REMOVEas follows:
# KDUMP_COMMANDLINE_REMOVE="hugepages hugepagesz slub_debug quiet log_buf_len swiotlb"KDUMP_COMMANDLINE_APPENDThis option appends arguments to the current command line. These arguments might have been parsed by the previous
KDUMP_COMMANDLINE_REMOVEvariable.For the
kdumpkernel, disabling certain modules such asmce,cgroup,numa,hest_disablecan help prevent kernel errors. These modules can consume a significant part of the kernel memory reserved forkdumpor causekdumpkernel boot failures.To disable memory
cgroupson thekdumpkernel command line, run the command as follows:
KDUMP_COMMANDLINE_APPEND="cgroup_disable=memory"15.7. Testing the kdump configuration
After configuring kdump, you must manually test a system crash and ensure that the vmcore file is generated in the defined kdump target. The vmcore file is captured from the context of the freshly booted kernel. Therefore, vmcore has critical information for debugging a kernel crash.
Do not test kdump on active production systems. The commands to test kdump cause the kernel to crash with data loss. Depending on your system architecture, ensure that you schedule significant maintenance time because kdump testing might require several reboots with a long boot time.
If the vmcore file is not generated during the kdump test, identify and fix issues before you run the test again for a successful kdump testing.
If you make any manual system modifications, you must test the kdump configuration at the end of any system modification. For example, if you make any of the following changes, ensure that you test the kdump configuration for an optimal kdump performances for:
- Package upgrades.
- Hardware level changes, for example, storage or networking changes.
- Firmware upgrades.
- New installation and application upgrades that include third party modules.
- If you use the hot-plugging mechanism to add more memory on hardware that support this mechanism.
-
After you make changes in the
/etc/kdump.confor/etc/sysconfig/kdumpfile.
Prerequisites
- You have root permissions on the system.
-
You have saved all important data. The commands to test
kdumpcause the kernel to crash with loss of data. - You have scheduled significant machine maintenance time depending on the system architecture.
Procedure
Enable the
kdumpservice:# kdumpctl restartCheck the status of the
kdumpservice with thekdumpctl:# kdumpctl statuskdump:Kdump is operationalOptionally, if you use the
systemctlcommand, the output prints in the systemd journal.Start a kernel crash to test the
kdumpconfiguration. Thesysrq-triggerkey combination causes the kernel to crash and might reboot the system if required.# echo c > /proc/sysrq-triggerOn a kernel reboot, the
address-YYYY-MM-DD-HH:MM:SS/vmcorefile is created at the location you have specified in the/etc/kdump.conffile. The default is/var/crash/.
15.8. Files produced by kdump after system crash
After your system crashes, the kdump service captures the kernel memory in a dump file (vmcore) and it also generates additional diagnostic files to aid in troubleshooting and postmortem analysis.
Files produced by kdump:
-
vmcore- main kernel memory dump file containing system memory at the time of the crash. It includes data as per the configuration of thecore_collectorprogram specified inkdumpconfiguration. By default the kernel data structures, process information, stack traces, and other diagnostic information. -
vmcore-dmesg.txt- contents of the kernel ring buffer log (dmesg) from the primary kernel that panicked. -
kexec-dmesg.log- has kernel and system log messages from the execution of the secondarykexeckernel that collects thevmcoredata.
15.9. Enabling and disabling the kdump service
You can configure to enable or disable the kdump functionality on a specific kernel or on all installed kernels. You must routinely test the kdump functionality and validate its operates correctly.
Prerequisites
- You have root permissions on the system.
-
You have completed
kdumprequirements for configurations and targets. See Supported kdump configurations and targets. -
All configurations for installing
kdumpare set up as required.
Procedure
Enable the
kdumpservice formulti-user.target:# systemctl enable kdump.serviceStart the service in the current session:
# systemctl start kdump.serviceStop the
kdumpservice:# systemctl stop kdump.serviceDisable the
kdumpservice:# systemctl disable kdump.service
It is recommended to set kptr_restrict=1 as default. When kptr_restrict is set to (1) as default, the kdumpctl service loads the crash kernel regardless of whether the Kernel Address Space Layout (KASLR) is enabled.
If kptr_restrict is not set to 1 and KASLR is enabled, the contents of /proc/kore file are generated as all zeros. The kdumpctl service fails to access the /proc/kcore file and load the crash kernel. The kexec-kdump-howto.txt file displays a warning message, which recommends you to set kptr_restrict=1. Verify for the following in the sysctl.conf file to ensure that kdumpctl service loads the crash kernel:
-
Kernel
kptr_restrict=1in thesysctl.conffile.
15.10. Preventing kernel drivers from loading for kdump
Prevent specific kernel drivers from loading into the kdump capture kernel by configuring the KDUMP_COMMANDLINE_APPEND= variable. This avoids out-of-memory (OOM) errors and ensures crash kernel stability by excluding problematic modules from the initramfs.
You can append the KDUMP_COMMANDLINE_APPEND= variable by using one of the following configuration options:
-
rd.driver.blacklist=<modules> -
modprobe.blacklist=<modules>
Prerequisites
- You have root permissions on the system.
Procedure
Display the list of modules that are loaded to the currently running kernel. Select the kernel module that you intend to block from loading:
$ lsmodModule Size Used by fuse 126976 3 xt_CHECKSUM 16384 1 ipt_MASQUERADE 16384 1 uinput 20480 1 xt_conntrack 16384 1Update the
KDUMP_COMMANDLINE_APPEND=variable in the/etc/sysconfig/kdumpfile. For example:KDUMP_COMMANDLINE_APPEND="rd.driver.blacklist=hv_vmbus,hv_storvsc,hv_utils,hv_netvsc,hid-hyperv"Also, consider the following example by using the
modprobe.blacklist=<modules>configuration option:KDUMP_COMMANDLINE_APPEND="modprobe.blacklist=emcp modprobe.blacklist=bnx2fc modprobe.blacklist=libfcoe modprobe.blacklist=fcoe"Restart the
kdumpservice:# systemctl restart kdump
15.11. Running kdump on systems with encrypted disk
Mounting a LUKS encrypted partition requires a specific amount of available memory. If the system lacks this available memory, the cryptsetup utility fails to mount the partition. As a result, the second kernel cannot capture the vmcore file to the encrypted target.
Use the kdumpctl estimate command to estimate the required memory. This command prints the recommended crashkernel value based on the current kernel size, kernel modules, initramfs, and LUKS requirements.
The recommended crashkernel value is calculated based on the current kernel size, kernel module, initramfs, and the LUKS encrypted target memory requirement.
If you are using the custom crashkernel= option, kdumpctl estimate prints the LUKS required size value. The value is the memory size required for LUKS encrypted target.
Procedure
Print the estimate
crashkernel=value:# *kdumpctl estimate*Encrypted kdump target requires extra memory, assuming using the keyslot with minimum memory requirement Reserved crashkernel: 256M Recommended crashkernel: 652M Kernel image size: 47M Kernel modules size: 8M Initramfs size: 20M Runtime reservation: 64M LUKS required size: 512M Large modules: <none> WARNING: Current crashkernel size is lower than recommended size 652M.-
Configure the amount of required memory by increasing the
crashkernel=value. - Reboot the system.
If the kdump service still fails to save the dump file to the encrypted target, increase the crashkernel= value as required.
Chapter 16. Configuring kdump in the web console
You can set up and test the kdump configuration by using the RHEL 9 web console. The web console can enable the kdump service at boot time. With the web console, you can configure the reserved memory for kdump and to select the vmcore saving location in an uncompressed or compressed format.
16.1. Configuring kdump memory usage and target location in web console
You can configure the memory reserve for the kdump kernel and also specify the target location to capture the vmcore dump file with the RHEL web console interface.
Prerequisites
- The web console must be installed and accessible. For details, see Installing the web console.
Procedure
-
In the web console, open the tab and start the
kdumpservice by setting the Kernel crash dump switch to on. Configure the
kdumpmemory usage in the terminal, for example:$ sudo grubby --update-kernel ALL --args crashkernel=512MRestart the system to apply the changes.
- In the Kernel dump tab, click Edit at the end of the Crash dump location field.
Specify the target directory for saving the
vmcoredump file:- For a local filesystem, select Local Filesystem from the drop-down menu.
For a remote system by using the SSH protocol, select Remote over SSH from the drop-down menu and specify the following fields:
- In the Server field, enter the remote server address.
- In the SSH key field, enter the SSH key location.
- In the Directory field, enter the target directory.
For a remote system by using the NFS protocol, select Remote over NFS from the drop-down menu and specify the following fields:
- In the Server field, enter the remote server address.
- In the Export field, enter the location of the shared folder of an NFS server.
In the Directory field, enter the target directory.
NoteYou can reduce the size of the
vmcorefile by selecting the Compression checkbox.
Optional: Display the automation script by clicking View automation script.
A window with the generated script opens. You can browse a shell script and an Ansible Playbook generation options tab.
Optional: Copy the script by clicking Copy to clipboard.
You can use this script to apply the same configuration on multiple machines.
Verification
- Click .
Click Crash system under Test kdump settings.
WarningWhen you start the system crash, the kernel operation stops and results in a system crash with data loss.
Chapter 17. Enabling kdump
For your RHEL 9 systems, you can configure enabling or disabling the kdump functionality on a specific kernel or on all installed kernels. However, you must routinely test the kdump functionality and validate its working status.
17.1. Enabling kdump for all installed kernels
Start the kdump service for all kernels installed on the machine. The service starts after the kexec tool is installed.
Prerequisites
- You have administrator privileges.
Procedure
Add the
crashkernel=command-line parameter to all installed kernels:# grubby --update-kernel=ALL --args="crashkernel=xxM"xxMis the required memory in megabytes.-
In terms of UKI, add the
crashkernel=command-line parameter to all installed UKIs by copying an add-on associated with the required argument from/lib/modules/$(uname -r)/vmlinuz-virt.efi.extra.d/to/boot/efi/loader/addons/. Reboot the system:
# rebootEnable the
kdumpservice:# systemctl enable --now kdump.service
Verification
Check that the
kdumpservice is running:# systemctl status kdump.servicekdump.service - Crash recovery kernel arming Loaded: loaded (/usr/lib/systemd/system/kdump.service; enabled; vendor preset: disabled) Active: active (live)
17.2. Enabling kdump for a specific installed kernel
Start the kdump service for a specific kernel on the machine.
Prerequisites
- You have administrator privileges.
Procedure
List the kernels installed on the machine.
# ls -a /boot/vmlinuz-*/boot/vmlinuz-0-rescue-2930657cd0dc43c2b75db480e5e5b4a9 /boot/vmlinuz-4.18.0-330.el8.x86_64 /boot/vmlinuz-4.18.0-330.rt7.111.el8.x86_64Add a specific
kdumpkernel to the system’s Grand Unified Bootloader (GRUB) configuration.For example:
# grubby --update-kernel=vmlinuz-4.18.0-330.el8.x86_64 --args="crashkernel=xxM"xxMis the required memory reserve in megabytes.-
In terms of UKI, add the
crashkernel=command-line parameter to a specific UKI by copying an add-on associated with the required argument from/lib/modules/$(uname -r)/vmlinuz-virt.efi.extra.d/to/boot/efi/EFI/Linux/<machine-id>-<kernel-version>.efi.extra.d/. Enable the
kdumpservice.# systemctl enable --now kdump.service
Verification
Check that the
kdumpservice is running.# systemctl status kdump.servicekdump.service - Crash recovery kernel arming Loaded: loaded (/usr/lib/systemd/system/kdump.service; enabled; vendor preset: disabled) Active: active (live)
17.3. Disabling the kdump service
You can stop the kdump.service and disable the service from starting on your RHEL 9 systems.
Prerequisites
-
Fulfilled requirements for
kdumpconfigurations and targets. For details, see Supported kdump configurations and targets. -
All configurations for installing
kdumpare set up according to your needs. For details, see Installing kdump.
Procedure
To stop the
kdumpservice in the current session:# systemctl stop kdump.serviceTo disable the
kdumpservice:# systemctl disable kdump.service
It is recommended to set kptr_restrict=1 as default. When kptr_restrict is set to (1) as default, the kdumpctl service loads the crash kernel regardless of whether the Kernel Address Space Layout (KASLR) is enabled.
If kptr_restrict is not set to 1 and KASLR is enabled, the contents of /proc/kore file are generated as all zeros. The kdumpctl service fails to access the /proc/kcore file and load the crash kernel. The kexec-kdump-howto.txt file displays a warning message, which recommends you to set kptr_restrict=1. Verify for the following in the sysctl.conf file to ensure that kdumpctl service loads the crash kernel:
-
Kernel
kptr_restrict=1in thesysctl.conffile.
Chapter 18. Supported kdump configurations and targets
The kdump mechanism is a feature of the Linux kernel that generates a crash dump file when a kernel crash occurs. The kernel dump file has critical information that helps to analyze and determine the root cause of a kernel crash. The crash can be because of various factors, hardware issues or third-party kernel modules problems, to name a few.
By using the provided information and procedures, you can perform the following actions:
- Identify the supported configurations and targets for your RHEL 9 systems.
- Configure kdump.
- Verify kdump operation.
18.1. Memory requirements for kdump
For kdump to capture a kernel crash dump and save it for further analysis, a part of the system memory should be permanently reserved for the capture kernel. When reserved, this part of the system memory is not available to the main kernel.
The memory requirements vary based on certain system parameters. One of the major factors is the system’s hardware architecture. To identify the exact machine architecture, such as Intel 64 and AMD64, also known as x86_64, and print it to standard output, use the following command:
$ uname -m
With the stated list of minimum memory requirements, you can set the appropriate memory size to automatically reserve a memory for kdump on the latest available versions. The memory size depends on the system’s architecture and total available physical memory.
| Architecture | Available Memory | Minimum Reserved Memory |
|---|---|---|
|
AMD64 and Intel 64 ( | 1 GB to 4 GB | 192 MB of RAM |
| 4 GB to 64 GB | 256 MB of RAM | |
| 64 GB and more | 512 MB of RAM | |
| 64-bit ARM (4k pages) | 1 GB to 4 GB | 256 MB of RAM |
| 4 GB to 64 GB | 320 MB of RAM | |
| 64 GB and more | 576 MB of RAM | |
| 64-bit ARM (64k pages) | 1 GB to 4 GB | 356 MB of RAM |
| 4 GB to 64 GB | 420 MB of RAM | |
| 64 GB and more | 676 MB of RAM | |
|
IBM Power Systems ( | 2 GB to 4 GB | 384 MB of RAM |
| 4 GB to 16 GB | 512 MB of RAM | |
| 16 GB to 64 GB | 1 GB of RAM | |
| 64 GB to 128 GB | 2 GB of RAM | |
| 128 GB and more | 4 GB of RAM | |
|
IBM Z ( | 1 GB to 4 GB | 192 MB of RAM |
| 4 GB to 64 GB | 256 MB of RAM | |
| 64 GB and more | 512 MB of RAM |
On many systems, kdump is able to estimate the amount of required memory and reserve it automatically. This behavior is enabled by default, but only works on systems that have more than a certain amount of total available memory, which varies based on the system architecture.
The automatic configuration of reserved memory based on the total amount of memory in the system is a best effort estimation. The actual required memory might vary due to other factors such as I/O devices. Using not enough of memory might cause debug kernel unable to boot as a capture kernel in the case of kernel panic. To avoid this problem, increase the crash kernel memory sufficiently.
18.2. Minimum threshold for automatic memory reservation
The kexec-tools utility can automatically reserve memory for kdump using the crashkernel=auto parameter. This feature requires a minimum amount of system memory, which varies by architecture. If your system memory is below the specified threshold, you must configure the reservation manually.
| Architecture | Required Memory |
|---|---|
|
AMD64 and Intel 64 ( | 1 GB |
|
IBM Power Systems ( | 2 GB |
|
IBM Z ( | 1 GB |
| 64-bit ARM | 1 GB |
The crashkernel=auto option in the boot command line is no longer supported on RHEL 9 and later releases.
18.3. Supported kdump targets
Upon a kernel crash, the system saves a dump file to a configured target. You can save the dump file to a local device, a file system, or a network location. This reference lists the storage targets supported by kdump.
| Target type | Supported Targets | Unsupported Targets |
|---|---|---|
| Physical Storage |
|
|
| Network |
|
|
| Hypervisor |
| |
| Filesystem |
The |
The |
| Firmware |
|
18.4. Supported kdump filtering levels
Reduce dump file size using the makedumpfile core collector to compress data and exclude unnecessary information. By selecting specific filtering levels, such as removing hugepages, you can optimize storage usage. This reference lists the supported filtering levels for kdump.
| Option | Description |
|---|---|
|
| Zero pages |
|
| Cache pages |
|
| Cache private |
|
| User pages |
|
| Free pages |
18.5. Supported default failure responses
By default, when kdump fails to create a core dump, the operating system reboots. However, you can configure kdump to perform a different operation in case it fails to save the core dump to the primary target.
dump_to_rootfs- Attempt to save the core dump to the root file system. This option is especially useful in combination with a network target: if the network target is unreachable, this option configures kdump to save the core dump locally. The system is rebooted afterwards.
reboot- Reboot the system, losing the core dump in the process.
halt- Halt the system, losing the core dump in the process.
poweroff- Power off the system, losing the core dump in the process.
shell- Run a shell session from within the initramfs, allowing the user to record the core dump manually.
final_action-
Enable additional operations such as
reboot,halt, andpoweroffactions after a successfulkdumpor whenshellordump_to_rootfsfailure action completes. The defaultfinal_actionoption isreboot. failure_action-
Specifies the action to perform when a dump might fail in the event of a kernel crash. The default
failure_actionoption isreboot.
18.6. Using final_action parameter
When kdump succeeds or if kdump fails to save the vmcore file at the configured target, you can perform additional operations like reboot, halt, and poweroff by using the final_action parameter. If the final_action parameter is not specified, reboot is the default response.
Procedure
To configure
final_action, edit the/etc/kdump.conffile and add one of the following options:-
final_action reboot -
final_action halt -
final_action poweroff
-
Restart the
kdumpservice for the changes to take effect.# kdumpctl restart
18.7. Using failure_action parameter
The failure_action parameter specifies the action to perform when a dump fails in the event of a kernel crash. The default action for failure_action is reboot that reboots the system.
The parameter recognizes the following actions to take:
reboot- Reboots the system after a dump failure.
dump_to_rootfs- Saves the dump file on a root file system when a non-root dump target is configured.
halt- Halts the system.
poweroff- Stops the running operations on the system.
shell-
Starts a shell session inside
initramfs, from which you can manually perform additional recovery actions.
Procedure
To configure an action to take if the dump fails, edit the
/etc/kdump.conffile and specify one of thefailure_actionoptions:-
failure_action reboot -
failure_action halt -
failure_action poweroff -
failure_action shell -
failure_action dump_to_rootfs
-
Restart the
kdumpservice for the changes to take effect.# kdumpctl restart
Chapter 19. Firmware assisted dump mechanisms
Firmware-assisted dump (fadump) provides an alternative to kdump for capturing core dumps on IBM POWER systems. By using onboard firmware, fadump isolates memory regions to prevent data overwrites during crashes. The resulting dump is accurate where standard kdump might fail.
19.1. Firmware assisted dump on IBM PowerPC hardware
Capture vmcore files on IBM PowerPC systems using the fadump utility. This mechanism uses firmware to preserve memory regions during a crash, reusing kdump scripts to save data from a fully reset system while excluding boot memory and registers.
The fadump mechanism offers improved reliability over the traditional dump type, by rebooting the partition and using a new kernel to dump the data from the previous kernel crash. The fadump requires an IBM POWER6 processor-based or later version hardware platform.
For further details about the fadump mechanism, including PowerPC specific methods of resetting hardware, see the /usr/share/doc/kexec-tools/fadump-howto.txt file.
The area of memory that is not preserved, known as boot memory, is the amount of RAM required to successfully boot the kernel after a crash event. By default, the boot memory size is 256MB or 5% of total system RAM, whichever is larger.
Unlike kexec-initiated event, the fadump mechanism uses the production kernel to recover a crash dump. When booting after a crash, PowerPC hardware makes the device node /proc/device-tree/rtas/ibm.kernel-dump available to the proc filesystem (procfs). The fadump-aware kdump scripts, check for the stored vmcore, and then complete the system reboot cleanly.
19.2. Enabling firmware assisted dump mechanism
You can enhance the crash dumping capabilities of IBM POWER systems by enabling the firmware assisted dump (fadump) mechanism.
In the Secure Boot environment, the GRUB boot loader allocates a boot memory region, known as the Real Mode Area (RMA). The RMA has a size of 512 MB, divided among the boot components. If a component exceeds its size allocation, GRUB fails with an out-of-memory (OOM) error.
Do not enable firmware assisted dump (fadump) mechanism in the Secure Boot environment on RHEL 9.1 and earlier versions. The GRUB boot loader fails with the following error:
error: ../../grub-core/kern/mm.c:376:out of memory.
Press any key to continue…
The system is recoverable only if you increase the default initramfs size due to the fadump configuration.
For information about workaround methods to recover the system, see the System boot ends in GRUB Out of Memory (OOM) article.
Prerequisites
- You have root permissions on the system.
Procedure
-
Install the
kexec-toolspackage. Configure the default value for
crashkernel.# kdumpctl reset-crashkernel --fadump=on --kernel=ALLOptional: Reserve boot memory instead of the default value.
# grubby --update-kernel ALL --args="fadump=on crashkernel=xxM"xxMis the required memory size in megabytes.NoteWhen specifying boot configuration options, test the configurations by rebooting the kernel with
kdumpenabled. If thekdumpkernel fails to boot, increase thecrashkernelvalue gradually to set an appropriate value.Reboot for changes to take effect.
# reboot
19.3. Firmware assisted dump mechanisms on IBM Z hardware
IBM Z systems support the Stand-alone dump (sadump) and VMDUMP firmware assisted dump mechanisms.
The kdump infrastructure is supported and used on IBM Z systems. However, using one of the firmware assisted dump (fadump) methods for IBM Z has the following benefits:
-
The system console initiates and controls the
sadumpmechanism, and stores it on anIPLbootable device. -
The
VMDUMPmechanism is similar tosadump. This tool is also initiated from the system console, but retrieves the resulting dump from hardware and copies it to the system for analysis. -
These methods (similarly to other hardware based dump mechanisms) have the ability to capture the state of a machine in the early boot phase, before the
kdumpservice starts. -
Although
VMDUMPcontains a mechanism to receive the dump file into a Red Hat Enterprise Linux system, the configuration and control ofVMDUMPis managed from the IBM Z Hardware console.
19.4. Using sadump on Fujitsu PRIMEQUEST systems
The Fujitsu sadump mechanism offers a fallback dump capture method when kdump fails. After configuring kdump for your server, enable sadump to allow manual invocation through the Management Board (MMB) interface.
Procedure
Add or edit the following lines in the
/etc/sysctl.conffile to ensure thatkdumpstarts as expected forsadump:kernel.panic=0 kernel.unknown_nmi_panic=1WarningIn particular, ensure that after
kdump, the system does not reboot. If the system reboots afterkdumphas failed to save thevmcorefile, then it is not possible to invoke thesadump.Set the
failure_actionparameter in/etc/kdump.confappropriately ashaltorshell.failure_action shell
Chapter 20. Analyzing a core dump
Identify the cause of system crashes by using the crash utility to analyze core dumps from kdump, netdump, diskdump, or xendump. This interactive tool, similar to GDB, inspects running systems and dumps. Alternatively, use the Kernel Oops Analyzer or Kdump Helper.
20.1. Installing the crash utility
Install the crash utility to interactively analyze system state during runtime or after a kernel crash. This tool interprets vmcore dump files, providing critical data for troubleshooting.
Procedure
Enable the relevant repositories:
# subscription-manager repos --enable baseos repository# subscription-manager repos --enable appstream repository# subscription-manager repos --enable rhel-9-for-x86_64-baseos-debug-rpmsInstall the
crashpackage:# dnf install crashInstall the
kernel-debuginfopackage:# dnf install kernel-debuginfoThe package
kernel-debuginfocorresponds to the running kernel and provides the data necessary for the dump analysis.
20.2. Running and exiting the crash utility
The crash utility is a powerful tool for analyzing kdump. By running crash on a crash dump file, you can gain insights into the system’s state at the time of the crash, identify the root cause of the issue, and troubleshoot kernel-related problems.
Prerequisites
-
Identify the currently running kernel (for example
5.14.0-1.el9.x86_64).
Procedure
To start the
crashutility, two necessary parameters need to be passed to the command:-
The debug-info (a decompressed vmlinuz image), for example
/usr/lib/debug/lib/modules/5.14.0-1.el9.x86_64/vmlinuxprovided through a specifickernel-debuginfopackage. The actual vmcore file, for example
/var/crash/127.0.0.1-2021-09-13-14:05:33/vmcoreThe resulting
crashcommand then looks:# crash /usr/lib/debug/lib/modules/5.14.0-1.el9.x86_64/vmlinux /var/crash/127.0.0.1-2021-09-13-14:05:33/vmcoreUse the same <kernel> version that was captured by
kdump.
-
The debug-info (a decompressed vmlinuz image), for example
Running the crash utility.
The following example shows analyzing a core dump created on September 13 2021 at 14:05 PM, using the 5.14.0-1.el9.x86_64 kernel.
...
WARNING: kernel relocated [202MB]: patching 90160 gdb minimal_symbol values

      KERNEL: /usr/lib/debug/lib/modules/5.14.0-1.el9.x86_64/vmlinux
    DUMPFILE: /var/crash/127.0.0.1-2021-09-13-14:05:33/vmcore  [PARTIAL DUMP]
        CPUS: 2
        DATE: Mon Sep 13 14:05:16 2021
      UPTIME: 01:03:57
LOAD AVERAGE: 0.00, 0.00, 0.00
       TASKS: 586
    NODENAME: localhost.localdomain
     RELEASE: 5.14.0-1.el9.x86_64
     VERSION: #1 SMP Wed Aug 29 11:51:55 UTC 2018
     MACHINE: x86_64  (2904 Mhz)
      MEMORY: 2.9 GB
       PANIC: "sysrq: SysRq : Trigger a crash"
         PID: 10635
     COMMAND: "bash"
        TASK: ffff8d6c84271800  [THREAD_INFO: ffff8d6c84271800]
         CPU: 1
       STATE: TASK_RUNNING (SYSRQ)

crash>
To exit the interactive prompt and stop
crash, typeexitorq.crash> exit ~]#
The crash command is also used as a powerful tool for debugging a live system. However, you must use it with caution to avoid system-level issues.
20.3. Displaying various indicators in the crash utility
Use the crash utility to display various indicators, such as a kernel message buffer, a backtrace, a process status, virtual memory information and open files.
Displaying the message buffer
To display the kernel message buffer, type the
logcommand at the interactive prompt:crash> log ... several lines omitted ... EIP: 0060:[<c068124f>] EFLAGS: 00010096 CPU: 2 EIP is at sysrq_handle_crash+0xf/0x20 EAX: 00000063 EBX: 00000063 ECX: c09e1c8c EDX: 00000000 ESI: c0a09ca0 EDI: 00000286 EBP: 00000000 ESP: ef4dbf24 DS: 007b ES: 007b FS: 00d8 GS: 00e0 SS: 0068 Process bash (pid: 5591, ti=ef4da000 task=f196d560 task.ti=ef4da000) Stack: c068146b c0960891 c0968653 00000003 00000000 00000002 efade5c0 c06814d0 <0> fffffffb c068150f b7776000 f2600c40 c0569ec4 ef4dbf9c 00000002 b7776000 <0> efade5c0 00000002 b7776000 c0569e60 c051de50 ef4dbf9c f196d560 ef4dbfb4 Call Trace: [<c068146b>] ? __handle_sysrq+0xfb/0x160 [<c06814d0>] ? write_sysrq_trigger+0x0/0x50 [<c068150f>] ? write_sysrq_trigger+0x3f/0x50 [<c0569ec4>] ? proc_reg_write+0x64/0xa0 [<c0569e60>] ? proc_reg_write+0x0/0xa0 [<c051de50>] ? vfs_write+0xa0/0x190 [<c051e8d1>] ? sys_write+0x41/0x70 [<c0409adc>] ? syscall_call+0x7/0xb Code: a0 c0 01 0f b6 41 03 19 d2 f7 d2 83 e2 03 83 e0 cf c1 e2 04 09 d0 88 41 03 f3 c3 90 c7 05 c8 1b 9e c0 01 00 00 00 0f ae f8 89 f6 <c6> 05 00 00 00 00 01 c3 89 f6 8d bc 27 00 00 00 00 8d 50 d0 83 EIP: [<c068124f>] sysrq_handle_crash+0xf/0x20 SS:ESP 0068:ef4dbf24 CR2: 0000000000000000Type
help logfor more information about the command usage.NoteThe kernel message buffer includes the most essential information about the system crash. It is always dumped first in to the
vmcore-dmesg.txtfile. If you fail to obtain the fullvmcorefile, for example, due to insufficient space on the target location, you can obtain the required information from the kernel message buffer. By default,vmcore-dmesg.txtis placed in the/var/crash/directory.
Displaying a backtrace
To display the kernel stack trace, use the
btcommand.crash> bt PID: 5591 TASK: f196d560 CPU: 2 COMMAND: "bash" #0 [ef4dbdcc] crash_kexec at c0494922 #1 [ef4dbe20] oops_end at c080e402 #2 [ef4dbe34] no_context at c043089d #3 [ef4dbe58] bad_area at c0430b26 #4 [ef4dbe6c] do_page_fault at c080fb9b #5 [ef4dbee4] error_code (via page_fault) at c080d809 EAX: 00000063 EBX: 00000063 ECX: c09e1c8c EDX: 00000000 EBP: 00000000 DS: 007b ESI: c0a09ca0 ES: 007b EDI: 00000286 GS: 00e0 CS: 0060 EIP: c068124f ERR: ffffffff EFLAGS: 00010096 #6 [ef4dbf18] sysrq_handle_crash at c068124f #7 [ef4dbf24] __handle_sysrq at c0681469 #8 [ef4dbf48] write_sysrq_trigger at c068150a #9 [ef4dbf54] proc_reg_write at c0569ec2 #10 [ef4dbf74] vfs_write at c051de4e #11 [ef4dbf94] sys_write at c051e8cc #12 [ef4dbfb0] system_call at c0409ad5 EAX: ffffffda EBX: 00000001 ECX: b7776000 EDX: 00000002 DS: 007b ESI: 00000002 ES: 007b EDI: b7776000 SS: 007b ESP: bfcb2088 EBP: bfcb20b4 GS: 0033 CS: 0073 EIP: 00edc416 ERR: 00000004 EFLAGS: 00000246Type
bt <pid>to display the backtrace of a specific process or typehelp btfor more information aboutbtusage.
Displaying a process status
To display the status of processes in the system, use the
pscommand.crash> ps PID PPID CPU TASK ST %MEM VSZ RSS COMM > 0 0 0 c09dc560 RU 0.0 0 0 [swapper] > 0 0 1 f7072030 RU 0.0 0 0 [swapper] 0 0 2 f70a3a90 RU 0.0 0 0 [swapper] > 0 0 3 f70ac560 RU 0.0 0 0 [swapper] 1 0 1 f705ba90 IN 0.0 2828 1424 init ... several lines omitted ... 5566 1 1 f2592560 IN 0.0 12876 784 auditd 5567 1 2 ef427560 IN 0.0 12876 784 auditd 5587 5132 0 f196d030 IN 0.0 11064 3184 sshd > 5591 5587 2 f196d560 RU 0.0 5084 1648 bashUse
ps <pid>to display the status of a single specific process. Use help ps for more information aboutpsusage.
Displaying virtual memory information
To display basic virtual memory information, type the
vmcommand at the interactive prompt.crash> vm PID: 5591 TASK: f196d560 CPU: 2 COMMAND: "bash" MM PGD RSS TOTAL_VM f19b5900 ef9c6000 1648k 5084k VMA START END FLAGS FILE f1bb0310 242000 260000 8000875 /lib/ld-2.12.so f26af0b8 260000 261000 8100871 /lib/ld-2.12.so efbc275c 261000 262000 8100873 /lib/ld-2.12.so efbc2a18 268000 3ed000 8000075 /lib/libc-2.12.so efbc23d8 3ed000 3ee000 8000070 /lib/libc-2.12.so efbc2888 3ee000 3f0000 8100071 /lib/libc-2.12.so efbc2cd4 3f0000 3f1000 8100073 /lib/libc-2.12.so efbc243c 3f1000 3f4000 100073 efbc28ec 3f6000 3f9000 8000075 /lib/libdl-2.12.so efbc2568 3f9000 3fa000 8100071 /lib/libdl-2.12.so efbc2f2c 3fa000 3fb000 8100073 /lib/libdl-2.12.so f26af888 7e6000 7fc000 8000075 /lib/libtinfo.so.5.7 f26aff2c 7fc000 7ff000 8100073 /lib/libtinfo.so.5.7 efbc211c d83000 d8f000 8000075 /lib/libnss_files-2.12.so efbc2504 d8f000 d90000 8100071 /lib/libnss_files-2.12.so efbc2950 d90000 d91000 8100073 /lib/libnss_files-2.12.so f26afe00 edc000 edd000 4040075 f1bb0a18 8047000 8118000 8001875 /bin/bash f1bb01e4 8118000 811d000 8101873 /bin/bash f1bb0c70 811d000 8122000 100073 f26afae0 9fd9000 9ffa000 100073 ... several lines omitted ...Use
vm <pid>to display information about a single specific process, or usehelp vmfor more information aboutvmusage.
Displaying open files
To display information about open files, use the
filescommand.crash> files PID: 5591 TASK: f196d560 CPU: 2 COMMAND: "bash" ROOT: / CWD: /root FD FILE DENTRY INODE TYPE PATH 0 f734f640 eedc2c6c eecd6048 CHR /pts/0 1 efade5c0 eee14090 f00431d4 REG /proc/sysrq-trigger 2 f734f640 eedc2c6c eecd6048 CHR /pts/0 10 f734f640 eedc2c6c eecd6048 CHR /pts/0 255 f734f640 eedc2c6c eecd6048 CHR /pts/0Use
files <pid>to display files opened by only one selected process, or usehelp filesfor more information aboutfilesusage.
20.4. Using Kernel Oops Analyzer
The Kernel Oops Analyzer tool analyzes the crash dump by comparing the oops messages with known issues in the knowledge base.
Prerequisites
-
An
oopsmessage is secured to feed the Kernel Oops Analyzer.
Procedure
- Access the Kernel Oops Analyzer tool.
To diagnose a kernel crash issue, upload a kernel oops log generated in
vmcore.-
Alternatively, you can diagnose a kernel crash issue by providing a text message or a
vmcore-dmesg.txtas an input.
-
Alternatively, you can diagnose a kernel crash issue by providing a text message or a
-
Click
DETECTto compare theoopsmessage based on information from themakedumpfileagainst known solutions.
20.5. The Kdump Helper tool
The Kdump Helper tool helps to set up the kdump using the provided information. Kdump Helper generates a configuration script based on your preferences. Initiating and running the script on your server sets up the kdump service.
Chapter 21. Using early kdump to capture boot time crashes
Early kdump is a feature of the kdump mechanism that captures the vmcore file if a system or kernel crash occurs during the early phases of the boot process before the system services start. Early kdump loads the crash kernel and the initramfs of crash kernel in the memory much earlier.
A kernel crash can sometimes occur during the early boot phase before the kdump service starts and is able to capture and save the contents of the crashed kernel memory. Therefore, crucial information related to the crash that is important for troubleshooting is lost. To address this problem, you can use the early kdump feature, which is a part of the kdump service.
21.1. Enabling early kdump
The early kdump feature sets up the crash kernel and the initial RAM disk image (initramfs) to load early enough to capture the vmcore information for an early crash. This helps to eliminate the risk of losing information about the early boot kernel crashes.
Prerequisites
- An active RHEL subscription.
-
A repository containing the
kexec-toolspackage for your system CPU architecture. -
Fulfilled
kdumpconfiguration and targets requirements. For more information see, Supported kdump configurations and targets.
Procedure
Verify that the
kdumpservice is enabled and active:# systemctl is-enabled kdump.service && systemctl is-active kdump.service enabled activeIf
kdumpis not enabled and running, set all required configurations and verify thatkdumpservice is enabled.Rebuild the
initramfsimage of the booting kernel with theearly kdumpfunctionality:# dracut -f --add earlykdumpAdd the
rd.earlykdumpkernel command line parameter:# grubby --update-kernel=/boot/vmlinuz-$(uname -r) --args="rd.earlykdump"Reboot the system to reflect the changes:
# reboot
Verification
Verify that
rd.earlykdumpis successfully added andearly kdumpfeature is enabled:# cat /proc/cmdline BOOT_IMAGE=(hd0,msdos1)/vmlinuz-5.14.0-1.el9.x86_64 root=/dev/mapper/rhel-root ro crashkernel=auto resume=/dev/mapper/rhel-swap rd.lvm.lv=rhel/root rd.lvm.lv=rhel/swap rhgb quiet rd.earlykdump # journalctl -x | grep early-kdump Sep 13 15:46:11 redhat dracut-cmdline[304]: early-kdump is enabled. Sep 13 15:46:12 redhat dracut-cmdline[304]: kexec: loaded early-kdump kernel
Chapter 22. Signing a kernel and modules for Secure Boot
Enhance system security by using signed kernels and modules. On UEFI systems with Secure Boot, you can self-sign custom kernel builds or kernel modules, and import public keys to target systems. Secure Boot requires signing the boot loader, kernel, and all kernel modules to ensure a successful boot process.
RHEL 9 includes:
- Signed boot loaders
- Signed kernels
- Signed kernel modules
In addition, the signed first-stage boot loader and the signed kernel include embedded Red Hat public keys. These signed executable binaries and embedded keys enable RHEL 9 to install, boot, and run with the Microsoft UEFI Secure Boot Certification Authority keys. These keys are provided by the UEFI firmware on systems that support UEFI Secure Boot.
- Not all UEFI-based systems include support for Secure Boot.
- The build system, where you build and sign your kernel module, does not need to have UEFI Secure Boot enabled and does not even need to be a UEFI-based system.
22.1. Prerequisites
To be able to sign externally built kernel modules, install the utilities from the following packages:
# dnf install pesign openssl kernel-devel mokutil keyutilsExpand Table 22.1. Required utilities Utility Provided by package Used on Purpose efikeygenpesignBuild system
Generates public and private X.509 key pair
opensslopensslBuild system
Exports the unencrypted private key
sign-filekernel-develBuild system
Executable file used to sign a kernel module with the private key
mokutilmokutilTarget system
Optional utility used to manually enroll the public key
keyctlkeyutilsTarget system
Optional utility used to display public keys in the system keyring
22.2. What is UEFI Secure Boot
With the Unified Extensible Firmware Interface (UEFI) Secure Boot technology, you can prevent the execution of the kernel-space code that is not signed by a trusted key. The system boot loader is signed with a cryptographic key. The database of public keys in the firmware authorizes the process of signing the key. You can subsequently verify a signature in the next-stage boot loader and the kernel.
UEFI Secure Boot establishes a chain of trust from the firmware to the signed drivers and kernel modules as follows:
-
An UEFI private key signs, and a public key authenticates the
shimfirst-stage boot loader. A certificate authority (CA) in turn signs the public key. The CA is stored in the firmware database. -
The
shimfile contains the Red Hat public key Red Hat Secure Boot (CA key 1) to authenticate the GRUB boot loader and the kernel. - The kernel in turn contains public keys to authenticate drivers and modules.
Secure Boot is the boot path validation component of the UEFI specification. The specification defines:
- Programming interface for cryptographically protected UEFI variables in non-volatile storage.
- Storing the trusted X.509 root certificates in UEFI variables.
- Validation of UEFI applications such as boot loaders and drivers.
- Procedures to revoke known-bad certificates and application hashes.
UEFI Secure Boot helps in the detection of unauthorized changes but does not:
- Prevent installation or removal of second-stage boot loaders.
- Require explicit user confirmation of such changes.
- Stop boot path manipulations. Signatures are verified during booting but, not when the boot loader is installed or updated.
If the boot loader or the kernel are not signed by a system trusted key, Secure Boot prevents them from starting.
22.3. UEFI Secure Boot support
You can install and run RHEL 9 on systems with UEFI Secure Boot enabled if a trusted key signs the kernel and all loaded drivers. Red Hat provides signed and authenticated kernels and drivers. You must sign externally built kernels or drivers before loading them.
Restrictions imposed by UEFI Secure Boot
- The system only runs the kernel-mode code after its signature has been properly authenticated.
- GRUB module loading is disabled because no infrastructure exists for signing and verification of GRUB modules. Allowing module loading would run untrusted code within the security perimeter defined by Secure Boot.
- Red Hat provides a signed GRUB binary that has all supported modules on RHEL 9.
22.4. Requirements for authenticating kernel modules with X.509 keys
When loading a kernel module, the kernel verifies its signature against public X.509 keys in the system (.builtin_trusted_keys) and platform (.platform) keyrings. Keys in the .blacklist keyring are explicitly excluded from verification.
You need to meet certain conditions to load kernel modules on systems with enabled UEFI Secure Boot functionality:
If UEFI Secure Boot is enabled or if the
module.sig_enforcekernel parameter has been specified:-
You can only load those signed kernel modules whose signatures were authenticated against keys from the system keyring (
.builtin_trusted_keys) and the platform keyring (.platform). -
The public key must not be on the system revoked keys keyring (
.blacklist).
-
You can only load those signed kernel modules whose signatures were authenticated against keys from the system keyring (
If UEFI Secure Boot is disabled and the
module.sig_enforcekernel parameter has not been specified:- You can load unsigned kernel modules and signed kernel modules without a public key.
If the system is not UEFI-based or if UEFI Secure Boot is disabled:
-
Only the keys embedded in the kernel are loaded onto
.builtin_trusted_keysand.platform. - You have no ability to augment that set of keys without rebuilding the kernel.
-
Only the keys embedded in the kernel are loaded onto
| Module signed | Public key found and signature valid | UEFI Secure Boot state | sig_enforce | Module load | Kernel tainted |
|---|---|---|---|---|---|
| Unsigned | - | Not enabled | Not enabled | Succeeds | Yes |
| Not enabled | Enabled | Fails | - | ||
| Enabled | - | Fails | - | ||
| Signed | No | Not enabled | Not enabled | Succeeds | Yes |
| Not enabled | Enabled | Fails | - | ||
| Enabled | - | Fails | - | ||
| Signed | Yes | Not enabled | Not enabled | Succeeds | No |
| Not enabled | Enabled | Succeeds | No | ||
| Enabled | - | Succeeds | No |
22.5. Sources for public keys
During boot, the kernel loads X.509 keys from a set of persistent key stores into the following keyrings:
-
The system keyring (
.builtin_trusted_keys) -
The
.platformkeyring -
The system
.blacklistkeyring
| Source of X.509 keys | User can add keys | UEFI Secure Boot state | Keys loaded during boot |
|---|---|---|---|
| Embedded in kernel | No | - |
|
|
UEFI | Limited | Not enabled | No |
| Enabled |
| ||
|
Embedded in the | No | Not enabled | No |
| Enabled |
| ||
| Machine Owner Key (MOK) list | Yes | Not enabled | No |
| Enabled |
|
.builtin_trusted_keys- A keyring that is built on boot.
- Provides trusted public keys.
-
rootprivileges are required to view the keys.
.platform- A keyring that is built on boot.
- Provides keys from third-party platform providers and custom public keys.
-
rootprivileges are required to view the keys.
.blacklist- A keyring with X.509 keys which have been revoked.
-
A module signed by a key from
.blacklistwill fail authentication even if your public key is in.builtin_trusted_keys.
- UEFI Secure Boot
db - A signature database.
- Stores keys (hashes) of UEFI applications, UEFI drivers, and boot loaders.
- The keys can be loaded on the machine.
- UEFI Secure Boot
dbx - A revoked signature database.
- Prevents keys from getting loaded.
-
The revoked keys from this database are added to the
.blacklistkeyring.
22.6. Generating a public and private key pair
Generate an X.509 key pair to use custom kernels or modules on Secure Boot systems. Use the private key to sign your binaries, and enroll the public key in the Machine Owner Key (MOK) list to validate and authorize them for boot.
Apply strong security measures and access policies to guard the contents of your private key. In the wrong hands, the key could be used to compromise any system which is authenticated by the corresponding public key.
Procedure
Create an X.509 public and private key pair:
If you only want to sign custom kernel modules:
# efikeygen --dbdir /etc/pki/pesign \
            --self-sign \
            --module \
            --common-name 'CN=Organization signing key' \
            --nickname 'Custom Secure Boot key'
If you want to sign custom kernel:
# efikeygen --dbdir /etc/pki/pesign \
            --self-sign \
            --kernel \
            --common-name 'CN=Organization signing key' \
            --nickname 'Custom Secure Boot key'
When the RHEL system is running FIPS mode:
# efikeygen --dbdir /etc/pki/pesign \ --self-sign \ --kernel \ --common-name 'CN=Organization signing key' \ --nickname 'Custom Secure Boot key' \ --token 'NSS FIPS 140-2 Certificate DB'NoteIn FIPS mode, you must use the
--tokenoption so thatefikeygenfinds the default "NSS Certificate DB" token in the PKI database.The public and private keys are now stored in the
/etc/pki/pesign/directory.
It is a good security practice to sign the kernel and the kernel modules within the validity period of its signing key. However, the sign-file utility does not warn you and the key will be usable in RHEL 9 regardless of the validity dates.
22.7. Example output of system keyrings
You can display information about the keys on the system keyrings using the keyctl utility from the keyutils package.
Prerequisites
- You have root permissions.
-
You have installed the
keyctlutility from thekeyutilspackage.
Example 22.1. Keyrings output
The following is a shortened example output of .builtin_trusted_keys, .platform, and .blacklist keyrings from a RHEL 9 system where UEFI Secure Boot is enabled.
# keyctl list %:.builtin_trusted_keys
6 keys in keyring:
...asymmetric: Red Hat Enterprise Linux Driver Update Program (key 3): bf57f3e87...
...asymmetric: Red Hat Secure Boot (CA key 1): 4016841644ce3a810408050766e8f8a29...
...asymmetric: Microsoft Corporation UEFI CA 2011: 13adbf4309bd82709c8cd54f316ed...
...asymmetric: Microsoft Windows Production PCA 2011: a92902398e16c49778cd90f99e...
...asymmetric: Red Hat Enterprise Linux kernel signing key: 4249689eefc77e95880b...
...asymmetric: Red Hat Enterprise Linux kpatch signing key: 4d38fd864ebe18c5f0b7...

# keyctl list %:.platform
4 keys in keyring:
...asymmetric: VMware, Inc.: 4ad8da0472073...
...asymmetric: Red Hat Secure Boot CA 5: cc6fafe72...
...asymmetric: Microsoft Windows Production PCA 2011: a929f298e1...
...asymmetric: Microsoft Corporation UEFI CA 2011: 13adbf4e0bd82...

# keyctl list %:.blacklist
4 keys in keyring:
...blacklist: bin:f5ff83a...
...blacklist: bin:0dfdbec...
...blacklist: bin:38f1d22...
...blacklist: bin:51f831f...
The .builtin_trusted_keys keyring in the example shows the addition of two keys from the UEFI Secure Boot db keys as well as the Red Hat Secure Boot (CA key 1), which is embedded in the shim boot loader.
Example 22.2. Kernel console output
The following example shows the kernel console output. The messages identify the keys with an UEFI Secure Boot related source. These include UEFI Secure Boot db, embedded shim, and MOK list.
# dmesg | egrep 'integrity.*cert'
[1.512966] integrity: Loading X.509 certificate: UEFI:db
[1.513027] integrity: Loaded X.509 cert 'Microsoft Windows Production PCA 2011: a929023...
[1.513028] integrity: Loading X.509 certificate: UEFI:db
[1.513057] integrity: Loaded X.509 cert 'Microsoft Corporation UEFI CA 2011: 13adbf4309...
[1.513298] integrity: Loading X.509 certificate: UEFI:MokListRT (MOKvar table)
[1.513549] integrity: Loaded X.509 cert 'Red Hat Secure Boot CA 5: cc6fa5e72868ba494e93...22.8. Enrolling public key on target system by adding the public key to the MOK list
Authenticate kernel module access by enrolling your public key in the target system’s platform keyring (.platform). Using the Machine Owner Key (MOK) facility, you can expand the UEFI Secure Boot key database to include custom keys for persistent authentication across reboots.
The MOK facility is supported by shim, MokManager, GRUB, and the mokutil utility that enables secure key management and authentication for UEFI-based systems.
To get the authentication service of your kernel module on your systems, consider requesting your system vendor to incorporate your public key into the UEFI Secure Boot key database in their factory firmware image.
Prerequisites
- You have generated a public and private key pair and know the validity dates of your public keys. For details, see Generating a public and private key pair.
Procedure
Export your public key to the
sb_cert.cerfile:# certutil -d /etc/pki/pesign \ -n 'Custom Secure Boot key' \ -Lr \ > sb_cert.cerImport your public key into the MOK list:
# mokutil --import sb_cert.cer- Enter a new password for this MOK enrollment request.
Reboot the machine.
The
shimboot loader notices the pending MOK key enrollment request and it launchesMokManager.efito enable you to complete the enrollment from the UEFI console.Choose
Enroll MOK, enter the password you previously associated with this request when prompted, and confirm the enrollment.Your public key is added to the MOK list, which is persistent.
Once a key is on the MOK list, it will be automatically propagated to the
.platformkeyring on this and subsequent boots when UEFI Secure Boot is enabled.
22.9. Signing a kernel with the private key
You can obtain enhanced security benefits on your system by loading a signed kernel if the UEFI Secure Boot mechanism is enabled.
Prerequisites
- You have generated a public and private key pair and know the validity dates of your public keys. For details, see Generating a public and private key pair.
- You have enrolled your public key on the target system. For details, see Enrolling public key on target system by adding the public key to the MOK list.
- You have a kernel image in the ELF format available for signing.
Procedure
On the x64 architecture:
Create a signed image:
# pesign --certificate 'Custom Secure Boot key' \
         --in vmlinuz-version \
         --sign \
         --out vmlinuz-version.signed
Replace
versionwith the version suffix of yourvmlinuzfile, andCustom Secure Boot keywith the name that you chose earlier.Optional: Check the signatures:
# pesign --show-signature \
         --in vmlinuz-version.signed
Overwrite the unsigned image with the signed image:
# mv vmlinuz-version.signed vmlinuz-version
On the 64-bit ARM architecture:
Decompress the
vmlinuzfile:# zcat vmlinuz-version > vmlinux-versionCreate a signed image:
# pesign --certificate 'Custom Secure Boot key' \
         --in vmlinux-version \
         --sign \
         --out vmlinux-version.signed
Optional: Check the signatures:
# pesign --show-signature \
         --in vmlinux-version.signed
Compress the
vmlinuxfile:# gzip --to-stdout vmlinux-version.signed > vmlinuz-versionRemove the uncompressed
vmlinuxfile:# rm vmlinux-version*
22.10. Signing a GRUB build with the private key
On a system where the UEFI Secure Boot mechanism is enabled, you can sign a GRUB build with a custom existing private key. You must do this if you are using a custom GRUB build, or if you have removed the Microsoft trust anchor from your system.
Prerequisites
- You have generated a public and private key pair and know the validity dates of your public keys. For details, see Generating a public and private key pair.
- You have enrolled your public key on the target system. For details, see Enrolling public key on target system by adding the public key to the MOK list.
- You have a GRUB EFI binary available for signing.
Procedure
On the x64 architecture:
Create a signed GRUB EFI binary:
# pesign --in /boot/efi/EFI/redhat/grubx64.efi \
         --out /boot/efi/EFI/redhat/grubx64.efi.signed \
         --certificate 'Custom Secure Boot key' \
         --sign
Replace
Custom Secure Boot keywith the name that you chose earlier.Optional: Check the signatures:
# pesign --in /boot/efi/EFI/redhat/grubx64.efi.signed \
         --show-signature
Overwrite the unsigned binary with the signed binary:
# mv /boot/efi/EFI/redhat/grubx64.efi.signed \
     /boot/efi/EFI/redhat/grubx64.efi
On the 64-bit ARM architecture:
Create a signed GRUB EFI binary:
# pesign --in /boot/efi/EFI/redhat/grubaa64.efi \
         --out /boot/efi/EFI/redhat/grubaa64.efi.signed \
         --certificate 'Custom Secure Boot key' \
         --sign
Replace
Custom Secure Boot keywith the name that you chose earlier.Optional: Check the signatures:
# pesign --in /boot/efi/EFI/redhat/grubaa64.efi.signed \
         --show-signature
Overwrite the unsigned binary with the signed binary:
# mv /boot/efi/EFI/redhat/grubaa64.efi.signed \
     /boot/efi/EFI/redhat/grubaa64.efi
22.11. Signing kernel modules with the private key
Load signed kernel modules to enhance system security when UEFI Secure Boot is active.
Your signed kernel module is also loadable on systems where UEFI Secure Boot is disabled or on a non-UEFI system. As a result, you do not need to provide both, a signed and unsigned version of your kernel module.
Prerequisites
- You have generated a public and private key pair and know the validity dates of your public keys. For details, see Generating a public and private key pair.
- You have enrolled your public key on the target system. For details, see Enrolling public key on target system by adding the public key to the MOK list.
- You have a kernel module in ELF image format available for signing.
Procedure
Export your public key to the
sb_cert.cerfile:# certutil -d /etc/pki/pesign \ -n 'Custom Secure Boot key' \ -Lr \ > sb_cert.cerExtract the key from the NSS database as a PKCS #12 file:
# pk12util -o sb_cert.p12 \ -n 'Custom Secure Boot key' \ -d /etc/pki/pesign- When the previous command prompts, enter a new password that encrypts the private key.
Export the unencrypted private key:
# openssl pkcs12 \ -in sb_cert.p12 \ -out sb_cert.priv \ -nocerts \ -noencImportantKeep the unencrypted private key secure.
Sign your kernel module. The following command appends the signature directly to the ELF image in your kernel module file:
# /usr/src/kernels/$(uname -r)/scripts/sign-file \
          sha256 \
          sb_cert.priv \
          sb_cert.cer \
          my_module.ko
Your kernel module is now ready for loading.
In RHEL 9, the validity dates of the key pair matter. The key does not expire, but the kernel module must be signed within the validity period of its signing key. The sign-file utility will not warn you of this. For example, a key that is only valid in 2021 can be used to authenticate a kernel module signed in 2021 with that key. However, users cannot use that key to sign a kernel module in 2022.
Verification
Display information about the kernel module’s signature:
# modinfo my_module.ko | grep signersigner: Your Name KeyCheck that the signature lists your name as entered during generation.
NoteThe appended signature is not contained in an ELF image section and is not a formal part of the ELF image. Therefore, utilities such as
readelfcannot display the signature on your kernel module.Load the module:
# insmod my_module.koRemove (unload) the module:
# modprobe -r my_module.ko
22.12. Loading signed kernel modules
After enrolling your public key in the system keyring (.builtin_trusted_keys) and the MOK list, and signing kernel modules with your private key, you can load them using the modprobe command.
Prerequisites
- You have generated the public and private key pair. For details, see Generating a public and private key pair.
- You have enrolled the public key into the system keyring. For details, see Enrolling public key on target system by adding the public key to the MOK list.
- You have signed a kernel module with the private key. For details, see Signing kernel modules with the private key.
Install the
kernel-modules-extrapackage, which creates the/lib/modules/$(uname -r)/extra/directory:# dnf -y install kernel-modules-extra
Procedure
Verify that your public keys are on the system keyring:
# keyctl list %:.platformCopy the kernel module into the
extra/directory of the kernel that you want:# cp my_module.ko /lib/modules/$(uname -r)/extra/Update the modular dependency list:
# depmod -aLoad the kernel module:
# modprobe -v my_moduleOptional: To load the module on boot, add it to the
/etc/modules-loaded.d/my_module.conffile:# echo "my_module" > /etc/modules-load.d/my_module.conf
Verification
Verify that the module was successfully loaded:
# lsmod | grep my_module
Chapter 23. Updating the Secure Boot Revocation List
You can update the UEFI Secure Boot Revocation List on your system so that Secure Boot identifies software with known security issues and prevents it from compromising your boot process.
23.1. The Secure Boot Revocation List
The UEFI Secure Boot Revocation List (Secure Boot Forbidden Signature Database, dbx) identifies software that Secure Boot no longer allows to run. When security or stability issues are found, the list stores hash signatures to prevent compromised software from booting.
For example, a certain version of GRUB might contain a security issue that allows an attacker to bypass the Secure Boot mechanism. When the issue is found, the Revocation List adds hash signatures of all GRUB versions that contain the issue. As a result, only secure GRUB versions can boot on the system.
The Revocation List requires regular updates to recognize newly found issues. When updating the Revocation List, make sure to use a safe update method that does not cause your currently installed system to no longer boot.
23.2. Applying an online Revocation List update
Update the Secure Boot Revocation List on your system to prevent known security issues. This safe procedure ensures the update does not prevent your system from booting.
Prerequisites
- Secure Boot is enabled on your system.
- Your system can access the internet for updates.
Procedure
Determine the current version of the Revocation List:
# fwupdmgr get-devicesSee the
Current versionfield underUEFI dbx.Enable the LVFS Revocation List repository:
# fwupdmgr enable-remote lvfsRefresh the repository metadata:
# fwupdmgr refreshApply the Revocation List update:
On the command line:
# fwupdmgr updateIn the graphical interface:
- Open the Software application
- Navigate to the Updates tab.
- Find the Secure Boot dbx Configuration Update entry.
- Click .
-
At the end of the update,
fwupdmgror Software asks you to reboot the system. Confirm the reboot.
Verification
After the reboot, check the current version of the Revocation List again:
# fwupdmgr get-devices
23.3. Applying an offline Revocation List update
Update the Secure Boot Revocation List from RHEL on systems without internet access to prevent known security issues. This safe procedure ensures the update does not prevent your system from booting.
Procedure
Determine the current version of the Revocation List:
# fwupdmgr get-devicesSee the
Current versionfield underUEFI dbx.List the updates available from RHEL:
# ls /usr/share/dbxtool/Select the most recent update file for your architecture. The file names use the following format:
DBXUpdate-date-architecture.cabInstall the selected update file:
# fwupdmgr install /usr/share/dbxtool/DBXUpdate-date-architecture.cab-
At the end of the update,
fwupdmgrasks you to reboot the system. Confirm the reboot.
Verification
After the reboot, check the current version of the Revocation List again:
# fwupdmgr get-devices
Chapter 24. Enhancing security with the kernel integrity subsystem
You can improve the security of your system by using components of the kernel integrity subsystem. Learn more about the relevant components and their configuration.
24.1. The kernel integrity subsystem
Protect system integrity by detecting file tampering and enforcing access policies with the kernel integrity subsystem. Comprising IMA and EVM, it logs access data to validation by remote parties through attestation.
Overview of IMA and EVM
Integrity Measurement Architecture (IMA) maintains the integrity of file content. It includes three features that you can enable through an IMA policy:
IMA-Measurement- Collect the file content hash or signature and store the measurements in the kernel. If a TPM is available, each measurement extends a TPM PCR, which enables remote attestation with an attestation quote.
IMA-Appraisal- Verify file integrity by comparing the calculated file hash with a known good reference value or by verifying a signature stored in the security.ima attribute. If verification fails, the system denies access.
IMA-Audit- Store the calculated file content hash or signature in the system audit log.
The Extended Verification Module (EVM) protects file metadata, including extended attributes related to system security such as security.ima and security.selinux. EVM stores a reference hash or HMAC for these security attributes in security.evm and uses it to detect if the file metadata has been changed maliciously.
Secure Boot integration
Secure Boot establishes the chain of trust from firmware to boot loader and then to kernel. With the integrity subsystem of the trusted kernel making sure only trusted user space code is executed, the chain of trust is now extended to the user space. Although the integrity subsystem can be used alone, some behaviours of the integrity subsystem are tied to secure boot, for example,
- Some IMA policy rules is activated automatically when Secure Boot is enabled. For example, IMA-Measurement is enabled for kexec’ed kernel and kernel modules on UEFI systems, and IMA-Appraisal is enabled for kexec’ed kernel on PowerPC.
- Currently, for Red Hat Enterprise Linux 10, only IMA policy signed by trusted keys can be loaded when secure boot is enabled
24.2. Enabling kernel’s runtime integrity monitoring through IMA-signature based appraisal
Enable signature-based IMA appraisal to ensure only authorized package files are accessed. Starting from RHEL 9, all package files are signed per file.
Enable the signature-based IMA appraisal:
ima-setup --policy=/usr/share/ima/policies/01-appraise-executable-and-lib-signaturesThis command:
-
Stores package file signature in
security.imafor all installed packages. -
Includes the
dracutintegrity module to load the IMA code signing key to kernel. -
Copies the policy to
/etc/ima/ima-policyso systemd loads it at boot time.
Verification
-
The
ipcommand can be successfully executed. If
ipis copied to/tmp, by default, it loses itssecurity.imaand thereforeipcommand is not executed.# cp /usr/sbin/ip /tmp # /tmp/ip -bash: /tmp/ip: Permission denied # /tmp/ip doesn’t have security.ima # getfattr -m security.ima -d /tmp/ip # whereas /usr/sbin/ip has # getfattr -m security.ima /usr/sbin/ip # file: usr/sbin/ip security.ima=0sAwIE0zIESQBnMGUCMQCLXZ7ukyDcguLgPYwzXU16dcVrmlHxOta7vm7EUfX07Nf0xnP1MyE//AZaqeNIKBoCMFHNDOuA4uNvS+8OOAy7YEn8oathfsF2wsDSZi+NAoumC6RFqIB912zkRKxraSX8sA==
If the sample policy 01-appraise-executable-and-lib-signatures does not meet your requirements, you can create and use a custom policy.
24.3. Enabling remote attestation with IMA measurement
Enable remote attestation with IMA measurement to verify system integrity. Use IMA measurement with tools such as Keylime by deploying the signed measurement policy from /usr/share/ima/policies/02-keylime-remote-attestation.
Prerequisites
-
A signed measurement policy is available at
/usr/share/ima/policies/02-keylime-remote-attestation.
Procedure
Deploy the policy:
# cp --preserve=xattr /usr/share/ima/policies/02-keylime-remote-attestation /etc/ima/ima-policyLoad the policy:
# echo /etc/ima/ima-policy > /sys/kernel/security/integrity/ima/policy
If the sample policy does not meet your requirements, or if you want to ensure that only signed IMA policies are loaded for security reasons, see Deploying a custom signed IMA policy for UEFI systems.
Verification
Verify that the policy is loaded:
# cat /sys/kernel/security/integrity/ima/policy
Chapter 25. Extending, customizing, and troubleshooting kernel integrity subsystem
Extend, customize, and troubleshoot the kernel integrity subsystem to support diverse security requirements and operational environments.
25.1. Generate good reference values for IMA appraisal
Generate valid reference values stored in the security.ima extended attribute for all files governed by IMA-appraisal rules before deploying the policy to prevent boot failures or access denials.
# ima-appraise-file </path/to/file>25.1.1. Adding IMA signatures as good references for immutable files
Use IMA signatures as trusted reference values for immutable files to support integrity verification and ensure only files with valid signatures are accessed.
Prerequisites
- You have created an IMA policy that includes IMA-appraisal rules.
Procedure
Install the
rpm-plugin-ima:$ sudo dnf install rpm-plugin-ima -yqThis ensures that package files have IMA signature stored in
security.xattrautomatically during package installation, reinstallation, or upgradation.Reinstall all the packages:
$ sudo dnf reinstall "*" -yThis ensures that the
security.xattrextended attribute is updated for all packages.Enable the dracut integrity module so the official IMA code-signing key in
/etc/keys/imaloads automatically on boot:$ sudo dracut -f
Verification
Verify that signature is correctly stored in
security.imaextended attribute:$ # evmctl ima_verify -k /etc/keys/ima/redhatimarelease-10.der /usr/lib/systemd/systemdkeyid d3320449 (from /etc/keys/ima/redhatimarelease-10.der) key 1: d3320449 /etc/keys/ima/redhatimarelease-10.der /usr/lib/systemd/systemd: verification is OK$ # evmctl ima_verify -k /etc/keys/ima/redhatimarelease-10.der /bin/bashkeyid d3320449 (from /etc/keys/ima/redhatimarelease-10.der) key 1: d3320449 /etc/keys/ima/redhatimarelease-10.der /bin/bash: verification is OK ...
25.1.2. Generating good reference values for mutable files
Generate and update reference values for mutable files to maintain integrity and ensure the system accurately verifies file authenticity.
Prerequisites
- You have root privileges on the system.
- You have created an IMA policy that includes IMA-appraisal rules.
- You have generated good reference values for IMA appraisal.
- Secure Boot is disabled.
Procedure
Optional: Enable your chosen IMA-appraisal policy or skip this step if you only use your custom policy. Take built-in
ima_policy=appraise_tcbas an example:# grubby --update-kernel=/boot/vmlinuz-$(uname -r) --args="ima_policy=appraise_tcb"Additionally for
s390xsystems:# zipl
Enable IMA-appraisal fix mode by adding the
ima_appraise=fixkernel command line parameter:# grubby --update-kernel=/boot/vmlinuz-$(uname -r) --args="ima_appraise=fix"Additionally for
s390xsystems:# zipl
Reboot the system:
# rebootOptional: Load your custom IMA policy:
# echo <path_to_your_custom_ima_policy> > /sys/kernel/security/ima/policyRe-label the whole system:
# find / -fstype xfs -type f -uid 0 -exec head -c 0 '{}' \;Turn off IMA-appraisal fix mode by removing the
ima_appraise=fixkernel command line parameter:# grubby --update-kernel=/boot/vmlinuz-$(uname -r) --remove-args="ima_appraise=fix"Additionally for
s390xsystems:# zipl
- Enable the secure boot if it is disabled.
Additional resources
25.2. Writing custom IMA policy
Create custom IMA policy rules when built-in policies or sample policies do not meet your requirements. Systemd loads custom policies from /etc/ima/ima-policy, replacing the built-in IMA policy.
After you define your IMA policy, generate good reference values if the policy includes IMA-appraisal rules before you deploy it. If your policy does not include IMA-appraisal rules, you can verify the policy by running echo /PATH-TO-YOUR-DRAFT-IMA-POLICY > /sys/kernel/security/integrity/ima/policy. This approach helps prevent system boot failures.
An IMA policy rule uses the format action [condition …] to specify an action that is triggered under certain conditions. For example, the sample policy in /usr/share/ima/policies/01-appraise-executable-and-lib-signatures includes the following rules:
# Skip some unsupported filesystems
# For a list of these filesystems, see
# https://www.kernel.org/doc/Documentation/ABI/testing/ima_policy
# PROC_SUPER_MAGIC
dont_appraise fsmagic=0x9fa0
…
appraise func=BPRM_CHECK appraise_type=imasig
The first rule, dont_appraise fsmagic=0x9fa0, instructs IMA to skip appraising files in the PROC_SUPER_MAGIC filesystem. The last rule, appraise func=BPRM_CHECK appraise_type=imasig, enforces signature verification when a file is executed.
25.3. Creating custom IMA keys using OpenSSL
Generate a CSR with OpenSSL to create digital certificates for code security. The kernel validates IMA signatures using code signing keys in the .ima keyring. Before adding a key, ensure it is signed by an IMA CA key present in the trusted keyrings.
Prerequisites
The custom IMA CA key has the following extensions:
- the basic constraints extension with the CA boolean asserted.
-
the
KeyUsageextension with thekeyCertSignbit asserted but without thedigitalSignatureasserted.
The custom IMA code signing key falls under the following criteria:
- The IMA CA key signed this custom IMA code signing key.
-
The custom key includes the
subjectKeyIdentifierextension.
-
UEFI Secure Boot on
x86_64oraarch64systems or PowerVM Secure Boot onppc64lesystems is enabled.
Procedure
To generate a custom IMA CA key pair, run:
# openssl req -new -x509 -utf8 -sha256 -days 3650 -batch -config ima_ca.conf -outform DER -out custom_ima_ca.der -keyout custom_ima_ca.privOptional: To check the content of the
ima_ca.conffile, run:# cat ima_ca.conf [ req ] default_bits = 2048 distinguished_name = req_distinguished_name prompt = no string_mask = utf8only x509_extensions = ca [ req_distinguished_name ] O = YOUR_ORG CN = YOUR_COMMON_NAME IMA CA emailAddress = YOUR_EMAIL [ ca ] basicConstraints=critical,CA:TRUE subjectKeyIdentifier=hash authorityKeyIdentifier=keyid:always,issuer keyUsage=critical,keyCertSign,cRLSignTo generate a private key and a certificate signing request (CSR) for the IMA code signing key, run:
# openssl req -new -utf8 -sha256 -days 365 -batch -config ima.conf -out custom_ima.csr -keyout custom_ima.privOptional: To check the content of the
ima.conffile, run:# cat ima.conf [ req ] default_bits = 2048 distinguished_name = req_distinguished_name prompt = no string_mask = utf8only x509_extensions = code_signing [ req_distinguished_name ] O = YOUR_ORG CN = YOUR_COMMON_NAME IMA signing key emailAddress = YOUR_EMAIL [ code_signing ] basicConstraints=critical,CA:FALSE keyUsage=digitalSignature subjectKeyIdentifier=hash authorityKeyIdentifier=keyid:always,issuerUse the IMA CA private key to sign the CSR to create the IMA code signing certificate:
# openssl x509 -req -in custom_ima.csr -days 365 -extfile ima.conf -extensions code_signing -CA custom_ima_ca.der -CAkey custom_ima_ca.priv -CAcreateserial -outform DER -out ima.der
25.4. Loading an IMA policy signed by your custom IMA key
Load an IMA policy signed with your custom IMA key to maintain system integrity and ensure only trusted, authenticated policies are applied during system startup or runtime.
This procedure applies only to x86_64 and aarch64 systems with UEFI Secure Boot enabled, and to ppc64le systems running PowerVM Secure Boot.
Prerequisites
- You must have root privileges on your system.
-
UEFI Secure Boot is enabled for Red Hat Enterprise Linux or the kernel is booted with the
ima_policy=secure_bootparameter to ensure only signed IMA policy can be loaded. - The custom IMA CA key has been added to the MOK list. For more information, see Enrolling public key on target system by adding the public key to the MOK list.
- The kernel version is 5.14 or later.
- Good reference values have been generated for the IMA policy. For more information, see Generate good reference values for IMA appraisal.
Procedure
Add your custom IMA code signing key to the
.imakeyring:# keyctl padd asymmetric <KEY_SUBJECT> %:.ima < <PATH_TO_YOUR_CUSTOM_IMA_KEY>Prepare your IMA policy and sign it with your custom IMA code signing key:
# evmctl ima_sign <PATH_TO_YOUR_CUSTOM_IMA_POLICY> -k <PATH_TO_YOUR_CUSTOM_IMA_KEY>Load the signed IMA policy:
# echo <PATH_TO_YOUR_CUSTOM_SIGNED_IMA_POLICY> > /sys/kernel/security/ima/policyCheck the exit status of the previous command:
# echo $?00indicates that the IMA policy was loaded successfully. If the command returns a nonzero value, the IMA policy was not loaded successfully.
WarningDo not skip this step. If you do, your system might fail to boot and you need to recover your system.
If the IMA policy fails to load, repeat the steps 2, 3, and 4 to fix the issue.
Copy the signed IMA policy to
/etc/ima/ima-policyto enable systemd load it automatically on boot:# cp --preserve=xattr <PATH_TO_YOUR_CUSTOM_IMA_POLICY> /etc/ima/ima-policyCopy your custom IMA code signing key to
/etc/keys/ima/:# cp <PATH_TO_YOUR_CUSTOM_IMA_KEY> /etc/keys/ima/Copy the
dracutintegrity module configuration file:# cp --preserve=xattr /usr/share/ima/dracut-98-integrity.conf /etc/dracut.conf.d/98-integrity.confRegenerate the initial RAM disk:
# dracut -fAdditionally for
s390xsystems:# zipl
Verification
Verify that the IMA policy is loaded successfully:
# cat /sys/kernel/security/ima/policyThe output should include the rules from your custom IMA policy.
25.5. Troubleshooting systemd failure to load the IMA policy
If systemd fails to load the /etc/ima/ima-policy file, the system may hang and display a Freezing execution error. You can troubleshoot and recover the system from this state by using the methods described in this procedure.
[    5.829882] ima: policy update failed
[    5.830094] ima: signed policy file (specified as an absolute pathname) required
[!!!!!!] Failed to load IMA policy.
…
[    5.859994] systemd[1]: Freezing execution.
There are three methods that you can use to recover your system.
25.5.1. Turn off Secure Boot
If system startup fails because an unsigned IMA policy cannot load, temporarily disable Secure Boot. With disabled Secure Boot, you can resolve the error before re-enabling security features.
[    5.661906] ima: policy update failed
[    5.662290] ima: signed policy file (specified as an absolute pathname) required
[    5.662496] systemd[1]: Failed to load the IMA custom policy file /etc/ima/ima-policy1: Permission denied
[    5.662663] ima: policy update failed
[    5.662856] audit: type=1800 audit(1744968172.925:7): pid=1 uid=0 auid=4294967295 ses=4294967295 subj=system_u:system_r:init_t:s0 op=appraise_data cause=IMA-signature-required comm="systemd" name="/etc/ima/ima-policy" dev="vda3" ino=25679834 res=0 errno=0
[    5.663205] audit: type=1802 audit(1744968172.925:8): pid=1 uid=0 auid=4294967295 ses=4294967295 subj=system_u:system_r:init_t:s0 op=policy_update cause=failed comm="systemd" res=0 errno=0
[!!!!!!] Failed to load IMA policy.
As a workaround, you can turn off Secure Boot temporarily and follow Deploying a custom signed IMA policy for UEFI systems to fix the issue.
25.5.2. Booting the system with the init=/bin/bash kernel parameter
Boot the system with the init=/bin/bash kernel parameter to access a shell for system recovery or troubleshooting.
-
Modify the bootloader entry and add the
init=/bin/bashkernel parameter. After you access the shell, remount the system with write permissions:
# mount -o remount,rw /Rename
/etc/ima/ima-policyto/etc/ima/ima-policy.bak:# mv /etc/ima/ima-policy /etc/ima/ima-policy.bakEnable the
SysRqkey:# echo 1 > /proc/sys/kernel/sysrqReboot the system:
# printf "s\nb" > /proc/sysrq-triggerResolve any issues in
/etc/ima/ima-policy.bakand verify that the policy can be loaded:# echo /etc/ima/ima-policy.bak >> /sys/kernel/security/integrity/ima/policyRename
/etc/ima/ima-policy.bakto/etc/ima/ima-policy:# mv /etc/ima/ima-policy.bak /etc/ima/ima-policy
25.5.3. Booting the system with the initcall_blacklist=init_ima kernel parameter
Boot the system with the initcall_blacklist=init_ima kernel parameter to disable the IMA policy when the system hangs with systemd[1]: Freezing execution.
-
Modify the boot loader entry and add the
initcall_blacklist=init_imakernel parameter. Rename
/etc/ima/ima-policyto/etc/ima/ima-policy.bak:# mv /etc/ima/ima-policy /etc/ima/ima-policy.bakReboot the system:
# systemctl rebootResolve any issues in
/etc/ima/ima-policy.bakand verify that the policy can be loaded:# echo /etc/ima/ima-policy.bak >> /sys/kernel/security/integrity/ima/policyRename
/etc/ima/ima-policy.bakto/etc/ima/ima-policy:# mv /etc/ima/ima-policy.bak /etc/ima/ima-policy
25.6. Signing custom built packages
Sign custom built packages before deployment using the rpm-sign tool and IMA code signing key to maintain system integrity.
Prerequisites
- You have root privileges on your system.
- You have a custom built package that you want to sign.
- You have the IMA code signing key.
-
You have the
rpm-signtool installed. - Custom IMA keys are created. See Creating custom IMA keys using OpenSSL.
Procedure
Use
rpmsign –signfilesto sign package files:# rpmsign --define "gpg_name _<GPG_KEY_NAME>" --addsign --signfiles --fskpass --fskpath=<PATH_TO_YOUR_PRIVATE_IMA_CODE_SIGNING_KEY> <PATH_TO_YOUR_RPM>--define "gpg_name _<GPG_KEY_NAME>"- The GPG key signs the package, and the IMA code signing key signs each file in the package.
--addsign- Adds the signature to the package.
--signfiles- Signs each file in the package.
--fskpass- Avoids repeatedly entering the password for the IMA code signing key.
--fskpath- Specifies the path to the IMA code signing key.
Verification
To verify that the package is signed, you can use the following command:
# rpm -q --queryformat "[%{FILENAMES} %{FILESIGNATURES}\n] <PATH_TO_YOUR_RPM>"/usr/bin/YOUR_BIN 030204... /usr/lib/YOUR_LIB.so 030204... ...
25.7. Comparison of IMA and fapolicyd
Compare IMA and fapolicyd tools for enforcing file integrity. IMA verifies file integrity at boot time, while fapolicyd verifies at runtime.
The following list can help you determine which tool meets your requirements:
-
IMA verifies digital signatures to ensure integrity, while
fapolicydcurrently supports only hash-based verification. -
IMA operates in kernel space, while
fapolicydoperates in user space. -
fapolicydsupports basic integrity verification by checking file size and can also verify reference hash values stored insecurity.ima. -
IMA and
fapolicyduse different policy syntax. For example,fapolicydsupports path-based policies, but IMA does not.
Chapter 26. Using systemd to manage resources used by applications
RHEL 9 binds cgroup hierarchies to the systemd unit tree. This moves resource management from the process level to the application level. You can manage system resources by using the systemctl command or by modifying systemd unit files.
To achieve this, systemd takes various configuration options from the unit files or directly via the systemctl command. Then systemd applies those options to specific process groups by using the Linux kernel system calls and features like cgroups and namespaces.
You can review the full set of configuration options for systemd in the following manual pages:
-
systemd.resource-control(5) -
systemd.exec(5)
26.1. Role of systemd in resource management
Systemd manages and supervises services, ensuring they start at the right time and in the correct order during boot, run smoothly to optimize hardware usage, and provides capabilities to define resource management policies and tune performance options.
Use systemd to control the usage of system resources. Manually configure the cgroups virtual file system only in special cases, such as when you need to use cgroups-v1 controllers that have no equivalents in the cgroups-v2 hierarchy.
26.2. Distribution models of system sources
Apply one or more distribution models to modify how system resources are distributed among processes and services.
- Weights
You can distribute the resource by adding up the weights of all sub-groups and giving each sub-group the fraction matching its ratio against the sum.
For example, if you have 10 cgroups, each with weight of value 100, the sum is 1000. Each cgroup receives one tenth of the resource.
Weight is usually used to distribute stateless resources. For example the CPUWeight= option is an implementation of this resource distribution model.
- Limits
A cgroup can consume up to the configured amount of the resource. The sum of sub-group limits can exceed the limit of the parent cgroup. Therefore it is possible to overcommit resources in this model.
For example the MemoryMax= option is an implementation of this resource distribution model.
- Protections
You can set up a protected amount of a resource for a cgroup. If the resource usage is below the protection boundary, the kernel will try not to penalize this cgroup in favor of other cgroups that compete for the same resource. An overcommit is also possible.
For example the MemoryLow= option is an implementation of this resource distribution model.
- Allocations
- Exclusive allocations of an absolute amount of a finite resource. An overcommit is not possible. An example of this resource type in Linux is the real-time budget.
- unit file option
A setting for resource control configuration.
For example, you can configure CPU resource with options like CPUAccounting=, or CPUQuota=. Similarly, you can configure memory or I/O resources with options like AllowedMemoryNodes= and IOAccounting=.
26.3. Allocating system resources using systemd
Allocate system resources by creating and managing systemd services and units, which can be configured to start, stop, or restart at specific times or in response to system events.
Procedure
To change the required value of the unit file option of your service, you can adjust the value in the unit file, or use the systemctl command:
Check the assigned values for the service of your choice.
# systemctl show --property <unit file option> <service name>Set the required value of the CPU time allocation policy option:
# systemctl set-property <service name> <unit file option>=<value>
Verification
Check the newly assigned values for the service of your choice.
# systemctl show --property <unit file option> <service name>
26.4. Overview of systemd hierarchy for cgroups
Systemd system and service manager uses slice, scope, and service units to organize processes in control groups. Modify this hierarchy by creating custom unit files or using the systemctl command. Systemd automatically mounts hierarchies for kernel resource controllers at /sys/fs/cgroup/.
For resource control, you can use the following three systemd unit types:
- Service
A process or a group of processes, which systemd started according to a unit configuration file.
Services encapsulate the specified processes so that they can be started and stopped as one set. Services are named in the following way:
<name>.service- Scope
A group of externally created processes. Scopes encapsulate processes that are started and stopped by the arbitrary processes through the
fork()function and then registered by systemd at runtime. For example, user sessions, containers, and virtual machines are treated as scopes. Scopes are named as follows:<name>.scope- Slice
A group of hierarchically organized units. Slices organize a hierarchy in which scopes and services are placed.
The actual processes are contained in scopes or in services. Every name of a slice unit corresponds to the path to a location in the hierarchy.
The dash (
-) character acts as a separator of the path components to a slice from the-.sliceroot slice. In the following example:<parent-name>.sliceparent-name.sliceis a sub-slice ofparent.slice, which is a sub-slice of the-.sliceroot slice.parent-name.slicecan have its own sub-slice namedparent-name-name2.slice, and so on.
The service, the scope, and the slice units directly map to objects in the control group hierarchy. When these units are activated, they map directly to control group paths built from the unit names.
The following is an abbreviated example of a control group hierarchy:
Control group /:
-.slice
├─user.slice
│ ├─user-42.slice
│ │ ├─session-c1.scope
│ │ │ ├─ 967 gdm-session-worker [pam/gdm-launch-environment]
│ │ │ ├─1035 /usr/libexec/gdm-x-session gnome-session --autostart /usr/share/gdm/greeter/autostart
│ │ │ ├─1054 /usr/libexec/Xorg vt1 -displayfd 3 -auth /run/user/42/gdm/Xauthority -background none -noreset -keeptty -verbose 3
│ │ │ ├─1212 /usr/libexec/gnome-session-binary --autostart /usr/share/gdm/greeter/autostart
│ │ │ ├─1369 /usr/bin/gnome-shell
│ │ │ ├─1732 ibus-daemon --xim --panel disable
│ │ │ ├─1752 /usr/libexec/ibus-dconf
│ │ │ ├─1762 /usr/libexec/ibus-x11 --kill-daemon
│ │ │ ├─1912 /usr/libexec/gsd-xsettings
│ │ │ ├─1917 /usr/libexec/gsd-a11y-settings
│ │ │ ├─1920 /usr/libexec/gsd-clipboard
…
├─init.scope
│ └─1 /usr/lib/systemd/systemd --switched-root --system --deserialize 18
└─system.slice
├─rngd.service
│ └─800 /sbin/rngd -f
├─systemd-udevd.service
│ └─659 /usr/lib/systemd/systemd-udevd
├─chronyd.service
│ └─823 /usr/sbin/chronyd
├─auditd.service
│ ├─761 /sbin/auditd
│ └─763 /usr/sbin/sedispatch
├─accounts-daemon.service
│ └─876 /usr/libexec/accounts-daemon
├─example.service
│ ├─ 929 /bin/bash /home/jdoe/example.sh
│ └─4902 sleep 1
…The example above shows that services and scopes contain processes and are placed in slices that do not contain processes of their own.
26.5. Listing systemd units
Use the systemd system and service manager to list its units.
Procedure
List all active units on the system with the
systemctlutility. The terminal returns an output similar to the following example:# systemctl UNIT LOAD ACTIVE SUB DESCRIPTION … init.scope loaded active running System and Service Manager session-2.scope loaded active running Session 2 of user jdoe abrt-ccpp.service loaded active exited Install ABRT coredump hook abrt-oops.service loaded active running ABRT kernel log watcher abrt-vmcore.service loaded active exited Harvest vmcores for ABRT abrt-xorg.service loaded active running ABRT Xorg log watcher … -.slice loaded active active Root Slice machine.slice loaded active active Virtual Machine and Container Slice system-getty.slice loaded active active system-getty.slice system-lvm2\x2dpvscan.slice loaded active active system-lvm2\x2dpvscan.slice system-sshd\x2dkeygen.slice loaded active active system-sshd\x2dkeygen.slice system-systemd\x2dhibernate\x2dresume.slice loaded active active system-systemd\x2dhibernate\x2dresume> system-user\x2druntime\x2ddir.slice loaded active active system-user\x2druntime\x2ddir.slice system.slice loaded active active System Slice user-1000.slice loaded active active User Slice of UID 1000 user-42.slice loaded active active User Slice of UID 42 user.slice loaded active active User and Session Slice …UNIT- A name of a unit that also reflects the unit position in a control group hierarchy. The units relevant for resource control are a slice, a scope, and a service.
LOAD- Indicates whether the unit configuration file was properly loaded. If the unit file failed to load, the field provides the state error instead of loaded. Other unit load states are: stub, merged, and masked.
ACTIVE-
The high-level unit activation state, which is a generalization of
SUB. SUB- The low-level unit activation state. The range of possible values depends on the unit type.
DESCRIPTION- The description of the unit content and functionality.
List all active and inactive units:
# systemctl --allLimit the amount of information in the output:
# systemctl --type service,maskedThe
--typeoption requires a comma-separated list of unit types such as a service and a slice, or unit load states such as loaded and masked.
26.6. Viewing systemd cgroups hierarchy
Display control groups (cgroups) hierarchy and processes running in specific cgroups.
Procedure
Display the whole
cgroupshierarchy on your system with thesystemd-cglscommand.# systemd-cgls Control group /: -.slice ├─user.slice │ ├─user-42.slice │ │ ├─session-c1.scope │ │ │ ├─ 965 gdm-session-worker [pam/gdm-launch-environment] │ │ │ ├─1040 /usr/libexec/gdm-x-session gnome-session --autostart /usr/share/gdm/greeter/autostart … ├─init.scope │ └─1 /usr/lib/systemd/systemd --switched-root --system --deserialize 18 └─system.slice … ├─example.service │ ├─6882 /bin/bash /home/jdoe/example.sh │ └─6902 sleep 1 ├─systemd-journald.service └─629 /usr/lib/systemd/systemd-journald …The example output returns the entire
cgroupshierarchy, where the highest level is formed by slices.Display the
cgroupshierarchy filtered by a resource controller with thesystemd-cgls <resource_controller>command.# systemd-cgls memory Controller memory; Control group /: ├─1 /usr/lib/systemd/systemd --switched-root --system --deserialize 18 ├─user.slice │ ├─user-42.slice │ │ ├─session-c1.scope │ │ │ ├─ 965 gdm-session-worker [pam/gdm-launch-environment] … └─system.slice | … ├─chronyd.service │ └─844 /usr/sbin/chronyd ├─example.service │ ├─8914 /bin/bash /home/jdoe/example.sh │ └─8916 sleep 1 …The example output lists the services that interact with the selected controller.
Display detailed information about a certain unit and its part of the
cgroupshierarchy with thesystemctl status <system_unit>command.# systemctl status example.service ● example.service - My example service Loaded: loaded (/usr/lib/systemd/system/example.service; enabled; vendor preset: disabled) Active: active (running) since Tue 2019-04-16 12:12:39 CEST; 3s ago Main PID: 17737 (bash) Tasks: 2 (limit: 11522) Memory: 496.0K (limit: 1.5M) CGroup: /system.slice/example.service ├─17737 /bin/bash /home/jdoe/example.sh └─17743 sleep 1 Apr 16 12:12:39 redhat systemd[1]: Started My example service. Apr 16 12:12:39 redhat bash[17737]: The current time is Tue Apr 16 12:12:39 CEST 2019 Apr 16 12:12:40 redhat bash[17737]: The current time is Tue Apr 16 12:12:40 CEST 2019
26.7. Viewing cgroups of processes
Identify which control group (cgroup) a process belongs to and check which controllers and controller-specific configurations the cgroup uses.
Procedure
To view which
cgroupa process belongs to, run the# cat proc/<PID>/cgroupcommand:# cat /proc/2467/cgroup 0::/system.slice/example.serviceThe example output relates to a process of interest. In this case, it is a process identified by
PID 2467, which belongs to theexample.serviceunit. You can determine whether the process is placed in a correct control group as defined by the systemd unit file specifications.To display what controllers and their configuration files the
cgroupuses, check thecgroupdirectory:# cat /sys/fs/cgroup/system.slice/example.service/cgroup.controllers memory pids # ls /sys/fs/cgroup/system.slice/example.service/ cgroup.controllers cgroup.events … cpu.pressure cpu.stat io.pressure memory.current memory.events … pids.current pids.events pids.max
The version 1 hierarchy of cgroups uses a per-controller model. Therefore the output from the /proc/PID/cgroup file shows, which cgroups under each controller the PID belongs to. You can find the cgroups under the controller directories at /sys/fs/cgroup/<controller_name>/.
26.8. Monitoring resource consumption
View a list of currently running control groups (cgroups) and their resource consumption in real-time.
Procedure
Display a dynamic account of currently running
cgroupswith thesystemd-cgtopcommand.# systemd-cgtop Control Group Tasks %CPU Memory Input/s Output/s / 607 29.8 1.5G - - /system.slice 125 - 428.7M - - /system.slice/ModemManager.service 3 - 8.6M - - /system.slice/NetworkManager.service 3 - 12.8M - - /system.slice/accounts-daemon.service 3 - 1.8M - - /system.slice/boot.mount - - 48.0K - - /system.slice/chronyd.service 1 - 2.0M - - /system.slice/cockpit.socket - - 1.3M - - /system.slice/colord.service 3 - 3.5M - - /system.slice/crond.service 1 - 1.8M - - /system.slice/cups.service 1 - 3.1M - - /system.slice/dev-hugepages.mount - - 244.0K - - /system.slice/dev-mapper-rhel\x2dswap.swap - - 912.0K - - /system.slice/dev-mqueue.mount - - 48.0K - - /system.slice/example.service 2 - 2.0M - - /system.slice/firewalld.service 2 - 28.8M - - ...The example output displays currently running
cgroupsordered by their resource usage (CPU, memory, disk I/O load). The list refreshes every 1 second by default. Therefore, it offers a dynamic insight into the actual resource usage of each control group.
26.9. Using systemd unit files to set limits for applications
Modify systemd unit files in /usr/lib/systemd/system/ to set limits, prioritize, and control access to hardware resources for groups of processes. The systemd service manager supervises units and creates control groups for them.
Prerequisites
-
You have the
rootprivileges.
Procedure
Edit the
/usr/lib/systemd/system/example.servicefile to limit the memory usage of a service:… [Service] MemoryMax=1500K …The configuration limits the maximum memory that the processes in a control group cannot exceed. The
example.serviceservice is part of such a control group which has imposed limitations. You can use suffixes K, M, G, or T to identify Kilobyte, Megabyte, Gigabyte, or Terabyte as a unit of measurement.Reload all unit configuration files:
# systemctl daemon-reloadRestart the service:
# systemctl restart example.service
Verification
Check that the changes took effect:
# cat /sys/fs/cgroup/system.slice/example.service/memory.max
1536000
The example output shows that the memory consumption was limited at around 1,500 KB.
26.10. Using systemctl command to set limits to applications
CPU affinity settings restrict the access of a process to specific CPUs. The CPU scheduler never schedules the process on a CPU that is not in the affinity mask of the process.
The default CPU affinity mask applies to all services managed by systemd.
To configure CPU affinity mask for a particular systemd service, systemd provides CPUAffinity= both as:
- a unit file option.
-
a configuration option in the [Manager] section of the
/etc/systemd/system.conffile.
The CPUAffinity= unit file option sets a list of CPUs or CPU ranges that are merged and used as the affinity mask.
You can set the CPU affinity mask for a systemd service by using the CPUAffinity unit file option.
Procedure
Check the values of the
CPUAffinityunit file option in the service of your choice:$ systemctl show --property <CPU affinity configuration option> <service name>As the root user, set the required value of the
CPUAffinityunit file option for the CPU ranges used as the affinity mask:# systemctl set-property <service name> CPUAffinity=<value>Restart the service to apply the changes.
# systemctl restart <service name>
26.11. Setting global default CPU affinity through manager configuration
Set the global default CPU affinity mask using the CPUAffinity option in /etc/systemd/system.conf for PID 1 and all processes forked from it. Override this setting on a per-service basis.
To set the default CPU affinity mask for all systemd services using the /etc/systemd/system.conf file:
-
Set the CPU numbers for the
CPUAffinity=option in the [Manager] section of the/etc/systemd/system.conffile. Save the edited file and reload the systemd service:
# systemctl daemon-reload- Reboot the server to apply the changes.
26.12. Configuring NUMA policies using systemd
Non-uniform memory access (NUMA) is a computer memory subsystem design, in which the memory access time depends on the physical memory location relative to the processor.
Memory close to the CPU has lower latency (local memory) than memory that is local for a different CPU (foreign memory) or is shared between a set of CPUs.
In terms of the Linux kernel, NUMA policy governs where (for example, on which NUMA nodes) the kernel allocates physical memory pages for the process.
You can use the NUMAPolicy and NUMAMask systemd unit file options to control memory allocation policies for services.
Procedure
To set the NUMA memory policy through the NUMAPolicy unit file option:
Check the values of the
NUMAPolicyunit file option in the service of your choice:$ systemctl show --property <NUMA policy configuration option> <service name>As a root, set the required policy type of the
NUMAPolicyunit file option:# systemctl set-property <service name> NUMAPolicy=<value>Restart the service to apply the changes.
# systemctl restart <service name>
To set a global NUMAPolicy setting using the [Manager] configuration option:
-
Search in the
/etc/systemd/system.conffile for theNUMAPolicyoption in the [Manager] section of the file. - Edit the policy type and save the file.
Reload the systemd configuration:
# systemd daemon-reload- Reboot the server.
When you configure a strict NUMA policy, for example bind, make sure that you also appropriately set the CPUAffinity= unit file option.
26.13. NUMA policy configuration options for systemd
Systemd provides the following options to configure the NUMA policy:
NUMAPolicyControls the NUMA memory policy of the executed processes. You can use these policy types:
- default
- preferred
- bind
- interleave
- local
NUMAMaskControls the NUMA node list that is associated with the selected NUMA policy.
Note that you do not have to specify the
NUMAMaskoption for the following policies:- default
- local
For the preferred policy, the list specifies only a single NUMA node.
26.14. Creating transient cgroups using systemd-run command
The transient cgroups set limits on resources consumed by a unit (service or scope) during its runtime.
Procedure
To create a transient control group, use the
systemd-runcommand in the following format:# systemd-run --unit=<name> --slice=<name>.slice <command>This command creates and starts a transient service or a scope unit and runs a custom command in such a unit.
-
The
--unit=<name>option gives a name to the unit. If--unitis not specified, the name is generated automatically. -
The
--slice=<name>.sliceoption makes your service or scope unit a member of a specified slice. Replace<name>.slicewith the name of an existing slice (as shown in the output ofsystemctl -t slice), or create a new slice by passing a unique name. By default, services and scopes are created as members of thesystem.slice. Replace
<command>with the command you want to enter in the service or the scope unit.The following message is displayed to confirm that you created and started the service or the scope successfully:
# Running as unit <name>.service
-
The
Optional: Keep the unit running after its processes finished to collect runtime information:
# systemd-run --unit=<name> --slice=<name>.slice --remain-after-exit <command>The command creates and starts a transient service unit and runs a custom command in the unit. The
--remain-after-exitoption ensures that the service keeps running after its processes have finished.
26.15. Removing transient control groups
You can use the systemd system and service manager to remove transient control groups (cgroups) if you no longer need to limit, prioritize, or control access to hardware resources for groups of processes.
Transient cgroups are automatically released when all the processes that a service or a scope unit contains finish.
Procedure
To stop the service unit with all its processes, enter:
# systemctl stop <name>.serviceTo terminate one or more of the unit processes, enter:
# systemctl kill <name>.service --kill-who=PID,… --signal=<signal>The command uses the
--kill-whooption to select process(es) from the control group you want to terminate. To kill multiple processes at the same time, pass a comma-separated list of PIDs. The--signaloption determines the type of POSIX signal to be sent to the specified processes. The default signal is SIGTERM.
Chapter 27. Understanding control groups
Using the control groups (cgroups) kernel functionality, you can control resource usage of applications to use them more efficiently.
You can use cgroups for the following tasks:
- Setting limits for system resource allocation.
- Prioritizing the allocation of hardware resources to specific processes.
- Isolating certain processes from obtaining hardware resources.
27.1. Introducing control groups
Organize processes into hierarchically ordered groups using the control groups (cgroups) Linux kernel feature. Define the hierarchy by providing structure to the cgroups virtual file system, mounted by default in the /sys/fs/cgroup/ directory.
The systemd service manager uses cgroups to organize all units and services that it governs. You can manually manage the hierarchies of cgroups by creating and removing subdirectories in the /sys/fs/cgroup/ directory.
The resource controllers in the kernel then modify the behavior of processes in cgroups by limiting, prioritizing or allocating system resources, of those processes. These resources include the following:
- CPU time
- Memory
- Network bandwidth
- Combinations of these resources
The primary use case of cgroups is aggregating system processes and dividing hardware resources among applications and users. This makes it possible to increase the efficiency, stability, and security of your environment.
- Control groups version 1
Control groups version 1 (
cgroups-v1) provide a per-resource controller hierarchy. Each resource, such as CPU, memory, or I/O, has its own control group hierarchy. You can combine different control group hierarchies in a way that one controller can coordinate with another in managing their resources. However, when the two controllers belong to different process hierarchies, the coordination is limited.The
cgroups-v1controllers were developed across a large time span, resulting in inconsistent behavior and naming of their control files.- Control groups version 2
Control groups version 2 (
cgroups-v2) provide a single control group hierarchy against which all resource controllers are mounted.The control file behavior and naming is consistent among different controllers.
For more details about cgroups-v1 and cgroups-v2, install the kernel-doc RPM package. After installation, the documentation is in the /usr/share/doc/kernel-doc-<version>/Documentation directory on the local system. The cgroups-v1 documentation files are in the Documentation/admin-guide/cgroups-v1/ directory. This directory has multiple files for different controllers. The cgroups-v2 documentation is in the Documentation/admin-guide/cgroups-v2.rst file.
RHEL 9, by default, mounts and uses cgroups-v2.
27.2. Introducing kernel resource controllers
Kernel resource controllers enable the functionality of control groups. RHEL 9 supports various controllers for control groups version 1 (cgroups-v1) and control groups version 2 (cgroups-v2).
A resource controller, also called a control group subsystem, is a kernel subsystem that represents a single resource, such as CPU time, memory, network bandwidth or disk I/O. The Linux kernel provides a range of resource controllers that are mounted automatically by the systemd service manager. You can find a list of the currently mounted resource controllers in the /proc/cgroups file.
Controllers available for cgroups-v1:
blkio- Sets limits on input/output access to and from block devices.
cpu-
Adjusts the parameters of the Completely Fair Scheduler (CFS) for a control group’s tasks. The
cpucontroller is mounted together with thecpuacctcontroller on the same mount. cpuacct-
Creates automatic reports on CPU resources used by tasks in a control group. The
cpuacctcontroller is mounted together with thecpucontroller on the same mount. cpuset- Restricts control group tasks to run only on a specified subset of CPUs and to direct the tasks to use memory only on specified memory nodes.
devices- Controls access to devices for tasks in a control group.
freezer- Suspends or resumes tasks in a control group.
memory- Sets limits on memory use by tasks in a control group and generates automatic reports on memory resources used by those tasks.
net_cls-
Tags network packets with a class identifier (
classid) that enables the Linux traffic controller (thetccommand) to identify packets that originate from a particular control group task. A subsystem ofnet_cls, thenet_filter(iptables), can also use this tag to perform actions on such packets. Thenet_filtertags network sockets with a firewall identifier (fwid) that allows the Linux firewall to identify packets that originate from a particular control group task (by using theiptablescommand). net_prio- Sets the priority of network traffic.
pids- Sets limits for multiple processes and their children in a control group.
perf_event-
Groups tasks for monitoring by the
perfperformance monitoring and reporting utility. rdma- Sets limits on Remote Direct Memory Access/InfiniBand specific resources in a control group.
hugetlb- Limits the usage of large size virtual memory pages by tasks in a control group.
Controllers available for cgroups-v2:
io- Sets limits on input/output access to and from block devices.
memory- Sets limits on memory use by tasks in a control group and generates automatic reports on memory resources used by those tasks.
pids- Sets limits for multiple processes and their children in a control group.
rdma- Sets limits on Remote Direct Memory Access/InfiniBand specific resources in a control group.
cpu- Adjusts the parameters of the Completely Fair Scheduler (CFS) for a control group’s tasks and creates automatic reports on CPU resources used by tasks in a control group.
cpuset-
Restricts control group tasks to run only on a specified subset of CPUs and to direct the tasks to use memory only on specified memory nodes. Supports only the core functionality (
cpus{,.effective},mems{,.effective}) with a new partition feature. perf_event-
Groups tasks for monitoring by the
perfperformance monitoring and reporting utility.perf_eventis enabled automatically on the v2 hierarchy.
A resource controller can be used either in a cgroups-v1 hierarchy or a cgroups-v2 hierarchy, not simultaneously in both.
27.3. Introducing namespaces
Isolate software objects by using namespaces to prevent interference and manage resources independently. Each namespace maintains its own mount points, network devices, and hostnames, enabling technologies such as containers to operate securely on a shared system.
To inspect which namespaces a process is a member of, you can check the symbolic links in the /proc/<PID>/ns/ directory.
| Namespace | Isolates |
|---|---|
| Mount | Mount points |
| UTS | Hostname and NIS domain name |
| IPC | SysV IPC, POSIX message queues |
| PID | Process IDs |
| Network | Network devices, stacks, ports, etc |
| User | User and group IDs |
| Control groups | Control group root directory |
Chapter 28. Using cgroupfs to manually manage cgroups
You can manage cgroup hierarchies on your system by creating directories on the cgroupfs virtual file system. The file system is mounted by default on the /sys/fs/cgroup/ directory and you can specify desired configurations in dedicated control files.
Use systemd to control system resources. Manually configure the cgroups virtual file system only in special cases. For example, manual configuration is required if you need cgroup-v1 controllers that have no cgroup-v2 equivalents.
28.1. Creating cgroups and enabling controllers in cgroups-v2 file system
Manage control groups (cgroups) by creating or removing directories and writing to files in the cgroups virtual file system, which is mounted at /sys/fs/cgroup/ by default.
Enable the required controllers for child cgroups to use their settings. The root cgroup has the memory and pids controllers enabled by default for its child cgroups. Create at least two levels of child cgroups to optionally remove these controllers from child cgroups and maintain better organizational clarity.
Prerequisites
- You have root permissions.
Procedure
Create the
/sys/fs/cgroup/Example/directory:# mkdir /sys/fs/cgroup/Example/The
/sys/fs/cgroup/Example/directory defines a child group. When you create the/sys/fs/cgroup/Example/directory, somecgroups-v2interface files are automatically created in the directory. The/sys/fs/cgroup/Example/directory contains also controller-specific files for thememoryandpidscontrollers.Optional: Inspect the newly created child control group:
# ll /sys/fs/cgroup/Example/ -r—r—r--. 1 root root 0 Jun 1 10:33 cgroup.controllers -r—r—r--. 1 root root 0 Jun 1 10:33 cgroup.events -rw-r—r--. 1 root root 0 Jun 1 10:33 cgroup.freeze -rw-r--r--. 1 root root 0 Jun 1 10:33 cgroup.procs … -rw-r—r--. 1 root root 0 Jun 1 10:33 cgroup.subtree_control -r—r—r--. 1 root root 0 Jun 1 10:33 memory.events.local -rw-r—r--. 1 root root 0 Jun 1 10:33 memory.high -rw-r—r--. 1 root root 0 Jun 1 10:33 memory.low … -r—r—r--. 1 root root 0 Jun 1 10:33 pids.current -r—r—r--. 1 root root 0 Jun 1 10:33 pids.events -rw-r—r--. 1 root root 0 Jun 1 10:33 pids.maxThe example output shows general
cgroupcontrol interface files such ascgroup.procsorcgroup.controllers. These files are common to all control groups, regardless of enabled controllers.The files such as
memory.highandpids.maxrelate to thememoryandpidscontrollers, which are in the root control group (/sys/fs/cgroup/), and are enabled by default by systemd.By default, the newly created child group inherits all settings from the parent
cgroup. In this case, no limits are inherited from the rootcgroup.Verify that the desired controllers are available in the
/sys/fs/cgroup/cgroup.controllersfile:# cat /sys/fs/cgroup/cgroup.controllers cpuset cpu io memory hugetlb pids rdmaEnable the desired controllers. In this example it is
cpuandcpusetcontrollers:# echo "+cpu" >> /sys/fs/cgroup/cgroup.subtree_control # echo "+cpuset" >> /sys/fs/cgroup/cgroup.subtree_controlThese commands enable the
cpuandcpusetcontrollers for the immediate child groups of the/sys/fs/cgroup/root control group. Including the newly createdExamplecontrol group. A child group is where you can specify processes and apply control checks to each of the processes based on your criteria.Users can read the contents of the
cgroup.subtree_controlfile at any level to get an idea of what controllers are going to be available for enablement in the immediate child group.NoteBy default, the
/sys/fs/cgroup/cgroup.subtree_controlfile in the root control group containsmemoryandpidscontrollers.Enable the desired controllers for child
cgroupsof theExamplecontrol group:# echo "+cpu +cpuset" >> /sys/fs/cgroup/Example/cgroup.subtree_controlThis command ensures that the immediate child control group will only have controllers relevant to regulate the CPU time distribution - not to
memoryorpidscontrollers.Create the
/sys/fs/cgroup/Example/tasks/directory:# mkdir /sys/fs/cgroup/Example/tasks/The
/sys/fs/cgroup/Example/tasks/directory defines a child group with files that relate purely tocpuandcpusetcontrollers. You can now assign processes to this control group and usecpuandcpusetcontroller options for your processes.Optional: Inspect the child control group:
# ll /sys/fs/cgroup/Example/tasks -r—r—r--. 1 root root 0 Jun 1 11:45 cgroup.controllers -r—r—r--. 1 root root 0 Jun 1 11:45 cgroup.events -rw-r—r--. 1 root root 0 Jun 1 11:45 cgroup.freeze -rw-r—r--. 1 root root 0 Jun 1 11:45 cgroup.max.depth -rw-r—r--. 1 root root 0 Jun 1 11:45 cgroup.max.descendants -rw-r—r--. 1 root root 0 Jun 1 11:45 cgroup.procs -r—r—r--. 1 root root 0 Jun 1 11:45 cgroup.stat -rw-r—r--. 1 root root 0 Jun 1 11:45 cgroup.subtree_control -rw-r—r--. 1 root root 0 Jun 1 11:45 cgroup.threads -rw-r—r--. 1 root root 0 Jun 1 11:45 cgroup.type -rw-r—r--. 1 root root 0 Jun 1 11:45 cpu.max -rw-r—r--. 1 root root 0 Jun 1 11:45 cpu.pressure -rw-r—r--. 1 root root 0 Jun 1 11:45 cpuset.cpus -r—r—r--. 1 root root 0 Jun 1 11:45 cpuset.cpus.effective -rw-r—r--. 1 root root 0 Jun 1 11:45 cpuset.cpus.partition -rw-r—r--. 1 root root 0 Jun 1 11:45 cpuset.mems -r—r—r--. 1 root root 0 Jun 1 11:45 cpuset.mems.effective -r—r—r--. 1 root root 0 Jun 1 11:45 cpu.stat -rw-r—r--. 1 root root 0 Jun 1 11:45 cpu.weight -rw-r—r--. 1 root root 0 Jun 1 11:45 cpu.weight.nice -rw-r—r--. 1 root root 0 Jun 1 11:45 io.pressure -rw-r—r--. 1 root root 0 Jun 1 11:45 memory.pressure
The cpu controller is only activated if the relevant child control group has at least 2 processes which compete for time on a single CPU.
Verification
Optional: confirm that you have created a new
cgroupwith only the desired controllers active:# cat /sys/fs/cgroup/Example/tasks/cgroup.controllers cpuset cpu
28.2. Controlling distribution of CPU time for applications by adjusting CPU weight
You need to assign values to the relevant files of the cpu controller to regulate distribution of the CPU time to applications under the specific cgroup tree.
Prerequisites
- You have root permissions.
- You have applications for which you want to control distribution of CPU time.
You created a two level hierarchy of child control groups inside the
/sys/fs/cgroup/root control group as in the following example:… ├── Example │ ├── g1 │ ├── g2 │ └── g3 …-
You enabled the
cpucontroller in the parent control group and in child control groups similarly as described in Creating cgroups and enabling controllers in cgroups-v2 file system.
Procedure
Configure desired CPU weights to achieve resource restrictions within the control groups:
# echo "150" > /sys/fs/cgroup/Example/g1/cpu.weight
# echo "100" > /sys/fs/cgroup/Example/g2/cpu.weight
# echo "50" > /sys/fs/cgroup/Example/g3/cpu.weight
Add the applications' PIDs to the
g1,g2, andg3child groups:# echo "33373" > /sys/fs/cgroup/Example/g1/cgroup.procs # echo "33374" > /sys/fs/cgroup/Example/g2/cgroup.procs # echo "33377" > /sys/fs/cgroup/Example/g3/cgroup.procsThe example commands ensure that desired applications become members of the
Example/g*/child cgroups and will get their CPU time distributed as per the configuration of those cgroups.The weights of the children cgroups (
g1,g2,g3) that have running processes are summed up at the level of the parent cgroup (Example). The CPU resource is then distributed proportionally based on their weights.As a result, when all processes run at the same time, the kernel allocates to each of them the proportionate CPU time based on their cgroup’s
cpu.weightfile:Expand Child cgroup cpu.weightfileCPU time allocation g1
150
~50% (150/300)
g2
100
~33% (100/300)
g3
50
~16% (50/300)
The value of the
cpu.weightcontroller file is not a percentage.If one process stopped running, leaving cgroup
g2with no running processes, the calculation would omit the cgroupg2and only account weights of cgroupsg1andg3:Expand Child cgroup cpu.weightfileCPU time allocation g1
150
~75% (150/200)
g3
50
~25% (50/200)
ImportantIf a child cgroup has multiple running processes, the CPU time allocated to the cgroup is distributed equally among its member processes.
Verification
Verify that the applications run in the specified control groups:
# cat /proc/33373/cgroup /proc/33374/cgroup /proc/33377/cgroup
0::/Example/g1
0::/Example/g2
0::/Example/g3
The command output shows the processes of the specified applications that run in the
Example/g*/child cgroups.Inspect the current CPU consumption of the throttled applications:
# top top - 05:17:18 up 1 day, 18:25, 1 user, load average: 3.03, 3.03, 3.00 Tasks: 95 total, 4 running, 91 sleeping, 0 stopped, 0 zombie %Cpu(s): 18.1 us, 81.6 sy, 0.0 ni, 0.0 id, 0.0 wa, 0.3 hi, 0.0 si, 0.0 st MiB Mem : 3737.0 total, 3233.7 free, 132.8 used, 370.5 buff/cache MiB Swap: 4060.0 total, 4060.0 free, 0.0 used. 3373.1 avail Mem PID USER PR NI VIRT RES SHR S %CPU %MEM TIME+ COMMAND 33373 root 20 0 18720 1748 1460 R 49.5 0.0 415:05.87 sha1sum 33374 root 20 0 18720 1756 1464 R 32.9 0.0 412:58.33 sha1sum 33377 root 20 0 18720 1860 1568 R 16.3 0.0 411:03.12 sha1sum 760 root 20 0 416620 28540 15296 S 0.3 0.7 0:10.23 tuned 1 root 20 0 186328 14108 9484 S 0.0 0.4 0:02.00 systemd 2 root 20 0 0 0 0 S 0.0 0.0 0:00.01 kthread ...NoteAll processes run on a single CPU for clear illustration. The CPU weight applies the same principles when used on multiple CPUs.
Notice that the CPU resource for the
PID 33373,PID 33374, andPID 33377was allocated based on the 150, 100, and 50 weights you assigned to the child cgroups. The weights correspond to around 50%, 33%, and 16% allocation of CPU time for each application.
28.3. Mounting cgroups-v1
Manually configure the system to mount cgroups-v1 for resource limiting. RHEL 9 mounts cgroups-v2 by default during boot.
Both cgroups-v1 and cgroups-v2 are fully enabled in the kernel. There is no default control group version from the kernel point of view, and is decided by systemd to mount at startup.
Prerequisites
- You have root permissions.
Procedure
Configure the system to mount
cgroups-v1by default during system boot by the systemd system and service manager:# grubby --update-kernel=/boot/vmlinuz-$(uname -r) --args="systemd.unified_cgroup_hierarchy=0 systemd.legacy_systemd_cgroup_controller"This adds the necessary kernel command-line parameters to the current boot entry.
To add the same parameters to all kernel boot entries:
# grubby --update-kernel=ALL --args="systemd.unified_cgroup_hierarchy=0 systemd.legacy_systemd_cgroup_controller"- Reboot the system for the changes to take effect.
Verification
Verify that the
cgroups-v1filesystem was mounted:# mount -l | grep cgroup tmpfs on /sys/fs/cgroup type tmpfs (ro,nosuid,nodev,noexec,seclabel,size=4096k,nr_inodes=1024,mode=755,inode64) cgroup on /sys/fs/cgroup/systemd type cgroup (rw,nosuid,nodev,noexec,relatime,seclabel,xattr,release_agent=/usr/lib/systemd/systemd-cgroups-agent,name=systemd) cgroup on /sys/fs/cgroup/perf_event type cgroup (rw,nosuid,nodev,noexec,relatime,seclabel,perf_event) cgroup on /sys/fs/cgroup/cpu,cpuacct type cgroup (rw,nosuid,nodev,noexec,relatime,seclabel,cpu,cpuacct) cgroup on /sys/fs/cgroup/pids type cgroup (rw,nosuid,nodev,noexec,relatime,seclabel,pids) cgroup on /sys/fs/cgroup/cpuset type cgroup (rw,nosuid,nodev,noexec,relatime,seclabel,cpuset) cgroup on /sys/fs/cgroup/net_cls,net_prio type cgroup (rw,nosuid,nodev,noexec,relatime,seclabel,net_cls,net_prio) cgroup on /sys/fs/cgroup/hugetlb type cgroup (rw,nosuid,nodev,noexec,relatime,seclabel,hugetlb) cgroup on /sys/fs/cgroup/memory type cgroup (rw,nosuid,nodev,noexec,relatime,seclabel,memory) cgroup on /sys/fs/cgroup/blkio type cgroup (rw,nosuid,nodev,noexec,relatime,seclabel,blkio) cgroup on /sys/fs/cgroup/devices type cgroup (rw,nosuid,nodev,noexec,relatime,seclabel,devices) cgroup on /sys/fs/cgroup/misc type cgroup (rw,nosuid,nodev,noexec,relatime,seclabel,misc) cgroup on /sys/fs/cgroup/freezer type cgroup (rw,nosuid,nodev,noexec,relatime,seclabel,freezer) cgroup on /sys/fs/cgroup/rdma type cgroup (rw,nosuid,nodev,noexec,relatime,seclabel,rdma)The
cgroups-v1filesystems that correspond to variouscgroups-v1controllers, were successfully mounted on the/sys/fs/cgroup/directory.Inspect the contents of the
/sys/fs/cgroup/directory:# ll /sys/fs/cgroup/ dr-xr-xr-x. 10 root root 0 Mar 16 09:34 blkio lrwxrwxrwx. 1 root root 11 Mar 16 09:34 cpu → cpu,cpuacct lrwxrwxrwx. 1 root root 11 Mar 16 09:34 cpuacct → cpu,cpuacct dr-xr-xr-x. 10 root root 0 Mar 16 09:34 cpu,cpuacct dr-xr-xr-x. 2 root root 0 Mar 16 09:34 cpuset dr-xr-xr-x. 10 root root 0 Mar 16 09:34 devices dr-xr-xr-x. 2 root root 0 Mar 16 09:34 freezer dr-xr-xr-x. 2 root root 0 Mar 16 09:34 hugetlb dr-xr-xr-x. 10 root root 0 Mar 16 09:34 memory dr-xr-xr-x. 2 root root 0 Mar 16 09:34 misc lrwxrwxrwx. 1 root root 16 Mar 16 09:34 net_cls → net_cls,net_prio dr-xr-xr-x. 2 root root 0 Mar 16 09:34 net_cls,net_prio lrwxrwxrwx. 1 root root 16 Mar 16 09:34 net_prio → net_cls,net_prio dr-xr-xr-x. 2 root root 0 Mar 16 09:34 perf_event dr-xr-xr-x. 10 root root 0 Mar 16 09:34 pids dr-xr-xr-x. 2 root root 0 Mar 16 09:34 rdma dr-xr-xr-x. 11 root root 0 Mar 16 09:34 systemdThe
/sys/fs/cgroup/directory, also called the root control group, by default, contains controller-specific directories such ascpuset. In addition, the directory contains some systemd-related directories.
28.4. Setting CPU limits to applications using cgroups-v1
To configure CPU limits to an application by using control groups version 1 (cgroups-v1), use the /sys/fs/ virtual file system.
Prerequisites
- You have root permissions.
- You have an application to restrict its CPU consumption installed on your system.
You configured the system to mount
cgroups-v1by default during system boot by the systemd system and service manager:# grubby --update-kernel=/boot/vmlinuz-$(uname -r) --args="systemd.unified_cgroup_hierarchy=0 systemd.legacy_systemd_cgroup_controller"This adds the necessary kernel command-line parameters to the current boot entry.
Procedure
Identify the process ID (PID) of the application that you want to restrict in CPU consumption:
# top
top - 11:34:09 up 11 min,  1 user,  load average: 0.51, 0.27, 0.22
Tasks: 267 total,   3 running, 264 sleeping,   0 stopped,   0 zombie
%Cpu(s): 49.0 us,  3.3 sy,  0.0 ni, 47.5 id,  0.0 wa,  0.2 hi,  0.0 si,  0.0 st
MiB Mem :   1826.8 total,    303.4 free,   1046.8 used,    476.5 buff/cache
MiB Swap:   1536.0 total,   1396.0 free,    140.0 used.    616.4 avail Mem

  PID USER      PR  NI    VIRT    RES    SHR S  %CPU  %MEM     TIME+ COMMAND
 6955 root      20   0  228440   1752   1472 R  99.3   0.1   0:32.71 sha1sum
 5760 jdoe      20   0 3603868 205188  64196 S   3.7  11.0   0:17.19 gnome-shell
 6448 jdoe      20   0  743648  30640  19488 S   0.7   1.6   0:02.73 gnome-terminal-
    1 root      20   0  245300   6568   4116 S   0.3   0.4   0:01.87 systemd
  505 root      20   0       0      0      0 I   0.3   0.0   0:00.75 kworker/u4:4-events_unbound
...
The
sha1sumexample application withPID 6955consumes a large amount of CPU resources.Create a subdirectory in the
cpuresource controller directory:# mkdir /sys/fs/cgroup/cpu/Example/This directory represents a control group, where you can place specific processes and apply certain CPU limits to the processes. At the same time, several
cgroups-v1interface files andcpucontroller-specific files will be created in the directory.Optional: Inspect the newly created control group:
# ll /sys/fs/cgroup/cpu/Example/ -rw-r—r--. 1 root root 0 Mar 11 11:42 cgroup.clone_children -rw-r—r--. 1 root root 0 Mar 11 11:42 cgroup.procs -r—r—r--. 1 root root 0 Mar 11 11:42 cpuacct.stat -rw-r—r--. 1 root root 0 Mar 11 11:42 cpuacct.usage -r—r—r--. 1 root root 0 Mar 11 11:42 cpuacct.usage_all -r—r—r--. 1 root root 0 Mar 11 11:42 cpuacct.usage_percpu -r—r—r--. 1 root root 0 Mar 11 11:42 cpuacct.usage_percpu_sys -r—r—r--. 1 root root 0 Mar 11 11:42 cpuacct.usage_percpu_user -r—r—r--. 1 root root 0 Mar 11 11:42 cpuacct.usage_sys -r—r—r--. 1 root root 0 Mar 11 11:42 cpuacct.usage_user -rw-r—r--. 1 root root 0 Mar 11 11:42 cpu.cfs_period_us -rw-r—r--. 1 root root 0 Mar 11 11:42 cpu.cfs_quota_us -rw-r—r--. 1 root root 0 Mar 11 11:42 cpu.rt_period_us -rw-r—r--. 1 root root 0 Mar 11 11:42 cpu.rt_runtime_us -rw-r—r--. 1 root root 0 Mar 11 11:42 cpu.shares -r—r—r--. 1 root root 0 Mar 11 11:42 cpu.stat -rw-r—r--. 1 root root 0 Mar 11 11:42 notify_on_release -rw-r—r--. 1 root root 0 Mar 11 11:42 tasksFiles, such as
cpuacct.usage,cpu.cfs._period_usrepresent specific configurations and/or limits, which can be set for processes in theExamplecontrol group. Note that the file names are prefixed with the name of the control group controller they belong to.By default, the newly created control group inherits access to the system’s entire CPU resources without a limit.
Configure CPU limits for the control group:
# echo "1000000" > /sys/fs/cgroup/cpu/Example/cpu.cfs_period_us # echo "200000" > /sys/fs/cgroup/cpu/Example/cpu.cfs_quota_us-
The
cpu.cfs_period_usfile represents how frequently a control group’s access to CPU resources must be reallocated. The time period is in microseconds (µs, "us"). The upper limit is 1 000 000 microseconds and the lower limit is 1000 microseconds. The
cpu.cfs_quota_usfile represents the total amount of time in microseconds for which all processes in a control group can collectively run during one period, as defined bycpu.cfs_period_us. When processes in a control group use up all the time specified by the quota during a single period, they are throttled for the remainder of the period and not allowed to run until the next period. The lower limit is 1000 microseconds.The example commands above set the CPU time limits so that all processes collectively in the
Examplecontrol group will be able to run only for 0.2 seconds (defined bycpu.cfs_quota_us) out of every 1 second (defined bycpu.cfs_period_us).
-
The
Optional: Verify the limits:
# cat /sys/fs/cgroup/cpu/Example/cpu.cfs_period_us /sys/fs/cgroup/cpu/Example/cpu.cfs_quota_us
1000000
200000
Add the application’s PID to the
Examplecontrol group:# echo "6955" > /sys/fs/cgroup/cpu/Example/cgroup.procsThis command ensures that a specific application becomes a member of the
Examplecontrol group and does not exceed the CPU limits configured for theExamplecontrol group. The PID must represent an existing process in the system. ThePID 6955here was assigned to thesha1sum /dev/zero &process, used to illustrate the use case of thecpucontroller.
Verification
Verify that the application runs in the specified control group:
# cat /proc/6955/cgroup
12:cpuset:/
11:hugetlb:/
10:net_cls,net_prio:/
9:memory:/user.slice/user-1000.slice/user@1000.service
8:devices:/user.slice
7:blkio:/
6:freezer:/
5:rdma:/
4:pids:/user.slice/user-1000.slice/user@1000.service
3:perf_event:/
2:cpu,cpuacct:/Example
1:name=systemd:/user.slice/user-1000.slice/user@1000.service/gnome-terminal-server.service
The process of an application runs in the
Examplecontrol group applying CPU limits to the application’s process.Identify the current CPU consumption of your throttled application:
# top
top - 12:28:42 up  1:06,  1 user,  load average: 1.02, 1.02, 1.00
Tasks: 266 total,   6 running, 260 sleeping,   0 stopped,   0 zombie
%Cpu(s): 11.0 us,  1.2 sy,  0.0 ni, 87.5 id,  0.0 wa,  0.2 hi,  0.0 si,  0.2 st
MiB Mem :   1826.8 total,    287.1 free,   1054.4 used,    485.3 buff/cache
MiB Swap:   1536.0 total,   1396.7 free,    139.2 used.    608.3 avail Mem

  PID USER      PR  NI    VIRT    RES    SHR S  %CPU  %MEM     TIME+ COMMAND
 6955 root      20   0  228440   1752   1472 R  20.6   0.1  47:11.43 sha1sum
 5760 jdoe      20   0 3604956 208832  65316 R   2.3  11.2   0:43.50 gnome-shell
 6448 jdoe      20   0  743836  31736  19488 S   0.7   1.7   0:08.25 gnome-terminal-
  505 root      20   0       0      0      0 I   0.3   0.0   0:03.39 kworker/u4:4-events_unbound
 4217 root      20   0   74192   1612   1320 S   0.3   0.1   0:01.19 spice-vdagentd
...
Note that the CPU consumption of the
PID 6955has decreased from 99% to 20%.
The cgroups-v2 counterpart for cpu.cfs_period_us and cpu.cfs_quota_us is the cpu.max file. The cpu.max file is available through the cpu controller.
Chapter 29. Analyzing system performance with BPF Compiler Collection
Analyze system performance by using the BPF Compiler Collection (BCC), which uses Berkeley Packet Filter (BPF) capabilities. BCC provides tools and libraries to develop BPF programs for safe kernel-level monitoring, tracing, and debugging.
29.1. Installing the bcc-tools package
Install the bcc-tools package, which also installs the BPF Compiler Collection (BCC) library as a dependency.
Procedure
Install
bcc-tools.# dnf install bcc-toolsThe BCC tools are installed in the
/usr/share/bcc/tools/directory.
Verification
Inspect the installed tools:
# ls -l /usr/share/bcc/tools/
...
-rwxr-xr-x. 1 root root  4198 Dec 14 17:53 dcsnoop
-rwxr-xr-x. 1 root root  3931 Dec 14 17:53 dcstat
-rwxr-xr-x. 1 root root 20040 Dec 14 17:53 deadlock_detector
-rw-r--r--. 1 root root  7105 Dec 14 17:53 deadlock_detector.c
drwxr-xr-x. 3 root root  8192 Mar 11 10:28 doc
-rwxr-xr-x. 1 root root  7588 Dec 14 17:53 execsnoop
-rwxr-xr-x. 1 root root  6373 Dec 14 17:53 ext4dist
-rwxr-xr-x. 1 root root 10401 Dec 14 17:53 ext4slower
...
The
docdirectory in the listing provides documentation for each tool.
29.2. Using selected bcc-tools for performance analyses
Use certain pre-created programs from the BPF Compiler Collection (BCC) library to efficiently and securely analyze the system performance on the per-event basis. The set of pre-created programs in the BCC library can serve as examples for creation of additional programs.
Prerequisites
- Installed bcc-tools package
- Root permissions
Procedure
- Using
execsnoopto examine the system processes -
Run the
execsnoopprogram in one terminal:
# /usr/share/bcc/tools/execsnoopTo create a short-lived process of the
lscommand, in another terminal, enter:$ ls /usr/share/bcc/tools/doc/The terminal running
execsnoopshows the output similar to the following:PCOMM PID PPID RET ARGS ls 8382 8287 0 /usr/bin/ls --color=auto /usr/share/bcc/tools/doc/ ...The
execsnoopprogram prints a line of output for each new process that consume system resources. It even detects processes of programs that run very shortly, such asls, and most monitoring tools would not register them.The
execsnoopoutput displays the following fields:
-
Run the
- PCOMM
-
The parent process name. (
ls) - PID
-
The process ID. (
8382) - PPID
-
The parent process ID. (
8287) - RET
-
The return value of the
exec()system call (0), which loads program code into new processes. - ARGS
- The location of the started program with arguments.
To see more details, examples, and options for execsnoop, see /usr/share/bcc/tools/doc/execsnoop_example.txt file.
For more information about exec(), see exec(3) manual pages.
- Using
opensnoopto track what files a command opens -
In one terminal, run the
opensnoopprogram to print the output for files opened only by the process of theunamecommand:
# /usr/share/bcc/tools/opensnoop -n unameIn another terminal, enter the command to open certain files:
$ unameThe terminal running
opensnoopshows the output similar to the following:PID COMM FD ERR PATH 8596 uname 3 0 /etc/ld.so.cache 8596 uname 3 0 /lib64/libc.so.6 8596 uname 3 0 /usr/lib/locale/locale-archive ...The
opensnoopprogram watches theopen()system call across the whole system, and prints a line of output for each file thatunametried to open along the way.The
opensnoopoutput displays the following fields:- PID
-
The process ID. (
8596) - COMM
-
The process name. (
uname) - FD
-
The file descriptor - a value that
open()returns to refer to the open file. (3) - ERR
- Any errors.
- PATH
-
The location of files that
open()tried to open.
If a command tries to read a non-existent file, then the
FDcolumn returns-1and theERRcolumn prints a value corresponding to the relevant error. As a result,opensnoopcan help you identify an application that does not behave properly.
-
In one terminal, run the
To see more details, examples, and options for opensnoop, see /usr/share/bcc/tools/doc/opensnoop_example.txt file.
For more information about open(), see open(2) manual pages.
- Use the
biotopto monitor the top processes performing I/O operations on the disk -
Run the
biotopprogram in one terminal with argument30to produce 30 second summary:
# /usr/share/bcc/tools/biotop 30NoteWhen no argument provided, the output screen by default refreshes every 1 second.
In another terminal, enter command to read the content from the local hard disk device and write the output to the
/dev/zerofile:# dd if=/dev/vda of=/dev/zeroThis step generates certain I/O traffic to illustrate
biotop.The terminal running
biotopshows the output similar to the following:PID COMM D MAJ MIN DISK I/O Kbytes AVGms 9568 dd R 252 0 vda 16294 14440636.0 3.69 48 kswapd0 W 252 0 vda 1763 120696.0 1.65 7571 gnome-shell R 252 0 vda 834 83612.0 0.33 1891 gnome-shell R 252 0 vda 1379 19792.0 0.15 7515 Xorg R 252 0 vda 280 9940.0 0.28 7579 llvmpipe-1 R 252 0 vda 228 6928.0 0.19 9515 gnome-control-c R 252 0 vda 62 6444.0 0.43 8112 gnome-terminal- R 252 0 vda 67 2572.0 1.54 7807 gnome-software R 252 0 vda 31 2336.0 0.73 9578 awk R 252 0 vda 17 2228.0 0.66 7578 llvmpipe-0 R 252 0 vda 156 2204.0 0.07 9581 pgrep R 252 0 vda 58 1748.0 0.42 7531 InputThread R 252 0 vda 30 1200.0 0.48 7504 gdbus R 252 0 vda 3 1164.0 0.30 1983 llvmpipe-1 R 252 0 vda 39 724.0 0.08 1982 llvmpipe-0 R 252 0 vda 36 652.0 0.06 ...The
biotopoutput displays the following fields:
-
Run the
- PID
-
The process ID. (
9568) - COMM
-
The process name. (
dd) - DISK
-
The disk performing the read operations. (
vda) - I/O
- The number of read operations performed. (16294)
- Kbytes
- The amount of Kbytes reached by the read operations. (14,440,636)
- AVGms
- The average I/O time of read operations. (3.69)
For more details, examples, and options for biotop, see the /usr/share/bcc/tools/doc/biotop_example.txt file.
For more information about dd, see dd(1) manual pages.
Using xfsslower to expose unexpectedly slow file system operations
The xfsslower measures the time spent by XFS file system in performing read, write, open or sync (fsync) operations. The 1 argument ensures that the program shows only the operations that are slower than 1 ms.
Run the
xfsslowerprogram in one terminal:# /usr/share/bcc/tools/xfsslower 1NoteWhen no arguments provided,
xfsslowerby default displays operations slower than 10 ms.In another terminal, enter the command to create a text file in the
vimeditor to start interaction with the XFS file system:$ vim textThe terminal running
xfsslowershows something similar upon saving the file from the previous step:TIME COMM PID T BYTES OFF_KB LAT(ms) FILENAME 13:07:14 b'bash' 4754 R 256 0 7.11 b'vim' 13:07:14 b'vim' 4754 R 832 0 4.03 b'libgpm.so.2.1.0' 13:07:14 b'vim' 4754 R 32 20 1.04 b'libgpm.so.2.1.0' 13:07:14 b'vim' 4754 R 1982 0 2.30 b'vimrc' 13:07:14 b'vim' 4754 R 1393 0 2.52 b'getscriptPlugin.vim' 13:07:45 b'vim' 4754 S 0 0 6.71 b'text' 13:07:45 b'pool' 2588 R 16 0 5.58 b'text' ...Each line represents an operation in the file system, which took more time than a certain threshold.
xfsslowerdetects possible file system problems, which can take form of unexpectedly slow operations.The
xfssloweroutput displays the following fields:- COMM
-
The process name. (
b’bash') - T
The operation type. (
R)- Read
- Write
- Sync
- OFF_KB
- The file offset in KB. (0)
- FILENAME
- The file that is read, written, or synced.
To see more details, examples, and options for xfsslower, see /usr/share/bcc/tools/doc/xfsslower_example.txt file.
For more information about fsync, see fsync(2) manual pages.